


 Loading...
Overview of Machine Functions
Set Up the Machine to Suit Your Purposes
Set Up the Machine
Make Fax Settings (D1180/D1170/D1150 Only)
Set Up Network Connection
Set Up Computers and Software
Appendix
Please read this guide before operating this product.
After you finish reading this guide, store it in a safe place for future reference.

 Contents
Overview of Machine Functions..................................................................................................................... |
1 |
Available Features............................................................................................................................................................. |
1 |
1 Set Up the Machine to Suit Your Purposes................................................................................................... |
2 |
2 Set Up the Machine........................................................................................................................................... |
3 |
Items Included with the Machine............................................................................................................................... |
3 |
Optional Items......................................................................................................................................................................... |
3 |
Installation Space................................................................................................................................................................... |
3 |
Manuals for the Machine..................................................................................................................................................... |
4 |
Set Up Paper Cassette and Load Paper..................................................................................................................... |
4 |
Connect Power Cord and Turn On the Machine.................................................................................................... |
7 |
3 Make Fax Settings (D1180/D1170/D1150 Only)......................................................................................... |
8 |
Connect Telephone Cables............................................................................................................................................ |
8 |
Register User Telephone Number and Unit Name................................................................................................ |
9 |
Information About the Keys............................................................................................................................................... |
9 |
About Sender Information................................................................................................................................................ |
11 |
Set Date and Time........................................................................................................................................................... |
12 |
Select the Receive Mode that Suits Your Needs................................................................................................... |
13 |
About the Receive Modes................................................................................................................................................. |
13 |
If You Need to Use Pulse Dialing..................................................................................................................................... |
15 |
4 Set Up Network Connection......................................................................................................................... |
16 |
Connect the LAN Cable................................................................................................................................................. |
16 |
Compatible LAN Cables..................................................................................................................................................... |
16 |
Connect the Machine to Network............................................................................................................................. |
17 |
Specify the IP Address Settings.................................................................................................................................. |
17 |
Automatic Setting................................................................................................................................................................ |
17 |
Check IP Address Setting................................................................................................................................................... |
17 |
Manual Setting...................................................................................................................................................................... |
18 |
5 Set Up Computers and Software.................................................................................................................. |
19 |
Types of Connection between Computers and the Machine......................................................................... |
19 |
Network Connection........................................................................................................................................................... |
19 |
USB Connection.................................................................................................................................................................... |
19 |
About User Software CD-ROM................................................................................................................................... |
20 |
Network Connection...................................................................................................................................................... |
22 |
MF Drivers Installation........................................................................................................................................................ |
22 |
Check Installation................................................................................................................................................................. |
24 |
USB Connection............................................................................................................................................................... |
25 |
MF Drivers & MF Toolbox Installation............................................................................................................................ |
25 |
Check Installation................................................................................................................................................................. |
28 |
6 Appendix.......................................................................................................................................................... |
29 |
User Manual CD-ROM (e-Manual)............................................................................................................................. |
29 |
System Requirements......................................................................................................................................................... |
29 |
Using the User Manual CD-ROM (e-Manual).............................................................................................................. |
30 |

Overview of Machine Functions
This manual describes how to set the required settings to set up the machine and install the software. After you set up the machine, you can use the functions described in the illustration below.
For the details of each function, refer to the Basic Operation Guide and e-Manual.
Illustrations used in this manual are the model D1180. When there is any difference among D1180, D1170, D1150 and D1120, it is clearly indicated in the text, e.g., “D1180 Only.”
For information on the standard features for each model, see “Available Features,” shown below.
The displays shown in this manual are the factory preset display for the D1180 in default setting. Depending on the system configuration and product purchased, the appearance of the display may differ.
Available Features
The table below shows the available features on a product basis.
 : available
—: not available
|
|
|
|
E-Mail/SMB/ |
Remote UI |
|
||
COPY |
Print (PCL) |
SCAN |
FAX |
I-Fax |
(Network |
ADF |
||
(UFRII LT) |
||||||||
|
|
|
|
(Receive) |
Board) |
|
||
|
|
|
|
|
|
imageCLASS |
|
|
|
|
D1180 |
|
|
|
|
imageCLASS |
— |
|
|
|
D1170 |
|
|
||
|
|
|
||
imageCLASS |
— |
|
— |
|
D1150 |
|
|||
|
|
|
||
imageCLASS |
— |
— |
— |
|
D1120 |
||||
|
|
|
The Cassette Feeding Module-U1 is an available option.
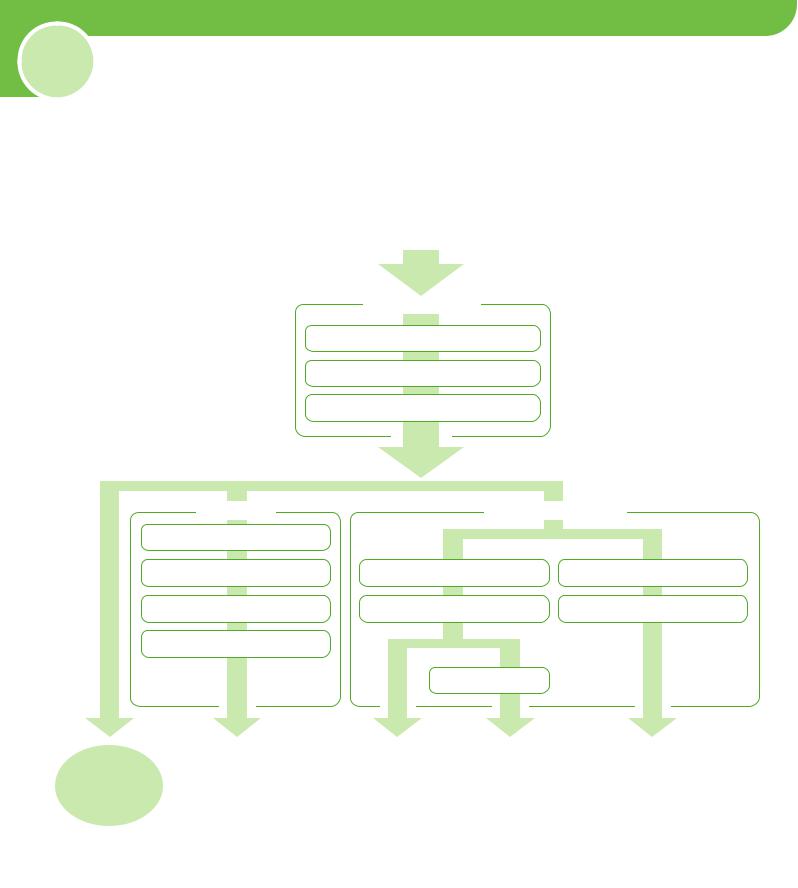
1 Set Up the Machine to Suit Your Purposes
Determine which machine functions (Copy, Fax, Scan, PC Print, PC Fax, Scan to File Server, E-Mail, Remote UI, I-Fax (Receive)) you intend to use, and make the settings according to the flowchart below.
For example, when you use copy function only, perform “Necessary Settings.”When you use both copy and fax functions, perform “Necessary Settings” and “Fax Settings.”
p. 4 p. 7
p. 8 |
|
|
p. 9 |
p. 17 |
p. 25 |
p. 12 |
p. 17 |
p. 26 |
p. 13 |
|
|
|
p. 22 |
|


 (See “Connect Telephone Cables,” on p. 8.)

2 Set Up the Machine
Items Included with the Machine
●Machine |
●Toner Cartridge (enclosed in |
●Power Cord |
●Telephone Cable* |
|
the machine) |
|
|
|
●Starter Guide (This |
●Unpacking Instruction Sheet |
|
|
Document) |
●e-Store Sheet |
|
|
●Basic Operation Guide |
|
|
|
●User Manual CD-ROM |
|
|
|
●User Software CD-ROM |
|
|
|
●Limited Warranty Notice |
|
|
|
●Registration Card |
|
|
●Destination Labels* |
|
* Not available for the D1120 |
|
Optional Items
●Cassette Feeding Module-U1
Installation Space

2 Set Up the Machine
Manuals for the Machine
Starter Guide (This Document):
The Starter Guide contains the machine setup and software Read this manual installation. Read this guide before operating this product. first.
Basic Operation Guide:
The Basic Operation Guide contains the basic operation Read this manual features.
next.
Read the sections of this manual that correspond to your intended use.
e-Manual (located on the User Manual CD-ROM):
The e-Manual is a web browser-based manual that you can see on your computer. This manual contains total operation features. (Also includes the Starter Guide contents and the Basic Operation Guide contents.)
Set Up Paper Cassette and Load Paper
This section describes how to set the paper size for the paper cassette and how to load the paper.
1 Pull out the paper cassette.
2 Hold the paper cassette with both hands and remove it from the machine.
Make sure to take the paper cassette out of the machine before loading paper. If paper is loaded while the paper cassette is partially pulled out, the paper cassette may fall, resulting in damage to the machine or personal injury.

3 Hold the lock release lever of the side paper guides (A) and slide the guides to the mark for the size of the paper to be loaded. The side paper guides move together.
–Make sure to set the guides to the mark for the size of the paper to be loaded correctly. If the guides are positioned incorrectly, it may cause paper jams, dirty prints, etc.
–A6 size paper cannot be loaded.
4 Hold the lock release lever of the rear paper guide (A) and slide the guide to the mark for the size of the paper to be loaded.
–Make sure to set the guide to the mark for the size of the paper to be loaded correctly. If the guide is positioned incorrectly, it may cause paper jams, dirty prints, etc.
–A6 size paper cannot be loaded.
2 Set Up the Machine
5 Fan the paper stack and even the edges.
6 Load the paper stack of the appropriate size with the print side facing up. Align the rear edge of the paper stack with the rear paper guide.
–When loading paper, be careful not to cut your fingers on the edges of the paper.
–Make sure the paper stack does not exceed the load limit mark (A) and (B).
–The paper cassette holds approximately 500 sheets of paper (21 lb (80 g/m2)).
7 Hold the paper cassette with both hands and set it back into the machine.
2 Set Up the Machine
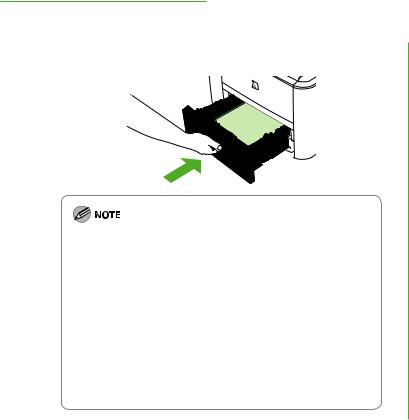
8 Push the paper cassette as far as it will go.
–Be careful not to get your fingers caught.
–The default paper size/type is set to <LTR> and <PLAIN PAPER> in the setting menu. When you load other size and/or type of paper, change the paper size/type setting
by pressing  [Paper Settings]. For details, see “Introduction of the Machine,” in the e-Manual.
–For details on loading paper in the multi-purpose tray, see “Introduction of the Machine,” in the e-Manual.
–In the same manner, load the paper into the optional paper cassette. For attaching the optional paper cassette, see the instruction sheet that comes with the optional paper cassette.

2 Set Up the Machine
Connect Power Cord and Turn On the Machine
1 Connect the power cord into the rear socket on the back side of the machine and the wall outlet, and press the [I] side of the main power switch (A) to turn ON.
–Do not connect the machine and the computer with a USB cable at this time. Connect the machine and the computer with a USB cable only during the software installation procedure. (A USB cable is not used when the machine is used via a network connection.)
–If you want to use the optional paper cassette, attach the Cassette Feeding Module-U1 to the machine before turning ON the machine. (For instructions on how to attach the Cassette Feeding Module-U1, see the instruction sheet that comes with the Cassette Feeding Module-U1.)
2 <DISPLAY LANGUAGE> appears, press  or
or  to select the language, and press [OK].
D I S P L A Y L A N G U A G E
E N G L I S H
If you want to change the display language at a later time, press  [Menu] → <2. COMMON SETTINGS> → <6. DISPLAY LANGUAGE>, then select the language.
3 <COUNTRY/REGION> appears, press  or
or  to select the country, and press [OK].
C O U N T R Y / R E G I O N
U N I T E D S T A T E
–Make sure that the country/region is selected correctly. If not, sending/receiving faxes may not work properly.
–For imageCLASS D1180/D1170/D1150, it is possible to change the country/region at a later time. To change the
country/region, press  [Menu] → <10. SYSTEM SETTINGS> → <6. COMMUNICATIONS> → <1. COUNTRY/ REGION>, then select the country/region.
4 The machine enters the standby mode.
1 0 0 % |
L T R |
0 1 |
||
|
|
|
T E X T / P H O T O |
|
|
|
|
||
|
|
|
||
|
|
|
|
|
5 Turn OFF the main power on the right side of the machine, then turn ON the power to restart the machine.
● The display returns to the standby mode:
The machine may enter the standby mode (Auto Clear function) while you are setting it up. Make the setting again from the main menu.
● The display turned OFF:
The machine may enter the Sleep mode while you are performing setup. Press
 [Energy Saver] to turn the display back ON and continue the setup.
● <SET TONER AGAIN> is displayed:
Check the installation of the toner cartridge and the placement of the paper. (See Unpacking Instruction Sheet and “Set Up Paper Cassette and Load Paper,” on p. 4.)
● <TONER COVER OPEN/CLOSE COVER> is displayed:
Make sure that the front cover and scanning platform are closed properly. (See Unpacking Instruction Sheet.)

3 Make Fax Settings (D1180/D1170/
D1150 Only)
This section describes the fax settings.
Connect Telephone Cables
●Connect the supplied telephone cable to the telephone line jack (A) on the back side of the machine and the wall jack.
●If you want to connect your own external telephone or telephone with built-in answering machine, connect it to external device jack (B) on the back side of the machine.
Use the telephone cable shorter than 118 1/8" (3 m).
3 Make Fax Settings (D1180/D1170/D1150 Only)
Register User Telephone Number and Unit Name
Before sending documents, you MUST register your fax or telephone number, unit name, and the current date and time in the machine.
Information About the Keys
Use the keys below to enter information in the machine.
You can enter the following characters in each input mode:
● Press  to switch between input modes: [a]: Letter mode
[1]: Number mode
● Use  –
–  [numeric keys] to enter characters.
● Press  –
–  [numeric keys] repeatedly until the required character appears.
● Press  to enter symbols.
● Press  or
or  to move the cursor position.
● Press  [Clear] to delete the character at the cursor position. Hold
  [Clear] to delete the entire entry.
Loading...