


 Loading...
imageCLASS
MF269dw / MF267dw / MF264dw / MF269dw VP
User's Guide
USRMA-3281-01 2019-02 en |
Copyright CANON INC. 2019 |
Contents |
|
Setting Up ............................................................................................................................................................ |
3 |
Main Functions ......................................................................................................................................................... |
4 |
Preparations Required Before Use ............................................................................................................................. |
5 |
Preventing Unauthorized Access ................................................................................................................................ |
7 |
Setting Up Using the Setup Guide .............................................................................................................................. |
9 |
Setting the Date/Time ............................................................................................................................................. |
11 |
Setting Up the Network Environment ...................................................................................................................... |
14 |
Selecting Wired LAN or Wireless LAN ..................................................................................................................... |
16 |
Connecting to a Wired LAN .................................................................................................................................. |
17 |
Connecting to a Wireless LAN ............................................................................................................................... |
18 |
Setting Up Connection Using WPS Push Button Mode ....................................................................................... |
20 |
Setting Up Connection Using WPS PIN Code Mode ........................................................................................... |
22 |
Setting Up Connection by Selecting a Wireless Router ....................................................................................... |
24 |
Setting Up Connection by Specifying Detailed Settings ...................................................................................... |
27 |
Checking the SSID and Network Key ............................................................................................................... |
30 |
Setting IP Addresses ........................................................................................................................................... |
31 |
Setting IPv4 Address ..................................................................................................................................... |
32 |
Setting IPv6 Addresses .................................................................................................................................. |
35 |
Viewing Network Settings .................................................................................................................................... |
38 |
onfiguring Settings for Communication with a Computer ...................................................................................... |
41 |
onfiguring Printing Protocols and WSD Functions ........................................................................................... |
42 |
onfiguring Printer Ports ............................................................................................................................... |
45 |
Setting Up Print Server .................................................................................................................................. |
49 |
onfiguring the Machine for Your Network Environment ......................................................................................... |
52 |
onfiguring Ethernet Settings ........................................................................................................................ |
53 |
Changing the Maximum Transmission Unit ...................................................................................................... |
55 |
Setting a Wait Time for Connecting to a Network .............................................................................................. |
56 |
onfiguring DNS .......................................................................................................................................... |
57 |
onfiguring SMB .......................................................................................................................................... |
61 |
Monitoring and Controlling the Machine with SNMP ......................................................................................... |
63 |
onfiguring SNTP ......................................................................................................................................... |
67 |
Installing Drivers .................................................................................................................................................... |
69 |
onfigur ng Initial Settings for Fax Functions ........................................................................................................... |
70 |
Deciding Which Fax Receive Mode to Use .............................................................................................................. |
71 |
Registering the Fax Number and Unit Name .......................................................................................................... |
72 |
Selecting the Receive Mode .................................................................................................................................. |
73 |
Connecting the Telephone Line ............................................................................................................................ |
74 |
onfigur ng Scan Settings ....................................................................................................................................... |
76 |
Preparing to Use the Machine as a Scanner ........................................................................................................... |
77 |
Procedure for Setting to Send E-Mail ..................................................................................................................... |
78 |
onfiguring Basic E-Mail Settings .................................................................................................................... |
79 |
onfiguring E-Mail Communication Settings .................................................................................................... |
82 |
Procedure for Setting a Shared Folder as a Save Location ........................................................................................ |
85 |
I |
|
Setting a Shared Folder as a Save Location ....................................................................................................... |
86 |
Basic Operations .......................................................................................................................................... |
91 |
Parts and Their Functions ........................................................................................................................................ |
94 |
Front Side .......................................................................................................................................................... |
95 |
Back Side ........................................................................................................................................................... |
97 |
Interior .............................................................................................................................................................. |
98 |
Feeder ............................................................................................................................................................... |
99 |
Multi-Purpose Tray ........................................................................................................................................... |
100 |
Drawer ............................................................................................................................................................ |
101 |
Operation Panel ............................................................................................................................................... |
102 |
Turning ON the Machine ....................................................................................................................................... |
107 |
Turning OFF the Machine ................................................................................................................................... |
108 |
Using the Operation Panel .................................................................................................................................... |
109 |
Basic Screens ................................................................................................................................................... |
110 |
Home Screen ............................................................................................................................................. |
111 |
<Status Monitor> Screen ............................................................................................................................. |
115 |
Message Display ......................................................................................................................................... |
117 |
Basic Operation ................................................................................................................................................ |
118 |
Entering Text ................................................................................................................................................... |
123 |
Placing Originals ................................................................................................................................................... |
128 |
Loading Paper ....................................................................................................................................................... |
132 |
Loading Paper in the Drawer .............................................................................................................................. |
134 |
Loading Paper in the Multi-Purpose Tray ............................................................................................................. |
138 |
Loading Envelopes ............................................................................................................................................ |
141 |
Loading Preprinted Paper .................................................................................................................................. |
143 |
Specifying Paper Size and Type .......................................................................................................................... |
145 |
Specifying Paper Size and Type in the Drawer ................................................................................................ |
146 |
Specifying Paper Size and Type in the Multi-Purpose Tray ................................................................................ |
147 |
Registering a Custom Paper Size .................................................................................................................. |
148 |
Limiting the Paper Sizes Displayed ................................................................................................................ |
150 |
Customizing the Display ........................................................................................................................................ |
151 |
Customizing the Home Screen ........................................................................................................................... |
152 |
Changing the Default Settings for Functions .......................................................................................................... |
154 |
Setting Sounds ...................................................................................................................................................... |
155 |
Entering Quiet Mode ............................................................................................................................................. |
157 |
Entering Sleep Mode ............................................................................................................................................. |
159 |
Registering Destinations ....................................................................................................................................... |
161 |
Registering Destinations in the Address Book ...................................................................................................... |
163 |
Registering Destinations for One-Touch Dial ........................................................................................................ |
165 |
Registering Multiple Destinations as a Group ................................................................................................. |
167 |
Editing the Registered Destinations in the Address Book ................................................................................. |
169 |
Copying .............................................................................................................................................................. |
171 |
Basic Copy Operations ........................................................................................................................................... |
173 |
II |
|
Canceling Copies .............................................................................................................................................. |
177 |
Checking the Copying Status and Log ................................................................................................................. |
179 |
Enhancing and Adjusting Copy Quality ................................................................................................................... |
180 |
Selecting the Type of Original for Copying ........................................................................................................... |
181 |
Adjusting Sharpness for Copying (Sharpness) ...................................................................................................... |
182 |
Useful Copy Functions ........................................................................................................................................... |
184 |
Copying Multiple Documents onto One Sheet (N on 1) .......................................................................................... |
185 |
Using <Paper Save Copy> .................................................................................................................................. |
187 |
Collating Copies by Page ................................................................................................................................... |
188 |
Making ID Card Copies ...................................................................................................................................... |
189 |
Making Passport Copy ....................................................................................................................................... |
190 |
Faxing .................................................................................................................................................................. |
193 |
Basic Operations for Sending Faxes ....................................................................................................................... |
195 |
Canceling Sending Faxes ................................................................................................................................... |
202 |
Receiving Faxes .................................................................................................................................................... |
203 |
Useful Functions When Sending ............................................................................................................................. |
207 |
Recalling Previously Used Settings for Sending (Recall Settings) ............................................................................. |
208 |
Sending a Fax after a Phone Call (Manual Sending) ............................................................................................... |
210 |
Various Receiving Methods .................................................................................................................................... |
212 |
Saving Received Documents into the Machine (Memory Reception) ........................................................................ |
213 |
Forwarding the Received Documents Automatically ............................................................................................... |
215 |
Checking Status and Log for Sent and Received Documents .................................................................................... |
217 |
Sending Faxes from Your Computer (PC Fax) .......................................................................................................... |
219 |
Sending PC Faxes ............................................................................................................................................. |
220 |
Printing .............................................................................................................................................................. |
223 |
Printing from a Computer ..................................................................................................................................... |
224 |
Canceling Prints ............................................................................................................................................... |
226 |
Checking the Printing Status and Log .................................................................................................................. |
228 |
Scanning ........................................................................................................................................................... |
231 |
Basic Operations for Scanning Originals ................................................................................................................ |
233 |
Scanning and Saving to a Computer .................................................................................................................... |
234 |
Scanning Using the Shortcut Key ........................................................................................................................ |
236 |
Sending Data by E-Mail/Saving Data to a Shared Folder ......................................................................................... |
239 |
Canceling Sending Documents ........................................................................................................................... |
247 |
Checking Status and Log for Scanned Originals .................................................................................................... |
249 |
Scanning Clearly ................................................................................................................................................... |
251 |
Adjusting Image Quality .................................................................................................................................... |
252 |
Adjusting Density ............................................................................................................................................. |
253 |
Adjusting Sharpness When Scanning (Sharpness) ................................................................................................. |
254 |
Useful Scanning Functions .................................................................................................................................... |
255 |
Adjusting Balance between File Size and Image Quality ......................................................................................... |
256 |
III |
|
Recalling Previously Used Settings for Sending/Saving (Recall Settings) ................................................................... |
257 |
Specifying E-Mail Settings .................................................................................................................................. |
259 |
Using Your Computer to Scan (Remote Scan) .......................................................................................................... |
261 |
Scanning Documents from an Application ........................................................................................................... |
262 |
Using ScanGear MF ........................................................................................................................................... |
264 |
Linking with Mobile Devices ............................................................................................................ |
266 |
Connecting with Mobile Devices ............................................................................................................................ |
267 |
Connecting via a Wireless LAN Router (LAN Connection) ........................................................................................ |
268 |
Connecting Directly (Access Point Mode) ............................................................................................................. |
269 |
Utilizing the Machine through Applications ........................................................................................................... |
272 |
Using AirPrint ....................................................................................................................................................... |
273 |
Printing with AirPrint ........................................................................................................................................ |
278 |
Scanning with AirPrint ....................................................................................................................................... |
281 |
Faxing with AirPrint .......................................................................................................................................... |
283 |
If AirPrint Cannot Be Used ................................................................................................................................. |
285 |
Using Google Cloud Print ....................................................................................................................................... |
286 |
Managing the Machine by the Remote Control ....................................................................................................... |
288 |
Managing the Machine ........................................................................................................................ |
290 |
Setting Access Privileges ....................................................................................................................................... |
292 |
Setting the System Manager PIN ........................................................................................................................ |
293 |
Setting a Remote UI PIN .................................................................................................................................... |
295 |
onfigur ng the Network Security Settings ............................................................................................................ |
297 |
Restricting Communication by Using Firewalls ..................................................................................................... |
299 |
Specifying IP Addresses for Firewall Settings .................................................................................................. |
300 |
Specifying MAC Addresses for Firewall Settings .............................................................................................. |
303 |
Changing Port Numbers .................................................................................................................................... |
305 |
Setting a Proxy ................................................................................................................................................. |
306 |
onfiguring the Key and ertificate for TLS .......................................................................................................... |
308 |
Generating the Key and ertificate for Network Communication ...................................................................... |
310 |
Generating a Key and ertificate Signing Request (CSR) ................................................................................... |
313 |
Registering the Key and ertificate for Network Communication ...................................................................... |
316 |
onfiguring IEEE 802.1X Authentication Settings .................................................................................................. |
318 |
Restricting the Machine's Functions ...................................................................................................................... |
322 |
Restricting Access to Address Book and Sending Functions .................................................................................... |
324 |
Restricting Use of the Address Book ............................................................................................................. |
325 |
Limiting Available Destinations ..................................................................................................................... |
327 |
Restricting the Fax Sending Functions ........................................................................................................... |
329 |
Restricting USB Functions .................................................................................................................................. |
331 |
Disabling HTTP Communication ......................................................................................................................... |
332 |
Disabling Remote UI ......................................................................................................................................... |
333 |
Managing the Machine from a Computer (Remote UI) ............................................................................................ |
334 |
Starting Remote UI ........................................................................................................................................... |
335 |
Checking the Status and Logs ............................................................................................................................ |
338 |
IV |
|
Setting Up Menu Options from Remote UI ........................................................................................................... |
344 |
Registering Destinations from Remote UI .............................................................................................................. |
347 |
Saving/Loading Address Book from Remote UI ....................................................................................................... |
351 |
Importing/Exporting Address Book Data with the Supplied Software ...................................................................... |
353 |
Updating the Firmware ......................................................................................................................................... |
355 |
Initializing Settings ............................................................................................................................................... |
358 |
Setting Menu List ...................................................................................................................................... |
361 |
<Direct Connection> .............................................................................................................................................. |
362 |
<Network Settings> .............................................................................................................................................. |
363 |
<Output Rprt.>/<Output Reports> .......................................................................................................................... |
374 |
<Preferences> ....................................................................................................................................................... |
375 |
<Timer Settings> ................................................................................................................................................... |
381 |
<Common Settings> .............................................................................................................................................. |
385 |
<Copy Settings> .................................................................................................................................................... |
387 |
<Fax Settings> ...................................................................................................................................................... |
389 |
<Scan Settings> ..................................................................................................................................................... |
400 |
<Printer Settings> ................................................................................................................................................. |
405 |
<Adjustment/Maintenance> .................................................................................................................................. |
415 |
<System Management Settings> ............................................................................................................................ |
421 |
Maintenance ................................................................................................................................................. |
430 |
Regular Cleaning .................................................................................................................................................. |
432 |
Cleaning the Exterior ........................................................................................................................................ |
433 |
Cleaning the Platen Glass .................................................................................................................................. |
434 |
Cleaning the Feeder .......................................................................................................................................... |
435 |
Cleaning the Fixing Assembly ............................................................................................................................. |
439 |
Cleaning the Machine Interior ............................................................................................................................ |
440 |
Replacing the Toner Cartridge ............................................................................................................................... |
443 |
Replacing the Drum Cartridge ............................................................................................................................... |
447 |
Checking the Remaining Amount of Consumables .................................................................................................. |
451 |
Relocating the Machine ......................................................................................................................................... |
452 |
Viewing the Counter Value .................................................................................................................................... |
454 |
Printing Reports and Lists ..................................................................................................................................... |
455 |
Consumables ........................................................................................................................................................ |
460 |
Troubleshooting ......................................................................................................................................... |
464 |
Common Problems ................................................................................................................................................ |
466 |
Installation/Settings Problems ........................................................................................................................... |
467 |
Copying/Printing Problems ................................................................................................................................ |
471 |
Faxing/Telephone Problems ............................................................................................................................... |
474 |
When You Cannot Print Properly ............................................................................................................................ |
476 |
Printing Results Are Not Satisfactory ................................................................................................................... |
478 |
Paper Creases or Curls ...................................................................................................................................... |
487 |
V |
|
Paper Is Fed Incorrectly ..................................................................................................................................... |
489 |
A Message or a Number Starting with "#" (an Error Code) Is Displayed .................................................................... |
490 |
Countermeasures for Each Message ................................................................................................................... |
491 |
Countermeasures for Each Error Code ................................................................................................................ |
504 |
Clearing Paper Jams .............................................................................................................................................. |
510 |
Paper Jams in the Feeder ................................................................................................................................... |
511 |
Paper Jams inside the Machine ........................................................................................................................... |
514 |
When a Problem Cannot Be Solved ......................................................................................................................... |
518 |
Appendix ........................................................................................................................................................... |
521 |
Third Party Software ............................................................................................................................................. |
522 |
Feature Highlights ................................................................................................................................................ |
523 |
Going Green and Saving Money ......................................................................................................................... |
524 |
Improving fficiency ......................................................................................................................................... |
526 |
Going Digital .................................................................................................................................................... |
528 |
So Much More .................................................................................................................................................. |
530 |
pec ficat ons ....................................................................................................................................................... |
532 |
Main Unit ........................................................................................................................................................ |
533 |
Feeder ............................................................................................................................................................ |
536 |
Available Paper ................................................................................................................................................ |
538 |
Fax Function .................................................................................................................................................... |
541 |
Scan Function .................................................................................................................................................. |
542 |
Printer Functions .............................................................................................................................................. |
543 |
Management Functions ..................................................................................................................................... |
545 |
System Environment ......................................................................................................................................... |
546 |
Network Environment ....................................................................................................................................... |
548 |
Manuals and Their Contents .................................................................................................................................. |
549 |
Using User's Guide ................................................................................................................................................ |
550 |
Screen Layout of User's Guide ............................................................................................................................ |
551 |
Viewing User's Guide ........................................................................................................................................ |
554 |
Basic Windows Operations .................................................................................................................................... |
556 |
Menu Route Map ................................................................................................................................................... |
564 |
Notice .................................................................................................................................................................. |
565 |
VI
Setting Up
Setting Up |
|
Setting Up ............................................................................................................................................................... |
3 |
Main Functions ...................................................................................................................................................... |
4 |
Preparations Required Before Use ....................................................................................................................... |
5 |
Preventing Unauthorized Access .......................................................................................................................... |
7 |
Setting Up Using the Setup Guide ........................................................................................................................ |
9 |
Setting the Date/Time ......................................................................................................................................... |
11 |
Setting Up the Network Environment ............................................................................................................... |
14 |
Selecting Wired LAN or Wireless LAN .............................................................................................................. |
16 |
Connecting to a Wired LAN ............................................................................................................................. |
17 |
Connecting to a Wireless LAN ......................................................................................................................... |
18 |
Setting Up Connection Using WPS Push Button Mode ............................................................................. |
20 |
Setting Up Connection Using WPS PIN Code Mode .................................................................................. |
22 |
Setting Up Connection by Selecting a Wireless Router ............................................................................. |
24 |
Setting Up Connection by Specifying Detailed Settings ............................................................................ |
27 |
Checking the SSID and Network Key ........................................................................................................ |
30 |
Setting IP Addresses ....................................................................................................................................... |
31 |
Setting IPv4 Address ................................................................................................................................ |
32 |
Setting IPv6 Addresses ............................................................................................................................ |
35 |
Viewing Network Settings ............................................................................................................................... |
38 |
onfiguring Settings for Communication with a Computer ............................................................................ |
41 |
onfiguring Printing Protocols and WSD Functions ................................................................................. |
42 |
onfiguring Printer Ports ......................................................................................................................... |
45 |
Setting Up Print Server ............................................................................................................................ |
49 |
onfiguring the Machine for Your Network Environment ............................................................................... |
52 |
onfiguring Ethernet Settings ................................................................................................................. |
53 |
Changing the Maximum Transmission Unit ............................................................................................. |
55 |
Setting a Wait Time for Connecting to a Network .................................................................................... |
56 |
onfiguring DNS ...................................................................................................................................... |
57 |
onfiguring SMB ...................................................................................................................................... |
61 |
Monitoring and Controlling the Machine with SNMP ............................................................................... |
63 |
onfiguring SNTP .................................................................................................................................... |
67 |
Installing Drivers ................................................................................................................................................. |
69 |
onfigur ng Initial Settings for Fax Functions ................................................................................................... |
70 |
Deciding Which Fax Receive Mode to Use ....................................................................................................... |
71 |
Registering the Fax Number and Unit Name .................................................................................................. |
72 |
Selecting the Receive Mode ............................................................................................................................ |
73 |
1
Setting Up |
|
Connecting the Telephone Line ...................................................................................................................... |
74 |
onfigur ng Scan Settings ................................................................................................................................... |
76 |
Preparing to Use the Machine as a Scanner ................................................................................................... |
77 |
Procedure for Setting to Send E-Mail .............................................................................................................. |
78 |
onfiguring Basic E-Mail Settings ............................................................................................................ |
79 |
onfiguring E-Mail Communication Settings ............................................................................................ |
82 |
Procedure for Setting a Shared Folder as a Save Location .............................................................................. |
85 |
Setting a Shared Folder as a Save Location .............................................................................................. |
86 |
2

Setting Up
Setting Up
2KUU-000
Before using the functions of the machine, the environmental conditions must be set in advance. To begin with, check the sequences of flow required to complete the setup, and then perform the actual settings.  Preparations Required
Before Use(P. 5)
●The functions installed on the machine vary depending on the model you purchased. Before using the machine, see  Main Functions(P. 4) and check the available functions.
onfigur ng Initial Settings of the Machine (Setup Guide)
●You can easily configure the initial settings required to use the machine, such as date, time, and network settings, by following the on-screen guidance.  Setting Up Using the Setup Guide(P. 9)
3
Setting Up
Main Functions
2KUU-001
This manual covers all the functions of the model series you purchased. Before getting started, check which functions are available on the model you purchased.
: With function |
: Without function |
|
|
|
|
|
|
|
|
|
|
Function |
|
MF269dw |
MF267dw |
MF264dw |
MF269dw VP |
|
|
|
|
|
|
Copy |
|
|
|
|
|
|
|
|
|
|
|
|
|
|
|
|
|
|
|
|
|
|
|
Fax |
|
|
|
|
|
|
|
|
|
|
|
Scan |
|
|
|
|
|
|
|
|
|
|
|
2-sided printing |
|
|
|
|
|
|
|
|
|
|
|
Forward received faxes |
|
|
|
|
|
|
|
|
|
|
|
Send scanned data (e-Mail/SMB) |
|
|
|
|
|
|
|
|
|
|
|
Wired LAN connection |
|
|
|
|
|
|
|
|
|
|
|
Wireless LAN connection |
|
|
|
|
|
|
|
|
|
|
|
Linking with Mobile Devices |
|
|
|
|
|
|
|
|
|
|
|
Display |
|
Touch Panel |
Touch Panel |
5 Lines LCD |
Touch Panel |
|
|
|
|
|
|
Feeder / Platen glass cover |
Feeder (2-sided |
Feeder (1-sided |
Feeder (1-sided |
Feeder (2-sided |
|
|
|
scanning) |
scanning) |
scanning) |
scanning) |
|
|
|
|
|
|
●For the available driver types, see the CD-ROM/DVD-ROM supplied with the machine, or see the Canon website (https://global.canon).
●In the User's Guide, when operations differ depending on screens, distinctions are highlighted with the different descriptions: "Touch Panel Model" and "5 Lines LCD Model".
●When operations are the same for both models, the screens from the touch panel display will be used for explanation in most cases. The 5 Lines LCD Model has screens different from those of the Touch Panel Model. In either case, follow the on-screen terms to perform operations.
LINKS
 Viewing User's Guide(P. 554)
4

Setting Up
Preparations Required Before Use
2KUU-002
Set up the machine following steps 1 to 5 in order. For more information about a particular step, click on the link to go to the corresponding section. In addition, to use the machine safely, also check  Preventing Unauthorized Access(P. 7) .
Step 1 |
Setting Up Using the Setup Guide(P. 9) |
|
|
Step 2 |
Setting Up the Network Environment(P. 14) |
|
|
● onfigure the network settings that are not covered in the Setup Guide. If you do not need to use the Setup Guide, configure the network settings from here.
Step 3 |
Installing Drivers(P. 69) |
|
|
Step 4 |
onfigur ng Initial Settings for Fax Functions(P. 70) |
|
|
Step 5 |
onfigur ng Scan Settings(P. 76) |
|
|
5

Setting Up
Setting from the Remote UI
●When the network environment settings are complete, you can efficiently set the machine from a computer using Remote UI.  Starting Remote UI(P. 335)
6
Setting Up
Preventing Unauthorized Access
2KUU-003
This section describes the security measures on how to prevent unauthorized access from the external network. This is a must-read for all users and administrators before using this machine, other printers, and multifunction machines connected to the network. In recent years, a printer/multifunction machine connected to the network can offer you a variety of useful functions, such as printing from a computer, operating from a computer using the remote function, and sending scanned documents via the Internet. On the other hand, it is essential to take security measures to reduce the security risk for information leakage, as a printer/multifunction machine has become more exposed to threats, such as unauthorized access and theft, when it is connected to the network. This section explains necessary settings you need to specify to prevent unauthorized access before using a printer/multifunction machine connected to the network.
Security Measures to Prevent Unauthorized Access from the External Network
 Assigning a Private IP Address(P. 7)
 Using Firewall to Restrict Transmission(P. 8)
 Specifying the TLS Encrypted Communication (P. 8)
 Setting PIN to Manage Information Stored in the Machine(P. 8)
Assigning a Private IP Address
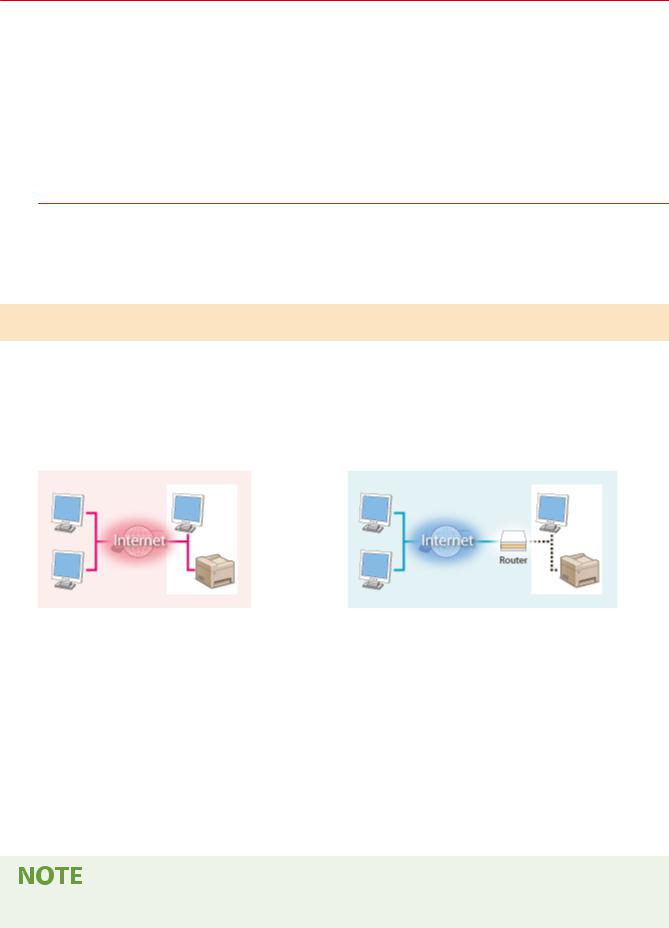
An IP address is a numerical label assigned to each device participating in a computer network. A "global IP address" is used for the communication connecting to the Internet, and a "private IP address" is used for the communication within a local area network, such as a LAN in the company. If a global IP address is assigned, your printer/ multifunction machine is open to the public and can be accessed via the Internet. Thus, the risk of information leakage due to unauthorized access from external network increases. On the other hand, if a private IP address is assigned, your printer/multifunction machine is closed to a local area network and can be accessed by only users on your local area network, such as a LAN in the company.
Global IP Address |
Private IP Address |
Can be accessed from the external network |
Can be accessed from the users within a local area network |
Basically, assign a private IP address to your printer/multifunction machine. Make sure to confirm the IP address, assigned to the printer/multifunction machine you are using, is a private IP address or not. A private IP address is found in one of the following ranges.
 Ranges for Private IP addresses
●From 10.0.0.0 to 10.255.255.255
●From 172.16.0.0 to 172.31.255.255
●From 192.168.0.0 to 192.168.255.255
For information on how to confirm the IP address, see  Setting IPv4 Address(P. 32) .
●If a global IP address is assigned to a printer/multifunction machine, you can create a network environment to reduce the risk of unauthorized access by installing security software, such as a firewall that prevents
7

Setting Up
access from the external networks. If you want to assign a global IP address to and use a printer/ multifunction machine, contact your network administrator.
Using Firewall to Restrict Transmission
A firewall is a system that prevents unauthorized access from the external networks and protects against attacks/ intrusions to a local area network. You can use a firewall on your network environment to block access from the external network that appears to be dangerous, by restricting communication from specified IP address of the external network. The function installed to a Canon printer/multifunction machine enables you to set up the IP address filter. For information on how to set up an IP address filter, see  Specifying IP Addresses for Firewall Settings(P. 300) .
Specifying the TLS Encrypted Communication
For information on the TLS Encrypted Communication, see  onfigur ng the Network Security Settings(P. 297) , and on the procedures to specify, see
  onfigur ng the Key and ert ficate for TLS(P. 308) .
Setting PIN to Manage Information Stored in the Machine
If a malicious third party attempts to gain unauthorized access to a printer/multifunction machine, setting PIN to information stored in the machine will reduce the risk of information leakage. Canon printers/multifunction machines enable you to protect various type of information by setting PIN.
 Setting PIN to Each Function
●Setting PIN for Using Remote UI
For more information, see  Setting a Remote UI PIN(P. 295) .
●Setting PIN for the System Manager Settings
For more information, see  Setting the System Manager PIN(P. 293) .
●Address Book PIN
For more information on setting a PIN, see  Restricting Use of the Address Book(P. 325) .
Listed above are some examples of security measures for preventing unauthorized access. For more information on the other security measures, see  Managing the Machine(P. 290) and take necessary security measures for preventing unauthorized access to suit your environment.
8

Setting Up
Setting Up Using the Setup Guide
2KUU-004
When the machine is turned on (  Turning ON the Machine(P. 107) ) for the first time, the Setup Guide starts up to assist you to configure the initial settings of the machine by following the on-screen guidance. In the Setup Guide, the setting screens are displayed in the following order.
Step 1 |
Setting the Display Language and the Country or Region |
|
|
|
Set the language to be displayed on the operation panel screen or in reports, as well as the |
|
country or region where the machine will be used. |
1
2
3
Select a language.
For a touch panel model, select <Yes>.
Select a country or region.
Step 2 |
Setting the Date and Time |
|
|
|
Adjust the machine's date/time. |
1Select a time zone.
What is UTC?
●Coordinated Universal Time (UTC) is the primary time standard by which the world regulates clocks and time. The correct UTC time zone setting is required for Internet communications.
2Enter the date and time, and press <Apply> (  ).
).
Touch Panel Model
Tap <  > or <
  > to move the cursor, and enter the date and time using the numeric keys. Tap <
  > or <
  > to switch between <AM> or <PM>.
5 Lines LCD Model
|
Use |
or |
to move the cursor, and enter the date and time using the |
||
|
numeric keys. Use |
or |
to switch between <AM> or <PM>. |
||
|
|
|
|
|
|
Step 3 |
Setting the Wireless LAN |
|
|
|
|
|
|
||||
|
onfigure the settings to connect to the network using the wireless LAN. |
||||
1
2
3
4
Select <Yes>.
●Select <No> to finish the Setup Guide without configuring the wireless LAN settings. Read the displayed message, and press <Close> (  ).
).
Select <OK>.
Select the setting method.
●For more information about the wireless LAN settings, see  Connecting to a Wireless LAN(P. 18) .
Read the message that is displayed, and press <Close> (  ).
).
9
Setting Up
When the Setup Guide is complete, the screen below appears.
Touch Panel Model |
5 Lines LCD Model |
10
Setting Up
Setting the Date/Time
2KUU-005
Set the date and time for the machine. The date and time are used as the reference for the functions specifying the time, therefore, they need to be set accurately.
 Setting the Time Zone(P. 11)
 Setting the Current Date and Time(P. 11)
 Setting the Daylight Saving Time(P. 12)
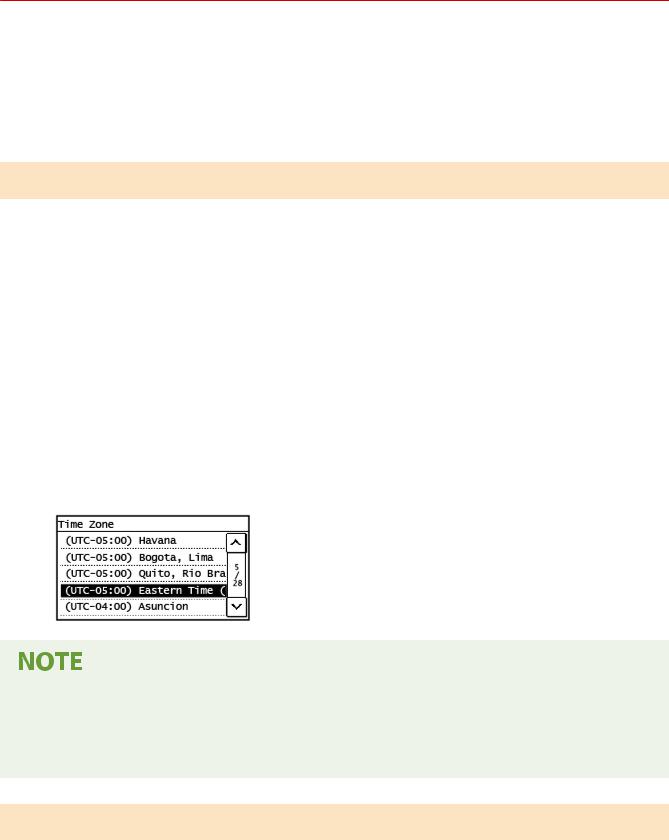
Setting the Time Zone
If the time zone setting is changed, the values set in <Current Date/Time Settings> are also changed accordingly.
1 Display the <Menu> screen.  Home Screen(P. 111)
Touch Panel Model
Select <Menu> in the Home screen.
5 Lines LCD Model
Press  .
.
2
3
Select <Timer Settings>  <Date/Time Settings>
  <Time Zone>.
Select the time zone.
What is UTC?
●Coordinated Universal Time (UTC) is the primary time standard by which the world regulates clocks and time. Time differences exist depending on the country or area where the machine is used. The correct UTC time zone setting is required for Internet communications.
Setting the Current Date and Time
1 Display the <Menu> screen.  Home Screen(P. 111)
11

Setting Up
Touch Panel Model
Select <Menu> in the Home screen.
5 Lines LCD Model
Press  .
.
2
3
Select <Timer Settings>  <Date/Time Settings>
  <Current Date/Time Settings>.
Enter the date and time.
Touch Panel Model
Tap <  > or <
  > to move the cursor, and enter the date and time using the numeric keys. Tap <
  > or <
  > to switch between <AM> or <PM>.
5 Lines LCD Model
Use  or
or  to move the cursor, and enter the date and time using the numeric keys. Use
  or
or  to switch between <AM> or <PM>.
4Press <Apply> ( ).
).
●Set <Time Zone> before setting the current date and time. If the <Time Zone> setting is changed later, the current date and time are also changed accordingly.
●The display format of the date and time can be changed, respectively.
 <Date Format>(P. 381)
 <Time Format>(P. 382)
Setting the Daylight Saving Time
If daylight saving time is enabled, specify the dates from which and to which daylight saving time is in effect.
1 Display the <Menu> screen.  Home Screen(P. 111)
Touch Panel Model
Select <Menu> in the Home screen.
5 Lines LCD Model
Press  .
.
2 Select <Timer Settings>  <Date/Time Settings>
  <Daylight Saving Time Settings>.
12
Setting Up
3Select <Off> or <On> in <Daylight Saving Time>.
●When you select <On>, proceed to step 4.
4Set the month and day for the start date, and then select <Apply>.
●To set the day, specify "what day of which week."
5Set the month and day for the end date, and then select <Apply>.
●To set the day, specify "what day of which week."
13
Setting Up
Setting Up the Network Environment
2KUU-006
When connecting the machine to a wired or wireless local area network (LAN), you need to set an IP address unique to the selected network. Select "wired" or "wireless" depending on your communication environment and networking devices. For specific IP address settings, contact your Internet service provider or Network Administrator.
●If the machine is connected to an unsecured network, your personal information might be leaked to a third party.
●The machine cannot connect to both wired and wireless LANs at the same time.
●The machine does not come with a LAN cable or router. Have them ready as necessary.
●For more information about your networking devices, see the instruction manuals for the devices or contact your manufacturer.
Before You Start
Follow these steps to connect the machine to a network.
Check your computer settings.
●Make sure that the computer is correctly connected to the network. For more information, see the instruction manuals for the devices you are using, or contact the device manufacturers.
●Make sure that the network settings have been completed on the computer. If the network has not been set up properly, you will not be able to use the machine on the network, even if you perform the rest of the procedure below.
●Depending on the network, you may need to change settings for the communication method or the Ethernet type (  onfigur ng Ethernet Settings(P. 53) ). For more information, contact your Internet service provider or Network Administrator.
●To check the MAC address of the machine.
 Viewing the MAC Address for Wired LAN(P. 38)
 Viewing the MAC Address and Information for Wireless LAN(P. 39)
14

Setting Up
●To connect to an IEEE 802.1X network, see  onfigur ng IEEE 802.1X Authentication Settings(P. 318) .
Select wired or wireless LAN.
 Selecting Wired LAN or Wireless LAN(P. 16)
Connect to a wired or wireless LAN.
●Proceed to the section that corresponds to the setting you selected in step 2.
 Connecting to a Wired LAN(P. 17)
 Connecting to a Wireless LAN(P. 18)
Set the IP address as necessary.
●At the time of purchase, the machine is set to automatically acquire an IP address. Change this setting if you want to use a specific IP address.  Setting IP
Addresses(P. 31)
LINKS
onfigur ng Settings for Communication with a Computer(P. 41) onfigur ng the Machine for Your Network Environment(P. 52)
15

Setting Up
Selecting Wired LAN or Wireless LAN
2KUU-007
After you decide on wired or wireless LAN to connect the machine to the computer, select wired LAN or wireless LAN using the operation panel. Note that if you change the setting from <Wired LAN> to <Wireless LAN> or vice versa, you will need to uninstall the drivers installed on your computer and then reinstall them. For more information, see the manuals for the relevant drivers on the online manual website.
1 Display the <Menu> screen.  Home Screen(P. 111)
Touch Panel Model
Select <Menu> in the Home screen.
5 Lines LCD Model
Press  .
.
2Select <Network Settings>.
●If the screen for entering a PIN appears, enter the correct PIN.  Setting the System Manager PIN(P. 293)
3
4
Select <Select Wired/Wireless LAN>.
Select <Wired LAN> or <Wireless LAN>.
LINKS
 Setting Up the Network Environment(P. 14)
 Connecting to a Wired LAN(P. 17)
  Connecting to a Wireless LAN(P. 18)
16

Setting Up
Connecting to a Wired LAN
2KUU-008
Connect the machine to a computer via a router. Use a LAN cable to connect the machine to the router.
1Connect a LAN cable.
●Connect the machine to a router by using a LAN cable.
●Push the connector in until it clicks into place.
2Wait for several minutes.
The IP address is set automatically.
● You can set the IP address manually.  Setting IP Addresses(P. 31)
LINKS
 Setting Up the Network Environment(P. 14)
17
Setting Up
Connecting to a Wireless LAN
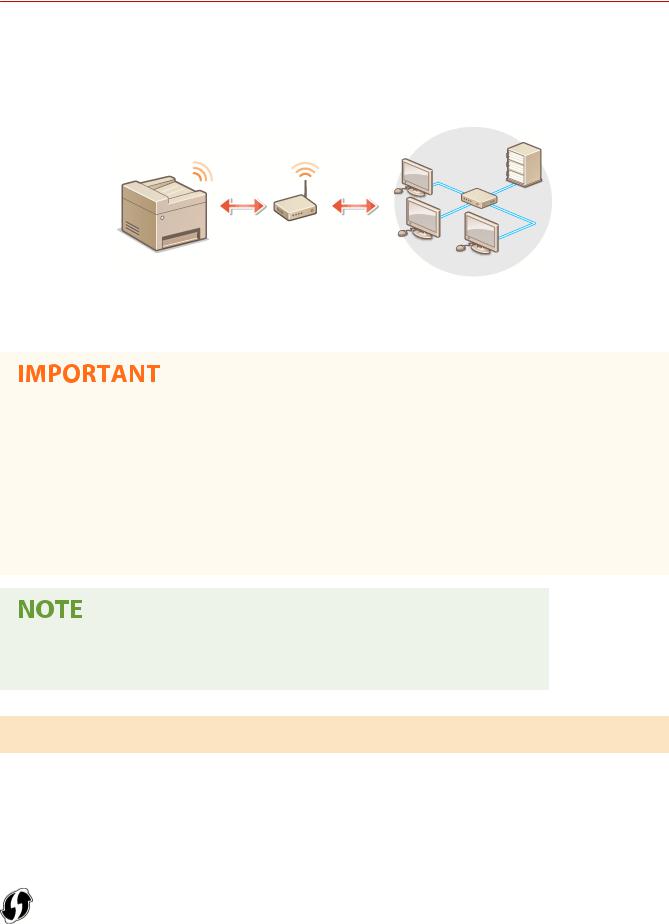
2KUU-009
Wireless routers (or access points) connect the machine to a computer via radio waves. If your wireless router is equipped with Wi-Fi Protected Setup (WPS), configuring your network is automatic and easy. If your networking devices do not support automatic configuration, or if you want to specify authentication and encryption settings in detail, you need to manually set up the connection. Make sure that your computer is correctly connected to the network.
 Setting Up Connection Using WPS(P. 18)
 Manually Setting Up Connection(P. 19)
Risk of information leak
●Use wireless LAN connection at your own discretion and at your own risk. If the machine is connected to an unsecured network, your personal information might be leaked to a third party because radio waves used in wireless communication can go anywhere nearby, even beyond walls.
Wireless LAN security
●The wireless LAN function of this machine supports WEP, WPA-PSK, and WPA2-PSK. For the wireless security compatibility of your wireless router, see the instruction manuals for your networking devices or contact your manufacturer.
Required devices for wireless LAN connection
● The machine does not come with a wireless router. Have the router ready as necessary.
Setting Up Connection Using WPS
When using WPS, two modes are available: push button mode and PIN code mode.
Push Button Mode
Find the WPS mark shown below on the package of your wireless router. Also make sure that there is a WPS button on your networking device.  Setting Up Connection Using WPS Push Button Mode(P. 20)
18

Setting Up
PIN Code Mode
Some WPS routers do not support the push button mode. If WPS PIN code mode is mentioned on the package or in the instruction manuals of your networking device, set up the connection by entering the PIN code.  Setting Up
Connection Using WPS PIN Code Mode(P. 22)
● If the wireless router is set to use WEP authentication, you may not be able to set up connection using WPS.
Manually Setting Up Connection
When manually setting up a wireless connection, you can either select a wireless router or manually enter the required information. Regardless of the method, make sure that you have the required setup information, including the SSID and network key.  Checking the SSID and Network Key(P. 30)
Selecting a Wireless Router
Select this setup option if you need to manually set up the connection but want to complete the setup as easily as possible.  Setting Up Connection by Selecting a Wireless Router(P. 24)
Manually Entering the Setup Information
If you want to specify security settings in detail, such as authentication and encryption settings, manually enter the SSID and network key to set up the connection.  Setting Up Connection by Specifying Detailed Settings(P. 27)
LINKS
 Setting Up the Network Environment(P. 14)
 Selecting Wired LAN or Wireless LAN(P. 16)
19

Setting Up
Setting Up Connection Using WPS Push Button Mode
2KUU-00A If your wireless router supports WPS push button mode, you can easily set up a connection with a WPS button.
● How to operate the wireless router may vary on each device. See the instruction manuals for your networking device for help.
1 Display the <Menu> screen.  Home Screen(P. 111)
Touch Panel Model
Select <Menu> in the Home screen.
5 Lines LCD Model
Press  .
.
2Select <Network Settings>.
●If the screen for entering a PIN appears, enter the correct PIN.  Setting the System Manager PIN(P. 293)
3Select <Wireless LAN Settings>.
●If the <Do you want to enable the wireless LAN?>/<Enable the wireless LAN?> message is displayed, select <Yes>.
●If the <Direct Connection will be terminated. Is it OK?> message is displayed, select <Yes>.
4
5
6
Read the message that is displayed, and select <OK>.
Select <WPS Push Button Mode>.
Select <Yes>.
7Press and hold the WPS button on the wireless router.
●The button must be pressed within 2 minutes after selecting <Yes> in step 6.
●Depending on the networking device, you may need to press and hold the button for 2 seconds or longer. See the instruction manuals for your networking device for help.
20

Setting Up
If an error message is displayed during setup
● Select <Close> and return to step 5.
8Wait until message <Connected.> is displayed.
Wait several minutes until the IP address and other items are set automatically.
Signal strength
●When more than one wireless router is available for connection, the machine connects to the device with the strongest signal. Signal strength is measured using RSSI (Received Signal Strength Indication).
●You can set the IP address manually.  Setting IP Addresses(P. 31)
●On the touch panel model, while the machine is connected to the wireless LAN, the Wi-Fi icon is displayed in the Home screen.  Home Screen(P. 111)
Reducing power consumption
●You can set the machine to enter <Power Save Mode> based on signals emitted from the wireless router. 
<Power Save Mode>(P. 364)
If the IP address of the machine has changed
●In a DHCP environment, the IP address of the machine may be changed automatically. If this happens, the connection is maintained as long as the machine and the computer belong to the same subnet.
LINKS
 Connecting to a Wireless LAN(P. 18)
21

Setting Up
Setting Up Connection Using WPS PIN Code Mode
2KUU-00C
If your wireless router supports WPS PIN code mode, generate a PIN code with the machine and register the code to the networking device.
●How to operate the wireless router may vary on each device. See the instruction manuals for your networking device for help.
 From a Computer
1Access your wireless router from a computer and display the screen for entering a WPS PIN code.
●For more information, see the instruction manuals for your networking device.
 From the Operation Panel
2 Display the <Menu> screen.  Home Screen(P. 111)
Touch Panel Model
Select <Menu> in the Home screen.
5 Lines LCD Model
Press  .
.
3Select <Network Settings>.
●If the screen for entering a PIN appears, enter the correct PIN.  Setting the System Manager PIN(P. 293)
4Select <Wireless LAN Settings>.
●If the <Do you want to enable the wireless LAN?>/<Enable the wireless LAN?> message is displayed, select <Yes>.
●If the <Direct Connection will be terminated. Is it OK?> message is displayed, select <Yes>.
5
6
7
Read the message that is displayed, and select <OK>.
Select <WPS PIN Code Mode>.
Select <Yes>.
22

Setting Up
The PIN code is generated and shown on the display.
 From a Computer
8Register the generated PIN code to the wireless router.
●Register the PIN code on the setup screen displayed in step 1.
●The PIN code must be registered within 10 minutes after selecting <Yes> in step 7.
If an error message is displayed during setup
● Select <Close> and return to step 6.
 From the Operation Panel
9Wait until the message <Connected.> is displayed.
Wait several minutes until the IP address and other items are set automatically.
Signal strength
●When more than one wireless router is available for connection, the machine connects to the device with the strongest signal. Signal strength is measured using RSSI (Received Signal Strength Indication).
●You can set the IP address manually.  Setting IP Addresses(P. 31)
●On the touch panel model, while the machine is connected to the wireless LAN, the Wi-Fi icon is displayed in the Home screen.  Home Screen(P. 111)
Reducing power consumption
●You can set the machine to enter <Power Save Mode> based on signals emitted from the wireless router. 
<Power Save Mode>(P. 364)
If the IP address of the machine has changed
●In a DHCP environment, the IP address of the machine may be changed automatically. If this happens, the connection is maintained as long as the machine and the computer belong to the same subnet.
LINKS
 Connecting to a Wireless LAN(P. 18)
23
Loading...