


188A

Introduction
The Canon Speedlite 188A is an automatic,
electronic, flash unit for hot-shoe attach
ment on the Canon A-series SLR cameras
such as AE-1 PROGRAM or A-1, and F-1
The speedlite mounts onto the accessory
shoe of the cameras for hot-shoe attach
ment
On the A-1, AE-1 PROGRAM, and AE-1,
the 188A will set both the shutter speed
the aperture for the cameras set normally
for automatic exposure For the F-1, the
188A will set only the shutter speed or lens
aperture as well depending on the exposure
mode the camera is set for. For the AL-1,
AV-1 and AT-1, the flash will set the shut
ter speed automatically while the aperture is
set manually
When the 188A is used with the AE-1
PROGRAM, a blitz mark lights up in
the viewfinder when the flash is charged.
After the shutter is released, the same dis
play flashes on and off to indicate there
was sufficient illumination for the shooting

distance. Thus you can concentrate on
shooting and picture composition You
never have to take your eye away from the
viewfinder.
For the AE-1 PROGRAM as well as for
other A-series SLRs and the F-1, a unique
average light measuring system ensures at
taining better overall exposure.
Another feature of the 188A is that while
you are waiting for the flash to recycle, the
camera's normal automatic exposure func
tion is retained and you can shoot using ex
isting light. Of course, for insufficient light
slow shutter speed is required and long ex
posures may be suitable only when there is
no motion to be stopped
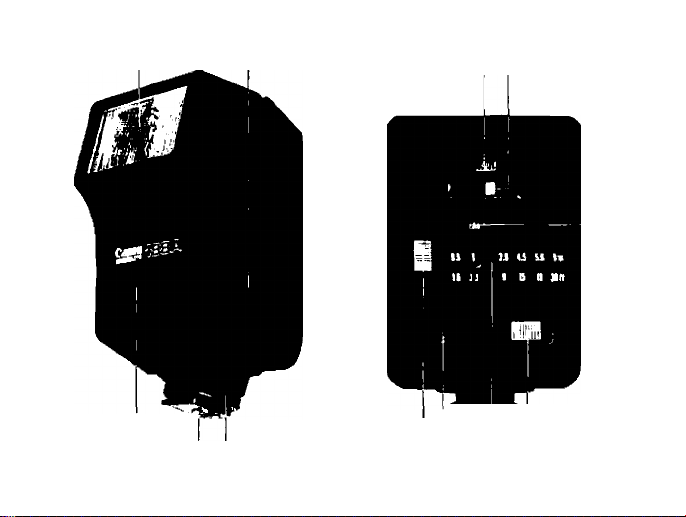
Flash Head Battery Chamber Cover
ISO Film Speed Window
ISO Film Speed Switch
Aperture
-/MANU
Window
Sensor
Directly Coupled Contact
Lock Nut
Aperture/MANU
Selection Switch
Auto Shooting Distance
Range Indicator
Pilot Lamp
(Flash Test Button)
Switch

Sum mary for Use of the 188A
1 Load the batteries correctly 2 Set the ISO film speed.
Set the 188A's main switch to ON, and
focus on the subject.
• Wait for the pilot lamp to glow
' Check viewfinder information, and
press the shutter button.
Mount the 188A on the camera
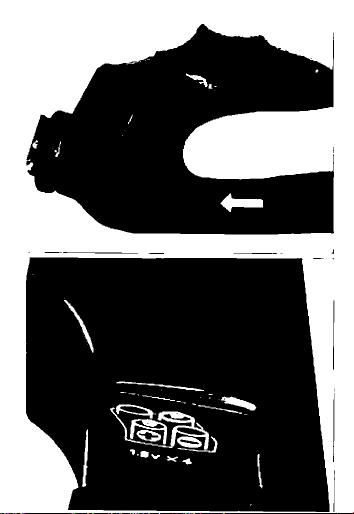

Loading the Batteries
1 Use four new size AA alkaline-man-
ganese (LR6/AM-3) or Ni-Cd batteries.
Carbon-zinc batteries may also be
used, but their battery life is shorter
Before loading the batteries, wipe their
contacts and the flash contacts with a
clean, dry cloth to prevent poor contact
from dirt.
2 Press and slide the battery chamber
cover off in the direction of the arrow in
the photo
3 Load the batteries so that their con
tacts are in the directions indicated by
the diagram inside the battery cham
ber For proper function of the flash, it
is very important that their contacts be
facing in the correct directions.
4 Once the batteries are loaded, slide the
battery chamber cover back on while
pressing the batteries down Make sure
the cover’s tab fits into the correspond
ing groove on the flash body

Remove the batteries if you do not
expect to use the 188A for about three
weeks or longer
Set the main switch to OFF when
flash photography Is finished
When the batteries become exhausted,
replace all four at the same time with
four new ones of the same brand
Since battery performance deteriorates
in low temperatures, keep the batteries
warm until just before use. Keep a set
of spare batteries warm and alternate
them with the loaded ones so that
warm batteries are always in use
In temperatures below 0“C, the use of
fully-charged Ni-Cd batteries is recom
mended When recharging Ni-Cd bat
teries. follow the instructions of the
battery manufacturer
Each brand of Ni-Cd batteries has its
own terminal system Be sure to use a
type which is suitable for this flash.
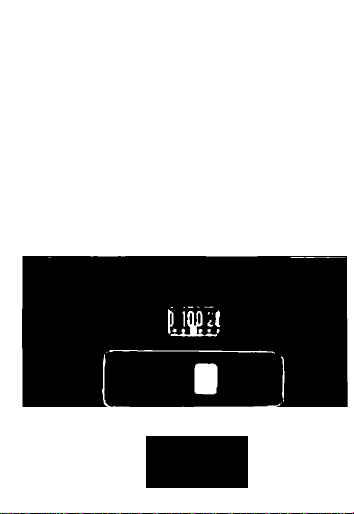
Setting the ISO Film Speed
To set the film speed, slide the ISO film
speed switch until the ISO value of your
film is aligned with the orange index At this
time, the aperture displayed in the Aperture/
MANU window will also change Because
the guide number of the flash varies with
the sensitivity of the film in use, be sure to
set the ISO film speed correctly
* The number after ISO is the equivalent
ASA number
LIOD
* Make sure that the camera is set to the
correct ISO film speed
It is possible to set the following ISO
film speeds Numbers in parentheses
are intermediate film speeds indicated
by the dots on the scale.
132) (40) (64)180) (125)1160)
IS025 . • 50 ♦ ♦ 100 •
(2501 (3201 (5001 (640)
200 • • 400 • • 800

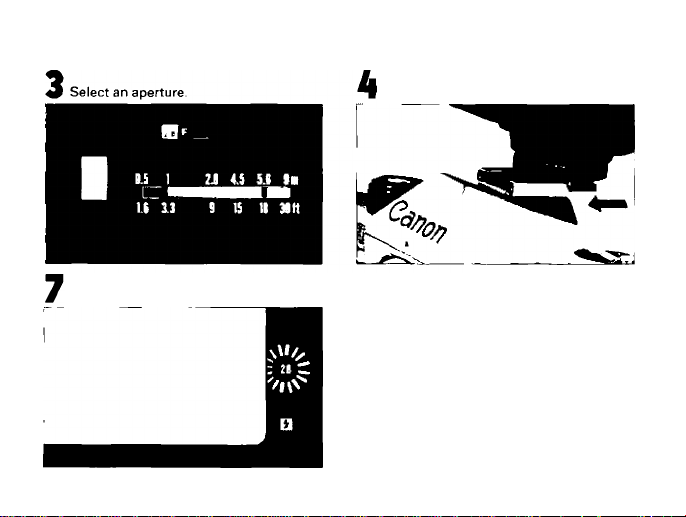
Cho osing an Aperture and Rea ding its
Value
There is a choice of two apertures for auto
matic flash photography To select an aper
ture, set the Aperture/MANU selection
switch to the upper or middle position; the
aperture value will appear
in the Aperture/
MANU window The aperture will change
depending on the setting of the ISO film
speed When ISO 100 film is used, for ins
tance, the upper position is f/2 8 and the
middle position is f/5 6
When the Aperture/MANU selection switch
is set on the lowest position, "MANU" ap
pears in the window As this indicates
manual flash photography, automatic flash
photography is impossible.
• In automatic flash photography, if the
ISO film speed is set between gradua
tions, such as 64 or 80, the aperture
value indicated is between click-stops
on the aperture ring. In the case of the
F-1 (depending on its exposure mode),
AL-1 or AV-1, set the lens' aperture
ring to the click-stop of the larger aper
ture

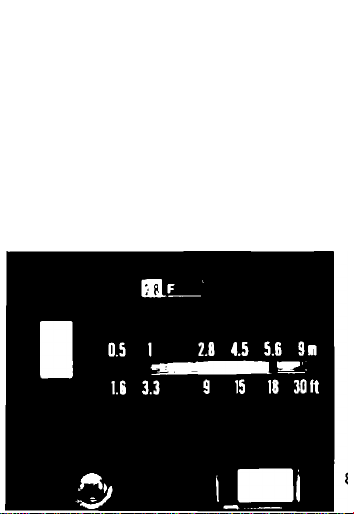
Rea ding the A uto Shooting Distance
Ran ge
Once you have selected an aperture by
setting the Aperture/MANU selection
switch to the upper or middle position,
there is only a certain range of shooting
distances which will give correct exposure
On the 188A. the correct shooting dis
tance is indicated by the red and green
lines in accordance with the selection of
the aperture
The break in the colored tine indicates the
maximum limits of the range, and the left
range is effective when the Wide Adaptor
188A is attached.
Effective Shooting Distance Range
Green Line
0.5-4.5m; 1 6-15 ft
(0 5-2.8m: 1.6-9 ft.)
Red Line
1-9m: 3 3-30 ft
(1-5.6m: 3.3-18 ft )

0.S I 2.B
1.6 3.3 S 15 IS 30 f1
(Numbers in parentheses indicate the range of correct
shooting distances when the Wide Adaptor 186A is
attached )
After focusing, confirm the shooting dis
tance on the lens' distance scale Remem
ber that correct exposure is impossible if
the shooting distance is not within the
effective shooting range.
Both depth of field and the shooting dis
tance are factors to consider when select
ing an aperture on the 168A. Use the
following as guides;
i.i
5.E 9in

upper position:
(red line)
For isolating the subject
from its surroundings by
blurring the foreground
and background Also to
be used when the sub
ject distance is greater
than 4 5m (15 ft.) (with
out Wide Adaptor 1 88A),
or when camera-to-subject distance varies with
in the limits of the effec
tive range

Middle position: For the widest range of
{green line) good focus in front of
and behind the subject.
* Note that the auto shooting distance
ranges remain the same regardless of
the film speed
Mounting the 188A on th e C amera
1 Turn OFF the 188A's main switch,
2 Loosen the lock nut and insert the
Speedlite into the camera's accessory
shoe For correct electrical contact
make sure it is pushed in all the way
3 Retighten the lock nut
10
 Loading...