


 Loading...
AXIS 1650 User’s Manual |
1 |
|
|
AXIS 1650 User’s Manual
The Network Print Server for Canon Printers and Multifunctional Products
* Including support for the host-based printing methods Canon Advanced Printing Technology
Canon Advanced Raster Printing System and other printer types such as Canon BubbleJet
2 |
Safety Notices |
AXIS 1650 User’s Manual |
|
|
|
Safety Notices
Take some time to read through the safety notices before installing the print server. Please observe all safety markings and instructions when using this product.
Important:
Observe “Important:” in the text to avoid operational impairment. Do not proceed until you have fully understood the implications.
Electromagnetic Compatibility (EMC)
USA
This equipment has been tested and found to comply with the limits for a Class B digital device, pursuant to Part 15 of the FCC Rules. These limits are designed to provide reasonable protection against harmful interference in a residential installation. This equipment generates, uses and can radiate radio frequency energy and, if not installed and used in accordance with the instructions, may cause harmful interference to radio communications. However, there is no guarantee that interference will not occur in a particular installation. If this equipment does cause harmful interference to radio or television reception, which can be determined by turning the equipment off and on, the user is encouraged to try to correct the interference by one or more of the following measures:
-reorient or relocate the receiving antenna
-increase the separation between the equipment and receiver
-connect the equipment into an outlet on a circuit different from that to which the receiver is connected
-consult the dealer or an experienced radio/TV technician for help. Shielded (STP) network cables must be used with this unit to ensure compliance with the class B limits..
Europe
This digital equipment fulfils the requirements for radiated emission according to limit B of EN55022, and the requirements for immunity according to EN55024 residential, commercial, and light industry. Compliance is not valid for unshielded network cables.
Japan
This is a class B product based on the standard of the Voluntary Control Council for Interference from Information Technology Equipment (VCCI). If this is used near a radio or television receiver in a domestic environment, it may cause radio interference. Install and use the equipment according to the instruction manual. Compliance is not valid for unshielded network cables.
Australia
This electronic device meets the requirements of the Radio communications (Electromagnetic Compatibility) Standard 1998 AS/NZS 3548. Compliance is not valid for unshielded network cables.

AXIS 1650 User’s Manual |
Safety Notices |
3 |
|
|
|
Liability
Every care has been taken in the preparation of this manual; if you detect any inaccuracies or omissions, please inform your local Axis office, which can be found on the cover of this document. Axis Communications AB cannot be held responsible for any technical or typographical errors and reserves the right to make changes to the product and manuals without prior notice. Axis Communications AB makes no warranty of any kind with regard to the material contained within this document, including, but not limited to, the implied warranties of merchantability and fitness for a particular purpose. Axis Communications AB shall not be liable nor responsible for incidental or consequential damages in connection with the furnishing, performance or use of this material.
Axis’ Trademarks
AXIS IP JumpStarter, AXIS CAPT Print Monitor.
Other Trademark Acknowledgments
Adobe Acrobat Reader, Canon, Ethernet, Internet Explorer, Microsoft, NetScape, NetSpot Device Installer (NSDI), Windows, are registered trademarks of the respective holders.
Patent information
Axis AB has intellectual property rights relating to technology embodied in the product that is described in this document. In particular, and without limitation, these intellectual property rights may include one or more of the patents listed at http://www.axis.com/patent.htm and one or more additional patents or pending patent applications in the US and other countries.
AXIS 1650 User’s Manual
Revision 1.01
Part No: 22415
Date: August 2004
Copyright © Axis Communications AB, 2004
4 |
AXIS 1650 User’s Manual |
|
|
Table of Contents |
|
|
|
About this Manual . . . . . . . . . . . . . . . . . . . . . . . . . . . . . . . . . . . . . . . . |
. 5 |
|
About Axis . . . . . . . . . . . . . . . . . . . . . . . . . . . . . . . . . . . . . . . . . . . . . . |
. 5 |
|
Support Services . . . . . . . . . . . . . . . . . . . . . . . . . . . . . . . . . . . . . . . . . . |
. 6 |
Section 1 |
Product Overview . . . . . . . . . . . . . . . . . . . . . . . . . . . . . . . . . . . . . . . . . . . . . . |
. 7 |
|
Package Contents . . . . . . . . . . . . . . . . . . . . . . . . . . . . . . . . . . . . . . . . . |
. 7 |
Section 2 |
Print Server Installation . . . . . . . . . . . . . . . . . . . . . . . . . . . . . . . . . . . . . . . . . |
11 |
|
1. Connect the Hardware . . . . . . . . . . . . . . . . . . . . . . . . . . . . . . . . . . . |
11 |
|
2. Set the IP Address . . . . . . . . . . . . . . . . . . . . . . . . . . . . . . . . . . . . . . . |
13 |
|
Set an IP Address with NetSpot Device Installer software . . . . . . . . . . . |
18 |
|
IP Address Host Names . . . . . . . . . . . . . . . . . . . . . . . . . . . . . . . . . . . . . |
21 |
Section 3 |
Windows Installation . . . . . . . . . . . . . . . . . . . . . . . . . . . . . . . . . . . . . . . . . . . |
22 |
|
Installing Printer Ports using AXIS CAPT Print Monitor . . . . . . . . . . . . . |
22 |
|
Using AXIS CAPT Print Monitor in Windows 2000, XP and Server 2003 |
23 |
|
Using AXIS CAPT Print Monitor in Windows 98 and Me . . . . . . . . . . . . |
29 |
|
Using the Standard TCP/IP Port in Windows 2000/XP/2003 . . . . . . . . . |
32 |
Section 4 |
Print Server Management and Configuration . . . . . . . . . . . . . . . . . . . . . . . . . |
35 |
|
Configuration Overview . . . . . . . . . . . . . . . . . . . . . . . . . . . . . . . . . . . . |
35 |
|
Print Server Management from the Embedded Web Pages . . . . . . . . . . |
36 |
|
Accessing the Embedded Web Pages . . . . . . . . . . . . . . . . . . . . . . . . . . |
37 |
|
Available Services from the User Mode . . . . . . . . . . . . . . . . . . . . . . . . . |
38 |
|
Available Services from the Admin Mode . . . . . . . . . . . . . . . . . . . . . . . |
40 |
|
Print Server Management Using FTP . . . . . . . . . . . . . . . . . . . . . . . . . . . |
51 |
|
Print Server Management Using SNMP . . . . . . . . . . . . . . . . . . . . . . . . . |
53 |
Section 5 |
The Test Button . . . . . . . . . . . . . . . . . . . . . . . . . . . . . . . . . . . . . . . . . . . . . . . |
54 |
Section 6 |
Upgrading the Firmware . . . . . . . . . . . . . . . . . . . . . . . . . . . . . . . . . . . . . . . . |
55 |
Appendix A Enabling Unicast Network Communication . . . . . . . . . . . . . . . . . . . . . . . . . . . . . |
58 |
|
Appendix B Internet Connection Firewall in Windows XP SP2 . . . . . . . . . . . . . . . . . . . . . . . |
. 62 |
|
Index |
. . . . . . . . . . . . . . . . . . . . . . . . . . . . . . . . . . . . . . . . . . . . . . . . . . . . . . . . . . . . . . . . |
. 68 |
AXIS 1650 User’s Manual |
5 |
|
|
Preface
Thank you for purchasing the AXIS 1650. This product has been developed to connect your printer anywhere in your network, allowing all network users access to shared printer resources.
About this Manual
This manual is applicable for the AXIS 1650 print server with firmware version 1.00 or later, providing introductory information as well as detailed instructions on how to set up and manage the print server in various network environments. It is intended for everyone involved in installing and managing the print server. To fully benefit from this manual, you should be familiar with basic networking principles.
These instructions are based on the settings in a new and unconfigured print server. To reload the default parameters, you can perform a Factory Default, which will restore all default settings. See The Test Button, on page 54.
About Axis
Axis increases the value of network solutions. The company is an innovative market leader in network video and print servers. Axis' products and solutions are focused on applications such as security surveillance, remote monitoring and document management. The products are based on in-house developed chip technology, which is also sold to third parties.
Axis was founded in 1984 and is listed on the Stockholmsbörsen (XSSE:AXIS). Axis operates globally with offices in 14 countries and in cooperation with distributors, system integrators and OEM partners in 70 countries. Markets outside Sweden account for more than 95 % of sales. Information about Axis can be found at www.axis.com
6 |
AXIS 1650 User’s Manual |
|
|
Support Services
Should you require any technical assistance, please contact your Axis reseller. If your questions cannot be answered immediately, your Axis reseller will forward your queries through the appropriate channels to ensure a rapid response.
If you are connected to the Internet, you can:
•Download user documentation and firmware updates
•Find answers to previously resolved problems in the FAQ database. Search by product, category or phrase
•Report problems to Axis support staff by logging in to your private support area
•Visit the Axis support Web: www.axis.com/techsup
AXIS 1650 User’s Manual |
Product Overview |
7 |
|
|
|
Section 1 Product Overview
Package Contents
Hardware |
Model |
Model/ Part Number |
|
|
|
|
|
Network Print Server |
AXIS 1650 |
0214-001- XX |
|
With firmware version 1.00 or higher |
|||
|
|
||
|
|
|
|
Adhesive Holder & Clip |
ACC AXIS CLIPS K |
20119 |
|
|
|
|
|
|
70 cm, 28 inches |
|
|
USB Cable |
USB cable supports USB Low-Speed and |
20208 |
|
|
Full-Speed. Hi-Speed is not supported. |
|
|
|
|
|
|
|
Model |
PS-H Part No. |
|
|
|
|
|
|
Australia |
19111 |
|
|
|
|
|
|
Europe |
19108 |
|
|
|
|
|
Power Adapter |
UK |
19109 |
|
|
|
|
|
|
Japan |
19110 |
|
|
|
|
|
|
USA (120V) |
19110 |
|
|
|
|
|
|
USA (230V) |
19108 |
|
|
|
|
|
Network cable |
RJ 45 Shielded CAT5 0.5M |
16283 |
|
|
|
|
|
CD |
AXIS 1650 CD |
rev.1.0 or higher |
|
|
|
|
|
Printed Material |
AXIS 1650 Quick Installation Guide |
rev.1.0 or higher |
|
|
|
||
WARRANTY AXIS SERVERS 1YR |
21681 |
||
|
|||
|
|
|
|
|
|
|
|
Optional accessories (not |
Description |
Part Number |
|
included in package) |
|||
|
|
||
|
|
|
|
Cables |
Parallel Printer Cable |
13360 |
|
|
|
||
Centronics to Mini Centronics Cable |
16453 |
||
|
|||
|
|
|
8 |
Product Overview |
AXIS 1650 User’s Manual |
|
|
|
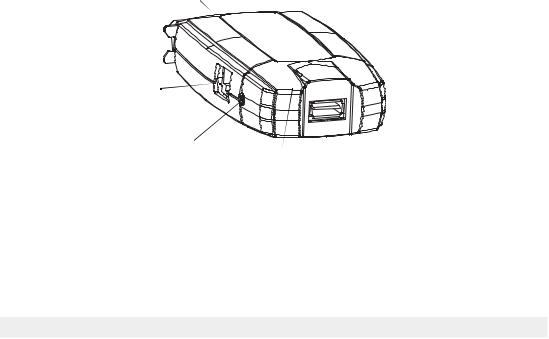
The AXIS 1650 Network Print Server
Parallel printer port (LPT1)
Test button

 Network indicator
Ethernet connector
 USB Printer Port (USB1)
Power adapter |
Power indicator |
connector |
Supported Printers
AXIS 1650 is developed to network Canon printers and multifunctional products. AXIS 1650 supports host-based printing methods such as Canon Advanced Printing Technology, Canon Advanced Raster Printing System and other printer types such as Canon BubbleJet.
IMPORTANT: Printers from other manufacturers than Canon are not supported.
Supported Environments
The AXIS 1650 supports printing over TCP/IP from the following clients:
•Windows 98
•Windows Me
•Windows 2000
•Windows XP
•Windows Server 2003

AXIS 1650 User’s Manual |
Product Overview |
9 |
|
|
|
Installation and Integration
The installation of the AXIS 1650 and its integration into the network is performed using one of these software combinations:
•AXIS IP JumpStarter (for IP setting) and then AXIS CAPT Print Monitor (for printer installation)
•Canon NetSpot Device Installer (for IP setting) and then AXIS CAPT Print Monitor (for printer installation)
•AXIS IP JumpStarter and AXIS CAPT Print Monitor are available free of charge from the AXIS 1650 CD and on www.axis.com.
•NetSpot Device Installer is available on www.canon.com
Configuration and Management
Configuration and management of AXIS 1650 is performed using the TCP/IP protocol. The main method is using a Standard Web browser, See “Print Server Management from the Embedded Web Pages” on page 36.
Printing Protocol: TCP/IP
Speed
The AXIS ETRAX chip has been specifically designed for LAN products and benefits users with a faster throughput than a direct PC-to-printer connection. With a sustained data throughput of over 1 Mbytes per second (100baseTX) the AXIS 1650 is fast. ECP high-speed communication is supported.
Security: You can assign a password that restricts unauthorized configuration of the AXIS 1650.
Monitoring: The AXIS 1650 embedded Web pages allow you to continuously monitor printer status. Additionally, the AXIS 1650 supports SNMP for remote monitoring.

10 |
Product Overview |
AXIS 1650 User’s Manual |
|
|
|
Future proof: You can upgrade the AXIS 1650 Flash memory over the network. This allows you to quickly update and enhance the operational features of your AXIS 1650 when new print server software becomes available.
Printer Ports
•One Low and -Full speed USB 1.1 port that also works with USB 2.0. Hi-Speed is not supported.
•One high-speed IEEE 1284 compatible parallel port that plugs directly into the printer´s parallel port.
AXIS 1650 is featured with two ports for ease of integration with most Canon printers. There is however no support for handling two connected printers simultaneously.
AXIS 1650 User’s Manual |
Print Server Installation |
11 |
|
|
|
Section 2 Print Server Installation
Follow these steps to install and configure your AXIS 1650:
1.Connect the Hardware, on page 11
2.Set the IP Address, on page 13
3.Windows Installation, on page 22
1.Connect the Hardware
Parallel printer port (LPT1)
Test button
 Network indicator
Ethernet connector
USB Printer Port (USB1)
Power adapter |
Power indicator |
connector |
Backside label of print server
The print server’s Mac/Ethernet address is based on its serial number (S/N).
Example: If the print server’s serial number is 00408c181cf0 the Ethernet/Mac address will be 00-40-8c-18-1c-f0

12 |
Print Server Installation |
AXIS 1650 User’s Manual |
|
|
|
1.Make sure that your printer is switched off and that the print server’s power adapter is disconnected.
2.Locate the serial number, found on the underside label of the print server, and write it down. You will need this number to configure the print server.
3.Either connect the printer to the USB port using the USB cable, or connect the printer directly to the LPT port or use a printer cable.
AXIS 1650 is featured with two ports for ease of integration with most Canon printers. There is however no support for handling two connected printers simultaneously.
4.Connect the print server to the network using a shielded twisted pair (category 5) RJ45 cable, 10baseT or 100baseTX.
5.Switch on the printer and make sure it is ready for use.
6.Connect the Power Adapter to the print server. The power indicator will light up. When the network indicator starts to flash, the print server is correctly connected to the network.
7.Optionally, you can mount the print server e.g. on the back of the printer or on a wall, using the supplied clips and holder.
Adhesive Clip |
|
Fasten to print server by peeling off adhesive tape. |
|
|
|
Adhesive Holder |
|
Fasten to mounting surface by peeling off adhesive tape. |
|
|
|

AXIS 1650 User’s Manual |
Print Server Installation |
13 |
|
|
|
2. Set the IP Address
•Before setting the IP address, make a note of the print server’s serial number (S/N), located on its backside label. See Backside label of print server, on page 11.
•You should obtain an unused IP address from your network administrator.
Method |
Platform |
Comment |
|
|
|
|
|
Axis software that allows you to find print servers in your network |
AXIS IP JumpStarter |
Windows |
and assign an IP address to them. |
software |
|
|
|
|
|
|
|
See Set a Static IP Address using AXIS IP JumpStarter, on page 14 |
|
|
|
|
Windows |
See Set a Static IP Address using ARP in Windows |
|
98/Me/2000/XP/2003, on page 16 |
|
|
|
|
Arp/Ping |
|
|
|
|
|
|
Unix/Linux |
See Set a Static IP Address using ARP in UNIX, on page 17 |
|
|
|
|
|
Canon software that allows you to find print servers in your network |
Canon’s NetSpot |
Windows |
and assign an IP address to them. |
Device Installer software |
|
|
|
|
|
|
|
See Set the IP address using NetSpot Device Installer, on page 19 |
|
|
|
It is not possible to obtain a dynamic IP address using DHCP, since DHCP is disabled by default in AXIS 1650. To enable DHCP in the print server, see DHCP Enabled, on page 46. You can, however, obtain a DHCP address for the print server via AXIS IPJumpStarter or NetSpot Device Installer. If you choose to obtain a DHCP address for the print server from these programs, the DHCP function will be enabled in the print server.

14 |
Print Server Installation |
AXIS 1650 User’s Manual |
|
|
|
Set a Static IP Address using AXIS IP JumpStarter
AXIS IP JumpStarter is an application that helps you to locate your Axis print server on the network and assign an IP address to it.
1.Install AXIS IP JumpStarter, it is available on the AXIS 1650 CD and on www.axis.com
2.Select a print server from the serial number list. All AXIS 1650 appear with the default IP address 192.168.0.90. If you are installing several AXIS 1650, check the Serial Number to locate a specific print server.
All AXIS 1650 have the default IP address 192.168.0.90 Change this default IP address to either a
static IP address or to a DHCP address.
3. From the Server menu, select Set IP Address. The Set IP Address dialog appears.
AXIS 1650 User’s Manual |
Print Server Installation |
15 |
|
|
|
4.Click the radio button that corresponds to your choice of IP setting method (static or dynamic using DHCP). When assigning a static IP address you also have to define the Subnet Mask and
Default Gateway.
5.Click OK to save your settings.
6.You may be prompted to enter the server root password (by default set to <blank>), click OK and the print server will appear in the list with the assigned IP address.
7.To verify that you have access to the print server’s Web pages, highlight the print server in the list and select Server Home Page from the Server menu.
8.You have now finished the procedure of setting the IP address. Continue to Windows Installation, on page 22.
16 |
Print Server Installation |
AXIS 1650 User’s Manual |
|
|
|
Set a Static IP Address using ARP in Windows 98/Me/2000/XP/2003
1. Open a Command Prompt and type:
arp -s <IP address> <Ethernet address> ping -l 479 <IP address>
Example:
arp -s 192.168.3.191 00-40-8c-18-1c-f0 ping -l 479 192.168.3.191
2.If the host returns Reply from 192.168.3.191 ... or a similar message, the IP address has been set successfully.
If the host returns Request time out... you need to reboot the print server and perform steps 1-2 above again. Rebooting the print server is done by disconnecting and then re-connecting the print server’s power supply.
3.Access the print server’s Web pages ( - See page 37), select Admin | Network Settings | Detailed View | TCP/IP and define the Default Router and Subnet Mask. Make sure DHCP, BOOTP and RARP are disabled.
You have now set the IP address of the print server. Continue with Windows Installation, on page 22.
Note:
When you execute the ping command for the first time, you will experience a significantly longer response time than usual.
AXIS 1650 User’s Manual |
Print Server Installation |
17 |
|
|
|
Set a Static IP Address using ARP in UNIX
Follow the instructions below to set the IP address using ARP. 1. Type the following commands in the shell window:
arp -s <ip address> <Ethernet address> temp ping -s 479 <ip address>
Example:
arp -s 192.168.3.191 00:40:8c:18:1c:f0 temp ping -s 479 192.168.3.191
2.The host will return 192.168.3.191 is alive or a similar message. This indicates that the address has been set and that the communication is established.
3.Access the print server’s Web pages ( - See page 37), select Admin | Network Settings | Detailed View | TCP/IP and define the Default Router and Subnet Mask. Make sure DHCP, BOOTP and RARP are disabled.
Notes:
•The ARP command varies between different UNIX systems. Some BSD type systems expect the host name and node address in reverse order.
•When you execute the ping command for the first time, you may experience a significantly longer response time than usual.

18 |
Print Server Installation |
AXIS 1650 User’s Manual |
|
|
|
Set an IP Address with NetSpot Device Installer software
NetSpot Device Installer is software from Canon that allows you to assign an IP address and manage Canon devices connected to your network. NetSpot Device Installer software is supplied on CD-ROM with your Canon printer and on www.canon.com
Depending on the provided CD-ROM, NetSpot Device Installer may not be included. If this is the case, please download NetSpot Device Installer from www.canon.com
Install NetSpot Device Installer
1.In Windows 2000/XP, log on as an Administrator before installing. Insert the CD-ROM supplied with your Canon printer into the CD-ROM drive of your computer.
2.In Windows Explorer, double-click the CD-ROM drive icon.
3.Double-click NetSpot_Device_Installer => Windows => nsdisetup.exe
4.A license agreement will be shown in the window. Check the contents and click Yes.
5.Specify the program destination folder and click OK. The installation will launch.
If you check “Add to Start menu”, you can add NetSpot Device Installer to your Window’s Start menu.
6.When the installation is finished, click OK. You can now start the program, see SettheIPaddress using NetSpot Device Installer, on page 19.
AXIS 1650 User’s Manual |
Print Server Installation |
19 |
|
|
|
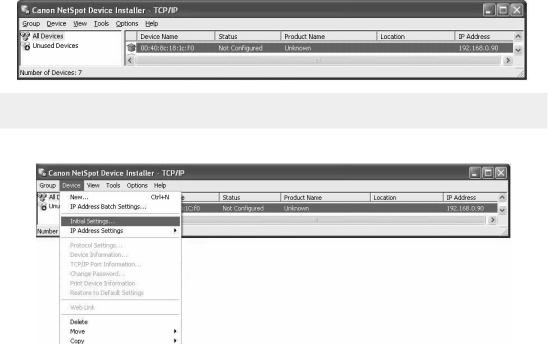
Set the IP address using NetSpot Device Installer
Follow these instructions to set the IP address using NetSpot Device Installer:
1.Start the program. The main window will open. After a while a list of devices detected on the network will be displayed.
2.Select the AXIS 1650 that displays the unit’s MAC address and default IP address
196.168.0.90
The MAC address is based on the Serial Number (S/N) of your AXIS 1650 and is printed on the underside label of the print server.
3. From the Device menu, select Initial Settings.
4.From the Initial Settings dialogue box, select the AXIS 1650 print server from the Product Type drop-down list and click Next.

20 |
Print Server Installation |
AXIS 1650 User’s Manual |
|
|
|
5. Next, configure the TCP/IP protocol:
Select Manual Setting
Enter IP Address Enter Gateway Address
Enter Subnet Mask
The Broadcast Address is filled in automatically
6. After you have finished the configuration, click OK.
If you get a message reading “Resetting device”, click OK.
7.Click OK. Your printer’s protocol configuration is now finished and your AXIS 1650 has received an IP address. Continue to Windows Installation, on page 22.
AXIS 1650 User’s Manual |
Print Server Installation |
21 |
|
|
|
IP Address Host Names
If you are using host names, you can map a unique host name to the IP address. Refer to your system manuals or to your network administrator for instructions on how to perform name mapping on your system.
Notes
•You need to know the Ethernet address of your AXIS 1650 to perform the installation. The Ethernet address is based on the serial number of your AXIS 1650. For example, an AXIS 1650 with the serial number of 00408C181CF0, will have the corresponding Ethernet address of 00 40 8C 18 1C F0. The serial number is located on a label on the backside of the print server.
•DO NOT use the IP addresses shown in the following examples when installing the AXIS 1650.
•ARP/Ping operates on single network segments only, i.e. it cannot be used over routers.
•The default host name of the print server is ’AXIS’ followed by the last 6 digits in the serial number. e.g. AXIS181636. The host name is changed in the Print server name field in Admin | General Settings.
•The host name limitations conclude that if you want to register the same host name at a WINS server and a DDNS server, the host name should be no longer than 15 characters and it should only contain the characters ‘A-Z’, ‘a-z’, ’0-9’ and ‘-’.
•Refer to your system manuals or to your network administrator for instructions on how host name resolutions are performed on your system.
•At least one WINS server IP address must be included in the DHCP scope if you are using WINS. Immediately after the IP address has been received, the AXIS 1650 registers its host name and IP address on the WINS server.
•If the host name has not been mapped to the IP address, you can still perform the following instructions to download the IP address. In this case, simply replace the host name entry with the IP address wherever required.
22 |
Windows Installation |
AXIS 1650 User’s Manual |
|
|
|
Section 3 Windows Installation
Installing Printer Ports using AXIS CAPT Print Monitor
AXIS CAPT Print Monitor is a Windows component that has been developed for network printing. AXIS CAPT Print Monitor is the recommended tool for Canon printers, including CAPT, Canon Advanced Raster Printing System and BubbleJet.
AXIS CAPT Print Monitor allows your AXIS 1650 to be connected in the same simple fashion as a local printer port and once installed, it is automatically initialized upon system start-up.
AXIS CAPT Print Monitor needs to be installed on each workstation for peer-to-peer printing.
Refer to the instructions relevant to your network on how to install a printer using AXIS CAPT Print Monitor:
•Print Server Installation using AXIS CAPT Print Monitor in Windows 2000, XP and Server 2003 on page 23
•Print Server Installation using AXIS CAPT Print Monitor in Windows 98 and Me on page 29
See also Print Server Installation using the Standard TCP/IP Port in Windows 2000/XP/2003, on page 32.
Loading...