


 Loading...
Remote UI Guide
Please read this guide before operating this product. |
ENG |
After you finish reading this guide, store it in a safe place for future reference. |
imageRUNNER 1750i/1740i 1730i/1730 Remote UI Guide


 Manuals for the Machine
The manuals for this machine are organized as shown below. Please refer to them for detailed information. Some manuals may not be needed for certain system configurations and products purchased.
Guides with this symbol are printed manuals.
Guides with this symbol are PDF manuals included on the CD-ROM accompanying CD-ROM.
•Installation of the Machine
•Legal Notices
•Setup Instructions
•Quick Reference for Basic Operations
•Basic Operations
•Troubleshooting
•Copying Instructions
•Sending and Fax Instructions
•Remote User Interface Instructions
•Network Connectivity
•Security Management
•Color Network ScanGear Instructions
•USB Memory Media Printing Instructions
•PS/PCL/UFRII LT Printer Instructions
•Windows Printer Driver Instructions
•Windows Fax Driver Instructions
•Macintosh Printer Driver Instructions
Starter Guide
User’s Guide
Easy Operation Guide
Reference Guide
Copying Guide
Sending and Facsimile Guide
Remote UI Guide
(This Document)
System Settings Guide
Network ScanGear Guide
Printer Guide
Windows Printer Driver Guide
Windows Fax Driver Guide
Mac Printer Driver Guide
CD-ROM
CD-ROM
CD-ROM
CD-ROM
CD-ROM
CD-ROM
CD-ROM
CD-ROM
CD-ROM
CD-ROM
To view the manual in PDF format, Adobe Reader/Adobe Acrobat Reader is required. If Adobe Reader/Adobe Acrobat Reader is not installed on your system, please download it from the Adobe Systems Incorporated website.


 How This Manual Is Organized
Chapter 1 Introduction to the Remote UI
Chapter 2 |
Managing Jobs and Machine Data |
|
|
Chapter 3 |
Specifying Department ID and User Management |
|
|
Chapter 4 |
Customizing Settings |
|
|
Chapter 5 |
Appendix |
|
Includes the glossary and index. |
Considerable effort has been made to ensure that this manual is free of inaccuracies and omissions. However, as we are constantly improving our products, if you need an exact specification, please contact Canon.

Contents
Preface . . . . . . . . . . . . . . . . . . . . . . . . . . . . . . . . . . . . . . . . . . . . . . . . . . . . . . . . . vi
How to Use This Manual . . . . . . . . . . . . . . . . . . . . . . . . . . . . . . . . . . . . . . . . . . . vi
Symbols Used in This Manual . . . . . . . . . . . . . . . . . . . . . . . . . . . . . . . . . . . . . . vi Keys and Buttons Used in This Manual . . . . . . . . . . . . . . . . . . . . . . . . . . . . . . . vi Displays Used in This Manual . . . . . . . . . . . . . . . . . . . . . . . . . . . . . . . . . . . . . vii Abbreviations Used in This Manual . . . . . . . . . . . . . . . . . . . . . . . . . . . . . . . . . viii Trademarks . . . . . . . . . . . . . . . . . . . . . . . . . . . . . . . . . . . . . . . . . . . . . . . . . . . viii Availability of the Optional Equipment . . . . . . . . . . . . . . . . . . . . . . . . . . . . . . . viii
Legal Notices . . . . . . . . . . . . . . . . . . . . . . . . . . . . . . . . . . . . . . . . . . . . . . . . . . . . ix
Copyright . . . . . . . . . . . . . . . . . . . . . . . . . . . . . . . . . . . . . . . . . . . . . . . . . . . . . . ix Disclaimers. . . . . . . . . . . . . . . . . . . . . . . . . . . . . . . . . . . . . . . . . . . . . . . . . . . . . ix
Chapter 1 Introduction to the Remote UI
Overview of the Remote UI . . . . . . . . . . . . . . . . . . . . . . . . . . . . . . . . . . . . . . . . .1-2
Functions of the Remote UI . . . . . . . . . . . . . . . . . . . . . . . . . . . . . . . . . . . . . . .1-3 The Top Page of the Remote UI . . . . . . . . . . . . . . . . . . . . . . . . . . . . . . . . . . .1-4 Logon Modes of the Remote UI . . . . . . . . . . . . . . . . . . . . . . . . . . . . . . . . . . . .1-5 Buttons on the Remote UI . . . . . . . . . . . . . . . . . . . . . . . . . . . . . . . . . . . . . . . .1-6
System Requirements . . . . . . . . . . . . . . . . . . . . . . . . . . . . . . . . . . . . . . . . . . . . .1-7
Before Using the Remote UI . . . . . . . . . . . . . . . . . . . . . . . . . . . . . . . . . . . . . . . .1-8
Starting the Remote UI . . . . . . . . . . . . . . . . . . . . . . . . . . . . . . . . . . . . . . . . . . . .1-9
Viewing the Machine Status and Information . . . . . . . . . . . . . . . . . . . . . . . . .1-14
Chapter 2 Managing Jobs and Machine Data
Managing Jobs. . . . . . . . . . . . . . . . . . . . . . . . . . . . . . . . . . . . . . . . . . . . . . . . . . .2-2
Managing the Print Jobs . . . . . . . . . . . . . . . . . . . . . . . . . . . . . . . . . . . . . . . . .2-2
Viewing the Job Logs . . . . . . . . . . . . . . . . . . . . . . . . . . . . . . . . . . . . . . . . . . . .2-4
Managing the Address Book . . . . . . . . . . . . . . . . . . . . . . . . . . . . . . . . . . . . . . .2-5
Editing the Destinations . . . . . . . . . . . . . . . . . . . . . . . . . . . . . . . . . . . . . . . . . .2-6
Importing and Exporting Data . . . . . . . . . . . . . . . . . . . . . . . . . . . . . . . . . . . . .2-11
Exporting Address Book Data . . . . . . . . . . . . . . . . . . . . . . . . . . . . . . . . . . . .2-12
Importing Address Book Data . . . . . . . . . . . . . . . . . . . . . . . . . . . . . . . . . . . .2-13
Exporting User Management Data. . . . . . . . . . . . . . . . . . . . . . . . . . . . . . . . .2-14
Importing User Management Data . . . . . . . . . . . . . . . . . . . . . . . . . . . . . . . . .2-15
Resetting Imported User Management Data . . . . . . . . . . . . . . . . . . . . . . . . .2-17
Exporting Additional Functions Setting Data . . . . . . . . . . . . . . . . . . . . . . . . .2-21
Importing Additional Functions Setting Data . . . . . . . . . . . . . . . . . . . . . . . . .2-23
iv

Managing Key Pairs and Digital Certificates
from a Web Browser . . . . . . . . . . . . . . . . . . . . . . . . . . . . . . . . . . . . . . . . . . . . . 2-25
Installing and Registering a Key and Certificate . . . . . . . . . . . . . . . . . . . . . . 2-26 Deleting a Key and Certificate . . . . . . . . . . . . . . . . . . . . . . . . . . . . . . . . . . . . 2-30 Installing and Registering a CA Certificate . . . . . . . . . . . . . . . . . . . . . . . . . . 2-32 Deleting a CA Certificate . . . . . . . . . . . . . . . . . . . . . . . . . . . . . . . . . . . . . . . . 2-35
Chapter 3 Specifying Department ID and User Management
Managing the Department IDs and User IDs. . . . . . . . . . . . . . . . . . . . . . . . . . . 3-2
Enabling Department ID Management and User Management. . . . . . . . . . . . 3-2 Managing the Department IDs. . . . . . . . . . . . . . . . . . . . . . . . . . . . . . . . . . . . . 3-6 Managing the User IDs . . . . . . . . . . . . . . . . . . . . . . . . . . . . . . . . . . . . . . . . . 3-10
Chapter 4 Customizing Settings
Customizing the System Settings . . . . . . . . . . . . . . . . . . . . . . . . . . . . . . . . . . . 4-2 Editing the LDAP Server Settings . . . . . . . . . . . . . . . . . . . . . . . . . . . . . . . . . . 4-10 Editing the Forwarding Settings . . . . . . . . . . . . . . . . . . . . . . . . . . . . . . . . . . . 4-14 Specifying the Authorized Send Settings . . . . . . . . . . . . . . . . . . . . . . . . . . . . 4-17 Customizing the Machine Settings . . . . . . . . . . . . . . . . . . . . . . . . . . . . . . . . . 4-26
Specifying the SNMPv3 Settings . . . . . . . . . . . . . . . . . . . . . . . . . . . . . . . . . . . 4-29
Enabling SNMPv3 . . . . . . . . . . . . . . . . . . . . . . . . . . . . . . . . . . . . . . . . . . . . . 4-30 Specifying the User Information for SNMPv3 . . . . . . . . . . . . . . . . . . . . . . . . 4-31 Specifying the Context Settings for SNMPv3. . . . . . . . . . . . . . . . . . . . . . . . . 4-34
Verifying SSL Server Certificates . . . . . . . . . . . . . . . . . . . . . . . . . . . . . . . . . . 4-37
Chapter 5 Appendix
Glossary . . . . . . . . . . . . . . . . . . . . . . . . . . . . . . . . . . . . . . . . . . . . . . . . . . . . . . . . 5-2
Index . . . . . . . . . . . . . . . . . . . . . . . . . . . . . . . . . . . . . . . . . . . . . . . . . . . . . . . . . . . 5-6
v

Preface
Thank you for purchasing the Canon imageRUNNER 1750i/1740i/1730i/1730. Please read this manual thoroughly before operating the machine to familiarize yourself with its capabilities, and to make the most of its many functions. After reading this manual, store it in a safe place for future reference.
How to Use This Manual
Symbols Used in This Manual
The following symbols are used in this manual to explain procedures, restrictions, handling precautions, and instructions that should be observed for safety.
IMPORTANT |
Indicates operational requirements and restrictions. Be sure to read |
|
these items carefully to operate the machine correctly, and avoid |
|
damage to the machine or property. |
NOTE |
Indicates a clarification of an operation, or contains additional |
|
explanations for a procedure. Reading these notes is highly |
|
recommended. |
Keys and Buttons Used in This Manual
The following tables provide a few examples of how keys, buttons, and other user interfaces such as icons displayed on the screen are expressed in this manual:
• Keys on the machine’s control panel and touch panel display:
|
Keys |
Example |
|
|
|
|
|
Control Panel |
Key icon + (Key Name) |
(Additional Functions) |
|
|
|
|
|
Touch Panel Display |
[Key Name] |
[OK], [Cancel], etc. |
|
|
|
||
[Key Icon] |
[ ], [ ], etc. |
||
|
|||
|
|
|
• Buttons, icons and other user interfaces on computer operation screens:
Buttons and Other Objects |
|
Example |
|
|
|
[Button Name] |
[OK] |
|
|
|
|
[Name] + icon, menu, etc. |
[CD-ROM] icon, [Start] menu, etc. |
|
|
|
|
[Icon] + (Icon Name). |
[ |
] (New) |
|
|
|
vi
Displays Used in This Manual
Unless otherwise noted, the screen shots used in this manual are taken from the imageRUNNER 1740i with the following optional equipment: Staple Finisher-H1, Cassette Module-Y1 (triple-tiered), Super G3 Fax Board-AJ1, PCL Printer Kit-AL1, and PS Printer Kit-AL1.
Functions that are unavailable due to a particular combination of accessories and optional equipment are not displayed in the web browser. Therefore, the screen shots of the Remote UI used in this manual may differ from the ones you actually see on your web browser, depending on the model or options you have installed or activated.
The IP addresses shown in the screen shots and text in this manual are for illustrative purposes only.
The buttons and other objects that are related to operations during the procedure are marked with a  , as shown in the example below.
vii

Abbreviations Used in This Manual
In this manual, product names are abbreviated as follows: |
|
Microsoft Windows 2000 operating system: |
Windows 2000 |
Microsoft Windows XP operating system: |
Windows XP |
Microsoft Windows Vista operating system: |
Windows Vista |
Microsoft Windows 7 operating system: |
Windows 7 |
Microsoft Windows operating system: |
Windows |
Trademarks
Macintosh and Mac OS are trademarks of Apple Inc., registered in the U.S. and other countries.
Microsoft, Windows, Windows Vista, and Internet Explorer are either registered trademarks or trademarks of Microsoft Corporation in the United States and/or other countries.
Other product and company names herein may be the trademarks of their respective owners.
Availability of the Optional Equipment
Of the optional equipment described in the manuals, the Copy Card Reader-F1 may not be available depending on the country or region of purchase. For more information on the optional equipment, see Chapter 4, “Optional Equipment,” in the
Reference Guide.
viii

Legal Notices
Copyright
Copyright 2012 by Canon Inc. All rights reserved.
No part of this publication may be reproduced or transmitted in any form or by any means, electronic or mechanical, including photocopying and recording, or by any information storage or retrieval system without the prior written permission of Canon Inc.
Disclaimers
The information in this document is subject to change without notice.
CANON INC. MAKES NO WARRANTY OF ANY KIND WITH REGARD TO THIS MATERIAL, EITHER EXPRESS OR IMPLIED, EXCEPT AS PROVIDED HEREIN, INCLUDING WITHOUT LIMITATION, THEREOF, WARRANTIES AS TO MARKETABILITY, MERCHANTABILITY, FITNESS FOR A PARTICULAR PURPOSE OR USE OR NON-INFRINGEMENT. CANON INC. SHALL NOT BE LIABLE FOR ANY DIRECT, INCIDENTAL, OR CONSEQUENTIAL DAMAGES OF ANY NATURE, OR LOSSES OR EXPENSES RESULTING FROM THE USE OF THIS MATERIAL.
ix
x

|
|
|
|
|
|
Introduction to the Remote UI |
1 |
|
|
CHAPTER |
|
|
|
|
This chapter describes the functionality of the Remote UI and how to start it.
Overview of the Remote UI. . . . . . . . . . . . . . . . . . . . . . . . . . . . . . . . . . . . . . . . . . . . . . . . 1-2
Functions of the Remote UI . . . . . . . . . . . . . . . . . . . . . . . . . . . . . . . . . . . . . . . . . . . . . . . . . . . . .1-3
The Top Page of the Remote UI . . . . . . . . . . . . . . . . . . . . . . . . . . . . . . . . . . . . . . . . . . . . . . . . . .1-4
Logon Modes of the Remote UI . . . . . . . . . . . . . . . . . . . . . . . . . . . . . . . . . . . . . . . . . . . . . . . . . .1-5
Buttons on the Remote UI . . . . . . . . . . . . . . . . . . . . . . . . . . . . . . . . . . . . . . . . . . . . . . . . . . . . . .1-6
System Requirements . . . . . . . . . . . . . . . . . . . . . . . . . . . . . . . . . . . . . . . . . . . . . . . . . . . 1-7
Before Using the Remote UI. . . . . . . . . . . . . . . . . . . . . . . . . . . . . . . . . . . . . . . . . . . . . . . 1-8
Starting the Remote UI . . . . . . . . . . . . . . . . . . . . . . . . . . . . . . . . . . . . . . . . . . . . . . . . . . . 1-9
Viewing the Machine Status and Information . . . . . . . . . . . . . . . . . . . . . . . . . . . . . . . . . 1-14
1-1
1
Introduction to the Remote UI
Overview of the Remote UI
The Remote UI (Remote User Interface) software comes preinstalled in the machine and enables you to access the machine’s functions by using a web browser. For example, the Remote UI enables you to check the job status, delete jobs, and edit various settings. To use the Remote UI, all you need is a web browser and a network connection between your computer and the machine.
First set the IP (Internet Protocol) address for the machine from the machine’s control panel and set up the necessary network connection. Then start your web browser and enter the IP address of the machine. The Remote UI top page is displayed on your computer screen and is ready for you to log in.
Touch Panel Display
Machine’s Control Panel
Computer
You can operate the machine both with the control panel and from the Remote UI.
1-2 Overview of the Remote UI

Functions of the Remote UI
The major functions available on the Remote UI are as follows:
■Viewing the machine status
You can view the current status of the machine, such as the remaining paper or toner amount, on your computer screen.
(See “Viewing the Machine Status and Information,” on p. 1-14.)
■Managing jobs and job logs
You can view the current status of the jobs and the job logs processed by the machine on your computer screen. You can also delete the jobs when you log in to the Remote UI as the System Manager or can delete your own jobs when you log in as an End User.
(See “Managing Jobs,” on p. 2-2.)
NOTE
For the End Users to delete their own jobs, the Permit End-user’s Job Operation setting must be enabled. (See “To specify the System Manager ID and System Password:,” on p. 4-9.)
■Importing and exporting the machine data
You can save and load the machine data such as Address Book data or the Additional Functions setting data.
(See “Importing and Exporting Data,” on p. 2-11.)
■Managing key pairs and digital certificates
You can install and register key pairs and digital certificates.
(See “Managing Key Pairs and Digital Certificates from a Web Browser,” on p. 2-25.)
■Specifying the Department ID Management and User Management
You can manage the Department IDs and User IDs. User IDs can be registered, edited, or deleted only on the Remote UI, while the Department IDs can be managed both on the machine’s control panel and on the Remote UI.
(See “Managing the Department IDs and User IDs,” on p. 3-2.)
■Specifying the Authorized Send settings
You can specify the Authorized Send settings only on the Remote UI. (See “Specifying the Authorized Send Settings,” on p. 4-17.)
1
Introduction to the Remote UI
Overview of the Remote UI |
1-3 |
1
Introduction to the Remote UI
■Customizing the Additional Functions settings
You can edit the Additional Functions settings on the Remote UI as you can by pressing  (Additional Functions) on the machine’s control panel.
(See “Customizing Settings,” on p. 4-1.)
The Top Page of the Remote UI
When you enter the IP address of the machine on your web browser and press the [ENTER] key on your computer keyboard, the Remote UI top page is displayed.
NOTE
•The appearance of the Remote UI top page depends on the management mode applied to the machine. For more information, see “Enabling Department ID Management and User Management,” on p. 3-2.
•For instructions on how to log in to the Remote UI, see “Starting the Remote UI,” on p. 1-9.
1-4 Overview of the Remote UI

Logon Modes of the Remote UI
When you log in to the Remote UI by entering the System Manager ID and System Password or the User ID registered as the System Manager and its password, the authority of the System Manager is applied to the Remote UI, and other users (End Users) cannot edit the System Settings and other settings restricted to the System Manager.
■System Manager Mode
You can access the Remote UI functions with no restrictions.
■End-User Mode
You can access all Remote UI functions except those restricted to the System Manager. Major functions open to End Users and the System Manager are:
•Checking the machine status such as paper or toner amount
•Checking the job status and deleting their own jobs
NOTE
For the End Users to delete their own jobs, the Permit End-user’s Job Operation setting must be enabled. (See “To specify the System Manager ID and System Password:,” on p. 4-9.)
• Registering or editing the addresses for the Send/Fax functions
NOTE
The Address Book can be protected by setting a password in the Restrict Send Function page. (See “To specify the Restrict the Send Function settings:,” on p. 4-8.)
•Customizing the Additional Functions settings except those restricted to the System Manager, such as the System Settings.
1
Introduction to the Remote UI
Overview of the Remote UI |
1-5 |
Buttons on the Remote UI
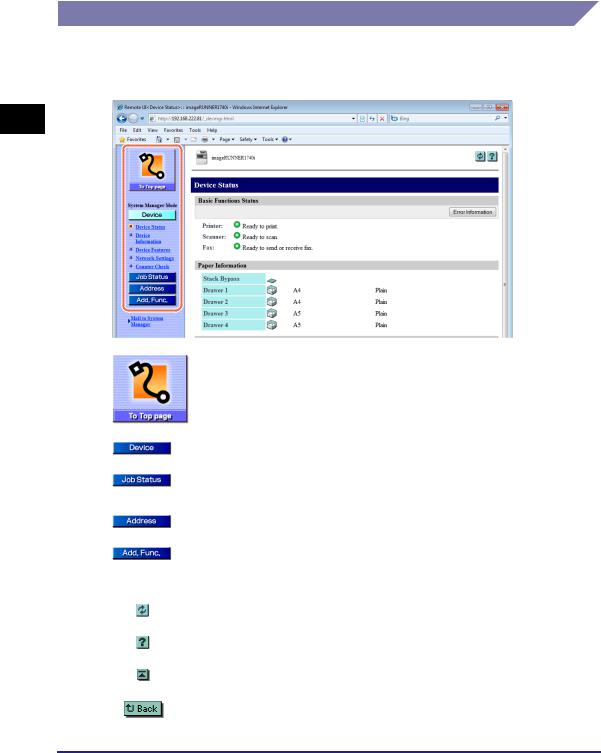
After you have logged in to the Remote UI, the Device Status page is displayed. The left frame of the page displays the buttons listed below, which allow you to access and perform operations on other Remote UI pages.
1
Introduction to the Remote UI
Click to return to the Remote UI top page.
Click to display the machine status and various setting information.
Click to display the status of the jobs and the logs of the jobs processed by the machine.
Click to manage the Address Book of the machine.
Click to specify or change various settings on the machine. This button works similarly as the  (Additional Functions) key on the machine’s control panel.
Click to update or refresh the current page with the latest information.
Click to display the online help for the Remote UI.
Click to return to the top of the page.
Click to return to the previous page.
1-6 Overview of the Remote UI

System Requirements
The Remote UI has been confirmed to work in the following system environments.
■Windows
•OS (Operating Systems)
-Windows 2000
-Windows XP
-Windows Vista
-Windows 7
•Web Browser
-Microsoft Internet Explorer 6.0 or later
■Macintosh
•OS (Operating System)
-Mac OS X 10.3 or later, except Classic Environment
•Web Browser
-Safari 2.0.3 or later
-Safari 1.3.2 on Mac OS X 10.3.x is also supported.
NOTE
Other than the software listed above, no other software, such as a web server, is necessary. (There is already a web server inside the machine.)
1
Introduction to the Remote UI
System Requirements |
1-7 |

1
Introduction to the Remote UI
Before Using the Remote UI
Before you start using the Remote UI, specify or check the following settings.
■Specifying the Network Settings on the machine
•Specify or check the Network Settings to obtain or find out the IP address of the machine.
•Confirm that the Use HTTP setting is set to ‘On’.
NOTE
•You can find the Network Settings including the Use HTTP setting by pressing  (Additional Functions) [System Settings].
•If you cannot find out the IP address of the machine, consult your network administrator or see the System Settings Guide.
■Enabling the Remote UI and specifying the device name
•Confirm that the Remote UI On/Off setting is set to ‘On’. If you want to establish a more secure communication by using SSL, set the Use SSL setting to ‘On’. Make sure to generate and specify the default SSL key pair. (See Chapter 3, “Setting up the Machine for Your Network Environment,” in the System Settings Guide.)
•Specify the name of the device in the Device Info Settings to identify the machine you operate from the Remote UI by the specified name.
IMPORTANT
•Connection via a proxy server is not possible. If your system environment has a proxy server, specify the IP address of the machine as an proxy exception on your web browser. (Set your web browser not to access the IP address of the machine through a proxy server.) Setting procedures vary depending on the system environment. Consult your network administrator.
•Enable all cookies and use Java Script on your web browser. Otherwise, you will not be able to change the machine’s settings using the Remote UI.
•If multiple Remote UIs are running simultaneously, the latest setting is enabled.
NOTE
You can find the Remote UI On/Off setting and Device Info Settings by pressing  (Additional Functions) [System Settings]. For more information on the Remote UI On/Off setting, see Chapter 6, “Protecting the Machine from Unauthorized Access,” in the System Settings Guide. For more information on the Device Info Settings, see Chapter 7, “Other System Settings,” in the System Settings Guide.
1-8 Before Using the Remote UI

Starting the Remote UI
To start the Remote UI, follow the procedure below.
IMPORTANT
•The IP addresses shown in the screen shots and text in this manual are for illustrative purposes only.
•If the Language Switch setting is set to ‘On’, some characters are restricted and cannot be entered. To enter all characters, set the Language Switch setting to ‘Off’. (See Chapter 3, “Configuring the Machine’s Basic Settings,” in the Reference Guide.)
•If you change the language on the Remote UI, the characters of the displayed language can be entered. However, if the displayed language is different from the language used on the touch panel display of the machine, the language may not be displayed correctly.
•To enter characters from a web browser, use the characters that you can enter from the machine’s control panel. If you use other characters, they may not be displayed or recognized properly on the machine.
1 Start your web browser.
2 Enter the appropriate URL into [Address] or [Location] bar in the web browser press the [ENTER] key on your computer keyboard.
http://<the IP address of the machine>/
If you do not know the appropriate URL, consult your network administrator.
The Remote UI top page is displayed.
IMPORTANT
If the machine’s SSL communication is enabled, a security alert may be displayed regarding the security certificate. In this case, check that the correct URL is entered, and then proceed to display the Remote UI top page. For more information on the SSL communication, see Chapter 3, “Setting up the Machine for Your Network Environment,” in the System Settings Guide.
NOTE
You can change the language displayed on the Remote UI top page by clicking the [Language] drop-down list box and selecting the desired language, regardless of the language used on the touch panel display of the machine.
1
Introduction to the Remote UI
Starting the Remote UI |
1-9 |
1
Introduction to the Remote UI
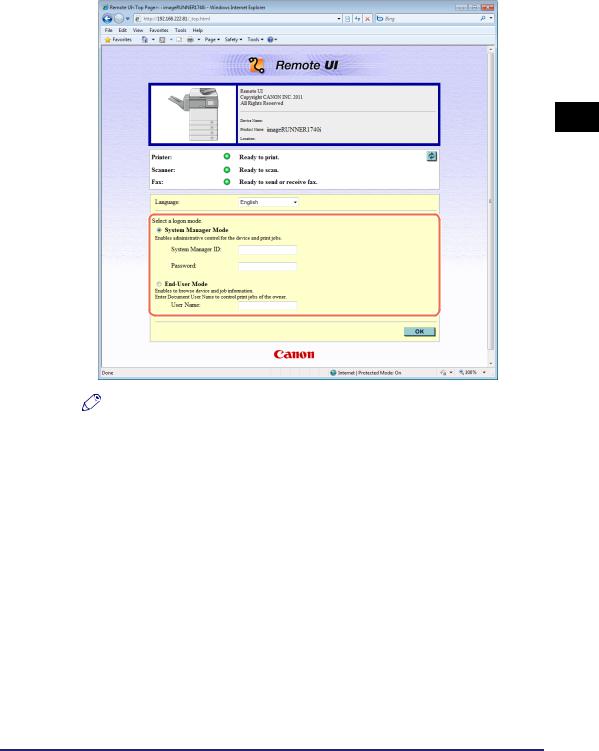
3 Enter your ID and password depending on the management mode applied to the machine.
The required ID and password vary depending on the management mode (Department ID/User Management) applied to the machine. For more information, see “Enabling Department ID Management and User Management,” on p. 3-2.
When Department ID Management and User Management are disabled:
Select the logon mode and enter the System Manager ID and System Password, or user name.
•To log in to the Remote UI in the System Manager Mode, select the option button for [System Manager Mode] enter the System Manager ID and System Password.
IMPORTANT
The System Manager ID and System Password are both set to ‘7654321’ at purchase. Change them before using the machine. (See “To specify the System Manager ID and System Password:,” on p. 4-9.)
•To log in to the Remote UI in the End-User Mode, select the option button for [End-User Mode] enter the user name or leave the [User Name] text box blank. (See the note below.)
NOTE
If you are logging in to the Remote UI in the End-User Mode and want to delete your own print job, enter your user name with which you sent the print job (it is usually the user name for your computer). Otherwise, click [OK] to log in to the Remote UI with the [User Name] text box left blank. (See the note on p. 1-5.)
1-10 Starting the Remote UI
1
Introduction to the Remote UI
NOTE
•If the page is not shown correctly, check the following settings:
-Cache settings on your web browser
-HTTP port number (default is ‘80’)
•For information on other network connection problems and remedies, see Chapter 8, “Troubleshooting,” in the System Settings Guide or consult your network administrator.
Starting the Remote UI |
1-11 |
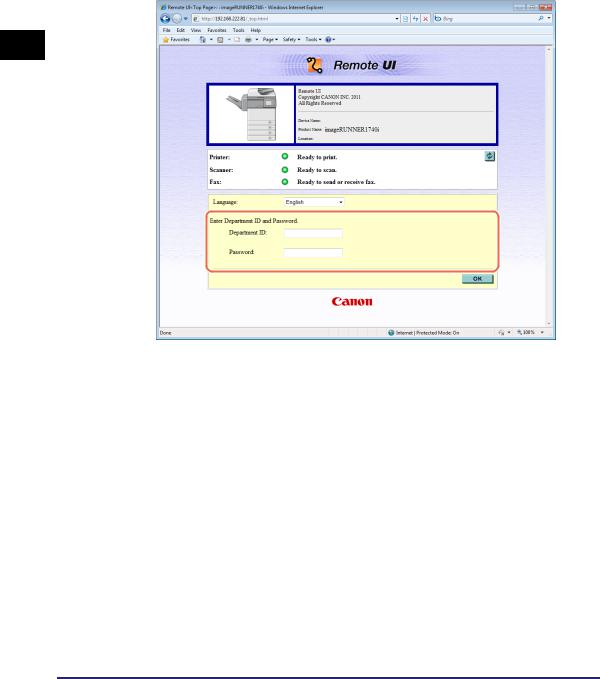
When Department ID Management is enabled:
Enter the Department ID and password.
You can log in as the System Manager by entering the System Manager ID in the [Department ID] text box and the System Password in the [Password] text box.
1
Introduction to the Remote UI
1-12 Starting the Remote UI

When User Management is enabled:
Enter the User ID and password.
You can log in as the System Manager by entering the User ID registered as the System Manager in the [User ID] text box and its password in the [Password] text box.
1
Introduction to the Remote UI
When both Department ID Management and User Management are enabled:
NOTE
The same Remote UI top page as shown in “When User Management is enabled:,” on p. 1-13 appears.
Enter the User ID and password.
You can log in as the System Manager by entering the User ID registered as the System Manager in the [User ID] text box and its password in the [Password] text box.
4 Click [OK].
The Device Status page appears. (See “Viewing the Machine Status and Information,” on p. 1-14.)
Starting the Remote UI |
1-13 |
1
Introduction to the Remote UI
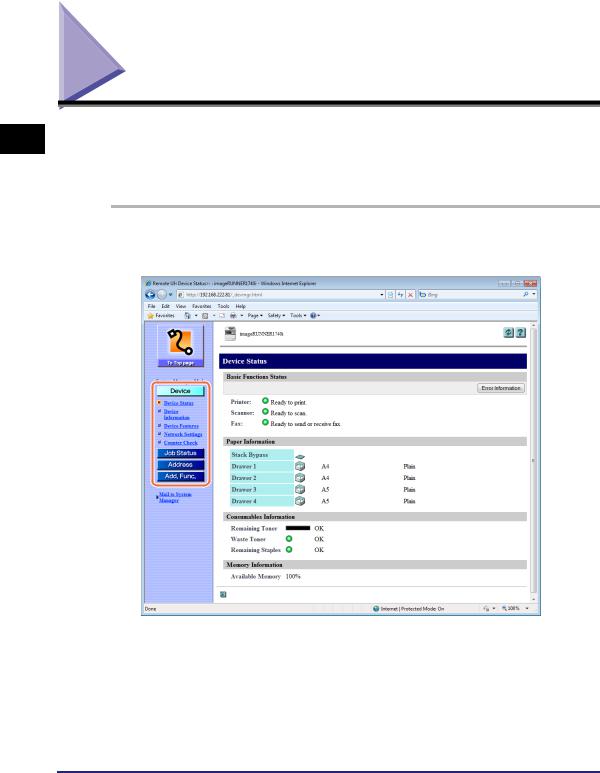
Viewing the Machine Status and Information
When you successfully log in to the Remote UI, the Device Status page in the [Device] menu is displayed. From the [Device] menu, you can view the current status of the machine, information about the consumables such as paper, and other information about the machine.
1 Click [Device] click the hyperlink to the page you want to display in the [Device] menu.
The information page you selected is displayed.
1-14 Viewing the Machine Status and Information

The pages in the [Device] menu are as follows:
Device Status |
Displays the machine status such as available memory, |
page: |
availability of consumables, and error information if any. To check |
|
the details of the error, click [Error Information]. |
Device Information |
Displays the information about the machine, such as the system |
page: |
manager’s information and the location where the machine is |
|
installed. |
Device Features |
Displays the information about the machine, such as the |
page: |
maximum print speed, the total RAM size, and the number of the |
|
drawers attached to the machine. |
Network Settings |
Displays the information about the machine’s network settings. |
page: |
|
Counter Check |
Displays page counts such as the total counts and copy counts. |
page: |
The number and types of counters displayed may vary |
|
depending on the machine configuration. |
1
Introduction to the Remote UI
Viewing the Machine Status and Information |
1-15 |

1
Introduction to the Remote UI
1-16 Viewing the Machine Status and Information

|
|
|
|
|
|
Managing Jobs and |
2 |
|
Machine Data |
|
|
|
CHAPTER |
|
|
|
|
This chapter describes how to manage jobs, import/export data, and install key pairs and digital certificates by using the Remote UI.
Managing Jobs . . . . . . . . . . . . . . . . . . . . . . . . . . . . . . . . . . . . . . . . . . . . . . . . . . . . . . . . . 2-2
Managing the Print Jobs . . . . . . . . . . . . . . . . . . . . . . . . . . . . . . . . . . . . . . . . . . . . . . . . . . . . . . .2-2
Viewing the Job Logs . . . . . . . . . . . . . . . . . . . . . . . . . . . . . . . . . . . . . . . . . . . . . . . . . . . . . . . . . .2-4
Managing the Address Book. . . . . . . . . . . . . . . . . . . . . . . . . . . . . . . . . . . . . . . . . . . . . . . 2-5
Editing the Destinations . . . . . . . . . . . . . . . . . . . . . . . . . . . . . . . . . . . . . . . . . . . . . . . . . . . . . . . .2-6
Importing and Exporting Data. . . . . . . . . . . . . . . . . . . . . . . . . . . . . . . . . . . . . . . . . . . . . 2-11
Exporting Address Book Data . . . . . . . . . . . . . . . . . . . . . . . . . . . . . . . . . . . . . . . . . . . . . . . . . .2-12
Importing Address Book Data . . . . . . . . . . . . . . . . . . . . . . . . . . . . . . . . . . . . . . . . . . . . . . . . . .2-13
Exporting User Management Data. . . . . . . . . . . . . . . . . . . . . . . . . . . . . . . . . . . . . . . . . . . . . . .2-14
Importing User Management Data. . . . . . . . . . . . . . . . . . . . . . . . . . . . . . . . . . . . . . . . . . . . . . .2-15
Resetting Imported User Management Data . . . . . . . . . . . . . . . . . . . . . . . . . . . . . . . . . . . . . . .2-17
Exporting Additional Functions Setting Data . . . . . . . . . . . . . . . . . . . . . . . . . . . . . . . . . . . . . . .2-21
Importing Additional Functions Setting Data . . . . . . . . . . . . . . . . . . . . . . . . . . . . . . . . . . . . . . .2-23
Managing Key Pairs and Digital Certificates from a Web Browser . . . . . . . . . . . . . . . . . 2-25
Installing and Registering a Key and Certificate . . . . . . . . . . . . . . . . . . . . . . . . . . . . . . . . . . . .2-26
Deleting a Key and Certificate . . . . . . . . . . . . . . . . . . . . . . . . . . . . . . . . . . . . . . . . . . . . . . . . . .2-30
Installing and Registering a CA Certificate . . . . . . . . . . . . . . . . . . . . . . . . . . . . . . . . . . . . . . . .2-32
Deleting a CA Certificate . . . . . . . . . . . . . . . . . . . . . . . . . . . . . . . . . . . . . . . . . . . . . . . . . . . . . .2-35
2-1

2
Managing Jobs and Machine Data
Managing Jobs
You can manage the print jobs and view the logs of the jobs processed by the machine. The [Job Status] menu has the following sections:
•Print Job
-Status
-Log
•Send/Receive Fax Job
-Log
•Send/Store/Receive Job
-Log
Managing the Print Jobs
You can manage the print jobs that are being processed or waiting to be processed by the machine.
NOTE
End Users can delete their own print jobs, when the Permit End-user’s Job Operation setting is enabled. (See “To specify the System Manager ID and System Password:,” on p. 4-9.)
2-2 Managing Jobs

1 Click [Job Status] [Status] in the [Job Status] menu.
The list of print jobs being processed or waiting to be processed by the machine is displayed.
2 To delete a print job, click [ ] (Select) next to the job you want to delete [
 ] (Delete).
The selected job is deleted.
2
Managing Jobs and Machine Data
Managing Jobs |
2-3 |
Loading...