Canon 1895C016AA, 1895C018AA Instruction manual

Instruction Manual
Instruction manuals (PDF files) and software can be |
|
downloaded from the Canon website (p.4, 475). |
|
ENGLISH |
|
www.canon.com/icpd |
E |

Introduction
The EOS 800D is a digital single-lens reflex camera featuring a finedetail CMOS sensor with approx. 24.2 effective megapixels, DIGIC 7, high-precision and high-speed 45-point AF (up to 45 cross-type AF points), maximum continuous shooting speed of approx. 6.0 shots/sec., Live View shooting, Full High-Definition (Full HD) movie shooting, and Wi-Fi/NFC/Bluetooth (wireless communication) function.
Before Starting to Shoot, Be Sure to Read the Following
To avoid botched pictures and accidents, first read the “Safety Precautions” (p.22-24) and “Handling Precautions” (p.25-27). Also, read this manual carefully to ensure that you use the camera correctly.
Refer to This Manual while Using the Camera to Further Familiarize Yourself with the Camera
While reading this manual, take a few test shots and see how they come out. You can then better understand the camera. Be sure to store this manual safely, too, so that you can refer to it again when necessary.
Testing the Camera Before Use and Liability
After shooting, play images back and check whether they have been properly recorded. If the camera or memory card is faulty and the images cannot be recorded or downloaded to a computer, Canon cannot be held liable for any loss or inconvenience caused.
Copyrights
Copyright laws in your country may prohibit the use of your recorded images or copyrighted music and images with music on the memory card for anything other than private enjoyment. Also be aware that certain public performances, exhibitions, etc., may prohibit photography even for private enjoyment.
2
Item Check List
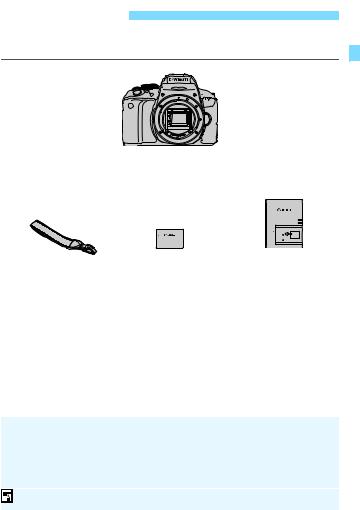
Before starting, check that all the following items are included with your camera. If anything is missing, contact your dealer.
Camera
(with eyecup and body cap)
Strap |
Battery Pack |
Battery Charger |
LP-E17 |
LC-E17E* |
|
|
(with protective cover) |
|
* Battery Charger LC-E17E comes with a power cord.
The camera does not come with the Software CD-ROM, an interface cable or HDMI cable.
The Instruction Manuals are listed on the next page.
If you purchased a Lens Kit, check that the lenses are included.
Be careful not to lose any of the above items.
For items sold separately, see the System Map (p.426).
 When you need Lens Instruction Manuals, download them from the Canon website (p.4).
The Lens Instruction Manuals (PDF) are for lenses sold individually. Note that when purchasing the Lens Kit, some of the accessories included with the lens may not match those listed in the Lens Instruction Manual.
Software can be downloaded from the Canon website (p.475) for your use.
3

Instruction Manuals
Quick Reference Guide
The booklet is the Quick Reference Guide.
More detailed Instruction Manuals (PDF files) can be downloaded from the Canon website.
Downloading and Viewing the Instruction Manuals (PDF Files)
1 Download the Instruction Manuals (PDF files).
Connect to the Internet and access the following Canon website. www.canon.com/icpd
Select your country or region of residence and download the Instruction Manuals.
Instruction Manuals Available for Download
•Camera Instruction Manual
•Wi-Fi (Wireless Communication) Function Instruction Manual
•Lens Instruction Manuals
•Software Instruction Manuals
2View the Instruction Manuals (PDF files).
Double-click a downloaded Instruction Manual (PDF file) to open it.
To view the Instruction Manuals (PDF files), Adobe Acrobat Reader DC or other Adobe PDF viewer (most recent version recommended) is required.
Adobe Acrobat Reader DC can be downloaded for free from the Internet.
To learn how to use PDF viewing software, refer to the software’s Help section.
4

Instruction Manuals
The Instruction Manuals (PDF files) can also be downloaded using the QR code.
www.canon.com/icpd
A software application is required to read out the QR code.
Select your country or region of residence, then download the Instruction Manuals.
The QR code can also be displayed under [54: Manual/software URL].
5
Quick Start Guide
1 

2 

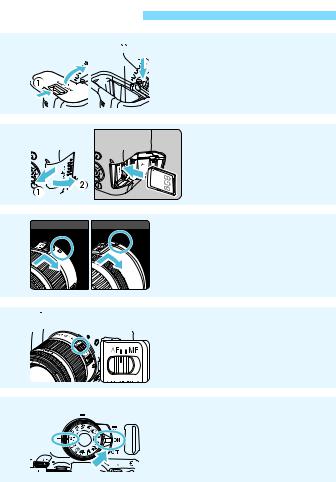
Insert the battery (p.38).
Upon purchase, charge the battery to start using (p.36).
Insert the card (p.39).
With the card’s label facing toward the back of the camera, insert it into the card slot.
3 |
White index |
Red index Attach the lens (p.49). |
|
Align the lens’s white or red mount |
|
|
|
index with the camera’s mount |
|
|
index of the same color to attach |
|
|
the lens. |
4 
5 
Set the lens’s focus mode switch to <f> (p.49).
Set the power switch to <1>, then set the Mode Dial to <A> (Scene Intelligent Auto) (p.78).
All the necessary camera settings will be set automatically.
6
Quick Start Guide
6 
7
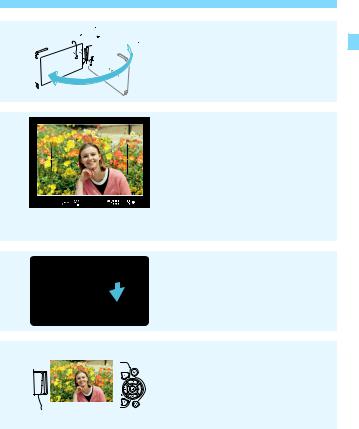
Flip out the LCD monitor (p.42).
When the LCD monitor displays the date/time/zone setting screen, see page 45.
Focus on the subject (p.52).
Look through the viewfinder and aim the viewfinder center over the subject.
Press the shutter button halfway, and the camera will focus on the subject.
The built-in flash will be raised as necessary.
8 
9 
Take the picture (p.52).
Press the shutter button completely to take the picture.
Review the picture.
The image just captured will be displayed for approx. 2 sec. on the LCD monitor.
To display the image again, press the <x> button (p.115).
To shoot while looking at the LCD monitor, see “Live View Shooting” (p.229).
To view the images captured so far, see “Image Playback” (p.115).
To delete images, see “Erasing Images” (p.363).
7

Compatible Cards
The following cards can be used with the camera regardless of capacity. If the card is new or was previously formatted (initialized) by another camera or computer, format the card with this camera
(p.69).
SD/SDHC*/SDXC* memory cards
*UHS-I cards supported.
Cards that Can Record Movies
When shooting movies, use a large-capacity card with a reading/writing speed class at least as high as shown in the following table.
Movie Recording Size |
Recording Formats |
|||
(p.275) |
MOV |
MP4 |
||
ALL-I* |
UHS Speed Class 3 or |
- |
||
faster |
||||
|
|
|
||
|
L: 87 |
- |
SD Speed Class 10 or |
|
IPB |
faster |
|||
(Standard) |
Other than |
- |
SD Speed Class 6 or |
|
|
above |
faster |
||
|
|
|||
IPB (Light) |
- |
SD Speed Class 4 or |
||
faster |
||||
|
|
|
||
*Image-recording quality that is automatically set for time-lapse movie shooting (p.284).
If you use a slow-writing card when shooting movies, the movie may not be recorded properly. Also, if you play back a movie on a card with a slow reading speed, the movie may not be played back properly.
To check the card’s reading/writing speed, refer to the card manufacturer’s website.
In this manual, “card” refers to SD memory cards, SDHC memory cards, and SDXC memory cards.
*The camera does not come with a card for recording photos/ movies. Please purchase it separately.
8

Chapters
|
Introduction |
2 |
|
|
|
||
|
|
|
|
1 |
Getting Started and Basic Camera Operations |
35 |
|
|
|||
|
|
|
|
2 |
Basic Shooting and Image Playback |
77 |
|
|
|||
|
|
|
|
3 |
Setting the AF and Drive Modes |
117 |
|
|
|||
|
|
|
|
4 |
Image Settings |
145 |
|
|
|||
|
|
|
|
5 |
Advanced Operations for Photographic Effects |
183 |
|
|
|||
|
|
|
|
6 |
Flash Photography |
203 |
|
|
|||
|
|
|
|
7 |
Shooting with the LCD Monitor |
229 |
|
|
|||
(Live View Shooting) |
|
||
|
|
||
8 |
Shooting Movies |
263 |
|
|
|||
|
|
|
|
9 |
Handy Features |
311 |
|
|
|||
|
|
|
|
10 |
Image Playback |
333 |
|
|
|||
|
|
|
|
11 |
Post-Processing Images |
379 |
|
|
|||
|
|
|
|
12 |
Customizing the Camera |
387 |
|
|
|||
|
|
|
|
13 |
Reference |
405 |
|
|
|||
|
|
|
|
14 |
Software Start Guide / |
473 |
|
|
|||
Downloading Images to a Computer |
|
||
|
|
9

Contents by Purpose
Shooting
Shoot automatically |
p.77-114 (Basic Zone modes) |
|
|
|
|
Shoot continuously |
p.141 |
(iContinuous shooting) |
|
|
|
Take a picture of yourself in a group p.143 |
(jSelf-timer) |
|
|
|
|
Freeze the action |
p.186 |
(sShutter-priority AE) |
Blur the action |
|
|
|
|
|
Blur the background |
p.84 (CCreative Auto) |
|
Keep the background in sharp focus p.188 |
(fAperture-priority AE) |
|
|
|
|
Adjust the image brightness (exposure) p.196 |
(Exposure compensation) |
|
|
|
|
Shoot in low light |
p.78, 204 (DFlash photography) |
|
|
p.152 |
(ISO speed setting) |
|
|
|
Shoot without flash |
p.83 (7Flash Off) |
|
|
p.112 (bFlash off) |
|
|
|
|
Shoot fireworks at night |
p.193 |
(Bulb exposure) |
|
|
|
Shoot while viewing the LCD monitor p.229 |
(ALive View shooting) |
|
|
|
|
Use Creative filters |
p.105, 239 (Creative filters) |
|
|
|
|
Shoot movies |
p.263 |
(kMovie shooting) |
Image Quality
Shoot with image effects matching the subject p.155 (Picture Style)
Make a large-size print of the picture p.146 (73, 83, 1)
10

Take many pictures p.146 (7a, 8a, b)
AF (Focusing)
Change the AF area selection mode p.123 (SAF area selection mode) |
|
Shoot a moving subject |
p.94, 97, 120 (AI Servo AF) |
Playback
View the images on the camera p.115 (xPlayback)
Search for pictures quickly |
p.334 |
(HIndex display) |
|
p.335 |
(IImage browsing) |
|
|
|
Rate images |
p.341 |
(Ratings) |
|
|
|
Prevent important images |
p.360 |
(KImage protect) |
from accidental deletion |
|
|
|
|
|
Delete unnecessary images |
p.363 (LDelete) |
|
Auto play back photos and movies p.354 (Slide show)
View the photos and movies on a TV set p.357 (TV set)
Adjust the LCD monitor brightness p.314 (LCD monitor brightness)
Apply special effect to images |
p.380 (Creative filters) |
11

Index to Features
Power
Battery |
|
• Charging |
p.36 |
• Installing/Removing |
p.38 |
• Battery level |
p.44 |
• Checking battery |
|
information |
p.407 |
Household power outlet |
p.408 |
Auto power off |
p.43 |
Cards
Installing/Removing |
p.39 |
Formatting |
p.69 |
Releasing shutter |
|
without card |
p.312 |
Lens
Attaching/Detaching |
p.49 |
Zoom |
p.50 |
Basic Settings
Dioptric adjustment |
p.51 |
Language |
p.48 |
Date/Time/Zone |
p.45 |
Beeper |
p.312 |
LCD monitor
Using the LCD monitor |
p.42 |
LCD off/on button |
p.326 |
Brightness adjustment |
p.314 |
Touch screen |
p.66 |
Display level settings |
p.53 |
Feature guide |
p.57 |
Recording Images
Creating/Selecting |
|
a folder |
p.315 |
File numbering |
p.317 |
AF
AF operation |
p.118 |
AF area selection mode |
p.123 |
AF point selection |
p.125 |
Lens group |
p.131 |
Manual focusing |
p.140 |
Drive
Drive mode |
p.141 |
Continuous shooting |
p.141 |
Self-timer |
p.143 |
Maximum burst |
p.148 |
Image Quality
Image-recording quality |
p.146 |
Picture Style |
p.155 |
White balance |
p.163 |
Auto Lighting Optimizer |
p.169 |
Noise reduction for long |
|
exposures |
p.171 |
Noise reduction for |
|
high ISO speeds |
p.170 |
Lens aberration |
|
correction |
p.173 |
Reducing flicker |
p.179 |
Highlight tone priority |
p.391 |
Color space |
p.181 |
12

Index to Features
Shooting
Shooting mode |
p.30 |
ISO speed |
p.152 |
Aspect ratio |
p.150 |
Bulb |
p.193 |
Metering mode |
p.194 |
Mirror lockup |
p.200 |
Remote control |
p.409 |
Exposure Adjustment
Exposure compensation p.196
Exposure compensation |
|
with M+ISO Auto |
p.192 |
AEB |
p.197 |
AE lock |
p.199 |
Flash
Built-in flash |
p.204 |
External flash |
p.209 |
Flash function settings |
p.211 |
Wireless photography |
p.217 |
Live View Shooting
Live View shooting |
p.229 |
AF operation |
p.244 |
AF method |
p.247 |
Creative filters |
p.239 |
Touch shutter |
p.257 |
Movie Shooting
Movie shooting |
p.263 |
AF method |
p.247 |
Movie recording size |
p.275 |
Movie Servo AF |
p.303 |
Sound recording |
p.301 |
Manual exposure |
p.268 |
Digital zoom |
p.278 |
HDR movie shooting |
p.279 |
Creative filters for movies p.280
Video snapshot |
p.291 |
Time-lapse movie |
p.284 |
Remote control shooting p.306
Playback
Image review time |
p.313 |
Single-image display |
p.115 |
Shooting information |
p.373 |
Index display |
p.334 |
Image browsing |
|
(Jump display) |
p.335 |
Magnified view |
p.337 |
Image rotation |
p.340 |
Rating |
p.341 |
Movie playback |
p.350 |
Slide show |
p.354 |
Viewing images on |
|
a TV set |
p.357 |
Protect |
p.360 |
Erasing |
p.363 |
Touch playback |
p.338 |
Print Order (DPOF) |
p.366 |
Photobook Set-up |
p.370 |
13

Index to Features
Image Editing
Creative filters |
p.380 |
Resizing |
p.383 |
Cropping |
p.385 |
Customization
Custom Functions (C.Fn) p.388
My Menu |
p.399 |
Software
Software Start Guide |
p.474 |
Software Instruction |
|
Manual |
p.476 |
Wi-Fi Function
Wi-Fi (Wireless Communication) Function Instruction Manual
14

Conventions Used in this Manual 
Icons in this Manual
<6> |
: Indicates the Main Dial. |
|
|
||
<W><X><Y><Z> |
: Indicate up, down, left, and right on the <V> |
|
|
||
|
cross keys respectively. |
|
<0> |
: Indicates the Setting button. |
|
0/9/7/8 |
: Indicates that each function remains active |
|
|
for approx. 4 sec., 6 sec., 10 sec., or 16 sec. |
|
|
after you let go of the button. |
|
*In addition to the above, the icons and symbols used on the camera’s buttons and displayed on the LCD monitor are also used in this manual when discussing relevant operations and functionality.
3: Indicates a function that can be changed by pressing the <M> button to change its settings.
O: This icon at the upper right of the page titles indicates that the function is available only in the Creative Zone modes (p.31).
(p.**) |
: Reference page numbers for more information. |
||
|
|
|
: Warning to prevent shooting problems. |
|
|
|
: Supplemental information. |
|
|
|
|
|
|
|
|
|
|
|
: Tips or advice for better shooting. |
|
|
|
: Troubleshooting advice. |
Basic Assumptions and Sample Photos
All operations described in this manual assume that the power switch is set to <1> (p.43).
It is assumed that all the menu settings and Custom Functions are set to their defaults.
The illustrations in this manual describe the camera attached with the EF-S18-55mm f/4-5.6 IS STM lens as an example.
The sample photos displayed on the camera and used in this manual are only for illustrative purposes to show the effects more clearly.
15

Contents |
|
Introduction |
2 |
Item Check List................................................................................. |
3 |
Instruction Manuals .......................................................................... |
4 |
Quick Start Guide ............................................................................. |
6 |
Compatible Cards............................................................................. |
8 |
Chapters........................................................................................... |
9 |
Contents by Purpose...................................................................... |
10 |
Index to Features ........................................................................... |
12 |
Conventions Used in this Manual................................................... |
15 |
Safety Precautions ......................................................................... |
22 |
Handling Precautions ..................................................................... |
25 |
Nomenclature ................................................................................. |
28 |
1 Getting Started and Basic Camera Operations |
35 |
Charging the Battery ...................................................................... |
36 |
Installing and Removing the Battery............................................... |
38 |
Installing and Removing the Card .................................................. |
39 |
Using the LCD Monitor ................................................................... |
42 |
Turning on the Power ..................................................................... |
43 |
Setting the Date, Time, and Zone................................................... |
45 |
Selecting the Interface Language................................................... |
48 |
Attaching and Detaching a Lens..................................................... |
49 |
Basic Shooting Operations............................................................. |
51 |
Setting the Screen Display Level ................................................... |
53 |
QQuick Control for Shooting Functions ....................................... |
59 |
3Menu Operations and Configurations................................... |
61 |
dOperating the Camera with Touch Screen ................................. |
66 |
Formatting the Card ....................................................................... |
69 |
Switching the LCD Monitor Display ................................................ |
71 |
Displaying the Electronic Level ...................................................... |
72 |
Displaying the Grid ......................................................................... |
74 |
Displaying the Flicker Detection ..................................................... |
75 |
16

|
|
Contents |
2 |
Basic Shooting and Image Playback |
77 |
|
AFully Automatic Shooting (Scene Intelligent Auto) ................... |
78 |
|
AFull Auto Techniques (Scene Intelligent Auto).......................... |
81 |
|
7Shooting When You Cannot Use Flash .................................... |
83 |
|
CCreative Auto Shooting............................................................. |
84 |
|
2Shooting Portraits ...................................................................... |
91 |
|
3Shooting Landscapes ............................................................... |
92 |
|
4Shooting Close-ups.................................................................... |
93 |
|
5Shooting Moving Subjects ........................................................ |
94 |
|
8: Special Scene Mode ............................................................. |
95 |
|
qShooting Group Photos ............................................................. |
96 |
|
CPhotographing Children ............................................................. |
97 |
|
PShooting Food ............................................................................ |
98 |
|
xShooting Candlelight Portraits ................................................... |
99 |
|
6Shooting Night Portraits (With a Tripod) .................................. |
100 |
|
FShooting Night Scenes (Handheld).......................................... |
101 |
|
GShooting Backlit Scenes.......................................................... |
102 |
|
vShooting with Creative Filter Effects ....................................... |
105 |
|
QQuick Control........................................................................... |
111 |
|
Adjusting the Brightness ............................................................... |
114 |
|
xImage Playback ...................................................................... |
115 |
3 |
Setting the AF and Drive Modes |
117 |
|
f: Changing the Autofocus Operation (AF operation) ............... |
118 |
|
SSelecting the AF Area and AF Point ....................................... |
123 |
|
AF Area Selection Modes ............................................................. |
127 |
|
AF Sensor ..................................................................................... |
130 |
|
Lenses and Usable AF Points....................................................... |
131 |
|
Subjects Difficult to Focus on........................................................ |
139 |
|
MF: Manual Focus ..................................................................... |
140 |
|
iSelecting the Drive Mode........................................................ |
141 |
|
jUsing the Self-timer ................................................................. |
143 |
17

Contents |
|
|
4 |
Image Settings |
145 |
|
Setting the Image-Recording Quality ........................................... |
146 |
|
Changing the Image’s Aspect Ratio ............................................. |
150 |
|
g: Setting the ISO Speed for Still Photos ................................. |
152 |
|
ASelecting a Picture Style ...................................................... |
155 |
|
ACustomizing a Picture Style ................................................. |
158 |
|
ARegistering a Picture Style ................................................... |
161 |
|
B: Matching the Light Source (White balance)......................... |
163 |
|
uAdjusting the Color Tone for the Light Source......................... |
167 |
|
Auto Correction of Brightness and Contrast (Auto Lighting Optimizer) .. |
169 |
|
Setting Noise Reduction............................................................... |
170 |
|
Correction of Lens Aberrations due to Optical Characteristics..... |
173 |
|
Reducing Flicker........................................................................... |
179 |
|
Setting the Color Reproduction Range (Color space) .................. |
181 |
5 |
Advanced Operations for Photographic Effects |
183 |
|
d: Program AE ............................................................................ |
184 |
|
s: Conveying the Subject’s Movement (Shutter priority AE)..... |
186 |
|
f: Changing the Depth of Field (Aperture priority AE).............. |
188 |
|
Depth-of-Field Preview .............................................................. |
190 |
|
a: Manual Exposure ................................................................... |
191 |
|
qChanging the Metering Mode ................................................. |
194 |
|
Setting the Desired Exposure Compensation ............................... |
196 |
|
Auto Exposure Bracketing (AEB) ................................................. |
197 |
|
ALocking the Exposure (AE Lock)............................................. |
199 |
|
Mirror Lockup to Reduce Camera Vibration Blur.......................... |
200 |
6 |
Flash Photography |
203 |
|
DUsing the Built-in Flash............................................................. |
204 |
|
DUsing an External Speedlite ..................................................... |
209 |
|
Setting the Flash Function............................................................. |
211 |
|
Wireless Flash Photography ........................................................ |
217 |
18

|
Contents |
Easy Wireless Flash Photography ................................................ |
220 |
Custom Wireless Flash Photography............................................ |
223 |
7Shooting with the LCD Monitor (Live View Shooting) 229
|
AShooting with the LCD Monitor............................................... |
230 |
|
Shooting Function Settings ........................................................... |
237 |
|
UShooting with Creative Filter Effects ....................................... |
239 |
|
Menu Function Settings ................................................................ |
243 |
|
Changing the Autofocus Operation (AF operation)....................... |
244 |
|
Focusing with AF (AF method) ..................................................... |
247 |
|
xShooting with the Touch Shutter ............................................. |
257 |
|
MF: Focusing Manually................................................................. |
259 |
8 |
Shooting Movies |
263 |
|
kShooting Movies ..................................................................... |
264 |
|
Autoexposure Shooting.............................................................. |
264 |
|
Manual Exposure Shooting ........................................................ |
268 |
|
Shooting Function Settings ........................................................... |
274 |
|
Setting the Movie Recording Size................................................. |
275 |
|
Using Movie Digital Zoom ............................................................. |
278 |
|
uShooting HDR Movies ............................................................. |
279 |
|
vShooting Movies with Creative Filter Effects ........................... |
280 |
|
NShooting Time-lapse Movies................................................. |
284 |
|
Shooting Video Snapshots............................................................ |
291 |
|
Menu Function Settings ................................................................ |
301 |
9 |
Handy Features |
311 |
|
Handy Features ............................................................................ |
312 |
|
Disabling the Beeper.................................................................. |
312 |
|
Card Reminder........................................................................... |
312 |
|
Setting the Image Review Time ................................................. |
313 |
|
Setting the Auto Power Off Time................................................ |
313 |
|
Adjusting the LCD Monitor Brightness ....................................... |
314 |
|
Creating and Selecting a Folder................................................. |
315 |
19

Contents |
|
|
|
File Numbering Methods............................................................ |
317 |
|
Setting the Copyright Information .............................................. |
320 |
|
Auto Rotation of Vertical Images ............................................... |
322 |
|
Reverting the Camera to the Default Settings ........................... |
323 |
|
Turning the LCD Monitor Off/On ................................................ |
326 |
|
fAutomatic Sensor Cleaning .................................................. |
327 |
|
Appending Dust Delete Data........................................................ |
329 |
|
Manual Sensor Cleaning .............................................................. |
331 |
10 |
Image Playback |
333 |
|
xSearching for Images Quickly ................................................ |
334 |
|
u/yMagnifying Images ............................................................. |
337 |
|
dPlaying Back with the Touch Screen ........................................ |
338 |
|
bRotating the Image.................................................................. |
340 |
|
Setting Ratings ............................................................................. |
341 |
|
Setting Image Search Conditions................................................. |
344 |
|
QQuick Control for Playback ..................................................... |
346 |
|
kEnjoying Movies ..................................................................... |
348 |
|
kPlaying Back Movies .............................................................. |
350 |
|
XEditing a Movie’s First and Last Scenes ................................. |
352 |
|
Slide Show (Auto Playback) ......................................................... |
354 |
|
Viewing Images on a TV Set ........................................................ |
357 |
|
KProtecting Images................................................................... |
360 |
|
LErasing Images........................................................................ |
363 |
|
W Digital Print Order Format (DPOF) ......................................... |
366 |
|
pSpecifying Images for a Photobook ......................................... |
370 |
|
B: Shooting Information Display ............................................ |
373 |
11 |
Post-Processing Images |
379 |
|
UApplying Creative Filter Effects............................................... |
380 |
|
SResizing JPEG Images........................................................... |
383 |
|
NCropping JPEG Images .......................................................... |
385 |
20

|
Contents |
|
12 |
Customizing the Camera |
387 |
|
Setting Custom Functions............................................................. |
388 |
|
Custom Function Setting Items..................................................... |
390 |
|
C.Fn I: Exposure ........................................................................ |
390 |
|
C.Fn II: Image ............................................................................ |
391 |
|
C.Fn III: Autofocus/Drive ............................................................ |
392 |
|
C.Fn IV: Operation/Others.......................................................... |
395 |
|
Registering My Menu .................................................................... |
399 |
13 |
Reference |
405 |
|
BButton Functions ................................................................. |
406 |
|
Checking the Battery Information.................................................. |
407 |
|
Using a Household Power Outlet.................................................. |
408 |
|
Remote Control Shooting.............................................................. |
409 |
|
HUsing Eye-Fi Cards ................................................................. |
414 |
|
Function Availability Table by Shooting Mode............................... |
416 |
|
System Map .................................................................................. |
426 |
|
Menu Settings ............................................................................... |
428 |
|
Troubleshooting Guide.................................................................. |
438 |
|
Error Codes................................................................................... |
453 |
|
Specifications ................................................................................ |
454 |
14 |
Software Start Guide / |
|
|
Downloading Images to a Computer |
473 |
|
Software Start Guide..................................................................... |
474 |
|
Downloading and Viewing the Software Instruction Manuals (PDF Files) ... |
476 |
|
Downloading Images to a Computer............................................. |
477 |
|
Index ............................................................................................. |
479 |
21

Safety Precautions
The following precautions are provided to prevent harm or injury to yourself and others. Make sure to thoroughly understand and follow these precautions before using the product.
If you experience any malfunctions, problems, or damage to the product, contact the nearest Canon Service Center or the dealer from whom you purchased the product.
Warnings: Follow the warnings below. Otherwise, death or serious injuries may result.
To prevent fire, excessive heat, chemical leakage, explosions, and electrical shock, follow the safeguards below:
•Do not use any batteries, power sources, or accessories not specified in the Instruction Manual. Do not use any home-made or modified batteries, or the product if it is damaged.
•Do not short-circuit, disassemble, or modify the battery. Do not apply heat or solder to the battery. Do not expose the battery to fire or water. Do not subject the battery to strong physical shock.
•Do not insert the battery’s plus and minus ends incorrectly.
•Do not recharge the battery in temperatures outside the allowable charging (working) temperature range. Also, do not exceed the recharge time indicated in the Instruction Manual.
•Do not insert any foreign metallic objects into the electrical contacts of the camera, accessories, connecting cables, etc.
When disposing of a battery, insulate the electrical contacts with tape. Contact with other metallic objects or batteries may cause a fire or an explosion.
If excessive heat, smoke, or fumes are emitted when recharging the battery, immediately unplug the battery charger from the power outlet to stop recharging. Otherwise, it may cause a fire, heat damage, or electrical shock.
If the battery leaks, changes color, deforms, or emits smoke or fumes, remove it immediately. Be careful not to get burned in the process. It may cause a fire, electrical shock or burns if you keep using it.
Prevent any battery leakage from contacting your eyes, skin, and clothing. It can cause blindness or skin problems. If the battery leakage comes in contact with your eyes, skin, or clothing, flush the affected area with lots of clean water without rubbing it. See a physician immediately.
Do not leave any cords near a heat source. It can deform the cord or melt the insulation and cause a fire or electrical shock.
Do not hold the camera in the same position for long periods of time. Even if the camera does not feel too hot, prolonged contact with the same body part may cause skin redness or blistering due to low-temperature contact burns. Using a tripod is recommended for people with circulation problems or very sensitive skin, or when using the camera in very hot places.
Do not fire the flash at anyone driving a car or other vehicle. It may cause an accident.
22

Safety Precautions
When the camera or accessories are not in use, make sure to remove the battery, and disconnect the power plug and connecting cables from the equipment before storing. This is to prevent electrical shock, excessive heat, fire, and corrosion.
Do not use the equipment where there is flammable gas. This is to prevent an explosion or a fire.
If you drop the equipment and the casing breaks open to expose the internal parts, do not touch the exposed internal parts. There is a possibility of an electrical shock.
Do not disassemble or modify the equipment. High-voltage internal parts can cause electrical shock.
Do not look at the sun or an extremely bright light source through the camera or lens. Doing so may damage your vision.
Keep equipment out of the reach of children and infants, including when in use. Straps or cords may accidentally cause choking, electrical shock, or injury. Choking or injury may also occur if a child or infant accidentally swallows a camera part or accessory. If a child or infant swallows a part or accessory, consult a physician immediately.
Do not use or store the equipment in dusty or humid places. Likewise, keep the battery away from metallic items and store it with its protective cover attached to prevent shortcircuit. This is to prevent fire, excessive heat, electrical shock, and burns.
Before using the camera inside an airplane or hospital, check if it is allowed. Electromagnetic waves emitted by the camera may interfere with the plane’s instruments or the hospital’s medical equipment.
To prevent a fire and electrical shock, follow the safeguards below:
•Always insert the power plug all the way in.
•Do not handle a power plug with wet hands.
•When unplugging a power plug, grasp and pull the plug instead of the cord.
•Do not scratch, cut, or excessively bend the cord or put a heavy object on the cord. Also do not twist or tie the cords.
•Do not connect too many power plugs to the same power outlet.
•Do not use a cord whose wire is broken or insulation is damaged.
Unplug the power plug periodically and clean off the dust around the power outlet with a dry cloth. If the surrounding is dusty, humid, or oily, the dust on the power outlet may become moist and short-circuit the outlet, causing a fire.
Do not connect the battery directly to an electrical outlet or a car’s cigarette lighter outlet. The battery may leak, generate excessive heat or explode, causing fire, burns, or injuries.
A thorough explanation of how to use the product by an adult is required when the product is used by children. Supervise children while they are using the product. Incorrect usage may result in electrical shock or injury.
Do not leave a lens or lens-attached camera in the sun without the lens cap attached. Otherwise, the lens may concentrate the sun’s rays and cause a fire.
Do not cover or wrap the product with a cloth when using it. Doing so may trap heat within and cause the casing to deform or catch fire.
Be careful not to get the camera wet. If you drop the product in the water or if water or metal get inside the product, promptly remove the battery. This is to prevent fire, electrical shock, and burns.
Do not use paint thinner, benzene, or other organic solvents to clean the product. Doing so may cause fire or a health hazard.
23

Safety Precautions
Cautions: Follow the cautions below. Otherwise, physical injury or property damage may result.
Do not use or store the product in a high-temperature location such as inside a car under the hot sun. The product may become hot and cause burns. Doing so may also cause battery leakage or explosion, which will degrade the performance or shorten the life of the product.
Do not carry the camera around when it is attached to a tripod. Doing so may cause an injury or an accident. Also make sure the tripod is sturdy enough to support the camera and lens.
Do not leave the product in a low-temperature environment for an extended period of time. The product will become cold and may cause injury when touched.
Do not fire the flash near the eyes. It may hurt the eyes.
24

Handling Precautions
Camera Care
This camera is a precision instrument. Do not drop it or subject it to physical shock.
The camera is not waterproof and cannot be used underwater. If you accidentally drop the camera into water, promptly consult the nearest Canon Service Center. Wipe off any water droplets with a dry and clean cloth. If the camera has been exposed to salty air, wipe it with a clean, well-wrung wet cloth.
Never leave the camera near anything having a strong magnetic field such as a magnet or electric motor. Also, avoid using or leaving the camera near anything emitting strong radio waves, such as a large antenna. Strong magnetic fields can cause camera misoperation or destroy image data.
Do not leave the camera in excessive heat, such as in a car in direct sunlight. High temperatures can cause the camera to malfunction.
The camera contains precision electronic circuitry. Never attempt to disassemble the camera yourself.
Do not block the built-in flash or mirror operation with your finger, etc. Doing so may cause a malfunction.
Use only a commercially-available blower to blow away dust when it adheres to the lens, viewfinder, reflex mirror, focusing screen, etc. Do not use cleaners that contain organic solvents to clean the camera body or lens. For stubborn dirt, take the camera to the nearest Canon Service Center.
Do not touch the camera’s electrical contacts with your fingers. This is to prevent the contacts from corroding. Corroded contacts can cause camera malfunction.
If the camera is suddenly brought in from the cold into a warm room, condensation may form on the camera and internal parts. To prevent condensation, first put the camera in a sealed plastic bag and let it adjust to the warmer temperature before taking it out of the bag.
25

Handling Precautions
If condensation forms on the camera, do not use the camera. This is to avoid damaging the camera. If there is condensation, remove the lens, card and battery from the camera, and wait until condensation has evaporated before using the camera.
If the camera will not be used for an extended period, remove the battery and store the camera in a cool, dry, well-ventilated location. Even while the camera is in storage, press the shutter button a few times once in a while to check that the camera is still working.
Avoid storing the camera where there are chemicals that result in rust and corrosion such as in a chemical lab.
If the camera has not been used for an extended period, test all its functions before using it. If you have not used the camera for some time or if there is an important shoot such as a foreign trip coming up, have the camera checked by your nearest Canon Service Center or check the camera yourself and make sure it is working properly.
If you repeat continuous shooting or perform Live View shooting or movie shooting for a prolonged period, the camera may become hot. This is not a malfunction.
If there is a bright light source inside or outside the image area, ghosting may occur.
LCD Monitor
Although the LCD monitor is manufactured with very high precision technology with over 99.99% effective pixels, 0.01% or fewer of the pixels may be dead, and there may also be spots of black, red, or other colors. Dead pixels are not a malfunction. They do not affect the images recorded.
If the LCD monitor is left on for a prolonged period, screen burn-in may occur where you see remnants of what was displayed. However, this is only temporary and will disappear when the camera is left unused for a few days.
The LCD monitor display may seem slightly slow in low temperatures, or look black in high temperatures. It will return to normal at room temperature.
26
Handling Precautions
Cards
To protect the card and its recorded data, note the following:
Do not drop, bend, or wet the card. Do not subject it to excessive force, physical shock, or vibration.
Do not touch the card’s electronic contacts with your fingers or anything metallic.
Do not affix any stickers, etc., on the card.
Do not store or use the card near anything that has a strong magnetic field, such as a TV set, speakers, or magnets. Also avoid places prone to having static electricity.
Do not leave the card in direct sunlight or near a heat source.
Store the card in a case.
Do not store the card in hot, dusty, or humid locations.
Smudges adhering to the front of the sensor
Besides dust entering the camera from outside, in rare cases, lubricant from the camera’s internal parts may adhere to the front of the sensor. If smudges are visible on the images, having the sensor cleaned by a Canon Service Center is recommended.
Lens
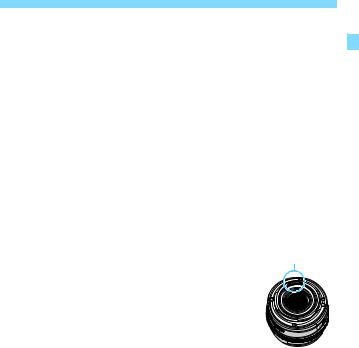
After detaching the lens from the camera, put down the lens |
Contacts |
with the rear end up and attach the rear lens cap to avoid |
|
scratching the lens surface and electrical contacts. |
|
27
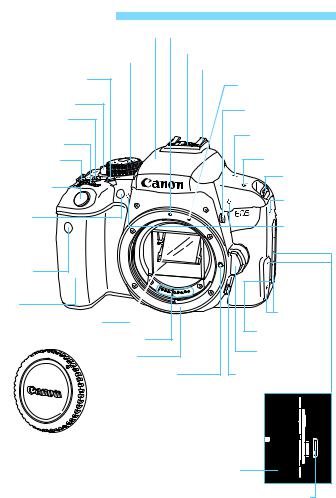
Nomenclature
Built-in flash/AF-assist beam emitter |
|
|
|
|
EF lens mount index (p.49) |
|||||
|
|
|
||||||||
(p.204/121) |
|
|
|
|
Flash sync contacts |
|||||
Mode Dial (p.30) |
|
|
|
|
|
|
|
|
||
|
|
|
|
|
|
|
|
|||
|
|
|
|
|
|
|
|
|
Hot shoe (p.209) |
|
|
|
|
|
|
|
|
||||
|
|
|
|
|
|
|
|
|
|
|
|
|
|
|
|
|
|
|
|
|
|
<B> AF area selection
button (p.124) EF-S lens mount index (p.49)
Power switch (p.43) |
<D> Flash button |
|
<g> ISO speed |
||
(p.204) |
||
setting button (p.152) |
<V> Focal plane mark |
|
<6> Main Dial |
||
(p.93) |
||
<U> Display |
<k> Wi-Fi lamp |
|
button (p.71) |
Strap mount |
|
|
||
Shutter button |
(p.35) |
|
(p.52) |
Speaker |
|
|
||
Red-eye |
(p.350) |
|
|
||
reduction/ |
Built-in |
|
Self-timer |
microphones |
|
lamp |
(p.264) |
|
(p.205/143) |
|
Remote control sensor (p.200, 412)
Grip
Terminal cover
Mirror (p.200, 331)
Contacts (p.27) |
p(N-Mark)* |
|
|
||
Lens mount |
Lens release button |
|
(p.50) |
||
|
||
Lens lock pin |
Depth-of-field preview |
|
|
button (p.190) |
Body cap (p.49)
*Used for Wi-Fi connections via the NFC function.
<I> Digital terminal (p.477) 
<F> Remote control terminal (p.413) 
<Y> External microphone IN terminal (p.301)
<D> HDMI mini OUT terminal (p.357)
28
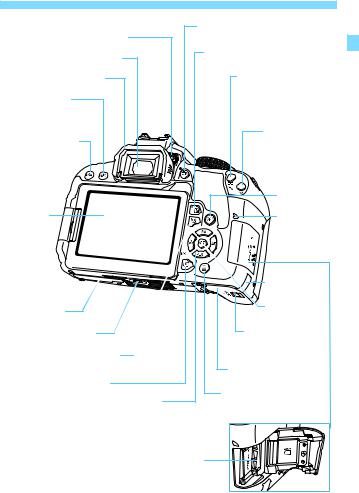
Nomenclature
Dioptric adjustment knob (p.51)
Viewfinder eyepiece
Eyecup (p.413)
<B> Info button |
(p.71, 115, 233, 270, 406) |
<M> Menu button |
(p.61) |
LCD monitor/ |
Touch screen |
(p.61, 313/66, |
338, 352) |
Serial number |
Tripod socket |
<Q> Quick Control button (p.59) |
<x> Playback button (p.115) |
<W><X><Y><Z>: <V> Cross keys (p.61) |
<WB> White balance selection button (p.163) |
<XA> Picture Style selection button (p.155) |
<YQi> Drive mode selection button (p.141, 143) |
<Zf> AF operation selection button (p.118) |
<A> Live View shooting/Movie shooting button (p.230/264)
<g> Aperture/
Exposure compensation button
<A/I> AE lock/ FE lock button/ Index/Reduce button (p.199/207/334, 337)
<S/u>
AF point selection/ Magnify button (p.125/337)
<k> Wi-Fi button
Access lamp (p.40)

 Card slot cover
  (p.39)
DC cord hole |
(p.408) |
<0> Setting |
button (p.61) |
Battery compartment |
cover release lever |
(p.38) |
Battery compartment cover |
(p.38) |
<L> Erase button (p.363) |
Card slot (p.39)
29
Nomenclature
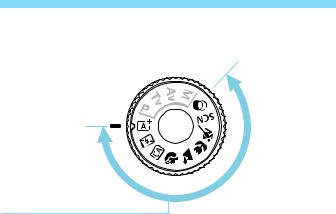
Mode Dial
The Mode Dial includes the Basic Zone modes and Creative Zone modes.
Basic Zone
All you do is press the shutter button. The camera sets everything to suit the subject or scene for shooting.
A : Scene Intelligent Auto |
2 : Portrait (p.91) |
||||
|
(p.78) |
3 : Landscape (p.92) |
|||
7 : Flash Off (p.83) |
4 : Close-up (p.93) |
||||
C : Creative Auto (p.84) |
5 : Sports (p.94) |
||||
8: Special scene (p.95) |
|
|
|
||
|
q |
Group Photo (p.96) |
|
6 |
Night Portrait (p.100) |
|
C |
Kids (p.97) |
|
F |
Handheld Night Scene (p.101) |
|
P |
Food (p.98) |
|
G |
HDR Backlight Control (p.102) |
|
x |
Candlelight (p.99) |
|
|
|
v : Creative filters (p.105) |
|
|
|
||
|
G |
Grainy B/W (p.107) |
|
c |
Miniature effect (p.108) |
|
W |
Soft focus (p.107) |
|
A |
HDR art standard (p.108) |
|
X |
Fish-eye effect (p.107) |
|
B |
HDR art vivid (p.108) |
|
Z |
Water painting effect (p.108) |
|
C |
HDR art bold (p.109) |
|
H |
Toy camera effect (p.108) |
|
D |
HDR art embossed (p.109) |
30
 Loading...