


 COPY
COPY


 INSTRUCTION MANUAL MODE D’EMPLOI MANUAL DE INSTRUCCIONES
Español Français English

COPY
English
 COPY
COPY 


Thank you for purchasing a Canon product.
The Canon Speedlite 270EX II is a compact flash unit for Canon EOS cameras, and works with the E-TTL II and E-TTL autoflash systems. All control is performed on the camera side, letting you easily enjoy flash shooting in the same manner as a built-in flash.
Use with an EOS DIGITAL camera
•The 270EX II is designed for optimum use with an EOS DIGITAL camera.
Use with an EOS film camera
•When used with an E-TTL II orCOPYE-TTL autoflash EOS film camera, autoflash shooting can be performed in the same manner as when used with an EOS DIGITAL camera.
•The 270EX II cannot be used with TTL autoflash EOS film cameras. is
2
Contents |
|
|
Nomenclature............................................................................................................. |
|
4 |
Installing the Batteries .............................................................................................. |
|
5 |
Attaching the Flash ................................................................................................... |
|
7 |
Fully Automatic Flash Shooting............................................................................... |
8 |
|
|
COPY |
|
Flash Shooting in Each Camera Mode .................................................................... |
9 |
|
Switching Flash Coverage |
...................................................................................... |
11 |
Bounce Flash Shooting........................................................................................... |
|
12 |
Other Functions ....................................................................................................... |
|
13 |
Setting the Flash Functions by amera Operation .............................................. |
14 |
|
Wireless Flash Shooting ......................................................................................... |
|
17 |
Remote Control Shooting ....................................................................................... |
|
21 |
Troubleshooting Guide ........................................................................................... |
|
22 |
Specifications .......................................................................................................... |
|
24 |
3

Nomenclature
"
+

 .
.
# |
|
( |
|
|
|
|
COPY |
|
|||
|
|
' |
|
|
|
|
& |
) |
|
|
|
$ |
% |
|
|
|
* |
" Flash head/AF-assist beam emitter (p.13) |
* 270EX II mini stand (p.17) |
||||
# Wireless sensor |
|
|
+ <Q> lamp (p.8) |
|
|
$ Locking pin |
|
|
, Mounting foot lock lever (p.7) |
||
% Contacts |
|
|
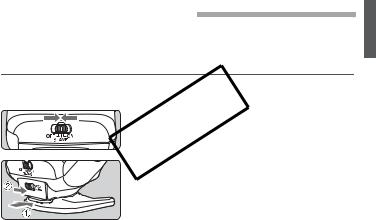
- Power switch (p.8, 17) |
||
& Mounting foot (p.7) |
|
|
<ON> |
: Turns on power |
|
' Battery compartment cover (p.5) |
<SLAVE> : For wireless flash shooting |
||||
( Remote control transmitter (p.19) |
<OFF> |
: Turns off power |
|||
) Bounce angle index (p.12) |
. Remote release button (p.19) |
||||
-
,
4
Installing the Batteries
1 Slide the battery compartment cover and open it as shown by the arrows.
COPY |
|
2 |
Install two batteries. |
Make sure the + and - battery contacts are correctly |
|
oriented.
Return the cover to its original position.
Recycling Time and Flash Count
Recycling Time: Approx. 0.1 - 3.9 sec. Flash Count: Approx. 100 - 680 flashes
Based on new size-AA/LR6 alkaline batteries and Canon’s testing standards.
5
Be sure to use a new set of two batteries of the same brand. When replacing the batteries, replace both batteries at once.
Do not fire more than 20 continuous flashes in a short time.
If you fire more than 20 continuous flashes in a short time, the overheating prevention function may be activated and make the recycling time about 8 to 20 sec. If this occurs, allow a rest time of about 15 min. and the functioning of the flash will then return to normal.
If you change the batteries after firing flashes continuously, be aware that the batteries might be hot.
Using size-AA/LR6 batteries other than the alkaline type may cause improper battery contact due to the irregularCOPYshape of the battery contacts.
Size-AA/LR6 Ni-MH or lithium batteries can also be used.
6
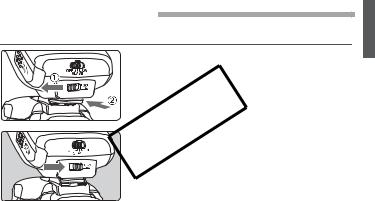
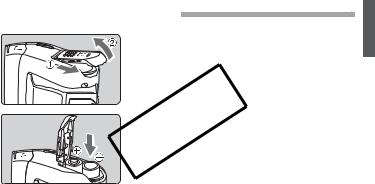
Attaching the Flash
Be sure to turn off the Speedlite before attaching or detaching it.
|
|
Slide the lock lever to the left and |
|
|
|
|
1 attach the Speedlite to the camera. |
|
|
|
Slip the Speedlite’s mounting foot firmly all the way |
|
|
into the camera’s hot shoe. |
|
COPY |
|
|
||
2 |
Secure the Speedlite. |
|
Slide the lock lever to the right. |
||
To remove the Speedlite, slide the lock lever to the left and detach it from the camera.
7
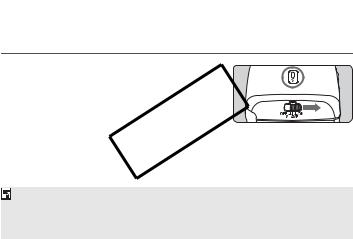
Fully Automatic Flash Shooting 
When you set the camera shooting mode to <V> or Full Auto, you can shoot in fully automatic flash mode.
1
2
3
Set the power switch to <ON>.
BThe flash recycling starts.
Check that the <Q> lamp is lit.
COPY
When the <Q> lamp lights, you can shoot with the flash.
See p.26 for guidelines about the flash shooting range.
Shooting is also possible when the lamp is blinking (Quick Flash), but the flash output level will be 1/2 to 1/3 the normal flash.
When the resulting picture is dark, move closer to the subject or increase the ISO speed and try shooting again.
Quick Flash cannot be used when the flash mode is set to M: Manual Flash (p.14). Quick Flash cannot be used during continuous shooting. (To enable flash, see p.16) Set the power switch to <SLAVE> for wireless flash shooting (p.17).
8
Flash Shooting in Each Camera Mode 
X: Shutter Priority AE
In this mode, the camera will automatically adjust the flash output level to achieve standard exposure for the automatically set aperture.
•If the aperture display blinks, it means that the background exposure will be underexposed or overexposed. Adjust the shutter speed until the aperture display stops blinking.
•Since a slow shutter speed willCOPYbe used for low-light scenes, using a tripod is recommended.
•If the shutter speed display blinks, it means that the background exposure will be
underexposed or overexposed. Adjust the aperture until the shutter speed display stops blinking. standardobtainedmain
9
q: Manual Exposure
Select this mode if you want to set both the shutter speed and aperture manually.
As the camera will automatically adjust the flash output level according to the aperture you set, the exposure of the main subject will be standard. The exposure of the background is obtained with the shutter speed and aperture combination you set.
Flash Sync Speeds and Apertures Used
|
Shutter Speed Setting |
Aperture Setting |
V |
Set automatically (1/X sec. - 1/60 sec.) |
Automatic |
|
|
|
X |
Set manually (1/X sec. - 30 sec.) |
Automatic |
|
|
|
W |
Set automatically (1/X sec. - 30 sec.) |
Manual |
|
|
|
q |
Set manually (1/X sec. - 30 sec., Bulb) |
Manual |
|
COPY |
|
1/X sec. is the camera’s maximum flash sync speed. |
|
|
If you use the <Z> or <Y> shooting mode, the result will be the same as flash shooting with <V> (Program AE) mode.
10
Switching Flash Coverage
Flash head (normal position)
The Guide No. is 22/72 (ISO 100 in meters/feet). The maximum flash coverage matches an EF 28mm wide angle lens (EF-S 18mm).
Flash head (pulled forward)COPY
The Guide No. is 27/89 (ISO 100 in meters/feet). The flash coverage matches an EF 50mm (EF-S 32mm) or lenses with longer focal length.
When shooting with a lens wider than EF 50mm (EF-S 32mm), the periphery of the picture may become dark.
See p.26 for guidelines about the flash shooting range.
11
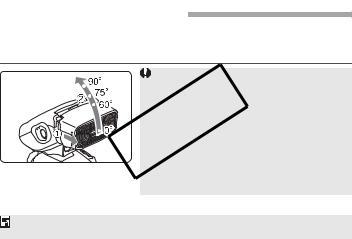
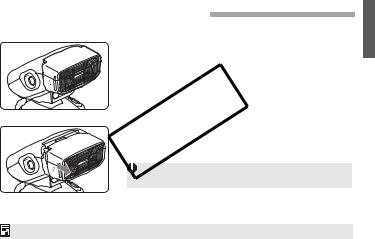
Bounce Flash Shooting
By pointing the flash head toward a wall or ceiling, the flash will bounce off the surface before illuminating the subject. This can soften shadows behind the subject for more naturallooking shots.
|
When the resulting picture is dark, set a smaller F |
|
number (open the aperture) or increase the ISO |
|
speed and try shooting again. The resulting |
|
picture may also be dark if the wall or ceiling is too |
|
far away. |
|
The wall or ceiling should be plain white or nearly |
|
white for high reflectance. If the bounce surface is |
|
colored, this may produce a color cast in the |
|
resulting picture. |
|
After shooting with bounce flash, be sure to |
|
return the flash head to the forward-facing |
Pull the flash head forward and |
|
COPYposition and push the flash head back into its |
|
then tilt it upward to determine |
original position. |
the flash head angle.
Determine the best angle for bounce flash by taking test shots and checking the resulting pictures on the camera LCD monitor.
12

Other Functions
Auto Power Off
To save battery power, power will be turned off automatically after 90 sec. of idle use. Press the camera’s shutter button to turn on the Speedlite again.
* Canceling the auto power off function is possible. (p.16)
When you press the camera’s shutterCOPYbutton halfway, the flash may fire repeatedly. This is
the AF-assist beam function that facilitates autofocus for dark scenes. Its effective range is approximately 4 m/13.1 ft.
This function is available when using the Speedlite with an EOS DIGITAL camera that has an external flash control function. Depending on the camera model, note that the firmware may need to be updated.
Pressing the camera’s depth-of-field button will fire the flash continuously for 1 sec. This enables you to see the shadow effects on the subject before flash shooting.
Do not fire the modeling flash more than 10 consecutive times. If you fire the modeling flash 10 consecutive times, allow the Speedlite to rest for at least 10 min. to avoid overheating and deteriorating the flash head.
13
Setting the Flash Functions by Camera Operation 
When the 270EX II is attached to an EOS DIGITAL camera with an external flash control function, the following settings are available through camera menu operations. See the camera’s instruction manual for the setting method and functions.
[Flash firing] (Enable*/Disable)COPY
Set to [Disable] when you wish to use only the AF-assist beam.
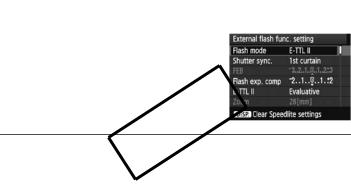
[External flash func. setting]
• Flash mode (E-TTL II*/Manual flash)
Normally, use [E-TTL II]. [Manual flash] can also be set when not using autoflash.
Default settings are indicated by *.
14
•Shutter sync. (1st curtain*/2nd curtain/High-speed)
- 1st curtain: This is the normal flash shooting mode in which the flash fires at the
timing when the shutter is fully open.
-2nd curtain: The flash fires right before the shutter closes.
-High-speed: This mode enables flash shooting at all shutter speeds. This is
effective when you want to use aperture priority for fill-flash portraits.
•Flash exp. comp
You can adjust the flash output level in the same way as normal exposure compensation.
•E-TTL II (Evaluative*/Average)COPY
- Evaluative: Fully automatic flash shooting can be performed, from dark scenes
15

[External flash C.Fn setting]
C.Fn-01: Auto power off (Enabled*/Disabled)
C.Fn-06: Quick flash w/continuous shot (Disabled*/Enabled) C.Fn-10: Slave auto power off timer (60 minutes*/10 minutes)
During normal auto power off (C.Fn-01), the power turns off if no operations are made within 90 seconds, but in slave mode, the power turns off if no operations are made within 60 or 10 minutes.
C.Fn-11: Slave auto power off cancel (Within 8 hours*/Within 1 hour)
When the master unit has a function to cancel the auto power off on the slave unit, the master unit can cancel the auto power off on the slave unit within eight hours or one hour COPYafter the slave unit enters the auto power off mode.
16
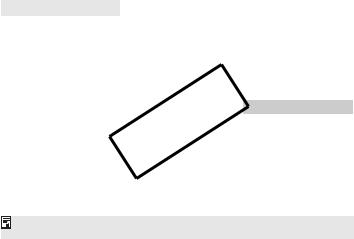
Wireless Flash Shooting
To perform wireless flash shooting, the camera or the Speedlite attached to the camera must have a master function. The 270EX II fires as a slave flash when controlled from a master unit. For the detailed shooting method, refer to the instruction manual of the camera or the Speedlite with a master function.
|
Set the camera or Speedlite as the |
1 master unit. |
|
2 |
Set the 270EX II as the slave unit. |
Set the power switch of the 270EX II to <SLAVE>. |
|
3 Attach the 270EX II to the supplied |
|
COPYmini stand and position the flash. |
|
Indoors, you can perform wireless flash shooting using the reflection of the surrounding walls without having to point the wireless sensor of the 270EX II toward the camera. Position the 270EX II while checking that it can fire.
17

Transmission channel
You can use the flash regardless of the transmission channel (1 to 4) on the master unit.
Slave ID (firing group)
The slave ID is set (fixed) to group A. This cannot be changed to group B or C.
Auto power off on the slave unit
When the power switch of the 270EX II is set to <SLAVE>, the power of the flash turns off
automatically if no operations areCOPYmade within 60 or 10 minutes (p.16 C.Fn-10).
If the master unit does not have a function for canceling the auto power off (p.16 C.Fn-11) on the 270EX II, set the power switch of the 270EX II to <OFF> and then to <SLAVE> again.
The supplied mini stand is for use only with the 270EX II. Use with another flash may cause the attached flash to fall.
18
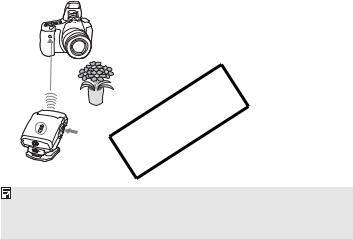
Using the 270EX II for Remote Control Shooting
During Wireless Flash Shooting
The 270EX II can be used for remote control shooting with cameras compatible with Remote Controller RC-1, RC-5, or RC-6. When wireless flash shooting is enabled, remote control shooting is possible while changing easily the position of the 270EX II.
Example of using the flash for wireless flash shooting
" Point the 270EX II toward the camera COPY and press the remote release button.
# oint the 270EX II to the subject within two seconds.
19
1 Set the camera to <R> (Remote control shooting).
For the setting method, see the explanations about the drive mode or remote control shooting in the camera’s instruction manual.
Shade the eyepiece of the camera viewfinder so that light does not enter.
|
Take the picture. |
COPY |
|
2 |
Check that the <Q> lamp is lit, point the remote |
control transmitter toward the camera, and press the remote release button.
BThe picture is taken after two seconds.
When wireless flash shooting is enabled and the power switch on the 270EX II is set to <SLAVE>, the 270EX II fires.
Be careful not to cover the remote control transmitter or the wireless sensor of the 270EX II with your hand.
The remote control function has an operation range of about 5 m / 16.4 ft. from the front of the camera.
Check the shooting results while performing remote control shooting.
20
Remote Control Shooting
The 270EX II can be used for remote control shooting with cameras compatible with Remote Controller RC-1, RC-5, or RC-6.
1 Set the camera to <R> (Remote control shooting). (p.20)
2 Take the picture.
BThe picture is taken afterCOPYtwo seconds.
Point the remote control transmitter toward the camera, and press the remote release button.
Bulb (Long Exposure) Shooting
When you press the remote release button during bulb shooting, the shutter opens after two seconds. Press the remote release button again to close the shutter.
Be careful not to cover the remote control transmitter or the wireless sensor of the 270EX II with your hand.
The remote control function has an operation range of about 5 m / 16.4 ft. from the front of the camera.
Check the shooting results while performing remote control shooting.
21

Troubleshooting Guide
If a problem occurs, refer to this Troubleshooting Guide.
The Speedlite does not fire.
•Make sure the batteries are installed in the correct orientation. (p.5)
•If the <Q> lamp does not light after 30 seconds, replace the batteries with new ones. (p.5)
•Clean the electrical contacts of the Speedlite and the camera.
The bottom of the picture looks dark.
•You were too close to the subject. Keep at least 0.7 m/2.3 ft. away from the subject.
•If a lens hood is attached, remove the lens hood.
The periphery of the pictureCOPYlooks extremely dark.
•After shooting with the flash head pulled forward, be sure to return the flash head to its original position before shooting again.
22

The picture is really blurred.
•When the shooting mode is set to <W> mode for a dark scene, a slow sync speed is automatically set, and the shutter speed also becomes slower. Use a tripod or set the shooting mode to <V>.
Remote control shooting does not work.
•Remote control shooting works only with cameras compatible with Remote Controller RC-1, RC-5, or RC-6.
•Set the camera to <R> (RemoteCOPYcontrol shooting).
23
Specifications
Type
Type ................................................. |
On-camera autoflash Speedlite |
Compatible cameras ........................ |
E-TTL II/E-TTL autoflash EOS camera |
Guide No.......................................... |
27/89 (with the flash head pulled forward, ISO 100 in |
|
meters/feet) |
Flash coverage ................................ |
Matches a EF 28mm (EF-S 18mm) wide angle lens |
Color temperature information |
|
transmission..................................... |
Flash color temperature information transmitted to |
Exposure Control |
camera when flash is fired |
|
|
Exposure control system.................. |
E-TTL II/E-TTL autoflash, manual flash |
Effective flash range........................... |
0.7 - 19.3 m / 2.3 - 63.3 ft. (Quick flash: 0.7 - 11.1 m / |
(With EF 50mm f/1.4 lens at ISO 100) 2.3 - 36.4 ft.) |
|
|
* High-speed sync: 0.7 - 7.6 m / 2.3 - 24.9 ft. (at 1/250 sec.) |
Functions supported by cameraCOPY |
|
operations ........................................ |
Flash exposure compensation, 1st/2nd curtain sync, |
Wireless Release |
high-speed sync, FE lock, modeling flash |
Infrared method |
|
|
Operating range: 5 m / 16.4 ft. from the front of the |
|
camera |
24
Wireless Slave Function |
Optical pulse method |
|
|
|
|||
Reception channel ........................... |
|
All channels |
|
Reception angle ............................... |
|
Approx. ±45° horizontally and ±25° vertically, facing |
|
|
|
the master unit |
|
Slave ID ........................................... |
|
Fixed to group A |
|
AF-Assist Beam |
|
Intermittent flash firing |
|
|
|
||
|
|
Effective range: Center: Approx. 4 m / 13.1 ft., |
|
|
|
Periphery: Approx. 3.5 m / 11.5 ft. |
|
Power Source |
|
|
|
Battery.............................................. |
|
Two size-AA/LR6 alkaline batteries |
|
Recycling time.................................. |
|
Approx. 0.1 - 3.9 sec. (Quick flash: approx. 0.1 - 2.6 sec.) |
|
Battery life (flash count) ................... |
|
Approx. 100 - 680 flashes |
|
Dimensions (W x H x D)........... |
|
65.8 x 65.2 x 77 mm / 2.6 x 2.6 x 3.0 in. |
|
Weight ....................................... |
COPYApprox. 155 g / 5.5 oz. (excluding batteries) |
|
|
All specifications above are based on Canon’s testing standards.
Product specifications and external appearance are subject to change without notice.
25
 Loading...