


PL |
Instrukcja obs∏ugi |
DFI 105 T |
|
||
FR |
Mode d’emploi |
|
EN |
User instructions |
|
DE |
Bedienungsanleitung |
|
NL |
Gebruiksaanwijzing |
|
ES |
Instrucciones para el uso |
|
PT |
Instruções de Utilização |
|
DA |
Brugsanvisning |
|
SV |
Bruksanvisning |
|
FI |
Käyttöohje |
|
NO |
Bruksanvisning |
|
|
|
|

Gratulacje:
Kupujàc sprz´t AGD firmy Candy dowiod∏eÊ, ˝e nie akceptujesz kompromisów i chcesz mieç to co najlepsze. Firma Candy ma przyjemnoÊç przedstawiç nowà zmywark´ do naczyƒ, która jest rezultatem lat poszukiwaƒ i doÊwiadczeƒ nabytych w bezpoÊrednim kontakcie z konsumentem. WybraeÊ jakoÊç, trwa∏oÊç i wysokà sprawnoÊç - cechy charakteryzujàce zmywark´ Candy.
Firma Candy oferuje tak˝e szeroki asortyment innych urzàdzeƒ AGD, takich jak: pralk´ automatycznà, pralko-suszarki, kuchenki, kuchenki mikrofalowe, tradycyjne piecyki i kuchenki, a tak˝e lodówki i zamra˝arki.
PoproÊ Twojego sprzedawc´ o kompletny katalog produktów firmy Candy.
Przeczytaj uwa˝nie niniejszà instrukcj´, gdy˝ zawiera ona wskazówki dotyczàce bezpiecznej instalacji, u˝ytkowania i konserwacji, oraz kilka praktycznych porad pozwalajàcych zoptymalizowaç sposób u˝ytkowania zmywarki.
Zachowaj niniejszà instrukcj´ w celu pó˝niejszej konsultacji.
Spis treÊci
Opis panelu sterujàcego |
strona |
3 |
Dane techniczne |
strona |
3 |
Wybór programu i funkcje szczególne |
strona |
4 |
Waterblock |
strona |
7 |
Lista programów |
strona |
8 |
2
Opis panelu sterujàcego
H
|
|
|
|
|
|
|
|
|
|
|
|
|
55° |
50° |
|
|
|
|
|
|
|
|
||
|
|
|
|
|
|
|
|
|
|
|
|
|
|
|
|
|
|
|
|
|
||||
|
|
|
|
|
|
|
|
|
|
|
|
75° |
|
|
|
|
70° |
|
|
|
||||
|
|
|
|
|
|
|
|
|
|
|
|
|
|
|
||||||||||
|
|
|
|
|
|
|
|
|
|
|
|
|
|
|
|
|
|
|
|
|
|
|
|
|
|
|
|
|
|
|
|
|
|
|
|
|
|
|
|
|
|
|
|
|
|
|
|
|
|
|
|
|
|
|
|
|
|
|
|
|
|
|
|
|
|
|
|
|
|
|
|
|
|
|
|
|
|
|
|
|
|
|
|
|
|
|
|
|
|
|
|
|
|
|
|
|
|
|
|
|
A B C D E F GI |
L |
M |
|
A |
WyÊwietlacz cyfrowy |
G |
Przycisk uruchomienia programów |
|
B |
Przycisk wyboru programów |
H |
Wskaênik Êwietlny braku soli |
|
C |
Przycisk opóênionego startu |
I |
Wskaênik Êwietlny braku Êrodka do |
|
D |
Przycisk zmywania oszcz´dnego |
|
p∏ukania |
|
L |
Przycisk w∏àczenia/wy∏àczenia |
|||
E |
Przycisk HPS |
|||
M |
Opis programów |
|||
F |
Przycisk po∏owy za∏adunku |
|||
|
|
|||
Wymiary: |
|
|
||
WysokoÊç |
cm |
82 ÷ 88,5 |
||
G∏´bokoÊç |
cm |
55 |
||
SzerokoÊç |
cm |
59,8 |
||
Zajmowane miejsce przy |
cm |
117 |
||
otwartych drzwiczkach |
|
|
||
Dane techniczne: |
|
|
||
IloÊç nakryç (EN 50242) |
|
12 |
||
PojemnoÊç wraz z garnkami i talerzami |
|
dla 8 osób |
||
Dopuszczalne ciÊnienie instalacji wodnej |
Minimum 0,08 - maksimum 0,8 MPa |
|||
Moc bezpieczników |
|
(patrz tabliczka znamionowa) |
||
Maksymalna pobierana moc |
|
(patrz tabliczka znamionowa) |
||
Napi´cie |
|
(patrz tabliczka znamionowa) |
||
|
|
3 |
|
|

Wybór programu i funkcje szczególne
Wybór programów
Otworzyç drzwiczki. Aby dokonaç wyboru programu nale˝y nacisnàç przycisk " I "
(w∏àczenia/ wy∏àczenia), na wyÊwietlaczu uka˝e si´ symbol wybranego ostatnio programu.
Aby wybraç nowy program nale˝y wcisnàç przycisk wyboru programów "P"; gdy na wyÊwietlaczu uka˝e si´ nazwa ˝àdanego programu nale˝y wcisnàç przycisk "START"
— wtedy na wyÊwietlaczu pojawi si´, migoczàc, informacja o czasie trwania wybranego programu (w godzinach i minutach).
Zamknàç drzwiczki. Po sygnale dêwi´kowym (jeÊli nie jest wy∏àczony) program automatycznie zaczyna prac´.
Przycisk po∏owy za∏adunku
WciÊni´cie tego przycisku umo˝liwia zmywanie ograniczonej liczby naczyƒ umieszczonych w górnym koszyku, z wyjàtkiem nakryç, które zostanà umieszczone w koszyku dolnym.
Wybór tej funkcji pozwala zmniejszyç zu˝ycie wody i energii elektrycznej. Do zmywania nale˝y dawkowaç Êrodek do zmywania w iloÊciach mniejszych ni˝ dla zmywania normalnego.
Uwaga:
Po wciÊni´ciu przycisku "START" nie jest mo˝liwe wy∏àczenie tej opcji.
Przycisk HPS
Niniejsza zmywarka wyposa˝ona jest w specjalny silnik umo˝liwiajàcy rozwijanie dwóch ró˝nych pr´dkoÊci. WciÊni´cie przycisku HPS wyzwala wi´kszà moc i pozwala oddzia∏ywaç na brud wi´kszà iloÊcià wody i z wi´kszym ciÊnieniem.
Te szczególne i wy∏àczne funkcje przycisku HPS sà wskazane najbardziej w przypadku zmywania garnków i usuwania uporczywych zabrudzeƒ.
Uwaga:
Nastawienie tej funkcji musi zostaç wykonane przed wciÊni´ciem przycisku "START".
Przycisk zmywania oszcz´dnego E
WciÊni´cie przycisku "E" powoduje skrócenie koƒcowego podgrzewania wody przeznaczonej do ostatniego p∏ukania, co pozwala zmniejszyç zu˝ycie energii o ponad 20% oraz skróciç czas zmywania.
Zaleca si´ t´ funkcj´ do zmywania wieczornego, kiedy nie musimy mieç doskonale suchych naczyƒ tu˝ po zmywaniu.
Przerwanie programu zmywania
Podczas pracy programu zmywania, szczególnie w Êrodkowej fazie zmywania i p∏ukania na goràco, nie nale˝y otwieraç drzwiczek zmywarki.
Maszyna zatrzymuje si´ jednak automatycznie z chwilà otwarcia drzwiczek. Mo˝na wtedy w∏àczyç lub wy∏àczyç ró˝ne warianty zmywania lub anulowaç wykonywany program.
JeÊli otworzymy drzwiczki podczas pracy programu, na wyÊwietlaczu pojawi si´ migoczàca informacja o aktualnym programie i zmywarka zatrzyma si´.
Uwaga:
JeÊli otworzymy drzwiczki suszarki w fazie suszenia zostanie w∏àczony sygna∏ dêwi´kowy, ostrzegajàcy, ˝e cykl nie zosta∏ jeszcze zakoƒczony.
Aby ponownie uruchomiç program nale˝y wcisnàç przycisk "START", na wyÊwietlaczu zacznie migotaç wartoÊç czasu pozosta∏ego do zakoƒczenia cyklu. Nale˝y wtedy zamknàç drzwiczki.
JeÊli chcemy zmieniç lub anulowaç aktualnie trwajàcy program, nale˝y post´powaç w nast´pujàcy sposób: otworzyç drzwiczki utrzymujàc wciÊni´ty przycisk "START", a˝ na wyÊwietlaczu przestanie migotaç numer programu. Mo˝na wtedy dokonaç nowego wyboru programu.
UWAGA. W przypadku, gdy przy wciÊni´tym przycisku "START" na wyÊwietlaczu uka˝e si´ migoczàcy symbol "00", oznacza to obecnoÊç wody w zmywarce.
Zamknàç drzwiczki aby umo˝liwiç wypompowanie wody; poczekaç na sygna∏ dêwi´kowy, po którym mo˝na wybraç nowy program.
Przed uruchomieniem nowego programu trzeba upewniç si´, czy nie brakuje Êrodka do zmywania; jeÊli tak, wtedy nale˝y uzupe∏niç pojemnik.
Koniec programu
Koniec programu oznajmia sygna∏ dêwi´kowy (jeÊli nie jest on wy∏àczony) po otwarciu drzwiczek na wyÊwietlaczu pojawia si´ numer zakoƒczonego przed chwilà programu.
Uwaga:
Za ka˝dym razem, kiedy na ekranie pojawia si´ migoczàcy numer programu i maszyna nie akceptuje ˝adnego wyboru, nale˝y wcisnàç przycisk "START" i utrzymywaç go w takiej pozycji a˝ do chwili, kiedy numer programu przestanie migotaç.
Przycisk opóênionego rozpocz´cia
zmywania. |
|
Aby ustawiç opóêniony |
zmywania |
nale˝y wcisnàç przycisk |
|
Po pierwszym wciÊni´ciu |
wyÊwietlaczu |
uka˝e si´ bie˝àca godzina rozpocz´cia programu. Ka˝de kolejne wciÊni´cie tego przycisku zwi´ksza opóênienie o jednà godzin´, a˝ do maksymalnej wartoÊci 19 godzin.
Po wprowadzeniu wartoÊci opóênienia czasowego nale˝y poczekaç na zaakceptowanie tej wartoÊci, na wyÊwietlaczu ukazuje si´ wtedy informacja o wybranym cyklu zmywania.
Aby uruchomiç odliczanie czasu, nale˝y wcisnàç przycisk "START". JeÊli nie uaktywni-
liÊmy odliczania, mo˝emy |
|
opóêniony start wciskajàc przycisk |
i |
trzymajàc ten przycisk wciÊni´ty |
d∏ugo, |
a˝ na wyÊwietlaczu uka˝e si´ symbol wybranego programu.
W dowolnej chwili mo˝na anulowaç opóêniony start utrzymujàc wciÊni´ty przycisk "START" do momentu, kiedy na wyÊwietlaczu uka˝e si´ symbol wybranego cyklu zmywania. JeÊli chcemy upewniç si´, jaki program wybraliÊmy, nale˝y wcisnàç przycisk wyboru programów "P"
Uwaga: JeÊli podczas odliczania otworzymy drzwiczki zmywarki, w celu wybrania jakiejÊ opcji lub do∏o˝enia naczyƒ do zmywania to
— aby powróciç do odliczania — nale˝y przed zamkni´ciem drzwiczek wcisnàç przycisk "START".
Wy∏àczenie sygna∏u dêwi´kowego
Funkcj´ sygna∏u dêwi´kowego mo˝na wy∏àczyç w nast´pujàcy sposób: przez kilka sekund utrzymaç wciÊni´ty przycisk wyboru programów "P" i jednoczeÊnie wcisnàç
przycisk w∏àczenie/wy∏àczenie |
I |
; jeÊli |
|
|
na wyÊwietlaczu uka˝e si´ napis "b1" b´dzie to oznaczaç, ˝e funkcja sygna∏u dêwi´kowego jest w∏àczona. Po kolejnym wciÊni´ciu przycisku wyboru programów "P" na wyÊwietlaczu uka˝e si´ napis "b0", wskazujàcy, ˝e sygna∏ dêwi´kowy zosta∏ wy∏àczony.
Nale˝y wtedy poczekaç na sygna∏ dêwi´kowy, oznaczaç on b´dzie zapami´tanie ostatniego ustawienia.
Uwaga
Niniejsza zmywarka wyposa˝ona jest w uk∏ad zabezpi eczajàcy przed zalaniem, dzia∏ajàcy równie˝ przy braku zasilania w energi´ elektrycznà. Uk∏ad ten automatycznie blokuje dop∏yw wody w przypadku awarii powodujàcej przekroczenie dopuszczalnego poziomu wody w zmywarce.
Wa˝ne
Aby nie dopuÊciç do nieumyÊlnego w∏àczenia uk∏adu zabezpieczajàcego przed zalaniem nie zaleca si´ przesuwaç ani przechylaç zmywarki podczas jej dzia∏ania.
W przypadku, w którym zachodzi koniecznoÊç przesuni´cia lub przechylenia zmywarki nale˝y sprawdziç wczeÊniej, czy zmywanie zakoƒczy∏o si´ i czy w zbiorniku zmywarki nie pozosta∏a woda.
Zmywarka mo˝e sygnalizowaç, poprzez informacj´ na wyÊwietlaczu, ca∏y szereg wadliwych dzia∏aƒ:
AUTOMATYCZNE SYGNALIZOWANIE ANOMALII W PRACY ZMYWARKI:
ANOMALIA |
PRZYCZYNA |
ÂRODEK ZARADCZY |
|
|
|
Na wyÊwietlaczu pokazujà si´ |
Zamkni´ty kran dop∏ywu wody. |
Wy∏àczyç zmywark´, otworzyç |
symbole E1, rozlega si´ sygna∏ |
|
kran, ponownie wybraç |
dêwi´kowy. |
|
program. |
|
|
|
Na wyÊwietlaczu pokazujà si´ |
Uszkodzenie uk∏adu regulacji |
Zachodzi koniecznoÊç wezwania |
symbole E2, rozlega si´ sygna∏ |
temperatury. |
technika serwisowego. |
dêwi´kowy. |
|
|
|
|
|
Na wyÊwietlaczu pokazujà si´ |
Nie dzia∏a prawid∏owo grza∏ka |
OczyÊciç p∏ytk´ filtra. JeÊli usterki |
symbole E3, rozlega si´ sygna∏ |
podgrzewajàca wod´ |
nie udaje si´ wyeliminowaç, |
dêwi´kowy. |
lub filtr jest zatkany |
wezwaç technika serwisowego. |
|
|
|
Na wyÊwietlaczu pokazujà si´ |
Zmywarka nie odprowadza wody |
Sprawdê, czy nie jest zagi´ta wà˝ |
symbole E4, rozlega si´ sygna∏ |
ze zbiornika. |
odp∏ywowy lub czy nie sà |
dêwi´kowy. |
|
zatkane syfon albo filtry. |
|
|
|
4 |
5 |

Regulacja zmi´kczania wody programatorem elektronicznym
Zmi´kczacz mo˝e skutecznie ulepszaç wod´, której twardoÊç osiàga wartoÊç 90° fH (w skali francuskiej), 50° dH (w skali niemieckiej), za poÊrednictwem 8 poziomów regulacji.
W poni˝szej tabeli podano wartoÊci regulacji dla kolejnych poziomów twardoÊci wody z sieci wodociàgowej.
|
TwardoÊç |
TwardoÊç |
Wykorzys- |
Regulacja |
|
|
wody |
wody |
tanie soli |
||
Poziom |
|
|
regenera- |
zmi´kcza- |
|
°fH stopnie |
°dH stopnie |
||||
|
cza |
||||
|
francuskie |
niemieckie |
cyjnej |
|
|
|
|
|
|
|
|
0 |
0-5 |
0-3 |
NIE |
D1 |
|
1 |
6-10 |
4-6 |
TAK |
D1 |
|
2 |
11-20 |
7-11 |
TAK |
D2 |
|
3 |
21-30 |
12-16 |
TAK |
D3 |
|
4 |
31-40 |
17-22 |
TAK |
D4 |
|
5 |
41-50 |
23-27 |
TAK |
D5 |
|
6 |
51-60 |
28-33 |
TAK |
D6 |
|
7 |
61-90 |
34-50 |
TAK |
D7 |
|
|
|
|
|
|
Zmi´kczacz ustawiony jest fabrycznie na poziomie 4 (D4), gdy˝ poziom ten zadowala wi´kszoÊç klientów. W zale˝noÊci od stopnia twardoÊci miejscowej wody nale˝y wyregulowaç zmi´kczacz w nast´pujàcy sposób: otworzyç
drzwiczki. Przy wciÊni´tym przycisku |
("Opóêniony start") nale˝y wcisnàç |
przycisk w∏àczenia/wy∏àczenia I |
wyÊwietlaczu uka˝e si´ wartoÊç |
nastawiona fabrycznie "D4". Aby zmieniç to nastawienie, nale˝y wciskaç przycisk ("Opóêniony start"), wciskajàc kilkakrotnie ten przycisk, za ka˝dym przyciÊni´ciem zwi´kszamy ustawienie stopnia twardoÊci o jednostk´.
Po osiàgni´ciu wartoÊci "D7" wskaênik przeskakuje ponownie do wartoÊci "D1". Po ukazaniu si´ ˝àdanej wartoÊci nale˝y poczekaç na sygna∏ dêwi´kowy, który oznaczaç b´dzie zapami´tanie wprowadzonej wartoÊci.
|
|
|
|
|
|
Przycisk |
Przycisk |
||
|
opóênionego |
w∏àczenia/wy∏àczenia |
||
|
startu |
|
|
|
|
|
|
|
|
WyÊwietlacz |
|
|
||
cyfrowy |
|
|
||
Waterblock
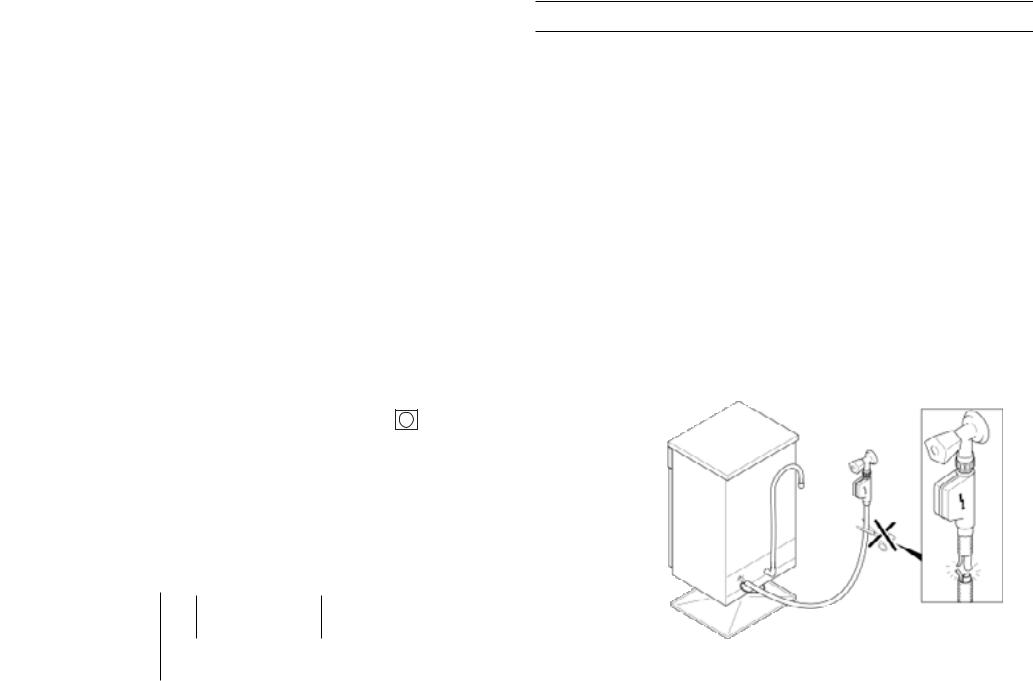
Zadaniem funkcji "Waterblock" jest dodatkowe zabezpieczenie zmywarki, szczególnie pod nieobecnÊç domowników. Funkcja „Waterblock" przerywa ewentualne wycieki wody, które mog∏yby doprowadziç do zalania mieszkania, spowodowane niepoprawnym dzia∏aniem zmywarki lub rozerwaniem lub przeci´ciem w´˝y gumowych, w szczególnoÊci w´˝a zasilajàcego w wod´.
Ja dzia∏a "Waterblock"
Dno umieszczone pod zmywarkà zbiera ewentualne wycieki wody i za poÊrednictwem czujnika zamyka zawór bezpieczeƒstwa umieszczony pod kurkiem dop∏ywu wody. W ten sposób nie dopuszcza si´ do wycieku wody na zewnàtrz nawet przy otwartym kurku dop∏ywowym.
JeÊli skrzynka zawierajàca elementy elektryczne zosta∏a uszkodzona nale˝y natychmiast odciàç zasilanie w energi´ elektrycznà.
Aby zapewniç idealne dzia∏anie zabezpieczenia skrzynka "A" z przewodem powinny byç do∏àczone do kurka w sposób wskazany na Rys. "1". Nie wolno przecinaç przewodu zasilania w wod´, gdy˝ zawiera on cz´Êci pod napi´ciem.
JeÊli d∏ugoÊç przewodu nie pozwala na prawid∏owe do∏àczenie, sam przewód nale˝y zamieniç na inny, o poprawnej d∏ugoÊci. Rys. 1
Rys. 1
A
6 |
7 |

Ogólny program porównawczy
(patrz tabela programów zmywania)
Zgodnie z normà EN 50242:
1)Koszyk górny w pozycji dolnej
2)Za∏adunek znormalizowany
3)Ustawienie Êrodka wyb∏yszczajàcego na pozycji: 5
4)Wcisnàç przycisk zmywania oszcz´dnego
5)IloÊç Êrodka do zmywania:
-8 gr dla zmywania wst´pnego
-22 gr dla zmywania zasadniczego.
LISTA PROGRAMÓW
Programu |
|
|
|
Opis |
|
|
|
|
|
|
|
|
|
||||
|
|
|
|
|
|
|
|
|
|
Intensywny |
Przeznaczony do zmywania |
mocno |
|||||
75° C |
zabrudzonych naczyƒ i garnków codziennego |
|||||||
|
|
u˝ytku. |
|
|
|
|
|
|
|
|
|
Przeznaczony do zmywania naczyƒ i |
|||||
65° C |
Uniwersalny |
garnków |
codziennego |
u˝ytku, |
normalnie |
|||
|
|
zabrudzonych. |
|
|
|
|
||
|
|
|
|
|
|
|
||
|
|
|
|
|||||
|
Zmywanie |
Przeznaczony do zmywania naczyƒ i |
||||||
|
garnków |
codziennego |
u˝ytku, |
normalnie |
||||
55° C |
codzienne |
zabrudzonych. |
|
|
|
|
||
Do stosowania tu˝ po zakoƒczeniu posi∏ku. |
||||||||
|
|
|
Przystosowany do zmywania naczyƒ i |
|||||
|
Eco 50°C |
garnków |
codziennego |
u˝ytku, |
normalnie |
|||
50° C |
zabrudzonych, |
z |
|
zastosowaniem |
||||
|
|
enzymatycznego Êrodka do zmywania. |
||||||
|
|
|
Przystosowany do zmywania naczyƒ i |
|||||
|
Eco 50°C |
garnków |
codziennego |
u˝ytku, |
normalnie |
|||
50° C |
zabrudzonych, |
z |
|
zastosowaniem |
||||
|
|
enzymatycznego |
Êrodka |
do zmywania. |
||||
|
|
|
Program znormalizowany EN 50242. |
|||||
|
|
|
|
|
|
|
||
|
|
|
Program |
przystosowany |
do |
zmywania |
||
|
Zmywanie |
naczyƒ delikatnych dekorowanych i z kryszta∏u. |
||||||
50° C |
Wskazany do zmywania naczyƒ codziennego |
|||||||
delikatne |
u˝ytku w niewielkim stopniu zabrudzonych, |
|||||||
|
|
za wyjàtkiem garnków. |
|
|
|
|||
|
Szk∏o |
Odpowiedni do zmywania szk∏a i porcelany |
||||||
45° C |
delikatnej z niezaschni´tymi zabrudzeniami. |
|||||||
|
|
|
|
|
|
|
|
|
|
Wst´pne |
Wst´pne, |
krótkie |
zmywanie wykonywane |
||||
|
zmywanie na |
rano lub w po∏udnie, kiedy chcemy przenieÊç |
||||||
|
zimno |
g∏ówne zmywanie na okres po kolacji. |
||||||
|
|
|
|
|
|
|
||
|
P∏ukanie goràce |
Program przeznaczony do p∏ukania naczyƒ |
||||||
|
i podgrzewanie |
nie u˝ywanych od pewnego czasu oraz do |
||||||
70° C |
podania do sto∏u goràcych talerzy, co jest |
|||||||
talerzy |
wskazane dla niektórych potraw. |
|
||||||
|
|
|
|
|||||
|
Zmywanie |
Bardzo szybkie zmywanie wykonywane tu˝ |
||||||
|
po zakoƒczeniu posi∏ku po podgrzaniu |
|||||||
|
szybkie 32 minut |
wody, wskazane do zmywania naczyƒ dla |
||||||
|
4-6 osób najwy˝ej. |
|
|
|
|
|||
|
|
|
|
|
|
|
||
|
|
|
|
|
|
|
|
|
Zmywanie z zamaczaniem
W przypadku, gdy stosujemy program Uniwersalny nale˝y równie˝ dodaç porcj´ Êrodka myjàcego, w iloÊci 5 gr, do pojemnika na Êrodek do zmywania wst´pnego (2).
|
|
CzynnoÊci |
|
|
Przebieg wykonania |
|
Czas |
|
|
Funkcje |
|
||||||||
|
|
|
|
|
zmy- |
|
|
|
|||||||||||
|
|
do wykonania |
|
|
|
programu |
|
|
|
wania w |
|
dodatkowe |
|
||||||
|
|
|
|
|
|
|
|
|
|
|
|
|
minutach |
|
|
|
|
|
|
|
Ârodek do zmywania wst´pnego |
Ârodek do zmywania |
Czyszczenie filtrów i p∏ytki |
Kontrola Êrodka wyb∏yszczajàcego |
Kontrola zapasu soli |
Zmywanie wst´pne goràce |
Zmywanie wst´pne zimne |
Zmywanie zasadnicze |
Pierwsze zimne p∏ukanie |
Drugie zimne p∏ukanie |
|
P∏ukanie goràce ze Êrodkiem wyb∏yszczajàcym |
Wodà zimnà (15°C)* |
Przycisk opóênionego startu |
|
Przyscisk zmywania oszcz´dnego |
Przycisk HPS |
|
Przycisk po∏owy za∏adunku |
|
|
|
|
|
|
|
|
|
|
|
|
|
|
|
|
|
|
|
|
|
• |
• |
• |
• |
• |
• |
|
75°C |
•• |
•• |
•• |
120 |
TAK |
TAK |
TAK |
|
TAK |
|
• |
• |
• |
• |
• |
|
•• |
65°C |
•• |
|
•• |
100 |
TAK |
TAK |
TAK |
|
TAK |
|
|
• |
• |
• |
• |
|
|
55°C |
•• |
|
•• |
90 |
TAK |
TAK |
TAK |
|
TAK |
|
• |
• |
• |
• |
• |
|
•• |
50°C |
•• |
|
•• |
125 |
TAK |
|
TAK |
|
TAK |
|
• |
• |
• |
• |
• |
|
•• |
50°C |
|
|
•• |
130 |
TAK |
TAK |
TAK |
|
TAK |
|
|
• |
• |
• |
• |
|
|
50°C |
•• |
|
•• |
75 |
TAK |
TAK |
|
|
TAK |
|
|
• |
• |
• |
• |
|
|
45°C |
•• |
|
•• |
75 |
TAK |
TAK |
|
|
TAK |
|
|
|
• |
|
|
|
•• |
|
|
|
|
6 |
TAK |
N.D |
TAK |
|
TAK |
|
|
|
|
|
|
|
|
|
|
|
|
|
|||||
|
|
|
|
|
|
|
|
|
|
|
|
|
|
|
|
|
|
|
|
|
• |
• |
|
|
|
70°C |
|
|
•• |
50 |
TAK |
N.D |
|
|
TAK |
|
|
• |
• |
• |
|
|
|
40°C |
•• |
|
•• |
32 |
|
N.D |
|
|
TAK |
N.D. = Funkcja niedost´pna |
|
* Przy zmywaniu w goràcej wodzie czas pozosta∏y do koƒca programu |
|
||||||||||||||
|
|
|
|
|
|
dostosowuje si´ automatycznie w trakcie wykonywanego programu. |
|
||||||||||
8 |
9 |

Compliments,
en ayant acheté un appareil électroménager Candy, vous avez fait preuve d’une très grande éxigence: vous voulez le meilleur. Candy est heureux de vous proposer cette nouvelle machine, fruit d’années de recherches et d’expériences confirmées sur le marché. Vous avez choisi la qualité, la fiabilité et les prestations techniques élevées.
Candy vous propose de plus, une gamme complète d’appareils d’électroménagers: machines-à-laver, lave-vaisselle, machines-à- laver séchantes, séche-linge, four à micro-ondes, fours et plaques de cuisson, réfrigérateurs
Demandez à votre Revendeur le catalogue complet des produits Candy. Nous vous prions de lire attentivement les indications contenues dans ce mode d’emploi. Vous y trouverez d’importantes indications, sur la sécurité d’installation, d’emploi, de manutention et d’autres conseils utiles pour le meilleur emploi du lave-vaisselle. Conservez avec soin ce mode d’emploi pour des consultations futures.
Garantie
Cet appareil est garanti pendant une année contre tous défauts de fabrications ou de matière.
Pendant cette période, les pièces défectueuses seront, soient remplacées, soient réparées gratuitement.
Sauf spécification particulière les frais de main d’oeuvre et de déplacement restent à la charge de l’utilisateur.
En aucun cas le remplacement de l’appareil ne pourra être exigé. Le constructeur décline toute responsabilité en cas de dommages survenant aux choses ainsi qu’aux personnes et imputables aux appareils.
Aucune indemnité ne pourra être exigée sous quelque forme que ce soit.
Garantie legale
Les dispositions stipulées ci-dessus n’excluent pas le bénéfice de la garantie légale concernant les vices cachés, conformément aux dispositions de l’article 1641 et suivant le Code Civil.
Indice
Description de la machine |
Page |
11 |
Données techniques |
Page |
11 |
Sélection du programme et fonctions particulières |
Page |
12 |
Réglage de l'adoucisseur d'eau |
Page |
14 |
Waterblock |
Page |
15 |
Liste des programmes |
Page |
16 |
10 |
|
|
Description de la machine
H
|
|
|
|
|
|
|
|
|
|
|
|
|
|
55° |
50° |
|
|
|
|
|
|
|
|
|
|
|
|
|
|
|
|
|
|
|
|
|
|
|
|
|
|
|
|
|
|
|
|||
|
|
|
|
|
|
|
|
|
|
|
|
75° |
|
|
|
|
|
70° |
|
|
|
|||
|
|
|
|
|
|
|
|
|
|
|
|
|
|
|
|
|||||||||
|
|
|
|
|
|
|
|
|
|
|
|
|
|
|
|
|
|
|
|
|
|
|
|
|
|
|
|
|
|
|
|
|
|
|
|
|
|
|
|
|
|
|
|
|
|
|
|
|
|
|
|
|
|
|
|
|
|
|
|
|
|
|
|
|
|
|
|
|
|
|
|
|
|
|
|
|
|
|
|
|
|
|
|
|
|
|
|
|
|
|
|
|
|
|
|
|
|
|
|
|
A B C D E F GI |
L |
|
M |
A |
Ecran digital |
|
G |
Touche départ programmes |
B Touche de sélection des programmes |
H |
Témoin lumineux manque de sel |
||
C |
Touche Départ différé |
|
I |
Témoin luminex manque |
D |
Touche Economie |
|
|
de produit de rinçage |
|
L |
Touche Marche/Arrêt |
||
E |
Touche HPS |
|
||
|
M |
Description des programmes |
||
F |
Touche 1/2 charge |
|
||
|
|
|
||
Dimensions: |
|
|
|
|
Hauteur |
cm |
|
82 ÷ 88,5 |
|
Profondeur |
cm |
|
55 |
|
Largeur |
cm |
|
59,8 |
|
Encombrement porte ouverte |
cm |
|
117 |
|
Données techniques: |
|
|
|
|
Couvert EN 50242 |
|
|
12 |
|
Capacité avec casseroles et assiettes |
|
|
8 personnes |
|
Pression admise pour l'installation hydraulique |
|
Min. 0,08 - Max 0,8 MPa |
||
Calibre fusible |
|
|
(voir plaque signalétique) |
|
Puissance maximum absorbée |
|
|
(voir plaque signalétique) |
|
Tension |
|
|
(voir plaque signalétique) |
|
|
|
|
11 |
|

Sélection du programme et fonctions particulières
Choix des programmes |
I |
Ouvrez la porte et appuyez sur le bouton |
; |
le dernier programme sélectionné apparaîtra sur l'afficheur.
Pour sélectionner un nouveau programme, enfoncez la touche ''P''.
Lorsque le programme désiré s'inscrit sur l'afficheur, appuyez sur la touche ''START''. La durée du programme sélectionné (en heures et minutes) apparaîtra sur l'afficheur.
Fermez la porte, après que le signal sonore ait retenti (s'il n'a pas été désactivé), le programme démarrera automatiquement.
Touche 1/2 charge
En enclenchant cette il est possible de limiter le lavage de la vaisselle contenue dans le panier supérieur, à l'exclusion des couverts qui seront placés dans le panier inférieur.
Le choix de cette fonction permet de réduire les consommations d'eau et d'énergie.
ATTENTION :
dès que vous avez sélectionné la touche ''START'', vous ne pouvez pas désactiver cette option.
Touche HPS
Le lave vaisselle est doté d'un moteur particulier capable de développer deux vitesses différentes. En appuyant sur la touche HPS, le moteur developpe une puissance supplémentaire attaquant les salissures avec une quantité d'eau supplémentaire et une pression plus élevée. Ces fonctions particulières sont indiquées pour le lavage des casseroles et vaisselle trés sales.
ATTENTION :
cette option doit être sélectionnée avant d’appuyer sur la touche ''START''.
Touche Economie E
La touche ''E'' réduit le chauffage de l'eau au cours du dernier rinçage, permet d'économiser
20% d'énergie et de raccourcir le temps du cycle.
Recommandée pour les lavages du soir lorsque la vaisselle n'a pas besoin d'être parfaitement sèche dès la fin du lavage.
12
Interrompre un programme
Il n'est pas recommandé d'ouvrir la porte en cours de programme, en particulier au milieu de celui ci, ni durant le séchage final.
De toute façon, l'appareil s'arrête automatiquement lorsque la porte est ouverte.
A ce moment là, les options de lavage peuvent être activées ou désactivées, ou le programme sélectionné, annulé.
Lorsqu'en cours de programme, la porte est ouverte, le symbole qui correspond à ce programme s'allume sur l'afficheur et la machine s'arrête.
ATTENTION :
si vous ouvrez la porte pendant que le lavevaisselle effectue son cycle de séchage, un signal sonore vous alerte que le cycle n’est pas achevé.
Pour relancer la machine, appuyez sur la touche ''START'', le temps restant s'affichera. Vous pouvez ensuite fermer la porte.
Si vous souhaitez changer ou annuler un programme en cours, veuillez opérer de la manière suivante :
ouvrir la porte, maintenir la touche ''START'' enfoncée jusqu'à ce que le numéro du programme s'éteigne.
Une nouvelle sélection peut maintenant être faite.
NB : si, en appuyant sur la touche ''START'', le symbole ''00'' clignote sur l'afficheur, cela signifie que de l'eau est dans l'appareil.
Fermez la porte pour permettre à l'eau d'être évacuée et attendez le signal sonore, ensuite le nouveau programme peut être sélectionné.
Avant de démarrer un nouveau programme, veuillez contrôler la présence de lessive dans le compartiment. Si nécessaire, remplir le compartiment.
Fin du programme
La fin du programme est signalée par un signal sonore (s'il n'a pas été désactivé). Lorsque la porte est ouverte, le numéro du dernier programme utilisé apparaîtra sur l'afficheur.
Attention: Si sur l’afficheur le programme clignote et le lave-vaisselle n’accepte aucune programmation, maintenir la pression sur la touche “START” jusqu'à ce que le programme arrête de clignoter.
Touche Départ différé
Pour activer le programme départ différé appuyez sur la touche
A la première pression |
sélection en cours |
apparaît sur l'afficheur. |
|
A chaque pression de la touche le décalage horaire augmente pour atteindre 19 heures au maximum.
La sélection faite, attendez que le temps sélectionné soit confirmé sur l'afficheur. Appuyez sur la touche ''START'' pour enclencher le compte à rebours.
Si le compte à rebours n'a pas déjà été activé, le départ différé peut être annulé en appuyant
sur la touche |
jusqu'à ce que le programme |
sélectionné |
sur l'afficheur. |
Le départ différé peut être annulé à tout moment en maintenant appuyé le bouton ''START'' jusqu'à ce que le programme sélectionné apparaisse sur l'afficheur.
NB: si la porte est ouverte, au cours du compte à rebours, afin de sélectionner une des options, par exemple , ou de rajouter de la vaisselle, la touche ''START''' doit être enfoncée avant de fermer de nouveau la porte, le démarrage du compte à rebours peut alors reprendre.
Annulation du signal sonore
Le signal sonore peut être désactivé de la manière suivante:
Maintenez enfoncée la touche de sélection de programmes (P) pendant quelques secondes et simultanément enfoncez la touche Marche/Arrêt
I ; si le symbole ''b1''apparaît sur l'afficheur, le signal sonore est activé.
Appuyez de nouveau sur la touche de sélection de programmes (P) et le symbole ''b0'' apparaîtra, le signal sonore est alors désactivé. Un signal sonore indique que la programmation est mémorisée.
Attention
Ce lave-vaisselle est équipé d'un dispositif de sécurité anti-débordement, fonctionnant même en l'absence de courant électrique, qui bloque automatiquement l'écoulement de l'eau au cas où celle-ci dépasserait le niveau normal à cause d'une panne éventuelle.
Important
Pour éviter le déclenchement intempestif du dispositif de sécurité anti-débordement, il est recommandé de ne pas remuer ou incliner le lave-vaisselle pendant son fonctionnement.
Au cas où il serait nécessaire de remuer ou d'incliner le lave-vaisselle, s'assurer d'abord que le cycle de lavage est terminé et qu'il n'y a plus d'eau dans la cuve.
Votre lave-vaisselle est capable de détecter certains problèmes, l’afficheur vous signalera les anomalies suivantes :
ANOMALIES |
CAUSE |
SOLUTIONS |
|
|
|
E1 + signal sonore |
Robinet d’arrivée d’eau fermé |
Eteindre le lave-vaisselle, ouvrir le |
|
|
robinet, redémarrer le lave-vaisselle |
|
|
|
E2 + signal sonore |
Anomalie du contrôle électronique de |
Appelez le service après-vente |
|
la température |
|
|
|
|
E3 + signal sonore |
Anomalie de la résistance |
Nettoyer la plaque filtrante. |
|
ou plaque filtrante bouché |
Si l’anomalie persiste, appelez le |
|
|
service après-vente |
|
|
|
E4 + signal sonore |
Anomalie du système de vidange |
Vérifiez si le tuyau de vidange est |
|
|
plié, si le siphon est obstrué, si les |
|
|
filtres sont à nettoyer |
|
|
|
13

Réglage de l'adoucisseur d'eau avec le programmateur électronique
Waterblock
L'adoucisseur d'eau peut traiter l'eau dont la dureté s'élève jusqu'à 90°fH (Graduation française) ou 50°dH (Graduation germanique) et ce à partir de 8 niveaux de réglage.
Les positions de réglage de l'adoucisseur d'eau sont indiquées dans le tableau suivant:
L’intérêt du waterblok est de rendre encore plus sûr votre appareil en particulier en cas de votre absence dans votre appartement. Avec le waterblok sont éliminés tous risques de fuites d’eau et d’innondation provoqués par des anomalies de fonctionnement de la machine, en cas de rupture de tuyaux et plus particulièrement du tuyau d’alimentation d’eau.
|
Dureté de |
Dureté de |
Utilisation |
Position de |
|
|
l'eau |
l'eau |
|||
Niveau |
|
|
de sel |
l'adoucis- |
|
°fH (France) |
°dH |
||||
|
régénérant |
seur d'eau |
|||
|
|
(Allemagne) |
|
|
|
0 |
0-5 |
0-3 |
NO |
D1 |
|
1 |
6-10 |
4-6 |
OUI |
D1 |
|
2 |
11-20 |
7-11 |
OUI |
D2 |
|
3 |
21-30 |
12-16 |
OUI |
D3 |
|
4 |
31-40 |
17-22 |
OUI |
D4 |
|
5 |
41-50 |
23-27 |
OUI |
D5 |
|
6 |
51-60 |
28-33 |
OUI |
D6 |
|
7 |
61-90 |
34-50 |
OUI |
D7 |
|
|
|
|
|
|
L'adoucisseur d'eau est pré réglé en usine sur le niveau 4 (D4) car ce niveau répond à la majorité des besoins. Pour régler la position de l'adoucisseur d'eau en fonction du degré de dureté de votre eau, procédez comme suit :ouvrez la porte, enfoncez simultanément la touche départ différé la touche marche/arrêt I .
La position de réglage ''D4''apparaîtra sur l'afficheur. Pour modifier la position, enfoncez le bouton départ différé Chaque pression sur la touche augmentera la position d'un niveau.
Quand vous aurez atteint la position ''D7'', l'afficheur retournera à la position ''D1''.
Lorsque la position désirée apparaît sur l'afficheur, attendez le signal sonore qui confirme la bonne mémorisation de la nouvelle position.
Fonctionnement
Le fond placé sous l’appareil recueille d’éventuelles fuites d’eau qui à l’aide d’un sensor pneumatique, actionne la valve de sécurité située sous le robinet empéchant l’eau de couler même si le robinet est ouvert.
Si la boîte, contenant les parties électriques, devait être endommagée, il est nécessaire de débrancher l’appareil. Pour installer correctement le systéme de sécurité, la boîte “A” avec le tuyau doit être reliée au robinet comme indiqué sur la figure “1”. Le tuyau d’arrivée ne doit pas être coupé car il contient des parties électriques.
Si le tuyau n’est pas assez long pour permettre un branchement correct, il doit être remplacé par un tuyau plus long. Le tuyau peut être fourni par votre service après-vente.
A
|
|
|
|
|
|
|
TOUCHE |
TOUCHE |
Fig. 1 |
||
|
DEPART |
MARCHE/ARRET |
|||
|
DIFFERE |
|
|
|
|
|
|
|
|
|
|
AFFICHEUR |
|
|
|
||
14 |
15 |

Information pour
les essais en laboratoire
Programme comparatif général
Selon norme EN 50242:
1)Panier supérieur en position: bas
2)Chargement normalisé
3)Réglage du produit de rinçage sur index: 5
4)Touche Economie appuyée
5)Quantité de lessive:
–8 gr pour le prélavage
–22 gr pour le lavage.
LISTE DES PROGRAMMES
Programme |
|
|
Description |
|
|
||
|
|
|
|
||||
|
|
|
|
|
|
|
|
|
Intensif |
Conçu pour le lavage des casseroles et de |
|||||
75° C |
toute autre vaisselle d'un usage quotidien |
||||||
|
|
particulièrement sale. |
|
|
|||
|
|
|
Destiné au lavage de la vaisselle et |
||||
65° C |
Universel |
casseroles |
d'un |
usage |
quotidien |
||
normalement sale. |
|
|
|||||
|
|
|
|
||||
|
|
|
|
||||
|
|
|
Destiné au lavage de la vaisselle et |
||||
55° C |
Journalier |
casseroles d'un usage quotidien. |
|
||||
A utiliser immédiatement après le repas. |
|||||||
|
|
||||||
|
|
|
|||||
|
|
|
|
||||
|
Eco 50°C |
Adapté au lavage de vaisselle et casseroles |
|||||
50° C |
d'usage quotidien, normalement sales, avec |
||||||
|
|
utilisation de lessive à base d'enzyme. |
|||||
|
|
|
Adapté au lavage de vaisselle et casseroles |
||||
|
Eco 50°C |
d'usage quotidien, normalement sales, avec |
|||||
50° C |
utilisation de lessive à base d'enzyme. |
||||||
|
|
Programme normalisé EN 50242. |
|
||||
|
|
|
Adapté au lavage de la vaisselle délicate |
||||
|
Délicat |
décorée ou en cristal. |
|
|
|||
50° C |
Indiqué pour le lavage de la vaisselle |
||||||
|
|
d'usage quotidien peu sale, à l'exclusion |
|||||
|
|
|
des casseroles. |
|
|
||
45° C |
Verres |
Adapté au lavage de verres et porcelaines |
|||||
délicates avec salissures non séchées. |
|||||||
|
|
||||||
|
|
|
|||||
|
|
|
|
||||
|
Trempage |
Pour la vaisselle utilisée le matin ou à midi |
|||||
|
quand on souhaite effectuer le lavage |
||||||
|
|
|
après le dîner. |
|
|
|
|
|
|
|
|
||||
|
|
|
Adapté au rinçage de la vaisselle non |
||||
|
Chauffe assiettes |
utilisée depuis un certain temps, et pour |
|||||
70° C |
|
|
servir à table des assiettes chaudes pour |
||||
|
|
certains mets. |
|
|
|
||
|
|
|
Cycle très rapide à effectuer à la fin du |
||||
|
Rapide 32' |
repas. |
|
|
|
||
|
Recommander pour un lavage de vaisselle |
||||||
|
|
|
jusqu'à 4/6 personnes. |
|
|
||
|
|
|
|
|
|
|
|
Lavage précédé d'un prélavage
Dans le cas où l'on utilise le programme Universel il faut également mettre une dose de lessive, 5 grammes dans le bac "prélavage" (2).
|
Opérations à réaliser |
Déroulement du programme |
Durée |
|
Fonctions |
|
|||||||||||
|
moyenne |
|
|
||||||||||||||
|
|
Facultatives |
|
||||||||||||||
|
|
|
|
|
|
|
|
|
|
|
|
en minutes |
|
|
|||
|
Lessive prélavage |
Lessive lavage |
Nettoyage des filtres |
Contrôle du niveau de rinçage |
Contrôle du niveau de Sel |
Prélavage chaud |
Prélavage froid |
Lavage |
Premier rinçage à froid |
Second rinçage à froid |
Rinçage chaud avec produit de rinçage |
Avec eau froide (15°C)* |
Départ différé |
Touche Economie |
Touche HPS |
|
Touche 1/2 charge |
|
|
|
|
|
|
|
|
|
|
|
|
|
|
|
|
|
|
|
• |
• |
• |
• |
• |
• |
|
75°C |
•• |
•• |
•• |
120 |
OUI |
OUI |
OUI |
OUI |
|
• |
• |
• |
• |
• |
|
•• |
65°C |
•• |
|
•• |
100 |
OUI |
OUI |
OUI |
OUI |
|
|
• |
• |
• |
• |
|
|
55°C |
•• |
|
•• |
90 |
OUI |
OUI |
OUI |
OUI |
|
• |
• |
• |
• |
• |
|
•• |
50°C |
•• |
|
•• |
125 |
OUI |
|
OUI |
OUI |
|
• |
• |
• |
• |
• |
|
•• |
50°C |
|
|
•• |
130 |
OUI |
OUI |
OUI |
OUI |
|
|
• |
• |
• |
• |
|
|
50°C |
•• |
|
•• |
75 |
OUI |
OUI |
|
OUI |
|
|
|
|
|
|
|
|
|
|
|
|
|
|
|
|
|
|
|
• |
• |
• |
• |
|
|
45°C |
•• |
|
•• |
75 |
OUI |
OUI |
|
OUI |
|
|
|
• |
|
|
|
•• |
|
|
|
|
6 |
OUI |
N/A |
OUI |
OUI |
|
|
|
|
|
|
|
|
|
|
|
|
|||||
|
|
|
|
|
|
|
|
|
|
|
|
|
|
|
|
|
|
|
|
• |
• |
|
|
|
70°C |
|
|
•• |
50 |
OUI |
N/A |
|
OUI |
|
|
• |
• |
• |
|
|
|
40°C |
•• |
|
•• |
32 |
|
N/A |
|
OUI |
N/A = OPTION NON DISPONIBLE |
|
* AVEC DE L'EAU CHAUDE LE TEMPS RESTANT AVANT LA FIN DU PROGAMME |
||||||||||||||
|
|
|
|
|
|
DE LAVAGE EST AUTOMATIQUEMENT AFFICHÉ EN COURS DE CYCLE. |
|
|||||||||
16 |
17 |

Congratulations!
Thank you for choosing a Candy appliance; quality dishwashers which guarantee high performance and reliability.
Candy manufacture a vast range of domestic appliances: washing machines, washer/dryers, cookers, microwave ovens, ovens and hobs, refrigerators and freezers.
Ask your dealer for the catalogue with the complete range of Candy products.
Please read this booklet carefully as it provides important information regarding the safe
together with some useful advice on how to achieve the best results from your dishwasher.
For future reference please keep this instruction booklet in a safe place.
Guarantee
This appliance is supplied with a guarantee certificate which allows free use of the Technical Assistance Service, apart from a fixed call out charge, for a period of one year from the date of purchase.
Remember to post part A of the guarantee certificate within 10 days of the purchase date.
Part B should be filled in and retained by you, to be shown to the person from the Technical Assistance Service if required. You should also keep your sales receipt.
Contents
Description of the controls |
Page 19 |
|
Page 19 |
||
Technical data |
||
Page 20 |
||
Operating the programmes and special functions |
||
Page 22 |
||
Water softener setting |
||
Page 23 |
||
The waterblock system |
||
Page 24 |
||
Programmes selection |
||
|
18
Description of the control
H
|
|
|
|
|
|
|
|
|
|
|
|
|
55° |
50° |
|
|
|
|
|
|
|
|
||
|
|
|
|
|
|
|
|
|
|
|
|
|
|
|
|
|
|
|
|
|
||||
|
|
|
|
|
|
|
|
|
|
|
|
75° |
|
|
|
|
70° |
|
|
|
||||
|
|
|
|
|
|
|
|
|
|
|
|
|
|
|
||||||||||
|
|
|
|
|
|
|
|
|
|
|
|
|
|
|
|
|
|
|
|
|
|
|
|
|
|
|
|
|
|
|
|
|
|
|
|
|
|
|
|
|
|
|
|
|
|
|
|
|
|
|
|
|
|
|
|
|
|
|
|
|
|
|
|
|
|
|
|
|
|
|
|
|
|
|
|
|
|
|
|
|
|
|
|
|
|
|
|
|
|
|
|
|
|
|
|
|
|
|
|
|
A B C D E F GI |
L |
|
M |
A |
Digital led display |
|
G |
START programme button |
B |
Programme selection button |
|
H |
Salt level indicator light |
C |
Delay start button |
|
I |
Rinse aid indicator light |
D |
Economy button |
|
L |
On/off button |
E |
HPS button |
|
M |
Programme guide |
FHalf load button
Dimensions:
Height |
cm |
82 ÷ 88,5 |
Depth |
cm |
55 |
Width |
cm |
59,8 |
Depth with door open |
cm |
117 |
Technical Data
EN 50242 place load |
12 |
Capacity with pans and dishes |
8 persons |
Water supply pressure |
Min. 0,08 - Max 0,8 MPa |
Fuse |
(see rating plate) |
Power input |
(see rating plate) |
Supply voltage |
(see rating plate) |
|
19 |
Operating the programmes and special functions
Use in conjunction with programme guide
Setting a programme
Open the door press the I button; the last programme selected will appear on the display. To set a new programme, press the Programme Selection Button "P". When the required programme is shown in the display, press the "START" button. The time of the selected programme (in hours and minutes) will start to flash in the display.
Close the door and after an audible signal has sounded (if it has not been deactivated) the programme will start automatically.
Half load button
By pressing this button it is possible to wash a small quantity of crockery using only the upper basket for dishes and cutlery in the bottom basket.
This reduces water and energy consumption and requires a smaller quantity of detergent.
Please Note:
When the START Button has been selected it is not possible to deselect it.
HPS button (High Pressure System)
Your dishwasher is fitted with a two speed motor. By pressing the HPS Button, the motor operates at a higher speed which will result in higher water pressure, to attack the dirt.
The HPS option is particularly suitable for washing pans, pots and heavily soiled crockery.
Please Note:
This option must be selected before pressing the START button.
Economy button E
The "E" button reduces the temperature of the water during the last rinse, provides an energy saving of more than 20% and shortens the cycle.
Recommended for evening washes when the dishes are not required perfectly dry, straight away.
Interrupting a programme
It is not recommended that the door be opened while a programme is running, and especially not during the main wash phase and final drying.
However, the appliance will stop automatically when the door is opened.
At this point the various wash options can be programmed or cancelled. The current programme can also be cancelled.
If, the door is opened during a programme, the symbol for that programme will flash in the display and the machine stops.
Please Note:
If you open the door during the drying cycle an audible audio signal advises you that the drying cycle has not yet completed.
To restart the machine, press the "START" button and the time remaining for the programme will flash. Now close the door.
If you wish to cancel or change a programme that is running, carry out the following: open the door keep the "START" button pressed in until the number of the programme stops flashing. A new programme can now be set.
NB: If, on pressing the "START" button the symbol "00" starts to flash on the display, it means that there is water in the machine.
Close the door to allow the water to be discharged and wait for the audible signal, after which the new programme can be set.
Before starting a new programme, you should check that there is still detergent in the dispenser. If necessary, top up the dispenser.
End of programme
The end of the programme is indicated by an audible signal (if it has not been deactivated). When the door is opened the number of the programme that has just finished will appear on the display.
Important:
If the programme shown in the display starts to flash and the machine will not let any more programmes be selected, press the “START” button and keep this button pressed until the display stops flashing.
Delay Start programme button
To set the delay start programme press the button.
On the first press the current setting appears on the display. Each time the button is pressed the delayed time in one hour increments increases, up to a maximum of 19 hours.
Once set, wait until the selected time is confirmed when it appears in the display. Press the "START" button to start the countdown. If the countdown has not already been activated, the delay start can be cancelled by pressing the button
until the selected programme appears on the display.
The delay start can be cancelled at any time simply by keeping the "START" button pressed in until the required wash cycle appears on the display.
If you wish to see which programme has been selected, press the "Programme Selection" button “P”.
NB: If the door is opened during the countdown, for example to select one of the options (or to add more dishes), the "START" button should be pressed before closing the door again, in order to restart the countdown.
Activating and deactivating the audible signal
The audible signal function can be deactivated in the following way:
keep the Programme Selection Button (P) pressed in for a few seconds and at the same
time press the stop/start button |
I |
; if the |
|
|
symbol "b1" appears on the display the audible signal is activated. Press the programme selection button (P) again and the symbol "b0" will appear which means that the audible signal has been deactivated.
An audible signal sounds to indicate that the setting has been stored in memory.
Attention
This dishwasher is equipped with an anti-overflow safety device which works even when power is off, and if the water level is too high, the supply will automatically be closed off.
Important
To ensure the correct operation of the anti-overflow safety device, it is recommended not to move or to tilt the dishwasher during operation.
If it is necessary to move or to tilt the dishwasher, first make sure the washing cycle is finished and that no water is left in the tank.
The Dishwasher is able to self-assess a number of problems. The problem will be illustrated in the display window and by an audible signal.
PROBLEMS AUTOMATICALLY SIGNED
PROBLEM |
CAUSE |
REMEDY |
|
|
|
Display shows E1. |
Water supply switched off. |
Switch off appliance. |
|
|
Turn on water supply. |
|
|
Reset the cycle. |
|
|
|
Display shows E2. |
Problem with electronic temperature |
Call Service for assistance. |
|
control. |
|
|
|
|
Display shows E3. |
The Water Heater Element does not |
Clean the Filter Mesh and if the |
|
work properly or the filter mesh is |
problem continues please contact |
|
blocked. |
Service. |
|
|
|
Display shows E4. |
The appliance does not discharge |
Check : |
|
water. |
• That the discharge hose is not |
|
|
bent |
|
|
• Syphon is not blocked |
|
|
• Filters are not blocked |
|
|
|
20 |
21 |
Regulating the water softener with electronic programmer
The water softener can treat water with a hardness level of up to 90°fH (French grading) or 50°dH (German grading) through 8 settings.
The settings are listed in the table below:
|
Water |
Water |
Use of |
Water |
|
|
hardness |
hardness |
|||
Level |
|
|
regenerating |
softener |
|
°fH |
°dH |
||||
|
salt |
setting |
|||
|
(French) |
(German) |
|
|
|
0 |
0-5 |
0-3 |
NO |
D1 |
|
1 |
6-10 |
4-6 |
YES |
D1 |
|
2 |
11-20 |
7-11 |
YES |
D2 |
|
3 |
21-30 |
12-16 |
YES |
D3 |
|
4 |
31-40 |
17-22 |
YES |
D4 |
|
5 |
41-50 |
23-27 |
YES |
D5 |
|
6 |
51-60 |
28-33 |
YES |
D6 |
|
7 |
61-90 |
34-50 |
YES |
D7 |
|
|
|
|
|
|
The softener unit is set in the factory at level 4 (D4) as this satisfies the requirements of the majority of users. Regulate the setting of your water softener unit according to the degree of hardness of your water as follows: open the door, keep the delay start
button |
pressed in and at the same time press the stop/start button I . |
|
The factory setting |
will appear on the display. To change the setting, press the |
|
start delay button |
Each time you press that button the setting will increase by |
|
one level. When |
have reached "D7", the display will go back to "D1". |
|
When the required setting appears on the display, wait for an audible signal to confirm that the new setting has been stored in memory.
START DELAY |
STOP/START |
BUTTON |
BUTTON |
DISPLAY
The waterblock system
The waterblock system has been designed to improve the safety of your appliance, particularly when the machine is left unattended.
The waterblock system actually prevents flooding which might be caused by a machine malfunction or as a result of a fracture on the pipes.
How does waterblock work
The sump located in the base of the appliance collects any possible water leakage and operates a sensor which subsequently activates a valve placed under the water tap and stops any water from the supply even with the tap fully opened. If the box containing the electrical parts is damaged, remove the plug from the socket immediately.
To ensure perfect operation of the safety system, box “A” with the hose, should be connected to the tap as shown in Figure “1”. The inlet hose should not be cut, as it contains parts under load. If the hose is not long enough for correct connection, it must be replaced with a longer one. The hose can be obtained from your Service Agent.
A
Fig. 1
22 |
23 |

Information for the test laboratories
General programme comparison
Ref. EN 50242 Standards:
1)Upper basket position: low
2)Normal load
3)Shine setting: 5
4)Economy button pressed
5)Amount of detergent:
–8 gr for pre-wash
–22 gr for wash.
PROGRAMME SELECTION
Programme |
|
|
Description |
|
|
|
|
|
|
|
|
|
|
|
|
Intensive |
Once a day - for heavily soiled pans and |
||
75° C |
any other items that have been left all day |
|||
|
|
for washing. |
||
|
Normal |
Once a day - for normal soiled pans and |
||
65° C |
any other items that have been left all day |
|||
|
|
for washing. |
||
|
|
|
|
|
55° C |
Regular |
Suitable for heavily soiled items that are |
||
to be washed straight after a meal. |
||||
|
|
|||
|
|
|
||
|
|
|
|
|
|
Eco 50°C |
Energy Saving Programme suitable for |
||
50° C |
normal soiled items. Using detergents |
|||
|
|
with enzyme. |
||
|
|
|
Energy Saving Programme suitable for |
|
50° C |
Eco 50°C |
normal soiled items. Using detergents |
||
with enzyme. |
||||
|
|
|||
|
|
Programme standardised to EN 50242. |
||
|
|
|
|
|
|
Delicate |
Suitable for delicate crockery and |
||
50° C |
glassware. Also for less soiled items |
|||
|
|
excluding pans. |
||
|
|
|
|
|
45° C |
Glassware |
For washing glassware and delicate |
||
porcelain without dried-on material. |
||||
|
|
|
||
|
Cold pre-wash |
Short cold pre-wash for items that are |
||
|
stored in the dishwasher until you are |
|||
|
|
|
ready to wash a full load. |
|
|
|
|
|
|
|
|
|
Suitable for rinsing dishes which have not |
|
70° C |
Platewarming |
been used for some time and for warming |
||
|
|
dishes prior to serving. |
||
|
|
|
||
|
|
|
|
|
|
Rapid 32 minute |
Quick wash for dishes which are to be |
||
|
programme |
washed immediately after the meal. |
||
|
Wash load of 4/6 persons. |
|||
|
|
|
|
|
Wash with soaking cycle (Prewash)
If setting the Normal wash programme, a second dose of about 5 gr of detergent must be added to the machine in the prewash section of detergent compartment (2).
|
|
|
|
|
|
|
|
|
|
|
|
Avarage |
|
Special function |
|||
|
|
Check list |
|
|
Programme contents |
|
duration |
|
|||||||||
|
|
|
|
|
buttons available |
||||||||||||
|
|
|
|
|
|
|
|
|
|
|
|
in minutes |
|||||
|
Detergent for soaking (Prewash) |
Detergent for washing |
Clean filter |
Check rinse aid dispenser |
Check salt container |
Hot pre-wash |
Cold pre-wash |
Main wash |
First cold rinse |
Second cold rinse |
Hot rinse with rinse aid |
With cold water (15°C)* |
Delayed start |
|
Economy button |
HPS button |
Half load button |
|
|
|
|
|
|
|
|
|
|
|
|
|
|
|
|
|
|
|
• |
• |
• |
• |
• |
• |
|
75°C |
•• |
•• |
•• |
120 |
YES |
YES |
YES |
YES |
|
• |
• |
• |
• |
• |
|
•• |
65°C |
•• |
|
•• |
100 |
YES |
YES |
YES |
YES |
|
|
• |
• |
• |
• |
|
|
55°C |
•• |
|
•• |
90 |
YES |
YES |
YES |
YES |
|
• |
• |
• |
• |
• |
|
•• |
50°C |
•• |
|
•• |
125 |
YES |
|
YES |
YES |
|
• |
• |
• |
• |
• |
|
•• |
50°C |
|
|
•• |
130 |
YES |
YES |
YES |
YES |
|
|
• |
• |
• |
• |
|
|
50°C |
•• |
|
•• |
75 |
YES |
YES |
|
YES |
|
|
• |
• |
• |
• |
|
|
45°C |
•• |
|
•• |
75 |
YES |
YES |
|
YES |
|
|
|
• |
|
|
|
•• |
|
|
|
|
6 |
YES |
N/A |
YES |
YES |
|
|
|
|
|
|
|
|
|
|
|
|
|||||
|
|
|
|
|
|
|
|
|
|
|
|
|
|
|
|
|
|
|
|
• |
• |
|
|
|
70°C |
|
|
•• |
50 |
YES |
N/A |
|
YES |
|
|
• |
• |
• |
|
|
|
40°C |
•• |
|
•• |
32 |
|
N/A |
|
YES |
N/A = OPTION NOT AVAILABLE |
* WITH HOT WATER THE TIME REMAINING UNTIL THE END OF THE PROGRAMME |
|||||||||||||||
|
|
|
|
|
IS AUTOMATICALLY DISPLAYED WHILE THE PROGRAMME IS RUNNING. |
|||||||||||
24 |
25 |

Herzlichen Glückwunsch!
Sie haben eine ausgezeichnete Wahl getroffen! Denn die CandyHaushaltsgeräte zählen zu den Spitzenprodukten europäischer Haushaltsgeräte-Technologie.
Unsere Produkte sind kompromißlose Spitzengeräte für Kunden, die sich nur mit dem Besten zufriedengeben.
Es erfüllt uns deshalb mit großer Freude, daß wir Ihnen diese neuartige Geschirrspülmaschine präsentieren können: sie ist das Ergebnis jahrelanger Forschung in unseren Versuchslaboratorien, aber nicht nur das: hier haben wir auch unsere gediegenen Marktkenntnisse und, nicht zuletzt, die Früchte unserer intensiven Kundenbetreuung einbringen können. Sie haben ein Gerät von hervorragender Qualität und langer Lebensdauer gekauft, dessen Spülergebnisse Sie in jeder Hinsicht überzeugen werden.
Die Candy-Produktpalette umfaßt den gesamten Haushaltsgerätebereich - und alles in der hochwertigen Candy-Qualität: Waschautomaten, Geschirrspülmaschinen, Wäschetrockner, Gasund Elektro-Herde in allen Ausstattungsniveaus, Kühlschränke und Gefriergeräte.
Eine Bitte: Lesen Sie diese Broschüre mit größter Aufmerksamkeit, denn sie enthält nicht allein Hinweise auf Sicherheitsvorkehrungen bei Installation, Gebrauch und Instandhaltung, sondern auch einige wichtige Hinweise für den alltäglichen Umgang mit dem Gerät.
Bewahren Sie deshalb dieses Heft bitte sorgfältig auf.
Regelung für Garantieabwicklung
1. CANDY - Garantie
Während der Garantiezeit vorhandene oder auftretende Mängel für defekte Teile werden von uns kostenlos beseitigt, wobei wir alle erforderlichen Aufwendungen, insbesondere Transportwege, Arbeitsund Materialkosten tragen. Die Übernahme der Transportwegekosten entfällt sechs Monate ab Anlieferung beim Endverbraucher sowie ferner, wenn die Haushaltsmaschinen nach Erwerb an einen anderen Ort als den Wohnsitz oder die gewerbliche Niederlassung des Endverbrauchers verbracht worden ist. Die Garantie ist eine zusätzliche Leistung durch uns gegenüber dem Endverbraucher. Aus der Garantie können Folgeschäden nicht geltend gemacht werden.
2. Enstehung des Garantie-Anspruches
a)Voraussetzung für den Garantieanspruch ist, daß die Haushaltsmaschine durch uns in den Verkehr gebracht worden ist und Teil “B” der Garantiekarte innerhalb von zehn Tagen, ab Kaufdatum, vollständig ausgefüllt und die zuständige Kundendienstzentrale gesandt wird.
b)Der Garantieanspruch besteht nur für Erstkäufer.
3. Dauer
a)Die Garantiedauer beträgt 12 Monate. Ersetzte Teile gehen in unser Eigentum über. Für gewerblich benutzte Geräte beträgt die Garantiedauer sechs Monaten, ebenso für gemeinschaftlich benutzte Geräte. Die Garantiezeit für Teile, welche dem natürlichen Verschleiß unterliegen (z.B. Kontrollampen, Keilriemen, Bremsbeläge, Gummiteile) beträgt sechs Monate.
b)Ausgeführte Garantiearbeiten verlängern die Garantiezeit nicht. Es entsteht auch kein Anspruch auf Neubeginn der Garantiezeit. Wird ein Garantieanspruch von uns abgelehnt, so verjährt er spätestens sechs Monate nach Ablehnung.
4. Garantiearbeiten
Die Garantiearbeiten werden im Hause des Endverbrauchers ausgeführt, jedoch bei Fehlern, die nicht an Ort und Stelle behoben werden können, wird das Gerät in die nächste Kundendienststelle gebracht.
5. Garantiefortfall
a)Alle Mängel, die nicht auf Material - oder Fabrikationsfehler zurückzuführen sind, fallen nicht unter die Garantie. Hierunter fallen Schäden durch fehlerhafte installation, unsachgemässe Bedienung und Nichtbeachtung der Aufstellungsanweisung sowie Bedienungsanleitung. Von der Garantieverpflichtung weiter ausgeschlossen sind Schäden durch Transport, Lackschäden oder Schäden durch Brand und Wasser.
b)Keine Garantie wird bei Fremdeingriff oder bei Einbau fabrik fremder Ersatzteile gewährt, ebenso bei Entfernung oder Veränderung des Typenschildes oder, wenn dessen Angaben mit denen der Garantiekarte nicht übereinstimmen.
6. Erfüllungsort und Gerichtsstand ist der Sitz der örtlich zuständigen CANDY-Kundendienstzentrale.
Inhaltsverzeichnis
Beschreibung der Bedienelemente |
Seite |
28 |
Technische Daten |
Seite |
28 |
Beschreibung der Programme |
Seite |
29 |
Enthärtereinstellung |
Seite |
31 |
Liste der Programme |
Seite |
32 |
Waterblock |
Seite |
34 |
26 |
27 |
Beschreibung der Bedienelemente
H
|
|
|
|
|
|
|
|
|
|
|
|
|
|
55 |
50° |
|
|
|
|
|
|
|
|
|
|
|
|
|
|
|
|
|
|
|
|
|
|
|
|
|
|
|
|
|
|
|
|||
|
|
|
|
|
|
|
|
|
|
|
|
75° |
|
|
|
|
|
70° |
|
|
|
|||
|
|
|
|
|
|
|
|
|
|
|
|
|
|
|
|
|||||||||
|
|
|
|
|
|
|
|
|
|
|
|
|
|
|
|
|
|
|
|
|
|
|
|
|
|
|
|
|
|
|
|
|
|
|
|
|
|
|
|
|
|
|
|
|
|
|
|
|
|
|
|
|
|
|
|
|
|
|
|
|
|
|
|
|
|
|
|
|
|
|
|
|
|
|
|
|
|
|
|
|
|
|
|
|
|
|
|
|
|
|
|
|
|
|
|
|
|
|
|
|
A B C D E F GI |
L |
|
|
M |
A |
Digitales Display |
|
G |
T |
START Programmstart |
B |
Taste Programmwahl |
|
H |
Salzkontrollanzeige |
|
C |
Taste Startverzögerung |
|
I |
Kontrollampe Klarspülerfüllstand |
|
D |
Spartaste "E" |
|
L |
Ein-Aus-Taste |
|
E |
HPS Taste |
|
M |
Programmbeschreibung |
|
FTaste Sparspülprogramm 1/2
Abmessungen:
Höhe |
cm |
÷ 88,5 |
Tiefe |
cm |
55 |
Breite |
cm |
|
Tiefe bei geöffneter Tür |
cm |
117 |
Technische Daten:
Fassungsvermögen (EN 50242) |
Maßgedecke |
Ventildruck der Hydraulikanlage |
Min. 0,08 - Max 0,8 MPa |
Absicherung |
Matrikelschild) |
Gesamtanschlußwert |
Matrikelschild) |
Spannung |
Matrikelschild) |
|
28 |
Beschreibung der Programme
Programmwahl
Öffnen Sie die Tür und drücken Sie die Taste I Auf dem Display wird das zuletzt
gewählte Programm angezeigt.
Um ein neues Programm einzustellen, drücken
Sie die Programmwahltaste "P"; wenn auf dem Display das gewünschte Programm erscheint, drücken Sie auf die START-Taste. Auf dem
Display blinkt die Programmdauer des eingestellten Programmes in Stunden und
Minuten.
Schließen Sie die Tür. Das Programm startet automatisch nach einem akustischen Signal
(ertönt nicht, wenn es deaktiviert ist).
Taste Sparspülprogramm
Wenn wenig Geschirr werden soll, können Sie durch Drücken dieser Taste die
Funktion nur Oberkorbspülen wählen.
Das Geschirr wird hierzu nur in den Oberkorb geladen, während das Besteck wie üblich im
Besteckkorb im unteren Korb eingeordnet wird. Das Sparprogramm 1/2 ermöglicht eine
Reduzierung der Wasser-und Stromverbrauchswerte.
Setzen Sie entsprechend weniger Spülmittel ein
Achtung:
Nachdem Sie die START Taste gedrückt haben, ist diese Option nicht mehr einstellbar.
HPS Taste
Diese Geschirrspülmaschine kann in zwei verschiedenen Leistungsstufen betrieben werden. Durch Drücken der "HPS-Taste" entwickelt der Motor eine höhere Leistung, wodurch der Schmutz mit einer größeren Wassermenge und einem höheren Druck gelöst wird. Die "HPS-Taste" sollte vor allem für das Spülen von Töpfen zum Einsatz kommen.
Achtung:
Die Benutzung dieser Option muss vor der Betätigung der START Taste erfolgen.
Spartaste E
Durch die Taste "E" wird die Heizphase beim letzten Nachspülen reduziert. Die Taste "E" ermöglicht eine Energieersparnis von über 20% und verkürzt außerdem die Programmdauer.
Diese Option empfiehlt sich besonders am Abend und zu anderen Gelegenheiten, zu denen man das Geschirr nicht sofort ausräumen will oder kann.
29
Programmunterbrechung
Es empfiehlt sich nicht, die Tür während des Programmablaufs zu öffnen, besonders während des Hauptspülganges und der Endtrocknung. Die Maschine stellt sich auf jeden Fall beim Öffnen der Tür automatisch ab.
In dieser Zeit ist es möglich, die verschiedenen Optionen einoder auszuschalten und das laufende Programm zu löschen.
Wenn die Tür bei laufendem Programm geöffnet wird, blinkt die Aufschrift des Programmes auf dem Display und das Gerät schaltet sich automatisch ab.
Achtung:
Wenn der Deckel während der Trocknensphase geöffnet wird, warnt ein akustisches Signal, daß der Zyklus nicht beendet ist.
Um das Programm zu starten, drücken Sie auf die Start-Taste. Auf dem Display erscheint blinkend die Restzeit zum Programmende. Schließen Sie jetzt die Tür.
Wenn Sie das laufende Programm ändern oder ganz unterbrechen möchten, gehen Sie wie folgt vor: Öffnen Sie die Tür, drücken Sie START-Taste so lange, bis die Aufschrift des Programmes aufhört zu blinken. Jetzt können Sie ein anderes Programm einstellen.
Achtung: Wenn beim Drücken der START-Taste die Aufschrift "00" auf dem Display blinkt, heißt es, daß sich in der Maschine Wasser befindet. Schließen Sie in diesem Fall die Tür, damit das Wasser abgepumpt werden kann. Nach dem akustischen Signal ist es möglich, ein neues Programm einzustellen.
Vor Ingangsetzung eines neuen Programmes sollte man sich vergewissern, daß das Spülmittel nicht bereits ausgespült wurde. Sollte dies der Fall sein, füllen Sie die Kammer neu.
Programmende
Das Programmende wird durch ein akustisches Signal angezeigt. Beim Öffnen der Tür erscheint auf dem Display die Nummer des gerade durchgeführten Programmes.
Achtung: Falls das Display die blinkende Programmnummer anzeigt und das Gerät keine weitere Einstellung akzeptiert, halten Sie die START-Taste gedrückt, bis die Programmnummer aufhört zu blinken.
Taste Startverzögerung
Um die Startverzögerung einzustellen, betätigen
Sie die Taste |
. |
Beim ersten Drücken erscheint auf dem Display die aktuelle Einstellung. Bei jedem weiteren
 Loading...