


USER INSTRUCTIONS
OVENS
NOTICE D'EMPLOI ET D'INSTALLATION
DES FOURS ENCASTRABLES
MANUALE D’ISTRUZIONI
FORNO
INSTRUCCIONES DE USO
HORNOS EMPOTRABLES
EN 02
FR 12
IT 23
ES 33
CANDY HOOVER GROUP S.R.L. • Via Privata Eden Fumagalli • 20047 Brugherio Milano Italy

Safety Indications
•WARNING: the appliance and accessible parts become hot during use. Be careful not to touch any hot parts.
•WARNING: the accessible parts can become hot when the grill is in use. Children should be kept at a safe distance.
•WARNING: ensure that the appliance is switched off before replacing the bulb, to avoid the possibility of electric shocks.
•WARNING: in order to avoid any danger caused by the accidental resetting of the thermal interruption device, the appliance should not be powered by an external switching device, such as a timer, or be connected to a circuit that is regularly switched on and off.
•WARNING: before initiating the automatic cleaning cycle:
-clean the oven door;
-remove large or coarse food residues from the inside of the oven using a damp sponge. Do not use detergents;
-remove all accessories and the sliding rack kit (where present);
-do not place tea towels
•In ovens with meat probe it is necessary, before making the cleaning cycle, close the hole with the nut provided. Always close the hole with the nut when the meat probe is not used.
•Children under 8 should be kept at a safe distance from the appliance if not continuously supervised.
•Children should not play with the appliance. The appliance can be used by those aged 8 or over and by those with limited physical, sensorial or mental capacities, without experience or knowledge of the product, only if supervised or provided with instruction as to the operation of the appliance, in a safe way with awareness of the possible risks.
•Cleaning and maintenance should not be carried out by unsupervised children.
•Do not use rough or abrasive materials or sharp metal scrapers to clean the oven door glasses, as they can scratch the surface and cause the glass to shatter.
•The oven must be switched off before removing the removable parts
and, after cleaning, reassemble them according the instructions.
EN 02
•Only use the meat probe recommended for this oven. •Do not use a steam cleaner.
•Put the plug into a socket equipped with a third contact which corresponds to the earth and which must be connected and in operation. For models without a plug, attach a standard plug to the cable that is able to bear the load indicated on the tag. The earth conductor is yellow-green in colour. This operation should be carried out by a suitably qualified professional. In case of incompatibility between the socket and the appliance plug, ask a qualified electrician to substitute the socket with another suitable type. Connection to the power source can also be made by placing an omnipolar breaker between the appliance and the power source that can bear the maximum connected load and that is in line with current legislation. The yellow-green earth cable should not be interrupted by the breaker. The socket or omnipolar breaker used for the connection should be easily accessible when the appliance is installed.
•If the power cable is damaged, it should be substituted with a cable or special bundle available from the manufacturer or by contacting the customer service department.
If the cable is damaged, replace it promptly in accordance with the following instructions:
-open the cover of the terminal block;
-remove the power cable and substitute it with a similar cable which is compatible with the appliance (type H05VV-F, H05V2V2-F).
•This operation should be carried out by a suitably qualified professional. The earth conductor (yellow-green) must be approximately 10 mm longer than the other conductors. For any repairs, refer only to the Customer Care Department and request the use of original spare parts.
•Failure to comply with the above can compromise the safety of the appliance and invalidate the guarantee.
•Any excess of spilled material should be removed before cleaning. •During the pyrolytic cleaning process, surfaces can heat up more than usual, children should therefore be kept at a safe distance.
EN 03

Summary
General Instructions
5
Product Description
7
Use of the Oven
8
Oven Cleaning and Maintenance
9
Troubleshooting
1.1Safety indications
1.2Electrical safety
1.3Recommendations
1.4Installation
1.5Waste management
1.6Conformity declaration
2.1Overview
2.2Accessories
2.3First use
3.1Display description
3.2Cooking modes
4.1General notes on cleaning
4.2Maintenance
•Removal of the oven window
•Removal and cleaning of the glass door
•Changing the bulb
5.1 F.A.Q.
11
EN 04
1. General Instructions
We thank you for choosing one of our products. For the best results with your oven, you should read this manual carefully and retain it for future reference.
Before installing the oven, take note of the serial number so that you can give it to customer service staff if any repairs are required. Having removed the oven from its packaging, check that it has not been damaged during transportation. If you have doubts, do not use
the oven and refer to a qualified technician for advice. Keep all of the packaging material (plastic bags, polystyrene, nails) out of the reach of children. When the oven is switched on for the first time, strong
smelling smoke can develop, which is caused by the glue on the insulation panels surrounding the oven heating for the first time. This is absolutely normal and, if it occurs, you should wait for the smoke to dissipate before putting food in the oven. The manufacturer accepts no responsibility in cases where the instructions contained in this document are not observed.
NOTE: the oven functions, properties and accessories cited in this manual will vary, depending on the model you have purchased.
1.1 Safety Indications
Only use the oven for its intended purpose, that is only for the cooking of foods; any other use, for example as a heat source, is considered improper and therefore dangerous. The manufacturer cannot be held responsible for any damage resulting from improper, incorrect or unreasonable usage.
The use of any electrical appliance implies the observance of some fundamental rules:
-do not pull on the power cable to disconnect the plug from the socket;
-do not touch the appliance with wet or damp hands or feet;
-in general the use of adaptors, multiple sockets and extension cables is not recommended;
-in case of malfunction and/or poor operation, switch off the appliance and do not tamper with it.
1.2 Electrical Safety
ENSURE THAT AN ELECTRICIAN OR QUALIFIED TECHNICIAN MAKES THE ELECTRICAL CONNECTIONS.
The power supply to which the oven is connected must conform with the laws in force in the country of installation. The manufacturer accepts no responsibility for any damage caused by the failure to observe these instructions. The oven must be connected to an electrical supply with an earthed wall outlet or a disconnector with multiple poles, depending on the laws in force in the country of installation. The electrical supply should be protected with suitable fuses and the cables used must have a transverse section that can ensure correct supply to the oven.
CONNECTION
The oven is supplied with a power cable that should only be connected to an electrical supply with 220240 Vac 50 Hz power between the phases or between the phase and neutral. Before the oven is connected to the electrical supply, it is important to check:
-power voltage indicated on the gauge;
-the setting of the disconnector.
The grounding wire connected to the oven's earth terminal must be connected to the earth terminal of the power supply.
WARNING
Before connecting the oven to the power supply, ask a qualified electrician to check the continuity of the power supply's earth terminal. The manufacturer accepts no responsibility for any accidents or other problems caused by failure to connect the oven to the earth terminal or by an earth connection that has defective continuity.
EN 05
NOTE: as the oven could require maintenance work, it is advisable to keep another wall socket available so that the oven can be connected to this if it is removed from the space in which it is installed. The power cable must only be substituted by technical service staff or by technicians with equivalent qualifications.
1.3 Recommendations
After each use of the oven, a minimum of cleaning will help keep the oven perfectly clean.
Do not line the oven walls with aluminium foil or single-use protection available from stores. Aluminium foil or any other protection, in direct contact with the hot enamel, risks melting and deteriorating the enamel of the insides. In order to prevent excessive dirtying of your oven and the resulting strong smokey smells, we recommend not using the oven at very high temperature. It is better to extend the cooking time and lower the temperature a little. In addition to the accessories supplied with the oven, we advise you only use dishes and baking moulds resistant to very high temperatures.
1.4 Installation
The manufacturers have no obligation to carry this out. If the assistance of the manufacturer is required to rectify faults arising from incorrect installation, this assistance is not covered by the guarantee. The installation instructions for professionally qualified personnel must be followed. Incorrect installation may cause harm or injury to people, animals or belongings. The manufacturer cannot be held responsible for such harm or injury.
The oven can be located high in a column or under a worktop. Before fixing, you must ensure good ventilation in the oven space to allow proper circulation of the fresh air required for cooling and protecting the internal parts. Make the openings specified on last page according to the type of fitting.
1.5 Waste management and environmental protection
This appliance is labelled in accordance with European Directive 2012/19/EU regarding electric and electronic appliances (WEEE). The WEEE contain both polluting substances (that can have a negative effect on the environment) and base elements (that can be reused). It is important that the WEEE undergo specific treatments to correctly remove and dispose of the pollutants and recover all the materials. Individuals can play an important role in ensuring that the WEEE do not become an environmental problem; it is essential to follow a few basic rules:
-the WEEE should not be treated as domestic waste;
-the WEEE should be taken to dedicated collection areas managed by the town council or a registered company.
In many countries, domestic collections may be available for large WEEEs. When you buy a new appliance, the old one can be returned to the vendor who must accept it free of charge as a one-off, as long as the appliance is of an equivalent type and has the same functions as the purchased appliance.
SAVING AND RESPECTING THE ENVIRONMENT
Where possible, avoid pre-heating the oven and always try to fill it. Open the oven door as infrequently as possible, because heat from the cavity disperses every time it is opened. For a significant energy saving, switch off the oven between 5 and 10 minutes before the planned end of the cooking time, and use the residual heat that the oven continues to generate. Keep the seals clean and in order, to avoid any heat dispersal outside of the cavity. If you have an electric contract with an hourly tariff, the "delayed cooking" programme makes energy saving more simple, moving the cooking process to start at the reduced tariff time slot.
1.6 Declaration of compliance
The parts of this appliance that may come into contact with foodstuffs comply with the provisions of EEC Directive 89/109.
By placing the 
 mark on this product, we are confirming compliance to all relevant European safety, health and environmental requirements which are applicable in legislation for this product.
EN 06
2. Product Description
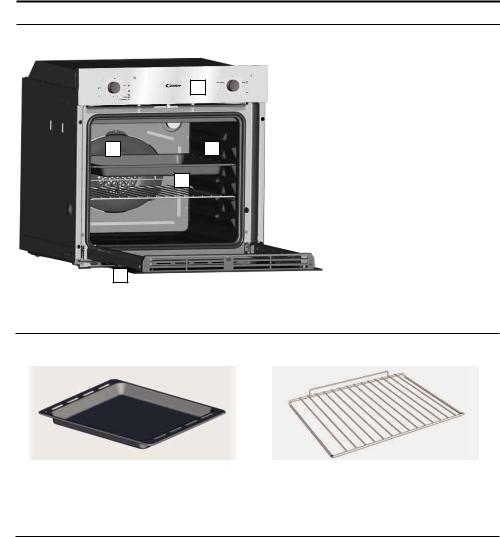
2.1 Overview
1
|
|
1. Control panel |
|
|
|
2. |
Shelf positions |
4 |
2 |
(lateral wire grid if included) |
|
3. |
Metal grill |
||
|
3 |
4. |
Drip pan |
|
5. |
Oven door |
|
|
|
||
5
2.2 Accessories
1 Drip pan |
|
2 Metal grill |
||||
|
|
|
|
|
|
|
|
|
|
|
|
|
|
Holds baking trays and plates.
Collects the residues that drip during the cooking of foods on the grills.
2.3 First Use
PRELIMINARY CLEANING
Clean the oven before using for the first time. Wipe over external surfaces with a damp soft cloth. Wash all accessories and wipe inside the oven with a solution of hot water and washing up liquid. Set the empty oven to the maximum temperature and leave on for about 1 hour, this will remove any lingering smells of newness.
EN 07
3. Use of the Oven
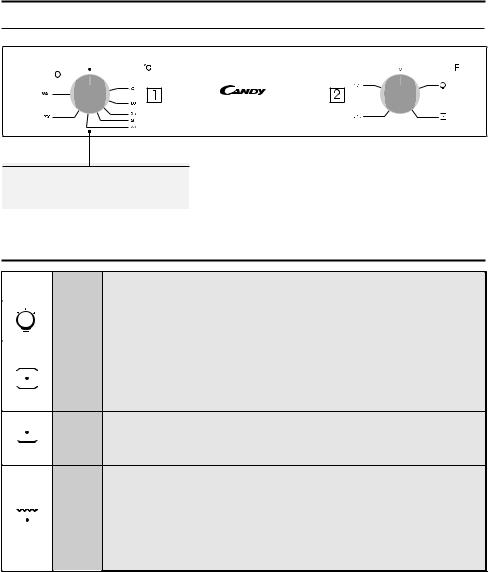
3.1 Display description
1.Thermostat selector knob
2.Function selector knob
3.2 Cooking Modes
Function |
T °C |
Function (Depends on the oven model) |
Dial |
range |
|
|
|
LAMP: Turns on the oven light. |
|
|
|
|
|
CONVENTIONAL COOKING: Both top and bottom heating elements are used. Preheat the |
* |
50 ÷ 280 |
oven for about ten minutes. This method is ideal for all traditional roasting and baking. For |
seizing red meats, roast beef, leg of lamb, game, bread, foil wrapped food (papillotes), |
||
|
|
flaky pastry. Place the food and its dish on a shelf in mid position. |
BOTTOM: Using the lower element. Ideal for cooking all pastry based dishes. Use this for 50 ÷ 230 flans, quiches, tarts, pate and any cooking that needs more heat from below.
GRILL: use the grill with the door closed.
The top heating element is used alone and you can adjust the temperature. Five minutes preheating is required to get the elements red-hot. Success is guaranteed for grills, kebabs and
L1 ÷ L5 gratin dishes. White meats should be put at a distance from the grill; the cooking time is longer, but the meat will be tastier. You can put red meats and fish fillets on the shelf with the drip tray underneath. The oven has two grill positions:
Grill: 2140 W Barbecue: 3340 W
*Tested in accordance with the CENELEC EN 60350-1 used for definition of energy class.
EN 08
4.Oven cleaning and maintenance
4.1General notes on cleaning
The lifecycle of the appliance can be extended through regular cleaning. Wait for the oven to cool before carrying out manual cleaning operations. Never use abrasive detergents, steel wool or sharp objects for cleaning, so as to not irreparably damage the enamelled parts. Use only water, soap or bleach-based detergents (ammonia).
GLASS PARTS
It is advisable to clean the glass window with absorbent kitchen towel after every use of the oven. To remove more obstinate stains, you can use a detergent-soaked sponge, well wrung out, and then rinse with water.
OVEN WINDOW SEAL
If dirty, the seal can be cleaned with a slightly damp sponge.
ACCESSORIES
Clean accessories with a wet, soapy sponge before rinsing and drying them: avoid using abrasive detergents.
DRIP PAN
After using the grill, remove the pan from the oven. Pour the hot fat into a container and wash the pan in hot water, using a sponge and washing-up liquid.
If greasy residues remain, immerse the pan in water and detergent. Alternatively, you can wash the pan in the dishwasher or use a commercial oven detergent. Never put a dirty pan back into the oven.
4.2 Maintenance
REMOVAL OF THE OVEN WINDOW
1.Open the front window.
2.Open the clamps of the hinge housing on the right and left side of the front window by pushing them downwards.
3.Replace the window by carrying out the procedure in reverse.
EN 09

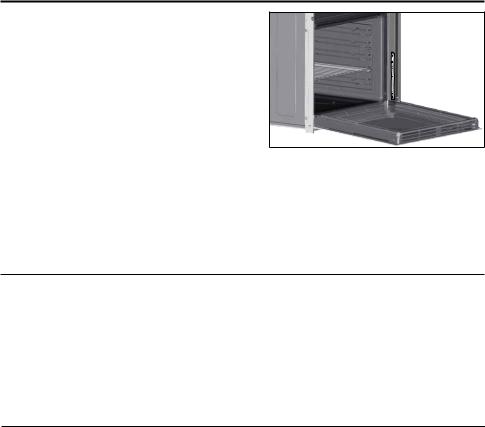
REMOVAL AND CLEANING OF THE GLASS DOOR
1. Open the oven door.
2.3.4. Lock the hinges, remove the screws and remove the upper metal cover by pulling it upwards.
5.6. Remove the glass, carefully extracting it from the oven door (NB: in pyrolytic ovens, also remove the second and third glass (if present)).
7. At the end of cleaning or substitution, reassemble the parts in reverse order.
On all glass, the indication "Pyro" must be legible and positioned on the left side of the door, close to the left-hand lateral hinge. In this way, the printed label of the first glass will be inside the door.
1. |
5. |
6.
2.
1
2
3
3.
7.
LOW-E
4.
EN 10
CHANGING THE BULB
1.Disconnect the oven from the mains supply.
2.Undo the glass cover, unscrew the bulb and replace it with a new bulb of the same type.
3.Once the defective bulb is replaced, replace the glass cover.
5. Troubleshooting
5.1 FAQ
PROBLEM |
POSSIBLE CAUSE |
SOLUTION |
|
|
|
|
|
The oven does not heat up |
The clock is not set |
Set the clock |
|
|
|
|
|
The oven does not heat up |
The child lock is on |
Deactivate the child lock |
|
|
|
|
|
The oven does not heat up |
A cooking function and |
Ensure that the necessary |
|
temperature has not been set |
settings are correct |
||
|
|||
|
|
|
EN 11

Conseils De Securite
•ATTENTION: l'appareil et les parties accessibles deviennent chauds pendant l'utilisation. Veillez à ne pas toucher les élements chauffants.
•MISE EN GARDE: les parties accessibles peuvent devenir chaudes lorsque le gril est en cours d'utilisation. Les enfants doivent être maintenus à une distance de sécurité.
•ATTENTION: le four doit être éteint avant de changer l'ampoule, de manière à éviter tout risque de choc électrique.
•ATTENTION: pour éviter tout danger dû à une réinitialisation accidentelle, cet appareil ne doit pas être alimenté par un dispositif de commutation externe, comme une minuterie, ou connecté à un circuit qui est régulièrement allumé et éteint par l'utilisateur.
• ATTENTION: avant d’activer la fonction de nettoyage automatique :
-nettoyer la porte du four
-enlever avec une éponge humide les résidus les plus gros. Ne pas utiliser de détergents;
-sortir tous les accessoires ainsi que le kit éventuel de glissières coulissantes ;
-ne pas placer de torchons ou de maniques sur la poignée du four.
•Dans les fours avec sonde à viande, il est nécessaire, avant d'effectuer le cycle de nettoyage de refermer l'embout avec l'écrou fourni. Refermer toujours le trou avec l'écrou lorsque la sonde de viande n'est pas utilisé .
•Les enfants de moins de 8 ans doivent être tenus à l'écart à moins d'être surveillés continuellement.
•Les enfants ne doivent pas jouer avec l'appareil. Cet appareil n'est pas destiné à être utilisé par des personnes (y compris les enfants) dont les capacités physiques, sensorielles ou mentales sont réduites, ou ayant un manque d'expérience et de connaissances, à moins qu'elles n'aient été formées à l'utilisation de l'appareil, par une personne responsable de leur sécurité.
•Le nettoyage et entretien ne doivent pas être effectués par des enfants sans surveillance.
•Ne pas utiliser de matériaux rêches, abrasifs, ou de racloirs métalliques tranchants pour nettoyer les portes en verre du four car ils peuvent rayer la surface entrainant des risques d'exposions.
FR 12
•Le four doit être éteint avant le démontage des accessoires. Après
nettoyage, remonter les accessoires en suivant les instructions.
•Utilisez uniquement la sonde thermique recommandée pour ce four.
•Ne pas utiliser un nettoyeur à vapeur.
•Brancher la fiche dans une prise de courant équipée d’un troisième contact correspondant à la prise de terre. Monter sur le fil une prise normalisée capable de supporter la charge indiquée sur la plaquette. Le fil conducteur de masse à la terre est identifié par les couleurs jaune et vert. Veiller à ce que votre installation soit capable de supporter toute la puissance absorbée par le four. Si votre installation électrique n’est pas conforme faites la modifier par un électricien afin de prévenir tous risques. On peut également effectuer le branchement au réseau en interposant entre l’appareil et le réseau un interrupteur omnipolaire dimensionnée en fonction de la charge et conforme aux normes en vigueur. Le fil de terre jaune et vert ne doit pas être interrompu par l’interrupteur. La prise et l’interrupteur omnipolaire utilisés doivent être facilement accessibles une fois l’appareil électroménager installé.
•Si le cordon d'alimentation est endommagé, il doit être remplacé par un cordon spécial disponible auprès du fabricant ou de stations de dépannage agrées.
Si le câble est endommagé, remplacez-le rapidement en conformité
avec les indications suivantes:
-Ouvrir le couvercle de la boîte à bornes;
-Retirer le câble d'alimentation et le remplacer par un câble similaire adaptée à l'appareil (type H05VV-F, H05V2V2-F).
•Cette opération doit être effectuée par du personnel qualifié. Le conducteur de terre (jaune-vert) doit être environ 10 mm plus long que les conducteurs de ligne. Pour toute réparation, reportez-vous seulement à un centre de service technique agréé et demander l'utilisation de pièces de rechange d'origine.
•Le non respect de ce qui précède peut compromettre la sécurité de l'appareil.
•Tout excédent de produit déversé doit être enlevé avant de le nettoyer.
•Pendant la pyrolyse, les surfaces peuvent chauffer plus que d'habitude: les enfants doivent donc être maintenus à une distance de
sécurité.
FR 13

SOMMAIRE
Instructions Générales
15
1.1Indications de sécurité
1.2Sécurité électrique
1.3Recommandations
1.4Installation
1.5La gestion des déchets et la protection de l'environnement
1.6Déclaration de conformité
Description du produit |
2.1 Vue d'ensemble |
|
17 |
2.2 |
Accessoires |
2.3 |
Première utilisation |
|
Utilisation du Four |
3.1 |
Description de l'affichage |
18 |
3.2 Mode de cuisson |
|
|
|
|
Nettoyage du four et
maintenance
20
Dépannage
4.1Remarques générales concernant le nettoyage
4.2Entretien
•Retrait de la porte du four
•Retrait et nettoyage des vitres
•Remplacement de l'ampoule
5.1 F.A.Q.
22
FR 14
 Loading...