


CFNF3654
1
COMBINATI FROST FREE ..............................................................................da pag.1 a pag.2
IT
FROST FREE COMBIS .................................................................................. page 3 to page 4
GB
COMBINE NO FROST ............................................................................................. pages 5 à 6
FR
FROST-FREE KOMBINATIONEN ................................................................. Seite 7 bis Seite 8
DE
CONJUNTO DE FRIGORÍFICOS ..................................................................de pág.9 a pág.10
ES
COMBINADO SEM FORMAÇÃO DE GELO (FROST-FREE) ......................da pág. 11 à pág.12
PT
ȌȊīǼǿȅȀǹȉǹȌȊȀȉǼȈ ȂǼ ǹȊȉȅȂǹȉǾ ǹȆȅȌȊȄǾ ......................... Įȩ ıİȜ. 13 ȑȦȢ ıİȜ. 14
EL
CHŁODZIARKO-ZAMRAŻARKA FROST FREE ........................................ od str. 15 do str.16
PL
KOMBINOVANÉ CHLADNIČKY FROST FREE .............................. od strany 17 do strany 18
CZ
FROST-FREE-COMBINATIE .......................................................................pag. 19 t/m pag. 20
NL
HUURTUMATON YHDISTELMÄ ............................................................................... sivut 21-22
FI
FROSTFRITT KOMBISKAP .................................................................... fra side 23 til side 24
NO
FROSTFRITT KOMBISKÅP..... ............................................................. från sida 25 till sida 26
SV
FROSTFRIT KOMBISKAB ................................................................................fra s. 27 til s.28
DA

1 IT
COMBINATI FROST FREE
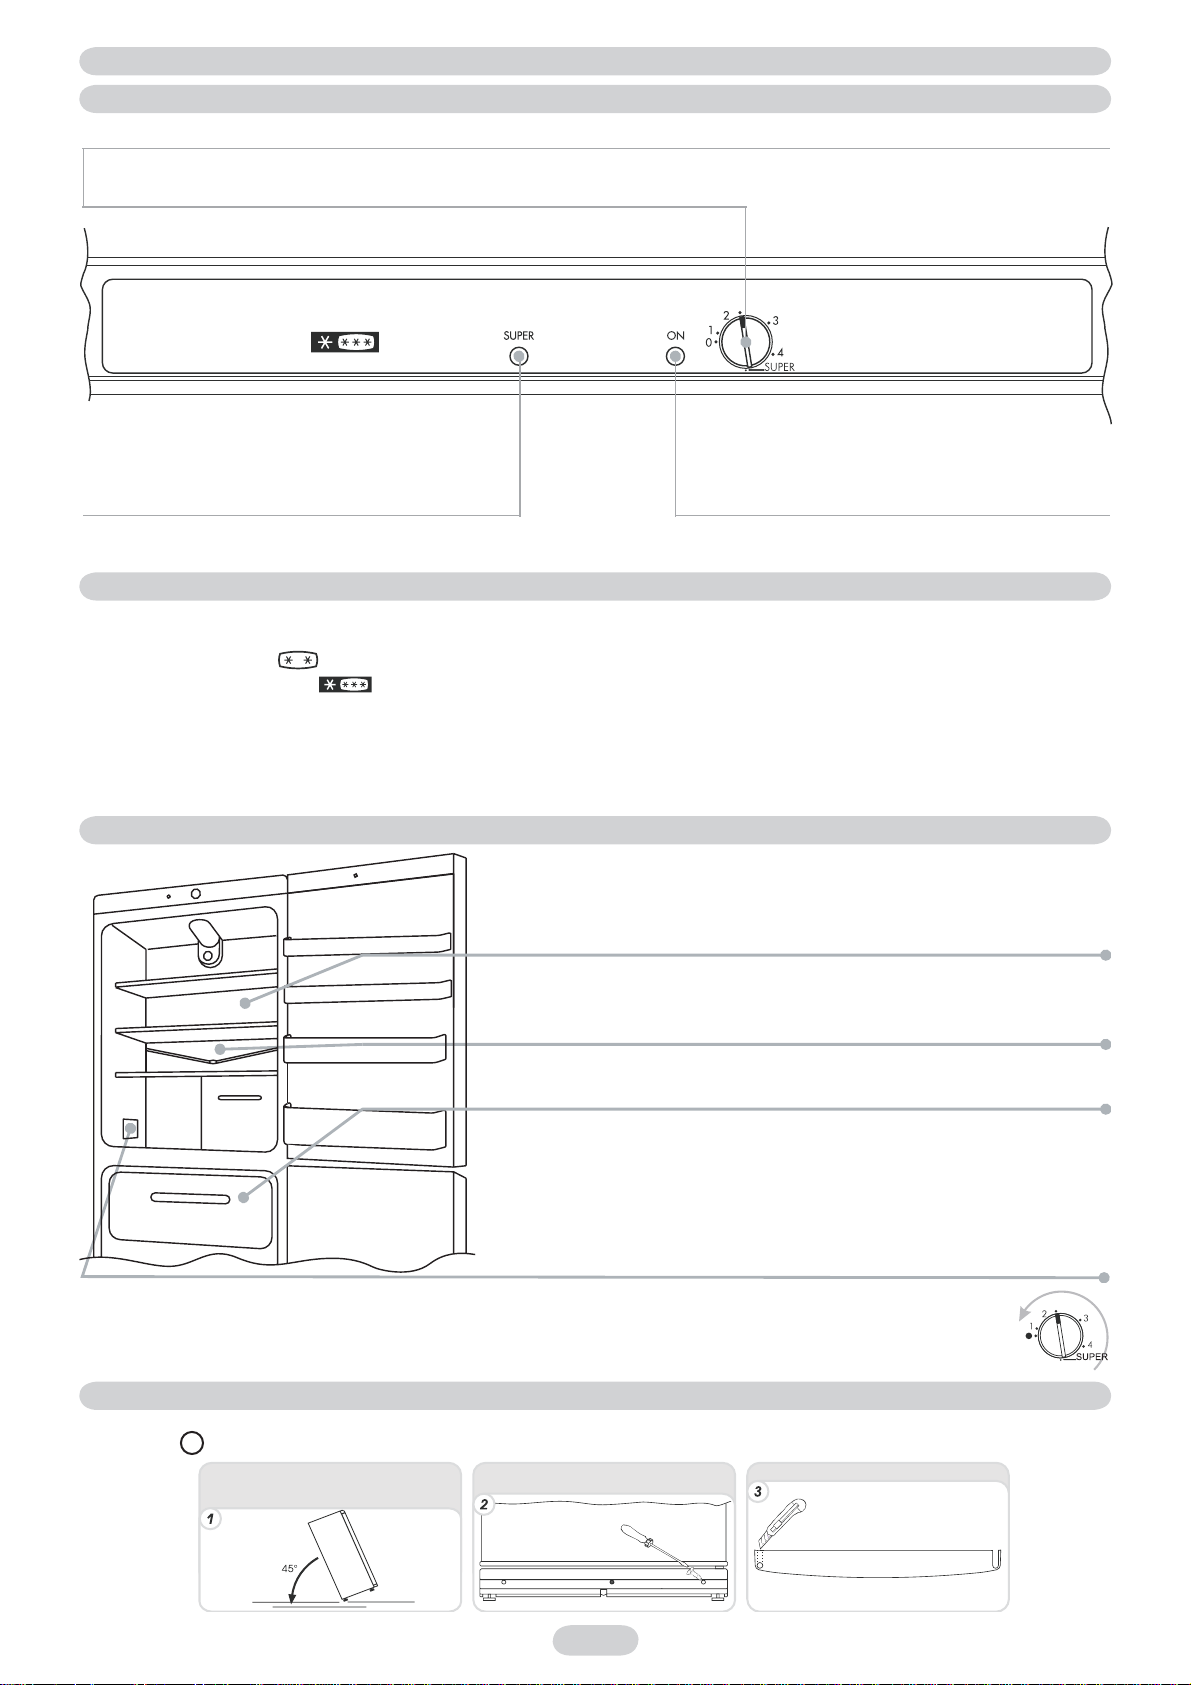
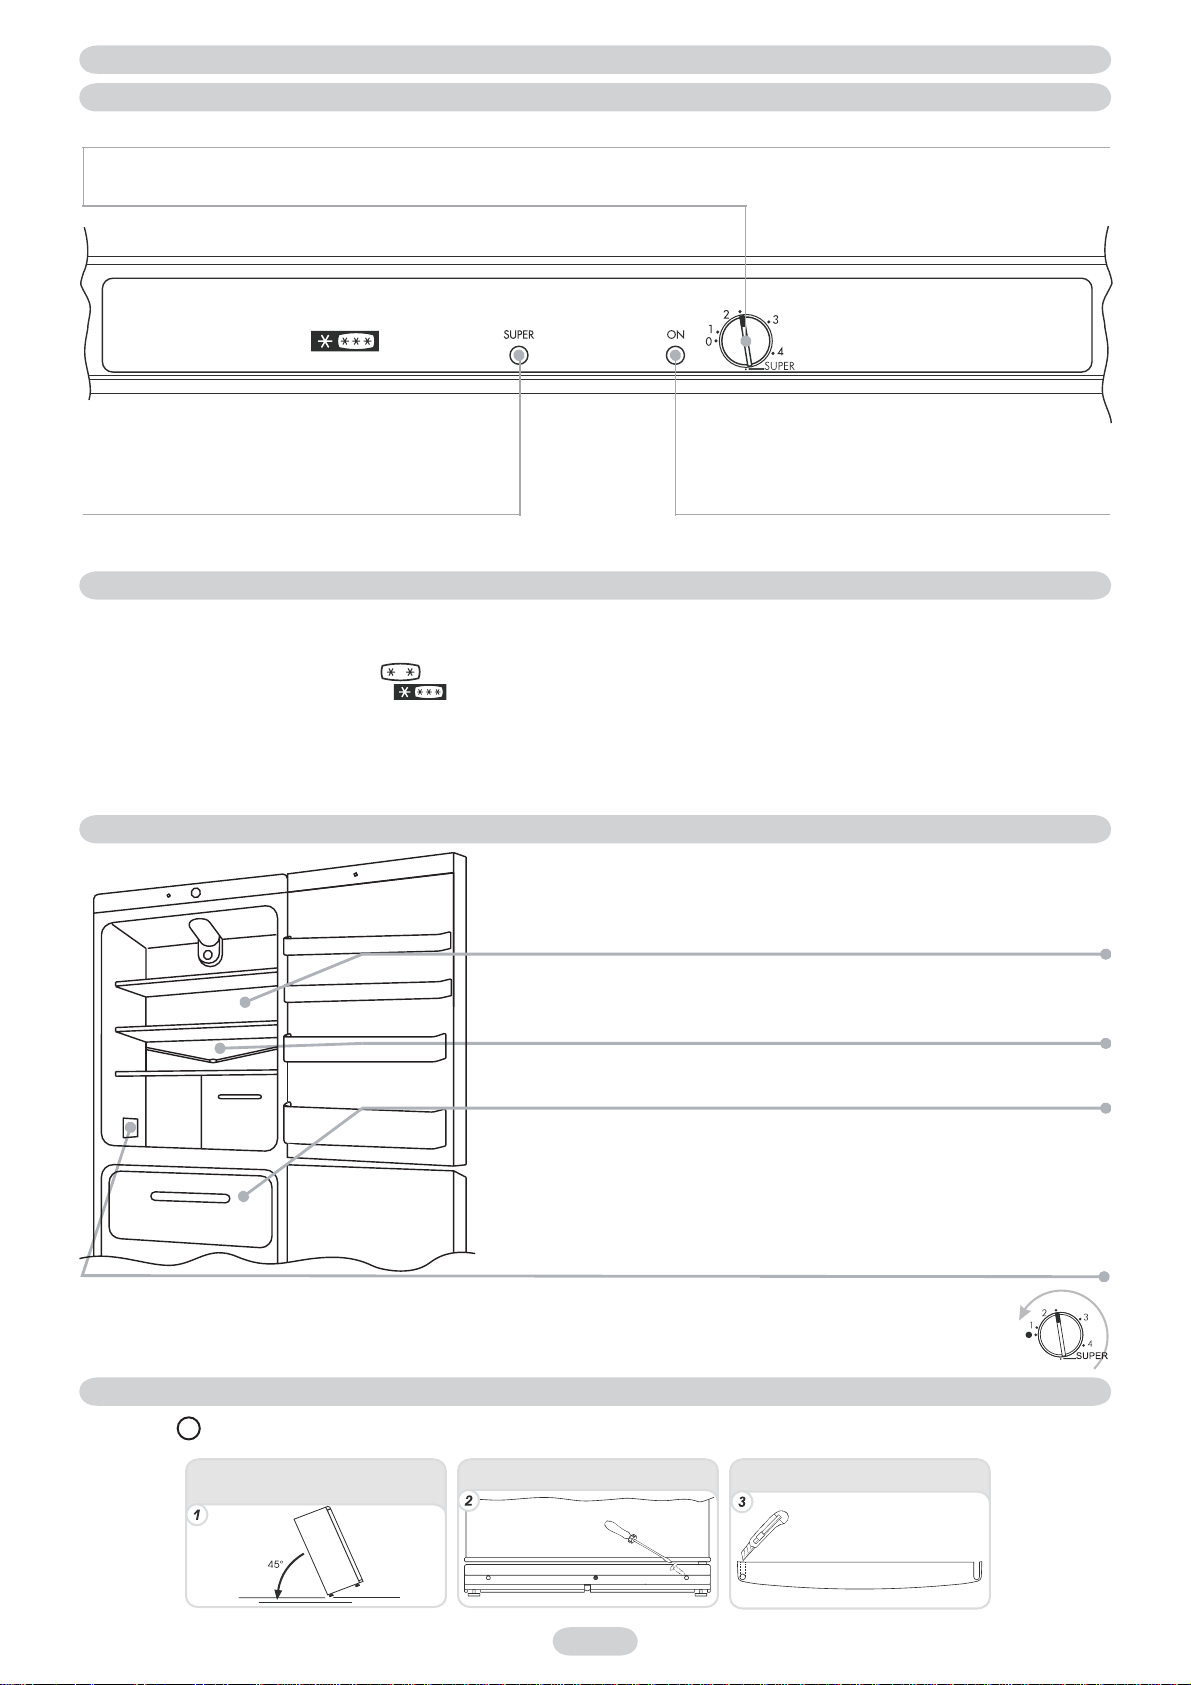
QUADRO COMANDI
Per raggiungere il quadro comandi è sufficiente aprire la porta superiore del frigorifero
La manopola consente di attivare tutto l’apparecchio e di impostare la temperatura del vano congelatore e Frigorifero. Le posizioni consigliate sono
2-3. Se si ruota sulla posizione “0“ si disattiva completamente l’apparecchio.
La spia arancio si accende quando la manopola termostato è
ruotata in corrispondenza della posizione SUPER. In questo
caso il compressore funziona continuamente.
CONGELAZIONE
(Figura 1)
La buona conservazione degli alimenti congelati è garantita in tutti gli scomparti del congelatore.
Per la congelazione del massimo carico dichiarato si consiglia di appoggiare gli alimenti direttamente sui ripiani, e togliendo temporaneamente
i cassetti.
In alcuni prodotti è presente una sezione
nella parte superiore, (vedi guida rapida).
Disporre i cibi da congelare nel cassetto
, ruotare in senso orario il termostato fino a raggiungere la posizione di SUPER, contemporaneamente
si accenderà la relativa spia arancio (vedi figura 1). Trascorse altre 24 ore la congelazione è terminata. Riportare quindi il termostato nella posizione
2-3. La funzione SUPER viene disattivata automaticamente dalla scheda elettronica dopo 26 ore.
La quantità massima di alimenti che è possibile congelare è indicata nella targhetta matricola, (vedi figura 2).
N.B. Per una miglior circolazione dell’aria, lasciare dello spazio tra gli alimenti ed evitare di ostruire le bochette dell’aria di
raffreddamento.
LO SBRINAMENTO
(Figura 2)
La presenza di un lieve strato di brina o di gocce d’acqua durante il funzionamento è da
considerarsi normale
E’ importante mantenere sempre pulito il condotto di scarico ed evitare di porre i cibi
a contatto con la parete della cella
Il vano freezer non necessita di sbrinamento poiché questo prodotto è dotato di un
sistema automatico che impedisce la formazione di ghiaccio (frost free)
Importante: In presenza di temperatura ambiente molto calda, l’apparecchio potrebbe funzionare in continuo, con
conseguente formazione anomala di brina sulla parete di fondo della cella frigo. In questi casi è necessario ruotare la
manopola frigo su numeri più bassi (1-2).
La spia verde “ON“ indica che l’apparecchio è in funzione.
La spia si accende qualunque sia la posizione del termostato
ad eccezione dello 0.
Importante: Alcuni apparecchi inizieranno a funzionare dopo un tempo di almeno 6 minuti dal momento in cui si è inserita la spina nella
presa della corrente e impostata la temperatura.
NB. In questa posizione è possibile trovare la targa matricola, contenente i dati da
comunicare all’Assistenza Tecnica qualora si verificasse un guasto.
A
Per invertire il senso di apertura delle porte seguire le indicazioni in relazione al tipo di testata e di cerniera di cui il vostro prodotto è costituito.
INVERSIONE DEL SENSO DI APERTURA DELLE PORTE
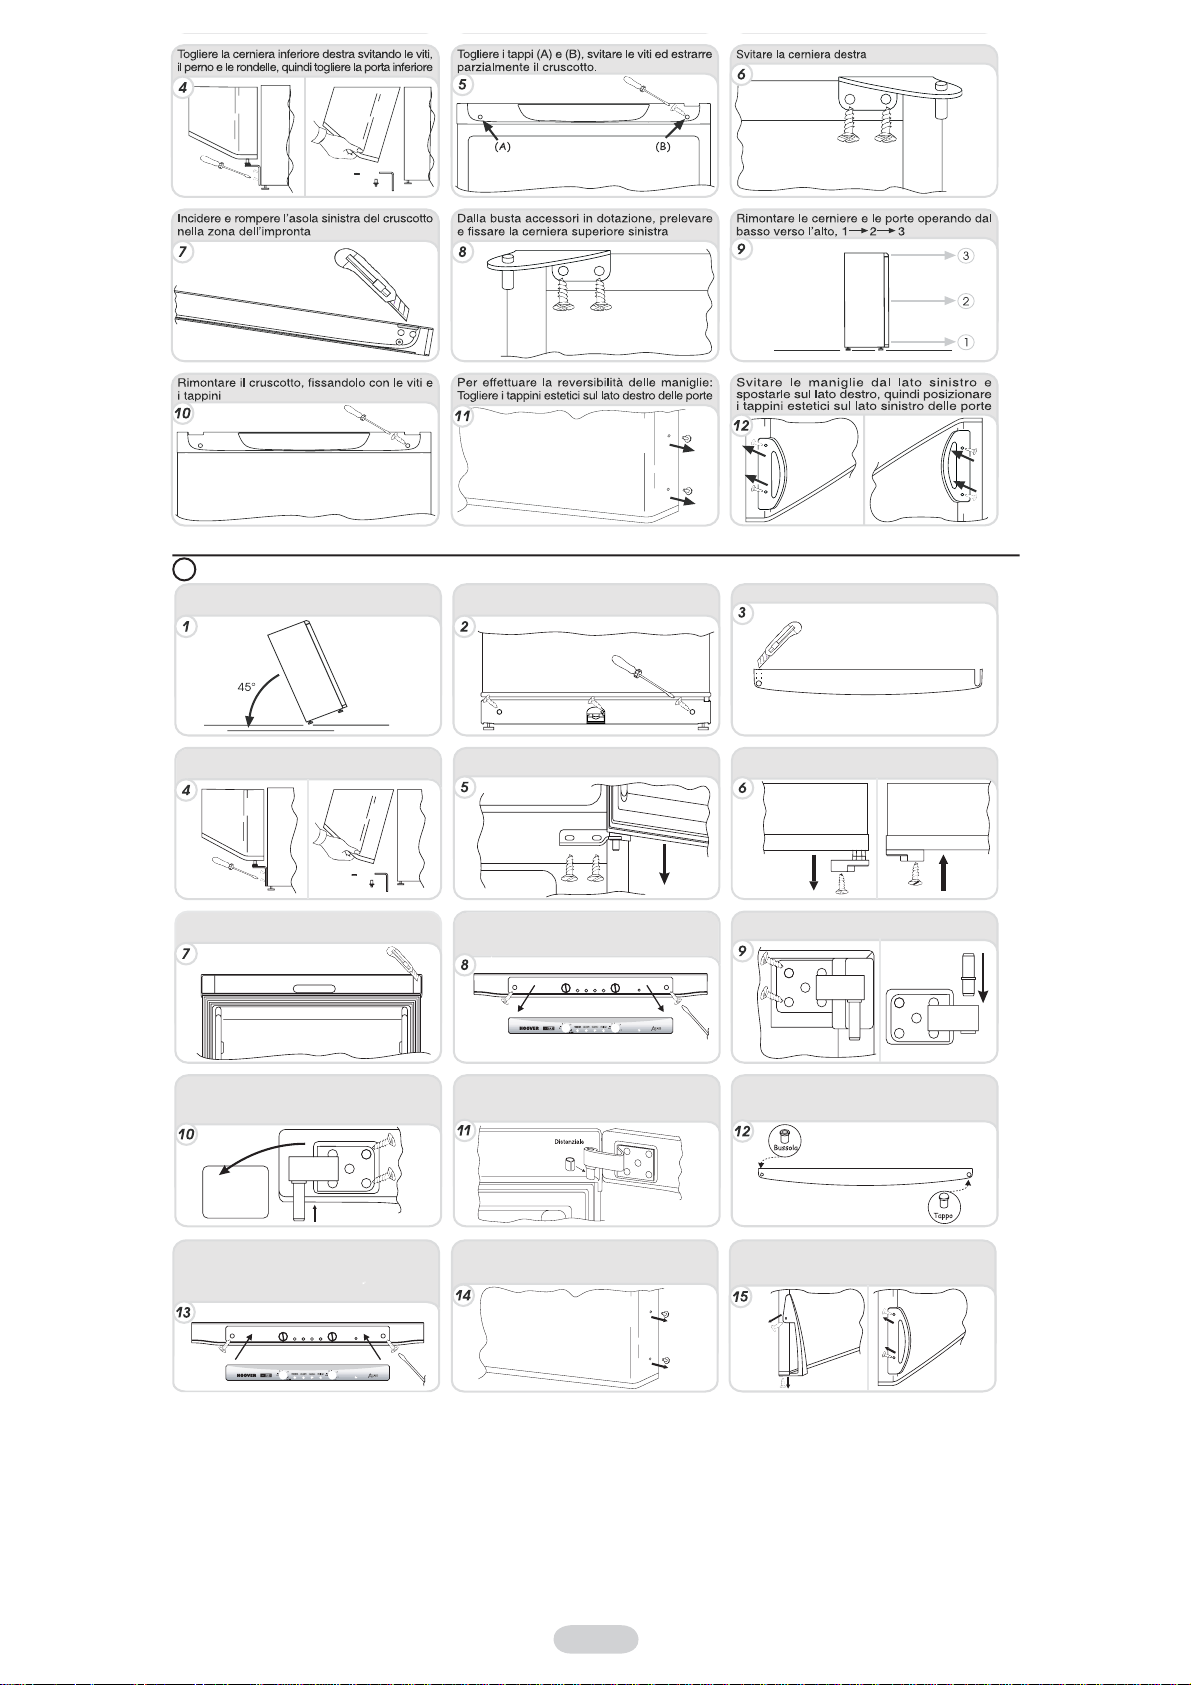
2 IT
Sdraiare o inclinare di 45° il frigorifero, per facilitare
le operazioni nella parte inferiore dello stesso
Incidere e rompere l'asola sinistra del cruscotto
nella zona dell'impronta
Se il cruscotto è di altro tipo, rompere la
membrana, inserire il perno e avvitare la cerniera
sul lato sinistro del cruscotto
Avvitare il cruscotto e rimontare l’etichetta
estetica. Riportare l’apparecchio in posizione
verticale ed attendere 2 ore prima di rimetterlo in
funzione
Per effettuare la reversibilità delle maniglie:
Togliere i tappini estetici sul lato destro delle
porte
Svitare le maniglie dal lato sinistro e rimontarle
sul lato destro del prodotto.
Posizionare i tappini sul lato sinistro.
Inserire il perno della cerniera e il distanziale
nella testata. Rimontare le cerniere e le porte
operando dal basso verso l’alto
Rimuovere il tappo sulla parte sinistra e inserirlo
sulla parte destra delle testatine centrali e
inferiore.
In presenza di questa tipologia di cruscotto, asportare
l’etichetta e svitare le viti, quindi estrarre parzialmente
il cruscotto.
Svitare la cerniera superiore destra ed invertire la
posizione del perno, quindi rimontarla sul lato sinistro
Svitare la cerniera centrale e togliere la porta
superiore
Togliere la cerniera inferiore destra svitando le viti, il
perno e le rondelle, quindi togliere la porta inferiore
Svitare il fermo dalla porta frigo e montare quello in
dotazione sull’altro lato
Rimuovere lo zoccolo inferiore, estraendo i
3 tappini protettivi e allentando le apposite viti
Forare lo zoccolo nella zona dell’impronta sinistra
1) rompere la
membrana
2) Inserire il perno
Riportare l‘apparecchio in posizione verticale e attendere 2 ore prima di rimetterlo in funzione
B
3
3 EN
FROST FREE COMBIS
CONTROL PANEL
Open the top door of the fridge in order to access the control panel.
Turn on the knob to switch on the appliance and set the temperature of the freezer compartment and Fridge. (Recommended setting – 2-3).
Turn the knob to “0” to turn off the appliance.
The orange light comes on when the thermostat knob is turned
to SUPER. In this case the compressor continues to function
as normal.
FREEZING
(Figure 1)
The preservation of frozen foods is guaranteed in all of the freezer’s compartments.
During maximum capacity of the freezer, it is advised to remove the drawers and to place the food directly on the shelves for optimal freezing.
In some products there is a
section in the top part, (see quick guide).
Place the foods to be frozen in the
drawer, turn the thermostat clock-wise to SUPER position, and the orange light will come on (see figure 1).
After 24 hours, freezing is completed. Therefore, reset the thermostat to position 2-3. The SUPER function is automatically disabled
from the circuit board after 26 hours.
The rating plate states the maximum quantity of foods that can be frozen, (see figure 2).
N.B. For better air circulation, leave some room in between the foods and avoid blocking the cooling air outlets.
DEFROSTING
(Figure 2)
A small amount of frost or drops of water on the back of the freezer compartment when
the freezer is working is normal.
Make sure the water outlet is always clean. Make sure foods do not touch the back or
sides of the freezer compartment.
The freezer compartment does not need to be defrosted because this product is equipped
with an automatic system which prevents frost from being formed (frost free).
Important: If the room temperature is very warm, the appliance may work continuously and a layer of frost will deposit on
the back of the fridge compartment. In this case, turn the knob to lower settings (1-2).
The green “ON” light shows that the unit is working. This light
is on irrespective of the knob setting, except for when the
knob is set to 0.
Important: Some appliances will start to function at least 6 minutes after the plug has been connected to the power supply outlet and the
temperature has been set.
NB. This is the rating plate. If you need to contact our Service Department in the
event of faults, remember to give them the information on the plate.
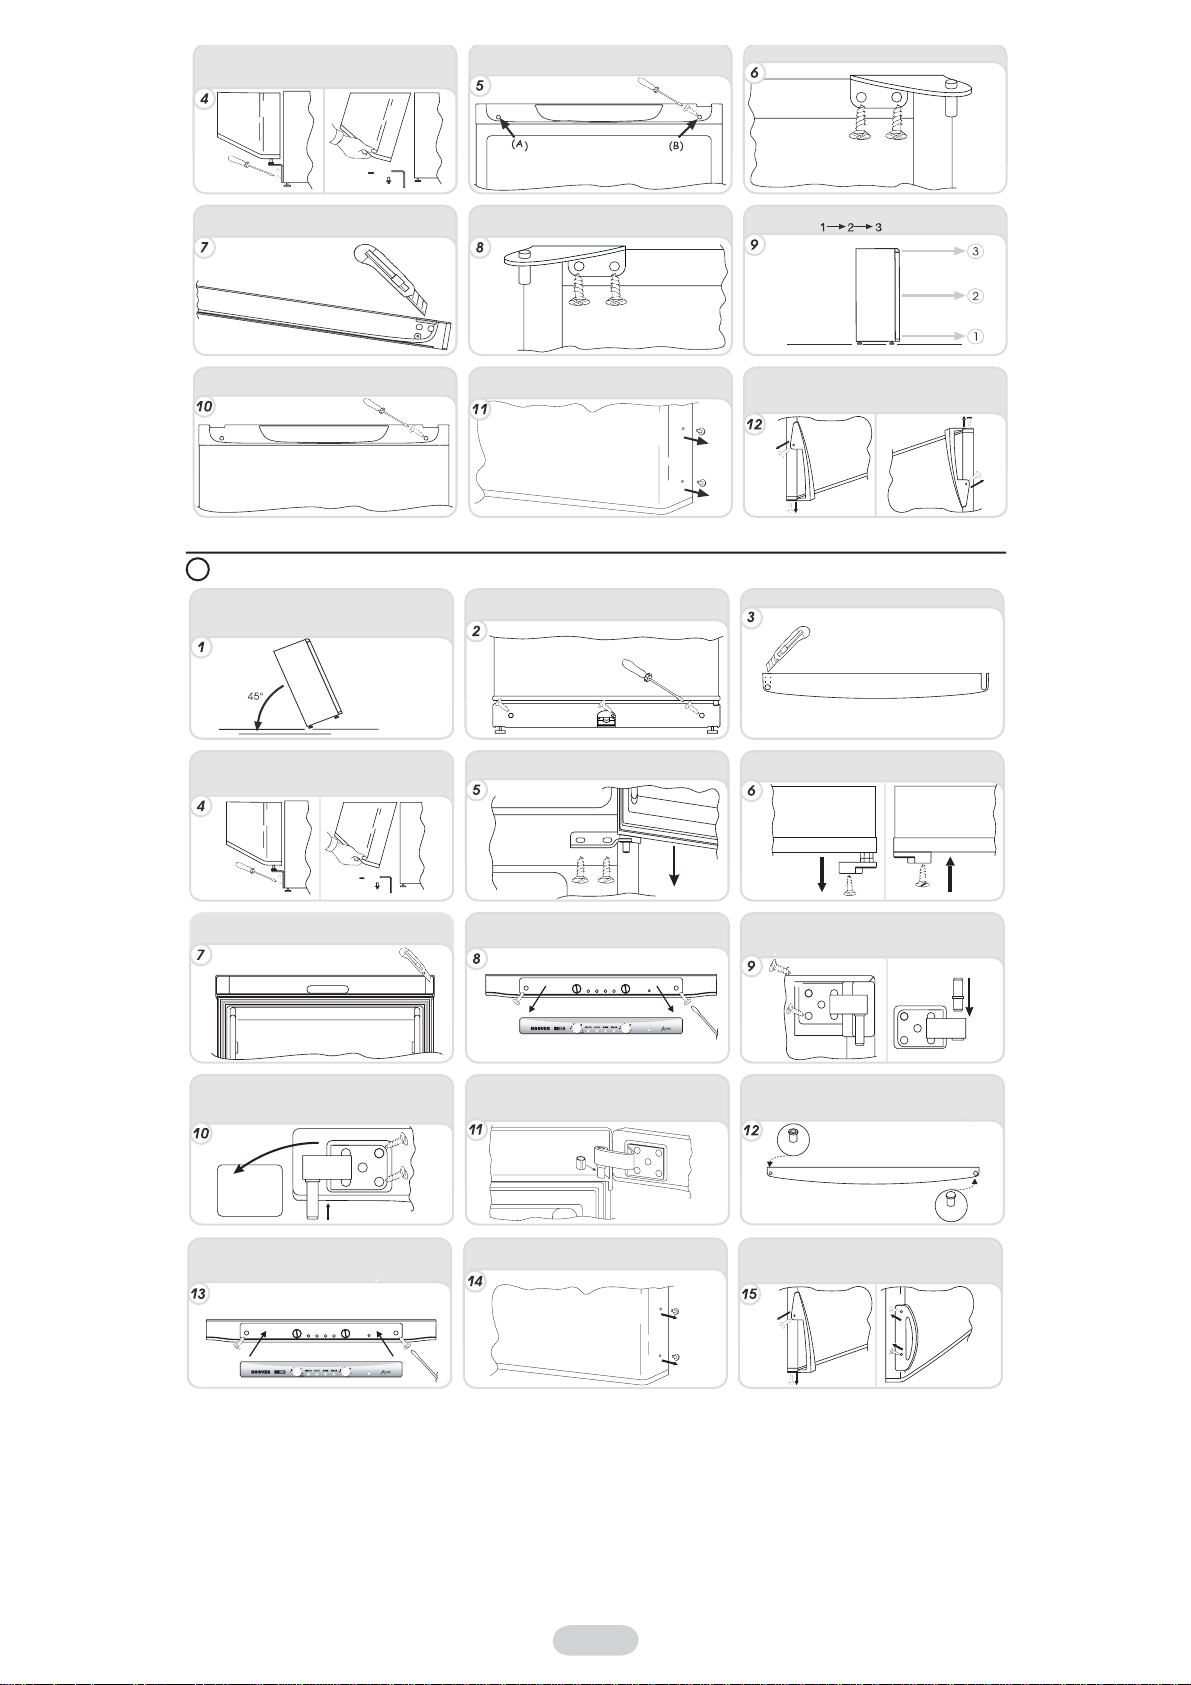
A
Place the appliance on the floor or at a 45° angle,
as it is necessary to work on the bottom of the
appliance.
Remove the lower plinth by pulling out the 3
protective plugs and by loosening the screws.
Drill the plinth on the marked left hand-side area.
REVERSING THE OPENING OF THE DOORS
In order to reverse the opening of the doors, follow the indications in relation to the insert and hinge type your product is made up of.
4
4 EN
Take off the bottom right-hand hinge by removing
the screws, pin and washers, then remove the
lower door.
Mark and break the left-hand slot on the panel, in
the insert area.
Flip the top left-hand hinge found in the
accessories kit.
Fit the panel, and secure with the screws and
caps.
To reverse the handles: remove the outer caps
from the right-hand side of the doors.
Remount the hinges and doors working from
bottom to top,
Unscrew the handles from the left-hand side and
move them to the right-hand side, then position
the outer caps on the left-hand side of the doors.
Remove the caps (A) and (B), loosen the screws
and partially remove the panel.
Unscrew the right hinge.
Place the appliance on the floor or at a 45° angle,
as it is necessary to work on the bottom of the
appliance.
Mark and break the left-hand slot on the panel, in
the insert area.
With another panel type, break the plastic
membrane and screw the hinge on the left-hand
side of the panel.
Screw the panel back on and place the outer
label back on. Put the appliance in the upright
position and wait two hours before turning it on.
To reverse the handles: remove the outer caps
from the right-hand side of the doors.
Unscrew the handles from the left-hand side and
remount them on the right-hand side of the product.
Place the plugs on the left-hand side.
Insert the pin in the hinge and the spacer in the
insert. Reassemble the hinges and doors
working from bottom to top.
Remove the plug on the left-hand side and insert
it on the right-hand side of the central and lower
inserts. Invert the bushing in the lower insert.
With this panel type, remove the label and screws,
then partially remove the panel.
Remove the screws from the top right hinge and
invert the position of the pin, then reassemble it on
the left-hand side.
Remove the screws from the central hinge and
remove the top door.
Take off the bottom right-hand hinge by removing
the screws, pin and washers, then remove the
lower door.
Unscrew the hinge from the fridge door and mount
the one supplied on the other side.
Remove the lower plinth by pulling out the
3 protective plugs and by loosening the screws.
Drill the plinth on the marked left hand-side area.
1) break the
plastic membrane
2) Insert the pin
spacer
bushing
plug
Put the appliance in an upright position and wait two hours before turning it on.
B
COMBINE NO FROST
PANNEAU DE COMMANDE
Ouvrez la porte supérieure du réfrigérateur afin d‘accéder au panneau de commande.
Tournez le bouton afin de mettre l‘appareil en marche et de régler la température du compartiment congélateur et du réfrigérateur. (Réglages
recommandés – 2-3). Mettre le bouton en position “0” afin d‘éteindre l‘appareil.
Le voyant orange s‘allume quand le bouton du thermostat est
sur la position SUPER. Dans ce cas, le compresseur continue
de fonctionner normalement.
CONGELATION
(Image 1)
La conservation d‘aliments surgelés est garantie dans tous les compartiments du congélateur.
Si la capacité maximum du congélateur est utilisée, il est conseillé de retirer les tiroirs et de placer les aliments directement sur les rayonnages pour
une congélation optimale.
Sur certains produits il existe une section
en partie haute, (voir guide de référence rapide).
Placez les aliments à congeler dans le tiroir
, tournez le thermostat dans le sens des aiguilles d‘une montre jusqu‘à la position SUPER. Le
voyant orange s‘allume (voir image 1).
La congélation est terminée après 24 heures. Par conséquent, vous pouvez repositionner le thermostat sur la position 2-3. La fonction SUPER est
automatiquement neutralisée à partir du circuit électrique après 26 heures.
La plaque de signalisation indique la quantité d‘aliments maximale pouvant être congelée. (voir image 2).
N.B. Pour garantir une meilleure circulation de l‘air, laissez de l‘espace entre les aliments et évitez d‘obturer les sorties d‘air de refroidissement.
DEGIVRAGE
(Image 2)
La présence d’une fine pellicule de givre, ou de gouttes d’eau, est normale durant le
fonctionnement de l’appareil.
Assurez-vous de toujours maintenir propre la zone d‘évacuation d‘eau. Assurez-vous que les
aliments ne soient pas en contact avec les parois de la cuve.
Le compatiment congélateur n‘a pas besoin d‘être dégivré car ce produit est équipé
d‘un système automatique qui évite la formation de givre (No Frost).
Important : Si la trempérature de la pièce est trop élevée, il se peut que l‘appareil fonctionne en continue et qu‘une couche
de givre se forme dans le fond du compartiment réfrigérateur. Dans ce cas, positionnez le bouton sur les réglages les
plus bas. (1-2).
Le voyant vert “ON” indique que l‘appareil est en marche. Le
voyant reste allumé peu importe la position du bouton, sauf
si ce dernier est en position 0.
Important : Certains appareils commencent à fonctionner 6 minutes au moins après que la prise ait été raccordée à l‘alimentation électrique
et que la température ait été réglée.
NB. Ceci est la plaque de signalétique. Si vous deviez contacter notre service
après vente en cas de dysfonctionnement, pensez à leur fournir les informations
figurant sur la plaque.
5 FR
A
Allongez l'appareil au sol ou à un angle de 45°
car il est nécessaire d'intervenir sur le bas de
l'appareil.
Retirez la plinthe inférieure en tirant sur les trois
caches protecteurs et en devissant les vis.
Percez la plinthe au niveau du repère situé à
gauche.
INVERSER LE SENS D‘OUVERTURE DES PORTES
Afin d’inverser le sens d’ouverture des portes, reportez-vous aux instructions relatives au type de charnière et de fronton
dont votre appareil est équipé.
 Loading...