

COMBINATI MONOCOMPRESORE ...............................................................da pag.1 a pag.4
IT
SINGLE COMPRESSOR COMBIS ................................................................. page 5 to page 8
COMBINÉ MONO-COMPRESSEUR .................................................................... pages 9 à 12
KÜHLKOMBINATIONEN MIT 1 KOMPRESSOR ..................................... Seite 13 bis Seite 16
COMBINADOS CON 1 TERMOSTATO ........................................................de pág.17 a pág.20
COMBINADO COM UM COMPRESSOR ...................................................da pág. 21 à pág.24
ΨΥΓΕΙΟΚΑΤΑΨΥΚΤΕΣ ΕΝΟΣ ΣΥΜΠΙΕΣΤΗ ...................................... αό σελ. 25 έως σελ. 28
CHŁODZIARKO-ZAMRAŻARKA Z JEDNĄ SPRĘŻARKĄ ........................ od str. 29 do str.32
KOMBINOVANÉ CHLADNIČKY S JEDNÍM KOMPRESOREM ..... od strany 33 do strany 36
KOEL/VRIESCOMBINATIE MET ENKELVOUDIGE COMPRESSOR .........pag. 37 t/m pag. 40
YHDEN KOMPRESSORIN YHDISTELMÄ ......................................................................sivut 41-44
ENKEL KOMPRESSOR KOMBISKAP .................................................... fra side 45 til side 48
KOMBINERAD ENKEL KOMPRESSOR ................................................. från sida 49 till sida 52
GB
FR
DE
ES
PT
EL
PL
CZ
NL
FI
NO
SV
KOMBINERETSINGLE-KOMPRESSOR ...........................................................fra s. 53 til s.56
DA
COMBINATI MONOCOMPRESSORE
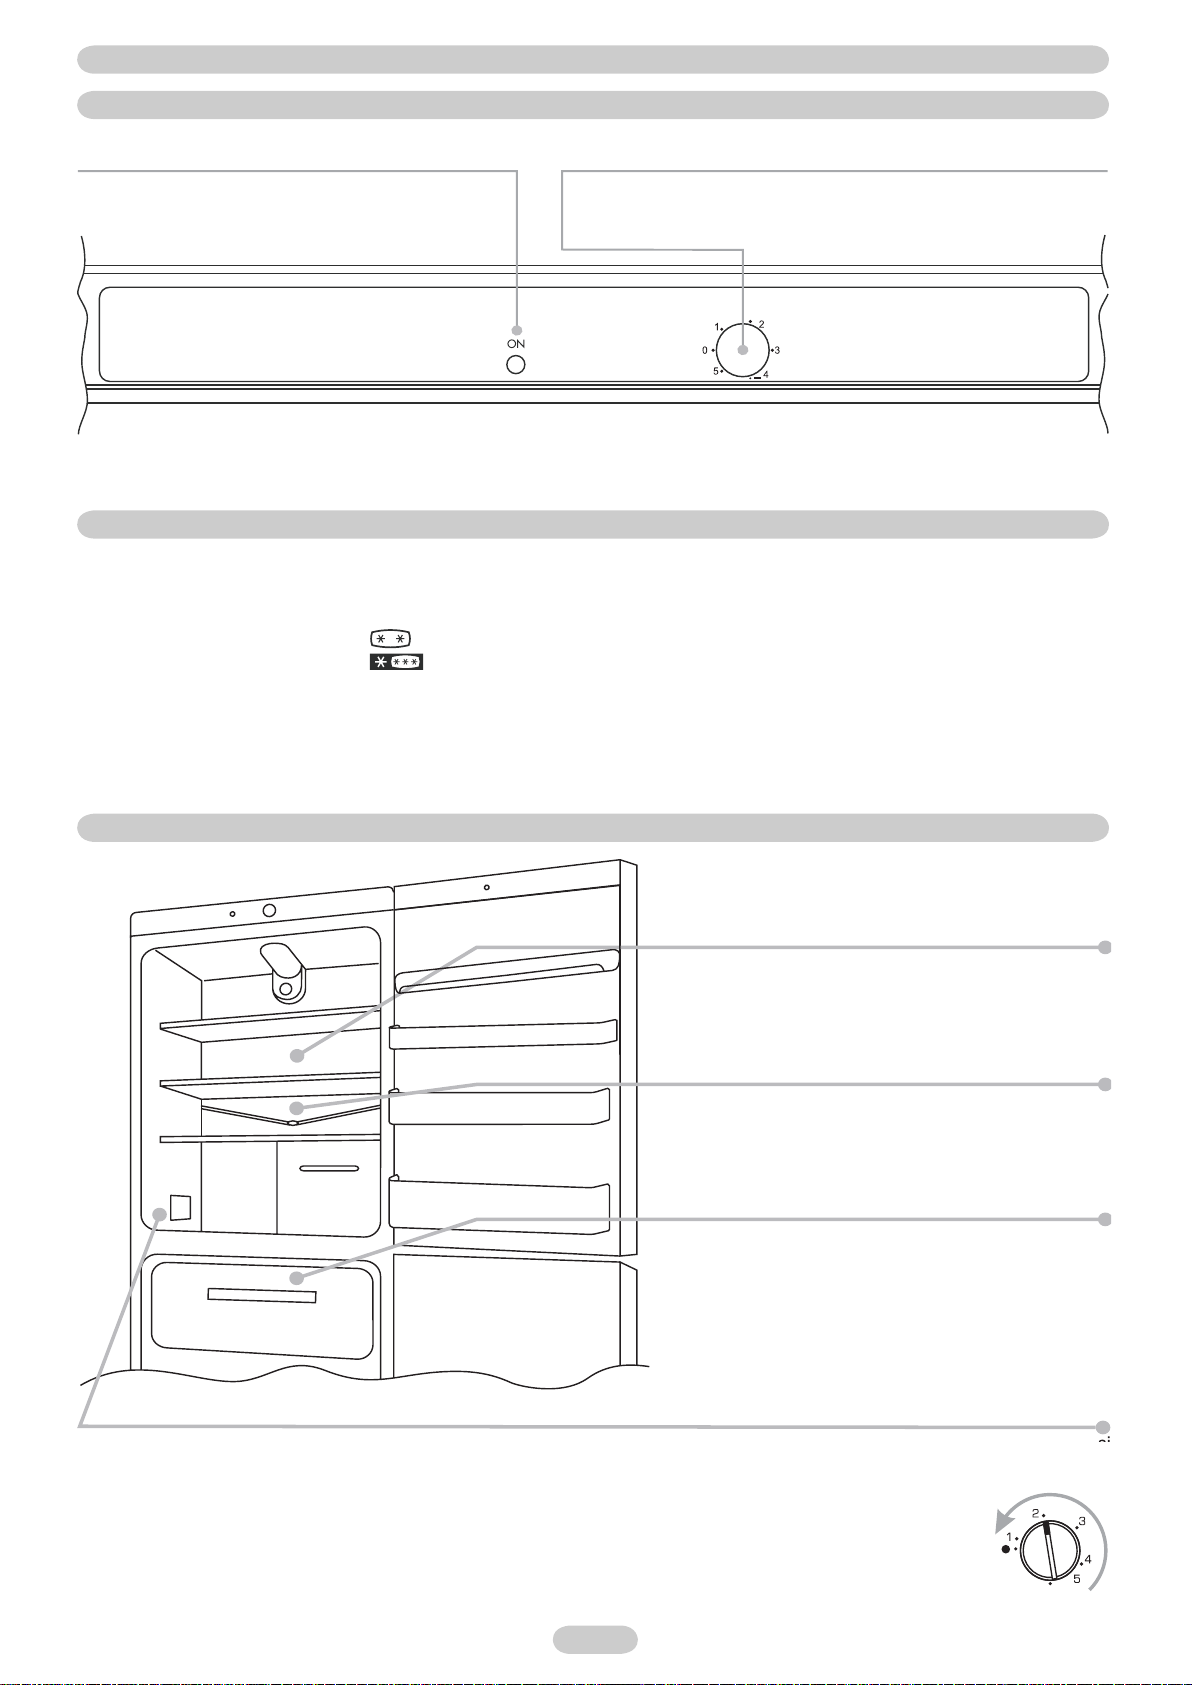
QUADRO COMANDI
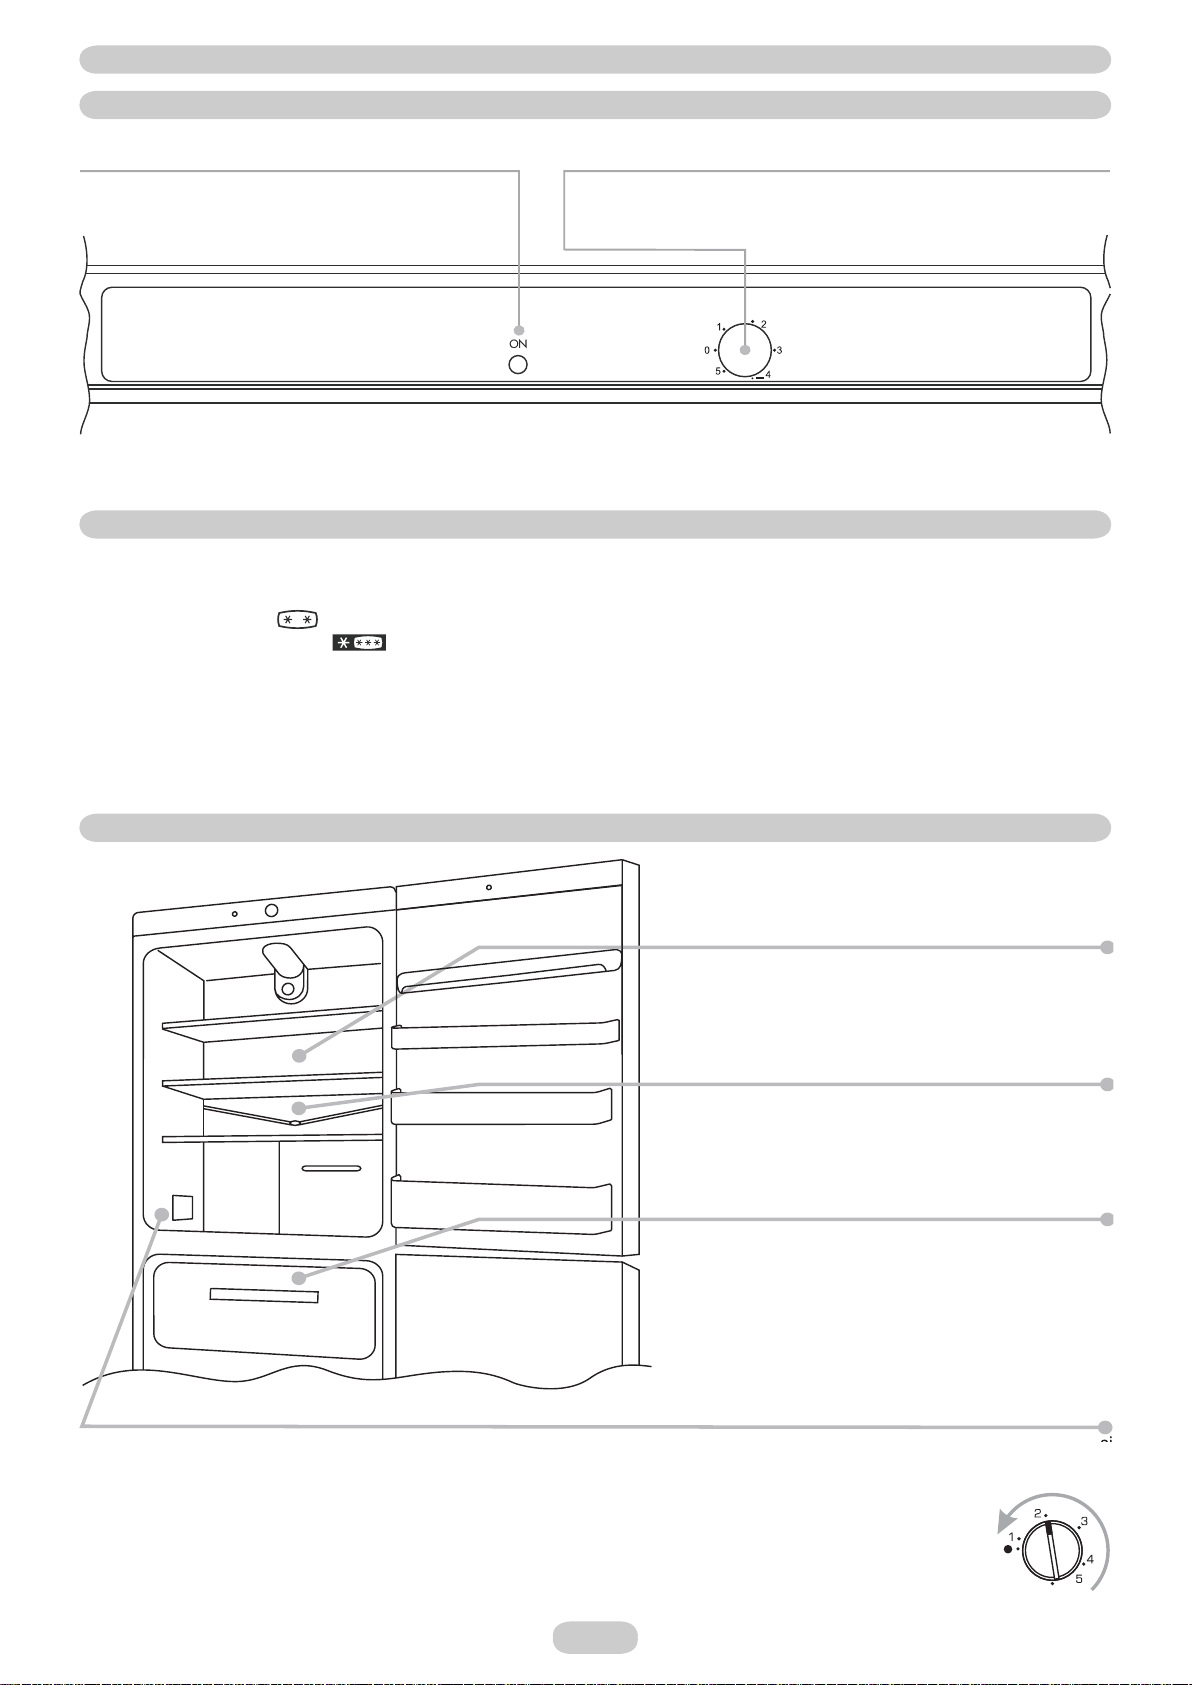
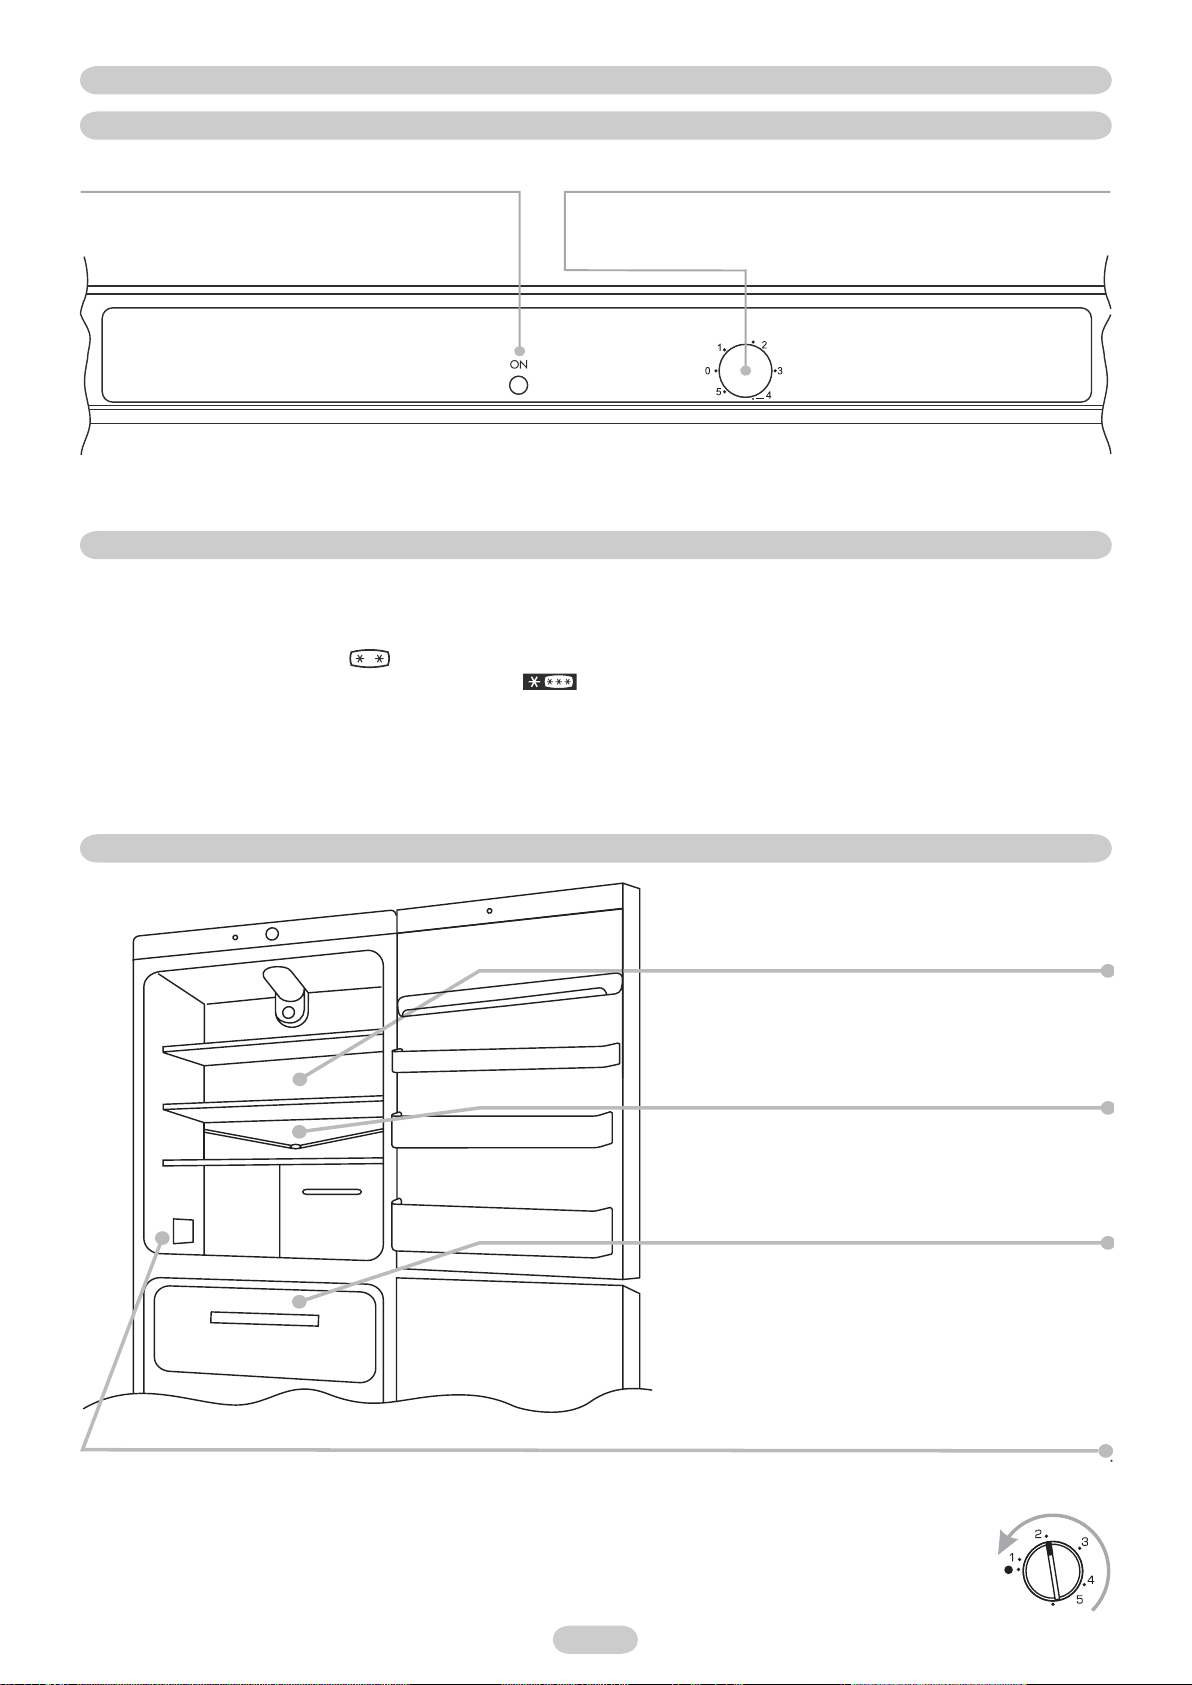
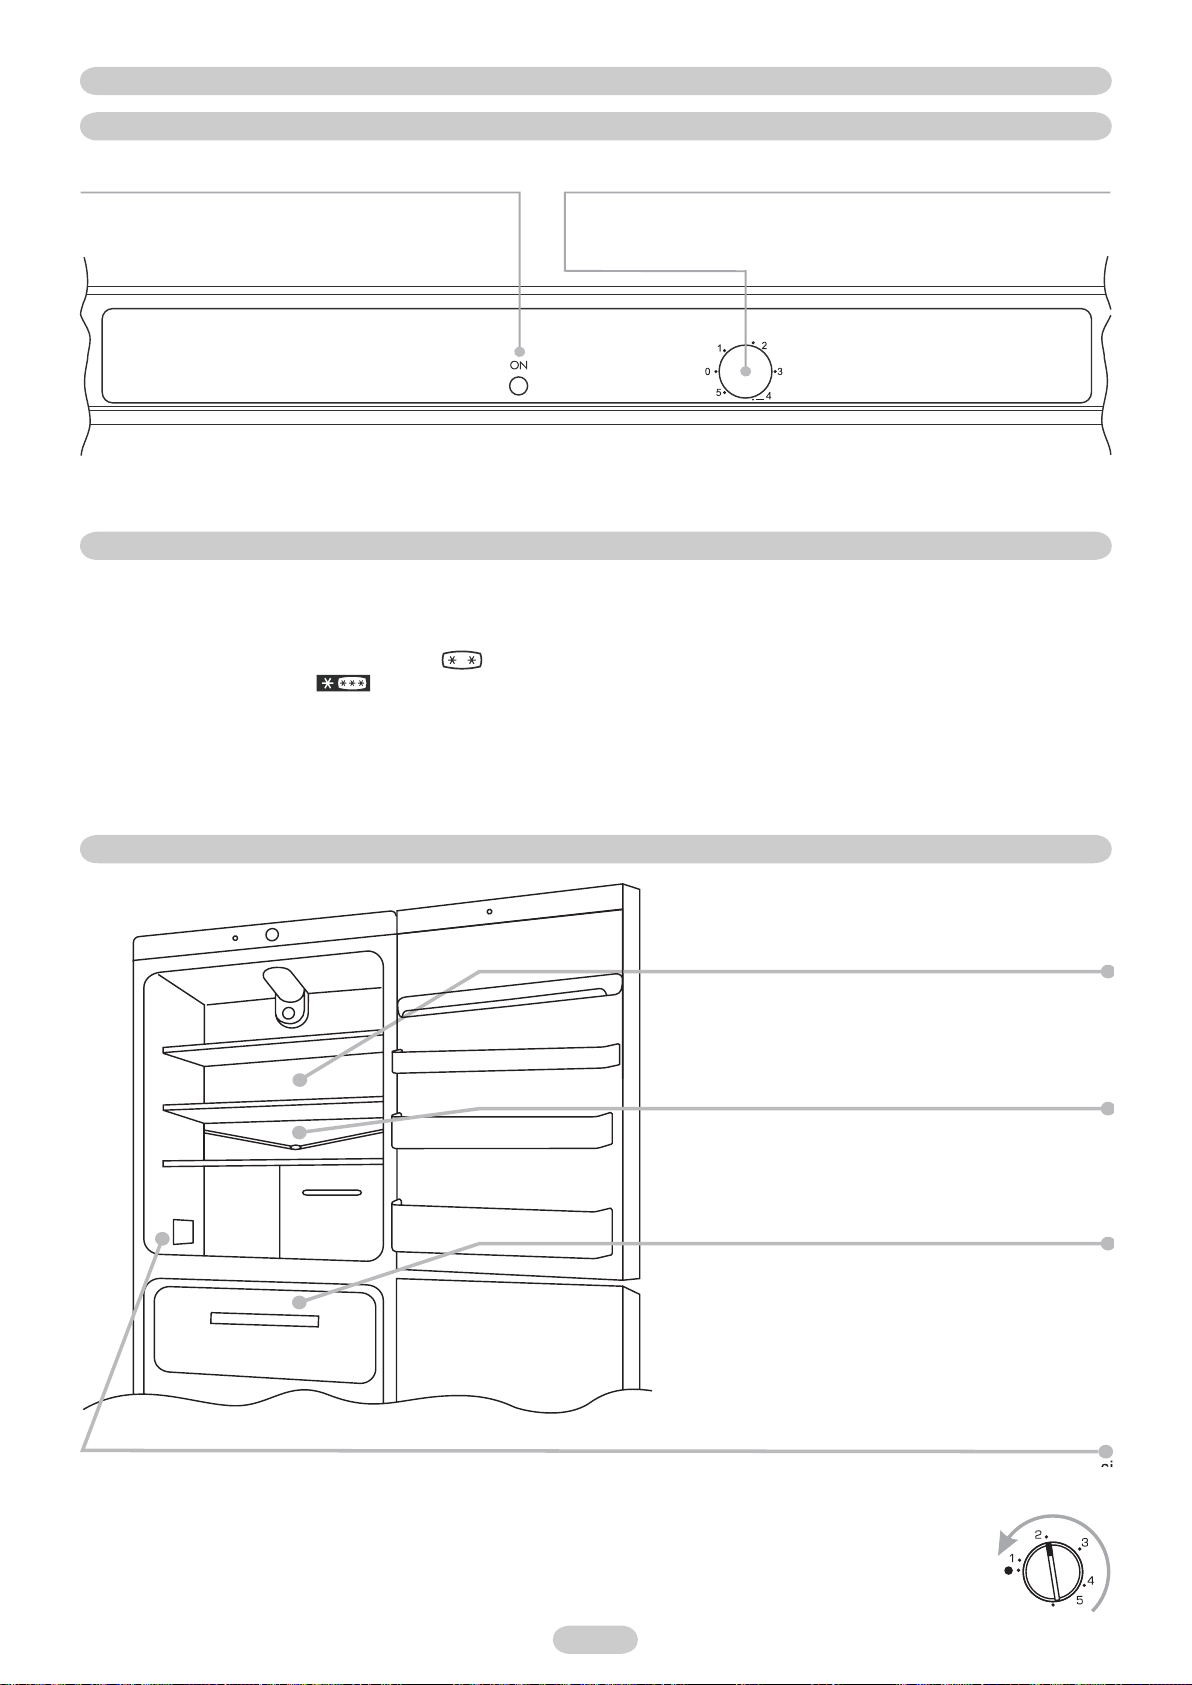
Per raggiungere il quadro comandi è sufficiente aprire la porta superiore del frigorifero.
La spia verde “ON” indica che l’apparecchio è in funzione. La
spia si accende qualunque sia la posizione del termostato ad
eccezione dello 0.
La manopola consente di attivare tutto l’apparecchio e di impostare la temperatura
del vano congelatore e Frigorifero. Le posizioni consigliate sono 2-3. Se si ruota
sulla posizione “0” si disattiva completamente l’apparecchio.
(Figura 1)
CONGELAZIONE
La buona conservazione degli alimenti congelati è garantita in tutti gli scomparti del congelatore.
Per la congelazione del massimo carico dichiarato si consiglia di appoggiare gli alimenti direttamente sui ripiani, e togliendo temporaneamente i
cassetti.
In alcuni prodotti è presente una sezione nella parte superiore, (vedi guida rapida).
Disporre i cibi da congelare nel cassetto , ruotare in senso orario il termostato fino a raggiungere la posizione 5. Trascorse altre 24 ore la
congelazione è terminata. Riportare quindi il termostato nella posizione 2-3.
La quantità massima di alimenti che è possibile congelare è indicata nella targhetta matricola, (vedi figura 2)
Per le prove normative di congelazione e conservazione togliere tutti i cassetti ad esclusione di quello in basso.
(Figura 2)
LO SBRINAMENTO
In questo prodotto lo sbrinamento della cella frigo avviene
automaticamente
La presenza di un lieve strato di brina o di gocce d’acqua
durante il funzionamento è da considerarsi normale
E’ importante mantenere sempre pulito il condotto di scarico ed
evitare di porre i cibi a contatto con la parete della cella
E’ consigliabile sbrinare la zona congelatore quando lo strato
di ghiaccio supera i 3 mm. di spessore
NB. In questa posizione è possibile trovare la targa matricola, contenente i dati da comunicare all’Assistenza Tecnica qualora si verificasse
un guasto.
Importante: In presenza di temperatura ambiente molto calda, l’apparecchio potrebbe funzionare in continuo, con
conseguente formazione anomala di brina sulla parete di fondo della cella frigo. In questi casi è necessario ruotare la
manopola frigo su numeri più bassi (1-2)
1 IT
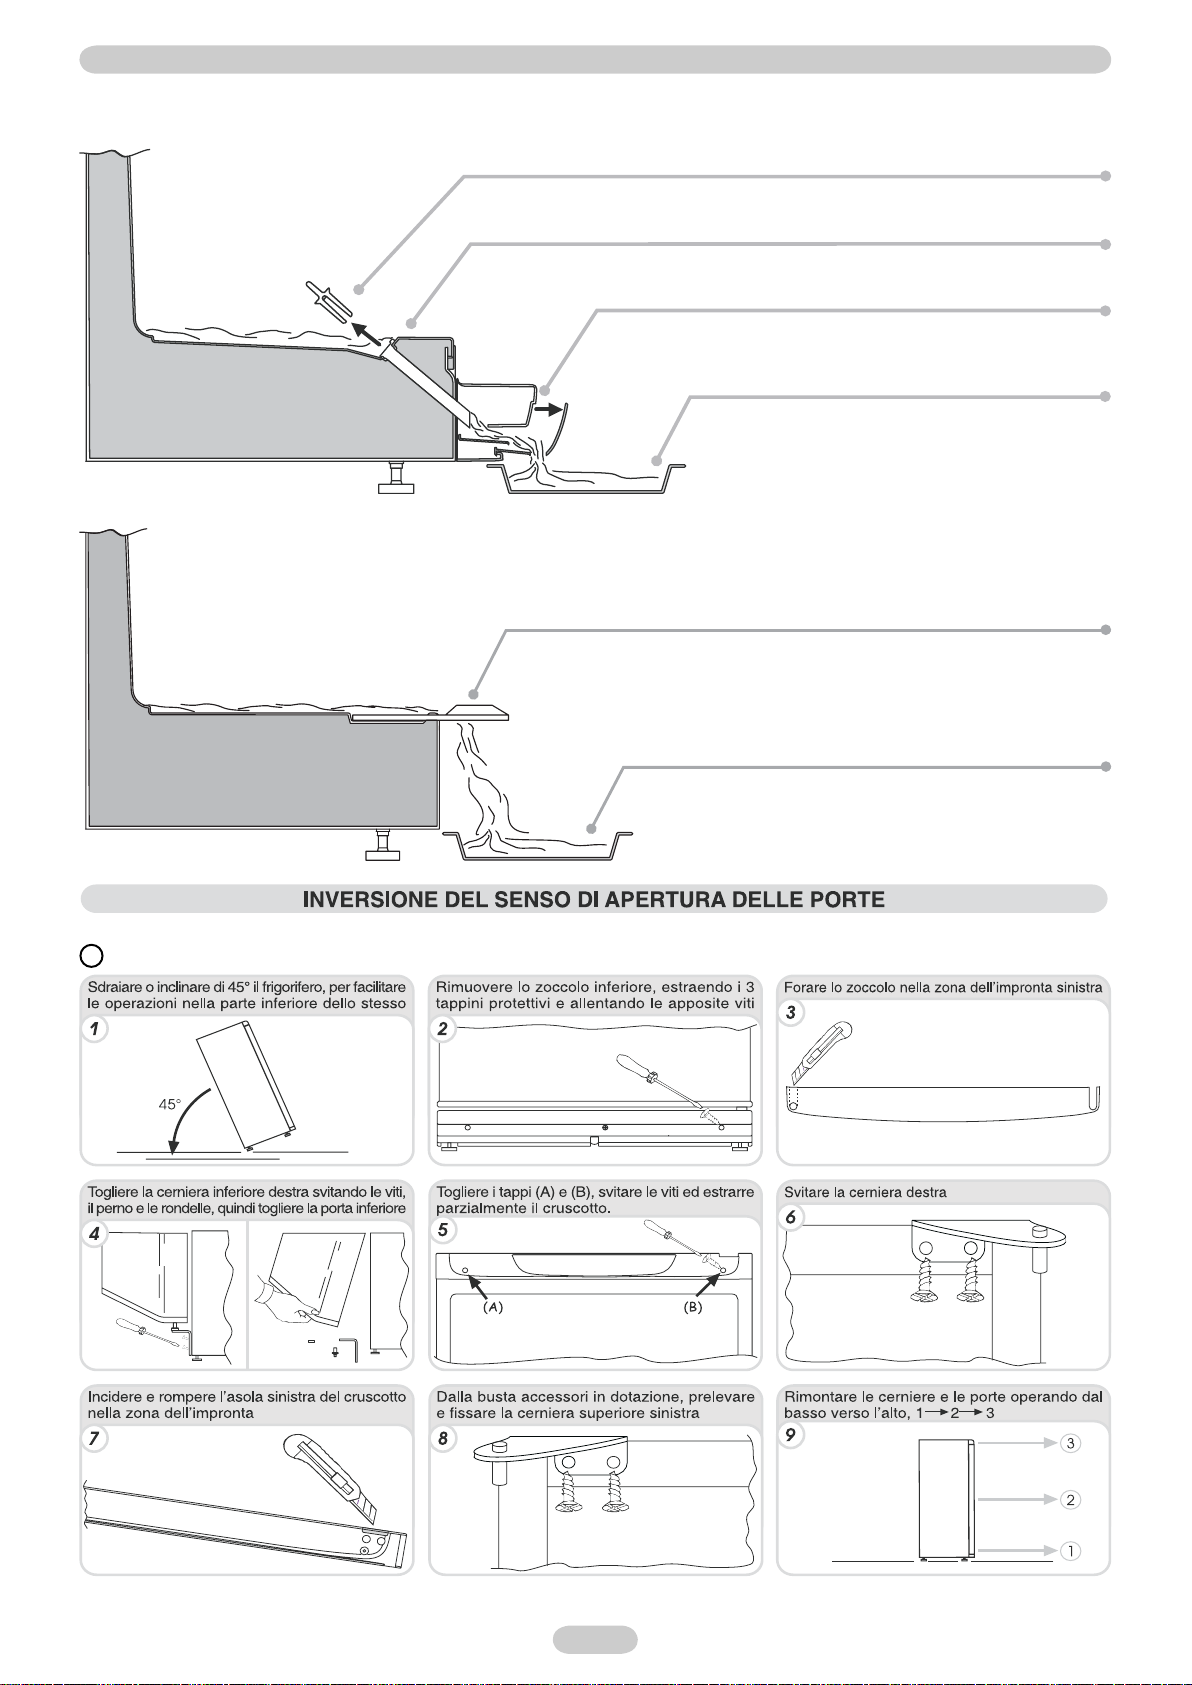
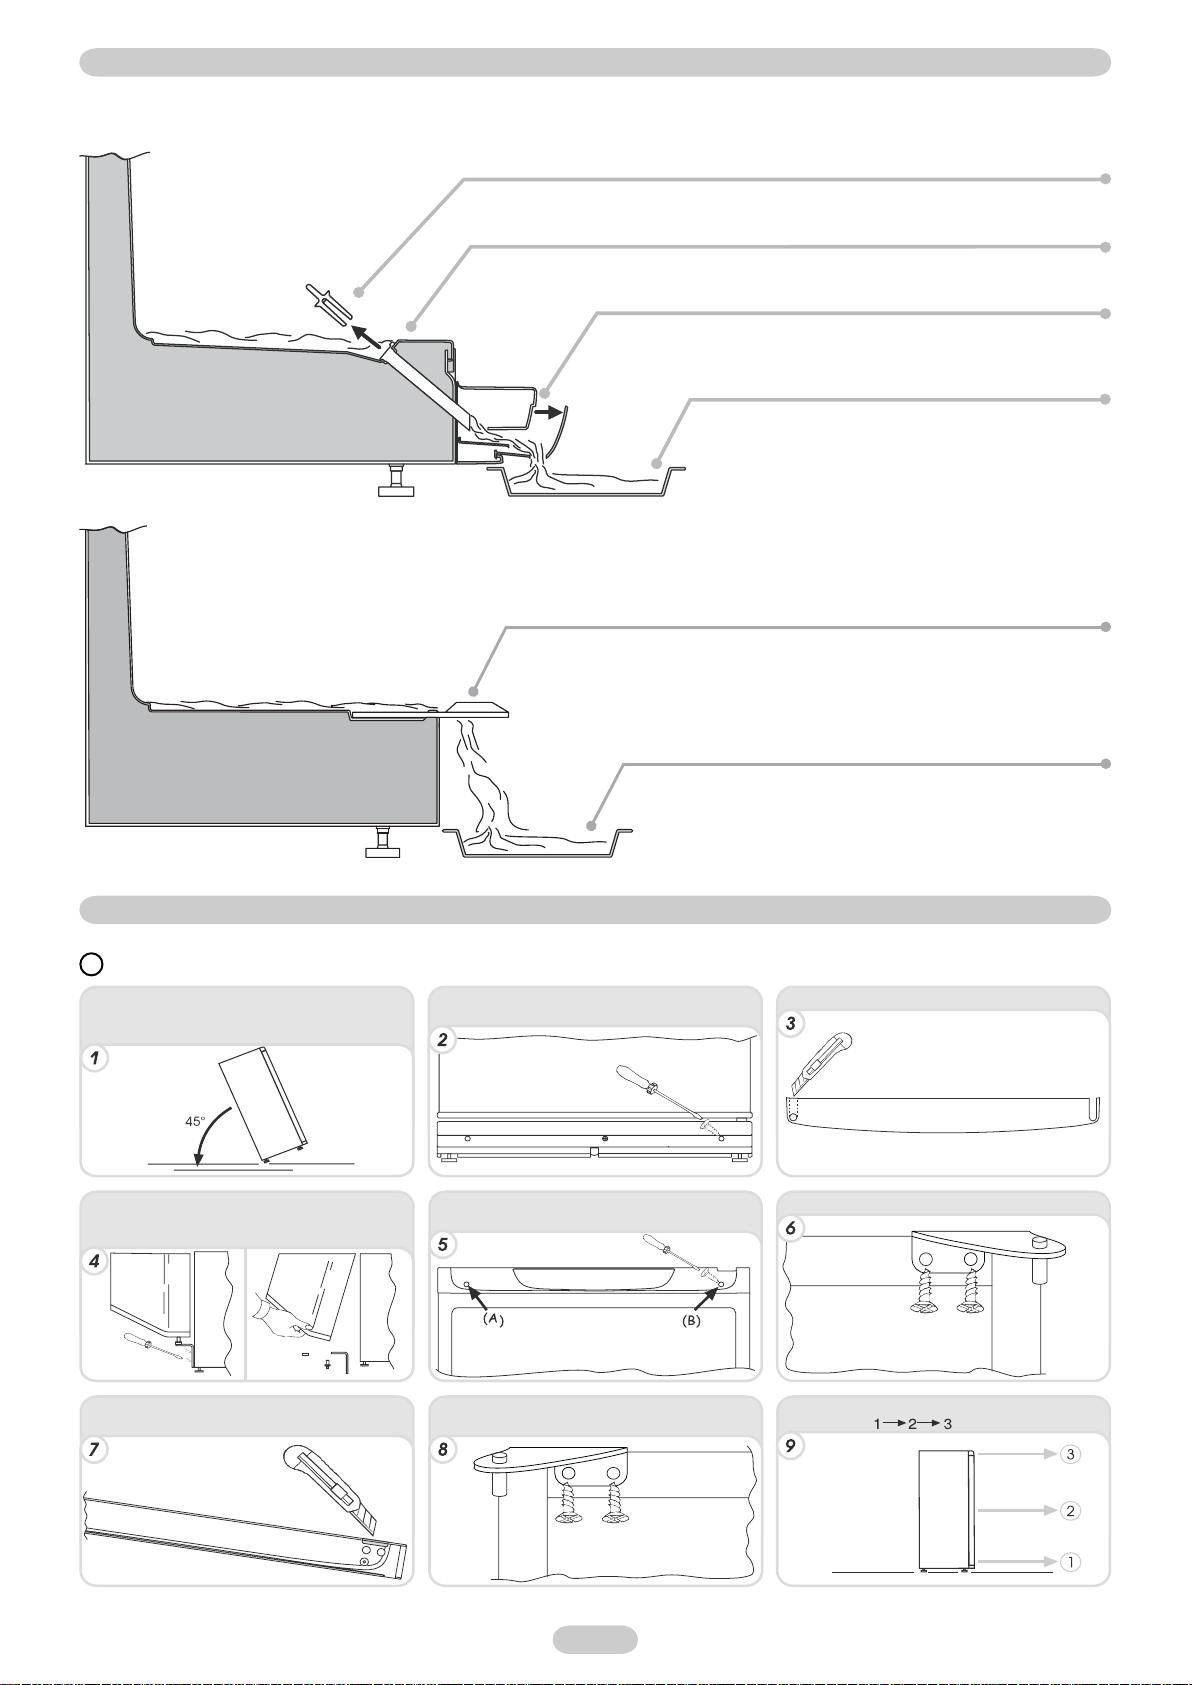
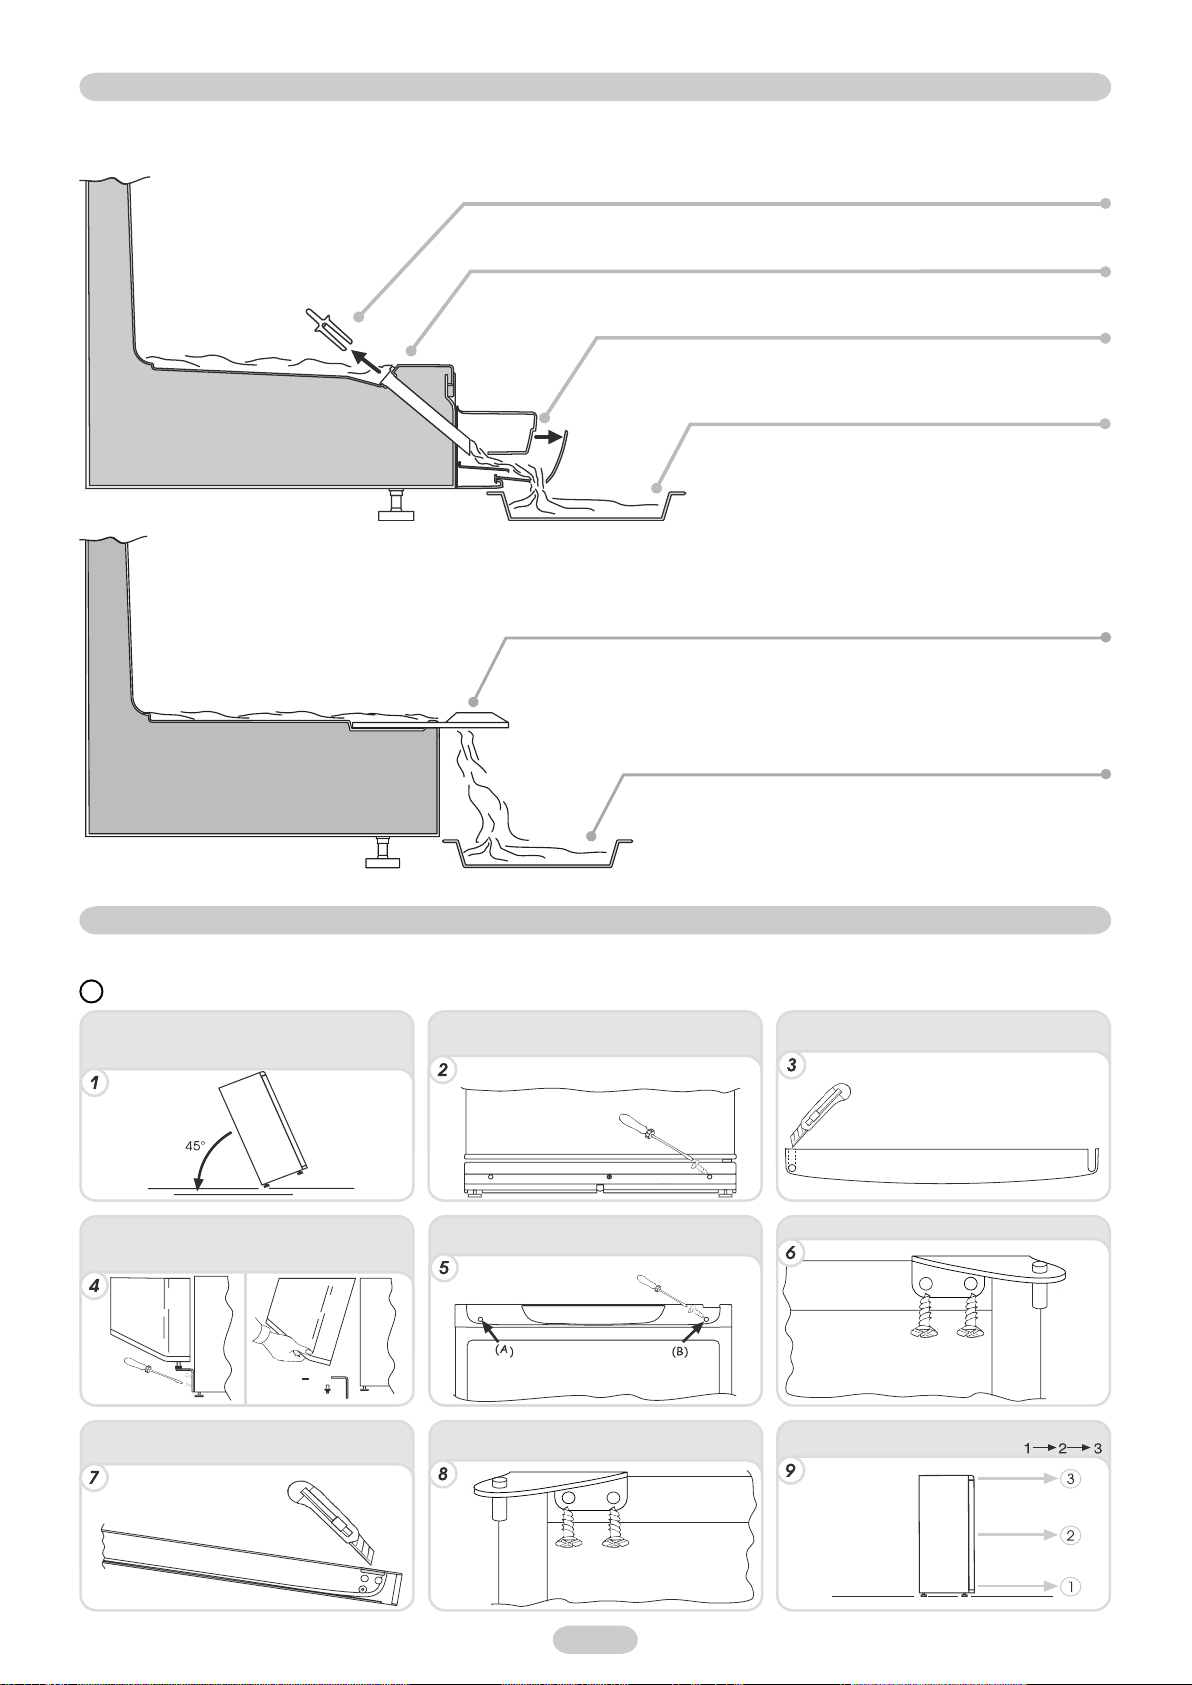
IL DRENAGGIO DELL’ACQUA
Il Congelatore è dotato di un sistema di evacuazione dell’acqua di sbrinamento.
Tale sistema può essere costituito da:
Un condotto collegato ad un gocciolatoio ricavato nella zona inferiore del frigorifero.
Oppure:
Un tappino che deve essere rimosso durante lo sbrinamento per permettere il deflusso
dell’acqua.
Un cassetto gocciolatoio inserito nello zoccolo che deve essere estratto
per consentire il flusso dell’acqua.
Bacinella di raccolta acqua non in dotazione
Una linguetta che deve essere estratta per consentire il flusso dell’acqua.
Bacinella di raccolta acqua non in dotazione
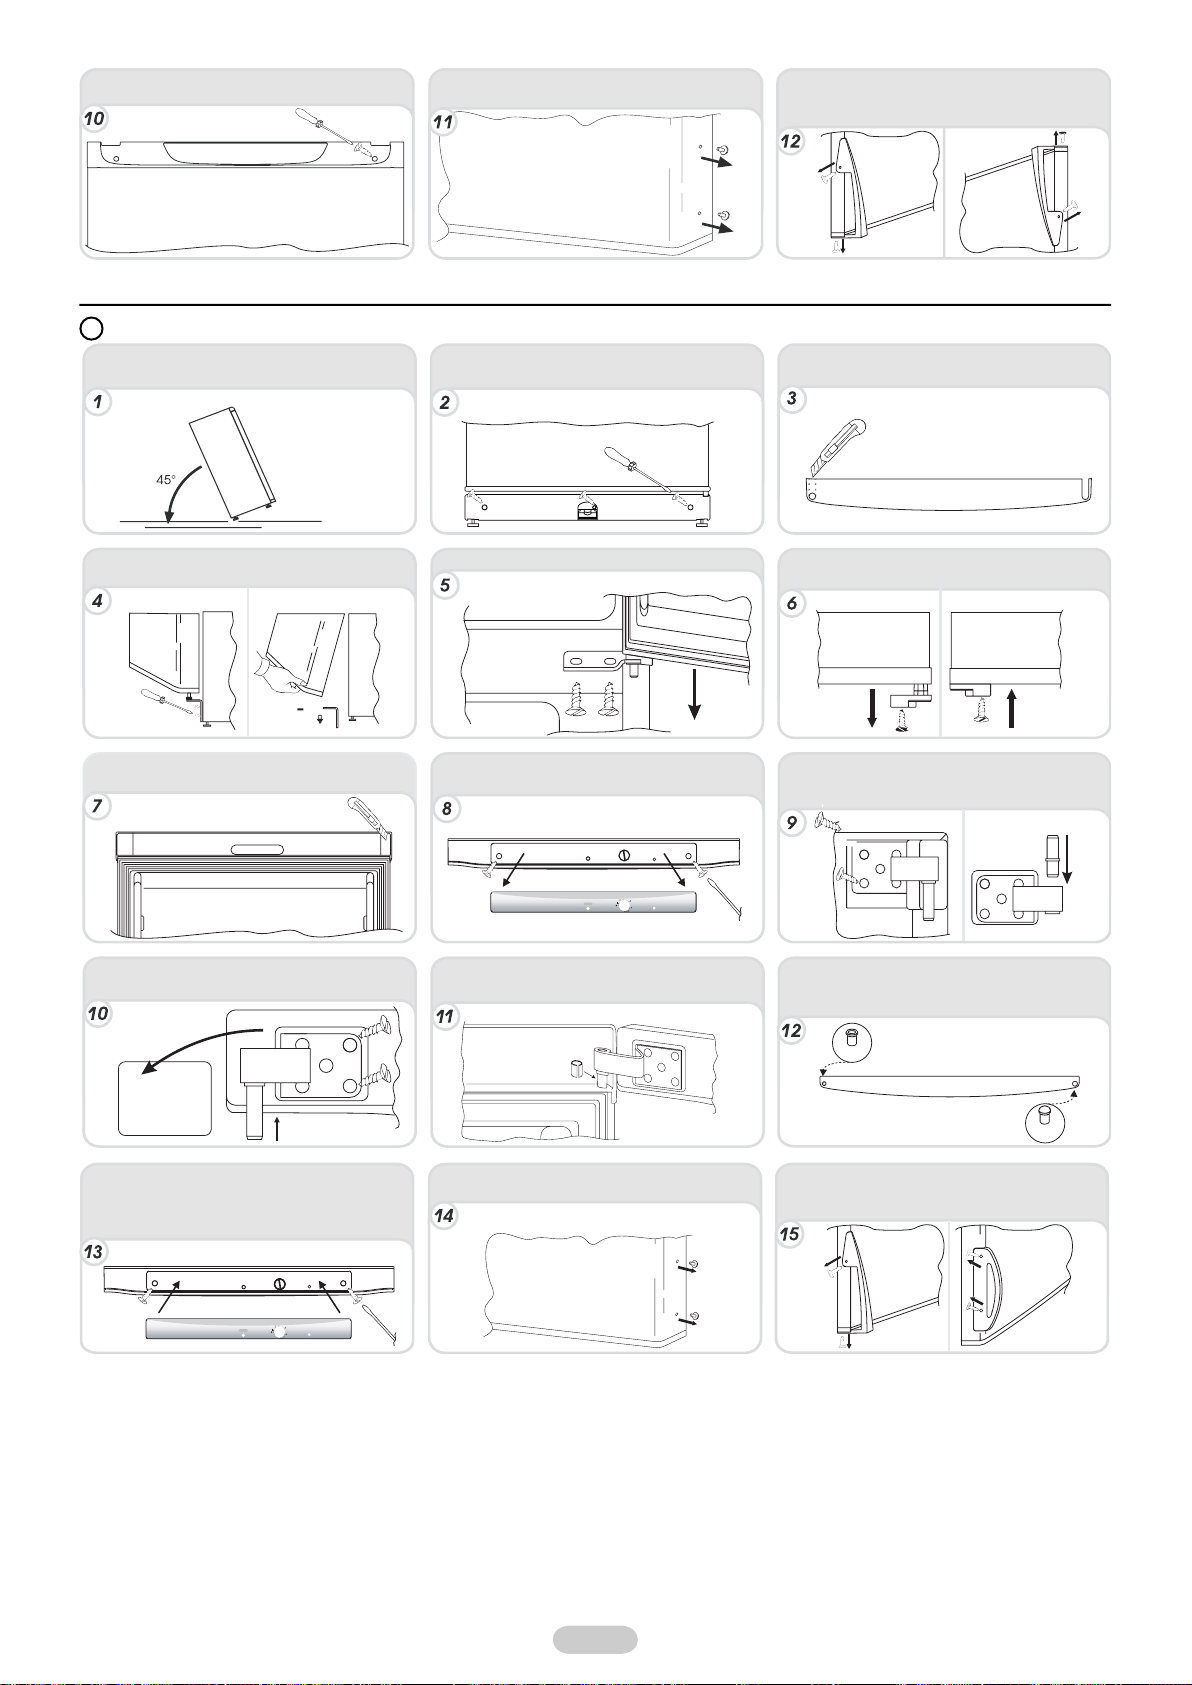
Per invertire il senso di apertura delle porte seguire le indicazioni in relazione al tipo di testata e di cerniera di cui il vostro prodotto è costituito.
A
2 IT
Riportare l‘apparecchio in posizione verticale e attendere 2 ore prima di rimetterlo in funzione
B
Sdraiare o inclinare di 45° il frigorifero, per facilitare
le operazioni nella parte inferiore dello stesso
Rimuovere lo zoccolo inferiore, estraendo i 3
tappini protettivi e allentando le apposite viti
Forare lo zoccolo nella zona dell’impronta sinistra
Togliere la cerniera inferiore destra svitando le viti, il
perno e le rondelle, quindi togliere la porta inferiore
Incidere e rompere l'asola sinistra del cruscotto
nella zona dell'impronta
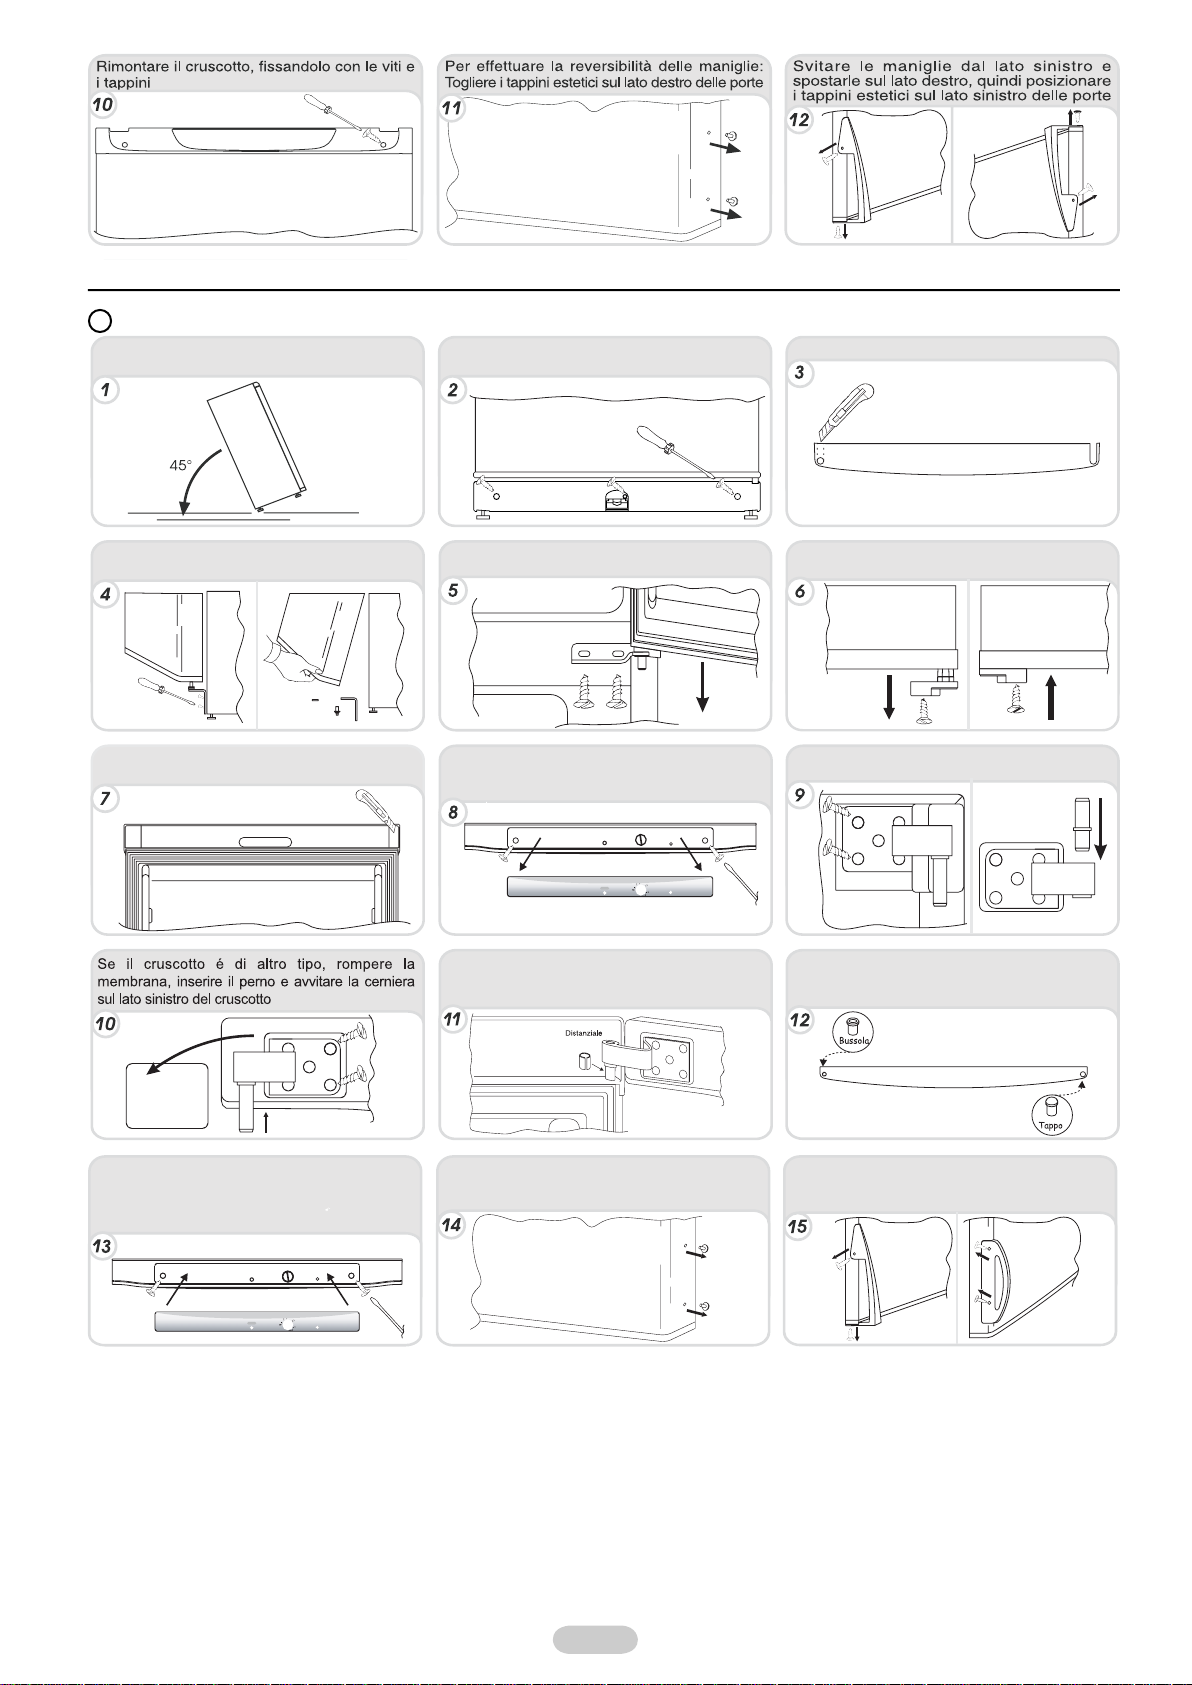
1) rompere la
membrana
2) Inserire il perno
Svitare la cerniera centrale e togliere la porta
superiore
In presenza di questa tipologia di cruscotto, asportare
l’etichetta e svitare le viti, quindi estrarre parzialmente
il cruscotto.
Inserire il perno della cerniera e il distanziale
nella testata. Rimontare le cerniere e le porte
operando dal basso verso l’alto
Svitare il fermo dalla porta frigo e montare quello in
dotazione sull’altro lato
Svitare la cerniera superiore destra ed invertire la
posizione del perno, quindi rimontarla sul lato sinistro
Rimuovere il tappo sulla parte sinistra e inserirlo
sulla parte destra delle testatine centrali e
inferiore.
Avvitare il cruscotto e rimontare l’etichetta
estetica. Riportare l’apparecchio in posizione
verticale ed attendere 2 ore prima di rimetterlo in
funzione
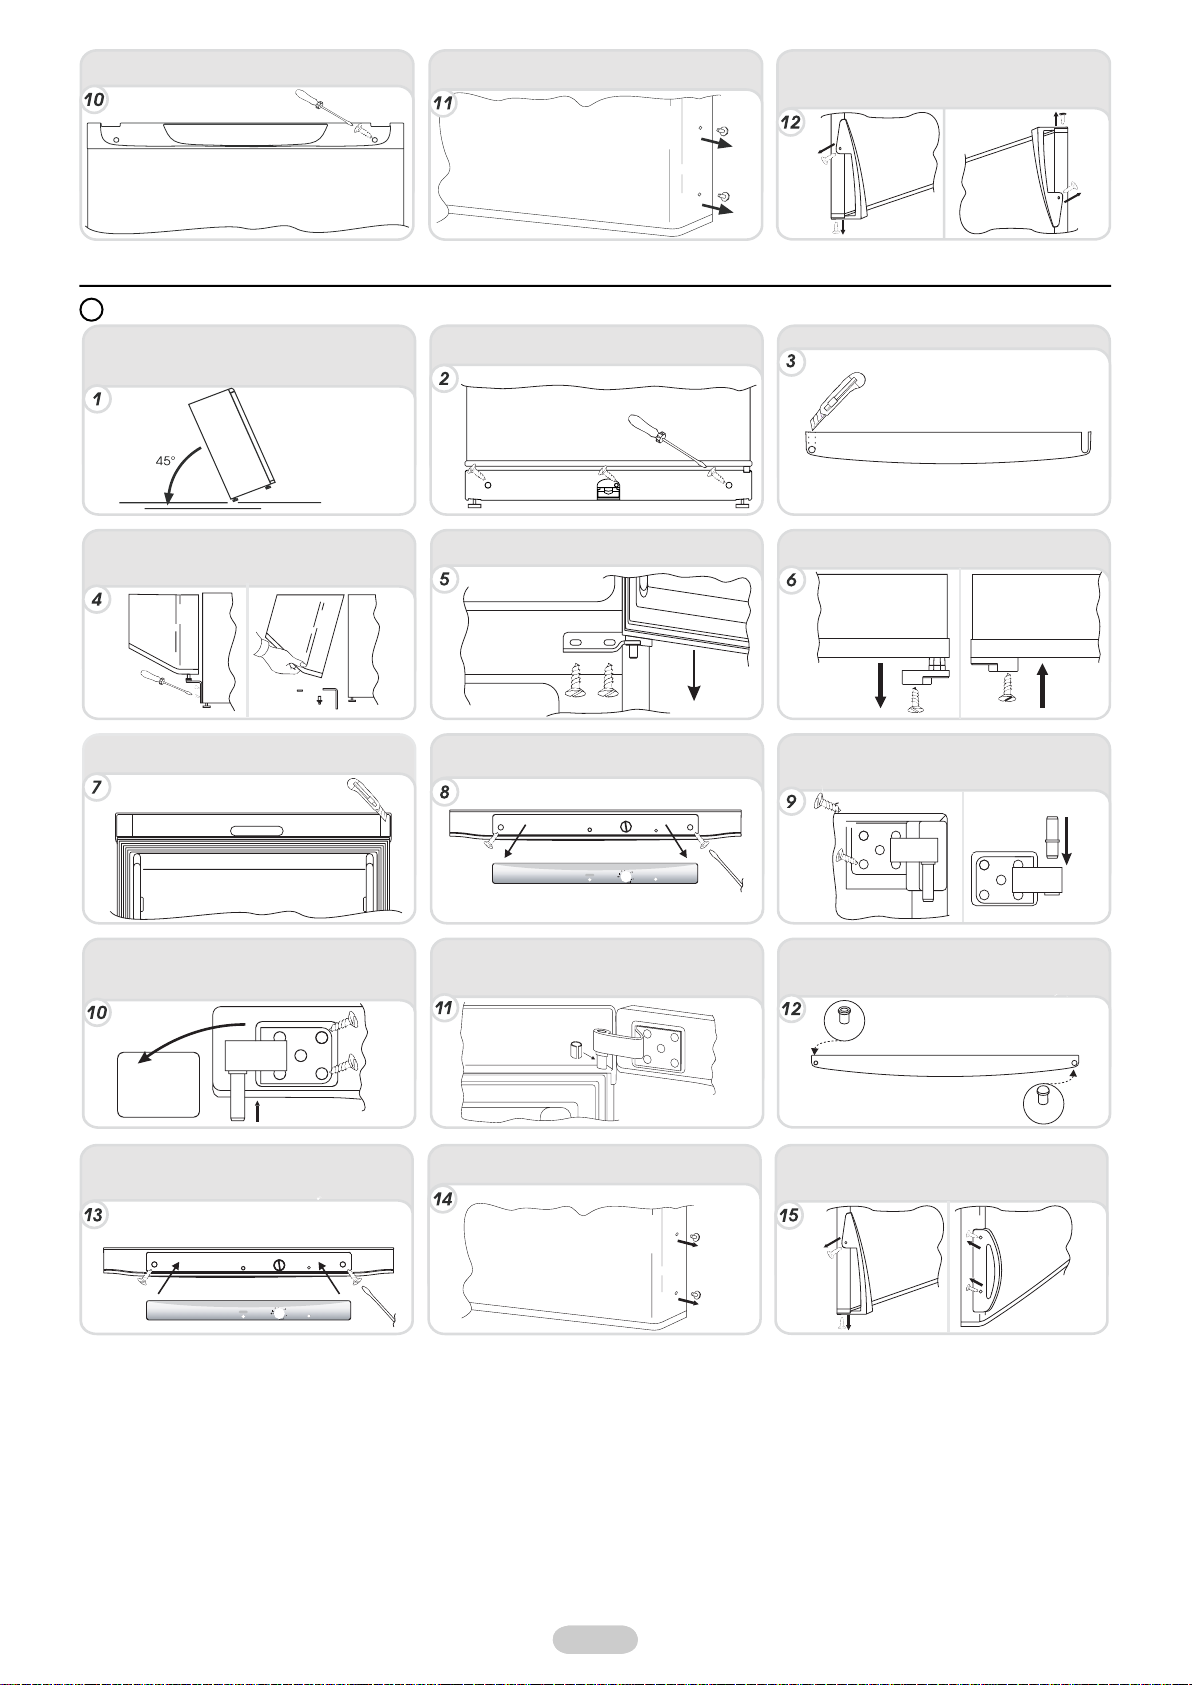
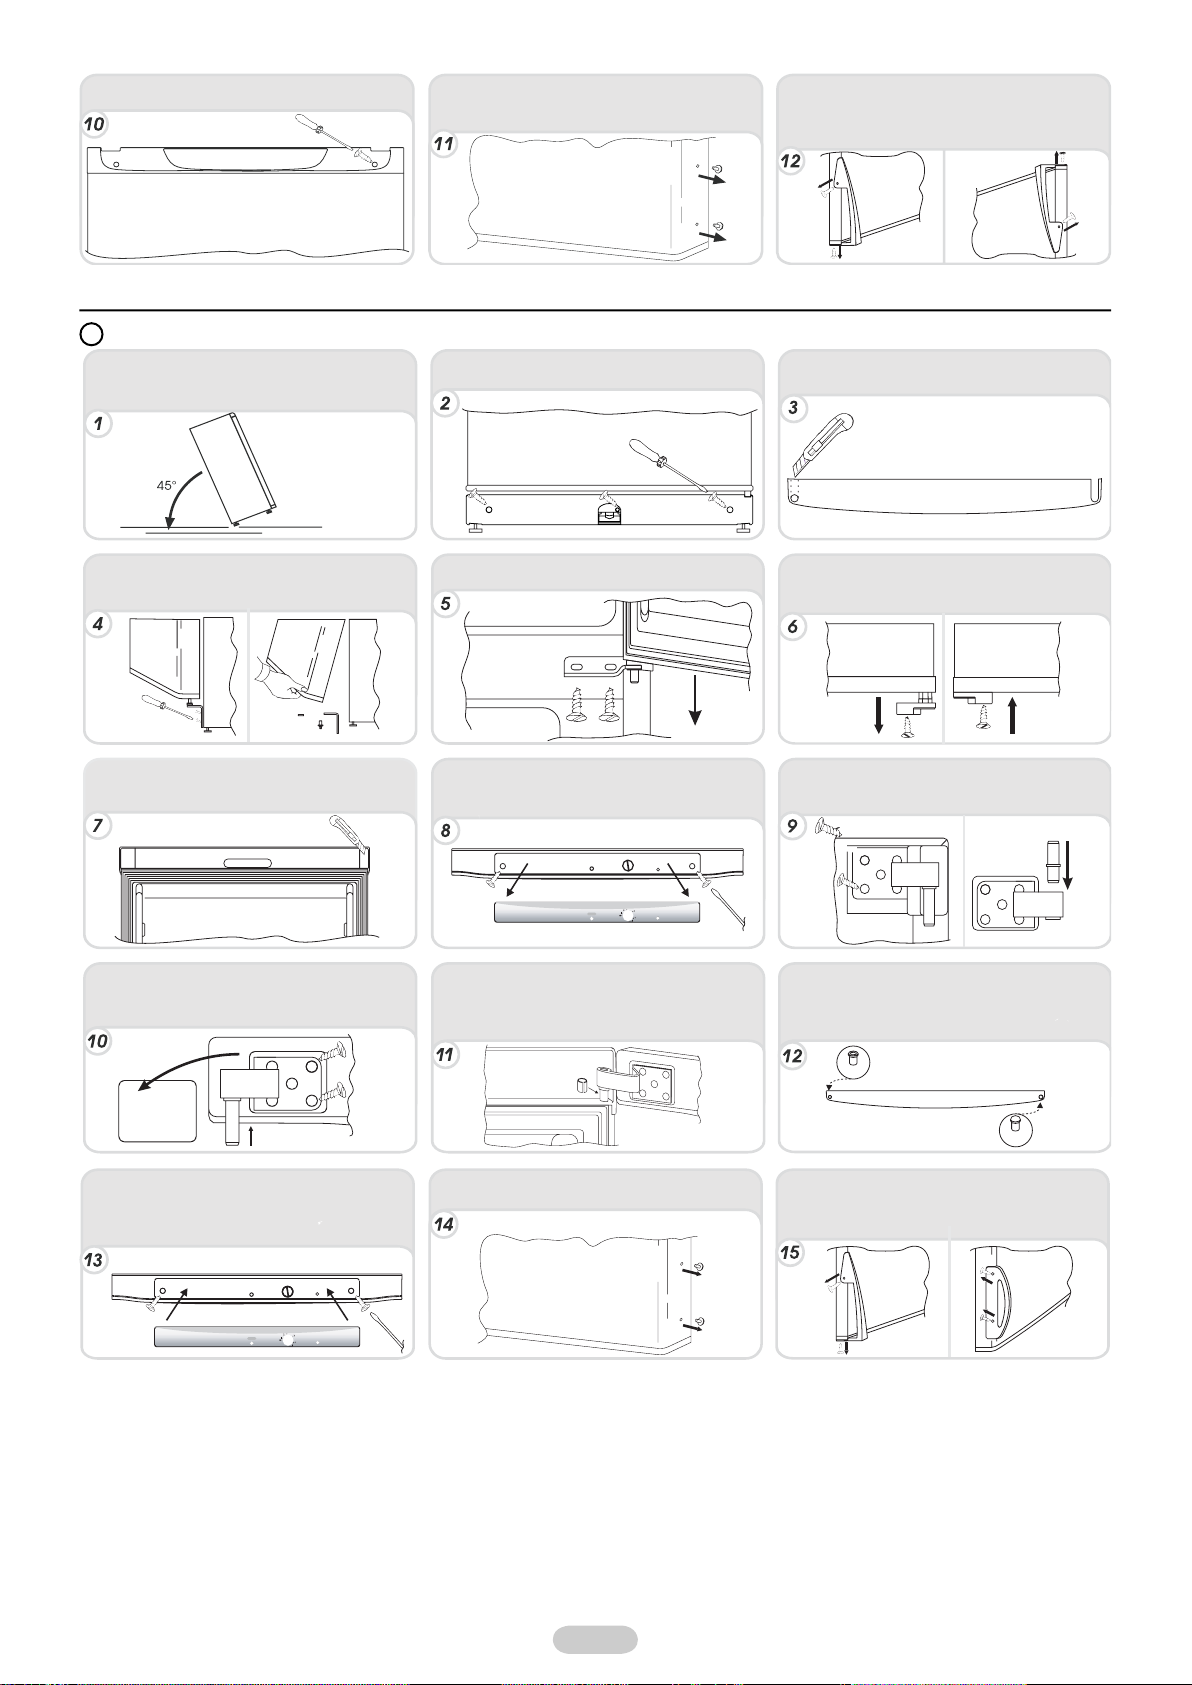
Per effettuare la reversibilitŕ delle maniglie:
Togliere i tappini estetici sul lato destro delle
porte
3 IT
Svitare le maniglie dal lato sinistro e rimontarle
sul lato destro del prodotto.
Posizionare i tappini sul lato sinistro.
SINGLE COMPRESSOR COMBIS
CONTROL PANEL
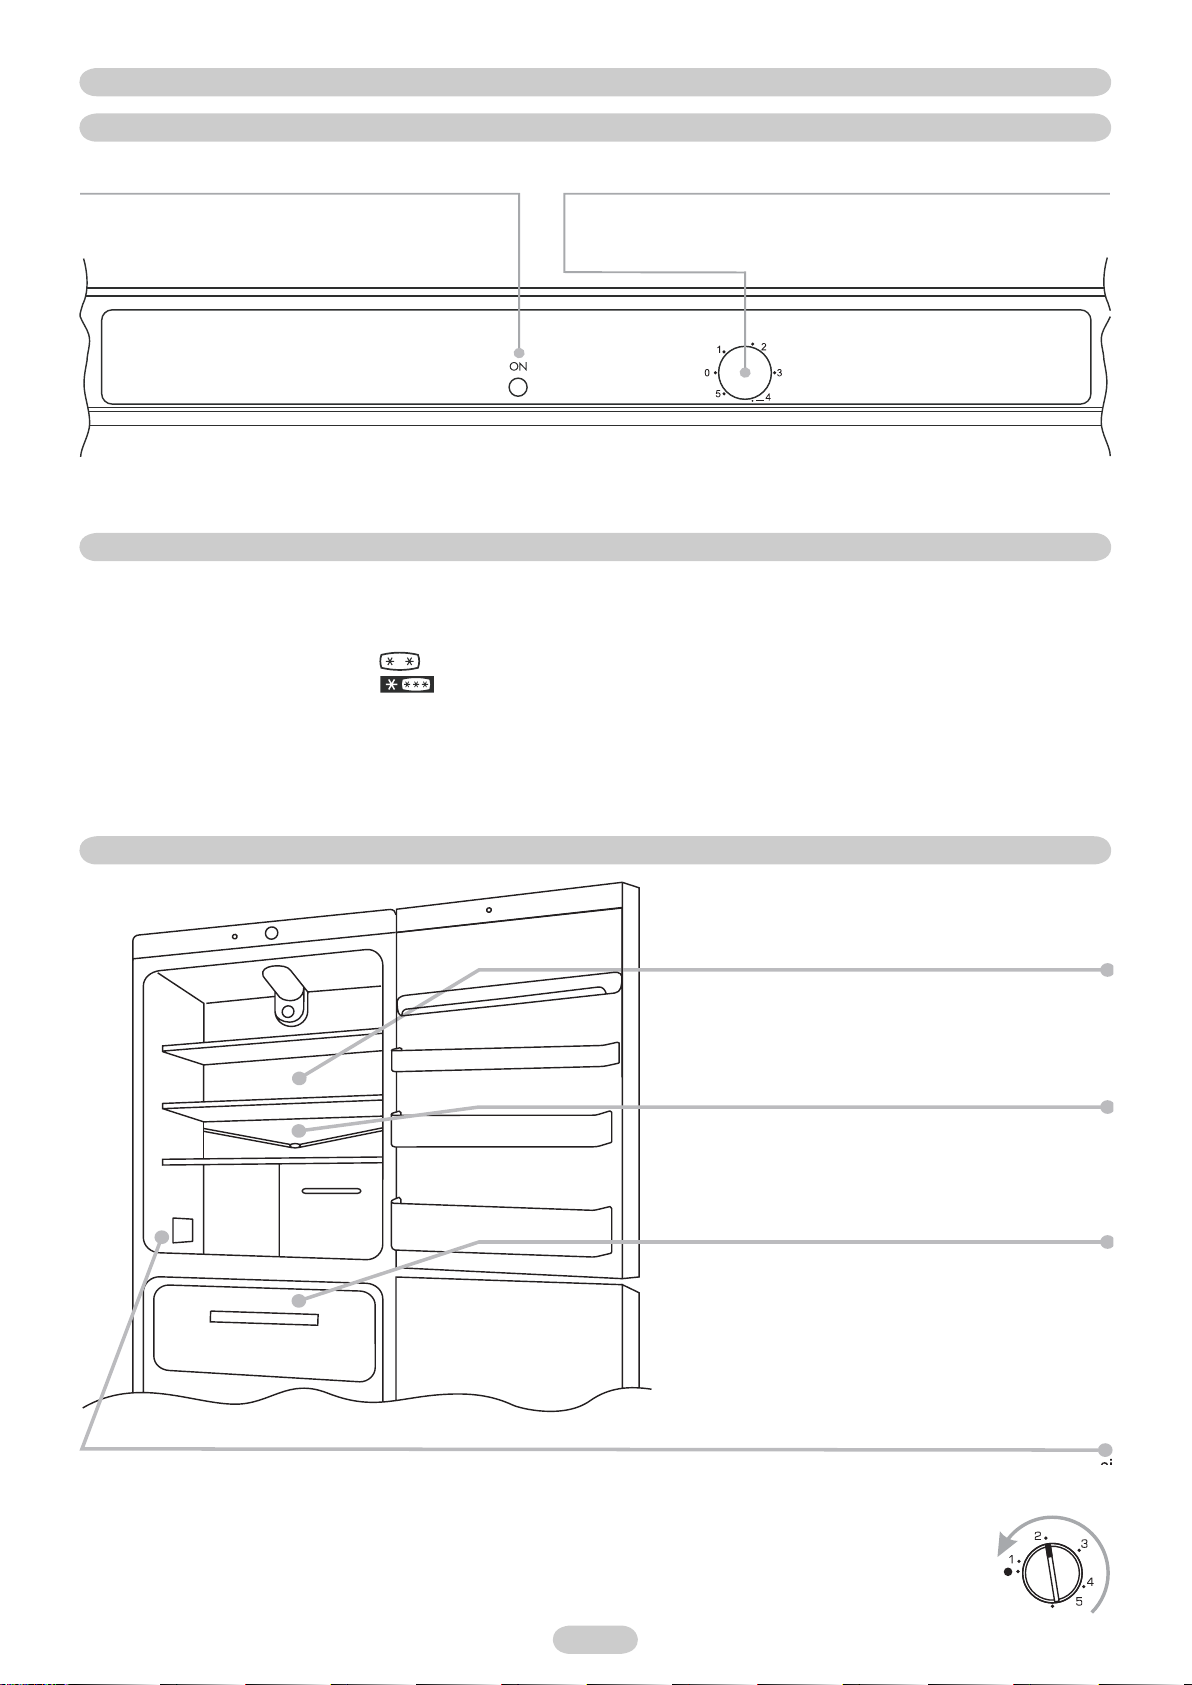
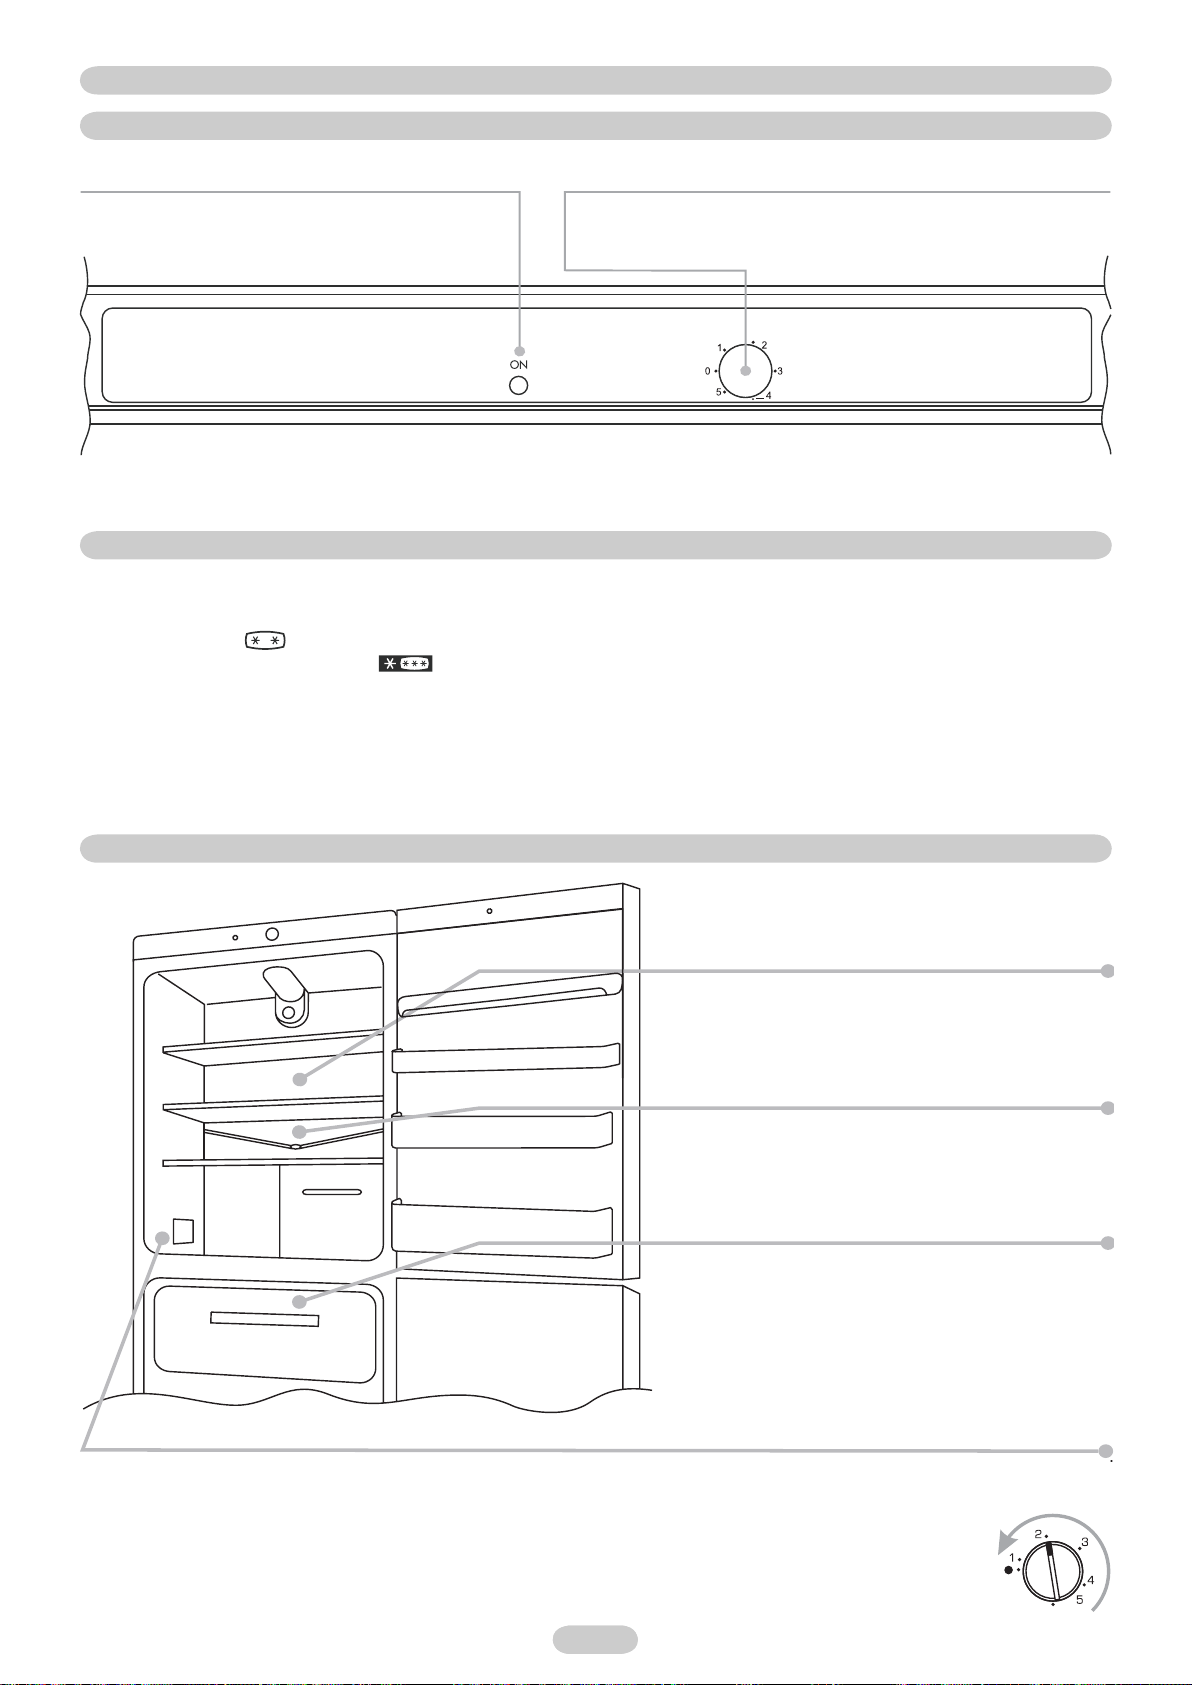
Open the top door of the fridge in order to access the control panel.
The green “ON” light shows that the unit is working. This light
is on irrespective of the knob setting, except for when the
knob is set to 0.
Turn on the knob to switch on the appliance and set the temperature of the
freezer compartment and Fridge. (Recommended setting – 2-3).
Turn the knob to “0” to turn off the appliance.
(Figure 1)
FREEZING
The preservation of frozen foods is guaranteed in all of the freezer’s compartments.
During maximum capacity of the freezer, it is advised to remove the drawers and to place the food directly on the shelves for optimal freezing.
In some products there is a section in the top part, (see quick guide).
Place the foods to be frozen in the drawer, turn the thermostat clock-wise to position 5. After 24 hours, freezing is completed. Therefore,
reset the thermostat to position 2-3
The rating plate states the maximum quantity of foods that can be frozen, (see figure 2)
To test out the freezing and conservation functions, remove all the drawers apart from the bottom one.
(Figure 2)
DEFROSTING
Defrosting of the fridge compartment is automatic in this
product.
A small amount of frost or drops of water on the back of the
freezer compartment when the freezer is working is normal.
Make sure the water outlet is always clean. Mak e sure foods do
not touch the back or sides of the freezer compartment.
We recommend you defrost the freezer area when the la yer of
frost is more than 3 mm thick.
NB. This is the rating plate. If you need to contact our Service Department in the event of faults, remember to give them the information
on the plate.
Important: If the room temperature is very warm, the appliance may work continuously and a layer of frost will deposit
on the back of the fridge compartment. In this case, turn the knob to lower settings (1-2).
4 GB
4
DRAINING WATER
The appliance has a system for draining water while defrosting.
This system comprises:
A pipe connected to a drip tray located at the bottom of the fridge.
A plug to be removed when defrosting in order to drain the defrosted water.
Or:
A drip tray located at the chick plate which must be pulled out so water
can flow into a basin.
A drainage basin (not supplied).
A bar to be removed when defrosting so water can flow into a basin.
A drainage basin (not supplied).
REVERSING THE OPENING OF THE DOORS
In order to reverse the opening of the doors, follow the indications in relation to the insert and hinge type your product is made up of.
A
Place the appliance on the floor or at a 45° angle,
as it is necessary to work on the bottom of the
appliance.
Take off the bottom right-hand hinge by removing
the screws, pin and washers, then remove the
lower door.
Mark and break the left-hand slot on the panel, in
the insert area.
Remove the lower plinth by pulling out the 3
protective plugs and by loosening the screws.
Remove the caps (A) and (B), loosen the screws
and partially remove the panel.
Flip the top left-hand hinge found in the
accessories kit.
Drill the plinth on the marked left hand-side area.
Unscrew the right hinge.
Remount the hinges and doors working from
bottom to top,
55 GB
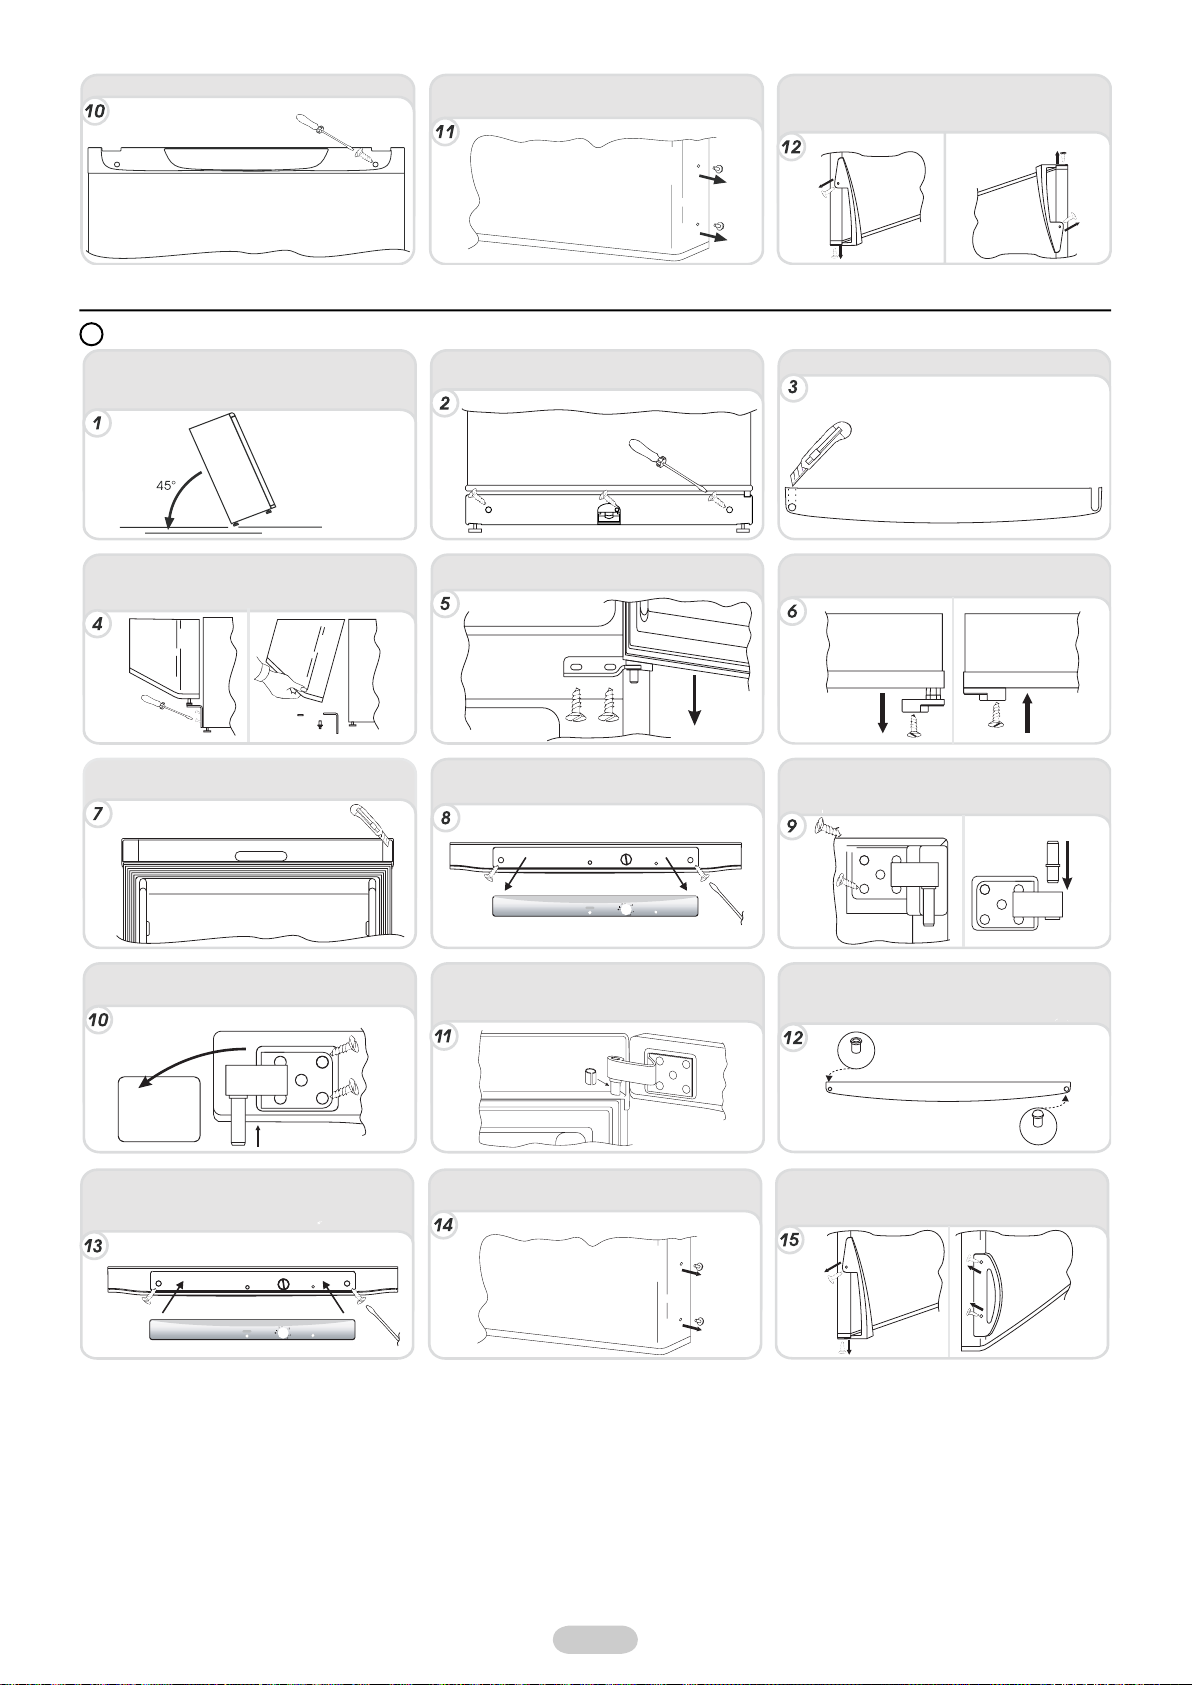
Fit the panel, and secure with the screws and
caps.
To reverse the handles: remove the outer caps
from the right-hand side of the doors.
Put the appliance in an upright position and wait two hours before turning it on.
B
Place the appliance on the floor or at a 45° angle,
as it is necessary to work on the bottom of the
appliance.
Remove the lower plinth by pulling out the
3 protective plugs and by loosening the screws.
Unscrew the handles from the left-hand side and
move them to the right-hand side, then position
the outer caps on the left-hand side of the doors.
Drill the plinth on the marked left hand-side area.
Take off the bottom right-hand hinge by removing
the screws, pin and washers, then remove the
lower door.
Mark and break the left-hand slot on the panel, in
the insert area.
With another panel type, break the plastic
membrane and screw the hinge on the left-hand
side of the panel.
1) break the
plastic membrane
2) Insert the pin
Remove the screws from the central hinge and
remove the top door.
With this panel type, remove the label and screws,
then partially remove the panel.
Insert the pin in the hinge and the spacer in the
insert. Reassemble the hinges and doors
working from bottom to top.
spacer
Unscrew the hinge from the fridge door and mount
the one supplied on the other side.
Remove the screws from the top right hinge and
invert the position of the pin, then reassemble it on
the left-hand side.
Remove the plug on the left-hand side and insert
it on the right-hand side of the central and lower
inserts. Invert the bushing in the lower insert.
bushing
plug
Screw the panel back on and place the outer
label back on. Put the appliance in the upright
position and wait two hours before turning it on.
To reverse the handles: remove the outer caps
from the right-hand side of the doors.
66 GB
Unscrew the handles from the left-hand side and
remount them on the right-hand side of the product.
Place the plugs on the left-hand side.
COMBINÉ MONO-COMPRESSEUR
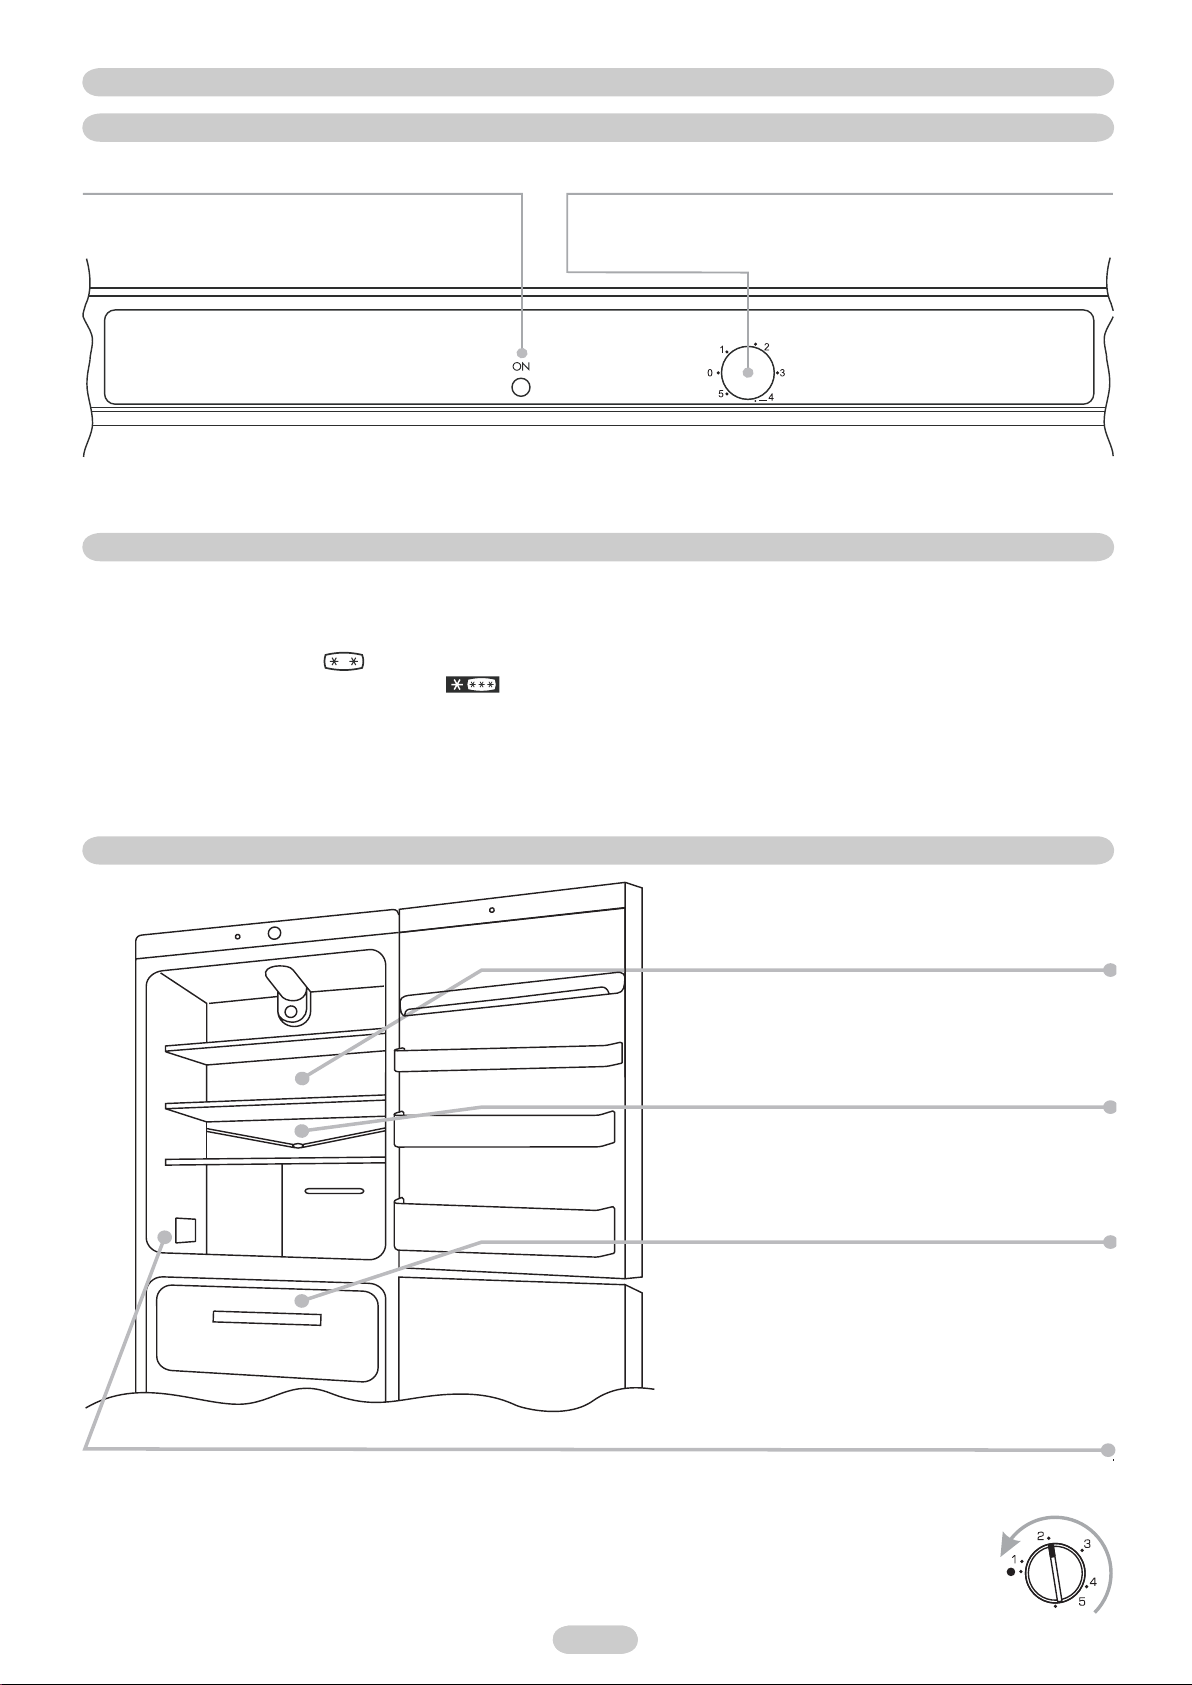
PANNEAU DE COMMANDE
Ouvrez la porte supérieure du réfrigérateur afin d'accéder au panneau de commande.
Le voyant vert “ON” indique que l'appareil est en marche. Le
voyant reste allumé peu importe la position du bouton, sauf si
ce dernier est en position 0.
Tournez le bouton afin de mettre l'appareil en marche et de régler la température
du compartiment congélateur et du réfrigérateur. Réglages recommandés 2-
3).
Mettre le bouton en position “0” afin d'éteindre l'appareil.
(Image 1)
CONGELATION
La conservation d'aliments surgelés est garantie dans tous les compartiments du congélateur.
Si la capacité maximum du congélateur est utilisée, il est conseillé de retirer les tiroirs et de placer les aliments directement sur les ray onnages pour
une congélation optimale.
Sur certains produits, il existe une section en partie haute, (voir guide de référence rapide).
Placez les aliments à congeler dans le tiroir , tournez le thermostat dans le sens des aiguilles d'une montre jusqu'à la position 5. La congélation
est terminée après 24 heures. Par conséquent, vous pouvez repositionner le thermostat sur la position 2-3
La signalétique de signalisation indique la quantité maximale d'aliments pouvant être congelée, (voir image 2)
Afin de tester les capacités de congélation et de conservation, retirez tous les tiroirs à l'exception de celui du bas.
(Image 2)
DEGIVRAGE
Le dégivrage du compartiment réfrigérateur est automatique
sur ce produit.
La présence d’une fine pellicule de givre, ou de gouttes d’eau,
est normale durant le fonctionnement de l’appareil.
Assurez-vous de toujours maintenir propre la zone
d'évacuation d'eau. Assurez-vous que les aliments ne soient
pas en contact avec le fond ou les parois de la cuve.
Nous vous conseillons de dégivrer le congélateur quand la
couche de givre atteint 3mm d'épaisseur.
NB. Ceci est la plaque signalétique. Si vous deviez contacter notre service après vente en cas de dysfonctionnement ou de panne, pensez
à leur fournir les informations figurant sur la plaque.
Important: Si la température de la pièce est trop élevée, il se peut que l'appareil fonctionne en continue et qu'une
couche de givre se forme dans le fond du compartiment réfrigérateur. Dans ce cas il est nécessaire diminuer les
réglages avec le bouton de commande
7 FR

VIDANGE D'EAU
L'appareil est muni d'un système de vidange de l'eau issue du dégivrage.
Ce système est composé :
D'un cache à retirer avant le dégivrage afin de permettre à l'eau de s'écouler.
D'un tuyau raccordé à un réceptacle situé au bas du réfrigérateur.
Ou :
D'un réceptable situé au niveau de la plaque support qui doit être retirée
afin de permettre à l'eau de s'écouler dans la bassine..
Une bassine de vidange (non fournie).
Une barre devant être retirée avant le dégivrage afin de permettre à l'eau de
s’écouler dans une bassine.
Une bassine de vidange (non fournie).
INVERSER LE SENS D'OUVERTURE DES PORTES
Afin de pouvoir inverser le sens d'ouverture des portes, reportez vous aux instructions relatives au type de charnière et d'insert dont votre appareil est équipé
A
Allongez l'appareil au sol ou à un angle de 45°
car il est nécessaire d'intervenir sur le bas de
l'appareil.
Enlevez la charnière inférieure droite en retirant
les vis, le goujon et les rondelles. Enlevez
ensuite la porte du bas.
Découpez une fente sur le côté gauche du
panneau au niveau de la zone marquée a cet effet.
Retirez la plinthe inférieure en tirant sur les trois
caches protecteurs et en devissant les vis.
Retirez les caches (A) et (B), desserrez les vis et
enlevez partiellement le bandeau.
Fixez la charnière supérieure gauche que vous
trouverez dans le kit d'accessoires.
Percez la plinthe au niveau du repère situé à
gauche.
Devissez la charnière de droite.
Remontez les charnières et les portes en
commençant par celles du bas
.
8 FR
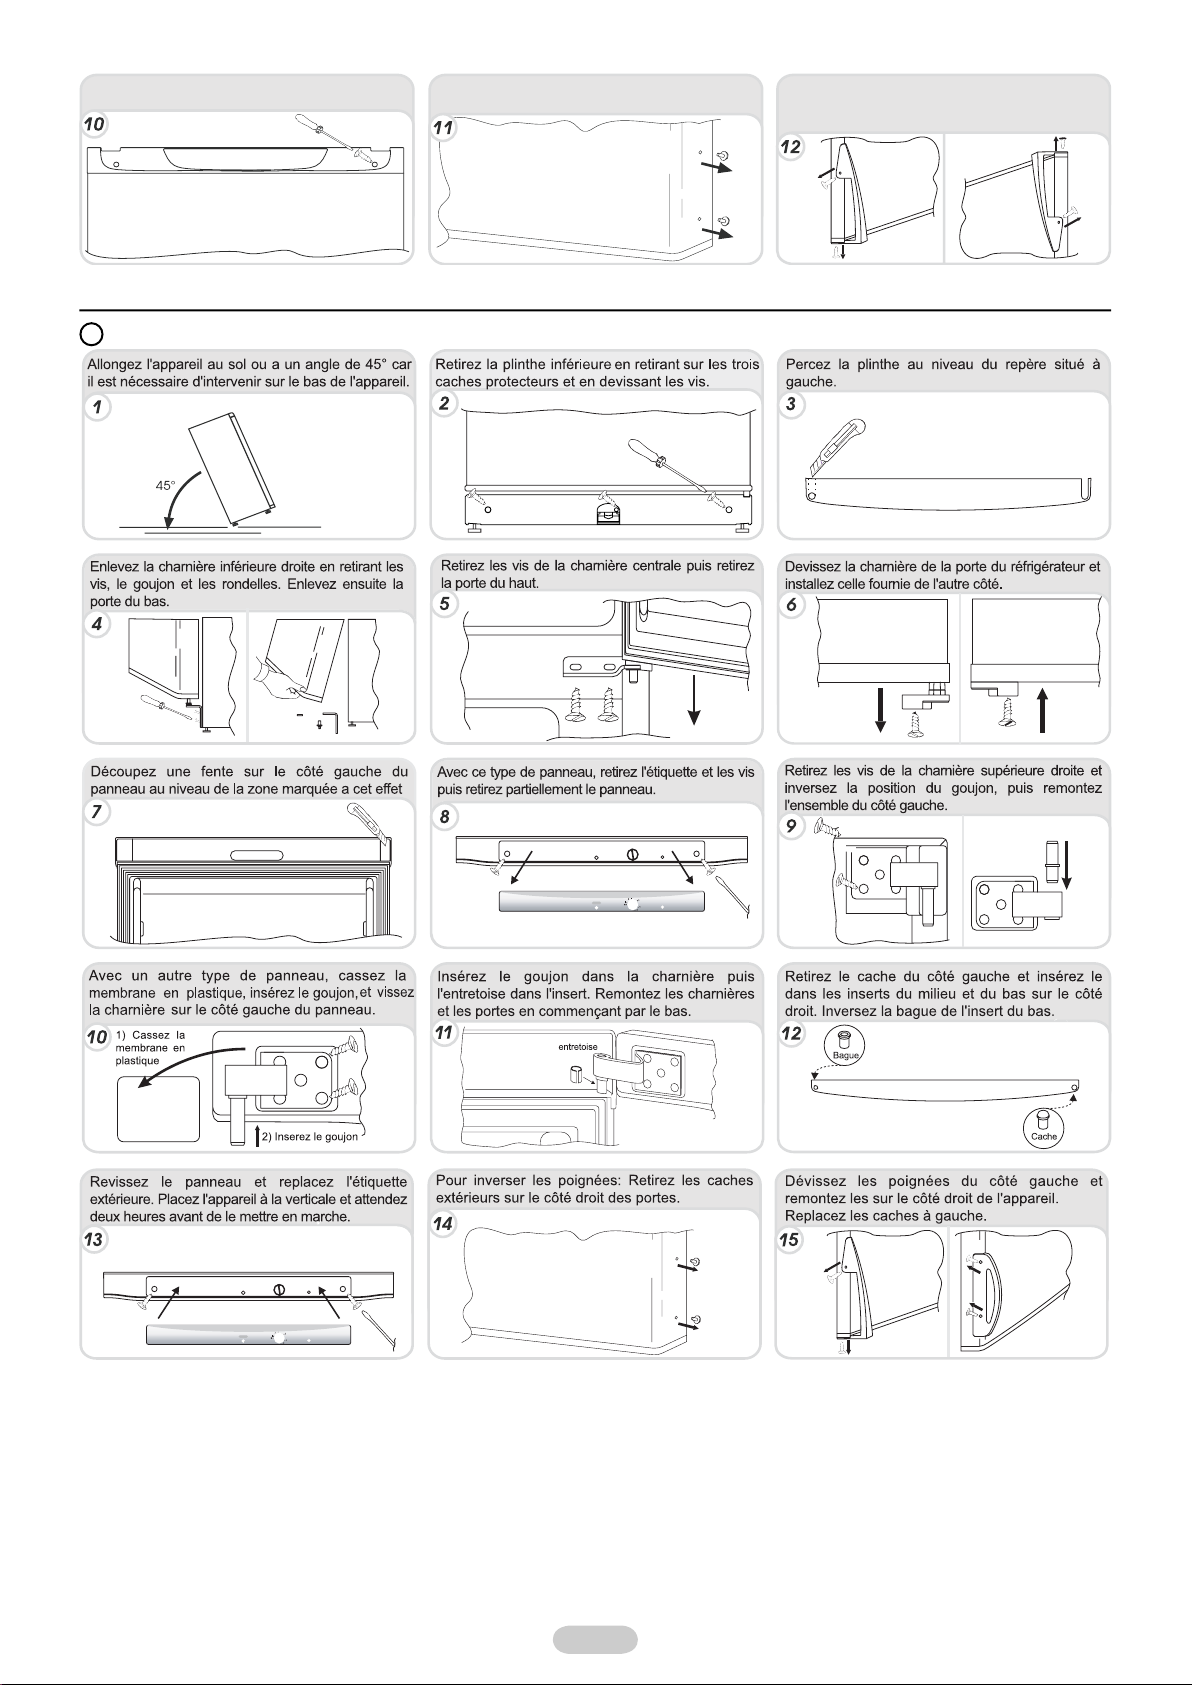
Installez le panneau et fixez-le à l'aide des vis et
des caches.
Pour inverser les poignées: Retirez les caches
extérieurs sur le côté droit des portes.
Placez l'appareil à la verticale et attendez deux heures avant de le mettre en marche.
B
Devissez les poignées à gauche et déplacez les
du côté droit, puis positionnez les caches
extérieurs dans les trous du côté gauche.
9 FR
KÜHLKOMBINATIONEN MIT 1 KOMPRESSOR
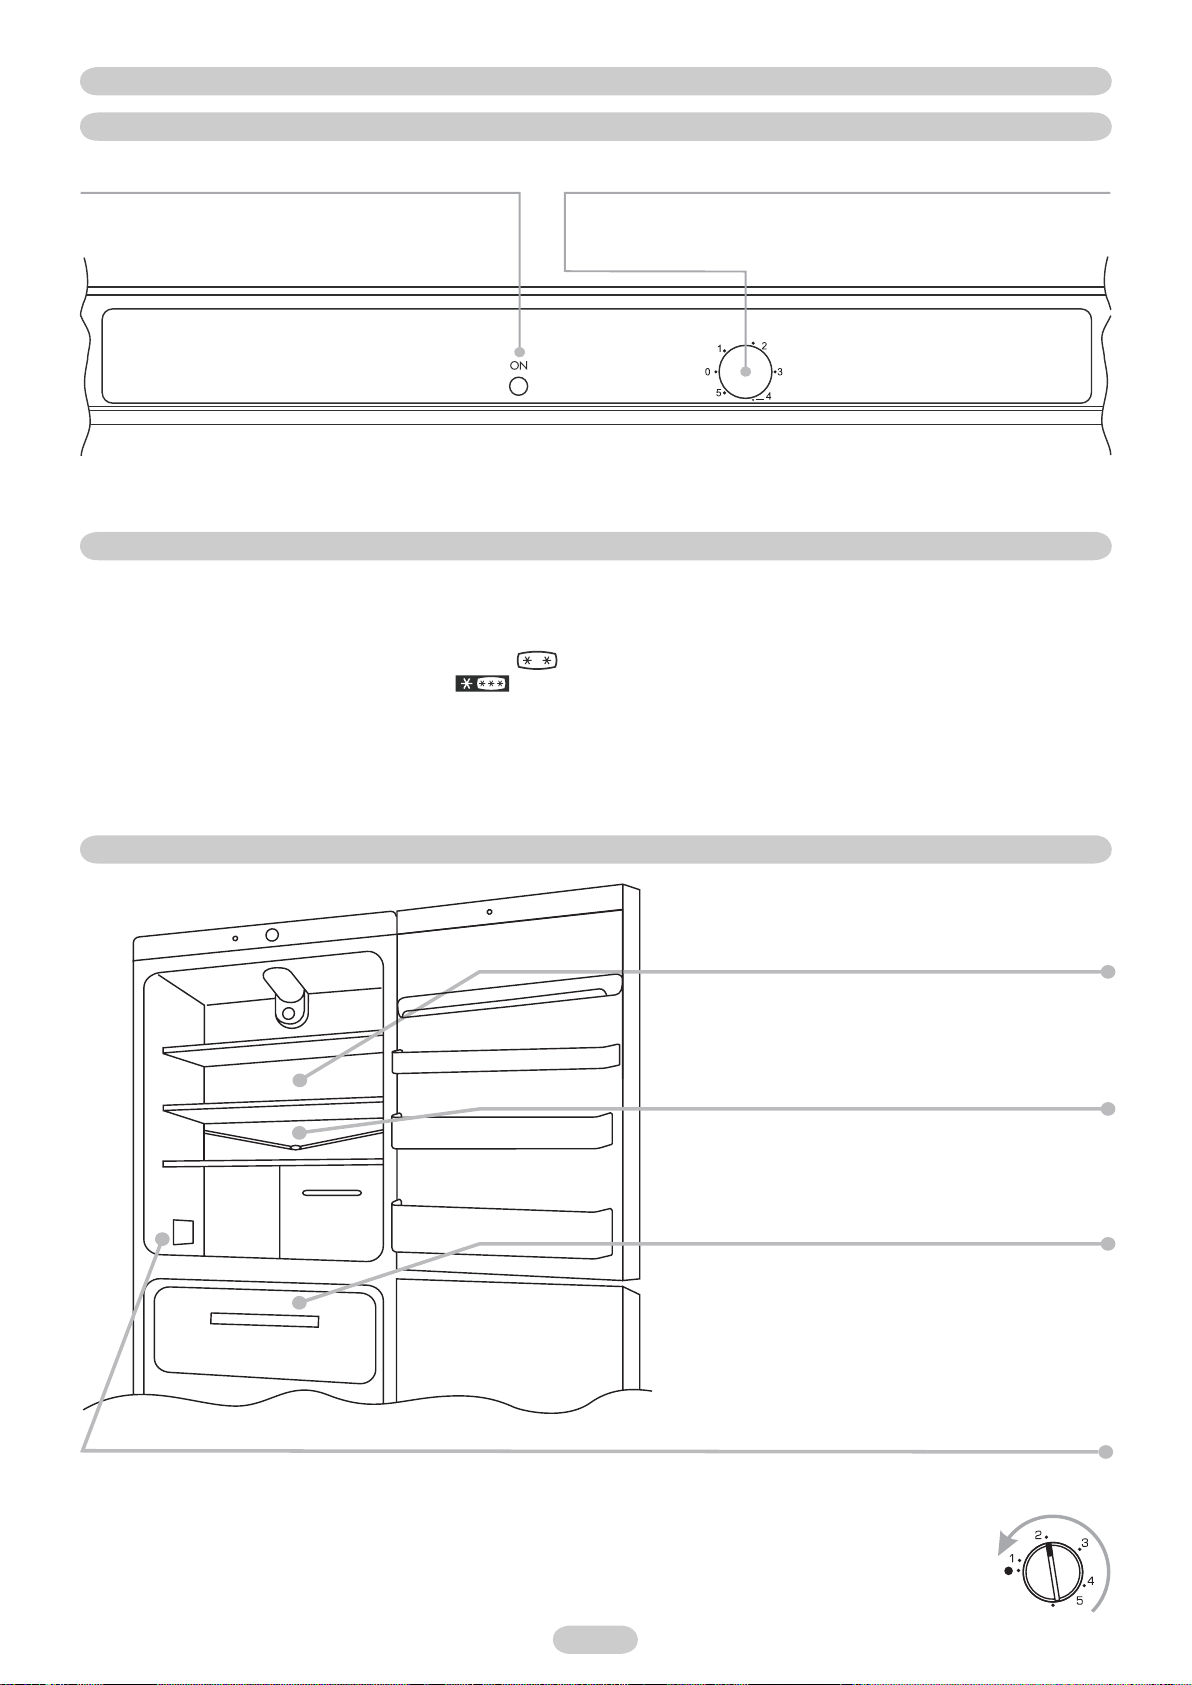
SCHALTBRETT
Öffnen Sie die obere Tür des Kühlschranks, um das Schaltbrett zu bedienen.
Das grüne "ON"-Licht zeigt an, dass das Gerät arbeitet. Dieses
Licht ist unabhängig von der Einstellung des Drehknopfes
außer für den Fall, dass der Drehknopf auf "0" steht.
Um das Gerät einzuschalten und die Temperatur im Kühlschrank und dem
Gefrierfach einzustellen, müsen Sie den Drehknopf einschalten. (Empfohlene
Einstellung – 2-3). Drehen Sie den Drehknopf auf "0", um das Gerät
auszuschalten.
(Abbildung 1)
EINFRIEREN
Die Konservierung des Gefrierguts ist in allen Gefrierfächern gewährleistet.
Wenn Sie das maximale Fassungsvermögen des Gefrierschranks nutzen, ist es für die bestmögliche Kühlung empfehlenswert, die Schubladen
herauszunehmen und die Nahrungsmittel direkt in die Fächer zu legen.
Bei einigen Geräten gibt es einen Bereich im Oberteil (siehe Kurzanleitung).
Legen Sie die einzufrierenden Lebensmittel in das Fach und drehen Sie das Thermostat im Uhrzeigersinn bis zur Einstellung 5. Nach 24
Stunden ist das Einfrieren abgeschlossen. Setzen Sie daher das Thermostat auf die Einstellung 2-3 zurück.
Das Matrikelschild gibt die maximale Anzahl von Nahrungsmitteln an, die eingefroren werden können (siehe Abbildung 2).
Um die Einfrier- und Konservierungsfunktion nach Norm zu testen, entfernen Sie alle Schubladen außer der unteren.
(Abbildung 2)
ABTAUEN
Bei diesem Gerät wird der Kühlschrank automatisch
abgetaut.
Beim normalen Betrieb des Kühlschranks entstehen auf der
Rückseite des Gefrierfachs eine dünne Reifschicht oder ein
paar Wassertropfen.
Vergewissern Sie sich, dass die Wasserablaufrinne immer
sauber ist. Achten Sie darauf , dass die Nahrungsmittel nicht die
Rückseite oder die Seitenwände des Gefrierfachs berühren.
Wir empfehlen Ihnen, das Gefrierfach abzutauen, wenn die
Frostschicht stärker als 3 mm ist.
Hinweis: Hier finden Sie das Matrikelschild. Wenn Sie bei einer Störung den Kundendienst kontaktieren müssen, geben Sie die Informationen
auf diesem Schild an.
Wichtiger Hinweis: Wenn die Raumtemperatur sehr warm ist, wird das Gerät unter Umständen ständig laufen und auf
der Rückseite des Kühlraums wird sich eine Frostschicht ablagern. Stellen Sie den Drehknopf in diesem Fall auf eine
niedrigere Einstellung (1-2).
10
10 DE

WASSERABLAUF
Das Gerät ist mit einem System ausgestattet, um das Wasser während des Abtauens ablaufen zu lassen.
Das System besteht aus:
einem Rohr, dass an ein Auffangbecken im unteren Bereich des Kühlschranks
angeschlossen ist;
Oder:
einem Stopfen, der beim Abtauen entfernt werden muss, um das abgetaute Wasser
ablaufen zu lassen;
einem Auffangbecken, dass am Auffangblech angebracht ist und
herausgezogen werden muss, damit das Wasser in einen Auffangbehälter
abfließen kann;
einem Auffangbehälter (nicht im Lieferumfang enthalten).
einem Schieber, der beim Abtauen entfernt werden muss, damit das Wasser in den
Auffangbehälter ablaufen kann;
einem Auffangbehälter (nicht im Lieferumfang enthalten).
WECHSEL DES TÜRANSCHLAGES
Um den Türanschlag zu wechseln, befolgen Sie die Anweisungen, die sich auf die Art des Schaltbretts und der Scharniere beziehen, die ihr Gerät
verwendet.
A
Stellen Sie den Kühlschrank auf den Fußboden
oder kippen Sie ihn um 45°, um leichter an der
Unterseite arbeiten zu können.
Entfernen Sie das untere rechte Scharnier, indem
Sie die Schrauben, den Stift und die Unterlegscheiben
abschrauben. Nehmen Sie dann die untere Tür ab.
Ritzen Sie die linke Öse der Stirnwand ein und
stechen Sie diese an der markierten Stelle im
Bereich des Einsatzes durch.
Entfernen Sie den unteren Sockel, indem Sie die
3 Schutzstopfen herausziehen und die
Schrauben lösen.
Entfernen Sie die Schutzkappen (A) und (B),
lösen Sie die Schrauben und ziehen Sie die
Stirnwand teilweise heraus.
Nehmen Sie aus dem Zubehör das obere linke
Scharnier und befestigen Sie es.
Bohren Sie an der Markierung der linken Seite
ein Loch in den Sockel.
Schrauben Sie das rechte Scharnier ab.
Bringen Sie die Scharniere und Türen wieder an,
beginnen Sie dabei von unten:
11
11 DE
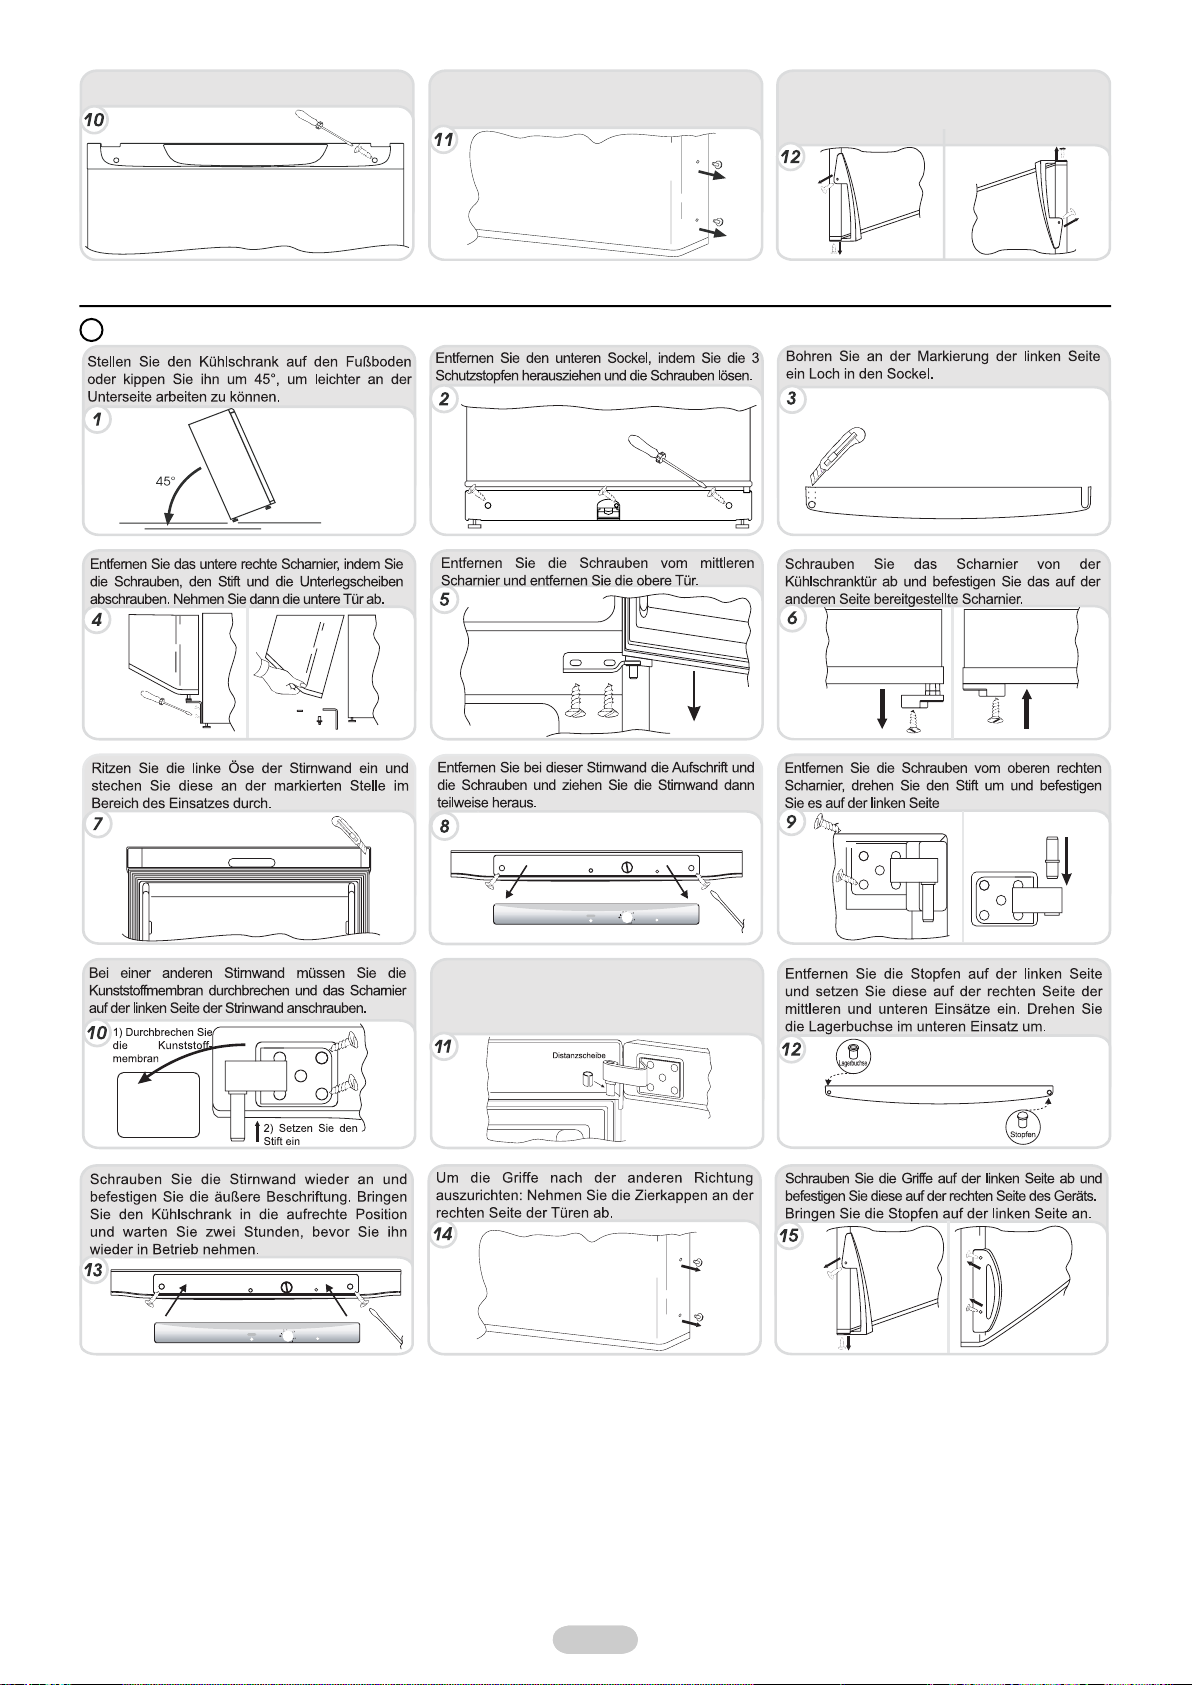
Bringen Sie die Stirnwand wieder an, indem Sie
die Schrauben und Schutzkappen befestigen.
Um die Griffe nach der anderen Richtung
auszurichten: Nehmen Sie die Zierkappen an der
rechten Seite der Türen ab.
Schrauben Sie die Kappen von der linken Seite
ab und bringen Sie sie an der rechten Seite an,
befestigen Sie dann erneut die Zierkappen an
der linken Seite der Türen.
Bringen Sie den Kühlschrank in die aufrechte Position und warten Sie zwei Stunden, bevor Sie ihn wieder in Betrieb nehmen.
B
Setzen Sie den Stift in das Scharnier und die
Distanzscheibe in den Einsatz ein. Bringen Sie
die Scharniere und Türen wieder an, beginnen
Sie dabei von unten.
12
12 DE
COMBINADOS CON 1 TERMOSTATO
CAJA DE MANDOS
Abra la puerta superior del frigorífico para acceder a la caja de mandos.
La luz verde “ON” (encendido) indica que la unidad está
funcionando. Esta luz es independiente de la posición del botón,
salvo en el caso de que éste se encuentre fijado en 0.
Pulse el botón para encender el aparato y fijar la temperatura del congelador
y del frigorífico- (Temperaturas recomendables – 2-3).
Ponga el interruptor a “0” para apagar el aparato.
(Figura 1)
CONGELADOR
La conservación de todas las comidas congeladas queda garantizda en cualquiera de los compartimentos del congelador.
Cuando el congelador está muy lleno, es aconsejable retirar los cajones y colocar la comida directamente sobre las estanterías para optimizar el
proceso de congelado.
Algunos productos incluyen una sección en la parte superior, (véase la guía rápida).
Para la congelación, coloque los alimentos en la celda , gire el interruptor del termostato hasta la posición 5. Al cabo de 24 horas , el congelado
habrá terminado. A continuación, vuelva a colocar el termostato en la posición 2-3
La placa indicadora muestra la cantidad máxima de comida que puede ser congelada, (véase figura 2).
Para comprobar las funciones de congelado y conservación, saque todas las celdas desde arriba una por una.
(Figura 2)
DESCONGELACIÓN
La descongelación del compartimento del congelador es
automática en este producto.
Un pequeño goteo de agua en la parte interna del compartimento
del congelador mientras esté funcionando es totalmente
normal.
Asegúrese de mantener siempre limpio el desagüe. Asegúrese
de que las comidas no tocan la parte trasera del compartimento
del congelador.
Le aconsejamos que descongele el congelador cuando la
bandeja de hielo haya alcanzado un espesor de 3 mm como
mínimo.
NOTA: esta es la placa indicadora. Si necesita contactar con nuestro servicio de atención al cliente en caso de fallos o defectos, no olvide
indicarle la información contenida en dicha placa.
Importante: si la temperatura de la habitación es muy alta, el aparato seguirá funcionando pero una capa de hielo se
formará en la parte trasera del compartimento del frigorífico. En este caso, gire el interruptor para alcanzar temperaturas
inferiores (1-2).
13 ES

DESAGUE
El aparato cuenta con un sistema para evacuar el agua tras la descongelación.
Este sistema comprende:
Un tubo conectado a una bandeja escurridora colocada bajo el frigorífico.
O:
Una tapa que debe ser quitada durante la descongelación para evacuar el agua
descongelada.
Deberá sacar la bandeja escurridora colocada en el plato para que el
agua pueda dirigirse hacia una pila.
Pila de desagüe (no suministrada con el producto).
Una barra que deberá sacar en el momento de descongelación para que el agua
pueda dirigirse a la pila.
Pila de desagüe (no suministrada con el producto).
INVERTIR EL SENTIDO DE APERTURA DE LAS PUERTAS
Para invertir el sentido de apertura de las puertas, siga las siguientes instrucciones en función del tipo de orificio y de bisagra que contenga su
producto.
A
Coloque el aparato en el suelo, respetando un
ángulo de 45°, ya que deberá trabajar sobre la
parte inferior del aparato.
Saque la bisagra del lado inferior derecho
desajustando los tornillos, la clavija y la arandelas.
A continuación, saque la puerta inferior.
Marque y perfore la ranura de la parte izquierda
del panel, situada en la zona de inserción.
Saque el plinto inferior, quitando las 3 tapas de
protección y desajustando los tornillos.
Quite las tapas (A) y (B), ajustadas por los
tornillos y saque una parte de la caja de mandos.
Ajuste la bisagra del lado superior izquierdo que
se encuentra en su kit de accesorios.
Taladre el plinto en el lado izquierdo indicado.
Desapriete la bisagra derecha.
Coloque las puertas y las bisagras instaladas de
arriba a abajo indicadas por los números
14 ES

Ajuste la caja de mandos y refuerce todo el
conjunto con ayuda de los tornillos y las tapas.
Para invertir el sentido de las asas: quite las
tapas exteriores situadas el la parte derecha de
las puertas.
Coloque el aparato en posición vertical y espere durante dos horas antes de encenderlo.
B
Desajuste las asas situadas en la parte izquierda
y colóquelas en la parte derecha. A continuación,
coloque las tapas externas en la parte izquierda
de las puertas.
15 ES

COMBINADO COM UM COMPRESSOR
PAINEL DE CONTROLO
Abra a porta superior do frigorífico para aceder ao painel de controlo.
A luz “ON” verde indica que o aparelho está em funcionamento.
Este indicador luminoso está ligado, independentemente
da programação do botão, excepto quando o botão está
programado para 0.
Carregue no botão para ligar o aparelho e regular a temperatura do congelador
e do frigorífico. (Programação recomendada – 2-3).
Rode o botão para “0” para desligar o aparelho.
(Figura 1)
CONGELAÇÃO
A conservação dos alimentos congelados é garantida em todos os compartimentos do congelador.
Durante a capacidade máxima do congelador, deve retirar as gavetas e colocar os alimentos directamente nas prateleiras para um congelamento
óptimo.
Nalguns produtos, está disponível uma secção na parte superior, (consulte o guia rápido)
Coloque os alimentos que pretende congelar na gaveta , rode o termóstato no sentido dos ponteiros do relógio para a posição 5. Após
24 horas, a congelação está concluída. Deste modo, reponha o termóstato para a posição 2-3
A placa de identificação indica a quantidade máxima de alimentos que podem ser congelados, (ver figura 2)
Para testar as funções de congelação e conservação, retire todas as gavetas com excepção da última gaveta inferior.
(Figura 2)
DESCONGELAÇÃO
Neste produto, a descongelação do refrigerador é
automática.
A presença de uma camada fina de gelo ou de gotas de água
na parte posterior do refrigerador durante o funcionamento
é normal.
É importante manter a conduta de água sempre limpa. Evite
guardar os alimentos encostados às partes posterior ou laterais
do compartimento do refrigerador.
Recomendamos que descongele a zona do congelador quando
a camada de gelo tiver mais de 3 mm de espessura.
Obs.: Esta é a placa de identificação. Se necessitar de entrar em contacto com a Assistência técnica em caso de avaria, deve fornecerlhes a informação indicada na placa.
Importante: Se a temperatura ambiente estiver muito quente, o aparelho pode continuar a funcionar de forma contínua
e uma camada de gelo irá formar-se na parte posterior do frigorífico. Neste caso, rode o botão para programações
mais baixas (1-2).
16
16 PT

ESCOAMENTO DE ÁGUA
O aparelho dispõe de um sistema para escoamento de água durante a descongelação.
Este sistema inclui:
Um tubo ligado a um tabuleiro para a água de descongelação localizado na parte inferior do
frigorífico.
Ou:
Um tampão que deve ser retirado durante a descongelação para escoar a água
descongelada.
Um tabuleiro para a água de descongelação no rodapé que deve ser
puxado para fora, para que a água possa escoar para um reservatório.
Um reservatório de escoamento (não fornecido).
Uma barra que deve ser retirada durante a descongelação para que a água possa
escoar para um reservatório.
Um reservatório de escoamento (não fornecido).
INVERTER A ABERTURA DAS PORTAS
Para inverter a abertura das portas, siga as indicações relacionadas com o tipo de dobradiça e fecho incluídos no seu produto.
A
Deite ou incline o frigorífico a 45°, para facilitar
as operaçőes na parte inferior do mesmo.
Para retirar o fecho interior da direita, retire os
parafusos, a cavilha e as anilhas e, em seguida,
remova a porta inferior.
Faça uma incisão e parta a aba da esquerda do
painel na zona marcada.
Remova o rodapé, puxando as 3 tampas de
protecçăo e desapertando os parafusos.
Retire as tampas (A) e (B), desaperte os
parafusos e remova parcialmente o painel.
No saquinho dos acessórios fornecidos, procure
o fecho superior da esquerda.
Perfure o rodapé na zona marcada à esquerda.
Desaparafuse o fecho da direita.
Monte outra vez os fechos e as portas de baixo
para cima,
17
17 PT

Coloque novamente o painel, fixando-o com os
parafusos e coloque as tampas.
Para inverter os puxadores: retire as tampas de
protecção do lado direito das portas.
Coloque o aparelho na vertical e aguarde duas horas antes de o ligar.
B
Desaperte os puxadores do lado esquerdo e
desloque-os para o lado direito e, em seguida,
no lado esquerdo das portas, coloque as tampas
anteriormente retiradas.
18
18 PT
ΨΥΓΕΙΟΚΑΤΑΨΥΚΤΕΣ ΕΝΟΣ ΣΥΜΠΙΕΣΤΗ
ΠΙΝΑΚΑΣ ΕΛΕΓΧΟΥ
Ανοίξτε την επάνω πόρτα του ψυγείου για να αποκτήσετε πρόσβαση στον πίνακα ελέγχου.
Το πράσινο φωτάκι “ON” δείχνει ότι η μονάδα λειτουργεί. Αυτό
το φωτάκι είναι αναμμένο ανεξάρτητα από τη ρύθμιση του
κουμπιού, εκτός εάν το κουμπί έχει ρυθμιστεί στη θέση “0”.
Γυρίστε το κουμπί για να θέσετε σε λειτουργία τη συσκευή και για να ρυθμίσετε
τη θερμοκρασία του χώρου της κατάψυξης και της συντήρησης. (Συνιστώμενη
ρύθμιση – 2-3). Εάν θέλετε να απενεργοποιήσετε τη συσκευή γυρίστε το κουμπί
στη θέση “0”.
(Εικόνα 1)
ΚΑΤΑΨΥΞΗ
Η διατήρηση των κατεψυγμένων τροφίμων είναι εγγυημένη σε όλα τα διαμερίσματα του χώρου κατάψυξης.
Κατά τη λειτουργία του καταψύκτη με μέγιστο φορτίο, σας συμβουλεύουμε να αφαιρείτε τα συρτάρια και να τοποθετείτε τα τρόφιμα απ' ευθείας στα
ράφια για καλύτερο πάγωμα.
Σε ορισμένα προϊόντα υπάρχει τμήμα στο επάνω μέρος (βλέπε γρήγορο οδηγό).
Τοποθετήστε τα φαγητά που πρέπει να παγώσουν στο συρτάρι και γυρίστε το θερμοστάτη στη θέση 5. Μετά από 24 ώρες, έχει ολοκληρωθεί
το πάγωμα. Τότε τοποθετήστε πάλι το θερμοστάτη στη θέση 2-3
Η πινακίδα στοιχείων αναφέρει τη μέγιστη ποσότητα τροφίμων που μπορούν να καταψυχθούν (βλέπε εικόνα 2)
Για να ελέγξετε τις λειτουργίες κατάψυξης και συντήρησης, αφαιρέστε όλα τα συρτάρια εκτός από το κάτω.
(Εικόνα 2)
ΑΠΟΨΥΞΗ
Σε αυτό το προϊόν η απόψυξη στο χώρο της συντήρησης γίνεται
όταν δεν λειτουργεί ο συμπιεστής
Μικρή ποσότητα πάχνης ή σταγόνες νερού στο πίσω μέρος
του χώρου της κατάψυξης είναι κανονικό φαινόμενο κατά τη
λειτουργία του καταψύκτη.
Να βεβαιώνεστε ότι ή έξοδος του νερού είναι πάντα καθαρή.
Επίσης να βεβαιώνεστε ότι τα τρόφιμα δεν αγγίζουν την πίσω
πλευρά ή τα πλαϊνά του χώρου της κατάψυξης.
Συνιστούμε να εκτελείτε απόψυξη του χώρου της κατάψυξης
όταν η στοιβάδα της πάχνης έχει πάχος μεγαλύτερο από
3 χιλιοστά.
ΣΗΜΕΙΩΣΗ: Αυτή είναι η πινακίδα στοιχείων. Εάν χρειάζεται να απευθυνθείτε στο Τμήμα μας Τεχνικής Εξυπηρέτησης σε περίπτωση
κάποιου προβλήματος, θυμηθείτε να αναφέρετε τις πληροφορίες που περιλαμβάνει αυτή η πινακίδα.
Σημαντική παρατήρηση: Εάν η θερμοκρασία του χώρου είναι πολύ υψηλή, η συσκευή ενδεχομένως να λειτουργεί
συνεχώς και να σχηματιστεί στοιβάδα πάχνης στο πίσω μέρος του χώρου της συντήρησης. Σ' αυτήν την περίπτωση
γυρίστε το κουμπί σε κάποια χαμηλότερη ρύθμιση (1-2).
19 EL
ΑΠΟΣΤΡΑΓΓΙΣΗ ΤΟΥ ΝΕΡΟΥ
Η συσκευή διαθέτει ένα σύστημα για την αποστράγγιση του νερού κατά την απόψυξη.
Αυτό το σύστημα αποτελείται από:
ή:
Ένα πώμα το οποίο πρέπει να αφαιρείται κατά την απόψυξη, ώστε να αποστραγγίζεται το
Ένα σωλήνα συνδεδεμένο σε δίσκο συλλογής που βρίσκεται στο κάτω μέρος του ψυγείου.
Ένα δίσκο συλλογής νερού που βρίσκεται στο πλαϊνό τοίχωμα, ο οποίος πρέπει
να σύρεται προς τα έξω ώστε το νερό να μπορεί να τρέξει σε μια λεκάνη..
νερό της απόψυξης.
Μια λεκάνη αποστράγγισης (δεν παρέχεται).
Μια μπάρα η οποία πρέπει να απομακρύνεται κατά την απόψυξη ώστε το νερό να
τρέχει μέσα σε μια λεκάνη.
Μια λεκάνη αποστράγγισης (δεν παρέχεται).
ΑΝΤΙΣΤΡΟΦΗ ΤΗΣ ΦΟΡΑΣ ΠΟΥ ΑΝΟΙΓΟΥΝ ΟΙ ΠΟΡΤΕΣ
Για να αντιστρέψετε τη φορά που ανοίγουν οι πόρτες, ακολουθήστε τις ενδείξεις σχετικά με τον τύπο παρεμβλήματος και μεντεσέ που περιλαμβάνει
το προϊόν σας.
Α
Τοποθετήστε τη συσκευή στο δάπεδο ή σε γωνία 45°,
όπως χρειάζεται για να εργαστείτε στο κάτω μέρος της
συσκευής.
Αφαιρέστε τον κάτω δεξιό μεντεσέ αφαιρώντας τις βίδες,
τον πείρο και τις ροδέλες και κατόπιν αφαιρέστε την κάτω
πόρτα.
Αφαιρέστε την κάτω βάση βγάζοντας τις 3 προστατευτικές
τάπες και ξεβιδώνοντας τις βίδες.
Αφαιρέστε τα καπάκια (Α) και (Β), ξεβιδώστε τις βίδες και
αφαιρέστε μερικώς τον πίνακα.
Τρυπήστε τη βάση στη σημειωμένη περιοχή στην
αριστερή πλευρά.
Ξεβιδώστε το δεξιό μεντεσέ.
Σημειώστε και σπάστε την αριστερή υποδοχή στον
πίνακα, στην περιοχή του παρεμβλήματος.
Από τα παρεχόμενα αξεσουάρ, πάρτε και συνδέστε τον
επάνω αριστερά μεντεσέ.
20 EL
Τοποθετήστε πάλι τους μεντεσέδες και τις πόρτες,
από το κάτω μέρος προς το επάνω,
Προσαρμόστε τον πίνακα, στερεώστε τον με τις βίδες και
τοποθετήστε τα καπάκια τους.
Για να αντιστρέψετε τις λαβές: αφαιρέστε τα
εξωτερικά καπάκια από την δεξιά πλευρά της κάθε
πόρτας.
Τοποθετήστε τη συσκευή σε όρθια θέση και περιμένετε δύο ώρες πριν τη θέσετε σε λειτουργία.
Β
Τοποθετήστε τη συσκευή στο δάπεδο ή σε γωνία
45°, όπως χρειάζεται για να εργαστείτε στο κάτω
μέρος της συσκευής.
Αφαιρέστε την κάτω βάση βγάζοντας τις 3
προστατευτικές τάπες και ξεβιδώνοντας τις βίδες.
Ξεβιδώστε τις λαβές από την αριστερή πλευρά,
τοποθετήστε τις στη δεξιά πλευρά, και στη συνέχεια
τοποθετήστε τα καπάκια στην αριστερή πλευρά της κάθε
πόρτας.
Τρυπήστε τη βάση στη σημειωμένη περιοχή στην
αριστερή της πλευρά.
Αφαιρέστε τον κάτω δεξιό μεντεσέ αφαιρώντας
τις βίδες, τον πείρο και τις ροδέλες και κατόπιν
αφαιρέστε την κάτω πόρτα.
Αποσυναρμολογήστε το πλαστικό παρέμβλημα,
κόψτε τη δεξιά γωνία και κατόπιν συναρμολογήστε
το πάλι.
Με άλλο τύπο πίνακα, σπάστε την πλαστική
μεμβράνη και βιδώστε το μεντεσέ στην αριστερή
πλευρά του πίνακα.
1) σπάστε την
πλαστική
μεμβράνη
2) Τοποθετήστε τον
πείρο
Αφαιρέστε τις βίδες από τον κεντρικό μεντεσέ και κατόπιν
αφαιρέστε την επάνω πόρτα.
Με αυτόν τον τύπο πίνακα, αφαιρέστε την ετικέτα
και τις βίδες και κατόπιν αφαιρέστε μερικώς τον
πίνακα.
Τοποθετήστε τον πείρο στο μεντεσέ και τον
αποστάτη στο παρέμβλημα. Συναρμολογήστε πάλι
τους μεντεσέδες και τις πόρτες από το κάτω μέρος
προς το επάνω.
αποστάτης
Ξεβιδώστε το μεντεσέ από την πόρτα του ψυγείου
και τοποθετήστε στην άλλη πλευρά αυτόν που σας
έχει παραδοθεί.
Ξεβιδώστε τις βίδες από τον επάνω δεξιά μεντεσέ,
αντιστρέψτε τη θέση του πείρου και κατόπιν
ξανατοποθετήστε τον στην αριστερή πλευρά.
Αφαιρέστε την τάπα από την αριστερή πλευρά και
τοποθετήστε τη στη δεξιά πλευρά του κεντρικού και
του κατώτερου παρεμβλήματος. Αντιστρέψτε τον
αντιτριβικό δακτύλιο στο κατώτερο παρέμβλημα.
αντιτριβικός
δακτύλιος
τάπα
Βιδώστε τον πίνακα πάλι στη θέση του και τοποθετήστε
πάλι την εξωτερική ετικέτα. Επαναφέρετε τη συσκευή
στην όρθια θέση και περιμένετε δύο ώρες πριν την
θέσετε πάλι σε λειτουργία.
Για να αντιστρέψετε τις λαβές: αφαιρέστε τα εξωτερικά
καπάκια από την δεξιά πλευρά της κάθε πόρτας.
21 EL
Ξεβιδώστε τις λαβές από την αριστερή πλευρά
και ξαναεγκαταστήστε τις στη δεξιά πλευρά της
συσκευής.
Τοποθετήστε τα καπάκια στην αριστερή πλευρά.

CHŁODZIARKO-ZAMRAŻARKA Z JEDNĄ SPRĘŻARKĄ
PANEL STEROWANIA
Aby uzyskać dostęp do panelu sterowania, należy otworzyć górne drzwi lodówki.
Zielona kontrolka „ON” świeci się, gdy urządzenie pracuje.
Kontrolka ta świeci się niezależnie od położenia pokrętła za
wyjątkiem ustawienia 0.
W celu włączenia urządzenia oraz ustawienia temperatury zamrażarki
i chłodziarki należy przekręcić pokrętło. (Zalecane ustawienie – 2-3).
Aby wyłączyć urządzenie, pokrętło należy ustawić w pozycji 0.
(rysunek 1)
ZAMRAŻANIE
Produkty mrożone zachowują trwałość po umieszczeniu w dowolnej części zamrażarki.
W przypadku całkowitego zapełnienia zamrażarki, dla zapewnienia optymalnego mrożenia zaleca się wyjęcie szuflad i umieszczenie produktów
bezpośrednio na półkach.
Dla niektórych produktów przeznaczone jest miejsce oznaczone symbolem w górnej części zamrażarki (patrz krótka instrukcja).
W celu zamrożenia produktów należy umieścić je w szufladzie , a następnie, obracając pokrętłem termostatu zgodnie z ruchem wskazówek
zegara, ustawić je w pozycji 5. Produkt jest zamrożony po 24 godzinach. Po tym czasie należy przestawić pokrętło termostatu ponownie na pozycję
2-3.
Na tabliczce znamionowej umieszczono informację o maksymalnej ilości produktów, jaką można zamrozić (patrz rysunek 2).
W celu przetestowania funkcji zamrażania i przechowywania należy usunąć wszystkie szuflady oprócz dolnej.
ROZMRAŻANIE
(rysunek 2)
W tym produkcie część chłodnicza jest rozmrażana
automatycznie.
Niewielka ilość lodu lub wody w tylnej części chłodziarki
podczas jej pracy jest zjawiskiem normalnym.
Należy zadbać o to, aby odpływ wody był zawsze czysty.
Produkty nie powinny dotykać tylnej ani bocznych ścianek
chłodziarki.
Zalecamy rozmrożenie zamrażarki, gdy grubość warstwy lodu
przekracza 3 mm.
Uwaga. Tutaj widoczna jest tabliczka znamionowa. W razie problemów, kiedy zachodzi konieczność skontaktowania się z serwisem, należy
podać informacje umieszczone na tej tabliczce.
Ważne: W wysokiej temperaturze otoczenia urządzenie może działać bez przerwy, a w tylnej części zamrażarki może
odkładać się warstwa lodu. W takim przypadku pokrętło należy ustawić na niższą wartość (1-2).
22
22 PL

ODPROWADZANIE WODY
Urządzenie wyposażone jest w system odprowadzania wody podczas rozmrażania.
System ten składa się z następujących części:
rurki prowadzącej do tacki na wodę umieszczonej w dolnej części lodówki;
zatyczki, którą podczas rozmrażania należy wyjąc w celu zapewnienia ujścia dla wody;
lub:
tacki na wodę umieszczonej na półce, którą należy wyciągnąć, aby woda
mogła spływać do zbiornika;
zbiornika, do którego odprowadzana jest woda (nie jest
dostarczany w zestawie);
listwy wyciąganej tak, aby woda spływała do zbiornika;
zbiornika, do którego odprowadzana jest woda (nie jest dostarczany
w zestawie).
ODWRACANIE KIERUNKU OTWIERANIA DRZWI
W celu odwrócenia kierunku otwierania drzwi należy postępować zgodnie ze wskazówkami odpowiednimi dla danego urządzenia oraz z uwzględnieniem
specyficznych zawiasów tego urządzenia.
A
Przechylić urządzenie pod kątem ok. 45°, tak aby
uzyskać dostęp do dolnej części urządzenia.
Zdjąć prawy dolny zawias, odkręcając wkręty,
wyjmując bolec mocujący i zdejmując podkładki.
Następnie zdjąć dolne drzwi.
Naciąć i wyłamać otwór w zaznaczonym miejscu
po lewej stronie.
Zdjąć dolny cokół, wyciągając trzy bolce
mocujące i odkręcając wkręty.
Usunąć zatyczki (A) i (B), odkręcić wkręty
i częściowo wyciągnąć listwę.
Z woreczka z akcesoriami wyjąć i zamocować
lewy zawias.
Wywiercić otwór w cokole, w oznaczonym
miejscu po lewej stronie.
Odkręcić prawy zawias.
Ponownie założyć zawiasy i drzwi, idąc od dołu
ku górze:
23
23 PL

Zamocować listwę, dokręcić wkręty i założyć
zatyczki.
Przekładanie uchwytów: usunąć zatyczki
z prawej strony drzwi.
Umieścić urządzenie w pozycji pionowej i przed jego włączeniem odczekać dwie godziny.
B
Odkręcić uchwyty z lewej strony drzwi i przełożyć
je na prawą. Następnie założyć zatyczki z lewej
strony drzwi.
24
24 PL

KOMBINOVANÉ CHLADNIČKY S JEDNÍM KOMPRESOREM
Pro přístup k ovládacímu panelu otevřete dveře chladničky
OVLÁDACÍ PANEL
Zelené světlo “ON”(zapnuto) ukazuje, že spotřebič pracuje. Toto
zelené světlo svítí bez ohledu na nastavení ovladače termostatu,
kromě případu, že ovladač termostatu je nastaven na 0.
Po zapnutí spotřebiče otočte ovladačem termostatu a nastavte teplotu oddělení
mrazničky a chladničky. (Doporučené nastavení – 2-3).
Po vypnutí spotřebiče nastavte ovladač termostatu na „0“.
(Obrázek 1)
ZMRAZOVÁNÍ
Uchovávání zmražených potravin je zaručeno ve všech odděleních mrazničky.
Během využívání maximální kapacity mrazničky je doporučeno vyjmout zásuvky a umístit potraviny přímo do poliček pro dosažení optimálního
zmrazení.
U některých výrobků je oddělení v horní části (viz rychlý průvodce).
Potraviny pro zmrazení umístěte do zásuvky , otočte voličem termostatu po směru hodinových ručiček na polohu 5. Po 24 hodinách je proces
zmrazení kompletní. Proto znovu nastavte termostat do polohy 2-3
Popisný štítek stanovuje maximální množství potravin, které mohou být zmrazeny (viz obrázek 2)
Pro testování funkcí pro zmrazení a uchovávání vyjměte všechny zásuvky kromě spodní zásuvky.
(Obrázek 2)
ODMRAZOVÁNÍ
Rozmrazování prostoru chladničky je u tohoto výrobku
automatické.
Malé množství námrazy nabo kapky vody na zadní části
prostoru mrazničky je při provozu mrazničky normální.
Zajistěte, aby tento odvod vody byl vždy čistý. Zajistěte, aby se
potraviny nedotýkaly zadní strany nebo bočních stěn prostoru
mrazničky.
Doporučujeme, abyste odmrazovali prostor mrazničky, pokud
je vrstva námrazy silnější než 3 mm.
Poznámka. Toto je popisný štítek. Potřebujete-li kontaktovat servisní oddělení v případě závad, nezapomeňte jim poskytnout informaci
z tohoto štítku.
Důležité: Pokud je teplota v místnosti velmi vysoká, může spotřebič pracovat nepřetržitě a vrstva námrazy se bude ukládat
na zadní straně prostoru chladničky. V takovém případě nastavte ovladač termostatu na nižší nastavení (1-2).
25 CZ

Spotřebič má systém pro odvod vody při odmrazování.
Tento systém se skládá z následujích součástí:
ODVOD VODY
Trubice, připojená na odkapávací podložku, umístěnou ve spodní části chladničky.
Zástrčka, která je při odmrazování odstraněna, aby mohla odtéci rozmrzlá voda.
nebo:
Odkapávací podložka, umístěná na desce, která musí být vytažena, aby
mohla voda odtéci do nádržky.
Odvodňovací nádržka (není součástí dodávky).
Tyčka, která je odstraněna při odmrazování, aby mohla rozmrzlá voda odtéci do
nádržky.
Odvodňovací nádržka (není součástí dodávky).
ZMĚNA SMĚRU OTEVÍRÁNÍ DVEŘÍ
Pro změnu směru otevírání dveří postupujte podle označení v závislosti na typu závěsů a výplně, kterými vybaven váš výrobek.
A
Spotřebič umístěte na podlahu nebo do úhlu 45°,
protože bude nezbytné pracovat na spodní části
spotřebiče.
Sejměte spodní pravý závěs odstraněním šroubů,
kolíku a podložek, poté sejměte dolní dveře.
Označte a vylomte levý otvor v panelu, v části
výplně.
Odstraňte spodní lištu, vytáhněte 3 ochranné
západky a uvolněte šrouby.
Odstraňte západky (A) a (B), uvolněte šrouby a
částečně sejměte panel.
Přetočte horní levý závěs, který je součástí sady
s příslušenstvím.
Provrtejte lištu ve vyznačené části na levé straně.
Odšroubujte pravý závěs.
Znovu nasaďte závěsy a dveře postupujíc zdola
nahoru,
26 CZ
Nasaďte panel a zajistěte šrouby západkami.
Obrácení rukojetí: odstraňte vnější západky
z pravé strany dveří.
Umístěte spotřebič do vertikální polohy a počkejte dvě hodiny před jeho uvedením do provozu.
B
Spotřebič umístěte na podlahu nebo v úhlu 45°,
protože bude nezbytné pracovat na spodní části
spotřebiče.
Odstraňte spodní lištu, vytáhněte 3 ochranné
západky a uvolněte šrouby.
Odšroubujte rukojeti z levé strany a přesuňte je
na pravou stranu, poté dejte vnější západky na
levou stranu dveří.
Provrtejte lištu ve vyznačené části na levé straně.
Sejměte spodní pravý závěs odstraněním
šroubů, kolíku a podložek, poté sejměte dolní
dveře.
Označte a prolomte otvor na levé straně panelu,
v části pro vložení.
U jiného typu panelu, vylomte plastový kryt a
našroubujte závěs na levou stranu desky.
1) vylomte plastový
kryt
2) Zasuňte kol
ík
Odstraňte šrouby ze středního závěsu a
sundejte horní dveře.
U tohoto typu panelu, odstraňte štítek a šrouby,
poté částečně odstraňte panel.
Zasuňte kolík do závěsu a rozpěrku ve výplni.
Znovu namontujte závěsy a dveře postupujíc
zdola nahoru.
rozpěrka
Odšroubujte závěs z dveří chladničky a namontujte
ten, který je součástí dodávky, na druhou stranu.
Odstraňte šrouby z horního pravého závěsu a
převraťte kolík, poté znovu smontujte na levé
straně.
Odstraňte západku na levé straně a vložte ji na
pravou stranu střední a spodní výplně. Obraťte
vložku ve spodní výplni.
Vložka
Západka
Našroubujte panel nazpět a umístěte nazpět venkovní
štítek. Umístěte spotřebič do vertikální polohy a
počkejte dvě hodiny před jeho uvedením do provozu.
Obrácení rukojetí: odstraňte vnější západky
z pravé strany dveří.
27 CZ
Odšroubujte rukojeti z levé strany a namontujte je
ma pravou stranu výrobku.
Umístěte západky na levé straně.

KOEL/VRIESCOMBINATIE MET ENKELVOUDIGE COMPRESSOR
BEDIENINGSPANEEL
Open de bovenste deur van de koelkast. Nu kunt u het bedieningspaneel bedienen.
Het groene “ON” lampje geeft aan dat het apparaat ingeschakeld
is. Het lampje brandt niet wanneer de regelknop in de stand "0"
staat. In de overige standen brandt het lampje wel.
Voor het aanzetten van het apparaat en voor het instellen van de temperatuur van
de koelkast en het vriesvak, dient u aan de regelknop te draaien. (Aanbevolen
stand: 2-3). Draai de regelknop op “0” om het apparaat uit te zetten.
(afb. 1)
INVRIEZEN
Ingevroren voedingsmiddelen kunnen zonder enig probleem in alle vriesvakken bewaard worden.
Voor optimaal in vriezen adviseren wij u de regelknop van de thermostaat in de hoogste stand te zetten, de laden te verwijderen en de v oedingsmiddelen
op de koelplaten te plaatsen.
Sommige producten hebben bovenin een vriesvak, (zie verkorte handleiding).
Plaats de in te vriezen voedingsmiddelen in het vak, zet de regelknop v an de thermostaat in stand 5. Na 24 uur is het in vriezen v oltooid. Zet
de regelknop van de thermostaat daarna in stand 2-3
Het identificatieplaatje geeft de maximale hoeveelheid voedingsmiddelen aan die ingevroren kunnen worden, (zie afbeelding 2)
Verwijder alle laden (met uitzondering van de onderste) om de vries- en conserveringsfuncties uit te testen.
(afb. 2)
ONTDOOIEN
Het ontdooien van het vriesvak geschiedt bij dit product
automatisch.
De aanwezigheid van een dun ijslaagje of waterdruppels op
de achterwand van het vriesvak is tijdens de werking van het
apparaat normaal.
Het is van belang dat het afvoerputje schoongehouden wordt.
Plaats voedingsmiddelen nooit tegen de achterwand of de
zijwanden van het vriesvak.
Wanneer het ijslaagje meer dan 3 mm dik is, adviseren wij u
om het vriesvak te ontdooien.
NB. Hier bevindt zich het identificatieplaatje. In geval van storingen moeten de gegevens op dit identificatieplaatje aan het technische
servicepunt worden doorgegeven.
Belangrijk: Het is mogelijk dat het apparaat bij een zeer hoge omgevingstemperatuur continue werkt. Als gevolg
daarvan vormt zich een ongebruikelijk ijslaagje op de achterwand van het vriesvak. Zet in dat geval de regelknop van
de thermostaat op een lagere stand (1-2).
28
28 NL

WATERAFVOER
Voor het ontdooien is het apparaat voorzien van een waterafvoersysteem.
Dit systeem bestaat uit het volgende:
Een leiding verbonden met een druppelvanger die zich aan de onderzijde van de koelkast bevindt.
Of:
Een aftapdop die verwijderd dient te worden om tijdens het ontdooien het dooiwater af te
voeren.
Een druppelvanger die uitgetrokken moet worden zodat het water in een
reservoir kan stromen.
Een afwateringsreservoir (niet meegeleverd).
Een afsluiting die tijdens het ontdooien verwijderd moet worden zodat het water in
een reservoir kan stromen.
Een afwateringsreservoir (niet meegeleverd).
OMKEREN VAN DE OPENINGSRICHTING VAN DE DEUREN
Voor het veranderen van de openingsrichting van de deuren verwijzen wij u naar de desbetreffende instructies. Deze zijn afhankelijk van het
scharniertype waarmee uw apparaat uitgerust is.
A
Leg het apparaat plat op de grond of houd hem
onder een hoek van 45°, om de handelingen aan
de onderkant makkelijker te kunnen uitvoeren.
Verwijder het scharnier rechtsonder door de
schroeven, de pen en de ringen los te draaien en
verwijder vervolgens de onderste deur.
Snij het linkeroog van het paneel bij de
markering door en breek hem.
Verwijder de onderrand door de drie
beschermingsdopjes eruit te wippen en de
bijbehorende schroeven los te draaien.
Verwijder de doppen (A) en (B), draai de
schroeven los en verwijder het paneel
gedeeltelijk.
Bevestig het scharnier linksboven (bevindt zich in
de set met accessoires).
Maak een gat in de onderrand bij de markering
aan de linkerkant.
Draai het rechterscharnier los.
Monteer opnieuw de scharnieren en deuren door
van beneden naar boven te werken,
29
29 NL

Monteer het paneel door hem vast te zetten met
de schroeven en de dopjes.
Voor het verplaatsen van de handvatten: verwijder
de dopjes aan de rechterkant van de deuren.
Zet het apparaat in verticale stand en wacht eerst twee uur alvorens het apparaat aan te zetten.
B
Draai de handvatten aan de linkerkant los,
verplaats ze naar de rechterkant en zet vervolgens
de dopjes op de linkerkant van de deuren.
30
30 NL
YHDEN KOMPRESSORIN YHDISTELMÄ
Avaa jääkaapin yläovi, jotta pääset käsiksi ohjauspaneeliin.
OHJAUSPANEELI
Vihreä PÄÄLLÄ-merkkivalo osoittaa, että yksikkö toimii.
Merkkivalo palaa valitsimen asetuksesta riippumatta, paitsi
silloin kun valitsin on asennossa 0.
Käännä valitsinta käynnistääksesi koneen ja asettaaksesi pakastimen ja
jääkaapin lämpötilan. (Suositeltu asetus: 2-3).
Käännä valitsimen asetukseksi “0”, kun haluat ottaa laitteen pois päältä.
(Kuva 1)
PAKASTAMINEN
Jäädytettyjen elintarvikkeiden säilyttäminen taataan pakastimen kaikissa osissa.
Kun käytetään pakastimen maksimikapasiteettia, on suositeltavaa poistaa laatikot ja asettaa elintarvikkeet suoraan hyllyille parhaan mahdollisen
jäätymisen varmistamiseksi.
Joidenkin tuotteiden yläosassa on erityinen osasto (katso pikaopas).
Aseta jäädytettävät elintarvikkeet laatikkoon, käännä termostaatti myötäpäiv ään asentoon 5. Jäätyminen on valmis 24 tunnin jälkeen. Aseta
sen jälkeen termostaatti asentoon 2-3.
Arvokilvessä ilmoitetaan jäädytettävien elintarvikkeiden enimmäismäärä (katso kuva 2)
Kun haluat testata pakastus- ja säilytystoimintoja, poista kaikki laatikot alimmaista lukuun ottamatta.
(Kuva 2)
SULATTAMINEN
Tässä tuotteessa on jääkaappiosan automaattinen sulatus.
Pieni määrä huurretta tai vesipisaroita pakastimen takaosassa
on normaalia silloin, kun pakastin toimii normaalisti.
Varmista, että veden poistoletku on aina puhdas . V armista, että
elintarvikkeet eivät kosketa pakastimen takaosaa tai sivuja.
Suosittelemme, että sulatat pakastimen, kun huurteen paksuus
on yli 3 mm.
Huom! Arvokilpi on kiinnitetty tähän. Jos sinun tarvitsee ottaa yhteyttä huoltoon vikatilanteessa, muista ilmoittaa kilven tiedot.
Tärkeää: Jos huoneen lämpötila on erittäin lämmin, laite saattaa käydä koko ajan ja jääkaapin takaosaan muodostuu
huurrekerros. Käännä tässä tapauksessa valitsin alhaisempaan asentoon (1-2).
31 FI

VEDEN TYHJENTÄMINEN
Laitteessa on järjestelmä veden tyhjentämiseksi sulatuksen aikana.
Järjestelmässä on:
Poistettava tulppa sulatetun veden valuttamiseksi.
Putki, joka on yhdistetty valuvan veden astiaan jääkaapin alaosassa.
Tai:
Valuvan veden astia, joka on vedettävä ulos, jotta vesi voi valua
altaaseen.
Valuma-allas (ei mukana toimituksessa).
Tanko, joka on poistettava vettä sulatettaessa niin, että vesi voi valua altaaseen.
Valuma-allas (ei mukana toimituksessa).
OVIEN KÄTISYYDEN VAIHTAMINEN
Kun haluat vaihtaa ovien kätisyyden, noudata ohjeita oman tuotteesi ja saranatyypin mukaisesti.
A
Laita jääkaappi lattialle tai kallista sitä 45°, koska
on tarpeen työskennellä laitteen pohjassa.
Irrota oikeanpuoleinen alasarana poistamalla
ruuvit, tappi ja aluslevyt. Poista alaovi.
Lävistä paneelissa oleva vasemmanpuoleinen
lovi merkin kohdalta.
Irrota jalkalista poistamalla kolme suojatulppaa ja
löysäämällä ruuvit.
Poista tulpat (A) ja (B), kierrä ruuvit auki ja poista
paneeli osittain.
Ota vasen yläsarana laitteen mukana
toimitettavasta välinepakkauksesta ja aseta se
paikalleen.
Tee jalkalistaan reikä vasemmalla olevan merkin
kohdalle.
Ruuvaa oikea sarana irti.
Asenna saranat ja ovet paikoilleen alhaalta
ylöspäin
32 FI
Asenna paneeli paikalleen ja kiinnitä se ruuveilla
ja tapeilla.
Kahvojen kätisyyden vaihto: poista tapit ovien
oikealta puolelta.
Aseta laite pystyasentoon ja odota kaksi tuntia ennen käynnistämistä.
B
Laita jääkaappi lattialle tai kallista sitä 45°, koska on
tarpeen työskennellä laitteen pohjassa.
Irrota jalkalista poistamalla kolme suojatulppaa ja
löysäämällä ruuvit.
Ruuvaa kahvat irti vasemmalta ja siirrä ne
oikealle. Aseta sitten tapit ovien vasemmalle
puolelle.
Tee jalkalistaan reikä vasemmalla olevan merkin
kohdalle.
Irrota oikeanpuoleinen alasarana poistamalla
ruuvit, tappi ja aluslevyt. Poista alaovi.
Lävistä paneelissa oleva vasemmanpuoleinen
lovi merkin kohdalta.
Toisen tyyppisessä paneelissa murra muoviosa
ja ruuvaa sarana paneelin vasemmalle puolelle.
1) Murra muoviosa
2) Aseta tappi
Irrota ruuvit keskisaranasta ja poista yläovi.
Tässä paneelityypissä poista merkki ja ruuvit ja
irrota paneeli osittain.
Aseta tappi saranaan ja aluslevy muoviosaan.
Asenna saranat ja ovet paikoilleen alhaalta ylöspäin.
välikappale
Ruuvaa sarana irti jääkaapin ovesta ja asenna
toimitettu ovi toiselle puolelle.
Irrota ruuvit oikeasta yläsaranasta ja käännä tapin
asento päinvastaiseksi. Kokoa sen jälkeen uudelleen
vasemmalla puolella.
Poista tulppa vasemmalta puolelta ja laita se
oikealle puolelle keskimmäiseen ja alempaan
reikään. Käännä holkki alemmassa reiässä.
Holkki
Tulppa
Ruuvaa paneeli takaisin paikalleen ja aseta
merkki takaisin paikalleen. Aseta laite
pystyasentoon ja odota kaksi tuntia ennen
käynnistämistä.
Kahvojen kätisyyden vaihto: poista tapit ovien
oikealta puolelta.
33 FI
Ruuvaa kahvat irti vasemmalta puolelta ja
asenna ne uudelleen jääkaapin oikealle puolelle.
Aseta tulpat vasemmalle puolelle.
ENKEL KOMPRESSOR KOMBISKAP
KONTROLLPANEL
Åpne den øvre kjøleskapsdøren for å få tilgang til kontrollpanelet.
Det grønne ”ON”-lyset viser at apparatet er slått på. Dette
lyset lyser uavhengig av hjulets innstilling, bortsett fra når det
er satt til 0.
Vri på hjulet på termostatboksen for å slå på apparatet og endre temperaturen
i kjøleskapet og dypfryseren. (Anbefalt innstilling – 2-3).
Vri hjulet på termostatboksen til "0" for å slå av apparatet.
(Figur 1)
DYPFRYSING
Frossen mat konserveres garantert i alle fryserens seksjoner.
Ved maksimal kapasitet av fryseren er det anbefalt å fjerne skuffene og sette matvarene direkte på hyllene for å få en optimal nedfrysing.
Noen produkter har en seksjon i den øvre delen, (se hurtigguide).
Plasser matvarene som skal fryses ned i skuffen, vri termostaten med urviseren til posisjon 5. Etter 24 timer er nedfrysingen fullført. Vri
derfor termostaten tilbake til posisjon 2-3
Merkeskiltet oppgir den maksimale mengden av matvarer som kan fryses ned, (se figur 2)
For å prøve fryse- og konserveringsfunksjonene, ta ut alle skuffene bortsett fra den nederste.
(Figur 2)
AVRIMING
I dette produktet foregår avrimingen av kjøleseksjonen
automatisk.
Litt rim og vanndråper bakerst i fryseren når den virker er
normalt.
Forsikre deg om at avløpshullet alltid er rent. Pass på at
matvarene ikke kommer i kontakt med bakveggen i fryseren.
Vi anbfelar å avrime fryseren hvis frostlaget overstiger 3 mm
i tykkelse.
N.B. Dette er merkeskiltet. Hvis du blir nødt til å kontakte vår serviceavdeling i tilfelle feil, oppgi dataene på merkeskiltet.
Viktig: Dersom romtemperaturen er veldig høy, vil apparatet sannsynligvis fungere uten stans. Dette kan forårsake at
det danner seg unormalt mye rim på den bakre kjøleskapsveggen. I dette tilfellet sett kjøleskapets termostathjul på et
lavere nummer (1-2).
34
34 NO

DRENERING AV VANN
Apparatet har et system for drenering av vann under avriming.
Systemet består av:
Et rør forbundet til et dryppebrett nederst på kjøleskapet.
En plugg som fjernes under avriming for at vannet skal dreneres.
Eller:
Et dryppebrett som må trekkes ut slik at vannet som dreneres kan
samles opp i en beholder..
Beholder (ikke levert).
Et stengsel som fjernes under avriming for at vannet skal dreneres.
Beholder (ikke levert).
SNUING AV DØRÅPNINGEN
For å snu døråpningen, følg instruksjonene i relasjon med innsettingen og hengseltypen for ditt produkt.
A
For å gjøre det lettere å komme til nederst på
kjøleskapet kan du legge det ned på gulvet eller
bikke det over 45°.
Skru av skruene, fjern det nederste høyre
hengselet, stiften og mellomleggsskivene og ta
av den nederste døren.
Skjær ut det venstre hullet i dekselet der du ser
merket.
Fjern de 3 beskyttelseshettene, løsne skruene
og ta av den nederste sokkelen.
Fjern hettene (A) og (B), skru av skruene og
trekk dekselet delvis av.
Fest det øverste venstre hengselet som du finner
i utstyrsposen.
Lag hull i sokkelen der du finner det venstre
merket.
Skru av høyre hengsel.
Monter hengslene og dørene nedenfra og
oppover,
35
35 NO

Monter hengslene og dørene nedenfra og
oppover,
For å flytte håndtakene til motsatt side: ta av
pyntehettene på den høyre siden av dørene.
Sett apparatet i vertikal stilling igjen og vent 2 timer før du setter det i gang.
B
Skru av håndtakene på venstre side og flytt dem
til høyre side, deretter setter du på pyntehettene
på venstre side av dørene.
36
36 NO

KOMBINERAD ENKEL KOMPRESSOR
KONTROLLPANEL
Öppna den övre kylskåpsdörren för att komma åt kontrollpanelen.
Den gröna lampan “ON” indikerar att enheten fungerar.
Denna lampa är tänd oberoende av vredets inställningar, med
undantag av när vredet ställs på 0.
Vrid vredet för att slå på apparaten och ställ in temperaturen i frysutrymmet och
kylskåpet. (Rekommenderad inställning – 2-3).
Vrid vredet till “0” för att stänga av apparaten.
(Figur 1)
INFRYSNING
Förvaring av frysta matvaror är garanterad i frysens alla utrymmen.
Under maximal infrysning av matvaror, rekommenderas att ta ur fryslådorna och placera matvarorna direkt på hyllorna för optimal infrysning.
På vissa produkter finns det en avdelning i den övre delen, (se snabbmanual).
Placera matvarorna som ska frysas i lådan, vrid termostaten medsols till läge 5. Efter 24 timmar är infrysningen klar. Ställ därefter tillbaka
termostaten till läge 2-3
Den maximala mängden matvaror som kan frysas in är angiven på märkplåten, (se figur 2)
För att testa infrysnings- och förvaringsfunktionerna, ta ur alla fryslådor förutom den understa.
(Figur 2)
AVFROSTNING
Avfrostningen av kylutrymmet är automatisk på den här
produkten.
Det är normalt att en mindre mängd frost eller vattendroppar
bildas på baksidan av frysutrymmet när frysen fungerar.
Säkerställ att vattenutloppet är alltid rent. Säkerställ att inga
matvaror vidrör baksidan eller sidorna i frysutrymmet.
Vi rekommenderar att du frostar av frysen när frostlagret har
blivit mer än 3 mm tjockt.
NB. Detta är märkplåten. Om du behöver kontakta service för eventuella fel, kom ihåg att ge dem informationen som finns på den här
plåten.
Viktigt: Om rumstemperaturen är mycket hög, kan apparaten fungera kontinuerligt och ett frostlager avsätter sig då på
baksidan av kylutrymmet. I det här fallet, vrid vredet till en lägre inställning (1-2).
37 SV

VATTENAVLEDNING
Apparaten har ett system för att avleda vattnet under avfrostningen.
Detta system består av:
Ett rör ansluten till en droppbricka placerad vid kylskåpsbotten.
En plugg att avlägsna under avfrostningen för att avleda det avfrostade vattnet.
Eller:
En droppbricka placerad i sockeln som måste dras ut så att vatten kan
rinna i den.
Ett dräneringskar (ej medlevererat).
En tunga att dra ut så att vatten kan rinna ner i ett kar.
Ett dräneringskar (ej medlevererat).
OMHÄNGNING AV DÖRRAR
För att hänga om dörrarna, följ anvisningarna i förhållande till insats och gångjärnstyp med vilka din apparat är tillverkad.
A
Placera apparaten på golvet i en 45° vinkel,
eftersom det är nödvändigt att arbeta på botten
av apparaten.
Avlägsna det undre högra gångjärnet genom att
avlägsna skruvarna, stiftet och brickorna,
avlägsna sedan den undre dörren.
Markera och bryt den vänstra springan på
panelen, i inpassningsområdet .
Avlägsna den undre sockeln genom att dra ut de
tre 3 täckpluggarna och skruva loss skruvarna.
Avlägsna täckpluggarna (A) och (B), skruva loss
skruvarna och avlägsna delvis panelen.
Markera och bryt den vänstra springan på
panelen, i inpassningsområdet .
Borra sockeln i det vänstra markerade området.
Skruva loss det högra gångjärnet.
Montera gångjärnen och dörrarna på nytt
nedifrån och upp,
38 SV

Fäst panelen på nytt med skruvarna och
täckpluggarna.
För att kasta om handtagen: ta bort de yttre
täckpluggarna från dörrarnas högra sida.
Ställ apparaten i upprätt läge och vänta två timmar innan du slår på den.
B
Placera apparaten pĺ golvet i en 45° vinkel,
eftersom det är nödvändigt att arbeta pĺ botten
av apparaten.
Avlägsna den undre sockeln genom att dra ut de
tre 3 täckpluggarna och skruva loss skruvarna.
Skruva loss handtagen från den vänstra sidan och
flytta dem till den högra sidan, placera sedan de yttre
täckpluggarna på den vänstra sidan av dörrarna.
Borra sockeln i det vänstra markerade omrĺdet.
Avlägsna det undre högra gĺngjärnet genom att
avlägsna skruvarna, stiftet och brickorna,
avlägsna sedan den undre dörren.
Markera och bryt den vänstra springan pĺ
panelen, i inpassningsomrĺdet.
Om panelen är av annan typ, bryt
plastmembranet och skruva fast gĺngjärnet pĺ
den vänstra sidan av panelen.
1) bryt
plastmembranet
2) Sätt i stiftet
Avlägsna skruvarna frĺn det mellersta gĺngjärnet
och lyft av den övre dörren.
Pĺ den här paneltypen, avlägsna etiketten och
skruvarna, ta sedan delvis bort panelen.
Sätt i stiftet i gĺngjärnet och brickan i insatsen.
Montera gĺngjärnen och dörrarna frĺn botten och
uppĺt.
bricka
Skruva loss gĺngjärnet frĺn kylskĺpsdörren och
montera det medlevererade pĺ den motsatta
sidan.
Avlägsna skruvarna frĺn det övre högra
gĺngjärnet och kasta om placeringen av stiftet,
ĺtermontera det sedan pĺ den vänstra sidan.
Ta bort pluggen pĺ den vänstra sidan och sätt i
den pĺ den högra sidan av den mellersta och
undre insatsen. Kasta om bussningen pĺ den
undre insatsen.
Bussning
plugg
Skruva tillbaka panelen igen och fäst den yttre
etiketten igen. Ställ apparaten upprätt och vänta
i tvĺ timmar innan du slĺr pĺ den.
För att kasta om handtagen: ta bort de yttre
täckpluggarna frĺn dörrens högra sida.
39 SV
Skruva loss handtagen pĺ den vänstra sidan och
montera dem pĺ produktens högra sida.
Placera täckpluggarna pĺ den vänstra sidan.

KOMBI-SINGLE-KOMPRESSOR
KONTROLPANEL
Åbn den øverste dør på køleskabet for at få adgang til kontrolpanelet.
Den grønne lampe “TÆNDT” viser, at enheden kører. Dette
lys er tændt, uanset hvordan knappen er indstillet, bortset fra
når knappen er sat til 0.
Drej på knappen for at tænde apparatet og indstille temperaturen i fryseboksen
og køleskabet. (Anbefalet indstilling – 2-3).
Drej knappen til “0” for at slukke for apparatet.
(Figur 1)
NEDFRYSNING
Bevaring af frosne madvarer garanteres i alle fryserens rum.
Ved maksimal frysekapacitet anbefales det at fjerne skufferne og placere madvarerne direkte på hylderne for at opnå optimal nedfrysning.
I nogle produkter er der et rum øverst, (se lynvejledning).
Placer de madvarer, der skal nedfryses, i -skuffen, drej termostaten med uret til position 5. Efter 24 timer er madvarerne helt nedfrosset.
Derefter skal termostaten igen sættes til 2-3
Typeskiltet angiver maksimumskvantitet af madvarer, der kan nedfryses, (se figur 2)
For at teste nedfrysning og bevaringsfunktioner skal du fjerne alle skufferne, bortset fra den nederste.
(Figur 2)
AFRIMNING
I dette produkt bliver fryseren automatisk afrimet.
En lille smule rim eller vanddråber bagerst i fryseren, når
fryseren kører, er helt normalt.
Sørg f or , at vandaflø bet altid er rent. Sørg f or , at madvarer ikk e
rører ved fryserens vægge.
Vi anbefaler afrimning af fryseren, hvis der er mere end 3
mm tykt rim.
NB. Dette er typeskiltet. Hvis du får brug for at kontakte serviceafdelingen i tilfælde af fejl, så husk at give dem de oplysninger, der er på
skiltet.
Vigtigt: Hvis rumtemperaturen er meget høj, så kan de ske, at apparatet kører hele tiden, og der vil blive dannet et lag
rim bagerst i køleskabet. I sådanne tilfælde skal du dreje på knappen til en lavere indstilling (1-2).
40 DA

AFTAPNING AF VAND
Apparatet har et system til aftapning af vand, mens det afrimer.
Systemet består af:
Der er forbundet et rør til den afdrypningsbakke, der befinder sig nederst i køleskabet.
En prop, der skal fjernes ved afriminig for at aftappe det afrimede vand.
Eller:
Afdrypningsbakken befinder sig ved soklen, som skal trækkes ud, så
vandet kan flyde ud i et kar.
Aftapningskar (medfølger ikke).
En bjælke, der skal fjernes, når der afrimes, så vand kan flyde ud i et kar.
Aftapningskar (medfølger ikke).
SÅDAN VENDES DØRENES ÅBNERETNING
For at vende døråbningerne, skal du følge anvisningerne for det ophæng og hængsel, som dit produkt består af.
A
Sæt apparatet på gulvet i en 45° vinkel, da det er
nødvendigt at kunne arbejde på bunden af
apparatet.
Fjern bundhængslet til højre ved at fjerne
skruerne, splitten og skiverne, og fjern derefter
den nederste dør.
Marker og bryd rillen på venstre side i
indsætningsområdet.
Fjern soklen ved at fjerne de
3 beskyttelsespropper og ved at løsne skruerne.
Fjern hætterne (A) og (B), løsn skruerne, og fjern
panelet delvist.
Slå let på det øverste venstre hængsel, som
findes i tilbehørs-sættet.
Bor i soklen på det markerede område på
venstre side.
Skru det højre hængsel af.
Sæt hængslerne og dørene på igen ved at
arbejde fra bunden og opefter,
41 DA

Juster panelet, og fastgør det med skruerne og
hætterne.
Sådan vendes håndtagene: fjern pyntepropperne
på højre side af dørene.
Rejs apparatet, og vent to timer, før du tænder for det.
B
Placer apparatet pĺ gulvet i en 45° vinkel, da det
er nřdvendigt at kunne arbejde pĺ bunden af
apparatet.
Fjern soklen ved at fjerne de 3
beskyttelsespropper og ved at lřsne skruerne.
Sådan vendes håndtagene: fjern
pyntepropperne på højre side af dørene.
Bor i soklen pĺ det markerede omrĺde pĺ venstre
side.
Fjern bundhćngslet til hřjre ved at fjerne
skruerne, splitten og skiverne, og fjern derefter
den nederste dřr.
Marker og bryd rillen pĺ venstre side i panelet pĺ
indstiksomrĺdet.
Ved en anden paneltype skal du bryde
plastikmembranen og skrue hćngslet pĺ venstre
side af panelet.
1) bryd
plastikmembranen
2) Isćt tappen
Fjern skruerne fra midterhćngslet, og fjern den
řverste dřr.
Med denne paneltype skal du fjerne skilt og
skruer, og derefter delvist fjerne panelet.
Isćt tappen i hćngslet og afstandsskiven i
ophćnget. Saml hćngslerne og dřrene igen, idet
du arbejder fra bunden og opefter.
afstandsskive
Skru hćngslet af křleskabsdřren, og monter det
medfřlgende hćngsel pĺ den modsatte side.
Fjern skruerne fra det řverste hřjre hćngsel, og
spejlvend placeringen af tappen, og saml det
derefter pĺ venstre side.
Fjern proppen pĺ venstre side og isćt den pĺ hřjre
side af de midterste og nederste ophćng.
Spejlvend břsningen pĺ den nederste indsats.
Břsning
prop
Skru panelbagsiden pĺ, og placer det ydre skilt
igen. Sćt apparatet i opretstĺende position, og
vent to timer, fřr du tćnder for det.
Sĺdan vendes hĺndtagene: fjern pyntepropperne
pĺ hřjre side af dřrene.
42 DA
Skru hĺndtagene af pĺ venstre side, og flyt dem til
hřjre side.
Placer derefter pyntepropperne pĺ venstre side af
dřrene.

Z STUDIO > 06-2005 – 41018174
43
 Loading...