


DOPPIA PORTA ................................................................................................ |
da pag.1 a pag.2 |
DOUBLE DOOR ............................................................................................... |
page 3 to page 4 |
DOUBLE PORTE ................................................................................................................... |
pages 5 à 6 |
DOPPELTÜRKÜHLGERÄTE ................................................................................. |
Seite 7 bis Seite 8 |
DOS PUERTAS .............................................................................................. |
de pág.9 a pág.10 |
DUAS PORTAS .............................................................................................. |
da pág. 11 à pág.12 |
ΔΙΠΛΗ ΠΟΡΤΑ ..................................................................................... |
α ό σελ. 13 έως σελ. 14 |
DWUDRZWIOWA ............................................................................................................. |
od str. 15 do str.16 |
KOMBINOVANÁ CHLADNIČKA ...................................................................... |
od strany 17 do strany 18 |
DUBBELE DEUR .......................................................................................... |
pag. 19 t/m pag. 20 |
KAKSIOVINEN ........................................................................................................... |
sivut 21-22 |
DOBBEL DØR .......................................................................................... |
fra side 23 til side 24 |
DUBBELDÖRR ...................................................................................... |
från sida 25 till sida 26 |
TO DØRE ............................................................................................................................. |
fra s. 27 til s.28 |
IT
GB FR DE ES PT EL PL CZ NL FI NO SV DA

DOPPIA PORTA
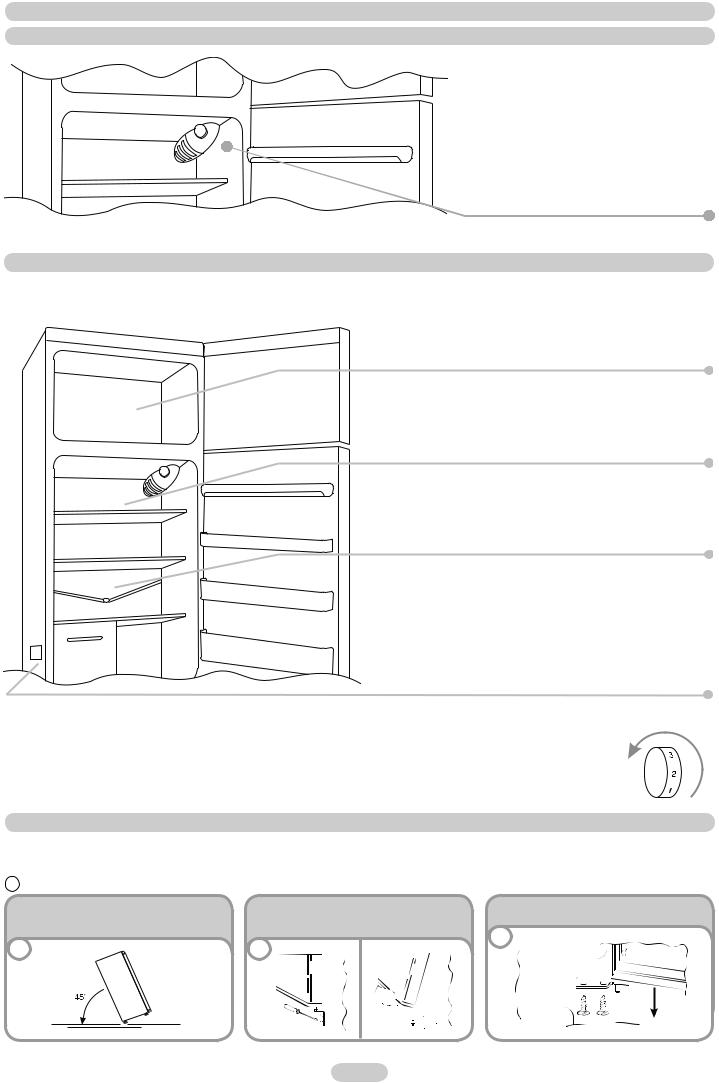
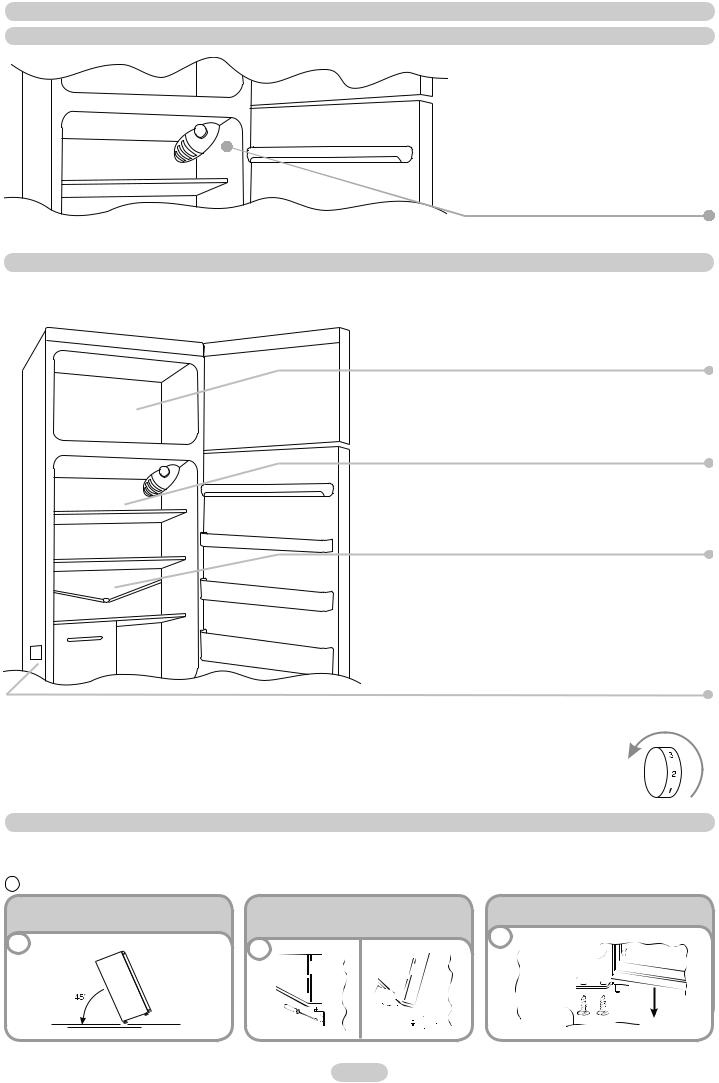
QUADRO COMANDI
La scatola ter mostato per il controllo dell‘apparecchio è collocata all‘interno della cella frigo in alto a destra. Per essere certi che l‘apparecchio stia funzionando accertarsi che la manopola termostato non sia sulla posizione „0“.
LO SBRINAMENTO e CONGELAZIONE
La quantità massima di alimenti che è possibile congelare è indicata nella targhetta matricola, (vedi figura 2) La congelazione è garantita in qualsiasi posizione della manopola.
(Figura 2)
In questo prodotto lo sbrinamento della cella frigo avviene automaticamente
E‘ consigliabile sbrinare la zona congelatore quando lo strato di ghiaco supera i 3 mm di spessore
La presenza di un lieve strato di brina o di gocce d‘acqua durante il funzionamento è da considerarsi normale
E‘ importante mantenere sempre pulito il condotto di scarico ed evitare di porre i cibi a contatto con la parete della cella
NB. In questa posizione è possibile trovare la targa matricola, contenente i dati da comunicare all‘ Assistenza Tecnica qualora si vericasse un guasto.
Importante: In presenza di temperatura ambiente molto calda, l‘apparecchio potrebbe funzionare in continuo, con conseguente formazione anomala di brina sulla parete di fondo della cella frigo. In questi casi è necessario ruotare la manopola frigo su numeri più bassi (1-2).
INVERSIONE DEL SENSO DI APERTURA DELLE PORTE
Per invertire il senso di apertura delle porte seguire le indicazioni in relazione al tipo di testata e di cerniera di cui il vostro prodotto è costituito.
A
Sdraiare o inclinare di 45° il frigorifero, per facilitare le operazioni nella parte inferiore dello stesso
1
Togliere la cerniera inferiore destra svitando le viti, il perno e le rondelle, quindi togliere la porta inferiore
2 
Svitare la vite centrale e togliere la porta superiore
3
1 IT

Togliere i tappi (A) e (B), svitare le viti ed estrarre parzialmente il cruscotto.
4 
Dalla busta accessori in dotazione, prelevare e fissare la cerniera superiore sinistra
7 
Svitare la cerniera destra
5
Rimuovere il tappo sulla parte sinistra e inserirlo sulla parte destra delle testatine centrali e inferiore.
8
Incidere e rompere l‘asola sinistra del cruscotto nella zona dell Impronta
6
Rimontare le cerniere e le porte operando dal basso verso l‘alto, 1 2 3
9
B
Sdraiare o inclinare di 45° il frigorifero, per facilitare le operazioni nella parte inferiore dello stesso
1
Svitare il fermo dalla porta frigo e montare quello in dotazione sull‘altro lato
4 
Dalla busta accessori in dotazione, prelevare e fissare la cerniera superiore sinistra
7
Rimuovere il tappo sulla parte sinistra e inserirlo sulla parte destra delle testatine centrali e inferiore.
10
Togliere la cerniera inferiore destra svitando le viti, il perno e le rondelle, quindi togliere la porta inferiore
2
Invertire la posizione del tappo di chiusura della testata
5
Inserire il perno della cerniera.
8
Rimontare le cerniere e le porte operando dal basso verso l‘alto. 1 2 3
11
Svitare la cerniera centrale e togliere la porta superiore
3
Togliere il tappo di chiusura del cruscotto
6
Mettere il tappo di chiusura del cruscotto
9
Per effettuare la reversibilità delle maniglie: Togliere i tappini estetici sul lato destro delle porte
12
Svitare le maniglie dal lato sinistro e rimontarle sul lato destro del prodotto.
Posizionare i tappini sul lato sinistro.
13
2 IT
DOUBLE DOOR
CONTROL PANEL
The thermostat box to control the appliance is located inside the fridge compartment on the top right. To check whether the appliance is functioning, make sure that the thermostat knob is not set on „0“.
DEFROSTING and FREEZING
The rating plate states the maximum quantity of foods that can be frozen, (see figure 2).
Freezing is guaranteed with any knob setting.
(Figure 2)
Defrosting of the fridge compartment occurs automatically in this product.
We recommend you defrost the freezer area when the layer of frost is more than 3 mm thick.
A small amount of frost or drops of water on the back of the fridge compartment when the fridge is working is normal
Make sure the water outlet is always clean. Make sure foods do not touch the back or sides of the fridge compartment
NB. This is the rating plate. If you need to contact our Service Department in the event of faults, remember to give them the information on the plate.
Important: If the room temperature is very warm, the appliance may work continuously and a layer of frost will deposit on the back of the fridge compartment. In this case, turn the knob to lower settings (1-2).
REVERSING THE OPENING OF THE DOORS
In order to reverse the opening of the doors, follow the indications in relation to the insert and hinge type your product is made up of.
A
Place or tilt the fridge at a 45° angle, since it is necessary to work on the bottom of the appliance
1
Remove the bottom hinge by removing the screws, the plug and washers, then remove the bottom door
2 
Remove the middle screw and remove the top door
3
3 EN

Remove the caps (A) and (B), loosen the screws and partially remove the panel.
4 
Flip the top left-hand hinge found in the accessories kit
7 
Unscrew the right hinge
5
Remove the plug on the left-hand side and insert it on the right hand-side of the central and lower inserts.
8
Mark and break the left-hand slot on the panel, in the insert area
6
Reassemble the hinges and doors working from bottom to top, 1 2 3
9
B
Place or tilt the fridge at a 45° angle, since it is necessary to work on the bottom of the appliance
1
Unscrew the hinge from the fridge door and mount the one supplied on the other side
4 
Flip the top left-hand hinge found in the accessories kit
7
Remove the plug on the left-hand side and insert it on the right hand-side of the central and lower inserts.
10
Remove the bottom hinge by removing the screws, the plug and washers, then remove the bottom door.
2
Invert the position of the closure plug of the insert
5
Insert the pin in the hinge.
8
Reassemble the hinges and doors working from bottom to top. 1 2 3
11
Unscrew the central hinge and remove the top door
3
Remove the closure plug of the panel
6
Place the closure plug of the panel
9
To reverse the handles: Remove the outer caps from the right-hand side of the doors
12
Unscrew the handles from the left hand-side and move them to the right hand-side of the product. Position the outer caps on the left hand-side.
13
4 EN
DOUBLE PORTE
PANNEAU DE COMMANDE
Le thermostat commandant l'appareil se trouve en haut à droite à l'intérieur du réfrigérateur. Pour vérifier que l'appareil fonctionne, assurez-vous que le bouton du thermostat ne se trouve pas en position „0“.
DEGIVRAGE et CONGELATION
La plaque de signalétique indique la quantité d'aliments maximale pouvant être congelée. (voir image 2). La congélation est garantie peu importe la position du bouton.
(Image 2)
Le dégivrage de la partie réfrigératique est automatique sur cet appareil.
Nous vous conseillons de dégivrer le congélateur quand la couche de givre atteint 3mm d'épaisseur.
La présence d’une fine pellicule de givre, ou de gouttes d’eau, est normale durant le fonctionnement de.
Assurez-vous de toujours maintenir propre la zone d'évacuation d'eau. Assurez-vous que les aliments ne soient pas en contact avec le fond ou les côtés du réfrigérateur.
NB. Ceci est la plaque d'signalétique. Si vous devez contacter notre service après vente en cas de dysfonctionnement, pensez à fournir les informations figurant sur cette plaque.
Important : Si la température de la pièce est trop élevée, il se peut que l'appareil fonctionne de façon continue et qu'une couche de givre se forme dans le fond du réfrigérateur. Dans ce cas, positionnez le bouton sur les réglages les plus bas. (1-2).
INVERSER LE SENS D'OUVERTURE DES PORTES
Afin d’inverser le sens d’ouverture des portes, suivez les instructions relatives au type de charnière dont votre appareil est équipé.
A
Allongez l’appareil au sol ou à un angle de 45° car il est nécessaire d’intervenir sur le bas de
1
Retirez la charnière du bas en retirant les vis, le cache et les rondelles, puis enlevez la porte du bas.
2 
Retirez la vis du milieu et enlevez la porte du haut
3
5 FR

Retirez les caches (A) et (B), desserrez les vis et enlevez partiellement le bandeau.
4 
Fixez la charnière supérieure gauche que vous trouverez dans le kit d'accessoires.
7 
Devissez la charnière de droite.
5
Retirez le cache du côté gauche et insérezle dans les inserts du milieu et du bas sur le côté droit.
8
Marquez puis découpez une fente sur le côté gauche du panneau au niveau de la zone d'insertion.
6
Remontez les charnières et les portes en partant du bas vers le haut, 1 * 2 * 3
9
B
Allongez l’appareil au sol ou à un angle de 45° car il est nécessaire d’intervenir sur le bas de l’appareil.
1
Devissez la charnière de la porte du réfrigérateur et installez celle fournie de l'autre côté.
4 
Fixez la charnière supérieure gauche que vous trouverez dans le kit d'accessoires.
7
Retirez le cache du côté gauche et insérez-le dans les inserts du milieu et du bas sur le côté droit.
10
Devissez les poignées à gauche et déplacez-les à droite de l'appareil. Positionnez les caches extérieurs du côté gauche.
13
Retirez la charnière du bas en retirant les vis, le cache et les rondelles, puis enlevez la porte du bas.
2
Inversez la position du cache
5
Inséres le goujon dans la charnière.
8
Remontez les charnières et les portes en commençant par le bas. 1 2 3
11
Dévissez la charnière centrale et retirez la porte du haut.
3
Retirez le cache du panneau
6
Replacez le cache du panneau
9
Pour inverser les poignées : Retirez les caches extérieurs sur le côté droit des portes.
12
6 FR

DOPPELTÜRKÜHLGERÄTE
SCHALTBRETT
Die Thermostatbox zur Steuerung des Gerätes befindet sich oben rechts im Inneren des Kühlraums. Um zu prüfen, ob das Gerät in Betrieb ist, stellen Sie sicher, dass der Thermostatknopf nicht auf „0“ gestellt ist.
ABTAUEN UND EINFRIEREN
Das Matrikelschild gibt die maximale Anzahl von Nahrungsmitteln an, die eingefroren werden können (siehe Abbildung 2). Einfrieren ist bei jeder Einstellung des Drehknopfes garantiert.
(Abbildung 2)
Das Abtauen des Kühlraums geschieht bei diesem Produkt automatisch.
Wir empfehlen Ihnen, das Gefrierfach abzutauen, wenn die Frostschicht stärker als 3 mm ist.
Beim normalen Betrieb des Kühlschranks entsteht auf der Rückseite des Kühlraums ein wenig Frost oder ein paar Wassertropfen.
Vergewissern Sie sich, dass die Wasserablaufrinne immer sauber ist. Achten Sie darauf, dass die Nahrungsmittel nicht die Rückseite oder die Seitenwände des Kühlschranks berühren.
Hinweis: Hier befindet isch das Matrikelschild. Wenn Sie bei einer Störung den Kundendienst kontaktieren müssen, geben Sie die Informationen auf diesem Schild an.
Wichtiger Hinweis: Wenn die Raumtemperatur sehr warm ist, wird das Gerät unter Umständen ständig laufen und auf der Rückseite des Kühlraums wird sich eine Frostschicht ablagern. Stellen Sie den Drehknopf in diesem Fall auf eine niedrigere Einstellung (1-2).
TÜRANSCHLAGWECHSEL
Um den Türanschlag zu wechseln, befolgen Sie die Anweisungen A oder B, je nach Ausführung und Bauart der Tür und der Scharniere, die ihr Gerät verwendet.
A
Stellen oder kippen Sie den Kühlschrank in einem 45°-Winkel, da es notwendig ist, an der
Unterseite des Gerätes zu arbeiten.
1
Entfernen Sie das untere Scharnier, indem Sie die Schrauben, den Stift und die Unterlegscheiben entfernen. Entfernen Sie anschließend die untere Tür.
2
Entfernen Sie die mittlere Schraube und enfernen Sie die obere Tür.
3 
7 DE

Entfernen Sie die Schutzkappen (A) und (B), lösen Sie die Schrauben und ziehen Sie die Stirnwand teilweise heraus.
4 
Nehmen Sie aus dem Zubehör das obere linke Scharnier und befestigen Sie es.
7 
Schrauben Sie das rechte Scharnier ab.
5
Entfernen Sie die Stopfen auf der linken Seite und setzen Sie diese auf der rechten Seite der mittleren und unteren Einsätze ein.
8
Ritzen Sie die linke Öse der Stirnwand ein und stechen Sie diese an der markierten Stelle im Bereich des Einsatzes durch.
6
Bauen Sie die Scharniere und die Türen wieder an, beginnen Sie dabei von unten, 1 2 3
9
B
Stellen oder kippen Sie den Kühlschrank in einem 45°-Winkel, da es notwendig ist, an der Unterseite des Gerätes zu arbeiten.
1
Schrauben Sie das Scharnier von der Kühlschranktür ab und befestigen Sie dasmitgelieferte Scharnier auf der anderen Seite.
4
Nehmen Sie aus dem Zubehör das obere linke Scharnier und befestigen Sie es.
7
Entfernen Sie die Stopfen auf der linken Seite und setzen Sie diese auf der rechten Seite der mittleren und unteren Einsätze ein.
10
Schrauben Sie die Kappen von der linken Seite ab und bringen Sie sie an der rechten Seite des Produktes an. Befestigen Sie dann erneut die
Zierkappen an der linken Seite.
Entfernen Sie das untere Scharnier, indem Sie die Schrauben, den Stift und die Unterlegscheiben entfernen. Entfernen Sie anschließend die untere Tür.
2
Tauschen Sie die Position des Verschlussstopfens am Einsatz um.
5
Stecken Sie den Bolzen in das Scharnier.
8
Bringen Sie die Scharniere und Türen wieder an, beginnen Sie dabei von unten. 1 2 3
11
Schrauben Sie das mittlere Scharnier heraus und entfernen Sie die obere Tür.
3
Entfernen Sie den Verschlussstopfen der Stirnwand.
6 
Befestigen Sie den Verschlussstopfen auf der Stirnwand.
9
Um die Griffe nach der anderen Richtung auszurichten: Nehmen Sie die Zierkappen an der rechten Seite der Türen ab.
12
13
8 DE

DOS PUERTAS
PANEL DE MANDOS
La caja del termostato que controla la aplicación se encuentra ubicada dentro del compartimento del frigorífico en la zona superior derecha. Para comprobar si la aplicación está funcionando, asegúrese de que la rueda del termostato no esté fijada en „0“.
DESCONGELACIÓN y CONGELACIÓN
La placa indicadora muestra la cantidad máxima de comida que puede ser congelada, (véase figura 2). La congelación está garantizada en cualquier posición de la rueda.
(Figura 2)
La descongelación del compartimento del frigorífico tiene lugar de forma automática en este producto.
Le aconsejamos que descongele el congelador cuando la bandeja de hielo haya alcanzado un espesor de 3 mm como mínimo.
Un pequeño goteo de agua en la parte interna del compartimento del frigorífico mientras esté funcionando es totalmente normal.
Asegúrese de mantener siempre limpio el desagüe. Asegúrese de que las comidas no tocan la parte trasera del compartimento del congelador.
NOTA: Esta es la placa indicadora. Si necesita contactar con nuestro servicio de atención al cliente en caso de fallos o defectos, no olvide indicarle la información contenida en dicha placa.
IMPORTANTE: Si la temperatura de la habitación es muy alta, el aparato seguirá funcionando pero una capa de hielo se formará en la parte trasera del compartimento del frigorífico. En este caso, gire el interruptor para alcanzar temperaturas inferiores (1-2).
INVERTIR EL SENTIDO DE APERTURA DE LAS PUERTAS
Para invertir el sentido de apertura de las puertas, siga las siguientes instrucciones en función del tipo de orificio y de bisagra que contenga su producto.
A
Coloque o incline el frigorífico respetando un
ángulo de 45°, ya que será necesario para poder trabajar sobre la parte inferior del aparato.
1
Saque la bisagra inferior, desatornillando las tuercas, sacando el enchufe y las arandelas y a continuación, saque la puerta inferior
2
Saque el tornillo intermedio y la puerta superior
3
9 ES
 Loading...