


CONS90914
D
GB
F
I
E
P
NL
CZ
R
H
SLO
Bedienungsanleitung
Gefriertruhe
Instruction for use
Chest Freezer
Instructions pour l' emploi
Gongélateur
Istruzioni per l'uso
Congelatore
Instrucciones de uso
Congelador
Manual de instruções
Congelador
Gebruiksaanwijzing
Diepvrieskast
Návod k obsluze
Truhkicový mrazák
Manual de utilizare
Ladă frigorifică
Használati utasítás
Fagyasztóláda
Navodila za uporabo
Zamrzovalna skrinja
MOD.
CCF 85
CCF 110 CCF 200 CCFE 120 CCFE 155 CCFE 205
fi
D |
KONFORMITÄTSERKLÄRUNG |
Der Hersteller der/des hierin beschriebenen Produkte(s) auf welche(s) sich diese Erklärung bezieht, erklärt hiermit in alleiniger Verantwortung, dass diese(s) die einschlägigen, grundliegenden SicherheitsGesundheitsund Schutzanforderungen der hierzu bestehenden EG Richtlinien erfüllen und die entsprechenden Prüfprotokolle, insbesondere die vom Hersteller oder seinem Bevollmächtigten ordnungsgemäss ausgestellte CEKonformitätserklärung zur Einsichtnahme der zuständigen Behörden vorhanden sind und über den Geräteverkäufer angefordert werden können.
Der Hersteller erklärt ebenso, dass die Bestandteile der in dieser Bedienungsanleitung beschriebenen Gerät, welche mit frischen Lebensmitteln in Kontakt kommen können, keine toxischen Substanzen enthalten.
GB |
DECLARATION OF CONFORMITY |
The manufacturer of the product/s described herein, to which this description refers, declares on its sole responsibility that the product/s meet the relevant fundamental safety, health and protection requirements of the relevant EU guidelines and that the corresponding test reports are available for examination by the relevant authorities and can be requested from the seller of the appliance, especially with regard to CE Declaration of Conformity issued by the manufacturer or with the manufacturer‘s approval.
Moreover, the manufacturer declares that the parts of the appliance described in this user manual, which come into contact with fresh food, do not contain any toxic substances.
F |
DECLARATION DE CONFORMITE |
Par la présente, le fabricant du (des) produit(s) décrit(s) se rapportant à la présente déclaration, déclare sous sa propre responsabilité que ce(s) produit(s) satisfait(font) aux normes de sécurité requises en matière de santé personnelle et de protection et sont conformes aux directives CE en la matière et que les procès-verbaux d’essai correspondant, notamment la déclaration de conformité CE régulièrement émise par le fabricant ou par le délégué relatif pour la prise de connaissance de la part des autorités compétentes, existent et peuvent être remis au vendeur de l’appareil.
Le fabricant déclare en outre que les composants de l’appareil décrits dans la notice d’utilisation pouvant entrer en contact avec les aliments frais ne contiennent aucune substance toxique.
I |
DICHIARAZIONE DI CONFORMITÀ |
Con la presente, il produttore del(dei) prodotto(i) qui descritto(i) a cui si riferisce la presente dichiarazione dichiara dietro propria responsabilità che questo(i) prodotto(i) soddisfa(no) i requisiti di sicurezza, salute personale e protezione di base pertinenti alle direttive CE esistenti in materia e che i relativi verbali di prova, in particolare la dichiarazione di conformità CE emessa regolarmente dal produttore o dal relativo delegato per la presa in visione da parte delle autorità competenti, sono presenti e possono essere richiesti al rivenditore dell’apparecchio.
Il produttore dichiara inoltre che i componenti dell’apparecchio descritto nelle presenti istruzioni per l’uso, che possono venire a contatto con alimenti freschi, non contengono alcuna sostanza tossica.
E |
DECLARACIÓN DE CONFORMIDAD |
El fabricante del(de los) producto(s) aquí descrito(s) declara bajo su propia responsabilidad que este(os) producto(os) cumple(n) los correspondientes requisitos para la seguridad, salud personal y protección de acuerdo con las directivas CE existentes en esta materia y que las respectivas actas de aprobación, en particular la declaración de conformidad – CE emitida regularmente por el fabricante o por su representante autorizado, se encuentran disponibles para el examen por parte de las autoridades competentes, pudiendo ser exigidas al vendedor del aparato.
El fabricante también declara que los componentes del aparato descrito en las presentes instrucciones para el uso, que pudieran entrar en contacto con alimentos frescos, no contienen sustancias tóxicas.
Deutsch |
Bedienungsanleitung Gefriertruhen |
D |
Inhaltsverzeichnis |
|
Seite |
1Wahl des Aufstellungs-Ortes..........................................................................................………......... 2
2Typenschild ........................................................................................................................………... 2
3Anschluss an das Stromnetz.................................................................................................……….. 2
4EinAusschalten und Temperaturwahl...............................................................................…………. 3
5Kontrolllampen .......................................................................................................................………. 3
6Akustischer Alarm....................................................................................................................……... 3
7Inbetriebnahme......................................................................................................................……….. 3
8Einfrieren / Lagern frischer Lebensmittel...............................................................................……….. 3
9Maximale Stapelhöhe ..........................................................................................................………… 4
10Lagerdauer...........................................................................................................................………… 4
11 Vorsichtsmassnahmen und Hinweise..................................................................................………… 4
12Reinigung und Pflege...........................................................................................................………… 4
13Abtauen................................................................................................................................………… 5
14Innenbeleuchtung..................................................................................................................……….. 5
15 Selbst Beseitigung von Störungen.......................................................................................………… 5
16Ihr Kundendienst...............................................................................................................…………… 6
17Garantie...............................................................................................................................…………. 6
18Was ist wenn.......... / Ursachen / Abhilfen...........................................................................…………. 6 Lagertabelle............................................................................................................................……….. 7 Geräte Komponenten........................................................................................................................... 8
Wir empfehlen Ihnen, diese Bedienungsanleitung aufmerksam zu lesen. - Sie werden so mit Ihrem neuen Gerät schneller und besser vertraut. Markieren Sie die für Sie wichtigen Stellen. Bewahren Sie dieses Dokument so auf, dass Sie jederzeit darin nachschlagen können und es möglichen Geräte - Folgebesitzern weitergeben können.
Sie haben ein gutes Gerät gewählt, welches Ihnen bei sachgerechter Bedienung und Wartung viele Jahre dienen wird.
Die einzelnen Abbildungen (FIG.) befinden sich auf den letzten Seiten dieser Bedienungsanleitung.
Betreiben Sie das Gerät nur an einem Ort mit Umgebungstemperaturen für welche es ausgelegt ist. Die Funktion des Gerätes kann sonst beeinträchtigt werden.
Beachten Sie hierzu das Kapitel „Klimaklassen“ Seite 2
 Wichtig !
Dieses Gerät ist zur Verwendung im Haushalt bestimmt. Bei einem Einsatz im gewerblichen Bereich, sind die für das jeweilige Gewerbe gültigen Bestimmungen zu beachten.
Bei übermässiger Beanspruchung des Gerätes, z.B. durch gewerblichen Einsatz reduziert sich die Garantiedauer für den Kompressors um 50 %.
Das Gerät ist gemäss den einschlägigen gesetzlichen Unfallverhütungsvorschriften auf Dichtheit geprüft.
Wenn Ihr neues Gerät als Ersatz für ein altes Kühloder Gefriergerät gekauft wurde; beachten Sie bitte dass allfällig vorhandene Schnappoder Riegelschlösser am alten Gerät unbedingt zerstört werden sollten, bevor Sie es zur Seite stellen.
Sie verhindern damit, dass spielende Kinder sich selbst einschliessen.
Lassen Sie Ihr altes Gerät unbedingt von einem Fachbetrieb Umwelt gerecht entsorgen, da dieses Umweltschädigende Komponenten im Kühlmittel enthalten kann, welches mit einer Spezialausrüstung abgesaugt werden muss. Fragen Sie Ihren Händler oder die Stadtverwaltung nach der in Ihrem Wohngebiet zugelassenen Entsorgungsstelle.
Achten Sie darauf, dass das alte Gerät bis zum Abtransport zu einer Entsorgungsbzw. Sammelstelle am Kältemittelkreislauf, insbesondere am Verflüssiger (Kondensator) auf der Geräterückseite, nicht beschädigt wird. So stellen Sie sicher, dass das enthaltene Kältemittel nicht unkontrolliert entweichen kann. Angaben über das verwendete Kältemittel und Isolationstreibmittel finden Sie in der Regel auf dem Gerätetypenschild.
©0512 fiCONS |
1 |
|
Deutsch |
Bedienungsanleitung Gefriertruhen |
D |
Gebrauchsanleitung
Im folgenden finden Sie alle wichtigen Angaben zum Gebrauch des Gerätes.
Die Bedienungsanleitung gilt für mehrere Geräte, weshalb sich Detailabweichungen je nach Gerätetype ergeben.
1 Wahl des Aufstellungsortes
Hohe Raumtemperaturen, direkte Sonneneinstrahlung unbedingt vermeiden.
Am besten stellen Sie Ihr Gerät in einem kühlen, gut belüfteten, trockenen Raum auf.
Das Aufstellen in unmittelbarer Nähe einer Wärmequelle (Heizung, Ofen usw.) ist sehr ungünstig (erhöhte Kompressor - Leistung und dadurch wesentlich höherer Stromverbrauch).
Lässt sich kein anderer Platz als neben einer Wärmequelle finden, empfiehlt es sich eine geeignete Isolationsplatte zwischen Gerät und Wärmequelle zu stellen (kein Asbest), oder mindestens folgende Abstände einzuhalten:
• |
zu Gasod. Elektroherd |
3 |
cm |
• |
zu Heizradiator od. Ofen etc. |
5 |
cm |
• |
zu anderem Kühlgerät |
2 |
cm |
Lüftungsgitter niemals zustellen
Grössere Gefriertruhen sind seitlich unten mit einem Lüftungsgitter (k) ausgestattet.
Diese Truhen dürfen nur mit der vom Lüftungsgitter abgewandten Seite direkt an eine Wand oder ein Möbelstück gestellt werden.
Truhen ohne Lüftungsgitter
Genügend Abstand zwischen Truhenrückseite und Wand lassen, damit die erwärmte Luft ungehindert abziehen kann.
Das Gerät soll waagerecht auf festem Untergrund stehen. Nur so ist ein ungehinderter Kältemittel - Kreislauf und damit die optimale Funktion des Gerätes gewährleistet.
ACHTUNG !
Lassen Sie Das Gerät am endgültigen Standort mindestens 2 Stunden stehen bevor Sie es anschliessen, damit sich der Kältemittel Kreislauf beruhigt und keine Betriebsstörungen auftreten.
Der Geruch der allen neuen Geräten anhaftet, lässt sich leicht beseitigen.
Wischen Sie dazu den Innenraum mit lauwarmem Essigwasser gründlich aus.
Keine Spülmittel, scharfe, körnige oder sodahaltige Putzmittel verwenden.
Vor dem Anschliessen des Gerätes muss der Innenraum - vor allem in den Ecken - unbedingt trocken sein.
 Gefahrenhinweise
Je nach Zusammensetzung des Kältemittels ist dieses leicht entflammbar. Der Kältemittel Kreislauf ist hermetisch abgeschlossen und mehrfach auf Dichtheit geprüft.
Bei unsachgemässen Eingriffen besteht akute Brandgefahr.
©0512 fiCONS |
2 |
|
Vermeiden Sie jede mechanische Einwirkung auf das Kältesystem, insbesondere auf den Verflüssiger (p),soweit vorhanden.
Bei einigen Geräten ist der Verflüssiger in die Aussenwand eingebaut.
Eingriffe in das Kältesystem sind nur autorisierten Fachkräften erlaubt.
 ACHTUNG !
Herausspritzendes Kältemittel kann zu Augenschäden führen.
Im Fall von Augenkontakt mit Kältemittel Augen sofort unter fliessendem Wasser spülen und unverzüglich Augenarzt aufsuchen / anrufen
Klimaklassen:
Je nach Breitengrad gibt es verschiedene Klimaklassen für Kühlgeräte.
Die Umgebungstemperaturen am Standort Ihres Gerätes sollen nicht unteroder überschritten werden. Die für Ihr Gerät zutreffende Klimaklasse ist auf dem Typenschild aufgedruckt. Sie bedeutet:
Klimaklassen- |
Ausgelegt für |
Bezeichnungen |
Umgebungstemperaturen von: |
SN |
+ 10° C bis + 32°C |
N |
+ 16° C bis + 32°C |
ST |
+ 18° C bis + 38° C |
T |
+ 18° C bis + 43° C |
2 Typenschild
Das Typenschild mit den Technischen Daten befindet sich am Gehäuse (D),auf der Rückseite des Gerätes.
Technische Daten notieren
Bitte übertragen Sie hier die technischen Daten vom Typenschild damit sie ohne das Gerät bewegen zu müssen jederzeit problemlos verfügbar sind.
Modell- / Typen N°. |
.............................. |
Brutto Inhalt ........................ |
Liter |
Netto Inhalt ........................ |
Liter |
Betriebsspannung ........................ |
V 50 Hz |
Anschlusswert (W).......................... |
Watt |
Absicherung (A) .......................... |
Ampere |
Energieverbrauch .......................... |
kWh/24h |
Gefriervermögen .......................... |
kg/24h |
3 Anschluss an das Stromnetz
Ihr Gerät darf nur an eine vorschriftsgemäss durch autorisierte Fachkräfte installierte geerdete Steckdose angeschlossen werden.
Bevor sie den Gerätestecker in die Steckdose stecken, unbedingt prüfen ob die auf dem Typenschild des Gerätes angegebene Spannung ( V ) mit der Netzspannung Ihres Hauses übereinstimmt.
Trifft dies nicht zu, sofort den zuständigen Kundendienst oder Ihren Verkäufer benachrichtigen und das Gerät auf keinen Fall ans Netz anschliessen.

Deutsch |
Bedienungsanleitung Gefriertruhen |
D |
4Ein- / Ausschalten und Temperaturwahl
Temperaturregler (Thermostat) (l)
Mit dem Temperaturregler wird das Gerät einund ausgeschaltet und die Kühltemperatur eingestellt.
Damit der Temperaturregler nicht unabsichtlich verstellt werden kann, wurde er absichtlich schwergängig gemacht. Zum Verstellen verwenden Sie am besten eine Münze oder einen Schraubendreher.
Einschalten: Regler (l) nach rechts drehen
Temperatur nach Bedarf einstellen zwischen:
-Min. (geringe Kühlung) und
-Max. (tiefste Temperatur) Ausschalten: Regler ganz nach links drehen
Die Einstellung der Temperatur muss angepasst werden an die:
-Geräte - Umgebungstemperatur
-Menge der eingelagerten Lebensmittel
-Häufigkeit des Öffnens des Gerätes
Wir empfehlen eine mittlere Einstellung.
Sie werden durch genaues Beobachten in kürzester Zeit die günstigste Einstellung für Ihren Bedarf selbst feststellen.
5 Kontrolllampen (m,n,o)
Soweit Ihr Gerät mit Kontrolllampen ausgestattet ist, hat das Aufleuchten der Lampen folgende Bedeutungen:
-Grün = CONTROL (Kontrolle)
Gerät ist am Strom angeschlossen und in Betrieb.
Die grüne Kontrolllampe muss immer leuchten, wenn das Gerät am Stromnetz angeschlossen und eingeschaltet ist. Dies zu beachten ist besonders wichtig, da bei Strom Unterbruch die rote und die gelbe Lampe ihre Funktion verlieren und Sie nicht warnen können.
-Rot = ALARM
Innentemperatur zu warm
Das Aufleuchten der roten Kontrolllampe kann mehrere Ursachen haben, nämlich:
•Erste Inbetriebnahme des Gerätes
•Wieder Inbetriebnahme nach Abtauung
•Einfüllen von frischem Gefriergut
In diesen Fällen ist das Aufleuchten der roten Kontrolllampe normal. Sie erlöscht automatisch wenn die Temperatur im Innern ca. - 18°C erreicht hat.
Schalten sie (wenn vorhanden) den SCHNELL GEFRIERSCHALTER (FIG. 4) ein. (spätestens nach 24 Std. oder wenn die rote Lampe erloschen ist wieder ausschalten).
Öffnen sie das Gerät in jedem Fall möglichst erst dann wieder, wenn die rote Lampe erloschen ist.
Leuchtet die rote Kontrolllampe nach 12 bis 24 Std. trotzdem immer noch, ist mit dem Vorliegen einer echten Störung zu rechnen.
Beachten Sie hierzu das Kapitel 18:
“Was ist wenn....“
©0512 fiCONS |
3 |
|
-Gelb = SCHNELL GEFRIERSCHALTER
ist eingeschaltet und die Funktion des Thermostaten ist aufgehoben.
Der Kompressor kühlt im Dauerbetrieb, bis der SCHNELL GEFRIERSCHALTER wieder ausgeschaltet wird.
6 Akustischer Alarm
Falls Ihr Gerät damit ausgestattet ist, ertönt gleichzeitig mit dem Aufleuchten der roten Lampe ein akustisches Alarmsignal. Dieses stellt automatisch ab, wenn Sie den SCHNELL GEFRIERSCHALTER einschalten.
7 Inbetriebnahme des Gerätes
1.Gerät vollständig auspacken
2.Styropor Teile im Kompressorraum (soweit vorhanden) entfernen
3.Dokumente und allfällig vorhandenes Zubehör aus dem Geräteinnern entfernen
4.Innenraum mit lauwarmem Essigwasser reinigen und mit Tuch gründlich trocken wischen
5.Gerät schliessen
6.Stecker in Steckdose stecken
7. Gerät durch Drehen des Temperaturreglers (l) |
nach |
rechts einschalten (den Regler vorerst ganz |
nach |
rechts, in Max. Stellung bringen). |
|
(grüne und rote Lampe leuchten auf) |
|
8.Wo vorhanden, SCHNELL GEFRIER-SCHALTER einschalten (gelbe Lampe leuchtet zusätzlich)
9.Gerät ca. 4 Std. bzw. bis die rote Lampe erloschen ist nicht mehr öffnen, damit im Innenraum die nötige Kälte aufgebaut werden kann.
10.Tiefkühlkost (bereits gefroren eingekaufte War kann nun in beliebiger Menge eingefüllt werden (beachten Sie das nachfolgende Kapitel “Maximale Stapelhöhe
11.Den SCHNELL GEFRIERSCHALTER spätestens nach 24 Std. wieder ausschalten
12.Wollen Sie frische, nicht gefrorene Lebensmittel einfrieren, gehen Sie wie unter dem nachfolgenden Kapitel “Einfrieren / Lagern frischer Lebensmittel“ vor
 Achtung!
Keine Flaschen mit Getränken einlagern. Die Flüssigkeit dehnt sich beim Einfrieren aus und die Flasche kann zerspringen.
Niemals Behälter mit explosionsgefährlichen Stoffen (Gas Feuerzeuge, Benzin, Äther oder ähnliches im Gefrierraum des Gerätes aufbewahren.
Beim Einlagern von fertiger Tiefkühlkost sind unbedingt die Anweisungen des Herstellers auf der Verpackung der Tiefkühlkost zu beachten.
Eis und Eislutscher sollten in tiefgekühltem Zustand erst einige Minuten nach der Entnahme aus dem Gerät genossen werden, um Lippen und Zungenverletzungen
( Hautabrisse ) zu vermeiden. Vermeiden Sie aus demselben Grund auch Berührungen der vereisten Innenwände mit nassen Händen.
Angetaute oder gar aufgetaute Produkte lieber gleich verbrauchen. Sie eignen sich in der Regel nicht zum erneuten Einfrieren.
8 Einfrieren / Lagern frischer Lebensmittel
Fast alle Frischprodukte eignen sich zum Einfrieren und Lagern in Ihrem Gerät.

Deutsch |
Bedienungsanleitung Gefriertruhen |
D |
Für die Gängigsten davon haben wir für Sie eine Tabelle mit Angaben zu den möglichen Lagerzeiten und dem
geeignetsten Verpackungsmaterial erstellt. (siehe “Lagertabelle“ im hinteren Teil dieser Bedienungsanleitung)
Beschriften Sie die Frischprodukte unbedingt schon deshalb, weil diese selbst bei Verwendung von transparenten Gefrierbeuteln in tiefgefrorenem Zustand nicht eindeutig identifiziert werden können.
Wir empfehlen hierzu die im Handel angebotenen Beschriftungsetiketten für Gefriergut zu verwenden.
Verpacken Sie die Frischprodukte in Ihrem Haushalt angepasste Portionen um zu vermeiden, dass grössere Mengen aufgetaut werden als an einem Tag in Ihrem Haushalt verzehrt werden können.
Beschriften Sie die Portionen mindestens mit folgenden Informationen:
•Produkt Name (z.B. Rindsfilet)
•Gewicht der Portion
•Menge (Anzahl Stück)
•Einfrierdatum
•Verbrauchsdatum (siehe Lagertabelle)
Anschliessend gehen Sie wie folgt vor:
a) Frische Lebensmittel am besten in das seitliche Vorgefrierfach (f) ( nicht bei allen Modellen vorhanden) oder auf den Truhenboden legen. Hier herrscht die tiefste Temperatur.
Vermeiden Sie dabei, dass frische Lebensmittel beim Einlegen mit tiefgefrorenem direkt in Berührung kommt. Tiefgefrorenes könnte sonst angetaut werden und die vorgesehene Lagerzeit nicht vollends überdauern.
b)Füllen Sie innerhalb von jeweils 24 Stunden nur die dem Gefriervermögen Ihres Gerätes angepasste Menge an frischen Lebensmitteln ein.
Siehe Angabe auf dem Typenschild
( XX kg/24h)
c)Wo vorhanden, den SCHNELL GEFRIER-SCHALTER (FIG. 4) einschalten. (nicht unbedingt erforderlich wenn bereits gefrorenes (z.B. Tiefkühlkost) eingefüllt wird.
d)Nach 24 Std. die nun tiefgefrorenen Lebensmittel vom Truhenboden oder Vorgefrierfach in einen Einhängekorb umschichten, so dass das Vorgefrierfach oder der Truhenboden nach Möglichkeit für das Einfrieren von zusätzlichen, frischen Lebensmitteln frei wird.
e)SCHNELL GEFRIERSCHALTER abschalten (gelbe Lampe erlischt).
f)Temperaturregler in eine dem Füllgrad des Gerätes entsprechende Einstellung bringen (siehe “Maximale Stapelhöhe“).
g)Die Temperatur im Lagerfach (d) möglichst durch Einlegen eines für Temperaturen bis -26°C ausgelegten Thermometers unter Kontrolle halten.
Die Lagertemperatur muss ständig mindestens - 18°C betragen.
Nachfüllen von frischen Lebensmitteln
(nicht gefrorene Lebensmittel )
Achten Sie darauf, dass jeweils frühestens 24 Stunden nach dem Einlegen von frischen Lebensmitteln die dem Gefriervermögen (XX kg/24h) ihres Gerätes angepasste Menge nachgefüllt werden darf.
©0512 fiCONS |
4 |
|
(Maximale Stapelhöhe nicht überschreiten)
9 Maximale Stapelhöhe
Um eine einwandfreie Lagerung des Gefriergutes zu gewährleisten, sollten Sie das Lagerfach (d) niemals
bis zum oberen Rand füllen. Zwischen Deckel und Gefriergut muss immer etwas Luft sein.
Achten Sie auf die vom Hersteller angebrachte(n) Stapelmarke(n) , soweit vorhanden.
Stellen Sie den Temperaturregler (l) unbedingt entsprechend der Füllmenge ein.
Bei normaler Umgebungstemperatur (+ 18 bis + 22°C) empfehlen wir auch unter dem Strom Sparaspekt folgende Einstellungen des Temperaturreglers:
Füllmenge Stapelmarke |
Einstellung |
|
voll |
obere |
Richtung 12:00 h |
halb voll |
mittlere |
Richtung 10:00 h |
¼ u. weniger |
untere |
Richtung 08:00 h |
10 Lagerdauer
Die Einlagerungszeit für fertig Tiefkühlprodukte ist je nach Art und Zusammensetzung des Produktes sehr unterschiedlich. Achten Sie diesbezüglich unbedingt auf die Angaben des Herstellers auf der Produkt Verpackung.
Für frische Lebensmittel die Sie selbst einfrieren beachten Sie bitte die Lagertabelle im hinteren Teil dieser Bedienungsanleitung.
Einmal angetautes Gefriergut sollten Sie umgehend verbrauchen.
Aufgetautes Gefriergut innerhalb 24 Stunden verbrauchen.
11 Vorsichtsmassnahmen und Hinweise 

•Bei jeder Reinigung oder Abtauung den Netzstecker ziehen.
•Den Truhendeckel nach dem Schliessen nicht sofort und unter Umständen mit Gewalt öffnen. Das an der Dichtung
(b) möglicherweise entstehende Vakuum baut sich nach 1 - 2 Minuten ab, so dass der Deckel sich wieder normal öffnen lässt.
•Gekochter Inhalt von Behältnissen mit Deckel vor dem Verschliessen und einlagern immer auf Raumtemperatur abkühlen lassen um
•Kondensation im Behältnis und Eisbildung im Gerät vorzubeugen.
•Den Truhendeckel nur so kurze Zeit wie möglich offen lassen um keine Energie zu verschwenden und übermässige Eisbildung im Gerät zu verhindern.
•Bei unerwartetem oder längerem Aufleuchten der roten Lampe das Gerät auf keinen Fall öffnen und sofort geeignete Massnahmen einleiten (siehe “Was ist wenn.....“ im hinteren Teil dieser Bedienungsanleitung)
•Verwenden Sie nie einen Schraubendreher oder andere Werkzeuge aus Metall beim Entfernen der Eisschicht. Die Innenwände sind sehr empfindlich und vertragen keine scharfen Kanten. Nur Kunststoffoder Holzschaber ohne scharfe Kanten verwenden.
12 Reinigung und Pflege
Für das gepflegte äussere Aussehen Ihres Gerätes verwenden sie ab und zu Möbelpolitur oder ein anderes

Deutsch |
Bedienungsanleitung Gefriertruhen |
D |
Lackpflegemittel (auf keinen Fall im Innern anwenden). Die Dichtung (b) sollten Sie ab und zu mit warmem Wasser ohne Verwendung von jeglichem Reinigungsmittel säubern.
Wenn Ihr Gerät mit einem Rückwand Verflüssiger (p) ausgestattet ist, befreien Sie dieses Teil von Zeit zu Zeit von Flusen und Staub. Staub und Flusen behindern nämlich die Abführung der Wärme aus dem Innenraum und erhöhen den Energieverbrauch
wesentlich. Am besten verwenden Sie zum Entstauben des Rückwand Verflüssigers (p) eine weiche Bürste oder einen Staubwedel.
Falls Sie Ihr Gerät für längere Zeit ausser Betrieb setzen (z.B. Ferien), sollten Sie dieses offen lassen um Geruchsbildung im Innern zu verhindern. Bei Geräten mit Schloss; das Schloss bei geöffnetem Truhendeckel unbedingt auf Stellung “geschlossen“ bringen und Schlüssel fern von Kleinkindern aufbewahren um Spielunfälle zu verhindern.
Eisund Reif - Schichten die sich an den Innenwänden bilden wirken ab einer gewissen Stärke wie eine Isolation und beeinträchtigen die Kälteabgabe der Innenwände. Sie müssen von Zeit zu Zeit entfernt werden.
Verwenden Sie zum Entfernen von Eisschichten an den Innenwänden einen Schaber ohne scharfe Kanten, aus Kunststoff oder Holz.
Legen Sie dabei ein Tuch auf das Gefriergut um das abgeschabte Eis aufzufangen und einfach entfernen zu können.
13 Abtauen
Bei normalem Gebrauch (3 - 4 mal öffnen pro Tag) muss die Truhe einbis zweimal im Jahr abgetaut werden ( in anderen Fällen öfter).
 Gefahrenhinweis
Niemals elektrische Geräte wie Haartrockner, Heizlüfter oder Hilfsmittel mit offener Flamme (z.B. Kerzen) zum Abtauen des Gerätes verwenden. Der Kunststoff Innenraum könnte schmelzen und austretendes Schäummittel - Gas könnte sich durch Funken bzw. offene Flammen entzünden.
Zum Abtauen gehen Sie wie folgt vor:
1.Stellen Sie einen geeigneten, nicht metallenen Behälter (Tragcontainer aus Kunststoff oder Wäschekorb) bereit.
2.Ziehen Sie unbedingt den Stecker aus der Steckdose.
3.Trocknen Sie Ihre Hände gut ab, um Hautschäden bei Eiskontakt zu vermeiden (besser; Handschuhe anziehen)
4.Entfernen Sie sämtliches Gefriergut aus der Truhe und legen Sie es dick in Zeitungspapier gewickelt in den bereitgestellten Behälter und stellen Sie diesen in einem kühlen, trockenen Raum ab.
5.Decken Sie den Behälter mit einer dicken Wolldecke rundum ab.
6.Ziehen Sie die Trennwand (e) (nicht bei allen Modellen vorhanden) nach oben aus den Führungsschienen in der Truhe.
7.Schieben Sie die Trennwand soweit vorhanden) als Tauwasser Auffangschale auf der Seite unter die Truhe wo sich der Tauwasser - Ablassstöpsel (nicht bei allen Modellen vorhanden) im Boden der Truhe befindet.
©0512 fiCONS |
5 |
|
8.Ziehen Sie den Stopfen (h) (soweit vorhanden) heraus.
9.Schaben Sie das gröbste Eis wie vorher beschrieben vorsichtig von den Truhenwänden und legen Sie dieses in die Küchenspüle.
10.Beschleunigen Sie bei Bedarf den AbtauVorgang indem Sie einen grossen Topf mit warmem (nicht zu heissem) Wasser auf den Truhenboden stellen.
11.Entfernen Sie bei Truhen ohne Ablassstöpsel das Tauwasser laufend mittels einem Schwamm.
12.Reinigen Sie den Innenraum gründlich. Verwenden Sie hierzu warmes Wasser mit etwas Essig und wischen Sie anschliessend mit klarem Wasser nach.
13.Wischen Sie die Truhe mit einem saugfähigen Tuch gründlich trocken und lassen Sie sie ca. 3-4 Minuten auslüften.
14.Stecken Sie wo vorhanden den Ablassstöpsel wieder ein.
15.Entleeren Sie wo vorhanden die Tauwasser Auffangschale und schieben Sie diese gut abgetrocknet wieder als Trennwand in die Führungsschienen in der Truhe.
16.Schliessen Sie die Truhe und stecken Sie den Stecker wieder in die Steckdose.
17.Bringen Sie den Temperaturregler (l) auf Max. Einstellung (grüne und rote Lampe leuchten) und schalten Sie wo vorhanden den SCHNELL GEFRIERSCHALTER (FIG.4) ein. (gelbe Lampe leuchtet zusätzlich)
18.Füllen Sie nun das Gefriergut - die älteste Ware zu oberst - wieder ein.
 Um das Antauen des ausgelagerten Gefriergutes zu verhindern, sollten Sie die Schritte 1. bis 17. möglichst innerhalb von maximal zwei Stunde erledigen.
19.Wenn die rote Lampe erloschen ist, stellen Sie den Temperaturregler wieder auf eine der Füllmenge angepasste Lagertemperatur ein.
20.Schalten Sie wo vorhanden den SCHNELL GEFRIERSCHALTER nach ca. 8 - 12, spätestens jedoch nach 24 Stunden wieder ab ( gelbe Lampe erlischt).
14 Innenbeleuchtung
(nicht bei allen Modellen vorhanden)
Bei den mit einer Beleuchtung ausgestatteten Geräten ist ein Schalter eingebaut.
Beim Öffnen des Gerätes geht die Beleuchtung automatisch an und beim Schliessen automatisch wieder aus.
Die Glühlampe ist mit einem transparenten Deckel geschützt.
Verwenden Sie nur Ersatzlampen mit max. 15 W.
15 Selbst Beseitigung von Störungen
Gute Fertigungsqualität unter Anwendung von modernster Kühlund Gefriertechnik sorgen grundsätzlich für eine einwandfreie Funktion Ihres Gerätes.
Prüfen Sie deshalb bei Verdacht auf eine Störung immer zuerst ob Sie alle Hinweise und Ratschläge in dieser Bedienungsanleitung befolgt haben, bevor Sie den Kundendienst direkt oder über Ihren Händler anfordern.
Kundendienst Einsätze zur Behebung von Störungen welche auf Nichtbefolgen der Hinweise und Ratschläge beruhen, sind nämlich kostenpflichtig und fallen nicht unter Garantie und Gewährleistung Ihres Händlers.
Deutsch |
Bedienungsanleitung Gefriertruhen |
D |
Bitte beachten:
Der Kompressor (auch Kühlmaschine genannt) muss nicht ununterbrochen laufen.
Er ist über den Thermostat welchen Sie mit dem Temperaturregler (l) einstellen gesteuert und schaltet
automatisch ein, wenn die eingestellte Temperatur im Lagerraum überschritten wird und automatisch aus, wenn diese wieder erreicht ist.
Bei jedem Kompressor - Kühlsystem treten Geräusche auf, wenn der Kompressor eingeschaltet ist. Diese Geräusche rühren einerseits vom laufenden Motor im Kompressor und andererseits von der Strömung des Kältemittels in den Kühlsystem Leitungen her. Solche Geräusche sind also normal und bedeuten keine Funktionsstörung.
In ungeheizten Räumen kommt es bei kalter Witterung vor, dass sich an den Aussenwänden des Gerätes Kondenswasser bildet.
Dies bedeutet keine Störung und regelt sich von selbst, wenn das Wetter wieder wärmer wird.
16 Ihr Kundendienst
Rufen Sie den Kundendienst erst dann, wenn Sie für eine mögliche Störung durch eine Selbstanalyse der möglichen Störungsfaktoren keine Ursache finden oder keine Mittel zur Behebung einer Störung zur Verfügung haben.
Sehen Sie also unbedingt zuerst nach unter: “Was ist wenn.......“
Sehen Sie in der beiliegenden Garantiekarte oder dem separat beiliegenden Kundendienstverzeichnis nach, welche Firma für den Kundendienst Ihres Gerätes zuständig ist. Sind Mehrere Kundendienststellen darin aufgeführt, wählen Sie bitte die Ihnen am nächsten liegende.
Falls Ihrem Gerät kein Kundendienstverzeichnis beiliegen sollte, wenden Sie sich bei Bedarf bitte an Ihren Händler. Um rasch Hilfe zu bekommen, unbedingt die wichtigsten Daten zur Identifikation Ihres Gerätes beim Anruf bereithalten:
•Gerätemarke
•Modell / Type
•Art der Störung
•Kaufdatum
•Bei wem gekauft ?
17 Garantie
Beachten Sie die allgemeinen Garantiebedingungen und die Dauer der Garantie in der beiliegenden oder beim Kauf vom Händler erhaltenen Garantiekarte.
Liegt Ihrer Gerätedokumentation keine Garantiekarte bei, so wenden Sie sich an Ihren Händler
18 Was ist wenn................ :
a) Keine Funktion (Gerät läuft nicht)
Prüfen Sie:
•Ist der Gerätestecker in Ordnung und sitzt er fest in der Steckdose
•Führt die Steckdose Strom ?
•(evtl. durch Anschliessen eines Kleingerätes wie Handmixer Haartrockner etc. prüfen)
•Ist Gerät eingeschaltet (Temperaturregler nicht auf Nullstellung)
 Achtung!
Die Isolation der Gerätewände ermöglicht bei Störungen oder Stromausfall eine Lagerzeit von 10 bis 12 Stunden nach Eintreten des Störereignisses.
Bei besonders stark isolierten Geräten sogar wesentlich mehr. Falls sie hierzu keine Angaben auf dem Typenschild finden, fragen Sie Ihren Händler nach der für Ihr Gerät zutreffenden Lagerzeit im Störungsfall
Bei länger andauernder Störung beginnt das Gefriergut im Gerät aufzutauen. Deshalb rechtzeitig geeignete Massnahmen zur Behebung der Störung einleiten und notfalls Gefriergut in ein anderes Gefriergerät (eventuell beim Nachbarn) umlagern.
b)Gerät kühlt nicht ausreichend Einfriervorgang dauert zu lange Kompressor läuft zu oft
Mögliche Ursachen / Abhilfen :
•haben Sie darauf geachtet, das Gerät am endgültigen Standort mindestens 2 Stunden stehen zu lassen, bevor Sie es einschalten. (Beruhigung des Kältemittel Kreislaufes) siehe: “Inbetriebnahme des Gerätes“.
Wenn nein; bei geschlossener Truhe den Stecker herausziehen, Truhe auf einer Seite für kurze Zeit etwas anheben und wieder abstellen. Nach 2 Stunden Stecker wieder einstecken. Truhe während dieser Zeit und bis 12 Stunden danach bzw. bis die rote Lampe erlischt nicht mehr öffnen.
•Ist der Gerätestecker in Ordnung und sitzt er fest in der Steckdose
•Führt die Steckdose Strom ?
(evtl. durch Anschliessen eines Kleingerätes wie Handmixer etc. prüfen)
•Schliesst der Gerätedeckel fest ?
Probe: Ein Blatt Schreibpapier zwischen Dichtung und Truhenrand legen und Deckel schliessen.
Das Papier darf sich an allen Seiten nur schwer herausziehen lassen.) Lässt sich das Papier an einer oder mehreren Stellen ohne Widerstand herausziehen, Kundendienst benachrichtigen.
•Starke Eisbildung an den Innenwänden (siehe:“ Reinigung und Pflege“)
•Gerät hat direkte Sonneneinstrahlung oder steht nahe an einer Wärmequelle (Ofen, Heizkörper etc.)
Gerät vor direkter Sonneneinstrahlung schützen / Abstand
zu Wärmequelle prüfen / Isolierplatte zwischen Gerät und Wärmequelle schieben (siehe „Wahl des Aufstellungsortes“)
•Menge von frische nachgefüllten Lebensmittel nicht dem Gefriervermögen Ihres Gerätes (Typenschild: XX kg/24h) angepasst oder zu warme Speisen eingelegt (siehe Kapitel 8.)
Der Hersteller arbeitet ständig an der Weiterentwicklung seiner Produkte. Bitte haben Sie deshalb Verständnis dafür, dass Änderungen in Form, Ausstattung und Technik vorbehalten bleiben.
©0512 fiCONS |
6 |
|

LAGERTABELLE |
|
|
|
Gefriertruhen |
D |
||||
|
|
|
|
|
|
|
|
|
|
|
|
|
|
|
|
-18°C < |
|
|
|
Frische Lebensmittel |
|
Geeignete Verpackung |
|
ca. Lagerzeit in Monaten |
|||||
|
|
2-3 |
4 |
6 |
|
8 |
10-12 |
||
|
|
|
|
|
|||||
|
|
|
|
|
|
|
|
|
|
Hackfleisch |
> |
Poliethylen Gefrierbeutel |
> |
z |
|
|
|
|
|
Würste |
> |
Poliethylen Gefrierbeutel |
> |
z |
|
|
|
|
|
Kleine Fische |
> |
Poliethylen Gefrierbeutel |
> |
z |
|
|
|
|
|
Herz / Leber |
> |
Poliethylen Gefrierbeutel |
> |
z |
|
|
|
|
|
Speiseeis |
> |
Kunststoffbehälter |
> |
z |
|
|
|
|
|
Früchte |
> |
Kunststoffbehälter |
> |
z |
|
|
|
|
|
|
|
|
|
|
|
|
|
|
|
Käse |
> |
Poliethylen Gefrierbeutel |
> |
|
z |
|
|
|
|
Brot |
> |
Poliethylen Gefrierbeutel |
> |
|
z |
|
|
|
|
Grosse Fische |
> |
Poliethylen Gefrierbeutel |
> |
|
z |
|
|
|
|
Kuchen / Kekse |
> |
Glasbehälter |
> |
|
z |
|
|
|
|
|
|
|
|
|
|
|
|
|
|
Schweinefleisch |
> |
Alu Folie |
> |
|
|
z |
|
|
|
Rindfleisch |
> |
Alu Folie |
> |
|
|
z |
|
|
|
Hase |
> |
Alu Folie |
> |
|
|
z |
|
|
|
Lamm |
> |
Alu Folie |
> |
|
|
z |
|
|
|
|
|
|
|
|
|
|
|
|
|
Pilze |
> |
Poliethylen Gefrierbeutel |
> |
|
|
z |
|
|
|
Spargel |
> |
Poliethylen Gefrierbeutel |
> |
|
|
z |
|
|
|
Gemüse (geschnitten) |
> |
Poliethylen Gefrierbeutel |
> |
|
|
z |
|
|
|
Erdbeeren |
> |
Poliethylen Gefrierbeutel |
> |
|
|
z |
|
|
|
Torten |
> |
Alu Folie |
> |
|
|
z |
|
|
|
|
|
|
|
|
|
|
|
|
|
Huhn |
> |
Alu Folie |
> |
|
|
|
|
z |
|
Truthahn |
> |
Alu Folie |
> |
|
|
|
|
z |
|
Ente |
> |
Alu Folie |
> |
|
|
|
|
z |
|
Gans |
> |
Alu Folie |
> |
|
|
|
|
z |
|
|
|
|
|
|
|
|
|
|
|
Blumenkohl |
> |
Poliethylen Gefrierbeutel |
> |
|
|
|
|
|
z |
Bohnen |
> |
Poliethylen Gefrierbeutel |
> |
|
|
|
|
|
z |
Peperoni |
> |
Poliethylen Gefrierbeutel |
> |
|
|
|
|
|
z |
|
|
|
|
|
|
|
|
|
|
Eingemachtes |
> |
Glasbehälter |
> |
|
|
|
|
|
z |
Eingekochte Früchte |
> |
Glasbehälter |
> |
|
|
|
|
|
z |
Eislutscher |
> |
Alu Folie |
> |
|
|
|
|
|
z |
7

Deutsch |
|
|
|
Komponenten |
D |
|
a |
|
|
|
a |
Truhendeckel |
|
|
|
|
b |
Deckeldichtung |
|
|
|
|
|
|
|
||
c |
|
|
b |
c |
Innenbeleuchtung |
* |
|
|
|
|
|
||
|
|
|
|
|
|
|
|
|
|
|
d |
Lagerraum |
|
|
|
|
|
e |
Trennwand |
* |
d |
e |
f |
|
f |
Vorgefrierfach |
* |
|
|
|
|
|||
|
|
|
|
g |
Gehäuse |
|
|
|
|
|
h |
Stopfen |
* |
g |
|
|
|
i |
Bedienblende |
|
|
|
|
k |
k |
Lüftungsgitter |
|
|
|
|
|
|
|
|
h
i
l |
m n |
p |
|
l |
|
|
m |
||
|
|
n |
|
|
p |
o |
|
o |
p |
||
|
|||
|
|
||
|
|
* |
Temperaturregler |
* |
Schnell Gefrierschalter |
* gelb |
Alram Leuchte |
* rot |
Betriebskontroll Lampe |
* grün |
Kondenser |
* |
je nach Modell |
|
Die verschiedenen Varianten von Bedienblenden |
|
FIG. 4 |
||||||
Bitte markieren Sie die für Ihr Gerät zutreffende Variante |
|
|
|
|||||
1. Variante mit separatem Schalter für SCHNELL GEFRIER Funktion |
FIG. 4a |
|||||||
|
|
|
|
|
|
A |
Temperaturregler (Thermostat) |
|
|
|
|
|
|
|
B |
ALARM |
rote Lampe |
|
|
|
|
Min. |
Max.. |
C |
Betriebskontrolle |
grüne Lampe |
|
|
|
|
D |
SCHNELL GEFRIER |
gelbe Lampe |
||
E |
D |
C |
B |
A |
|
E |
SCHNELL GEFRIER |
EIN/AUS |
|
|
|
|
|||||
2. Variante mit SCHNELL GEFRIER LEUCHTSCHALTER |
|
|
FIG. 4b |
|||||
|
|
|
|
|
|
A |
Temperaturregler (Thermostat) |
|
|
|
|
|
|
|
B |
Betriebskontrolle |
grüne Lampe |
|
|
|
|
|
|
C |
ALARM |
rote Lampe |
Min. |
Max.. |
|
|
|
|
D |
SCHNELL GEFRIER |
gelbe Lampe |
A |
B |
C |
|
D |
|
|
|
|
3. Variante ohne SCHNELL GEFRIER Funktion |
|
|
|
FIG. 4c |
||||
|
|
|
|
|
|
A |
Temperaturregler (Thermostat) |
|
|
|
|
|
|
|
B |
Betriebskontrolle |
grüne Lampe |
Min. |
Max.. |
|
|
|
|
C |
ALARM |
rote Lampe |
|
|
|
|
|
|
|
||
A B C
Sind die Kontrollampen an ihrem Gerät anders angeordnet, gilt immer:
grün = Betriebskontrolle / rot = ALARM / gelb = SCHNELL GEFRIERFUNKTION EIN
8
English |
Instruction for use CHEST FREEZERS |
GB |
Contents |
|
Page |
Electrical Safety Instruction..........................................................................................…...........…….……. 2
1Installation....................................................................................................................…………………3
2Rating plate..........................................................................................................……………………… 3
3Connection to power supply ...................................................................................…………………… 3
4Switching on / off and temperature selection.................................................................………………. 3
5Indicator-lights..............................................................................................................……………….. 4
6Warning buzzer……...........................................................................................……………………….. 4
7Start-up............................................................................................................…………….…………... 4
8Freezing/storage of fresh food...........................................................................……………………….. 4
9Maximum stacking height..................................................................................……………………….. 5
10Storage time......................................................................................................……………………….. 5
11Precautions and advice.....................................................................................……………………….. 5
12Cleaning and maintenance ...............................................................................……………………….. 5
13Defrosting.........................................................................................................………………………… 5
14Interior lighting..................................................................................................………………………… 6
15Resolving faults on your own.............................................................................……………………….. 6
16After-sales service ………………………………………………………………………………….………… 6
17Guarantee …………………………………………………………………………………………………….. 6
18Troubleshooting guide (what is when....).........................................................………...………………. 7 Storage Table...........................................................................................................………………….. 8 Components................................................................................................................………………… 9
Please read these instructions for use attentively to get a good and fast understanding of your new appliance. Underline any parts you consider particularly important for you. Look after this document so that you may consult it in future or pass it on to any future owners.
You have purchased a good appliance which will serve you for many years if it is used and maintained correctly. The illustration (FIG.) are on the last pages of this user manual.
Please, use the appliance only in a place with the appropriate ambient temperatures; otherwise the functioning of the appliance can be negatively influenced. See also "Climate classes" on page 3.
 Important!
This appliance is designed for domestic use. If it is installed for professional or commercial use, the standards applicable to the respective trade must be observed.
The appliance has been tested against leakage in compliance with the relevant legal safety standards .
In case of excessive use of the appliance, e.g. by commercial use, the warranty on the compressor will be reduced by 50 %.
Should you have bought your new fridge / freezer to replace an old appliance, please make sure that all existing latchor bolt-locks on the old appliance are destroyed, before you dispose of it.
This will ensure that a child cannot get trapped inside.
 Please have the old appliance ecologically disposed of by a company specialised in environmental protection, since the appliance may contain harmful components in the refrigerant and this must be removed with special equipment. Please check with your dealer or with your local authority.
Make sure that the refrigerating system containing the refrigerant, especially the heat exchanger at the back of the appliance, is not damaged during transportation to the disposal or collection site, so that you can be sure that the refrigerant does not leak out. Details of the utilised refrigerant and insulation propellant are on the rating plate affixed to the appliance
© 0512 fiCONS |
1 |
|

English |
Instruction for use CHEST FREEZERS |
GB |
Electrical Safety Instruction
WARNING !
THIS APPLIANCE MUST BE EARTHED.
IF THE MAINS LEAD OF THE APPLIANCE
IS FITTED WITH A PLUG:
FUSE REPLACEMENT
If the mains lead of this appliance is fitted with a BS 1363A 13 amp fused plug, to change a fuse in this type of plug use a A.S.T.A. approved fuse to BS 1362 type and proceed as follow:
1.Remove the fuse cover (A)
2.Remove the fuse (B)
3.Fit replacement fuse into plug
4.Refit the fuse cover
A
B
 IMPORTANT:
The fuse cover mast be refitted when changing a fuse and if the fuse cover is lost the plug must not be used until a correct replacement is fitted.
Correct replacements are identified by the colour insert or the colour embossed in words on the base of the plug. Replacement fuse cover are available from your local electrical store.
CONNECTION TO A REWIREABLE PLUG
If the fitted plug is not suitable for your socket outlet, then it should be cut off and disposed of in order to avoid a possible shock hazard should it be inserted into a 13A socket elsewhere.
A suitable alternative plug should then be fitted to the cable.
The wires in this mains lead are coloured in accordance with the following code:
BLUE |
“NEUTRAL” |
(N) |
BROWN |
“LIVE” |
(L) |
YELLOW & GREEN |
“EARTH” |
(E) |
YELLOW & GREEN E |
BROWN N |
|
BLUE N |
|
|
Connected to a |
|
CABLE CLAMP |
typical 13 amp plug |
|
|
1. The YELLOW & GREEN wire must be connected to the terminal in the plug which s marked with the letter E
or by the Earth symbol
or coloured green or yellow & green
2. The BLUE wire must be
connected to the terminal which is marked with the letter N
or coloured black
3. The BROW wire mast be
connected to the terminal which is marked with the letter L
or coloured red
© 0512 fiCONS |
2 |
|
English |
Instruction for use CHEST FREEZERS |
GB |
Directions for use
In the following, you will find all the important information for the use of your appliance.
The instructions for use apply to several models, which is why details of the information may differ according to the type of the appliance.
1 Installation (Choice of position for installation)
Strictly avoid high ambient temperatures and direct sunlight. We advise you to place your appliance in a cool, well aired, dry room. Installation in the immediate vicinity of a heat source (heating, oven etc.) is highly inappropriate (increased compressor performance would be necessary and, as a result, power consumption would be considerably higher).
If the installation near a heat source cannot be avoided, a suitable insulation plate must be fitted between the appliance and the heat source (do not use asbestos), or the following minimum distances must be observed:
• |
from gas or electric cooker |
3 |
cm |
• |
from radiator or oven |
5 |
cm |
• |
from a wall, piece of furniture or |
|
|
|
another appliance |
2 |
cm |
Never obstruct the ventilation grid
Larger chest freezers are equipped with a ventilation grille
(k) located below on one side. These appliances can be placed directly against a wall or a piece of furniture but not with the side protected with the ventilation grille.
Freezers without ventilation grid
Leave sufficient space between the rear of the appliance and the wall to ensure that outward flow of warm air is able to escape.
The appliance must be placed horizontally and on a levelled base. Only this way can an impeded circuit of the refrigerant and optimum function be ensured.
 IMPORTANT!
Leave the appliance stand in the final position for at least 2 hours before switching it on, so that the refrigerant circuit stabilises and no operating problems occur.
The odour which is typical of all new appliances is easy to remove.
Thoroughly clean the interior compartment with a mixture of lukewarm water and vinegar.
Do not use washing liquids, sharp or granular cleaning implements, or any cleaning products containing soda.
Before connecting the appliance, make sure that the inner area – especially the corners – is absolutely dry.
 Danger warning
Depending on its composition, the refrigerant is easily inflammable. The refrigerant circuit is hermetically sealed and the density has been subject to repeated tests.
An improper intervention can cause acute fire hazard.
Omit any mechanical influence on the cooling system, especially on the condenser (p), as far as available.
With some appliances the condenser is built into the external wall.
Interventions on the cooling system must be carried out by professional and authorised personnel only.
 IMPORTANT!
Escaping refrigerant can injure your eyes.
In the event of eye contact with the refrigerant, wash your eyes instantly under plenty of running water and call/consult an eye specialist immediately.
KLIMATE CLASSES
The appliance, according to its climate category, is meant for use at certain room temperatures.
These temperatures should not be exceeded! The climate category for your particular appliance is marked on the rating plate. The categories are:
name of climate |
suitable |
category |
room temperatures |
SN |
+ 10° C to + 32°C |
N |
+ 16° C to + 32°C |
ST |
+ 18° C to + 38° C |
T |
+ 18° C to + 43° C |
2 Rating plate
The rating plate (with technical data) is located on the housing (D) at the rear of the appliance.
Take a note of the technical data
Copy the technical data from the rating plate to here so that it is at any time readily available, without having to move the appliance
Model/Type …………….…………………………
Gross capacity |
……………………………….litres |
Net capacity |
………………….……………litres |
Operating voltage ………………….……...…...V-50Hz Maximum absorbed power(W)..……………….Watt Safety (A) ……………….....………………......Amp Power consumption………………………….....kWh/24h Freezing capacity…………………………….....kg/24h
3 Connection to power supply
Your appliance must be connected to a power socked with grounded connection, which is conform to the respective standards and has been installed by an authorised specialist.
Before you connect the plug of the appliance with the power socket, make absolutely sure that
the voltage (V) on the appliance’s data-plate corresponds with that of your mains.
If the voltage differs, notify the after-sales-service or your dealer immediately, and do not on any account connect the appliance to the mains.
4Switching on / off temperature selection
(Thermostat) (l)
The temperature control switches the appliance on and off and controls/sets the cooling temperature.
To prevent temperature being accidentally modified, the control is intentionally resistant to turning. To vary the setting, we recommend to use a coin or screwdriver.
© 0512 fiCONS |
3 |
|

English |
Instruction for use CHEST FREEZERS |
GB |
To switch on: Turn the control (l) to the right adjust temperature to the level you require, between:
-Min. (slight cooling) and
-max. (lowest temperature)
To switch off: Turn the control to the left
Temperature settings must be according to:
-ambient temperature of the appliance
-quantity of stored foodstuff
-frequency of opening
We recommend a medium setting.
You will soon learn which is the most suitable setting for your requirements.
5 Indicator-lights (m,n,o)
If your appliance is equipped with indicator-lights, the following guide explains what is meant by each light up:
-green = CONTROL
The appliance is under current and operating
The green control light must always be on when the appliance is connected to the mains and switched on. It is very important to pay attention to this, because in the event of a power failure, the red and yellow lights stop operating and do no longer provide a warning.
-- red = ALARM
Interior temperature too high
If the red indicator-light goes on, there may be several reasons for this, namely:
•First start-up of appliance
•Restart after defrosting
•Filling freezer with fresh food
In these cases it is normal that the red indicator-light goes on. It goes off automatically when the interior temperature reaches approximately –18°C.
Switch on the FAST FREEZE SWITCH (if equipped with)
(FIG.4). (switch off again not more than 24 hours later or when the red light has gone off).
Reopen the appliance, if possible, only after the red light has gone off.
If the red control light nevertheless stays on after 12 to 24 hours, there may be serious problems.
Consult the Troubleshooting guide “ what is when...” chapter 18
-yellow = FAST FREEZE SWITCH is on and the
thermostat function is disabled.
The compressor continues cooling until the FAST FREEZE switch is turned off again.
6 Warning Buzzer (Acoustic alarm)
If your appliance is supplied with a buzzer, it will sound when the red indicator-light goes on. The buzzer is silenced automatically when you turn on the FAST FREEZER SWITCH.
7 Start-up
1.Fully unpack the appliance.
2.Remove the polystyrene parts in the compressor chamber (if supplied).
3.Remove documents and any accessories from the inside of the appliance.
4.Clean the interior with a mixture of lukewarm water and vinegar, and dry thoroughly with a cloth.
5.Close the appliance.
6.Insert the plug in the socket
7.Switch on the appliance by turning the temperature control (FIG.4) to the right (For the time being, turn the controller fully to the right to Max position).
(green and red lights go on).
8.If equipped with a FAST FREEZE SWITCH, turn it on (yellow light goes on too).
9.Do not open the appliance any more for about 4 hours respectively as long as the red light is on, to allow the temperature in the inner compartment to drop to the necessary level.
10.You can now fill the appliance with any amount of deep frozen food (purchased ready frozen goods). (Consult the following chapter “Maximum stacking height”).
11.Turn off the FAST FREEZE SWITCH again after 24 hours at the latest.
12.If you wish to freeze fresh, unfrozen food, go on to the following chapter “Freezing/storage of fresh food”.
 Important!
Do not store any bottles containing liquids. Liquid expands when frozen and the bottle can explode. Never keep containers with explosive substances (gas lighters, petrol, ether and the like) in the freezer compartment of the appliance.
When storing ready frozen food, you must observe the manufacturer’s instructions on the food packaging.
Deep frozen ice-cream and ice lollies must be eaten only a few minutes after being taken from the appliance to avoid injury to lips and tongue (danger of skin detachment). For the same reason, avoid touching
the inner walls with wet hands. We advise you to use defrosted or slightly frozen products within short time. As a rule, such products are not suitable for re-freezing.
8 Freezing / storage of fresh food
Almost all fresh products are suitable for freezing and storage in the appliance.
For the most common of these products, we provide a table with instructions on acceptable storage times and the most suitable packing material (see “storage table” at the back of this user manual).
Label the fresh products clearly as they are not easy to identify when deep frozen in transparent freezer-bags.
We advise you to use commercially available labels for frozen foods.
Pack fresh products in portions suitable for your household to prevent defrosting of quantities that are too large for consumption in one day in your household.
Label the portions with at least the following information:
•Product name (e.g. beef fillet)
•Weight of portion
•Quantity (total of pieces)
•Freezing date
© 0512 fiCONS |
4 |
|

English |
Instruction for use CHEST FREEZERS |
GB |
• Use by date (consumption date) (see “storage table”)
Then continue as follows
a)We recommend you place fresh foods in the fast freezing compartment at the side (f) (not all models are equipped) or on the bottom of the freezer. This is the coldest part.
Avoid to put fresh foods directly in contact with deep frozen food. Deep frozen food could defrost and may not outlast the foreseen storage time.
b)Fill in within 24 hours, only the quantities of fresh food that are suitable for the freezing capacity of your appliance.
See information on the rating plate (XX kg/24h).
c)If available, switch on the FAST FREEZE SWITCH (FIG.4) (not absolutely necessary when filling in already frozen (e.g. deep-frozen food) items.
d)After 24 hours, shift deep-frozen goods from the freezer bottom or the pre-freeze shelf to a hung basket so that the pre-freeze shelf or freezer bottom are available for freezing additional fresh foods.
e)Turn off the FAST FREEZE SWITCH (yellow light goes off).
f)Set the temperature control to one of the appliance’s relevant filling capacities (see “Maximum stacking height”).
g)Keep the temperature in the storage shelf (d) under control, preferably by placing a thermometer with a scale range of up to –26°C.
The storage temperature must always be at least -18°C.
Refilling of fresh food (not frozen)
Make sure that you refill fresh food, in quantities adequate to the freezing capacity (XXkg/24h) earliest 24 hours after the previous filling.
(do not exceed maximum stacking height)
9 Maximum stacking height
To ensure correct storage of frozen food, never fill the storage compartment (d) up to the edge. Always allow space between the lid and the frozen foods.
Note the stacking marks affixed by the manufacturer. (as far as available)
Set the temperature control (l) strictly according to the filling capacity.
To save energy when operating in normal ambient temperature (+18 to + 22°C), we recommend the following settings for the temperature control:
Capacity |
Stacking mark |
Setting pos. |
Full |
upper |
12,00 h |
Half full |
medium |
10.00 h |
1/4 or less |
lower |
08.00 h |
10 Storage time
The storage time for purchased deep-frozen products varies and depends on the type of product and its packaging. Therefore, strictly observe the producer’s instructions on the packaging.
For fresh food that you like to deep freeze, consult the storage table at the back of this user manual.
After being defrosted, food must be consumed immediately but latest within the next 24 hours.
11 Precautions and advice 
•Whenever cleaning or defrosting, remove the power plug.
•After closing the freezer lid, do not open it immediately and do not force it open under any circumstances. Any vacuum remaining on the
•seal (b) is released after about 1 or 2 minutes, so that the lid can be opened normally once again.
•To prevent condensation and ice forming, allow cooked food to cool down to ambient temperature before closing the lid of the dish and before storage.
•Leave the freezer lid open as briefly as possible to avoid waste of energy and to prevent an excessive amount of ice forming in the appliance.
•ice forming in the appliance.
•If the red indicator-light goes on unexpectedly or stays on for a long period, do not open the lid on any account and take the appropriate measures immediately (see guide “what is when ....” at the back of the this user manual).
•Do not use a screwdriver or other metal objects to remove the layer of ice. The interior walls are very delicate and will not tolerate any sharp edges. Use only plastic or wooden scrapers.
12 Cleaning and maintenance
For the upkeep of the external appearance of your appliance, now and again clean with furniture polish or other enamel protecting product (never, on any account, use it in the inside. Clean the seal (b) with warm water now and again without using any cleaning product.
If your appliance has a condenser (p) in the rear inside, from time to time remove dirt and dust. Dust and dirt impede release of heat from the inner compartment and considerably increases consumption of energy. For best results, use a light brush or duster to remove dust from the condenser on the rear wall.
If you leave your appliance out of use for an extended period (e.g. when on holidays), leave it open to prevent odours building up inside. For appliances with locks: when the chest lid is open, always set the lock in “closed” position and keep the key well away from small children to prevent accidents.
When ice and frost layers form on the inner walls up to a certain thickness, they act as an insulation element and prevent the coldness being released from the inner walls. They must be removed from time to time.
To remove ice from the inner walls, use a plastic or wood scraper without sharp edges.
Cover the frozen food with a cloth which aids to collect the scraped ice and enables a simple removal.
13 Defrosting
Under normal conditions (3 to 4 openings per day) the freezer must be defrosted once or twice a year (more often in other cases).
© 0512 fiCONS |
5 |
|

English |
Instruction for use CHEST FREEZERS |
GB |
 Danger warning
Never use electrical appliances to defrost the chest freezer, e.g. hair dryer, fan heater, or devices with a naked flame (e.g. candles).
Plastic in the inner compartment can melt and escaping gas can be ignited by sparks or naked flames.
Proceed as follows:
1.Provide a suitable non-metallic container (plastic container or wash-basket).
2.Make absolutely sure that you remove the plug from the power socket.
3.Dry your hands thoroughly to prevent skin damage by contact with ice (it is advisable to use gloves).
4.Remove all frozen food from the freezer, roll it firmly in newspaper, put it into the container, place the container in a cool, dry room.
5.Cover up the container all around with a thick blanket.
6.Lift the separator (e) (not all models are equipped) upwards out of the guide-rail of the freezer.
7.Use the divider (so far as provided) as a defrosting dish and push it on the side under the freezer – where the defrosting water drain-plug is located.
8.Pull the plug (as far as provided) out of the freezer bottom.
9.As previously described, scrape the thickest ice carefully from the freezer inside and put it into the kitchen sink. for defrosting.
10.If necessary, speed up defrosting by placing a large pot of warm (not too hot) water on the freezer bottom.
11.In freezers not provided with a drain-plug, continuously wipe up the water with a sponge.
12.Thoroughly clean the inside. Rinse it with a mixture of warm water and vinegar, thereafter rinse with clear water.
13.Wipe the freezer with an absorbent cloth thoroughly dry and allow to air for about 3 to 4 minutes.
14.Replace the drain-plug (if provided)
15.Empty the dry defrosting water dish (if provided) and slide it as separator into the guide rails of the freezer.
16.Close the chest and plug it back into the socket.
17.Set the temperature control (l) to maximum setting (green and red lamps go on) and switch on the FAST FREEZE SWITCH (FIG.4) (if provided) (the yellow lamp lights additionally).
18.Now refill the frozen food – the oldest items at the top.
 To prevent frosted food from defrosting, carry out steps from 1 to 17 within max. two hours.
19.When the red lamp goes off, reset the temperature control to a as per the filling capacity suitable storage temperature.
20.Switch off the FAST FREEZER SWITCH (if provided) after about 8 to 12 hours or, latest after 24 hours (the yellow light goes off).
14 Interior light
(not provided in all models)
A switch is built into appliances equipped with lighting. When the appliance is opened the light goes on automatically and switches off automatically when
closed.
The lamp is protected with a transparent cover. Strictly use 15 W max. replacement bulbs.
15 Resolving faults on your own
High quality manufacturing processes and use of latest cooling and freezing technology will principally ensure trouble-free function of your appliance.
If you suspect any fault, before contacting the after-sales service directly or via your dealer, make sure you have observed all instructions and advice in this user manual.
Repairs by the after-sales service, of faults that have occurred because of non-adherence to the information and advice given in this manual have to be charged to the customer and are not covered by your dealer’s guarantee.
Attention
The compressor (also known as motor) must not operate continuously.
It is controlled by the thermostat which you set with the temperature control (FIG.4). It switches on automatically when the set temperature in the storage compartment exceeds and switches off automatically when the correct temperature is reached again.
Noise can be heard in every compressor – cooling system when the compressor is switched on. This noise is produced when the motor in the compressor operates and also by refrigerant flowing in the cooling system circuit. These noises are normal and do not indicate any functional trouble.
In unheated rooms and in cold weather condition condensation can build up on the outer walls of the appliance. This does not mean trouble and disappears when the weather becomes warmer.
16 After-sales service
Call the after-sales service only, if after analysis of possible trouble/fault factors you cannot find any cause for the defect or do not have the means to eliminate the trouble.
Therefore first check under “What is when ....”
Consult the enclosed guarantee card or the separately enclosed after-sales centres list, to see which company is responsible for servicing your appliance. If several aftersales centres are mentioned on the list, select the nearest one to you.
If no after-sales service centres list is enclosed with your appliance, contact your dealer.
In order to receive immediate help, make sure you have ready the following essential data to identify your appliance:
•Brand of appliance
•Model / Type
•Kind of trouble
•Date of purchase
•Purchased from whom?
17 Guarantee
Please note the general guarantee terms and the guarantee period are stated in the attached guarantee card.
If the appliance documentation does not include a guarantee card, please contact your dealer.
© 0512 fiCONS |
6 |
|

English |
Instruction for use CHEST FREEZERS |
GB |
18 What is when............ |
|
|
a)No function (appliance not running)
 Attention!
In the event of problems or of a power failure, the insulation of the appliance walls provides 10 to 12 hours storage time after the beginning of such failures.
Considerably more time is available in specially insulated appliances. Ask your dealer what is the suitable “storage time after problems” for your appliance.
If it takes longer to eliminate a problem, the frozen food in the appliance begins to defrost. Therefore, take prompt action to eliminate the problem and, if necessary, shift frozen food into another appliance (possibly neighbour).
b)Appliance not cooling sufficiently Freezing process too long Compressor operating too often
Possible causes/Remedies:
•Did you have the appliance t stand for at least 2 hours before switching it on? (stabilise the refrigerant flowcircuit). See: “Start-up”.
If not: unplug when the chest is closed, lift the chest for a brief moment and then put it back down to its original position. After 2 hours put the plug back in. Do not open the chest during this period and a further 12 hours afterwards, i.e. until the red light goes off.
•Is the plug in good condition and is it properly plugged into the socket?
•Is the socket under current?
(if necessary, test by connecting a small appliance such as a hand-mixer, etc.).
•The lid of the appliance does not close properly. The seal does not firmly press.
Test: place a piece of writing paper between the seal and the edge of the chest, and close the lid. It should be difficult to pull out the paper from any side. If you can pull out the paper without any resistance from one ore more sides, notify your after-sales service centre.
•Heavy ice formation on the inner walls.
(see “cleaning and maintenance”)
•The appliance is exposed to direct sunlight or is installed near a heat source (oven, radiator, etc.)
Protect the appliance against direct sunlight; check the distance to the heat source; place isolating (see “ Installation (Choice of position for installation”)
• The filling of food does not correspond with the excess freezing capacity of your appliance (see rating plate: XXkg/24h), or you did fill in too warm food
(see: ” Refilling of fresh food” ).
The manufacturer works constantly at the further development of all products. Please therefore bear this in mind as the form, set up and technology are subject to change, without prior notice.
© 0512 fiCONS |
7 |
|

STORAGE TABLE |
|
|
|
CHEST FREEZERS |
|
GB |
|||
|
|
|
|
|
|
|
|
|
|
|
|
|
|
|
|
-18°C < |
|
|
|
Fresh food |
|
Suitable packaging |
|
approx. storage time in months |
|||||
|
|
2-3 |
4 |
6 |
8 |
|
10-12 |
||
|
|
|
|
|
|||||
|
|
|
|
|
|
|
|
|
|
Mincemeat |
> |
Polyethylene freezer bag |
> |
z |
|
|
|
|
|
Sausages |
> |
Polyethylene freezer bag |
> |
z |
|
|
|
|
|
|
|
|
|
|
|
|
|
|
|
Small fish |
> |
Polyethylene freezer bag |
> |
z |
|
|
|
|
|
|
|
|
|
|
|
|
|
|
|
Heart / liver |
> |
Polyethylene freezer bag |
> |
z |
|
|
|
|
|
Ice cream |
> |
Plastic container |
> |
z |
|
|
|
|
|
Fruit |
> |
Plastic container |
> |
z |
|
|
|
|
|
|
|
|
|
|
|
|
|
|
|
Cheese |
> |
Polyethylene freezer bag |
> |
|
z |
|
|
|
|
|
|
|
|
|
|
|
|
|
|
Bread |
> |
Polyethylene freezer bag |
> |
|
z |
|
|
|
|
Large fish |
> |
Polyethylene freezer bag |
> |
|
z |
|
|
|
|
Cake / biscuits |
> |
Glass container |
> |
|
z |
|
|
|
|
|
|
|
|
|
|
|
|
|
|
Pork |
> |
Aluminium foil |
> |
|
|
z |
|
|
|
|
|
|
|
|
|
|
|
|
|
Beef |
> |
Aluminium foil |
> |
|
|
z |
|
|
|
Rabbit |
> |
Aluminium foil |
> |
|
|
z |
|
|
|
Lamb |
> |
Aluminium foil |
> |
|
|
z |
|
|
|
|
|
|
|
|
|
|
|
|
|
Mushrooms |
> |
Polyethylene freezer bag |
> |
|
|
z |
|
|
|
|
|
|
|
|
|
|
|
|
|
Asparagus |
> |
Polyethylene freezer bag |
> |
|
|
z |
|
|
|
Vegetables (cut) |
> |
Polyethylene freezer bag |
> |
|
|
z |
|
|
|
Strawberries |
> |
Polyethylene freezer bag |
> |
|
|
z |
|
|
|
Flans |
> |
Aluminium foil |
> |
|
|
z |
|
|
|
|
|
|
|
|
|
|
|
|
|
|
|
|
|
|
|
|
|
|
|
Chicken |
> |
Aluminium foil |
> |
|
|
|
z |
|
|
Turkey |
> |
Aluminium foil |
> |
|
|
|
z |
|
|
Duck |
> |
Aluminium foil |
> |
|
|
|
z |
|
|
Goose |
> |
Aluminium foil |
> |
|
|
|
z |
|
|
|
|
|
|
|
|
|
|
|
|
|
|
|
|
|
|
|
|
|
|
Cauliflower |
> |
Polyethylene freezer bag |
> |
|
|
|
|
|
z |
Beans |
> |
Polyethylene freezer bag |
> |
|
|
|
|
|
z |
Pepperoni |
> |
Polyethylene freezer bag |
> |
|
|
|
|
|
z |
|
|
|
|
|
|
|
|
|
|
Preserves |
> |
Glass container |
> |
|
|
|
|
|
z |
|
|
|
|
|
|
|
|
|
|
Preserved fruit |
> |
Glass container |
> |
|
|
|
|
|
z |
Ice lollies |
> |
Aluminium foil |
> |
|
|
|
|
|
z |
8
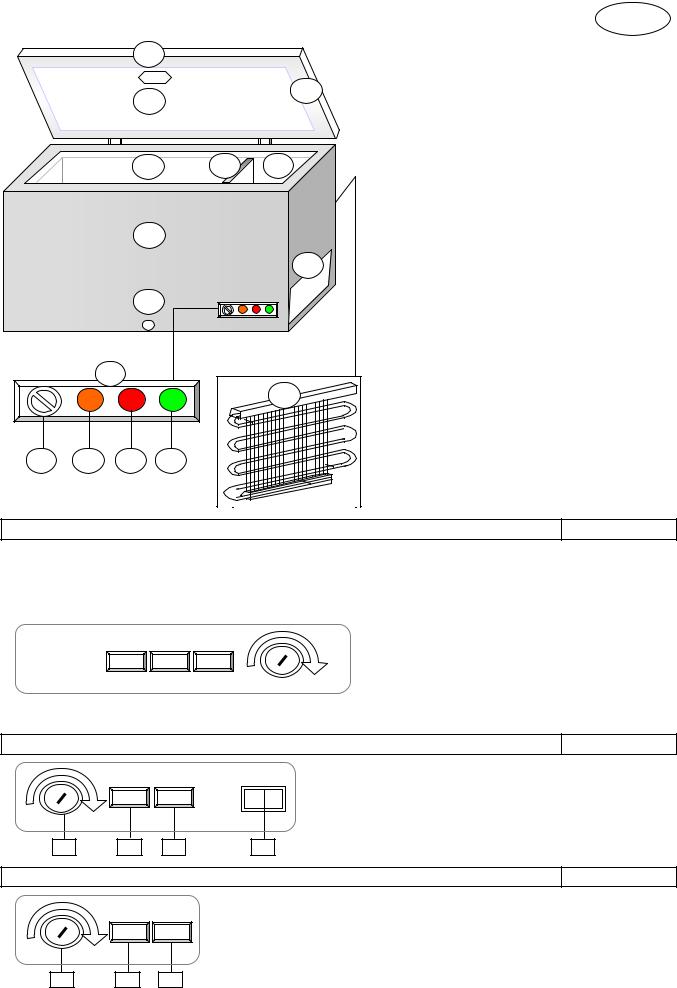
English |
|
|
|
Components |
GB |
|
a |
|
|
|
a |
Chest lid |
|
|
|
|
b |
Lid seal |
|
|
|
|
|
|
|
||
c |
|
|
b |
c |
Interior light |
* |
|
|
|
|
|
||
|
|
|
|
|
|
|
|
|
|
|
d |
Storage compartment |
|
|
|
|
|
e |
Separator |
* |
d |
e |
f |
|
f |
Fast freeze compartment |
* |
|
|
|
|
|||
|
|
|
|
g |
Housing |
|
|
|
|
|
h |
Plug (defrost water) |
* |
g |
|
|
|
i |
Control panel |
|
|
|
|
k |
k |
Ventilation grid |
|
|
|
|
|
|
|
|
h
|
|
i |
|
|
l |
Temperature control |
* Thermostat |
|
|
|
|
p |
|
||||
|
|
|
|
m |
Fast freeze key |
* yellow |
||
|
|
|
|
|
n |
Alarm |
* red |
|
|
|
|
|
p |
o |
Control |
* green |
|
l |
m |
n |
o |
p |
Condenser |
* |
||
|
||||||||
|
|
|
|
|||||
|
|
|
|
|
* |
depending on Model |
|
|
Control panel versions |
|
|
|
FIG. 4 |
||||
Please underline the appropriate version for your appliance
1st VERSION with separate switch for FAST FREEZE function |
FIG. 4a |
|||||||||||||||||||||||||||
|
|
|
|
|
|
|
|
|
|
|
|
|
|
|
|
|
|
|
|
|
|
|
|
|
|
A |
Temperature control (Thermostat) |
|
|
|
|
|
|
|
|
|
|
|
|
|
|
|
|
|
|
|
|
|
|
|
|
|
|
|
B |
ALARM |
red light |
|
|
|
|
|
|
|
|
|
|
|
|
|
|
|
|
|
|
|
|
|
|
|
|
|
|
C |
CONTROL |
green light |
|
|
|
|
|
|
|
|
|
|
|
|
|
|
|
|
|
|
|
|
|
|
Min. |
|
|
Max.. |
D |
FAST FREEZE |
yellow light |
|
|
|
|
|
|
|
|
|
|
|
|
|
|
|
|
|
|
|
|
|
|
|
|
|||||
|
|
|
|
|
|
|
|
|
|
|
|
|
|
|
|
|
|
|
|
|
|
|
|
|
|
E |
Fast freeze switch |
ON/OFF |
|
|
|
E |
|
|
|
|
D |
|
|
|
C |
|
|
|
B |
|
|
A |
|
|
|
|
|||||
2nd VERSION with FAST FREEZE LIGHT SWITCH |
|
FIG. 4b |
|||
|
|
|
A |
Temperature control (Thermostat) |
|
|
|
|
B |
CONTROL |
green light |
Min. |
Max.. |
|
C |
ALARM |
red light |
|
D |
FAST FREEZE |
yellow light |
||
|
|
|
|||
A |
B |
C |
D |
|
|
3rd VERSION without FAST FREEZE function |
|
FIG. 4c |
|
|
A |
Temperature control (Thermostat) |
|
|
B |
CONTROL |
green light |
|
C |
ALARM |
red light |
Min. |
Max.. |
|
|
A B C
If the indicator-lights on your appliance are laid out in a different way, the following always apply: green = appliance operating; red = ALARM; yellow = FAST FREEZE FUNCTION ON
9
.
Français |
Mode d'emploi Congélateur Coffre |
F |
|
Index |
|
Page |
|
1 |
Choix de l’emplacement d’installation ................................................................................................ |
2 |
|
2 |
Plaquette d’homologation....................................................................................................... |
............ |
2 |
3 |
Connexion électrique........................................................................................................... |
............... |
2 |
4 |
Connexion/ déconnexion, sélection de la température ...................................................................... |
3 |
|
5 |
Voyants lumineux ............................................................................................................... |
................ |
3 |
6 |
Alarme sonore .................................................................................................................. |
.................. |
3 |
7 |
Mise en fonction de l'appareil ................................................................................................. |
............ |
3 |
8 |
Congélation / conservation des aliments frais.................................................................................... |
4 |
|
9 |
Hauteur maximale d’empilage.................................................................................................... |
........ |
4 |
10 |
Durée de conservation .......................................................................................................... |
............. |
4 |
11 |
Mesures de sécurité et conseils ......................................................................................................... |
4 |
|
12 |
Nettoyage et entretien ......................................................................................................... |
............... |
5 |
13 |
Dégivrage ...................................................................................................................... |
..................... |
5 |
14 |
Éclairage intérieur............................................................................................................ |
................... |
5 |
15 |
Réparer soi-même les pannes .................................................................................................... |
....... |
6 |
16 |
Service après-vente ........................................................................................................... |
................ |
6 |
17 |
Garantie ……………………………………………………………………………………………………... 6 |
||
18 |
Détection des pannes/origines/remèdes............................................................................................ |
6-7 |
|
|
Tableau de conservation ................................................................................................. |
................... |
8 |
|
Composants.................................................................................................................................……. 9 |
||
Nous vous recommandons de lire attentivement les instructions de ce mode d’emploi. Elles vous permettront de vous familiariser plus rapidement avec votre nouvel appareil. Notez les points que vous estimez importants. Conservez le présent document à portée de main pour pouvoir le consulter à tout moment et le remettre à de futurs utilisateurs éventuels de l’appareil.
L’appareil que vous avez acheté vous servira pendant de nombreuses années si vous l’utilisez correctement et l’entretenez régulièrement.
Les illustrations se trouvent à la dernière page de ce mode d’emploi.
Veuillez employer l'appareil seulement à un endroit avec les températures ambiantes appropriées. Autrement la fonction de l'appareil peut être altérée. Examinez le chapitre "Désignation de la classe climatique" à la page 2.
Important !
Cet appareil est destiné à un usage domestique. Au cas où l’appareil serait utilisé industriellement, il est nécessaire de se conformer aux dispositions valables pour l’entreprise concernée.
L’étanchéité de l’appareil a été testée d’après les dispositions légales actuelles en matière de prévention des accidents.
Dans le cas d'une demande excessive de l'appareil, par exemple par utilisation commercial, la durée de garantie pour le compresseur ce réduit par 50 %.
Si votre appareil remplace un réfrigérateur ou congélateur ancien, assurez-vous d’en enlever les serrures ou verrous éventuels avant de vous en débarrasser.
Vous éviterez ainsi que des enfants y soient enfermés en jouant.
 Faites débarrasser votre vieil appareil par une entreprise spécialisée (informez-vous auprès de la mairie), car il peut contenir des éléments polluants devant être éliminés grâce à un appareillage spécial.
© 0512 fiCONS |
1 |
|

Français |
Mode d'emploi Congélateur Coffre |
F |
Mode d’emploi
Vous trouverez ci-dessous toutes les indications importantes se rapportant à l’utilisation de l’appareil.
Les instructions du mode d’emploi concernent divers modèles. C’est pourquoi des différences de détails peuvent exister selon le type d’appareil.
1 Choix de l’emplacement d’installation
Éviter absolument les températures élevées et les rayons du soleil. Nous vous conseillons d’installer votre appareil dans un endroit frais, bien aéré et sec. L’installer à proximité d’une source de chaleur (chauffage, four, etc.) est absolument déconseillé (cela provoque une surcharge du compresseur entraînant une consommation d’énergie sensiblement plus élevée).
Si vous ne pouvez le placer autrement qu’à proximité d’une source de chaleur, nous vous conseillons de fixer une plaque isolante adéquate entre l’appareil et la source de chaleur (ne pas utiliser de plaques en amiante) ou de respecter les distances minimales suivantes :
• À la cuisinière à gaz ou électrique3 cm |
|
|
• Au radiateur du chauffage ou du four |
5 |
cm |
• À la paroi, un meuble ou un autre |
2 |
cm |
réfrigérateur |
|
|
Ne jamais obstruer la grille d’aération
Les congélateurs horizontaux de grandes taille sont équipés d’une grille d’aération (k) dans la position latérale inférieure. Les congélateurs peuvent être placés directement contre une paroi ou un meuble, mais pas du côté de la grille d’aération.
Congélateurs sans grille d’aération
Respecter une distance suffisante entre l’arrière du congélateur et la paroi, de sorte que l’air chauffé s’échappe librement.
L’appareil doit être posé horizontalement sur un sol plat. Ce n’est qu’ainsi que l’on pourra garantir une circulation adéquate du réfrigérant et donc le fonctionnement optimal de l’appareil.
 ATTENTION !
Laisser reposer l’appareil à sa place d’installation définitive au moins 2 heures avant de le brancher, afin que le circuit de réfrigération se stabilise et d’éviter d’éventuels problèmes de fonctionnement.
L’odeur dégagée par tous les appareils neufs s’élimine facilement.
Pour cela, lavez soigneusement l’intérieur de l’appareil à l’eau tiède additionnée de vinaigre.
 Ne pas utiliser de produits corrosifs, de détergents agressifs, en poudre ou à base de carbonate ou bicarbonate de sodium.
Avant de brancher l’appareil, le compartiment interne doit être absolument sec, notamment dans les coins.
 Avertissements concernant la sécurité
Suivant sa composition, le réfrigérant s’avère facilement inflammable. Le circuit du réfrigérant est étanche et sa densité a été vérifiée à plusieurs reprises.
Les interventions effectuées par un personnel non qualifié comportent un sérieux danger d’incendie. S’abstenir de toute contrainte mécanique sur le système réfrigérant, notamment le condensateur extérieur (p)
Les interventions sur le système réfrigérant doivent être faites uniquement par du personnel qualifié agréé.
 ATTENTION !
Les projections de réfrigérant peuvent causer des dommages aux yeux.
Si les yeux devaient être atteints par du réfrigérant, les laver immédiatement à l’eau courante et consulter immédiatement un oculiste
Désignation de la classe climatique
La catégorie de l'appareil est imprimée sur sa plaque signalétique. En voici la signification:
|
Températures ambiantes |
Désignation de la |
pour lesquelles |
classe |
l'appareil a été dimensionné |
SN |
+10°C à +32°C |
N |
+16°C à +32°C |
ST |
+18°C à +38°C |
T |
+18°C à +43°C |
2 Plaquette d’homologation
La plaquette d’homologation mentionnant les données techniques est fixée dans le logement (D) à l’arrière de l’appareil.
Copier les données techniques
C’est ici qu’il faut recopier les données techniques de la plaquette d’homologation pour en disposer à tout moment sans devoir déplacer l’appareil.
Modèle/Type n° ……………………………………
Capacité brute |
....................................litres |
Capacité nette.................................... |
litres |
Tension de service………………….. V 50 Hz
Puissance maximum (W)................... |
Watt |
Fusible (A).......................................... |
ampère |
Consommation énergétique............... |
kWh/24h |
Capacité de congélation..................... |
kg/24h |
3 Connexion électrique
Votre appareil doit être branché exclusivement à une prise munie d’une mise à la terre, installée convenablement par un électricien agréé.
Avant d’enfoncer la fiche de l’appareil dans la prise, vérifier impérativement que la tension (V) reportée sur la plaquette d’homologation de l’appareil correspond à celle de votre réseau électrique.
Dans le cas contraire, consulter immédiatement le service après-vente compétent ou le revendeur agréé
© 0512 fiCONS |
2 |
|

Français |
Mode d'emploi Congélateur Coffre |
F |
et s’abstenir absolument de brancher l’appareil sur le réseau.
4Connexion / déconnexion, sélection de la température
Régulateur de température (thermostat) (l)
Au moyen du régulateur de température, il est possible de connecter et de déconnecter l’appareil et de régler la température de refroidissement.
Pour que le réglage de la température ne puisse être changé par mégarde, le régulateur a été spécialement conçu pour être difficilement commutable. Pour le régler, nous vous conseillons d’utiliser une pièce de monnaie ou un tournevis.
Connexion : tourner le régulateur vers la droite>. Suivant les besoins, régler la température entre :
•minimum (réfrigération minimum).
•maximum (température la plus basse). Déconnexion : tourner le régulateur vers la gauche<.
Le réglage de la température doit être proportionnel :
•À la température à l’emplacement de l’appareil ;
•À la quantité d’aliments mis dans l’appareil ;
•À la fréquence d’ouverture de l’appareil.
Nous vous conseillons de choisir une température moyenne.
Vous pourrez rapidement, par une observation précise, établir vous-même le meilleur réglage correspondant à vos besoins.
5 Voyants lumineux (m,n,o)
Si votre appareil est équipé de voyants lumineux, voici leur signification:
-vert = CONTROL (contrôle)
L’appareil est relié au secteur et fonctionne.
Le voyant vert doit toujours être allumé lorsque l’appareil est raccordé à l’alimentation électrique et qu’il est branché. Ce voyant est particulièrement important, puisqu’en cas de chutes de tension, les voyants rouge et jaune ne fonctionnent plus et ne peuvent donc rien signaler.
-rouge = ALARM (alarme)
Température intérieure trop élevée
Si le voyant rouge reste allumé, ce peut être pour diverses raisons :
•Première mise en fonction de l’appareil ;
•Remise en fonction après le dégivrage ;
•Introduction d’aliments frais.
Dans ces cas, si le voyant rouge reste allumé, c’est normal. Le voyant s’éteindra automatiquement
lorsque la température intérieure atteint environ –18°C.
Si l’appareil en est équipé, enclencher l’interrupteur de SUPER-CONGÉLATION (FIG. 4). (Le déconnecter au maximum après 24 heures ou une fois le voyant rouge éteint).
Dans tous les cas, n’ouvrir si possible l’appareil qu’une fois le voyant rouge éteint.
Cependant, si le voyant rouge reste encore allumé après 12-24 heures, il est possible qu’une vraie panne se soit produite.
Se rapporter pour cela au chapitre 18:
« Détection des pannes/causes/remèdes »
- jaune = INTERRUPTEUR DE SUPERCONGÉLATION
Lorsque qu’il est enclenché, le thermostat est mis hors fonction.
Le compresseur produit sa fonction de refroidissement jusqu’à ce que l’interrupteur de SUPER-CONGÉLATION soit à nouveau déclenché.
6 Alarme sonore
Si l’appareil en est équipé, une alarme sonore se fait entendre en plus du voyant rouge qui s’allume. Elle se déconnecte automatiquement une fois l’interrupteur de SUPER-CONGÉLATION enclenché.
7 Mise en fonction de l’appareil
1.Déballer complètement l’appareil.
2.Enlever les parties en polystyrène du compartiment du compresseur (si c’est le cas).
3.Sortir toute la documentation du compartiment interne de l’appareil, ainsi que les accessoires éventuellement présents.
4.Nettoyer le compartiment interne à l’eau tiède additionnée de vinaigre et essuyer soigneusement avec un chiffon.
5.Fermer l’appareil.
6.Mettre la fiche dans la prise.
7.Brancher l’appareil en tournant le régulateur de température (l) sur la droite (tourner d’abord le régulateur à l’extrême droite en position maximale).
(Les voyants vert et rouge s’allument).
8.S’il y en a un, enclencher l’interrupteur de SUPER-CONGÉLATION (le voyant jaune s’allume).
9.Ne pas ouvrir l’appareil pendant environ 4 heures ou jusqu’à ce que le voyant rouge soit éteint, pour que le compartiment interne soit suffisamment refroidi.
10.Vous pouvez maintenant remplir le congélateur d’aliments déjà congelés à –18 °C (aliments achetés congelés). (Voir chapitre « Hauteur maximum d’empilage »).
11.Au plus tard après 24 heures, déconnectez à nouveau l’interrupteur de SUPER-CONGÉLATION.
12.Si vous souhaitez congeler des aliments frais, pas encore congelés, procédez comme indiqué au chapitre « Congélation/conservation des aliments frais ».
 Attention !
Ne pas congeler de bouteilles contenant des boissons. Le liquide se dilate durant la congélation et la bouteille pourrait éclater.
Ne jamais conserver de récipients contenant des substances explosives (allume-gaz, essence, éther etc.) dans le compartiment de l’appareil.
En cas de conservation de produits congelés, suivre absolument les instructions du fabricant figurant sur leur emballage.
© 0512 fiCONS |
3 |
|

Français |
Mode d'emploi Congélateur Coffre |
F |
Glaces et glaçons ne doivent être consommés congelés que quelques minutes après avoir été sortis de l’appareil, pour éviter de se blesser les lèvres et la langue (brûlure de la peau). Pour la même raison, éviter de toucher les parois internes glacées avec les mains mouillées. Nous vous conseillons de consommer immédiatement les produits décongelés ou à moitié décongelés. La re congélation est en principe déconseillée.
8 Congélation / Conservation des aliments frais
Presque tous les produits frais peuvent être congelés et conservés dans votre appareil. C’est pourquoi nous avons indiqué un tableau des produits les plus fréquemment congelés en indiquant les durées de
conservation possibles et le matériau d’emballage préférable (voir « Tableau de conservation » dans les présentes instructions de ce mode d’emploi)
Avant de les mettre dans l’appareil, marquer les emballages des divers produits frais, car en cas d’emploi de sachets plastique transparents les aliments congelés sont difficilement reconnaissables.
À ce propos, nous vous conseillons d’utiliser les étiquettes pour produits congelés que l’on trouve dans le commerce. Envelopper les produits frais dans des sachets adéquats, en les divisant en portions que vous avez l’habitude d’utiliser, pour éviter de décongeler de grosses quantités que vous ne consommeriez pas en une journée.
Identifier les portions en marquant au moins les informations suivantes :
•Nom du produit (par exemple : filet de bœuf) ;
•Poids de la portion ;
•Quantité (nombre de pièces) ;
•Date de congélation ;
• Date |
de |
consommation |
(voir |
« Tableau |
de |
conservation »). |
|
|
|
||
Puis procéder comme suit :
a)Placer si possible les aliments frais dans le compartiment de pré-congélation latéral (f) (pas sur tous les modèles) ou au fond du congélateur où règne la température la plus basse.
À ce propos, éviter tout contact en plaçant les aliments frais et ceux déjà congelés, sinon ils pourraient se décongeler et la durée de conservation prévue ne serait plus valable.
b)Dans les 24 heures, mettre les produits de manière à n’atteindre que la quantité d’aliments frais adéquate à la capacité de congélation de votre appareil. Se reporter aux données mentionnées sur la plaquette d’homologation
(xx kg/24h).
c)S’il y en a un, enclencher l’interrupteur de SUPERCONGÉLATION (FIG. 4) (pas obligatoire si l’on introduit des aliments déjà congelés (par exemple : produits congelés).
d)24 heures plus tard, retirer les produits congelés du fond du congélateur ou du compartiment de précongélation et les mettre dans un panier, de sorte que le compartiment de pré-congélation (f) ou le fond du congélateur servent à congeler d’autres aliments frais.
e)Déconnecter l’interrupteur de SUPER-CONGÉLATION (le voyant jaune s’éteint).
f)Régler le régulateur de température selon le degré de remplissage de l’appareil (voir « Hauteur maximale d’empilage »).
g)Surveiller si possible la température du compartiment de conservation (e) au moyen d’un thermomètre mesurant les températures jusqu’à –26°C.
 La température de conservation doit toujours être au minimum de –18 °C.
Remplissage d’aliments frais(non congelés)
Veiller à ce qu’au plus tôt 24 heures après avoir mis des aliments frais, l’on puisse ajouter la quantité adéquate à la capacité de congélation (xx kg/24h) de votre appareil.
(Ne pas dépasser la hauteur d’empilage maximum).
9 Hauteur maximale d’empilage
Pour garantir une conservation optimale des produits congelés, nous vous recommandons de ne jamais remplir le compartiment de congélation jusqu’à la ligne supérieure. Toujours prévoir un certain espace entre le couvercle et les produits congelés.
Ne pas dépasser la ou les marques d’empilage prévues par le producteur.
Régler toujours le régulateur de température (FIG. 4) selon la quantité remplie.
À température ambiante normale (entre +18 °C et + 22 °C), nous vous recommandons de placer le régulateur
de la température dans les positions ci-dessous pour économiser l’énergie :
Capacité |
Marque d’empilage |
Position |
Plein |
Dessus |
Sur 12h. |
À moitié plein |
Milieu |
Sur 10h. |
Un quart plein, ou Bas |
Sur 8h. |
|
moins |
|
|
10 Durée de conservation
La durée de conservation des produits pré-congelés diffère beaucoup selon le type d’aliment et sa composition. À ce propos, respecter les instructions du producteur se trouvant sur l’emballage du produit.
Quant aux aliments frais que vous congelez vous-mêmes, respectez les indications du tableau de conservation dans ce mode d’emploi.
Il faut consommer immédiatement les produits déjà décongelés une fois.
Consommer les produits décongelés dans les 24 heures.
11 Mesures de sécurité et conseils 

•À chaque nettoyage ou dégivrage, débrancher votre appareil.
•Ne pas ouvrir le couvercle du congélateur juste après l’avoir fermé, et ne pas l’ouvrir trop fortement. Un éventuel vide sur la garniture (b) disparaît après 1-2 minutes, le couvercle peut ainsi être ouvert à nouveau normalement.
•Laisser refroidir les aliments cuisinés à la température ambiante, pour éviter la formation de condensation et de glace dans l’appareil.
•Laisser le couvercle du congélateur ouvert le moins longtemps possible, pour ne pas gaspiller de courant et éviter la formation de glace superflue dans l’appareil.
© 0512 fiCONS |
4 |
|

Français |
Mode d'emploi Congélateur Coffre |
F |
•Au cas où le voyant rouge s’allumerait de façon inattendue ou plus longtemps que d’habitude, n’ouvrez en aucun cas l’appareil, mais prenez les mesures nécessaires .
(voir chapitre 18 « Détection des pannes / causes / remèdes »).
•Ne jamais employer de tournevis ou à autres outils métalliques pour enlever la couche de glace. Les parois intérieures sont très sensibles et ne supportent pas le contact avec des objets pointus. Se servir exclusivement de grattoirs en plastique ou en bois non pointus.
12 Nettoyage et entretien
Pour conserver à votre appareil un aspect soigné même à l’extérieur, utilisez de temps en temps un produit à polir les meubles ou un produit pour objets vernis (ne jamais s’en servir à l’intérieur du
congélateur). Nettoyer de temps en temps le joint (b) à l’eau chaude sans utiliser de détergent.
Si votre appareil est muni d’un condensateur sur la paroi derrière (e), en enlever de temps en temps la saleté et la poussière qui pourraient empêcher l’évacuation de la chaleur du compartiment interne et augmenter sensiblement la consommation d’énergie. Nous vous recommandons d’utiliser une brosse souple ou un balai pour nettoyer le condensateur.
En cas de mise hors service de l’appareil pendant une longue durée (vacances, etc.), le laisser ouvert pour éviter la formation de mauvaises odeurs à l’intérieur. Pour les appareils à serrure : mettre la serrure sur « fermé » et maintenir le couvercle du congélateur levé. Garder la clé hors de portée des enfants pour éviter tout accident durant leurs jeux.
À partir d’une certaine épaisseur, les couches de glace et de givre formées sur les parois intérieures jouent le rôle d’isolant et empêchent la circulation du froid sur les parois intérieures. Il faut donc les enlever de temps en temps. Se servir pour cela d’un grattoir non pointu en plastique ou en bois.
Penser à recouvrir les produits congelés d’un tissu pour enlever facilement la glace déposée.
13 Dégivrage
En utilisation normale (3-4 ouvertures par jour), dégivrer le congélateur une à deux fois par année (dégivrer plus souvent en cas d’ouvertures quotidiennes plus fréquentes).
 Mise en garde concernant la sécurité
Ne jamais utiliser d’appareils électriques, tels que séchoir à cheveux, ventilateur, ou d’appareils émettant des flammes vives (par ex. bougies) pour dégivrer l’appareil.
L’intérieur en matière plastique formé pourrait fondre et provoquer ainsi des étincelles ou des flammes vives.
Procéder comme suit :
1. Préparer un récipient adéquat non métallique (en plastique etc.).
2.Toujours débrancher l’appareil.
3.Bien se sécher les mains pour éviter de se blesser en touchant la glace (il est recommandé de mettre des gants).
4.Sortir tous les produits congelés du congélateur et les ranger dans le récipient séparé en les emballant dans du papier-journal. Mettre ensuite le récipient dans un compartiment frais et sec.
5.Couvrir entièrement le récipient d’une nappe en laine épaisse.
6.Déboîter en haut de la cloison (e) (pas sur tous les modèles) les glissières du congélateur.
7.Pousser la cloison – s’il en est pourvu – servant à recueillir l’eau de dégivrage – sous le congélateur, au fond duquel se trouve le trou d’écoulement de l’eau de dégivrage (pas sur tous les modèles).
8.Enlever le bouchon (h) du trou (si prévu) du fond du congélateur.
9.Enlever les parties de glace les plus épaisses comme décrit précédemment, en prenant soin de ne pas endommager les parois du congélateur ; mettre la glace dans l’évier de la cuisine.
10.Le cas échéant, accélérer le dégivrage en versant une grande marmite d’eau chaude (non bouillante)sur le fond du congélateur.
11.Au cas où votre congélateur serait dépourvu de trou d’écoulement, enlever constamment l’eau de dégivrage avec une éponge.
12.Nettoyer à fond le compartiment interne. Utiliser pour cela de l’eau chaude et un peu de vinaigre et rincer ensuite à l’eau claire.
13.Sécher à fond le congélateur avec un chiffon absorbant et laisser aérer pendant environ 3-4 minutes.
14.Remettre le bouchon du trou d’écoulement (h).
15.Remettez la plaque de collecte de l’eau de dégivrage bien séchée à sa place dans les glissières du congélateur.
16.Fermer le congélateur et remettre la fiche dans la prise.
17.Mettre le régulateur de température (l) en position maximum (le voyant vert et le voyant rouge s’allument) et, si c’est le cas, enclencher l’interrupteur de super-congélation (FIG. 4)
(le voyant jaune s’allume également).
18.Remettre les produits congelés, en rangeant les aliments les plus anciens dessus.
 Pour éviter la décongélation des aliments congelés, il vaut mieux exécuter les opérations 1 à 18 en deux heures au plus.
19Si le voyant est éteint, remettre le régulateur à une température de conservation
correspondant à la quantité d’aliments dans le congélateur.
20Sil y en a un, désactiver l’interrupteur de supercongélation après 8-12 heures, mais après 24 au plus tard (le voyant jaune s’éteint).
14 Eclairage intérieur
(pas sur tous les modèles)
Les appareils munis d’éclairage interne possèdent un interrupteur.
En ouvrant l’appareil, l’éclairage s’allume automatiquement et s’éteint automatiquement à sa fermeture.
L’ampoule lumineuse est protégée par un couvercle transparent.
N’utiliser que des ampoules de rechange de 15 W au maximum.
© 0512 fiCONS |
5 |
|

Français |
Mode d'emploi Congélateur Coffre |
F |
15 Réparer soi-même les pannes
La bonne finition et l’emploi de matériaux de refroidissement et de techniques de congélation les plus modernes assurent aussi un fonctionnement optimal de votre appareil.
C’est pourquoi, en cas de panne, bien s’assurer que toutes les instructions et suggestions mentionnées dans le présent mode d’emploi ont été bien suivies
avant de s’adresser au service après-vente ou à votre revendeur. (Voir chapitre "Détection de pannes /origines/remèdes)
Les interventions du service après-vente pour réparer des pannes dues à l’inobservation des instructions et conseils ci-contre sont à la charge du client et ne sont pas couvertes par la garantie de votre revendeur.
Remarque :
Le compresseur (dit aussi groupe frigorifique) ne doit pas fonctionner sans interruption.
Le compresseur commandé par le thermostat utilisé pour régler la température au moyen du régulateur correspondant (l) ; il s’enclenche automatiquement si la température dans le compartiment de conservation est dépassée et se déclenche automatiquement lorsqu’elle est à nouveau atteinte.
Tout système réfrigérant à compresseur émet des bruits quand le compresseur est en marche. Ces bruits proviennent d’une part du compresseur en fonction et de l’autre de la circulation du réfrigérant dans les tubes du système de réfrigération. Ces bruits sont donc normaux et ne signifient en aucun cas une anomalie de fonctionnement.
Dans les pièces non chauffées ou dans des conditions climatiques rigoureuses, il peut arriver qu’une condensation se forme sur les parois externes de l’appareil.
Ce n’est en aucun cas un signe de panne et cela disparaît tout seul lors de conditions climatiques plus douces.
16 Service après-vente
Ne s’adresser au service après-vente que si l’on n’est pas en mesure de détecter la cause d’une panne éventuelle, même après avoir observé les causes possibles ou si l’on ne dispose pas des moyens nécessaires pour la réparer.
À ce propos, lire absolument les instructions : voir chapitre "Détection de pannes/origines/remèdes ………. "
La carte de garantie incluse ou la liste des points de service après-vente ci-jointe mentionne le nom de l’entreprise compétente assurant le service après-vente de votre appareil. Si plusieurs points de service sont mentionnés, adressez-vous à l’établissement le plus proche.
Si votre appareil ne s’accompagne d’aucune liste de points de service, adressez-vous au besoin à votre revendeur.
 Pour obtenir une assistance rapide, nous vous recommandons d’avoir sous les yeux les données importantes d’identification de votre appareil lors de l’appel :
•Marque de l’appareil ;
•Modèle / type ; Marque de l’appareil ;
•Genre de panne ;
•Date d’achat ;
•Nom du revendeur.
17 Garantie
Prendre connaissance des conditions générales de la garantie et de sa durée figurant sur la carte de garantie.
Si la carte de garantie n’est pas jointe a l’appareil , s’adresser au revendeur.
18 Détection des pannes/origines/remèdes
a)Aucun fonctionnement (l’appareil ne marche pas)
Vérifiez:
•si la fiche de l'appareil est en ordre et est bien insérée dans la prise murale;
•s'il y a du courant dans la prise murale;
(vérifiez éventuellement en y branchant un petit appareil, par ex. un mixer à main, un séchoir à cheveux, etc.)
•si l'appareil est allumé (commande de température en position diverse de zéro).
 Attention !
En cas de panne ou de chute de tension, l’isolation des parois de l’appareil permet une durée de conservation de 10-12 heures dès l’apparition de l’anomalie.
Dans les appareils possédant une isolation plus importante, cette durée est prolongée. Demandez à votre revendeur la "durée de conservation en cas de panne" de votre appareil.
En cas de panne prolongée, les aliments congelés commencent à se décongeler dans le congélateur. Il faut alors prendre rapidement les mesures nécessaires pour trouver la panne et mettre éventuellement les aliments congelés dans un autre congélateur (éventuellement chez les voisins, etc.).
b)L’appareil ne refroidit pas assez
Le |
processus |
de |
congélation |
dure |
trop longtemps |
|
|
|
|
Le compresseur s’enclenche trop souvent |
|
|||
Causes et remèdes possibles : |
|
|
||
• Avez-vous |
bien |
laissé |
l’appareil |
immobile |
à sa place définitive pendant 2 heures avant de le brancher (stabilisation du circuit de réfrigération) ? Voir : « Mise en marche de l’appareil ».
Si ce n’est pas le cas : enlevez la fiche de la prise, congélateur fermé, soulevez le congélateur sur le côté quelque temps et laissez-le reposer. Après 2 heures, remettez la fiche dans la prise. Pendant ce temps, et pendant au moins 12 heures, ou jusqu’à ce que le voyant rouge ne s’éteigne, ne plus ouvrir le congélateur.
•La fiche de l’appareil est-elle en bon état et mise correctement dans la prise ?
•La prise reçoit-elle du courant ?
(Le cas échéant, vérifier en branchant un petit appareil : mixer, etc.).
•Le couvercle de l’appareil ne se ferme pas correctement. Le joint n’est pas enfoncé totalement.
Essai : glisser une feuille de papier entre la garniture et le congélateur et fermer le couvercle. Le papier doit être retiré en tirant dessus avec peine. Si le papier s’enlève sans résistance, il faut en informer le service après-vente.
© 0512 fiCONS |
6 |
|

Français |
Mode d'emploi Congélateur Coffre |
F |
•Formation importante de glace sur les parois intérieures (voir : "Nettoyage et entretien ").
•L’appareil a été exposé au soleil ou mis trop près d’une source de chaleur (four, chauffage, etc.).
 Protéger l’appareil des rayons directs du soleil / Contrôler la distance entre la source de chaleur / Mettre une plaque isolante entre l’appareil et la source de chaleur (voir : « Choix de l’emplacement »).
•Quantité d’aliments frais introduits disproportionnée à la capacité de congélation de votre appareil (plaquette d’homologationx kg/24h) ou introduction de mets trop chauds
(voir : "8 Congélation / Conservation des aliments frais ").
Le fabricant travaille en permanence à l’évolution de ses produits. Des modifications dans le for, l’équipement et la technique restant réservé. Nous faisons appel à votre compréhension
© 0512 fiCONS |
7 |
|

TABLEAU DE CONSERVATION |
|
Congélateur |
F |
||||||
|
|
|
|
|
|
|
|
|
|
|
|
|
|
|
|
-18°C < |
|
|
|
Aliments frais |
|
Emballage approprié |
|
Durée appr. de conservation (mois) |
|||||
|
|
2-3 |
4 |
6 |
|
8 |
10-12 |
||
|
|
|
|
|
|||||
|
|
|
|
|
|
|
|
|
|
Viande hachée |
> |
Sachet de congélation en polyéthylène |
> |
z |
|
|
|
|
|
Saucisses |
> |
Sachet de congélation en polyéthylène |
> |
z |
|
|
|
|
|
|
|
|
|
|
|
|
|
|
|
Petits poissons |
> |
Sachet de congélation en polyéthylène |
> |
z |
|
|
|
|
|
|
|
|
|
|
|
|
|
|
|
Coeur / foie |
> |
Sachet de congélation en polyéthylène |
> |
z |
|
|
|
|
|
Crème glacée |
> |
Récipient en plastique |
> |
z |
|
|
|
|
|
Fruits |
> |
Récipient en plastique |
> |
z |
|
|
|
|
|
|
|
|
|
|
|
|
|
|
|
Fromage |
> |
Sachet de congélation en polyéthylène |
> |
|
z |
|
|
|
|
|
|
|
|
|
|
|
|
|
|
Pain |
> |
Sachet de congélation en polyéthylène |
> |
|
z |
|
|
|
|
Gros poissons |
> |
Sachet de congélation en polyéthylène |
> |
|
z |
|
|
|
|
Gâteau / biscuits |
> |
Récipient en verre |
> |
|
z |
|
|
|
|
|
|
|
|
|
|
|
|
|
|
Porc |
> |
Papier d'aluminium |
> |
|
|
z |
|
|
|
|
|
|
|
|
|
|
|
|
|
Boeuf |
> |
Papier d'aluminium |
> |
|
|
z |
|
|
|
Lièvre |
> |
Papier d'aluminium |
> |
|
|
z |
|
|
|
Agneau |
> |
Papier d'aluminium |
> |
|
|
z |
|
|
|
|
|
|
|
|
|
|
|
|
|
Champignons |
> |
Sachet de congélation en polyéthylène |
> |
|
|
z |
|
|
|
|
|
|
|
|
|
|
|
|
|
Asperges |
> |
Sachet de congélation en polyéthylène |
> |
|
|
z |
|
|
|
Légumes (coupés) |
> |
Sachet de congélation en polyéthylène |
> |
|
|
z |
|
|
|
Fraises |
> |
Sachet de congélation en polyéthylène |
> |
|
|
z |
|
|
|
Tartes |
> |
Papier d'aluminium |
> |
|
|
z |
|
|
|
|
|
|
|
|
|
|
|
|
|
|
|
|
|
|
|
|
|
|
|
Poulet |
> |
Papier d'aluminium |
> |
|
|
|
|
z |
|
Dindonneau |
> |
Papier d'aluminium |
> |
|
|
|
|
z |
|
Canard |
> |
Papier d'aluminium |
> |
|
|
|
|
z |
|
Oie |
> |
Papier d'aluminium |
> |
|
|
|
|
z |
|
|
|
|
|
|
|
|
|
|
|
|
|
|
|
|
|
|
|
|
|
Chou-fleur |
> |
Sachet de congélation en polyéthylène |
> |
|
|
|
|
|
z |
Haricots |
> |
Sachet de congélation en polyéthylène |
> |
|
|
|
|
|
z |
Peperoni |
> |
Sachet de congélation en polyéthylène |
> |
|
|
|
|
|
z |
|
|
|
|
|
|
|
|
|
|
Conserves |
> |
Récipient en verre |
> |
|
|
|
|
|
z |
|
|
|
|
|
|
|
|
|
|
Fruits en conserve |
> |
Récipient en verre |
> |
|
|
|
|
|
z |
Esquimaux |
> |
Papier d'aluminium |
> |
|
|
|
|
|
z |
8
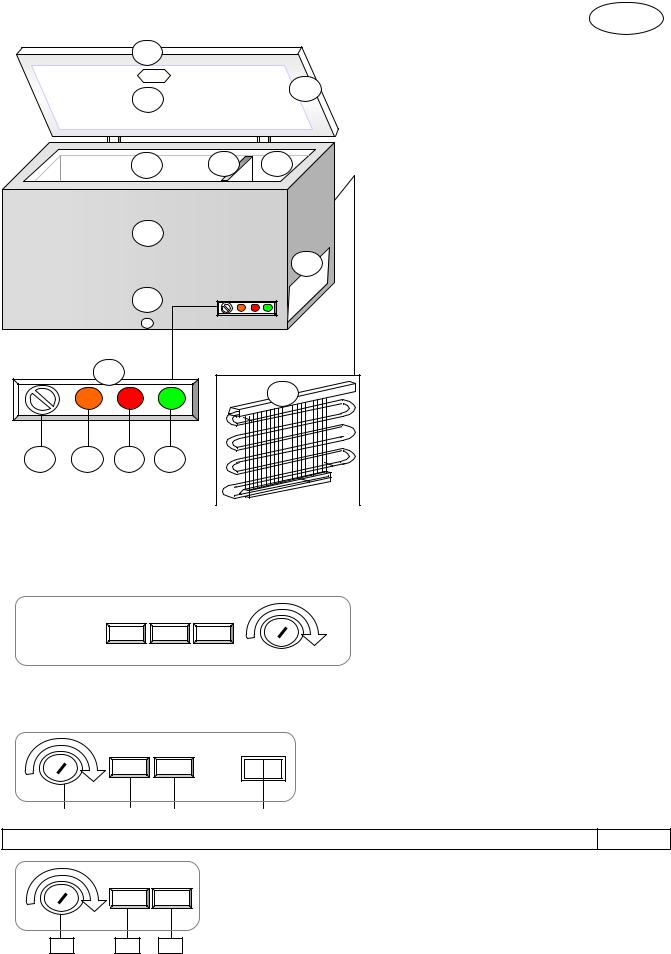
Français |
|
|
|
Composants |
F |
|
a |
|
|
|
a |
Couvercle du congélateur |
|
|
|
|
b |
Garniture du couvercle (join) |
|
|
|
|
|
|
|
||
c |
|
|
b |
c |
Eclairage intérieur |
* |
|
|
|
|
|
||
|
|
|
|
|
|
|
|
|
|
|
d |
Compartiment de conservation |
|
|
|
|
|
e |
Cloison |
* |
d |
e |
f |
|
f |
Comp. de pré-congélation |
* |
|
|
|
|
|||
|
|
|
|
g |
Boîtier |
|
|
|
|
|
h |
Bouchent (écouler l'eau) |
* |
g |
|
|
|
i |
Panneau de commande |
|
|
|
|
k |
k |
Grille de ventilation |
|
|
|
|
|
|
|
|
h
i
l |
m n |
p |
|
l |
|
|
m |
||
|
|
n |
|
|
p |
o |
|
o |
p |
||
|
|||
|
|
||
|
|
* |
Régulateur de température |
* thermostat |
Touche super-congélation |
* jaune |
ALARM |
* rouge |
CONTROL (en marche) |
* vert |
Condensateur exterieur |
* |
selon le modèl
Variantes dans les panneaux de commande |
|
|
FIG. 4 |
|||||||||||||||||||||||||
Prière de marquer les variantes concernant votre appareil. |
|
|
|
|||||||||||||||||||||||||
|
|
|
|
|
|
|
|
|
|
|
|
|
|
|
|
|
|
|
|
|
|
|
|
|
|
|
||
1ère variante avec interrupteur séparé pour fonction super-congélation |
FIG. 4a |
|||||||||||||||||||||||||||
|
|
|
|
|
|
|
|
|
|
|
|
|
|
|
|
|
|
|
|
|
|
|
|
|
|
A Régulateur de température (thermostat) |
||
|
|
|
|
|
|
|
|
|
|
|
|
|
|
|
|
|
|
|
|
|
|
|
|
|
|
B |
ALARM |
rouge |
|
|
|
|
|
|
|
|
|
|
|
|
|
|
|
|
|
|
|
|
|
|
|
|
|
|
C |
CONTROL (en marche) |
vert |
|
|
|
|
|
|
|
|
|
|
|
|
|
|
|
|
|
|
|
|
|
|
Min. |
|
|
Max.. |
D |
Indicateur de super-congélation |
jaune |
|
|
|
|
|
|
|
|
|
|
|
|
|
|
|
|
|
|
|
|
|
|
|
|
|||||
|
|
|
|
|
|
|
|
|
|
|
|
|
|
|
|
|
|
|
|
|
|
|
|
|
|
E |
Interrupteur super-congélation |
séparé |
|
|
|
E |
|
|
|
|
D |
|
|
|
C |
|
|
|
B |
|
|
A |
|
|
|
|
|||||
|
|
|
|
|
|
|
|
|
|
|
|
|
|
|
|
|
|
|
|
|
|
|
|
|
|
|
|
|
2e variante avec interrupteur de super-congélation |
|
|
FIG. 4b |
|||||||||||||||||||||||||
Min. Max..
A |
|
B |
|
C |
|
D |
A Régulateur de température (thermostat
B |
CONTROL (en marche) |
rouge |
C |
ALARM |
vert |
D |
Interrupteur super-congélation |
jaune |
3e variante sans fonction de super-congélation |
|
FIG. 4c |
|
|
A Régulateur de température (thermostat) |
||
|
B |
CONTROL (en marche) |
vert |
|
C |
ALARM |
rouge |
Min. |
Max.. |
|
|
A B C
Si les voyants sont disposés autrement sur votre appareil, ce qui suit reste valable :
voyant vert = contrôle du fonctionnement / voyant rouge = alarme / voyant jaune = fonction de super-congélation
9
.
 Loading...