


I GB D
F ES P
FRIGO-CONGELATORE DA INCASSO INTEGRALE CON PORTE TRAINATE FLUSH-MOUNTED FRIDGE-FREEZERS WITH PULL-ACTION DOORS INTEGRIERBARER KOMBI-KUEHLSCHRANK MIT AUSZUGSTUEREN
REFREIGERATEURS COMBINES A ENCASTREMENT INTEGRAL AVEC PORTES TRAÎNÉES REFIGERADOR-CONGELADOR CON EMBUTIDO COMPLETO CON PUERTAS REMOLCABLES FRIGORÍFICO-CONGELADOR DE ENCASTRE INTEGRAL COM PORTAS REBOCADAS
FCI0605-300 |

1
D
P
FCI0605-020
3 |
K
INC0704-050
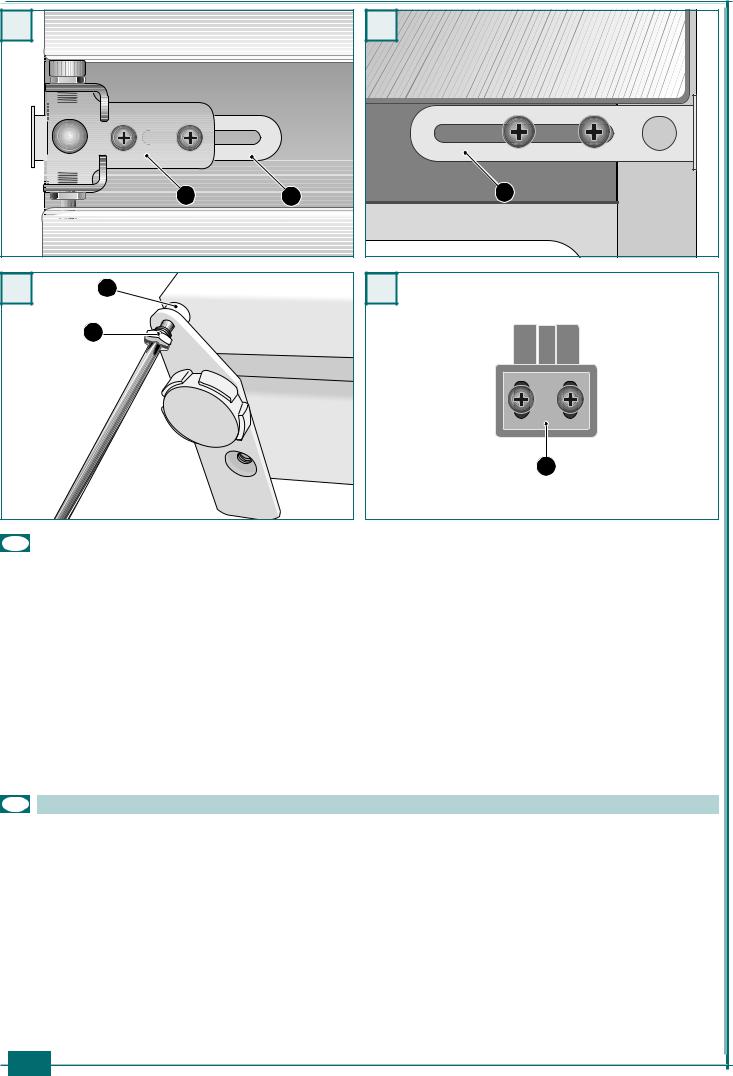
I1 REVERSIBILITÀ DELLE PORTE
•Coricare o inclinare il frigorifero sul lato schienale ponendo attenzione a non schiacciare o danneggiare il condensatore.
a) Smontare il perno cerniera inferiore P e il distanziale D. b) Liberare la porta inferiore.
c) Sfilare il coperchio cerniera H; smontare la cerniera inter-
media C e quindi liberare la porta superiore.
d) Smontare il perno superiore K e rimontarlo sul lato oppo-
sto (Fig.3).
e) Smontare il supporto centrale L. f) Rimontare la porta superiore.
2 |
H
L
C
FCI0605-030
4 |
L
FCI0605-050
GB 1 REVERSING THE DOOR OPENING
•Lay or lean the refrigerator on the backside taking care not to break or damage the condenser.
a) Disassemble the lower hinge rod P and the distance spacer
D.
b) Remove the lower door.
c) Slide off hinge cover H; disassemble the middle hinge C, then release the upper door.
d) Disassemble the upper rod K and reassemble it on the opposite side (Fig.3).
e)Disassemble the central support L.
f)Reassemble the upper door.
2

D 1 WECHSELBARER TUERANSCHLAG
•Den Kühlschrank auf die Rückseite legen oder neigen und darauf achten, dass der Kondensator dabei nicht zusammengedrückt oder beschädigt wird.
a) den unteren Gelenkstift P und das Distanzstück D
entfernen.
b) Die untere Tür abmontieren.
c) Scharnierabdeckung H entfernen; Das Zwischengelenk C
und die obere Tür abmontieren.
d) Den oberen Stift K entfernen und auf der Gegenseite neu
montieren (Fig.3).
e) Die Mittelhalterung L entfernen f) Die obere Tür wieder montieren.
F1 INVERSION DU SENS D’OUVERTURE DES PORTES
•Coucher ou incliner le réfrigérateur sur le dos en faisant attention à ne pas écraser ou endommager le condenseur.
a) Démonter le pivot charnière inférieur P et l’entretoise D. b) Déclenchez la porte inférieure.
c) Déboîtez le couvre-charnière H; démonter la charnière intermédiaire C et ensuite débloquer la porte supérieure. d) Démonter le pivot supérieur K et le remonter au côté opposé
(Fig.3).
e) Démonter le support central L. f) Remonter la porte supérieure.
E1 REVERSIBILIDAD DE LAS PUERTAS
•Acostar o inclinar el frigorífico por el lado del respaldo con cuidado para no romper o dañar el condensador.
a) Desarmar el perno de la bisagra inferior P y el separdor D. b) Quitar la puerta inferior.
c) Extraer el cubre-bisagra H; Desarmar la bisagra intermedia C y luego liberar la puerta superior.
d) Desarmar el perno superior K y reensamblarlo en el lado opuesto (Fig.3).
e) Desarmar el soporte central L. f) Rearmar la puerta superior.
P1 REVERSIBILIDADE DAS PORTAS
•Deitar ou inclinar a geladeira prestando atenção para não amassar ou danificar o condensador.
a) Desmontar a dobradiça inferior P e o distanciador D. b) Deixar livre a porta inferior.
c) Tirar a tampa da dobradiça H; Desmontar a dobradiça intermediária C e soltar a porta superior.
d) Desmontar o eixo superior K e montá-lo novamente no lado oposto (Fig.3).
e) Desmontar o suporte central L.
f) Montar novamente a porta superior.
3
5 |
6 |
C |
L |
L |
FCI0605-060 |
|
7 |
D |
|
P |
FCI0605-070
8 |
S
FCI0605-080 |
FCI0605-090 |
||
|
|
|
|
|
I |
|
|
g) Rimontare la cerniera C e supporto L sul lato sinistro. (Il |
|
||
|
copricerniera H, fig.2, deve essere rimontato alla fine del- |
|
|
|
l’installazione). |
|
|
h) Rimontare il supporto centrale C sul lato destro (fig.6). |
|
||
i) |
Rimontare la porta inferiore. |
|
|
l) |
Inserire il perno P interponendo il distanziatore D. |
|
|
m) Smontare gli elementi di traino porte S e rimontarli sul lato |
|
||
|
opposto. |
|
|
GB
g) Reassemble the hinge C and the support L on the left side. (The hinge cover H, fig. 2, must be remounted at the end of installation).
h) Reassemble the middle support C on the right side (fig.6). i) Remount the lower door.
l)Insert rod P interposing the distance spacer D.
m)Disassemble the door dragging elements S and reassemble them on the opposite side.
4
 Loading...