


CDB 754D-80
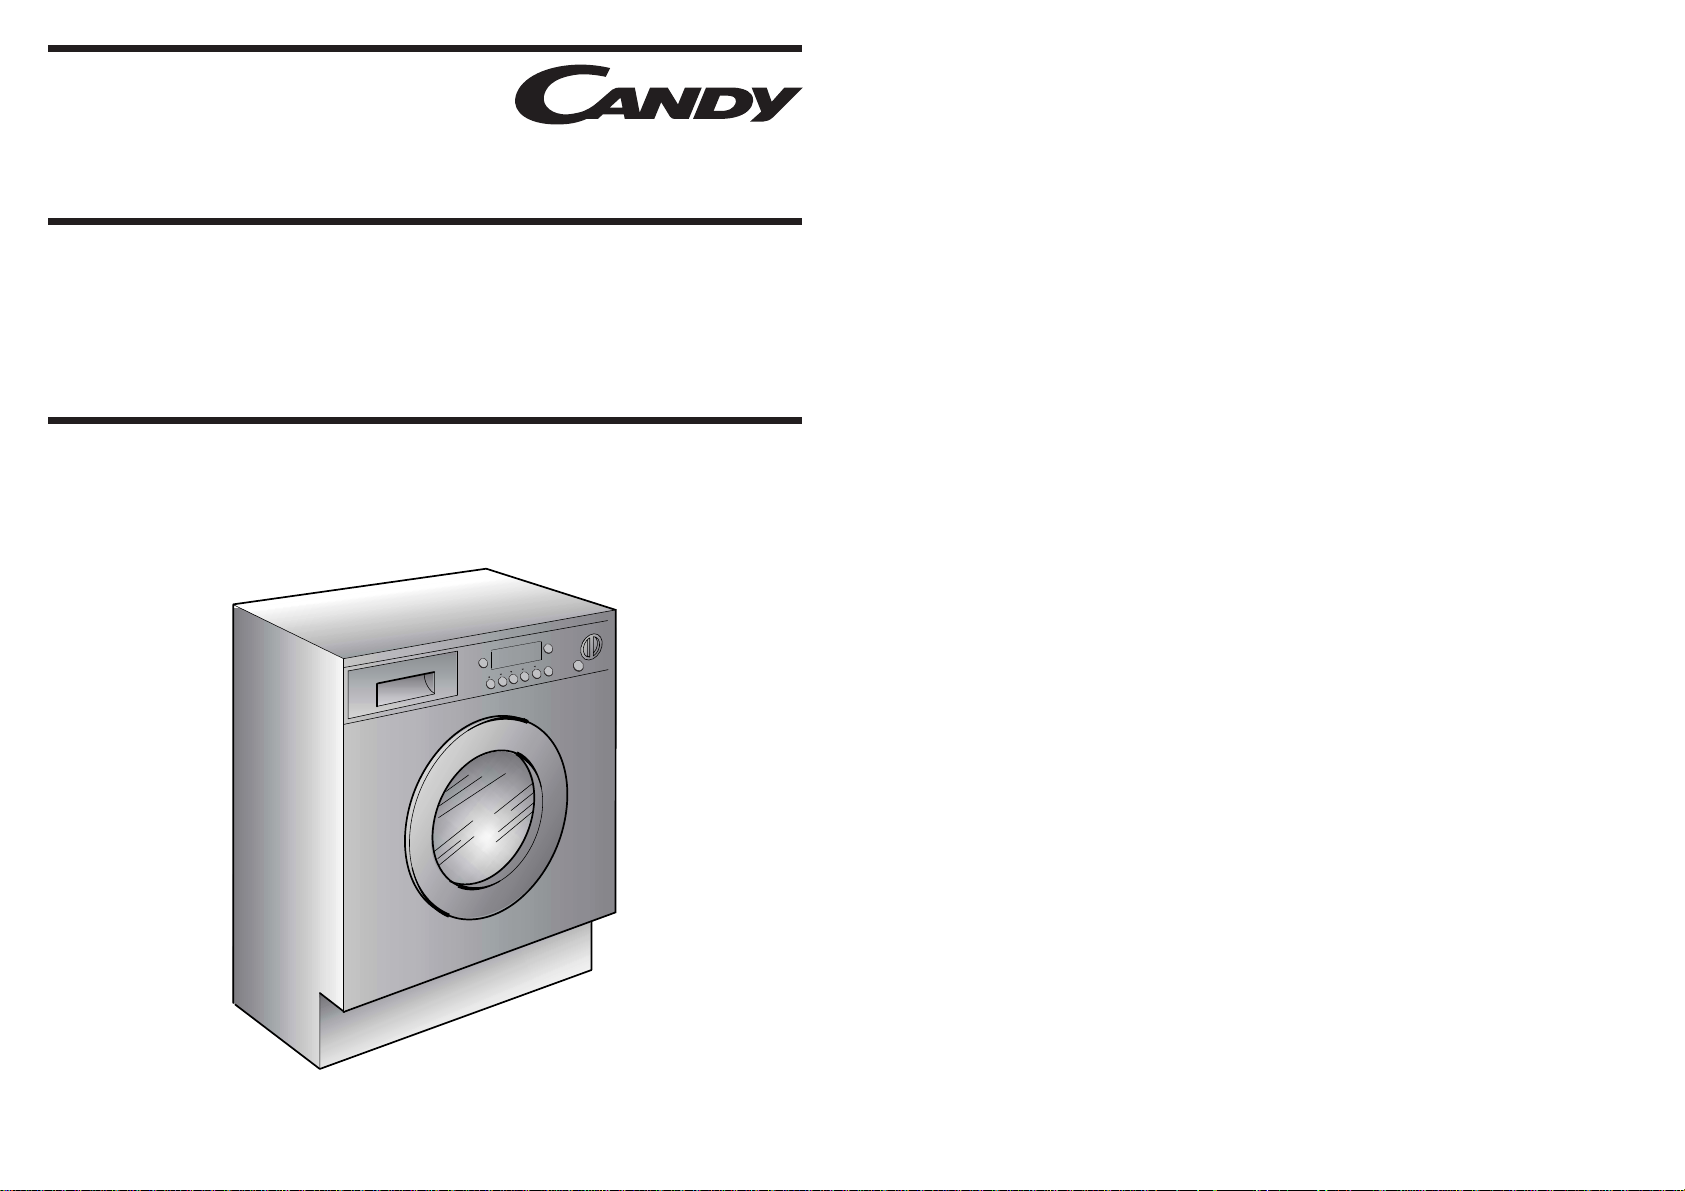
Washer Dryer Instructions for use
CDB 754 D
Contents Page
Introduction 2
General delivery notes 4
Safety notes 4
Quick start 5
Description of controls 6
Programme Table 14
Programme selector 16
Detergent drawer 19
Detergents, washing aids and amounts to use 20
Useful advice for the user 22
The main wash 23
Drying 25
Automatic washing/drying cycle 26
Drying cycle 27
Cleaning and routine maintenance 29
Investigating malfunctions 30
Technical data 32
Setting up + installation 33
BEFORE SWITCHING ON THE APPLIANCE MAKE SURE
IT IS CORRECTLY INSTALLED AND THAT THE TRANSIT
SCREWS ARE REMOVED AS SHOWN IN PAGE 33.
Introduction
Please read these instructions for use carefully and all other information
enclosed with the washing machine.
Keep all documentation in a safe place for future reference or for any
future owners.
Note: this machine is solely for domestic use.
Notes on disposal
All packaging material used is environmentally-friendly and recyclable. Please help dispose of
the packaging via environmentally-friendly means.
Your supplier or local council will be able to give you
details of current means of disposal.
Valuable materials can be salvaged from an old appliance via scrap reprocessing.
Note: pull out the mains plug from any old appliance.
Cut the power cable and dispose of it, together with the
plug.
When disposing of an old washing machine, please ensure that the door lock is rendered
inoperable to prevent children shutting themselves in the appliance.
2 3
4 5
General delivery notes
On delivery check that there is the following with the appliance:
–Instruction manual
– Certificate of guarantee
– Caps
– Inlet hose
and check that no damage has occurred during transit, and if so, call your nearest
Authorised Technical Support Service agent (see Customer Service)
Safety notes.
Note: for any cleaning or maintenance procedure for the
washing machine
A) Pull out the plug
B) Turn off the tap
C) Candy equips all its appliances with earthing. Ensure that the mains supply is earthed,
and if it is not, seek assistance from a qualified person.
D) Do not touch the appliance when hands or feet are wet or damp. Do not use the
appliance with bare feet.
E) The use of adapters, multiple connectors and/or extensions is not recommended.
Note:
water temperature can reach 90°C during the wash cycle
F) Check there is no water left in the drum before opening the door.
G) This appliance is not intended for use by persons (including children) with reduced
physical, sensory or mental capabilities, or lack of experience and knowledge, unless
they have been given supervision or instruction concerning use of the appliance by a
person responsible for their safety.
Children should be supervised to ensure that they do not play with the appliance.
H) Do not pull the power cable or the appliance itself to remove the plug from the socket.
I) The appliance must not be exposed to weather conditions (rain, direct sun, etc...)
L) When moving the appliance never lift it by the controls or by the detergent drawer.
When in transit never rest the door against the trolley or transport the appliance without
the polystyrene base.
DRYING
If you would like the drying cycle to begin automatically after
washing, select the programme required using the Drying
Selection button.
Otherwise it is possible to finish the wash and then decide on the
drying programme and load.
M) N.B!
If the appliance is installed on a carpeted floor ensure that the ventilation holes on the
base of the appliance are not obstructed.
N) If the appliance is not running properly or breaks down, switch it off, turn off the tap and do
not tamper with the appliance.
Consult only the Authorised Technical Support Service for possible repair and ask them to
use original spare parts.
Failure to comply with the above can compromise the safety of the appliance.
O) If the appliance’s power cable should ever need replacing, consult the Authorised
Technical Support Service
Quick start
Washing
- Open the door by using the button “A” (Fig. 1, page 6)
- Select laundry and put it in the machine
- Close the door
- Put detergent in the compartments as indicated in the programme guide in this instruction
manual
- Select programme
- The display will show the settings for the programme selected.
- Adjust the wash temperature if necessary.
Press additional function buttons (if required)
- Press the “Start/Pause” button (page 8)
- The programme starts.
After washing
- The word “End” will appear on the display.
- Wait for the door lock to be released
(about 2 minutes after the programme has finished).
The “Door Security” indicator light will go out.
- Switch off the washing machine by turning the
selector to “OFF” position.
- Open the door and remove the laundry.
Ensure that the machine is correctly installed in line with the instructions found on page 33.
“KG DETECTOR”
(Function active only on Cotton and Synthetics programmes)
Through every wash phase “KG DETECTOR” allows to monitor information on
the wash load in the drum.
So, as soon as the “KG DETECTOR” is set in motion, in the first 4 minutes of the wash, it:
- adjusts the amount of water required
- determines the length of the wash cycle
- controls rinsing
according to the type of fabric selected to be washed it:
- adjusts the rhythm of drum rotation for the type of fabric being washed
- recognises the presence of lather, increasing, if necessary, the amount of water during
rinsing
- adjusts the spin speed according to the load, thus avoiding any imbalance.
In this way “KG DETECTOR” is able to decide, by itself, the most suitable programme for
each individual wash from the hundreds of possible wash combinations.
“KG DETECTOR” meets the need for easy use by permitting a simplified programme
selection. In fact, the user need only tell the machine the type of fabric in the drum and the
degree of soiling, to obtain a perfect wash with the highest level of drying possible with a spin
which really cares for your clothes.
6
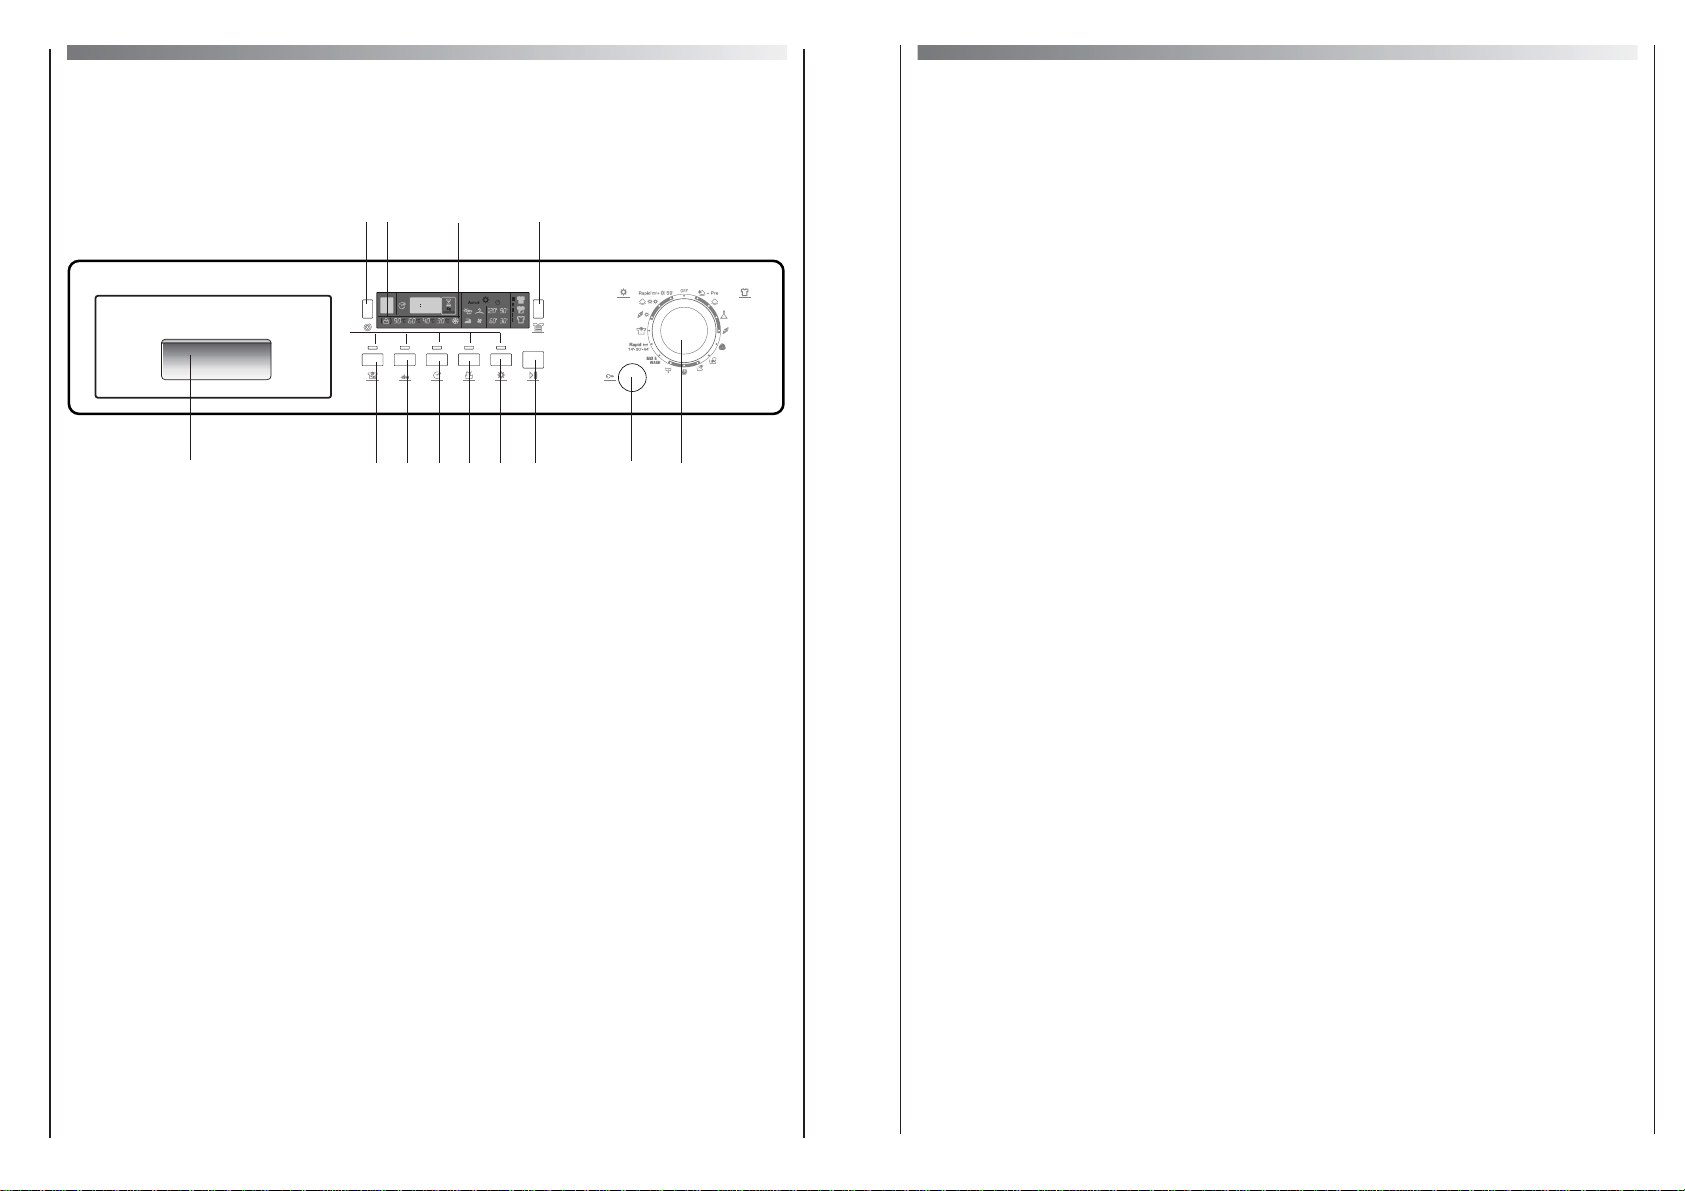
Description of controls
Door open button A
"Door Security" indicator light B
"Start/Pause" button C
"Stain Vanish" button D
"Allergy Care" button E
"Delay Start" button F
"Temperature Selection" button G
"Drying Selection" button H
"Spin Speed" button I
Digital display L
Stain Level button M
Programme selector with “OFF” position N
Buttons indicator light O
Detergent drawer P
7
P
L
O
I
M
D
E
FHC AN
B
G
“START/PAUSE” button
Press to start the selected cycle .
Changing the settings after the programmes has started (PAUSE)
Press and hold the “START/PAUSE” button for about 2 seconds, the flashing lights on the
options buttons and time remaining indicator will show that the machine has been paused,
adjust as required and press the “START/PAUSE” button again to cancel the flashing lights.
If you wish to add or remove items during washing, wait 2 minutes until the safety device
unlocks the door.
When you have carried out the manoeuvre, close the door, press "Start/Pause" button and
the appliance will continue working where it left off.
CANCELLING THE PROGRAMME
To cancel the programme, set the selector to the OFF position.
Select a different programme.
Re-set the programme selector to the OFF position.
9
“STAIN VANISH” Button
By pressing this button, which can only be activated in the Cotton cycles, the sensors in the
new system come into operation. They affect both the selected temperature, keeping it at a
constant level throughout the wash cycle, and the mechanical function of the drum.
The drum is made to turn at two different speeds at crucial moments. When the detergent
enters the garments, the drum rotates in such a way that the detergent is distributed in a
uniform manner; during the wash and rinse procedures, however, the speed increases in
order to maximise the cleaning action. Thanks to this special system, the efficiency of the
wash procedure is improved WITHOUT ANY INCREASE IN THE LENGTH OF THE
PROGRAM.
D
The option buttons should be selected before pressing
the "Start/Pause" button.
“ALLERGY CARE” button
By pressing this button you can activate a special new wash cycle in the Cotton and Mixed
Fabrics programs, thanks to the new Sensor System. This option treats with care the fibres of
garments and the delicate skin of those who wear them.
The load is washed in a much larger quantity of water and this, together with the new combined
action of the drum rotation cycles, where water is filled and emptied, will give you garments which
have been cleaned and rinsed to perfection. The amount of water in the wash is increased so that
the detergent dissolves perfectly , ensuring an efficient cleaning action. The amount of water is also
increased during the rinse procedure so as to remove all traces of detergent from the fibres. This
function has been specifically designed for people with delicate and sensitive skin, for whom even
a very small amount of detergent can cause irritation or allergy .
You are advised to also use this function for children’s clothing and for delicate fabrics in general,
or when washing garments made of towelling, where the fibres tend to absorb a greater quantity of
detergent. To ensure the best performance for your wash, this function is always activated on the
Delicates and Woollens/Hand Wash programs.
E
F
“DELAY START” button
This button allows you to pre-programme the wash cycle to delay the start of the cycle for up
to 24 hours.
To delay the start use the following procedure:
Set the required programme.
Press the button once to activate it (h00 appears on the display) and then press it again to set
a 1 hour delay (h01 appears on the display); the pre-set delay increases by 1 hour each time
the button is pressed, until h24 appears on the display, at which point pressing the button
again will reset the delay start to zero.
Confirm by pressing the “START/PAUSE” button (the light on the display starts to flash). The
countdown will begin and when it has finished the programme will start automatically.
8
“DOOR SECURITY” indicator light
The “Door Security” indicator light is illuminated when the door is fully closed and the machine is ON.
When "Start/Pause" is pressed on the machine with the door closed the indicator will flash
momentarily and then illuminate.
If the door is not closed the indicator will continue to flash.
Aspecial safety device prevents the door from being opened immediately after the end of the cycle.
Wait for 2 minutes after the wash cycle has finished and the “Door Security” light has gone out
before opening the door. At the end of the cycle turn the programme selector to "OFF" .
B
NOTE:
few seconds after the start the wash cycle will begin.
During the first 4 minutes of the wash cycle, the kG
DETECTOR (active only on cotton and synthetics
programmes) will weigh the clothes and update the
maximum wash time remaining on the display every five
seconds until the weight has been determined. While this
function is operating the “kG DETECTOR” indicator is on.
C
Door open button
Press the button to open the door.
Important:
a special safety device prevents the door from opening at the end of the wash/spin cycle. at
the end of the spin phase wait up to 2 minutes before opening the door.
A
11
“SPIN SPEED” button
The spin cycle is very important to remove as much water as possible from the laundry without
damaging the fabrics. You can adjust the spin speed of the machine to suit your needs.
By pressing this button, it is possible to reduce the maximum speed, and if you wish, the spin cycle
can be cancelled. To reactivate the spin cycle press the button until you reach the spin speed you
would like to set. To prevent damage to the fabrics, it is not possible to increase the speed over
that which is automatically suitable during the selection of the program.
It is possible to modify the spin speed without to pausing the machine.
Note:
The machine is fitted with a special electronic device, which prevents
the spin cycle should the load be unbalanced. This reduces the noise
and vibration in the machine and so prolongs the life of your machine.
I
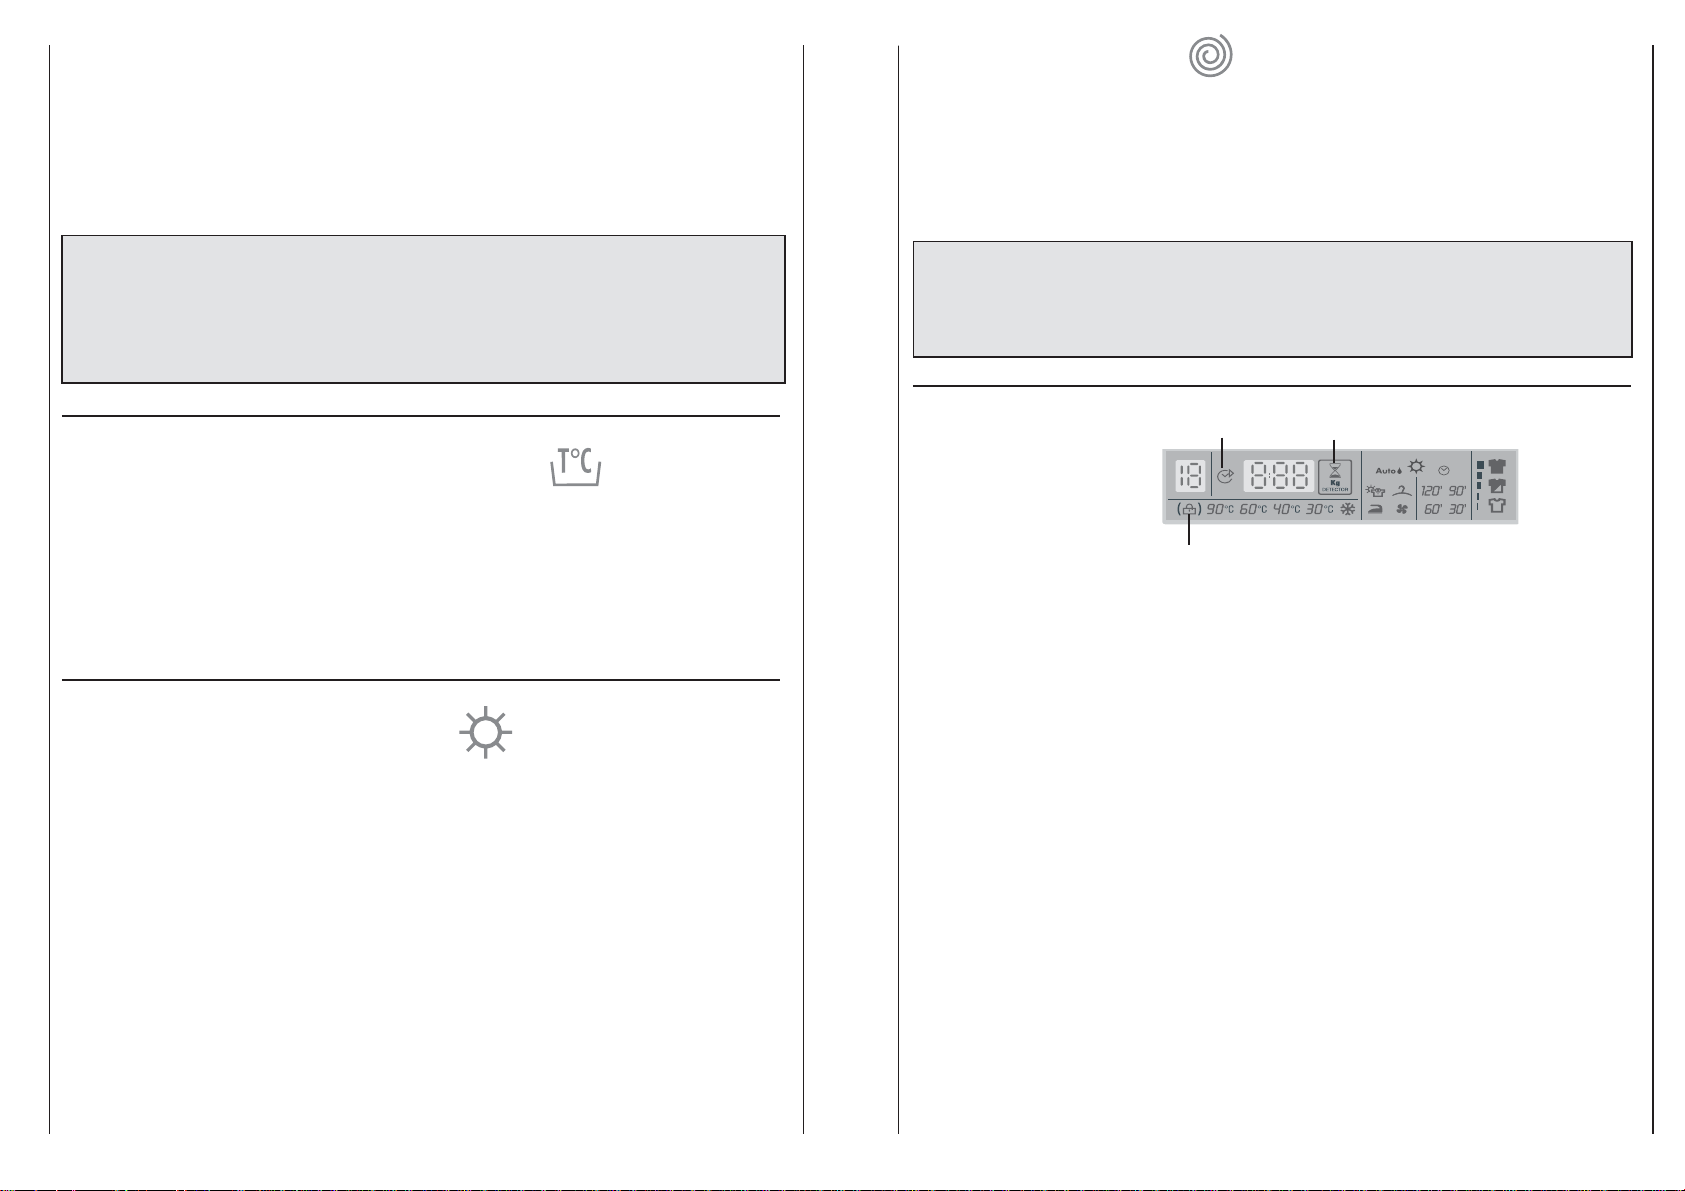
“DIGITAL” Display
The display’s indicator system allows you to be constantly informed about the status of the machine:
1) WASH TEMPERATURE
When a programme is selected the relevant indicator will light up to show the recommended
wash temperature. The Temperature button can be used to decrease or increase the
temperature of your chosen wash cycle. Each time the button is pressed, the new
temperature level is shown on the Wash Temperature Indicator.
2) DOOR LIGHT
Once the START/PAUSE button has been pressed the light first flashes then stops flashing
and remains on until the end of the wash. 2 minutes after the end of the wash the light goes
off to show that the door can now be opened.
3) SPIN SPEED
Once the programme has been selected, the maximum spin speed allowed for that
programme appears on the display. Pressing the spin button will reduce the speed by 100
rpm each time the button is pressed. The minimum speed allowed is 400 rpm, or it is
possible to omit the spin by pressing the spin button repeatedly.
4) DELAY STARTLIGHT
This flashes when delay start has been set.
5) CYCLE DURATION
When a programme is selected the display automatically shows the cycle duration, which
can vary, depending on the options selected. Once the programme has started you will be
kept informed constantly of the time remaining to the end of the wash.
If is selected the automatic washing/drying, at the end of the wash phase, the drying time
remaining to the end will be shown on the display.
L
Warning: If there is any break in the power supply while
the machine is operating, a special memory stores the
selected programme and, when the power is restored, it
continues where it left off.
10
It is possible to cancel the delay start by taking the following action:
Press and hold the button for 5 seconds until the display will show the settings for the
programme selected.
At this stage it is possible to start the programme previously selected by pressing the
“START/PAUSE” button or to cancel the process by setting the selector to the OFF position
and then selecting another programme.
“TEMPERATURE SELECTION” button
When a programme is selected the relevant indicator will light up to show the recommended
wash temperature.
The Temperature button can be used to decrease or increase the temperature of your chosen
wash cycle.
Each time the button is pressed, the new temperature level is shown on the Wash
Temperature Indicator .
G
“DRYING SELECTION” button
With the programme selector not in the OFF position, press the button to select the required
drying programme; an indicator will light to display the drying result selected each time you
press the button.
To cancel the selection before the start of a drying programme, press the button repeatedly
until the indicators go out or return the programme selector to the OFF position.
To cancel the cycle during the drying phase, hold the button down for 2 seconds until the
cooling indicator lights up; given the high temperature inside the drum, we recommend that
you allow the dryer to complete the cool down period before returning the programme
selector to the OFF position and removing the laundry.
H
{
1
2
4 6
{
5
{
7
8
{
3
{
6) KG DETECTOR indicator
Available on Cotton and Synthetic cycles, during the first 4 minutes of the cycle the intelligent
sensor will weigh the laundry and adjust the cycle time, water and electricity consumption
accordingly.
7) DRYING PROGRAMME INDICATORS
The indicators display the type of the drying programme:
Candy washer dryers incorporate an Automatic Sensor Drying function which takes the
guesswork out of setting the drying time. You simply select the degree of dryness you
require and the dryer automatically switches off when that level is reached. For added
flexibility there are 3 Sensor Drying levels to choose from:
= Extra dry programme
= Cupboard dry programme
= Iron dry programme
USEFUL TIPS:
Once the programme option has been selected, press the Start Pause button. The appliance
will then calculate the time to the end of the selected programme based upon a full dry load.
During the cycle the appliance will update the time to suit the actual load size and dampness
of the fabrics.
T
imed programmes:
Alternatively you may select a pre-determined time for the drying cycle. The Timed Drying
programmes may be set to the following times:
120 minutes – 90 minutes – 60 minutes – 30 minutes:
Cool down phase
:
A 10 minute cool down phase occurs at the end of each drying cycle to ensure clothes are
not too hot to touch when the cycle finishes.
8) STAIN LEVEL
When a programme is selected the relevant indicator will light up to show the minimum
possible Stain Level.
Selecting a greater Stain Level using the special button will cause the corresponding indicator to
light up.
12
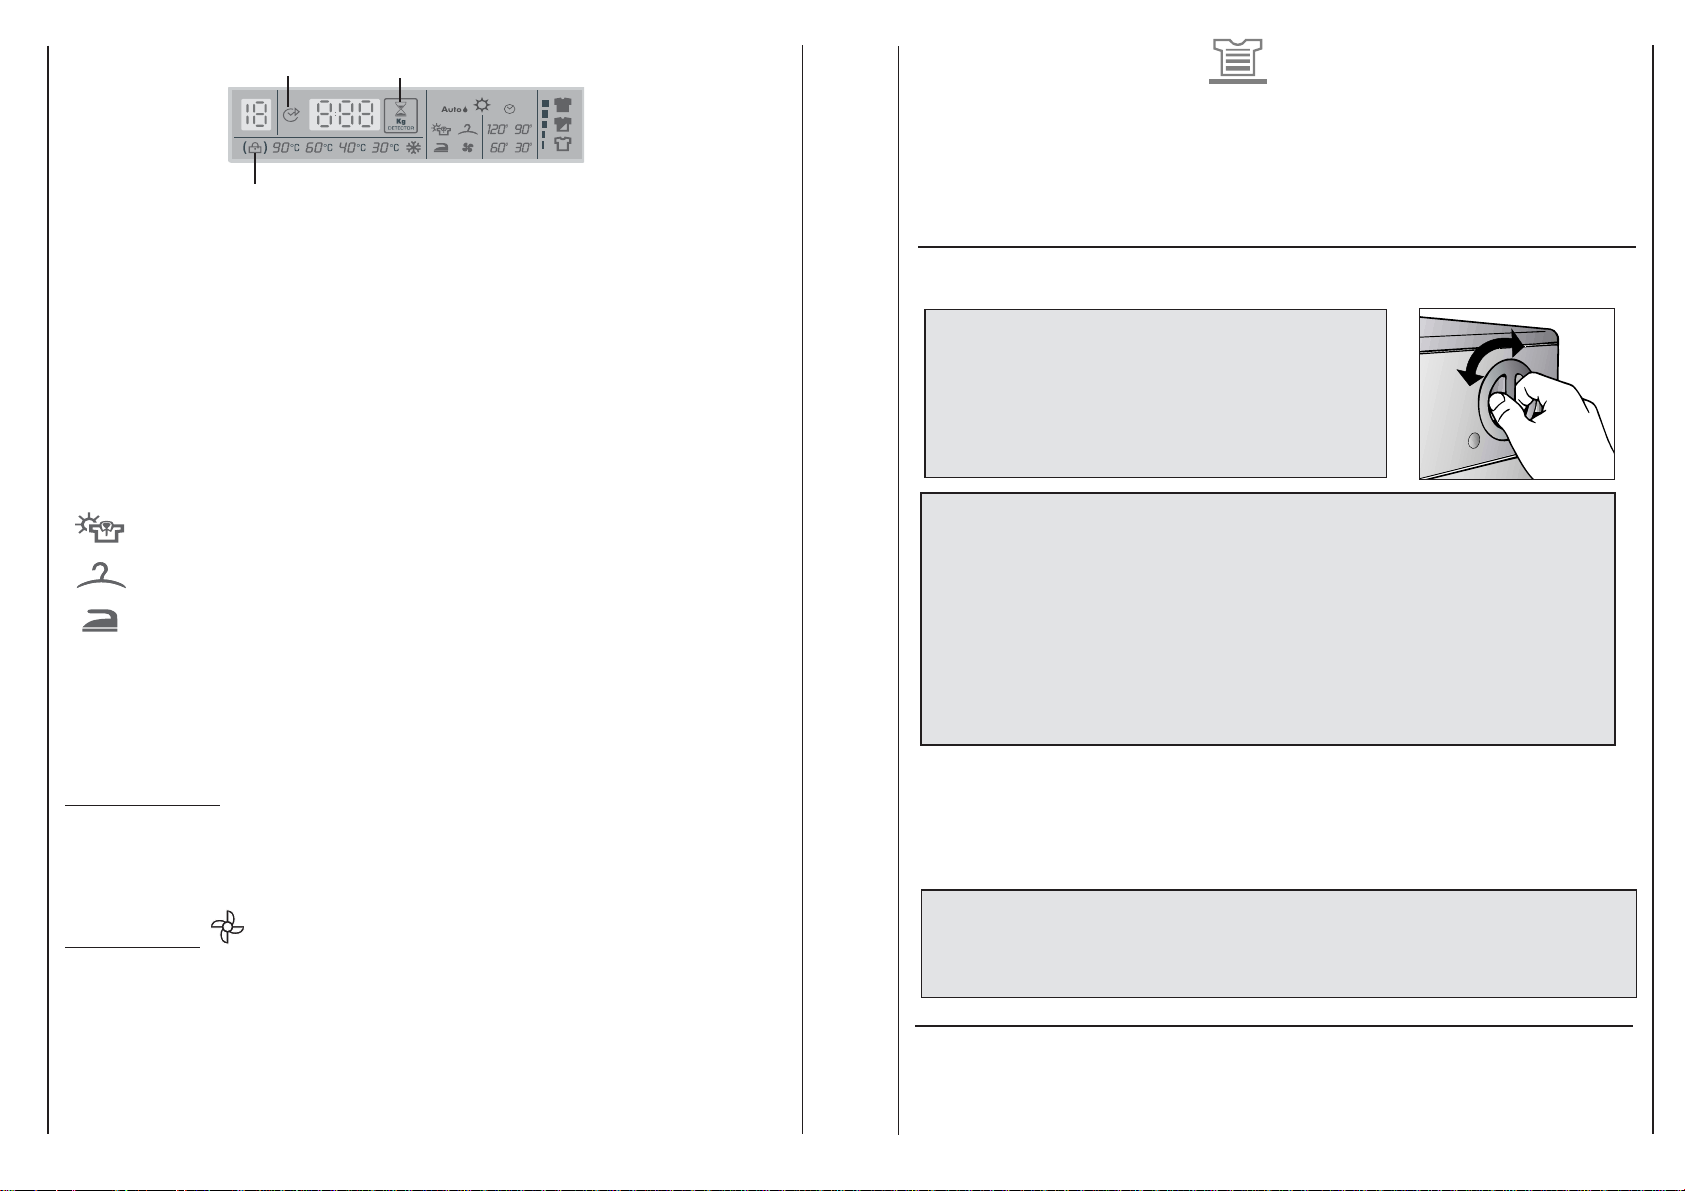
PROGRAMME selector with "OFF" position
When the programme selector is turned
the display lights up to show the settings
for the programme selected.
N.B. To switch the machine off, turn the
programme selector to the “OFF”
position.
Press the "Start/Pause" button to start the selected cycle.
Once a programme is selected the programme selector remains stationary on the selected
programme till cycle ends.
Switch off the washing machine by turning the selector to "OFF".
Note:
The programme selector must be returned to the "OFF" position
at the end of each cycle or when starting a subsequent wash
cycle prior to the next programme being selected and started.
N
Buttons indicator light
These light up when the relevant buttons are pressed.
If an option is selected that is not compatible with the selected programme then the light on
the button first flashes and then goes off.
O
“STAIN LEVEL” button
By selecting this button (active only on COTTON and MIXED FIBRES programmes) there is
a choice of 3 levels of wash intensity, depending on how much the fabrics are soiled.
Once the programme has been selected the indicator light will automatically show the
minimum level required for that programme. Pressing the button increases the duration of the
wash cycle, and adjusts the wash settings accordingly. For example: Using this button on
the Rapid Wash cycle will enable you to select either a 14, 30 or 44 minute wash cycle.
M
Today, most detergents have been improved to wash
efficiently at lower temperatures, therefore we have set the
default temperature settings of each programme to a lower
level, saving electricity and reducing the carbon footprint of
your machine.
You can select an high temperature by pressing the
temperature button.
Please refer to the programme guide for the maximum
temperature to which each programme can be set.
13
{
1
2
4 6
{
5
{
7
8
{
3
{
 Loading...