


|
|
|
|
|
|
|
|
|
|
|
SERIE Z / Z SERIES / SÉRIE Z / BAUREIHE Z / SERIE Z |
Documentazione |
||||
|
|
|
|
|
|
|
|
|
|
|
||||||
|
|
|
|
|
|
|
|
|
|
|
||||||
|
|
|
|
|
|
|
|
|
|
|
|
|
|
|||
|
|
|
|
|
|
|
|
|
|
|
|
|
|
|
Tecnica |
|
|
|
|
|
|
|
|
|
|
|
|
|
QUADRO COMANDO |
27 |
|
||
|
|
|
|
|
|
|
|
|
|
|
|
CONTROL PANEL |
|
|||
|
|
|
|
|
|
|
|
|
|
|
|
ARMOIRE DE COMMANDE |
|
rev. 2.0 |
||
|
|
|
|
|
|
|
|
|
|
|
|
SCHALTTAFEL |
|
© CAME 05/99 |
||
|
|
|
|
|
|
|
|
|
|
|
|
CUADRO DE MANDO |
|
31927 |
|
|
|
|
|
|
|
|
|
|
|
|
|
|
|
|
|
|
|
|
|
|
|
|
|
|
|
|
|
|
|
|
|
|
|
|
ZA2
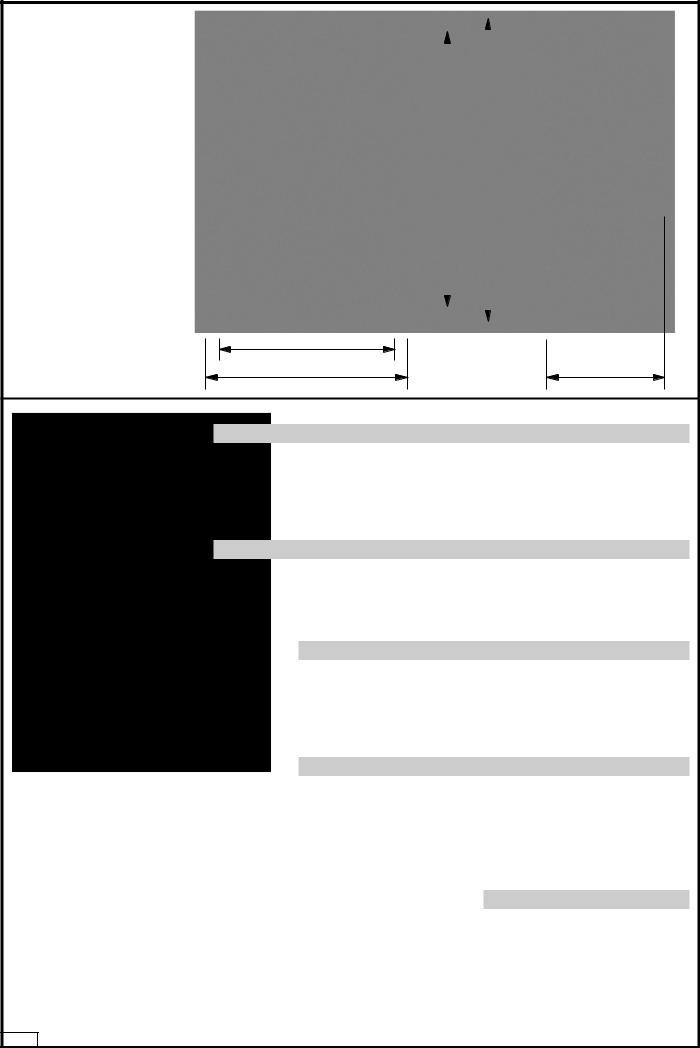
Misure d’ingombro (* misure per fissaggio quadro)
Overall dimensions (* hole sizes for attachment of control panel)
Mesures d’encombrements (* mesures pour la fixation de l’armoire de commande)
Abmessungen (* Maße für SteuergerätBefestigung)
Medidas
(* medidas para fijar el cuadro de mando)
- 2 -
|
|
|
|
264* |
|
290 |
|
|
|
|
|
|
|
|
|
|
|
|
|
174* |
|
197 |
110 |
ITALIANO
BLOK - Dispositivo di sicurezza
1)Fissare all’interno della scatola in corrispondenza dei fori d’aggancio, la base del BLOK
2)Aprire il foro predisposto nel coperchio e fissare il particolare 1
3)Procedere al collegamento elettrico
ENGLISH
BLOK - Safety system
1)Mount the BLOK mounting structure on the inside of the housing (preset holes)
2)Open the hole which has been provided in the cover and mount the BLOK unit 1
3)Connect the electric wires to the BLOK unit
FRANÇAIS
BLOK - Dispositif de sécurité
1)Fixer la base du BLOK à l’intérieur du boîtier, sur les deux trous d’enclenchement
2)Percer le trou prévu dans le couvercle et fixer l’élément 1
3)Effectuer le branchement électrique
DEUTSCH
BLOK - Sicherheitsvorrichtung
1)Das BLOK-Unterteil im Innern des Gehäuses in Übereinstimmung mit den Befestigungsbohrungen befestigen
2)Die am Dekel vorgesehene Bohrung öffnen und das Teil 1 befestigen
3)Die elektrischen Anschlüsse ausführen
ESPAÑOL
BLOK - Dispositivo de seguridad
1) Fijar en el interior de la caja la base del BLOK, donde hay dos agujeros de enganche
2) Abrir el agujero dispuesto en la tapa y fijar el detalle 1
3) Efectuar la conexión eléctrica
ITALIANO
, vedi pagina 12
- 3 -
ENGLISH
, see page 12
- 4 -
FRANÇAIS
, voir page 12
- 5 -
 Loading...