


A20® AVIATION HEADSET
Owner’s Guide

SAFETY INFORMATION
NOTE: This equipment has been tested and found to comply with the limits for a Class B digital device, pursuant to Part 15 of the FCC Rules. These limits are designed to provide reasonable protection against harmful interference in a residential installation. This equipment generates, uses, and can radiate radio frequency energy and, if not installed and used in accordance with the instructions, may cause harmful interference to radio communications. However, there is no guarantee that interference will not occur in a particular installation. If this equipment does cause harmful interference to radio or television reception, which can be determined by turning this equipment off and on, the user is encouraged to try to correct the interference by one or more of the following measures:
–Re-orient or relocate the receiving antenna.
–Increase the separation between this equipment and receiver.
–Connect this equipment into an outlet on a circuit different from that to which the receiver is connected.
–Consult Bose or an experienced radio/TV technician for help.
Changes or modifications not expressly approved by Bose Corporation could void the user’s authority to operate this equipment.
Operation is subject to the following two conditions: (1) This device may not cause harmful interference, and (2) this device must accept any interference received, including interference that may cause undesired operation.
This device complies with FCC and Industry Canada RF radiation exposure limits for general population. It must not be collocated or operating in conjunction with any other antenna or transmitter.
Bose Corporation hereby declares that this product is in compliance with the essential requirements and other relevant provisions of Directive 1999/5/EC and all other applicable EU directive requirements. The complete declaration of conformity
can be found at: www.Bose.com/compliance.
Operate this product within the temperature range of 5°F to 131°F (-15°C to 55°C) only.
Important Safety Instructions
•Please read these instructions carefully and completely before using the headset.
•Keep these instructions and make these instructions easily accessible to all users at all times. Always include these instructions when passing the headset on to third parties.
•During flight operations, do not use the headset for telephone calls.
•It is the responsibility of each aircraft operator or pilot in command to determine that any and all portable devices will be free of any interference with the navigation or communication system of the aircraft. In addition, it is their responsibility to determine the suitability of the performance of portable devices in relation to the use of the Bose® A20® Aviation Headset.
•The headset is capable of producing sound pressure levels exceeding 85dB(A). In many countries 85dB(A) is the maximum legally permissible level for continuous noise exposure during the working day. Exposure to sounds of higher volume levels or longer durations can permanently damage your hearing.
•Never repair or attempt to repair a defective headset yourself. Contact Bose® Technical Support. Refer to “Contact information” on page 37.
•Do not immerse the headphones in water or any other liquid. See “Cleaning the headset” on page 23 for cleaning instructions.
•Warning: Choking
hazard. Keep the batteries away from children.
•Danger of explosion if
batteries are incorrectly replaced.
Replace only with AA alkaline batteries. Do not use any other battery chemistries.
Batteries may cause a fire or chemical burn if mishandled. Do not recharge, disassemble, heat, or incinerate. Dispose of used batteries properly.
i

CONTENTS
ADVISORIES |
1 |
|
|
Operational advisory . . . . . . . . . . . . . . . . . . . . . . . . . . . . . . . . . . . . . . . . . 1 Hearing safety . . . . . . . . . . . . . . . . . . . . . . . . . . . . . . . . . . . . . . . . . . . . . . 2 Volume control . . . . . . . . . . . . . . . . . . . . . . . . . . . . . . . . . . . . . . . . . . . . . 2 Recognizing aircraft sounds . . . . . . . . . . . . . . . . . . . . . . . . . . . . . . . . . . . 2 Using audio sources . . . . . . . . . . . . . . . . . . . . . . . . . . . . . . . . . . . . . . . . . 2 Headset earcup requirements . . . . . . . . . . . . . . . . . . . . . . . . . . . . . . . . . 3 Earcup inner screen . . . . . . . . . . . . . . . . . . . . . . . . . . . . . . . . . . . . . . . . . 3
INTRODUCTION |
4 |
What’s included . . . . . . . . . . . . . . . . . . . . . . . . . . . . . . . . . . . . . . . . . . . . . 4 What’s in the carton . . . . . . . . . . . . . . . . . . . . . . . . . . . . . . . . . . . . . . . . . 5 Control module variations . . . . . . . . . . . . . . . . . . . . . . . . . . . . . . . . . . . . . 6
Power and cable variations . . . . . . . . . . . . . . . . . . . . . . . . . . . . . . . . . . . |
7 |
PREPARING THE HEADSET FOR USE |
8 |
The microphone assembly . . . . . . . . . . . . . . . . . . . . . . . . . . . . . . . . . . . . . 8 Attaching the microphone assembly . . . . . . . . . . . . . . . . . . . . . . . . . . . . 8 The battery compartment . . . . . . . . . . . . . . . . . . . . . . . . . . . . . . . . . . . . . 9 Opening the battery compartment . . . . . . . . . . . . . . . . . . . . . . . . . . . . . . 9 The operation switches . . . . . . . . . . . . . . . . . . . . . . . . . . . . . . . . . . . . . . . 9
Inserting and replacing the batteries . . . . . . . . . . . . . . . . . . . . . . . . . . . |
10 |
Connecting the headset to the aircraft . . . . . . . . . . . . . . . . . . . . . . . . . . . |
11 |
Using the 6-pin plug . . . . . . . . . . . . . . . . . . . . . . . . . . . . . . . . . . . . . . . . |
11 |
Using the dual general aviation plugs . . . . . . . . . . . . . . . . . . . . . . . . . . . |
12 |
Using other plug types . . . . . . . . . . . . . . . . . . . . . . . . . . . . . . . . . . . . . . |
12 |
USING THE HEADSET |
13 |
Wearing and adjusting the headset . . . . . . . . . . . . . . . . . . . . . . . . . . . . . . |
13 |
Conditions related to fit . . . . . . . . . . . . . . . . . . . . . . . . . . . . . . . . . . . . . |
13 |
Microphone placement . . . . . . . . . . . . . . . . . . . . . . . . . . . . . . . . . . . . . . 13 Clothing clips . . . . . . . . . . . . . . . . . . . . . . . . . . . . . . . . . . . . . . . . . . . . . 14 Using the control module . . . . . . . . . . . . . . . . . . . . . . . . . . . . . . . . . . . . . . 15 Power button . . . . . . . . . . . . . . . . . . . . . . . . . . . . . . . . . . . . . . . . . . . . . 15 Volume control . . . . . . . . . . . . . . . . . . . . . . . . . . . . . . . . . . . . . . . . . . . . 16 Power indicator . . . . . . . . . . . . . . . . . . . . . . . . . . . . . . . . . . . . . . . . . . . . 16 Auxiliary (AUX) audio input . . . . . . . . . . . . . . . . . . . . . . . . . . . . . . . . . . . 17 Audio priority . . . . . . . . . . . . . . . . . . . . . . . . . . . . . . . . . . . . . . . . . . . . . . 17 Using the headset with a Bluetooth®-enabled phone . . . . . . . . . . . . . . . . 19 Pairing the headset with your phone . . . . . . . . . . . . . . . . . . . . . . . . . . . 19 Bluetooth® volume control . . . . . . . . . . . . . . . . . . . . . . . . . . . . . . . . . . . 21
Making and answering calls . . . . . . . . . . . . . . . . . . . . . . . . . . . . . . . . . |
22 |
ii

CONTENTS
HEADSET CARE AND MAINTENANCE |
23 |
|
|
Instructions for continued airworthiness . . . . . . . . . . . . . . . . . . . . . . . . . 23 Cleaning the headset . . . . . . . . . . . . . . . . . . . . . . . . . . . . . . . . . . . . . . . . 23 General cleaning . . . . . . . . . . . . . . . . . . . . . . . . . . . . . . . . . . . . . . . . . . 23 Headset earcup openings . . . . . . . . . . . . . . . . . . . . . . . . . . . . . . . . . . . 23
Microphone windscreen . . . . . . . . . . . . . . . . . . . . . . . . . . . . . . . . . . . . |
24 |
Earcup inner screen . . . . . . . . . . . . . . . . . . . . . . . . . . . . . . . . . . . . . . . |
24 |
Headband cushion . . . . . . . . . . . . . . . . . . . . . . . . . . . . . . . . . . . . . . . . |
24 |
Replacing parts . . . . . . . . . . . . . . . . . . . . . . . . . . . . . . . . . . . . . . . . . . . . . |
24 |
Microphone windscreen replacement . . . . . . . . . . . . . . . . . . . . . . . . . . |
24 |
Ear cushion replacement . . . . . . . . . . . . . . . . . . . . . . . . . . . . . . . . . . . . |
25 |
Battery replacement . . . . . . . . . . . . . . . . . . . . . . . . . . . . . . . . . . . . . . . |
25 |
Headband cushion replacement . . . . . . . . . . . . . . . . . . . . . . . . . . . . . . |
26 |
Microphone assembly or access cover replacement . . . . . . . . . . . . . . |
26 |
Storage . . . . . . . . . . . . . . . . . . . . . . . . . . . . . . . . . . . . . . . . . . . . . . . . . . . |
26 |
TROUBLESHOOTING |
27 |
In case of difficulty . . . . . . . . . . . . . . . . . . . . . . . . . . . . . . . . . . . . . . . . . . |
27 |
INSTALLATION |
31 |
Mounting the aircraft panel connector . . . . . . . . . . . . . . . . . . . . . . . . . . . |
31 |
Details on making the connections . . . . . . . . . . . . . . . . . . . . . . . . . . . . |
33 |
TECHNICAL INFORMATION |
34 |
SERVICE AND WARRANTY INFORMATION |
36 |
Locating the headset serial number . . . . . . . . . . . . . . . . . . . . . . . . . . . . . |
36 |
Warranty period . . . . . . . . . . . . . . . . . . . . . . . . . . . . . . . . . . . . . . . . . . . . |
36 |
Limited warranty service . . . . . . . . . . . . . . . . . . . . . . . . . . . . . . . . . . . . . . |
36 |
To return your headset to Bose for repair . . . . . . . . . . . . . . . . . . . . . . . |
36 |
Contact information . . . . . . . . . . . . . . . . . . . . . . . . . . . . . . . . . . . . . . . . |
37 |
Ordering parts and accessories . . . . . . . . . . . . . . . . . . . . . . . . . . . . . . |
37 |
iii

ADVISORIES
Operational advisory
The Bose® A20® Aviation Headset incorporates Acoustic Noise Cancelling® technology. As with any complex electronic device, it is possible for this headset to fail during operation. Symptoms of failure may include loud tones, distortion, and loss of communications signal in the headset when used in the Acoustic Noise Cancelling mode.
Note: The headset includes redundant circuitry to reduce the effects of such failures and to allow for continued use of the headset in the passive noise reducing mode.
In passive noise reducing mode, the volume controls on the control module will automatically be set to maximum volume. If additional volume control is needed, you can use the intercom or radio volume control.
Acoustic Noise Cancelling mode is active when the headset control module is powered on (power indicator is lit). The headset is in the passive mode when the power is off (power indicator is not lit). See “Control module variations” on page 6.
If your headset is aircraft powered, connect the headset to the aircraft power sources only as described in “Connecting the headset to the aircraft” on page 11. The headset will not operate properly if used with any battery source other than the Bose A20 Aviation Headset control module.
Note: In the unlikely event of a headset issue, we suggest that you switch to an alternate communications method and use standard cockpit resource management skills to minimize distractions.
1

ADVISORIES
Hearing safety
The headset is intended for use with the Acoustic Noise Cancelling® mode turned on. Noise reduction and communications performance are reduced with Acoustic Noise Cancelling mode turned off.
Volume control
Make sure your aircraft communications system volume control is easily accessible. This control affects the strength of the communications signal coming into the headset.
As pilot in command, you must be sure you can understand critical communications even with Acoustic Noise Cancelling mode turned off. In this case, you may need to turn up the aircraft communications system volume.
Avoid setting the volume controls at levels high enough to impair your hearing during extended periods of headset use.
Recognizing aircraft sounds
With the headset’s active and passive noise reduction, typical aircraft sounds (such as engines, propellers, warning alarms, and other sound sources) may not sound familiar. We strongly advise you to make sure you can hear and recognize these sounds when using the Bose® A20® Aviation Headset while operating any aircraft.
Using audio sources
When listening to in-flight entertainment, or a portable audio source through a Bose A20 Aviation Headset, be sure to limit the volume to safe levels that do not interfere with your ability to hear informational sounds and warning alarms, such as stall warnings or gear up, while piloting.
2
ADVISORIES
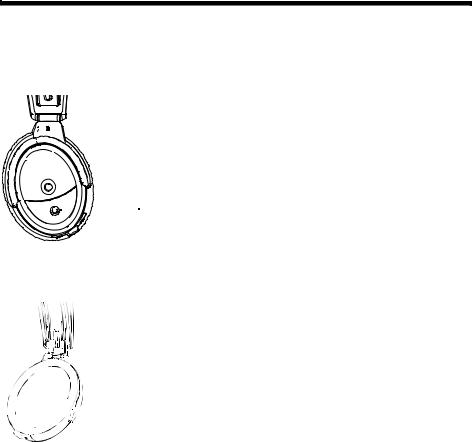
Headset earcup requirements
Proper headset operation requires that the headset TriPort® openings on the earcup are kept free of debris. The headset TriPort openings are located on the outside of each earcup and include two holes and a screen.
 TriPort
opening


 Microphone
opening
Earcup inner screen
The protective inner screen is critical to the headset’s performance.
 Earcup
inner screen
Do not attempt to remove, replace, or repair this screen. If screen replacement seems necessary, contact Bose® Technical Support. See “Contact information” on page 37.
If the screen gets wet or any foreign objects become lodged on or adjacent to it, follow the instructions in “Headset Care and Maintenance” on page 23.
3

INTRODUCTION
Congratulations on your purchase of a Bose® A20® Aviation Headset. The Bose A20 Aviation Headset is our most advanced aviation headset yet. It delivers significantly increased noise reduction and provides a more comfortable fit, without compromising the clear audio you expect from Bose. Plus, it offers auxiliary audio input and is available with Bluetooth® wireless technology.
What’s included
Each Bose A20 Aviation Headset is supplied with a control module, cable, and carrying case. The type of control module and end-plug configuration depends on the options you chose for your headset.
There are two options for the control module:
•Control module with Bluetooth wireless technology
•Conventional control module
There are several end-plug configurations for the headset. Your headset falls into one of two general categories:
•Battery powered: Operates with battery power only.
•Dual powered: Operates with either aircraft or battery power. No battery needed when connected to aircraft power.
4
INTRODUCTION
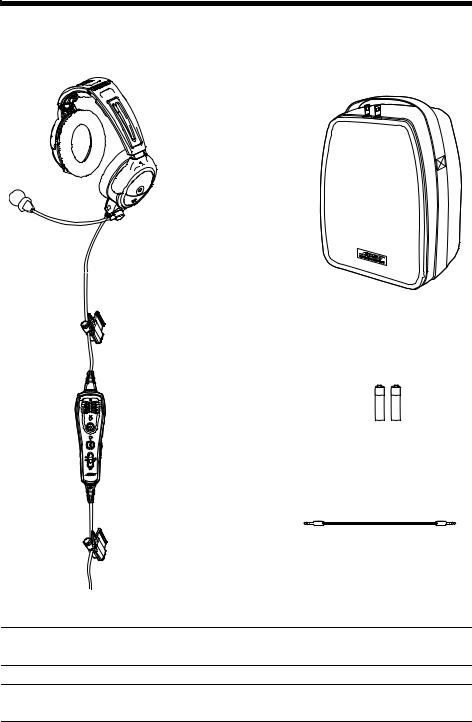
What’s in the carton
Headset assembly:
Headphones
Clothing clip
Control module
See “Control module variations” on page 6 for options.
Second clothing clip
Cable connector (varies)
Accessories:
Carrying case
2 AA alkaline batteries*
3.5 mm adapter cable
Note: Cable connector types will vary based on model of headset. See “Power and cable variations” on page 7.
Note: *Replace batteries with alkaline batteries only. Do not use any other battery chemistries.
5
INTRODUCTION
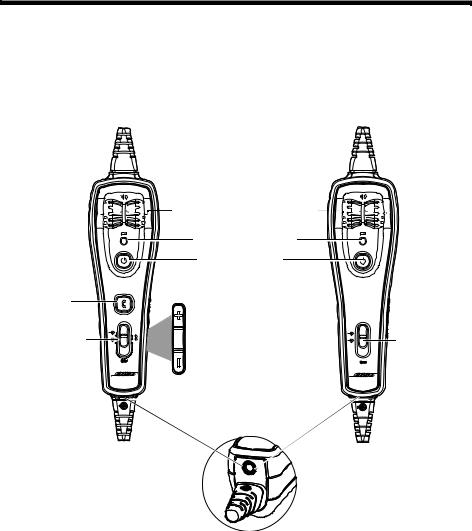
Control module variations
If you opted for Bluetooth® wireless technology, you received the control module featuring Bluetooth technology. If not, you received the conventional control module.
Bluetooth control module |
Conventional control module |


 Left/Right volume controls*


Power indicator
Power button
Bluetooth indicator 

Bluetooth |
Bluetooth |
|
function button |
||
Volume Up button |
||
|
Multifunction |
|
Audio Priority |
|
switch: |
Bluetooth |
switch: |
|
Top |
Volume Down button |
Top |
|
Intercom |
|
Intercom |
|
prioritized |
Auxiliary (AUX) |
prioritized |
|
Middle |
Middle |
||
audio input |
|||
Intercom |
Intercom |
||
|
|||
mixed |
|
mixed |
|
Bottom |
|
Bottom |
|
Intercom |
|
Intercom |
|
only |
|
only |
*Control the intercom volume
6
INTRODUCTION
Power and cable variations
The Bose® A20® Aviation Headset is available for purchase in different standard aircraft connector options, including:
Battery powered options |
Dual powered options |
Operate with battery power only |
Operate with either aircraft or battery power |
|
No battery needed when connected to aircraft power |
|
|
Dual G/A |
6-pin* |
U174 |
5-pin XLR |
U384 |
8-pin |
|
|
*An adapter is available from Bose to convert a 6-pin connector to a dual G/A or U174 plug for additional connection flexibility. Other configurations require the purchase of a cable assembly.
7
PREPARING THE HEADSET FOR USE
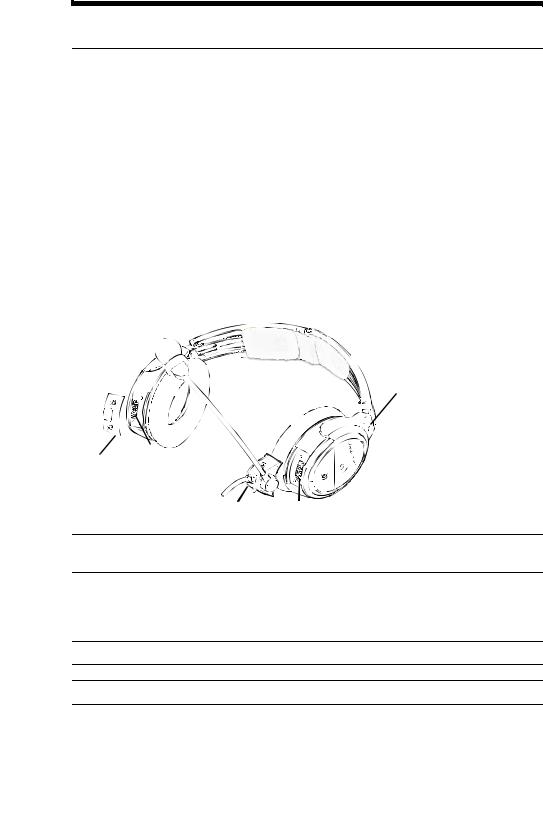
The microphone assembly
Your headset may be shipped with the microphone assembly (boom microphone and cable) attached to the left earcup. If your headset is shipped with the microphone assembly packed separately, you can attach it to either earcup.
Attaching the microphone assembly
Choose the earcup (L or R) to receive the microphone assembly. Also, make sure that the earcup connector pins are clean and free of debris.
1.Use a Phillips screwdriver to loosen the two screws on the terminator cover near the bottom of the earcup where you want to attach the
microphone assembly.
2.Remove the terminator cover to reveal the connector pins on the earcup.
3.Carefully line up the microphone assembly to the small connector socket on the earcup.
4.Slide the connector into the socket until it reaches the stop.
L for left
Terminator Connector cover pins
Microphone assembly Connector pins
CAUTION: Do not force the connector into the socket, or earcup damage may occur.
5.Tighten the screws to secure the assembly.
6.Attach the terminator cover to the earcup that does not have the microphone assembly attached. Insert the screws, then align and tighten them.
Note: The headset will not work without the terminator cover installed.
CAUTION: Be sure to try the headset and fully test its operation before flight.
8
PREPARING THE HEADSET FOR USE
The battery compartment
The Bose® A20® Aviation Headset is shipped with factory-set operation defaults. If you want to alter these defaults, you can change the operation switches located inside the control module battery compartment. If you do not want to change any of the operation switches, skip ahead to “Inserting and replacing the batteries” on page 10.
Note: For aircraft-powered versions (5-pin XLR, 6-pin, 8-pin) batteries are not required for operation.
Opening the battery compartment
You must open the battery compartment to access the operation switches. Press down firmly on the battery compartment cover finger indent and slide the cover down. The cover is tethered to the module. Do not attempt to detach it.
Note: The battery compartment cover is designed to remain securely closed. You may need to use additional force when pressing down and releasing cover.
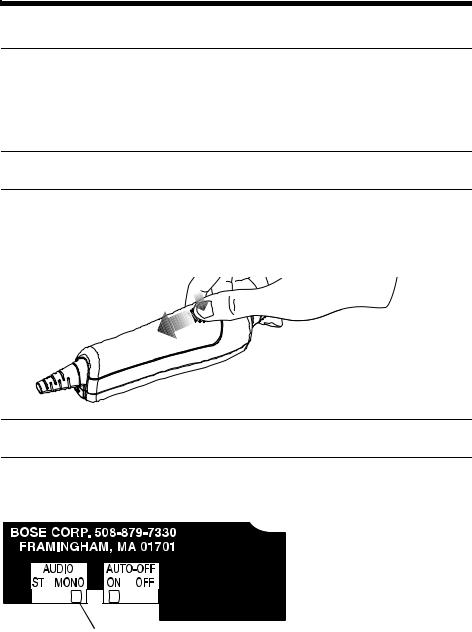
The operation switches
The operation switches control the Auto Off and Stereo/Mono functions.
Operation switches
To change the operation switches
1.Open the battery compartment.
2.If batteries are installed, remove them. In the battery compartment, you can observe and change the switch positions.
9

PREPARING THE HEADSET FOR USE
3.To change a switch position, use a pen or a small, flat-tipped screwdriver to gently move the switch.
This table shows possible positions, default setting, and purpose for each switch.
Switch |
Options |
Purpose |
|
|
|
|
|
1. |
Auto Off |
ON, OFF |
Set at the factory to enable the Auto Off function. The headset |
|
function |
Default: ON |
will turn off after 3 to 9 minutes of inactivity. To disable Auto |
|
|
Off, set the switch to OFF. With the switch in OFF position, the |
|
|
|
|
Acoustic Noise Cancelling® system will not turn off until you |
|
|
|
press and hold the power button for at least one second. |
|
|
|
|
2. |
Mono/ |
Mono, Stereo |
For most configurations, set at the factory for mono audio |
|
Stereo |
Default: MONO |
systems (to provide audio in both ears). Set it to stereo (ST) |
|
selection |
if your aircraft has a stereo intercom. |
|
|
|
|
|
Auto Off functionality
The Auto Off feature detects when the headset is not in use and shuts it off after several minutes to preserve battery power. The exact time it takes to shut off varies and can range between 3 to 9 minutes after you stop using the headset.
When the headset is running on battery power only and is not plugged in to an intercom, it will shut off even when there is an auxiliary input present.
If you are on a phone call and unplugged from an intercom, the headset will allow you to complete your call, then it will turn off approximately three seconds after the call is terminated.
Note: To use the headset when unplugged from the intercom to listen to auxiliary input audio or as a Bluetooth® wireless technology-enabled headset to make or receive calls, we recommend you disable the Auto Off feature for uninterrupted functionality.
Inserting and replacing the batteries
CAUTION: If the batteries do not fit correctly, do not force them in. Forcing an improper connection will cause permanent damage to the control module.
To insert or replace the batteries
1.Turn off headset power.
2.Press down firmly on the battery compartment cover and slide the cover to release. The battery door is tethered. Do not detach the door from module.
3.Insert the two supplied alkaline AA batteries into the control module, observing proper polarity.
4.Replace the battery compartment cover.
Note: Replace batteries with alkaline batteries only. Do not use any other battery chemistries.
10
 Loading...