


HOS 1800
|
1 |
|
7 |
|
13 |
|
19 |
5. Français |
25 |
6. |
31 |
|
37 |

English | 1
Quick Start Guide
HOS-1800
Kit content:
HOS-1800 Camera |
Camera Antenna |
Power Adapter |
Ethernet cable |
Quick Start Guide |
x 1 |
x 1 |
x 1 |
x 1 |
x 1 |
- Motion PIR HOS-IR1 |
- Window/door contact HOS-DC1 |
- Installed 8GB MicroSD card |
||
- Panic Remote
Important:
-For video recording, BE SURE TO use CLASS 10 memory card or above (not included). Other kinds of memory card may cause unexpected results and should be avoided.
-Anytime when you find the camera pan/tile function does not perform properly, calibrate the camera to get correct principle position (refer to step 8 of setup the camera section)
Hardware overview:
Mag
Light Sensor
Lens
Reset |
PIR |
|
LAN Port |
|
|
Micro SD Card Slot |
|
Microphone |
Power LED |
|
|
Power |
Panic Remote |
|
Antenna |
English | 2
Setup the camera
1. Download and install the "OMGuard HD" APP to your device.
For iOS |
For Android |
2.Power on the camera and wait until the GREEN LED indicator becomes steady on.
(This process would be finished within 45 seconds and make sure the LED is flashing in green)
3a.Wireless Connection
(1)In the Wi-Fi setting of your smart device. Choose the Wi-Fi router with prefix of HD-xxxxxx (xxxxxx=Camera ID numbers). Enter the default
password 12345678 and save the settings. |
4 |
|
|
||
(2) Launch the APP, tap |
to add the camera. |
|
(3) Tap (QR code icon) and scan the QR code label on the back of the camera |
3 |
||
|
|||
|
to bring up the DID information. Or tap "Search" to locate the camera. |
|
|
(4) |
Enter the default password 123456 and save the settings. |
2 |
|
(5) |
Later, APP will request user to modify default password to |
|
|
|
|
||
private password .
3b.Wired Connection
(1)Make sure your smartphone is connected your Wi-Fi router.
(2)Connect the camera to the Wi-Fi router with an Ethernet cable.
(3)Launch the APP, tap the “Search” to locate the camera.
(4)Enter the default password 123456 and save the settings.
(5)Later, APP will request user to modify default password to private password .
Note: In soft AP mode, the GREEN LED long flashes once followed by 2 short flashes. In normal mode, the LED
is flashing in green. For more details, please refer to the user manual at http://security.blaupunkt-service.com .

English | 3
4. Wi-Fi Setting
4a.
Advanced |
Enter Admin Password |
|
(default 123456) |
Choose the appropriate Wi-Fi router on your local network
4b. The Camera will o ine for around 40 seconds to reboot for Wifi connection. When camera connects to Wi-Fi router correctly, the Green LED will stay ON.
4c. In the Wi-Fi setting on your smart device again, make sure the Wi-Fi router you are connecting to is the same as the camera. If not, manually assign to it.
Note: If you fail to add the camera for several times, please press and hold the “Reset” button for 5 seconds to reset it. Then follow steps 3a or 3b again.
Setup sensor PIR/MAG
Add Sensor Device
(1)Tap  then choose
(2)In the advanced section, enter admin password default 123456.
(3)Select sensor setup, tap “+” to add sensor device.
(4)Name your device and tap”Save”.
(5)Tap “Camera Pan control” to calibrate the camera position, and save the settings
(1) |
(1)-1 |
(3) |
|
(2) |
|||
|
|
||
|
|
Advanced |
|
|
|
Enter Admin Password |
|
|
|
(default 123456) |
|
(3)-1 |
|
|
|
(4) |
|
|
|
|
(5) |
|
|
|
|
|
|
|
|
|
|
|
|
|
Carrier |
9:41 AM |
75% |
|
Carrier |
9:41 AM |
75% |
|
|
Carrier |
9:41 AM |
75% |
Back |
Sensor Setup |
|
|
Back |
Sensor Edit |
Save |
|
Cancel |
Trigger Preset |
Save |
|
|
Add Sensor |
|
|
|
|
|
|
|
|
|
|
Sensor Name:
Front Door
- Make sure camera & sensor are in xed position.
- Slide 


 to position camera angle.
- Tap “save” to save setting and exit.
Trigger Preset
Delete |
Reset |
|
English | 4
Position your camera & sensor
Event Trigger Auto-Position
-When an intruder is detected, the camera can immediately and automatically position itself to capture video image of the intruder as evidence. With every event, the camera will immediately send out push notifications to your mobile device.
-If you move or relocate the camera, please recalibrate the camera position again.
Mag
Camera rotate |
PIR |
to the scene |
|
APP introduction
Camera List |
Live-View |
Live View
|
|
|
|
|
|
|
|
|
|
|
|
|
|
|
|
|
|
|
|
|
Arm/Disarm |
|
|
|
|
|
|
|
|
|
|
|
|
|
|
|
|
|
|
|
|
|
|
Information |
|
|
|
|
|
|
|
|
|
|
|
|
|
|
|
|
|
|
|
|
Snapshot |
Refresh |
|
|
|
|
|
|
|
|
|
|
|
|
|
|
|
|
|
|
|
|
Mute |
|
|
|
|
|
|
|
|
|
|
|
|
|
|
|
|
|
|
Video Record |
|||
Camera Setting |
|
|
|
|
|
|
|
|
|
|
|
|
|
|
|
|
|
|
Setup Camera Position |
||
Add Camera |
|
|
|
|
|
|
|
|
|
|
|
|
|
Return |
|||||||
|
|
|
|
|
|
|
|
|
|
|
|||||||||||
|
|
|
|
|
|
|
|
|
|
|
|
||||||||||
|
|
|
|
|
|
|
|
|
|
|
|
|
|
|
|
|
|
|
|
|
|
|
|
|
|
|
|
|
|
|
|
|
|
|
|
|
|
|
|
|
|
|
Talking Button |
English | 5
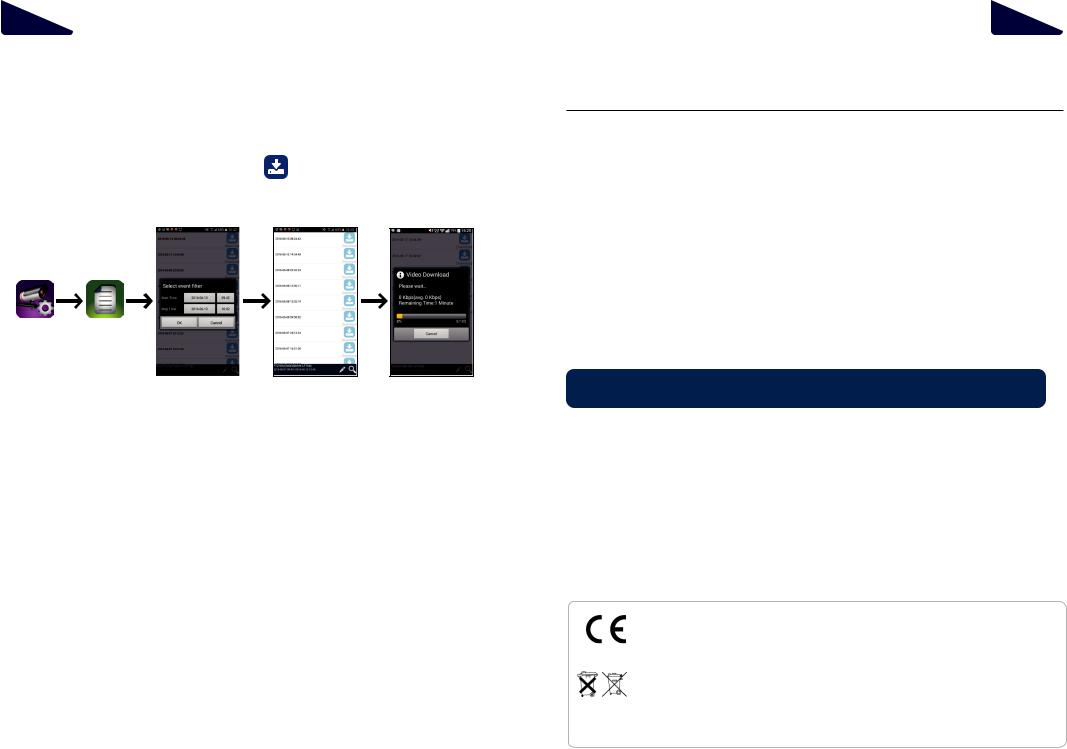
Follow the steps below for Event Playback.
1.Tap  and then the
2.Select the time interval for the event list.
3.Tap to select the file for playback.
4. If you want to store the files in mobile device, tap |
to download the file (Best while under |
|
Wi-Fi enviornment due to larger high defination data size). |
|
|
(2) |
(3) |
(4) |
(1)(1)-1
English | 6
Motion detection / camera setting tips
For optimum detection, we suggest the camera is to be mounted 7 to 8 feet (2.1m to 2.4m) from the floor, and:
•On a rigid vibration-free surface.
•So the expected movement of an intruder is across the fields of the detection pattern.
To avoid false alerts, please note this device is equipped with a PIR Motion Sensor that operates by detecting temperature changes in the area in front of the device; Please avoid placing the device under the following environments:
(1)Aiming the PIR at windows or glass doors.
(2)Where small animals may enter the detection area.
(3)Where a heat source (sunlight, incandescent light, car headlights, etc) may a ect the motion sensor.
(4)Where sudden temperature changes inside or around the detection area caused by hot or cold wind (fans, air conditioners, etc.).
Note: For more details, please refer to the user manual at http://security.blaupunkt-service.com
Products with CE Marking comply with EMC Directive (2014/30/EU); Low Voltage Directive (2014/35/EU); RED (2014/53/EU); ROHS Directive (2011/65/EU) issued by the Commission of the European Community. Compliance with these directives implies conformity to the following European Norms:
EMC: EN 301 489
LVD: EN 60950 Radio: EN 300 328
If the camera system no longer functions or can no longer be repaired, it must be disposed of according to the valid statutory regulations. Disposal of spent batteries/accumulators:
You are required by law (Battery Ordinance) to return all spent batteries and accumulators. Disposing of spent batteries/accumulators with common household waste is prohibited! Batteries/accumulators that contain hazardous substances are marked with the symbols on the side. These symbols indicate that it is prohibited to dispose of these batteries/accumulators in the household waste. The abbreviations for the respective heavy metals are: Cd=cadmium, Hg=mercury, Pb=lead. You can return spent batteries and accumulators that can no longer be charged to the designated collection points in your community, outlets or wherever batteries or accumulators are sold. Following these instructions will allow you to ful ll the legal requirements and contribute to the protection of our environment!

Deutsch | 7
QUICK START GUIDE
HOS-1800
LIEFERUMFANG :
Drahtlose Dreh-/ |
Kamera-Antenne |
Netzteil |
|
Ethernet-Kabel |
Quick Start Guide |
||
Schwenk App- |
|
|
|
|
|
|
|
Kamera |
|
|
|
|
|
|
|
|
x 1 |
|
x 1 |
|
x 1 |
x 1 |
x 1 |
Optionales Zubehör für limitierte Edition: |
|
|
|
|
|||
- |
Bewegungsmelder |
(PIR) |
- |
|
Tür/Fenstersensor |
|
|
- |
Fernbedienung mit Notruftaste |
- |
8GB Micro-SD |
|
|||
WICHTIGER HINWEIS:
-Zur Speicherung von Videos, STELLEN SIE SICHER, dass Sie CLASS 10 Speicherkarten oder höher nutzen (nicht im Lieferumfang enthalten). Andere Speicherkarten können zu ungewünschtem Verhalten führen und sollten nicht genutzt werden.
-Sobald Sie feststellen, dass das Drehen und Schwenken nicht ordnungsgemäß funktioniert, kalibrieren Sie die Kamera, um die richtige Ausgangsposition zu finden (siehe Schritt 8 des Kapitels Inbetriebnahme der Kamera).
Hardware overview:
|
Tür-/Fenstersensor |
|
Lichtsensor |
|
|
Objektiv |
|
|
|
Neustart |
PIR |
|
LAN Port |
|
|
Mikro SD Slot |
|
Mikrofon |
Strom LED |
|
|
|
Fernbedienung mit Notruftaste |
|
Strom |
|
|
Antenne |
|
Deutsch | 8
INBETRIEBNAHME DER KAMERA
1. Laden Sie die "OMGuard HD" APP auf Ihrem Gerät herunter.
Für iOS |
Für Android |
2. Schalten Sie die Kamera ein und warten Sie bis die GRÜNE LED dauerhaft leuchtet. Power on the camera and wait until the GREEN LED indicator becomes steady on.Das Hochfahren dauert etwa 45 Sekunden. Achten Sie darauf, dass die LED im Anschluss grün blinkt.
3a. WLAN Verbindung |
|
|
|
(1) Gehen Sie zu den WLAN Einstellungen Ihres Smartphones. Wählen Sie den |
|
||
WLAN Router mit dem Präfix HD-xxxxxx (xxxxxx=Kamera ID Nummern). Geben |
|
||
Sie das voreingestellte Passwort 12345678 ein und speichern Sie die Einstellun-4 |
|
||
gen. |
|
|
|
(2) Starten Sie die App und klicken Sie |
, um die Kamera hinzuzufügen. |
3 |
|
(3) Klicken Sie (QR code icon) und scannen Sie den QR-Code an der Rückseite |
|
||
der Kamera, um die nötigen Informationen abzurufen. Oder klicken Sie “Suche”, |
|
||
um auf diesem Wege die Kamera zu finden. |
2 |
|
|
(4) Geben Sie das voreingestellte Passwort 12345678 ein und
speichern Sie die Einstellungen.
(6) In einem späteren Schritt wird die APP den Nutzer
au ordern, dass voreingestellte Passwort in ein privates Passwort umzuändern. 3b. Ethernet Verbindung


 Leuchtet
(1)Stellen Sie sicher, dass Ihr Smartphone mit dem WLAN Router verbunden ist.
(2)Verbinden Sie die Kamera mit Hilfe des Ethernet-Kabels mit dem Router.
(3)Starten Sie die App und klicken Sie “Suche”, um die Kamera auszuwählen.
(4)Geben Sie das voreingestellte Passwort 12345678 ein und speichern Sie die Einstellungen.
(5)In einem späteren Schritt wird die APP den Nutzer au ordern, dass voreingestellte Passwort in ein privates Passwort umzuändern.
Hinweis: Im AP-Modus blinkt die GRÜNE LED einmal lang und dann zweimal kurz. Im normalen Modus blinkt die LED in grün. Für mehr Infos laden Sie die ausführliche Bedienungsanleitung herunter.

Deutsch | 9
4. WLAN Einstellungen
4a.
Erweitert |
Geben Sie das Admin |
|
Passwort ein (Standard |
|
123456) |
WählenSie Ihren lokalen
WLAN Router
4b. Die Kamera schaltet sich für etwa 40 Sekunden ab und startet dann neu.
Wenn die Kamera sich ordnungsgemäß mit dem Router verbindet, leuchtet die Grüne LED durchgehend grün. 4c. Stellen Sie über die WLAN Einstellungen Ihres Smartphones sicher, dass der gewählte Router im Smartphone und der Kamera übereinstimmen.
Hinweis: Wenn das Hinzufügen der Kamera mehrmals fehlschlägt, drücken und halten Sie die Neustart-Taste für 5 Sekunden, um die Kamera neu zu starten.
INBETRIEBNAHME PIR & TÜR/FENSTERSENSOR
Gerät hinzufügen
(1)Klicken Sie  und dann wählen Sie
(2)In den erweiterten Einstellungen geben Sie das Admin Passwort ein (Standard 123456).
(3)Wählen Sie Einstellungen (Gerät) und klicken Sie “+”, um ein Gerät hinzuzufügen.
(4)Benennen Sie das Gerät und klicken Sie „Speichern“.
(5)Klicken Sie “Kamera schwenken”, um die Kamera-Position zu kalibrieren und speichern Sie die Einstellungen.
(1) |
(1)-1 |
(3) |
(2)
Advanced
Passwort eingeben (Standard 123456)
|
(3)-1 |
|
|
|
(4) |
|
|
|
|
(5) |
|
|
|
|
|
|
|
|
|
|
|
|
|
Carrier |
9:41 AM |
75% |
|
Carrier |
9:41 AM |
75% |
|
|
Carrier |
9:41 AM |
75% |
Back |
Sensor Setup |
|
|
Back |
Sensor Edit |
Save |
|
Cancel |
Trigger Preset |
Save |
|
|
Add Sensor |
|
|
|
|
|
|
|
|
|
|
Sensor Name:
Front Door
- Make sure camera & sensor are in xed position.
- Slide 


 to position camera angle.
- Tap “save” to save setting and exit.
Trigger Preset
Delete |
Reset |
|
Deutsch | 10
KAMERA & SENSOR POSITIONIEREN
Bei Ereignis Auto-Position
-Wenn ein Eindringling erkannt wird, kann die Kamera sich zu einer vordefinierten Position bewegen, um ein Beweisvideo vom Eindringling aufzunehmen. Bei jedem Ereignis verschickt die Kamera automatisch eine Push-Nachricht an Ihr Smartphone.
-Wenn Sie die Kamera an einem anderen Ort aufstellen, führen Sie die Kalibrierung der Auto-Position erneut durch.
Tür/Fenstersensor
Kamera findet das Ereignis |
PIR |
APP EINFÜHRUNG
Cam-Liste |
Live-Video |
Live Video
|
|
|
|
|
|
|
|
|
|
|
|
|
|
|
|
|
|
|
Scharf/Unscharf |
|
|
|
|
|
|
|
|
|
|
|
|
|
|
|
|
|
|
|
|
Information |
|
|
|
|
|
|
|
|
|
|
|
|
|
|
|
|
|
|
Snapshot |
Aktualisieren |
|
|
|
|
|
|
|
|
|
|
|
|
|
|
|
|
|
|
Stumm |
|
|
|
|
|
|
|
|
|
|
|
|
|
|
|
|
|
|
Video-Aufnahme |
|
Kamera Einstellung |
|
|
|
|
|
|
|
|
|
|
|
|
|
|
|
|
|
|
Einstellung Position |
Hinzufügen Kamera |
|
|
|
|
|
|
|
|
|
|
|
|
|
Zurück |
|||||
|
|
|
|
|
|
|
|
|
|
|
|||||||||
|
|
|
|
|
|
|
|
|
|
|
|
||||||||
|
|
|
|
|
|
|
|
|
|
|
|
|
|
|
|
|
|
|
|
|
|
|
|
|
|
|
|
|
|
|
|
|
|
|
|
|
|
|
Sprechen |

Deutsch | 11
Befolgen Sie folgenden Schritte zur Wiedergabe von Ereignissen.
1. |
Klicken Sie |
und dann |
. |
2.Wählen Sie den Zeitraum der Ereignisliste.
3.Klicken Sie das gewünschte Ereignis, um es wiederzugeben.
4.Wenn Sie die Ereignisse auf Ihrem Smartphone speichern möchten, klicken Sie  um die Datei herunterzuladen. (Das Bestehen einer WLAN Verbindung wird aufgrund
der größeren Datenmenge zum Download empfohlen).
(2) |
(3) |
(4) |
(1)(1)-1
Deutsch | 12
BEWEGUNGSERKENNUNG: TIPPS ZUM MONTAGEORT
Für optimale Bewegungserkennung empfehlen wir eine Montagehöhe von 2.1m bis 2.4 sowie:
•Auf einer stabilen, nicht vibrierenden Oberfläche.
•So, dass ein Eindringling sich sehr wahrscheinlich durch den Erfassungsbereich bewegen würde.
Um Fehlalarme zu vermeiden, beachten Sie, dass das Gerät mit einem Passiv-Infrarot-Sensor (PIR) zur Bewegungserkennung ausgestattet ist. Dieser nimmt Veränderungen der Temperatur im Bereich vor der Kamera wahr. Vermeiden Sie daher die Ausrichtung auf folgende Bereiche:
(1)Fenster oder Glastüren.
(2)Bereiche, in denen sich Haustiere bewegen.
(3)Sonnenlicht, Glühlampen, Heizkörper, Autolampen oder ähnliche Wärmequellen.
(4)Bereiche mit schnellen Temperaturanstiegen oder Temperatursenkungen, z. B. durch Klimaanlagen oder Ventilatoren.
Products with CE Marking comply with EMC Directive (2014/30/EU); Low Voltage Directive (2014/35/EU); RED (2014/53/EU); ROHS Directive (2011/65/EU) issued by the Commission of the European Community. Compliance with these directives implies conformity to the following European Norms:
EMC: EN 301 489
LVD: EN 60950 Radio: EN 300 328
If the camera system no longer functions or can no longer be repaired, it must be disposed of according to the valid statutory regulations. Disposal of spent batteries/accumulators:
You are required by law (Battery Ordinance) to return all spent batteries and accumulators. Disposing of spent batteries/accumulators with common household waste is prohibited! Batteries/accumulators that contain hazardous substances are marked with the symbols on the side. These symbols indicate that it is prohibited to dispose of these batteries/accumulators in the household waste. The abbreviations for the respective heavy metals are: Cd=cadmium, Hg=mercury, Pb=lead. You can return spent batteries and accumulators that can no longer be charged to the designated collection points in your community, outlets or wherever batteries or accumulators are sold. Following these instructions will allow you to ful ll the legal requirements and contribute to the protection of our environment!
 Loading...