


Radio / Cassette
Frankfurt RCM 169
Operating instructions
Refer to the Quick Reference for the explanation of these operating elements
1 |
2 |
3 |
4 |
5 |
6 |
15 |
14 |
13 |
12 |
11 |
10 |
9 |
8 |
7 |
16 |
|
|
|
|
|
21 |
|
|
|
|
|
20 |
|
|
Optional |
||
|
|
|
|
|
|
|||
|
|
|
|
|
|
|
|
|
17 |
|
2 |
|
|
|
|
|
|
|
|
|
|
|
|
|
|
|
1 |
|
|
|
|
|
22 |
|
|
23
3
19 18

Contents
Quick Reference ........................... |
54 |
RC 08 remote control unit |
|
(Option) ......................................... |
63 |
Important notes ............................ |
65 |
What you need to know ........................ |
65 |
Traffic safety ......................................... |
65 |
Installation ............................................. |
65 |
Telephone mute .................................... |
65 |
Accessories .......................................... |
65 |
Guarantee ............................................. |
65 |
International telephone information ...... |
65 |
KeyCard theft protection |
|
system ........................................... |
66 |
Operating the unit for the first time ....... |
66 |
Incorrect KeyCard ............................. |
66 |
Removing the KeyCard ........................ |
66 |
“Training” a second KeyCard / |
|
Replacing a KeyCard ............................ |
67 |
Incorrect KeyCard ............................. |
67 |
Displaying the radio pass data ............. |
67 |
Short Additional Memory (S.A.M.) ........ |
67 |
Turn On Message (T.O.M.) .................. |
67 |
Flashing light as theft protection .......... |
67 |
Care of your KeyCard ........................... |
68 |
Lost or damaged KeyCard ................... |
68 |
Training the new KeyCard .................... |
68 |
First-time installation ................... |
69 |
Activating the Install menu ................... |
69 |
Closing the Install menu ....................... |
69 |
Setting the clock ................................... |
69 |
Entering your Owner Identification ....... |
69 |
Reset to default settings ....................... |
70 |
Switching the ignition connection on/off .. |
70 |
Switching the internal output stage |
|
on/off ..................................................... |
70 |
Connecting external equipment ........... |
70 |
Closing the INSTALL menu .................. |
70 |
Selecting the operating mode ..... |
71 |
Optimising the viewing angle ..... |
71 |
Radio operation with RDS ........... |
72 |
Switching between the menu levels ..... |
72 |
AF - Alternative frequency .................... |
72 |
REG - regional program ....................... |
73 |
Selecting a waveband .......................... |
73 |
Station tuning ........................................ |
73 |
Automatic tuning / ....................... |
73 |
Manual tuning with << / >> ................ |
74 |
Scrolling through the broadcasting |
|
networks (FM only) ............................... |
74 |
Changing the memory bank (FM)......... |
74 |
Storing stations ..................................... |
74 |
Automatically storing the strongest |
|
stations with Travelstore ....................... |
75 |
Recalling stored stations ...................... |
75 |
Scanning stored stations with |
|
Preset Scan .......................................... |
75 |
Scanning stations with Radio Scan ...... |
76 |
Changing the scan time (Scan) ............ |
76 |
Selecting the seek tuning sensitivity .... |
76 |
Switching from stereo to mono (FM) .... |
76 |
Automatic bandwidth adjustment |
|
(SHARX) ............................................... |
76 |
PTY - Program Type ............................. |
76 |
Switching PTY on/off ......................... |
77 |
Program type ........................................ |
77 |
Checking the program type of the |
|
station ................................................ |
77 |
Selecting and storing PTY program |
|
types .................................................. |
77 |
PTY seek tuning ................................ |
78 |
Radio text .............................................. |
78 |
Traffic information station |
|
reception with RDS-EON ............. |
79 |
Traffic announcement priority on/off .... |
79 |
Warning beep ....................................... |
79 |
Switching the warning beep off ......... |
79 |
Automatic seek tuning start .................. |
80 |
Adjusting the volume for traffic |
|
announcements and the warning beep 80 |
|
52

Contents |
|
Traffic Memo (TIM) ....................... |
80 |
Switching TIM on/off ............................. |
80 |
Recording traffic messages .................. |
80 |
Altering the TIM standby time .............. |
81 |
Retrieving stored traffic |
|
messages .............................................. |
81 |
Warning ................................................. |
81 |
Temporarily interrupting the TIM |
|
standby mode (before driving into a |
|
car wash) .............................................. |
81 |
Tape operation ............................. |
82 |
Inserting a cassette .............................. |
82 |
Removing a cassette ............................ |
82 |
Switching on tape deck operation ........ |
82 |
Dolby B NR* .......................................... |
82 |
Selecting the display mode .................. |
83 |
Track reverse ........................................ |
83 |
Scanning cassette titles with SCAN ..... |
83 |
Selecting titles with S-CPS ................... |
83 |
Repeating titles with RPT ..................... |
84 |
Fast tape forward/rewind ...................... |
84 |
Listening to the radio while fast |
|
forwarding or rewinding the tape with |
|
Radio Monitor (RM) .............................. |
84 |
Automatically skipping over blank |
|
portions of the tape with Blank Skip |
|
(BLS) ..................................................... |
84 |
Care instructions ................................... |
84 |
CD changer operation.................. |
85 |
Switching on CD changer |
|
operation ............................................... |
85 |
Selecting the display mode .................. |
85 |
Selecting CDs ....................................... |
85 |
Selecting tracks .................................... |
86 |
Repeating tracks/CDs ........................... |
86 |
TPM (Track Program Memory) ............. |
86 |
Switching TPM playback on/off ......... |
86 |
Storing tracks with TPM .................... |
86 |
Deleting the TPM .............................. |
86 |
MIX ........................................................ |
87 |
SCAN .................................................... |
87 |
Entering CD names .............................. |
87 |
Deleting CD names/TPM at the |
|
same time ............................................. |
87 |
Clock - Time .................................. |
88 |
Displaying the clock .............................. |
88 |
Setting the clock ................................... |
88 |
Selecting a 12 or 24-hour mode ........... |
89 |
Synchronisation .................................... |
89 |
Setting the equaliser .................... |
89 |
Notes on making the settings ............... |
89 |
Switching the equaliser on/off .............. |
90 |
Setting recommendations on |
|
the Internet ............................................ |
90 |
Assistance in setting your equaliser ..... |
91 |
DSC programming ....................... |
92 |
TUN (Tuner) .......................................... |
92 |
DISP (Display) ...................................... |
93 |
VAR (Various) ....................................... |
93 |
KC (KeyCard) ....................................... |
94 |
CLK (Clock) .......................................... |
95 |
CDC (changer) ...................................... |
96 |
Overview of the DSC default |
|
settings .................................................. |
96 |
Specifications ............................... |
97 |
Amplifier ................................................ |
97 |
Tuner ..................................................... |
97 |
Tape deck ............................................. |
97 |
Glossary - |
|
Technical Terminology ................ |
97 |
Index .............................................. |
99 |
Installation instructions ............ |
395 |
PORTUGUÊS ESPAÑOL SVENSKA NEDERLANDS ITALIANO FRANÇAIS ENGLISH DEUTSCH
53
Quick Reference
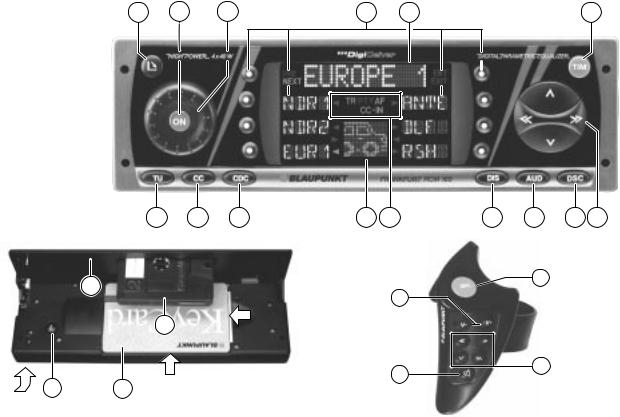
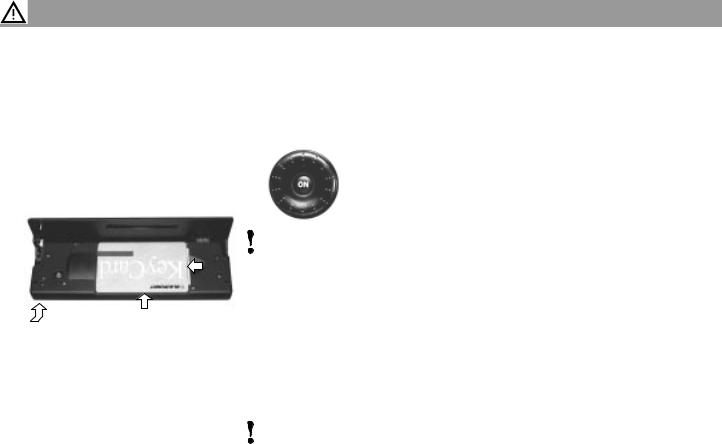
1Unlocking the fold-down operating panel
After the operating panel has been unlocked it is possible to insert or remove
the KeyCard or a cassette.
Press 1 to unlock the panel, it will fold down forwards. The operating panel cannot be removed and must not be used as a storage shelf. To close and lock the operating panel, push it back to its original position (arrow 3).
2ON
Switching the unit on:
With the KeyCard inserted, press ON briefly.
The unit will begin to operate in the mode last selected at the power-on volume.
2
1
3
For safety’s sake, the operating panel must always remain closed while the vehicle is moving.
When you leave the vehicle, open the operating panel and remove the KeyCard as added theft protection.
When the unit is switched on for the first time, “INSTALL” will appear in the top line of the display. Now it is possible to alter important basic settings, such as the clock, proof of ownership, reset to the default settings, etc.
If necessary, refer to the section on “First-time installation”.
Press EXIT to quit this menu.
Switching the unit off:
Press ON for approx. 1 sec.
The angle of the display can be adjusted to optimise its legibility. If necessary, refer to the section on “Optimising the viewing angle”.
Switching the sound on/off:
Press ON briefly. If the sound has been switched off, “Mute” will appear in the display.
You can switch on the sound again by turning the volume knob 3.
Switching the unit on/off with the KeyCard:
The unit can also be switched on/off by inserting or removing the KeyCard. Also refer to No. B in the Quick Reference for the section on the KeyCard theft protection system.
Switching the unit on/off with the ignition:
The unit can be switched on/off with the vehicle ignition if the unit has been installed accordingly.
After you switch off the ignition, you will hear a beep to remind you to remove the KeyCard before you leave the vehicle.
Switching the unit on when the ignition is off
If the ignition is switched off (but the KeyCard in place), it is possible to operate the unit as follows:
54
Quick Reference
After the beep press ON. The unit will switch on.
After the unit has played for an hour, it will switch off automatically to prevent the vehicle battery from running down.
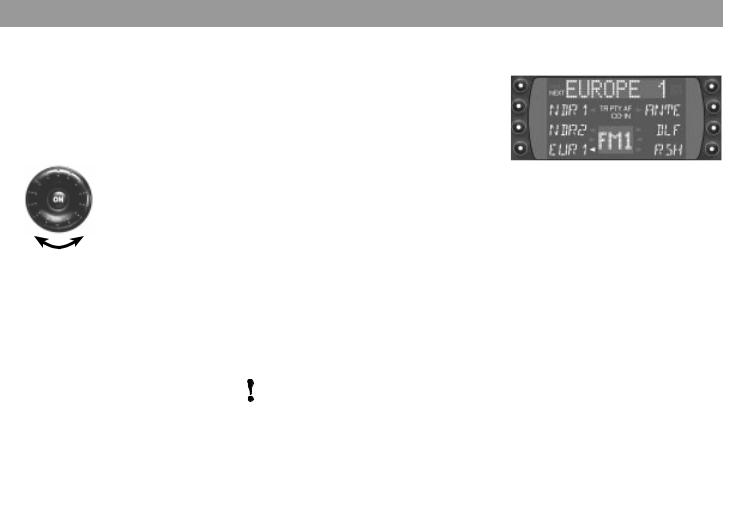
3Adjusting the volume
Turn the knob to adjust the volume.
The volume setting will appear in the top line of the display. When the unit is switched on, it will play at a pre-de- fined volume (VOL).
VOL can be adjusted as well (refer to “DSC programming - VAR, VOL”).
4Softkeys / Display
Softkey = a key with changing functions
You can select the functions which appear in the display.
Radio operation
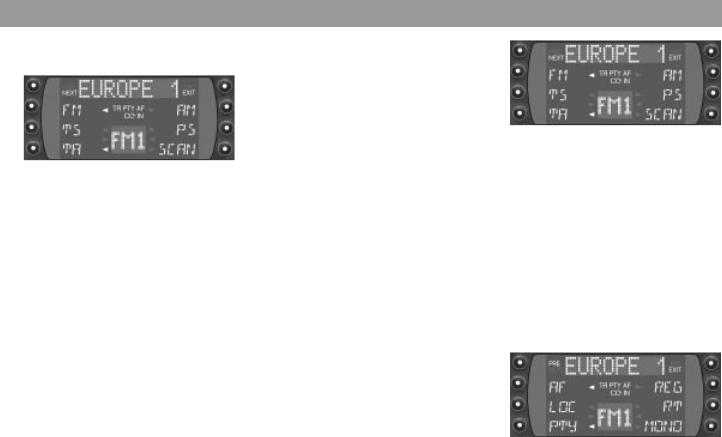
Switching between the menu levels
During radio operation, you can press TU to switch between menu level 1 and menu level 2.
Menu level 1 contains four pages (FM1, FM2, FM3, FMT) which can be used to store radio stations. Press NEXT to switch to the next page.
Menu level 2 has two pages containing functions related to radio operation. Page 1 includes FM, TS, TA, AM, PS, SCAN.
Page 2 includes AF, LOC, PTY, REG, RT, MONO. Press PRE or NEXT to switch between the pages.
The unit will switch back to menu level 1 automatically 8 sec. after the last key has been pressed.
Menu level 1 |
|
DEUTSCH |
|
|
|
||
Station keys and memory banks |
|
|
|
|
|
|
|
|
|
ENGLISH |
|
|
|
|
|
|
|
|
|
NEXT - FM |
FRANÇAIS |
||
|
|||
Switches between FM1, FM2, FM3, |
|
||
FMT |
|
||
ITALIANO |
|||
NEXT - AM (MW, LW) |
|||
|
|||
Switches between the MW and LW |
|
||
wavebands |
|
||
|
|
|
|
|
|
|
|
Keys 1 - 6 |
NEDERLANDS |
||
|
|||
To store and recall radio stations on |
|
||
the FM waveband: FM1, FM2, FM3, |
|
||
FMT. |
|
||
|
|||
It is possible to store and recall 6 sta- |
SVENSKA |
||
tions each on the MW and LW wave- |
|||
|
|||
bands. |
|
||
To store stations: Press the key for ap- |
|
||
prox. 1 sec. |
|
||
ESPAÑOL |
|||
To recall stations: Press the key brief- |
|||
|
|||
ly. |
|
||
|
|
|
|
|
|
|
|
|
|
PORTUGUÊS |
|
|
|
|
|
55
Quick Reference
Menu level 2
Adjusting the radio functions
NEXT - FM
Switches to additional radio functions: AF, LOC, PTY, REG, RT, MONO
PRE
Switches to the previous radio functions:
FM, TS, TA, AM, PS, SCAN.
FM
Switches to FM.
TS (Travelstore)
Automatically stores the six stations with the strongest reception in the “FMT” memory bank.
TA (Traffic Announcement = Priority for traffic information)
“TP” will appear in the display when the radio is tuned into a station which broadcasts traffic information.
“TA” will appear when the priority for traffic information has been activated. Switching priority on/off: Press TA. To interrupt a traffic message: Press
STOP. Stop will only appear in the display during traffic message broadcasts.
ENT (Enter)
Press this key to accept/store the settings made.
EXIT
Press this key to end/cancel any settings made.
AM
Switches to AM (MW or LW). Press NEXT to select the other AM waveband.
PS (Preset-Scan)
The radio stations stored on the preset keys in reception range will be scanned one after the other.
To stop the Preset Scan function: Press EXIT.
SCAN
All of the radio stations within reception range on the selected waveband will be scanned.
To stop the Scan function:
Press EXIT.
Switch to
AF, LOC, PTY, REG, RT, MONO: Press NEXT.
If you want to activate these functions from menu level 1, first press TU and then NEXT.
56
Quick Reference
AF
(Alternative Frequency for RDS operation)
Switching AF on/off: Press AF briefly.
LOC - Local
Press LOC to switch the seek tuning sensitivity between “Local” and “Distance”.
PTY
(Program Type)
PTY changes the station keys into program keys.
Switching PTY on/off: Press PTY briefly. PTY will light up under top line in the display.
REG (Regional)
Gives priority to regional programs. Switching REG on/off: Press REG briefly.
RT - Radio text
Transmits the text broadcast by the radio station selected.
Radio text cannot be activated unless the ignition is off or you have switched to “IGN off” in the Install menu.
MONO
Switches between stereo/mono When the unit is switched on, it automatically switches to stereo.
Tape deck operation
During tape deck operation, the tape deck functions can be selected when you press the corresponding softkeys.
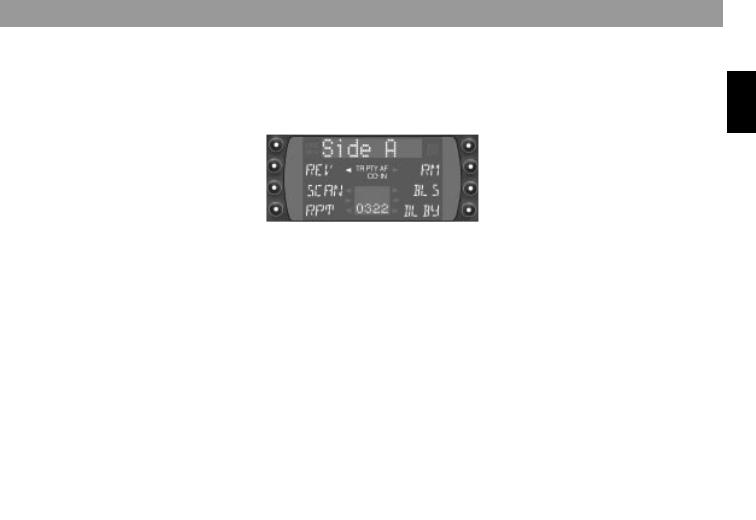
REVerse
Switches to the other tape track (side). The display indicates which side (A/B) is currently playing.
SCAN
Scans the songs on the cassette briefly.
To start/stop Scan: Press SCAN. When Scan is switched on, the corresponding red arrow will flash.
RPT (Repeat)
Repeats the scanned or the next song. The song will continue to repeat until RPT is switched off. The Repeat function will end automatically when the cassette is removed or the tape deck is switched off.
To switch Repeat on/off: Press RPT. The function will be displayed briefly in the top line of the display and the DOT display.
When RPT has been activated, the corresponding red arrow will light up.
RM (Radio Monitor)
Plays the radio while the tape is fastforwarding or rewinding. When the red arrow lights up in front of “RM”, the radio will play when the tape is fast-for- warding or rewinding.
To switch RM on/off: Press RM. The function will be displayed briefly in the top line of the display and the DOT display.
PORTUGUÊS ESPAÑOL SVENSKA NEDERLANDS ITALIANO FRANÇAIS ENGLISH DEUTSCH
57

Quick Reference
BLS (Blank Skip)
Skips over blank portions of the tape. When the red arrow lights up in front of “BLS”, this function has been activated.
As soon as the system detects a pause of more than 10 seconds in the tape playback, it will automatically fastforward the tape to the next song.
To switch Blank Skip on/off: Press BLS. The function will be displayed briefly in the top line of the display and the DOT display.
DLBY ( Dolby B NR*)
Cassettes recorded using Dolby B NR can be played back in the best possible quality. The function has been activated when the red arrow lights up in front of “DLBY”.
To switch Dolby on/off: Press DLBY. The function will be displayed briefly in the top line of the display and the DOT display.
*The noise reduction system is manufactured under licence from the Dolby Laboratories Licensing Corporation. The word DOLBY and the double-D symbol are trademarks of the DOLBY Laboratories.
CD changer operation (CDC)
During CD changer operation, use the corresponding softkeys to select MIX, SCAN, RPT (repeat), TPM and NAME.
Press CDC:
During CD changer operation, menu level 1 indicates which magazine slots contain CDs, use NEXT to page through.
Press CDC to switch the menu level. Now you can activate the functions from “MIX” to “NAME”.
MIX
CD tracks are played in random order. Press MIX to select the following functions:
-MIX CD = The tracks on the CD selected are played in random order. The CDs are selected in numerical order, the tracks then played back in random order.
-MIX MAG = All of the tracks on the CDs in the magazine are played back in random order.
-MIX OFF = switches the function off.
SCAN
Scans the tracks on all of the CDs.
Start SCAN:
Press SCAN. The tracks will be scanned in ascending order.
End SCAN:
Press SCAN. The track last scanned will begin to play.
RPT - Repeat
CD tracks and entire CDs can be played repeatedly.
Press RPT to select from the following functions:
-REP TRCK = repeats track
-REP CD = repeats CD
-RPT off = switches the function off.
TPM - Track Program Memory Stores and plays back your favourite
tracks. It is possible to archive up to 99 CDs with a maximum of 40 tracks each (refer to the section on “TPM programming”).
58

Quick Reference
CLR
Deletes the TPM (refer to the section on “Deleting the TPM”).
NAME
You can enter names with a maximum of 7 characters for up to 99 CDs. When these CDs are played, the name entered will appear in the top line of the display if the display has been set to “Name” (refer to the section on “CD naming”).
5Top line
Indicates a function of the operating mode selected, e.g. the radio station selected during radio operation.
You can use DIS to select what is displayed in the top line.
Radio operation
EUROPE 1 - |
radio station name |
|
or |
|
|
102.40 |
- |
frequency |
or |
|
|
Pop M(usic) - |
PTY code |
|
or |
|
|
10:53 |
- |
clock |
Tape deck operation |
||
Side A / B |
- |
Tape side |
Forward |
- |
Fast forward |
Rewind |
- |
Fast rewind |
CPS FF/FR |
- |
Cassette Program |
|
|
Search forwards/back |
CD changer operation |
||
VIVALDI |
- |
CD name |
or |
|
|
CD 2 T 2 |
- |
CD number and track |
|
|
number |
or |
|
|
10:53 |
- |
clock |
6TIM (Traffic Memo)
Up to four traffic messages can be stored automatically and played back as often as desired (refer to the section on “Traffic Memo - TIM”).
7 Rocker switch
Radio operation
If you press the rocker switch while you are on menu level 2, the unit will automatically switch back to menu level 1.
 /
/  Radio station seek tuning
Up Down
<< / >> Up/down in increments (for FM only, when AF and PTY are switched off)
For FM only:
<< / >> Pages through the station network when AF and PTY are switched off, e.g.: NDR 1, 2, 3, 4, N-JOY ... .
PORTUGUÊS ESPAÑOL SVENSKA NEDERLANDS ITALIANO FRANÇAIS ENGLISH DEUTSCH
59
Quick Reference
Tape deck operation
 /
/  Selects title (S-CPS)
Forward
Rewind
>> Fast forward
<<Fast rewind
CD changer operation
<</ >> Selects CDs
>> Up: Press briefly
<<Down: Press briefly
 /
/  Selects tracks Up: Press briefly
CUE - fast forward (audible):
Hold pressed down
Down: Press briefly twice or repeatedly in succession
Restart a track: Press briefly
Review - fast reverse (audible): Hold pressed down
8DSC (Direct Software Control)
Use DSC to adjust those basic settings which can be programmed. For more information refer to “DSC programming”.
9AUD
The AUD menu contains two pages. Page 1:
Adjusts Treble, Bass, Fader (front/ rear), Balance (left/right), Loudness (boosts lower frequency ranges at low volume to create a more natural sound) and SUB (-out) to adjust the amplifier level for the SUB-woofer.
Making adjustments:
Select the operating mode.
Press AUD once and select the function you wish to adjust with the corresponding key. “Bass” and the current setting, for example, will appear in the top line of the display.
Use << / >> to alter the setting.
The last setting selected will be stored automatically.
SUB-Out
If a SUB-woofer is connected to the system, it is possible to adjust the output level with “SUB” and  /
/  .
.
Page 2:
Switches on/off (DPE) and sets (LOW, HIGH) the equalizer.
Switching the equalizer on/off:
Press AUD, NEXT and DPE in succession. Use the rocker switch << / >> to switch DPE on or off.
The equalizer can be set with “LOW” and “HIGH”.
For more information, refer to the section on “Setting the equaliser”.
Switching AUD off:
Press AUD or EXIT.
60
Quick Reference
:DIS
Select from a number of displays
Radio operation
Press DIS repeatedly to select:
-the name of the station selected
-the current frequency
-PTY code
-clock
This will not operate properly unless the radio is tuned into an RDS station with adequate signal strength.
Press DIS for approx. 4 sec.:
to synchronise the clock (internal clock with the DCF-77 atomic clock).
Tape deck operation
Press DIS:
-Tape side
-Clock
CD changer operation
Press DIS:
-CD number, track number
-CD number (if entered)
-Clock
;Display
Radio operation
TP, TA |
- |
TP = Traffic Program (ra- |
|
|
dio is tuned into a traffic |
|
|
program station) |
|
- |
TA = priority for traffic pro- |
|
|
gram stations is active |
PTY |
- |
Program type is active |
AF |
- |
Alternative frequency for |
|
|
RDS |
CC-IN |
- |
Cassette is in the tape |
|
|
deck |
<DOT field
Additional display for top line. Radio operation
FM1, 2, 3,T - FM memory banks or
MW, LW - Wavebands or
Special pictures for a given situation,
e.g. driving cars during traffic announcements
Tape deck operation
00:25 |
- |
Tape counter |
or |
|
|
Side A / B |
- |
Tape side |
CD changer operation
00:25 - Time (elapsed playing time)
or
TRACK 3 - CD track number
PORTUGUÊS ESPAÑOL SVENSKA NEDERLANDS ITALIANO FRANÇAIS ENGLISH DEUTSCH
61
Quick Reference
=CDC
Switches to changer operation (only if a changer is connected),
selects the menu levels.
If there is no CD changer connected, this key will switch the system to AUX if “AUX on” has been selected in the INSTALL menu.
>CC
Switches to tape deck operation
?TU (tuner)
Switches to radio operation, selects the menu levels
@Cassette slot
Insert a cassette (Side A or 1 facing up; opening to the right).
AVisual theft protection
If you want to use the flashing LED to deter thieves, make sure that
the car radio is installed correctly and switched off;
the operating panel is opened; the KeyCard has been removed; LED is switched to on in the DSC menu (default setting).
For more information, refer to the section on “DSC programming, KeyCard, LED on/off”.
BKeyCard theft protection system
To operate this unit, the KeyCard must be inserted.

 KeyCard
Inserting the KeyCard
Press 1 to unlock the operating panel, the operating panel will fold down forward.
Slide the KeyCard in with the contacts facing down (see illustration). Lock operating panel back in place.
2
1
3
To remove KeyCard perform these steps in the reverse order.
Make sure to read the information in the section on the “KeyCard theft protection system”.
62
CEject
Press the Eject button briefly, the cassette will eject.
For safety’s sake, the operating panel must remain locked when the vehicle is in motion. When you leave the vehicle, unlock the panel and remove the KeyCard to protect the equipment against theft.
RC 08 remote control unit (Option)
21
20
 22
22
23
DV- / V+
Volume control.
ESRC (Source)
Switches operating modes Press SCR repeatedly to select.
-Radio
-Cassette
-Changer (if a changer is connected)
To switch TIM on/off:
Press SRC for approx. 1 sec.
F<</>>,  /
/  Radio operation
Station seek tuning
 up
up
 down
down
<</>> down/up in short intervals (for FM only when AF is switched off)
For FM only:
<</>> Pages through the station network with AF on e.g.: NDR 1, 2, 3, 4, N-JOY, ... .
Tape deck operation
 /
/  Select title (S-CPS)
Forward
Rewind
>> Fast forward
<<Fast rewind
PORTUGUÊS ESPAÑOL SVENSKA NEDERLANDS ITALIANO FRANÇAIS ENGLISH DEUTSCH
63

RC 08 remote control unit (Option)
CD changer operation
<</>> Select CD
>> up: Press briefly
<<down: Press briefly
 /
/  Select track up: Press briefly
CUE - fast forward (audible):
Hold pressed down
down: Press twice or repeatedly briefly
To restart the track: Press briefly
REVIEW - fast reverse (audible): Hold pressed down
TIM
 /
/  Select TIM messages
(To switch TIM on/off: Press SCR for approx. 1 sec.)
G
Sound mute on/off:
Press  briefly. When the sound has been switched off “Mute” will appear in the display.
Tape deck operation
To switch tape sound on/off: Press  briefly.
To switch tape sides:
Press  for approximately 1 second.
64

Important notes
What you need to know
Before using your new car audio system, please read through the following information carefully.
Traffic safety
As the driver of a motor vehicle, it is your responsibility to pay attention to the traffic situation at all times. Never use your car audio system in a way that could distract you.
Please keep in mind that you travel a distance of 14 m per second at a speed of only 50 km/h.
Should the traffic situation become particularly demanding, we advise you not to use the audio system.
Always make sure that you are still able to hear any warning signals coming from outside the vehicle, such as police or fire engine sirens, so that you can react accordingly.
Consequently, you should always select a moderate volume for playing your car audio system while you are driving.
Installation
If you would like to install your new car stereo yourself or add other audio components to existing ones, then please read the in-
structions on installation and connection at the end of this manual carefully.
Telephone mute
If you have installed a car telephone in your vehicle, it is possible to automatically mute the radio or CD playback when you use the telephone (telephone mute).
“Phone” will then appear in the display. Traffic announcements continue to have priority if you have activated TA. You can activate TIM when the system is switched to telephone mute.
Accessories
Use only Blaupunkt-approved accessories and spare parts.
You can use the following Blaupunkt products with this unit:
RC 08 remote control unit
The RC 08 infrared remote control unit allows you to conveniently operate the most important functions from the steering wheel.
CD changers
The following CD changers can be connected directly: CDC A 06, A 071, A 072, A 08. The A 05 can be connected with the adapter cable 7 607 889 093.
Amplifiers
All Blaupunkt amplifiers.
Guarantee
The scope of the guarantee is determined by the laws in the country where the unit was purchased.
Regardless of the legal guarantee regulations, Blaupunkt affords a 12-month guarantee. Your cash register receipt is a valid guarantee coupon.
If you have any questions about the guarantee, please contact your dealer. He will be happy to assist you, repair your equipment or forward it to an authorised Blaupunkt repair shop. In addition, our employees are there to help you on our service hotline.
You will find the telephone and fax numbers on the last page of this manual.
International telephone information
Have you got any questions on the operation of this equipment or do you require more information?
Give us a call!
You will find the international telephone and fax numbers on the last page of this manual.
PORTUGUÊS ESPAÑOL SVENSKA NEDERLANDS ITALIANO FRANÇAIS ENGLISH DEUTSCH
65
 Loading...