


RPD 552
High-Power FM/AM/CD Receiver with Detachable Face
Autoradio AM/FM à Lecteur CD de Forte Puissance et à Face Amovible Receptor FM/AM/Reproductor de CD de Alta Potencia y con Panel Extraíble Rádio FM/AM/CD de Alta Potência
com Face Removível
|
|
|
CD |
|
|
210 |
PWR |
|
|
|
FM |
|
RPD |
552 |
TS |
|
AM |
||
|
|
||
|
|
|
DISP |
|
|
|
LD/SENS |
|
U |
RPT |
|
|
T |
|
|
|
/ |
MIX |
|
|
N |
|
|
|
T |
|
|
|
R |
|
|
|
K |
|
|
VOL |
AUD |
|
|
Robert Bosch Corporation
Sales Group —
Blaupunkt Division
2800 South 25th Avenue,
Broadview, Illinois 60155
ENGLISH
FRANÇAIS
PORTUGUÊS ESPAÑOL
FCC WARNING |
Precautions |
Handling the Front Panel |
This equipment has been tested and found to comply with the limits for a Class B device, pursuant to Part 15 of the FCC Rules. These limits are designed to provide reasonable protection against harmful interference in a residential installation. This equipment generates, uses, and can radiate radio frequency energy, and, if not installed and used in accordance with instructions, may cause harmful interference with radio communications. However, there is no guarantee that radio interference will not occur in particular installation. If this equipment does cause harmful interference to radio or television reception, which can be determined by turning the equipment off and on, the user is encouraged to consult the dealer or an experienced radio/TV technician for help.
You are cautioned that any changes or modifications not expressly approved in this manual could void your authority to operate this equipment.
Features
•Detachable front panel
•Built-in power amplifier (max. output : 52.5W × 4ch)
•Digital 12-hour quartz clock
•FM/AM PLL synthesizer tuner
•30 Station preset memory
•Auto Store / Scan tuning
•2-ch preamp output
•Carefully read this manual before using the unit. If you encounter any problems that are not covered in this manual, please consult the dealer where you purchased the unit or the dealer nearest to you.
•Avoid installing the unit where it would be subject to high temperatures, such as in direct sunlight or a hot air stream from the heater, or where it would be subject to dust, dirt, or excessive vibration.
•Do not turn on the unit if the temperature inside the car is very high. Always cool down the unit before usage. Parking your car in direct sunlight will result in a temperature rise.
•If the unit does not turn on, check the connections first. Then check whether the fuse at the back of the unit is blown.
•This unit has been designed specifically for playback of com-
pact discs bearing the |
mark. Other discs cannot be |
played. |
|
•Do not use non-conventional discs such as heart-shaped, octagonal discs, etc. The player could be dameged.
Handling Compact Discs
•Be careful when removing a compact disc after the playback is completed because the disc may be extremely hot.
•Do not expose compact discs to direct sunlight or any direct heat source.
•Check all compact discs before playing, and discard cracked, scratched or warped discs.
•Wipe dirty or damp discs outward from the center with a soft cloth.
•Do not use any solvent such as commercially available cleaners, antistatic spray, or thinner to clean the compact discs.
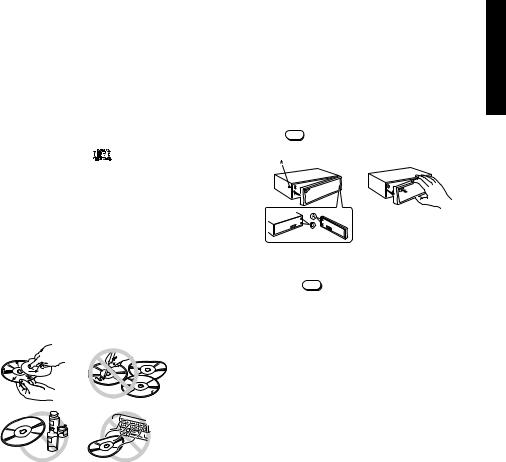
Attaching the Front Panel
Place the right hand side of the front panel so that the parts A of the front panel are engaged with the parts B of the unit as shown below. Then push the left hand side of the front panel until it is securely locked.
Detaching the Front Panel
Remove the CD from the unit, if any, and turn off the power of the unit.
Press the REL to unlock the front panel from the unit. Grasp the front panel as shown below and remove it from the unit.
Security
To avoid theft or loss of the front panel, you can deactivate the release button REL by installing the locking screw provided.
1.
2.
3.
ENGLISH
Notes
•Do not press hard on the front panel when affixing it to the unit. No more than light to moderate pressure should be needed.
•Make sure there is no dust or dirt on the electrical terminals on the back of the front panel as this could cause intermitent operation or other malfunctions.
E-1
Identification of Controls
ENGLISH
|
RPD 552 |
|
|
210 |
|
CD |
|
|
|
|
|
PWR |
|
|
T |
|
|
|
|
|
|
U |
|
|
|
|
|
|
N |
|
|
|
|
|
|
/ |
|
|
|
|
FM |
VOL |
T |
|
|
|
|
|
R |
|
|
|
|
|
|
|
K |
|
|
|
|
TS |
|
AUD |
MIX |
RPT |
LD/SENS |
DISP |
AM |
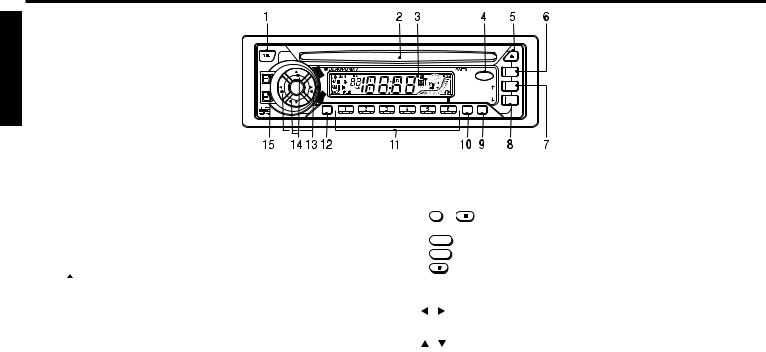
1REL button
Releases the detachable front panel.
2CD insertion slot
Insert the CD here.
3LCD Display window
4PWR button
Turns the power of the unit on. Mute on/off during power on. Press for more than 2 seconds to turn off.
5Eject  button Ejects the CD.
6CD button
Switches the CD playback mode.
7FM button
Selects the FM Band & FM Travel store.
8AM button
Selects the AM Band & AM Travel store.
9DISP button
Display selector. Clock adjustment.
10LD/SENS button
Switches the reception sensitivity between local and distance. Loudness on/off.
11PRESET MEMORY button During radio reception :
1 |
- |
6/ |
; |
For Preset memory |
During CD mode : |
|
|
||
4/MIX |
|
|
; |
For Mix play |
5/RPT |
|
|
; |
For Repeat play |
6/ |
|
|
; |
For Pause |
12AUD button
Audio control selector; Bass, Treble, Balance, Fader & Mute level. Mute level is selectable.
13/ button
|
Used to tune in to the desired station. |
|
|
Adjusts the bass/treble/balance. |
|
14 |
/ |
button |
Scan/Preset scan tuning. Scan play in CD mode.
Adjusts the bass/treble/fader.
15VOL + / – button
Adjusts the volume and mute level. Mute is adjustable from 0 to -80.
E-2
 Loading...