


BLAUPUNKT SPECIFICATIONS - PA2150 AND PA2200, 2/1 CHANNEL AMPLIFIER
Below is a basic trouble-shooting guide to assist in seeking out and correcting a problem that may occur in the installation process. Although lengthy, this chart cannot address every single problem possible but mainly the ones most common.
PARAMETER/FEATURE |
|
PA2150 |
PA2200 |
Channels |
|
2/1 |
2/1 |
|
|
|
|
Size ( W x H x D) |
|
10.4 x9.8x2.6 inches (265x250x67mm) |
10.4 x9.8x2.6 inches (265x250x67mm) |
|
|
|
|
Weight (with housing) |
|
6.0 lbs (2.7 kg) |
6.0 lbs (2.7 kg) |
|
|
|
|
Crimping style speaker terminals? |
|
YES |
YES |
|
|
|
|
Maximum terminal wire size |
|
10 ga. |
10 ga. |
|
|
|
|
Subsonic filter |
|
YES (10 Hz) |
YES (10 Hz) |
|
|
|
|
Separate front/rear or left/right gains? |
|
NO |
NO |
|
|
|
|
Fuse Type |
|
ATC spade -2@30A |
ATC spade -2@40A |
|
|
|
|
Speaker short, short to +12V, and short to ground protection? |
YES |
YES |
|
|
|
|
|
High, low, and reverse voltage protection? |
|
YES |
YES |
|
|
|
|
Power output transistors |
|
MOSFET |
MOSFET |
|
|
|
|
Switching power supply transistors |
|
MOSFET |
MOSFET |
|
|
|
|
Minimum speaker impedance |
(non-bridged) |
2 ohms |
2 ohms |
|
|
|
|
|
(bridged) |
4 ohms |
4 ohms |
|
|
|
|
PERFORMANCE DATA |
|
|
|
Rated power output @ 0.1% THD, 13.8V |
|
|
|
|
|
|
|
2 channels into 4 ohms / 2 ohms |
|
2 x 150 W / 2 x 200 W |
2 x 200 W / 2 x 250 W |
|
|
|
|
1 channel into 4 ohms |
|
1 x 400 W |
1 x 500 W |
|
|
|
|
Total Harmonic Distortion @ rated full output |
|
0.03% THD |
0.03% THD |
|
|
|
|
Rated Signal/Noise ratio (averaged value) |
|
|
|
|
|
|
|
Measured @ 1 watt / 1 kHz |
dBA |
82 |
82 |
|
|
|
|
Measured @ full rated power (0.1% THD) |
dBA |
>100 |
>100 |
|
|
|
|
Damping factor |
|
>100 |
>100 |
|
|
|
|
Frequency response (full-range mode) |
|
20 - 50,000 Hz |
20 - 50,000 Hz |
|
|
|
|
High-pass crossover frequency limits |
|
50 H z - 250 Hz (variable), 12dB/oct |
50 H z - 250 Hz (variable), 12dB/oct |
|
|
|
|
Low-pass crossover frequency limits |
|
50 H z - 250 Hz (variable), 12dB/oct |
50 H z - 250 Hz (variable), 12dB/oct |
|
|
|
|
Input impedance |
|
10 kohms |
10 kohms |
|
|
|
|
Input signal voltage control range |
|
0.3 - 6.0 vrms |
0.3 - 6.0 vrms |
|
|
|
|
Current Draw @ 13.8 VDC (typical values @ X watts / Efficiency %) |
|
|
|
|
|
|
|
@ full rated power, bridged mode |
(@ 4 ohms) |
50 A (65%) |
60 A (65%) |
|
|
|
|
@ full rated power, unbridged |
(@ 4 ohms) |
31 A (78%) |
16 A (60%) |
|
|
|
|
@ 33% rated power, unbridged |
(@ 4 ohms) |
12.0 A (60%) |
16.0 A (60%) |
|
|
|
|
@ 10% rated power, unbridged |
(@ 4 ohms) |
6.0 A (40%) |
8.0 A (40%) |
|
|
|
|
@ idle |
(@ 4 ohms) |
2.0 A |
2.5 A |
|
|
|
|
Minimum battery voltage to maintain rated power |
|
12.6 VDC |
12.6 VDC |
|
|
|
|
Usable battery voltage |
|
10 - 16 VDC |
10 - 16 VDC |
|
|
|
|
Trigger line voltage range |
|
10 - 16 VDC |
10 - 16 VDC |
|
|
|
|
Trigger line current draw |
|
@ 20 mA |
@ 20 mA |
|
|
|
|
Turn on delay time |
|
@ 2.0 seconds |
@ 2.0 seconds |
|
|
|
|
Thermal shutoff temperature (average heat-sink temp) |
@ 85˚ C (185˚ F) |
@ 85˚ C (185˚ F) |
|
|
|
|
|
NOTE: DUE TO ONGOING PRODUCT IMPROVEMENTS, DESIGN AND SPECIFICATIONS ARE SUBJECT TO CHANGE WITHOUT ADVANCED NOTICE TO THE CONSUMER OR RETAILER.

TABLE OF CONTENTS
What is an amplifier? . . . . . . . . . . . . . . . . . . . . . . . . . . . . . . . . . . . . . . . . . . . . . . . . . . . . . . . . . . . . . . . . . . . . . . . . . . . . . . . . . . .2 Key features . . . . . . . . . . . . . . . . . . . . . . . . . . . . . . . . . . . . . . . . . . . . . . . . . . . . . . . . . . . . . . . . . . . . . . . . . . . . . . . . . . . . . . . . . .2 Safety Concerns & installation warnings . . . . . . . . . . . . . . . . . . . . . . . . . . . . . . . . . . . . . . . . . . . . . . . . . . . . . . . . . . . . . . . . . . .3 System planning . . . . . . . . . . . . . . . . . . . . . . . . . . . . . . . . . . . . . . . . . . . . . . . . . . . . . . . . . . . . . . . . . . . . . . . . . . . . . . . . . . . . . .4 Installation tools . . . . . . . . . . . . . . . . . . . . . . . . . . . . . . . . . . . . . . . . . . . . . . . . . . . . . . . . . . . . . . . . . . . . . . . . . . . . . . . . . . . . . . .4 Vehicle wiring . . . . . . . . . . . . . . . . . . . . . . . . . . . . . . . . . . . . . . . . . . . . . . . . . . . . . . . . . . . . . . . . . . . . . . . . . . . . . . . . . . . . . . . . .5 Connections & controls . . . . . . . . . . . . . . . . . . . . . . . . . . . . . . . . . . . . . . . . . . . . . . . . . . . . . . . . . . . . . . . . . . . . . . . . . . . . . . .6-7 System configurations 1 & 2 . . . . . . . . . . . . . . . . . . . . . . . . . . . . . . . . . . . . . . . . . . . . . . . . . . . . . . . . . . . . . . . . . . . . . . . . . . . . .8 System configurations 3 & 4 . . . . . . . . . . . . . . . . . . . . . . . . . . . . . . . . . . . . . . . . . . . . . . . . . . . . . . . . . . . . . . . . . . . . . . . . . . . . .9 Troubleshooting chart . . . . . . . . . . . . . . . . . . . . . . . . . . . . . . . . . . . . . . . . . . . . . . . . . . . . . . . . . . . . . . . . . . . . . . . . . . . . . . . . .10 Warranty information . . . . . . . . . . . . . . . . . . . . . . . . . . . . . . . . . . . . . . . . . . . . . . . . . . . . . . . . . . . . . . . . . . . . . . . . . . . . . . . . . .11 Blaupunkt technical support . . . . . . . . . . . . . . . . . . . . . . . . . . . . . . . . . . . . . . . . . . . . . . . . . . . . . . . . . . . . . . . . . . . . . . . . . . . .11 Assembly & Mounting . . . . . . . . . . . . . . . . . . . . . . . . . . . . . . . . . . . . . . . . . . . . . . . . . . . . . . . . . . . . . . . . . . . . . . . . .Back Cover
TABLE DES MATIÈRES
Qu’est-ce qu’un amplificateur . . . . . . . . . . . . . . . . . . . . . . . . . . . . . . . . . . . . . . . . . . . . . . . . . . . . . . . . . . . . . . . . . . . . . . . . . .12 Caractéristiques principales . . . . . . . . . . . . . . . . . . . . . . . . . . . . . . . . . . . . . . . . . . . . . . . . . . . . . . . . . . . . . . . . . . . . . . . . . . . .12 Consignes de sécurité et avertissements relatifs à l’ installation . . . . . . . . . . . . . . . . . . . . . . . . . . . . . . . . . . . . . . . . . . . . . . . .13 Planification du système . . . . . . . . . . . . . . . . . . . . . . . . . . . . . . . . . . . . . . . . . . . . . . . . . . . . . . . . . . . . . . . . . . . . . . . . . . . . . . .14 Outils d’installation . . . . . . . . . . . . . . . . . . . . . . . . . . . . . . . . . . . . . . . . . . . . . . . . . . . . . . . . . . . . . . . . . . . . . . . . . . . . . . . . . . .14 Câblage du véhicule . . . . . . . . . . . . . . . . . . . . . . . . . . . . . . . . . . . . . . . . . . . . . . . . . . . . . . . . . . . . . . . . . . . . . . . . . . . . . . . . . .15 Connexions & Commandes . . . . . . . . . . . . . . . . . . . . . . . . . . . . . . . . . . . . . . . . . . . . . . . . . . . . . . . . . . . . . . . . . . . . . . . . .16-17 Configuration des systèmes 1 et 2 . . . . . . . . . . . . . . . . . . . . . . . . . . . . . . . . . . . . . . . . . . . . . . . . . . . . . . . . . . . . . . . . . . . . . . .18 Configuration des systèmes 3 et 4 . . . . . . . . . . . . . . . . . . . . . . . . . . . . . . . . . . . . . . . . . . . . . . . . . . . . . . . . . . . . . . . . . . . . . . .19 Tableau de dépannage . . . . . . . . . . . . . . . . . . . . . . . . . . . . . . . . . . . . . . . . . . . . . . . . . . . . . . . . . . . . . . . . . . . . . . . . . . . . . . . .20 Garantie . . . . . . . . . . . . . . . . . . . . . . . . . . . . . . . . . . . . . . . . . . . . . . . . . . . . . . . . . . . . . . . . . . . . . . . . . . . . . . . . . . . . . . . . . . . .21 Assistance technique de Blaupunkt . . . . . . . . . . . . . . . . . . . . . . . . . . . . . . . . . . . . . . . . . . . . . . . . . . . . . . . . . . . . . . . . . . . . . .21 Assemblage & Montage . . . . . . . . . . . . . . . . . . . . . . . . . . . . . . . . . . . . . . . . . . . . . . . . . . . . . . . . . . . . . . . . . .Couverture de dos
INDICE
¿Qué es un amplificador? . . . . . . . . . . . . . . . . . . . . . . . . . . . . . . . . . . . . . . . . . . . . . . . . . . . . . . . . . . . . . . . . . . . . . . . . . . . . . .22 Características principales . . . . . . . . . . . . . . . . . . . . . . . . . . . . . . . . . . . . . . . . . . . . . . . . . . . . . . . . . . . . . . . . . . . . . . . . . . . . .22 Consideraciones de seguridad y precauciones en la instalación . . . . . . . . . . . . . . . . . . . . . . . . . . . . . . . . . . . . . . . . . . . . . . .23 Planificación del sistema . . . . . . . . . . . . . . . . . . . . . . . . . . . . . . . . . . . . . . . . . . . . . . . . . . . . . . . . . . . . . . . . . . . . . . . . . . . . . . .24 Herramientas de instalación . . . . . . . . . . . . . . . . . . . . . . . . . . . . . . . . . . . . . . . . . . . . . . . . . . . . . . . . . . . . . . . . . . . . . . . . . . . .24 Alambrado del vehículo . . . . . . . . . . . . . . . . . . . . . . . . . . . . . . . . . . . . . . . . . . . . . . . . . . . . . . . . . . . . . . . . . . . . . . . . . . . . . . .25 Conexiones y Controles . . . . . . . . . . . . . . . . . . . . . . . . . . . . . . . . . . . . . . . . . . . . . . . . . . . . . . . . . . . . . . . . . . . . . . . . . . . .26-27 Configuración de los sistemas 1 y 2 . . . . . . . . . . . . . . . . . . . . . . . . . . . . . . . . . . . . . . . . . . . . . . . . . . . . . . . . . . . . . . . . . . . . . .28 Configuración de los sistemas 3 y 4 . . . . . . . . . . . . . . . . . . . . . . . . . . . . . . . . . . . . . . . . . . . . . . . . . . . . . . . . . . . . . . . . . . . . . .29 Cuadro de solución de problemas . . . . . . . . . . . . . . . . . . . . . . . . . . . . . . . . . . . . . . . . . . . . . . . . . . . . . . . . . . . . . . . . . . . . . . .30 Información de garantía . . . . . . . . . . . . . . . . . . . . . . . . . . . . . . . . . . . . . . . . . . . . . . . . . . . . . . . . . . . . . . . . . . . . . . . . . . . . . . .31 Apoyo técnico de Blaupunkt . . . . . . . . . . . . . . . . . . . . . . . . . . . . . . . . . . . . . . . . . . . . . . . . . . . . . . . . . . . . . . . . . . . . . . . . . . .31 Armadura y Montaje . . . . . . . . . . . . . . . . . . . . . . . . . . . . . . . . . . . . . . . . . . . . . . . . . . . . . . . . . . . . . . . . . . . . . . .Portada Trasera
ÍNDICE DAS MATÉRIAS
O que é um amplificador? . . . . . . . . . . . . . . . . . . . . . . . . . . . . . . . . . . . . . . . . . . . . . . . . . . . . . . . . . . . . . . . . . . . . . . . . . . . . .32 Características-chave . . . . . . . . . . . . . . . . . . . . . . . . . . . . . . . . . . . . . . . . . . . . . . . . . . . . . . . . . . . . . . . . . . . . . . . . . . . . . . . . .32 Medidas de Segurança e advertências para a instalação . . . . . . . . . . . . . . . . . . . . . . . . . . . . . . . . . . . . . . . . . . . . . . . . . . . . .33 Planejamento do sistema . . . . . . . . . . . . . . . . . . . . . . . . . . . . . . . . . . . . . . . . . . . . . . . . . . . . . . . . . . . . . . . . . . . . . . . . . . . . . .34 Ferramentas para a instalação . . . . . . . . . . . . . . . . . . . . . . . . . . . . . . . . . . . . . . . . . . . . . . . . . . . . . . . . . . . . . . . . . . . . . . . . . .34 Fiação do veículo . . . . . . . . . . . . . . . . . . . . . . . . . . . . . . . . . . . . . . . . . . . . . . . . . . . . . . . . . . . . . . . . . . . . . . . . . . . . . . . . . . . .35 Conexões e controles . . . . . . . . . . . . . . . . . . . . . . . . . . . . . . . . . . . . . . . . . . . . . . . . . . . . . . . . . . . . . . . . . . . . . . . . . . . . . .36-37 Configurações 1 e 2 do sistema . . . . . . . . . . . . . . . . . . . . . . . . . . . . . . . . . . . . . . . . . . . . . . . . . . . . . . . . . . . . . . . . . . . . . . . . .38 Configurações 3 e 4 do sistema . . . . . . . . . . . . . . . . . . . . . . . . . . . . . . . . . . . . . . . . . . . . . . . . . . . . . . . . . . . . . . . . . . . . . . . . .39 Quadro para solução de problemas . . . . . . . . . . . . . . . . . . . . . . . . . . . . . . . . . . . . . . . . . . . . . . . . . . . . . . . . . . . . . . . . . . . . . .40 Informações sobre a garantia . . . . . . . . . . . . . . . . . . . . . . . . . . . . . . . . . . . . . . . . . . . . . . . . . . . . . . . . . . . . . . . . . . . . . . . . . . .41 Assistência técnica da Blaupunkt . . . . . . . . . . . . . . . . . . . . . . . . . . . . . . . . . . . . . . . . . . . . . . . . . . . . . . . . . . . . . . . . . . . . . . . .41 Montagem e instalarão . . . . . . . . . . . . . . . . . . . . . . . . . . . . . . . . . . . . . . . . . . . . . . . . . . . . . . . . . . . . . . . . . . . . . . . .Tampa preta
– 1 –– 1 –
THANK YOU FOR CHOOSING BLAUPUNKT!
Congratulations! You are the now the owner of an exceptional car audio amplifier from the audio enthusiasts at Blaupunkt. Our engineering staff has spent considerable time refining our PA series amplifiers in order to introduce great sound to the consumer at an affordable price. With these products we focus on sonic performance but balanced with rugged design and flexible installation.
Not only do we offer you a great product but also a supportive owners manual. This manual can be used as a teaching guide due to its brief, but informative, explanations of amplifier and system design. We are also very concerned about the end consumer using proper installation techniques for the highest performance possible from their new audio products. MOST important to us are the concerns with safety and the installation process. Since our Blaupunkt retail dealers have the tools and experience for an optimized and safe installation, we always recommend they do the final vehicle integration. But, should you choose to install these products yourself, please take the time to read this manual completely and abide by all precautions.
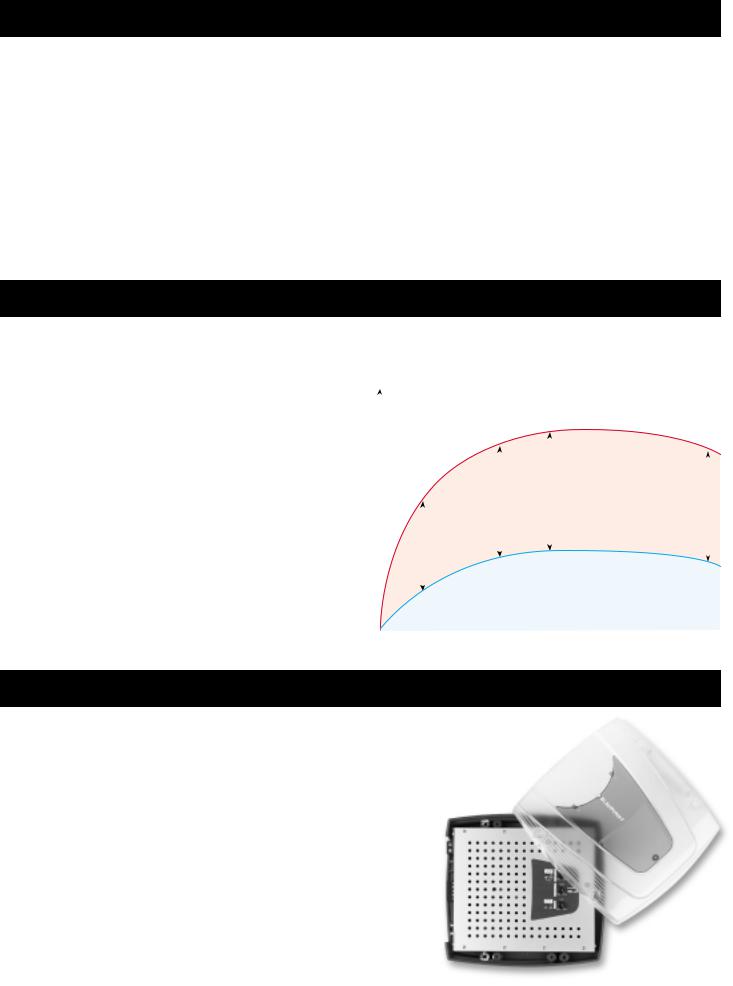
ENGINEERING BENEFITS OF BLAUPUNKT’S CLASS “T” AMPLIFIERS
Audio amplifiers take power from the car battery and convert it to audio power. Although much of the energy output is sound, a considerable amount of power is lost as heat. Such heat loss must typically be dissipated via large heat sinks, thus creating heavy metal amps with a large footprint.
In the audio world, Class ‘D’ amps have recently helped reduce this wasted heat, allowing them to use a smaller enclosure, but their poor fidelity limits them to bass reproduction only. In contrast, conventional Class ‘AB’ amps march on with their high fidelity, but poor efficiencies. Therefore, the need still exists for an amp with high fidelity, but with low heat and a small chassis.
Class ‘T’, invented and patented by Tripath® Technologies, provides the best of both worlds with high quality sound, yet low heat dissipation. Due to the remarkably low heat generated we can design very small, hide-away boxes but also creatively shape the external housings from plastics or other materials. With heat losses of only 1⁄3 to 1⁄4 of an ‘AB’ design, Tripath opens up a whole new application world for compact, small design, attractive amps. Looks cool, runs cool!
Total |
|
|
|
|
|
|
|
|
|
|
|
|
|
|
|
|
|
|
|
|
|
|
|
|
|
|
|
|
||
Energy |
|
|
|
HEAT DISSIPATION CURVES |
|
|
|
|
|
|
||||||||||||||||||||
Lost as |
|
|
|
|
|
|
|
|
|
|||||||||||||||||||||
Heat |
|
|
|
For 2x200 Watt Class ‘T’ and ‘AB’ Amps |
|
|
|
|
|
|
||||||||||||||||||||
(Watts) |
|
|
|
|
|
|
|
|
|
|
|
|
|
|
|
|
|
|
|
|
|
|
|
|
|
|
|
|
|
|
250W |
|
|
|
|
|
|
|
|
|
|
|
|
|
|
|
|
Conventional |
|
|
|
|
|
|
|||||||
|
|
|
|
|
|
|
|
|
|
|
|
|
|
|
|
|
|
|
|
|
|
|||||||||
|
|
|
|
|
|
|
|
|
|
|
|
|
|
|
|
|
|
|
|
|
|
|
||||||||
|
|
|
|
|
|
|
|
|
|
|
|
|
|
|
|
|
|
|
|
|
|
|||||||||
200W |
|
|
|
|
|
|
|
|
|
|
|
|
|
|
|
|
|
|
Class AB |
|
|
|
|
|
|
|||||
|
|
|
|
|
|
|
|
|
|
|
|
|
|
160W |
|
|
|
|
|
|
|
140W |
|
|||||||
|
|
|
|
|
|
|
|
|
|
|
|
|
|
|
|
|
|
|
|
|
|
|||||||||
|
|
|
|
|
|
|
|
|
|
|
|
|
|
|
|
|
|
|
|
|
|
|
||||||||
|
|
|
|
|
|
|
|
|
|
|
150W |
|
Excess |
|
|
|
|
|
|
|
Excess |
|
||||||||
150W |
|
|
|
|
|
|
|
|
|
|
|
Heat |
|
|
|
|
|
|
|
|
|
Heat |
|
|||||||
|
|
|
|
|
|
|
|
|
|
|
|
|
|
|
|
|
|
|
||||||||||||
|
|
|
|
|
|
|
|
|
|
|
Excess |
|
|
|
|
|
|
|
|
|
|
|
|
|
|
|
|
|
||
|
|
|
|
|
|
|
|
|
|
|
Heat |
|
|
|
|
|
Excess Energy |
|
|
|
|
|
|
|||||||
100W |
|
|
|
100W |
|
|
|
|
|
|
|
|
|
|
|
Wasted as Heat |
|
|
|
|
|
|||||||||
|
|
|
|
|
|
|
|
|
|
|
|
|
|
|
|
|
|
|
|
|
|
|
|
|
|
|||||
|
|
|
Excess |
|
|
|
|
|
|
|
|
|
|
|
|
|
|
|
|
|
|
|
|
|
|
|
||||
|
|
|
|
Heat |
|
|
|
|
|
|
|
|
|
|
|
|
|
|
|
|
|
|
|
|
|
|
|
|||
50W |
|
|
|
|
|
|
|
|
|
|
|
|
|
|
|
Blaupunkt Class T |
|
|
||||||||||||
|
|
|
|
|
|
|
|
|
|
|
|
|
|
|
||||||||||||||||
|
|
|
|
|
|
|
|
|
|
|
|
|
|
|
|
|
||||||||||||||
|
|
|
|
|
|
|
|
|
|
|
|
|
|
|
|
|
|
|||||||||||||
0W |
|
|
|
|
|
|
|
|
|
|
|
|
|
|
|
|
|
|
|
|
|
|
|
|
|
|
|
|
|
|
IDLE |
20 |
40 |
60 |
80 |
100 |
120 |
140 |
160 |
180 |
200 |
||||||||||||||||||||
Audio Power Output (Watts/Channel)
KEY FEATURES
Your new Blaupunkt Amplifier offers some important features:
■“Break-away” design allowing the internal amplifier to be removed from the housing and mounted in a “hide-away” location
■REM1, Remote gain control (operates in bass mode only)
■HLA1, High Level Adapter allowing for speaker level voltage to drive the amplifier
■Plugs that allow for wiring the vehicle first then connect the amp
■Continuously variable high-pass and low-pass crossover filters
■Bass boost control (fixed gain)
■Interchangeable colored plastic control lenses (optional)
■2 ohm (non-bridged) capability
■0.3-6.0Vrms input capability allowing for wide range drive voltage capability from a receiver or other media device
– 2 –

SAFETY CONCERNS
We always recommend you have your Blaupunkt amplifiers professionally installed but the installation process is often so easy that the average consumer can achieve success with little trouble. Regardless of the person installing, you should be sure to review the following points before proceeding with the installation:
■READ THE MANUAL! Understanding the product and installation limitations before lifting a screwdriver.
■WEAR SAFETY GLASSES AT ALL TIMES - Flying debris are always dangerous.
■PROTECT THE VEHICLE - Always disconnect the negative battery cable before starting any kind of installation work. This prevents a possible high current electrical short (potential fires).
■HEAT - Keep all audio components away from nearby hot vehicle components that heat up over time such as hoses, high current wires, and braking system components.
■GIVE YOURSELF LOTS OF TIME - Rushing to complete an installation nearly always ends up with problems.
■DO NOT LISTEN AT HIGH SOUND LEVELS FOR A PROLONGED TIME - these amplifiers, used with high efficiency speakers from ANY manufacturer, have the potential to cause permanent hearing loss after listening at maximum volume levels for several hours.
INSTALLATION WARNINGS!
Before disassembling your beautiful new car you need some basic installation knowledge and skill with common hand and power tools. Following such basic installation tips and warnings will prevent possible damage to the vehicle and also prevent possible fires.
■AGAIN...READ THE MANUAL! There is a lot of helpful information in this manual that will save time and prevent problems later.
■COVER THE VEHICLE WORK AREAS - Use fender covers or blankets to protect the work areas from scratches or dings.
■DISCONNECT THE (-) LEAD ON THE BATTERY - No sparks or fires please!
■“REVIEW” THE INSTALLATION - Before using any tools or moving vehicle components, take five minutes to review the installation intentions (e.g., verify that an amplifier will fit in an area of a car before tearing out all the interior).
■“REVIEW” THE VEHICLE - Before drilling any holes or cutting into any surfaces, make sure there are no fuel or hydraulic lines behind the surfaces. Also make sure there are no wires routed directly behind or near the desired mounting area (remember...screws can often extend 1-2 inches behind the mounting surface).
■ENSURE PROPER FIT - Before cutting or drilling, make sure the amplifier will physically fit in its desired location. Check for clearance around rear deck torsion bars or other structural elements.
■EVERY CAR IS ASSEMBLED DIFFERENT - Every auto manufacturer uses different
assembly techniques. Take care in removing/modifying all trim panels and mounting surfaces since they often use unique screws or snap fasteners that are difficult to replace if they are lost or broken.
■BE CAREFUL WITH CABLE ROUTING - When routing audio cables, make sure RCA and speaker wires are routed away from high current power lines for audio amplifiers and vehicle systems lines when possible. This will help prevent noises from creeping into the audio system, plus prevent potential damage to the vehicle wiring itself.
■BE CAREFUL WITH ALL CONNECTIONS - When making connections, make sure each connection is clean and properly secured. Observe all polarity markings carefully to ensure proper end performance.
■CAUTION - FUEL TANKS AND FUEL LINES ARE NOW LOCATED DIRECTLY BENEATH THE REAR DECK IN MANY CARS - CHECK FOR ADEQUATE CLEARANCE BEFORE EVEN CONSIDERING SUCH A MOUNTING LOCATION!
– 3 –
 Loading...