


artista 200 Embroidery
MASTERING
YOUR
BERNINA
®
BERNINA® artista 200 Embroidery
MASTERING YOUR
®
BERNINA
artista 200 Embroidery Module
OWNER’S WORKBOOK
MASTERING YOUR BERNINA® 9/15/02
artista 200 Embroidery/1

MASTERING
YOUR
BERNINA
®
BERNINA® artista 200 Embroidery
Table of Contents
SECTION A Pages 3-26
artista 200 Embroidery Beginnings
SECTION B Pages 27-43
Alphabet Antics
MASTERING YOUR BERNINA® 9/15/02
artista 200 Embroidery/2
MASTERING
YOUR
BERNINA
®
BERNINA® artista 200 Embroidery
MASTERING YOUR
®
BERNINA
artista 200 Embroidery Module
OWNER’S WORKBOOK
Embroidery Beginnings
MASTERING YOUR BERNINA® 9/15/02
Section A
artista 200 Embroidery/3

MASTERING
YOUR
BERNINA
®
BERNINA® artista 200 Embroidery
SECTION A
artista 200 Embroidery Beginnings
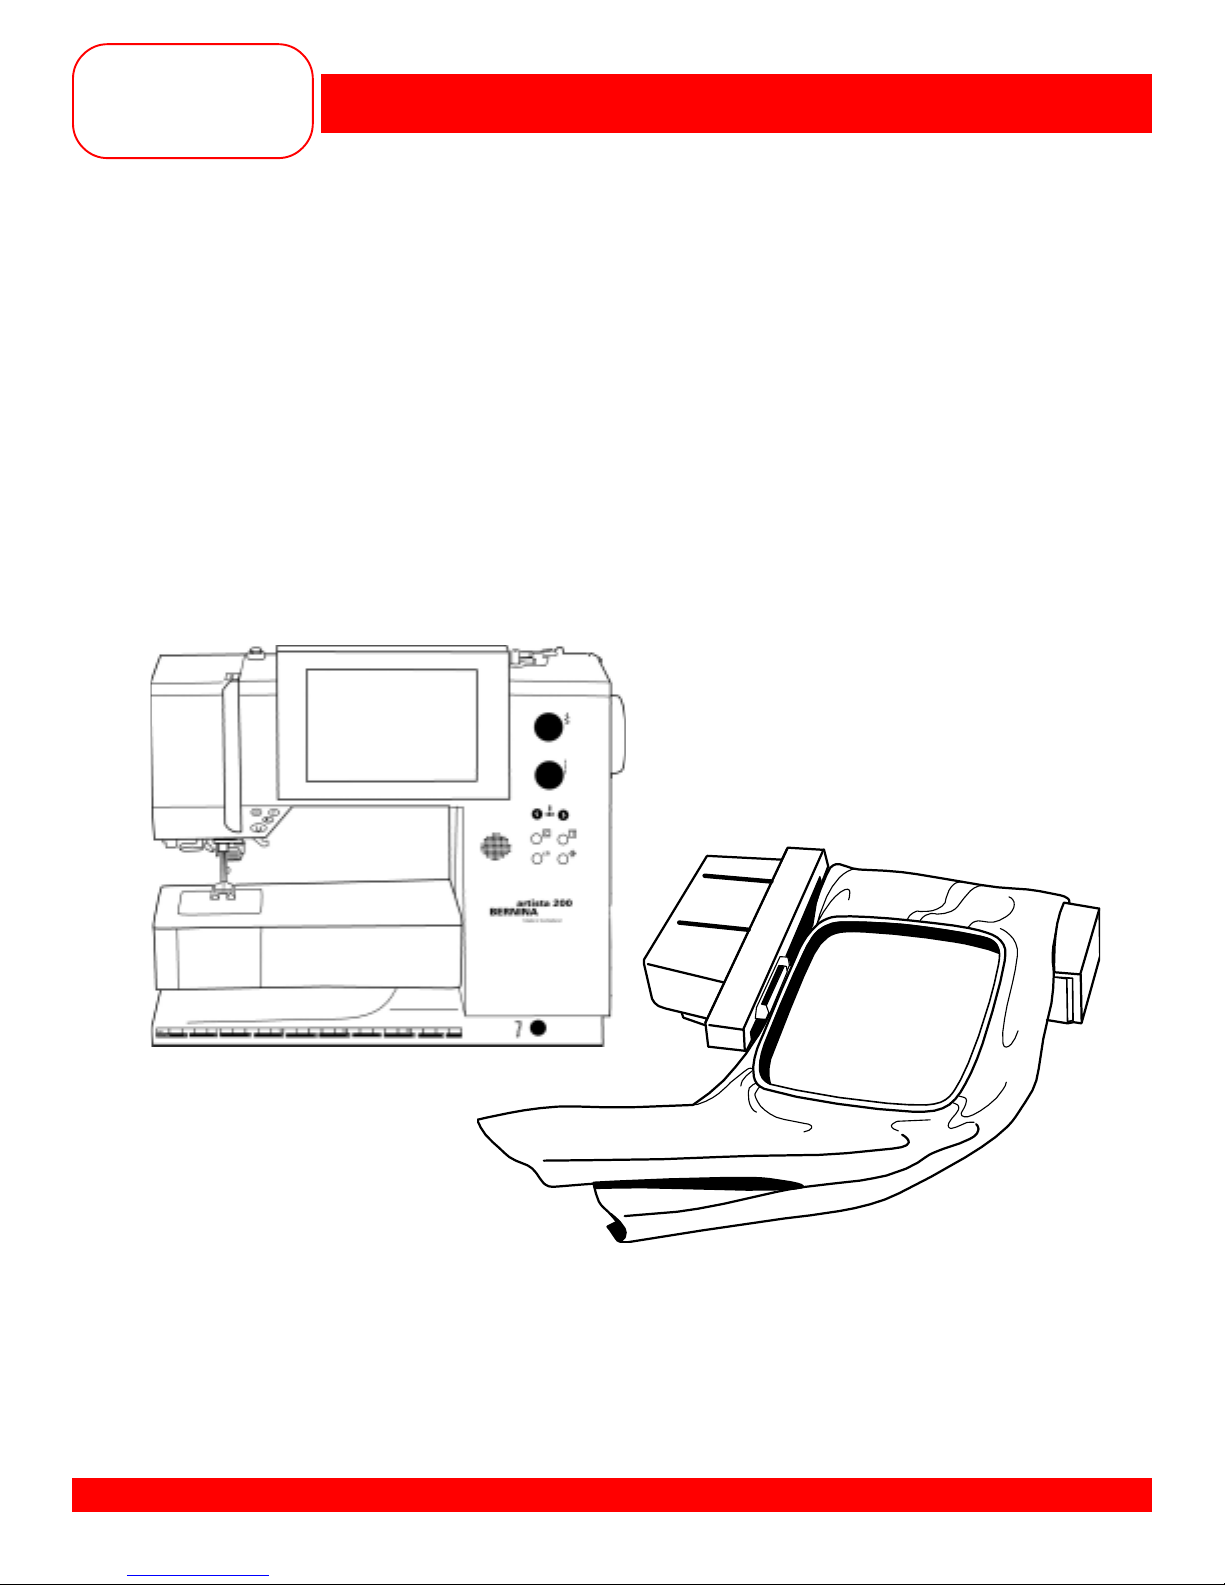
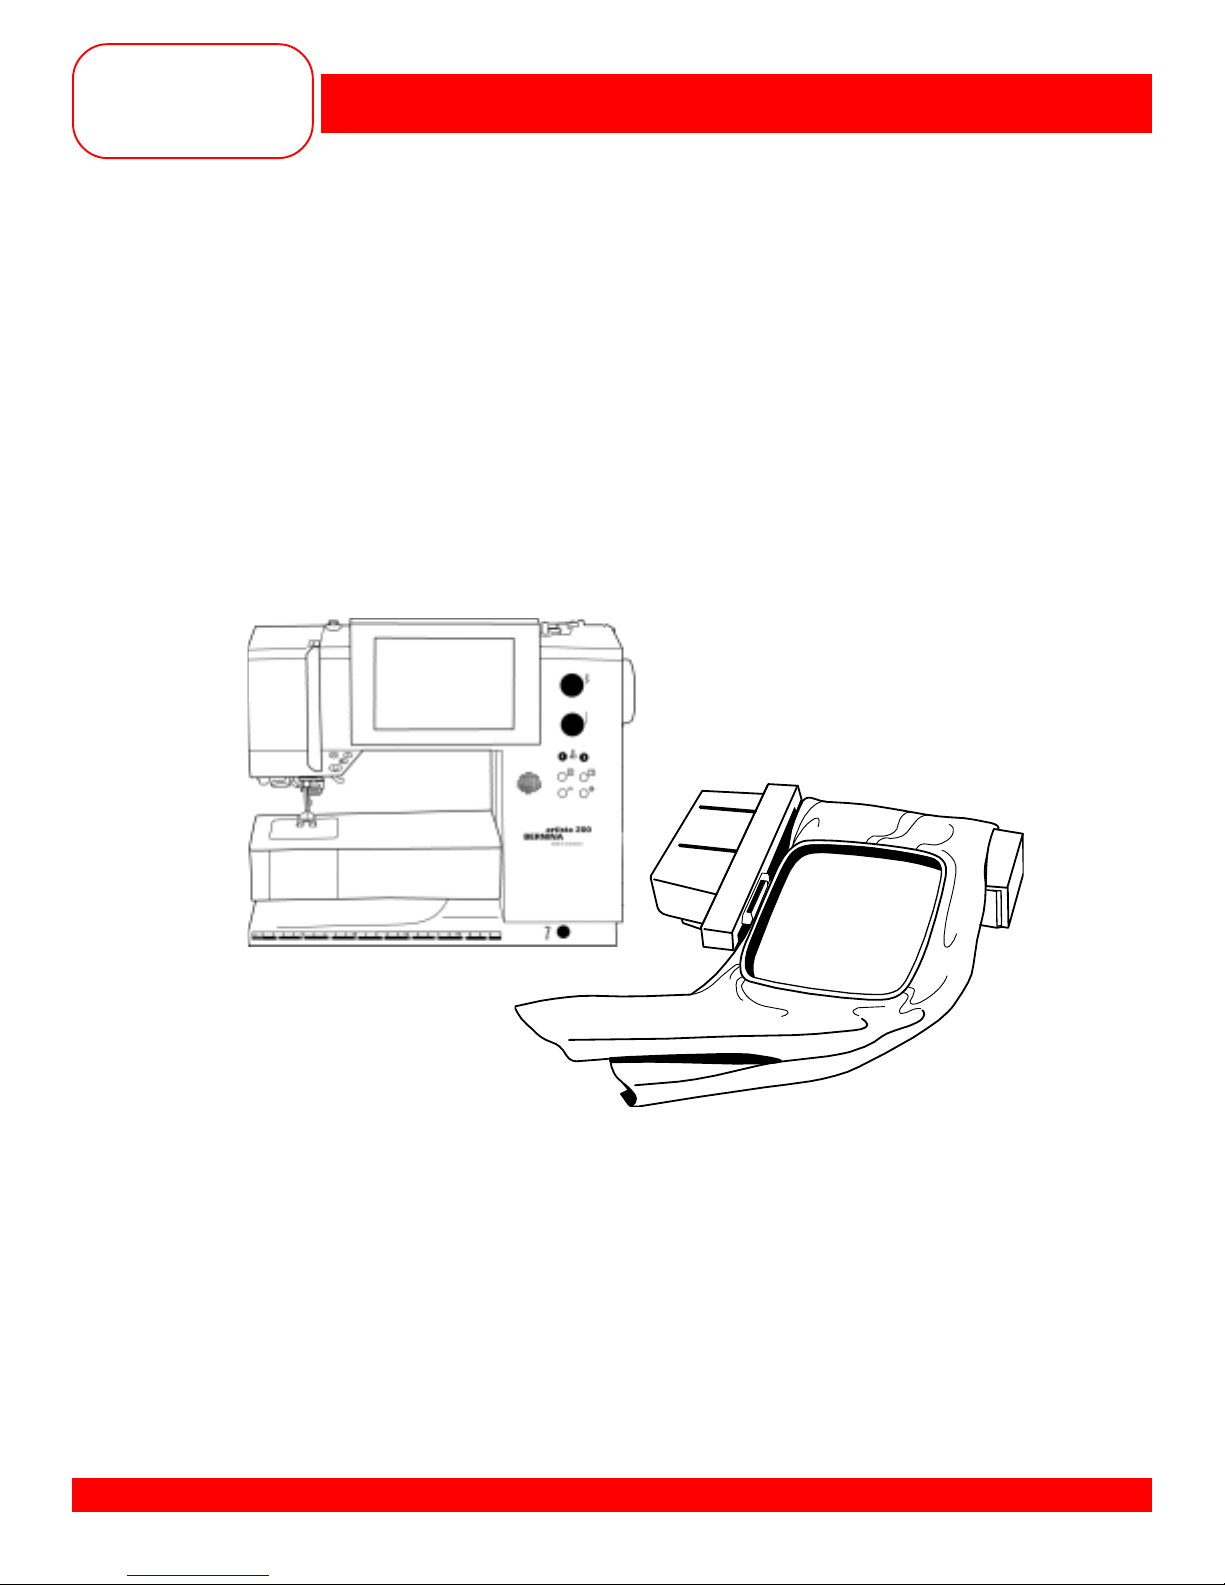
Details of the Module
Owner’s manual pg.__
Standard Accessories
Owner's manual pg.___
Special Accessories
Owner's manual pg.___
Module Set Up
Owner's manual pg.___
• Module Connection Cable
- Stored on the bottom back edge of the module
- Make sure the FLA T side of the cable is to the FRONT
- REMEMBER, your sewing/embroidery computer is Microsoft Windows powered, so your module has
“Plug and Play” capabilities. There is NO NEED to turn your sewing/embroidery computer OFF to
connect your module.
• Attaching the Module
- Remember that both your sewing/embroidery computer and the module MUST be on a flat surface to
properly complete embroidery
- Place the module on the machine behind the free arm
- Slide the module on from the left until the lugs engage in the base plate
• Removing Module
- Remove the cable plug from the sewing/embroidery computer
- Lift slightly and slide the module to the left to remove it from the machine
Prepare for Embroidery
Owner's manual pg.___
• Presser Foot
- Embroidery Foot #15 comes with the module
- Attach the foot to the machine
• Needles - Owner’s manual pg.____
- Use the proper needle for the thread and fabric being used
- Insert a new needle at the beginning of each project
- Needle should be in the highest position when attaching the hoop
• Straight Stitch Plate (optional accessory)
- While embroidering, the needle only moves up and down. There is no sideways movement. The hoop
is what moves. By using the Straight stitch plate, the quality of your embroidery can be improved.
• Bobbin
- Use the Gold Latch bobbin case with the “pigtail”. When threading the bobbin into the case, finish the
threading process by threading the bobbin thread through the wire loop.
- Remember to ONL Y use high quality lightweight bobbin thread for your embroidery project s.
MASTERING YOUR BERNINA® 9/1/02 SECTION A
artista 200 Embroidery/4

MASTERING
YOUR
BERNINA
®
BERNINA® artista 200 Embroidery
Threading
Owner's manual pg.___
• Thread machine wtih the presser foot up (to release the tension discs)
• Thread the machine using either the horizontal or vertical spool pin
- Horizontal spool pin is designed for use with cross-wound threads
- match disc size to end of spool
- smallest disc fits into the end of large cones/spools such as Isacord embroidery thread
- V ertical spool pin is designed for use with stacked threads
- also used for some decorative threads such as metallic threads
- a supplemental thread guide is available and should be used when using the vertical spool
pin to help decorative threads reel off the spool more consistently and keep them from falling
off the spool
• Another threading option is to use the Multiple Spool holder . This accessory att aches to the back of your
artista. It can hold up to 13 different spools of thread. There is also an extender available that will hold up to
three additional spools of thread. The Multiple Spool holder has room for 2 Extenders.
• Adjust tensions as needed for the threads used
Hoop Sizes
Owner's manual pg.___
• When embroidering, it is always best to select the hoop that most closely matches the size of your design.
• Your artista 200 know the size of the embroidery motif selected. It will suggest and show the smallest hoop
size that will fit your embroidery motif.
• Your artista 200 comes with 3 different hoop sizes
- Large Oval embroidery hoop (145mm x 255mm)
- stitch area is approximately 5 3/4” x 10 1/8”
- Medium embroidery hoop (100mm x 130mm)
- stitch area is approximately 4” x 51/8”
- Small embroidery hoop (72mm x 50mm)
- stitch area is approximately 2 7/8” x 2”
- for use with free arm embroidery and when stitching small motifs
Stabilizers
Owner's manual pg.___
• Proper hooping techniques and stabilizer information - Owner’s manual pg.____
• Cut-Away Stabilizers – Heavy weight
- Most widely used in the commercial embroidery market
- Provides permanent support for embroidery stitches
- High quality cut-away stabilizers will not have any “give” or stretch
- Must use with any fabrics that stretch. (Don’t forget, a fabric does not have to be a knit to have stretch.
There are many woven fabrics that have stretch.)
- Must use with embroidery motifs that have high stitch counts
- These types of stabilizers can be used in multiple layers as necessary
- Must be trimmed away from the back of embroidery motifs after stitching is complete
- Available in White and Black
MASTERING YOUR BERNINA® 9/1/02 SECTION A
artista 200 Embroidery/5

MASTERING
YOUR
BERNINA
• Cut-Away Stabilizers – Light weight – Poly-Mesh
- Perfect for lighter weight and light colored fabrics
- Poly-Mesh provides a softer “hand” which makes it better for clothing use that lies directly on the skin
- Provides permanent support for embroidery stitches
- This type of stabilizer can be used in multiple layers as necessary
• Tear Away Stabilizers
- These types of stabilizers have been widely used within the sewing industry.
- These tear away easily; pull gently and hold stitches to prevent distortion
- For most embroidery, tear away stabilizers do not provide support for stitches after removal due to
extreme perforation from the needle
- Can be used in multiple layers
- Available in black and white
• Water Soluble Stabilizer
- Dissolves in water
- Can be used as a backing or topping for textured fabrics (velvet, terry)
- Is available in different weights to be used as support for stitching or simply as a topping
- Make sure to hoop the fabric with this stabilizer
• Adhesive Paper
- Hoop the stabilizer first; use a pin to “score” the stabilizer around the inside edge of the hoop
- Remove the backing and carefully position fabric on the stabilizer; smooth to adhere
• Spray Starch and/or Brush-On stabilizers
- Ideal for “firming up” soft fabrics
- Treat only the area to be embroidered; allow to dry completely or press dry
- Use with additional stabilizer on the wrong side of the fabric
• Fusible Interfacing products
- Although these products DO NOT provide sufficient support for embroidery by themselves, they can add
body to softer fabrics to help them better support embroidery stitches
- They are fused to the wrong side of the fabric; permanently bonded and NOT removed after the stitching
is complete
- Use in combination with traditional embroidery stabilizers
- Available in a variety of colors, weights, and thickness
®
BERNINA® artista 200 Embroidery
Hooping Fabric
Owner's manual pg.___
• Find the center of the fabric
• Separate the embroidery hoop
- Loosen the screw - it should be loose enough that fabric and stabilizer both will EASILY fit into the hoop
• Remove the inner ring
• Embroidery Templates
- Use to ensure that the motif is centered in the hoop
- Each hoop has a corresponding template
- When inserted correctly , “BERNINA” reads lef t to right, right side up
MASTERING YOUR BERNINA® 9/1/02 SECTION A
artista 200 Embroidery/6

MASTERING
YOUR
BERNINA
- Template surface marked in 1cm squares
- Each template has cut-outs to facilitate transfer of markings to fabric
- There are finger holes for easy removal purposes in the small and medium hoop templates
- With the large oval and Mega hoop templates, there are special attachment clips that allow for easy
removal
• Secure fabric/stabilizer in the hoop
- Lay the outer hoop on a HARD, FLA T surface
- Secure stabilizer to the back of the fabric by lightly coating stabilizer with 505 temporary spray adhesive
- Place fabric and stabilizer on a firm surface
- Position template inside the inner hoop
- Position inner hoop on the fabric, aligning any markings on the fabric
- Grasping both inner hoop and fabric/stabilizer , insert into the outer hoop, making sure to align the arrows
at the edges of both the inner and outer hoops
- DO NOT DISTORT the fabric when tightening the screw on the hoop
- Hooped fabric should be taut, but not stretched
- Remove template before stitching
®
BERNINA® artista 200 Embroidery
Attaching and Removing Hoop
Owner's manual pg.___
Adjusting Embroidery Hoop
Owner's manual pg.___
• This adjustment process calibrates the needle to the center of the embroidery hoop
• It is only necessary to complete this process once as it will apply to all the hoops
- Make sure that the module s properly attached to the artista 200
- Touch the external Setup button
- Select the Embroidery Settings option
- Insert the embroidery tempoate into the Large Oval hoop and attach to the module
- Touch “Check”
- The hoop position will be read and the hoop movement will stop with the needle positioned over the
center marking of the hoop
- If the needle is not positioned over the center properly , use the arrows on the screen to make
adjustments
- Touch OK
- The setting is now saved and you may touch Esc to leave this menu as well as the Setup menu.
MASTERING YOUR BERNINA® 9/1/02 SECTION A
artista 200 Embroidery/7

MASTERING
YOUR
BERNINA
®
BERNINA® artista 200 Embroidery
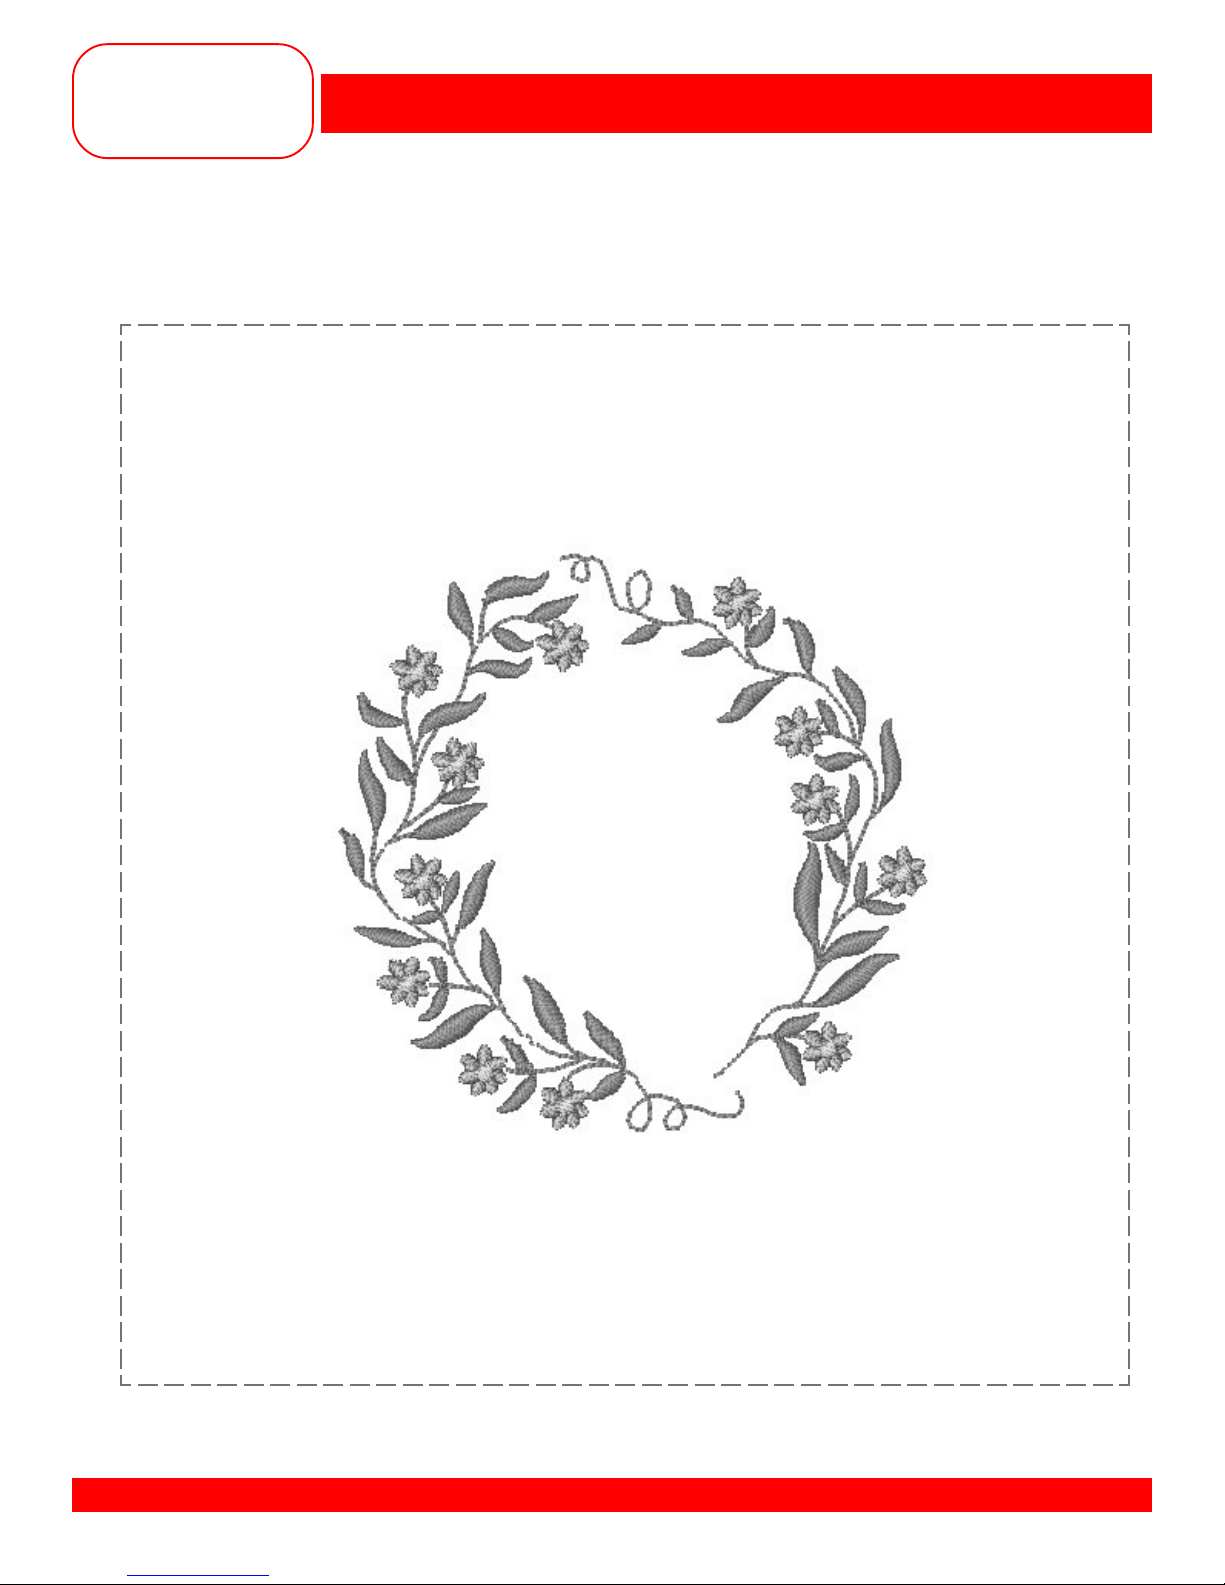
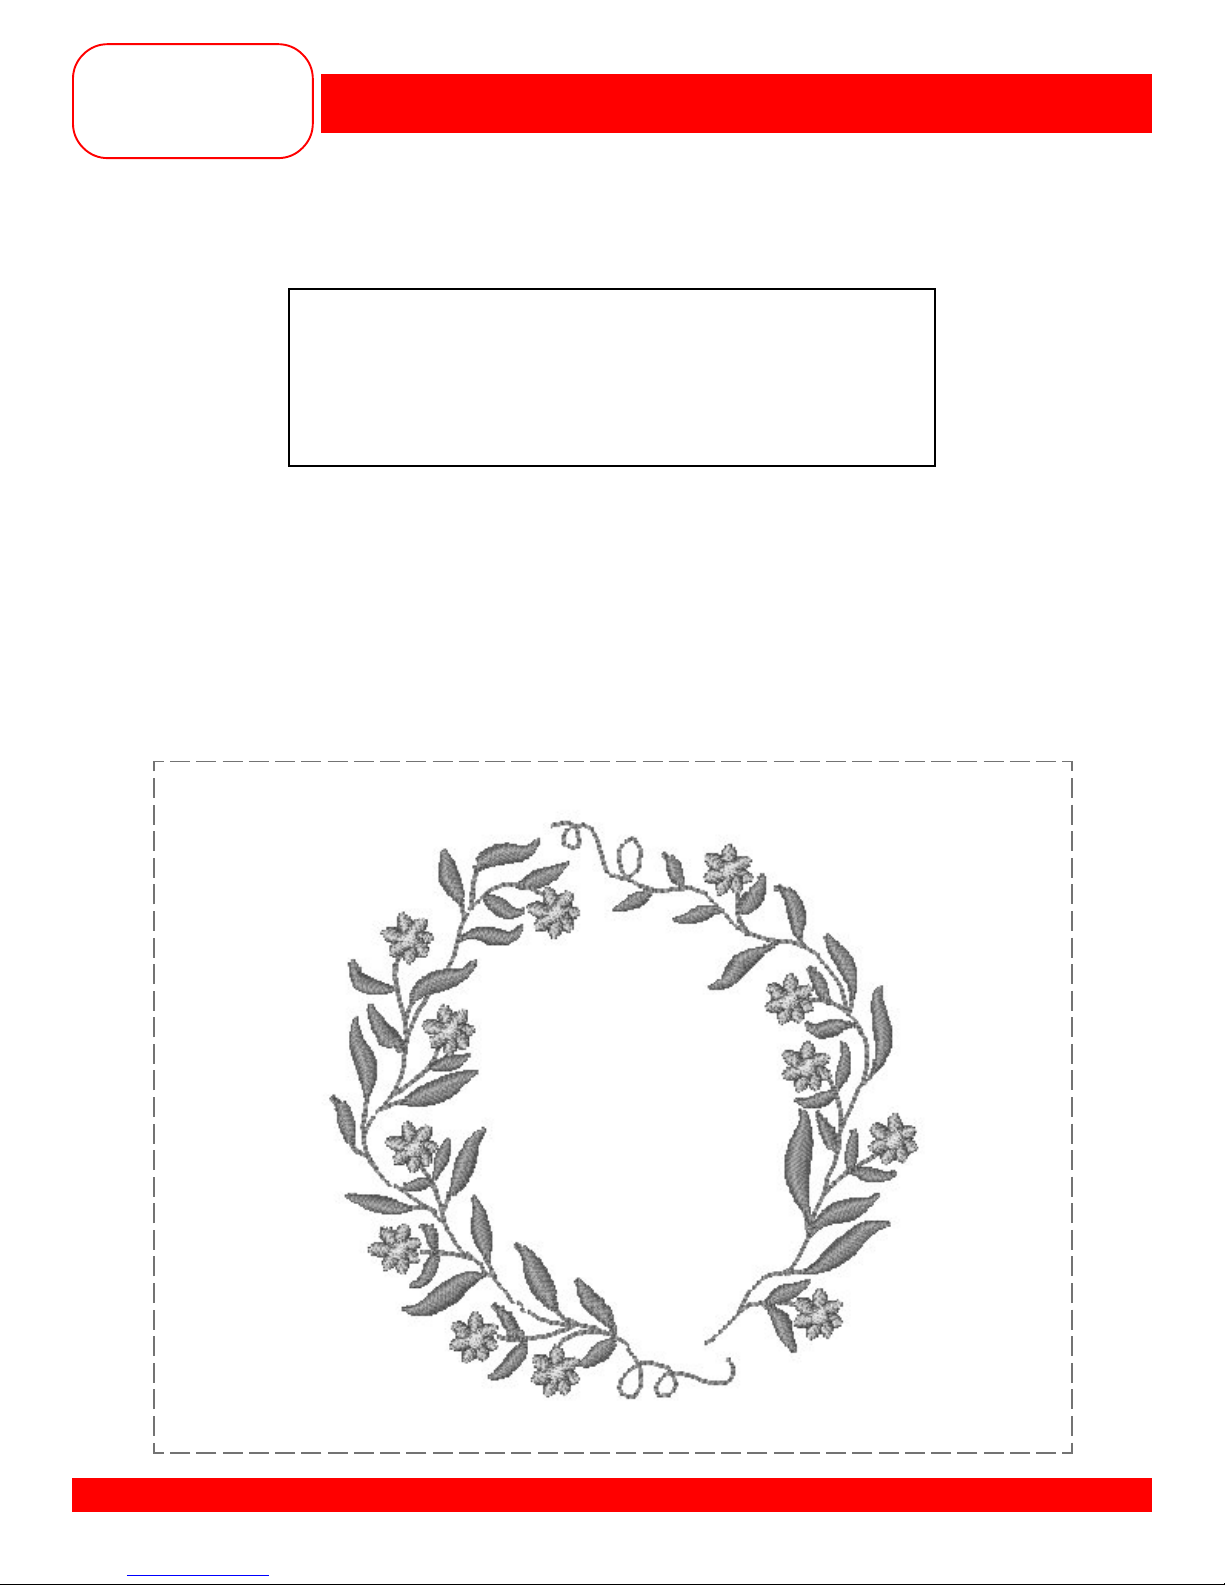
STITCHING A MOTIF
Fabric: Firm fabric and stabilizer, 8” x 10”
Needle: Embroidery
Thread: Isacord embroidery thread
Choose colors to match the motif
Presser Foot: Embroidery Foot #15
Built-in Motifs: Floral Wreath
Owner’s manual pg.___
• Using the medium hoop, hoop the fabric and stabilizer .
• Attach the embroidery module.
• Access embroidery by touching the Embroidery Mode Category button
• follow the on-screen instructions to prepare for embroidery
• Select the Motif folder
• Select the Floral Wreath motif
• Touch OK to go to the Embroidery Ready screen
• Begin the embroidery process.
• Note at the completion of color one, the thread is automatically cut and a message appears
reminding you that it is time to for the next thread color in the motif.
• When the motif is complete, a message will appear indicating, “Design successfully finished”
• Remove the hoop from the machine.
• Remove the fabric from the hoop.
• Trim and mount the sample
MASTERING YOUR BERNINA® 9/1/02 SECTION A
artista 200 Embroidery/8
MASTERING
YOUR
BERNINA
®
BERNINA® artista 200 Embroidery
STITCHING A MOTIF
MASTERING YOUR BERNINA® 9/1/02 SECTION A
artista 200 Embroidery/9
MASTERING
YOUR
BERNINA
®
BERNINA® artista 200 Embroidery
MONOCHROME EMBROIDERY
Fabric: Firm fabric and stabilizer, 8” x 10”
Needle: Embroidery
Thread: Isacord embroidery thread
Choose one color
Presser Foot: Embroidery Foot #15
Built-in Motifs: Floral Wreath
Owner’s manual pg.___
• Using the medium hoop, hoop the fabric and stabilizer .
• Select the Floral Wreath again
• Touch OK to go to the Embroidery Ready screen
• Select the Single/Multi color motif symbol
• By touching this once, the wreath will be completely sewn in one color with no stops or thread cuts.
• Embroider the motif.
• When the motif is complete, a message will appear indicating, “Design successfully finished”
• Trim and mount the sample
MASTERING YOUR BERNINA® 9/1/02 SECTION A
artista 200 Embroidery/10

MASTERING
YOUR
BERNINA
®
BERNINA® artista 200 Embroidery
CUSTOMIZING THREAD COLOR
Fabric: Firm fabric and stabilizer, 8” x 10”
Needle: Embroidery
Thread: Embroidery thread brand per your selection
Colors to match motif
Presser Foot: Embroidery Foot #15
Built-in Motifs: Floral Wreath
Owner’s manual pg.___
• Using the Medium hoop, hoop the fabric and stabilizer
• Select the Floral Wreath again
• The motif opens up in the Edit 1 screen
• Touch the Color Number symbol
• The Color Motif display appears
• Touch the Color Information bar
• A dialog box opens with Change thread color/brand information. In this box, the current thread color
and/or brand of thread can be changed.
• Select a brand of thread.
• Choose from Isacord, Madeira, Mettler Silky Sheen, Sulky , and Mettler Poly Sheen
• Assign a new color of green to the design and touch OK.
• You are back in the Edit 1 screen again
• Use the right hand scroll arrow to move to the second color and repeat the process changing the
color of the flowers.
• Repeat a third time and change the color of the flower centers.
• Embroider your newly colored design.
• If you wanted, this customized motif could be saved with your new color settings for later use.
(Saving of Motifs will be covered in Section B)
• Trim and mount the sample
MASTERING YOUR BERNINA® 9/1/02 SECTION A
artista 200 Embroidery/11

MASTERING
YOUR
BERNINA
®
BERNINA® artista 200 Embroidery
CUSTOMIZING THREAD COLOR
MASTERING YOUR BERNINA® 9/1/02 SECTION A
artista 200 Embroidery/12
MASTERING
YOUR
BERNINA
®
BERNINA® artista 200 Embroidery
DUPLICATING AND RESIZING MOTIFS
Fabric: Firm fabric and stabilizer, 1 1” x 15”
Needle: Embroidery
Thread: Isacord embroidery thread
Choose thread colors to match motif
Presser Foot: Embroidery Foot #15
Built-in Motifs: Little Pansies
Owner’s manual pg.___
• Using the large oval hoop, hoop the fabric and stabilizer
• Select the Little Pansies motif
• The motif opens up in the Edit 1 screen
• Select the Duplicate Motif symbol
• There are now 2 copies of the Little Pansies motif on the screen. the bottom one is “grayed out” and
the top one is in color. The motif in color is the active one.
• Touch the To Next Page - Edit 2 symbol. You are now in Edit 2.
• Touch the Move Motif symbol and move the active Little Pansies motif towards the top of the hoop
[Stitch length knob - Position +600 / Stitch width knob - Position 0]
• Using the Retrieve function, activate the other Little Pansies motif and move it towards the bottom of the
hoop [Stitch length knob - Position -450 / Stitch Width knob - Position 0]
• Touch the Rescale Motif Proportionally symbol and increase the size of the lower motif to 180%
• Touch OK
• A dialog box opens asking if you wish to recalculate the stitch count or simple resize?
• Select the Resizing option
• Remember that resize will simply take the existing stitch count of your design and spread the stitches
out to fit the new size parameters of your design.
• Embroider the motif.
• When the motif is complete, trim and mount the sample.
• Note the stitch count of the design for later reference.
• DO NOT TURN THE MACHINE OFF OR SELECT A DIFFERENT MOTIF.
YOU WILL BE USING THIS DESING FOR THE NEXT EXERCISE.
MASTERING YOUR BERNINA® 9/1/02 SECTION A
artista 200 Embroidery/13
 Loading...