


Fully Automatic
Espresso Machine
User Manual
CEG5311X |
|
|
|
|
|
|
||||
EN |
|
DE |
|
FR |
|
TR |
|
ES |
|
CS |
|
|
|
|
|
||||||
IT |
|
PL |
|
RO |
|
SL |
|
AR |
|
|
01M-8813573200-2718-01

CONTENTS
ENGLISH |
5-19 |
|
|
DEUTSCH |
20-38 |
|
|
FRANÇAIS |
39-55 |
|
|
TÜRKÇE |
56-72 |
|
|
ESPAÑOL |
73-91 |
|
|
ČESKY |
92-108 |
|
|
ITALIANO |
109-126 |
|
|
POLSKI |
127-147 |
|
|
SLOVAK |
148-166 |
|
|
ROMÂNĂ |
167-183 |
|
1 |
|
16 |
2 |
|
|
3 |
|
15 |
4 |
|
5 |
|
|
|
6 |
|
|
7 |
|
|
8 |
|
14 |
|
|
|
9 |
|
13 |
|
|
10
12 |
11 |
|
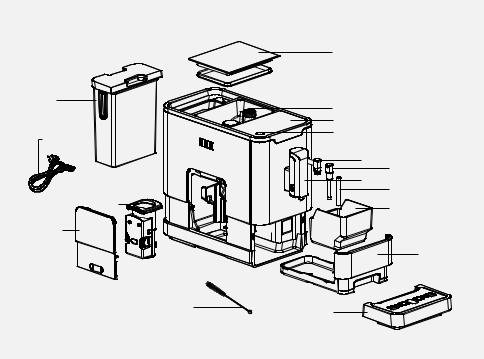
1. |
Coffee Beans Container Cover |
Technical data |
2. |
Coffee Bean Container |
Power supply: |
3. |
Control Panel |
220-240 V~, 50-60 Hz |
4. |
On/Off button |
Power: 1350 W |
5. |
Steam Nozzle |
Technical and design modifications |
6. |
Nozzle cover |
reserved. |
|
7.Adjustable coffee spout
8.Metal tube
9.Coffee Grounds Container
10.Internal Drip Tray
11.External Drip Tray
12.Cleanness brush
13.Service Door
14.Brewer
15.Power cord
16.Water Tank
All declared values on the product and on the printed leaflets are picked up after laboratory measurements performed according to related standarts. These values may differ upon usage and ambient conditions.

Please read this user manual first!
Dear Customers,
Thank you for selecting an Beko product. We hope that you get the best results from your product which has been manufactured with high quality and state-of-the-art technology. Therefore, please read this entire user manual and all other accompanying documents carefully before using the product and keep it as a reference for future use. If you handover the product to someone else, give the user manual as well. Follow all warnings and information in the user manual.
Meanings of the symbols
Following symbols are used in the various section of this manual:
Important information or useful hints about usage.
DANGER: Warning for hazardous situations with regard to life and property.
WARNING: Warning indicates a potentially dangerous situation.
CAUTION: Warning indicates potential material damage.
This product has been produced in environmentally-friendly, state-of-the-art facilities.
Complies with the WEEE Directive. |
It does not contain PCB. |

1 Important instructions for safety and environment
This section includes the safety instructions that will help providing protection against personal injury and material loss risks. Failure to followtheseinstructionsinvalidates the granted warranty.
1.1 Danger of electric current
Danger to life by electric current! Contact with live wires or components could lead to serious injury or even death!
Observe the following safety precautions to avoid electric shocks:
•• Do not use the coffee machine if the connecting cable or mains plug are damaged.
•• Before reusing the coffee machine, the mains cable must be renewed by a qualified electrician.
•• Do not open the housing of the coffee machine. Danger of electric shock if live connections are touched and/or the electrical and mechanical configuration is changed.
•• Before cleaning the bean container, pull the mains plug of the appliance out of the socket. Danger from rotating coffee mill!
1.2 Danger of burning or scalding
Parts of the coffee machine can become very hot during operation! Dispensed drinks and escaping steam are very hot!
Observe the following safety precautions to avoid burning/ scalding yourself and/or others:
•• Do not touch either of the metal sleeves on both coffee spouts.
•• Avoid direct contact of the skin with escaping steam or hot rinsing, cleaning and descaling water.
1.3 Fundamental safety precautions
Observe the following safety precautions to ensure safe handling of the coffee machine:
•• Never play with packaging material. Risk of suffocation.
•• Inspect the coffee machine for visible signs of damage before use. Do not use a damaged coffee machine.
Fully Automatic Coffee Machine / User Manual |
5 / EN |
|
|

1 Important instructions for safety and environment
•• If the connecting cable is damaged, it should only be replaced by a service agent recommended by the manufacturer in order to prevent any danger! Please contact the manufacturer or his customer service.
•• Repairs to the coffee machine must only be carried out by an authorised specialist or by the works customer service. Unqualified repairs can lead to considerable danger for the user. They will also void the warranty.
•• Repairs to the coffee machine during the warranty period may only be carried out by service centres authorised by the manufacturer, otherwise the warranty will become void in the event of subsequent damage.
•• Defective parts may only be replaced with original spare parts. Only original spare parts guarantee that the safety requirements are met.
•• This appliance can be used by children from the age of 8 up as well as by persons with reduced physical, sensory or mental abilities or with lacking experience and/or knowledge, if these persons are supervised or have been instructed how to use the appliance in a safe way and have understood the hazards which could arise from using it. Children must not play with the appliance. Cleaning and user maintenance shall not be made by children unless they are older than 8 and supervised.
•• This appliance is intended to be used in household and similar applications such as:
-staff kitchen areas in shops, offices and other working environments,
-farm houses,
-by clients in hotels, motels and other residential type environments,
-bed and breakfast type environments.
•• Protect the coffee machine against the effects of weather such as rain, frost and direct sunlight. Do not use the coffee machine outdoors.
6 / EN |
Fully Automatic Coffee Machine / User Manual |
|
|
1 Important instructions for safety and environment
•• Never immerse the coffee machine itself, the mains cable or the mains plug into water or other liquids.
•• Do not clean the coffee machine or accessories in a dish washer.
•• Do not pour any other liquids apart from water or place foodstuffs into the water tank.
•• Do not fill the water tank beyond the maximum mark (lower edge of the filling hole) (1.5 litres).
•• Only operate the machine when the waste container, drip tray and the cup grate are fitted.
•• Do not pull the cable to remove the plug from the mains socket or touch with wet hands.
•• Do not hold the coffee machine with the mains cable.
•• Keep the appliance and its cord out of reach of children aged less than 8 years.
•• Do not operate the hot water function continuously for more than one tank of water.
1.4 Intended use
The fully automatic coffee machine Beko is intended for use in homes and similar applications, for instance in staff kitchens, shops, offices and similar areas or by customers in bed & breakfast, hotels, motels and other living accommodation. This coffee machine is not intended for commercial use. The machine is only intended for preparing coffee and heating milk and water. Any other use other than previously stated is considered as improper use.
Danger resulting from improper use!
If not used for its intended purpose or used in any other way, the coffee machine may be or become a source of danger.
AWARNING: Therefore, the coffee machine may only be used for its intended purpose.
AWARNING: Observe the procedures described in this user manual.
No claims of any kind will be accepted for damage or injury resulting from use of the coffee machine for other than its intended purpose.
The risk has to be borne solely by the machine owner.
Fully Automatic Coffee Machine / User Manual |
7 / EN |
|
|
1 Important instructions for safety and environment
1.5 Limitation of liability
All technical information, data and instructions on installation, operation and maintenance of the coffee machine contained in these operating instructions represent the current status at the time of printing and are based on the best possible knowledge gained by experience and knowhow.
No claims can be derived from the information, illustrations and descriptions in this user manual. The manufacturer assumes no liability for damage or injury resulting from failure to observe the user manual, use for other than the intended purpose, unprofessional repairs, unauthorised modifications or use of non-approved spare parts.
1.8 Package information
Packaging materials of the product are manufacturedfromrecyclablematerials in accordance with our National Environment Regulations. Do not
dispose of the packaging materials together with the domestic or other wastes. Take them to the packaging material collection points designated by the local authorities.
1.6 Compliance with the WEEE Directive and Disposing of the Waste Product:
This product complies with EU WEEE Directive (2012/19/EU). This product bears a classification symbol for waste electrical and electronic equipment (WEEE).
 This product has been manufactured
with high quality parts and materials
which can be reused and are suitable
 for recycling. Do not dispose of the waste product with normal domestic and other wastes at the end of its service life. Take
it to the collection center for the recycling of electrical and electronic equipment. Please consult your local authorities to learn about these collection centers.
1.7 Compliance with RoHS Directive
The product you have purchased complies with EU RoHS Directive (2011/65/EU). It does not contain harmful and prohibited materials specified in the Directive.
8 / EN |
Fully Automatic Coffee Machine / User Manual |
|
|
2Display
2.1Control Panel
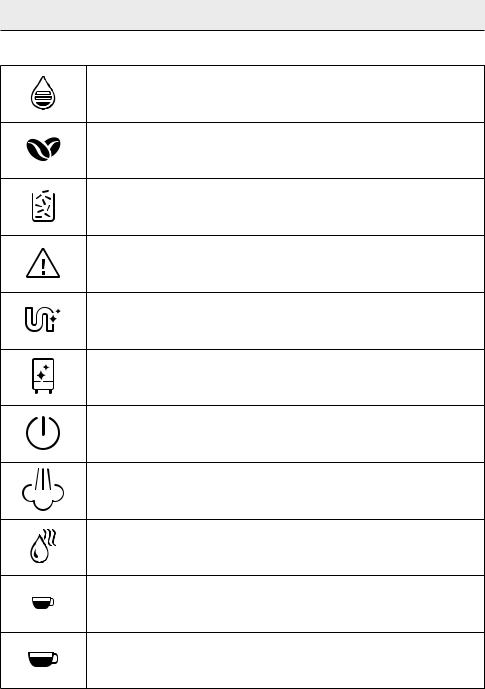
Flashing: Low water level/ Water tank missing
Lack of bean
Lights up stably: coffee grounds container is full
Flashing: Internal Drip Tray/coffee grounds container is missing
Lights up stably: Brewer is missing/ installed improperly
Flashing: Service door is opened / installed improperly
Lights up stably: Requires to do descaling
Flashing: Descaling is under process
Empty System Function is running
Power ON/OFF Button
Steam Button
Hot Water Button
Strong Espresso Button
Mild Espresso Button
In the box, three packs of cleaning agents are included for the process of self-cleaning.
Fully Automatic Coffee Machine / User Manual |
9 / EN |
|
|
3Preparation
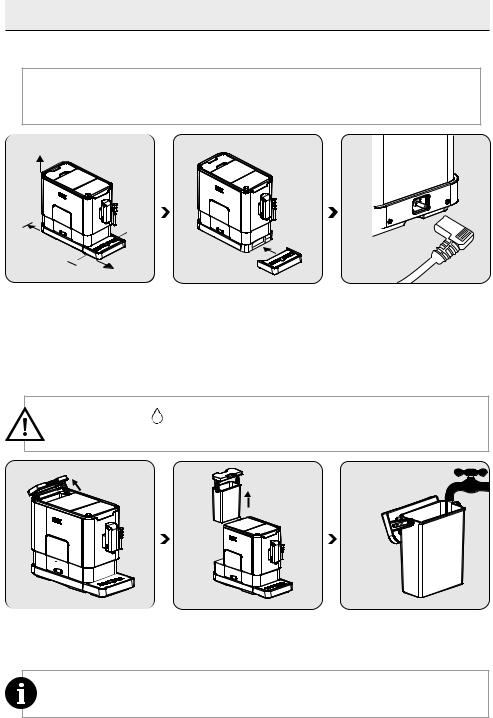
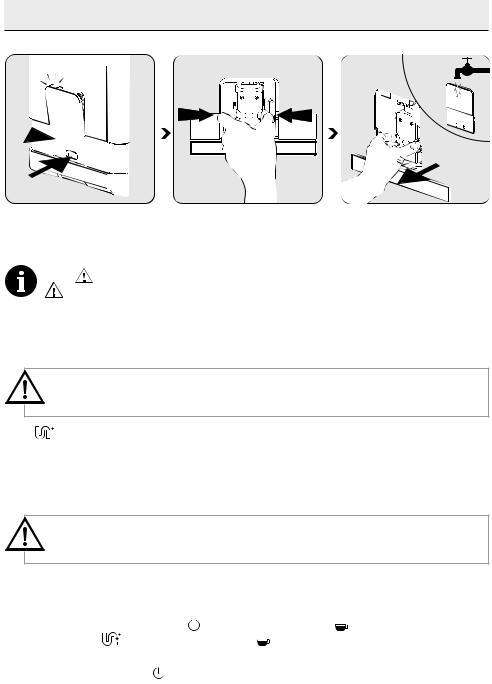
3.1Installation
 Remove any protective films, stickers and any other packing material on the appliance.
150mm
.
150mm  150mm
150mm

 150mm 150mm
Choose a safe and stable surface with an |
Insert the external drip tray. Make sure it |
Unwind and straighten the power cord |
easily reachable power supply and allow |
is inserted correctly. |
and insert the plug into the socket loca- |
minimum distance from the sides of the |
|
ted on the back of the machine. Insert |
machines. |
|
the other end of the power cord into a |
|
|
wall socket with suitable power voltage. |
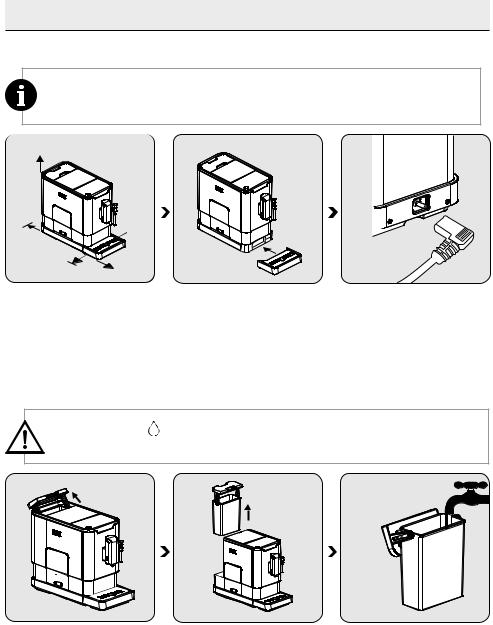
3.3 Filling the water tank
WARNING: When  is flashing, the water tank is in low water level and requires filling the water tank.
Lift the water tank by using the lid as the |
Take the water tank out. |
Rinse the water tank with fresh water |
handle. |
|
and then fill the tank to the Max level and |
|
|
place it back into the machine. Make sure |
|
|
it is fully inserted. |
To prevent overflow of water from the water tank, do not add water directly into the appliance with another container.
10 / EN |
Fully Automatic Coffee Machine / User Manual |
|
|
3 Preparation
WARNING: Never fill the water tank with warm, hot, sparkling water or any other liquid which might damage the water tank and the machine.
.
Placethewatertankbackbyusingthelid |
Close the water tank by using the lid. |
as the handle. |
|
4Operation
4.1Grinding Adjustment
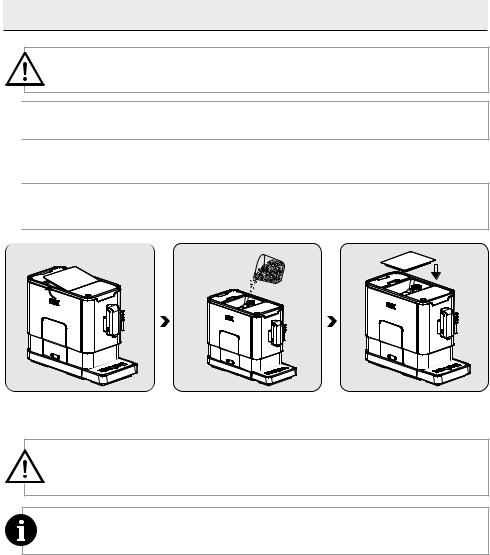
You can adjust the grinder to suit the roast of your coffee by turning adjuster knob in the bean container:
When the grinder is grinding the coffee bean when it is making the coffee, you can turn the adjust knob to do the adjustment.
WARNING: Never do the grinding adjustment when the grinder is not operating. It may damage the grinder.
 The dots on the adjuster knob indicate the fineness of the grind.
Fully Automatic Coffee Machine / User Manual |
11 / EN |
|
|

4Operation
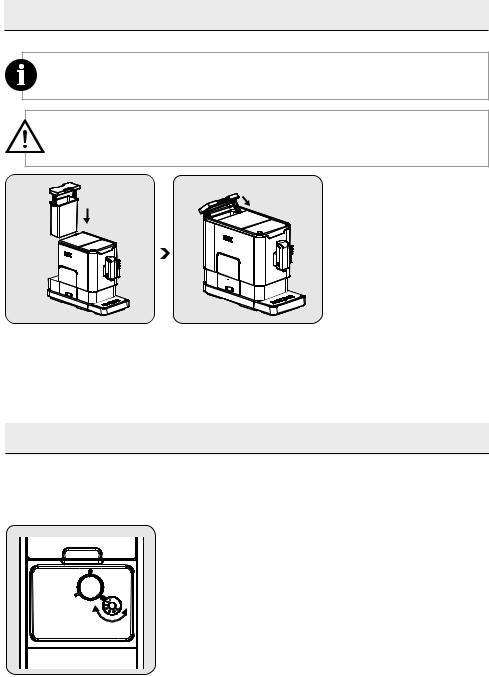
4.2Filling the bean container
 When
When is flashing, the appliance needs to be filled with coffee bean.
|
|
|
|
Remove the bean container lid. |
Slowly pour in the coffee beans. |
Place the container lid back. |
|
WARNING: Fill the coffee bean container only with coffee beans. Grounded coffee, instant coffee, caramelized coffee and any other objects may damage the machine.
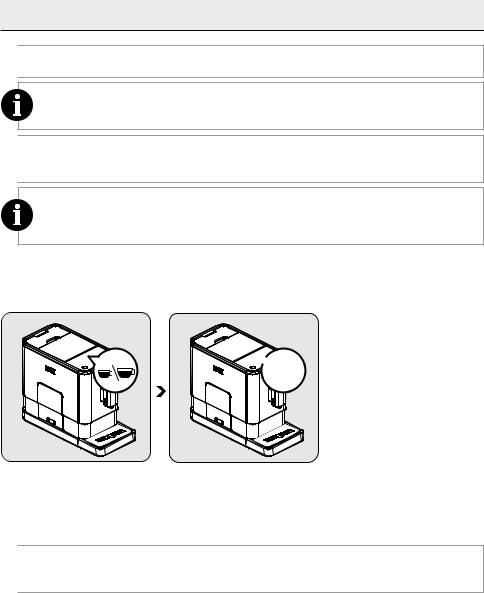
 Press the hot water button to clean inside of the coffee maker before first use.
4.3 Making Your Coffee
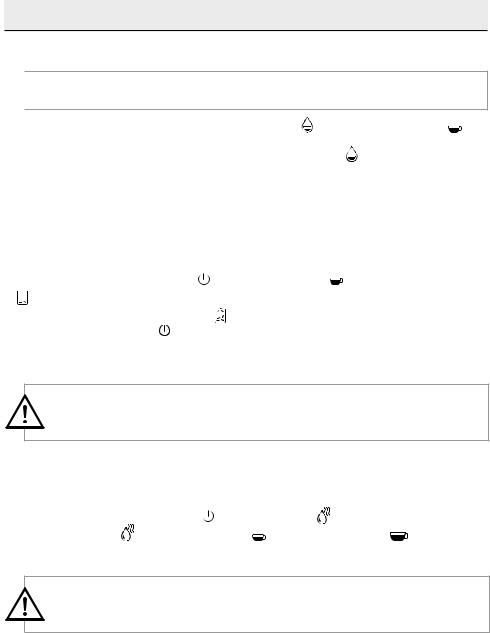
Switch on the appliance by pressing the power on/off button. The appliance is then in the standby condition.
Place a cup under the coffee spout and adjust the height of the spout the fit the cup.
The espresso button being pressed will lightonandtheilluminationwilllightsup indicates that the appliance is preparing the cup of coffee.
When the appliance is back to standby condition, the coffee is ready to serve.
12 / EN |
Fully Automatic Coffee Machine / User Manual |
|
|
4 Operation
 Switch off the appliance by pressing the power on/off button.
Depending on the taste of coffee you would like to have, press strong espresso button or mild espresso button .
 Press the hot water button to clean inside of the coffee maker before first use.
The Appliance is equipped with auto-shut off. Depending on the mode you have selected the appliance will have different auto-shut off timing.
4.4 Adjustiing The Volume Of Your Coffee/Hot Water
You can memorize your desired volume of coffee for both strong espresso and mild espresso and also the hot water from 25ml to 250ml.
 2x bipp!
When making your coffee (either strong espresso or mild espresso) or dispensing hot water, press and hold the button you selected. The appliance will continue to make the cup of coffee.
When the volume of coffee meets your desiredvolume,releasethebutton.Two beep sounds will be heard indicates that the volume of coffee is being memorized.
 You can reset the volume of coffee back to the factory setting by selecting the default setting.
Fully Automatic Coffee Machine / User Manual |
13 / EN |
|
|

4Operation
4.5Preparing Frothy Milk for Coffee
As the temperature of steam is higher than the temperature of espresso, so espresso should be prepared before making frothy milk; otherwise the espresso might be burnt.
Prepare the espresso coffee with larger cup.Turnthesteamnozzletowardtothe Drip tray.
Press the steam button. Steam indicator light will flash. Then the appliance is heating up and draining the residual water into the Drip Tray or another container. After the steam indicator light stop flashing and stay on, place a container with milk under the steam nozzle and immerse the steam nozzle about 5cm deep into the container. Swivel the container while the hot steam comes out.
Pour the hot frothy milk into the espresso. Now you can enjoy your coffee.
4.6 Hot Water
The appliance can dispense hot water by simply pressing the hot water button. The hot water button and the illumination will lights up indicates that the appliance is heating up the water. When the hot water button and the illumination turn off, the water is ready to serve.
14 / EN |
Fully Automatic Coffee Machine / User Manual |
|
|
4Operation
4.7Mode Selection
The machine has two different setting: default setting, ECO mode and speed mode. In ECO mode, the appliance helps to save more energy. In speed mode, the user can make their coffee faster than in default setting.
|
ECO Mode |
Speed Mode |
Default Setting |
|
|
|
|
Illumination Light |
No |
Yes |
Yes |
|
|
|
|
Pre-brewing* |
Yes |
No |
Yes |
|
|
|
|
Auto shut off time |
10mins |
30mins |
20mins |
|
|
|
|
Cup Volume memory |
Yes |
Yes |
Yes |
|
|
|
|
The pre-brewing function moistens the grounded beans in the brewer with a small amount of water before full extraction. This expands the coffee grounds to build up a greater pressure in the brewer which help extraction of all the oils and full flavor from the grounded beans.
1.When the machine is in standby condition, press and holds the for 5 seconds.
2.The  will then be flashing and the following button will have the following indications for different settings:
|
Hot water button |
Strong espresso button |
Mild espresso button |
|
|
|
|
In ECO Mode |
Lights ON |
Flashing |
Flashing |
|
|
|
|
In Speed Mode |
Yes |
No |
Flashing |
|
|
|
|
In Default Setting |
Flashing |
Flashing |
Lights On |
|
|
|
|
3.Press the hot water button for ECO mode, strong espresso button for speed mode and mild espresso button for default setting. Two Beep sound will be heard indicates that the mode is being selected. (Note: If you are pressing the relative lights on button for each mode, the machine will not response).
4.If you would like to remain the setting unchanged, press  again or wait for 5 seconds for the machine to return to the standby condition
Fully Automatic Coffee Machine / User Manual |
15 / EN |
|
|
5Cleaning
5.1Cleaning of the appliance
1.Disconnect the power cord from the mains supply outlet.
2.Pour away all the water in the internal and external drip tray
3.Use a damped cloth or non-scratching cleaner to clean the water stains on the appliance.
WARNING: Never use any abrasive, vinegar or descaling agents not included in the box to clean the appliance.
Timely cleaning and maintenance of the appliance is very important in prolonging the life of the appliance.

 1
1

 2
2
 1
1
 2
2
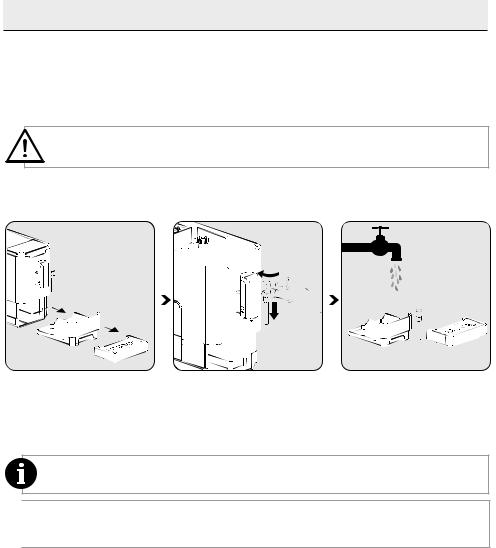
Remove the external drip tray. Slides open the internal drip tray and the coffee grounds container.
Unlock the nozzle cover by turning it to left. Then pull it downward to remove Pull the metal tube downward to ds-assembly the nozzle cover and metal tube.
Empty the coffee grounds container, external drip tray, nozzle cover and metal tube wash it with fresh water. Dry it afterwards.
Assembly the metal tube back to the nozzle cover. Then push upward to place the nozzle cover back. And turn it to right to lock it.
 When
When lights up, the coffee grounds container needs to be empty.
16 / EN |
Fully Automatic Coffee Machine / User Manual |
|
|
5 Cleaning
2 

1
Pulldowntheservicedoorandremoveit. |
Press the release knob. |
Remove the brewer. Wash the brewer |
||
|
|
|
|
with fresh water. Dry the brewer after- |
|
|
|
|
wards. |
|
|
|
||
|
When |
lights up stably, it indicates that the brewer is missing / installed improperly. When |
||
|
is flashing, it indicates that the service door is missing/installed improperly. |
|||
|
|
|
|
|
5.2 Self-Cleaning
WARNING: Please wait for finishing the self cleaning process and then switch off the machine.
When  is flashing, it indicates that the appliance needs to undergo self-cleaning. The appliance will remain in the best condition if this function is performed at least once a month or more regularly depending on the hardness of water used. It is also suggested that to
1. Fully fill the water tank.
2. Adding one pack of cleaning agent included in the box to the water tank.
WARNING: Do not use vinegar or other cleaning agent to do self-cleaning of this appliance. The cleaning agent might damage the appliance.
3.Plug in the appliance.
4.Place a sufficient large container under the coffee spout.
5. In standby condition, press and hold and strong espresso button for 5 seconds. A beep sound |
|
will be heard with |
and strong espresso button will be flashing. |
6. Press strong espresso button to confirm undergoing the self-cleaning process. To resume back to the standby condition, press .
Fully Automatic Coffee Machine / User Manual |
17 / EN |
|
|
5 Cleaning
7.Will be flashing indicates that the appliance is undergoing the self-cleaning process.
 WARNING: Keep skin/body away from the hot water.
8. When all the water in the water tank is being dispensed out, and strong espresso button will be flashing. Remove all the remaining solution in the water tank and fill the tank with normal tap water until the max position. When water is filled into the water tank,
 will goes off. Then the appliance will continue the self-cleaning process.
9. When the self-cleaning process is completed, the appliance will switch off automatically.
5.3 Empty System Function
The empty system function is recommended to be used before long period of non-use, frost protection and before talking to repair agent.
1. In standby condition, press and hold the and mild espresso button together for 5 seconds. 2  will then be flashing.
3. Remove the water tank from the appliance will light up stably indicates that the empty system is under process. You can press before removing the water tank to resume back to the standby condition.
4. When the empty system function is completed, the appliance will switch off automatically.
WARNING: After perform EMPTY SYSYEM FUNCTION; press the hot water button until water can come out from spout when the coffee maker is reused again.
5.4 Manual Rinsing
You can perform a manual rinsing cycle to clean the coffee nozzle after use. It is also suggested to perform a manual rinsing if the appliance has not been used for a long period of time.
1. In standby condition, press and hold the and hot water button together.
2. The hot water button , strong espresso button and mild espresso button will then goes off. The coffee nozzle will then dispense a small amount of water which is used for the rinising.
WARNING: Water comes out of the coffee nozzle is hot and is collected in the drip tray underneath. Avoid contact with splashes of water.
3. After rinsing, the appliance will return to the standby condition.
18 / EN |
Fully Automatic Coffee Machine / User Manual |
|
|

6 Troubleshooting
Problem |
|
Cause |
Solution |
|
|
|
|
The appliance does not work. |
|
The appliance is not connected to the mains. |
Plug in and press the switch. Check the cable |
|
|
|
and the Plug |
|
|
|
|
No or delayed response in several trials of |
Appliance is under an electromagnetic |
Unplug the appliance. Restart after few |
|
pressing on function key on the panel |
interference |
minutes Clean the panel with the cloth |
|
|
|
Dirt over the panel |
provided |
|
|
|
|
The coffee is not hot enough. |
|
The cups have not been preheated. |
Rinse the appliance at least 3 times before |
|
|
The brewing unit is too cold. |
making the coffee. |
|
|
|
|
The coffee cannot come out from spout. |
Empty system function maybe used before. |
Press the hot water button until water can |
|
|
|
|
come out from spout. |
|
|
|
|
The first cup of coffee is poor quality. |
The first run of grinder does not pour |
Throw the coffee away. The other coffees |
|
|
|
sufficient quantity coffee power into the |
will always be of good quality. |
|
|
brewing unit. |
|
|
|
|
|
The touch buttons are not sensitive |
|
Excessive scale has built up. |
Descale the appliance. |
|
|
|
|
The water tank is removed / the water level |
The area near the water |
Wipe the water around the water tank |
|
is very low in the water tank but |
have no |
tank connector is wet. |
connector |
alert. |
|
|
|
|
|
|
|
Internal drip tray is filled with a lot of water. |
Coffee powder too fine which block the water |
Adjust the coffee fineness to bigger dot |
|
|
|
to come out. |
during grinder operation. |
|
|
|
|
Coffee is delivered too slowly or a drop at a |
Coffee powder too fine which block the water |
Adjust the coffee fineness to bigger dot |
|
time. |
|
to come out. |
during grinder operation. |
|
|
|
|
Lack of bean indicator flashes but there is still |
Internal coffee powder outlet is blocked. |
To follow the steps of section E (V. Cleaning |
|
a lot of coffee bean inside the container. |
|
coffee powder outlet). |
|
|
|
|
|
The brewer or the coffee ground tray is |
The appliance did not finish the self-cleaning |
Please switch on the machine again and let it |
|
impossible to remove. |
|
process and was switched off . |
finish its auto cleaning process. |
|
|
|
|
Fully Automatic Coffee Machine / User Manual |
19 / EN |
|
|

Bitte lesen Sie zunächst diese Anleitung!
Sehr geehrte Kundin, sehr geehrter Kunde,
Danke, dass Sie sich für ein Produkt der Marke Beko entschieden haben. Wir hoffen, dass Sie mit diesem Produkt, das mitdenhöchstenQualitätsanforderungen und der modernsten Technologie hergestellt wurde, beste Ergebnisse erzielen. Bitte lesen Sie die gesamte Bedienungsanleitung und alle anderen Begleitdokumente aufmerksam, bevor Sie das Produkt verwenden; bewahren Sie sie zum künftigen Nachschlagen sicher auf. Wenn Sie das Produkt an einen Dritten weitergeben, händigen Sie bitte auch diese Anleitung aus. Befolgen Sie alle Warnhinweise und Informationen in dieser Anleitung.
1.Abdeckung des Kaffeebohnenbehälters
2.Kaffeebohnenbehälter
3.Bedienfeld
4.Ein-/Austaste
5.Dampfdüse
6.Düsenabdeckung
7.Anpassbare Kaffeedüse
8.Metallrohr
9.Kaffeesatzbehälter
10.Interne Tropfschale
11.Externe Tropfschale
12.Reinigungspinsel
13.Serviceklappe
14.Brühgruppe
15.Netzkabel
16.Wassertank
Erklärung der Symbole
In dieser Anleitung werden die folgenden Symbole verwendet:
Wichtige Informationen oder nützliche
Tipps zur Verwendung.
GEFAHR: Warnung vor Situationen, die Körperund Sachschäden zur Folge haben können.
Warnung: Warnung zeigt eine potenziell gefährliche Situation.
Achtung: Warnung zeigt potenzielle
Materialschäden.
Technische Daten
Spannungsversorgung:
220-240 V Wechselspannung,
50 bis 60 Hz
Leistung: 1350 W
Technische und optische Änderungen vorbehalten.
Alle angegebenen Werte am Produkte und im Dokument wurden unter Laborbedingungen entsprechend den zutreffenden Standards ermittelt. Diese Werte können je nach Nutzung und Umgebungsbedingungen variieren.
Dieses Produkt wurde in umweltfreundlichen, modernen Einrichtungen hergestellt
Das Gerät erfüllt die Vorgaben der |
Es enthält kein PCB. |
WEEE-Richtlinie. |
|
1 Wichtige Anweisungen zu Sicherheit und Umwelt
In diesem Kapitel erhalten Sie wichtige Sicherheitshinweise im UmgangmitdemGerät.DiesesGerät entspricht den vorgeschriebenen Sicherheitsbestimmungen . Ein unsachgemäßer Gebrauch kann jedoch zu Personen und Sachschäden führen.
1.1 Gefahr durch elektrischen Strom
Lebensgefahr durch elektrischen Strom!
Beim Kontakt mit unter Spannung stehenden Leitungen oder Bauteilen besteht Lebensgefahr! Beachten Sie die folgenden Sicherheitshinweise, um eine Gefährdung durch elektrischen Strom zu vermeiden:
•• Benutzen Sie das Gerät nicht, wenn das Anschlusskabel oder der Netzstecker beschädigt sind.
•• Lassen Sie vor der Weiterbenutzung des Gerätes eine neue Anschlussleitung durch eine autorisierte Fachkraft installieren.
•• Öffnen Sie auf keinen Fall das Gehäuse des Gerätes. Werden spannungsführende Anschlüsse
berührt und der elektrische und mechanische Aufbau verändert, besteht Stromschlaggefahr.
•• Gefahr bei drehendem Mahlwerk! Ziehen Sie vor dem Reinigen des Bohnenbehälters den Netzstecker des Gerätes aus der Steckdose.
1.2 Verbrennungsund Verbrühungsgefahr
Teile des Gerätes können während des Betriebes sehr heiß werden! Die ausgegebenen Getränke und austretender Dampf sind sehr heiß! Beachten Sie die folgenden Sicherheitshinweise, um sich und/ oder andere nicht zu verbrennen/ verbrühen:
•• Berühren Sie nicht die Metallhülsen an den beiden Kaffeeausläufen.
•• Vermeiden Sie direkten Hautkontakt mit austretendem Dampf und mit herauslaufendem, heißen Spül-, Reinigungs-, und Entkalkungswasser.
Kaffeevollautomat / Bedienungsanleitung |
21 / DE |
|
|

1 Wichtige Anweisungen zu Sicherheit und Umwelt
1.3 Grundlegende
Sicherheitshinweise
Beachten Sie für einen sicheren Umgang mit dem Gerät die folgenden Sicherheitshinweise:
•• Kontrollieren Sie das Gerät vor der Verwendung auf äußere sichtbare Schäden. Nehmen Sie ein beschädigtes Gerät nicht in Betrieb.
•• Lassen Sie Reparaturen am Gerät nur von autorisierten Fachhändlern oder vom Werkskundendienst durchführen. Durch unsachgemäße Reparaturen können erhebliche Gefahren für den Benutzer entstehen. Zudem erlischt der Garantieanspruch.
•• Bei Beschädigung des Netzkabels darf dieses nur durch eine vom Hersteller benannte Reparaturwerkstatt ersetzt werden, um eine Gefährdung zu ver meiden! Bitte wenden Sie sich an den Hersteller oder seinen Kundendienst.
•• Eine Reparatur des Gerätes während der Garantiezeit darf nur von einem vom Hersteller autorisierten Kundendienst vorgenommen werden, sonst besteht bei nachfolgenden Schäden kein Garantieanspruch mehr.
•• Defekte Bauteile dürfen nur gegen Original-Ersatzteile ausgetauscht werden. Nur bei diesen Teilen ist gewährleistet, dass sie die Sicherheitsanforderungen erfüllen werden.
•• Dieses Gerät kann von Kindern ab 8 Jahren und darüber und von Personen mit reduzierten physischen, sensorischen oder mentalen Fähigkeiten oder Mangel an Erfahrung und/oder Wissen benutzt werden, wenn sie überwacht oder unterwiesen wurden, bezüglich des sicheren Gebrauchs des Gerätes und die daraus resultierenden Gefahren verstanden haben. Kinder dürfen nicht mit dem Gerät spielen. Reinigung und Benutzerwartung dürfen nicht durch Kinder durchgeführt werden, Kinder ohne Überwachung durchgeführt werden.
22 / DE |
Kaffeevollautomat / Bedienungsanleitung |
|
|

1 Wichtige Anweisungen zu Sicherheit und Umwelt
•• Gestatten Sie Kindern die Benutzung des Gerätes nur unter Aufsicht um sicherzustellen, dass sie nicht mit dem Gerät spielen.
•• Dieses Gerät ist dazu bestimmt, im Haushalt und ähnlichen Anwendungen verwendet zu werden, wie beispielsweise:
- in Küchen für Mitarbeiter in Läden, Büros und anderen gewerblichen Bereichen,
- in landwirtschaftlichen Anwesen,
- von Kunden in Hotels, Motels und anderen gewerblichen Bereichen,
- in Frühstückspensionen.
•• Schützen Sie das Gerät vor Witterungseinflüssen wie Regen, Frost und direkter Sonneneinstrahlung. Benutzen Sie das Gerät nicht im Freien.
•• Tauchen Sie das Gerät, das Anschlusskabel oder den Netzstecker niemals in Wasser oder andere Flüssigkeiten.
•• Reinigen Sie das Gerät oder die Zubehörteile nicht im Geschirrspüler.
•• Füllen Sie außer Wasser keine anderen Flüssigkeiten oder Lebensmittel in den Wassertank.
•• Befüllen Sie den Wassertank nicht über die Max-Markierung (unterer Rand der Einfüllöffnung) hinaus mit Wasser (1,5 Liter).
•• Betreiben Sie das Gerät nur, wenn der Kaffeesatzbehälter, die Tropfschale und das Tassenrost eingesetzt sind.
•• Die Anschlussleitung immer am Netzstecker aus der Steckdose ziehen, nicht am Anschlusskabel und nicht mit nassen Händen anfassen.
•• Tragen Sie das Gerät nicht am Anschlusskabel.
•• Das Gerät und seine Anschlussleitungen sind von Kindern jünger als 8 Jahre fernzuhalten.
•• Verwende n Si e die Heißwasserfunktion nicht kontinuierlich für mehr als einen Tank Wasser.
Kaffeevollautomat / Bedienungsanleitung |
23 / DE |
|
|

1 Wichtige Anweisungen zu Sicherheit und Umwelt
1.4 Bestimmungsgemäße
Verwendung
Der Kaffeevollautomat Beko ist dazu bestimmt, im Haushalt und ähnlichen Anwendungen genutzt zu werden, beispielsweise in
Mit arbeiterküchen, Läden, Büros und vergleichbaren Bereichen oder von Kunden in Frühstückspensionen, Hotels, Motels und anderen Wohneinrichtungen. Dieses Gerät ist
nicht für den gewerblichen Gebrauch bestimmt. Das Gerät ist nur zur Kaffeezubereitung und dem Erwärmen von Milch und Wasser bestimmt. Eine andere oder darüber hinausgehende Benutzung gilt als nicht bestimmungsgemäß.
Gefahr durch nicht bestimmungsgemäße Verwendung!
Bei nicht bestimmungsgemäßer Verwendung und/oder andersartiger Nutzung können von dem Gerät Gefahren ausgehen.
WARNUNG: Deshalb darf Adas Gerät ausschließlich
bestimmungsgemäß verwendet werden.
WARNUNG: Die in dieser ABedienungsanleitung
beschriebenen Vorgehensweisen einhalten.
Ansprüche jeglicher Art wegen Schäden aus nicht bestimmungsgemäßer Verwendung sind ausgeschlossen.
Das Risiko trägt allein der Betreiber.
1.5 Haftungsbeschränkung
Alle in dieser Bedienungsanleitung enthaltenen technischen Informationen, Daten und Hinweise für die Installation, Betrieb und Pflege entsprechen dem letzten Stand bei Drucklegung und erfolgen unter Berücksichtigung unserer bisherigen Erfahrungen und Erkenntnisse nach bestem Wissen.
Aus den Angaben, Abbildungen und Beschreibungen in dieser Anleitung können keine Ansprüche hergeleitet werden.
Der Hersteller übernimmt keine Haftung für Schäden aufgrund von Nichtbeachtung der Anleitung, nicht bestimmungsgemäßer Verwendung, unsachgemäßen Reparaturen,
unerlaubt vorgenommener Veränderungen oder Verwendung nicht zugelassener Ersatzteile.
1.6 Entsorgung von Altgeräten:
Dieses Produkt erfüllt die Vorgaben der EU-WEEE- Direktive (19/2012/EU). Das Produkt wurde mit einem Klassifizierungssymbol für elektrische und elektronische Altgeräte (WEEE) gekennzeichnet.  Dieses Gerät wurde aus hochwertigen
Materialien hergestellt, die
wiederverwendet und recycelt werden können. Entsorgen Sie das Gerät am Ende seiner Einsatzzeit nicht mit dem
regulären Hausmüll; geben Sie es stattdessen bei einer Sammelstelle zur Wiederverwertung von elektrischen und elektronischen Altgeräten ab. Ihre Stadtverwaltung informiert Sie gerne über geeignete Sammelstellen in Ihrer Nähe.
1.7 Einhaltung von RoHS-Vorgaben:
Das von Ihnen erworbene Produkt erfüllt die Vorgaben der EU-RoHS Direktive (65/2011/EU). Es enthält keine in der Direktive angegebenen gefährlichen und unzulässigen Materialien.
24 / DE |
Kaffeevollautomat / Bedienungsanleitung |
|
|
1 Wichtige Anweisungen zu Sicherheit und Umwelt
1.8 Informationen zur Verpackung
Die Verpackung des Produkts wurde gemäß unserer nationalen Gesetzgebung aus recyclingfähigen Materialien hergestellt. Entsorgen Sie
die Verpackungsmaterialien nicht mit dem Hausmüll oder anderem Müll. Bringen Sie sie zu einer von der Stadtverwaltung bereitgestellten Sammelstelle für Verpackungsmaterial.
Kaffeevollautomat / Bedienungsanleitung |
25 / DE |
|
|

2Anzeige
2.1Control Panel
Blinkt: Geringer Wasserstand / Wassertank fehlt
Keine oder zu wenig Bohnen
Leuchtet: Kaffeesatzbehälter ist voll Blinkt: Interne Tropfschale / Kaffeesatzbehälter fehlt
Leuchtet: Brühgruppe fehlt / falsch installiert Blinkt: Serviceklappe ist geöffnet / falsch installiert
Leuchtet: Entkalkung erforderlich Blinkt: Entkalkung läuft
Systementleerung läuft
Dampfstoßtaste
Ein-/Austaste
Heißwasser-Taste
Starker-Espresso-Taste
Schwacher-Espresso-Taste
Im Lieferumfang sind drei Beutel mit Reinigungsmittel für die Selbstreinigung enthalten.
26 / DE |
Kaffeevollautomat / Bedienungsanleitung |
|
|
3Vorbereitung
3.1Montage
Entfernen Sie jegliche Schutzfolien, Aufkleber und andere Verpackungsmaterialien am Gerät.
150mm
150mm  150mm
150mm

 150mm 150mm
Wählen Sie einen sicheren und stabilen Untergrund mit einer leicht erreichbaren Steckdose und halten Sie den Mindestabstand an den Seiten von Geräten ein.
.
Setzen Sie die externe Tropfschale ein. Vergewissern Sie sich, dass sie richtig sitzt.
Wickeln Sie das Netzkabel ab und begradigen Sie es. Schließen Sie den Stecker an der Rückseite des Gerätes an. Stecken Sie das andere Ende des Netzkabels ineineSteckdosemitgeeigneterVersorgungsspannung.
3.2 Wassertank füllen
Warnung: Wenn  blinkt, ist der Wasserstand im Wassertank zu gering und es muss Wasser nachgefüllt werden.
Heben Sie den Wassertank an, indem Sie |
Nehmen Sie den Wassertank heraus. |
Spülen Sie den Wassertank mit saube- |
die Abdeckung als Griff verwenden. |
|
rem Wasser aus, füllen Sie ihn dann bis zu |
|
|
Max-Markierung und setzen Sie ihn wie- |
|
|
der in das Gerät ein. Vergewissern Sie |
|
|
sich, dass er richtig sitzt. |
Kaffeevollautomat / Bedienungsanleitung |
27 / DE |
|
|
3 Vorbereitung
Geben Sie nicht direkt mit einem anderen Behälter Wasser in das Gerät; andernfalls könnte der Wassertank überlaufen.
Warnung: Füllen Sie den Wassertank niemals mit warmem, heißem, oder kohlensäurehaltigem Wasser oder anderen Flüssigkeiten, die Wassertank und Gerät beschädigen könnten.
.
Setzen Sie den Wassertank wieder ein; verwenden Sie dabei die Abdeckung als Griff.
Schließen Sie den Wassertank mit der Abdeckung.
4Bedienung
4.1Mahleinstellung
Sie können das Mahlwerk anpassen, indem Sie den Einstellknopf am Bohnenbehälter drehen:
Wenn das Mahlwerk bei der Kaffeezubereitung Kaffee mahlt, können Sie den Mahlgrad über den Einstellknopf anpassen.
28 / DE |
Kaffeevollautomat / Bedienungsanleitung |
|
|
4 Bedienung
Warnung: Nehmen Sie niemals Änderungen an der Mahleinstellung vor, wenn das Mahlwerk nicht in Betrieb ist. Andernfalls könnte das Mahlwerk beschädigt werden.
 Die Punkte am Einstellknopf zeigen den Mahlgrad.
4.2 Bohnenbehälter auffüllen
 Wenn
Wenn blinkt, muss das Gerät mit Kaffeebohnen aufgefüllt werden.
Entfernen Sie die Abdeckung des Bohnenbehälters.
|
|
|
Geben Sie langsam die Kaffeebohnen |
BringenSiedieAbdeckungdesBehälters |
|
hinein. |
wieder an. |
|
Warnung: Füllen Sie den Kaffeebohnenbehälter nur mit Kaffeebohnen. Gemahlener Kaffee, Instantkaffee, karamellisierter Kaffee und andere Objekte können die Maschine beschädigen.
Reinigen Sie vor der ersten Benutzung das Innere der Kaffeemaschine, indem Sie die Heißwassertaste drücken (siehe Seite 9, Abschnitt IV).
Kaffeevollautomat / Bedienungsanleitung |
29 / DE |
|
|

4Bedienung
4.3Kaffee zubereiten
SchaltenSiedasGerätüberdieEin-/Aus- taste ein. Das Gerät befindet sich dann im Bereitschaftsmodus.
Stellen Sie eine Tasse unter die Kaffeedüse und passen Sie die Höhe der Düse entsprechend der Tasse an.
Betätigte Espresso-Taste und Leuchte leuchten auf. Dies zeigt an, dass das Gerät eine Tasse Kaffee zubereitet.
Wenn sich das Gerät wieder im Bereitschaftsmodus befindet, ist der Kaffee servierbereit.
Schalten Sie das Gerät über die Ein-/Austaste aus.
Je nach Geschmack können Sie die Starker-Espresso- oder Schwacher-Espresso-Taste drücken.
Reinigen Sie vor der ersten Benutzung das Innere der Kaffeemaschine, indem Sie die Heißwassertaste drücken.
Das Gerät ist mit einer automatischen Abschaltung ausgestattet. Je nach ausgewähltem Modus hat das Gerät verschiedene Zeiten zur automatischen Abschaltung.
30 / DE |
Kaffeevollautomat / Bedienungsanleitung |
|
|
 Loading...