


Frost Free Fridge-Freezer |
CFP1675DW |
|
|

Congratulations on your choice of a quality Appliance which has been designed to give you service for many years. 
WARNING ! IMPORTANT !
DO NOT connect your appliance to the electricity supply until all packing and transit protectors have been removed.
!Leave to stand for at least 4 hours before switching on to allow compressor oil to settle if transported horizontally.
!If you are discarding an old refrigerator with a lock or latch fitted to the door, disable the lock/latch, ensure that it is left in a safe condition to prevent the entrapment of children.
!This fridge/freezer must only be used for its intended purpose i.e the storing of edible foodstuff.
!Do not dispose of the appliance on a fire. At BEKO, the care and protection of our environment is an ongoing commitment. This appliance which is among the latest range introduced is particularly environment friendly. Your appliance contains non CFC / HFC natural substances in the cooling system (Called R600a) and in the insulation (Called cyclopentane) which are potentially flammable if exposed to fire. Therefore, take care not to damage, the cooling circuit / pipes of the appliance in transportation and in use. In case of a damage do not expose the appliance to fire, potential ignition source and immediately ventilate the room where the appliance is situated.
!We suggest you contact your local authority for disposal information and facilities available.
!To obtain the best possible performance and trouble free operation from your appliance it is very important to carefully read these instructions.
!On delivery, check to make sure that the product is not damaged and that all the parts and accessories are in perfect condition.
!Ensure that the plug remains readily accesible.
!We do not recommend the use of extension leads and multi-way adapters.
!Failure to observe these instructions may invalidate your right to free service during the guarantee period.
WARNING- Do not use electrical appliances inside the food storage compartments of the appliance, unless they are of the type recommended by the manufacturer.
WARNING- Do not use mechanical devices or other means to accelerate the defrosting process, other than those recommended by the manufacturer.
WARNING- Do not damage the refrigerant circuit.
WARNING- Do not use electrical appliances inside the food storage compartments of the appliance, unless they are of the type recommended by the manufacturer.
!We suggest you keep these instructions in a safe place for easy reference.
|
Frost Free Fridge-Freezer |
|
CFP1675DW |
PERFORMANCE |
|
|
|
Energy efficiency class |
A+ |
Energy consumption - Kwh/year |
291 |
Net storage – vol fresh food ltrs (cu.ft.) |
206 (7.2) |
Net storage – vol frozen food ltrs (cu.ft.) |
97 (3.3) |
Total net vol – ltrs (cu.ft.) |
303 (10.5) |
Frozen food compartment rating |
4 STAR |
Conservation time from failure |
18 hrs. |
Freezing capacity fresh food – kg (lb) /24 hrs. |
4 (8.4) |
Climate class |
SN-ST |
Operating noise level dB(A) |
43 |
1
CONTENTS PAGE
SAFETY FIRST / ELECTRICAL REQUIREMENTS |
3 |
|
|
|
|
|
|
|
|
|
|
TRANSPORTATION INSTRUCTIONS |
4 |
|
|
|
|
|
|
|
|
|
|
INSTALLATION INSTRUCTIONS |
4 |
|
|
|
|
|
|
|
|
|
|
GETTING TO KNOW YOUR COMBI BEKO FRIDGE / FREEZER |
6 |
|
|
|
|
|
|
|
|
|
|
REVERSING THE DOOR |
7 |
|
|
|
|
|
|
|
|
|
|
SUGGESTED ARRANGEMENT OF FOOD IN THE FRIDGE/FREEZER |
8 |
|
|
|
|
|
|
WATER DISPENSER |
9 |
|
|
|
|
|
|
TEMPERATURE CONTROL AND ADJUSTMENT |
11 |
|
|
|
|
|
|
BEFORE OPERATING |
11 |
|
|
|
|
|
|
STORING FROZEN FOOD |
12 |
|
|
|
|
|
|
FREEZING FRESH FOOD |
12 |
|
|
|
|
|
|
MAKING ICE CUBES |
12 |
|
|
|
|
|
|
DEFROSTING |
13 |
|
|
|
|
|
|
REPLACING THE INTERIOR LIGHT BULB |
13 |
|
|
|
|
|
|
CLEANING AND CARE |
14 |
|
|
|
|
|
|
DO'S AND DON'TS |
15 |
|
|
|
|
|
|
ENERGY SAVING TIPS |
16 |
|
|
|
|
|
|
PROBLEM SOLVING |
16 |
|
|
|
|
|
|
GUARANTEE DETAILS |
17 |
|
|
|
|
|
|
HOW TO OBTAIN SERVICE |
18 |
|
|
|
|
|
|
2

ELECTRICAL REQUIREMENTS
Before you insert the plug into the wall socket make sure that the voltage and the frequency shown in the rating plate inside the appliance corresponds to your electricity supply. Rating label is on the left hand side of fridge inner liner. We recommend that this appliance is connected to the mains supply via a suitable switched and fused socket in a readily accessible position. WARNING: When positioning the appliance ensure the supply cord is not trapped or damaged. Should the mains lead of the appliance become damaged or should it need replacing at any time, it must be replaced by a special purpose made mains lead which can only be obtained from a BEKO Authorised Service Agent.
WARNING! THIS APPLIANCE MUST BE EARTHED
If the fitted moulded plug is not suitable for your socket, then the plug should be cut off and an appropriate plug fitted. Destroy the old plug which is cut off as a plug with bared cord could cause a shock hazard if inserted into a socket elsewhere in the house. The moulded plug on this appliance incorporates a 13 A fuse. Should the fuse need to be replaced an ASTA approved BS 1362 fuse of the same rating must be used. Do not forget to refit the fuse cover. In the event of losing the fuse cover the plug must not be used until a replacement fuse cover has been fitted. Colour of the replacement fuse cover must be the same colour as that visible on the pin face of the plug. Fuse covers are available from any good electrical store.
WARNING: Do not locate extension sockets or charging transformers/power supplies or
Lithium-Iron battery operated products adjacent to the compressor as they could overheat.
IMPORTANT! FITTING A DIFFERENT PLUG
As the colours of the wires in the mains lead of this appliance may not correspond with the coloured markings identifying the terminals in your plug proceed as follows:
(See diagram).
1. Connect the green-yellow or green (Earth) wire to the terminal in the plug marked 'E' or with the symbol  or coloured green and yellow or green.
2. Connect the blue (Neutral) wire to the terminal in the plug marked 'N' or coloured black.
3. Connect the brown (Live) wire to the terminal in the plug marked 'L' or coloured red.
With alternative plugs a 13 A fuse must be fitted either in the plug or adaptor or in the main fuse box.
If in doubt contact a qualified electrician.
3
TRANSPORTATION INSTRUCTIONS
1.The appliance should be transported only in an upright position. The packing as supplied must be intact during transportation.
2.If during the course of transport the appliance has to be transported horizontally, it must only be laid on its left hand side when standing in the front of the appliance. After bringing it to upright position,it must not be operated for at least 4 hours to allow the system to settle.
3.Failure to comply with the above instructions could result in damage to the appliance, for which the manufacturer will not be held liable.
4.The appliance must be protected against rain, moisture and other atmospheric influences. 5. When positioning your appliance take care not to damage your flooring, pipes, wall coverings etc. Do not move the appliance by pulling by the door or handle. 6. Empty any water in the drain tray before moving. See section „Defrosting” and „Care & Cleaning” for further information. 7. Make sure that the defrost water pipe at the back of the product is fixed to the plastic evaporating pan on the top of the compressor, to avoid defrost water spillage on the floor.
Important!
!Care must be taken while cleaning/carrying the appliance not to touch the bottom of the condenser metal wires at the back of the appliance, as this could cause injury to fingers and hands.
!Do not attempt to sit or stand on top of your appliance as it is not designed for such use. You could injure yourself or damage the appliance.
!Make sure that the mains cable is not caught under the appliance during and after moving, as this could damage the cable.
!Do not allow children to play with the appliance or tamper with the controls. BEKO plc declines to accept any liability should the instructions not be followed.
This appliance has been designed to operate in ambient temperatures up to 38 degrees C (90 degrees F) and is equipped with Freezer Guard which ensures that at the advised setting [2 - two on the knob] the frozen food in the freezer will not defrost even if the ambient temperature falls as low as -15 °C. When first installed the product MUST NOT be placed in low ambient temperatures because the freezer will not reduce to it’s standard operating temperature. Once it has reached its steady operating state it can be re-located. So you may then install your appliance in a garage or an unheated room without having to worry about frozen food in the freezer being spoilt. When the ambient temperature returns to normal, you may change the knob setting to suit your needs. If the ambient temperature is below 0°C, the food in the fridge compartment will freeze. So, we recommend you don’t use the fridge compartment in such low ambient conditions. You can continue using the freezer compartment as usual.
INSTALLATION INSTRUCTIONS
1.The space in the room where the appliance is installed must not be smaller than 10 cubic metres.
2.If the ambient temperature is below 0°C, the food in the fridge compartment will freeze. So, we recommend you don't use the fridge compartment in such low ambient conditions. You can continue using the freezer compartment as usual.
4

3.Do not place the appliance near cookers, radiators or in direct sunlight as this will cause your appliance to work harder. If installed next to a source of heat or freezer, maintain the following minimum side clearances:
From Cookers |
12" (300 mm) |
From Radiators |
12" (300 mm) |
From Refrigerators or Larder Fridge |
1" (25 mm) |
4.Make sure that sufficient room is provided around the appliance to ensure free air circulation. Fit the two plastic wall spacer supplied
with the appliance rotating 1/4 turn to the condenser on the back of the appliance by rotating 1/4 turn. (see diagram).
5.The fridge/freezer should be located on a smooth surface. The two front feet can be adjusted as required. To ensure that, your appliance is standing upright adjust the two front feet by turning clockwise or anti-clockwise, until the product is in firm contact with the floor. Correct adjustment of feet avoids excessive vibration and noise.
6.Refer to cleaning and care section to prepare your appliance for use.
WARNING!
Do not connect your appliance to the electricity supply until all the packing and transit protectors have been removed including polystyrene block(s) inserted between the compressor motor and the cabinet (see diagrams). Do not remove the plastic drain tray fitted above the compressor motor on models with auto - defrost fridge.
COMPRESSOR |
7. To take out the baskets from the freezer compartment please proceed as in item:
 200
200
1 |
2 |
3 |
5
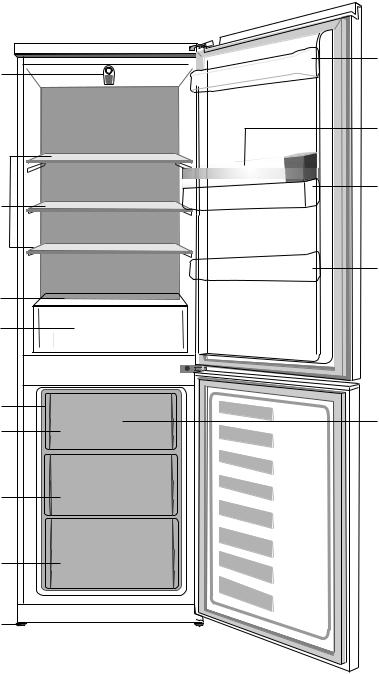
GETTING TO KNOW YOUR
FROST FREE FRIDGE-FREEZER
1 |
9 |
|
|
||
|
10 |
|
|
11 |
|
2 |
|
|
|
9 |
|
3 |
|
|
4 |
|
|
5 |
12 |
|
6 |
||
|
||
7 |
|
|
7 |
|
|
8 |
|
1 - Setting knob and interior light 2 - Cabinet shelves
3 - Salad crisper cover
4 - Salad crisper
5 - Ice Bank & ice cube tray 6 - Fast Freeze compartment
7 - Frozen froods storage drawers 8 - Adjustable feet
9 - Door shelves
10- Egg tray
11- Water dispenser
12- Freezer fan
Figures that take place in this instruction manual are schematic and may not correspond exactly with your product. If the subject parts are not included in the product you have purchased, then it is valid for other models.
6
 Loading...