

Bang & Olufsen BeoSound Shape Installation Manual
BeoSound Shape
Amplier and Empty Tile
Type 6307
Speaker Tile
Type 6308
Acoustic Damper Tile
Type 2997
Fabric Cover
Type 6072
Installation Guide
English - version 0.5
48.0
36.4
0.6 + 11.1
64.7
Preliminary ver. 0.5

Introduction 2
Introduction
BeoSound Shape is a unique scalable wireless speaker system that can be customdesigned and turn high-quality music into an interior art form.
It is designed as a modular combination of hexagonal shapes that are combined in a wall decoration, which can be placed on the wall in the size
and pattern you prefer. It consists of a combination of Speakers, Ampliers, Empty and Damper Tiles that you can combine in different patterns,
fabrics and colours. The amplier tile contains the electronics and eight ampliers. This tile can drive up to 4 speaker tiles. Each speaker tile
includes two driver units; one ¾-inch tweeter and a 5 1/4-inch bass/midrange unit.
The speaker system is mend to be set up together with a BeoSound Core, but the amplier tile together with some speaker tiles can also be
connected to other audio sources via Power Link or Optical In.
Embedding BeoSound Core you are able to wirelessly stream high quality music from your mobile device via the latest streaming technologies such
as AirPlay, Google Cast or Bluetooth. You also have the BeoLink Multiroom functionality making BeoSound Shape part of the family of products
that can play different music in different rooms or let one tune ow throughout your home.
A special cable solution means that although it is an active speaker design with one amplier per driver, you only need one cable per speaker tile,
and you can combine several amplier and speaker tiles in one coherent system and thereby increase the sound performance. You simply daisy
chain from one amplier tile to the next. You will have tiles that have no speakers or electronics inside but which binds the design into a coherent
look and may be hiding BeoSound Core, dampening materials, the cabling or the mains outlet.
There are practically no limitations as to the number of tiles you can have in a design, but we have tested a setup with 44 tiles. Each amplier tile
includes eight ampliers of each 80 watts so the performance of the system depends on the number of amplier and speaker tiles you have. Each
amplier tile can drive up to four speaker tiles.
A star rail, which has to hold the design, is easily clicked together with connector rails to create the pattern you want on the plain and vertical wall.
This means you can create the placement of the tile s e.g. on the oor before you mount the system on the wall. The Star Rail is screwed into the
wall and then you start mounting the tiles with the electronics, the drivers and the cabling. The cabinet holds the cabling in place so the
installation looks neat. The Bang & Olufsen Logo badge is created as an attachment in aluminium, which you can easily click on in one of the
connectors if you want to on any side of the tiles and on any time, you want to.
The speaker system is designed by the costumer in the Conguration Tool on www.bang-olufsen.com. The design is stored on a BeoCloud account
and a PDF with details is created. When the BeoSound Shape is mounted on the costumers wall, the Bang & Olufsen app is used to setup the
system with the conguration specialised for exactly this design.
How to use this installation guide 3
How to use this installation guide
Use this installation guide together with the installation video on
www.bang-olufsen.com/bsshapeuserguide.
This installation guide and the video gives introduction to the product and step
by step instructions on how to:
- Mount the BeoSound Shape on the wall.
For correct placement on the wall see Placement Tool on BeoWise
- First time setup and additional setup of speakers, services and settings.
- Troubleshooting
- Other 'nice to know' subjects are dealt with. Also the connector specications
are shown.
Introduction
Connecting cables
Mounting Bang & Olufsen Logo badge
Mount fabric cover
Connection specications
Alternative Setup
Software update
Automatic software update
LED indications
Troubleshooting
First time setup
Mounting
Mounting the tiles
Mounting Star Rails
Technical specications
Connectivity (provided by BeoSound Core)
Table of Contents
Navigation in this guide!
Navigation TIP s
Connection panel
BeoSound Shape
How to use this installation guide

How to use this installation guide 4
Navigation in this guide
When the guide is opened, it automatically opens in Full Screen Mode (can be left as desired - see below). This is primarily done to optimise the
usability of screen reading. There are several ways to navigate when using the guide, see the survey of keys, shortcuts and hot keys below:
/ (arrow keys on the keyboard) navigates to the next page
/ (arrow keys on the keyboard) navigates to the previous page
Esc
(Esc button ) exits Full Screen Mode (press Ctrl + L to return to
Full Screen Mode).
Another feature to optimise the navigation is the navigation icons at the bottom of the screen (see below for explanation).
Navigates you to the previous view
Navigates you directly to the start page
Navigates directly to the table of contents (these are active links
- click the link to be directed directly to the associated section)
Prints the document - the print dialogue box opens
(Ctrl + P also brings up this feature)
Navigation TIP
The right side of this page and the Table of Contents, page 24, acts as an active table of contents. Simply click the subject you want and you are
transferred to the section in question.
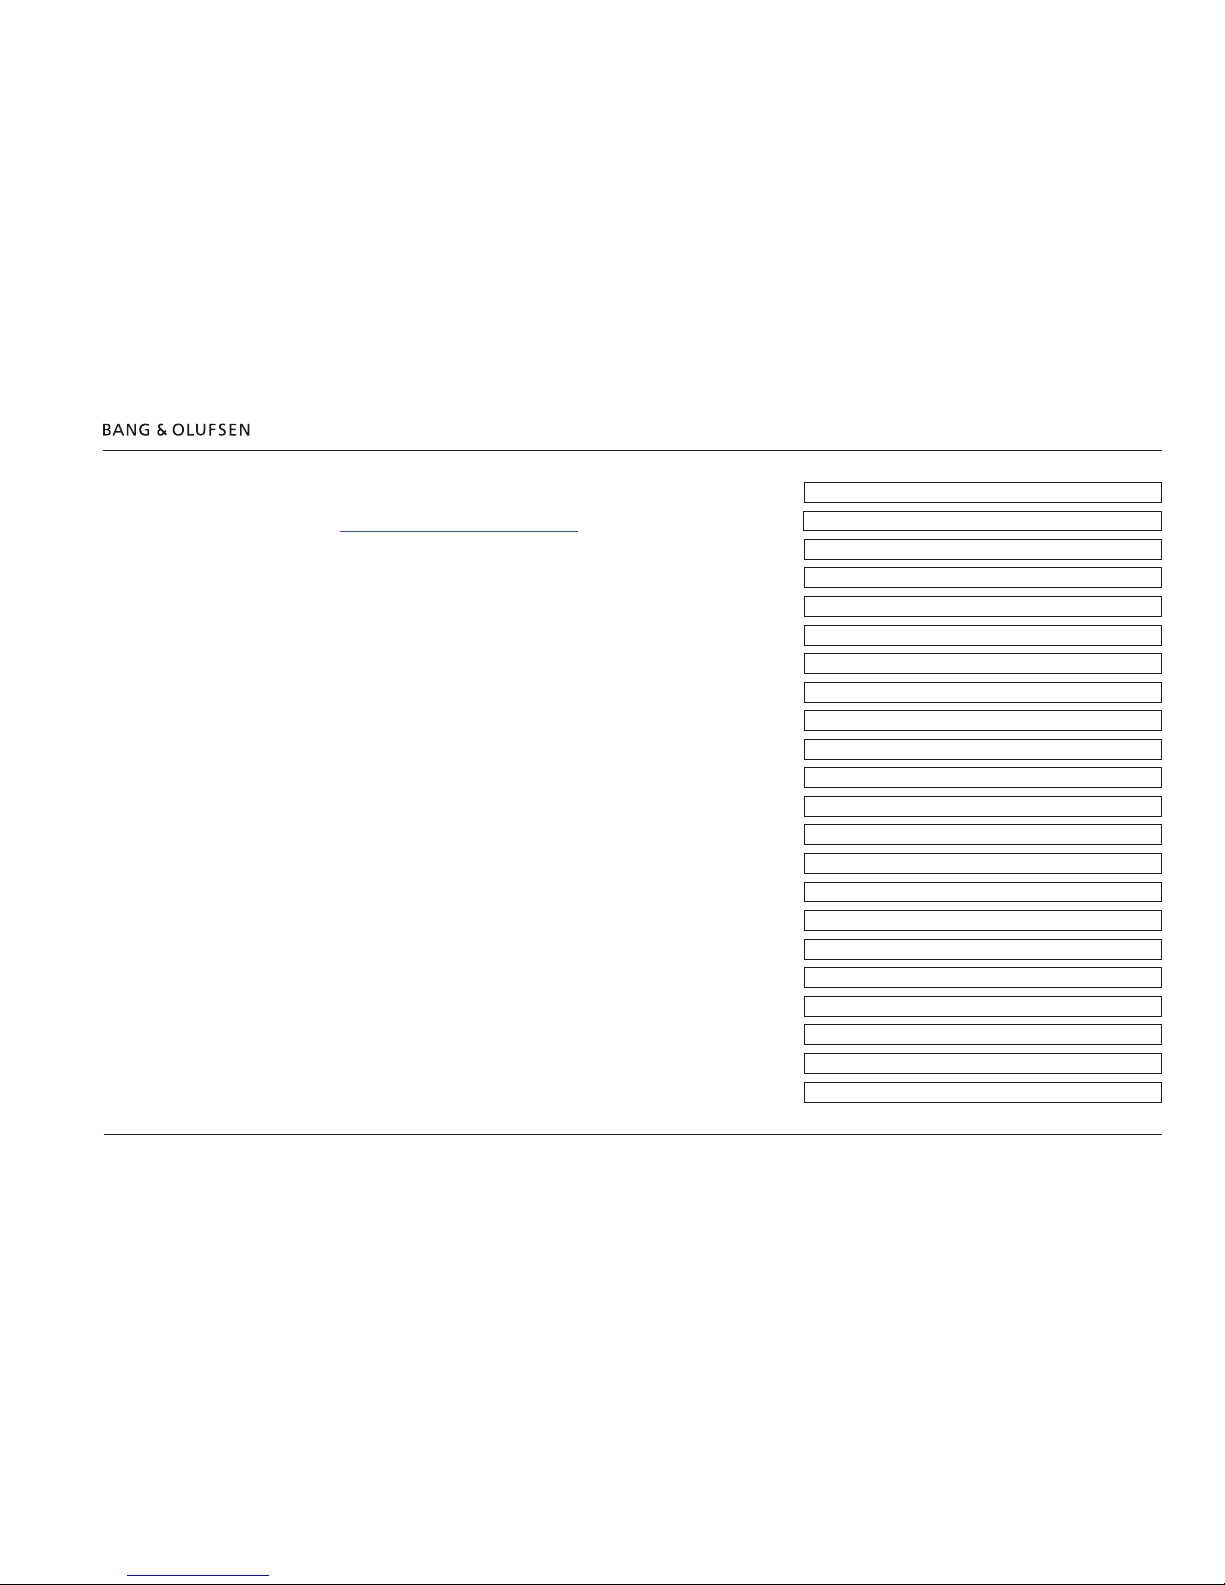
BeoSound Shape 5
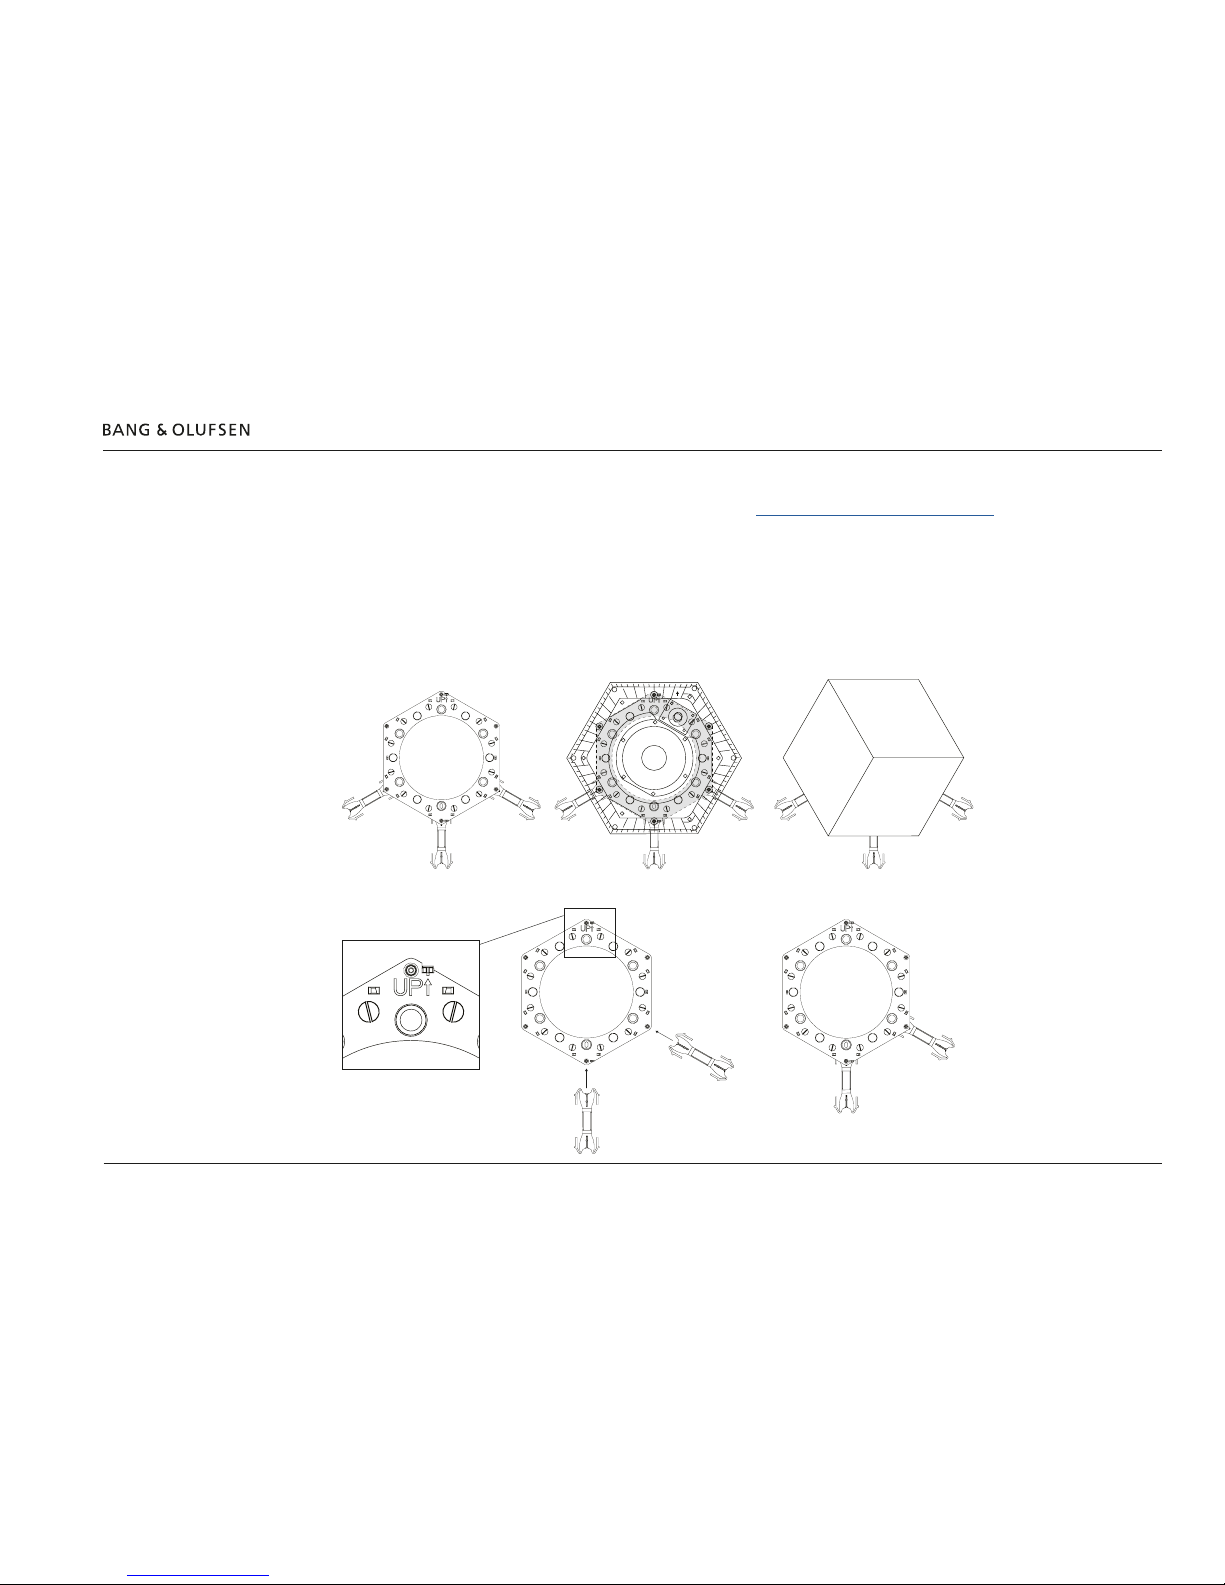
BeoSound Shape
Amplier Tile Empty Tile Speaker Tile Damper Tile
Star Rail Fabric Cover Connection Rail Logo badge
Gap Absorber
What is in the package?
Name Type Contents
Amplier* 6307 1 Amplier tile
1 Empty tile
1 Logo badge
Speaker* 6308 2 Speakers
Damper* 2997 2 Dampers
Fabric Cover 6072 2 fabric Covers
* Also includes: 2 star rails, 4 connection rails, 4 gap absorbers, 5 felt stickers, 2 straps for wires, 12 PT3x18 torx 10 zink screws, 12 washers
UP
UP
UP
UP
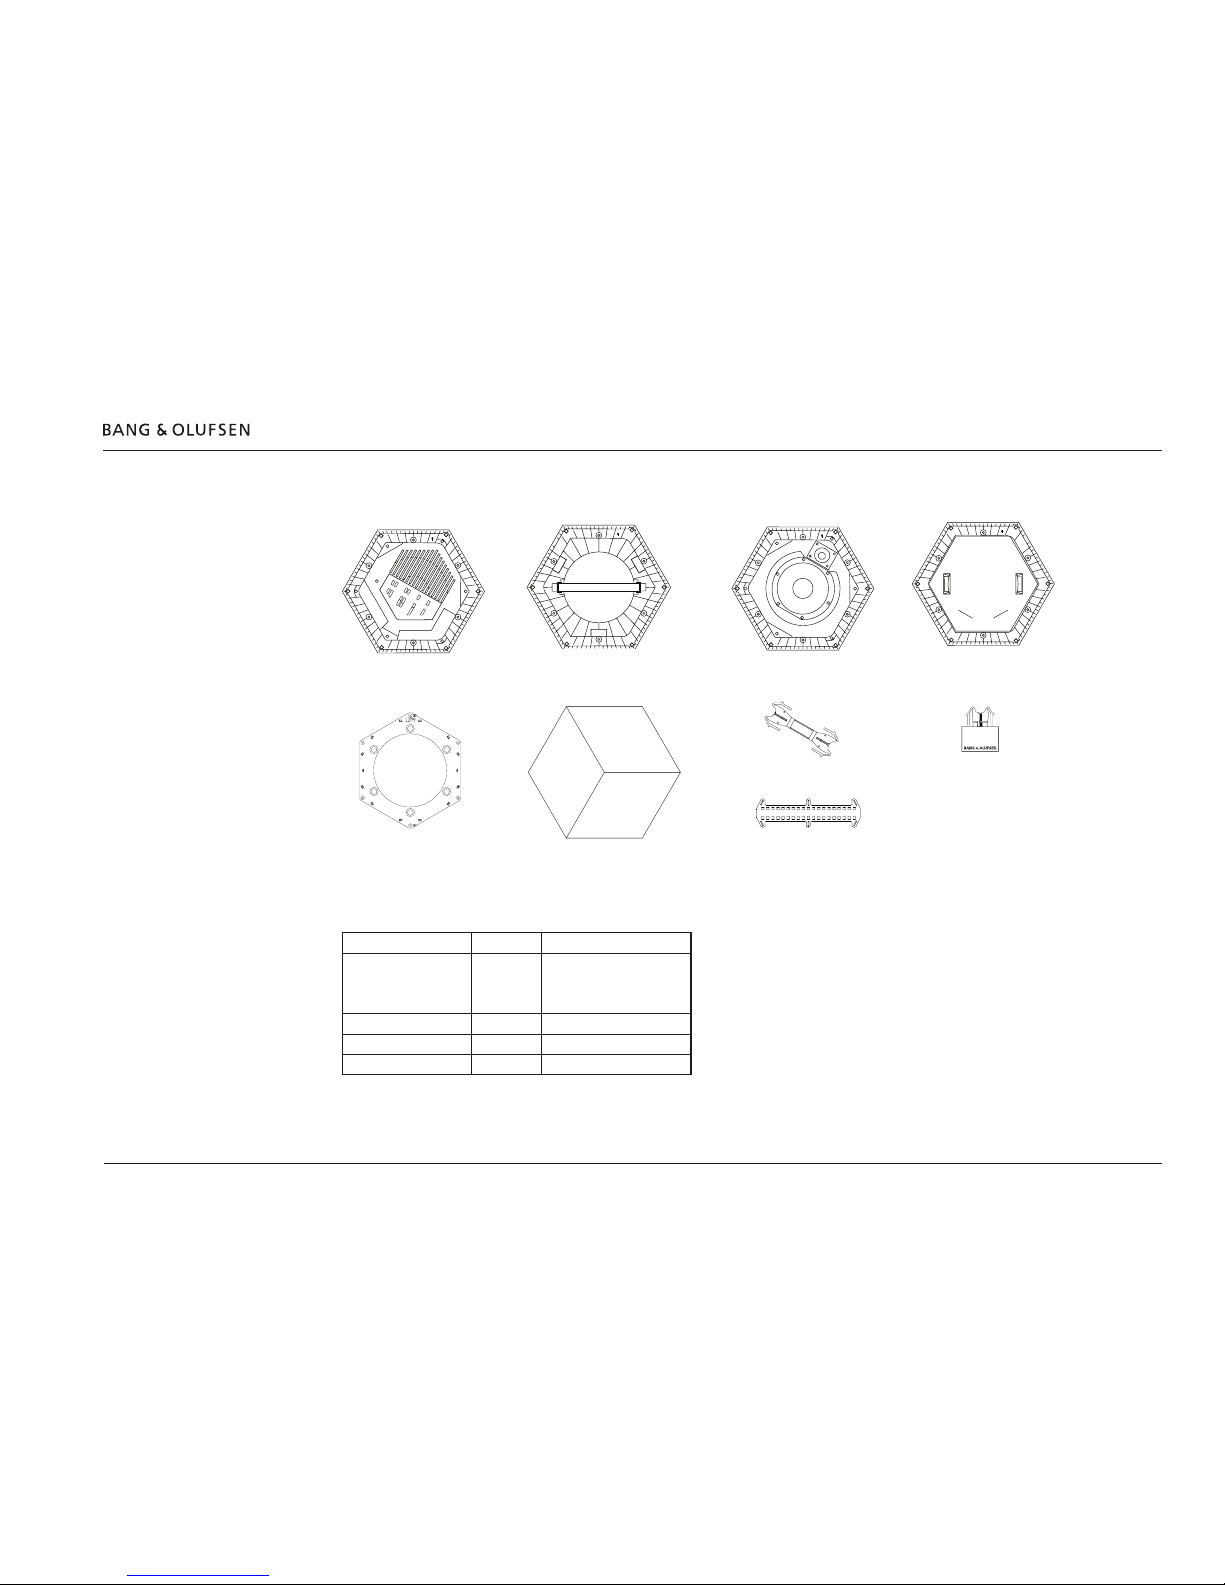
Connection panel 6
Connection panel
Amplier Tile:
OPTICAL-IN
Digital audio input
USB
USB for control and SW update
COMM IN
Amplier input (sound & control input), for daisy
chaining of ampliers
COMM OUT
Amplier output (sound & control output), for
daisy chaining of ampliers
POWER LINK
Power Link input
1-4
4 x speaker 4-wire output
AC power (note if multiple amplier, each requires its own AC power connection)
Speaker Tile:
1 x speaker 4-wire input
COMM OUT
COMM IN
OPTICAL-IN
POWER LINK
Mounting 7
Mounting
Before mounting the BeoSound Shape please se the installations video on www.bang-olufsen.com/bsshapeuserguide and see Placement Tool on
BeoWise
Placement conditions
The product is intended for indoor use in dry domestic environments only. Placed on a plane vertical wall. Use within a temperature range of 1040ºC (50-105ºF).
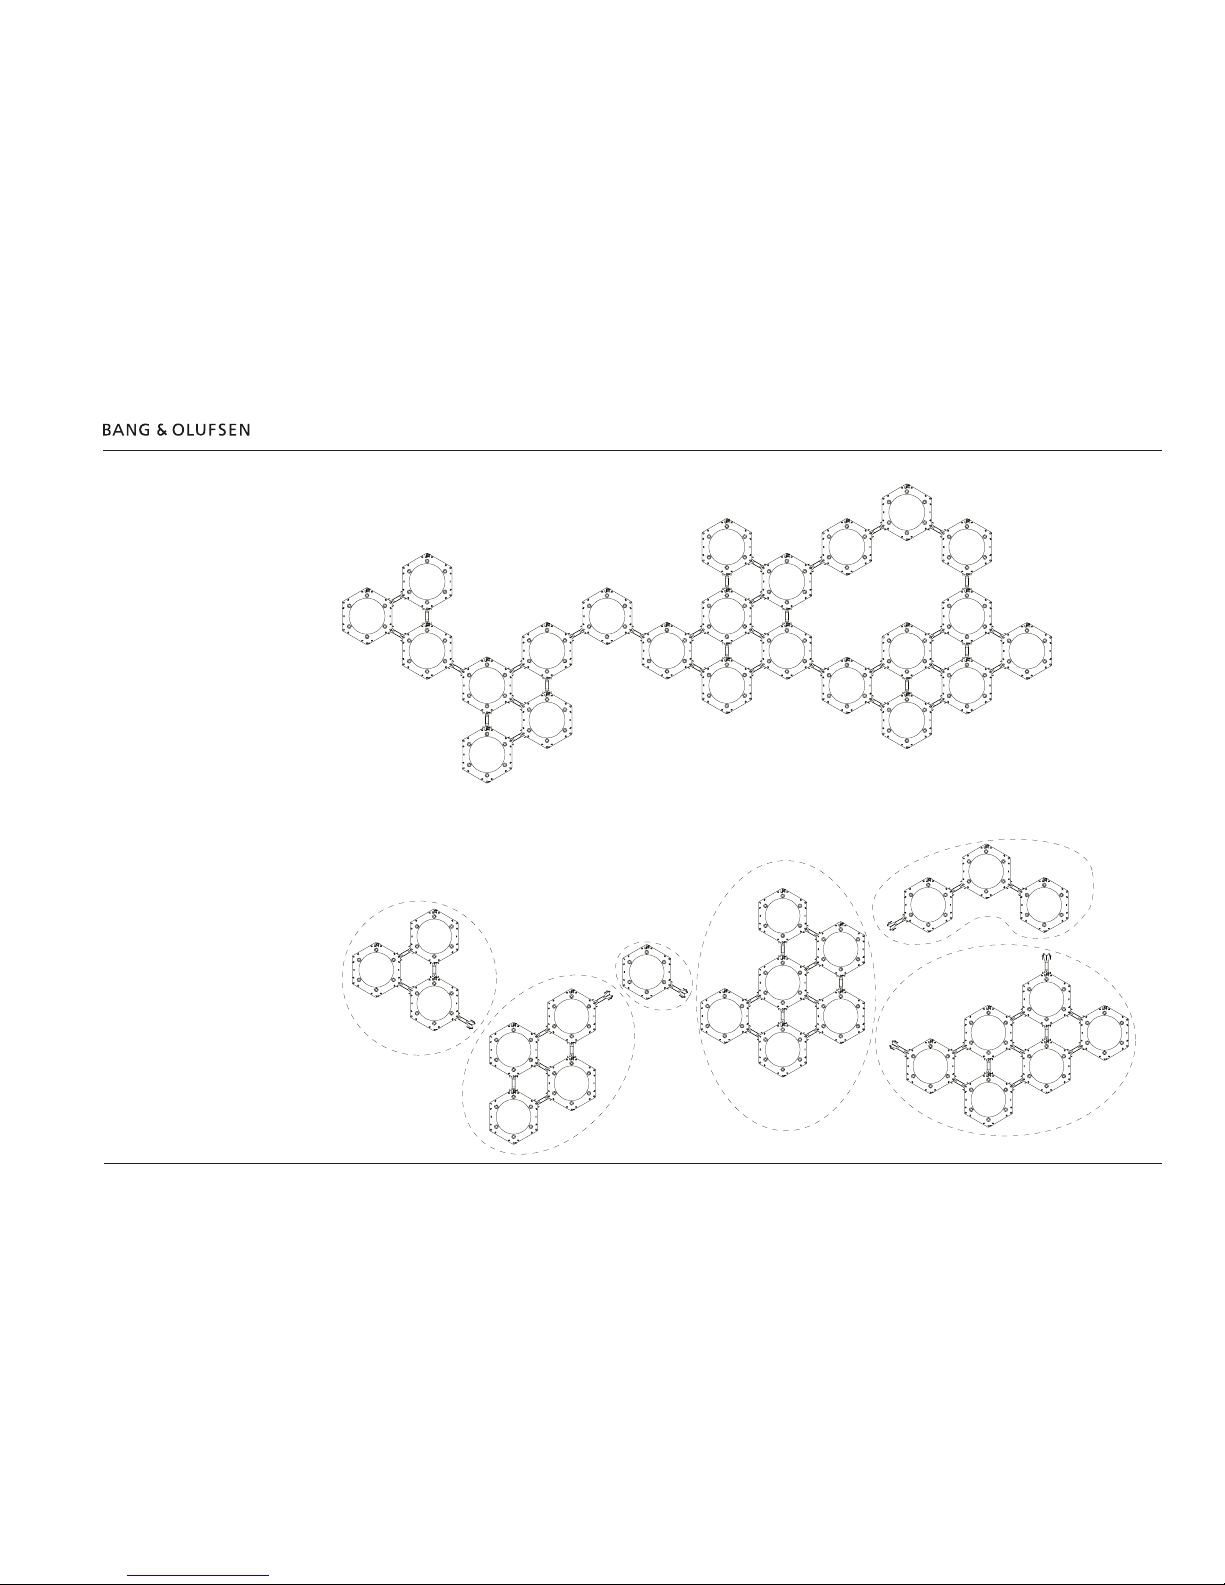
Mounting Star Rails
Be aware that the pattern of the nal setup is not the same as the pattern only with Star Rails mounted on the wall. This is due to the different
shape of the Star Rails and the tiles with front covers (Amplier, Speaker, Damper and Empty Tiles)
Lay all the Star Rails down on the oor in the chosen pattern according to the PDF document presented in the Conguration tool. Connect all the
Star Rails with the Connection Rails.
UP
‘Click’
‘Click’
Mounting 8
Example of Star Rail setup
Disconnect the setup into smaller sections, e.g. 3-5 tiles depending on the setup. Start hanging up the most compact part of the setup.
Example: Start hanging up section 1, then 2 etc.
Se c ti on 1.
Sec tion 2.
Sectio n 3.
Section 4.
Section 5.
Section 6.
 Loading...