


Instructions for use
WASHING MACHINE
GB |
|
|
|
|
GR |
|
|
|
CIS |
|
|
||
|
|
|
|
|
|
|
|
|
|
|
|
|
|
English, 1 |
РУССКИЙ, 13 |
ЕЛЛЗНЙКБ, 25 |
||||
Contents
GB
Installation, 2-3
Unpacking and levelling, 2
Electric and water connections, 2-3 The first wash cycle, 3
Technical details, 3
HU CZ
Magyar, 37 |
Èeský, 49 |
AVTL 104
Washing machine description, 4-5
Control panel, 4
How to open and shut the drum, 5 Leds, 5
Starting and Programmes, 6
Briefly: how to start a programme, 6 Programme table, 6
Personalisations, 7
Setting the temperature, 7
Setting the spin cycle, 7
Functions, 7
Detergents and laundry, 8
Detergent dispenser, 8
Bleach cycle, 8
Preparing your laundry, 8
Special items, 8
Woolmark Platinum Care, 8
Precautions and advice, 9
General safety, 9 Disposal, 9
Saving energy and respecting the environment, 9
Care and maintenance, 10
Cutting off the water or electricity supply, 10 Cleaning your appliance, 10
Caring for your appliance door and drum, 10 Cleaning the pump, 10
Checking the water inlet hose, 10 Cleaning the detergent dispenser, 10
Troubleshooting, 11
Service, 12
Before calling for Assistance, 12
1
Installation
Keep this instruction manual in a safe place for GB future reference. Should the appliance be sold,
transferred or moved, make sure the instruction manual accompanies the washing machine to inform the new owner as to its operation and features.
Read these instructions carefully: they contain vital information on installation, use and safety.
Unpacking and levelling
Unpacking |
1.Unpack the washing machine.
2.Check whether the washing machine has been damaged during transport. If this is the case, do not install it and contact your retailer.
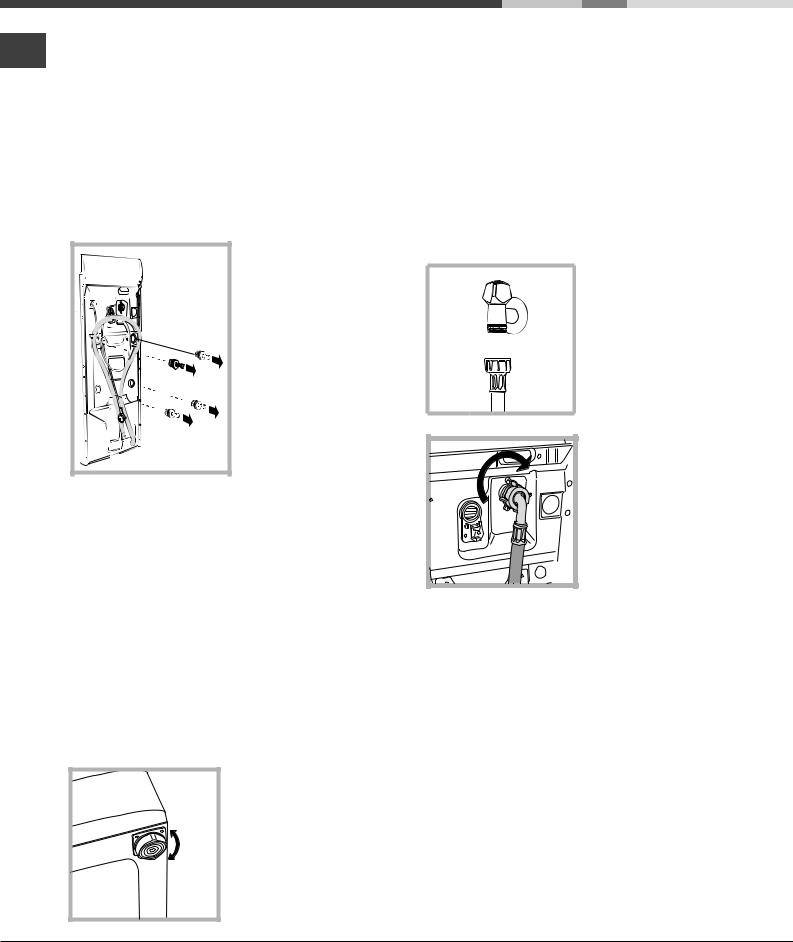
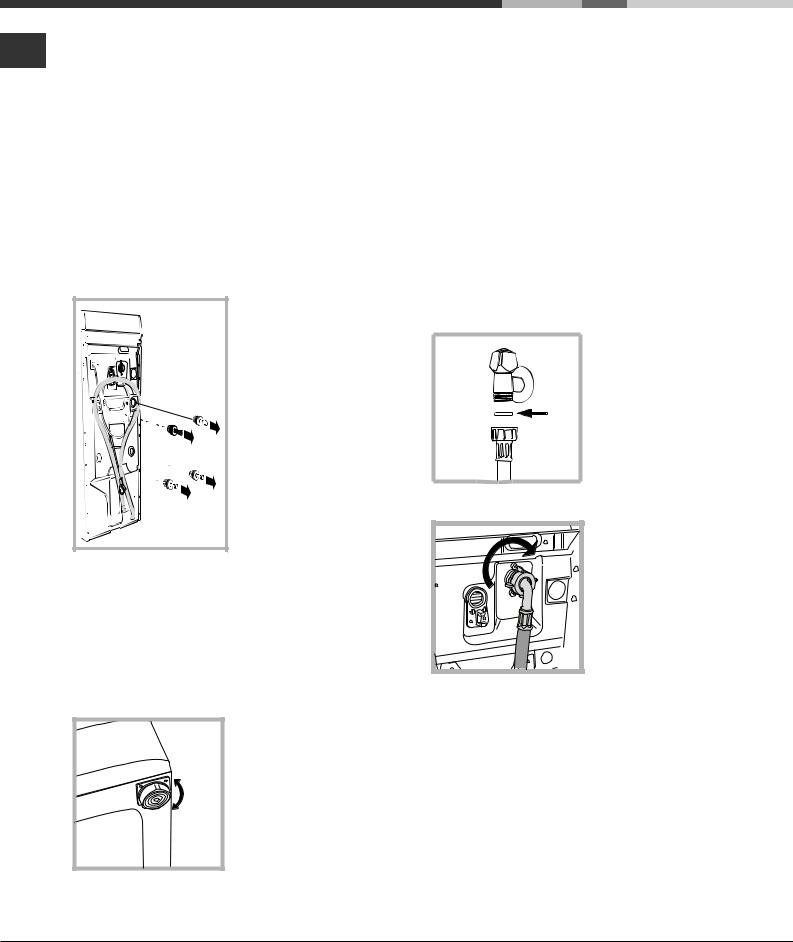
3.Remove the four protective screws and the rubber washer with the respective spacer, situated on the rear of the appliance (see figure).
4.Seal the gaps using the plastic plugs provided.
5.Keep all the parts: you will need them again if the washing machine needs to be moved to another location.
Warning: should the screws be re-used, make sure you fasten the shorter ones at the top.
Packaging materials are not children's toys.
Levelling
1. Install the washing machine on a flat sturdy floor, without resting it up against walls, furniture cabinets or other.
2. If the floor is not perfectly level, compensate for any unevenness
by tightening or
loosening the adjustable
front feet (see figure); the angle of inclination, measured according to the worktop, must not exceed 2°.
Levelling your appliance correctly will provide it with stability and avoid any vibrations, noise and shifting during operation. If it is placed on a fitted or loose carpet, adjust the feet in such a way as to allow enough room for ventilation beneath the washing machine.
Electric and water connections
Connecting the water inlet hose
1. Insert seal A into the end of the inlet hose and screw the latter onto a
cold water tap with a 3/4
gas threaded mouth (see

 A figure).
Before making the connection, allow the water to run freely until it is perfectly clear.
2. Connect the other end of the water inlet hose to the washing machine, screwing it onto the appliance's cold water inlet, situated on the top right-hand side on the rear of the appliance
(see figure).
3. Make sure there are no kinks or bends in the hose.
The water pressure at the tap must be within the values indicated in the Technical details table
(on the next page).
If the water inlet hose is not long enough, contact a specialist store or an authorised serviceman.
2
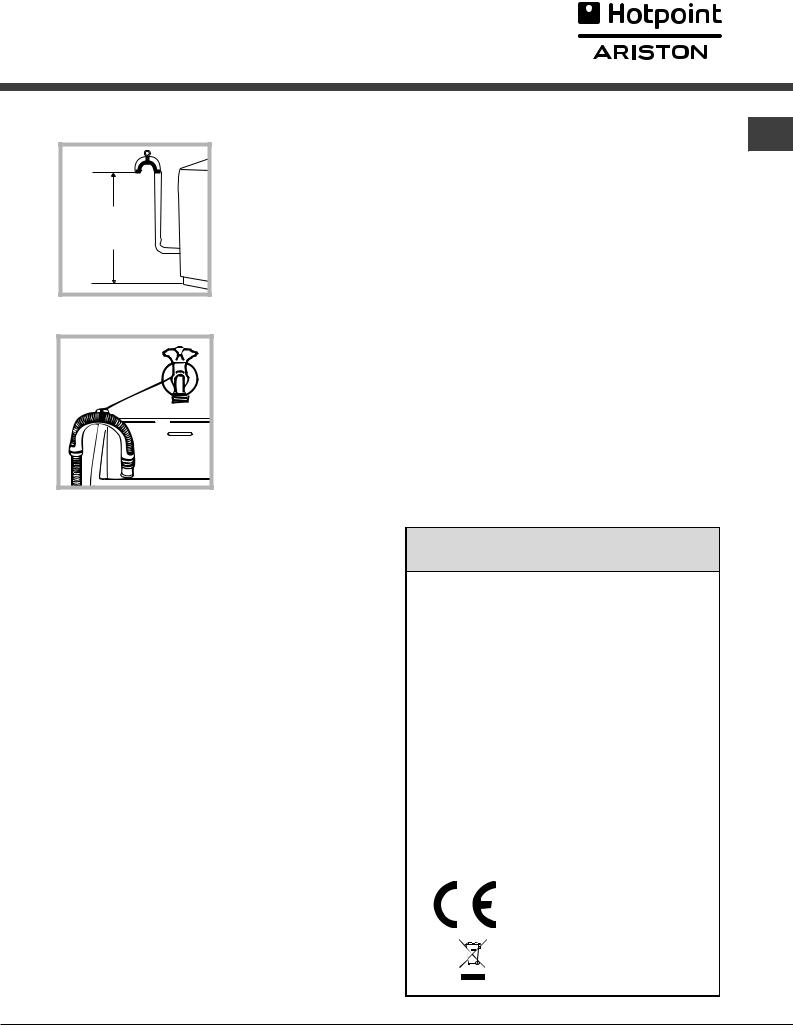
Connecting the drain hose
65 - 100 cm |
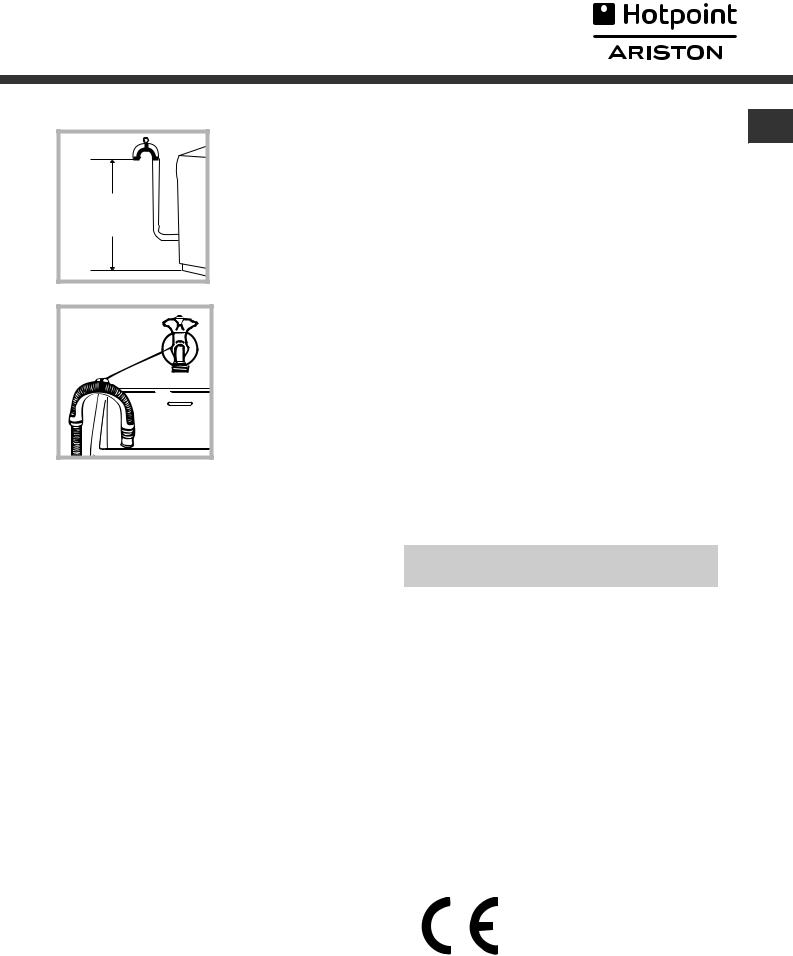
Connect the drain hose, without bending it, to a draining duct or a wall drain situated between 65 and 100 cm from the floor;
alternatively, place it over the edge of a basin, sink or tub, fastening the duct supplied to the tap (see figure). The free end of the hose should not be underwater.
We advise against the use of hose extensions; in case of absolute need, the extension must have the same diameter as the original hose and must not exceed 150 cm in length.
Electric connection
Before plugging the appliance into the mains socket, make sure that:
•the socket is earthed and in compliance with the applicable law;
•the socket is able to sustain the appliance's maximum power load indicated in the Technical details table (on the right);
•the supply voltage is included within the values i ndicated on the Technical details table
(on the right);
•the socket is compatible with the washing machine's plug. If this is not the case, replace the socket or the plug.
The washing machine should not be installed in an outdoor environment, not even when the area is sheltered, because it may be very dangerous to leave it exposed to rain and thunderstorms.
GB
When the washing machine is installed, the main socket must be within easy reach.
Do not use extensions or multiple sockets.
The power supply cable must never be bent or dangerously compressed.
The power supply cable must only be replaced by an authorised serviceman.
Warning! The company denies all liability if and when these norms are not respected.
The first wash cycle
Once the appliance has been installed, and before you use it for the first time, run a wash cycle with detergent and no laundry, setting the 90°C programme without a pre-wash cycle.
Technical details
Model |
AVTL 104 |
|
|
|
|
|
40 cm wide |
|
Dimensions |
85 cm high |
|
|
60 cm deep |
|
|
|
|
Capacity |
from 1 to 5 kg |
|
|
|
|
Electric |
Please refer to the technical data plate |
|
connections |
fixed to the machine. |
|
|
|
|
Water |
maximum pressure 1 MPa (10 bar) |
|
minimum pressure 0.05 MPa (0.5 bar) |
||
connections |
||
drum capacity 42 litres |
||
|
||
|
|
|
Spin speed |
up to 1000 rpm |
|
|
|
|
Control |
|
|
programmes |
programme 3; temperature 60°C; |
|
according to EN |
run with a load of 5 kg. |
|
60456 directive |
|
|
|
|
|
|
This appliance is compliant with the |
|
|
following European Community |
|
|
Directives: |
|
|
- 89/336/CEE of 03/05/89 |
|
|
(Electromagnetic Compatibility) and |
|
|
subsequent amendments |
|
|
- 2006/95/CE (Low Voltage) |
|
|
- 2002/96/CE |
3
Washing machine description
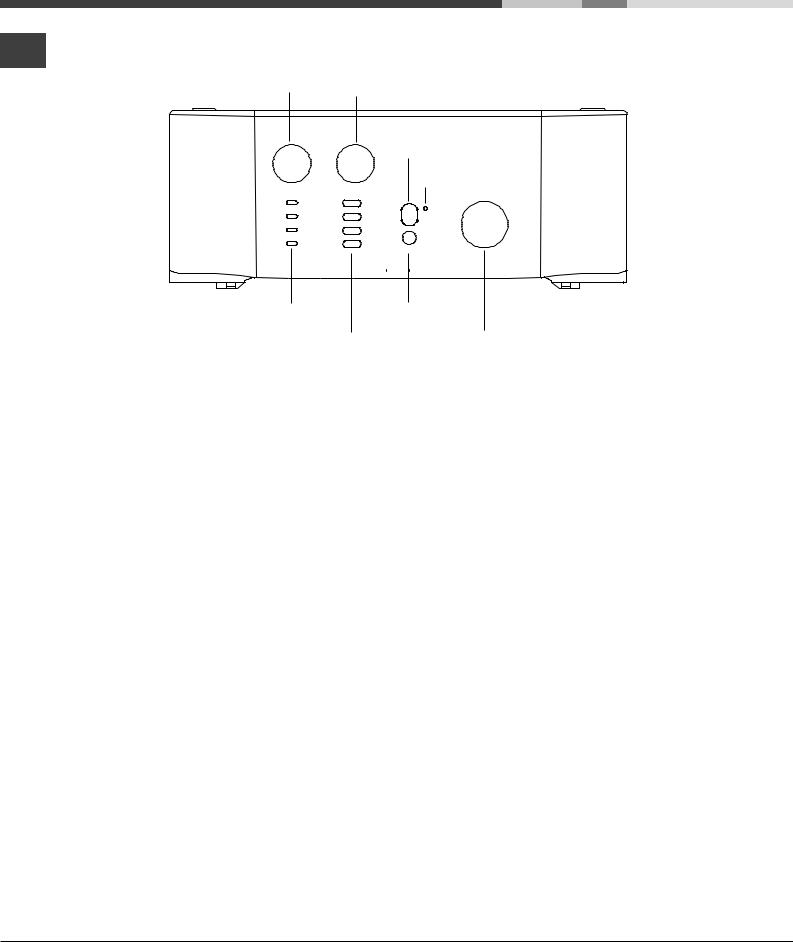
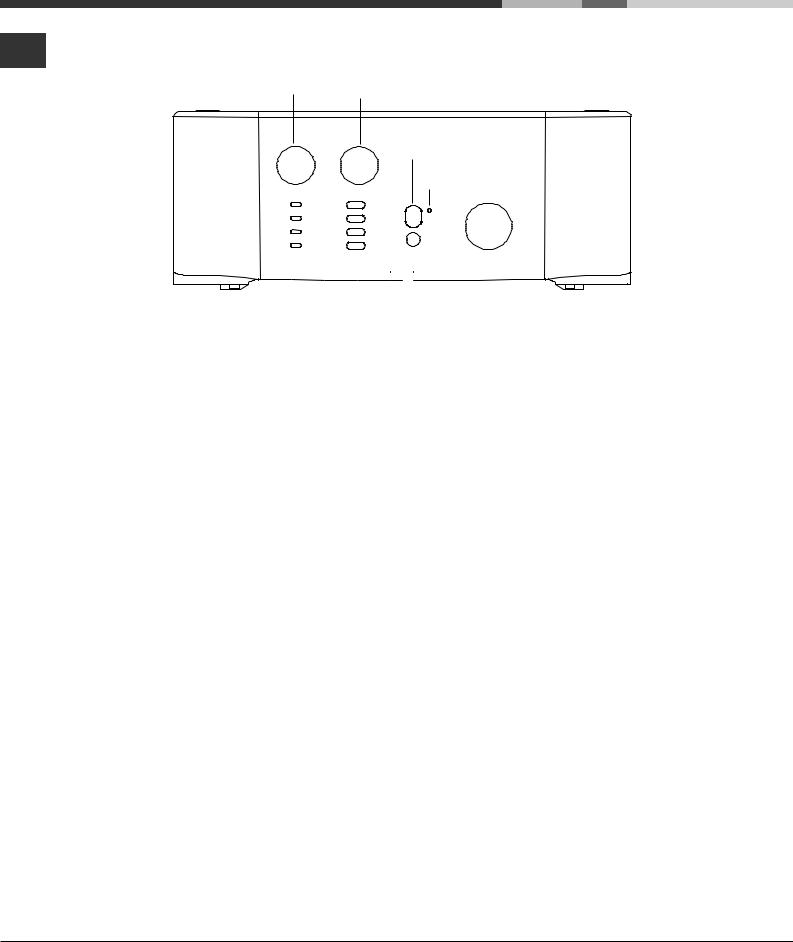
Control panel
GB
SPIN SPEED |
TEMPERATURE |
knob |
knob |
ON/OFF key
LID LOCKED
LED
LEDs START/RESET
key
FUNCTION keys
Detergent dispenser to add detergent and fabric softener (see page 8).
LEDs to find out which wash cycle phase is under way. If the Delay Timer function has been set, the time left until the programme starts will be indicated (see page 5).
SPIN SPEED knob to set the spin speed or exclude the spin cycle completely (see page 7).
FUNCTION keys to select the functions available. The button corresponding to the function selected will remain on.
TEMPERATURE knob to set the temperature or the cold wash cycle (see page 7).
PROGRAMME knob
ON/OFF key to turn the washing machine on and off.
START/RESET key to start the programmes or cancel incorrect settings.
ON-OFF/LID LOCK led ,to find out whether the washing machine is on (flashing) and if the lid may be opened (see page 5).
PROGRAMME knob to set the programmes (see page 6).
The knob stays still during the cycle.
 ON-OFF/LID LOCK led:
If this LED is on, the appliance Lid is locked to prevent it from being opened accidentally; to avoid any damages, you must wait for the lamp to flash before you open the Lid.
.
The rapid flashing of the ON-OFF/LID LOCK Led together with the flashing of at least one other LED indicates there is an abnormality (see page 11).
4

How to open and to close the drum |
GB |
|
|
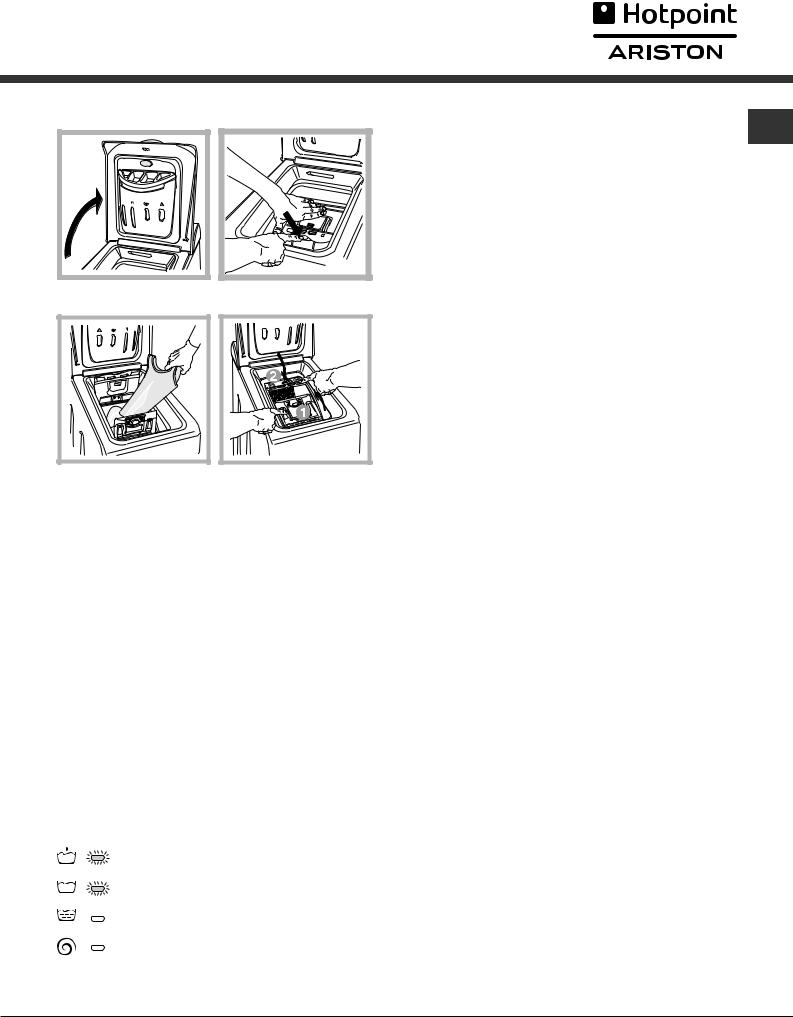
A) Opening (Fig. 1). |
|
|
Lift the external lid and open it completely. |
|
|
B) Then open the drum using both hands as |
|
|
shown in Fig. 2: |
|
|
- press the button indicated by the arrow in Fig. 2 |
|
|
lightly downwards, with one hand firmly resting on |
|
|
the doors to prevent them from suddenly opening |
|
|
and hurting your fingers; |
|
|
- therefore follow the appliance doors along as these |
|
|
unhook and open easily. |
|
Fig. 1 |
Fig. 2 |
|
|
C) Loading the washing machine. (Fig. 3). |
|
|
D) Shutting (Fig. 4). |
|
|
- close the drum fully by first shutting the front door |
|
|
followed by the |
rear one; |
|
- then ensure the hooks on the front door are perfectly |
|
|
housed within the seat of the rear door; |
|
|
- after the hooks have clicked into position, press both |
|
|
doors lightly downwards to make sure they do not |
|
|
come loose; |
|
|
- finally shut the external lid. |
|
Fig. 3 |
Fig. 4 |
|
Leds
The LEDS provide important information. This is what they can tell you:
Cycle phase under way:
During the wash cycle, the LEDs gradually illuminate on to indicate the cycle phase under way:
Prewash
Wash
Rinse
Spin cycle
Note: during draining, the LED corresponding to the Spin cycle phase will be turned on.
Function keys
The FUNCTION KEYS also act like LEDS.
When a function is selected, the corresponding button is illuminated.
If the function selected is incompatible with the programme set, the button will flash and the function will not be enabled.
If you set a function that is incompatible with another function you selected previously, only the last one selected will be enabled.
5

Starting and Programmes
Briefly: starting a programme
GB
1. |
Switch the washing machine on by pressing button . |
|
All the LEDS will light up for a few seconds and |
|
the ON-OFF/DOOR LOCK Led will begin to flash. |
2. |
Load your laundry into the washing machine, add |
|
the detergent and any fabric softener (see page 8) |
|
and shut the appliance door. |
3. |
Set the PROGRAMME knob to the programme |
|
required. |
4. |
Set the wash temperature (see page 7). |
5.Set the spin speed (see page 7).
6.Start he programme by pressing the START/RESET button.
To cancel it, keep the START/RESET button pressed for at least 2 seconds.
7.When the programme is finished, the ON-OFF/ DOOR LOCK Led will flash to indicate that the appliance door can be opened. Take out your laundry and leave the appliance door ajar to allow
the drum to dry thoroughly. Turn the washing machine off by pressing button  .
.
Programme table
Type of fabric and degree |
Program- |
Wash |
Detergent |
Fabric |
Bleaching |
Cycle |
|
||
tempe- |
|
|
/option |
length |
Description of wash cycle |
||||
of soil |
mes |
|
|
softener |
|||||
rature |
Pre- |
Wash |
Bleach |
(minutes) |
|
||||
|
|
|
|
|
|||||
|
|
|
|
wash |
|
|
|
|
|
|
|
|
|
|
|
|
|
|
|
Cotton |
|
|
|
|
|
|
|
|
|
Extremely soiled whites |
|
|
|
|
|
|
|
|
Pre-wash, wash cycle, rinse |
1 |
90°C |
• |
• |
• |
|
155 |
cycles, intermediate and final |
||
(sheets, tablecloths, etc.) |
|
||||||||
|
|
|
|
|
|
|
|
spin cycles |
|
|
|
|
|
|
|
|
|
|
|
Extremely soiled whites |
|
|
|
|
|
|
Delicate/ |
|
Wash cycle, rinse cycles, |
2 |
90°C |
|
• |
• |
147 |
intermediate and final spin |
|||
(sheets, tablecloths, etc.) |
|
Traditional |
|||||||
|
|
|
|
|
|
|
cycles |
||
|
|
|
|
|
|
|
|
|
|
Heavily soiled whites and |
|
|
|
|
|
|
Delicate/ |
|
Wash cycle, rinse cycles, |
3 |
60°C |
|
• |
• |
157 |
intermediate and final spin |
|||
fast colours |
|
Traditional |
|||||||
|
|
|
|
|
|
|
cycles |
||
|
|
|
|
|
|
|
|
|
|
Heavily soiled whites and |
|
|
|
|
|
|
Delicate/ |
|
Wash cycle, rinse cycles, |
4 |
40°C |
|
• |
• |
96 |
intermediate and final spin |
|||
fast colours |
|
Traditional |
|||||||
|
|
|
|
|
|
|
cycles |
||
|
|
|
|
|
|
|
|
|
|
Slightly soiled whites and |
|
|
|
|
|
|
Delicate/ |
|
Wash cycle, rinse cycles, |
delicate colours (shirts, |
5 |
30°C |
|
• |
• |
88 |
intermediate and final spin |
||
|
Traditional |
||||||||
jumpers, etc.) |
|
|
|
|
|
|
|
cycles |
|
|
|
|
|
|
|
|
|
||
Synthetics |
|
|
|
|
|
|
|
|
|
Heavily soiled fast colours |
6 |
60°C |
|
• |
• |
Delicate |
97 |
Wash cycle, rinse cycles, anti- |
|
(baby linen, etc.) |
|
crease or delicate spin cycle |
|||||||
|
|
|
|
|
|
|
|
||
|
|
|
|
|
|
|
|
|
|
Heavily soiled fast colours |
7 |
50°C |
|
• |
• |
Delicate |
93 |
Wash cycle, rinse cycles, anti- |
|
(baby linen, etc.) |
|
crease or delicate spin cycle |
|||||||
|
|
|
|
|
|
|
|
||
|
|
|
|
|
|
|
|
|
|
Delicate colours (all types |
|
|
|
|
|
|
|
|
Wash cycle, rinse cycles, anti- |
of slightly soiled |
8 |
40°C |
|
• |
• |
Delicate |
83 |
||
|
crease or delicate spin cycle |
||||||||
garments) |
|
|
|
|
|
|
|
|
|
|
|
|
|
|
|
|
|
|
|
Delicate colours (all types |
|
|
|
|
|
|
|
|
Wash cycle, rinse cycles and |
of slightly soiled |
9 |
30°C |
|
• |
• |
|
33 |
||
|
|
delicate spin cycl |
|||||||
garments) |
|
|
|
|
|
|
|
|
|
|
|
|
|
|
|
|
|
|
|
Delicate |
|
|
|
|
|
|
|
|
|
Wool |
10 |
40°C |
|
• |
• |
Delicate |
48 |
Wash cycle, rinse cycles and |
|
|
delicate spin cycle |
||||||||
|
|
|
|
|
|
|
|
|
|
Very delicate fabrics |
|
|
|
|
|
|
|
|
Wash cycle, rinse cycles, anti- |
(curtains, silk, viscose, |
11 |
30°C |
|
• |
• |
|
55 |
||
|
|
crease or draining cycle |
|||||||
etc.) |
|
|
|
|
|
|
|
|
|
|
|
|
|
|
|
|
|
|
|
PARTIAL PROGRAMMES |
|
|
|
|
|
|
|
|
|
Rinse |
|
|
|
|
|
• |
|
|
Rinse cycles and spin cycle |
|
|
|
|
|
|
|
|
|
|
Delicate rinse cycle |
|
|
|
|
|
• |
|
|
Rinse cycles, anti-crease or |
|
|
|
|
|
|
|
draining |
||
|
|
|
|
|
|
|
|
|
|
Spin cycle |
|
|
|
|
|
|
|
|
Draining and heavy duty spin |
|
|
|
|
|
|
|
|
cycle |
|
|
|
|
|
|
|
|
|
|
|
Delicate spin cycle |
|
|
|
|
|
|
|
|
Draining and delicate spin |
|
|
|
|
|
|
|
|
cycle |
|
|
|
|
|
|
|
|
|
|
|
Draining |
|
|
|
|
|
|
|
|
Draining |
|
|
|
|
|
|
|
|
||
|
|
|
|
|
|
|
|
|
|
Notes
For the anti-crease function: see Easy iron, opposite page. The information contained in the table is purely indicative.
Special programme
Daily 30' (programme 9 for Synthetics) is designed to wash lightly soiled garments in a short amount of time: it only lasts 30 minutes and allows you to save on both time and energy. By setting this programme (9 at 30°C), you can wash different fabrics together (except for woollen and silk items), with a maximum load of 3 kg.
We recommend the use of liquid detergent.
6

Personalisations
 Setting the temperature
GB
Turn the TEMPERATURE knob to set the wash temperature (see Programme table on page 6). The temperature can be lowered, or even set to a cold wash ( ).
).
 Setting the spin speed
Turn the SPIN SPEED knob to set the spin speed for the programme selected.
The maximum spin speeds for each programme are as follows:
Programmes |
Maximum spin speed |
Cottone |
1000 rpm |
Synthetics |
800 rpm |
Wool |
600 rpm |
Silk |
no |
The spin speed can be lowered, or the spin cycle can be excluded altogether by selecting symbol  .
.
The washing machine will automatically prevent you from selecting a spin speed higher than the maximum speed for each programme.
To avoid excessive vibrations, before every spin cycle the machine distributes the load in a uniform manner by continuously rotating the drum at a speed which is slightly faster than the normal washing speed.
When, despite repeated attempts, the load is still not evenly distributed, the machine spins at a lower speed than the set frequency.
If the load is excessively unbalanced, the machine attempts to distribute it instead of spinning.
The balancing attempts may extend the total duration of the cycle, up to a maximum of 10 minutes.
Functions
To enable a function:
1.press the button corresponding to the desired function, according to the table below;
2.the function is enabled when the corresponding button is illuminated.
Note: The rapid flashing of the button indicates that the corresponding function cannot be selected for the programme set.
|
Function |
Effect |
Comments |
|
|
|
Enabled with |
|
|
|
|
|
|
|
|
programmes: |
|
|
|
|
|
|
|
|
|
|
|
Super |
Allows for an |
|
|
|
|
|
|
|
Wash |
impeccable |
|
|
|
|
|
|
|
|
wash, visibly |
This function is incompatible with the RAPID function. |
1, 2, 3, 4, |
|
|||
|
|
whiter than a |
5, 6, 7, 8 |
|
||||
|
|
|
|
|
|
|
||
|
|
standard |
|
|
|
|
|
|
|
|
Class A wash. |
|
|
|
|
|
|
|
|
|
|
|
|
|
||
|
Easy iron |
This option |
When this function is set, programmes 6, 7, 8, 11 and |
All |
|
|||
|
|
reduces the |
Delicate rinse will end with the laundry left to soak |
programmes |
|
|||
|
|
amount of |
(Anti-crease) and the Rinse cycle phase LED |
will |
except for |
|
||
|
|
creasing on |
flash. |
|
|
|
1, 2, 9, 10 |
|
|
|
fabrics, |
- to conclude the cycle, press the START/RESET |
|
and |
|
||
|
|
making them |
button; |
|
|
|
Draining. |
|
|
|
easier to iron. |
- to run the draining cycle alone, set the knob to the |
|
|
|||
|
|
|
relative symbol |
|
and press the START/RESET |
|
|
|
|
|
|
|
|
|
|||
|
|
|
button. |
|
|
|
|
|
|
|
|
|
|
|
|
|
|
|
Rapid |
Cuts the |
|
|
|
|
1, 2, 3, 4, |
|
|
|
duration of |
This function is incompatible with the SUPER WASH |
5, 6, 7, 8 |
|
|||
|
|
the wash |
function. |
|
|
|
Rinses |
|
|
|
cycle by 30%. |
|
|
|
|
|
|
|
|
|
|
|
|
|
||
|
Extra |
Increases the |
Recommended when the appliance has a full load or |
1, 2, 3, 4, 5, |
|
|||
|
Rinse |
efficiency of |
with large quantities of detergent . |
|
6, 7, 8, and |
|
||
|
|
the rinse. |
|
|
|
|
Rinse |
|
|
|
|
|
|
|
|
cycles. |
|
|
|
|
|
|
|
|
|
|
|
|
|
|
|
|
|
|
|
7

Detergents and laundry
Detergent dispenser
GB
Good washing results also depend on the correct dose of detergent: adding too much detergent won't necessarily make for a more efficient wash, and may
in fact cause build up on the interior of your
appliance and even pollute the environment.
Open up the detergent dispenser and pour in the detergent and fabric softener, as follows.
compartment 1: Detergent for pre-wash
compartment 2: Detergent for the wash cycle (powder or liquid)
It is recommended that you place liquid detergent directly into the compartment using the appropriate dosing cup.
compartment 3: Additives (softener, etc.)
When pouring the softener in compartment 3, avoid exceeding the "max" level indicated.
The softener is added automatically into the machine during the last wash. At the end of the wash programme, some water will be left in compartment 3. This is used for the inlet of denser fabric softeners into the machine, i.e. to dilute the more concentrated softeners. Should more than a normal amount of water remain in compartment 3, this means the emptying device is blocked. For cleaning instructions, see page 10.
compartment 4: Bleach
Do not use hand wash detergent because it may form too much foam.
Bleach cycle
Traditional bleach should be used on sturdy white fabrics, and delicate bleach for coloured fabrics, synthetics and for wool.
When pouring in the bleach, be careful not to exceed the "max" level indicated on compartment 4 ..
To run the bleach cycle alone, pour the bleach into compartment 4 and set the Rinse programme  (for cotton fabrics) or delicate Rinse
  (for synthetic fabrics).
Preparing your laundry
•Divide your laundry according to:
-the type of fabric/the symbol on the label.
-the colours: separate coloured garments from whites.
•Empty all pockets and check for loose buttons.
•Do not exceed the weight limits stated below, which refer to the weight when dry:
Sturdy fabrics: max 5 kg Synthetic fabrics: max 2.5 kg Delicate fabrics: max 2 kg Wool: max 1 kg
How much does your laundry weigh?
1sheet 400-500 g
1pillow case 150-200 g
1tablecloth 400-500 g
1bathrobe 900-1,200 g
1towel 150-250 g
Special items
Curtains: fold curtains and place them in a pillow case or mesh bag. Wash them separately without exceeding half the appliance load. Use programme 11 which excludes the spin cycle automatically.
Quilted coats and windbreakers: if they are padded with goose or duck down, they can be machine-washed. Turn the garments inside out and load a maximum of 2-3 kg, repeating the rinse cycle once or twice and using the delicate spin cycle. Trainers: remove any mud. They can be washed together with jeans and other tough garments, but not with whites.
Wool: for best results, use a specific detergent, taking care not to exceed a load of 1 kg.
Woolmark Platinum Care
As gentle as a hand wash.
Hotpoint Ariston sets a new standard of superior performance that has been


 endorsed by The Woolmark Company with the prestigious Woolmark Platinum Care brand. Look for the Woolmark Platinum Care logo on the washing machine to ensure you can safely and effectively wash wool garments labelled as "hand wash" (M.0303):
Set programme 10 for all "Hand wash"  garments, using the appropriate detergent (max load 1 Kg).
8

Precautions and advice
The washing machine was designed and built in compliance with the applicable international safety regulations. The following information is provided for your safety and should consequently be read carefully.
General safety
•This appliance has been designed for nonprofessional, household use and its functions must not be changed.
•This washing machine should only be used by adults and in accordance with the instructions provided in this manual.
•Never touch the washing machine when barefoot or with wet or damp hands or feet.
•Do not pull on the power supply cable to unplug the appliance from the electricity socket. Pull the
plug out yourself.
•Do not open the detergent dispenser while the appliance is in operation.
•Do not touch the drain water as it could reach very high temperatures.
•Never force the washing machine door: this could damage the safety lock mechanism designed to
prevent any accidental openings.
•In the event of a malfunction, do not under any circumstances touch internal parts in order to attempt repairs.
•Always keep children well away from the appliance while in operation.
•The appliance door tends to get quite hot during the wash cycle.
•Should it have to be moved, proceed with the help of two or three people and handle it with the
utmost care. Never try to do this alone, because the appliance is very heavy.
•Before loading your laundry into the washing machine, make sure the drum is empty.
Disposal
•Disposing of the packaging material: observe local regulations, so the packaging can be re-used.
•Disposal of old electrical appliances
The European Directive 2002/96/EC on Waste Electrical and Electronic Equipment (WEEE), requires that old household electrical appliances must not be disposed of in the normal unsorted municipal waste stream. Old appliances must be collected separately
in order to optimise the recovery and recycling of
the materials they contain and reduce the impact on GB human health and the environment.
The crossed out "wheeled bin" symbol on the product reminds you of your obligation, that when you dispose of the appliance it must be separately collected.
Consumers should contact their local authority or retailer for information concerning the correct disposal of their old appliance.
•Disposing of an old washing machine:
before scrapping your appliance, cut the power supply cable and remove the appliance door.
Saving energy and respecting the environment
Environmentally-friendly technology
If you only see a little water through your appliance door, this is because thanks to the latest technology, your washing machine only needs less than half the amount of water to get the best results: an objective reached to respect the environment.
Saving on detergent, water, energy and time
• To avoid wasting resources, the washing machine should be used with a full load. A full load instead of two half loads allows you to save up to 50% on energy.
• The pre-wash cycle is only necessary on extremely soiled garments. Avoiding it will save on detergent, time, water and between 5 and 15% energy.
• Treating stains with a stain remover or leaving them to soak before washing will cut down the need to wash them at high temperatures. A programme at 60°C instead of 90°C or one at 40°C instead of 60°C will save up to 50% on energy.
• Use the correct quantity of detergent depending on the water hardness, how soiled the garments are and the amount of laundry you have, to avoid wastage and to protect the environment: despite being biodegradable, detergents do contain ingredients that alter the natural balance of the environment. In addition, avoid using fabric softener as much as possible.
•If you use your washing machine from late in the afternoon until the early hours of the morning, you will help reduce the electricity board's peak load.
•If your laundry has to be dried in a tumble dryer, select a high spin speed. Having the least water possible in your laundry will save you time and
energy in the drying process.
9
Care and maintenance
GB |
Cutting off the water or electricity |
|
supply |
|
|
|
• Turn off the water tap after every wash. This will |
|
limit the wear of your appliance's water system |
|
and also prevent leaks. |
|
• Unplug your appliance when cleaning it and |
|
during all maintenance operations. |
Cleaning your appliance
The exterior and rubber parts of your appliance can be cleaned with a soft cloth soaked in lukewarm soapy water. Do not use solvents or abrasives.
Cleaning the detergent dispenser
Remove the dispenser by raising it and pulling it out
(see figure).
Wash it under running water; this operation should be repeated
frequently.
Caring for your appliance door and drum
•Always leave the appliance door ajar to prevent unpleasant odours from forming.
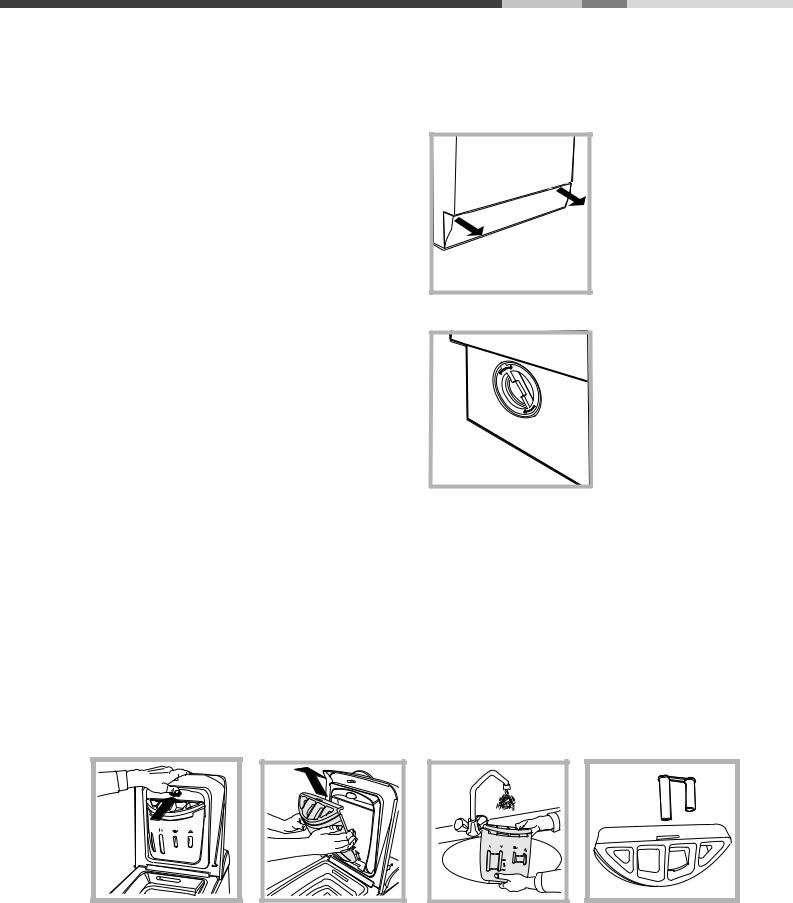
Cleaning the pump
The washing machine is fitted with a self-cleaning pump that does not require any maintenance. Sometimes, small items (such as coins or buttons) may fall into the pre-chamber that protects the pump, situated in the lower part of the same.
Make sure the wash cycle has ended and unplug the appliance.
To recover any objects that have fallen into the prechamber:
1. remove the plinth at the bottom on the front side of the washing machine by pulling from the side with your hands (see diagram); (see figure); 2. unscrew the lid rotating it anticlockwise (see figure): a little water may trickle out. This is perfectly normal;
3. clean the interior thoroughly;
4. screw the lid back on;
5. reposition the panel, making sure the hooks are securely in place before you push it onto the appliance.
Checking the water inlet hose
Check the water inlet hose at least once a year. If you see any cracks, replace it immediately: during the wash cycles, water pressure is very strong and a cracked hose could easily split open.
Never use hoses that have already been used.
Disassembly:
Press lightly on the large button on the front of the detergent dispenser and pull it upwards (fig. 1).
How to clean the detergent dispenser
Cleaning:
Then clean the dispenser under a tap (fig. 3) using an old toothbrush and, once the pair of siphons inserted in the top of compartments 1 and 2 (fig. 4) have been pulled out, check whether the same are not clogged and then rinse them.
Reassembly:
Do not forget to reinsert the pair of siphons into the special housings and then to replace the dispenser into its seat, clicking it into place (fig. 4, 2 and 1).
Fig. 1 |
Fig. 2 |
Fig. 3 |
Fig. 4 |
|
|
|
|
10
Troubleshooting
Your washing machine could fail to work. Before calling for Assistance (see page 12), make sure the problem
can't easily be solved by consulting the following list. |
GB |
|
Problem
The washing machine won't start.
The wash cycle won't start.
The washing machine fails to load water.
The washing machine continuously loads and unloads water.
The washing machine does not drain or spin.
The washing machine vibrates too much during the spin cycle.
The washing machine leaks.
The ON-OFF/DOOR LOCK Led flashes rapidly at the same time as at least one other LED.
There is too much foam.
Possible causes/Solution:
•The appliance is not plugged into the socket, or not enough to make contact.
•There has been a power failure.
•The appliance Lid is not shut properly. The Lid locked Led flashes.
•The  button has not been pressed.
•The START/RESET button has not been pressed.
•The water tap is not turned on.
•The water inlet hose is not connected to the tap.
•The hose is bent.
•The water tap is not turned on.
•There is a water shortage.
•The water pressure is insufficient.
•The START/RESET button has not been pressed.
•The drain hose is not fitted between 65 and 100 cm from the floor
(see page 3).
•The free end of the hose is underwater (see page 3).
•The wall drainage system doesn't have a breather pipe.
If the problem persists even after these checks, turn off the water tap, switch the appliance off and call for Assistance. If the dwelling is on one of the upper floors of a building, there may be drain trap problems causing the washing machine to load and unload water continuously. In order to avoid such an inconvenience, special anti-drain trap valves are available in shops.
•The programme does not foresee the draining: some programmes require enabling the draining manually (see page 6).
•The Easy iron option is enabled: to complete the programme, press the START/RESET button (see page 7).
•The drain hose is bent (see page 3).
•The drain duct is clogged.
•The drum was not unblocked correctly during installation (see page 2).
•The washing machine is not level (see page 2).
•The washing machine is closed in between furniture cabinets and the wall (see page 2).
•The water inlet hose is not screwed on correctly (see page 2).
•The detergent dispenser is obstructed (to clean it, see page 10).
•The drain hose is not secured properly (see page 3).
•Switch off the machine and unplug the appliance; wait for approximately 1 minute then switch it on again.
If the problem persists, contact Assistance.
•The detergent is not suitable for machine washing (it should bear
the definition "for washing machines" or "hand and machine wash", or the like).
•You used too much detergent.
11

Service
Before calling for Assistance:
GB |
• |
Check whether you can solve the problem on your own (see page 11); |
|
||
|
• |
Restart the programme to check whether the problem has been solved; |
|
• |
If this is not the case, contact an authorised Technical Service Centre on the telephone number |
|
|
provided on the guarantee certificate. |
|
|
Always request the assistance of authorised servicemen. |
Notify the operator of:
•the type of problem;
•the appliance model (Mod.);
•the serial number (S/N);
This information can be found on the data plate situated on the rear of the washing machine.
12

Руководство по экпуатации
СТИРАЛЬНАЯ МАШИНА
CIS
|
|
Содержание |
CIS |
|
|
|
Установка, 26-27 |
|
|
|
|
|
|
|
РУССКИЙ |
Распаковка и выравнивание, 26 |
|
|
|
Подключение к водопроводной и электрической сети, 26-27 |
|
|
Пробный цикл стирки, 27 |
|
|
Технические характеристики, 27 |
Описание стиральной машины, 28-29
Панель управления, 28
Как открыть и закрыть барабан, 29 Индикаторы, 29
|
|
|
|
Запуск машины. Программы, 30 |
|
|
|
|
Краткие инструкции: Порядок запуска программы, 30 |
|
|
|
|
Таблица программ, 30 |
|
|
|
|
Персонализация стирки, 31 |
AVTL 104 |
Выбор температуры, 31 |
|||
Выбор скорости отжима, 31 |
||||
|
|
|
|
Функции, 31 |
|
|
|
|
Моющие средства и белье, 32 |
|
|
|
|
Распределитель моющих средств, 32 |
|
|
|
|
Цикл отбеливания, 32 |
|
|
|
|
Подготовка белья, 32 |
|
|
|
|
Особенности стирки отдельных изделий, 32 |
|
|
|
|
Woolmark Platinum Care, 32 |
|
|
|
|
Предупреждения и рекомендации, 33 |
|
|
|
|
Общие правила безопасности, 33 |
|
|
|
|
Утилизация, 33 |
|
|
|
|
Экономия и охрана окружающей среды, 33 |
|
|
|
|
Обслуживание и уход, 34 |
|
|
|
|
Отключение воды и электричества, 34 |
|
|
|
|
Уход за стиральной машиной, 34 |
|
|
|
|
Уход за дверцей машины и барабаном, 34 |
|
|
|
|
Как чистить распределитель моющих средств, 34 |
|
|
|
|
Чистка насоса, 34 |
|
|
|
|
Проверка заливного шланга, 34 |
|
|
|
|
Устранение неисправностей, 35 |
|
|
|
|
Сервисное обслуживание, 36 |
|
|
|
|
|
|
|
|
|
|
|
|
|
|
|
|
|
|
|
|
|
|
|
|
|
!
|
Установка |
|
|
|
|
|
|
|
|
|
Сохраните данное руководство. Оно должно быть |
После установки машины на место проверьте по уров- |
|||||||
+15 |
в комплекте со стиральной машиной в случае про- |
ню горизонтальность верхней крышки корпуса, откло- |
|||||||
|
|||||||||
|
дажи, передачи оборудования или при переезде |
нение горизонтали должно быть не более 2°. |
|
||||||
|
на новую квартиру, чтобы новый владелец обору- |
Правильное выравнивание оборудования помо- |
|||||||
|
дования мог ознакомиться с правилами его функ- |
жет избежать шума, вибраций и смещений во время |
|||||||
|
ционирования и обслуживания. |
|
|
|
|||||
|
|
|
|
работы машины. |
|
|
|
||
|
|
|
|
|
|
|
|
|
|
|
Внимательно прочитайте руководство: в нем со- |
Если стиральная машина стоит на полу, покрытом |
|||||||
|
ковром, убедитесь, что ее основание возвыша- |
||||||||
|
держатся важные сведения по установке и безо- |
||||||||
|
ется над ковром. В противном случае вентиляция |
||||||||
|
пасной эксплуатации стиральной машины. |
|
|||||||
|
|
будет затруднена или вовсе невозможна. |
|
||||||
|
Распаковка и выравнивание |
|
|
|
|
|
|
|
|
|
Распаковка |
|
|
|
|
|
|
|
|
|
1. Распакуйте стиральную машину. |
|
|
|
|
|
|
|
|
|
2. Убедитесь, что оборудование не было повреждено |
Подключение к водопроводной и |
|
||||||
|
электрической сети |
|
|
|
|||||
|
во время транспортировки. При обнаружении по- |
|
|
|
|||||
|
|
|
|
|
|||||
|
вреждений – не подклю- |
|
|
|
|
||||
|
чайте машину – свяжи- |
Подсоединение заливного шланга |
|
|
|||||
|
тесь с поставщиком |
|
|
||||||
|
|
1. Вставьте прокладку А |
|||||||
|
немедленно. |
|
|
|
|||||
|
|
|
|
вконецзаливного шлан- |
|||||
|
|
|
|
|
|
|
|||
|
3. |
Удалите |
четыре |
|
га и наверните его на |
||||
|
транспортировочных |
|
вывод водопровода |
||||||
|
винта и |
резиновые |
|
холодной воды с резьбо- |
|||||
|
пробки с прокладками, |
A |
вым отверстием |
3/4 |
|||||
|
расположенные в зад- |
|
дюйма (см. рис.). |
|
|||||
|
ней части стиральной |
|
Перед подсоединением |
||||||
|
машины (см. рис.). |
|
откройте водопроводный |
||||||
|
4. Закройте отверстия |
|
кран и дайте стечь |
||||||
|
|
грязной воде. |
|
||||||
|
прилагающимися плас- |
|
|
||||||
|
|
|
|
|
|||||
|
тиковыми заглушками. |
|
2. Подсоедините за- |
||||||
|
|
|
|
|
|
|
|||
|
5. Сохраняйте |
âñå |
|
ливной шланг к сти- |
|||||
|
детали: |
îíè |
|
Âàì |
|
ральной |
машине, |
||
|
понадобятся |
|
ïðè |
|
навинтив |
åãî |
íà |
||
|
последующей транспортировке стиральной |
|
водоприемник, распо- |
||||||
|
машины. |
|
|
|
|
|
ложенный в задней |
||
|
áолты, резиновые шайбы и большую металличес- |
|
верхней части справа |
||||||
|
|
(ñì. ðèñ.). |
|
|
|||||
|
кую поперечную планку. Закройте образовавшиеся |
|
|
|
|||||
|
|
|
|
|
|||||
|
отверстия пластмассовыми заглушками. |
|
|
|
3.Убедитесь, |
÷òî |
|||
|
|
|
|
|
|
|
|||
|
Не разрешайте детям играть с упаковочными |
|
шланг не перекручен |
||||||
|
материалами. |
|
|
|
|
|
и не пережат. |
|
|
Выравнивание |
|
|
|
Давление воды должно быть в пределах зна- |
|
|
|
||
1. Установите стиральную |
|
чений, указанных в таблице Технических харак- |
||
машину |
íà |
ровном и |
|
теристик (см. с. 3). |
прочном полу, так чтобы |
|
|
||
она не касалась стен, |
|
Если длина водопроводного шланга окажется |
||
мебели |
è |
прочих |
|
недостаточной, обратитесь в Авторизованный |
предметов. |
|
|
Сервисный центр. |
|
2. После установки ма- |
|
|
||
шины на место отрегу- |
|
|
||
лируйте ее устойчивое |
|
|
||
положение путем вра- |
|
|
||
щения передних ножек |
|
|
||
(см. рис.). Для этого |
|
|
||
сначала ослабьте контргайку, после завершения |
|
|
||
регулировки контргайку затяните. |
|
|
|
|
"
Подсоединение сливного шланга |
|
|
|
|
l розетка заземлена в соответствии с нормами безо- |
CIS |
|
|
Повесьте загнутый ко- |
пасности, описанными в данном разделе инструкции |
|||||
|
допускается организация заземления рабочим ну- |
|
|||||
|
нец сливного шланга на |
|
|||||
|
лем, при условии, что защитная линия не имеет раз- |
|
|||||
|
край раковины, ванны, |
|
|||||
|
рыва и подключена напрямую в обвод каких-либо |
|
|||||
|
èëè |
поместите |
â |
|
|||
|
приборов (например, электрического счетчика). |
|
|||||
|
специальный |
вывод |
|
||||
|
Если вилка не подходит к розетке, ее следует заме- |
|
|||||
65 - 100 cm |
канализации. Шланг не |
|
|||||
нить на новую, соответствующую розетке, или заменить |
|
||||||
должен перегибаться. |
|
||||||
|
|
||||||
|
питающий кабель. Замена кабеля должна произво- |
|
|||||
|
Верхняя точка сливно- |
|
|||||
|
диться только квалифицированным персоналом. |
|
|||||
|
го шланга должна на- |
|
|||||
|
Запрещается использование переходников, двойных |
|
|||||
|
ходиться на высоте 65- |
|
|||||
|
и более розеток и удлинителей (они создают опасность |
|
|||||
|
100 см от пола. Распо- |
|
|||||
|
возгорания). Если Вы считаете их использование не- |
|
|||||
|
ложение |
сливного |
|
||||
|
обходимым, применяйте один единственный удлини- |
|
|||||
|
шланга должно обес- |
|
|||||
|
тель, удовлетворяющий требованиям безопасности. |
|
|||||
|
печивать разрыв струи |
|
|||||
|
|
|
|||||
|
при сливе (конец шлан- |
Оборудование, подключенное с нарушением требо- |
|
||||
|
ãà íå |
должен |
áûòü |
ваний безопасности бытовых приборов большой |
|
||
|
опущен в воду). |
|
мощности, изложенных в данной инструкции, явля- |
|
|||
|
|
ется потенциально опасным. |
|
||||
|
В случае крепления на |
|
|||||
|
Производитель не несет ответственности за |
|
|||||
|
край ванной или рако- |
|
|||||
|
ущерб здоровью и собственности, если он вызван |
|
|||||
|
вины, шланг вешается |
|
|||||
|
несоблюдением указанных норм установки. |
|
|||||
|
с помощью направля- |
|
|||||
|
|
|
|||||
|
ющей (входит в комп- |
|
|
||||
|
лект поставки), которая |
Первый цикл стирки |
|
||||
|
крепится к крану (рис.). |
|
|||||
|
По завершении установки, перед началом эксп- |
|
|||||
Не рекомендуется применение удлинителей для |
|
||||||
луатации необходимо произвести один цикл стир- |
|
||||||
сливного шланга, при необходимости допускает- |
|
||||||
ки со стиральным порошком, но без белья, по про- |
|
||||||
ся его наращивание шлангом такого же диаметра |
|
||||||
грамме 90°C без предварительной стирки. |
|
||||||
и длиной не более 150 см. |
|
|
|
|
|
|
|
|
|
|
|
|
|
|
|
Подсоединение к электросети |
Технические характеристики |
|
|
|
|
||
Внимание! Оборудование обязательно должно |
|
|
|
быть заземлено! |
Модель |
AVTL 104 |
|
|
|
||
1. Машина подключается к электрической сети при по- |
|
|
|
|
ш ирина 40 см |
|
|
мощи двухполюсной розетки с заземляющим контак- |
|
|
|
Размеры |
высота 85 см |
|
|
том (розетка не поставляется с машиной). Фазный |
|
||
|
глубина 60 см |
|
|
провод должен быть подключен через автомат защи- |
|
|
|
|
|
|
|
|
|
|
|
ты сети, рассчитанный на максимальный ток (ток сра- |
Загрузка |
1 - 5 êã |
|
батывания) 16 А, и имеющий время срабатывания не |
|
|
|
|
Смотрите паспортную табличку с |
|
|
более 0,1 с. |
Электрические |
|
|
2. При наличии вблизи от предполагаемого места уста- |
техническими характеристиками |
|
|
параметры |
|
||
на машине. |
|
||
новки машины розетки с заземляющим контактом, |
|
|
|
|
|
|
|
имеющей трехпроводную подводку кабеля с медными |
Гидравлические |
max давление 1 Мпа (10 бар) |
|
жилами сечением не менее 1,5 кв. мм (или алюмини- |
min давление 0,05 Мпа (0,5 бар) |
|
|
параметры |
|
||
евыми жилами сечением не менее 2,5 кв. мм), дора- |
объем барабана 42 л |
|
|
|
|
||
|
|
|
|
ботка электросети не производится. При отсутствии |
Скорость отжима |
äî 1000 îá/ìèí |
|
указанной розетки и проводки следует провести их мон- |
|
||
|
|
|
|
òàæ. |
|
|
|
Kонтрольные |
|
|
|
3. Прокладка заземления отдельным проводом не |
|
|
|
программы |
программа 3; температура 60°С; |
|
|
допускается. |
согласно |
|
|
при загрузке до 5 кг. |
|
||
4. Для доработки электрической сети рекомендуется |
нормативу |
|
|
|
|
||
применять провод типа ППВ 3х1,5 380 ГОСТ 6223-79. |
EN 60456 |
|
|
|
|
|
|
Допускается применение других марок кабеля, обес- |
|
|
|
печивающих пожаро- и электробезопасность при экс- |
|
Маш и на соответствует следующ им |
|
|
Директивам Европейского |
|
|
плуатации машины. |
|
|
|
|
Экономи ческого сообщ ества: |
|
|
|
|
|
|
Перед включением машины в сеть убедитесь, что: |
|
- 89/336 /ЕЕС от 03.05.89 (электро- |
|
l розетка и проводка соответствуют требованиям, из- |
|
магнитной совместимости) и |
|
|
последующ ие модиф икации |
|
|
ложенным в данном разделе инструкции; |
|
|
|
|
- 2006/95/CE (низкого напряжени я) |
|
|
l напряжение и частота тока сети соответствуют дан- |
|
|
|
|
|
|
|
ным машины; |
|
|
|
l розетка и вилка одного типа; |
|
|
|
|
|
|
|
|
|
|
|
#
Описание стиральной машины
Панель управления
+15
Рукоятка регуляции |
Рукоятка регуляции |
|
скорости ОТЖИМА |
||
ТЕМПЕРАТУРЫ |
||
|
Кнопка
ВКЛЮЧЕНИЕ/
ВЫКЛЮЧЕНИЕ
Индикатор ЛЮК ЗАБЛОКИРОВАН
|
|
|
|
|
|
|
|
|
|
|
|
|
|
|
|
|
|
|
|
|
|
|
|
Световые |
|
Кнопка |
|
|
|||
индикаторы |
|
ПУСК/ОТМЕНА |
|
|
|||
Кнопки |
|
|
|
Рукоятка |
|||
ДОПОЛНИТЕЛЬНЫЕ |
выбора |
||||||
ФУНКЦИИ |
|
|
ПРОГРАММ |
||||
Ячейка для стирального порошка, наполняе - |
Рукоятка ТЕМПЕРАТУРА служит для регуляции |
мая стиральным порошком и добавками |
температуры или для стирки в холодной воде |
(смотреть стр. 20). |
(смотреть стр. 19). |
|
Кнопка ВКЛЮЧЕНИЕ/ВЫКЛЮЧЕНИЕ служит для |
Световые индикаторы служат для контроля за |
включения и выключения стиральной машины. |
выполнением программы стирки. |
|
Если была включена функция Таймер задержки, |
Кнопка ПУСК/ОТМЕНА служит для запуска |
индикаторы показывают время, остающееся до |
программ или для отмены ошибочного |
запуска программы (смотреть стр. 17). |
программирования. |
Рукоятка ОТЖИМ служит для регуляции скорости |
Индикатор ВКЛЮЧЕНИЕ/ЛЮК ЗАБЛОКИРОВАН |
отжима или для его исключения (смотреть стр. |
мигает, когда стиральная машина включена, и горит, |
31). |
не мигая, если люк не заблокирован (смотреть |
|
ñòð. 17). |
Кнопки ДОПОЛНИТЕЛЬНЫЕ ФУНКЦИИ служат |
|
для подключения имеющихся дополнительных |
Рукоятка выбора ПРОГРАММ служит для выбора |
функций. Кнопка выбранной функции останется |
программ (смотреть стр. 18). |
включенной. |
В процессе выполнения программы рукоятка |
|
остается неподвижной. |
 Индикатор ВКЛЮЧЕНИЕ/ЛЮК ЗАБЛОКИРОВАН:
Горящий индикатор означает, что люк заблокирован во избежание его случайного открывания.
во избежание повреждений перед тем как открыть люк, необходимо дождаться, когда замигает индикатор.
! Частое мигание индикатора ВКЛЮЧЕНИЕ/ЛЮК ЗАБЛОКИРОВАН одновременно с любым другим индикатором означает неисправность (смотреть стр. 23).
$
Как открыть и закрыть барабан
A) ОТКРЫВАНИЕ (рис. 1). |
CIS |
|
|
Поднимите внешнюю крышку и полностью ее откройте. |
|
Б) Затем, используя обе руки, откройте барабан, как пока |
|
çàíî íà ðèñ. 2: |
|
- Нажмите кнопку, обозначенную стрелкой на рис. 2, слег |
|
êà âíèç, |
|
другой рукой придерживая дверцы (так вы избежите |
|
внезапного открывания дверок и защемления пальцев); |
|
дверцы расцепятся и легко откроются. |
|
Fig. 1 |
Fig. 2 |
|
В) ЗАГРУЗКА СТИРАЛЬНОЙ МАШИНЫ (рис. 3). |
|
Г) ЗАКРЫВАНИЕ (рис. 4). |
|
- закройте полностью барабан, опуская сначала переднюю |
|
дверцу, а затем заднюю; |
|
- затем удостоверьтесь, что крюки передней дверцы точно |
|
вошли в предназначенные места на задней дверце; |
|
- после того, как крюки защелкнулись, нажмите обе дверцы |
|
слегка вниз, чтобы убедиться они закрыты плотно; |
- и, наконец, закройте внешнюю крышку.
Fig. 3 |
Fig. 4 |
Индикаторы
Индикаторы сообщают пользователю важные сведения.
Значение индикаторов:
Текущая фаза цикла:
В процессе цикла стирки индикаторы будут загораться один за другим, показывая фазу выполнения программы:
Предварительная стирка
Стирка
Полоскание
Отжим
Примечание: в процессе слива загорится индикатор, соответствующий циклу Отжима.
Кнопки выбора функции
КНОПКИ ВЫБОРА ФУНКЦИИ также являются индикаторами.
При выборе функции загорается соответствующая кнопка.
Если выбранная функция является несовместимой с заданной программой, кнопка будет мигать, и такая функция не будет активирована.
Если будет выбрана функция, несовместимая с другой, ранее выбранной функцией, останется включенной только последняя выбранная функция.
%
Запуск машины. Программы
|
|
|
|
|
|
|
|
|
|
|
|
|
|
|
|
|
|
|
|
|
Краткие инструкции: Порядок запуска |
|
нужнуюпрограмму. |
|
|
|
|
|
|||||||||||
|
|
|
|
|
|
||||||||||||||
+15 |
программы |
|
|
|
|
|
|
|
4. Выбрать температуру стирки (см. стр. 19). |
||||||||||
|
1. Включите стиральную машину, нажав на кнопку |
. Âñå |
5. Выбрать скорость отжима (см. стр. 19). |
||||||||||||||||
|
6. Запустите программу, нажав кнопку ПУСК/СБРОС |
|
|||||||||||||||||
|
|
индикаторы загорятся на несколько секунд, затем |
|
||||||||||||||||
|
|
|
(Start/Reset). |
|
|
|
|
|
|||||||||||
погаснут, и индиактор |
ВКЛЮЧЕНИЕ/ЛЮК |
|
|
|
|
|
|
||||||||||||
|
Для отмены запуска держите нажатой кнопку ПУСК/ |
||||||||||||||||||
|
|
ЗАБЛОКИРОВАН начнет мигать. |
|
|
|
|
|
|
|||||||||||
|
|
|
|
|
|
|
|
СБРОС (Start/Reset) в течение 2-х секунд. |
|||||||||||
|
2. Загрузите белье в барабан, засыпьте |
стирал- |
|
||||||||||||||||
|
7. По завершении программы индикатор ВКЛЮЧЕНИЕ/ |
|
|||||||||||||||||
|
|
ьное вещество и добавки (смотрите стр. 20), |
|
|
|
||||||||||||||
|
|
|
|
|
ЛЮК ЗАБЛОКИРОВАН замигает, сигнализируя, что |
||||||||||||||
|
|
закройте крышки барабана и внешний люк. |
|
|
|
||||||||||||||
|
|
|
|
|
можно открыть люк. Вынуть белье и оставить люк |
||||||||||||||
|
3. Выбрать при помощи рукоятки выбора ПРОГРАММ |
|
|||||||||||||||||
|
|
полуоткрытым для сушки барабана. Выключить |
|||||||||||||||||
|
|
|
|
|
|
|
|
|
|
|
|||||||||
Таблица программ |
|
|
|
|
|
|
|
|
стиральную машину, нажав кнопку . |
||||||||||
|
|
|
|
|
|
|
|
|
|
|
|
|
|
|
|
|
|||
|
|
|
|
|
|
|
|
|
|
|
|
|
|
|
|
|
|
|
|
|
|
|
|
|
|
|
|
|
|
|
|
тбеливание |
|
Длите- |
|
|
|
|
|
|
|
Ткань и степень загрязнения |
Ïðîã- |
Темпе- |
Моющее средство |
|
Смягч- |
|
льность |
|
|
|
|
||||||
|
|
|
|
|
|
|
(Функция)/ |
|
цикла, |
Описание цикла стирки |
|
||||||||
|
|
|
ðàììa |
ратура |
|
|
|
|
|
итель |
Отбеливат- |
|
|
||||||
|
|
|
|
предв. |
|
основная |
|
|
ìèí |
|
|
|
|
||||||
|
|
|
|
|
|
|
стирка |
|
стирка |
|
|
åëü |
|
|
|
|
|
|
|
|
|
|
|
|
|
|
|
|
|
|
|
|
|
|
|
|
|
||
|
|
|
|
|
|
|
|
|
|
|
|
|
|
|
|
|
|
|
|
|
|
Хлопок |
|
|
|
|
|
|
|
|
|
|
|
|
|
|
|
|
|
|
|
сильным загрязнением |
|
|
|
|
|
|
|
|
|
|
|
|
|
Предварительная стирка, стирка |
|
||
|
|
Очень сильно загрязненное |
1 |
90°C |
|
• |
|
• |
|
• |
|
|
|
155 |
при высокой температуре, |
|
|||
|
|
белое белье (простыни, |
|
|
|
|
|
|
полоскание, промежуточный и |
|
|||||||||
|
|
|
|
|
|
|
|
|
|
|
|
|
|||||||
|
скатерти и т.д.) |
|
|
|
|
|
|
|
|
|
|
|
|
|
окончательный отжим |
|
|||
|
|
Очень сильно загрязненное |
|
|
|
|
|
|
• |
|
• |
Деликат./ |
|
|
Стирка при высокой температуре, |
|
|||
|
|
белое белье (простыни, |
2 |
90°C |
|
|
|
|
|
147 |
полоскание, промежуточный и |
|
|||||||
|
|
|
|
|
|
Обычный |
|
|
|||||||||||
|
|
скатерти и т.д.) |
|
|
|
|
|
|
|
|
|
окончательный отжим |
|
||||||
|
|
|
|
|
|
|
|
|
|
|
|
|
|
|
|||||
|
|
Сильно загрязненное белое и |
|
|
|
|
|
|
• |
|
• |
Деликат./ |
|
|
Стирка при 60°C,полоскание, |
|
|||
|
|
прочно окрашенное цветное |
3 |
60°C |
|
|
|
|
|
157 |
промежуточный и окончательный |
|
|||||||
|
|
|
|
|
Обычный |
|
|
||||||||||||
|
|
белье |
|
|
|
|
|
|
|
|
|
отжим |
|
|
|||||
|
|
|
|
|
|
|
|
|
|
|
|
|
|
|
|
|
|||
|
|
Слабо загрязненное белое и |
|
|
|
|
|
|
• |
|
• |
Деликат./ |
|
|
Стирка при 40°C,полоскание, |
|
|||
|
|
линяющее цветное белье |
4 |
40°C |
|
|
|
|
|
96 |
промежуточный и окончательный |
|
|||||||
|
|
|
|
|
|
Обычный |
|
|
|||||||||||
|
|
(рубашки, маки и пр.) |
|
|
|
|
|
|
|
|
|
отжим |
|
|
|||||
|
|
|
|
|
|
|
|
|
|
|
|
|
|
|
|
||||
|
|
Слабо загрязненное |
|
|
|
|
|
|
• |
|
• |
Деликат./ |
|
|
Стирка при 30°C,полоскание, |
|
|||
|
|
5 |
30°C |
|
|
|
|
|
88 |
промежуточный и окончательный |
|
||||||||
|
|
линяющее цветное белье |
|
|
|
|
Обычный |
|
|
||||||||||
|
|
|
|
|
|
|
|
|
|
|
отжим |
|
|
||||||
|
Синтетика |
|
|
|
|
|
|
|
|
|
|
|
|
|
|
|
|
|
|
|
|
|
|
|
|
|
|
|
|
|
|
|
|
|
|
|
|
||
|
|
Сильно загрязненная, прочно |
|
|
|
|
|
|
• |
|
• |
|
|
|
|
Стирка при 60°C, полоскание, |
|
||
|
|
окрашенная цветная (детская |
6 |
60°C |
|
|
|
|
Деликатн. |
|
97 |
остановка с водой или |
|
||||||
|
одежда и пр.) |
|
|
|
|
|
|
|
|
|
|
|
|
|
деликатный отжим |
|
|||
|
|
Сильно загрязненная, прочно |
|
|
|
|
|
|
• |
|
• |
|
|
|
|
Стирка при 50°C, полоскание, |
|
||
|
|
окрашенная цветная (детская |
7 |
50°C |
|
|
|
|
Деликатн. |
|
93 |
остановка с водой или |
|
||||||
|
одежда и пр.) |
|
|
|
|
|
|
|
|
|
|
|
|
|
деликатный отжим |
|
|||
|
|
Слабо загрязненная, |
|
|
|
|
|
|
• |
|
• |
|
|
|
|
Стирка при 40°C, полоскание, |
|
||
|
|
деликатная цветная (любая |
8 |
40°C |
|
|
|
|
Деликатн. |
|
83 |
остановка с водой или |
|
||||||
|
одежда) |
|
|
|
|
|
|
|
|
|
|
|
|
|
деликатный отжим |
|
|||
|
|
Слабо загрязненная, |
|
|
|
|
|
|
• |
|
• |
|
|
|
|
Стирка при 30°C, полоскание и |
|
||
|
|
деликатная цветная (любая |
9 |
30°C |
|
|
|
|
|
|
|
33 |
|
||||||
|
|
|
|
|
|
|
|
|
деликатный отжим |
|
|||||||||
|
|
одежда) |
|
|
|
|
|
|
|
|
|
|
|
|
|||||
|
Деликатные ткани |
|
|
|
|
|
|
|
|
|
|
|
|
|
|
|
|
|
|
|
|
|
|
|
|
|
|
|
|
|
|
|
|
|
|
|
|
||
|
|
Шерсть |
10 |
40°C |
|
|
|
• |
|
• |
Деликатн. |
|
48 |
Стирка при 40°C, полоскание и |
|
||||
|
|
|
|
|
|
|
деликатный отжим |
|
|||||||||||
|
|
|
|
|
|
|
|
|
|
|
|
|
|
|
|||||
|
|
|
|
|
|
|
|
|
|
|
|
|
|
|
|
|
|
|
|
Особо деликатные ткани и |
|
|
|
|
|
|
• |
|
• |
|
|
|
|
Стирка при 30°C, полоскание, |
|
||||
|
|
одежда (занавеси, шелк, вискоза |
11 |
30°C |
|
|
|
|
|
|
|
55 |
|
||||||
|
|
|
|
|
|
|
|
остановка с водой или слив |
|
||||||||||
|
|
è ïð.) |
|
|
|
|
|
|
|
|
|
|
|
|
|||||
|
ЧАСТИЧНЫЕ ПРОГРАММЫ |
|
|
|
|
|
|
|
|
|
|
|
|
|
|
|
|
|
|
|
|
|
|
|
|
|
|
|
|
|
|
|
|
|
|
|
|||
|
Полоскание |
|
|
|
|
|
|
|
|
• |
|
|
|
|
Полоскание и отжим |
|
|||
|
|
Деликатное полоскание |
|
|
|
|
|
|
|
|
• |
|
|
|
|
Пполоскание, остановка с водой |
|
||
|
|
|
|
|
|
|
|
|
|
|
|
|
èëè ñëèâ |
|
|
||||
|
|
|
|
|
|
|
|
|
|
|
|
|
|
|
|
|
|||
|
Отжим |
|
|
|
|
|
|
|
|
|
|
|
|
|
Слив и сильный отжим |
|
|||
|
|
|
|
|
|
|
|
|
|
|
|
|
|
|
|
|
|||
|
Деликатный отжим |
|
|
|
|
|
|
|
|
|
|
|
|
|
Слив и деликатный отжим |
|
|||
|
|
|
|
|
|
|
|
|
|
|
|
|
|
|
|
|
|
||
|
Ñëèâ |
|
|
|
|
|
|
|
|
|
|
|
|
|
Ñëèâ |
|
|
||
|
|
|
|
|
|
|
|
|
|
|
|
|
|
|
|
|
|||
|
|
|
|
|
|
|
|
|
|
|
|
|
|
|
|
|
|
|
|
Примечание
«Остановка с водой»: см. дополнительную функцию «Легкая глажка» на с. 31. Данные в таблице, являются справочными и могут меняться в зависимости от конкретных условий стирки (объем стирки, температура воды в водопроводной
системе, температура в помещении и др.).
Специальная программа
Повседневная стирка 30' мин (программа 9 для Синтетических тканей) предназначена для быстрой стирки слабозагрязненного белья: цикл длится всего 30 минут, что позволяет сэкономить время и электроэнергию. Установив эту программу (9 при температуре 30°С), Вы можете стирать различные виды тканей вместе (за исключением шерсти и шелка) при максимальной загрузке белья 3 кг. Мы рекомендуем использовать жидкое моющее средство.
&
 Loading...