


Instructions for use
|
|
|
|
|
|
|
WASHING MACHINE |
|
|
|
|
|
|
|
|
|
|
|
|
|
|
|
|
|
|
|
|
|
|
|
|
|
|
Contents |
|
|
|
|
|
|
|
|
GB |
|
|
|
|
|
|
|
|
|
|
|
|
|
|
|
|
|
Installation, 2-3 |
|
|
GB |
|
BG |
|
CZ |
|
|
|
|
|
|
|
Unpacking and levelling, 2 |
||||
|
|
|
|
|
|
|
Electric and water connections, 2-3 |
|
|
English, 1 |
|
|
Èeský, 25 |
||||
|
БЪЛГАРСКИ, 13 |
The first wash cycle, 3 |
||||||
|
|
|
|
|
|
|
Technical details, 3 |
|
SK HR
Slovenský, 37 Hrvatski, 49
AVF 129
Washing machine description, 4-5
Control panel, 4 Display, 5
Starting and Programmes, 6
Briefly: how to start a programme, 6 Programme table, 6
Personalisations, 7
Setting the spin cycle, 7
Setting the temperature, 7
Setting the delay Timer, 7
Functions, 7
Detergents and laundry, 8
Detergent dispenser, 8
Preparing your laundry, 8
Special items, 8
Woolmark Platinum Care, 8
Precautions and advice, 9
General safety, 9 Disposal, 9
Saving energy and respecting the environment, 9
Care and maintenance, 10
Cutting off the water or electricity supply, 10 Cleaning your appliance, 10
Cleaning the detergent dispenser, 10 Caring for your appliance door and drum, 10 Cleaning the pump, 10
Checking the water inlet hose, 10
Troubleshooting, 11
Service, 12
Before calling for Assistance, 12
1

Installation
Keep this instruction manual in a safe place for GB future reference. Should the appliance be sold,
transferred or moved, make sure the instruction manual accompanies the washing machine to inform the new owner as to its operation and features.
Read these instructions carefully: they contain vital information on installation, use and safety.
Unpacking and levelling
Unpacking
1.Unpack the washing machine.
2.Check whether the washing machine has been damaged during transport. If this is the case, do not install it and contact your retailer.
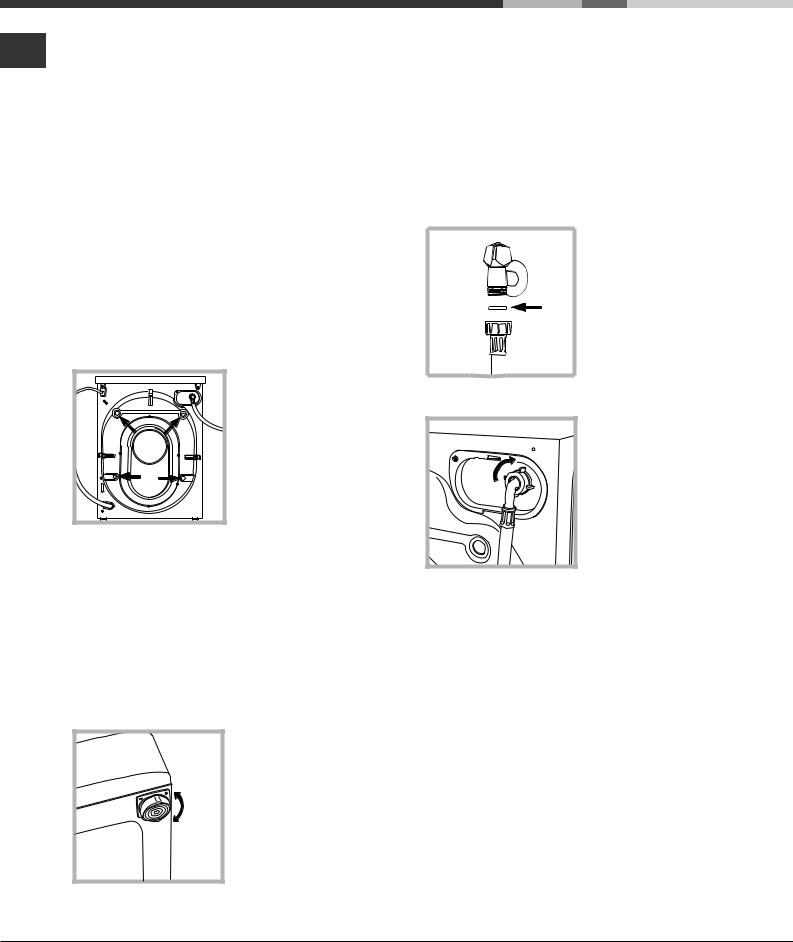
3. Remove the four protective screws and the rubber washer with the respective spacer, situated on the rear of the appliance (see figure).
4.Seal the gaps using the plastic plugs provided.
5.Keep all the parts: you will need them again if the washing machine needs to be moved to another location.
Packaging materials are not children's toys.
Levelling
1. Install the washing machine on a flat sturdy floor, without resting it up against walls, furniture cabinets or other.
2. If the floor is not perfectly level, compensate for any unevenness
by tightening or
loosening the adjustable
front feet (see figure); the angle of inclination, measured according to the worktop, must not exceed 2°.
Levelling your appliance correctly will provide it with stability and avoid any vibrations, noise and shifting during operation. If it is placed on a fitted or loose carpet, adjust the feet in such a way as to allow enough room for ventilation beneath the washing machine.
Electric and water connections
Connecting the water inlet hose
1. Insert seal A into the end of the inlet hose and screw the latter onto a cold water tap with a 3/4 gas threaded
A |
mouth (see figure). |
|
|
||
|
Before making the |
|
|
connection, allow the |
|
|
water to run freely until |
|
|
it is perfectly clear. |
|
|
2. Connect the other end |
|
|
of the water inlet hose to |
|
|
the washing machine, |
|
|
screwing it |
onto the |
|
appliance's cold water |
|
|
inlet, situated on the top |
|
|
right-hand side on the |
|
|
rear of the |
appliance |
|
(see figure). |
|
3. Make sure there are no kinks or bends in the hose.
The water pressure at the tap must be within the values indicated in the Technical details table
(on the next page).
If the water inlet hose is not long enough, contact a specialist store or an authorised serviceman.
2
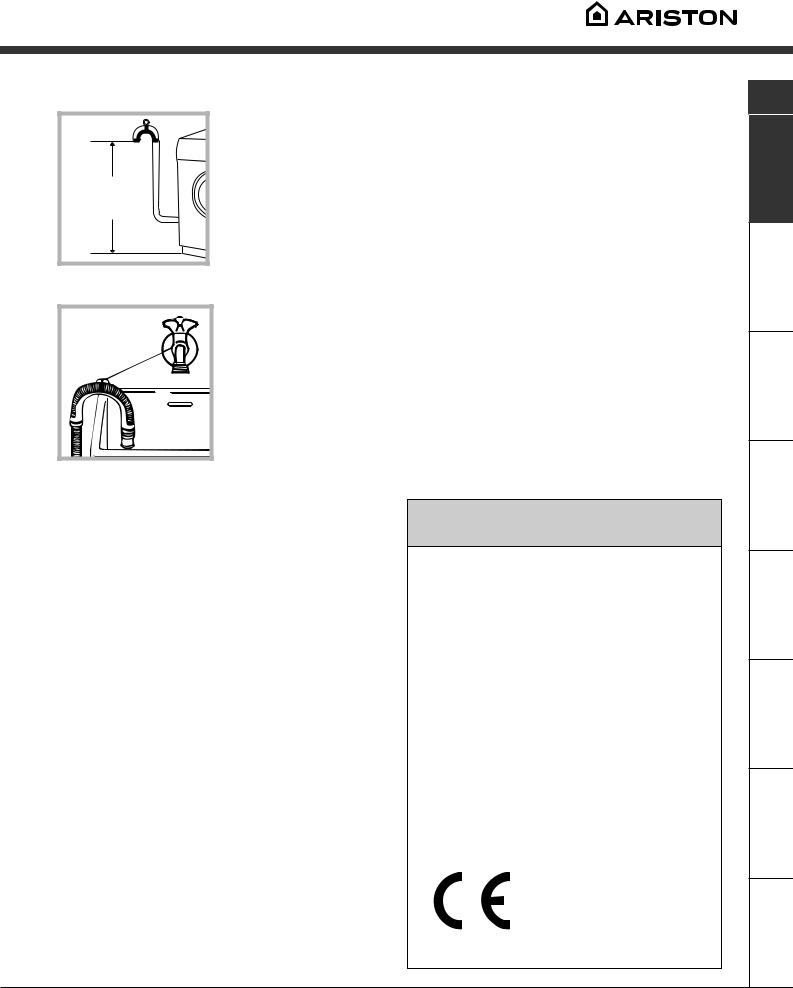
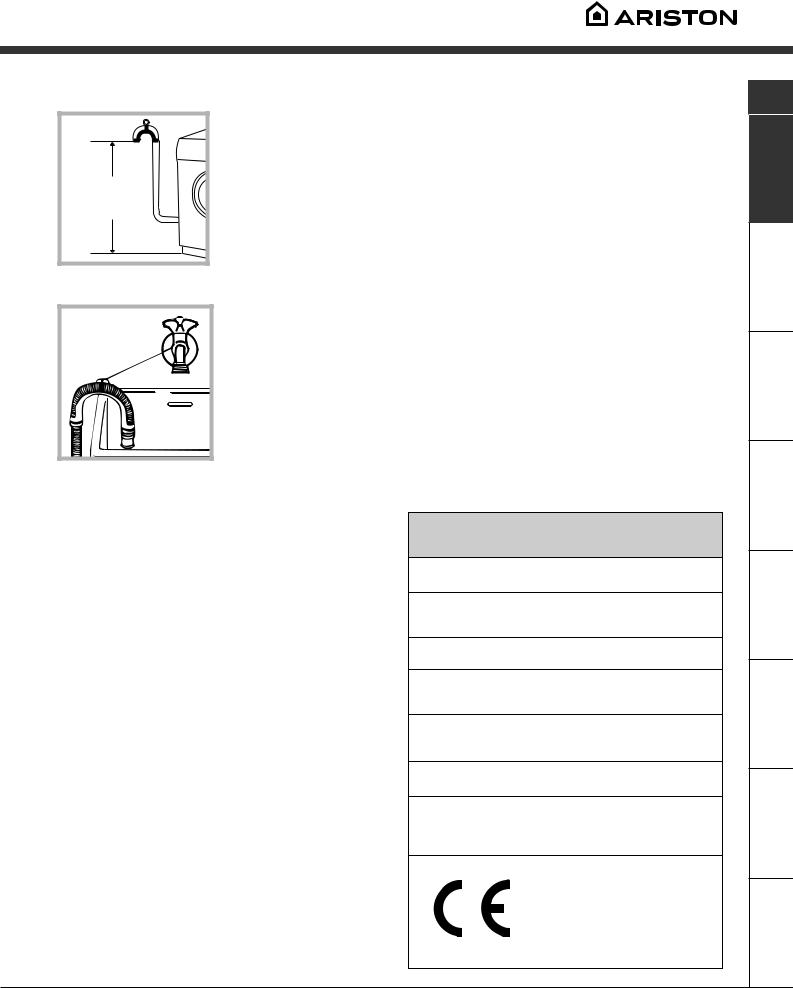
Connecting the drain hose
65 - 100 cm |
Connect the drain hose, without bending it, to a draining duct or a wall drain situated between 65 and 100 cm from the floor;
alternatively, place it over the edge of a basin, sink or tub, fastening the duct supplied to the tap (see figure). The free end of the hose should not be underwater.
We advise against the use of hose extensions; in case of absolute need, the extension must have the same diameter as the original hose and must not exceed 150 cm in length.
Electric connection
Before plugging the appliance into the mains socket, make sure that:
•the socket is earthed and in compliance with the applicable law;
•the socket is able to sustain the appliance's maximum power load indicated in the Technical details table (on the right);
•the supply voltage is included within the values i ndicated on the Technical details table
(on the right);
•the socket is compatible with the washing machine's plug. If this is not the case, replace the socket or the plug.
The washing machine should not be installed in an outdoor environment, not even when the area is sheltered, because it may be very dangerous to leave it exposed to rain and thunderstorms.
When the washing machine is installed, the mains socket must be within easy reach.
Do not use extensions or multiple sockets.
The power supply cable must never be bent or dangerously compressed.
The power supply cable must only be replaced by an authorised serviceman.
Warning! The company denies all liability if and when these norms are not respected.
The first wash cycle
Once the appliance has been installed, and before you use it for the first time, run a wash cycle with detergent and no laundry, setting the 90°C programme without a pre-wash cycle.
Technical details
Model |
AVF 129 |
|
|
|
|
|
59.5 cm wide |
|
Dimensions |
85 cm high |
|
|
53,5 cm deep |
|
|
|
|
Capacity |
from 1 to 5 kg |
|
|
|
|
Electric |
voltage 220/230 Volts 50 Hz |
|
connections |
maximum absorbed power 1850 W |
|
|
|
|
Water |
maximum pressure 1 MPa (10 bar) |
|
minimum pressure 0.05 MPa (0.5 bar) |
||
connections |
||
drum capacity 46 litres |
||
|
||
|
|
|
Spin speed |
up to 1200 rpm |
|
|
|
|
Control |
|
|
programmes |
programme 3; temperature 60°C; |
|
according to |
run with a load of 5 kg. |
|
IEC456 directive |
|
|
|
|
|
|
This appliance is compliant with the |
|
|
following European Community |
|
|
Directives: |
|
|
- 73/23/CEE of 19/02/73 (Low |
|
|
Voltage) and subsequent amendments |
|
|
- 89/336/CEE of 03/05/89 |
|
|
(Electromagnetic Compatibility) and |
|
|
subsequent amendments |
GB
Precautions Detergents Programmes Description Installation
Service Troubleshooting Care
3
Washing machine description
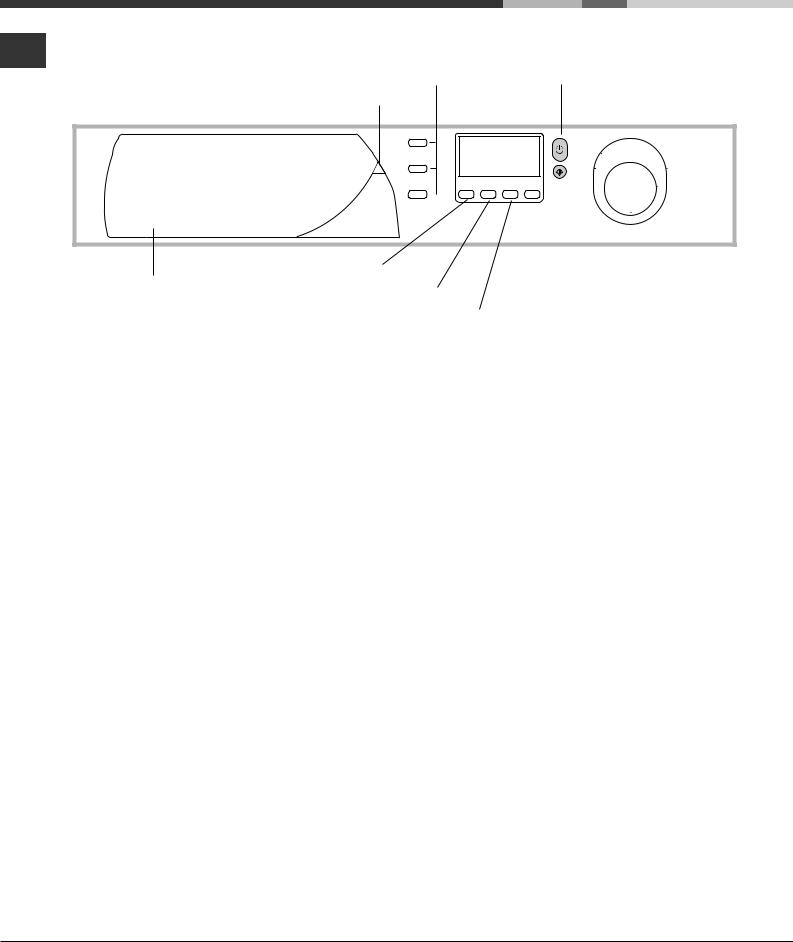
Control panel
GB
|
FUNCTION |
START/STOP |
Programme key |
buttons |
button |
|
|
|
|
Display |
|
Detergent dispenser
|
|
|
|
|
|
|
Control knob |
SPIN |
|
|
|
|
|||
|
|
|
|
||||
|
|
|
|
||||
TEMPERATURE |
KEYBOARD |
|
START/RESET |
||||
LOCK |
|
||||||
|
|
DELAYTIMER |
|
button |
|||
|
|
|
|||||
|
|
|
|
|
|||
Detergent dispenser to add detergent and fabric softener (see page 8).
Programme key to consult a straightforward chart of the different programmes available: pull the grey tab outwards to open it.
FUNCTION buttons to select the functions available. The button corresponding to the function selected will remain on.
SPIN button to adjust the spin speed or exclude it altogether (see page 7).
TEMPERATURE button to adjust the wash temperature (see page 7).
DELAY TIMER button to delay the start of the set programme for a maximum period of 24 hours
(see page 7).
KEYBOARD LOCK key. To lock all the keys on the washing machine during operation or during Stand-by mode.
Display to programme the washing machine and follow the wash cycle progress (see opposite page).
START/STOP button to turn the washing machine on and off (see page 6).
START/RESET button to start the programmes or cancel any incorrect settings (see page 6).
Control knob to select the wash programmes. The retractable control knob: press the centre of the knob for it to pop out. The knob stays still during the cycle.
4

Display
In addition to being a practical tool to programme your appliance (see page 7), the display provides useful information concerning the wash cycle and status.
Once you have pressed the START/RESET button to start the programme, the display will indicate the amount of time left until the end of the wash cycle. If a delayed start has been set (using the Delay Timer, see page 7), the delay time will be indicated on the display.
The following information is displayed during the wash cycle:
Cycle phase under way:
Pre-wash
Wash cycle
Rinse
Spin cycle
Customised functions and options:
To select functions and options, see below and on page 7.

 Buzzer:
Your washing machine comes with a buzzer, which will inform you of the various functions being carried out, or of any malfunctions: incompatibility, option/ programme keys, start, end of cycle, reset.
 Keyboard lock:
For your safety and that of your children, you can block all the keys during the machine's operation or during waiting position (delayed start - Stand-by) by pressing the function key for 2 seconds.
To disable this function, hold the same button down for 4 seconds.
 Door lock:
If the symbol is on, the washing machine door is locked to prevent it from being opened accidentally. To avoid any damages, wait for the symbol to switch itself off before you open the appliance door.
This model is fitted with a device that allows you to open the appliance door during some of the programme phases. This is possible when the symbol is not on.
At the end of the programme, the word END is displayed.
In the event of an anomaly, an error code will appear, such as: F-01, which should be communicated to the Service Centre (see page 12).
GB
Precautions Detergents Programmes Description Installation
Service Troubleshooting Care
5

Starting and Programmes
Briefly: starting a programme
GB |
1. Turn the washing machine on by pressing button . |
|
|
|
All the icons will light up for a few seconds and |
|
then go off. |
2.Load your laundry into the washing machine and shut the appliance door.
3.Set the knob to the desired programme. The estimated duration of the selected programme is displayed. The temperature and spin speed are automatically set according to the programme (to change them, see page 7).
4.Add the detergent and any fabric softener
(see page 8).
5.Select any function (see page 7).
6.Start he programme by pressing the START/RESET button.
To cancel it, keep the START/RESET button pressed for at least 2 seconds.
7.When the programme has ended, the word END is displayed. Take out your laundry and leave the appliance door ajar to allow the drum to dry thoroughly.
8.Turn the washing machine off by pressing button  .
.
Programme table
|
Program- |
Wash |
Detergent |
Fabric |
Cycle |
|
|||
Type of fabric and degree of soil |
|
|
length |
Description of wash cycle |
|||||
|
mes |
temperat. |
Pre- |
Wash |
softener |
(minutes) |
|
||
|
|
|
|
wash |
|
|
|
||
|
|
|
|
|
|
|
|
||
Cottons |
|
|
|
|
|
|
|
|
|
Extremely soiled whites |
1 |
90°C |
• |
• |
• |
147 |
Pre-wash, wash cycle, rinse cycles, |
||
(sheets, tablecloths, etc.) |
intermediate and final spin cycles |
||||||||
|
|
|
|
|
|
|
|||
|
|
|
|
|
|
|
|
|
|
Extremely soiled whites |
2 |
90°C |
|
• |
• |
130 |
Wash cycle, rinse cycles, intermediate |
||
(sheets, tablecloths, etc.) |
|
and final spin cycles |
|||||||
|
|
|
|
|
|
|
|||
|
|
|
|
|
|
|
|
|
|
Heavily soiled whites and fast |
3 |
60°C |
|
• |
• |
115 |
Wash cycle, rinse cycles, intermediate |
||
colours |
|
and final spin cycles |
|||||||
|
|
|
|
|
|
|
|||
Slightly soiled whites and delicate |
4 |
40°C |
|
• |
• |
82 |
Wash cycle, rinse cycles, intermediate |
||
colours (shirts, jumpers, etc.) |
|
and final spin cycles |
|||||||
|
|
|
|
|
|
|
|||
|
|
|
|
|
|
|
|
|
|
Slightly soiled delicate colours |
5 |
30°C |
|
• |
• |
75 |
Wash cycle, rinse cycles, intermediate |
||
|
and final spin cycles |
||||||||
|
|
|
|
|
|
|
|
||
|
|
|
|
|
|
|
|
|
|
Synthetics |
|
|
|
|
|
|
|
|
|
Heavily soiled fast colours |
6 |
60°C |
|
• |
• |
87 |
Wash cycle, rinse cycles, anti-crease or |
||
(baby linen, etc.) |
|
delicate spin cycle |
|||||||
|
|
|
|
|
|
|
|||
|
|
|
|
|
|
|
|
|
|
Fast colours (all types of slightly |
6 |
40°C |
|
• |
• |
72 |
Wash cycle, rinse cycles, anti-crease or |
||
soiled garments) |
|
delicate spin cycle |
|||||||
|
|
|
|
|
|
|
|||
Heavily soiled fast colours |
7 |
50°C |
|
• |
• |
83 |
Wash cycle, rinse cycles, anti-crease or |
||
(baby linen, etc.) |
|
delicate spin cycle |
|||||||
|
|
|
|
|
|
|
|||
|
|
|
|
|
|
|
|
|
|
Delicate colours (all types of |
8 |
40°C |
|
• |
• |
68 |
Wash cycle, rinse cycles, anti-crease or |
||
slightly soiled garments) |
|
delicate spin cycle |
|||||||
|
|
|
|
|
|
|
|||
Delicate colours (all types of |
9 |
30°C |
|
• |
• |
30 |
Wash cycle, rinse cycles and delicate |
||
slightly soiled garments) |
|
spin cycle |
|||||||
|
|
|
|
|
|
|
|||
|
|
|
|
|
|
|
|
|
|
Delicates |
|
|
|
|
|
|
|
|
|
Wool |
10 |
40°C |
|
• |
• |
50 |
Wash cycle, rinse cycles and delicate |
||
|
spin cycle |
||||||||
|
|
|
|
|
|
|
|
||
Very delicate fabrics |
11 |
30°C |
|
• |
• |
45 |
Wash cycle, rinse cycles, anti-crease or |
||
(curtains, silk, viscose, etc.) |
|
draining cycle |
|||||||
|
|
|
|
|
|
|
|||
|
|
|
|
|
|
|
|
|
|
PARTIAL PROGRAMMES |
|
|
|
|
|
|
|
|
|
Rinse |
|
|
|
|
|
• |
|
Rinse cycles and spin cycle |
|
|
|
|
|
|
|
|
|
|
|
Delicate rinse cycle |
|
|
|
|
|
• |
|
Rinse cycles, anti-crease or draining |
|
|
|
|
|
|
|
|
|
|
|
Spin cycle |
|
|
|
|
|
|
|
Draining and heavy duty spin cycle |
|
|
|
|
|
|
|
|
|
|
|
Delicate spin cycle |
|
|
|
|
|
|
|
Draining and delicate spin cycle |
|
|
|
|
|
|
|
|
|
|
|
Draining |
|
|
|
|
|
|
|
Draining |
|
|
|
|
|
|
|
|
|||
|
|
|
|
|
|
|
|||
|
|
|
|
|
|
|
|
|
|
Notes
For the anti-crease function: see Easy iron, opposite page. The information contained in the table is purely indicative.
Special programme
Daily 30' (programme 9 for Synthetics) is designed to wash lightly soiled garments in a short amount of time: it only lasts 30 minutes and allows you to save on both time and energy. By setting this programme (9 at 30°C), you can wash different fabrics together (except for woollen and silk items), with a maximum load of 3 kg.
We recommend the use of liquid detergent.
6

Personalisations
Option buttons
Setting the spin cycle
If, when the appliance is switched on, the KNOB is positioned on a programme with a spin cycle, a fixed  appears. Press button
  and the maximum spin speed allowed for the programme set will be displayed, and the
  icon flashes. Press it again and the values lower until they reach OFF, which indicates that the spin cycle has been excluded (press it again to go back to the maximum value); stop on the desired speed, after approximately 2 seconds the setting is accepted: the symbol
  remains fixed. The spin cycle setting is enabled with all the programmes except for 11 and the Draining cycle.
Setting the temperature
If, when the appliance is switched on, the KNOB is positioned on a programme for which the temperature needs to be regulated, a fixed  appears. Press button
  and the maximum temperature allowed for the programme set will be displayed and the
  icon flashes. Press it again and the temperature lowers until it reaches OFF, which indicates a cold wash cycle (press it again to go back to the maximum value); stop on the desired value, after approximately 2 seconds the setting is accepted: the symbol
  remains fixed.
The temperature adjustment is enabled with all wash programmes.
Setting the delay Timer
Press the button  and you will see the word OFF on the display, while the relative symbol flashes.
Press the button again and "1h" appears, that is, a delay of one hour (this can reach up to 24h); stop on the "desired" delay; after approximately 2 seconds the setting is accepted, following which, the time for the set programme appears on the display and the symbol  remains on.
If you now press the START/RESET button, the set "delay" appears; this decreases every hour until the start of the cycle. In this phase, the "delay" can only be modified by decreasing it.
The Delay Timer regulation is enabled with all programmes.
Keyboard Lock (see page 5).
Functions
To enable a function:
1.press the button corresponding to the desired function, according to the table below;
2.the function is enabled when the corresponding button is illuminated.
Note: The rapid flashing of the button indicates that the corresponding function cannot be selected for the programme set.
If you set a function that is incompatible with another function you selected previously, only the last one selected will be enabled.
Function |
Effect |
Comments |
Enabled with |
|||
programmes: |
||||||
|
|
|
|
|
||
|
|
|
|
|
|
|
|
Allows for an |
|
|
|
|
|
|
impeccable wash, |
|
|
|
1, 2, 3, 4, |
|
|
visibly whiter than |
This option is incompatible with the RAPID option. |
||||
|
5, 6, 7, 8 |
|||||
Super |
a standard Class |
|
|
|
||
|
|
|
|
|||
wash |
A wash. |
|
|
|
|
|
|
|
|
|
|
|
|
|
This option |
If you set this option, programmes 6, 7, 8, 11 and Delicate Rinse |
All |
|||
|
reduces the |
|||||
|
will be suspended, leaving the laundry to soak (Anti-crease) and |
|||||
|
amount of |
programmes |
||||
|
icon |
|
will flash: |
|||
|
creasing on |
|
except for |
|||
|
- to conclude the cycle, press the START/RESET button; |
|||||
|
fabrics, making |
1, 2, 9, 10 |
||||
|
- to run the draining cycle alone, set the knob to the relative |
|||||
|
them easier to |
and Draining. |
||||
|
symbol |
|
and press the START/RESET button. |
|||
Easy iron |
iron. |
|
|
|||
|
|
|
|
|||
|
|
|
|
|
|
|
|
Cuts the duration |
|
|
|
1, 2, 3, 4, |
|
|
of the wash cycle |
This option is incompatible with the SUPER WASH option. |
||||
|
5, 6, 7, 8 |
|||||
Rapid |
by 30%. |
|
|
|
||
|
|
|
|
|||
|
|
|
|
|
|
|
GB
Precautions Detergents Programmes Description Installation
Service Troubleshooting Care
7

Detergents and laundry
Detergent dispenser
GB
Good washing results also depend on the correct dose of detergent: adding too much detergent won't necessarily make for a more efficient wash, and may in fact cause build up on the interior of your appliance and even pollute the environment.
1 |
2 |
3 |
Open up the detergent dispenser and pour in the detergent and fabric softener, as follows.
compartment 1: Detergent for pre-wash (powder)
compartment 2: Detergent for the wash cycle (powder or liquid)
Liquid detergent should only be poured in immediately prior to the wash cycle start. compartment 3: Additives (fabric softeners, etc.)
The fabric softener should not overflow from the grid.
Do not use hand wash detergent because it may form too much foam.
Special items
Curtains: fold curtains and place them in a pillow case or mesh bag. Wash them separately without exceeding half the appliance load. Use programme 11 which excludes the spin cycle automatically.
Quilted coats and windbreakers: if they are padded with goose or duck down, they can be machine-washed. Turn the garments inside out and load a maximum of 2-3 kg, repeating the rinse cycle once or twice and using the delicate spin cycle. Trainers: remove any mud. They can be washed together with jeans and other tough garments, but not with whites.
Wool: for best results, use a specific detergent, taking care not to exceed a load of 1 kg.
Woolmark Platinum Care
As gentle as a hand wash.
Ariston sets a new standard of superior 

 performance that has been endorsed by The Woolmark Company with the prestigious Woolmark Platinum Care brand. Look for the Woolmark Platinum Care logo on the washing machine to ensure you can safely and effectively wash wool garments labelled as "hand wash" (M.00221):
Set programme 10 for all "Hand wash" garments, using the appropriate detergent.
Preparing your laundry
•Divide your laundry according to:
-the type of fabric/the symbol on the label.
-the colours: separate coloured garments from whites.
•Empty all pockets and check for loose buttons.
•Do not exceed the weight limits stated below, which refer to the weight when dry:
Sturdy fabrics: max 5 kg Synthetic fabrics: max 2.5 kg Delicate fabrics: max 2 kg Wool: max 1 kg
How much does your laundry weigh?
1sheet 400-500 g
1pillow case 150-200 g
1tablecloth 400-500 g
1bathrobe 900-1,200 g
1towel 150-250 g
8

Precautions and advice
The washing machine was designed and built in compliance with the applicable international safety regulations. The following information is provided for your safety and should consequently be read carefully.
General safety
•This appliance has been designed for nonprofessional, household use and its functions must not be changed.
•This washing machine should only be used by adults and in accordance with the instructions provided in this manual.
•Never touch the washing machine when barefoot or with wet or damp hands or feet.
•Do not pull on the power supply cable to unplug the appliance from the electricity socket. Pull the plug out yourself.
•Do not open the detergent dispenser while the appliance is in operation.
•Do not touch the drain water as it could reach very high temperatures.
•Never force the washing machine door: this could damage the safety lock mechanism designed to prevent any accidental openings.
•In the event of a malfunction, do not under any circumstances touch internal parts in order to attempt repairs.
•Always keep children well away from the appliance while in operation.
•The appliance door tends to get quite hot during the wash cycle.
•Should it have to be moved, proceed with the help of two or three people and handle it with the utmost care. Never try to do this alone, because the appliance is very heavy.
•Before loading your laundry into the washing machine, make sure the drum is empty.
Disposal
•Disposing of the packaging material:
observe local regulations, so the packaging can be re-used.
•Disposing of an old washing machine:
before scrapping your appliance, cut the power supply cable and remove the appliance door.
Saving energy and respecting the environment
Environmentally-friendly technology
If you only see a little water through your appliance door, this is because thanks to the latest Ariston technology, your washing machine only needs less than half the amount of water to get the best results: an objective reached to respect the environment.
Saving on detergent, water, energy and time
•To avoid wasting resources, the washing machine should be used with a full load. A full load instead of two half loads allows you to save up to 50% on energy.
•The pre-wash cycle is only necessary on extremely soiled garments. Avoiding it will save on detergent, time, water and between 5 and 15% energy.
•Treating stains with a stain remover or leaving them to soak before washing will cut down the need to wash them at high temperatures. A programme at 60°C instead of 90°C or one at 40°C instead of 60°C will save up to 50% on energy.
•Use the correct quantity of detergent depending on the water hardness, how soiled the garments are and the amount of laundry you have, to avoid wastage and to protect the environment: despite being biodegradable, detergents do contain ingredients that alter the natural balance of the environment. In addition, avoid using fabric softener as much as possible.
•If you use your washing machine from late in the afternoon until the early hours of the morning, you will help reduce the electricity board's peak load. The Delay Timer option (see page 7) helps to organise your wash cycles accordingly.
•If your laundry has to be dried in a tumble dryer, select a high spin speed. Having the least water possible in your laundry will save you time and energy in the drying process.
GB
Precautions Detergents Programmes Description Installation
Service Troubleshooting Care
9
Care and maintenance
Cutting off the water or electricity GB supply
•Turn off the water tap after every wash. This will limit the wear of your appliance's water system and also prevent leaks.
•Unplug your appliance when cleaning it and during all maintenance operations.
Cleaning your appliance
The exterior and rubber parts of your appliance can be cleaned with a soft cloth soaked in lukewarm soapy water. Do not use solvents or abrasives.
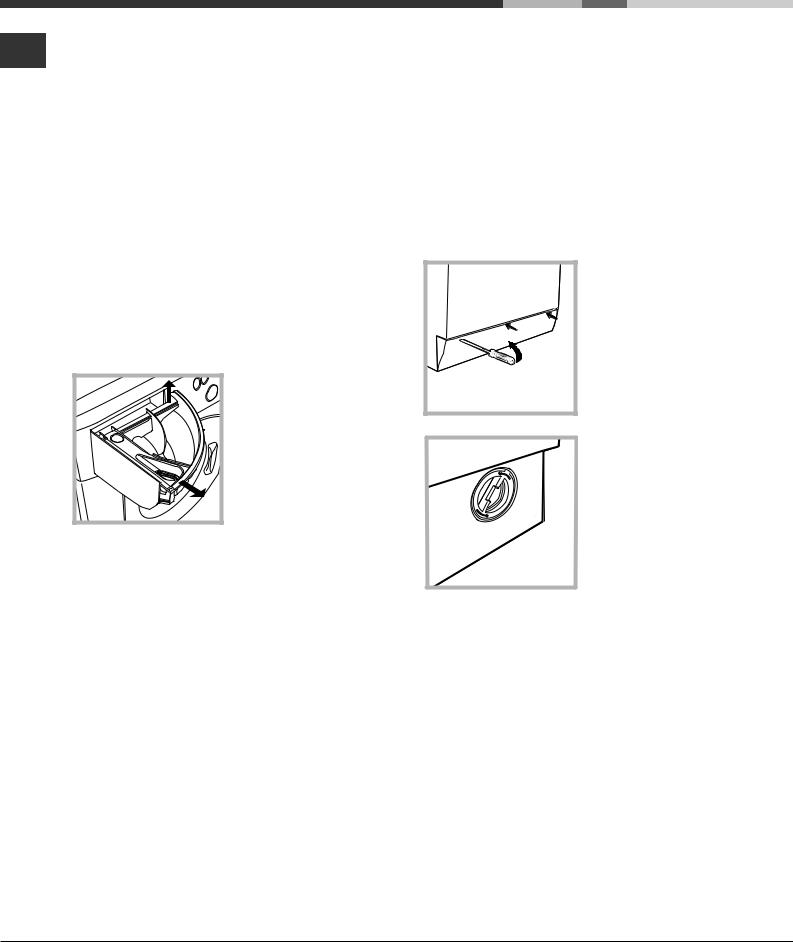
Cleaning the detergent dispenser
1 |
2 |
Remove the dispenser by raising it and pulling it out (see figure).
Wash it under running water; this operation should be repeated frequently.
Caring for your appliance door and drum
•Always leave the appliance door ajar to prevent unpleasant odours from forming.
Cleaning the pump
The washing machine is fitted with a self-cleaning pump that does not require any maintenance. Sometimes, small items (such as coins or buttons) may fall into the pre-chamber that protects the pump, situated in the lower part of the same.
Make sure the wash cycle has ended and unplug the appliance.
To access the pre-chamber:
1. using a screwdriver, remove the cover panel on the lower front of the washing machine (see figure);
2. unscrew the lid rotating it anticlockwise (see figure): a little water may trickle out. This is perfectly normal;
3.clean the interior thoroughly;
4.screw the lid back on;
5.reposition the panel, making sure the hooks are securely in place before you push it onto the appliance.
Checking the water inlet hose
Check the water inlet hose at least once a year. If you see any cracks, replace it immediately: during the wash cycles, water pressure is very strong and a cracked hose could easily split open.
Never use hoses that have already been used.
10
Troubleshooting
Your washing machine could fail to work. Before calling for Assistance (see page 12), make sure the problem can't easily be solved by consulting the following list.
Problem
The washing machine won't start.
The wash cycle won't start.
The washing machine fails to load water (The wording H2O is displayed).
The washing machine continuously loads and unloads water.
The washing machine does not drain or spin.
The washing machine vibrates too much during the spin cycle.
The washing machine leaks.
There is too much foam.
Possible causes/Solution:
•The appliance is not plugged into the socket, or not enough to make contact.
•There has been a power failure.
•The appliance door is not shut properly (the word DOOR is displayed).
•The  button has not been pressed.
•The START/RESET button has not been pressed.
•The water tap is not turned on.
•A delayed start has been set (using the Delay Timer, see page 7).
•The water inlet hose is not connected to the tap.
•The hose is bent.
•The water tap is not turned on.
•There is a water shortage.
•The water pressure is insufficient.
•The START/RESET button has not been pressed.
•The drain hose is not fitted between 65 and 100 cm from the floor
(see page 3).
•The free end of the hose is underwater (see page 3).
•The wall drainage system doesn't have a breather pipe.
If the problem persists even after these checks, turn off the water tap, switch the appliance off and call for Assistance. If the dwelling is on one of the upper floors of a building, there may be drain trap problems causing the washing machine to load and unload water continuously. In order to avoid such an inconvenience, special anti-drain trap valves are available in shops.
•The programme does not foresee the draining: some programmes require enabling the draining manually (see page 6).
•The Easy iron option is enabled: to complete the programme, press the START/RESET button (see page 7).
•The drain hose is bent (see page 3).
•The drain duct is clogged.
•The drum was not unblocked correctly during installation (see page 2).
•The washing machine is not level (see page 2).
•The washing machine is closed in between furniture cabinets and the wall (see page 2).
•The water inlet hose is not screwed on correctly (see page 2).
•The detergent dispenser is obstructed (to clean it, see page 10).
•The drain hose is not secured properly (see page 3).
•The detergent is not suitable for machine washing (it should bear the definition "for washing machines" or "hand and machine wash", or the like).
•You used too much detergent.
GB
Precautions Detergents Programmes Description Installation
Service Troubleshooting Care
11

Service
GB
Service
Before calling for Assistance:
• Check whether you can solve the problem on your own (see page 11);
•Restart the programme to check whether the problem has been solved;
•If this is not the case, contact an authorised Technical Service Centre on the telephone number provided on the guarantee certificate.
Always request the assistance of authorised servicemen.
Notify the operator of:
•the type of problem;
•the appliance model (Mod.);
•the serial number (S/N).
This information can be found on the data plate situated on the rear of the washing machine.
12

Инструкции за ползване
|
|
|
|
|
ПЕРАЛНА МАШИНА |
|
|
|
|
|
|
|
|
|
|
|
|
|
|
|
|
|
|
|
|
Съдържание |
|
|
|
|
|
|
BG |
|
|
|
|
|
|
|
|
|
|
|
|
|
Монтиране, 14-15 |
|
|
BG |
|
|
|
|
|
|
|
Разопаковане и нивелиране, 14 |
|
|||
|
|
|
|
|
Хидравлични и електрически връзки, 14-15 |
|
|
|
|
|
|
|
|
БЪЛГАРСКИ |
|
|
Първо пране, 15 |
|
||
|
|
|
|
|
Технически данни, 15 |
|
|
|
|
|
|
Описание на пералната машина, 16-17 |
|
|
|
|
|
|
Табло за управление, 16 |
|
|
|
|
|
|
Дисплей, 17 |
|
|
|
|
|
|
Включване и програми, 18 |
|
|
|
|
|
|
Кратко описание: включване на програма, 18 |
|
|
|
|
|
|
Таблица с програмите, 18 |
|
|
|
|
|
|
Програмиране според потребностите, 19 |
|
|
|
|
|
|
Регулиране на центрофугата, 19 |
|
|
|
|
|
|
Регулиране на температурата, 19 |
|
|
AVF 129 |
Регулиране на таймера за програмиран старт, 19 |
|
|||
|
|
|
|
|
Функции, 19 |
|
|
|
|
|
|
Перилни препарати и тъкани, 20 |
|
|
|
|
|
|
Касета за перилните препарати, 20 |
|
|
|
|
|
|
Разпределяне на прането, 20 |
|
|
|
|
|
|
Специфично пране, 20 |
|
|
|
|
|
|
Woolmark Platinum Care (Кашмирени дрехи), 20 |
|
|
|
|
|
|
Мерки за безопасност и препоръки, 21 |
|
|
|
|
|
|
Общи предохранителни мерки, 21 |
|
|
|
|
|
|
Претопяване, 21 |
|
|
|
|
|
|
Спестяване и опазване на околната среда, 21 |
|
|
|
|
|
|
Поддръжка и почистване, 22 |
|
|
|
|
|
|
Спиране на водата и изключване на |
|
|
|
|
|
|
електрозахранването, 22 |
|
|
|
|
|
|
Почистване на пералната машина, 22 |
|
|
|
|
|
|
Почистване на касетата за перилните препарати, 22 |
|
|
|
|
|
|
Поддръжка на люка и на казана, 22 |
|
|
|
|
|
|
Почистване на помпата, 22 |
|
|
|
|
|
|
Проверка на маркуча за студената вода, 22 |
|
|
|
|
|
|
Проблеми и мерки за отстраняването |
|
|
|
|
|
|
èì, 23 |
|
|
|
|
|
|
Сервизно обслужване, 24 |
|
|
|
|
|
|
Преди да се свържете с оторизирания сервиз, 24 |
|
|
|
|
|
|
|
|
|
|
|
|
|
|
|
|
|
|
|
|
|
|
|
|
|
|
|
|
|
|
|
|
|
|
|
|
13
Монтиране
Важно е да съхранявате инструкциите, за да BG можете да правите допълнителни справки по
всяко време. В случай, че пералната машина се продаде, преотстъпи или премести трябва да се погрижите инструкциите винаги да я придружават, за да се предостави информация на новия собственик за работата и предупрежденията.
Прочетете внимателно инструкциите, защото съдържат важна информация за монтажа, използването и безопасността.
Разопаковане и нивелиране
Разопаковане
1.Разопаковайте пералната машина.
2.Проверете дали пералната машина не е повредена при транспортирането. Ако е повредена, не я свързвайте, а се обърнете към продавача.
3. Свалете четирите защитни винта за транспортирането и гумичката с дистанционната втулка, поставени на гърба (виж фигурата).
4.Затворете отворите с предоставените пластмасови капачки.
5.Съхранете всички части, за да се монтират отново при необходимост пералната машина да бъде транспортирана.
Опаковъчният материал не е детска играчка
Нивелиране
1. Монтирайте пералната машина на равен и твърд под без да я опирате в стени, мебели и др.
2. Ако подът не е идеално хоризонтален, компенсирайте неравностите като отвиете или завиете предните крачета (виж фигурата). Наклонът, измерен върху горната повърхност, не трябва да надвишава 2° .
С точното нивелиране машината е стабилна и се избягват вибрациите, шумовете и преместването й по време на работа. Когато настилката е мокет или килим, регулирайте така крачетата, че под пералната машина да остане достатъчно място за вентилация.
Хидравлични и електрически връзки
Свързване на маркуча към водопроводната мрежа
|
1. Поставете |
|
уплътнението “А” в |
|
края на маркуча за |
|
студената вода и го |
A |
завийте към крана за |
студената вода на 3/4” |
|
|
(виж фигурата). |
|
Преди да го свържете |
|
източете водата, |
|
докато се избистри. |
|
2. Свържете маркуча |
|
за студената вода към |
|
пералната машина, |
|
като го завиете към |
|
щуцера, разположен |
|
на гърба, горе вдясно |
|
(виж фигурата). |
3. Внимавайте маркуча да не се прегъва и пречупва.
Налягането по водопроводната мрежа трябва да бъде в границите, указани в таблицата с техническите данни (виж следващата страница).
Ако дължината на захранващия маркуч не е достатъчна, се обърнете към специализиран магазин или към оторизиран техник.
14
Свързване на маркуча за мръсната вода
65 - 100 cm |
Свържете маркуча за мръсната вода, без да го прегъвате, към канализационната тръба или към тръбата за отвеждане в стената, разположени от пода на височина между 65 и 100 см;
или го подпрете в края на мивката или ваната, като вържете водача за крана (виж фигурата). Свободният край на маркуча за мръсната вода не трябва да бъде потопен във водата.
Не се препоръчва използването на удължителни маркучи. Ако е необходимо, удължителят трябва да има същия диаметър като оригиналния и да не надвишава 150 см.
Свързване към електрическата мрежа
Преди да свържете щепсела в контакта, проверете дали:
•контактът е заземен съгласно действащата норма;
•контактът може да поеме максималната мощност на натоварване на машината, указана в таблицата с техническите данни (виж
следващата страница);
•захранващото напрежение е в границите на указаното в таблицата с техническите данни
(виж следващата страница);
•контактът отговаря на щепсела на пералната машина. В противен случай заменете щепсела или контакта.
Пералната машина не се монтира на открито, дори под навес, защото е много опасно да се остави на влиянието на атмосферните условия.
За монтираната перална машина електрическият контакт трябва да бъде лесно достъпен.
Не използвайте удължители или разклонители.
Кабелът не трябва да бъде огънат или сплескан.
Захранващият кабел трябва да се заменя само от оторизирани техници.
Внимание! Фирмата отхвърля всякаква отговорност в случаите, в които тези норми не се спазват.
Първо пране
След монтирането, преди употреба, направете един цикъл на пране с перилен препарат, но без дрехи, като зададете програмата на 90°С без предпране.
Технически данни
Модел |
AVF 129 |
ширина 59,5 см Размери височина 85 см
дълбочина 53,5 см
Вместимост |
îò 1 äî 5 êã. |
Електрическо
напрежение 220/230V 50 Hz
захранване
максимална консумирана мощност 1850 W
Захранване с
максимално налягане 1 МРа (10 bar)
âîäà
минимално налягане 0,05 МРа (0,5 bar) обем на казана 46 литра
Скорост на
до 1200 оборота/минута
центрофугата
Програми за проверка програма 3; температура 60°;
съгласно норма извършена с 5 кг пране.
IEC 456
Пералната машина съответства на следните Европейски директиви:
-73/23/СЕЕ от 19/02/73 (за ниско напрежение) и последващите изменения
-89/336/СЕЕ от 03/05/89 (за електромагнитна съвместимост) и последващите изменения
BG
Сервизно Предпазни Перилни обслужване Проблеми Поддръжка мерки препарати Програми Описание Монтиране
15

Описание на пералната машина
Табло за управление
BG
Бутони за управление
Бутон ВКЛЮЧВАНЕ/
Джоб за схемата на ИЗКЛЮЧВАНЕ програмите
Дисплей
Касета за перилните препарати
ЦЕНТРОФУГА
Блокиране ТЕРМОРЕГУЛАТОР на бутоните
DELAY TIMER (таймера за програмиран старт)
Êëþ÷ çà
програмите
Бутон
СТАРТ/АНУЛИРАНЕ
Касетата за перилните препарати служи за зареждане с перилни препарати, омекотители и др. (виж стр. 20).
Джоб за пластмасовата схема на програмите, за да бъде винаги достъпна: дръпнете сивото езиче, за да отворите.
Бутони за управление: за избор на функциите. За избраната функция ще светне бутонът.
Бутон ЦЕНТРУФУГА за регулиране скоростта на центрофугата до изключването й (виж стр. 19).
ТЕРМОРЕГУЛАТОР за регулиране температурата на прането (виж стр. 19).
Бутон DELAY TIMER (Таймер за програмиран старт) за отлагане стартирането на зададената програма с максимум 24 часа (вж. стр. 19).
Този бутон служи за блокиране на всички бутони на вашата перална машина по време на функционирането й или в Stand-by режим (режим на изчакване).
Дисплей за програмиране на пералната машина и за проследяване циклите на изпълнението на програмата за пране (виж следващата страница).
Бутон ВКЛЮЧВАНЕ/ИЗКЛЮЧВАНЕ за включване и изключване на пералната машина (виж стр. 18).
Бутон СТАРТ/АНУЛИРАНЕ за стартиране на програмите или за анулиране на погрешно зададеното (виж стр. 18).
Ключ за избор на програмите. Ключът за избор на програмите може да се скрива. За да го извадите, натисне леко в центъра. По време на изпълнение на програмата, ключът остава неподвижен.
16

Дисплей
Освен, че е полезен инструмент за програмиране на машината (виж стр. 19) дисплеят дава информация за цикъла на пране и за етапа от изпълнението на програмата.
След като натиснете бутона СТАРТ/АНУЛИРАНЕ за стартиране на програмата на дисплея ще се появи времето, което е необходимо за изпълнение на цикъла. В случай, че зададете часа до включване на програмата (виж. стр. 19) същият ще се покаже на дисплея.
По време на цикъла на пране ще се изобразяват:
Текущите фази:
Предпране
Основно пране
Изплакване
Центрофуга
Функции и опции за персонализиране:
За да изберете функциите и опциите, вижте по-долу и на стр. 19.

 Зумер:
Вашата перална машина е снабдена с устройство за звукова сигнализация, което указва изпълнението на различните функции или евентуални аномалии: несъвместимост на опциите с програмите, стартиране, край на цикъла, нулиране.
 Блокиране на бутоните:
За вашата безопасност и безопасността на вашите деца, можете да блокирате всички бутони по време на функционирането на пералната машина или докато тя е в режим на изчакване (отложен старт – Stand-by), натискайки съответния функционален бутон за 2 секунди.
За да дезактивирате блокирането, задръжте бутона натиснат за около 4 секунди.
 Люк блокиран:
Светещият индикатор показва, че люкът е блокиран за избягване на случайното му отваряне. За избягване на щети трябва да изчакате знакът да угасне, преди да отворите люка.
Този модел се доставя с устройство, което позволява люкът да се отвори и по време на първата фаза на избраната програма. Това е възможно, когато символът не свети.
В края на изпълнението на програмата се показва надписът END (КРАЙ).
В случай на повреда се появява кода за грешка, например: F-01, който трябва да съобщите на оторизирания сервиз (виж стр. 24).
BG
Сервизно Предпазни Перилни обслужване Проблеми Поддръжка мерки препарати Програми Описание Монтиране
17

Включване и програми
Кратко описание: включване на програма
BG |
1. Включете пералната машина, като натиснете |
|
бутона . Всички индикатори ще се |
|
включат и ще светят в продължение на |
|
няколко секунди, след което ще угаснат. |
2.Заредете дрехите за пране и затворете люка.
3.Изберете желаната програма с ключа за програми. На дисплея ще се изобрази времето за изпълнение на програмата. Температурата и центрофугата се задават автоматично от програмата (за да ги промените вижте стр. 19).
4.Изсипете праха и допълнителните препарати (виж стр. 20).
5.Изберете която и да е функция (вж. стр. 19).
6.Стартирайте програмата, като натиснете бутона СТАРТ/АНУЛИРАНЕ. За анулиране натиснете бутона СТАРТ/АНУЛИРАНЕ поне за 2 секунди.
7.Когато програмата свърши ще се появи надпис END (КРАЙ). Извадете прането и оставете люка леко отворен, за да изсъхне казана.
8.Изключете пералната машина, като натиснете бутона  .
.
Таблица с програмите
Вид на тъканите и |
|
Темпе- |
Перилен |
|
Времетрае- |
Описание на цикъла на |
||
|
препарат |
|
||||||
степен на |
Програми |
Омекотител |
не на цикъла |
|||||
ратура |
пране |
|||||||
|
|
|||||||
замърсяването им |
|
|
предпране |
пране |
|
(минути) |
|
|
|
|
|
|
|
|
|||
|
|
|
|
|
|
|
|
|
Памучни
Бели изключително |
|
|
|
|
|
|
|
Предпране, пране, |
замърсени (чаршафи, |
1 |
90°Ñ |
• |
• |
• |
147 |
изплаквания, междинна и |
|
покривки и др.) |
|
|
|
|
|
|
|
крайна центрофуга |
Бели изключително |
|
|
|
|
|
|
|
Пране, изплаквания, междинна |
замърсени (чаршафи, |
2 |
90°C |
|
• |
• |
130 |
||
|
и крайна центрофуга |
|||||||
покривки и др.) |
|
|
|
|
|
|
|
|
|
|
|
|
|
|
|
|
|
Бели и устойчиви цветни |
3 |
60°C |
|
• |
• |
115 |
Пране, изплаквания, междинна |
|
много замърсени |
|
и крайна центрофуга |
||||||
|
|
|
|
|
|
|
||
|
|
|
|
|
|
|
|
|
Бели леко замърсени и |
|
|
|
|
|
|
|
Пране, изплаквания, междинна |
неустойчиви цветни |
4 |
40°C |
|
• |
• |
82 |
||
|
и крайна центрофуга |
|||||||
(ризи, фланели и др. ) |
|
|
|
|
|
|
|
|
|
|
|
|
|
|
|
|
|
Неустойчиви цветни леко |
5 |
30°C |
|
• |
• |
7 5 |
Пране, изплаквания, междинна |
|
замърсени |
|
и крайна центрофуга |
||||||
|
|
|
|
|
|
|
||
|
|
|
|
|
|
|
|
|
Синтетични |
|
|
|
|
|
|
|
|
Устойчиви цветни много |
|
|
|
|
|
|
|
Пране, изплаквания, центрофуга |
замърсени (бебешки |
6 |
60°C |
|
• |
• |
87 |
без намачкване или за фини |
|
дрехи и др.) |
|
|
|
|
|
|
|
дрехи/лека центрофуга/ |
Устойчиви цветни |
|
|
|
|
|
|
|
Пране, изплаквания, центрофуга |
(всякакъв тип леко |
6 |
40°C |
|
• |
• |
7 2 |
без намачкване или за фини |
|
замърсени дрехи) |
|
|
|
|
|
|
|
дрехи/лека центрофуга/ |
Устойчиви цветни много |
|
|
|
|
|
|
|
Пране, изплаквания, центрофуга |
замърсени (бебешки |
7 |
50°C |
|
• |
• |
83 |
без намачкване или за фини |
|
дрехи и др.) |
|
|
|
|
|
|
|
дрехи/лека центрофуга/ |
Неустойчиви цветни |
|
|
|
|
|
|
|
Пране, изплаквания, центрофуга |
(всякакъв тип леко |
8 |
40°C |
|
• |
• |
68 |
без намачкване или за фини |
|
замърсени дрехи) |
|
|
|
|
|
|
|
дрехи/лека центрофуга/ |
Неустойчиви цветни |
|
|
|
|
|
|
|
Пране, изплаквания и лека |
(всякакъв тип леко |
9 |
30°C |
|
• |
• |
30 |
||
|
центрофуга |
|||||||
замърсени дрехи) |
|
|
|
|
|
|
|
|
|
|
|
|
|
|
|
|
|
Ô èíè |
|
|
|
|
|
|
|
|
Вълнени |
10 |
40°C |
|
• |
• |
50 |
Пране, изплаквания и лека |
|
|
центрофуга |
|||||||
|
|
|
|
|
|
|
|
|
|
|
|
|
|
|
|
|
|
Много фини тъкани |
|
|
|
|
|
|
|
Пране, изплаквания, без |
(пердета, коприна, |
11 |
30°C |
|
• |
• |
45 |
||
|
намачкване или източване |
|||||||
вискоза и др.) |
|
|
|
|
|
|
|
|
|
|
|
|
|
|
|
|
|
ЧАСТИЧНИ ПРОГРАМИ |
|
|
|
|
|
|
|
|
Изплакване |
|
|
|
|
|
• |
|
Изплаквания и центрофуга |
|
|
|
|
|
|
|
|
|
Деликатно изплакване |
|
|
|
|
|
• |
|
Изплаквания, центрофуга без |
|
|
|
|
|
|
намачкване или източване |
||
|
|
|
|
|
|
|
|
|
Центрофуга |
|
|
|
|
|
|
|
Източване и енергична |
|
|
|
|
|
|
|
центрофуга |
|
|
|
|
|
|
|
|
|
|
Лека центрофуга |
|
|
|
|
|
|
|
Източване и лека центрофуга |
|
|
|
|
|
|
|
|
|
Източване |
|
|
|
|
|
|
|
Източване |
|
|
|
|
|
|
|
||
|
|
|
|
|
|
|
|
|
Бележка
За описанието на функцията “без намачкване” виж “лесно гладене” на следващата страница. Данните приведени в таблицата са указателни.
Специална програма
Дневна 30’ (програма 9 за синтетични тъкани), която е разработена за пране на леко замърсени дрехи: трае само 30 минути и по този начин пести време и средства. С избирането на програмата (9 на 30°C) може да перете едновременно тъкани от различен вид (с изключение на вълна и коприна) с максимално тегло до 3 кг. Препоръчва се използването на течен перилен препарат.
18
 Loading...