


Fridge/freezer combined
Installation and use
Kühl/Gefrier-Kombination
Installation und Gebrauch
Koel-vriescombinatie
Installatie en gebruik
Réfrigérateur-congélateur combiné
Installation et emploi

BC 312 AI EU
GB Fridge/freezer combined |
1 |
|
|
Instructions for installation and use |
|
D |
Kühl/Gefrier-Kombination |
11 |
|
Installationund Gebrauchshinweise |
|
NL |
Koel-vriescombinatie |
22 |
|
Gebruiksaanwijzingen voor plaatsing en gebruik |
|
F |
Réfrigérateur-congélateur combiné |
32 |
|
Instructions pour l'installation et l'emploi |
|
To maintain the EFFICIENCY and SAFETY of this appliance, we recommend:
-call only the Service Centers authorized by the manufacturer
-always use original Spare Parts
Um die Leistungsfähigkeit und Sicherheit dieses Gerätes zu gewährleisten, bitte folgendes beachten:
-wenden Sie sich ausschließlich an unsere autorisierten Service-Stellen
-verlangen Sie, daß nur Original-Ersatzteile verwendet werden
Om de doelmatigheid en veiligheid van dit toestel te garanderen raden wij u aan:
-voor reparaties alleen de Service Centers te bellen die door de fabrikant gemachtigd zijn
-altijd gebruik te maken van originele onderdelen
Pour garantir l’efficacité et la sécurité de ce produit:
-adressez-vous exclusivement aux Centres d’assistance technique agréés
-demander toujours l’utilisation de pièces détachées originales

Safety - a good habit to get into.
ATTENTION
Read your manual carefully since it contains instructions which will ensure safe installation, use and maintenance of your appliance.
Your Refrigerator is built to International safety standards (EN60) and has been awarded the European approval mark (IMQ) for compliance with UK electrical safety requirements. It also meets the EC standards on the prevention and elimination of radio interference (EC directive 87/308 - 02.06.89).
1.This appliance must not be installed outdoors - not even in an area protected by a roof. It is extremely dangerous to leave it exposed to rain or storms.
2.It must only be used by adults and exclusively to refrigerate and freeze foodstuffs, following the instructions for use contained in this manual.
3.Do not ever touch or handle the appliance with bare feet or with wet hands or feet.
4.It is highly recommended that you do not use extension cords or multiple socket adapters. If the refrigerator is installed between cabinets, make sure that the cord is not bent or dangerously pinched or compressed.
5.Never pull on the cord or the refrigerator to remove the plug from the wall socket - this is very dangerous.
6.Never touch the cooling components within the appliance, especially with wet hands because this could result in injury. Never put ice cubes just removed from the freezer into your mouth because they could stick to your mouth and cause burns.
7.Never clean or perform maintenance on the appliance without first removing the plug from the socket; in fact,
turning the knob for adjusting the temperature to the " "· setting is not sufficient to eliminate all electrical contact with the mains.
8.Before having your old refrigerator picked up for disposal, remove or make inoperable any locking devices to prevent children who might play in or around the appliance from being locked inside.
9.Before calling for service/assistance in the case of malfunction, consult the chapter entitled “Is There a Problem? to determine whether it is possible to eliminate the problem. do not try to repair the problem by trying to access the internal components of the appliance.
10.If damaged, the power supply cord on this appliance must necessarily be replaced by our service centre because special tools are required for replacement.
11.Do not use electric appliances inside the compartment for food storage, if these are not those recommended by the manufacturer.
12.At the end of the functional life of your appliance – containing cyclopentane gas in the insulation foam and perhaps gas R600a (isobutane) in the refrigeration circuit – the latter should made safe before being sent to the dump. For this operation, please contact your dealer or the Local Organisation in charge of waste disposal.
Installation
To ensure that the appliance operates properly and to reduce energy consumption, it is important that the appliance is installed correctly.
Ventilation
The compressor and condenser generate heat and, therefore, need to be ventilated properly. Rooms with less than perfect ventilation are not very suited for installation of the appliance. Therefore, it should be installed in a room with an opening (window or French window) that provide the appropriate amount of air re-circulation. It is also important that the room not be too humid.
Away from Heat
This appliance should not be positioned in a place where it is directly exposed to sunlight or directly next to an ovem/hob.
Electrical Connection and Earthing
Before proceeding with the electrical connection, make sure that the voltage indicated on the rating plate, located at the bottom left near the vegetable crisper, corresponds to the mains voltage in your home and that the socket is fitted
with a standard earthing wire in accordance with safety standards for 46/90 systems. If the socket is not fitted with an earthing wire, the manufacturer will not be held liability for any damages and or injuries arising out of the use of the appliance. Do not use multiple sockets or adapters.
Position the appliance in such a way that you can access the socket where it is plugged in.
Insufficient power?
The electrical socket must be able to handle the maximum power load of the appliance, which is indicated on the rating plate located at the bottom left next to the vegetable crisper.
Before making the electrical connection ...
After the appliance has been delivered, place it in the vertical upright position and wait at least 3 hours before inserting the plug into the socket in order to ensure that it functions properly.
1 |
GB |

A Closer Look
A Compartment for freezing fresh foods and storing frozen foods
This knob is used to regulate the temperature in the two compartments with the following settings:
 The refrigerator is off; 1 less cold;
5 colder
B Removable door shelves with
lid, with egg tray and lidded butter dish
J Fruit and Vegetable Crispers
K Meat/cheese storage box
L Removable/Adjustable Shelves
M Hinged bottle rack
A
C Removable miscellaneous shelf
D Compartment for a 2 litre bottle
E Removable door shelf for bottles
F Drain system for drawing off
defrost water from freezer compartment
G Compartment for storing frozen foods
H Ice tray
I Compartment for storing and freezing
L 
M
L
K
J
I
H 
G
H
G
B |
C |
C |
D |
E |
F
GB |
2 |

How to Start the Appliance
NOTICE
After the appliance has been delivered, stand it in the upright position and wait approximately 3 hours before connecting it to the electrical outlet to guarantee that it operates properly.
Before storing food in your refrigerator wipe the interior with a solution of warm water and bicarbonate of soda.
After having plugged the appliance into the socket, make sure that the refrigerator light has turned on. Then turn the thermostat knob “A” to setting “3”. After a few hours have passed, you can place fresh food in the refrigerator compartment and frozen foods into the freezer.
Food hygiene
1.Once you have bought your food, remove all external packaging made of paper/cardboard or other wrappers, which could introduce bacteria or dirt inside your refrigerator.
2.Protect the food, (especially easily perishable items and those that have a strong smell), in order to avoid contact between them, thereby removing both the possibility of germ/bacteria contamination as well as the diffusion of strong odours inside the fridge.
3.Store all food in such a way as to ensure air can circulate freely between different items.
4.Keep the inside of your fridge clean, taking care not to use oxidiser or abrasive products.
5.Remove all food past its expiry date from the refrigerator.
6.For the correct preservation of food, all easily perishable items (soft cheeses, raw fish, meat, etc.) should be stored in the coldest zone of the fridge compartment, i.e. just above the salad crisper where the temperature indicator is situated.
How to use the refrigerator compartment...
The thermostat automatically regulates the temperature inside the appliance
1 = less cold
5 = colder
It is recommended that a medium setting be used.
To increase the amount of space, optimize arrangement and improve appearance, this appliance has a “cooling area” located within the back panel of the refrigerator compartment. When the appliance is operating, this panel may be covered with frost or droplets of water depending on whether the compressor is operating or not at a given time. Do not be concerned about this! The refrigerator is operating normally.
If the thermostat knob is positioned on higher settings while the refrigerator is heavily filled and the ambient temperature high, the appliance may run continuously, resulting in the formation of frost on the back cooling area. This will lead to an increase in energy consumption.
To avoid this situation, just turn the thermostat knob to a lower setting so that the appliance defrosts automatically.
The temperature indicator
The fridge has been equipped with a temperature indicator for an improved, more precise definition of the coldest zone. Make sure “OK” comes up on the indicator.
Correct lighting also ensures an easier indicator reading.
If the word “OK” does not appear it means that the temperature is too high.
Adjust the thermostat (of the fridge compartment) to a higher setting (colder).
Each time you adjust the thermostat setting, wait for the temperature inside the fridge compartment to become stable (approximately 10 hours) before making any further adjustments.
WARNING: Should you place large quantities of food inside the fridge or should the fridge door have been opened frequently or for a prolonged period of time, it is quite normal for OK not to come up on the indicator.
Wait at least 10 hours before adjusting the thermostat to a higher setting.
3 |
GB |
Storing Food in the Refrigerator Compartment
Food |
Storage Time |
Location in the Refrigerator |
|
|
|
|
|
Wrapped meat and cleaned fish |
2 or 3 days |
On the shelf above the vegetable crisper |
|
(use plastic wrap or pack in plastic bags) |
(which is the coldest area). |
||
|
|||
|
|
|
|
Fresh cheese |
3 or 4 days |
On the shelf above the vegetable crisper |
|
(which is the coldest area). |
|||
|
|
||
|
|
|
|
Eggs |
1 month |
In special egg rack on door. |
|
|
|
|
|
Butter, margarine |
|
On any shelf. |
|
|
|
|
|
Cooked or precooked food |
|
|
|
(placer in air-tight containers and when cool store |
3 or 4 days |
On any shelf. |
|
in refrigerator) |
|
|
|
|
|
|
|
Sausages, salami, sandwich meats in general, fresh |
|
|
|
pasta, custards,puddings, chocolates, cream |
3 or 4 days |
On any shelf. |
|
pastries, bread, dry pastries, red tomatoes |
|
|
|
|
|
|
|
Bottled products, milk, drinks, yoghurt |
|
On special door shelves. |
|
|
|
|
|
Fruits and legumes |
|
In vegetable crisper. |
|
|
|
|
What Not to Store in the Refrigerator
Garlic (transmits odour), onions and leeks. Bananas (they will turn black).
Citrus fruits.
Potatoes and root vegetables (store in dark, dry places).
-Within the refrigerator compartment, the air circulates naturally, with the colder air falling because it is heavier. This is the reason why meat and cheeses should be placed above the vegetable crisper.
-Please follow our instructions carefully on maximum storage time: any food, even the freshest, will not remain edible for any extended amount of time.
-Contrary to popular belief, cooked foods do not store any longer than raw food.
-Do not place liquids in containers without covering them because this will lead to an increase in the level of moisture within the refrigerator, causing the formation of frost.
-Be careful not to place containers (plastic or glass), food or other objects in direct contact with the cooling area of the back wall of the refrigerator. This could harm the food, increase energy consumption and facilitate the formation of condensate (on food, containers, etc.).
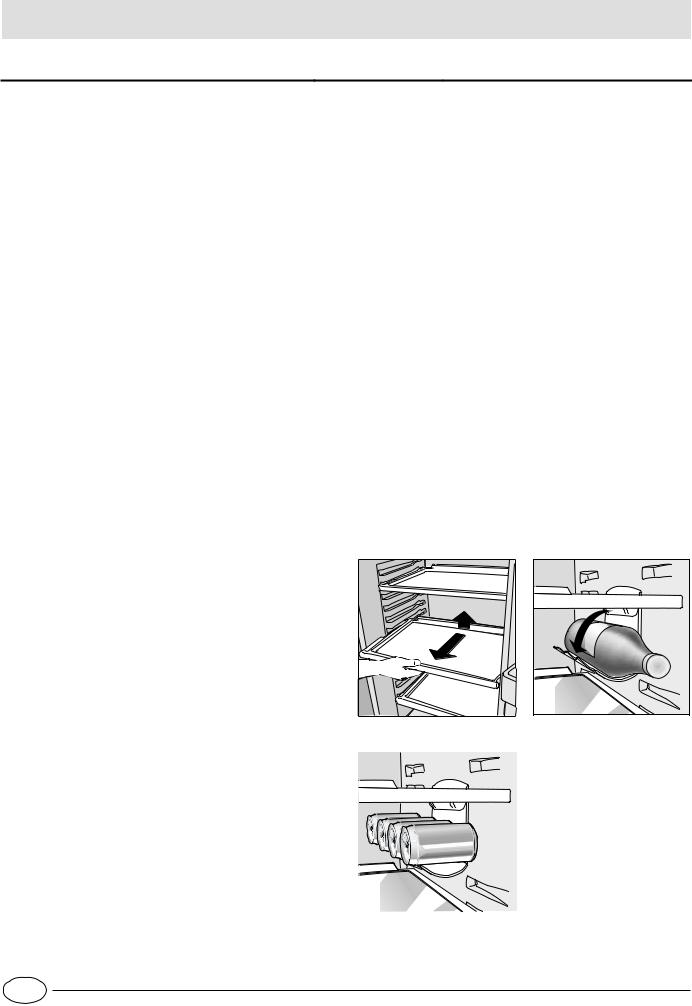
-The refrigerator compartment is equipped with convenient, removable shelves (Fig. 1) which can be adjusted for height using the shelf guides. This allows you to place even large containers and foodstuffs in the refrigerator.
The side bottle rack can be used either for storing bottles (Fig. 2) as well as several cans (2-4) placed horizontally (Fig. 3). If not in use, the bottle/can rack can be tipped up and away to make more room inside the refrigerator.
Fig. 1 |
Fig. 2 |
|
|
|
|
Fig. 3
GB |
4 |
Freezing Foods Properly
-For the preparation of food to be frozen, please consult a specialized manual.
-Food that has be thawed, even partially, must not be refrozen: you must cook it in order to consume it (within 24 hours) or to freeze it once again.
-When freezing fresh foods, remember that they should not touch other previously frozen or deep frozen foods. Place the food that you wish to freeze in the top compartment "I" where the temperature will fall below -18°C, which is ideal for freezing food properly. Remember that proper conservation depends on the speed of freezing.
-During the freezing process, avoid opening the door of the freezer.
-The maximum daily quantity of food that can be frozen is indicated on the rating plate located to the left of the vegetable crisper.
-In order to freeze and then thaw foods optimally, it is recommended that you divide food into small portions so that they freeze quickly and uniformly. The packages should be clearly marked with the content and the date they were frozen.
-In order to obtain a larger amount of space in the freezer compartment, you can remove the central drawer, and place the food directly onto the evaporator plate. Make sure that, after having inserted the load, the door closes correctly.
-In order to have a larger storage volume, the freezer compartment can be used without its drawers (except for the first one from the bottom), placing food directly onto the evaporator plates. After introducing the food to be stored, make sure that the door shuts properly.
-Do not open the freezer door in the event of a power failure or malfunction. This precaution will slow the rise in temperature within the compartment. If the door is not opened, frozen and fast-frozen foods will remain in their current state for approximately 9-14 hours.
-Do not place full bottles in the freezer: they could easily burst because all liquids increase in volume when they freeze.
-If the ambient temperature remains below 14°C for an extended period of time, the temperature needed for extended storage of food in the freezer will not be reached, resulting in reduced storage life of the food.
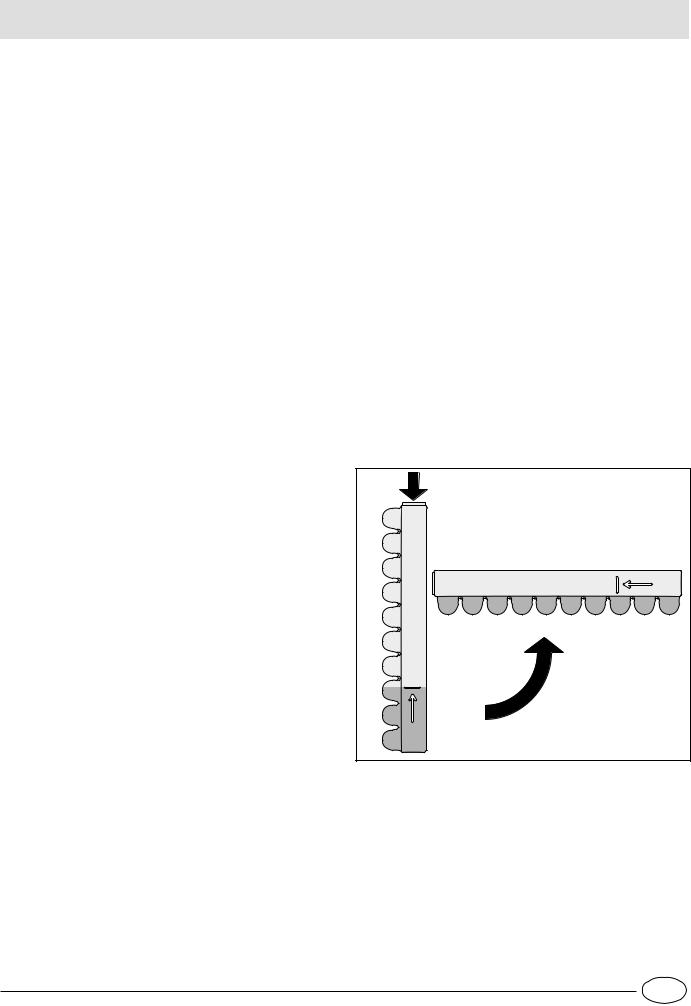
Ice trays
This new concept of ice trays is an exclusive Merloni patent. The fact that they are situated on the top part of the freezer drawers ensures greater ergonomics and cleanliness: the ice no longer comes into contact with the food placed inside the freezer compartment; furthermore, the dripping of the water during filling is avoided (a lid to cover up the hole after filling with water is also provided).
Instructions for use (Fig. 4)
Fill up the tray with water via the special hole up to the level indicated (MAX WATER LEVEL), taking care not to exceed it: inserting more water than is necessary will lead to the formation of ice which could obstruct the exit of the ice cubes.
If you have used an excessive amount of water, you will have to wait until the ice has melted, empty out the tray and re-fill it with water.
Once you have filled the ice tray up with water through the hole indicated, turn it by 90 °. This new concept of ice trays is an exclusive Merloni patent. The fact that they are situated on the top part of the freezer drawers ensures greater ergonomics and cleanliness.
Once the ice has formed, all you need to do is to knock the tray against a hard surface so that the ice cubes come away from their housing and come out of the same hole used to fill the tray with water. To make it easier for the ice cubes to come out, wet the outside of the tray.
WARNING: every time you fill up the ice tray with water , make sure that the same is completely empty and that there are no traces of ice left inside it.
The minimum time required for ice to form well is approximately 8 hours.
|
MAX |
|
WATER LEVEL |
WATER |
MAX |
LEVEL |
|
Fig. 4
5 |
GB |

Guide to Using the Freezer
Meat and Fish
Food |
Wrapping |
Tenderising |
Storage |
Thawing Time |
|
(days) |
(months) |
||||
|
|
|
|||
|
|
|
|
|
|
Beef Roast |
Tinfoil |
2 / 3 |
9 / 10 |
Not required. |
|
|
|
|
|
|
|
Lamb |
Tinfoil |
1 / 2 |
6 |
Not required. |
|
|
|
|
|
|
|
Pork Roast |
Tinfoil |
1 |
6 |
Not required. |
|
|
|
|
|
|
|
Veal Roast |
Tinfoil |
1 |
8 |
Not required. |
|
|
|
|
|
|
|
Veal/Pork Chops |
Each piece wrapped in cling wrap and |
|
6 |
Not required. |
|
then in tinfoil (4 to 6 slices) |
|
||||
|
|
|
|
||
|
|
|
|
|
|
Veal/Lamb Cutlets |
Each piece wrapped in cling wrap and |
|
6 |
Not required. |
|
then in tinfoil (4 to 6 slices) |
|
||||
|
|
|
|
||
|
|
|
|
|
|
Minced Meat |
In aluminium containers covered with cling |
Freshly |
2 |
Slowly in refrigerator. |
|
wrap. |
minced |
||||
|
|
|
|||
|
|
|
|
|
|
Heart and Liver |
Plastic Baggies |
|
3 |
Not required. |
|
|
|
|
|
|
|
Sausages |
Cling Wrap or Tinfoil |
|
2 |
As necessary. |
|
|
|
|
|
|
|
Chicken and Turkey |
Tinfoil |
1 / 3 |
9 |
Very slowly in refrigerator. |
|
|
|
|
|
|
|
Duck and Goose |
Tinfoil |
1 / 4 |
6 |
Very slowly in refrigerator. |
|
|
|
|
|
|
|
Pheasant, Partrige and |
Tinfoil |
1 / 3 |
9 |
Very slowly in refrigerator. |
|
Wild Duck |
|||||
|
|
|
|
||
|
|
|
|
|
|
Hare and Rabbit |
Tinfoil |
3 / 4 |
6 |
Very slowly in refrigerator. |
|
|
|
|
|
|
|
Venison |
Tinfoil or Cling Wrap |
5 / 6 |
9 |
Very slowly in refrigerator. |
|
|
|
|
|
|
|
Large Fish |
Tinfoil or Cling Wrap |
|
4 / 6 |
Very slowly in refrigerator. |
|
|
|
|
|
|
|
Small Fish |
Plastic Baggies |
|
2 / 3 |
Not required. |
|
|
|
|
|
|
|
Crustaceans |
Plastic Baggies |
|
3 / 6 |
Not required. |
|
|
|
|
|
|
|
Shellfish |
Store in salted water in aluminium |
|
3 |
Very slowly in refrigerator. |
|
containers or plastic containers. |
|
||||
|
|
|
|
||
|
|
|
|
|
|
Boiled Fish |
Tinfoil or Cling Wrap |
|
12 |
In hot water. |
|
|
|
|
|
|
|
Fried Fish |
Plastic Baggies |
|
4 / 6 |
Directly in pan. |
|
|
|
|
|
|
GB |
6 |

Fruits and Vegetables
Food |
Preparation |
Blanching |
Wrapping |
Storage |
Thawing Time |
|
Time |
(months) |
|||||
|
|
|
|
|||
|
|
|
|
|
|
|
Apples and Pears |
Peel and cut into slices. |
2’ |
In Containers (cover |
12 |
In refrigerator very |
|
with syrup) |
slowly. |
|||||
|
|
|
|
|||
|
|
|
|
|
|
|
Apricots, Peaches, |
Peel and pit. |
1’ / 2’ |
In Containers (cover |
12 |
In refrigerator very |
|
Cherries and Plums |
with syrup) |
slowly. |
||||
|
|
|
||||
|
|
|
|
|
|
|
Strawberries |
|
|
In Containers (cover |
|
In refrigerator very |
|
Blackberries and |
Rinse and fry. |
|
10 / 12 |
|||
|
with sugar) |
slowly. |
||||
Raspberries |
|
|
|
|||
|
|
|
|
|
||
|
|
|
|
|
|
|
Cooked Fruit |
Cut, cook and strain. |
|
In Containers (add |
12 |
In refrigerator very |
|
|
10% sugar) |
slowly. |
||||
|
|
|
|
|||
|
|
|
|
|
|
|
Fruit Juice |
Wash, cut and crush. |
|
In Containers (sugar |
10 / 12 |
In refrigerator very |
|
|
to taste) |
slowly. |
||||
|
|
|
|
|||
|
|
|
|
|
|
|
|
Remove leaves, cut head |
|
|
|
|
|
Cauliflower |
into small pieces and blanch |
2’ |
Plastic Baggies |
12 |
Not required. |
|
in water and a little lemon |
||||||
|
|
|
|
|
||
|
juice. |
|
|
|
|
|
|
|
|
|
|
|
|
Cabbage and |
Wash and cut into small |
1’ / 2’ |
Plastic Baggies |
10 / 12 |
At room temperature. |
|
Brussel Sprouts |
pieces. |
|||||
|
|
|
|
|||
|
|
|
|
|
|
|
Peas |
Shell and wash. |
2’ |
Plastic Baggies |
12 |
Not required. |
|
|
|
|
|
|
|
|
French Beans |
Wash and slice if required. |
2 |
Plastic Baggies |
10 / 12 |
Not required. |
|
|
|
|
|
|
|
|
Carrots, Peppers |
Peel, wash and slice if |
3’ / 4’ |
Plastic Baggies |
12 |
Not required. |
|
and Turnips |
necessary. |
|||||
|
|
|
|
|||
|
|
|
|
|
|
|
Mushrooms and |
Wash, peel and cut up. |
3’ / 4’ |
Plastic Baggies or |
6 |
At room temperature. |
|
Asparagus |
Containers |
|||||
|
|
|
|
|||
|
|
|
|
|
|
|
Spinach |
Wash and mince. |
2’ |
Plastic Baggies |
12 |
At room temperature. |
|
|
|
|
|
|
|
|
Vegetable for Soups |
Wash and cut up in small |
3’ |
Plastic Baggies or |
6 / 7 |
Not required. |
|
pieces. |
Containers |
|||||
|
|
|
|
|||
|
|
|
|
|
|
|
Various Foods |
Preparation |
Blanching |
Wrapping |
Storage |
Thawing time |
|
Time |
(months) |
|||||
|
|
|
|
|||
|
|
|
|
|
|
|
Bread |
|
|
Plastic Baggies |
4 |
At room temperature |
|
|
|
and in the oven. |
||||
|
|
|
|
|
||
|
|
|
|
|
|
|
|
|
|
|
|
About 10 minutes at |
|
Cakes |
|
|
Plastic Baggies |
6 |
room temperature, |
|
|
|
|
|
|
cook at 100/200°C. |
|
|
|
|
|
|
|
|
Cream |
|
|
Plastic Containers |
6 |
At room temperature or |
|
|
|
in refrigerator. |
||||
|
|
|
|
|
||
|
|
|
|
|
|
|
Butter |
|
|
In original wrapping |
6 |
In refrigerator. |
|
|
|
or tinfoil |
||||
|
|
|
|
|
||
|
|
|
|
|
|
|
Boiled Food or |
|
|
Plastic or Glass |
3 / 6 |
At room temperature or |
|
Vegetable Soup |
|
|
Containers |
in hot water. |
||
|
|
|
||||
|
|
|
|
|
|
|
Eggs |
|
|
Freeze without shells |
10 |
At room temperature or |
|
|
|
in small containers |
in refrigerator. |
|||
|
|
|
|
|||
|
|
|
|
|
|
7 |
GB |
Tips on Saving Energy
- Install the Appliance Properly
In other words, away from sources of heat and direct sunlight, in a well ventilated room complying with the minimum distances indicated in the paragraph entitled, “ Installation/Ventilation.”.
THE ACTUAL ENERGY CONSUMPTION OF THE APPLIANCE DEPENDS ON THE WAY THE SAME IS USED AND ON ITS LOCATION.
The consumption tests were performed in 560mm deep column units, the most common installation setting for this appliance.
- Use the Right Temperature Setting
A setting which is too cold increases energy consumption.
- Do not Overfill
To conserve food properly, the cold air must circulate freely within the refrigerator. If it is overfilled, this will prevent proper air circulation, forcing the compressor to work continuously.
- Close the Doors
Open your refrigerator as little as possible because each time you do so you loose much of the cold air. To raise the temperature to the proper level again, the motor must work for a long time, consuming energy.
- Keep an Eye on the Seals
Keep the seals clean and make sure that they adhere well to the door. This alone will ensure that no cold air escapes.
- No Hot Foods
A hot pot or pan placed in the refrigerator immediately raises the temperature several degrees. Let hot cookware and food cool to ambient temperature before placing them in the refrigerator.
- Defrost the Freezer
Check the thickness of the frost on the walls of the freezer and immediately defrost it if the layer of frost is too thick. (see the section entitled, “Keeping your Appliance in Shape”).
Keeping Your Appliance in Shape
Before doing any cleaning, disconnect the appliance from the electricity (by pulling out the plug or turning off the general switch in your home).
Defrosting
WARNING: do not damage the refrigeration circuit. Do not use mechanical devices or other tools to speed up the defrosting process, unless they have been recommended by the manufacturer.
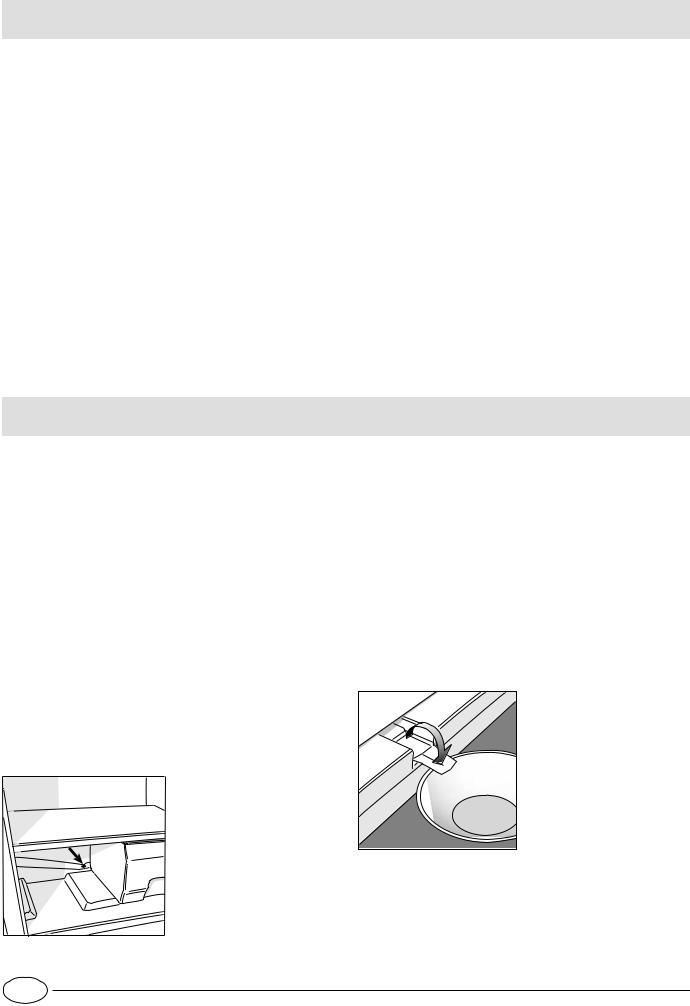
How to Defrost the Refrigerator
This appliance defrosts automatically and the water is channeled to the back toward the drain installed for this purpose (fig. 5). Here, the heat produced by the compressor will make it evaporate. The only thing you must do is to periodically check and clean the hole of the drain, which is located behind the vegetable crispers, so that the water drains properly.
How to Defrost the Freezer
-Every so often, remove the frost with the scraper provided with the appliance (do not use knives or metal objects).
-If the frost is more than 15 mm thick, the freezer must be defrosted.
Proceed as follows: turn the thermostat knob "A" to the ·
setting " ". Then wrap all the frozen and fast-frozen food in newspaper, placing it either in the refrigerator or in a cool place. Leave the freezer door open so that the frost thaws completely. You can speed this process by placing containers of warm water in the compartment.
The unit is provided with a system which allows the defrost water to be collected in a container to be placed beneath the unit (proceed as illustrated in fig. 6).
Fig. 6
Fig. 5
GB |
8 |
Cleaning and Special Maintenance
Before cleaning the refrigerator, disconnect it from the electrical mains (by removing the plug from the socket or by turning off the main electricity switch for the apartment or house).
-The materials used to build your appliance are hygienic and do not transmit odors. However, to preserve this quality of your appliance, the food stored in it must be well closed and covered to prevent spills which could stain it and cause unpleasant odors.
-Only water and baking soda. To clean both the interior and exterior, use a sponge with warm water and baking soda, which is, among other things, a good disinfectant. If you do not have any in the house, you can use a neutral soap.
-What not to use. Never use abrasives, bleach or ammonia. Solvents and similar products are strictly prohibited.
-All the removable part should be taken out and allowed to soak in hot water and dishwashing soap. Rinse and dry them well before putting them back in the refrigerator.
-When the appliance is not used for a long time. If you decide not to use the appliance (during the summer), it must cleaned and the doors left open to prevent the formation of mold and unpleasant odors.
-Replacing the light bulb. The bulb for lighting the interior of the appliance is located at the back of the thermostat box. Unscrew the burnt bulb and replace it with another bulb of no more than 15 Watt, follow the instructions illustrated in fig. 7.
Fig. 7
9 |
GB |
Is There a Problem?
The refrigerator does not function.
Have you checked whether:
•The main switch for the electricity to the apartment or home has been turned off;
•The plug is properly inserted in the outlet;
•The outlet is adequate; try inserting the plug into another outlet in the room.
The refrigerator and the freezer do not cool properly.
Have you checked whether:
•The doors do not close well or the seals are faulty;
•The doors are left open too long;
•The thermostat knob is not on the proper setting;
•The refrigerator or freezer is overfilled.
The food in the refrigerator becomes too cold.
Have you checked whether:
•The thermostat knob is on the proper setting;
•The food is in contact with the back wall - which is the coldest part.
The motor runs continuously.
Have you checked whether
•The doors are not closed well or have remained open too long;
•The ambient temperature is too high;
•The thermostat knob is not on the proper setting.
The appliance makes too much noise.
The gas refrigerant produces a slight noise even when the compressor is not running (this is not a defect).
Have you checked whether:
•The refrigerator is level.
•The appliance was installed between cabinets or objects that vibrate and make noise.
There is water on the bottom of the refrigerator.
Have you checked whether:
• The hole for draining the water from the frost is clogged (see fig. 5).
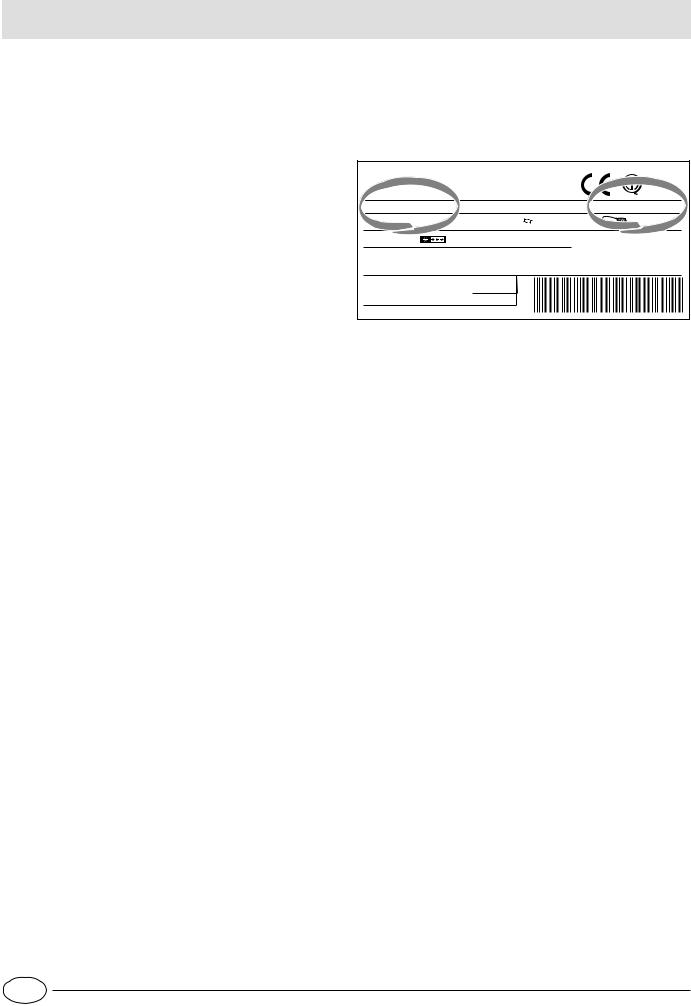
If after all the checks, the appliance still does not operate or the problem persists, call the nearest Service Centre and inform them of: the type of problem, the abbreviation of the model name (Mod.) and the relative numbers (S/N) written on the rating plate located at the bottom left next to the vegetable crisper (see examples in the figure below).
Mod. RG 2330 |
|
|
|
|
|
TI |
|
Cod. 93139180000 |
|
||||||||||||||
|
|
|
|
|
|
|
|
|
|
|
|
|
|
|
|
|
|
|
|
|
|
|
|
220 - 240 V- |
|
50 Hz |
|
150 W |
|
|
|
|
|
W |
Fuse |
|
|
|
|||||||||
|
|
|
|
|
|
|
|
|
|||||||||||||||
|
|
|
|
|
|
|
|
|
|
||||||||||||||
|
|
|
|
|
|
|
|
|
|
|
|
|
|
|
|
|
|
|
|
|
|
|
|
Total |
340 |
|
|
|
|
75 |
Net |
|
|
|
|
|
|
|
|
|
Freez |
Clase N |
|||||
|
|
|
|
|
|
|
|
|
|
|
|
|
|||||||||||
Gross |
|
|
|
Gross |
|
|
|
|
|
Gross |
|
Poder de Cong |
|||||||||||
Bruto |
|
|
|
Bruto |
|
Util |
|
|
|
Bruto |
|
kg/24 h 4,0 |
Classe |
||||||||||
Brut |
|
|
|
Brut |
|
|
|
|
Utile |
|
|
|
Brut |
|
|||||||||
|
|
|
|
|
|
|
|
|
|
||||||||||||||
Compr. |
|
R 134 a |
|
|
Test |
Pressure |
|
|
|
|
|
|
|
|
|
||||||||
Syst. |
|
|
|
|
|
|
|
|
|
HIGH-235 |
|
|
|
|
|
|
|
|
|
||||
Kompr. |
|
kg 0,090 |
|
|
P.S-I. LOW 140 |
|
|
|
|
|
|
|
|
|
|||||||||
Made in Italy 13918
Never call on unauthorized technicians and always refuse spare parts which are not originals.
GB |
10 |

Die Sicherheit - Eine gute Gewohnheit und unsere Verpflichtung
ACHTUNG
Lesen Sie bitte vor Inbetriebnahme aufmerksam die nachstehenden Sicherheitshinweise dieser Anleitung. Sie enthalten wichtige Angaben über die Sicherheit bei der Installation, Benutzung und Instandhaltung des Gerätes.
Dieses Gerät wurde gemäß der internationalen Sicherheitsregelung zum Schutz des Verbrauchers konstruiert. Das Gerät weist das IMQ Qualitätszeichen auf, ausgegeben vom Istituto Italiano di Qualità (Ital. Institut zur Qualitätsüberprüfung). Dieses Zeichen wird nur den Geräten zuteil, die den Normen des CEI, Comitato Elettrotecnico Italiano (Elektrotechn. Komitat Italiens ) entsprechen.
Dieses Gerät eignet sich zum Kühlen und Gefrieren von Lebensmitteln und zur Eisbereitung.
Es ist für die Verwendung im privaten Haushalt bestimmt. Bei Einsatz im gewerblichen Bereich sind die für das Gewerbe gültigen Bestimmungen zu beachten.
1.Sollte das Gerät wider Erwarten auf dem Transport zu Ihnen beschädigt worden sein, nehmen Sie es nicht in Betrieb ohne zuvor Rücksprache mit Ihrem Lieferanten gehalten zu haben.
2.Es darf nur von Erwachsenen benutzt werden und ausschließlich zur Konservierung und zum Einfrieren von Speisen unter Beachtung der hier aufgeführten Anleitung.
3.Berühren oder bedienen Sie niemals das Gerät mit nassen Händen oder barfuß, wenn Sie auf feuchtem oder nassem Bodenbelag stehen.
4.Wir raten vom Einsatz von Mehrfachsteckern, Adaptersteckern oder Verlängerungen ab.
5.Trennen Sie das Gerät bei Störungen, Wartung und Reinigung vom Stromnetz, oder schalten Sie die entsprechende Sicherung aus. Ziehen Sie bitte bei Entfernen des Netzkabels nie am Kabel, sondern bitte immer am Netzstecker.
6.Reinigen Sie das Gerät niemals, oder nehmen Sie keine Instandhaltungsarbeiten vor, ohne vorher den Stecker gezogen zu haben; es genügt nicht, die beiden Temperatur-
Reglerknöpfe auf " " gestellt zu haben, um jeglichen elektrischen Kontakt zu unterbrechen.
7.Berühren Sie nicht die inneren Kühlteile, besonders nicht mit nassen Händen; Sie könnten sich verbrennen oder verletzen. Nehmen Sie niemals frisch entnommene Eiswürfel oder gefrorenes Speiseeis in den Mund, Sie könnten sich durch die sehr starken Temperaturunterschiede verbrennen.
8.Vor der Entsorgung Ihres alten Kühlschranks entfernen Sie das Schloß, soweit vorhanden, um zu verhindern, daß spielende Kinder eingesperrt werden könnten.
9.Reparaturen an Elektrogeräten dürfen nur von Fachkräften ausgeführt werden. Durch unsachgemäße Reparaturen können erhebliche Gefahren für den Benutzer entstehen.
10.Lagern Sie hochprozentigen Alkohol nur dicht verschlossen und stehend, durch austretende Alkoholdämpfe kann Explosionsgefahr bestehen.
11.Vermeiden Sie Beschädigungen an Teilen des Kältemittelkreislaufes, zum Beispiel durch Aufstechen von Kältemittelkanälen mit scharfen Gegenständen usw.
12.Lagern Sie keine Flüssigkeiten in Flaschen oder Dosen, insbesondere mit kohlensäurehaltigen Flüssigkeiten, im Gefrierteil des Gerätes. Ihr Gerät könnte durch platzende Gebinde beschädigt werden.
13.Sollte Ihr Gerät nicht funktionieren oder einen Defekt aufweisen, lesen Sie zuerst das Kapitel “Gibt's ein Problem?”, bevor Sie den technischen Service anrufen; eventuell kann der Fehler so behoben werden. Versuchen Sie nicht, in das Innere der Kombination zu gelangen, um den Defekt zu reparieren.
14.Im Falle einer Beschädigung des Gerätespeisekabels muß dieses zwangsläufig durch unseren Kundendienst ausgewechselt werden, da hierzu Spezialwerkzeuge benötigt werden.
15.Bitte verwenden Sie im Innern des Lagerfachs für Speisen keine Elektrogeräte, die nicht ausdrücklichst von der Herstellerfirma empfohlen wurden.
16.Vor der Entsorgung eines Altgerätes - das ZyklopentaneGas im Isolierschaum, und eventuell R600a - Gas (Isobutan) im Kühlkreis enthält - muss dieses sichergestellt werden, bevor es der Entsorgung zugeführt wird.
Wenden Sie sich hierzu an Ihren Händler oder an die zuständige kommunale Entsorgungsstelle.
Entsorgung Ihres Altgerätes sowie der Verpackung des Neugerätes.
Ältere Kühlund Gefriergeräte enthalten im Kältekreis und in der Isolation Fluorchlorkohlenwasserstoffe (FCKW). Dieses
FCKW kann, wenn es freigesetzt wird, die Ozonschicht der Atmosphäre schädigen.
Nehmen Sie deshalb zum Entsorgen des Altgerätes Ihre zuständige kommunale Entsorgungsstelle in Anspruch. Achten Sie bitte darauf, daß die Rohrleitungen Ihres Kältegerätes bis zum Abtransport zu einer sachgerechten und umweltfreundlichen Entsorgung nicht beschädigt werden.
In der Bundesrepublik Deutschland können Sie die Verpackung Ihres Neugerätes zur weiteren stofflichen Verwendung Ihrem Händler zurückgeben.
11 |
D |

Installationshinweise
Um eine optimale und langfristige Funktion sowie einen möglichst geringen Stromverbrauch zu erzielen, ist es wichtig, das Gerät korrekt zu installieren.
Die Beund Entlüftung
Der Kompressor sowie der Kondensator strahlen Wärme aus, weshalb sich eine gute Lüftung als notwendig erweist. Das Gerät muß deshalb in einem trockenen Raum aufgestellt werden, in dem eine Öffnung (Fenster oder Balkontür) für den nötigen Luftaustausch sorgt. Achten Sie bitte bei der Installation darauf, die Luftgitter, die eine gute Belüftung des Gerätes ermöglichen, zu verdecken oder zu verstopfen.
Von Hitzequellen fernhalten
Installieren Sie das Gerät in einem Abstand von mind. 60 cm zu Öfen, Boilern, Wärmespendern, Backherden und Kaminen, sowie auch anderen Kühlgeräten und mind. 3cm zur nächsten Wand.
Eben aufstellen
Der Boden muß eben sein; wenn das nicht der Fall ist, können Sie die Lage des Gerätes mit den verstellbaren Vorderfüßen eben regulieren. Sollten Sie sich nicht sicher sein, daß das Gerät gerade steht, oder sollte das Gerät mit einer starken Lärmentwicklung arbeiten, kontrollieren Sie den Stand mit einer Wasserwaage.
Die Erdung
Vor dem Stromanschluß kontrollieren Sie bitte, ob die Voltangaben auf dem Schild links neben dem Gemüsefach den Stromdaten Ihrer Wohnung entsprechen, und ob die Steckdose eine reguläre Erdung aufweist. Fehlt diese Erdung, lehnt der Hersteller jegliche Verantwortung und Gewährleistung ab.
Benutzen Sie keine Mehrfachstecker, Adapterstecker oder Verlängerungen.
Ist die Stromleistung ausreichend?
Die Steckdose muß die Höchststromleistung des Gerätes aufnehmen können, die auf dem Schild unten links neben dem Gemüsefach angegeben ist, bzw. auch entsprechend abgesichert sein.
Vor dem Stromanschluß
Warten Sie mind. 3 Stunden, bevor Sie das Gerät an den Stromkreis anschließen; so garantieren Sie ein einwandfreies Funktionieren.
D |
12 |
 Loading...