

Instructions for use
WASHING MACHINE
GB
English,1
NL
Nederlands,37
AVSF 129
FR
Français,13
RO
Românã,49
DE
,AKJI?D,25
HU
Magyar,61
Contents
GB
Installation, 2-3
Unpacking and levelling, 2
Electric and water connections, 2-3
The first wash cycle, 3
Technical details, 3
Washing machine description, 4-5
Control panel, 4
Display, 5
Starting and Programmes, 6
Briefly: how to start a programme, 6
Programme table, 6
Personalisations, 7
Setting the spin cycle, 7
Setting the temperature, 7
Setting the delay Timer, 7
Functions, 7
Detergents and laundry, 8
Detergent dispenser, 8
Preparing your laundry, 8
Special items, 8
Woolmark Platinum Care, 8
Precautions and advice, 9
General safety, 9
Disposal, 9
Saving energy and respecting the environment, 9
Care and maintenance, 10
Cutting off the water or electricity supply, 10
Cleaning your appliance, 10
Cleaning the detergent dispenser, 10
Caring for your appliance door and drum, 10
Cleaning the pump, 10
Checking the water inlet hose, 10
Troubleshooting, 11
Service, 12
Before calling for Assistance, 12
1
Installation
GB
Keep this instruction manual in a safe place for
future reference. Should the appliance be sold,
transferred or moved, make sure the instruction
manual accompanies the washing machine to inform
the new owner as to its operation and features.
Read these instructions carefully: they contain vital
information on installation, use and safety.
Unpacking and levelling
Unpacking
1. Unpack the washing machine.
2. Check whether the washing machine has been
damaged during transport. If this is the case, do not
install it and contact your retailer.
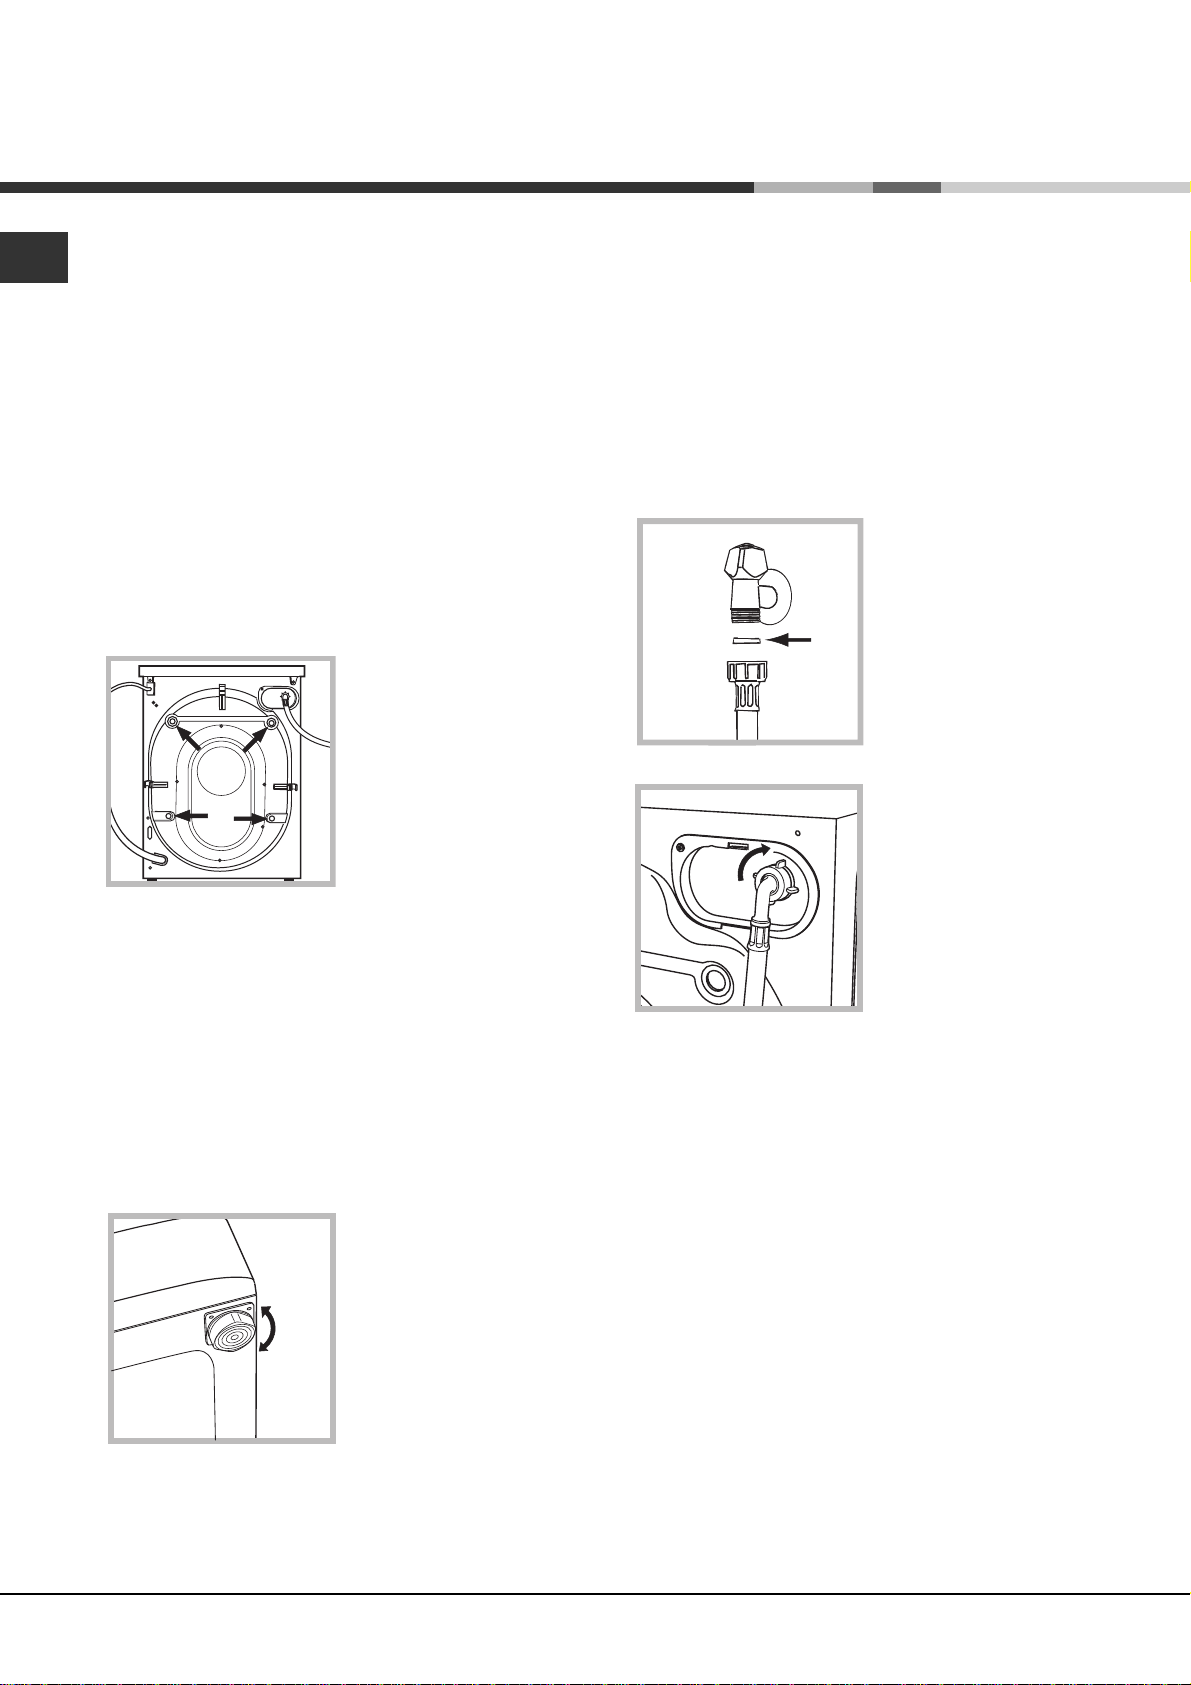
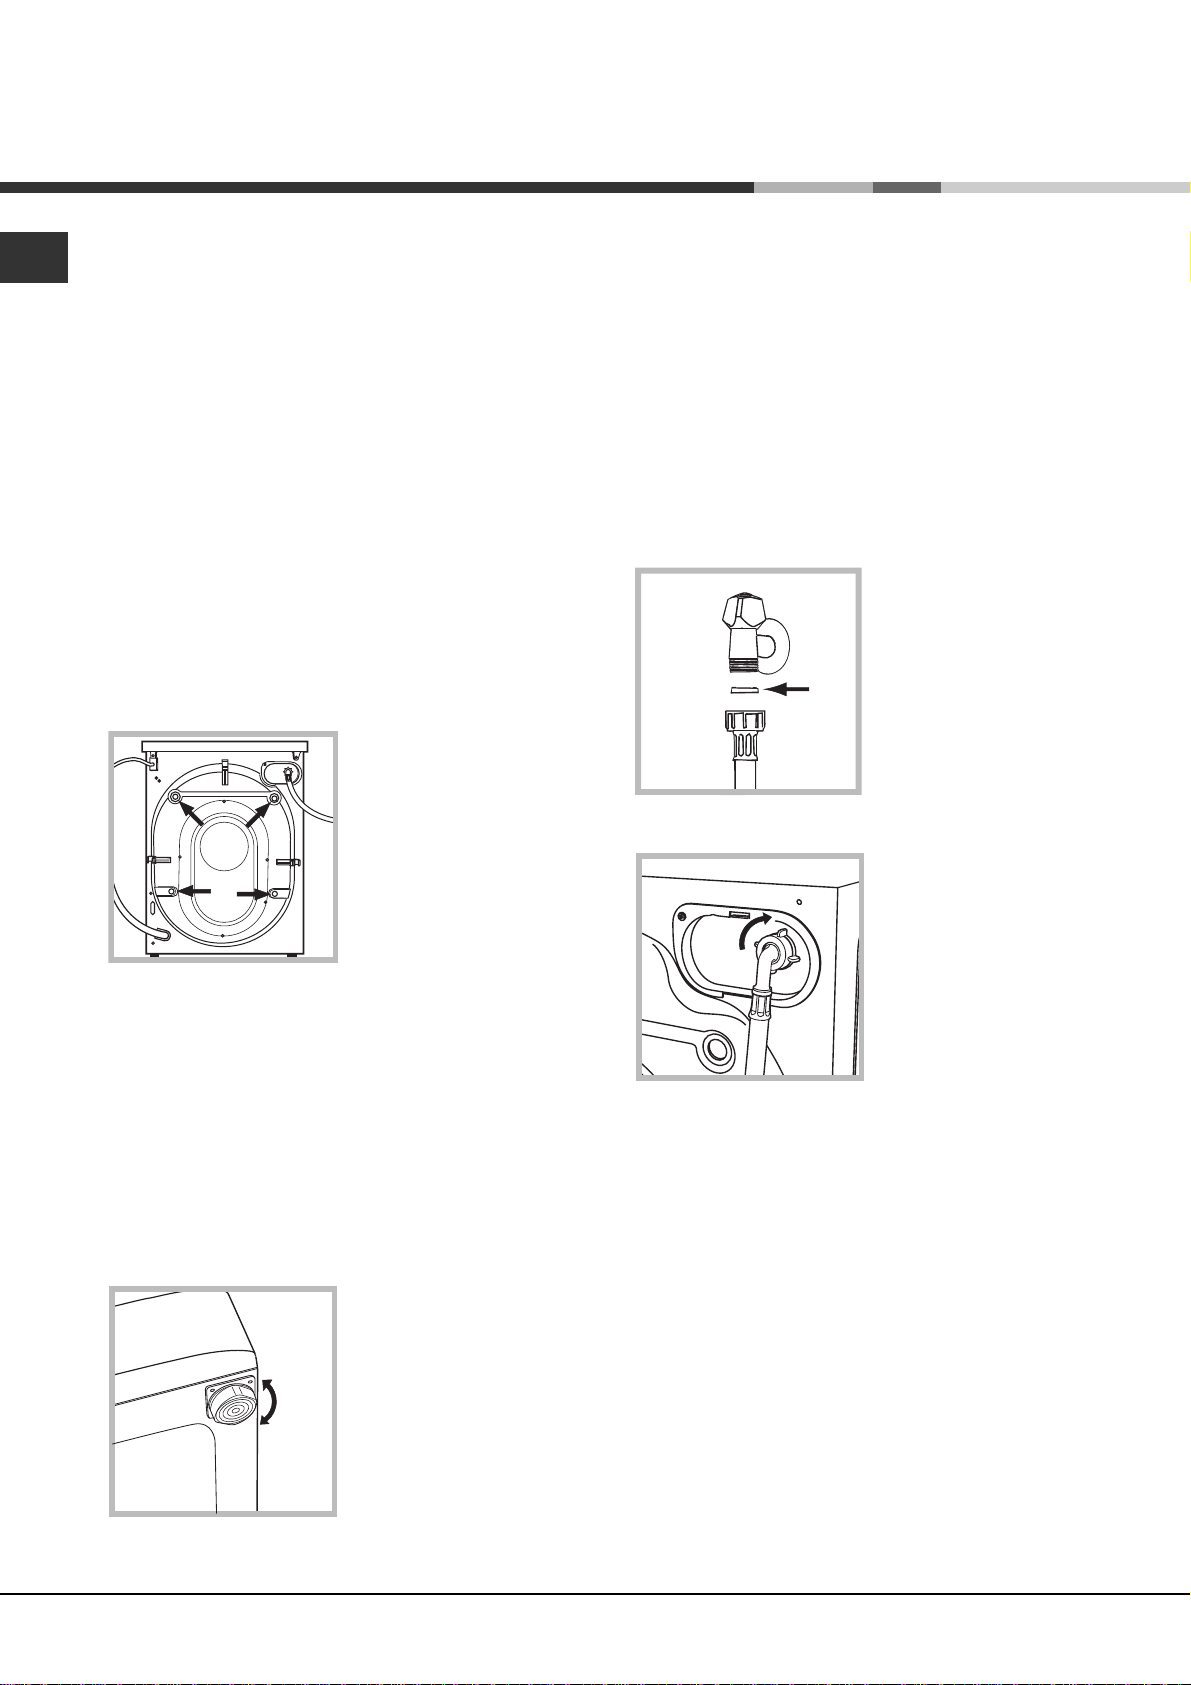
3. Remove the four
protective screws and
the rubber washer with
the respective spacer,
situated on the rear of
the appliance (see
figure).
4. Seal the gaps using the plastic plugs provided.
5. Keep all the parts: you will need them again if the
washing machine needs to be moved to another
location.
Levelling your appliance correctly will provide it with
stability and avoid any vibrations, noise and shifting
during operation. If it is placed on a fitted or loose
carpet, adjust the feet in such a way as to allow
enough room for ventilation beneath the washing
machine.
Electric and water connections
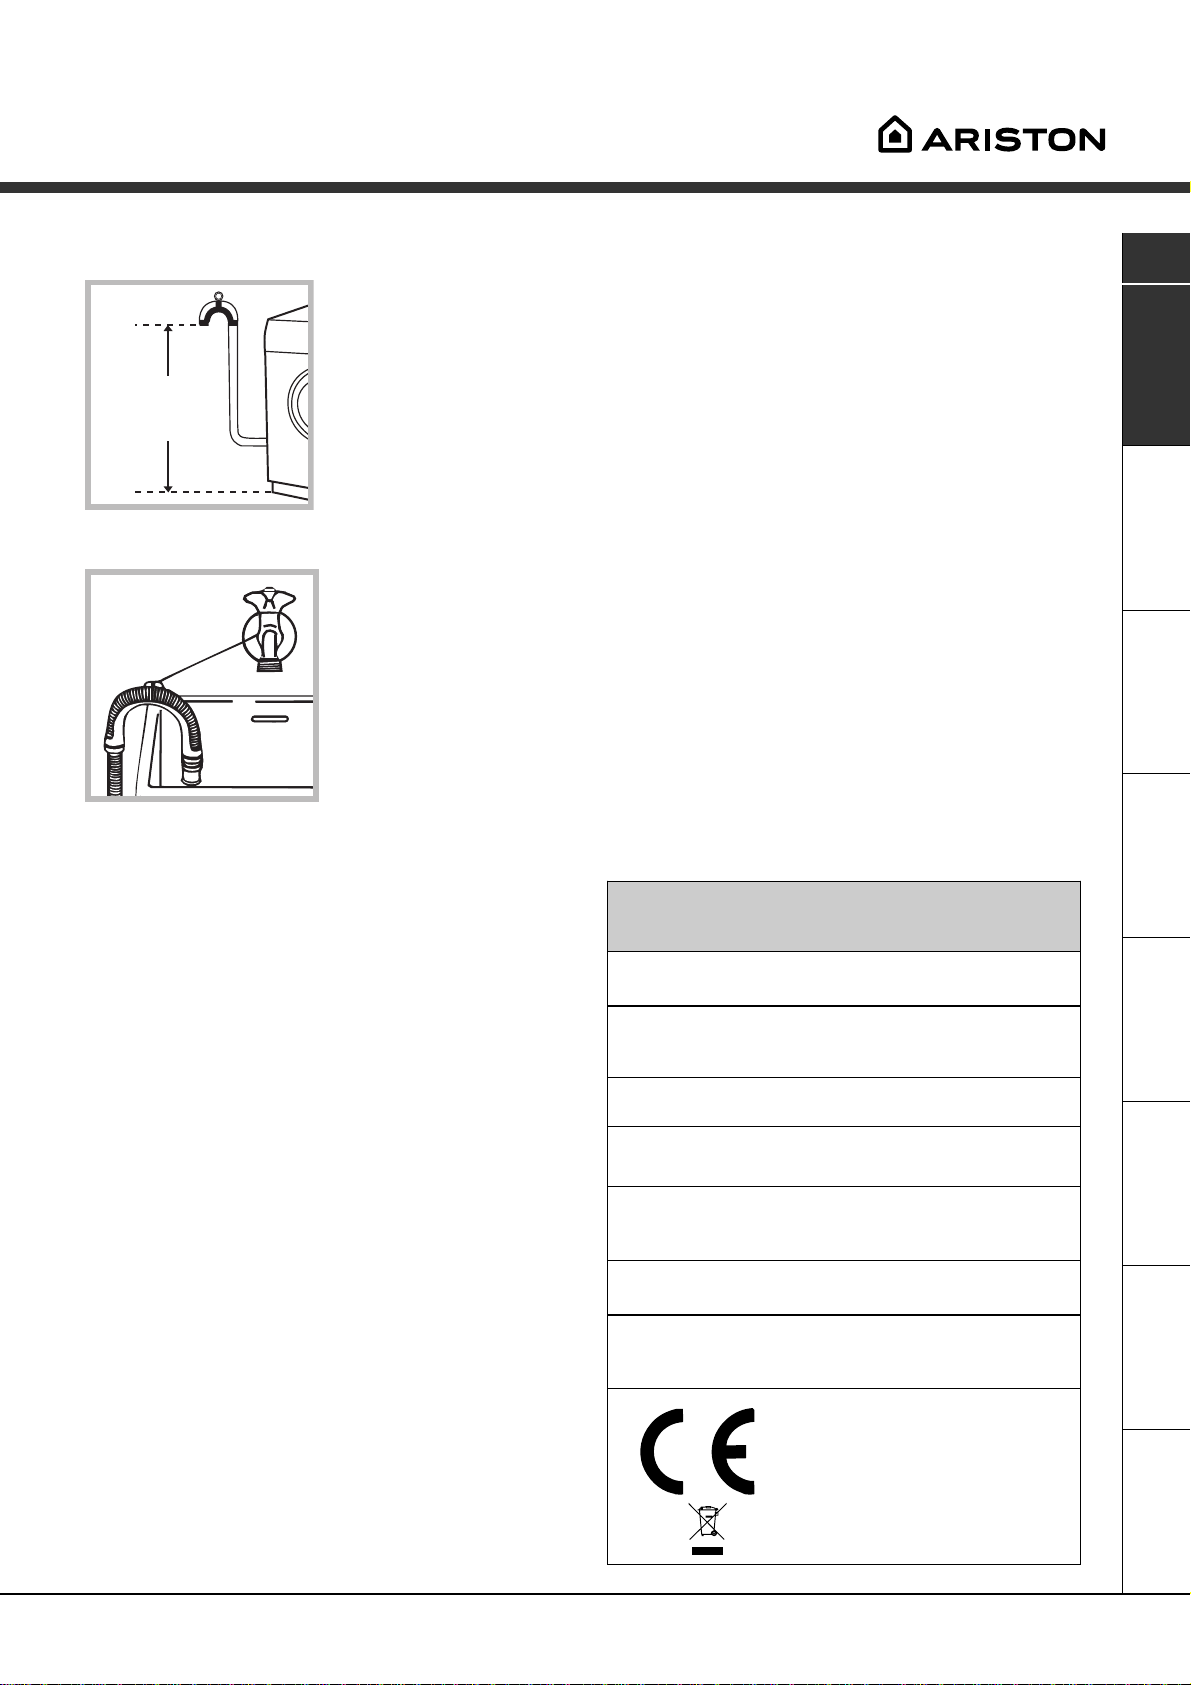
Connecting the water inlet hose
1. Insert seal A into the
end of the inlet hose
and screw the latter
onto a cold water tap
A
with a 3/4 gas threaded
mouth (see figure).
Before making the
connection, allow the
water to run freely until
it is perfectly clear.
2. Connect the other end
of the water inlet hose to
the washing machine,
screwing it onto the
appliance's cold water
inlet, situated on the top
right-hand side on the
rear of the appliance
(see figure).
Packaging materials are not children's toys.
Levelling
1. Install the washing machine on a flat sturdy floor,
without resting it up against walls, furniture cabinets
or other.
2. If the floor is not
perfectly level, compensate for any unevenness
by tightening or
loosening the adjustable
front feet (see figure);
the angle of inclination,
measured according to
the worktop, must not
exceed 2°.
2
3. Make sure there are no kinks or bends in the
hose.
The water pressure at the tap must be within the
values indicated in the Technical details table
(on the next page).
If the water inlet hose is not long enough, contact
a specialist store or an authorised serviceman.
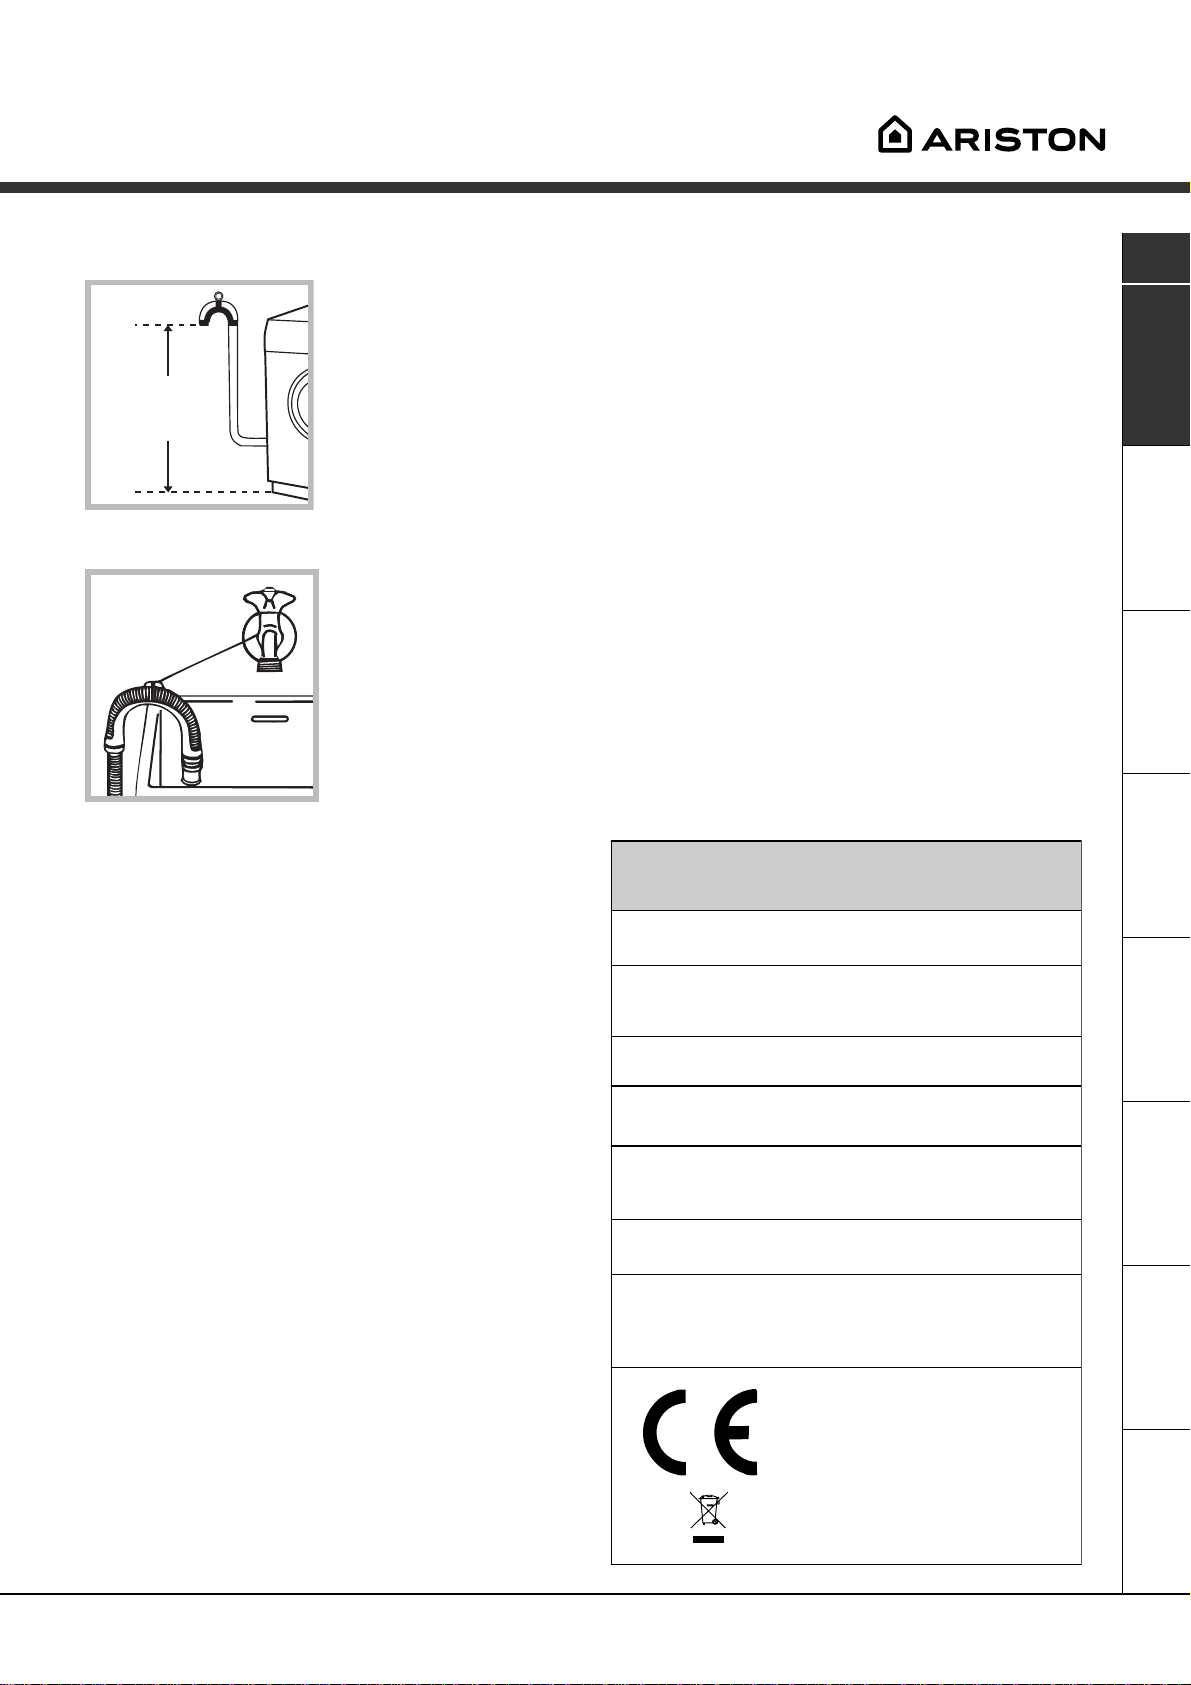
Connecting the drain hose
65 - 100 cm
Connect the drain hose,
without bending it, to a
draining duct or a wall
drain situated between
65 and 100 cm from the
floor;
Do not use extensions or multiple sockets.
GB
The power supply cable must never be bent or
dangerously compressed.
The power supply cable must only be replaced by
an authorised serviceman.
Warning! The company denies all liability if and when
these norms are not respected.
The first wash cycle
alternatively, place it
over the edge of a
basin, sink or tub,
fastening the duct
supplied to the tap (see
figure). The free end of
the hose should not be
underwater.
We advise against the use of hose extensions; in
case of absolute need, the extension must have the
same diameter as the original hose and must not
exceed 150 cm in length.
Electric connection
Before plugging the appliance into the mains socket,
make sure that:
the socket is earthed and in compliance with the
applicable law;
the socket is able to sustain the appliance's
maximum power load indicated in the Technical
details table (on the right);
the supply voltage is included within the values i
ndicated on the Technical details table
(on the right);
the socket is compatible with the washing
machine's plug. If this is not the case, replace the
socket or the plug.
The washing machine should not be installed in an
outdoor environment, not even when the area is
sheltered, because it may be very dangerous to
leave it exposed to rain and thunderstorms.
When the washing machine is installed, the mains
socket must be within easy reach.
Once the appliance has been installed, and before
you use it for the first time, run a wash cycle with
detergent and no laundry, setting the 90°C
programme without a pre-wash cycle.
Technical details
Model
Dimensions
Capacity
Electric
connections
Wat er
connections
Spin speed
Control
programmes
according to
IEC456 directive
AVSF 12 9
59.5 cm wide
85 cm high
40 cm deep
from 1 to 4,5 kg
voltage 220/230 Volts 50 Hz
maximum absorbed power 1850 W
maximum pressure 1 MPa (10 bar)
minimum pressure 0.05 MPa (0.5 bar)
drum capacity 40 litres
up to 1200 rpm
programme 3; temperature 60°C;
run with a load of 4,5 kg.
This appliance is compliant with the
following European Community
Directives:
- 73/23/CEE of 19/02/73 (Low
Voltage) and subsequent amendments
- 89/336/CEE of 03/05/89
(Electromagnetic Compatibility) and
subsequent amendments
- 2002/96/CE
ServiceTroubleshootingPrecautions CareProgrammes DetergentsInstallation Description
3

GB
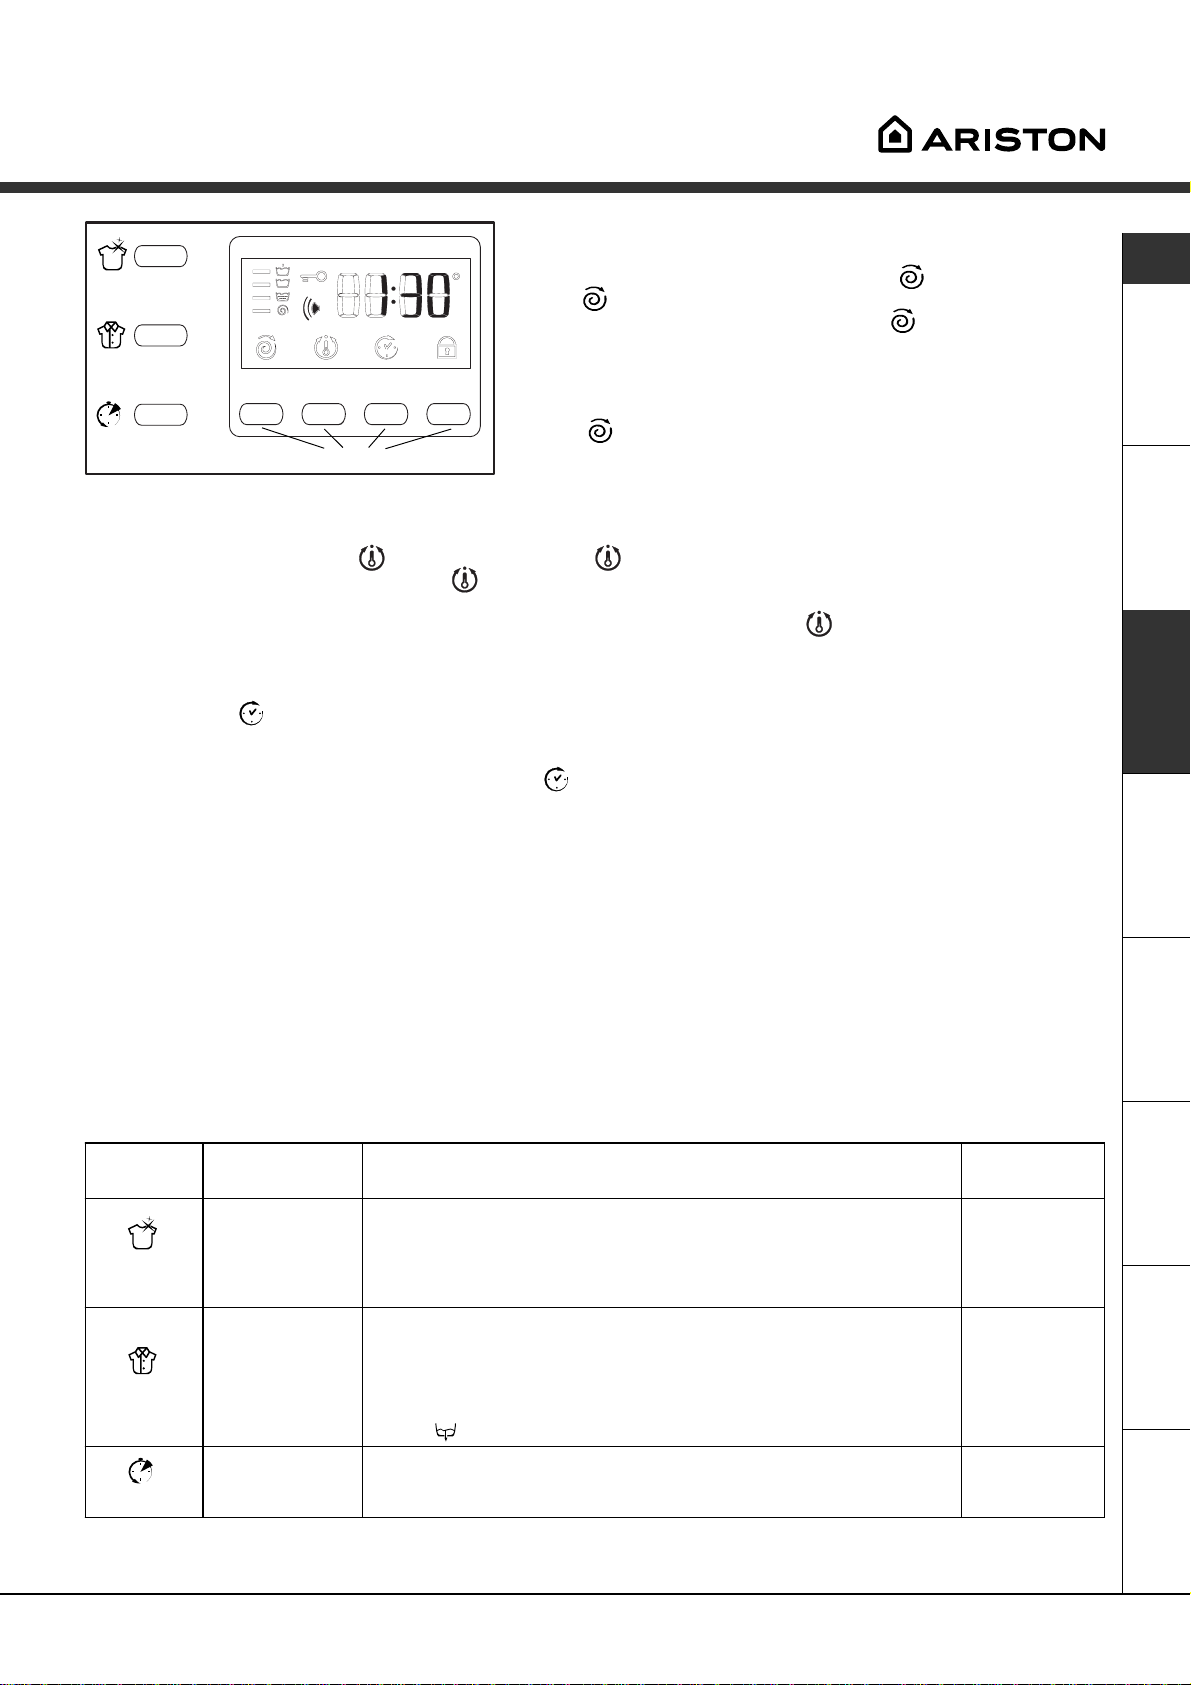
Washing machine description
Control panel
Programme key
Detergent dispenser
Detergent dispenser to add detergent and fabric
softener (see page 8).
Programme key to consult a straightforward chart
of the different programmes available: pull the grey
tab outwards to open it.
SPIN
FUNCTION
buttons
Display
TEMPERATURE
DELAY TIMER
KEYBOARD LOCK key. To lock all the keys on the
washing machine during operation or during Stand-by
mode.
Display to programme the washing machine and
follow the wash cycle progress (see opposite page).
KEYBOARD
LOCK
START/STOP
button
Control knob
START/RESET
button
FUNCTION buttons to select the functions
available. The button corresponding to the function
selected will remain on.
SPIN button to adjust the spin speed or exclude it
altogether (see page 7).
TEMPERATURE button to adjust the wash tempe-
rature (see page 7).
DELAY TIMER button to delay the start of the set
programme for a maximum period of 24 hours
(see page 7).
START/STOP button to turn the washing machine
on and off (see page 6).
START/RESET button to start the programmes or
cancel any incorrect settings (see page 6).
Control knob to select the wash programmes. The
retractable control knob: press the centre of the
knob for it to pop out. The knob stays still during the
cycle.
4

Display
In addition to being a practical tool to programme your appliance (see page 7), the display provides useful
information concerning the wash cycle and status.
Once you have pressed the START/RESET button to
start the programme, the display will indicate the
amount of time left until the end of the wash cycle. If
a delayed start has been set (using the Delay Timer,
see page 7), the delay time will be indicated on the
display.
The following information is displayed during the
wash cycle:
Cycle phase under way:
Pre-wash
Wash cycle
Rinse
Spin cycle
GB
Customised functions and options:
To select functions and options, see below and on
page 7.
Buzzer:
Your washing machine comes with a buzzer, which
will inform you of the various functions being carried
out, or of any malfunctions: incompatibility, option/
programme keys, start, end of cycle, reset.
Keyboard lock:
For your safety and that of your children, you can block all the keys during the machine's operation or during
waiting position (delayed start - Stand-by) by pressing the function key for 2 seconds.
To disable this function, hold the same button down for 4 seconds.
Door lock:
If the symbol is on, the washing machine door is locked to prevent it from being opened accidentally. To avoid
any damages, wait for the symbol to switch itself off before you open the appliance door.
This model is fitted with a device that allows you to open the appliance door during some of the programme
phases. This is possible when the symbol is not on.
At the end of the programme, the word END is displayed.
In the event of an anomaly, an error code will appear, such as: F-01, which should be communicated to the
Service Centre (see page 12).
ServiceTroubleshootingPrecautions CareProgrammes DetergentsInstallation Description
5
Starting and Programmes
GB
Briefly: starting a programme
1. Turn the washing machine on by pressing button .
All the icons will light up for a few seconds and
then go off.
2. Load your laundry into the washing machine and
shut the appliance door.
3. Set the knob to the desired programme. The
estimated duration of the selected programme is
displayed. The temperature and spin speed are
automatically set according to the programme
(to change them, see page 7).
4. Add the detergent and any fabric softener
(see page 8).
5. Select any function (see page 7).
6. Start he programme by pressing the START/RESET
button.
To cancel it, keep the START/RESET button
pressed for at least 2 seconds.
7. When the programme has ended, the word END is
displayed. Take out your laundry and leave the
appliance door ajar to allow the drum to dry
thoroughly.
8. Turn the washing machine off by pressing button
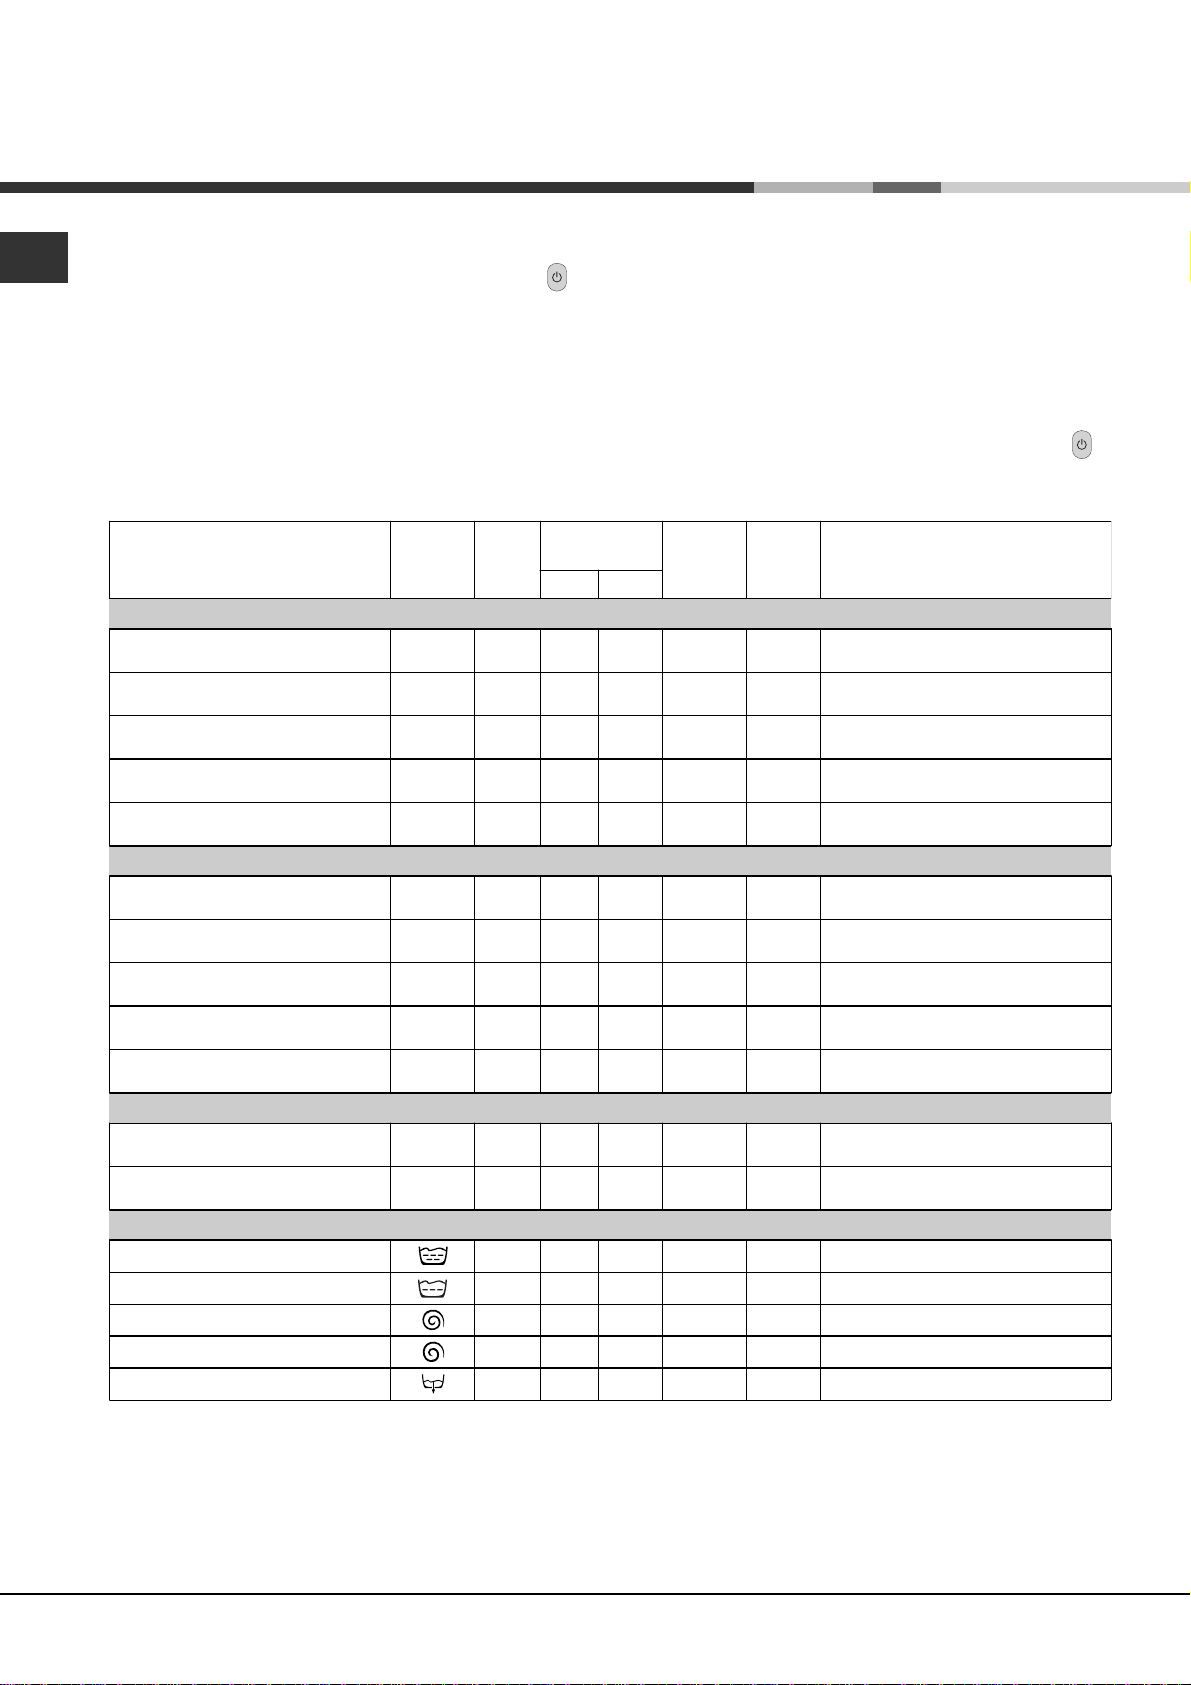
Programme table
Type of fabric and degree of soil
Programmes
Wash
temp .
Detergent
Pre-
wash
Wash
Fabric
softener
Cotton
Extremely soiled whites
(sheets, tablecloths, etc.)
Extremely soiled whites
(sheets, tablecloths, etc.)
Heavily soiled whites and fast
colours
Slightly soiled whites and
delicate colours
(shirts, jumpers, etc.)
Slightly soiled delicate colours
1
2
3
4
5
90°C 160
90°C 143
60°C 120
40°C 85
30°C 77
Synthetics
Heavily soiled fast colours
(baby linen, etc.)
Fast colours (all types of slightly
soiled garments)
Heavily soiled fast colours
(baby linen, etc.)
Delicate colours (all types of
slightly soiled garments)
Delicate colours (all types of
slightly soiled garments)
6
6
7
8
9
60°C 92
40°C 77
50°C 86
40°C 76
30°C 30
Delicate
Wool
Very delicate fabrics
(curtains, silk, viscose, etc.)
PARTIAL PROGRAMMES
Rinse Rinse cycles and spin cycle
Delicate rinse cycle Rinse cycles, anti-crease or draining
Spin cycle Draining and heavy duty spin cycle
Delicate spin cycle Draining and delicate spin cycle
Draining Draining
10
11
40°C 42
30°C 52
Cycle
length
(minutes)
Description of wash cycle
Pre-wash, wash cycle, rinse cycles,
intermediate and final spin cycles
Wash cycle, rinse cycles, intermediate and
final spin cycles
Wash cycle, rinse cycles, intermediate and
final spin cycles
Wash cycle, rinse cycles, intermediate and
final spin cycles
Wash cycle, rinse cycles, intermediate and
final spin cycles
Wash cycle, rinse cycles, anti-crease or
delicate spin cycle
Wash cycle, rinse cycles, anti-crease or
delicate spin cycle
Wash cycle, rinse cycles, anti-crease or
delicate spin cycle
Wash cycle, rinse cycles, anti-crease or
delicate spin cycle
Wash cycle, rinse cycles and delicate spin
cycle
Wash cycle, rinse cycles and delicate spin
cycle
Wash cycle, rinse cycles, anti-crease or
draining cycle
.
Notes
For the anti-crease function: see Easy iron, opposite page. The information contained in the table is purely indicative.
Special programme
Daily 30' (programme 9 for Synthetics) is designed to wash lightly soiled garments in a short amount of time: it only
lasts 30 minutes and allows you to save on both time and energy. By setting this programme (9 at 30°C), you can
wash different fabrics together (except for woollen and silk items), with a maximum load of 3 kg.
We recommend the use of liquid detergent.
6
Personalisations
Setting the spin cycle
If, when the appliance is switched on, the KNOB is positioned
on a programme with a spin cycle, a fixed
Option buttons
button
programme set will be displayed, and the
Press it again and the values lower until they reach OFF, which
indicates that the spin cycle has been excluded (press it again
to go back to the maximum value); stop on the desired speed,
after approximately 2 seconds the setting is accepted: the
symbol
all the programmes except for 11 and the Draining cycle.
and the maximum spin speed allowed for the
remains fixed. The spin cycle setting is enabled with
Setting the temperature
If, when the appliance is switched on, the KNOB is positioned on a programme for which the temperature
needs to be regulated, a fixed
programme set will be displayed and the
reaches OFF, which indicates a cold wash cycle (press it again to go back to the maximum value); stop on the
desired value, after approximately 2 seconds the setting is accepted: the symbol
The temperature adjustment is enabled with all wash programmes.
appears. Press button and the maximum temperature allowed for the
icon flashes. Press it again and the temperature lowers until it
remains fixed.
appears. Press
icon flashes.
GB
Setting the delay Timer
Press the button and you will see the word OFF on the display, while the relative symbol flashes.
Press the button again and "1h" appears, that is, a delay of one hour (this can reach up to 24h); stop on the
"desired" delay; after approximately 2 seconds the setting is accepted, following which, the time for the set
programme appears on the display and the symbol
If you now press the START/RESET button, the set "delay" appears; this decreases every hour until the start of
the cycle. In this phase, the "delay" can only be modified by decreasing it.
The Delay Timer regulation is enabled with all programmes.
remains on.
Keyboard Lock (see page 5).
Functions
To enable a function:
1. press the button corresponding to the desired function, according to the table below;
2. the function is enabled when the corresponding button is illuminated.
Note: The rapid flashing of the button indicates that the corresponding function cannot be selected for the
programme set.
If you set a function that is incompatible with another function you selected previously, only the last one
selected will be enabled.
Function Effect Comments
Allows for an
impeccable wash,
Su per
wash
visibly whiter than
a standard
wash.
A
Class
This option is incompatible with the RAPID option.
Enabled with
programmes:
1, 2, 3, 4,
5, 6, 7, 8
Eas y iron
Ra pi d
This option
reduces the
amount of
creasing on
fabrics, making
them easier to
iron.
Cuts the duration
of the wash cycle
by 30%.
If you set this option, programmes 6, 7, 8, 11 and Delicate Rinse
will be suspended, leaving the laundry to soak (Anti-crease) and
EASY IRON button will flash:
- to conclude the cycle, press the START/RESET button or EASY
IRON button;
- to run the draining cycle alone, set the knob to the relative
symbol and press the START/RESET button.
This option is incompatible with the SUPER WASH option.
All
programmes
except for
1, 2, 9, 10,
Spin cycles
and Draining.
1, 2, 3, 4,
5, 6, 7, 8
7
ServiceTroubleshootingPrecautions CareProgrammes DetergentsInstallation Description
Detergents and laundry
GB
Detergent dispenser
Good washing results also depend on the correct
dose of detergent: adding too much detergent won't
necessarily make for a more efficient wash, and may
in fact cause build up on the interior of your
appliance and even pollute the environment.
Open up the detergent
dispenser and pour in
the detergent and fabric
softener, as follows.
1
3
compartment 1: Detergent for pre-wash
(powder)
compartment 2: Detergent for the wash cycle
(powder or liquid)
Liquid detergent should only be poured in
immediately prior to the wash cycle start.
compartment 3: Additives (fabric softeners, etc.)
The fabric softener should not overflow from the grid.
Do not use hand wash detergent because it may
form too much foam.
2
Special items
Curtains: fold curtains and place them in a pillow
case or mesh bag. Wash them separately without
exceeding half the appliance load. Use programme
11 which excludes the spin cycle automatically.
Quilted coats and windbreakers: if they are
padded with goose or duck down, they can be
machine-washed. Turn the garments inside out and
load a maximum of 2-3 kg, repeating the rinse cycle
once or twice and using the delicate spin cycle.
Trainers: remove any mud. They can be washed
together with jeans and other tough garments, but
not with whites.
Wool: for best results, use a specific detergent,
taking care not to exceed a load of 1 kg.
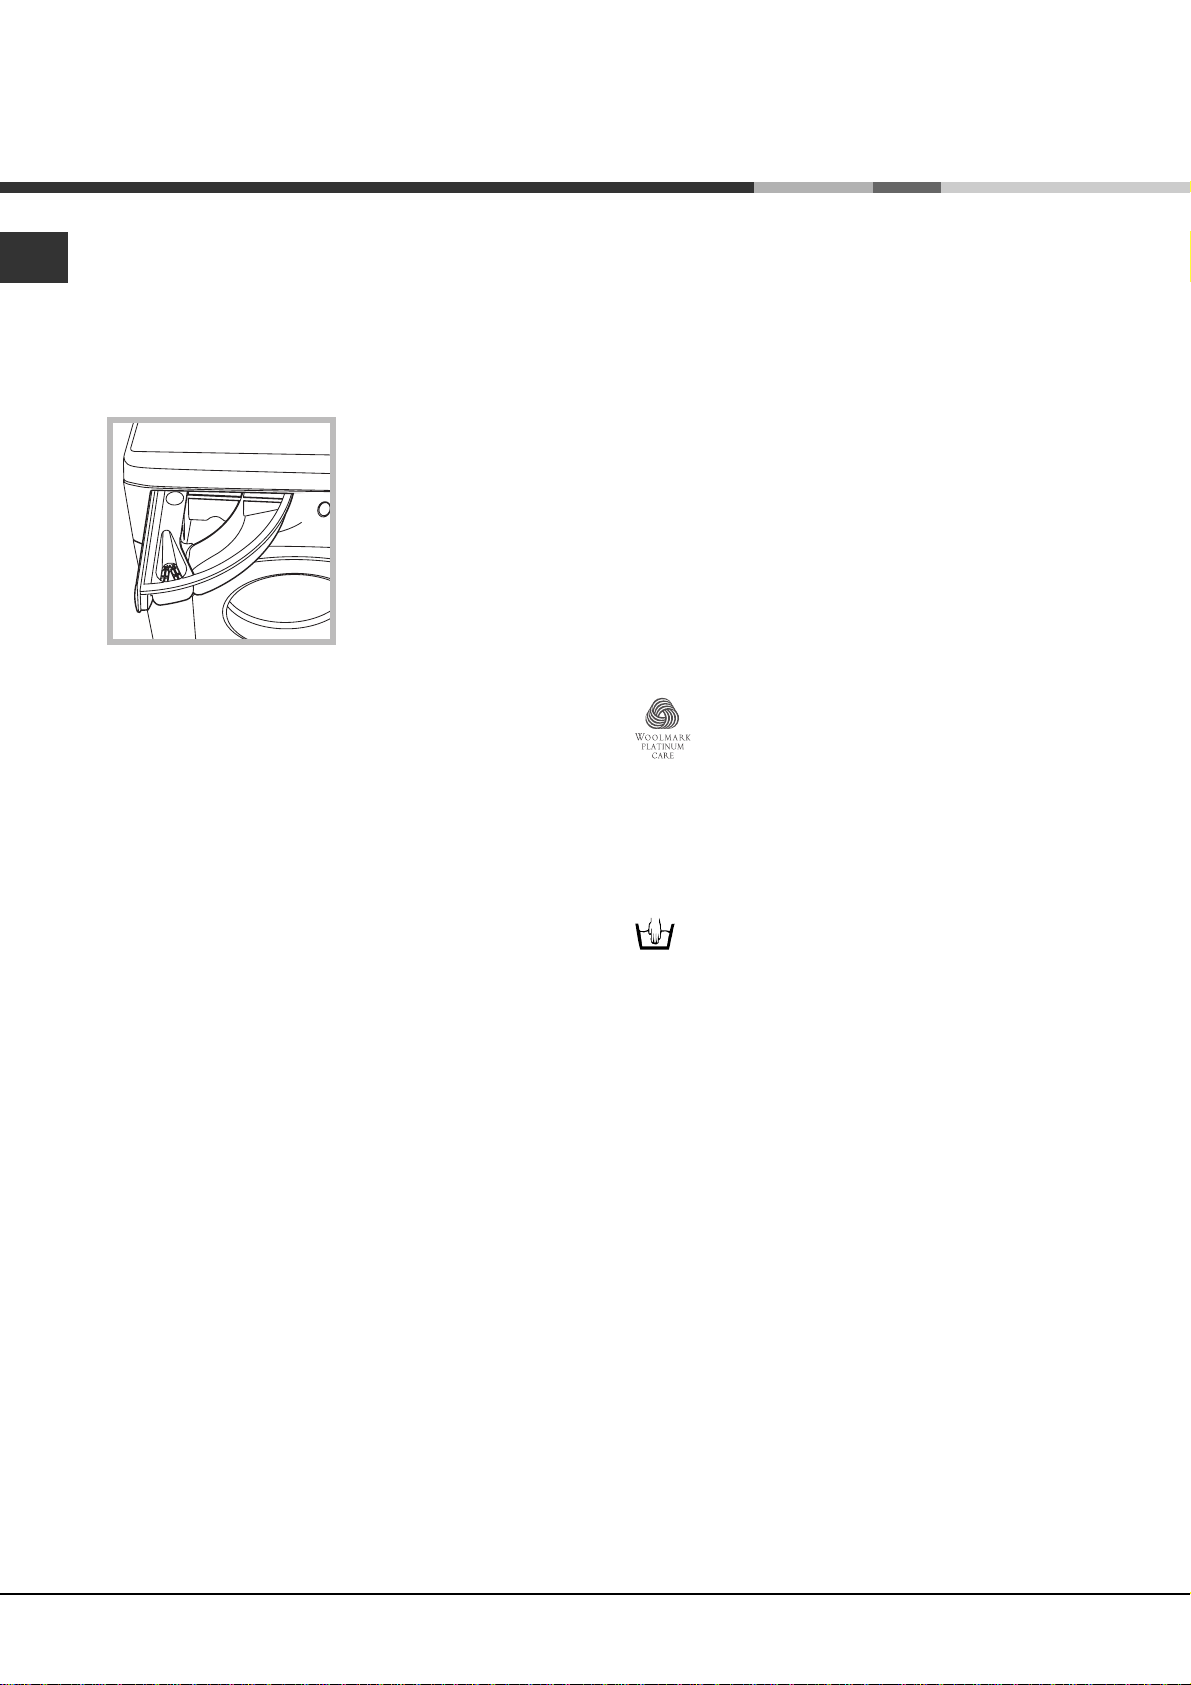
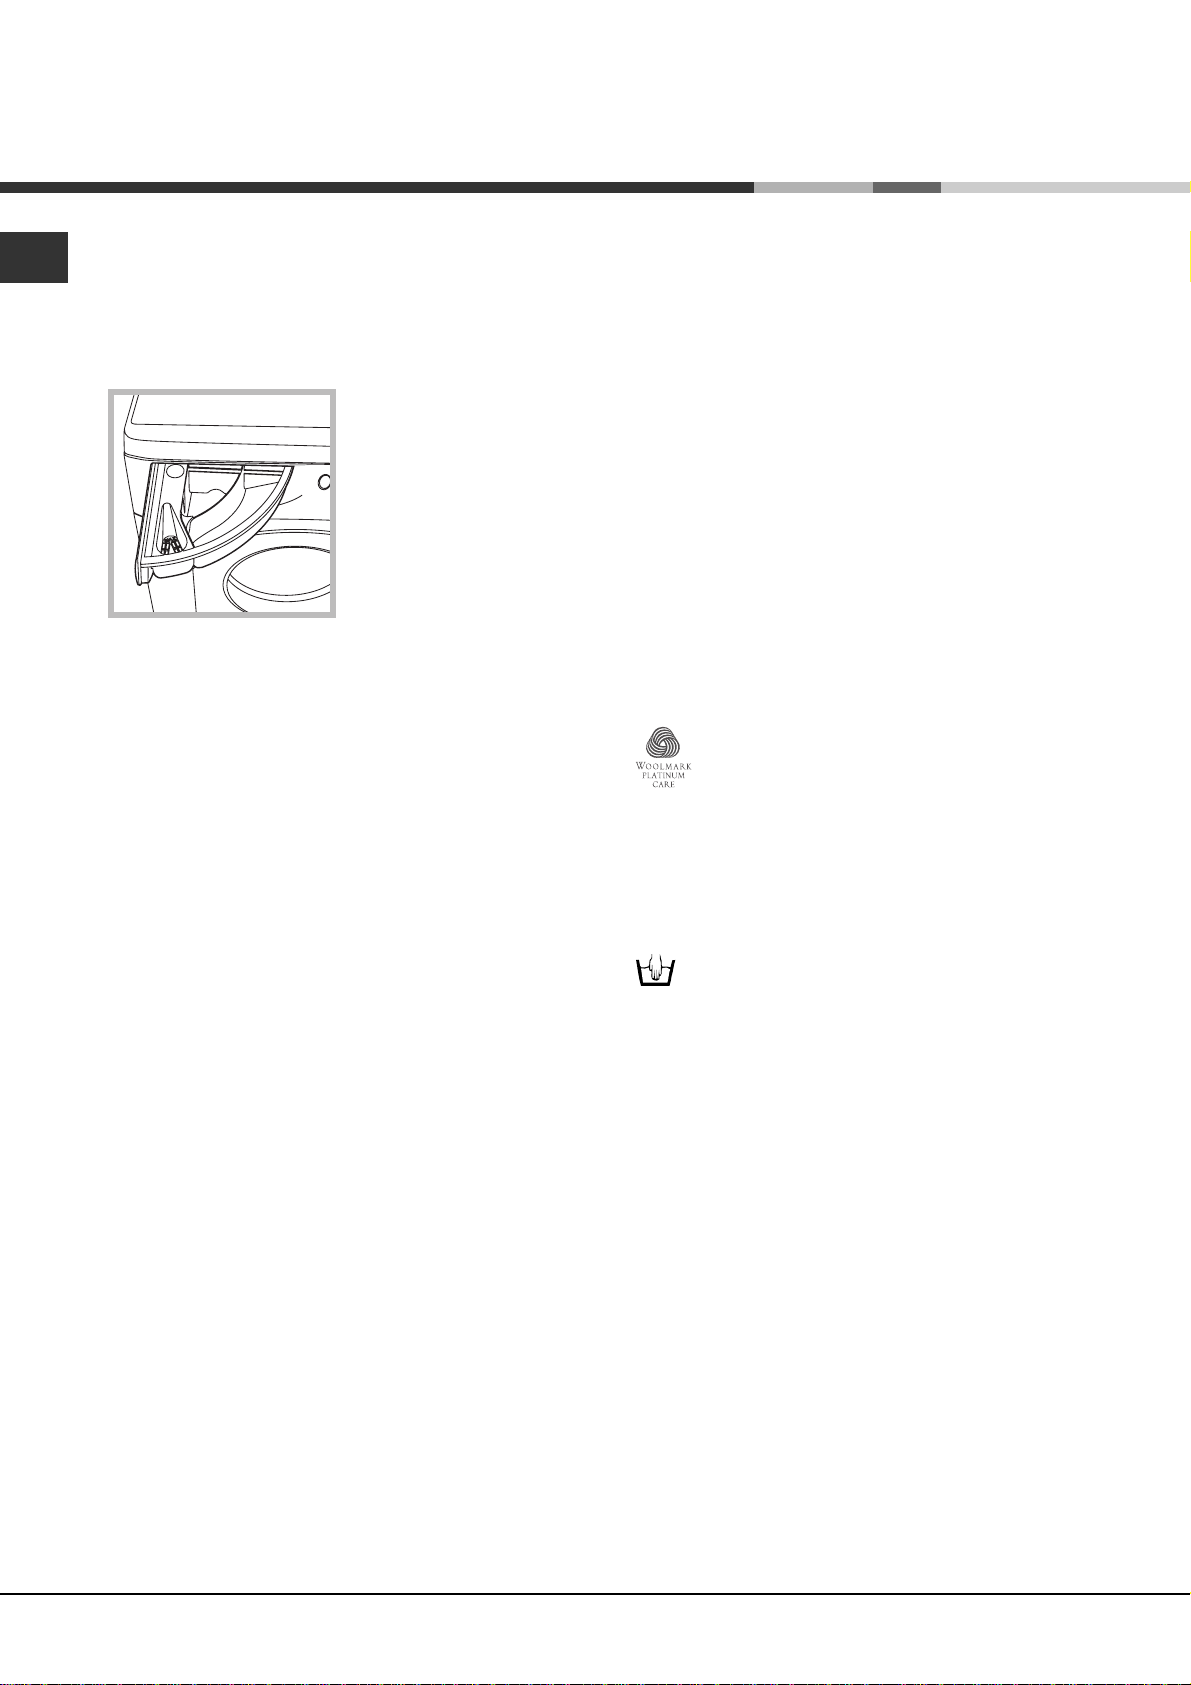
Woolmark Platinum Care
As gentle as a hand wash.
Ariston sets a new standard of superior
performance that has been endorsed by
The Woolmark Company with the prestigious
Woolmark Platinum Care brand. Look for the
Woolmark Platinum Care logo on the washing
machine to ensure you can safely and effectively
wash wool garments labelled as "hand wash"
(M.0303):
Set programme 10 for all "Hand wash"
garments, using the appropriate detergent.
Preparing your laundry
Divide your laundry according to:
- the type of fabric/the symbol on the label.
- the colours: separate coloured garments from
whites.
Empty all pockets and check for loose buttons.
Do not exceed the weight limits stated below,
which refer to the weight when dry:
Sturdy fabrics: max 4,5 kg
Synthetic fabrics: max 2.5 kg
Delicate fabrics: max 2 kg
Wool: max 1 kg
How much does your laundry weigh?
1 sheet 400-500 g
1 pillow case 150-200 g
1 tablecloth 400-500 g
1 bathrobe 900-1,200 g
1 towel 150-250 g
8

Precautions and advice
The washing machine was designed and built in
compliance with the applicable international safety
regulations. The following information is provided for
your safety and should consequently be read carefully.
General safety
This appliance has been designed for non-
professional, household use and its functions must
not be changed.
This washing machine should only be used by
adults and in accordance with the instructions
provided in this manual.
Never touch the washing machine when barefoot
or with wet or damp hands or feet.
Do not pull on the power supply cable to unplug
the appliance from the electricity socket. Pull the
plug out yourself.
Do not open the detergent dispenser while the
appliance is in operation.
Do not touch the drain water as it could reach
very high temperatures.
Never force the washing machine door: this could
damage the safety lock mechanism designed to
prevent any accidental openings.
In the event of a malfunction, do not under any
circumstances touch internal parts in order to
attempt repairs.
Always keep children well away from the
appliance while in operation.
The appliance door tends to get quite hot during
the wash cycle.
Should it have to be moved, proceed with the
help of two or three people and handle it with the
utmost care. Never try to do this alone, because
the appliance is very heavy.
Before loading your laundry into the washing
machine, make sure the drum is empty.
Disposal
Disposing of the packaging material:
observe local regulations, so the packaging can
be re-used.
The European Directive 2002/96/EC on Waste
Electrical and Electronic Equipment, requires that
old household electrical appliances must not be
disposed of in the normal unsorted municipal waste
stream. Old appliances must be collected
separately in order to optimise the recovery and
recycling of the materials they contain and reduce
the impact on human health and the environment.
The crossed out "wheeled bin" symbol on the
product reminds you of your obligation, that when
you dispose of the appliance it must be separately
collected.
Consumers should contact their local authority or
retailer for information concerning the correct
disposal of their old appliance.
Saving energy and respecting the
environment
Environmentally-friendly technology
If you only see a little water through your appliance
door, this is because thanks to the latest Ariston
technology, your washing machine only needs less
than half the amount of water to get the best results:
an objective reached to respect the environment.
Saving on detergent, water,
energy and time
To avoid wasting resources, the washing machine
should be used with a full load. A full load instead of
two half loads allows you to save up to 50% on energy.
The pre-wash cycle is only necessary on
extremely soiled garments. Avoiding it will save on
detergent, time, water and between 5 and 15%
energy.
Treating stains with a stain remover or leaving them
to soak before washing will cut down the need to
wash them at high temperatures. A programme at
60°C instead of 90°C or one at 40°C instead of
60°C will save up to 50% on energy.
Use the correct quantity of detergent depending
on the water hardness, how soiled the garments
are and the amount of laundry you have, to avoid
wastage and to protect the environment: despite
being biodegradable, detergents do contain
ingredients that alter the natural balance of the
environment. In addition, avoid using fabric
softener as much as possible.
If you use your washing machine from late in the
afternoon until the early hours of the morning, you
will help reduce the electricity board's peak load.
The Delay Timer option (see page 7) helps to
organise your wash cycles accordingly.
If your laundry has to be dried in a tumble dryer,
select a high spin speed. Having the least water
possible in your laundry will save you time and
energy in the drying process.
GB
ServiceTroubleshootingPrecautions CareProgrammes DetergentsInstallation Description
9
Care and maintenance
GB
Cutting off the water or electricity
supply
Turn off the water tap after every wash. This will
limit the wear of your appliance's water system
and also prevent leaks.
Unplug your appliance when cleaning it and
during all maintenance operations.
Cleaning your appliance
The exterior and rubber parts of your appliance can
be cleaned with a soft cloth soaked in lukewarm
soapy water. Do not use solvents or abrasives.
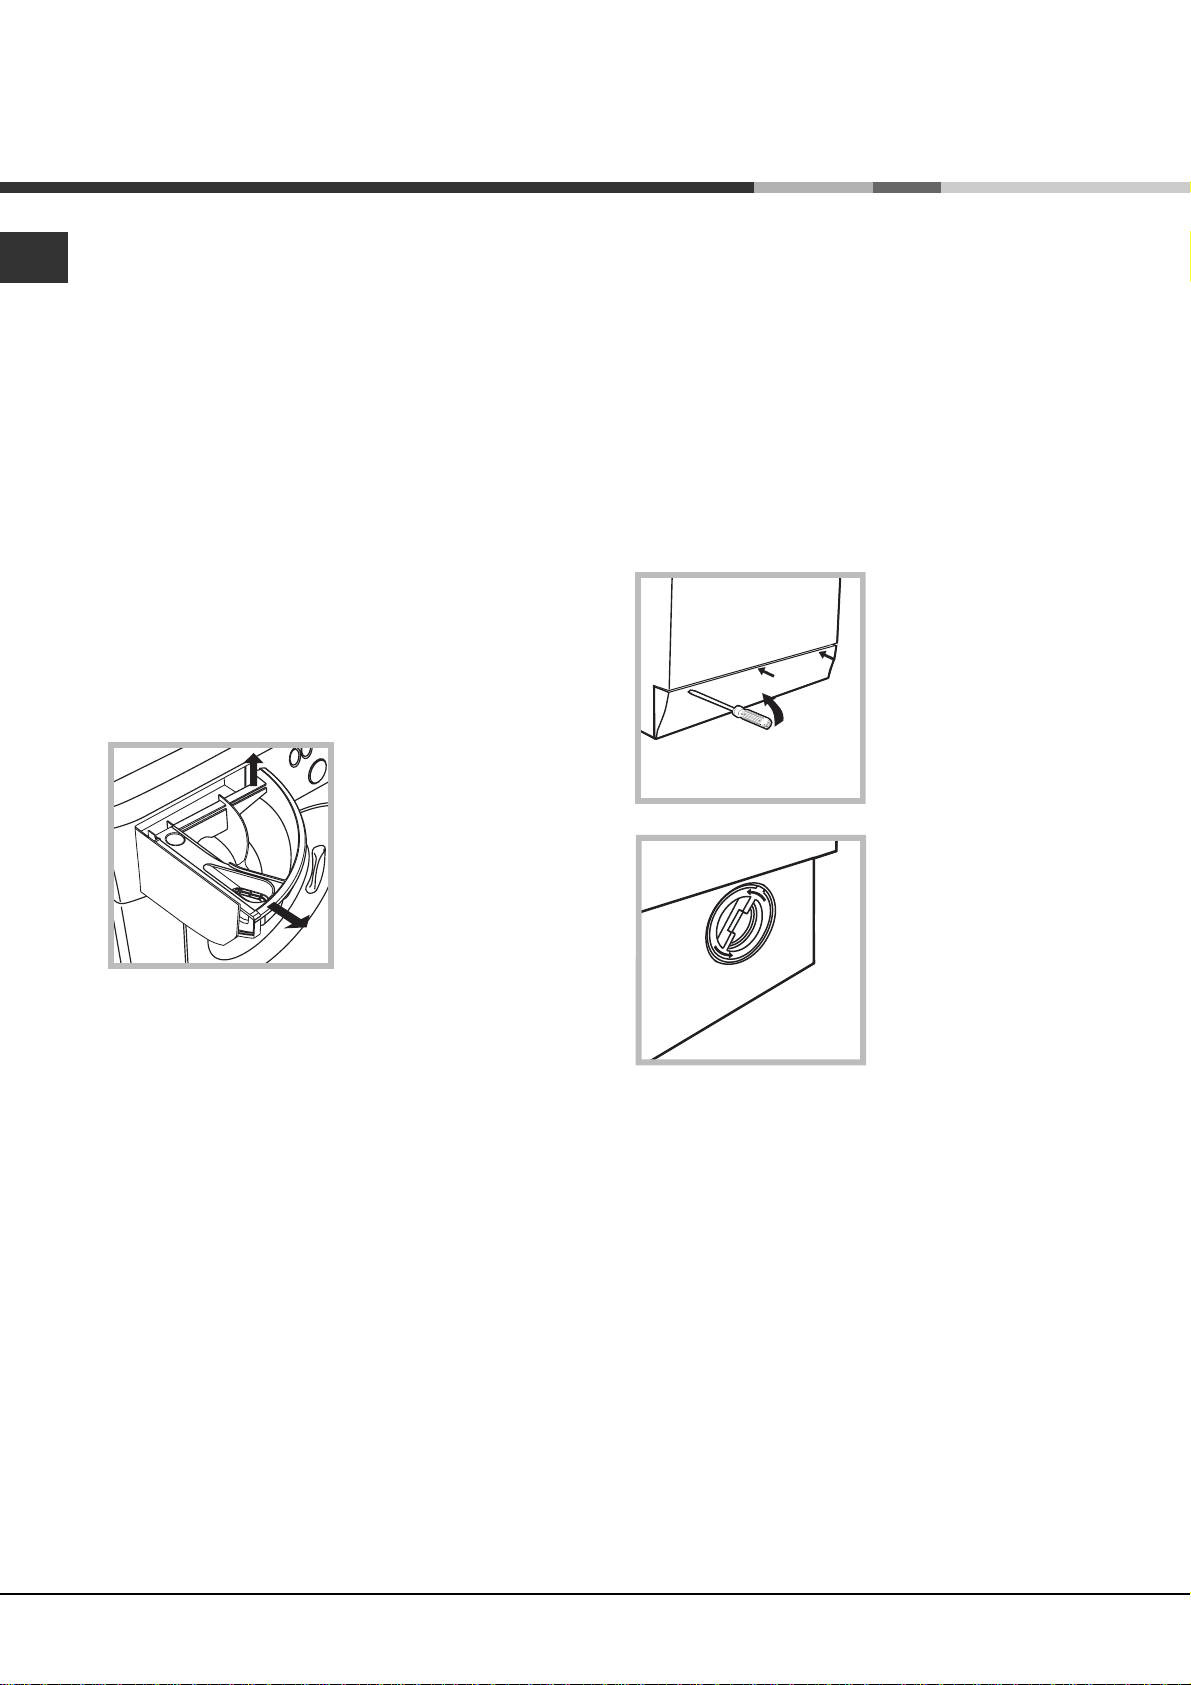
Cleaning the detergent dispenser
1
Remove the dispenser
by raising it and pulling it
out (see figure).
Wash it under running
water; this operation
should be repeated
frequently.
2
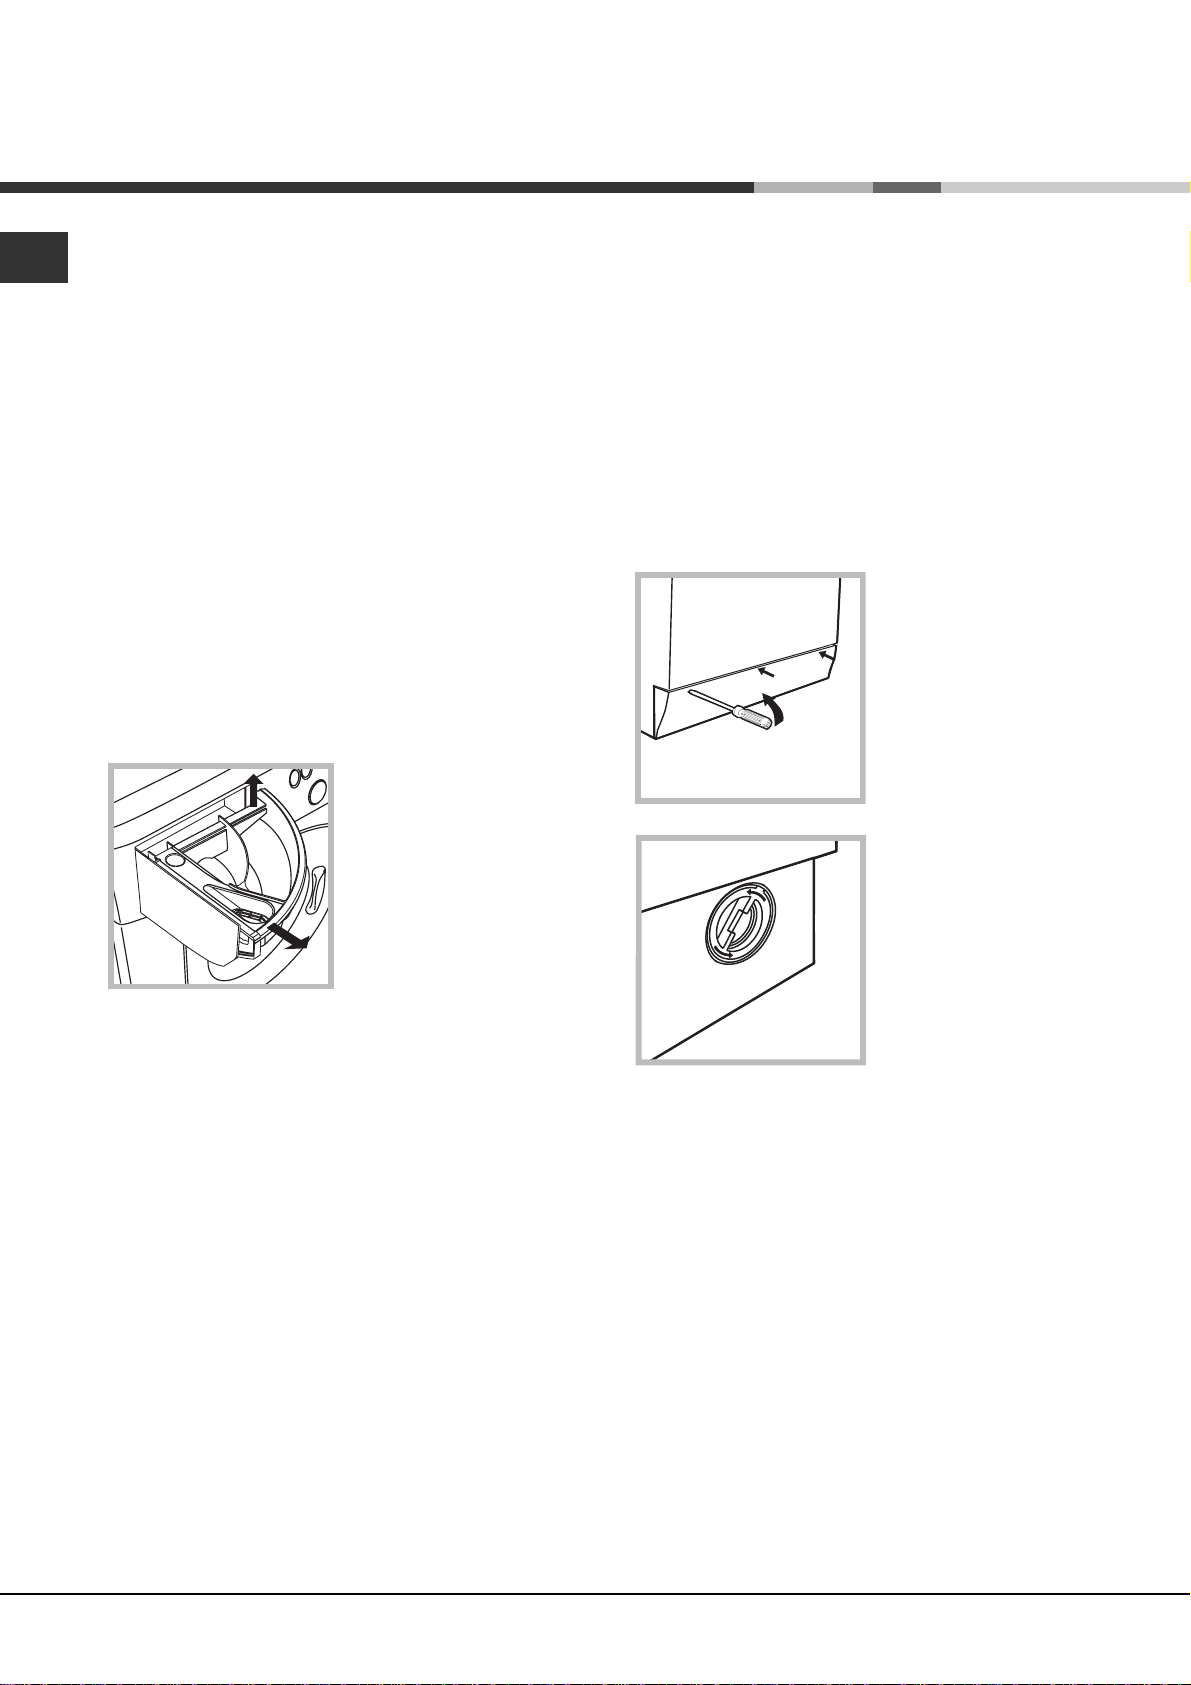
Cleaning the pump
The washing machine is fitted with a self-cleaning
pump that does not require any maintenance.
Sometimes, small items (such as coins or buttons)
may fall into the pre-chamber that protects the
pump, situated in the lower part of the same.
Make sure the wash cycle has ended and unplug
the appliance.
To access the pre-chamber:
1. using a screwdriver,
remove the cover panel
on the lower front of the
washing machine (see
figure);
2. unscrew the lid
rotating it anticlockwise (see figure):
a little water may trickle
out. This is perfectly
normal;
Caring for your appliance door and
drum
Always leave the appliance door ajar to prevent
unpleasant odours from forming.
3. clean the interior thoroughly;
4. screw the lid back on;
5. reposition the panel, making sure the hooks are
securely in place before you push it onto the
appliance.
Checking the water inlet hose
Check the water inlet hose at least once a year. If
you see any cracks, replace it immediately: during
the wash cycles, water pressure is very strong and
a cracked hose could easily split open.
Never use hoses that have already been used.
10

Troubleshooting
Your washing machine could fail to work. Before calling for Assistance (see page 12), make sure the problem
can't easily be solved by consulting the following list.
Problem
The washing machine won't
start.
The wash cycle won't start.
The washing machine fails to
load water (The wording H2O is
displayed).
The washing machine
continuously loads and unloads
water.
Possible causes/Solution:
The appliance is not plugged into the socket, or not enough to
make contact.
There has been a power failure.
The appliance door is not shut properly (the word DOOR is
displayed).
The
The START/RESET button has not been pressed.
The water tap is not turned on.
A delayed start has been set (using the Delay Timer, see page 7).
The water inlet hose is not connected to the tap.
The hose is bent.
The water tap is not turned on.
There is a water shortage.
The water pressure is insufficient.
The START/RESET button has not been pressed.
The drain hose is not fitted between 65 and 100 cm from the floor
The free end of the hose is underwater (see page 3).
The wall drainage system doesn't have a breather pipe.
button has not been pressed.
(see page 3).
GB
The washing machine does not
drain or spin.
The washing machine vibrates
too much during the spin cycle.
The washing machine leaks.
There is too much foam.
If the problem persists even after these checks, turn off the water tap,
switch the appliance off and call for Assistance. If the dwelling is on one of
the upper floors of a building, there may be drain trap problems causing the
washing machine to load and unload water continuously. In order to avoid
such an inconvenience, special anti-drain trap valves are available in shops.
The programme does not foresee the draining: some programmes
require enabling the draining manually (see page 6).
The Easy iron option is enabled: to complete the programme, press
the START/RESET button (see page 7).
The drain hose is bent (see page 3).
The drain duct is clogged.
The drum was not unblocked correctly during installation (see page 2).
The washing machine is not level (see page 2).
The washing machine is closed in between furniture cabinets and
the wall (see page 2).
The water inlet hose is not screwed on correctly (see page 2).
The detergent dispenser is obstructed (to clean it, see page 10).
The drain hose is not secured properly (see page 3).
The detergent is not suitable for machine washing (it should bear
the definition "for washing machines" or "hand and machine wash",
or the like).
You used too much detergent.
ServiceTroubleshootingPrecautions CareProgrammes DetergentsInstallation Description
11

Service
GB
Before calling for Assistance:
Check whether you can solve the problem on your own (see page 11);
Restart the programme to check whether the problem has been solved;
If this is not the case, contact an authorised Technical Service Centre on the telephone number
provided on the guarantee certificate.
Always request the assistance of authorised servicemen.
Notify the operator of:
the type of problem;
the appliance model (Mod.);
the serial number (S/N).
This information can be found on the data plate situated on the rear of the washing machine.
Service
12
Mode d'emploi
LAVE-LINGE
F
Français
AVSF 129
Sommaire
F
Installation, 14-15
Déballage et mise à niveau, 14
Raccordements hydrauliques et électriques, 14-15
Premier cycle de lavage, 15
Caractéristiques techniques, 15
Description du lave-linge, 16-17
Bandeau de commandes, 16
Ecran, 17
Mise en marche et Programmes, 18
En bref: démarrage d'un programme, 18
Tableau des programmes, 18
Personnalisations, 19
Réglage de l'essorage, 19
Réglage de la température, 19
Réglage du Delay Timer (Départ différé), 19
Fonctions, 19
Produits lessiviels et linge, 20
Tiroir à produits lessiviels, 20
Triage du linge, 20
Pièces de linge particulières, 20
Woolmark Platinum Care, 20
Précautions et conseils, 21
Sécurité générale, 21
Mise au rebut, 21
Economies et respect de l'environnement, 21
Entretien et soin, 22
Coupure de l'arrivée d'eau et de courant, 22
Nettoyage du lave-linge, 22
Nettoyage du tiroir à produits lessiviels, 22
Entretien du hublot et du tambour, 22
Nettoyage de la pompe, 22
Contrôle du tuyau d'arrivée de l'eau, 22
Anomalies et remèdes, 23
Assistance, 24
Consultation à tout moment, 24
13
Installation
Conservez ce mode d'emploi pour pouvoir le
F
consulter à tout moment. En cas de vente, de cession
ou de déménagement, veillez à ce qu'il suive toujours
le lave-linge pour que son nouveau propriétaire soit
informé sur son mode de fonctionnement et puisse
profiter des conseils correspondants.
Lisez attentivement les instructions: elles fournissent
d'importantes informations sur l'installation, l'utilisation
et la sécurité.
Déballage et mise à niveau
Déballage
1. Déballez le lave-linge.
2. Contrôlez que le lave-linge n'a pas été endommagé
pendant le transport. S'il est abîmé, ne le raccordez
pas et contactez votre revendeur.
3. Enlevez les quatre vis
de protection pour le
transport, le
caoutchouc et la cale,
placés dans la partie
arrière (voir figure).
4. Bouchez les trous à l'aide des bouchons plastique
fournis.
5. Conservez bien toutes ces pièces: il faudra les
remonter en cas de transport du lave-linge.
Une bonne mise à niveau garantit la stabilité de la
machine et évite qu'il y ait des vibrations, du bruit et
des déplacements en cours de fonctionnement. Si la
machine est posée sur de la moquette ou un tapis,
réglez les petits pieds de manière à ce qu'il y ait
suffisamment d'espace pour assurer une bonne
ventilation.
Raccordements hydrauliques et
électriques
Raccordement du tuyau d'arrivée de l'eau
1. Montez le joint A sur
l'extrémité du tuyau
d'alimentation et vissezle à un robinet d'eau
A
froide à embout fileté 3/4
gaz (voir figure).
Faites couler l'eau
jusqu'à ce qu'elle soit
limpide et sans
impuretés avant de
raccorder.
2. Raccordez le tuyau
d'alimentation au lavelinge en le vissant à la
prise d'eau prévue, dans
la partie arrière en haut
à droite (voir figure).
Les emballages ne sont pas des jouets pour enfants.
Mise à niveau
1. Installez le lave-linge sur un sol plat et rigide, sans
l'appuyer contre des murs, des meubles ou autre.
2. Si le sol n'est pas
parfaitement horizontal,
vissez ou dévissez les
petits pieds avant (voir
figure) pour niveler
l'appareil; son angle
d'inclinaison, mesuré
sur le plan de travail, ne
doit pas dépasser 2°.
14
3. Faites attention à ce que le tuyau ne soit ni plié ni
écrasé.
La pression de l'eau doit être comprise entre les
valeurs indiquées dans le tableau des
Caractéristiques techniques (voir page ci-contre).
Si la longueur du tuyau d'alimentation ne suffit pas,
adressez-vous à un magasin spécialisé ou à un
technicien agréé.
Raccordement du tuyau de vidange
Raccordez le tuyau
d'évacuation, sans le
plier, à un conduit
d'évacuation ou à une
évacuation murale
65 - 100 cm
placés à une distance
du sol comprise entre
65 et 100 cm;
N'utilisez ni rallonges ni prises multiples.
Le câble ne doit être ni plié ni écrasé.
Le câble d'alimentation ne doit être remplacé que
par des techniciens agréés.
Attention! Nous déclinons toute responsabilité en cas
de non respect des normes énumérées ci-dessus.
Premier cycle de lavage
F
Installation Description
ou bien accrochez-le à
un évier ou à une
baignoire, dans ce cas,
fixez le support en
plastique fourni avec
l'appareil au robinet
(voir figure). L'extrémité
libre du tuyau
d'évacuation ne doit
pas être plongée dans
l'eau.
L'utilisation de tuyaux de rallonge est absolument
déconseillée, si vous ne pouvez vraiment pas faire
autrement vous devrez utiliser un tuyau de même
diamètre et de longueur maximum de 150 cm.
Branchement électrique
Avant de brancher la fiche dans la prise de courant,
contrôlez que:
la prise dispose de mise à la terre et est conforme
aux normes;
la prise est bien apte à supporter la puissance
maximale de la machine indiquée dans le tableau
des Carcatéristiques techniques (voir ci-contre);
la tension d'alimentation est bien comprise entre les
valeurs figurant dans le tableau des
Caractéristiques techniques (voir ci-contre);
la prise est bien compatible avec la fiche du lave-
linge. Autrement, remplacez la prise ou la fiche.
Votre lave-linge ne doit pas être installé dehors,
même à l'abri, car il est très dangereux de le laisser
exposé à la pluie et aux orages.
Après installation du lave-linge, la prise de courant
doit être facilement accessible.
Avant la première utilisation de la machine, effectuez
un cycle de lavage avec un produit lessiviel mais
sans linge et sélectionnez le programme à 90°C
sans prélavage.
Caractéristiques techniques
Modèle
Dimensions
Capacité
Raccordements
électriques
Raccordements
hydrauliques
Vitesse
d'essorage
Programmes de
contrôle selon la
norme IEC456
AVSF 129
largeur 59,5 cm
hauteur 85 cm
profondeur 40 cm
de 1 à 4,5 kg
tension 220/230 Volt 50 Hz
puissance maximale absorbée 1850 W
pression maximale 1 MPa (10 bar)
pression minimale 0,05 MPa (0,5 bar)
capacité du tambour 40 litres
jusqu'à 1200 tours minute
programme 3; température 60°C;
effectué avec une charge de 4,5 kg.
Cet appareil est conforme aux
Directives Communautaires suivantes:
- 73/23/CEE du 19/02/73 (Basse
Tension) et modifications suivantes
- 89/336/CEE du 03/05/89
(Compatibilité électromagnétique) et
modifications suivantes
- 2002/96/CE
Bac produits
AssistanceAnomaliesPrécautions EntretienProgrammes
15
Description du lave-linge
Bandeau de commandes
F
Légende programmes
Tiroir à produits lessiviels
ESSORAGE
Tiroir à produits lessiviels: chargement des
produits lessiviels et additifs (voir page 20).
Légende programmes: consultation rapide des
programmes: pour l'ouvrir, tirez la languette grise
vers vous.
Touches FONCTION: sélection des fonctions
disponibles. La touche correspondant à la fonction
sélectionnée restera allumée.
Touches
FONCTION
Touche
MISE EN MARCHE/
ARRET
Ecran
TEMPÉRATURE
DÉPART
DIFFÉRÉ
VERROUILLAGE DES
COMMANDES
Touche
START/RESET
Touche VERROUILLAGE DES COMMANDES
pour bloquer tous les touches de votre machine
pendant la marche ou pendant le Stand-by.
Ecran: visualisation de lavancement du cycle de
lavage et/ou de la programmation (voir page ci-
contre).
Touche MISE EN MARCHE/ARRET: mise en
marche ou arrêt du lave-linge (voir page 18).
Bouton
Touche ESSORAGE: réglage de la vitesse
d'essorage ou exclusion (voir page 19).
Touche TEMPÉRATURE: modification de la
température de lavage (voir page 19).
Touche DÉPART DIFFÉRÉ pour différer le
démarrage du programme sélectionné jusqu'à 24
heures maximum (voir page 19).
16
Touche START/RESET: démarrage des
programmes ou annulation (en cas d'erreur) (voir
page 18).
Bouton: choix des programmes (voir page 18).
Le bouton est escamotable: pour le faire sortir,
pressez légèrement au centre.
En cours de lavage, le bouton ne bouge pas.
Ecran
C'est non seulement un instrument très utile pour programmer la machine (voir page 19), mais il fournit aussi
des informations sur le cycle de lavage et sur son stade d'avancement.
Après avoir appuyé sur la touche START/RESET
pour démarrer le programme, l'écran affiche le
temps estimé qui reste avant la fin du cycle. En cas
de sélection d'un départ différé (Départ différé, voir
page 19), le retard sera affiché.
Pendant le cycle de lavage, il ya a affichage de:
Phases en cours :
Prélavage
Lavage
Rinçage
Essorage
F
Bac produits
Options et Fonctions de personnalisation:
Pour choisir les options/fonctions voir page 19.
Sonnerie Buzzer:
Votre appareil est équipé d'un buzzer qui vous
signalera le stade de déroulement des fonctions ou
tout dysfonctionnement: incompatibilité, touches
options/programmes, démarrage, fin de cycle, reset.
Verrouillage des commandes:
Pour votre sécurité et celle de vos enfants, il vous suffit d'appuyer 2 secondes de suite sur la touche fonction pour
verrouiller toutes les touches lorsque votre machine est en marche ou en position d'attente (départ différé - Standby). Pour le déverrouiller, gardez la touche enfoncée pendant 4 secondes.
Verrouillage de porte:
Le symbole éclairé indique que le hublot est verrouillé pour éviter toute ouverture accidentelle. Attendez que le
symbole s'éteigne avant d'ouvrir le hublot, vous risqueriez d'endommager l'appareil.
Ce modèle est équipé d'un dispositif qui vous permet d'ouvrir votre hublot même pendant certains stades de
déroulement du programme. Ceci est possible quand le symbole n'est pas éclairé.
AssistanceAnomaliesPrécautions EntretienProgrammesInstallation Description
L'affichage de l'inscription END signale la fin du programme.
En cas d'anomalie, un code erreur est affiché, exemple: F-01, à communiquer au le Service-après-vente (voir page 24).
17
Mise en marche et Programmes
En bref: démarrage d'un programme
F
1. Allumez le lave-linge en appuyant sur la touche .
Toutes les icônes s'éclaireront pendant quelques
secondes puis s'éteindront.
2. Chargez le lave-linge et fermez le hublot.
3. Sélectionnez à l'aide du bouton le programme
désiré. L'écran affiche la durée prévue. La
température et l'essorage sont sélectionnés
automatiquement en fonction du programme
(pour les modifier voir page 19).
Tableau des programmes
Nature des tissus et degré de
salissure
Coton
Blancs extrêmement sales
(draps, nappes, etc.)
Blancs extrêmement sales
(draps, nappes, etc.)
Blancs et couleurs résistantes très
sales
Blancs peu sales et couleurs
délicates (chemises, pulls, etc.)
Couleurs délicates peu sales
Synthétiques
Couleurs résistantes très sales
(linge de bébé, etc.)
Couleurs résistantes (linge en tout
genre légèrement sale)
Couleurs résistantes très sales
(linge de bébé, etc.)
Couleurs délicates (linge en tout
genre légèrement sale)
Couleurs délicates (linge en tout
genre légèrement sale)
Délicats
Programmes
1
2
3
4
5
6
6
7
8
9
4. Versez le produit lessiviel et les additifs (voir page 20).
5. Appuyez un touche des options (voir page 19).
6. Appuyez sur la touche START/RESET pour lancer
le programme.
Pour annuler, poussez sur la touche START/
RESET pendant 2 secondes au moins.
7. L'inscription END est affichée à la fin du
programme. Sortez le linge et laissez le hublot
entrouvert pour faire sécher le tambour.
8. Eteignez le lave-linge en appuyant sur la touche
Te m p .
lavage
90°C 160
90°C 143
60°C 120
40°C 85
30°C 77
60°C 92
40°C 77
50°C 86
40°C 76
30°C 30 Lavage, rinçages et essorage délicat
Lessive
prélav. lavage.
Assouplis-
sant
Durée
du cycle
(minutes)
Description du cycle de lavage
Prélavage, lavage, rinçages,
essorages intermédiaires et finaux
Lavage, rinçages, essorages
intermédiaires et finaux
Lavage, rinçages, essorages
intermédiaires et finaux
Lavage, rinçages, essorages
intermédiaires et finaux
Lavage, rinçages, essorages
intermédiaires et finaux
Lavage, rinçages, anti-froissement ou
essorage délicat
Lavage, rinçages, anti-froissement ou
essorage délicat
Lavage, rinçages, anti-froissement ou
essorage délicat
Lavage, rinçages, anti-froissement ou
essorage délicat
.
Laine
Tissus particulièrement délicats
(rideaux, soie, viscose, etc.)
PROGRAMMES PARTIAUX
Rinçage Rinçages et essorage
Rinçage délicat Rinçages, anti-froissement ou vidange
Essorage Vidange et essorage énergique
Essorage délicat Vidange et essorage délicat
Vidange Vidange
10
11
40°C 42 Lavage, rinçages et essorage délicat
30°C 52
Lavage, rinçages, anti-froissement ou
vidange
Remarque
Pour la fonction anti-froissement: voir Repassage facile, page ci-contre. Les données reportées dans le tableau sont à titre indicatif.
Programme spécial
Quotidien 30' (programme 9 pour Synthétiques) spécialement conçu pour laver du linge peu sale en un rien de temps:
il ne dure que 30 minutes et permet ainsi de faire des économies d'énergie et de temps. Choisissez le programme (9 à
30°C), vous pourrez laver ensemble des textiles différents (sauf laine et soie) en ne dépassant pas 3 kg de charge.
Nous vous conseillons d'utiliser des lessives liquides.
18

Personnalisations
Réglage de l'essorage
Si à l'allumage de la machine, le BOUTON est placé sur un
Touches options
programme qui prévoit l'essorage, l'icône
Appuyez sur la touche
maximale autorisée pour le programme sélectionné et l'icône
se met à clignoter. Si vous appuyez à nouveau, le nombre de
tours s'abaisse jusqu'à OFF, qui indique la suppression de
l'essorage (appuyez encore une fois pour retourner à la valeur
plus élevée); arrêtez-vous sur la vitesse désirée, au bout de 2
secondes environ la sélection est acceptée : le symbole
reste fixe. Le réglage de l'essorage est activé avec tous les
programmes sauf 11 et Vidange.
pour afficher la vitesse d'essorage
apparaît fixe.
Réglage de la température
Si à l'allumage de la machine, le BOUTON est placé sur un programme qui prévoit un réglage de la température,
l'icône
programme sélectionné et l'icône
jusqu'à OFF, qui indique le lavage à froid (appuyez encore une fois pour retourner à la valeur plus élevée); arrêtezvous sur la valeur désirée, au bout de 2 secondes environ la sélection est acceptée : le symbole
Le réglage de la température est activé avec tous les programmes de lavage.
apparaît fixe. Appuyez sur la touche pour afficher la température maximale autorisée pour le
se met à clignoter. Si vous appuyez à nouveau, la température s'abaisse
reste fixe.
Réglage du Delay Timer (Départ différé)
Appuyez sur la touche , l'écran affiche l'inscription OFF et le symbole correspondant se met à clignoter.
Si vous appuyez une nouvelle fois sur la touche, il y a affichage de "1h" c'est à dire retard d'une heure et ainsi de
suite jusqu'à 24h; arrêtez-vous sur le "retard" souhaité, au bout de 2 secondes environ la sélection est acceptée;
après quoi l'écran affiche la durée prévue pour le programme sélectionné et le symbole
Appuyez à présent sur la touche START/RESET pour afficher à nouveau la valeur du "retard" sélectionné qui diminue
d'heure en heure jusqu'au départ du cycle, pendant cette phase vous pouvez modifier la valeur du "retard" mais
uniquement pour la diminuer. Le réglage du Delay Timer est activé avec tous les programmes.
reste allumé.
F
Bac produits
Verrouillage des commandes (voir page 17).
Fonctions
Les différentes fonctions de lavage prévues par le lave-linge permettent d'obtenir la propreté et le blanc
souhaités. Pour activer les fonctions:
1. appuyez sur la touche correspondant à la fonction désirée, d'après le tableau ci-dessous;
2. l'allumage de la touche correspondante signale que la fonction est activée.
Remarque: Le clignotement rapide de la touche signale que la fonction correspondante n'est pas disponible pour le
programme sélectionné.
En cas de sélection d'une fonction incompatible avec une autre précédemment sélectionnée, la seule à être
activée sera la dernière validée.
Option Effet Mode d'emploi
Pour obtenir un linge
d'une propreté
Super
lavage
Repassage
facile
impeccable, visiblement
plus blanc par rapport
au standard de lavage
de la
Classe A
Pour moins froisser
les tissus et
simplifier leur
repassage.
.
Elle est incompatible avec l'option PEU SALE.
Si cette option est sélectionnée, les programmes 6, 7, 8, 11 et
Rinçage délicat s'interrompent en laissant le linge tremper dans l'eau
(Anti-froissement) et la touche REPASSAGE FACILE clignotera:
- pour compléter le cycle appuyez sur la touche START/RESET ou
sur la touche REPASSAGE FACILE;
- pour n'effectuer que la vidange amenez le bouton sur le symbole
correspondant et appuyez sur la touche START/RESET.
Activée avec les
programmes:
1, 2, 3, 4,
5, 6, 7, 8.
To us sa u f
1, 2, 9, 10,
Essorage,
Essorage
délicat et
Vidange.
AssistanceAnomaliesPrécautions EntretienProgrammesInstallation Description
Peu sale
Pour réduire de 30%
environ la durée du
cycle de lavage.
Elle est incompatible avec l'option SUPER LAVAGE.
1, 2, 3, 4,
5, 6, 7, 8.
19
Produits lessiviels et linge
Tiroir à produits lessiviels
F
Un bon résultat de lavage dépend aussi d'un bon
dosage de produit lessiviel: un excès de lessive ne
lave pas mieux, il incruste l'intérieur de votre lave-linge
et pollue l'environnement.
Sortez le tiroir à produits
lessiviels et versez la
lessive ou l'additif
comme suit.
1
3
bac 1: Lessive prélavage
(en poudre)
bac 2: Lessive lavage
(en poudre ou liquide)
Versez la lessive liquide juste avant la mise en marche.
bac 3: Additifs (adoucissant, etc.)
L'assouplissant ne doit pas déborder de la grille.
2
N'utilisez pas de lessives pour lavage à la main,
elles génèrent trop de mousse.
Triage du linge
Triez correctement votre linge d'après:
- le type de textile / le symbole sur l'étiquette.
- les couleurs: séparez le linge coloré du blanc.
Videz les poches et contrôlez les boutons.
Ne dépassez pas les valeurs indiquées correspon-
dant au poids de linge sec:
Textiles résistants: 4,5 kg max.
Textiles synthétiques: 2,5 kg max.
Textiles délicats: 2 kg max.
Laine: 1 kg max.
Pièces de linge particulières
Rideaux: pliez-les bien et glissez-les dans une taie
d'oreiller ou dans un sac genre filet. Lavez-les seuls
sans dépasser la demi-charge. Sélectionnez le programme 11 qui supprime automatiquement l'essorage.
Doudounes et anoraks: s'ils sont en duvet d'oie ou
de canard, ils peuvent être lavés à la machine. Lavez
les vêtements sur lenvers. La charge ne doit pas
excéder 2-3 kg. Prévoyez 2, voire 3 rinçages et un
essorage léger.
Chaussures de tennis: débarrassez-les de la
boue. Lavez-les en même temps que jeans et
vêtements résistants, jamais avec du linge blanc.
Laine: pour obtenir d'excellents résultats utilisez un
produit lessiviel spécial et ne dépassez pas une
charge de 1kg.
Woolmark Platinum Care
Délicat comme le lavage à la main.
Ariston a introduit un nouveau standard de
performances supérieures, reconnu par The
Woolmark Company qui lui a attribué le prestigieux
label Woolmark Platinum Care. Si le logo Woolmark
Platinum Care est appliqué sur votre lave-linge, vous
pouvez laver avec d'excellents résultats vos vêtements en laine portant l'étiquette "laver à la main"
(M.0303):
Sélectionnez le programme 10 pour tous les
vêtements portant l'étiquette "Laver à la
main" et utilisez un produit lessiviel spécial.
Combien pèse le linge ?
1 drap 400-500 g
1 taie d'oreiller 150-200 g
1 nappe 400-500 g
1 peignoir 900-1.200 g
1 serviette éponge 150-250 g
20

Précautions et conseils
Ce lave-linge a été conçu et fabriqué conformé-
ment aux normes internationales de sécurité. Ces
avertissements sont fournis pour des raisons de
sécurité, lisez-les attentivement.
Sécurité générale
Cet appareil a été conçu pour une utilisation
domestique, non professionnelle et ses fonctions
ne doivent pas être altérées.
Ce lave-linge ne doit être utilisé que par des
adultes en suivant les instructions reportées dans
ce mode d'emploi.
Nutilisez pas lappareil si vous êtes pieds nus.
ne touchez jamais lappareil si vous avez les pieds
ou les mains humides.
Ne tirez jamais sur le câble pour débrancher la
fiche de la prise de courant.
N'ouvrez pas le tiroir à produits lessiviels si la
machine est en marche.
Ne touchez pas à l'eau de vidange, elle peut
atteindre des températures très élevées.
Ne forcez pas pour ouvrir le hublot: le verrouillage
de sécurité qui protège contre les ouvertures
accidentelles pourrait s'endommager.
En cas de panne, n'essayez en aucun cas
d'accéder aux mécanismes internes pour tenter
de la réparer.
Veillez à ce que les enfants ne s'approchent pas
de la machine pendant son fonctionnement.
Pendant le lavage, le hublot a tendance à se
réchauffer.
Deux ou trois personnes sont nécessaires pour la
déplacer en faisant très attention. Ne jamais la
déplacer seul car la machine est très lourde.
Avant d'introduire votre linge, contrôlez si le
tambour est bien vide.
Mise au rebut
Mise au rebut du matériel d'emballage:
se conformer aux réglementations locales de manière
à ce que les emballages puissent être recyclés.
La Directive Européenne 2002/96/EC sur les
Déchets des Equipements Electriques et Electroniques, exige que les appareils ménagers usagés
ne soient pas jetés dans le flux normal des déchets municipaux. Les appareils usagés doivent
être collectés séparément afin d'optimiser le taux
de récupération et le recyclage des matériaux qui
les composent et réduire l'impact sur la santé
humaine et l'environnement. Le symbole de la
''poubelle barrée'' est apposée sur tous les
produits pour rappeler les obligations de collecte
séparée.
Les consommateurs devront contacter les
autorités locales ou leur revendeur concernant la
démarche à suivre pour l'enlèvement de leur vieil
appareil.
Economies et respect de l'environnement
La technologie au service de l'environnement
Si vous voyez peu d'eau à travers le hublot c'est
parce que grâce à la nouvelle technologie Ariston, il
suffit de moins de la moitié d'eau pour obtenir une
propreté impeccable: un but atteint pour protéger
l'environnement.
Economie de produit lessiviel, d'eau, d'électricité et de temps
Pour ne pas gaspiller de ressources, utilisez le
lave-linge à sa charge maximale. Mieux vaut une
pleine charge que deux demies, vous économiserez jusqu'à 50% d'électricité.
Un prélavage n'est nécessaire qu'en cas de linge
très sale. S'en passer permet de faire des économies de produit lessiviel, de temps, d'eau et entre
5 et 15% d'électricité.
Si vous traitez les taches avec un produit déta-
chant ou si vous les laissez tremper avant de les
laver, vous éviterez d'avoir à laver à de hautes
températures. Un programme à 60°C au lieu de
90°C ou un à 40°C au lieu de 60°C, fait économiser jusqu'à 50% d'électricité.
Bien doser la quantité de produit lessiviel en
fonction de la dureté de l'eau, du degré de
salissure et de la quantité de linge à laver évite les
gaspillages et protège l'environnement: bien que
biodégradables, les produits lessiviels contiennent
des éléments qui altèrent l'équilibre de la nature.
Evitez le plus possible l'utilisation d'assouplissant.
Effectuer ses lavages tard dans l'après-midi et
jusqu'aux premières heures du matin permet de
réduire la charge d'absorption des opérateurs énergétiques. La fonction Départ différé (voir page 19)
aide à mieux organiser les lavages en ce sens.
Si le linge doit être séché dans un sèche-linge,
sélectionnez une haute vitesse d'essorage. Du
linge qui contient moins d'eau fait écomiser du
temps et de l'électricité dans le programme de
séchage.
F
Installation Description
Bac produits
AssistanceAnomaliesPrécautions EntretienProgrammes
21
Entretien et soin
Coupure de l'arrivée d'eau et de courant
F
Fermez le robinet de l'eau après chaque
lavage: vous limiterez ainsi l'usure de l'installation
hydraulique de votre lave-linge et éliminerez le
danger de fuites.
Débranchez la fiche de la prise de courant quand
vous nettoyez votre lave-linge et pendant tous vos
travaux d'entretien.
Nettoyage du lave-linge
Pour nettoyer l'extérieur et les parties en caoutchouc,
utilisez un chiffon imbibé d'eau tiède et de savon.
N'utilisez ni solvants ni abrasifs.
Nettoyage du tiroir à produits
lessiviels
1
Pour sortir le tiroir,
soulevez-le et tirez-le
vers vous (voir figure).
Lavez-le à l'eau
courante, effectuez
cette opération assez
souvent.
2
Nettoyage de la pompe
Le lave-linge est équipé d'une pompe autonettoyante
qui n'exige aucune opération d'entretien. Il peut
toutefois arriver que de menus objets (pièces de
monnaie, boutons) tombent dans la préchambre qui
protège la pompe, placée en bas de cette dernière.
Contrôlez que le cycle de lavage est bien terminé
et débranchez la fiche.
Pour accéder à cette préchambre:
1. démontez le panneau
situé à l'avant du lavelinge à l'aide d'un
tournevis (voir figure);
2. dévissez le couvercle
en le faisant tourner dans
le sens inverse des
aiguilles d'une montre (voir
figure): il est normal qu'un
peu d'eau s'écoule;
Entretien du hublot et du tambour
Quand vous nutilisez pas votre lave-linge, laissez
toujours le hublot entrouvert pour éviter la
formation de mauvaises odeurs.
22
3. nettoyez soigneusement à l'intérieur;
4. revissez le couvercle;
5. remontez le panneau en veillant à bien enfiler les
crochets dans les fentes prévues avant de le pousser
contre la machine.
Contrôle du tuyau d'arrivée de l'eau
Contrôlez le tuyau d'alimentation au moins une fois
par an. Remplacez-le dès que vous remarquez des
craquèlements et des fissures: les fortes pressions
subies pendant le lavage pourraient provoquer des
cassures.
N'utilisez jamais de tuyaux usés.

Anomalies et remèdes
Il peut arriver que le lave-linge ne fonctionne pas bien. Avant de appelez le Service après-vente (voir page 24),
contrôlez s'il ne s'agit pas d'un problème facile à résoudre grâce à la liste suivante.
Anomalies:
Le lave-linge ne s'allume pas.
Le cycle de lavage ne démarre
pas.
Il n'y a pas d'arrivée d'eau
(Il y aura affichage du message
"H2O").
Le lave-linge prend l'eau et
vidange continuellement.
Causes / Solutions possibles:
La fiche n'est pas branchée dans la prise de courant ou mal
branchée.
Il y a une panne de courant.
Le hublot n'est pas bien fermé (affichage de l'inscription DOOR).
La touche
La touche START/RESET n'a pas été actionnée.
Le robinet de l'eau n'est pas ouvert.
Un départ différé a été sélectionné (Départ différé, voir page 19).
Le tuyau d'arrivée de l'eau n'est pas raccordé au robinet.
Le tuyau est plié.
Le robinet de l'eau n'est pas ouvert.
Il y a une coupure d'eau.
La pression n'est pas suffisante.
La touche START/RESET n'a pas été actionnée.
le tuyau de vidange n'est pas installé à une distance du sol
comprise entre 65 et 100 cm (voir page 15).
L'extrémité du tuyau de vidange est plongée dans l'eau (voir page 15).
L'évacuation murale n'a pas d'évent.
n'a pas été actionnée.
F
Bac produits
Votre lave-linge ne vidange pas
et n'essore pas.
Votre lave-linge vibre beaucoup
pendant l'essorage.
Le lave-linge a des fuites.
Il y a un excès de mousse.
Si après ces vérifications, le problème persiste, fermez le robinet de l'eau,
éteignez la machine et appelez le service Assistance. Si vous habitez en
étage dans un immeuble, il peut y avoir des phénomènes de siphonnement
qui font que votre lave-linge prend et évacue l'eau continuellement. Pour
supprimer cet inconvénient, vous pouvez trouver dans le commerce des
valves spéciales anti-siphonnement.
Le programme ne prévoit pas de vidange: pour certains
programmes, il faut intervenir pour la faire démarrer (voir page 18).
L'option Repassage facile est activée: pour compléter le
programme, appuyez sur la touche START/RESET (voir page 19).
Le tuyau de vidange est plié (voir page 15).
La conduite de l'installation de vidage est bouchée.
Le tambour n'a pas été débloqué (comme indiqué page 14) lors de
l'installation du lave-linge.
Le lave-linge n'est pas posé à plat (voir page 14).
Le lave-linge est coincé entre des meubles et le mur (voir page 14).
Le tuyau d'arrivée de l'eau n'est pas bien vissé (voir figure page 14).
Le tiroir à produits lessiviels est bouché (pour le nettoyer voir pag. 22).
Le tuyau de vidange n'est pas bien fixé (voir page 15).
Le produit de lavage utilisé n'est pas une lessive spéciale machine
(il faut qu'il y ait l'inscription "pour lave-linge", "main et machine", ou
autre semblable).
La quantité utilisée est excessive.
AssistanceAnomaliesPrécautions EntretienProgrammesInstallation Description
23

Assistance
F
Avant d'appeler le service après-vente:
Vérifiez si vous ne pouvez pas résoudre vous-même le problème (voir page 23);
Remettez le programme en marche pour contrôler si le dysfonctionnement a disparu;
Autrement, appelez le Service après-vente de votre revendeur;
Ne vous adressez jamais à des techniciens non agréés.
Communiquez:
le type de panne;
le modèle de la machine (Référence);
le numéro de série (S/N);
Vous trouverez tous ces renseignements sur la plaquette signalétique située sur le panneau arrière de
votre lave-linge.
Assistance
24

Bedienungsanleitungen
WASCHVOLLAUTOMAT
DE
Deutsch
AVSF 129
INHALTSVERZEICHNIS
DE
Installation, 26-27
Auspacken und Aufstellen, 26
Wasser- und Elektroanschlüsse, 26-27
Erster Waschgang, 27
Technische Daten, 27
Beschreibung des
Waschvollautomaten, 28-29
Schalterblende, 28
Display, 29
Inbetriebnahme und Programme, 30
Kurz zusammengefasst: Waschprogramm starten, 30
Programmtabelle, 30
Individualisierungen, 31
Einstellen der Schleuder, 31
Einstellen der Temperatur, 31
Einstellung der Startvorwahl, 31
Funktionen, 31
Waschmittel und Wäsche, 32
Waschmittelschublade, 32
Vorsortieren der Wäsche, 32
Besondere Wäscheteile, 32
Woolmark Platinum Care, 32
Vorsichtsmaßregeln und Hinweise, 33
Allgemeine Sicherheit, 33
Entsorgung, 33
Energie sparen und Umwelt schonen, 33
Reinigung und Pflege, 34
Wasser- und Stromversorgung abstellen, 34
Reinigung des Gerätes, 34
Reinigung der Waschmittelschublade, 34
Pflege der Gerätetür und Trommel, 34
Reinigung der Pumpe, 34
Kontrolle des Wasserzulaufschlauchs, 34
Störungen und Abhilfe, 35
Kundendienst, 36
Bevor Sie sich an den Kundendienst wenden, 36
25

Installation
DE
Es ist äußerst wichtig, diese Bedienungsanleitung
sorgfältig aufzubewahren, um sie jederzeit zu Rate ziehen
zu können. Sorgen Sie dafür, dass sie im Falle eines
Umzugs oder Übergabe an einen anderen Benutzer das
Gerät stets begleitet, damit auch der neue Inhaber die
Möglichkeit hat, diese zu Rate zu ziehen.
Lesen Sie bitte folgende Hinweise aufmerksam durch,
sie liefern wichtige Informationen hinsichtlich der Installation, dem Gebrauch und der Sicherheit.
Auspacken und Aufstellen
Auspacken
1. Gerät auspacken.
2. Sicherstellen, dass der Waschvollautomat keine Transportschäden erlitten hat. Im Falle einer Beschädigung Gerät bitte
nicht anschließen, sondern den Kundendienst anfordern.
3. Die vier Transportschutzschrauben ausschrauben und das an
der Rückwand befindliche Gummiteil nebst
entsprechendem
Distanzstück abnehmen
(siehe Abbildung).
4. Die Löcher mittels der mitgelieferten Kunststoffstöpsel
schließen.
5. Sämtliche Teile aufbewahren: Sollte der Waschvollautomat erneut transportiert werden müssen, müssen
diese Teile wieder eingesetzt werden.
Verpackungsmaterial ist kein Spielzeug für Kinder
Standfläche
1. Der Waschvollautomat muss auf einem ebenen, festen
Untergrund aufgestellt werden, ohne ihn an Wände, Möbelteile
oder ähnliches anzulehnen.
2. Sollte der Boden nicht
perfekt eben sein, müssen
die Unebenheiten durch
An- bzw. Ausdrehen der
vorderen Stellfüße ausgeglichen werden (siehe
Abbildung), der auf der
Arbeitsfläche zu ermittelnde Neigungsgrad darf 2°
nicht überschreiten.
Eine präzise Nivellierung verleiht dem Gerät die erforderliche
Stabilität, durch die Vibrationen, Betriebsgeräusche und ein
Verrücken des Gerätes vermieden werden. Bei Teppichböden müssen die Stellfüße so reguliert werden, dass ein
ausreichender Freiraum zur Belüftung unter dem Waschvollautomaten gewährleistet ist.
Wasser- und Elektroanschlüsse
Anschluss des Zulaufschlauches
1. Legen Sie die Gummidichtung A in das
Anschlussstück des
Zulaufschlauches ein und
A
vor dem Anschluss so lange auslaufen, bis klares
Wasser austritt.
3. Der Schlauch darf hierbei nicht eingeklemmt oder
abgeknickt werden.
Der Wasserdruck muss innerhalb der Werte liegen,
die in der Tabelle der Technischen Daten angegebenen
sind (siehe nebenstehende Seite).
Sollte der Zulaufschlauch nicht lang genug sein, dann
wenden Sie sich bitte an einen Fachhändler oder an
einen autorisierten Fachmann.
drehen Sie dieses an
einen mit
Gewindeanschluss von ¾
G versehenen Kaltwasserhahn (siehe Abbildung).
Lassen Sie das Wasser
2. Schließen Sie das
andere Ende des Schlauches an den oben rechts
am Rückteil des Waschvollautomaten befindlichen Wasseranschluss
an (siehe Abbildung).
26

Anschluss des Ablaufschlauches
Schließen Sie den Ablaufschlauch, ohne ihn dabei
zu krümmen, an eine
Ablaufleitung, oder an
einen in der Wand in einer
65 - 100 cm
Mindesthöhe von 65 - 100
cm angelegten Ablauf an;
Verwenden Sie bitte keine Verlängerungen oder
Mehrfachstecker.
Das Kabel darf nicht gebogen bzw. eingeklemmt
werden.
Das Versorgungskabel darf nur durch autorisierte
Fachkräfte ausgetauscht werden.
Achtung! Der Hersteller weist jede Haftung zurück, falls
diese Vorschriften nicht eingehalten werden sollten.
DE
oder hängen Sie ihn in ein
Becken oder eine Wanne
ein; befestigen Sie ihn in
diesem Falle mittels der
mitgelieferten Führung an
dem Wasserhahn (siehe
Abbildung). Das freie
Ablaufschlauchende darf
nicht unter Wasser
bleiben.
Verlängerungsschläuche sollten nicht eingesetzt
werden, sollte dies jedoch absolut unvermeidlich sein,
muss die Verlängerung denselben Durchmesser des
Originalschlauchs aufweisen und 150 cm nicht überschreiten.
Elektronschluss
Vor Einfügen des Steckers in die Steckdose ist sicherzustellen, dass:
die Steckdose über eine normgerechte Erdung
verfügt;
die Steckdose die in nebenstehender Datentabelle
angegebene Höchstlast des Gerätes trägt;
die Stromspannung den in nebenstehender Daten-
tabelle aufgeführten Werten entspricht;
Erster Waschgang
Lassen Sie nach der Installation bzw. vor erstmaligem
Gebrauch erst einen Waschgang (mit Waschmittel) ohne
Wäsche durchlaufen. Stellen Sie hierzu das 90°CWaschprogramm ohne Vorwäsche ein.
Technische Daten
Modell
Abmessungen
Fassungsvermögen
Elektroanschlüsse
Wasseranschlüsse
AVSF 12 9
Breite 59,5 cm
Höhe 85 cm
Tiefe 40 cm
1 bis 4,5 kg
Spannung 220/230 Volt 50 Hz
max. Leistungsaufnahme 1850 W
Höchstdruck 1 MPa (10 bar)
Mindestdruck 0,05 MPa (0,5 bar)
Trommelvolumen 40 Liter
Waschprogramme WaschmittelInstallation Beschreibung
Wartung und
Pflege
der Stecker in die Steckdose passt. Andernfalls muss
der Stecker (oder die Steckdose) ersetzt werden.
Der Waschvollautomat darf nicht im Freien installiert
werden, auch nicht, wenn es sich um einen geschützten
Platz handelt. Es ist gefährlich, Ihren Vollwaschautomaten
Gewittern und Unwettern auszusetzen.
Die Steckdose sollte nach installiertem Gerät leicht
zugänglich sein.
Schleudertouren
Prüfprogramme
gemäß IEC456
bis zu 1200 U/min.
Programm 3; Temperatur 60°C;
bei einer Lademenge von 4,5 kg.
Dieses Gerät entspricht den
folgenden EG-Richtlinien:
- 73/23/EWG vom 19.02.73
(Niederspannung)
und nachfolgenden Änderungen
- 89/336/EWG vom 03.05.89
(elektromagnetische Verträglichkeit)
und nachfolgenden Änderungen
- 2002/96/CE
KundendienstStörungenVorsichtsmaßregeln
27

DE
Beschreibung des
Waschvollautomaten
Schalterblende
Anzeigetafel
Waschmittelschublade
Waschmittelschublade für Waschmittel und Zusätze
(siehe Seite 32).
Anzeigetafel die zu jeder Zeit einen klaren Überblick
über die möglichen Programme gewährleistet. Ganz
einfach an der grauen Zunge herausziehen.
Tasten FUNKTIONEN zur Einstellung der verfügbaren
Funktionen. Die gewählte Einstellung der entsprechenden Funktionstaste bleibt eingeschaltet. (sie leuchtet)
SCHLEUDERN
Taste
FUNKTIONEN
Display
TEMPERATUR
STARTVORWAHL
Die Taste TASTENSPERRE dient zur Sperre sämtlicher Tasten Ihres Waschvollautomaten während des
Betriebs bzw. des Standby-Betriebs.
Display zur Programmierung des Waschvollautomaten und Ansicht des Programmablaufs (siehe
nebenstehende Seite).
Taste "EIN/AUS" zur Ein- und Ausschaltung des
Waschvollautomaten (siehe Seite 30).
TASTENSPERRE
Taste
EIN/AUS
Wahlschalter
Taste
START/RESET
Taste "SCHLEUDERN" zur Geschwindigkeitsregelung oder gänzlichen Ausschaltung der Schleuder
(siehe Seite 31).
Taste "TEMPERATUR" zur Änderung der Wasch-
temperaturen (siehe Seite 31).
Taste STARTVORWAHL: Mit dieser Taste kann der
Start des eingestellten Programms um bis zu 24 Std.
verzögert werden (siehe Seite 31).
28
Taste "START/RESET" um die Programme zu
starten bzw. zu löschen, falls unkorrekt eingestellt
(siehe Seite 30).
Wahlschalter zur Programmwahl Die Wahlschalter
sind flächenbündig angebracht: Durch leichten Druck
auf die Knopfmitte können Sie herausgezogen werden.
Während des Programmablaufs bleibt der Schalter
feststehend.

Display
Das Display ist nicht nur ein praktisches Mittel zur Programmierung des Gerätes (siehe Seite 31), es liefert auch Informationen über den Waschgang und seinen Ablauf.
Nach Drücken der Taste START/RESET, durch das das
Waschprogramm in Gang gesetzt wird, wird auf dem
Display die bis zum Ende des Waschgangs noch verbleibende Zeit angezeigt. Sollte ein zeitverschobener Start
eingestellt worden sein (Startvorwahl, siehe Seite 31),
dann wird dies auf dem Display angezeigt.
Während des Wachgangs wird Folgendes angezeigt:
DE
Laufende Programmphase:
Vorwäsche
Hauptwäsche
Spülen
Schleudern
Individualisierungs-Funktionen und -optionen:
Zur Wahl dieser Funktionen und Optionen siehe unten
und Seite 31.
Buzzer:
Ihr Gerät ist mit einem Warnsummer ausgestattet, der
den Ablauf der verschiedenen Funktionen oder eventuelle
Störungen anzeigt: Unvereinbarkeit, Tasten Optionen/
Programme, Start, Ende des Waschvorgangs, Reset.
Waschprogramme WaschmittelInstallation Beschreibung
Wartung und
Pflege
Tastensperre:
Zu Ihrer Sicherheit und der Ihrer Kinder können die Tasten während des Betriebs des Gerätes, oder während des
Standby-Betriebs (verzögerter Start - Standby-Betrieb) gesperrt werden. Drücken Sie hierzu die Taste "FUNKTIONEN"
für 2 Sekunden. Um die Sperre zu beseitigen, drücken Sie die Taste für ca. 4 Sekunden.
Füllfenstersicherung:
Durch Leuchten des Symbols meldet das Gerät, dass das Füllfenster gesperrt ist, um ein versehentliches Öffnen zu
vermeiden. Warten Sie bitten, bis das Symbol erlischt, um eine evtl. Beschädigung des Fensters zu vermeiden.
Dieses Modell ist mit einer Vorrichtung ausgestattet, dank derer das Füllfenster während der ersten Programmphase
noch geöffnet werden kann. Dies ist möglich, wenn das Symbol nicht eingeschaltet ist.
Nach Ablauf des gesamten Waschprogramms erscheint die Anzeige END.
Im Falle eventueller Anomalien wird ein Fehlercode eingeblendet, wie zum Beispiel: F-01, der dem Kundendienst zu
übermitteln ist (siehe Seite 36).
29
KundendienstStörungenVorsichtsmaßregeln

Inbetriebnahme und Programme
DE
Kurz zusammengefasst:
Waschprogramm starten
4. Waschmittel und Zusätze einfüllen (siehe Seite 32).
5. Wählen Sie eine beliebige Funktion (siehe Seite 31).
6. Programm durch Druck auf die Taste START/RESET
1. Maschine durch Drücken der Taste einschalten.
Sämtliche Symbole leuchten für einige Sekunden
auf, um dann wieder zu erlöschen.
2. Wäsche einfüllen und Füllfenster schließen.
3. Das gewünschte Programm mittels des Wahlschalters
einstellen. Auf dem Display wird die voraussichtliche
Programmdauer angezeigt. Temperatur und Schleuder
werden je nach gewähltem Programm automatisch
in Gang setzen.
Um dieses zu löschen, Taste START/RESET für
mindestens 2 Sekunden gedrückt halten.
7. Bei Programmabschluss erscheint die Anzeige END.
Wäsche herausnehmen und Füllfenster leicht
offenstehen lassen, damit die Trommel trocknen
kann.
8. Maschine durch Drücken der Taste
ausschalten.
eingestellt (evtl. Änderung siehe Seite 31).
Programmtabelle
Gewebeart und Verschmutzungsgrad
Baumwolle
Stark verschmutzteKochwäsche
(Bettücher, Tischdecken usw.)
Stark verschmutzteKochwäsche
(Bettücher, Tischdecken usw.)
Widerstandsfähige, stark
verschmutzte Weiß- und Buntwäsche
Leicht verschmutzte Weißwäsche
und empfindliche Buntwäsche
(Oberhemden, Maschenwareusw.)
Leicht verschmutzte empflindliche
Buntwäsche
Synthetik
Stark verschmutzte, farbechte
Buntwäsche (Babywäsche usw.)
Waschechte Farben (leicht
verschmutzte Wäsche jeder Art).
Stark verschmutzte, farbechte
Buntwäsche (Babywäsche usw.)
Zarte Farben (leicht verschmutzte
Wäsche jeder Art).
Zarte Farben (leicht verschmutzte
Wäsche jeder Art).
Wolle /se ide
Wolle
Sehr zarte Feinwäsche
(Gardinen, Seide, Viskose, usw.)
TEILPROGRAMME
Spülen Spülen und Schleudern
Sanftes Spülen
Schleudern
Sanftes Schleudern Abpumpen und sanftes Schleudern
Abpumpen Abpumpen
Was chprogramme
10
11
Te m p e ratur
1
2
3
4
5
6
6
7
8
9
90°C 160
90°C 143
60°C 120
40°C 85
30°C 77
60°C 92
40°C 77
50°C 86
40°C 76
30°C 30
40°C 42
30°C 52
Waschmittel
Vorw. Ha up tw.
Weich-
macher
ProgrammDauer
(Minuten)
Beschreibung des Waschprogramms
Vorwäsche, Hauptwäsche, Spülen,
Zwischen- und Endschleudern
Hauptwäsche, Spülen, Zwischenund Endschleudern
Hauptwäsche, Spülen, Zwischenund Endschleudern
Hauptwäsche, Spülen, Zwischenund Endschleudern
Hauptwäsche, Spülen, Zwischenund Endschleudern
Hauptwäsche, Spülen, Knitterschutz
oder sanftes Schleudern
Hauptwäsche, Spülen, Knitterschutz
oder sanftes Schleudern
Hauptwäsche, Spülen, Knitterschutz
oder sanftes Schleudern
Hauptwäsche, Spülen, Knitterschutz
oder sanftes Schleudern
Hauptwäsche, Spülen und sanftes
Schleudern
Hauptwäsche, Spülen und sanftes
Schleudern
Hauptwäsche, Spülen, Knitterschutz
oder Wasser abpumpen
Spülen, Knitterschutz oder
Abpumpen
Abpumpen und energisches
Schleudern
Anmerkungen
Zum Knitterschutz: siehe "Bügelleicht", auf nebenstehender Seite. Bei den in der Tabelle aufgeführten Daten handelt
es sich um Richtwerte.
Spezialprogramm
Kurzprogramm 30' (Programm 9 für Kunstfasern) Kurzprogramm für die tägliche Wäsche leicht verschmutzter Teile:
in nur 30 Minuten, zur Einsparung von Zeit und Energie. Stellen Sie dieses Waschprogramm (9 bei 30°C) ein, dann
können, bei einer maximalen Lademenge von 3 kg, Gewebe unterschiedlicher Art (mit Ausnahme von Wolle und
Seide) zusammen gewaschen werden. Es ist ratsam, flüssige Waschmittel einzusetzen.
30

Individualisierungen
Einstellen der Schleuder
Befindet sich der WAHLSCHALTER bei Einschalten des Waschautomaten auf einer Position, bzw. einem Programm, das einen
Schleudergang vorsieht, dann schaltet die Ikone
Durch drücken der Taste
wird die für das eingestellte Programm
maximal zulässige Schleuderdrehzahl angezeigt und die Ikone
schaltet auf Blinklicht. Durch erneutes drücken dieser Taste kann die
Schleuderdrehzahl bis auf OFF (Schleuderstop), reduziert werden.
(Drücken Sie die Taste erneut, schaltet die Schleuderdrehzahl wieder
hoch.) Geben Sie die Taste frei, sobald die gewünschte Schleuder-
Tasten OPTIONEN
drehzahl eingeblendet wird. Nach ca. 2 Sekunden wird diese gespeichert: Das Symbol
schaltet auf Dauerlicht. Obiges gilt für alle
Programme mit Ausnahme des Programms 11 und Abpumpen.
Einstellen der Temperatur
Befindet sich der WAHLSCHALTER beim Einschalten des Waschautomaten auf einer Position bzw. einem Programm,
das die Einstellung einer Temperatur vorsieht, dann schaltet die Ikone
wird die für das eingestellte Programm maximal zulässige Temperatur angezeigt und die Ikone schaltet auf Blinklicht.
Durch erneutes drücken dieser Taste kann die Temperatur bis auf OFF (Kaltwäsche), reduziert werden. (Drücken Sie
die Taste erneut, schaltet die Temperatur wieder hoch.) Geben Sie die Taste frei, sobald die gewünschte Temperatur
eingeblendet wird. Nach ca. 2 Sekunden wird diese gespeichert: Das Symbol
Obiges gilt für alle Waschprogramme.
auf Dauerlicht. Durch drücken der Taste
schaltet auf Dauerlicht.
auf Dauerlicht.
DE
Waschprogramme WaschmittelInstallation Beschreibung
Einstellung der Startvorwahl
Drücken Sie die Taste , auf dem Display wird die Anzeige OFF eingeblendet und das entsprechende Symbol schaltet auf
Blinklicht. Drücken Sie diese Taste erneut, erscheint die Anzeige "1h", das entspricht einer Zeitverzögerung des Programmstarts von einer Stunde. Durch mehrmaliges drücken dieser Taste kann eine Zeitverzögerung bis auf "24h"gewählt werden.
Geben Sie die Taste frei, wenn die von Ihnen gewünschte "Startvorwahl" eingeblendet wird; diese wird nach ca. 2 Sekunden
gespeichert, auf dem Display wird die für das eingestellte Waschprogramm vorgesehene Zeit angezeigt. Das Symbol
bleibt eingeschaltet.
Drücken Sie nun die Taste START - RESET. Die eingestellte "Startvorwahl" wird angezeigt. In dieser Phase kann die "Startvorwahl" nur noch durch eine Reduzierung der Zeit geändert werden. Die Einstellung der Startvorwahl ist bei allen Programmen möglich.
Tastensperre (siehe Seite 29).
Funktionen
Die verschiedenen Waschfunktionen, die Ihnen Ihr Waschvollautomat bietet, ermöglichen es Ihnen, hygienisch saubere und weiße
Wäsche zu erhalten, die Ihren Wünschen entsprechen. Aktivierung der Funktionen:
1. Die Taste der gewünschten Funktion gemäss untenstehender Tabelle drücken;
2. Das Einschalten bzw. Aufleuchten der entsprechenden Taste zeigt an, dass die Funktion aktiviert wurde.
Anmerkung: Sollte die Taste jedoch auf Blinklicht schalten, bedeutet dies, dass die Funktion zu dem eingestellten Programm nicht
zugeschaltet werden kann.
Wird eine Funktion eingestellt, die zu der bereits eingestellten nicht zugeschaltet werden kann, bleibt nur die zuletzt gewählte aktiv.
Optionen Wirkung Anleitungen zur Anwendung
Für einwandfrei
Super Wash
saubere, sichtbar
weißere Wäsche des
Klasse A-Standards.
Nicht vereinbar mit der Funktion KURZ.
Aktiv mit den
Programmen:
1, 2, 3, 4,
5, 6, 7, 8
Wartung und
Pflege
Bügelleicht
Kurz
Reduziert die
Knitterbildung und
erleichtert so das
Bügeln.
Verkürzt die Dauer
des
Waschvorgangs
um ca. 30%.
Bei dieser Option werden die Programme 6, 7, 8, 11 und Sanftes
Spülen unterbrochen, das Wasser wird nicht abgepumpt, die
Wäsche bleibt im Wasser liegen (Knitterschutz), das Taste
BÜGELLEICHT blinkt:
- zur Vervollständigung des Waschzyklus drücken Sie die Taste
START/RESET, oder die Taste BÜGELLEICHT;
- nur das Wasser abpumpen: Knopf auf das entsprechende Symbol
drehen und die Taste START/RESET drücken.
Nicht vereinbar mit der Option SUPER WASH.
Alle, mit
Ausnahme
1, 2, 9, 10,
Schleudern
Sanftes
Schleudern,
Abpumpen.
1, 2, 3, 4,
5, 6, 7, 8
,
31
KundendienstStörungenVorsichtsmaßregeln

Waschmittel und Wäsche
DE
Waschmittelschublade
Ein gutes Waschergebnis hängt auch von einer korrekten
Waschmitteldosierung ab: Eine zu hohe Dosierung
bedeutet nicht unbedingt reinere Wäsche, sie trägt nur
dazu bei, die Maschineninnenteile zu verkrusten und die
Umwelt zu belasten.
Schublade herausziehen
und Waschmittel oder
Zusätze wie folgt einfüllen:
1
3
In Kammer 1: Waschpulver für die Vorwäsche
(kein Flüssigwaschmittel)
In Kammer 2: Waschmittel für die Hauptwäsche (Waschpulver oder Flüssigwaschmittel)
Flüssigwaschmittel nur kurz vor dem Start einfüllen.
In Kammer 3: Zusätze (Weichspüler usw.)
Der Weichspüler darf das Gitter nicht übersteigen.
2
Verwenden Sie keine Handwaschmittel, sie verursa-
chen eine zu hohe Schaumbildung.
Vorsortieren der Wäsche
Sortieren Sie die Wäsche nach:
- Gewebeart / Waschetikettensymbol
- und Farben: Buntwäsche von Weißwäsche trennen.
Entleeren Sie alle Taschen.
Das angegebene Gewicht, das sich auf die maximale
Ladung an Trockenwäsche bezieht, sollte nicht
überschritten werden:
Widerstandsfähige Gewebe: max 4,5 kg
Kunstfasergewebe: max 2,5 kg
Feinwäsche: max 2 kg
Wolle: max 1 kg
Wie schwer ist Wäsche?
Besondere Wäscheteile
Gardinen:Gardinen zusammengefaltet in einem
Kissenbezug oder in einem netzartigen Beutel waschen. Waschen Sie diese allein, ohne das Gesamtgewicht für halbe Füllung zu übersteigen. Stellen Sie das
Programm 11 ein, das ein automatisches Ausschließen
der Schleuder vorsieht.
Skijacken und Anoraks: Sind diese mit Gänseoder Daunenfedern gefüttert, können sie im Waschvollautomaten gewaschen werden. Ziehen Sie die Teile
auf links, achten Sie auf eine maximale Beladung von
2/3 kg, wiederholen Sie 2/3 Spülgänge und stellen Sie
die Schleuder auf Schonschleudern ein.
Tennisschuhe: Entfernen Sie Schlammreste. Tennis-
schuhe können zusammen mit Jeans oder sonstigen
widerstandsfähigen Teilen, nicht jedoch mit Weißwäsche, gewaschen werden.
Wolle: Verwenden Sie Spezialwaschmittel; Lademenge von 1 kg bitte nicht überziehen.
Woolmark Platinum Care
Schonend wie Waschen von Hand.
Ariston hat einen neuen Standard hochwerti-
ger Leistungen geschaffen, der von The
Woolmark Company mit dem prestigevollen Warenzeichen Woolmark Platinum Care zugelassen wurde.
Befindet sich auf Ihrem Waschvollautomaten das Logo
Woolmark Platinum Care, können Teile aus Schurwolle, die mit dem Pflegeetikett "Handwäsche" ausgezeichnet sind, darin gewaschen werden (M.0303):
Verwenden Sie für alle mit "Handwäsche"
ausgezeichneten Teile das Programm 10 und
Spezialwaschmittel.
1 Bettuch 400-500 gr
1 Kissenbezug 150-200 gr
1 Tischdecke 400-500 gr
1 Bademantel 900-1.200 gr
1 Handtuch 150-250 gr
32

Vorsichtsmaßregeln
und Hinweise
Der Waschvollautomat wurde nach den strengsten
internationalen Sicherheitsvorschriften entworfen und
gebaut. Nachstehende Hinweise werden aus Sicherheitsgründen geliefert und sollten aufmerksam gelesen
werden.
Allgemeine Sicherheit
Dieses Gerät wurde für den nicht professionellen Einsatz
im privaten Haushalt konzipiert und seine Funktionen
dürfen nicht verändert werden.
Der Waschvollautomat darf nur von Erwachsenen und
gemäß den Anleitungen dieses Handbuchs bedient werden.
Berühren Sie das Gerät nicht, wenn Sie barfuß sind, und
auch nicht mit nassen oder feuchten Händen oder Füßen.
Ziehen Sie den Gerätestecker nicht am Kabel aus der
Steckdose, sondern nur am Stecker selbst.
Öffnen Sie die Waschmittelschublade nicht, wenn das
Gerät in Betrieb ist.
Berühren Sie nicht das Ablaufwasser, es kann sehr heiß sein.
Öffnen Sie das Füllfenster nicht mit Gewalt: Der
Sicherheits-Schließmechanismus könnte hierdurch
beschädigt werden.
Bei etwaigen Störungen versuchen Sie bitte nicht,
Innenteile selbst zu reparieren.
Verpflichtung, dass Elektrohaushaltsgeräte gesondert
entsorgt werden müssen.
Endverbraucher können sich an Abfallämter der Gemeinden wenden, um mehr Informationen über die
korrekte Entsorgung ihrer Elektrohaushaltsgeräte zu
erhalten.
Energie sparen und Umwelt schonen
Technologie im Dienste der Umwelt
Glauben Sie, durch das Füllfenster hindurch wenig Wasser zu
sehen? Dank der neuen Ariston-Technik genügt die halbe
Wassermenge für eine maximale Sauberkeit: eine Maßnahme die zum Schutze der Umwelt angestrebt wurde.
Waschmittel, Wasser, Energie und Zeit sparen
Verschwendung von Strom, Wasser, Waschmittel und
Zeit kann man vermeiden, indem man die Waschmaschine mit der empfohlenen Höchstwäschemenge
benutzt. Bei einer vollen Auslastung Ihres Waschvollautomaten können Sie bis zu 50% Energie sparen.
Vorwäsche ist nur bei stark verschmutzter Wäsche
erforderlich. Durch Vermeidung einer solchen kann
Waschmittel, Zeit, Wasser und 5-15% Energie gespart
werden.
DE
Waschprogramme WaschmittelInstallation Beschreibung
Halten Sie Kinder stets von dem in Betrieb befindlichen
Gerät fern.
Während des Waschgangs kann das Füllfenster sehr
heiß werden.
Muss der Waschvollautomat versetzt werden, sollten
hierfür mindestens 2/3 Personen verfügbar sein. (Vorsich-
tig vorgehen). Versuchen Sie es niemals allein, das Gerät
ist äußerst schwer.
Vergewissern Sie sich, dass die Trommel völlig leer ist,
bevor Sie die Wäsche einfüllen.
Entsorgung
Entsorgung des Verpackungsmaterials:
Befolgen Sie die lokalen Vorschriften, Verpackungs-
material kann wiederverwertet werden.
Gemäß der Europäischen Richtlinie 2002/96/EC über
Elektro- und Elektronik-Altgeräte dürfen Elektro-
haushalts-Altgeräte nicht über den herkömmlichen
Haushaltsmüllkreislauf entsorgt werden. Altgeräte
müssen separat gesammelt werden, um die Wiederver-
wertung und das Recycling der beinhalteten Materialien
zu optimieren und die Einflüsse auf die Umwelt und die
Gesundheit zu reduzieren. Das Symbol durchgestri-
chene Mülltonne auf jedem Produkt erinnert Sie an Ihre
Flecken sollten mit einem Fleckenmittel vorbehandelt
werden, oder weichen Sie die Wäsche vor der Wäsche
ein. Hierdurch können hohe Waschtemperaturen vermieden werden. Ein 60°C-Programm anstelle eines 90°CProgramms, oder ein 40°C-Programm anstelle eines
60°C-Programms hilft bis zu 50% Energie zu sparen.
Dosieren Sie Waschmittel sparsam je nach Wasser-
härte, Verschmutzungsgrad und Wäschemenge, um
die Umwelt nicht über Gebühr zu belasten: obwohl sie
biologisch abbaubar sind, beinhalten Sie dennoch
Stoffe, die die Umwelt belasten. Auch Weichmacher
sollten höchst sparsam eingesetzt werden.
Waschen Sie am späten Nachmittag oder in den ersten
Morgenstunden, hierdurch tragen sie dazu bei, die
Belastung der Elektrizitätswerke zu mindern.
Die Option Delay Timer' (siehe Seite 31) hilft Ihnen in
dieser Hinsicht außerordentlich.
Soll die Wäsche in einem Wäschetrockner getrocknet
werden, dann stellen Sie eine hohe Schleudergeschwindigkeit ein. Je trockener die Wäsche geschleudert wird, desto niedriger ist der zum Trocknen
erforderliche Energieverbrauch.
Wartung und
Pflege
KundendienstStörungenVorsichtsmaßregeln
33

Reinigung und Pflege
DE
Wasser- und Stromversorgung abstellen
Wasserhahn nach jedem Waschvorgang zudrehen.
Hierdurch wird der Verschleiß der Wasseranlage
verringert und Wasserlecks vorgebeugt.
Ziehen Sie den Stecker aus der Steckdose, bevor Sie
Ihren Waschvollautomaten reinigen.
Reinigung des Gerätes
Die Gehäuseteile und die Teile aus Gummi können mit
einem mit warmer Spülmittellauge angefeuchteten Tuch
gereinigt werden. Vermeiden Sie Löse- und Scheuermittel.
Reinigung der Waschmittelschublade
1
Heben Sie die Schublade
leicht an und ziehen Sie
sie nach vorne hin heraus
(siehe Abbildung).
Spülen Sie diese regelmäßig unter fließendem
Wasser gründlich aus.
2
Reinigung der Pumpe
Ihr Gerät ist mit einer selbstreinigenden Pumpe ausgerüstet, eine Wartung ist demnach nicht erforderlich. Es
könnte doch einmal vorkommen, dass kleine Gegenstände (Münzen, Knöpfe) in die zum Schutz der Pumpe
dienende Vorkammer (befindlich unter der Pumpe) fallen.
! Vergewissern Sie sich, dass der Waschgang abgeschlossen ist und ziehen Sie den Stecker heraus.
Vergewissern Sie sich, dass der Waschgang abge-
schlossen ist und ziehen Sie den Stecker heraus.
Zugang zur Vorkammer:
1. Die Abdeckung (befindlich an der Gerätefront)
mit Hilfe eines Schraubenziehers abnehmen (siehe
Abbildung);
2.den Deckel gegen den
Uhrzeigersinn abdrehen
(siehe Abbildung): es ist
ganz normal, wenn
etwas Wasser austritt;
Pflege der Gerätetür und Trommel
Lassen Sie die Füllfenstertür stets leicht offen stehen,
um die Bildung unangenehmer Gerüche zu vermeiden.
3. das Innere gründlich reinigen;
4. den Deckel wieder aufschrauben;
5. die Abdeckung wieder anbringen. Stellen Sie hierbei
sicher, dass die Haken in die Schlitze eingreifen, bevor
Sie die Abdeckung fest andrücken.
Kontrolle des Wasserzulaufschlauchs
Kontrollieren Sie den Zulaufschlauch mindestens einmal
im Jahr. Weist er Risse bzw. Brüche auf, muss er
ausgetauscht werden. Der starke Druck während des
Waschprogramms könnte zu plötzlichem Platzen führen.
Verwenden Sie niemals bereits gebrauchte Schläuche.
34

Störungen und Abhilfe
Es kann immer einmal vorkommen, dass Ihr Waschvollautomat nicht funktioniert. Bevor Sie sich an den Technischen
Kundendienst wenden (siehe Seite 36), vergewissern Sie sich zuerst, ob es sich nicht um eine Kleinigkeit handelt, die
Sie selbst beheben können. Ziehen Sie hierzu nachstehendes Verzeichnis zu Rate.
DE
Störungen:
Der Waschvollautomat schaltet
sich nicht ein.
Der Waschgang startet nicht.
Der Waschvollautomat lädt kein
Wasser (Auf dem Display ist die
Anzeige H
Der Waschvollautomat lädt
laufend Wasser und pumpt es
laufend ab.
O eingeblendet).
2
Mögliche Ursachen / Lösungen:
Der Stecker steckt nicht in der Steckdose, oder nicht so, dass der
Kontakt hergestellt wird.
Der Strom ist ausgefallen.
Das Füllfenster ist nicht richtig geschlossen (Display-Anzeige: DOOR).
Die Taste
Die Taste START/RESET wurde nicht gedrückt.
Der Wasserhahn ist nicht auf.
Es wurde ein verzögerter Start gewählt (Startvorwahl, siehe Seite 31).
Der Zufuhrschlauch ist nicht am Wasserhahn angeschlossen.
Der Schlauch ist geknickt.
Der Wasserhahn ist nicht auf.
Es ist kein Wasser da.
Der Druck ist unzureichend.
Die Taste START/RESET wurde nicht gedrückt.
Der Ablaufschlauch befindet sich nicht auf der vorgeschriebenen Höhe,
d.h. 65 - 100 cm vom Boden (siehe Seite 27).
Das Schlauchende liegt unter Wasser (siehe Seite 27).
Der Mauerablauf wurde nicht mit einer Entlüftungsöffnung versehen.
Konnte die Störung durch diese Kontrollen nicht behoben werden, dann
drehen Sie den Wasserhahn zu, schalten das Gerät aus und fordern den
Kundendienst an. Falls Sie in einer der obersten Etagen eines Gebäudes
wohnen, kann es vorkommen, dass sich im Syphon ein Vakuum bildet,
und der Waschvollautomat ständig Wasser ansaugt und wieder abpumpt.
Zur Lösung dieser Probleme bietet der Handel spezielle Syphonventile.
wurde nicht gedrückt.
Waschprogramme WaschmittelInstallation Beschreibung
Der Waschvollautomat pumpt
nicht ab und schleudert nicht.
Der Waschvollautomat vibriert
zu stark während des Schleuderns.
Der Waschvollautomat ist undicht.
Es bildet sich zu viel Schaum.
Das Programm siehe kein Abpumpen vor: bei einigen Programmen
muss diese Funktion manuell gestartet werden (siehe Seite 30).
Die Funktion Bügelleicht' wurde eingestellt: zur Beendung des Pro-
gramms Taste START/RESET drücken (siehe Seite 31).
Der Ablaufschlauch ist geknickt (siehe Seite 27).
Die Ablaufleitung ist verstopft.
Die Trommel wurde bei der Installation nicht korrekt befreit (siehe Seite 26).
Der Waschvollautomat steht nicht eben (siehe Seite 26).
Der Waschvollautomat steht zu eng zwischen der Wand und einem
Möbel (siehe Seite 26).
Der Zulaufschlauch wurde nicht ordnungsgemäß aufgeschraubt (siehe
Seite 26).
Die Waschmittelschublade ist verstopft (zur Reinigung siehe Seite 34).
Der Ablaufschlauch wurde nicht ordnungsgemäß befestigt (siehe Seite 27).
Das Waschmittel ist für Waschmaschinen nicht geeignet (es muss mit
der Aufschrift "Für Waschmaschinen", "Für Handwäsche und Wasch-
maschinen" usw. versehen sein.
Es wurde zu hoch dosiert.
35
Wartung und
Pflege
KundendienstStörungenVorsichtsmaßregeln

Kundendienst
DE
Bevor Sie sich an den Kundendienst wenden:
Kontrollieren Sie zuerst, ob das Problem nicht allein gelöst werden kann (siehe Seite 35);
Starten Sie das Programm erneut, um sicherzustellen, dass die Störung auch wirklich behoben wurde;
Ist dies nicht der Fall, dann kontaktieren Sie den autorisierten Kundendienst unter der auf dem Garantieschein
befindlichen Telefonnummer.
Wenden Sie sich auf keinen Fall an nicht autorisierte Techniker.
Geben Sie bitte Folgendes an:
die Art der Störung;
das Maschinenmodell (Mod.);
die Seriennummer (S/N).
Diese Daten entnehmen Sie bitte dem auf der Rückseite der Maschine befindlichen Typenschild.
Kundendienst
36

Instructies voor het gebruik
WASMACHINE
NL
Nederlands
AVSF 129
Inhoud
NL
Installatie, 38-39
Uitpakken en waterpas zetten, 38
Water- en elektrische aansluiting, 38-39
Eerste wasprogramma, 39
Technische gegevens, 39
Beschrijving van de wasmachine, 40-41
Bedieningspaneel, 40
Display, 41
Start en programma's, 42
In het kort: een programma starten, 42
Tabel van de programma's, 42
Persoonlijk instellen, 43
Instellen van de centrifuge, 43
Instellen van de temperatuur, 43
Instellen van delay timer, 43
Functies, 43
Wasmiddel en wasgoed, 44
Wasmiddellaatje, 44
Prepareren van het wasgoed, 44
Speciale stukken, 44
Woolmark Platinum Care, 44
Voorzorgsmaatregelen en raadgevingen, 45
Algemene veiligheid, 45
Het afvoeren, 45
Bezuiniging en bescherming van het milieu, 45
Onderhoud, 46
Afsluiten van water en stroom, 46
Schoonmaken van de wasmachine, 46
Het wasmiddellaatje schoonmaken, 46
Reinigen van deur en trommel, 46
Reinigen van de pomp, 46
Controleer de slang van de watertoevoer, 46
Storingen en oplossingen, 47
Service, 48
Voordat u er de installateur bijhaalt, 48
37

Installatie
NL
Het is belangrijk dit boekje te bewaren zodat u het
kunt raadplegen wanneer u maar wilt. In het geval dat u
de machine verkoopt, of u verhuist, moet het boekje bij
de machine blijven zodat de nieuwe gebruiker de
functies en betreffende raadgevingen kan leren kennen.
Lees de instructies met aandacht: u vindt er belang-
rijke informatie betreffende het installeren, gebruik en
veiligheid.
Uitpakken en waterpas zetten
Uitpakken
1. Pak de wasmachine uit.
2. Controleer of de wasmachine geen schade heeft
geleden gedurende het vervoer. Indien dit wel het
geval is moet hij niet worden aangesloten en moet u
contact opnemen met de handelaar.
3. Verwijder de vier
transportbouten met de
rubberen ring en bijbehorende afstandstukken
die zich aan de achterkant bevinden (zie
afbeelding).
4. Sluit de gaten af met de bijgeleverde plastic doppen.
5. Bewaar alle stukken: mocht de wasmachine ooit
worden vervoerd, dan moeten deze weer worden
aangebracht.
Een correcte waterpas geeft de machine stabiliteit
en vermijdt trillingen, lawaai en het zich verplaatsen
gedurende het functioneren van de machine. In het
geval van vaste vloerbedekking of een tapijt regelt u
de stelvoetjes zodanig dat onder de wasmachine
genoeg plaats is voor ventilatie.
Water- en elektrische aansluiting
Aansluiting van de watertoevoerslang
1. Plaats de pakking A
op het uiteinde van de
waterslang en schroef
hem op een koud-
A
waterkraan met een
mondstuk met schroefdraad van 3/4 gas (zie
afbeelding).
Voordat u hem aansluit
moet u het water laten
lopen totdat het helder is.
2. Verbind de slang aan
de wasmachine door
hem op de betreffende
watertoevoer aan te
schroeven, rechtsboven
aan de achterkant (zie
afbeelding).
Het verpakkingsmateriaal is geen speelgoed voor
kinderen.
Waterpassen
1. Installeer de wasmachine op een rechte en stevige
vloer en laat hem niet leunen tegen een muur, meubel
of dergelijken.
2. Als de vloer niet perfect
horizontaal is kunt u de
onregelmatigheid opheffen
door de stelvoetjes aan de
voorkant in- of uit te
schroeven (zie afbeelding);
de hoek, gemeten ten
opzichte van de aanrecht,
mag de 2° niet overschrijden.
3. Let erop dat er geen knellingen of kronkels in de
slang zijn.
De waterdruk van de kraan moet binnen de
waarden van de tabel Technische Gegevens liggen
(zie bladzijde hiernaast).
Als de slang niet lang genoeg is moet u zich wenden
tot een gespecialiseerde handelaar of een bevoegde
installateur.
38

Aansluiting van de afvoerbuis
Verbind de buis, zonder
hem te buigen, aan een
afvoerleiding of aan een
afvoer in de muur tussen
65 en 100 cm van de
65 - 100 cm
grond af;
Gebruik geen verlengsnoeren of dubbelstekkers.
NL
Het snoer mag niet in bochten of geknikt liggen.
De voedingskabel mag alleen door een bevoegde
installateur worden vervangen.
Belangrijk! De fabrikant is niet aansprakelijk wanneer
deze normen niet gerespecteerd zijn.
Eerste wasprogramma
of hang hem op de rand
van een wasbak of bad,
en bind de bijgeleverde
leiding aan de kraan
(zie afbeelding). Het
uiteinde van de afvoerslang mag niet onder
water hangen.
Gebruik geen verlengstuk voor de slang ; indien dit
niet te vermijden is moet het verlengstuk dezelfde
doorsnee hebben als de originele slang en hij mag niet
langer zijn dan 150 cm.
Elektrische aansluiting
Voordat u de stekker in het stopcontact steekt moet u
zich ervan verzekeren dat:
het stopcontact geaard is en voldoet aan de gel-
dende normen;
het stopcontact het maximum vermogen van de
machine kan verdragen, zoals aangegeven in de
tabel Technische Gegevens (zie hiernaast);
het voltage correspondeert met de waarden die zijn
aangegeven in de tabel Technische Gegevens (zie
hiernaast);
het stopcontact geschikt is voor de stekker van de
machine. Indien dit niet zo is moet de stekker of het
stopcontact vervangen worden.
De wasmachine mag niet buiten worden geinstalleerd,
ook niet op een plaats die beschut is, aangezien het
gevaarlijk is hem aan regen en onweer bloot te stellen.
Als de wasmachine is geinstalleerd moet het stop-
contact gemakkelijk te bereiken zijn.
Voordat u de machine gaat gebruiken moet u hem een
wascycle laten uitvoeren met wasmiddel maar zonder
wasgoed, met het programma van 90° zonder voorwassen.
Technische gegevens
Model
Afmetingen
Vermog e n
Elektrische
aansl uitingen
Aansluiti ng
waterleidi ng
Snelheid
centrifuge
Controle-programma's volgens de
norm IEC456
AVSF 129
breedte cm 59,5
hoogte cm 85
diepte cm 40
van 1 tot 4,5 kg
spanning 220/230 Volt 50 Hz
max. aansluitwaarde 1850 W
max. druk 1 MPa (10 bar)
min. druk 0,05 MPa (0,5 bar)
Inhoud trommel 40 liters
tot 1200 toeren per minuut
programma 3; temperatuur 60°C;
uitgevoerd met 4,5 kg lading.
Deze apparatuur voldoet aan de
volgende EEC voorschriften:
-73/23/EEC van 19/02/73
(Laagspanning) en successievelijke
modificaties
-89/336/EEC van 03/05/89
(Elektromagnetische compatiabiliteit)
en successievelijke modificaties
- 2002/96/CE
maatregelen
Voorzorgs-
OnderhoudProgramma's WasmiddelInstallatie Beschrijving
ServiceStoringen
39

NL
Beschrijving van de
wasmachine
Bedieningspaneel
Programmaschijf
Wasmiddellaatje
Wasmiddellaatje voor wasmiddel en verdere
toevoegingen (zie blz. 44).
Programmaschijf voor het raadplegen, op ieder
willekeurig moment, van een beknopt schema van
de programma's: Trek het grijze lipje naar buiten.
FUNCTIE knoppen voor het kiezen van de functies.
De knop van de gekozen functie blijft verlicht.
TOERENTAL CENTRIFUGE knop voor het regelen
van de snelheid van de centrifuge tot aan het
uitsluiten ervan (zie blz. 43).
TEMPERATUUR knop voor het veranderen van de
wastemperatuur (zie blz. 43).
DELAY TIMER knop voor het uitstellen van de start
van het ingestelde programma tot een maximum
van 24 uren (zie blz. 43).
CENTRIFUGE
FUNCTIE
knoppen
Display
TEMPERATUUR
DELAY TIMER
Knop BLOKKERING KNOPPEN voor het blokkeren van alle knoppen op uw wasmachine terwijl hij
bezig is of in Stand-by.
Display voor het programmeren van de wasmachine en voor het volgen van de voortgang van het
wasprogramma (zie blz. hiernaast).
AAN/UIT knop voor het in- en uitschakelen van de
wasmachine (zie blz. 42).
START/RESET knop voor het starten van de
programma's of voor het annuleren als u per ongeluk verkeerd heeft ingesteld (zie blz. 42).
Knop voor het kiezen van de programma's. De
knoppen zijn van het verzonken soort: om ze naar
voren te halen drukt u licht op het midden. Gedurende het programma blijft de knop stilstaan.
BLOKKERING
KNOPPEN
AAN/UIT
knop
Knop
START/RESET
knop
40

Display
Behalve dat het een nuttig instrument is voor het programmeren van de machine (zie blz. 43) geeft de display
informatie betreffende het voortschrijden van het programma.
Nadat u de knop START/RESET heeft ingedrukt voor
het starten van het programma ziet u op de display
de tijd die resteert tot aan het einde van het wasprogramma. Als u een uitgestelde start heeft ingesteld (Delay Timer, zie blz. 43) wordt deze getoond.
Gedurende het wasprogramma worden getoond:
Fase die bezig is:
Voorwassen
Wassen
Spoelen
Centrifuge
NL
Functies en Opties van persoonlijk instellen:
Voor het kiezen van de functies en opties, zie hieronder en op blz. 43.
Buzzer:
Uw machine is voorzien van een geluidssignaal dat
het uitvoeren van de verschillende functies aangeeft
of eventuele stoornissen: incompatibiliteit, knoppen
opties/programma's, start, einde cycle, reset.
Blokkering knoppen:
Voor de veiligheid van uw kinderen en uzelf kunt u alle knoppen blokkeren gedurende het functioneren van de
machine of als de machine zich in de wachtstand bevindt (uitgestelde start-Stand-by), door de bedrijfsknop 2
seconden ingedrukt te houden.
Voor het disactiveren houdt u hem ongeveer 4 seconden ingedrukt.
Deur geblokkeerd:
Het symbool geeft aan dat de deur is geblokkeerd om eventuele ongelukken te voorkomen. Om schade te
voorkomen moet u wachten tot het symbool uitgaat en dan pas de deur openen.
Dit model is voorzien van een systeem dat het mogelijk maakt de deur ook gedurende de eerste fase van het
programma open te maken. Dit is mogelijk als het symbool niet aan is.
Aan het einde van het programma ziet u het woord END.
maatregelen
Voorzorgs-
ServiceStoringenOnderhoudProgramma's WasmiddelInstallatie Beschrijving
In het geval van storingen verschijnt een codenummer van de storing, b.v.: F-01, dat u moet mededelen aan
uw Installateur (zie blz. 48).
41

Start en Programma's
NL
In het kort: een programma starten
1. Schakel de machine in met de knop .
Alle symbolen gaan een paar seconden aan en
gaan dan weer uit.
2. Laad het wasgoed in en sluit de deur.
3. Kies met de knop het gewenste programma. Op
de display ziet u de geschatte tijdsduur. Temperatuur en centrifuge worden automatisch ingesteld
op basis van het programma (voor het veranderen
zie blz. 43).
Tabel van de programma's
Soort stof en vuil Pr ogra mm a's
Te m p e ratuur
4. Giet het wasmiddel en verdere toevoegingen in
het laatje (zie blz. 44).
5. Het kiezen van de functies (zie blz. 43).
6. Start het programma met de START/RESET
knop.
Voor het annuleren houdt u de START/RESET
knop minstens 2 seconden ingedrukt.
7. Aan het einde van het programma verschijnt het
woord END. Haal het wasgoed eruit en laat de
deur op een kier staan zodat de trommel kan
drogen.
8. Schakel de machine uit met de knop
Wasmid del
Voo r-
was
Was
Wasverz-
achter
Duur
van de
cycle
(min.)
Beschrijving wascycle
Katoen
Zeer vuile witte was
(lakens, tafellakens enz.)
Zeer vuile witte was
(lakens, tafellakens enz.)
Zeer vuil wit en gekleurd wasgoed
Weinig vuil wit wasgoed en fijn
gekleurd wasgoed (overhemden,
truien enz.)
Fijn gekleurd wasgoed weinig vuil
1
2
3
4
5
90°C 160
90°C 143
60°C 120
40°C 85
30°C 77
Voorwas, was,
centrifuge tussendoor en einde
Was, spoelingen, centrifuge
tussendoor en einde
Was, spoelingen, centrifuge
tussendoor en einde
Was, spoelingen, centrifuge
tussendoor en einde
Was, spoelingen, centrifuge
tussendoor en einde
spoelingen,
Synthetisch
Zeer vuile gekleurde stevige stoffen
(babygoed enz.)
Kleurvaste stoffen
(weinig vuil wasgoed)
Zeer vuile gekleurde stevige stoffen
(babygoed enz.)
Licht gekleurde stoffen (ieder soort
weinig vuil wasgoed)
Licht gekleurde stoffen (ieder soort
weinig vuil wasgoed)
6
6
7
8
9
60°C 92
40°C 77
50°C 86
40°C 76
30°C 30
Was, spoelingen, kreukvrij of
centrifuge
Was, spoelingen, kreukvrij of
centrifuge
Was, spoelingen, kreukvrij of
centrifuge
Was, spoelingen, kreukvrij of
centrifuge
spoelingen en
Was,
centrifuge
licht
Wol was
licht
licht
centrifuge
W
ol
Speciaal fijne stoffen
(gordijnen, zijde, viscose enz.)
PROGRAMMA ONDERDELEN
Spoelen Spoelingen en centrifuge
Licht
spoelen
Centrifuge
Licht
ren
centrifuge
ren
10
11
40°C 42
30°C 52
Spoelingen, kreukvrij of afpompen
Afpompen
Was, spoelingen en
centrifuge
Was, spoelingen, kreukvrij of
afpompen
Afpompen en energieke centrifuge
Afpompen en
Afpompen
.
licht
licht
licht
licht
N.B.
Kijk voor de beschrijving van kreukvrij: Zie Gemakkelijk Strijken, bladzijde hiernaast. De gevens in de tabel
hebben een indicatieve waarde.
Speciaal programma
Dagelijkse was 30' (programma 9 voor synthetische stoffen) is bedoeld voor het snel wassen van kledingstukken die
weinig vuil zijn: het duurt slechts 30 minuten en bespaart dus elektriciteit en tijd. Met programma (9 met 30 °C) kunt u
verschillende soorten stoffen tesamen wassen (behalve zijde en wol) met een lading van max. 3 kg.
Het beste is om hierbij vloeibaar wasmiddel te gebruiken.
42

Persoonlijk instellen
Instellen van de centrifuge
Als bij het starten van de machine de KNOP zich bevindt op een
programma dat centrifuge inhoudt, verschijnt het symbool
niet knipperend. Als u op de toets drukt wordt de maximum
snelheid van de centrifuge getoond die is toegestaan bij het
ingestelde programma en het symbool
nogmaals drukt gaan de waarden omlaag tot aan OFF, hetgeen
betekent dat de centrifuge is uitgesloten (druk nogmaals om tot
de hoogste waarde terug te keren); stop op de gewenste
snelheid en na ongeveer 2 seconden wordt de keuze bevestigd:
Keuze-knoppen
het symbool
actief bij alle programma's behalve 11 en Waterafvoer.
knippert niet. Het instellen van de centrifuge is
Instellen van de temperatuur
Als bij het starten van de machine de KNOP zich bevindt op een programma dat voorziet in het regelen van de
temperatuur, verschijnt het symbool
tuur getoond die is toegestaan bij het ingestelde programma en het symbool
drukt gaat de temperatuur omlaag tot OFF, hetgeen koude was betekent (druk nogmaals om naar de hoogste
waarde terug te keren); stop op de gewenste waarde en na ongeveer 2 seconden wordt de keuze bevestigd: het
symbool
knippert niet. Het instellen van de temperatuur is actief bij alle wasprogramma's.
niet knipperend. Als u op de toets drukt wordt de maximum tempera-
. gaat knipperen Als u nogmaals
gaat knipperen. Als u
NL
Installatie Beschrijving
Programma's
Instellen van delay timer
Door op de toets te drukken ziet u op de display het woord OFF verschijnen en het betreffende symbool gaat
knipperen.
Als u nogmaals op de toets drukt verschijnt "1h" hetgeen een uur uitgesteld betekent en zo verder tot aan 24h;
stop op de gewenste tijd van uitstel en na ongeveer 2 seconden wordt de keuze bevestigd; vervolgens ziet u op de
display de tijdsduur die voor het ingestelde programma is voorzien en het symbool
Als u nu op de START/RESET toets drukt verschijnt de gekozen tijd van uitstel die ieder uur minder wordt tot aan
het begin van de cycle; u kunt in deze fase het uitstel alleen maar korter maken.
Het regelen van de Delay Timer is actief bij alle programma's.
blijft aan.
Blokkering knoppen (zie blz. 41).
Functies
De verschillende functies van de wasmachine zorgen voor een heldere en witte was zoals door u gewenst. Voor
het activeren van de functies:
1. druk op de knop die bij de gewenste functie hoort, volgens de hiervolgende tabel;
2. het oplichten van de betreffende knop geeft aan dat de functie actief is.
N.B.: Snel knipperen van de knop geeft aan dat de bijbehorende functie van het ingestelde programma niet gekozen kan worden.
Als een functie wordt ingesteld die niet past bij een andere eerder ingestelde functie, dan blijft alleen de laatste keuze actief.
Optie Effect Notities voor het gebruik
Voor een perfecte
was, duidelijk
Super
Wash
witter dan de
standaard in
Klasse A.
Deze optie is niet geschikt voor de KORT PROGRAMMA.
Actief bij de
programma's:
1, 2, 3, 4,
5, 6, 7, 8
Wasmiddel
maatregelen
Voorzorgs-
Onderhoud
Storingen
Gemakkelijk
strijken
Kort
programma
Vermi nder t het
kreuken van de
stoffen en
vergemakkelijkt het
strijken.
Reduceert de duur
van het wasprogramma met ongeveer
30%.
Met deze optie worden de programma's 6, 7, 8, 11 en Delicate
spoeling onderbroken met de was in de week (kreukvrij) en de
knop GEMAKKELIJK STRIJKEN knippert:
- voor het afmaken van de cycle drukt u op de START/RESET knop
of op de knop GEMAKKELIJK STRIJKEN.
- voor alleen waterafvoer zet u de knop op het symbool en
drukt u op de START/RESET knop.
Deze optie is niet geschikt voor de SUPER WASH.
Allen behalve
1, 2, 9, 10,
Centrifugeren,
Licht
centrifugeren,
Afpompen.
Service
1, 2, 3, 4,
5, 6, 7, 8
43

Wasmiddel en wasgoed
NL
Wasmiddellaatje
Een goed resultaat van de was hangt ook af van
een juiste dosis wasmiddel: te veel maakt het
wassen niet beter en blijft in het wasgoed hangen
terwijl het slecht is voor het milieu.
Trek het laatje naar voren
en giet het wasmiddel
en/of de verdere toevoegingen erin als volgt.
1
3
bakje 1: voorwasmiddel (poeder)
bakje 2: wasmiddel (poeder of vloeibaar)
Het vloeibare wasmiddel wordt erin gegoten vlak voor
de start.
bakje 3: toevoegingen (wasverzachter enz.)
De wasverzachter mag niet boven het roostertje
uitkomen.
2
Gebruik nooit middelen voor handwas aangezien
die te veel schuim vormen.
Prepareren van het wasgoed
Verdeel het wasgoed volgens:
- het soort stof / het symbool op het etiket.
- de kleuren: scheid gekleurd goed van de witte was.
Maak de zakken leeg en controleer de knopen.
Ga niet boven het aangegeven gewicht, berekend
voor droog wasgoed:
stevige stoffen: max 4,5 kg
synthetische stoffen max 2,5 kg
fijne stoffen max 2 kg
Wol: max 1 kg
Speciale stukken
Gordijnen: vouw de gordijnen nauwkeurig en doe
ze in een kussensloop of net. Was ze apart zonder
ooit de halve lading te overschrijden. Gebruik programma 11 dat automatisch de centrifuge uitsluit.
Donzen dekbedden en met dons gevulde
windjacks: als de vulling uit ganzenveren of
eendendons bestaat kunt u ze wassen in de wasmachine. Keer de stukken binnenste buiten en ga
niet boven een max. lading van 2-3 kg; herhaal de
spoeling een of twee keer en gebruik de delicate
centrifuge.
Tennisschoenen: verwijder modder. Ze kunnen
tegelijk met jeans en sterke stoffen worden gewassen,
maar niet tegelijk met de witte was.
Wol: Gebruik voor de beste resultaten een wasmiddel
dat speciaal voor wol is bestemd en laad niet meer
dan 1kg wollen goed in de machine.
Woolmark Platinum Care
Voorzichtig als ware het met de hand
gewassen.
Ariston heeft een nieuwe standaard van
superieure prestaties geintroduceerd, door The
Woolmark Company erkend met het prestigieuze
kenmerk Woolmark Platinum Care. Als op de wasmachine het logo Woolmark Platinum Care voorkomt kunt
u met een gerust hart uw wollen goed wassen dat het
etiket "Handwas" bevat (M.0303):
Stel voor alle "Handwas" stukken programma
10 in, met gebruik van wasmiddel voor wol.
Hoeveel weegt het wasgoed?
1 laken 400-500 gr.
1 sloop 150-200 gr.
1 tafelkleed 400-500 gr.
1 badjas 900-1200 gr.
1 handdoek 150-200 gr.
44

Voorzorgsmaatregelen en
raadgevingen
De wasmachine is ontworpen en geproduceerd
volgens de internationale veiligheidsnormen. Deze
aanwijzingen worden voor uw eigen veiligheid gegeven en zij moeten met aandacht worden gelezen.
Algemene veiligheid
Dit apparaat is gemaakt voor huishoudelijk ge-
bruik, niet-professioneel, en zijn functies mogen
niet veranderd worden.
De wasmachine mag alleen door volwassen
personen en volgens de instructies in dit boekje
worden gebruikt.
Raak de machine niet aan als u blootsvoets bent
of met natte of vochtige handen of voeten.
Trek de stekker nooit aan het snoer uit het
stopcontact, maar altijd door de stekker aan te
pakken.
Open het wasmiddellaatje niet terwijl de machine
in werking is.
Raak het afvoerwater niet aan aangezien het
nogal warm kan zijn.
Forceer nooit de deur: het veiligheidsmechanisme,
dat tegen per ongeluk openen beschermt, kan
beschadigd worden.
erdoor herinnert u aan uw verplichting, dat
wanneer u het apparaat vernietigt, het apparaat
apart moet worden ingezameld.
Consumenten moeten contact opnemen met de
locale autoriteiten voor informatie over de juiste
wijze van vernietiging van hun oude apparaat.
Bezuiniging en bescherming van het milieu
Maximale reiniging
Als er weinig water door de glazen deur te zien is
komt dat doordat met de nieuwe Ariston technologie
minder dan de helft water voldoende is voor maximum reinheid van de was: een doel dat is bereikt
ten gunste van de milieu-bescherming.
Bezuinigen op wasmiddel, water, energie en tijd
Teneinde geen energiebronnen te verkwisten
moet de machine altijd met maximum lading
worden gebruikt. U spaart 50% energie met een
volle lading i.p.v. twee half volle ladingen.
Voorwassen is alleen nodig voor erg vuil wasgoed.
Door dit te vermijden bespaart u wasmiddel, tijd,
water en ongeveer 5 tot 15% energie.
NL
Probeer in geval van storingen nooit zelf interne
mechanismen van de machine te repareren.
Zorg ervoor dat kleine kinderen niet te dicht bij de
machine komen als deze in werking is.
De glazen deur kan heet worden.
Als de machine verplaatst moet worden doe dit dan
met twee of drie personen en met grote voorzichtig-
heid. Nooit alleen want de machine is zwaar.
Voordat u het wasgoed in de machine laadt,
controleer dat hij leeg is.
Het afvoeren
Het afvoeren van het verpakkingsmateriaal:
houd u zich aan de plaatselijke normen zodat het
materiaal gerecycled kan worden.
De Europese Richtlijn 2002/96/EC over Vernieti
ging van Electrische en Electronische Apparatuur,
vereist dat oude huishoudelijke electrische appa
raten niet mogen vernietigd via de normale
ongesorteerde afvalstroom. Oude apparaten
moeten apart worden ingezameld om zo het
hergebruik van de gebruikte materialen te optima
liseren en de negatieve invloed op de gezondheid
en het milieu te reduceren. Het symbool op het
product van de afvalcontainer met een kruis
Door vlekken met een ontvlekkingsmiddel te
behandelen of in de week te zetten kunt u met
minder hoge temperaturen wassen. Een programma op 60°C in plaats van op 90°C of op
40°C in plaats van 60°C zorgt voor een besparing
van 50% aan energie.
Doseer het wasmiddel op basis van de hardheid
van het water, de vuilheidsgraad en de hoeveelheid wasgoed, zo vermijd u onnodig energieverbruik en beschermt u het milieu. ook al zijn de
wasmiddelen biologisch afbreekbaar, toch bevatten ze elementen die het evenwicht in de natuur
verstoren. Bovendien moet u zoveel mogelijk
wasverzachters vermijden.
Door zoveel mogelijk te wassen met goedkope
stroomtarieven (s´nachts) werkt u mee aan het
reduceren van de belasting van de elektrische
centrale.
De optie Delay Timer (zie blz. 43) is van groot
belang voor de uitvoering van het wasprogramma
gedurende de nacht.
Als u na het wassen het wasgoed in een dryer
wilt drogen, kunt u een hoge snelheid centrifuge
kiezen. Weinig water in het wasgoed spaart tijd
en energie bij het droogprogramma.
maatregelen
Voorzorgs-
ServiceStoringenOnderhoudProgramma's WasmiddelInstallatie Beschrijving
45

Onderhoud
NL
Afsluiten van water en stroom
Doe de kraan dicht na iedere wasbeurt. Hiermee
reduceert u de kans op lekkage.
Sluit altijd eerst de stroom af voordat u de wasma-
chine gaat schoonmaken en gedurende
onderhoudswerkzaamheden.
Schoonmaken van de wasmachine
De buitenkant en de rubber onderdelen kunnen met
een spons en lauw sopje worden schoongemaakt.
Nooit schuurmiddelen of oplosmiddelen gebruiken!
Het wasmiddellaatje schoonmaken
1
Verwijder het laatje door
het op te lichten en naar
voren te trekken
(zie afbeelding).
Was het onder stromend water: dit moet u
regelmatig doen.
2
Reinigen van de pomp
De wasmachine is voorzien van een zelfreinigende
pomp en hoeft dus niet te worden schoongemaakt.
Het kan echter gebeuren dat kleine voorwerpen
(geldstukken, knopen) in het voorvakje terecht komen
dat de pomp beschermt en zich aan de onderkant
bevindt.
Verzeker u ervan dat het wasprogramma klaar is
en trek de stekker uit het stopcontact.
Toegang tot het paneel:
1. verwijder het paneeltje aan de voorkant van
de wasmachine met
behulp van een
schroevendraaier
(zie afbeelding);
2. draai de deksel eraf,
tegen de klok in
draaiend (zie afbeelding):
het is normaal dat er een
beetje water uit komt;
Reinigen van deur en trommel
Laat de deur altijd op een kier staan om muffe lucht
te vermijden.
3. maak de binnenkant goed schoon;
4. schroef de deksel er weer op;
5. monteer het paneeltje weer, met de haakjes in de
betreffende openingen voordat u het paneeltje
tegen de machine aan drukt.
Controleer de slang van de
watertoevoer
Controleer minstens eens per jaar de slang van de
watertoevoer. Als er barstjes in zitten moet hij vervangen worden: gedurende het wassen kan de hoge
waterdruk onverwachts scheurtjes veroorzaken.
Nooit reeds eerder gebruikte slangen gebruiken.
46

Storingen en oplossingen
Het kan gebeuren dat de machine niet werkt. Voordat u de installateur opbelt (zie blz. 48), controleert u of het
een storing betreft die gemakkelijk te verhelpen is met behulp van de volgende lijst.
Storingen:
De wasmachine
gaat niet aan.
Het wasprogramma
start niet.
De wasmachine neemt geen
water (Op de display ziet u
H2O).
De wasmachine blijft water
aan- en afvoeren.
Mogelijke oorzaken / Oplossing:
De stekker is niet in het stopcontact of niet ver genoeg ingestoken
om contact te maken.
Er is geen stroom.
De deur is niet goed dicht (op de display ziet u het woord DOOR).
De knop
De START/RESET knop is niet ingedrukt.
De waterkraan is niet open.
Uitgestelde start is ingesteld (Delay Timer, zie blz. 43).
De watertoevoerslang is niet aangesloten aan de kraan.
De slang ligt gekneld.
De kraan is niet open.
In huis mankeert het water.
Er is geen voldoende druk.
De START/RESET knop is niet ingedrukt.
De afvoerslang is niet geinstalleerd op 65 tot 100 cm afstand van de
grond (zie blz. 39).
Het uiteinde van de afvoerslang ligt onder water (zie blz. 39).
De afvoer in de muur heeft geen ontluchting.
is niet ingedrukt.
NL
De wasmachine pompt het water
niet af of centrifugeert niet.
De machine trilt erg tijdens het
centirfugeren.
De wasmachine lekt.
Er ontstaat teveel schuim.
Als na deze controle het probleem niet is opgelost, doet u de waterkraan dicht, de machine uit en belt u de installateur. Als u op een van
de hoogste verdiepingen van een flatgebouw woont kan zich een
probleem met het hevelen voordoen, waarbij de machine voortdurend
water aan- en afvoert. Om deze storing te verhelpen bestaan er speciale in de handel verkrijgbare ventielen.
Het programma voorziet niet in afvoer: bij enkele programma's moet
dit met de hand worden gestart (zie blz. 42).
De optie 'Gemakkelijk Strijken' is actief: voor het afmaken van het
programma drukt u op de START/RESET knop (zie blz. 43).
De afvoerslang ligt gekneld (zie blz. 39).
De afvoerleiding is verstopt.
De trommel is bij het installeren niet op de juiste wijze ontgrendeld (zie blz. 38).
De wasmachine staat niet recht (zie blz. 38).
De wasmachine staat te nauw tussen meubel en muur (zie blz. 38).
De slang van de watertoevoer is niet goed aangeschroefd (zie blz. 38).
Het wasmiddellaatje is verstopt (voor schoonmaken zie blz. 46).
De afvoerslang is niet goed bevestigd (zie blz. 39).
Het wasmiddel is niet bedoeld voor wasmachines (er moet "voor
wasmachine", "handwas en wasmachine", of dergelijke op staan).
De dosering is te veel.
maatregelen
Voorzorgs-
ServiceStoringenOnderhoudProgramma's WasmiddelInstallatie Beschrijving
47

Service
NL
Voordat u er de installateur bijhaalt:
Kijk eerst even of u het probleem zelf kunt oplossen (zie blz. 47);
Start het programma om te controleren of de storing is verholpen;
Is dit niet het geval dan neemt u contact op met de bevoegde dichtsbijzijnde Technische Dienst via
het telefoonnummer dat op het garantiebewijs/gebruiksaanwijzing staat.
Nooit een niet-bevoegde installateur erbij halen.
Vermeld:
het soort storing;
het model van de machine (Mod.);
het serienummer (S/N).
Deze informatie vindt u op het typeplaatje aan de achterkant van de wasmachine.
Service
48

INSTRUCÞIUNI DE FOLOSIRE
MAªINÃ DE SPÃLAT RUFE
RO
Românã
AVSF 129
Sumar
RO
Instalare, 50-51
Scoaterea din ambalaj ºi nivelarea, 50
Legãturi hidraulice ºi electrice, 50-51
Primul program de spãlare, 51
Date tehnice, 51
Descrierea maºinii de spãlat, 52-53
Panoul de control, 52
Display-ul, 53
Pornire ºi Programe, 54
Pe scurt: pornirea unui program, 54
Tabel de programe, 54
Personalizãri, 55
Reglarea turaþiei de centrifugare, 55
Reglarea temperaturii, 55
Reglarea delay timerului, 55
Funcþii, 55
Detergenþi ºi rufe albe, 56
Sertarul detergenþilor, 56
Sortarea rufelor, 56
Rufe deosebite, 56
Woolmark Platinum Care (Caºmir Platinum), 56
Precauþii ºi sfaturi, 57
Protecþie generalã, 57
Aruncarea reziduurilor, 57
Protecþia ºi respectarea mediului înconjurãtor, 57
Întreþinere ºi îngrijire, 58
Oprirea apei ºi a curentului electric, 58
Curãþarea maºinii de spãlat, 58
Curãþarea sertarului pentru detergenþi, 58
Îngrijirea hubloului ºi a cuvei, 58
Curãþarea pompei, 58
Controlarea furtunului de alimentare cu apã, 58
Anomalii ºi remedii, 59
Asistenþã, 60
Înainte de a lua legãtura cu Asistenþa, 60
49

Instalare
RO
Este important sã se pãstreze acest manual
pentru a-l putea consulta în orice moment. În caz
de vânzare, cesiune sau schimbare a locuinþei,
acesta trebuie pãstrat împreunã cu maºina de
spãlat pentru a informa noul proprietar cu privire la
funcþionare ºi la respectivele avertismente.
Citiþi cu atenþie instrucþiunile: veþi gãsi informaþii
importante cu privire la instalare, folosire ºi
siguranþã.
Scoaterea din ambalaj ºi nivelarea
Scoaterea din ambalaj
1. Scoateþi din ambalaj maºina de spãlat.
2. Controlaþi ca maºina de spãlat sã nu fii fost
deterioratã pe durata transportului. Dacã este
deterioratã, nu o conectaþi ºi luaþi legãtura cu cine v-a
vândut-o.
3. Scoateþi cele patru
ºuruburi de protecþie
pentru transport ºi
cauciucul cu
respectivul distanþator,
situate în partea
posterioarã (a se vedea
figura).
4. Închideþi orificiile cu dopurile de plastic din dotare.
5. Pãstraþi toate piesele: pentru cazul în care maºina de
spãlat va trebui sã fie transportatã, piesele vor trebui
montante din nou.
Ambalajele nu constituie jucãrii pentru copii.
Nivelare
1. Instalaþi maºina de spãlat pe un plan rigid, fãrã a
o sprijini de ziduri, mobilã sau altceva.
2. Dacã podeaua nu este
perfect orizontalã,
compensaþi neregularitãþile
deºurubând sau
înºurubând picioruºele
anterioare (a se vedea
figura); unghiul de
înclinare, mãsurat pe
planul de lucru, nu trebuie
sã depãºeascã 2°.
O nivelare precisã conferã stabilitate maºinii ºi
evitã vibraþii, zgomote ºi deplasãri pe durata
funcþionãrii. În cazul mochetelor sau a unui covor,
reglaþi picioruºele astfel încât sã menþineþi sub
maºina de spãlat un spaþiu suficient pentru
ventilare.
Legãturi hidraulice ºi electrice
Conectarea furtunului de alimentare cu apã
1. Introduceþi garnitura A
în extremitatea
furtunului de alimentare
ºi înºurubaþi-l la un
A
3. Fiþi atenþi ca furtunul sã nu fie nici curbat, nici
îndoit.
Presiunea apei trebuie sã fie cuprinsã în valorile
tabelului Date tehnice (a se vedea pagina
alãturatã).
Dacã lungimea furtunului de alimentare nu este
suficientã, adresaþi-vã unui magazin specializat sau
unui tehnician autorizat.
robinet filetat de apã
rece (a se vedea
figura).
Înainte de conectare,
lãsaþi apa sã curgã
pentru a se limpezi.
2. Conectaþi furtunul de
alimentare la maºina
de spãlat,
înºurubându-l la
respectiva prizã de
apã, în partea
posterioarã, sus, în
dreapta (a se vedea
figura).
50

Conectarea furtunului de evacuare
Conectaþi furtunul de
evacuare, fãrã a-l îndoi,
la o conductã de
evacuare sau la o gurã
de evacuare a apei,
65 - 100 cm
situate între 65 ºi 100
cm de pãmânt;
Nu folosiþi prelungitoare ºi prize multiple.
RO
Maºina nu funcþioneazã la temperaturi mai mici
de 16 grade.
Cablul nu trebuie sã fie îndoit sau comprimat.
Cablul de alimentare trebuie sã fie înlocuit doar
de tehnicieni autorizaþi.
Atenþie! Producãtorul îºi declinã orice
responsabilitate pentru cazul în care aceste norme
nu se respectã.
sau sprijiniþi-l pe
marginea unei chiuvete
sau a unei cãzi, legând
ghidajul aflat în dotare,
de robinet (a se vedea
figura). Extremitatea
liberã a furtunului de
evacuare nu trebuie sã
rãmânã cufundatã în
apã.
Nu este recomandabilã folosirea furtunurilor de
prelungire; dacã este indispensabil, furtunul de
prelungire trebuie sã aibã acelaºi diametru cu furtunul
original ºi nu trebuie sã depãºeascã 150 cm.
Legãtura electricã
Înainte de a introduce ºtecherul în priza de curent,
asiguraþi-vã ca:
priza sã fie cu împãmântare ºi conform
prevederilor legale;
priza sã poatã suporta sarcina maximã de
putere a maºinii, indicatã în tabelul cu date
tehnice (a se vedea alãturi);
tensiunea de alimentare sã fie cuprinsã în
valorile indicate în tabelul cu date tehnice (a se
vedea alãturi);
priza sã fie compatibilã cu ºtecherul maºinii de
spãlat. În caz contrar, înlocuiþi priza sau
ºtecherul.
Maºina de spãlat nu trebuie instalatã afarã, nici
chiar în cazul în care spaþiul este adãpostit, deoarece
este foarte periculoasã expunerea maºinii la ploi ºi
furtuni.
Primul program de spãlare
Dupã instalare, înainte de folosire, efectuaþi un
program de spãlare cu detergent ºi fãrã rufe,
selectând programul la 90°C, fãrã prespãlare.
Date tehnice
Model
Dimensiuni
Capacitate
Legãturi electrice
Legãturi hidrice
Turaþia de
centrifugare
Programe de control
în baza normei
IEC456
AVSF 129
lãrgime: 59,5 cm
înãlþime: 85 cm
profunzime: 40 cm
de la 1 la 4,5 kg
tensiune: 220/230 Volþi 50 Hz
putere maximã absorbitã: 1850 W
presiune maximã: 1 MPa (10 bari)
presiune minimã: 0,05 MPa (0,5 bari)
capacitatea cuvei : 40 litri
pânã la 1200 de rotaþii pe minut
programul 3; temperatura 60°
efectuatã cu 4,5 kg de rufe.
Acest aparat este conform cu
urmãtoarele Directive Comunitare:
- 73/23/CEE din data de 19/02/73
(Tensiuni Joase) ºi modificãri succesive
- 89/336/CEE din data de 03/05/89
(Compatibilitate Electromagneticã) ºi
modificãri succesive
C;
AsistenþãAnomaliiPrecauþii ÎntreþinerePrograme DetergenþiInstalare Descriere
Dupã instalarea maºinii de spãlat, priza de curent
trebuie sã fie uºor accesibilã.
Zgomot
(dB(A) re 1 pW)
Spãlare: 66
Turaþie de centrifugare: 77
51

Descrierea maºinii de spãlat
RO
Panoul de control
Legendã
Sertarul detergenþilor
Sertarul detergenþilor este folosit pentru a încãrca
detergenþi ºi aditivi (a se vedea pag. 56).
Legenda este folositã pentru a consulta în orice
moment o schemã sinteticã a programelor: se
deschide trãgând limba gri spre exterior.
Taste FUNCÞIONARE: sunt folosite pentru a
selecta funcþiile disponibile. Butonul corespunzãtor
funcþiei selectate va rãmâne aprins.
Butonul TURAÞIE DE CENTRIFUGARE este folosit
pentru reglarea turaþiei de centrifugare pânã la
excluderea acesteia (a se vedea pag. 55).
Butonul TEMPERATURÃ este folosit pentru
modificarea temperaturii de spãlare (a se vedea
pag. 55).
Buton DELAY TIMER este folosit pentru a întârzia
pornirea programului selectat cu maxim 24 de ore (a se
vedea pag. 55).
TURAÞIE DE
CENTRIFUGARE
Taste/butoane de
FUNCÞIONARE
Display-ul
TEMPERATURÃ
DELAY TIMER
Funcþia BLOCAREA TASTELOR blocheazã tastele
maºinii de spãlat pe durata funcþionãrii sau în
modalitatea de aºteptare.
Display-ul este folosit pentru programarea maºinii
de spãlat ºi efectuarea avansãrii programului de
spãlare (a se vedea pagina alãturatã).
Butonul PORNIRE/OPRIRE este folosit pentru
pornirea ºi oprirea maºinii de spãlat (a se vedea
pag. 54).
Butonul START/RESET este folosit pentru pornirea
programelor sau anularea a ceea a fost selectat
greºit (a se vedea pag. 54).
Selectorul este folosit pentru alegerea
programelor. Selectorul este cu locaº: pentru a-l
extrage, apãsaþi-l uºor, în centru. Pe durata
programului selectorul rãmâne ferm.
BLOCAREA
TASTELOR
Butonul
PORNIRE/OPRIRE
Selectorul
Butonul
START/RESET
52

Display-ul
Displayul este un instrument util pentru programarea maºinii (a se vedea pag. 55), furnizându-vã totodatã
informaþii cu privire la programul de spãlare ºi la starea de avansare.
Dupã apãsarea butonului START/RESET pentru a
porni programul, pe display este cronometratã durata
rezidualã pânã la iniþierea programului de spãlare
ales. În cazul în care aþi optat pentru iniþierea
programului de spãlare dupã un anumit interval de
timp (Delay Timer, a se vedea pag. 55), aceasta va fi
vizualizatã.
Pe parcursul programului de spãlare se vizualizeazã:
Faza în curs:
Prespãlare
Spãlare
Clãtire
Centrifugare
RO
Functii si Optiuni personale:
Pentru a alege funcþiile sau opþiunile personale, urmãriþi
indicaþiile ulterioare sau cele de la pag. 55.
Semnalare acusticã:
Maºina de spãlat este dotatã cu un semnalizator
sonor care vã va avertiza cu privire la desfãºurarea
funcþiilor sau la eventualele anomalii, ca de exemplu:
incompatibilitate, taste opþiuni, programe, pornire,
oprire, resetare.
Blocarea tastelor:
Pentru un surplus de siguranþã (a dvs. sau a copiilor dvs.), puteþi bloca tastele când maºina este în funcþiune
sau în modalitatea de aºteptare/Stand-by, þinând apãsatã tasta de funcþii 2 secunde.
Pentru a dezactiva funcþia, þineþi apãsatã tasta timp de 4 secunde.
Hublou blocat:
Simbolul aprins indicã faptul cã hubloul este blocat pentru a împiedica deschideri accidentale.
Pentru a evita daunele ce pot deriva dintr-o funcþionare defectuoasã, este necesar sã aºteptaþi ca simbolul sã
se stingã înainte de a deschide hubloul.
Acest model este echipat cu un dispozitiv care permite deschiderea hubloului chiar ºi pe parcursul primei
faze a programului. Acest lucru este posibil atunci când simbolul nu este aprins.
AsistenþãAnomaliiPrecauþii ÎntreþinerePrograme DetergenþiInstalare Descriere
La încheierea programului se vizualizeazã cuvântul END.
În caz de anomalie apare un cod de eroare, de exemplu: F-01, de transmis Asistenþei Tehnice (a se vedea pag. 60).
53

Pornire ºi Programe
RO
Pe scurt: pornirea unui program
1. Porniþi maºina de spãlat apãsând butonul .
Toate ledurile se vor aprinde timp de câteva
secunde, dupã care se vor stinge.
2. Introduceþi rufele ºi închideþi hubloul.
3. Selectaþi cu ajutorul selectorului programul dorit.
Pe display va apãrea durata estimatã.
Temperatura ºi turaþia de centrifugare se
selecteazã automat în baza programului (pentru
a le modifica, a se vedea pag. 55).
4. Vãrsaþi detergenþi ºi aditivii (a se vedea pag. 56).
5. Selectaþi eventuale funcþii (a se vedea pag. 55).
6. Porniþi programul apãsând butonul START/
RESET.
Pentru a-l anula, þineþi apãsat butonul START/
RESET timp de cel puþin 2 secunde.
7. La încheierea programului va apãrea scris END.
Scoateþi rufele ºi lãsaþi hubloul întredeschis
pentru a se putea usca cuva.
8. Opriþi maºina de spãlat apãsând butonul
Tabel de programe
Tipul de þesãturã ºi gradul de
murdãrie
Programe Temperaturã
Detergent
Presp. Spãl.
Ad itiv
înmu iere
Bumbac
Albe extrem de murdare
(cearceafuri, feþe de masã, etc.)
Albe extrem de murdare
(cearceafuri,feþe de masã, etc.)
Albe ºi colorate rezistente foarte
murdare
þin murdare ºi culori delicate
Albe
pu
(cãmãºi, bluze, etc.)
Colorate delicate p
þin murdare
u
1
2
3
4
5
40
90
90
60
30
°
C
°
C
°
C
C
°
°
C
160
143
120
85
77
Sintetice
Culori rezistente foarte murdare
(
pentru noi nãscuþi, etc.)
articole
Culori rezistente
(rufe de toate tipurile p
Culori rezistente foarte murdare
(
e pentru noi nã scuþi, etc.)
articol
Culori delicate
(rufe de toate tipurile p
Culori delicate
(rufe de toate tipurile p
þin murdare)
u
þin murdare)
u
þin murdare)
u
6
6
7
8
9
40
40
60
50
30
°
C
°
C
C
°
°
C
°
C
92
77
86
76
30
Delicate
Lânã
Þesãturi foarte delicate
(perdele, mãtase, vâscozã, etc.)
PROGRAME PARÞIALE
Clãtire Clãtiri ºi
Clãtire delicatã Clãtiri, antiºifonare sau
Turaþie de centrifugare
Turaþie de centrifugare
Evacuare Evacuare
delicatã
10
11
40
30
C
°
°
C
42
52
Durata
programului
(minute)
Descrierea programului de spãlare
Prespãlare, spãlare, clãtiri,
centrifugar
Spãlare, clãtiri,
intermediare ºi finale
Spãlare, clãtiri,
intermediare ºi finale
Spãlare, clãtiri,
intermediare ºi finale
Spãlare, clãtiri,
intermediare ºi finale
Spãlare, clãtiri, antiºifonare sau
de centrifugar
Spãlare, clãtiri, antiºifonare sau
de centrifugar
Spãlare, clãtiri, antiºifonare sau
de centrifugar
Spãlare, clãtiri, antiºifonare sau
de centrifugar
Spãlare, clãtiri ºi
centrifugar
Spãlare, clãtiri ºi
delicatã
Spãlare, clãtiri, antiºifonare sau
evacuare
Evacuare
energicã
Evacuare
delicatã
e intermediare ºi finale
turaþii de centrifugare
turaþii de centrifugare
turaþii de centrifugare
turaþii de centrifugare
e delicatã
e delicatã
e delicatã
e delicatã
turaþie de
e delicatã
turaþie de centrifugar
turaþie de centrifugar
apãºi
turaþie de centrifugar
apãºi
turaþie de centrifugar
turaþii de
evacuar
.
turaþie
turaþie
turaþie
turaþie
e
e
e apã
e
e
Note
Antiºifonare-a se vedea Calcã mai uºor, pagina alãturatã. Datele specificate în tabel au valoare indicativã.
Program special
Zilnic 30 (programul 9 pentru materiale sintetice) este studiat pentru a spãla rufe puþin murdare într-un
interval scurt de timp: dureazã doar 30 de minute, economisindu-se totodatã energie ºi timp. Selectând
programul (9 la 30°C) este posibilã spãlarea împreunã a þesãturilor de diverse tipuri (excluse lâna ºi mãtasea)
cu o încãrcãturã maximã de 3 kg. Se recomandã folosirea detergentului lichid.
54

Personalizãri
Reglarea turaþiei de centrifugare
Dacã la pornirea maºinii, SELECTORUL este poziþionat în
dreptul unui program care prevede turaþia de centrifugare,
simbolul
turaþia maximã permisã de centrifugare pentru programul
selectat iar simbolul
valorile coboarã pânã la OFF, ceea ce indicã excluderea turaþiei
de centrifugare(apãsaþi din nou pentru a reveni la valoarea cea
mai mare); opriþi-vã la valoarea doritã, dupã circa 2 secunde
selecþia se acceptã: simbolul
Taste Opþiuni
centrifugare este activã pentru toate programele cu excepþia
programului 11 ºi a evacuãrii.
Reglarea temperaturii
Dacã la pornirea maºinii, SELECTORUL este poziþionat în dreptul unui program care prevede reglarea
temperaturii, simbolul
programul selectat iar simbolul
care indicã spãlarea la rece (apãsaþi din nou pentru a reveni la valoarea cea mai mare); opriþi-vã la valoarea
doritã, dupã circa 2 secunde selecþia se acceptã: simbolul
Reglarea temperaturii este activã cu toate programele de spãlare.
apare fix. Apãsând butonul se vizualizeazã temperatura maximã permisã pentru
lumineazã intermitent. Apãsând din nou, temperatura coboarã pânã la OFF,
apare fix. Apãsând butonul se vizualizeazã
lumineazã intermitent. Apãsând din nou
rãmâne fix. Reglarea turaþiei de
rãmâne fix.
RO
Reglarea delay timerului
Apãsând butonul pe display se vizualizeazã scris OFF iar simbolul respectiv lumineazã intermitent.
Apãsând din nou pe buton apare 1h adicã întârziere de o orã ºi aºa mai departe pânã la 24h; opriþi-vã la
întârzierea doritã, dupã circa 2 secunde selecþia se acceptã; dupã aceea pe display se vizualizeazã durata
prevãzutã pentru programul selectat iar simbolul
Apãsând butonul START/RESET apare din nou valoarea întârzierii selectate care descreºte în fiecare orã pânã
la pornirea programului; în aceastã fazã se poate modifica valoarea întârzierii doar micºorând-o. Reglarea
Delay Timerului este activã cu toate programele.
rãmâne aprins.
Blocarea tastelor (a se vedea pag. 53).
Funcþii
Diferitele funcþii de spãlare prevãzute pentru maºina de spãlat permit obþinerea unor rezultate excepþionale (o
calitate îmbunãtãþitã a spãlãrii-rufe curate, etc.). Pentru a activa aceste funcþii, procedaþi astfel:
1. apãsaþi butonul aferent funcþiei dorite, þinând cont de informaþiile conþinute în tabelul de mai jos;
2. aprinderea butonului respectiv indicã faptul cã funcþia respectivã a fost activatã.
Notã: Intermitenþa rapidã a butonului indicã faptul cã funcþia respectivã nu este selecþionabilã pentru programul ales.
În cazul în care va fi selectatã o funcþie incompatibilã cu cea selectatã mai înainte, doar ultima aleasã va rãmâne activã.
Opþiune Efect Note pentru folosire
Permite o spãlare
Super
Wash
impecabilã, evident
îmbunãtãþitã faþã de
standardul în
Clasa A
Nu este compatibil cu opþiunea RAPID.
.
Activã cu
programele:
1, 2, 3, 4,
5, 6, 7, 8.
Calcã mai
uºor
Rapid
Reduce pliurile la
þesãturi facilitând
cãlcarea.
Reduce cu 30%
durata programului
de spãlare.
Selectând aceastã opþiune, programele 6, 7, 8, 11 ºi Clãtire delicatã se
întrerup cu rufele la înmuiat (antiºifonare) iar butonul CALCÃ MAI
USOR semnalizeazã:
- pentru a completa programul, apãsaþi butonul START/RESET sau pe
butonul CALCÃ MAI USOR;
- pentru a efectua doar evacuarea , poziþionaþi selectorul în dreptul
simbolului respectiv ºi apãsaþi butonul START/RESET.
Nu este compatibil cu opþiunea ALBIRE.
Nu este compatibil cu opþiunea SUPER WASH.
Toate cu
excepþia
1, 2, 9, 10,
Turaþie de
centrifugare,
Turaþie de
centrifugare
delicatã,
Evacuare.
AsistenþãAnomaliiPrecauþii ÎntreþinerePrograme DetergenþiInstalare Descriere
1, 2, 3, 4,
5, 6, 7, 8.
55

Detergenþi ºi rufe albe
RO
Sertarul detergenþilor
Un rezultat bun la spãlare depinde ºi de dozarea
corectã a detergentului: cu un exces de detergent
nu se spalã mai eficient, ci se contribuie la
încrustarea pãrþilor interne ale maºinii de spãlat ºi
poluarea mediului înconjurãtor.
Extrageþi sertarul
pentru detergenþi ºi
introduceþi detergentul
sau aditivul, dupã cum
1
3
sertarul 1: Detergent pentru prespãlare
(sub formã de praf)
sertarul 2: Detergent pentru spãlare
(sub formã de praf sau lichid)
Detergentul lichid trebuie vãrsat doar înainte de
pornire.
sertarul 3: Aditivi (soluþie de înmuiat, etc.)
Soluþia de înmuiat nu trebuie sã depãºeascã nivelul
grãtarului.
2
urmeazã:
Nu folosiþi detergenþi pentru spãlare manualã,
deoarece formeazã prea multã spumã.
Sortarea rufelor
Subdivizaþi rufele în funcþie de:
- tipul de þesãturã / simbolul de pe etichetã.
- culori: separaþi rufele colorate de cele albe.
Goliþi buzunarele ºi controlaþi nasturii.
Nu depãºiþi valorile indicate, referitoare la
greutatea rufelor uscate:
Þesãturi rezistente: max 4,5 kg
Þesãturi sintetice: max 2,5 kg
Þesãturi delicate: max 2 kg
Lânã: max 1 kg
Rufe deosebite
Perdele: împãturiþi-le ºi aºezaþi-le într-o faþã de
pernã sau într-un sac de tip plasã.Spãlaþi-le
singure fãrã a depãºi o jumãtate din încãrcãturã.
Folosiþi programul 11 care exclude turaþia de
centrifugare.
Plãpumi ºi haine de vânt: dacã cãptuºeala este
din fulgi de gâscã sau de raþã, se poate spãla în
maºina de spãlat numai câte un singur articol care
sã nu depãºeascã o încãrcãturã maximã de 2-3 kg,
repetând programul de clãtire o datã sau de douã
ori ºi utilizând o turaþie de centrifugare delicatã.
Adidaºi ºi teniºi: curãþaþi-i de noroi. Se pot spãla
împreunã cu blugii ºi cu lucrurile rezistente, însã
nu cu rufele albe.
Lânã: pentru a obþine cele mai bune rezultate,
folosiþi un detergent specific ºi nu depãºiþi 1 kg de
rufe.
Woolmark Platinum Care
(Caºmir Platinum)
Delicat ca ºi spãlarea manualã.
Ariston a introdus un standard nou de
prestaþii superioare recunoscut de The
Woolmark Company cu prestigioasa marcã
Woolmark Platinum Care. Dacã pe obiectele de
spãlat gãsiþi logo-ul Woolmark Platinum Care, se
pot spãla cu rezultate excelente lucrurile din lânã
prevãzute cu eticheta Spãlare manualã (M.0303):
Selectaþi programul 10 pentru toate lucrurile
prevãzute cu eticheta Spãlare manualã,
utilizând detergenþi specifici.
Cât cântãresc rufele?
1 cearceaf: 400-500 g.
1 faþã de pernã: 150-200 g.
1 faþã de masã: 400-500 g.
1 halat de baie: 900-1.200 g.
1 prosop: 150-250 g.
56

Precauþii ºi sfaturi
Maºina de spãlat a fost proiectatã ºi construitã
conform normelor internaþionale de protecþie.
Aceste avertizãri sunt furnizate din motive de
siguranþã ºi trebuie sã fie citite cu atenþie.
Protecþie generalã
Acest aparat a fost conceput pentru o folosire de
uz casnic, nu profesionalã, iar funcþiile sale nu
trebuie alterate.
Maºina de spãlat trebuie sã fie folositã doar de
persoane adulte ºi respectând instrucþiunile din
acest manual.
Nu atingeþi maºina când sunteþi desculþi sau cu
mâinile sau picioarele ude sau umede.
Nu scoateþi ºtecherul din priza de curent trãgând
de cablu, ci trãgând de ºtecher.
Nu deschideþi sertarul detergenþilor în timp ce
maºina se aflã în funcþiune.
Nu atingeþi apa provenitã din evacuare, care
poate atinge temperaturi ridicate.
Aruncarea maºinii vechi de spãlat:
înainte de a o arunca, faceþi-o inutilizabilã
tãindu-i cablul de alimentare electricã ºi
scoþându-i hubloul.
Protecþia ºi respectarea mediului
înconjurãtor
Tehnologia la dispoziþia mediului înconjurãtor
Dacã prin hublou se vede puþinã apã este pentru
cã, datoritã noii tehnologii Ariston, este suficientã
mai puþin de jumãtate de cantitate de apã pentru a
obþine o curãþare maximã: un scop atins pentru
respectarea mediului înconjurãtor.
Economisirea de detergent, apã, energie ºi
timp
Pentru a economisi detergent, apã, timp folosiþi
încãrcãtura maximã.
O încãrcare totalã în locul a douã jumãtãþi,
permite economisirea de pânã la 50% energie
electricã.
Prespãlarea este necesarã doar pentru rufele
foarte murdare. Evitarea acesteia permite
economisirea de detergent, timp, apã ºi între 5
ºi 15% energie electricã.
RO
Nu forþaþi în nici un caz hubloul: s-ar putea
deteriora mecanismul de siguranþã care
protejeazã deschiderile accidentale.
În cazul defecþiunilor, nu interveniþi în nici un caz
în mecanismele interne pentru a încerca sã
reparaþi maºina de spãlat.
Controlaþi mereu ca în apropierea maºinii aflate
în funcþiune sã nu se afle copii.
Pe durata spãlãrii hubloul are tendinþa de a se
încãlzi.
Dacã maºina trebuie sã fie deplasatã, faceþi
acest lucru în douã sau trei persoane, cu
maximã atenþie. Niciodatã nu deplasaþi maºina
singuri deoarece aceasta este foarte grea.
Înainte de a introduce rufele, controlaþi ca în
interior sã fie goalã.
Aruncarea reziduurilor
Aruncarea materialelor de ambalare:
respectaþi normele locale, în acest fel ambalajele
vor putea fi reutilizate.
Tratând petele cu o substanþã pentru
îndepãrtarea acestora ºi lãsându-le la înmuiat
înainte se spãlare, se reduce necesitatea de a
spãla la temperaturi mari. Un program la 60°C în
locul unuia la 90°C sau unul la 40°C în locul
unuia la 60°C, permit economisirea de pânã la
50% energie electricã.
Dozaþi bine detergentul în funcþie de duritatea
apei, de gradul de murdãrie ºi de cantitatea de
rufe, pentru a evita risipe ºi pentru a proteja
mediul înconjurãtor: deºi sunt biodegradabili,
detergenþii conþin elemente care altereazã
echilibrul naturii. Mai mult, evitaþi pe cât posibil
aditivul de înmuiere.
Efectuând spãlãri începând de seara ºi pânã la
primele ore ale dimineþii, se colaboreazã pentru
reducerea sarcinii de absorbire a întreprinderilor
electrice. Opþiunea Delay Timer (a se vedea pag.
55) contribuie la organizarea spãlãrilor în acest
sens.
Dacã rufele trebuie uscate într-un uscãtor,
selectaþi o turaþie mare de centrifugare.
Cantitatea redusã de apã permite economisirea
de timp ºi energie electricã la programul de
uscare.
AsistenþãAnomaliiPrecauþii ÎntreþinerePrograme DetergenþiInstalare Descriere
57

Întreþinere ºi îngrijire
RO
Oprirea apei ºi a curentului electric
Închideþi robinetul de apã dupã fiecare spãlare.
Se limiteazã astfel uzarea instalaþiei hidraulice a
maºinii de spãlat ºi se eliminã pericolul
scurgerilor.
Scoateþi ºtecherul din priza de curent atunci
când curãþaþi maºina de spãlat ºi când se
efectueazã lucrãri de întreþinere.
Curãþarea maºinii de spãlat
Partea externã ºi pãrþile din cauciuc pot fi curãþate
cu o cârpã înmuiatã în apã cãlduþã ºi sãpun. Nu
folosiþi solvenþi sau substanþe abrazive.
Curãþarea sertarului pentru detergenþi
1
Scoateþi sertarul
ridicându-l ºi trãgându-l
spre exterior (a se
vedea figura):
Spãlaþi-l cu apã;
aceastã curãþare
trebuie efectuatã
frecvent.
2
Curãþarea pompei
Maºina de spãlat este echipatã cu o pompã
autocurãþãtoare care nu necesitã întreþinere. Se
poate întâmpla însã ca obiecte mici (monede,
nasturi) sã cadã în precamera care protejeazã
pompa, situatã în partea inferioarã a acesteia.
Verificaþi ca programul de spãlare sã se fii
încheiat ºi scoateþi din prizã.
Pentru a avea acces la precamerã:
1. scoateþi panoul de
acoperire de pe latura
anterioarã a maºinii de
spãlat folosindu-vã de o
ºurubelniþã (a se vedea
figura):
2. deºurubaþi capacul
rotindu-l în sens invers
(a se vedea figura):
este normal sã curgã
puþinã apã;
Îngrijirea hubloului ºi a cuvei
Lãsaþi mereu hubloul întredeschis pentru a
evita formarea mirosurilor neplãcute.
3.curãþaþi cu grijã interiorul;
4.montaþi din nou capacul;
5.montaþi din nou panoul verificând, înainte de a-l
împinge spre maºinã, de a fi introdus cârligele în
orificiile respective.
Controlarea furtunului de alimentare cu
apã
Controlaþi furtunul de alimentare cel puþin o datã pe
an. Dacã prezintã crãpãturi sau fisuri trebuie
înlocuit: pe parcursul spãlãrilor, presiunile puternice
ar putea provoca crãpãturi neaºteptate.
Nu folosiþi furtunuri deja folosite.
58

Anomalii ºi remedii
Se poate întâmpla ca maºina de spãlat sã nu funcþioneze. Înainte de a telefona la Asistenþã (a se vedea pag.
60), verificaþi dacã aceastã problemã nu poate fi remediatã de dvs., astfel:
Anomalii:
Maºina de spãlat nu porneºte.
Programul de spãlare nu poate
fi activat.
Maºina de spãlat nu încarcã apã
(Pe display este vizualizat scris
O).
H
2
Maºina de spãlat încarcã ºi
evacueazã apã încontinuu.
Cauze posibile / Rezolvare:
ªtecherul nu este introdus sau nu a fost suficient introdus în priza
de curent astfel încât sã existe conexiune electricã.
În casã nu este curent electric.
Hubloul nu este bine închis (pe display se vizualizeazã scris DOOR).
Butonul
Butonul START/RESET nu a fost apãsat.
Robinetul de apã nu este deschis
A fost fixatã o întârziere de pornire (Delay Timer, a se vedea pag. 55).
Furtunul de alimentare cu apã nu este conectat la robinet.
Furtunul este îndoit.
Robinetul de apã nu este deschis
În casã lipseºte apa.
Nu este presiune suficientã.
Butonul START/RESET nu a fost apãsat.
Furtunul de evacuare nu a fost instalat la o distanþã cuprinsã între 65
ºi 100 cm de pãmânt (a se vedea pag. 51).
Extremitatea furtunului de evacuare este cufundatã în apã (a se vedea
pag. 51).
Dacã dupã aceste verificãri problema nu se rezolvã, închideþi robinetul
de apã, opriþi maºina de spãlat ºi chemaþi Asistenþa. Dacã locuinþa se
aflã la ultimele etaje ale unui edificiu, este posibil sã aibã loc fenomene
de sifonare, motiv pentru care maºina de spãlat încarcã ºi evacueazã
apã încontinuu. Pentru a elimina acest inconvenient, se gãsesc în
comerþ supape anti-sifonare.
nu a fost apãsat.
RO
Maºina de spãlat nu evacueazã
sau nu stoarce.
Maºina de spãlat vibreazã foarte
mult pe parcursul turaþiei de
centrifugare.
Maºina de spãlat pierde apã.
Se formeazã prea multã spumã.
Programul nu prevede evacuarea apei: cu unele programe este
necesar sã se porneascã manual (a se vedea pag. 54).
Este activã opþiunea Calcã mai uºor: pentru a completa programul
apãsaþi butonul START/RESET (a se vedea pag. 55).
Furtunul de evacuare este îndoit (a se vedea pag. 51).
Conducta de evacuare este înfundatã.
Cuva, în momentul instalãrii, nu a fost deblocatã în mod corect (a se vedea
pag. 50).
Maºina de spãlat nu este poziþionatã orizontal (a se vedea pag. 50).
Maºina de spãlat este fixatã foarte puternic între mobilã ºi zid (a se
vedea pag. 50).
Furtunul de alimentare cu apã nu este bine înºurubat (a se vedea
pag. 50).
Sertarul detergenþilor este înfundat (pentru a-l curãþa, a se vedea
pag. 58).
Furtunul de evacuare nu este bine fixat (a se vedea pag. 51).
Detergentul nu este specific pentru maºina de spãlat (trebuie sã fie
scris pentru maºina de spãlat, de mânã sau în maºina de spãlat,
sau ceva asemãnãtor).
Dozajul a fost excesiv.
AsistenþãAnomaliiPrecauþii ÎntreþinerePrograme DetergenþiInstalare Descriere
59

Asistenþã
RO
Înainte de a lua legãtura cu Asistenþa:
Verificaþi dacã anomalia poate fi rezolvatã de dvs. (a se vedea pag. 59);
Porniþi din nou programul pentru a controla dacã inconvenientul a fost eliminat;
În caz contrar, luaþi legãtura cu asistenþa tehnicã autorizatã la numãrul telefonic indicat pe
certificatul de garanþie.
Nu apelaþi niciodatã la tehnicieni neautorizaþi.
Comunicaþi:
tipul de anomalie;
modelul maºinii (Mod.);
numãrul de serie (S/N).
Aceste informaþii se aflã pe eticheta autocolantã, situatã în partea din spate a maºinii de spãlat.
Asistenþã
60

Használati utasítás
MOSÓGÉP
HU
Magyar
AVSF 129
Összefoglalás
HU
Üzembehelyezés, 62-63
Kicsomagolás és vízszintbe állítás, 62
Víz és elektromos csatlakozás, 62-63
Elsõ mosási ciklus, 63
Mûszaki adatok, 63
Mosógép leírása, 64-65
Vezérlõpanel, 64
Kijelzõ, 65
Indítás és Programok, 66
Röviden: egy program elindítása, 66
Programtáblázat, 66
Program módosítások, 67
Centrifugálás beállítása, 67
Hõmérséklet beállítása, 67
Az idõkésleltetés beállítása, 67
Funkciók, 67
Mosószerek és mosandók, 68
Mosószeradagoló fiók, 68
Mosandó ruhák elõkészítése, 68
Különleges bánásmódot igénylõ darabok, 68
Woolmark Platinum Care (Kasmir Platinum), 68
Óvintézkedések és tanácsok, 69
Általános biztonság, 69
Hulladékelhelyezés, 69
Környezetvédelem, 69
Karbantartás és törõdés, 70
A víz elzárása és az elektromos áram kikapcsolása, 70
A mosógép tisztítása, 70
A mosószertartó tisztítása, 70
Az ajtó és a forgódob gondozása, 70
A szivattyú tisztítása, 70
A vízbevezetõ csõ ellenõrzése, 70
Rendellenességek és elhárításuk, 71
Szerviz, 72
Mielõtt a Szervizhez fordulna, 72
61

Üzembehelyezés
HU
E kézikönyv megõrzése azért fontos, hogy bármikor
elõvehesse, és megnézhesse. Ha a mosógépet eladná,
átadná vagy másnál helyezné el, gondoskodjon arról,
hogy e használati utasítás a géppel együtt maradjon,
hogy az új tulajdonos is megismerhesse a mosógép
funkcióit és az ezekre vonatkozó figyelmeztetéseket.
Figyelmesen olvassa el az utasításokat: fontos
információkat tartalmaznak az üzembehelyezésrõl, a
használatról és a biztonságról.
Kicsomagolás és vízszintbe állítás
Kicsomagolás
1. Csomagolja ki a mosógépet.
2. Ellenõrizze, hogy a mosógép nem sérült-e meg a
szállítás során. Ha a gépen sérülést talál, ne
csatlakoztassa, és forduljon a készülék eladójához.
3. Távolítsa el a
hátoldalon található, a
szállításhoz felszerelt 4
védõcsavart, valamint a
gumit a hozzá tartozó
távtartóval (lásd ábra).
4. A furatokat zárja le a tartozékként kapott
mûanyag dugókkal.
5. Minden darabot õrizzen meg: ha a mosógépet
szállítani kell, elõtte ezeket vissza kell szerelni.
A csomagolóanyag nem gyermekjáték
A pontos vízszintezés biztosítja a gép stabilitását,
így az a mûködés során nem fog vibrálni, zajt
okozni vagy elmozdulni. Szõnyegpadló vagy
szõnyeg esetén a lábakat úgy állítsa be, hogy a
mosógép alatt elegendõ hely maradjon a
szellõzésre.
Víz és elektromos csatlakozás
Vízbevezetõ csõ csatlakoztatása
1. Illessze az A
tömítést a vízbevezetõ
csõ végére és
csavarozza fel a 3/4-os
külsõ menettel
A
3. Ügyeljen arra, hogy a csövön ne legyen törés
vagy szûkület.
rendelkezõ hidegvíz
csapra (lásd ábra).
A csatlakoztatás elõtt
eresszen ki a csapból
vizet addig, amíg a víz
teljesen átlátszóvá nem
válik.
2. Csatlakoztassa a
vízbevezetõ csövet a
mosógéphez úgy, hogy
azt a hátul jobboldalon
fent lévõ vízbemeneti
csonkra csavarozza
(lásd ábra).
Vízszintezés
1. A mosógépet sík és kemény padlóra állítsa,
úgy, hogy ne érjen falhoz, bútorhoz vagy máshoz.
2. Ha a padló nem
tökéletese vízszintes,
az elsõ lábak be-,
illetve kicsavarásával
kompenzálhatja azt
(lásd ábra). A dõlés a
gép felsõ burkolatán
mérve nem lehet több,
mint 2°.
62
A csapnál a víznyomásnak a Mûszaki adatok
táblázatban szereplõ határértékek között kell
lennie (lásd a szemben lévõ oldalt).
Amennyiben a vízbevezetõ csõ nem elég hosszú,
forduljon szaküzlethez vagy megbízott
szakemberhez.

A leeresztõcsõ csatlakoztatása
A leeresztõcsövet
csatlakoztassa
lefolyóhoz vagy a
padlótól 65 és 100 cm
közötti magasságban
65 - 100 cm
lévõ fali lefolyószifonhoz
anélkül, hogy megtörné,
Ne használjon hosszabbítót vagy elosztót.
Ne legyen a kábel megtörve vagy összenyomva.
A hálózati kábelt csak megbízott szakember
cserélheti.
Figyelem! A gyártó minden felelõsséget elhárít,
amennyiben a fenti elõírásokat figyelmen kívül
hagyják.
Elsõ mosási ciklus
HU
Üzembehelyezés
Leírás
vagy akassza a mosdó
vagy a kád szélére
úgy, hogy a tartozékok
között lévõ vezetõt a
csaphoz erõsíti (lásd
ábra). A leeresztõcsõ
szabad végének nem
szabad vízbe merülnie.
Toldások használata nem javasolt. Amennyiben
feltétlenül szükséges, a toldás átmérõje egyezzen
meg az eredeti csõével, és semmiképpen se
legyen 150 cm-nél hosszabb.
Elektromos bekötés
Mielõtt a csatlakozódugót az aljzatba dugná,
bizonyosodjon meg arról, hogy:
az aljzat földelése megfelel a törvény által elõírtnak;
az aljzat képes elviselni a gép Mûszaki adatait
tartalmazó táblázatban megadott maximális
teljesítményfelvételt (lásd szemben);
a hálózat feszültsége a Mûszaki adatokat
tartalmazó táblázatban szereplõ értékek közé esik
(lásd szemben);
Az aljzat legyen kompatibilis a gép
csatlakozódugójával. Ellenkezõ esetben cserélje
ki az aljzatot vagy a csatlakozódugót.
A mosógép nem állítható fel nyílt téren, még akkor
sem, ha a tér tetõvel van fedve, mert nagyon veszélyes,
ha a gép esõnek vagy zivataroknak van kitéve.
A csatlakozódugónak könnyen elérhetõ helyen kell
lennie akkor is, amikor a gép már a helyén áll.
Üzembehelyezés után, mielõtt a mosógépet
használni kezdené, végezzen egy 90°-os elõmosás
nélküli mosást mosóporral de mosandó ruha nélkül.
Mûszaki adatok
Modell
Méretek
Ruhatöltet:
Elektromos
csatlakozás
Vízcsatlakozások
Centrifuga
fordulatszám
IEC456 szabvány
Szerinti
vezérlõprogramok
AVSF 129
szélesség 59,5 cm
magasság 85 cm
mélység 40 cm
1-tõl 4,5 kg-ig
feszültség 220/230 Volt 50 Hz
maximális felvett teljesítmény 1850 W
maximális nyomás 1 MPa (10 bar)
minimális nyomás 0,05 MPa (0,5 bar)
dob ûrtartalma 40 liter
1200 fordulat/perc-ig
3-as program; hõmérséklet 60°
4,5 kg ruhatöltettel végezve.
Ez a berendezés megfelel a következõ
Uniós Elõírásoknak:
- 73/02/19-i 73/23/CEE elõírás
(Alacsony feszültség) és annak
módosításai
- 89/05/03-i 89/336/CEE elõírás
(Elektromágneses összeférhetõség) és
annak módosításai
- 2002/96/CE
C;
SzervizRendellenességekÓvintézkedések KarbantartásProgramok Mosószerek
63

HU
A mosógép leírása
Vezérlõpanel
Kottatartó
Mosószeradagoló fiók
Mosószeradagoló fiók a mosószerek és
adalékszerek betöltésére (lásd 68. oldal).
Kottatartó, hogy a programok összefoglaló vázlatát
bármikor megnézhesse: a szürke nyelvet kifelé
húzva nyílik.
FUNKCIÓ billentyûk: a lehetséges funkciók
kiválasztására. A kiválasztott funkció billentyûje
világít.
CENTRIFUGA
FUNKCIÓ
billentyûk
Kijelzõ
HÕMÉRSÉKLET
KÉSLELTETÕ
IDÕZÍTÕ
A BILLENTYÛ BLOKK gomb a mosógép
valamennyi billentyûjének zárolására szolgál
mûködés közben vagy Stand-by módban.
Kijelzõ a mosógép programozására és a mosási
ciklusok elõrehaladásának ellenõrzésére (lásd
szemben lévõ oldal).
BEKAPCSOLÁS/KIKAPCSOLÁS billentyû a
mosógép be- illetve kikapcsolására (lásd 66. oldal).
BILLENTYÛ
BLOKK
BEKAPCSOLÁS/
KIKAPCSOLÁS billentyû
Tárcsa
START/RESET
billentyû
CENTRIFUGA billentyû a centrifugálás
fordulatszámának beállítására illetve a
centrifugálás kikapcsolására (lásd 67. oldal).
HÕMÉRSÉKLET billentyû a mosás
hõmérsékletének módosítására (lásd 67. oldal).
KÉSLELTETÕ IDÕZÍTÕ billentyû, a beállított
program indítását késlelteti maximum 24 óráig
(lásd old. 67).
64
START/RESET billentyû a program elindítására
vagy a hibás beállítás törlésére (lásd 66. oldal).
Tárcsa a programok kiválasztására. A tárcsa
benyomható: könnyedén nyomja meg a közepét,
és kiugrik. A program során a tárcsa nem mozog.

Kijelzõ
Azon túl, hogy hasznos eszköz a gép programozásához (lásd 67. oldal), a kijelzõ fontos információkat nyújt a
mosóciklusokról és azok elõrehaladásáról.
Az után, hogy a program elindításához megnyomta a
START/RESET billentyût, a kijelzõn a ciklus végéig
hátlalévõ idõ látható. Abban az esetben, ha az indító
órán késleltetés van beállítva (Késleltetés idõzítõ,
lásd 67. oldal) ezt megjeleníti.
A mosóciklus során kijelzi:
A folyamatban lévõ fázist:
Elõmosás
Mosás
Öblítés
Centrifuga
HU
Üzembehelyezés
Leírás
Személyre szabható funkciók és opciók:
A funkciók és opciók kiválasztását lásd alább és a
67. oldalon.
Hangjelzés:
A készülék akusztikus jelzõberendezéssel van
felszerelve, ami jelzi a különféle funkciókat, illetve az
esetleges rendellenes funkciókat:
összeférhetetlenség, opció/program gombok, a
mosógép elindulása, ciklus vége, reset.
Billentyû blokk:
Az Ön és gyermekei biztonsága érdekében a mosógép muködési vagy várakozási (késleltetett indítás-Standby) ideje alatt valamennyi billentyut le tudja zárni, ha a funkciógombot 2 másodpercig lenyomva tartja.
Inaktiválásához tartsa lenyomva körülbelül 4 másodpercig.
Ajtózár:
A világító jelzõlámpa jelöli, hogy az ajtó reteszelve van a véletlen kinyitás megakadályozására. A károk
elkerülése érdekében meg kell várni, hogy a jelzõlámpa kialudjon, mielõtt megpróbálná az ajtót kinyitni.
Ez a modell olyan berendezéssel rendelkezik, amely lehetõvé teszi az ajtó nyitását a program elsõ
fázisának során is. Ez akkor lehetséges, ha a szimbólum nem világít.
SzervizRendellenességekÓvintézkedések KarbantartásProgramok Mosószerek
A program végén az END felirat jelenik meg.
Rendellenes mûködés esetén a hiba kódja jelenik meg, például: F-01, amit a Szervizzel közölni kell (lásd 72. oldal).
65

Indítás és Programok
HU
Röviden: egy program elindítása
1. Az billentyû megnyomásával kapcsolja be a
mosógépet.
Néhány másodpercre valamennyi ikon kigyullad,
majd kialszik.
2. Rakja be a mosandó ruhát, és csukja be az ajtót.
3. A tárcsával válassza ki a kívánt programot. A
kijelzõn a becsült idõ jelenik meg. A
hõmérsékletet és a centrifugálást a program
alapján automatikusan beállítja (a módosításhoz
4. Töltse be a mosószert és az adalékokat (lásd 68. oldal).
5. A lehetséges funkciók kiválasztása (lásd 67. oldal).
6. A START/RESET billentyû megnyomásával
indítsa el a programot.
A törléshez tartsa nyomva a START/RESET
billentyût legalább 2 másodpercen keresztül.
7. A program végén az END felirat jelenik meg.
Vegye ki a mosott ruhát, és résre hagyja nyitva
az ajtót, hogy a dob kiszáradhasson.
8. Az
billentyûvel kapcsolja ki a mosógépet.
lásd a 67. oldalt).
Programtáblázat
Kelmék és a szennyezõdés
természete
Pamut
Különösen szennyezett fehér
anyagok (lepedõ, asztalterítõ, stb.)
Különösen szennyezett fehér
anyagok (lepedõ, asztalterítõ, stb.)
Nagyon szennyezett tartós fehér és
színes anyagok
Kevéssé szennyezett fehér és kényes
színes anyagok (ingek pulóverek, stb.)
Kevéssé szennyezett kényes színes
anyagok
Szintetikus anyagok
Nagyon szennyezett tartós színes
anyagok (csecsemõruházat, stb.)
Tartós színes anyagok (mindenfajta
enyhén szennyezett ruházat)
Nagyon szennyezett tartós színes
anyagok (csecsemõruházat, stb.)
Kényes színes anyagok (mindenfajta
enyhén szennyezett ruházat)
Kényes színes anyagok (mindenfajta
enyhén szennyezett ruházat)
Kényes anyagok
Gyapjú
Nagyon kényes kelmék
(függönyök, selyem, viszkóz, stb.)
RÉSZLEGES PROGRAMOK
Öblítés
Kíméletes öblítés
Centrifugálás Szivattyúzás és erõs centrifugálás
Kíméletes centrifugálás Szivattyúzás és kíméletes centrifugálás
Szivattyúzás Szivattyúzás
Programok Hõmérséklet
1
2
3
4
5
6
6
7
8
9
10
11
90
90
60
40
30
60
40
50
40
30
40
30
C
°
C
°
C
°
C
°
C
°
C
°
C
°
C
°
C
°
C
°
C
°
C
°
Mosószer
Elõmosás Mosás
Öblítõszer
Ciklus
idõtartama (perc)
Mosóciklus leírása
Elõmosás, mosás, öblítések, köztes és
160
végsõ centrifugálások
Mosás, öblítések, köztes és végsõ
143
centrifugálások
Mosás, öblítések, köztes és végsõ
120
centrifugálások
Mosás, öblítések, köztes és végsõ
85
centrifugálások
Mosás, öblítések, köztes és végsõ
77
centrifugálások
Mosás, öblítések, gyûrõdésgátlás vagy
92
kíméletes centrifugálás
Mosás, öblítések, gyûrõdésgátlás vagy
77
kíméletes centrifugálás
Mosás, öblítések, gyûrõdésgátlás vagy
86
kíméletes centrifugálás
öblítések, gyûrõdésgátlás vagy
Mosás,
76
kíméletes centrifugálás
öblítések és kíméletes
Mosás,
30
42
52
centrifugálás
öblítések és kíméletes
Mosás,
centrifugálás
Mosás, öblítések, gyûrõdésgátlás vagy
szivattyúzás
Öblítések és centrifugálás
Öblítések, gyûrõdésgátlás vagy
szivattyúzás
Megjegyzések
A gyûrõdésgátlás leírásához: lásd Vasalj kevesebbet, szemben lévõ oldal. A táblázatban szereplõ értékek
tájékoztató jellegûek.
Speciális program
Napközbeni 30' (9-es program szintetikus anyagokhoz) programot kevéssé szennyezett ruhák gyors mosására
fejlesztettük ki: mindössze 30 percig tart, így energiát és idõt takarít meg. A 9-es programot 30°C
hõmérsékletre beállítva különbözõ jellegû anyagokat együttesen lehet mosni (kivéve gyapjú és selyem),
maximum 3 kg-os töltéssel. Folyékony mosószer használatát javasoljuk.
66

Program módosítások
Centrifugálás beállítása
Ha a mosógép bekapcsolásakor a TÁRCSA olyan programra van
állítva, amelynél a centrifugálást be kell állítani, az ikon
folyamatosan világít. Az
beállított programra vonatkozó maximális centrifugálási sebesség
Opció billentyûk
és az
érték OFF állásig csökken, ami a centrifugálás elhagyását jelenti
(ha vissza szeretne térni magasabb értékhez, nyomja a gombot
tovább); álljon meg a kívánt értéknél, körülbelül 2 másodperc múlva
a kiválasztott értéket a mosógép elfogadja: az
folyamatosan világít. A beállított centrifugálási fordulatszám minden
programra érvényes, kivéve a 11-est és a Szivattyúzást.
ikon villogni kezd. A gomb ismételt megnyomásával az
Hõmérséklet beállítása
Ha a mosógép bekapcsolásakor a TÁRCSA olyan programra van állítva, amelynél a hõmérsékletet be kell
állítani, az ikon folyamatosan világít. Az gomb megnyomásával megjelenik a beállított programra
vonatkozó maximális hõmérséklet és az
OFF állásig csökken, ami a hidegmosást jelenti (ha vissza szeretne térni magasabb értékhez, nyomja a
gombot tovább); álljon meg a kívánt értéknél, körülbelül 2 másodperc múlva a kiválasztott értéket a mosógép
elfogadja: az
szombólum folyamatosan világít. A beállított hõmérséklet minden mosóprogramra érvényes.
ikon villogni kezd. A gomb ismételt megnyomásával a hõmérséklet
gomb megnyomásával megjelenik a
szimbólum
HU
Üzembehelyezés
Leírás
Az idõkésleltetés beállítása
A kijelzõn az gomb megnyomása után megjelenik az OFF felirat és az ennek megfelelõ szimbólum villogni
kezd.
A gomb újbóli megnyomásásval megjelenik az 1h, azaz egy órás késleltetés, és így tovább, egészen 24
óráig; álljon meg a kívánt késleltetésnél, körülbelül 2 másodperc múlva a kiválasztott értéket a mosógép
elfogadja; ezt követõen a kijelzõn megjelenik a beállított programra vonatkozó késleltetési idõ és az
szimbólum folyamatosan világít. Ha most megnyomja a START/RESET gombot, újra megjelenik a kiválasztott
késleltetési idõ, mely minden órával csökken egészen a ciklus indulásáig, ebben a szakaszban a
késleltetés csak visszafele módosítható. Az Idõkésleltetõ mindegyik programhoz beállítható.
Billentyû blokk (lásd 65. oldal).
Funkciók
A mosógép különféle mosófunkciói lehetõvé teszik a kívánt tisztítás és fehérség elérését. A funkciók bekapcsolásához:
1. nyomja meg a kívánt funkcióhoz tartozó billentyût, az alábbi táblázat szerint;
2. a billentyû világítása azt jelzi, hogy a hozzá tartozó funkció be van kapcsolva.
Megjegyzés: A gyors villogás azt jelenti, hogy a beállított programhoz a billentyûhöz tartozó funkció nem
kapcsolható be.
Abban az esetben, ha egy másik, korábban kiválasztottal össze nem férõ funkciót kapcsol be, csak az utolsóként
választott marad bekapcsolva.
Opció Hatás Megjegyzések a használathoz
Az A Osztályban
szabványosnál
Super
Wash
láthatóan fehérebb,
makulátlan tisztaság
elérését teszi
lehetõvé.
Nem fér össze a GYORS opcióval
A következõ
programokkal mûködik:
1, 2, 3, 4,
5, 6, 7, 8.
Vasalj
kevesebbet
Gyors
Csökkenti az
anyagok gyûrését,
ezzel könnyítve a
vasalást.
Nagyjából 30%-kal
csökkenti a mosási
ciklus idejét.
Ezen opciót beállítva a 6-os, 7-es, 8-as, 11-es programok és a kíméletes
öblítés félbeszakad úgy, hogy a mosott ruha az öblítõvízben marad
(Gyûrõdésgátlás), és a VASALJKEVESEBBET gomb villogni kezd:
- a ciklus befejezéséhez nyomja meg a START/RESET vagy a
VASALJKEVESEBBET gombot;
- ha csak le akarja szivattyúzni a vizet, a tárcsát állítsa a szivattyúzás
szimbólumára , és nyomja meg a START/RESET billentyût.
Nem fér össze a SUPER WASH opcióval.
Mindegyik,
kivéve:
1, 2, 9, 10,
Centrifugálás,
Kíméletes
centrifugálás,
Szivattyúzás.
1, 2, 3, 4,
5, 6, 7, 8.
67
SzervizRendellenességekÓvintézkedések KarbantartásProgramok Mosószerek

Mosószerek és mosandók
HU
Mosószeradagoló fiók
A mosás eredményessége függ a mosószer helyes
adagolásától is: ha túl sokat adagol belõle, a mosás
nem lesz hatékonyabb, de hozzájárul ahhoz, hogy
lerakódás képzõdjön a mosógépben, valamint a
környezetet is jobban szennyezi.
Húzza ki a
mosószeradagoló fiókot,
és a következõképpen
tegye bele a mosószret
1
3
1-es tartály: Mosószer elõmosáshoz (por)
2-es tartály: Mosószer mosáshoz
(por vagy folyadék)
A folyékony mosószert csak az indítás elõtt lehet betölteni.
3-as tartály: Adalékok
(öblítõszerek, illatosítók, stb.)
Az öblítõszer ne érjen a rács fölé.
2
vagy az adalékot.
Ne használjon kézimosószert, mert túlzottan sok
hab képzõdik.
Mosandó ruhák elõkészítése
Osztályozza a mosandókat a következõk
szerint:
- kelme típusa / címkén lévõ szimbólum.
- színek: válogassa külön a színes ruhákat a
fehérektõl.
Ürítse ki a zsebeket, és vizsgálja meg a
gombokat.
Ne lépje túl a mosandók száraz súlyára
vonatkozóan megadott értékeket:
Tartós anyagok: max. 4,5 kg
Szintetikus anyagok: max. 2,5 kg
Kényes anyagok: max. 2 kg
Gyapjú: max. 1 kg
Különleges bánásmódot igénylõ
darabok
Függönyök: hajtogatva tegye párnahuzatba
(vászonzsákba) vagy hálós zacskóba. Külön
mossa õket, és ne lépje túl a fél töltésnyi
mennyiséget. használja a 11-es programot,
amelyik automatikusan kikapcsolja a
centrifugálást.
Toll/pehely ágynemûk és tollkabátok: ha a
benne lévõ liba vagy kacsatoll mosógépben
mosható. Fordítsa ki a darabokat, és egyszerre
legfeljebb 2-3 kg-nyit mosson úgy, hogy egyszer
vagy kétszer megismétli az öblítést, és kíméletes
centrifugálást használ.
Teniszcipõk: tisztítsa meg a sártól. Együtt
moshatók a farmer és más tartós anyagokkal, de
nem a fehér ruhadarabokkal.
Gyapjú: a legjobb eredmény elérése érdekében
használjon speciális mosószert (gyapjúmosószert),
és ne lépje túl az 1 kg ruhatöltetet.
Woolmark Platinum Care
(Kasmir Platinum)
Kímélõ, mint a kézi mosás.
Az Ariston új, igényesebb szabványt vezetett
be, amit a The Woolmark Company az
értékes Woolmark Platinum Care márkajelzéssel
ismert el. Ha a mosógépen a Woolmark Platinum Care
logó látható, kitûnõ eredménnyel moshatók benne az
olyan gyapjú ruhadarabok is, amelyek címkéjén a
Kézzel mosandó megjelölés olvasható (M.0303):
IAz összes Kézzel mosandó ruhadarabhoz a 10-
es programot állítsa be, és használjon
speciális mosószert.
Milyen nehezek a mosandó ruhák?
1 lepedõ 400-500 g.
1 párnahuzat 150-200 g.
1 asztalterítõ 400-500 g.
1 fürdõköpeny 900-1200 g.
1 törülközõ 150-250 g.
68

Óvintézkedések és tanácsok
A mosógépet a nemzetközi biztonsági
szabványoknak megfelelõen tervezték és gyártották.
Ezeket a figyelmeztetéseket biztonsági okokból
írjuk le, és figyelmesen el kell olvasni õket.
Általános biztonság
Ezt a készüléket egyfajta háztartási és nem
professzionális használatra tervezték, és a
funkcióit megváltoztatni nem szabad.
A mosógépet csak felnõtt használhatja, és csak
az e használati utasításban megadott utasítások
szerint.
Ne érjen a géphez mezítláb, illetve vizes vagy
nedves kézzel vagy lábbal.
A csatlakozódugót az aljzatból ne a kábelt,
hanem a csatlakozót fogva húzza ki.
Ne nyissa ki a mosószeradagoló fiókot, ha a
mosógép mûködik.
Ne nyúljon a leeresztett vízbe, mert forró lehet.
Semmiképpen ne feszegesse az ajtót:
megsérülhet a véletlen nyitást akadályozó
biztonsági retesz.
Hiba esetén semmiképpen se nyúljon a gép
belsõ részeihez, és ne próbálja megjavítani.
Mindig ügyeljen arra, hogy gyerekek ne
mehessenek a mûködõ gép közelébe.
A mosás során az ajtó meleg lehet.
Amennyiben a gépet át kell helyezni, két vagy
három személy végezze, maximális
figyelemmel. Soha sem egyedül, mert a gép
nagyon súlyos.
A mosandó berakása elõtt ellenõrizze, hogy a
forgódob üres legyen.
Hulladékelhelyezés
Csomagolóanyag megsemmisítése:
tartsa be a helyi elõírásokat, így a csomagolás
újrahasznosítható.
Az elektromos készülékek megsemmisítésérõl szóló
európai direktíva 2002/96/EC elõírja, hogy a régi
háztartási gépeket nem szabad a normál nem
szelektív hulladékgyûjtési folyamat során
összegyûjteni. A régi gépeket szelektíven kell
összegyûjteni, hogy optimalizálni lehessen a bennük
lévõ anyagok újrahasznosítását és csökkenteni
lehessen az emberi egészségre és környezetre
gyakorolt hatásukat. Az áthúzott szemeteskuka
jele emlékezteti Önt arra, hogy kötelessége ezeket a
termékeket szelektíven összegyûjteni.
A fogyasztóknak a helyi hatóságot vagy
kereskedõt kell felkeresniük a régi háztartási
gépek helyes elhelyezését illetõen.
Környezetvédelem
Környezetvédelmet szolgáló technológia
Ha az ajtó üvegén keresztül kevés víz látszik, az
azért van, mert az új technológiának köszönhetõen
az Ariston ak a felénél kevesebb víz is elég ahhoz,
hogy maximális tisztítóhatást érjen el: egy olyan cél,
amelyet a környezet megóvása érdekében tûztünk ki.
Takarítson meg mosószert, vizet, energiát és idõt
Annak érdekében, hogy ne pazaroljunk az
erõforrásokkal, a mosógépet teljes ruhatöltettel
kell használni. Egy teljes ruhatöltettel való
mosás két féltöltet helyett, akár 50% energia
megtakarítást is lehetõvé tehet.
Az elõmosás csak nagyon szennyezett ruhák
esetén szükséges. Ha nem használja, azzal
mosószert, idõt és 5-15% energiát takarít meg.
Ha a foltokat a mosás elõtt folttisztítóval kezeli,
és beáztatja, kevesebb szükség lesz a magas
hõmérsékletû mosásra. A 60°C-on történõ
mosás a 90°C helyett, vagy 40°C-on 60°C
helyett akár 50% energiamegtakarításhoz is
vezethet.
Ha a mosószert a víz keménysége, a
szennyezettség mértéke és a ruha mennyisége
alapján helyesen adagolja, elkerüli a pazarlást
és nem terheli feleslegesen a környezetet: még,
ha biológiailag lebomló fajtájúak is, a
mosószerek olyan összetevõket tartalmaznak,
amelyek megváltoztatják a természet
egyensúlyát. Ezen kívül, kerülje az öblítõszerek
használatát, amennyire csak lehet.
Ha a késõ délután és a kora hajnal közötti
idõszakban mos, akkor hozzájárul ahhoz, hogy
csökkentse az áramszolgáltató vállalatok terhelését.
A Késleltetõ idõzítõ (lásd 67. oldal) nagyon
hasznos a mosás idõzítése szempontjából.
Ha a mosott ruhákat utána szárítógépben
szárítja, magas fordulatszámú centrifugálást
válasszon. Ha a mosott ruhában kevés a víz, idõt
és energiát takarít meg a szárítóprogramnál.
HU
Üzembehelyezés
Leírás
SzervizRendellenességekÓvintézkedések KarbantartásProgramok Mosószerek
69

Karbantartás és törõdés
HU
A víz elzárása és az elektromos áram
kikapcsolása
Minden mosás után zárja el a vízcsapot. Így
kíméli a mosógép vízrendszerét, és megszünteti a
vízszivárgás kockázatát.
Húzza ki a hálózati csatlakozódugót az aljzatból,
amikor a mosógépet tisztítja vagy karbantartást
végez.
A mosógép tisztítása
A külsõ részeket és a gumi részeket langyos
szappanos vizes ronggyal tisztíthatja. Ne használjon
oldószert vagy súrolószert.
A mosószeradagoló fiók tisztítása
1
Vegye ki a fiókot úgy,
hogy felemeli és kifelé
húzza (lásd ábra).
Folyóvíz alatt mossa ki.
Ezt a tisztítást gyakran
el kell végezni.
2
Az ajtó és a forgódob gondozása
A szivattyú tisztítása
A mosógép öntisztító szivattyúval van felszerelve,
melynek nincs szüksége tisztítási és karbantartási
mûveletekre. Az azonban megtörténhet, hogy kis
tárgyak kerülnek (aprópénz, gomb) a szivattyút
védõ elõkamrába, ami a szivattyú alsó részén
található.
Gyõzõdjön meg róla, hogy a mosóprogram véget
ért, és húzza ki a hálózati csatlakozót.
Hogy hozzáférjen az elõkamrához:
1. egy csavarhúzó
segítségével távolítsa el
a burkolópanelt a
mosógép elejérõl (lásd
ábra);
2. az óra járásával
ellentétes irányban
forgatva csavarja le a
fedelet (lásd ábra):
természetes, hogy egy
kevés víz kifolyik;
Az ajtót hagyja mindig résre nyitva, nehogy
rossz szagok keletkezzenek.
70
3. gondosan tisztítsa ki a belsejét;
4. csavarja vissza a fedelet;
5. szerelje vissza a panelt úgy, hogy mielõtt azt a
gép felé nyomná, meggyõzõdik arról, hogy a horgok
a hozzájuk tartozó furatokba illeszkednek.
A vízbevezetõ csõ ellenõrzése
Évente legalább egyszer ellenõrizze a gumicsövet.
Ki kell cserélni, ha repedezett vagy hasadozott: a
mosás során a nagy nyomás hirtelen szakadást
okozhat.
Soha ne alkalmazzon már használt csöveket.

Rendellenességek
és elhárírásuk
Megtörténhet, hogy a mosógép nem mûködik. Mielõtt felhívná a Szervizt (lásd 72. oldal) ellenõrizze, hogy
nem olyan problémáról van szó, amely a következõ lista segítségével egyszerûen megoldható.
Rendellenességek:
A mosógép nem kapcsol be.
A mosási ciklus nem indul el.
A mosógép nem vesz fel vizet
(A kijelzõn H
A mosógép folytonosan szívja és
lereszti a vizet.
O olvasható).
2
Lehetséges okok / Megoldás:
A hálózati csatlakozódugó nincs bedugva az aljzatba, vagy nem
eléggé ahhoz, hogy jól érintkezzen.
Nincs áram a lakásban.
Az ajtó nincs jól becsukva (a kijelzõn a DOOR felirat olvasható).
Nem nyomta meg az
Nem nyomta meg a START/RESET billentyût.
A vízcsap nincs nyitva.
Az indítás késletetése van beállítva (Késleltetõ idõzítõ, lásd 67. oldal).
A vízbevezetõ csõ nincs csatlakoztatva a csaphoz.
A csõ meg van törve.
A vízcsap nincs nyitva.
A lakásban nincs víz.
Nincs elegendõ nyomás.
Nem nyomta meg a START/RESET billentyût.
A leeresztõcsõ nem a padlószinttõl 65 és 100 cm közötti
magasságban van felszerelve (lásd 63. oldal).
A leeresztõcsõ vége vízbe merül (lásd 63. oldal).
A fali szifonnak nincs szellõzése.
billentyût.
HU
Üzembehelyezés
Leírás
A mosógép nem ereszti le a
vizet, vagy nem centrifugál.
A mosógép nagyon rázkódik a
centrifugálás alatt.
A mosógépbõl elfolyik a víz.
Sok hab képzõdik.
Ha ezen vizsgálatok után a probléma nem oldódik meg, zárja el a
vízcsapot, kapcsolja ki a mosógépet és hívja ki a szervizszolgálatot.
Ha a lakás egy épület legfelsõbb emeleteinek egyikén található,
lehetséges, hogy a csatorna-szellõzõ eltömõdésének jelensége
(szivornyahatás) lépett fel, ezért a mosógép folytonosan szívja és
leereszti a vizet. Ezen kellemetlenség elkerülésére a kereskedelmi
forgalomban rendelkezésre állnak csatorna-szellõzõ szelepek.
A program nem ereszti le a vizet: némelyik programnál manuálisan
kell elindítani (lásd 66. oldal).
Be van kapcsolva a Vasalj kevesebbet opció: a program befejezéséhez
nyomja meg a START/RESET billentyût (lásd 67. oldal).
A leeresztõcsõ meg van törve (lásd 63. oldal).
A lefolyó el van dugulva.
Az üzembehelyezéskor nem távolították el a forgódob rögzítését
(lásd 62. oldal).
A mosógép nem áll vízszintben (lásd 62. oldal).
A mosógép a bútor és a fal köté van szorítva (lásd 62. oldal).
A vízbevezetõ csõ nincs jól felcsavarva (lásd 62. oldal).
A mosószeradagoló fiók eltömõdött (a tisztítást lásd a 70. oldalon).
A leeresztõcsõ nincs jól rögzítve (lásd 63. oldal).
A mosószer nem mosógépekhez való (kell, hogy szerepeljen rajta,
hogy gépi, kézi vagy gépi mosáshoz, vagy hasonló).
Túl sok mosószert használt.
SzervizRendellenességekÓvintézkedések KarbantartásProgramok Mosószerek
71

Szerviz
195046638.01
05/2005 - Xerox Business Services
HU
Mielõtt a Szervizhez fordulna:
Gyõzõdjön meg arról, hogy a hibát nem tudja maga is elhárítani (lásd 71. oldal);
Újból indítsa el a programot, hogy lássa, elhárította-e a hibát;
Ellenkezõ esetben forduljon a megbízott Szakszervizhez: a telefonszámot a garanciajegyen találja.
Soha ne forduljon nem megbízott szerelõhöz.
Közölje:
a meghibásodás jellegét;
a mosógép modelljét (Mod.);
a gyártási számot (Sorsz.).
Ezen információk a mosógép hátsó részére felerõsített táblán találhatók.
Szerviz
72
 Loading...