

Aprilia Pegaso 650 1997 Service manual

0
PREMESSA
– Questo manuale fornisce le informazioni principali per
le procedure di normale intervento.
– Le informazioni e le illustrazioni che compongono que-
sto manuale, sono aggiornate al momento della divulgazione del manuale stesso.
– Questa pubblicazione è indirizzata ai tecnici del setto-
re; molte nozioni sono state volutamente omesse, perché giudicate superflue.
Per eventuali informazioni, interpellare il REPARTO
ASSISTENZA
– Per ulteriori informazioni vedi il MANUALE D’OFFICI-
NA MOTORE, N˚ 933 (D-UK) / N˚ 934 (I-E-F), il CATALOGO RICAMBI MOTORE e il CATALOGO RICAMBI
“CICLISTICA”, N˚ 261V
La ditta
fiche in qualsiasi momento ai propri modelli, fermo restando le caratteristiche essenziali qui descritte e illustrate.
I diritti di memorizzazione elettronica, di riproduzione e di
adattamento totale o parziale, con qualsiasi mezzo sono
riservati per tutti i Paesi.
La citazione di prodotti o servizi di terze parti è solo a scopo informativo e non costituisce nessun impegno.
aprilia s.p.a.
prestazioni o l’uso di questi prodotti.
aprilia s.p.a.
aprilia
.
.
si riserva il diritto di apportare modi-
non si assume la responsabilità riguardo le
INDICE GENERALE
INFORMAZIONI GENERALI
OPERAZIONI DI MANUTENZIONE
PERIODICA E DI MESSA A PUNTO
MOTORE
SISTEMA DI ALIMENTAZIONE
IMPIANTO DI RAFFREDDAMENTO
1
2
3
4
5
USO DEL MANUALE
◆
NORME PER LA CONSULTAZIONE
– Se non espressamente descritto, il riassemblag-
gio dei gruppi segue in senso inverso le operazioni di smontaggio.
– Per ogni intervento sul motore consultare il manua-
le specifico.
– Consultare il libretto “USO E MANUTENZIONE” per
le operazioni di normale manutenzione.
SIMBOLOGIA
◆
Osservare scrupolosamente gli avvertimenti preceduti
dalle seguenti simbologie:
Norme e misure di sicurezza che proteggono
il pilota, l’operatore e altre persone da lesioni
a
o rischi gravi e/o danni al veicolo.
Indicazioni per facilitare lo svolgimento delle
c
operazioni. Informazioni tecniche.
★
Le operazioni precedute da questo simbolo
devono essere ripetute dal lato opposto del
veicolo.
In questo manuale le varianti sono indicate con i seguenti simboli:
optional
&
versione catalitica
2
versione Regno Unito
U
versione Austria
A
versione Svizzera
C
IMPIANTO ELETTRICO
CICLISTICA
INFORMAZIONI PER LE RIPARAZIONI
Prima edizione: marzo 1997
Ristampa:
Prodotto e stampato da:
Studio Tecno Public
Viale del Progresso - 37038 Soave (VR) - Italia
Tel. 045 -76 11 911
Fax 045 -76 12 241
per conto di:
aprilia s.p.a.
via G. Galilei, 1 - 30033 Noale (VE)
Tel. 041 - 58 29 111
Fax 041 - 44 10 54
6
7
8
- 1
1
2
3
4
5
INDICE GENERAL
INFORMACIONES GENERALES
OPERACIONES DE MANTENIMIENTO
PERIODICO Y DE PUESTA A PUNTO
MOTOR
SISTEMA DE ALIMENTACION
INSTALACION DE REFRIGERACION
0
PREMISA
– Este manual suministra las informaciones principales
para los procedimientos de intervención corriente.
– Las informaciones y las ilustraciones que forman parte
de este manual, están puestas al día en el momento
de la divulgación del manual mismo.
– Esta publicación se dirige a los técnicos del sector, por
lo tanto se han omitido voluntariamente muchas opciones en cuanto las consideramos superfluas.
Para otras informaciones, llame al DEPARTAMENTO
ASISTENCIA
– Para otras informaciones véase el MANUAL DE TA-
LLER MOTOR, N˚ 933 (D - UK) / N˚ 934 (I-E-F), el CATALOGO REPUESTOS MOTOR y el CATALOGO REPUESTOS "PARTE CICLO" N˚ 261V
La empresa aprilia s.p.a. se reserva el derecho de aportar modificaciones a sus modelos en cualquier momento,
guardando siempre las características esenciales descritas e ilustradas en este manual.
A todos los países se les reserva los derechos de memorización electrónica, de reproducción y de adaptación total y parcial, con cualquier medio.
El hecho de citar productos o servicios por cuenta ajena
tiene el solo fin de informar y no constituye ningún compromiso.
La empresa
responsabilidad en cuanto a las prestaciones o al uso de
estos productos.
aprilia s.p.a.
aprilia s.p.a.
no se hace cargo de ninguna
6
7
8
INSTALACION ELECTRICA
PARTE CICLO
INFORMACIONES
PARA LAS REPARACIONES
Primera edición: marzo 1997
Nueva edición:
Producido e impreso por:
Studio Tecno Public
Viale del Progresso - 37038 Soave (VR) - Italia
Tel. 045 - 76 11 911
Fax 045 - 76 12 241
por parte de:
aprilia s.p.a.
via G. Galilei, 1 - 30033 Noale (VE)
Tel. 041 - 58 29 111
Fax 041 - 44 10 54
USO DEL MANUAL
◆
NORMAS PARA LA CONSULTA
– De no estar expresamente descrito, hay que
realizar el reensamblaje de los grupos siguiendo en orden contrario las operaciones que se
han efectuado para el desmontaje.
– Para cada intervención sobre el motor, consulte el
manual específico.
– Consulte el manual "USO Y MANTENIMIENTO"
para las operaciones de mantenimiento corriente.
SIMBOLOS
◆
Observe esmeradamente las advertencias precedidas
por los siguientes símbolos:
Normas y medidas de seguridad que protegen
al piloto, al operador u a otras personas de le-
a
siones o riesgos graves y/o daños al vehículo.
Indicaciones para facilitar el desarrollo de las
c
operaciones. Informaciones técnicas.
★
Hay que repetir las operaciones que están
precedidas por este símbolo en el lado opuesto del vehículo.
En este manual las variantes están indicadas por los
siguientes símbolos:
optional
&
versión catalitica
2
versión Reino Unido
U
versión Austria
A
versión Suiza
C
- 2
FOREWORD
0
– This manual supplies the main information for normal
servicing procedures.
– The information and illustrations contained in this man-
ual are updated to the moment of its publication.
– This publication is meant for professional mechanics,
therefore many notions have been intentionally omitted, as they were regarded as superfluous.
For any further information, contact aprilia s.p.a.
SERVICE DEPARTMENT.
– For any further information see the ENGINE SERVICE
MANUAL, No 933 (D-UK) / No 934 (I-E-F), the ENGINE SPARE PARTS CATALOGUE and the "CHASSIS PARTS" SPARE PARTS CATALOGUE, No 261V
aprilia s.p.a. reserves the right to modify its models at
any time, without prejudice to the main characteristics
here described.
All rights as to electronic storage, reproduction and total
or partial adaptation, with any means, are reserved for all
Countries.
The mention to products or services supplied by third parties is made only for information purposes and is not
binding in any case.
aprilia s.p.a. takes no responsibility as to the perfor-
mance or the use of said products.
TABLE OF CONTENTS
GENERAL INFORMATION
SERVICE AND SETTING UP
ENGINE
FUEL SUPPLY SYSTEM
COOLING SYSTEM
1
2
3
4
5
HOW TO USE YOUR SERVICE
AND REPAIR MANUAL
◆
ADVICE FOR CONSULTATION
– If not expressly described otherwise, the reas-
sembly of the groups is to be carried out repeating the disassembly phases in the reverse order.
– For each single operation on the engine, consult the
specific manual.
– For ordinary maintenance, consult the "USE AND
MAINTENANCE” manual.
Remember: 1 mile = 1.6 km
c
◆
SYMBOLS
Carefully observe the instructions preceded by the following warning signs:
Safety norms and regulations to protect the
pilot, the mechanic and other people from se-
a
vere injuries or grave risks.
Indications to make the operations easier.
c
Technical information.
★
The operations preceded by this symbol must
be repeated on the opposite side of the vehicle.
1 km = 0.625 miles
ELECTRICAL SYSTEM
CHASSIS PARTS
REPAIR INFORMATION
First edition: march 1997
Reprint:
6
7
8
In this manual the various versions are indicated by
the following symbols:
optional
&
catalytic version
2
United Kingdom version
U
Austria version
A
Switzerland version
C
Produced and printed by:
Studio Tecno Public
Viale del Progresso - 37038 Soave (VR) - Italy
Ph. 045 - 76 11 911
Fax 045 - 76 12 241
On behalf of:
aprilia s.p.a.
Via G. Galilei, 1 - 30033 Noale (VE) - Italy
Ph. 041 - 58 29 111
Fax 041 - 44 10 54
- 3

NOTE / NOTES / ANMERKUNGEN
0 - 4
1
INFORMAZIONI GENERALI
1
INFORMACIONES GENERALES
GENERAL INFORMATION
2
3
4
5
6
7
8
- 1

1
1
INFORMAZIONI GENERALI
1
2
3
4
5
INDICE GENERAL
1.1 POSIZIONE DEI NUMERI DI SERIE ...Pag. 1-4
1.2 AVVERTENZE PER CARBURANTE,
1.3 NORME PER IL RODAGGIO .................Pag. 1-7
1.4 PRECAUZIONI E INFORMAZIONI
1.5 PARTI DI RICAMBIO ............................Pag. 1-12
1.6 CARATTERISTICHE
1.7 TABELLA LUBRIFICANTI ..................Pag. 1-14
1.8 ATTREZZI SPECIALI ...........................Pag. 1-16
INFORMAZIONI GENERALI
INDICE
1.1.1 NUMERO DI TELAIO ............................Pag. 1-4
1.1.2 NUMERO DI MOTORE .........................Pag. 1-4
LUBRIFICANTI E LIQUIDO
REFRIGERANTE .....................................Pag. 1-4
1.2.1 CARBURANTE .....................................Pag. 1-4
1.2.2 OLIO MOTORE .....................................Pag. 1-4
1.2.3 OLIO FORCELLA .................................Pag. 1-6
1.2.4 LIQUIDO FRENI ....................................Pag. 1-6
1.2.5 LIQUIDO REFRIGERANTE ..................Pag. 1-6
GENERALI ................................................Pag. 1-7
TECNICHE ..............................................Pag. 1-12
6
7
8
- 2

1
1
1
GENERAL INFORMATIONINFORMACIONES GENERALES
INFORMACIONES GENERALES
INDICE
1.1 POSICIÓN
DE LOS NÚMEROS DE SERIE ............Pag. 1-5
1.1.1 NÚMERO DE BASTIDOR .....................Pag. 1-5
1.1.2 NÚMERO DE MOTOR ..........................Pag. 1-5
1.2 ADVERTENCIAS PARA
EL COMBUSTIBLE, LUBRICANTES
Y LÍQUIDO REFRIGERANTE ...............Pag. 1-5
1.2.1 COMBUSTIBLE ....................................Pag. 1-5
1.2.2 ACEITE DEL MOTOR ...........................Pag. 1-5
1.2.3 ACEITE PARA HORQUILLA ................Pag. 1-8
1.2.4 LÍQUIDO DE FRENOS .........................Pag. 1-8
1.2.5 LÍQUIDO REFRIGERANTE ..................Pag. 1-8
1.3 NORMAS PARA EL RODAJE ...............Pag. 1-9
1.4 PRECAUCIONES
E INFORMACIONES GENERALES .....Pag. 1-9
1.5 PIEZAS DE REPUESTO ......................Pag. 1-12
1.6 FICHA TECNICA ...................................Pag. 1-12
1.7 TABLA DE LOS LUBRICANTES .......Pag. 1-15
1.8 EQUIPOS ESPECIALES ......................Pag. 1-16
GENERAL INFORMATION
TABLE OF CONTENTS
1.1 POSITION OF SERIAL NUMBERS .....Pag. 1-5
1.1.1 FRAME NUMBER .................................Pag. 1-5
1.1.2 ENGINE NUMBER ...............................Pag. 1-5
1.2 INSTRUCTIONS
FOR USE OF FUEL,
LUBRICANTS AND COOLANT ...........Pag. 1-5
1.2.1 FUEL .....................................................Pag. 1-5
1.2.2 ENGINE OIL ..........................................Pag. 1-5
1.2.3 FORK OIL ...........................................Pag. 1-10
1.2.4 BRAKE FLUID ....................................Pag. 1-10
1.2.5 COOLANT ...........................................Pag. 1-10
1.3 RUNNING-IN RULES ...........................Pag. 1-11
1.4 PRECAUTIONS AND GENERAL
INFORMATION .....................................Pag. 1-11
1.5 SPARE PARTS ......................................Pag. 1-12
1.6 TECHNICAL
SPECIFICATIONS ................................Pag. 1-12
1.7 LUBRICANT CHART ............................Pag. 1-15
1.8 SPECIAL TOOLS ..................................Pag. 1-16
1
2
3
4
5
6
7
8
- 3
INFORMAZIONI GENERALI
1.1 POSIZIONE DEI NUMERI DI SERIE
Questi numeri sono necessari per l’immatricolazione del
veicolo.
L’alterazione dei numeri di identificazione può
c
far incorrere in gravi sanzioni penali e ammini-
strative, e l’immediata decadenza della garanzia.
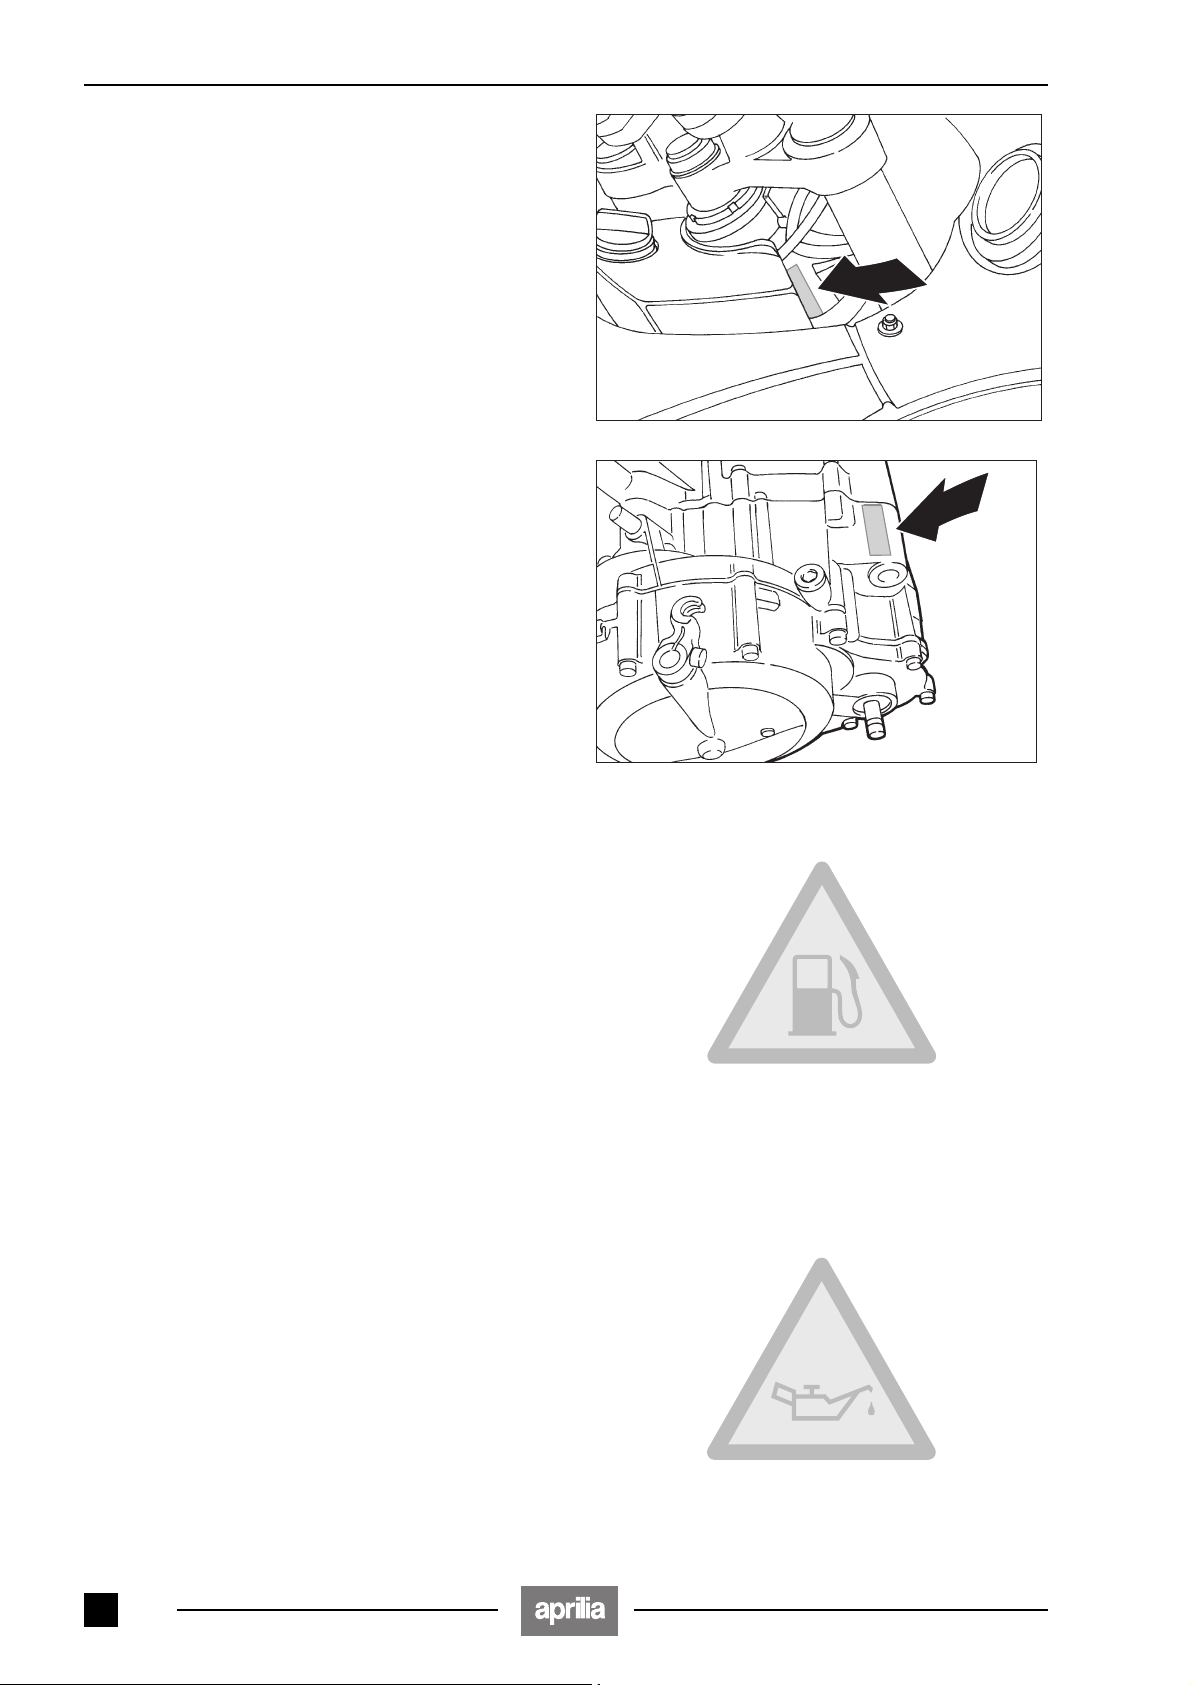
1.1.1 NUMERO DI TELAIO
Il numero telaio è stampigliato sul cannotto dello sterzo,
lato destro del veicolo.
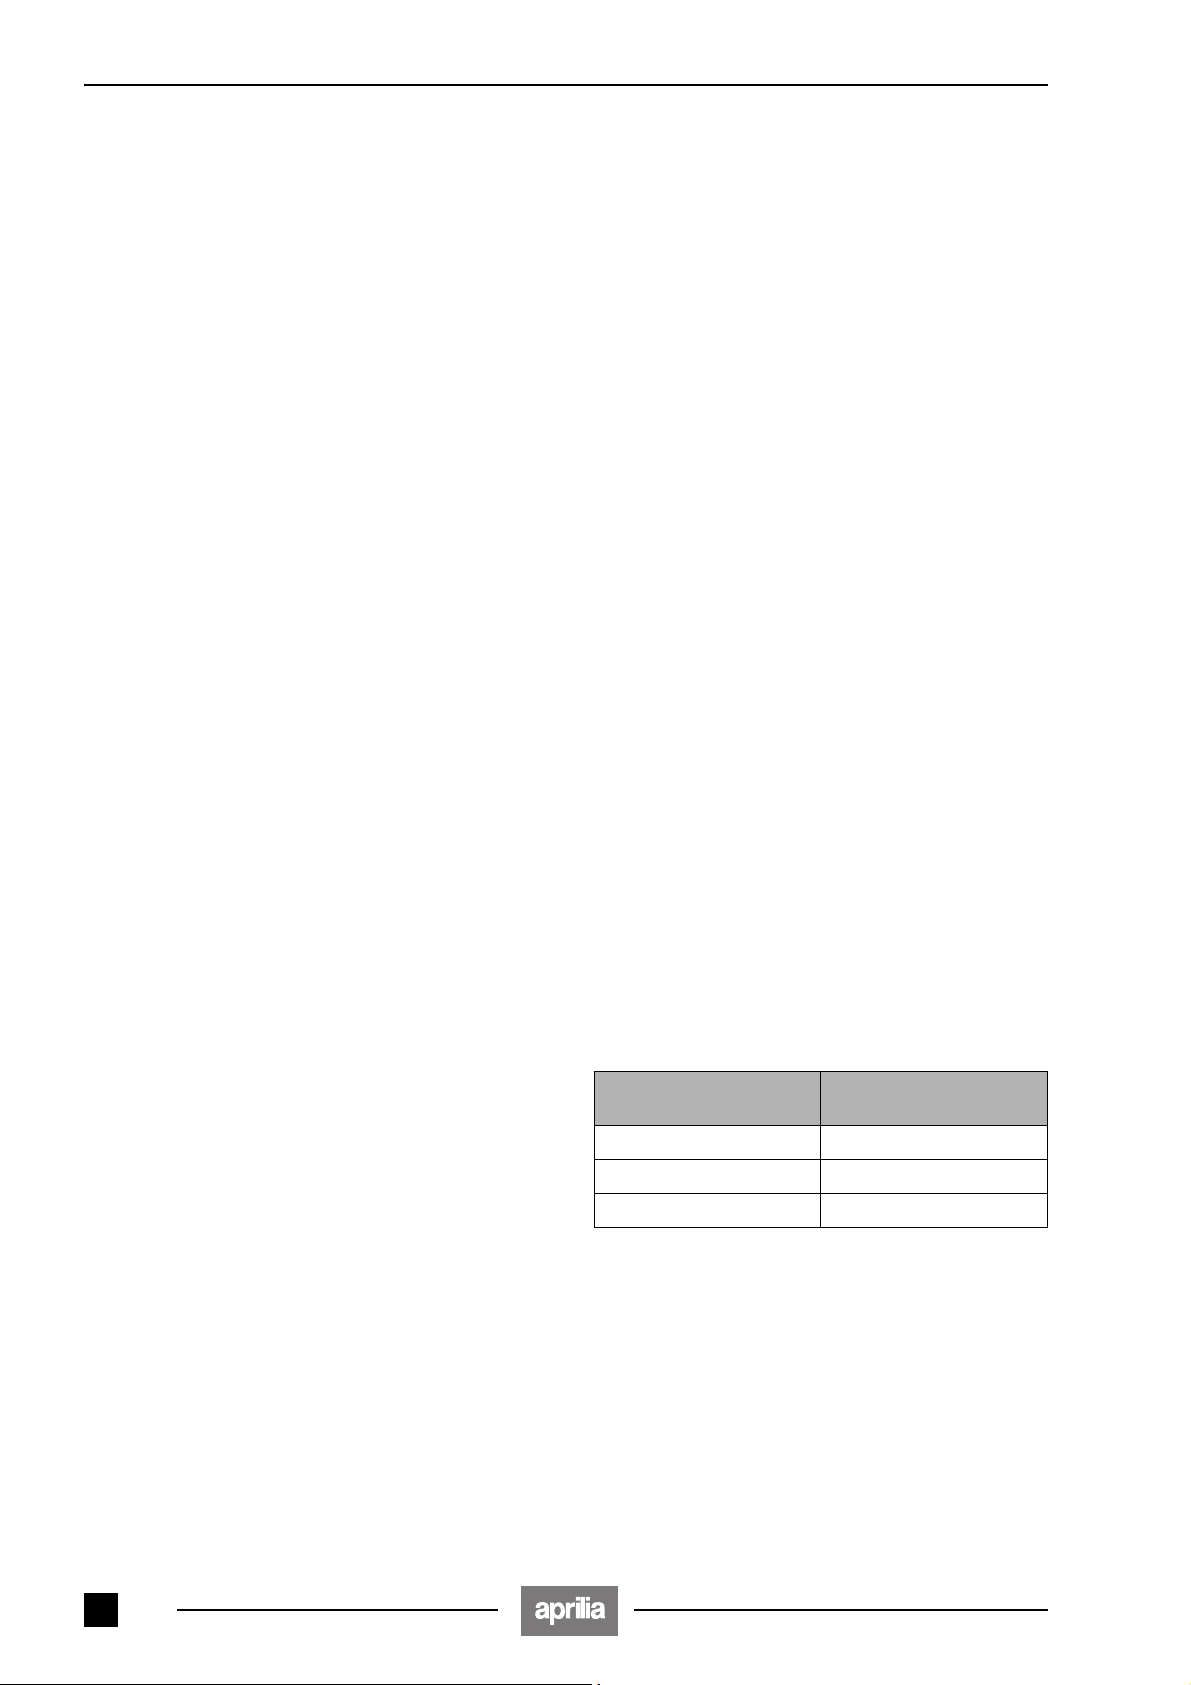
1.1.2 NUMERO DI MOTORE
Il numero del motore è stampigliato sulla parte posteriore,
in alto.
1.2 AVVERTENZE PER CARBURANTE,
LUBRIFICANTI E LIQUIDO
REFRIGERANTE
1.2.1 CARBURANTE
Il carburante utilizzato per la propulsione dei
motori a scoppio è estremamente infiammabile e può divenire esplosivo in determinate
a
condizioni. E' opportuno effettuare il rifornimento e le
operazioni di manutenzione in una zona ventilata e a
motore spento. Non fumare durante il rifornimento e
in vicinanza di vapori di carburante, evitando assolutamente il contatto con fiamme libere, scintille e qualsiasi altra fonte che potrebbe causarne l'accensione
o l'esplosione. Evitare, inoltre, la fuoriuscita di carburante dal bocchettone, in quanto potrebbe incendiarsi a contatto con le superfici roventi del motore.
Nel caso in cui involontariamente venisse versato del
carburante, controllare che la zona sia completamente asciutta, prima della messa in moto del veicolo.
Il carburante si dilata al calore e sotto l’azione dell’irragiamento solare. Perciò non riempire mai il serbatoio sino all’orlo. Chiudere accuratamente il tappo al
termine dell'operazione di rifornimento.
Evitare il contatto del carburante con la pelle, l'inalazione dei vapori, l'ingestione e il travaso da un contenitore all'altro con l'uso di un tubo.
Non disperdere il carburante nell’ambiente.
TENERE LONTANO DALLA PORTATA DEI BAMBINI.
Versione normale:
Benzina super (4 Stars
ottano minimo 98 (N.O.R.M.) e 88 (N.O.M.M.).
Versione catalitica
Benzina super senza piombo secondo DIN 51 607, con
numero di ottano minimo 95 (N.O.R.M.) e 85 (N.O.M.M.).
2
) DIN 51 600, con numero di
U
:
1
1.2.2 OLIO MOTORE
L'olio motore può causare seri danni alla pelle
se maneggiato a lungo e quotidianamente.
Si consiglia di lavare accuratamente le mani
a
dopo averlo maneggiato.
Non disperdere l'olio nell'ambiente.
Consegnarlo o farlo ritirare dalla più vicina azienda di
recupero olî usati o dal fornitore.
Controllare ogni 500 km il livello olio motore, vedi 2.12
(VERIFICA LIVELLO OLIO MOTORE E RABBOCCO).
Sostituire l’olio motore dopo i primi 1000 km e successivamente ogni 6000 km, vedi 2.13 (SOSTITUZIONE
OLIO MOTORE E FILTRO OLIO MOTORE).
Olio motore (consigliato):
IP SUPERBIKE 4, SAE 5W - 40.
In alternativa all’olio consigliato, si possono utilizzare olî
di marca con prestazioni conformi o superiori alle specifiche CCMC G-4, A.P.I. SG.
- 4

1
c
GENERAL INFORMATIONINFORMACIONES GENERALES
1.1 POSICIÓN DE LOS NÚMEROS DE SERIE
Estos números son necesarios para matricular el vehículo.
La alteración de los números de identificación
c
administrativas y la invalidez de la garantía.
1.1.1 NÚMERO DE BASTIDOR
El número del bastidor está impreso en el tubo de la dirección, en la parte derecha del vehículo.
1.1.2 NÚMERO DE MOTOR
El número del motor está impreso en la parte trasera superior.
1.2 ADVERTENCIAS PARA EL COMBUSTIBLE,
1.2.1 COMBUSTIBLE
nes. Es oportuno reponer gasolina y realizar las operaciones de mantenimiento en una zona ventilada y
con el motor apagado. No fume durante la provisión
de gasolina y cerca de los vapores del combustible;
evite el contacto con llamas, chispas y cualquier otra
fuente que pueda causar el encendido o la explosión.
Además, evite que el combustible salga de la boca de
llenado, ya que éste podría incendiarse si toca las superficies candentes del motor. En caso que se vierta
accidentalmente combustible, antes de arrancar el
vehículo, controle que la zona esté completamente
seca. El combustible se dilata con el calor y bajo la
acción de los rayos solares. Por lo tanto, nunca llene
el depósito hasta el tope. Cierre cuidadosamente la
tapa al finalizar las operaciones de reposición.
Evite el contacto del combustible con la piel, la inhalación de los vapores, la ingestión y el trasiego de un
recipiente a otro por medio de un tubo.
No esparsa el combustible en el medio ambiente.
MANTÉNGASE LEJOS DEL ALCANCE DE LOS NIÑOS.
Versión normal:
Gasolina super (4 Stars
98 (N.O.R.M.) y 88 (N.O.M.M.).
Versión catalítica
Gasolina super sin plomo según DIN 51 607, mínimo octano 95 (N.O.R.M) y 85 (N.O.M.M.).
puede provocar graves sanciones penales y
LUBRICANTES Y LÍQUIDO REFRIGERANTE
El combustible para la propulsión de los motores de explosión, es muy inflamable y puede
volverse explosivo en determinadas condicio-
a
) DIN 51 600, mínimo octano
U
:
2
1.1 POSITION OF SERIAL NUMBERS
These numbers are necessary in order to register the vehicle.
Do not alter the identification numbers if you
istrative sanctions and to cause the immediate invalidation of the guarantee.
1.1.1 FRAME NUMBER
The frame number is printed on the vehicle right side of
the steering tube.
1.1.2 ENGINE NUMBER
The engine number is printed high up on the rear part of
the vehicle.
1.2 INSTRUCTIONS FOR USE OF FUEL,
1.2.1 FUEL
It is advisable to perform the operations of refuelling
and maintenance in a well-ventilated area with the engine switched off. Do not smoke while refuelling or
when near fuel vapours and, in any case, avoid contact with naked flames, sparks and any other source
of heat that might cause the fuel to catch fire or to
explode. Avoid escape of fuel from the fuel filler as it
could ignite on contact with the red-hot surfaces of
the engine. In case fuel has accidentally been spilt,
make sure that the area is completely dry before
starting the vehicle.
Never fill the tank to the brim as fuel expands under
the heat of the sun and reacts to the effects of sun radiation .
Close the cap securely after refuelling.
Avoid contact of the fuel with the skin and inhalation
of the fumes; do not swallow fuel or pour it from one
container into another by means of a tube.
Do not dispose of fuel in the environment.
KEEP FUEL AWAY FROM CHILDREN.
Normal version:
premium grade petrol (4 Stars
51 600 standard, min. O.N. 98 (N.O.R.M.) and 88
(N.O.M.M.).
Catalytic version
unleaded petrol according to the DIN 51 607 standard,
min. O.N. 95 (N.O.R.M.) and 85 (N.O.M.M.).
do not want to incur severe penal and admin-
LUBRICANTS AND COOLANT
The fuel used for internal combustion engines
is extremely inflammable and in certain conditions can become explosive.
a
) according to the DIN
U
:
2
1.2.2 ACEITE DEL MOTOR El aceite del motor puede causar graves da-
ños a la piel si es manipulado por mucho
tiempo y diariamente. Se aconseja lavarse las
a
manos tras haberlo manipulado. No esparza el aceite
en el medio ambiente. Entréguelo o hágalo retirar por
la empresa de recuperación de aceites usados más
cercana o por el proveedor.
Controle cada 500 km el nivel del aceite del motor; véase
2.12 (CONTROL DEL NIVEL DEL ACEITE
DEL MOTOR Y RELLENO). Cambie el aceite del motor
tras los primeros 1000 km y sucesivamente cada 6000
km; véase 2.13 (CAMBIO DEL ACEITE MOTOR Y DEL
FILTRO DEL ACEITE DEL MOTOR).
Aceite del motor (aconsejado):
IP SUPERBIKE 4, SAE 5W - 40.
Como alternativa a el aceite aconsejado, pueden utilizarse aceites de marca con características conformes o superiores a las normas CCMC G-4, A.P.I. SG.
1.2.2 ENGINE OIL Engine oil may cause serious damage to the
skin if handled daily and for long periods.
It is advisable to wash your hands thoroughly
a
after using.
Do not dispose of oil in the environment.
Deliver it to or have it collected by the nearest used
oil recovery firm or by the supplier.
Check engine oil level every 500 km; see 2.12
(CHECKING THE ENGINE OIL LEVEL AND TOPPING
UP).
Change engine oil after the first 1000 km and successively every 6000 km; see 2.13 (CHANGING ENGINE OIL
AND OIL FILTER).
Recommended engine oil:
IP SUPERBIKE 4, SAE 5W - 40.
As an alternative to the recommended oil, high quality oils
with performance conforming or superior to CCMC G-4,
A.P.I.SG. specifications may be used.
- 5
INFORMAZIONI GENERALI
1.2.3 OLIO FORCELLA L'olio forcella può causare seri danni alla pel-
le se maneggiato a lungo e quotidianamente.
a
Si consiglia di lavare accuratamente le mani
dopo averlo maneggiato.
Non disperdere l'olio nell'ambiente.
Consegnarlo o farlo ritirare dalla più vicina azienda di
recupero olî usati o dal fornitore.
Olio forcella (consigliato): olio per forcelle IP F.A. 5W
oppure IP F.A. 20W.
Qualora si intendesse disporre di un comportamento intermedio tra quelli offerti da IP F.A. 5W e da IP F.A. 20W,
si possono miscelare i prodotti come sotto indicato:
SAE 10W IP F.A. 5W 67% del volume, +
SAE 15W IP F.A. 5W 33% del volume, +
1.2.4 LIQUIDO FRENI
c
ti. Le seguenti informazioni sono riferite a un singolo
impianto frenante, ma sono valide per entrambi.
a
venissero a contatto con il liquido, inoltre rivolgersi a
un oculista oppure a un medico se il liquido venisse a
contatto con gli occhi.
Non disperdere il liquido nell'ambiente.
TENERE LONTANO DALLA PORTATA DEI BAMBINI.
a
Liquido freni (consigliato):
IP F.F. DOT 5 (Compatibile DOT 4)
a
Non impiegare liquido freni prelevato da contenitori
vecchi o già aperti.
Non usare liquido freni avanzato da precedenti riparazioni se è trascorso molto tempo.
Improvvise variazioni del gioco o una resistenza elastica sulle leve dei freni, sono dovute a inconvenienti
nei circuiti idraulici.
Prestare particolare attenzione che i dischi dei freni e
le guarnizioni d'attrito non siano unti o ingrassati,
specialmente dopo l'esecuzione di operazioni di manutenzione o controllo.
Controllare che i tubi dei freni non risultino attorcigliati o consumati.
Fare attenzione che acqua o polvere non entrino
inavvertitamente all'interno del circuito.
IP F.A. 20W 33% del volume
IP F.A. 20W 67% del volume
Questo veicolo è dotato di freni a disco anteriore e posteriore, con circuiti idraulici separa-
ll liquido freni potrebbe causare irritazioni se
venisse a contatto con la pelle o con gli occhi.
Lavare accuratamente le parti del corpo che
Utilizzare il liquido freni con attenzione: altera
chimicamente la vernice e le parti in plastica,
gomma, ecc.
Non utilizzare liquidi diversi da quelli prescritti
e non miscelare liquidi differenti per il rabbocco, per non danneggiare l'impianto frenante.
1.2.5 LIQUIDO REFRIGERANTE Il liquido refrigerante può essere nocivo se in-
gerito, o se viene a contatto con la pelle o gli
a
le o gli occhi, risciacquare a lungo con acqua abbondante. Se è stato ingerito, provocare il vomito e consultare immediatamente un medico.
TENERE LONTANO DALLA PORTATA DEI BAMBINI.
Controllare ogni 1000 km e dopo lunghi viaggi il livello del
liquido refrigerante, vedi 2.14 (CONTROLLO E RABBOCCO LIQUIDO REFRIGERANTE); sostituirlo ogni
12000 km o due anni (la condizione che si verifica per prima), vedi 2.15 (SOSTITUZIONE DEL LIQUIDO REFRIGERANTE).
La soluzione di liquido refrigerante è composta da 50% di
acqua e 50% di antigelo. Questa miscela è ideale per la
maggior parte di temperature di funzionamento e garantisce una buona protezione contro la corrosione.
È conveniente mantenere la stessa miscela anche nella
stagione calda perché si riducono così le perdite per evaporazione e la necessità di frequenti rabbocchi. In questo
modo diminuiscono i depositi di sali minerali, lasciati nel
radiatore dall’acqua evaporata e si mantiene inalterata
l’efficienza del sistema di raffreddamento.
Nel caso in cui la temperatura esterna sia al di sotto dei
zero gradi centigradi, controllare frequentemente il circuito
refrigerante aggiungendo, se necessario, una concentrazione maggiore di antigelo (fino a un massimo del 60%).
Per la soluzione refrigerante utilizzare acqua distillata,
per non rovinare il motore.
Liquido refrigerante (consigliato):
IP ECOBLU -40˚
In base alla temperatura di congelamento della miscela
refrigerante che si vuole ottenere, aggiungere all'acqua la
percentuale di liquido refrigerante indicata dalla seguente
tabella:
grado di protezione che garantisce.
occhi. Se il liquido viene a contatto con la pel-
Non togliere il tappo del radiatore a motore
caldo, perché il liquido refrigerante è sotto
a
pressione e a temperatura elevata.
Non utilizzare il veicolo se il livello del liquido
a
refrigerante è al di sotto del livello minimo.
Punto di congelamento ˚CLiquido refrigerante
-20˚ 35
-30˚ 45
-40˚ 55
Le caratteristiche dei vari liquidi antigelo sono
c
diverse. Leggere sull’etichetta del prodotto il
Impiegare solo antigelo e anticorrosivo senza
nitrito, che assicuri una protezione almeno ai
a
-35˚C.
% del volume
Nel caso di interventi di manutenzione al circuito
idraulico, si consiglia l’utilizzo di guanti in lattice.
1 - 6
INFORMAZIONI GENERALI
1.3 NORME PER IL RODAGGIO
Il rodaggio del motore è fondamentale per garantirne la
successiva durata e il corretto funzionamento. Percorrere, se possibile, strade con molte curve e/o collinose,
dove il motore, le sospensioni e i freni vengono sottoposti
a un rodaggio più efficace.
Soltanto dopo i primi 1500 chilometri di rodaggio è possibile ottenere le migliori prestazioni
a
in accelerazione del veicolo.
Attenersi alle seguenti indicazioni:
◆ Non accelerare bruscamente e completamente quan-
do il motore sta funzionando a un regime di giri basso,
sia durante che dopo il rodaggio.
◆ Durante i primi 100 km agire con cautela sui freni, ed
evitare brusche e prolungate frenate.
Ciò per consentirne un corretto assestamento del materiale d’attrito delle pastiglie sui dischi freno.
◆ Durante i primi 500 km di percorrenza, non superare
mai 4000 giri/min (vedi tabella).
◆ Tra i 500 e i 1000 km di percorrenza, non superare mai
i 5000 giri/min (vedi tabella).
Dopo i primi 1000 km di funzionamento, eseguire i controlli previsti nella colonna “fine ro-
a
ZIONE PERIODICA), al fine di evitare danni a sé
stessi, agli altri e/o al veicolo.
◆ Tra i 1000 e i 2000 km di percorrenza, guidare più vi-
◆ Dopo i 2000 km si possono pretendere dal motore
daggio”, vedi 2.1.1 (SCHEDA DI MANUTEN-
vacemente, variare la velocità e usare l’accelerazione
massima solo per brevi istanti, per consentire un miglior accoppiamento dei componenti soggetti a usura;
non superare assolutamente i 5500 giri/min (vedi tabella).
maggiori prestazioni, senza tuttavia fare girare il motore oltre il regime di potenza massima (6250 giri/min).
Massimo numero di giri del motore per il rodaggio
Percorrenza km giri/min
0 - 500 4000
500 - 1000 5000
1000 - 2000 5500
oltre 2000 6250
1.4 PRECAUZIONI E INFORMAZIONI
GENERALI
Quando si esegue la riparazione, lo smontaggio e il rimontaggio del veicolo attenersi scrupolosamente alle seguenti raccomandazioni.
Per qualsiasi tipo di operazione è vietato l'uso
di viva fiamma.
a
tenzione o ispezione al veicolo, arrestare il motore e
togliere la chiave, attendere che motore e impianto di
scarico si siano raffreddati, sollevare possibilmente
il veicolo con apposita attrezzatura, su pavimento solido e in piano. Porre particolare attenzione alle parti
ancora calde del motore e dell' impianto di scarico, in
modo tale da evitare ustioni.
Il veicolo è costruito con parti non commestibili.
Non mordere, succhiare, masticare o ingerire nessuna parte dello stesso per nessun motivo.
Se non espressamente descritto, il rimontaggio dei
gruppi segue in senso inverso le operazioni di smontaggio.
Non far funzionare il motore in luoghi chiusi o poco
aerati.
Maneggiare il carburante con la massima cautela.
Non utilizzare mai il carburante come solvente per la
pulizia del veicolo.
Scollegare il cavo negativo (–) della batteria, in caso
si debbano eseguire saldature elettriche.
Quando due o più persone lavorano contemporaneamente, prestare attenzione alla sicurezza di ciascuno.
– Utilizzare esclusivamente RICAMBI ORIGINALI aprilia.
– Attenersi all'impiego dei lubrificanti consigliati.
– Impiegare, dove previsto, gli attrezzi speciali progettati
– Se il veicolo ne é provvisto, utilizzare sempre il caval– Per lo svolgimento di alcuni interventi è consigliabile
– Nel serraggio di viti e dadi, iniziare con quelli di diame-
– Pulire e lavare accuratamente i componenti smontati,
– Lubrificare le parti (quando è possibile) prima di rimon– Controllare che ogni componente sia stato montato in
– Sostituire sempre le guarnizioni, gli anelli di tenuta, gli
– Contrassegnare le posizioni su tutti i giunti di connes-
I cuscinetti devono ruotare liberamente, senza impuntamenti e/o rumorosità, altrimenti devono essere
sostituiti.
monta un anello elastico nuovo, fare attenzione a non
allontanare le sue estremità più dello stretto necessario per infilarlo sull’albero. Dopo il montaggio di un
anello elastico, verificare che sia completamente e
saldamente inserito nella sua sede.
Prima di iniziare qualsiasi intervento di manu-
per questo veicolo.
letto centrale.
utilizzare un cavalletto per sostenere il veicolo in posi-
zione verticale.
tro maggiore oppure quelli interni, procedendo in dia-
gonale. Eseguire il serraggio con passaggi successivi,
prima di applicare la coppia di serraggio.
con detergente a basso grado di infiammabilità.
tarle.
modo corretto.
anelli elastici, gli anelli O-Ring (OR) e le copiglie con al-
tri nuovi.
sioni (tubi, cavi, ecc.) prima di dividerli e identificarli
con segni distintivi differenti.
Ogni pezzo va segnato chiaramente per poter essere
identificato in fase di installazione.
Non riutilizzare mai un anello elastico.
Quando viene smontato da un albero deve es-
a
sere sostituito con uno nuovo. Quando si
1 - 7
INFORMACIONES GENERALES
1.2.3 ACEITE PARA HORQUILLA El aceite para horquilla puede causar graves
daños a la piel si es manipulado por mucho
a
tiempo y diariamente. Se aconseja lavarse las
manos tras haberlo manipulado.
No esparza el aceite en el medio ambiente.
Entréguelo o hágalo retirar por la empresa de recuperación de aceites usados más cercana o por el proveedor.
Aceite para horquilla (aconsejado): aceite para horqui-
llas IP F.A. 5W o bien IP F.A. 20W.
Si se desea utilizar un aceite con comportamiento intermedio, entre aquéllos ofrecidos por IP F.A. 5W y por IP
F.A. 20W, pueden mezclarse los productos como indicado a continuación:
SAE 10W IP F.A. 5W 67% del volumen, +
SAE 15W IP F.A. 5W 33% del volumen, +
1.2.4 LÍQUIDO DE FRENOS
c
dráulicos separados. Las siguientes informaciones
se refieren a un solo sistema de frenado, pero tienen
validez incluso para ambos sistemas.
a
que hayan tenido contacto con el líquido y diríjase a
un oculista o a un médico si el líquido entrara en contacto con los ojos.
No esparza el líquido en el medio ambiente.
MANTÉNGASE LEJOS DEL ALCANCE DE LOS NIÑOS
a
Líquido de frenos (aconsejado):
IP F.F. DOT 5 (Compatible DOT 4)
a
No utilice líquidos de frenos que hayan estado en recipientes viejos o ya abiertos. No use líquidos de frenos que hayan sobrado de reparaciones anteriores,
si ya ha pasado mucho tiempo.
Variaciones imprevistas del juego o la resistencia
elástica sobre las palancas de los frenos, se deben a
incovenientes en el sistema hidráulico.
Tenga cuidado que los discos de freno y las pastillas
de freno no estén untadas o engrasadas, especialmente tras las operaciones de mantenimiento o de
control. Controle que los tubos de los frenos no
estén estrangulados o desgastados.
Tenga cuidado que no entre accidentalmente agua o
polvo en el interior del circuito.
IP F.A. 20W 33% del volumen
IP F.A. 20W 67% del volumen
Este vehículo está equipado con frenos de
disco delantero y trasero, con circuitos hi-
El líquido de frenos puede producir irritaciones si tiene contacto con la piel o con los
ojos. Lávese muy bien las partes del cuerpo
Utilice el líquido de frenos con mucho cuidado: arruina químicamente la pintura y las piezas de plástico, goma, etc.
Para no dañar el sistema de frenado, no utilice
líquidos diferentes de aquéllos indicados y no
los mezcle para rellenar.
1.2.5 LÍQUIDO REFRIGERANTE El líquido refrigerante puede ser nocivo si se
traga o si tiene contacto con la piel o con los
a
con los ojos, enjuague abundantemente con agua
durante mucho tiempo.
Provoque el vómito y consulte inmediatamente a un
médico si ha tragado un poco de líquido.
MANTÉNGASE LEJOS DEL ALCANCE DE LOS NIÑOS.
Controle el líquido refrigerante cada 1000 km y luego de
un largo viaje, véase 2.14 (CONTROL Y RELLENO DEL
LÍQUIDO REFRIGERANTE); substitúyalo cada 12000
km o cada dos años (según cual de estas dos condiciones se verifica primero), véase 2.15 (SUBSTITUCIÓN
DEL LÍQUIDO REFRIGERANTE).
La solución del líquido refrigerante está compuesta por un
50% de agua y un 50% de anticongelante. Esta mezcla es
ideal para casi todas las temperaturas de funcionamiento
y garantiza una buena protección contra la corrosión.
Se aconseja mantener la misma mezcla incluso durante el
verano pues, de esta manera, se reducen las pérdidas por
evaporación y no es necesario rellenar frecuentemente.
De esta manera disminuyen los depósitos de sales minerales que deja el agua evaporada en el radiador y se mantiene inalterada la eficacia del sistema de refrigeración.
En caso de que la temperatura exterior fuera inferior a
cero grados centígrados, controle frecuentemente el circuito de refrigeración añadiendo, si es necesario, una
mayor concentración de anticongelante (hasta un máximo del 60%).
Para no arruinar el motor, use agua destilada para la solución refrigerante.
Líquido refrigerante (aconsejado): IP ECOBLU -40˚
De acuerdo con la temperatura de congelamiento de la
mezcla refrigerante que se quiere obtener, agregue al
agua, el porcentaje de líquido refrigerante indicado por la
siguiente tabla:
queta del producto, cuál es el grado de protección
que garantiza.
ojos. Si el líquido tiene contacto con la piel o
No quite la tapa del radiador con el motor caliente ya que el líquido refrigerante está bajo
a
presión y a temperatura elevada.
No utilice el vehículo si el nivel del líquido re-
a
frigerante está por debajo del nivel mínimo.
de congelamiento ˚C
c
a
Punto
-20˚ 35
-30˚ 45
-40˚ 55
Las características de los diferentes líquidos
anticongelantes son distintas. Lea en la eti-
Utilice sólo anticongelante y antioxidante sin
nitrito, que proteja por lo menos hasta -35˚C.
Líquido refrigerante
% del volumen
En caso de intervenciones de mantenimiento en el
circuito hidráulico, se aconseja use guantes de látex.
1 - 8

INFORMACIONES GENERALES
1.3 NORMAS PARA EL RODAJE
El rodaje del motor es fundamental para garantizar que el
mismo dure por mucho tiempo y funcione correctamente.
Si es posible, recorra carreteras con muchas curvas y/o
con colinas, en donde el motor, las suspensiones y los
frenos sean sometidos a un rodaje más eficaz.
Es posible obtener las mejores perfomances
de aceleración del vehículo, sólo tras los pri-
a
meros 1500 kilómetros de rodaje.
Aténgase a las siguientes indicaciones:
◆ No acelere bruscamente y del todo cuando el motor
está en función con un bajo régimen de revoluciones,
sea durante que después del rodaje.
◆ Durante los primeros 100 km, actúe con cuidado sobre
los frenos y evite frenazos repentinos y prolongados.
Todo esto para permitir un ajuste correcto del material
de fricción de las pastillas sobre los discos del freno.
◆ Durante los primeros 500 km, nunca supere las 4000
rpm (véase tabla).
◆ Entre los 500 y los 1000 km, nunca supere las 5000
rpm (véase tabla).
Luego de los primeros 1000 km de funcionamiento, efectúe los controles indicados en la
a
DE MANTENIMIENTO PERIÓDICO), para evitar daños
a Usted mismo, a los demás y/o al vehículo.
◆ Luego de los 1000 y los 2000 km de recorrido, conduz-
◆ Tras los 2000 km se pueden exigir del motor mayores
columna “fin de rodaje”, véase 2.1.1 (FICHA
ca con mayor vivacidad, varíe la velocidad y utilice la
aceleración máxima sólo por breves instantes, para
permitir un acoplamiento mejor de los componentes
sujetos a desgaste; no supere de ninguna manera las
5500 rpm (véase tabla).
prestaciones; sin embargo, las revoluciones del motor
no han de superar el régimen de potencia máxima
(6250 rpm).
Máximo número de revoluciones del motor
durante el rodaje
Recorrido km rpm
0 - 500 4000
500 - 1000 5000
1000 - 2000 5500
Tras los 2000 6250
1.4 PRECAUCIONES E INFORMACIONES
GENERALES
Cuando realice la reparación, el desmontaje o el remontaje del vehículo, aténgase escrupulosamente a los siguientes consejos.
Está prohibido utilizar llama viva para cualquier tipo de operación.
a
ción de mantenimiento o inspección en el vehículo,
apague el motor y quite la llave, espere a que el motor y el sistema de escape se hayan enfríado; si es
posible levante el vehículo mediante un equipo adecuado, sobre un piso sólido y nivelado.
En particular, preste atención a las piezas del motor y
del sistema de escape que aún estén calientes, para
evitar quemaduras. El vehículo está fabricado con
piezas no comestibles. Por ninguna razón, muerda,
chupe, mastique ni trague ninguna pieza del mismo.
Si no está indicado expresamente, la reinstalación de
los grupos se realiza en el sentido contrario al de las
operaciones de desmontaje.
No haga funcionar el motor en locales cerrados o
poco ventilados.
Maneje el combustible con mucho cuidado.
Nunca utilice el combustible como disolvente para
limpiar el vehículo.
En el caso de que deba efectuar soldaduras eléctri-
cas, desconecte el cable negativo (–) de la batería.
Cuando dos o más personas trabajan contemporá-
neamente, preste atención a la seguridad de cada
una de ellas.
– Utilice exclusivamente REPUESTOS ORIGINALES
– Utilice los lubricantes aconsejados.
– Utilice, en donde está previsto, las herramientas espe– Utilice siempre el caballete central si el vehículo está
– Para llevar a cabo algunas intervenciones, es acon-
– Al apretar los tornillos y las tuercas, empiece por los
– Limpie y lave cuidadosamente con detergente de bajo
– Lubrique las piezas (cuando es posible) antes de rein– Controle que cada componente haya sido montado
– Siempre substituya las juntas, anillos aislantes, anillos
– Marque la posición sobre todos los empalmes de co-
Los cojinetes deben girar libremente, sin tropiezos
ni/o ruidos, en caso contrario deben substituirse.
elástico nuevo, tenga cuidado en no estirar los extremos más de lo necesario para introducirlo en el eje.
Tras haber montado un anillo elástico, controle que
esté total y firmemente introducido en su alojamiento.
Antes de empezar cualquier tipo de interven-
aprilia.
ciales proyectadas para este vehículo.
equipado con éste.
sejable utilizar un caballete para sostener el vehículo
en posición vertical.
que tienen el diámetro mayor o por los que están en el
interior, siguiendo en diagonal.
Apriete con pasajes sucesivos antes de aplicar el par
de apriete.
nivel de inflamabilidad, los componentes desmontados.
stalarlas.
correctamente.
elásticos, juntas tóricas (OR) y grupillas por otros nuevos.
nexión (tubos, cables, etc.) antes de dividirlos e identi-
fíquelos con signos distintos.
Hay que marcar claramente cada pieza para poder
identificarla en fase de installación.
Nunca utilice nuevamente un anillo elástico.
Cuando se desmonta de un eje, debe substituir-
a
se con uno nuevo. Cuando se monta un anillo
1 - 9
GENERAL INFORMATION
1.2.3 FORK OIL Fork oil may cause serious damage to the
skin if handled daily and for long periods.
a
It is advisable to wash your hands thoroughly
after using.
Do not dispose of oil in the environment.
Deliver it to or have it collected by the nearest used
oil recovery firm or by the supplier.
Recommended fork oil: IP F.A. 5W or IP F.A. 20W fork
oil.
If an intermediate performance is desired (between those
of IP F.A. 5W and IP F.A. 20W) the products can be mixed as follows:
67% of volume SAE 10W IP F.A. 5W +
33% of volume IP F.A. 20W
33% of volume SAE 15W IP F.A. 5W +
67% of volume IP F.A. 20W
1.2.4 BRAKE FLUID This vehicle is provided with front and rear
c
disc brakes, with separate hydraulic circuits.
The following information refers to a single braking
system, but is valid for both.
Brake fluid may cause irritation if it comes
into contact with the skin or eyes.
a
Carefully wash the part of the body that has
come into contact with the fluid.
Consult an oculist or a physician if the fluid comes
into contact with your eyes.
Do not dispose of brake fluid in the environment.
1.2.5 COOLANT The coolant can be harmful if swallowed or if
it touches the skin or eyes.
a
rinse thoroughly with large quantities of water.
If the coolant is swallowed, induce vomiting and immediately consult a doctor.
KEEP COOLANT AWAY FROM CHILDREN.
Check coolant level every 1000 km and after long runs,
see 2.14 (CHECKING AND TOPPING UP COOLANT);
change it every 12000 km or every 2 years (whichever
occurs first), see 2.15 (CHANGING THE COOLANT).
The coolant is composed of 50% water and 50% antifreeze. This mixture is ideal for most running temperatures
and ensures good protection against corrosion.
It is advisable to keep the same mixture in the hot season
as well, since in this way losses due to evaporation are
reduced and it is not necessary to top up so frequently.
The mineral salt deposits left in the radiator by evaporated water are thus lessened and the efficiency of the cooling system remains unaltered.
If the outdoor temperature is below 0˚, check th cooling
circuit frequently and inf necessary increase the antifreeze concentration (up to maximum 60%).
Use distilled water for the cooling solution so as not to damage the engine.
If it comes in contact with the skin or eyes,
Do not remove the radiator cap when the engine is hot as the coolant is under pressure
a
and at a very high temperature.
Do not use vehicle if the coolant level is below
a
the minimum prescribed.
KEEP BRAKE FLUID AWAY FROM CHILDREN
Use the brake fluid; it may chemically alter
painted surfaces and the parts in plastic, rub-
a
ber, etc.
Recommended brake fluid:
IP F.F. DOT 5 (DOT 4 compatible)
To avoid serious damage to the braking system, do not use fluids other than the recom-
a
mended ones nor mix different fluids for topping up.
Do not use brake fluid taken from old or already opened containers. Do not use brake fluid left from previous repairs if they were done some time ago.
Sudden variations in clearance or an elastic resistance in the brake levers may be due to trouble in the
hydraulic circuits.
Make sure that the brake discs and the friction pads
are completely free of grease or oil, especially after
maintenance or checking operations.
Check that the brake cables are not twisted or worn.
Make sure that neither water nor dust accidentally
enter the circuit.
In case maintenance operations are to be performed
on the hydraulic circuit, it is advisable to use latex
gloves.
Recommended coolant: IP ECOBLU - 40˚
On the basis of the desired freezing temperature of the
coolant mixture, add to the water the percentage of coolant indicated in the following table:
Freezing point
˚C
-20˚ 35
-30˚ 45
-40˚ 55
The characteristics of the various antifreeze
c
on the product to learn the degree of protection it
guarantees.
liquids are different. Be sure to read the label
Use only antifreeze and anticorrosive without
nitrite in order to ensure protection at at least
a
-35˚C.
Coolant
of the volume %
1 - 10
GENERAL INFORMATION
1.3 RUNNING-IN RULES
The running-in of the engine is essential to ensure its duration and correct functioning.
If possible, drive on hilly roads or roads with many curves
where the engine, the suspensions and the brakes are
submitted to a more efficacious running-in.
Only after the first 1500 km of running-in is it
a
possible to obtain the best performance.
Keep in mind these important indications:
◆ Do not open the throttle completely if the speed is low,
both during and after the running-in.
◆ During the first 100 km put on the brakes with caution,
avoiding sharp and prolonged brakings. This ensures
a correct bedding-in of the pads on the brake disc.
◆ Do not open the throttle at low speeds, both during and
after running-in.
◆ Brake cautiously during the first 100 km, avoiding ab-
rupt and prolonged braking to ensure a correct adaptation of the brake disc pads.
◆ Do not exceed 4000 rpm during the first 500 km (see
table).
◆ Do not exceed 5000 rpm between the first 500 and
1000 km (see table).
After the first 1000 km perform the checking
operations indicated in the “after running-in”
a
CHART FOR THE COMPONENTS) in order to avoid
injuring yourself or others a/o damaging the vehicle.
◆ Between the first 1000 and 2000 km increase and vary
◆ After the first 2000 km you may expect better perfor-
column, see 2.1.1 (PERIODIC SERVICE
your speed, using the maximum acceleration only
briefly to ensure better coupling of the components
subject to wear.
NEVER exceed 5500 rpm (see table).
mance from the engine without, however, exceeding a
maximum 6250 rpm.
Engine maximum rpm
for the running-in
Mileage km Max. rpm
0 - 500 4000
500 - 1000 5000
1000 - 2000 5500
over 2000 6250
1.4 PRECAUTIONS AND GENERAL
INFORMATION
Follow with care these recommendations when repairing,
disassembling and reassembling the vehicle.
The use of naked flames is forbidden for any
type of operation.
a
operation on the vehicle, switch off the engine and
remove the key, wait until the engine and the exhaust
system have cooled down and, if possible, raise the
vehicle with the suitable equipment onto firm flat
ground.
In order to avoid burns, be careful not to touch any
parts of engine or exhaust system which have not
cooled down completely.
The vehicle is constructed of inedible parts.
Do not bite, suck, chew or swallow any part of the vehicle for any reason whatever.
If not expressly described, the reassembly of the
units is carried out by reversing the order of operations. Do not run the engine in closed or badly ventilated places.
Handle fuel with the greatest caution.
Never use fuel as a solvent for cleaning the vehicle.
Disconnect the negative cable (–) from the battery
when electric welding.
When two or more persons are working together,
make sure that each is working in safe conditions.
– Use only original aprilia SPARE PARTS.
– Use the recommended lubricants.
– Use, when necessary, the special tools designed for
– Always use the centre stand, if the vehicle is provided
– In order to carry out certain interventions we recom-
– When tightening screws and nuts, begin with those ha-
– Clean and wash carefully any disassembled parts with
– Whenever possible, lubricate the parts before reas– Make sure that each component has been reassem– Always replace gaskets, grommets, circlips, O-rings
– Before disconnecting the joints (pipes, cables, etc.),
The bearings must rotate freely, without halting a/o
noise otherwise they must be replaced.
When assembling a new circlip be careful not to
stretch its ends more than strictly necessary to put it
on the shaft.
After installing a circlip, make sure that it is completely and firmly inserted in its seat.
Before commencing any service or inspection
this vehicle.
with it.
mend using a stand to hold the vehicle in a vertical po-
sition.
ving greater diameters or with inner ones, proceeding
diagonally.
Tighten screws or nuts in successive passages before
applying driving torque.
low inflammability detergents.
sembly.
bled correctly.
and split pins with new ones.
mark the positions on all of them and mark them with
different distinguishing signs.
Each piece must be marked clearly, in order not to
have problems during installation.
Never re-use a circlip.
When a circlip is disassembled from a shaft it
a
must be replaced with a new one.
1 - 11
INFORMAZIONI GENERALI /
INFORMACIONES GENERALES
/ GENERAL INFORMATION
1.5 PARTI DI RICAMBIO
In caso di sostituzione, utiizzare solo
Ricambi Originali aprilia.
I Ricambi Originali aprilia sono di
alta qualità, progettati e costruiti
espressamente per i veicoli aprilia.
L’impiego di ricambi NON
originali aprilia può cau-
a
sare problemi di prestazio-
ni e danneggiamenti.
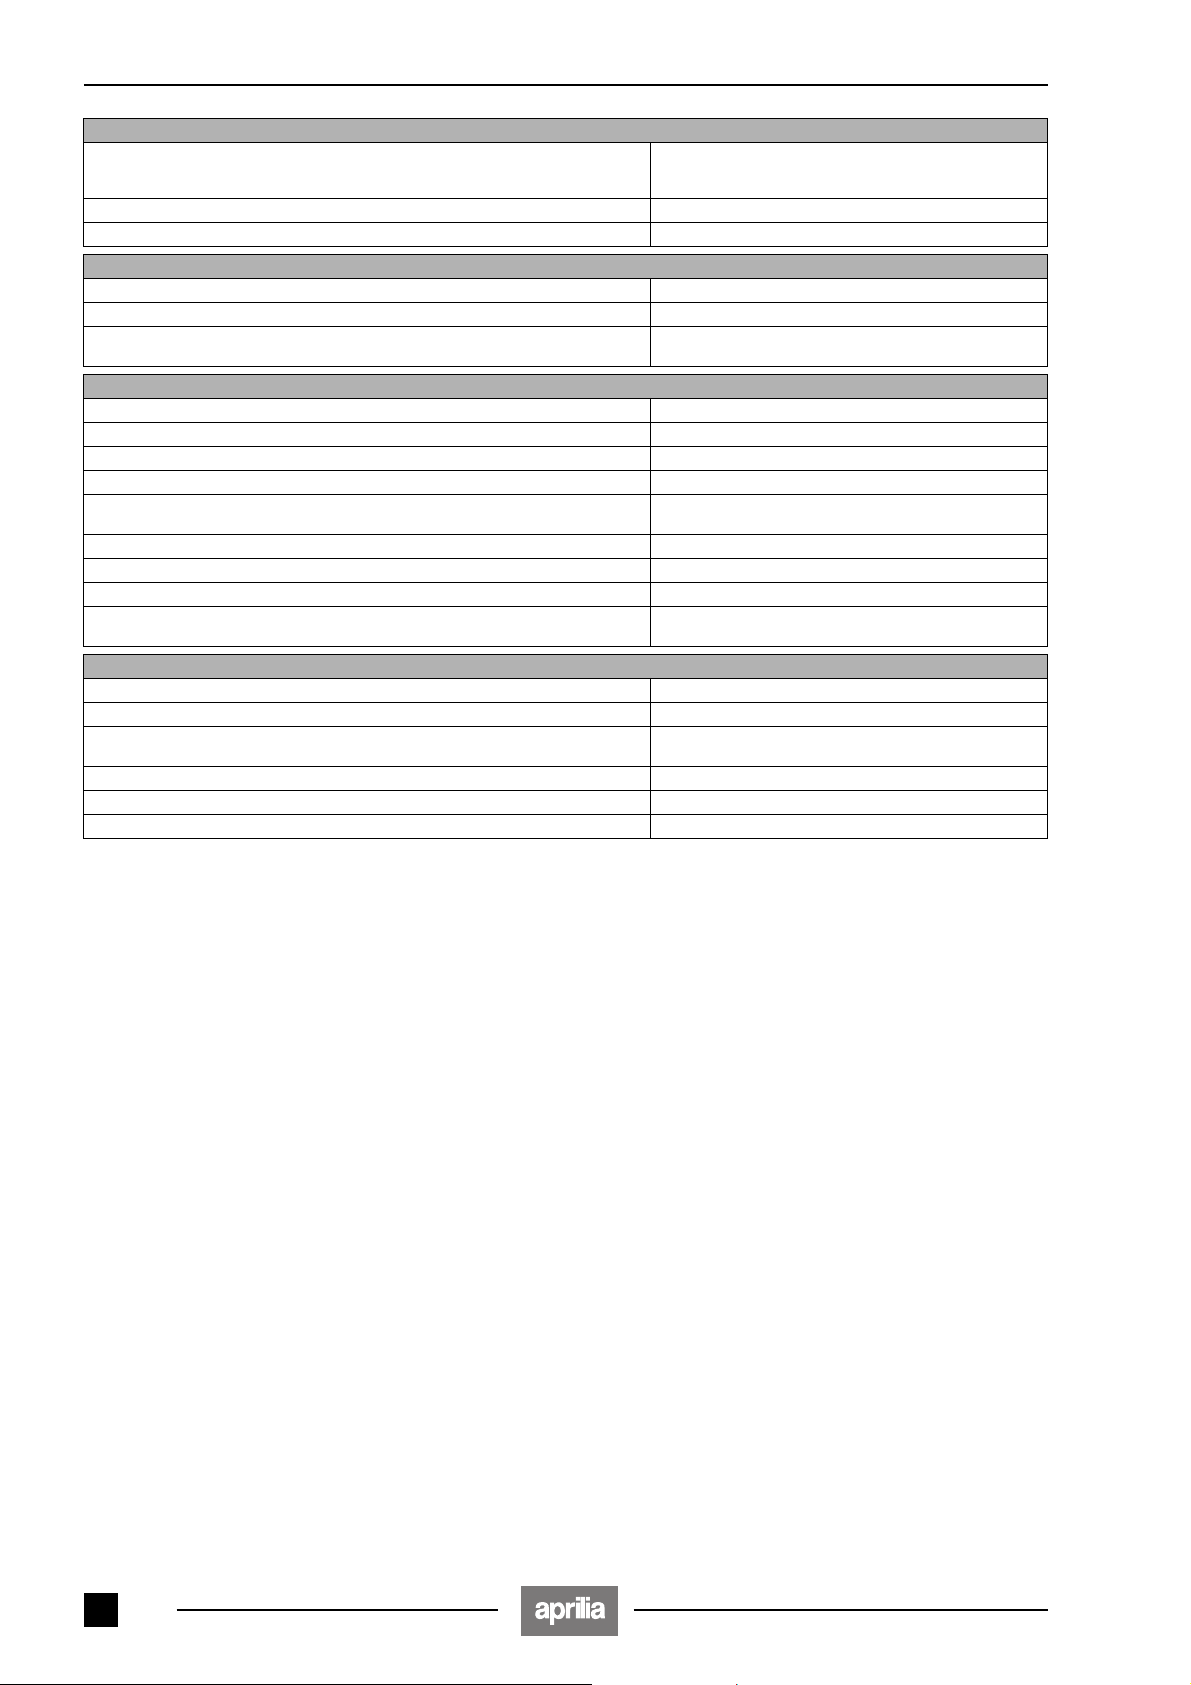
1.6 CARATTERISTICHE
TECNICHE
DIMENSIONI /
Lunghezza max /
Larghezza max /
Altezza max (agli strumenti) /
Max. height (height of instruments)
Altezza alla sella /
Interasse /
Altezza libera minima dal suolo /
Peso a vuoto (in ordine di marcia) /
Weight without driver (ready for starting)
MOTORE /
Tipo /
Numero cilindri /
Cilindrata /
Alesaggio e corsa /
Rapporto di compressione /
Avviamento /
N˚ giri del motore al minimo /
Frizione /
Cambio /
Raffreddamento /
DIMENSIONES
Longitud máx.
Anchura máx.
Altura hasta el sillín
Distancia entre los ejes
MOTOR
/ ENGINE
Tipo
/ T ype
Número cilindros
Cilindrada
Diámetro y carrera
Arranque
Embrague
Cambio
/ Clutch Multidisco in bagno d’olio con comando sul lato sinistro
/ Change gear Meccanico a 5 rapporti con comando a pedale sul lato
Refrigeración
/ DIMENSIONS
/ Max. length 2218 mm
/ Max. width 880 mm
Altura máx.
/ Saddle height 840 mm
/ Distance between centres 1480 mm
Altura libre mínima del suelo
Peso en vacío (en orden de marcha)
/ Number of cylinders 1
/ Displacement 651,88 cmC
/ Bore and stroke 100 mm / 83 mm
Relación de compresión
/ Starting elettrico /
N˚ revoluciones del motor al mínimo
/ Cooling a liquido /
1.5 PIEZAS DE REPUESTO
En caso de substitución, utilice sólo
Repuestos Originales aprilia. Los Repuestos Originales aprilia son de alta
calidad, proyectados y fabricados expresamente para vehículos aprilia.
Utilizar repuestos NO originales aprilia, puede cau-
a
sar daños y problemas de
rendimientos.
1.6 FICHA
TECNICA
(hasta los instrumentos) /
/ Min. ground clearance 200 mm
/
/ Compression ratio 9 ± 0,5 : 1
/ Idling engine 1400 ± 100 giri/min /
1.5 SPARE PARTS
For any replacement, use aprilia Genuine Spare Parts only. aprilia Genuine Spare Parts are high-quality
parts, expressly designed and manufactured for aprilia vehicles.
Failure to use aprilia Genuine Spare Parts may result
a
in incorrect performance
and damages.
1.6 TECHNICAL
SPECIFICATIONS
1265 mm
200 kg
ROTAX 655 - monocilindrico 4 tempi con 5 valvole,
lubrificazione a carter secco, due alberi a camme in
testa /
ROTAX 655 - monocilíndrico de 4 tiempos con 5
válvulas, lubricación con cárter seco, dos árboles
de leva en la culata
ROTAX 655- single-cylinder, 4-stroke with 5 valves,
dry-sump lubrication
eléctrico
del manubrio /
en el lado izquierdo del manillar
bath with control lever on left side of handlebar
sinistro del motore /
avec commande sur le côté gauche du guidon
Mechanical gearshift, 5 gears with foot lev er on left side
of engine
por líquido
/
/ electric
rpm
/ rpm
Multidisco en baño de aceite con mando
/ Multiple disc in oil
Disques multiples en bain d'huile
/ liquid-cooled
/
CAPACITÀ /
Carburante (inclusa riserva) /
Fuel (reserve included)
Riserva carburante /
Olio motore /
Olio forcella (stelo destro e stelo sinistro) /
barra izquierda
Liquido refrigerante /
Posti /
MAX CARICO VEICOLO /
(pilota + passeggero + bagaglio) /
(driver + passenger + luggage)
CAPACIDAD
Aceite motor
)
/ Fork oil (right fork tube and left fork tube)
Asientos
/ Seats 2
/ CAPACITY
Combustible (reserva incluida)
Reserva combustible
/ Engine oil 2200 cmC (2150 cmC cambio olio - 2200 cmC cambio
Líquido refrigerante
MÁX. CARGA VEHÍCULO
(
piloto + pasajero + equipaje
1 - 12
/
/ Fuel reserve 4l
Aceite horquilla (
/ Coolant 1,4l
barra derecha y
/ VEHICLE MAX. LOAD
)
/
22l
olio e filtro)
2200 cmC (2150 cmC cambio aceite - 2200 cmC cambio
aceite y filtro)
2200 cmC (2150 cmC oil change - 2200 cmC oil and filter
change)
430 cmC
182 kg
INFORMAZIONI GENERALI /
TRASMISSIONE
RAPPORTI Rapporto Primaria Secondaria Rapporto finale Rapporto totale
DI STRASMISSIONE / 1ª 37/72 = 1 : 1,946 12/33 = 1 : 2,750 16/47 = 1 : 2,937 15,720
TRANSMISION
RELACIONES Relación del cambio Transmisión primaria Transmisión secundaria Relación final Relación total
TRANSMISSION
GEAR RATIOS Gear Primary transmission Secondary transmission Final gear ratio Total gear ratio
CARBURATORI /
Modello /
Diffusore /
ALIMENTAZIONE /
Tipo /
Carburante /
– versione normale /
– versione catalittica /
TELAIO /
Tipo /
Angolo inclinazione sterzo /
Steering inclination angle
Avancorsa /
SOSPENSIONI /
Anteriore /
Escursione /
Posteriore /
Escursione /
FRENI /
Anteriore /
Posteriore /
RUOTE /
Tipo /
CERCHI /
Anteriore /
Posteriore /
PNEUMATICI /
Anteriore /
Posteriore /
PRESSIONE DI GONFIAGGIO STANDARD /
Anteriore /
Posteriore /
PRES. DI GONFIAGGIO CON PASSEGGERO /
Anteriore /
Posteriore /
Modelo
Tipo
/ Type a caduta /
BASTIDOR
Tipo
FRENOS
RUEDAS
Tipo
CARBURADORES
/ Model Mikuni BST 33
Difusor
/ Choke tube Ø 31,5mm
ALIMENTACION
Combustible
versión normal
versión catalítica
/ FRAME
/ Type A struttura composita in acciaio e lega leggera con culla e reg-
Lanzamiento
SUSPENSIONES
Delantera
Trasera
Delantero
Trasero
/ Type in alluminio a raggi tangenti /
LLANTAS
Delantera
Trasera
/ Front
Carrera
/ Stroke
/ Rear
Carrera
/ Stroke
/ BRAKES
/ Front a disco Ø 300 mm con trasmissione idraulica /
/ Rear
/ WHEELS
/ RIMS
/ Front 2,15 ∞ 19"
/ Rear 3,00 ∞ 17"
NEUMATICOS
Delantera
Trasera
Delantera
Trasera
Delantera
Trasera
/ Front 100/90 - 19 57H
/ Rear 130/80 - R17 65H
/ Front 180 kPa (1,8 bar)
/ Rear 190 kPa (1,9 bar)
/ Front 180 kPa (1,8 bar)
/ Rear 220 kPa (2,2 bar)
INFORMACIONES GENERALES
2ª 16/28 = 1 : 1,750 10,003
3ª 16/21 = 1 : 1,312 7,502
4ª 22/33 = 1 : 1,045 5,976
5ª 24/21 = 1 : 0,875 5,001
1ª 37/72 = 1 : 1,946 12/33 = 1 : 2,750 16/47 = 1 : 2,937 15,720
2ª 16/28 = 1 : 1,750 10,003
3ª 16/21 = 1 : 1,312 7,502
4ª 22/33 = 1 : 1,045 5,976
5ª 24/21 = 1 : 0,875 5,001
1ª 37/72 = 1 : 1,946 12/33 = 1 : 2,750 16/47 = 1 : 2,937 15,720
2ª 16/28 = 1 : 1,750 10,003
3ª 16/21 = 1 : 1,312 7,502
4ª 22/33 = 1 : 1,045 5,976
5ª 24/21 = 1 : 0,875 5,001
/ CARBURETTORS
/ FUEL SUPPLY
/ Fuel
/ normal version benzina super (4 Stars U) DIN 51 600, minimo ottanico 98
/ catalytic version
Ángulo inclinación dirección
/ Fore stroke 109 mm
/ SUSPENSIONS
2
/
/ GENERAL INFORMATION
por gravedad
(N.O.R.M.) e 88 (N.O.M.M.) /
51 600
, mínimo octanos 98 (N.O.R.M.) y 88 (N.O.M.M.)
premium grade petrol (4 Stars U) DIN 51 600, O.N. 98
(N.O.R.M.) and 88
benzina super senza piombo DIN 51 607, minimo ottanico 95
(N.O.R.M.) e 85 (N.O.M.M.) /
DIN 51 607, mínimo octanos 95 (N.O.R.M.) y 85 (N.O.M.M.)
premium grade unleaded petrol DIN 51 607 min, O.N. 95
(N.O.R.M.) and 85
gisella smontabili /
aleación ligera con cuna y vástago del sillín desmontables
Composite structure made of steel and light alloy, with removable cradle and saddle pillar.
28˚
forcella telescopica a funzionamento idraulico /
/ gravity feed
gasolina super
gasolina super sin plomo según
Con estructura compuesta de acero y
horquilla telescópica con funcionamiento hidráulico
hydraulically operated telescopic fork
180 mm
/ TYRES
monoammortizzatore idraulico /
hydraulic shock absorber
49 mm
de disco Ø 300 mm con transmisión hidráulica
disc brake, 300 mm with hydraulic transmission
a disco Ø 220 mm con trasmissione idraulica /
de disco Ø 220 mm con transmisión hidráulica
disc brake, 220 mm with hydraulic transmission
Aluminium tangent spoke wheels
PRESION DE HINCHADO ESTANDARD
PRESION DE HINCHADO CON PASAJERO
/ STANDARD INFLATION PRESSURE
/ INFLATION PRES. WITH PASSENGER
amortiguador hidráulico
de aluminio de radios
(4 Stars U) DIN
/
/
/
tangentes /
/
/
/
/
1 - 13
INFORMAZIONI GENERALI /
INFORMACIONES GENERALES
/ GENERAL INFORMATION
ACCENSIONE /
Tipo /
Tipo
Candela standard /
Distanza elettrodi candela /
IMPIANTO ELETTRICO /
Batteria /
Fusibili /
Generatore (a magnete permanente) /
Generator (with permanent magnet)
LAMPADINE /
Luce anabbagliante-abbagliante /
Luce abbagliante /
Luce posizione /
Indicatori di direzione /
Luce di posizione posteriore-stop /
and stop light
Luce targa /
Tachimetro /
Contagiri /
Indicatore temperatura liquido refrigerante /
líquido refrigerante
SPIE /
LUCES INDICADORAS
Indicatori di direzione /
Riserva carburante /
Pressione olio motore /
Engine oil pressure
Cambio in folle /
Luce abbagliante /
Luce anabbagliante /
ENCENDIDO
/ Type C.D.I. (a scarica capacitiva) / NIPPONDENSO
Bujía estándard
Batería
/ Battery 12 V - 12 Ah
Fusibles
/ Fuses 20 - 15 - 7,5 A
BOMBILLAS
Luz larga
Luz de posición
Luz placa de matriícula
Taquímetro
Contador de revoluciones
/ Coolant temperature indicator
Reserva combustible
Cambio en punto muerto
Luz larga
Luz de cruce
/ IGNITION
/ Standard spark plug NGK DR 8 EA - NGK DR 8 ES
Distancia electrodos bujía
INSTALACION ELECTRICA
Generador (de magneto permanente)
/ BULBS
Luz de cruce/luz larga
/ High beam 12 V - 3 W
/ Parking light 12 V - 5 W
Indicadores de dirección
Luz de posición trasera-freno
/ Plate light 12 V 3 W
/ Speedometer 12 V - 3 W
/ Revolution counter 12 V - 2 W
/ WARNING LIGHTS
Indicadores de dirección
Presión del aceite motor
/ High beam 12 V - 2 W
/ Low beam 12 V - 3 W
C.D.I. (por descarga capacitativa)
C.D.I. (capacitive discharge) / NIPPONDENSO
/ Spark plug gap 0,6 ÷ 0,7 mm
/ ELECTRIC SYSTEM
/
12 V - 280 W
/ Low/high beam 12 V - 55 / 60 W
/ Direction indicators 12 V - 10 W
/ Rear parking
Indicador de la temperatura del
/ Direction indicators 12 V - 3 W
/ Low fuel 12 V - 3 W
/
/ Gear in neutral 12 V - 3 W
12 V - 5/21 W
12 V - 1,2 W
12 V - 2 W
/
NIPPONDENSO
1.7 TABELLA LUBRIFICANTI
Olio motore (consigliato):
In alternativa agli olî consigliati, si possono utilizzare olî di marca con prestazioni conformi o superiori alle specifiche
CCMC G-4, A.P.I. SG.
Olio forcella (consigliato): olio per forcelle
Qualora si intendesse disporre di un comportamento intermedio tra quelli offerti da
sono miscelare i prodotti come sotto indicato:
SAE 10W
SAE 15W
Cuscinetti e altri punti di lubrificazione (consigliato):
In alternativa al prodotto consigliato, utilizzare grasso di marca per cuscinetti volventi, campo di temperatura utile
-30°C…+140°C, punto di gocciolamento 150 °C…230 °C, elevata protezione anticorrosiva, buona resistenza all’acqua e
all’ossidazione.
Protezione poli batteria: Grasso neutro oppure vaselina.
Grasso spray per catene (consigliato):
Liquido freni (consigliato):
0 F.A. 5W 67% del volume, + 0 F.A. 20W 33% del volume
0 F.A. 5W 33% del volume, + 0 F.A. 20W 67% del volume
Impiegare solo liquido freni nuovo.
0 SUPERBIKE 4, SAE 5W - 40.
0 F.A. 5W oppure 0 F.A. 20W.
0 F.A. 5W e da 0 F.A. 20W, si pos-
0 AUTOGREASE MP.
0 CHAIN SPRAY.
0 F.F., DOT 5 (Compatibile DOT 4)
a
Liquido refrigerante motore (consigliato):
0 ECOBLU - 40 °C.
Impiegare solo antigelo e anticorrosivo senza nitrito, che assicuri una protezione almeno ai -35 °C.
a
1 - 14

GENERAL INFORMATIONINFORMACIONES GENERALES
1.7 TABLA DE LOS LUBRICANTES
Aceite motor (aconsejado):
En sustitución al aceite aconsejado pueden utilizarse aceites de marca con prestaciones conformes o superiores a las especificaciones CCMC G-4, A.P.I. SG.
SUPERBIKE 4, SAE 5W - 40.
0
Aceite horquilla (aconsejado): aceite para horquillas
En caso de que se quiera conseguir un comportamiento intermedia entre las ofrecidas por
20W, pueden mezclarse los productos según lo indicado a continuación:
SAE 10W
SAE 15W
Cojinetes y otros puntos de lubricación (aconsejado):
En sustitución al producto aconsejado, utilice grasa de marca para cojinetes rodantes, campo de temperatura útil
-30˚C…+140˚C, punto de goteo 150˚C…230˚C, elevada protección antioxidante, buena resistencia al agua y a la oxidación.
Protección polos batería: Grasa neutra o vaselina.
Grasa spray para cadenas (aconsejada):
Líquido frenos (aconsejado):
Utilice sólo líquido frenos nuevo.
F.A. 5W 67% del volumen, + 0 F.A. 20W 33% del volumen.
0
F.A. 5W 33% del volumen, + 0 F.A. 20W 67% del volumen.
0
CHAIN SPRAY.
0
F.F., DOT 5 (Compatible DOT 4).
0
F.A. 5W o 0 F.A. 20W.
0
AUTOGREASE MP.
0
F.A. 5W y por 0 F.A.
0
a
Líquido refrigerante del motor (aconsejado):
Utilice sólo anticongelante y antioxidante sin nitrito que garantice una protección por lo menos a los
a
-35˚C.
1.7 LUBRICANT CHART
Engine oil (recommended):
As an alternative to the recommended oil, it is possible to use high-quality oils with characteristics in compliance with or
superior to the CCMC G-4, A.P.I. SG specifications.
Fork oil (recommended): fork oil
If you need an oil with intermediate characteristics in comparison with the two recommended products, these can be mixed
as indicated below:
SAE 10W
SAE 15W
Bearings and other lubrication points (recommended):
As an alternative to the recommended product, use high-quality grease for rolling bearings, working temperature range
-30˚C…+140˚C, dripping point 150˚C…230˚C, high protection against corrosion, good resistance to water and oxidation.
Protection of the battery poles: neutral grease or Vaseline.
Spray grease for chains (recommended):
Brake fluid (recommended):
0 F.A. 5W 67% of the volume, + 0 F.A. 20W 33% of the volume.
0 F.A. 5W 33% of the volume, + 0 F.A. 20W 67% of the volume.
SUPERBIKE 4, SAE 5W-40.
0
0 F.A. 5W or 0 F.A. 20 W.
0 F.F., DOT 5 (compatible with DOT 4).
ECOBLU -40˚C.
0
0 AUTOGREASE MP.
0 CHAIN SPRAY.
Use new brake fluid only.
a
Engine coolant (recommended):
Use only antifreeze and anticorrosive without nitrite, ensuring protection at -35˚C at least.
0 ECOBLU -40˚C.
a
Engine oil (recommended):
As an alternative to the recommended oil, it is possible to use high-quality oils with characteristics in compliance with or
superior to the CCMC G-4, A.P.I. SG specifications.
Fork oil (recommended): fork oil
If you need an oil with intermediate characteristics in comparison with the two recommended products, these can be mixed
as indicated below:
SAE 10W
SAE 15W
0 F.A. 5W 67% of the volume, + 0 F.A. 20W 33% of the volume.
0 F.A. 5W 33% of the volume, + 0 F.A. 20W 67% of the volume.
SUPERBIKE 4, SAE 5W-40.
0
0 F.A. 5W or 0 F.A. 20 W.
1 - 15
INFORMAZIONI GENERALI
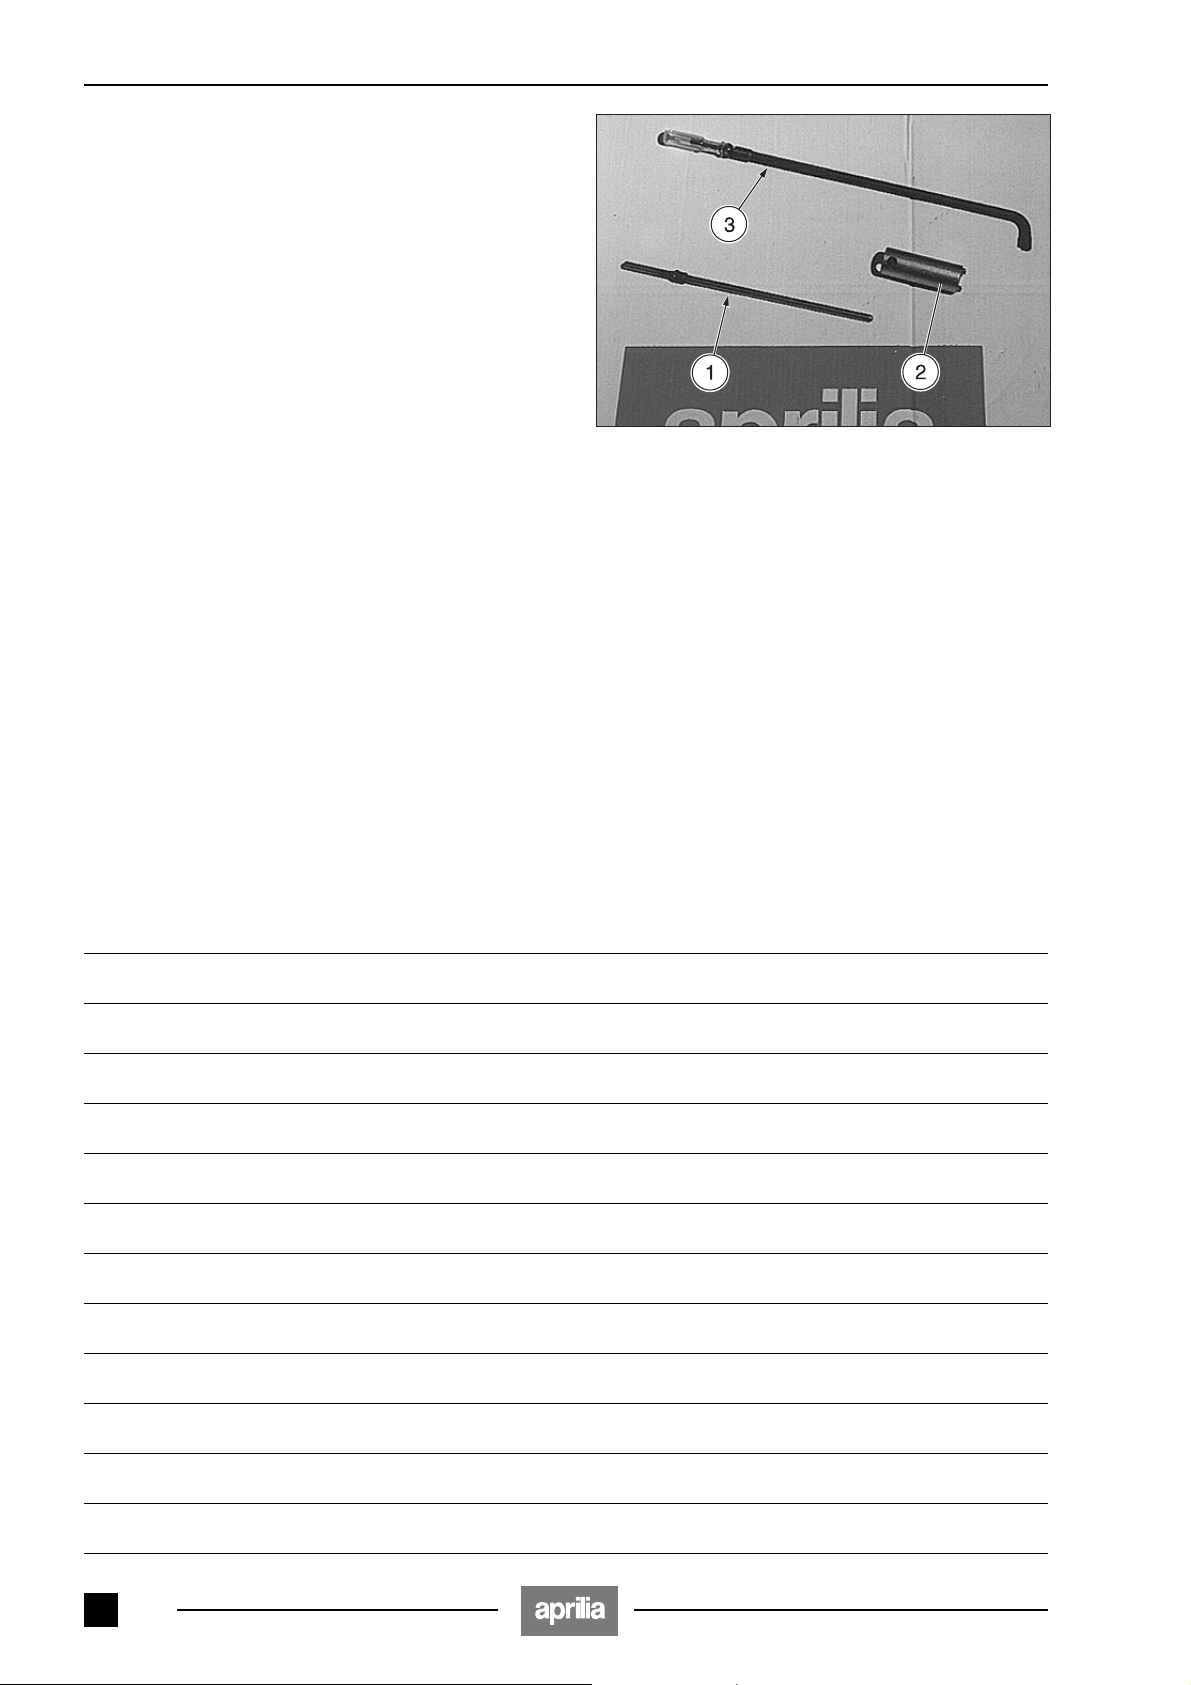
1.8 ATTREZZI SPECIALI
– Tondino (1) per sfilamento perno forcellone (permette
lo sfilamento parziale del perno durante la rimozione
del motore dal telaio).
– Chiave a tubo (2) per ghiera di bloccaggio perno forcel-
lone.
– Cacciavite (3) a 90˚ per regolazione vite aria su carbu-
ratori.
1.8 EQUIPOS ESPECIALES
◆ Redondo de hierro (1) para extraer el eje basculante
(permite extraer parcialmente el eje durante el desmontaje del motor del bastidor).
◆ Llave tubular (2) para tuerca de bloqueo eje basculan-
te.
◆ Destornillador (3) a 90˚ para ajustar el tornillo aire so-
bre los carburadores.
1.8 SPECIAL TOOLS
◆ Rod iron (1) for the withdrawing of the rear fork pin (it
makes it possible to withdraw the pin partially during
the removal of the engine from the frame).
◆ Socket spanner (2) for the rear fork pin locking ring.
◆ 90˚ screwdriver (3) for the adjustment of the air screw
on the carburettors.
NOTE / NOTES / ANMERKUNGEN
1 - 16
2
1
OPERAZIONI DI MANUTENZIONE
PERIODICA E DI MESSA A PUNTO
OPERACIONES DE MANTENIMIENTO
PERIÓDICO Y DE PUESTA A PUNTO
PERIODIC SERVICE
AND SETTING UP OPERATIONS
2
3
4
5
6
7
8
- 1

2
2
OPERAZIONI DI MANUTENZIONE PERIODICA E DI MESSA A PUNTO
OPERAZIONI DI MANUTENZIONE
PERIODICA E DI MESSA A PUNTO
INDICE
2.1 PIANO PER LA MANUTENZIONE
PERIODICA
2.1.1 SCHEDA DI MANUTENZIONE
PERIODICA .....................................................Pag. 2-5
2.2 PUNTI DA LUBRIFICARE
2.3 BATTERIA
2.3.1 CONTROLLO LIVELLO ELETTROLITA ........Pag. 2-8
2.3.2 RICARICA ......................................................Pag. 2-10
2.3.3 LUNGA INATTIVITÀ ......................................Pag. 2-10
2.4 DADI COLLETTORI DI SCARICO
2.5 FILTRO ARIA
2.6 CANDELA
2.7 CARBURATORE
2.8 TUBAZIONI CARBURANTE
2.9 CAVO ACCELERATORE
2.9.1 REGOLAZIONE
COMANDO ACCELERATORE .....................Pag. 2-16
2.9.2 REGOLAZIONE DEL MINIMO ......................Pag. 2-16
2.10 CAVO AVVIAMENTO A FREDDO
2.11 CAVO FRIZIONE
2.12 VERIFICA LIVELLO OLIO
MOTORE E RABBOCCO
2.13 SOSTITUZIONE OLIO MOTORE
E FILTRO OLIO MOTORE
2.13.1 SPURGO ARIA POMPA MANDATA OLIO .Pag. 2-24
2.14 CONTROLLO E RABBOCCO
LIQUIDO REFRIGERANTE
2.15 SOSTITUZIONE
DEL LIQUIDO REFRIGERANTE
2.16 CATENA DI TRASMISSIONE
2.16.1 CONTROLLO DEL GIOCO .........................Pag. 2-30
2.16.2 CONTROLLO USURA .................................Pag. 2-32
2.16.3 REGOLAZIONE ...........................................Pag. 2-32
2.16.4 PULIZIA E LUBRIFICAZIONE ....................Pag. 2-32
2.17 CONTROLLO E RABBOCCO
LIQUIDO FRENO ANTERIORE
2.18 CONTROLLO E RABBOCCO
LIQUIDO FRENO POSTERIORE
2.19 SPURGO ARIA
IMPIANTO FRENANTE
2.20 REGOLAZIONE PEDALE FRENO
POSTERIORE
2.21 REGOLAZIONE LEVA FRENO
ANTERIORE
2.22 VERIFICA USURA PASTIGLIE
2.23 PNEUMATICI
2.23.1 CONDIZIONI DEL BATTISTRADA .............Pag. 2-42
2.23.2 PRESSIONE DI GONFIAGGIO ...................Pag. 2-42
2.24 STERZO
2.24.1 CONTROLLO GIOCO CUSCINETTI ...........Pag. 2-44
2.24.2 REGOLAZIONE GIOCO CUSCINETTI .......Pag. 2-44
2.25 FORCELLA ANTERIORE
2.26 FORCELLONE POSTERIORE
2.26.1 REGISTRAZIONE
FORCELLONE POSTERIORE ....................Pag. 2-46
2.27 SOSPENSIONE POSTERIORE
2.27.1 REGOLAZIONE
SOSPENSIONE POSTERIORE ..................Pag. 2-48
2.27.2 REGOLAZIONE SOSPENSIONE
POSTERIORE CON REGOLAZIONE
IDRAULICA DI PRECARICO
2.27.3 CONTROLLO BIELLISMI
SOSPENSIONE POSTERIORE ..................Pag. 2-50
2.28 RUOTA ANTERIORE
2.29 RUOTA POSTERIORE
2.30 SERRAGGIO VITI E DADI
...............................................Pag. 2-4
.......................Pag. 2-6
....................................................Pag. 2-8
......Pag. 2-10
............................................Pag. 2-12
...................................................Pag. 2-14
.......................................Pag. 2-16
................Pag. 2-16
.......................Pag. 2-16
....Pag. 2-18
...................................Pag. 2-18
.....................Pag. 2-20
..................Pag. 2-22
................Pag. 2-26
.......Pag. 2-28
...........Pag. 2-30
........Pag. 2-34
......Pag. 2-36
.......................Pag. 2-38
.........................................Pag. 2-40
............................................Pag. 2-40
........Pag. 2-40
..........................................Pag. 2-42
...................................................Pag. 2-44
....................Pag. 2-46
...........Pag. 2-46
.........Pag. 2-48
...............Pag. 2-50
&
...........................Pag. 2-52
.........................Pag. 2-52
..................Pag. 2-54
2
- 2

2
OPERACIONES DE MANTENIMIENTO PERIÓDICO Y DE
PUESTA A PUNTO
OPERACIONES DE MANTENIMIENTO
PERIÓDICO Y DE PUESTA A PUNTO
ÍNDICE
2.1 PLAN PARA EL MANTENIMIENTO
PERIÓDICO
2.1.1 FICHA DE MANTENIMIENTO PERIÓDICO ....Pag. 2-5
2.2 PUNTOS POR LUBRICAR
2.3 BATERÍA
2.3.1 CONTROL DEL NIVEL DEL ELECTROLITO .Pag. 2-9
2.3.2 RECARGA BATERIA ....................................Pag. 2-11
2.3.3 LARGA INACTIVIDAD ..................................Pag. 2-11
2.4 TUERCAS DE LOS TUBOS
DE ESCAPE
2.5 FILTRO DEL AIRE
2.6 BUJÍA
2.7 CARBURADORES
2.8 TUBERÍAS DEL COMBUSTIBLE
2.9 CABLE DEL ACELERADOR
2.9.1 AJUSTE MANDO ACCELERADOR ..............Pag. 2-17
2.9.2 AJUSTE DEL RÉGIMEN DEL RALENTÍ ......Pag. 2-17
2.10 CABLE DEL ARRANQUE EN FRÍO
2.11 CABLE DEL EMBRAGUE
2.12 CONTROL DEL NIVEL DEL ACEITE
DEL MOTOR Y RELLENO
2.13 CAMBIO DEL ACEITE MOTOR Y DEL
FILTRO DEL ACEITE DEL MOTOR
2.13.1 PURGA DEL AIRE DE LA BOMBA
DE ALIMENTACIÓN DEL ACEITE ..............Pag. 2-25
2.14 CONTROL Y RELLENO
DEL LÍQUIDO REFRIGERANTE
2.15 SUBSTITUCIÓN DEL LÍQUIDO
REFRIGERANTE
2.16 CADENA DE TRANSMISIÓN
2.16.1 CONTROL DEL JUEGO ..............................Pag. 2-31
2.16.2 CONTROL DEL DESGASTE .......................Pag. 2-33
2.16.3 AJUSTE .......................................................Pag. 2-33
2.16.4 LIMPIEZA Y LUBRICACIÓN .......................Pag. 2-33
2.17 CONTROL Y RELLENO LIQUIDO
FRENO DELANTERO
2.18 CONTROL Y RELLENO
LIQUIDO FRENO TRASERO
2.19 PURGA DEL AIRE
DEL SISTEMA DE FRENADO
2.20 AJUSTE DEL PEDAL
DEL FRENO TRASERO
2.21 AJUSTE DE LA PALANCA
DEL FRENO DELANTERO
2.22 COMPROBACION
DESGASTE PASTILLAS
2.23 NEUMÁTICOS
2.23.1 CONDICIONES DE LA BANDA
DE RODAMIENTO .......................................Pag. 2-43
2.23.2 PRESIÓN DE INFLADO ..............................Pag. 2-43
2.24 DIRECCIÓN
2.24.1 CONTROL JUEGO COJINETES .................Pag. 2-45
2.24.2 AJUSTE JUEGO COJINETES ....................Pag. 2-45
2.25 HORQUILLA DELANTERA
2.26 HORQUILLA TRASERA
2.26.1 AJUSTE BASCULANTE .............................Pag. 2-47
2.27 SUSPENSIÓN TRASERA
2.27.1 AJUSTE SUSPENSION TRASERA ............Pag. 2-49
2.27.2 AJUSTE SUSPENSION TRASERA
CON REGULACION HIDRAULICA
DE PRECARGA
2.27.3 CONTROL PALANCAS
SUSPENSION TRASERA ............................Pag. 2-51
2.28 RUEDA DELANTERA
2.29 RUEDA TRASERA
2.30 APRIETE DE LOS TORNILLOS
Y TUERCAS
......................................................Pag. 2-4
.........................Pag. 2-6
...........................................................Pag. 2-9
..................................................Pag. 2-11
......................................Pag. 2-13
...............................................................Pag. 2-15
.......................................Pag. 2-17
.........Pag. 2-17
....................Pag. 2-17
..Pag. 2-19
......................Pag. 2-19
.....................Pag. 2-21
..Pag. 2-23
...........Pag. 2-27
.......................................Pag. 2-29
...............Pag. 2-31
..............................Pag. 2-35
...............Pag. 2-37
.............Pag. 2-39
..........................Pag. 2-41
..................Pag. 2-41
........................Pag. 2-41
............................................Pag. 2-43
.................................................Pag. 2-45
...................Pag. 2-47
.........................Pag. 2-47
......................Pag. 2-49
....................................Pag. 2-51
&
..............................Pag. 2-53
....................................Pag. 2-53
................................................Pag. 2-54
PERIODIC SERVICE AND SETTING UP OPERATIONS
PERIODIC SERVICE
2
AND SETTING UP OPERATIONS
TABLE OF CONTENTS
2.1 PERIODIC SERVICE PLAN
2.1.1 PERIODIC SERVICE CHART
FOR THE COMPONENTS ..............................Pag. 2-5
2.2 POINTS TO LUBRICATE
2.3 BATTERY
2.3.1 CHECKING THE ELECTROLYTE LEVEL .....Pag. 2-9
2.3.2 RECHARGING THE BATTERY ....................Pag. 2-11
2.3.3 LONG INACTIVITY OF THE BATTERY....... Pag. 2-11
.........................................................Pag. 2-9
2.4 EXHAUST MANIFOLD NUTS................Pag. 2-11
2.5 AIR CLEANER..............................................Pag. 2-13
2.6 SPARK PLUG ............................................... Pag. 2-15
2.7 CARBURETTORS ....................................... Pag. 2-17
2.8 FUEL TUBING..............................................Pag. 2-17
2.9 ACCELERATOR CABLE ..........................Pag. 2-17
2.9.1 ADJUSTING
THE ACCELERATOR CONTROL................Pag. 2-17
2.9.2 ADJUSTMENT OF IDLING RPM..................Pag. 2-17
2.10 COLD START CABLE.............................Pag. 2-19
2.11 CLUTCH CABLE.......................................Pag. 2-19
2.12 CHECKING THE ENGINE OIL LEVEL
AND TOPPING UP...................................Pag. 2-21
2.13 CHANGING ENGINE OIL
AND OIL FILTER...................................... Pag. 2-23
2.13.1 AIR BLEEDING
FROM OIL DELIVERY PUMP ......................Pag. 2-25
2.14 CHECKING
AND TOPPING UP COOLANT ...........Pag. 2-27
2.15 CHANGING THE COOLANT ...............Pag. 2-29
2.16 DRIVING CHAIN ......................................Pag. 2-31
2.16.1 CLEARANCE CONTROL ...........................Pag. 2-31
2.16.2 CHECKING WEAR......................................Pag. 2-33
2.16.3 ADJUSTMENT............................................ Pag. 2-33
2.16.4 CLEANING AND LUBRICATION ...............Pag. 2-33
2.17 CHECKING AND TOPPING UP
THE FRONT BRAKE FLUID................ Pag. 2-35
2.18 CHECKING AND TOPPING UP
THE REAR BRAKE FLUID...................Pag. 2-37
2.19 BLEEDING
THE BRAKING SYSTEM......................Pag. 2-39
2.20 REAR BRAKE PEDAL
ADJUSTMENT ..........................................Pag. 2-41
2.21 FRONT BRAKE LEVER
ADJUSTMENT ..........................................Pag. 2-41
2.22 CHECKING
THE BRAKE PAD WEAR ......................Pag. 2-41
2.23 TYRES...........................................................Pag. 2-43
2.23.1 CONDITION OF TREAD............................. Pag. 2-43
2.23.2 INFLATION PRESSURE............................. Pag. 2-43
2.24 STEERING...................................................Pag. 2-45
2.24.1 CHECKING THE BEARING SLACKS........Pag. 2-45
2.24.2 ADJUSTING THE BEARING SLACKS ......Pag. 2-45
2.25 FRONT FORK ............................................Pag. 2-47
2.26 REAR FORK ...............................................Pag. 2-47
2.26.1 ADJUSTING THE REAR FORK .................Pag. 2-47
2.27 REAR SUSPENSION ..............................Pag. 2-49
2.27.1 ADJUSTING THE REAR SUSPENSION....Pag. 2-49
2.27.2 ADJUSTING
THE REAR SUSPENSIONWITH PRELOAD
HYDRAULIC ADJUSTMENT &............... Pag. 2-51
2.27.3 CHECKING
THE REAR SUSPENSION LINKAGE ........Pag. 2-51
2.28 FRONT WHEEL.........................................Pag. 2-53
2.29 REAR WHEEL............................................Pag. 2-53
2.30 TIGHTENING SCREWS
AND NUTS .................................................. Pag. 2-54
......................Pag. 2-4
..........................Pag. 2-6
2
2
- 3

OPERAZIONI DI MANUTENZIONE PERIODICA E DI MESSA A PUNTO /
Y DE PUESTA A PUNTO
/ PERIODIC SERVICE AND SETTING UP OPERATIONS
OPERACIONES DE MANTENIMIENTO PERIÓDICO
Questa sezione descrive le procedure d’intervento per la manutenzione
periodica dei principali componenti
del veicolo.
Prima di iniziare qualsiasi
intervento di manutenzione
a
o ispezione al veicolo, arrestare il motore e togliere la chiave, attendere che motore e impianto di scarico si siano raffreddati,
sollevare possibilmente il veicolo
con apposita attrezzatura, su di un
terreno solido e in piano.
Porre particolare attenzione alle
parti ancora calde del motore e
dell’impianto di scarico, in modo
tale da evitare ustioni.
Il veicolo e’ costruito con parti non
commestibili. Non mordere, succhiare, masticare o ingerire nessuna parte dello stesso per nessun
motivo.
Se non espressamente de-
c
scritto, il rimontaggio dei
gruppi segue in senso inverso le
operazioni di smontaggio.
Esta sección describe los procedimientos de mantenimiento periódico
de los principales componentes del
vehículo.
Antes de comenzar con
cualquier tipo de manteni-
a
hículo, apague el motor y quite la
llave, espere a que el motor y el
sistema de escape se hayan enfriado y levante el vehículo con un
equipo adecuado, sobre una superficie sólida y plana.
Para evitar quemaduras, tenga
cuidado con las piezas del motor y
del sistema de escape que aún estén caliente.
El vehículo está fabricado con piezas no comestibles.
No muerda, chupe, mastique ni
trague ninguna pieza del mismo
por ningún motivo.
de los grupos sigue el orden contrario a las operaciones de desmontaje.
miento o inspección del ve-
Si no está expresamente
c
indicado, la reinstalación
This section describes the procedures for periodic service on the principal components of the vehicle.
Before beginning any service operations or inspec-
a
off the engine and remove the key,
wait until the engine and the exhaust system have cooled down
and, if possible, lift the vehicles
with the proper equipment onto
firm and flat ground.
In order to avoid burns, be careful
not to touch any parts of the engine or exhaust system which
have not cooled down completely.
The vehicle is constructed of nonedible parts.
Do not bite, suck, chew or low any
part of the vehicle for any reason
whatever.
the units is carried out repeating
the disassembly operations in the
reverse order.
tion of the vehicle, switch
If not expressly described
c
otherwise, reassembly of
Remember:
c
1 mile = 1.6 km
1 km = 0.625 miles
2.1 PIANO PER LA
MANUTENZIONE
PERIODICA
Per mantenere ottimali le condizioni
di funzionamento del veicolo, aprilia
raccomanda di rispettare gli intervalli
previsti per gli interventi di manutenzione periodica dei vari componenti.
2.1 PLAN PARA EL
MANTENIMIENTO
PERIÓDICO
Para que las condiciones de funcionamiento del vehículo se mantengan
óptimas, aprilia aconseja respetar
los intervalos previstos para las intervenciones de mantenimiento periódico de los diferentes componentes.
2.1 PERIODIC SERVICE PLAN
aprilia recommends respecting the
intervals indicated for the periodic
service on the various components in
order to ensure the best operating
conditions of the vehicle.
2 - 4
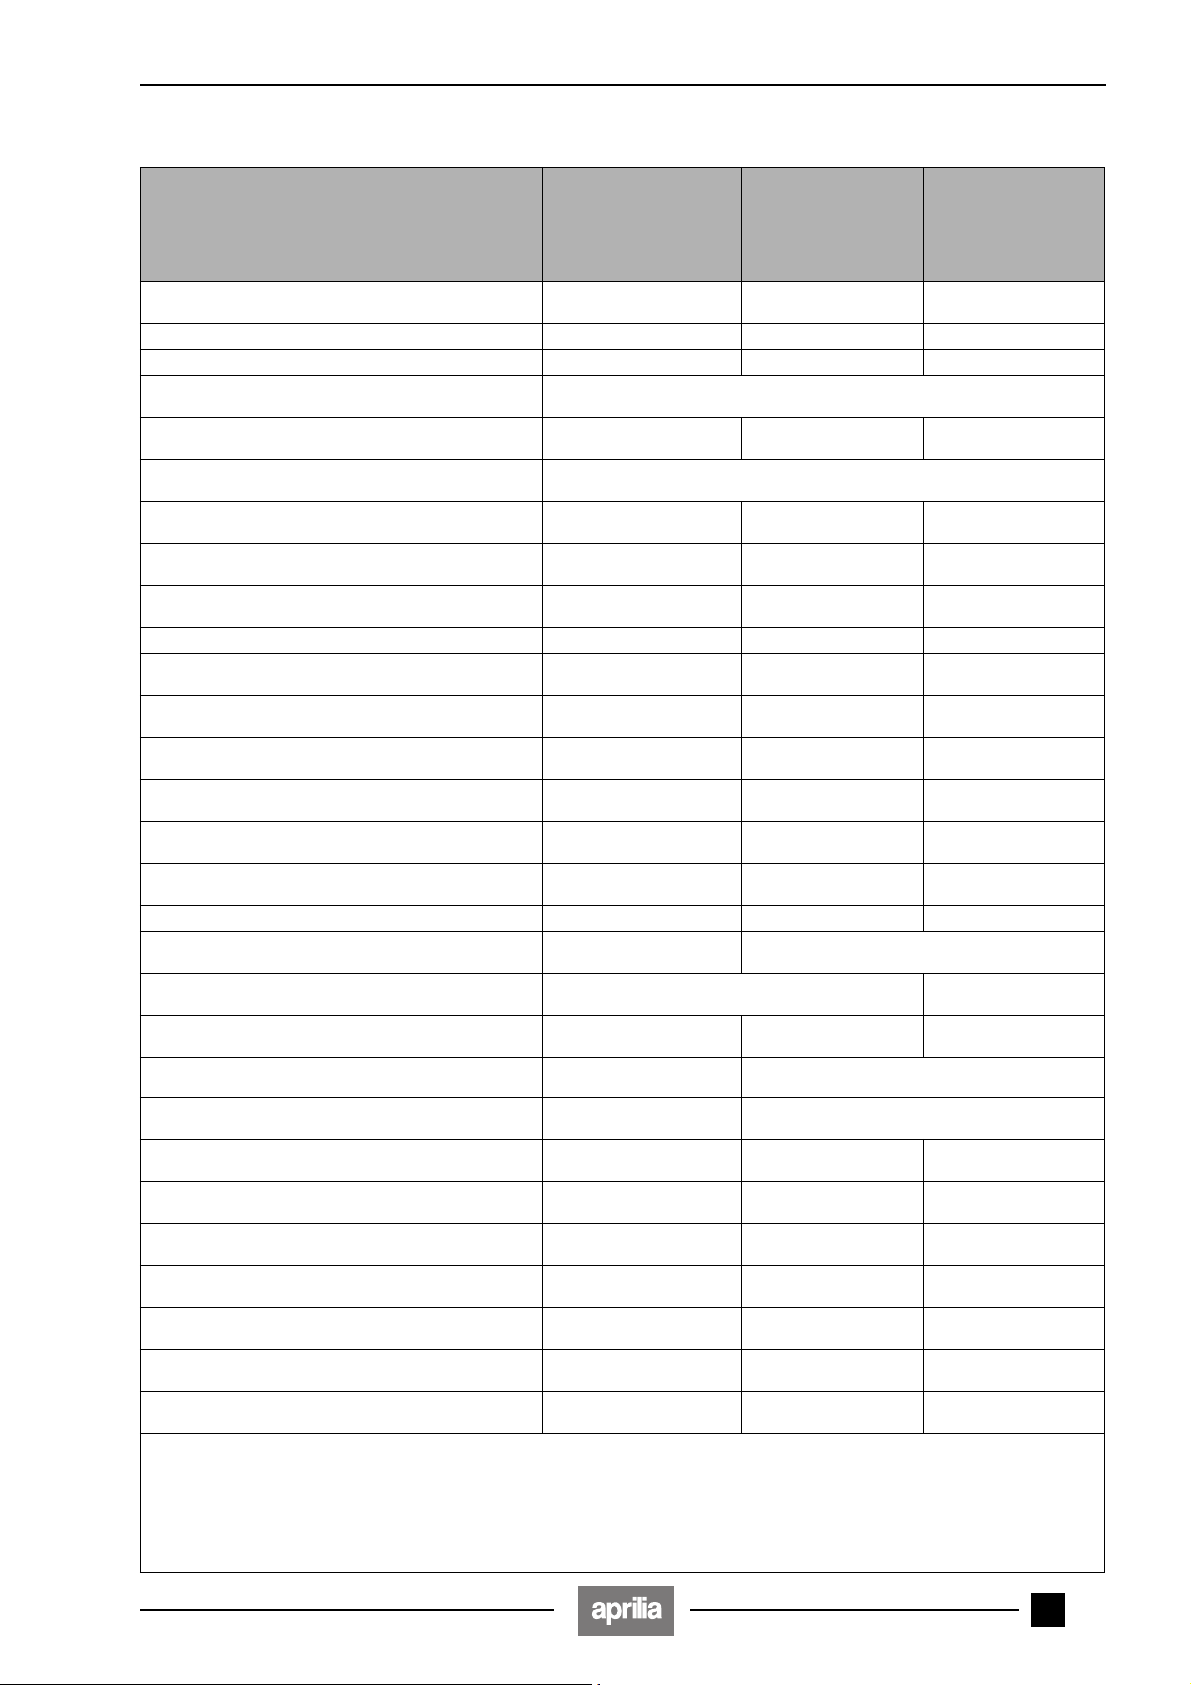
OPERAZIONI DI MANUTENZIONE PERIODICA E DI MESSA A PUNTO /
Y DE PUESTA A PUNTO
/ PERIODIC SERVICE AND SETTING UP OPERATIONS
OPERACIONES DE MANTENIMIENTO PERIÓDICO
2.1.1 SCHEDA DI MANUTENZIONE
PERIODICA
COMPONENTI
COMPONENTES
SERVICE
Batteria - livello liquido /
Battery - liquid level
Candela /
Carburatori /
Catena di trasmissione /
Driving chain
Catena di distribuzione /
Timing chain
Cuscinetti biellismi sospensione /
suspensión
Centratura ruote /
Wheel truing
Cuscinetti di sterzo e sterzo /
dirección
Cuscinetti ruote /
Wheel bearings
Filtro aria /
Filtro olio motore (sul telaio) /
(sul bastidor)
Filtro olio motore /
Engine oil filter
Gioco frizione /
Clutch clearance
Gioco punterie /
Tappet clearance
Impianti frenanti /
Braking system
Impianto di raffreddamento /
Cooling system
Impianto luci /
Liquido freni /
Brake fluid
Liquido refrigerante /
Coolant
Olio forcella /
Fork oil
Olio motore /
Pressione dei pneumatici /
Tyre pressure
Regime minimo di giri motore /
Engine idling rpm
Rubinetto carburante /
Fuel cock
Serraggio bulloneria /
Tightening bolts and nuts
Sospensioni ed assetto /
Suspensions and position
Spurgo liquido freni /
fluid bleeding
Tensione raggi /
Spoke tension
Tubi carburante /
Fuel pipes
C = controllare e pulire, regolare, lubrificare o sostituire se necessario /
P = pulire /
Eseguire le operazioni di manutenzione più frequentemente se il veicolo viene utilizzato in zone piovose, polverose o su percorsi accidentati /
Bujía
/ Spark plug
Carburadores
/ Suspension linkage bearings
/ Steering bearings and steering
Filtro del aire
/ Engine oil filter (on the frame)
Juego del embrague
Instalación de las luces
Líquido de frenos
Aceite de la horquilla
Aceite del motor
check and clean, adjust, lubricate or change, if necessary.
Limpie
nes de mantenimiento más frecuentemente
areas or on uneven roads.
Batería - nivel líquido
/ Carburettors
Cadena de transmisión
Cadena de distribución
Cojinetes palancas
Centrado de las ruedas
Cojinetes de dirección y
Cojinetes de las ruedas
/ Air cleaner
Filtro del aceite del motor
Filtro del aceite del motor
/
Juego de los empujaválvulas
Sistema de frenado
/
Sistema de refrigeración
/
Líquido refrigerante
/
/ Engine oil
Presión de los neumáticos
Régimen de ralentí
Grifo del combustible
Apriete del conjunto de pernos
Suspensiones y posición
Purga del líquido de frenos
Tensión de los radios
Tubos del combustible
/ clean S = sostituire /
Si el vehículo se utiliza en zonas lluviosas, polvorientas o en carreteras accidentadas, realice las operacio-
2.1.1 FICHA DE MANTENIMIENTO
/
/
/
/
/
/
/
/
/ Lighting system
/
/
/
/
/
/ Brake
/
/
substituya
/ change R = regolare /
/ Carry out service operations more frequently if the vehicle is used in rainy, dusty
PERIÓDICO
Fine rodaggio
(1000 km ou 4 mesi)
Fin rodaje
(1000 km o 4 meses)
After running-in
(1000 km or 4 months)
/
2.1.1 PERIODIC SERVICE CHART
FOR THE COMPONENTS
Ogni 6000 km
o 8 mesi
Cada 6000 km
o 8 meses
Every 6000 km
or 8 months
Ogni 12000 km
o 16 mesi
Cada 12000 km
o 16 meses
Every 12000 km
or 16 months
CC
CS
CP
ogni /
cada
/ every
500 km: C
C
ogni /
cada
/ every 30000 km: C
C
CC
C
CS
SS
SS
RR
CR
CC
CC
CC
C
ogni /
1000 km: C
cada
ogni anno /
/ every
cada año
every year:
ogni 2 anni /
/
S
cada 2 años
every 2 year:
S
S
ogni /
cada
S
R
ogni mese / cada meses / every month: R
500 km: C / 6000 km:
/ every
S
RR
CC
CC
CC
C
CC
C
ogni 4 anni /
controle y limpie, ajuste, lubrique o substituya si es necesario
ajuste
/ adjust
cada 4 años
every 4 year:
S
/
/
/
2 - 5

OPERAZIONI DI MANUTENZIONE PERIODICA E DI MESSA A PUNTO /
Y DE PUESTA A PUNTO
/ PERIODIC SERVICE AND SETTING UP OPERATIONS
OPERACIONES DE MANTENIMIENTO PERIÓDICO
2.2 PUNTI DA LUBRIFICARE
Una lubrificazione corretta è importante per un funzionamento scorrevole e una lunga durata del veicolo.
Prima della lubrificazione,
c
ripulire completamente
ogni parte da eventuale ruggine e
rimuovere tutto il grasso, la sporcizia e la polvere.
Le parti esposte che sono soggette alla ruggine, devono essere lubrificate con olio motore o grasso,
vedi 1.7 (TABELLA LUBRIFICANTI).
Nella “SCHEDA DI LUBRIFICAZIONE” sono riportati i punti da lubrificare.
LEGENDA SCHEDA
DI LUBRIFICAZIONE
1) Perno e cuscinetti ruota anteriore
2) Cuscinetti sterzo
3) Perno leva frizione/cavo frizione
4) Cavo leva per l’avviamento a
freddo
5) Perno e cuscinetti ruota posteriore
6) Perno poggiapiedi passeggero
7) Perno cavalletto laterale
8) Comando acceleratore
9) Cavi acceleratore
10) Rinvio tachimetro/contachilometri
11) Perno forcellone posteriore
12) Viti di fulcro cavalletto centrale
(n˚ 2 ingrassatori)
&
13) Leverismi sospensione posterio-
re
14) Catena di trasmissione
2.2 PUNTOS POR LUBRICAR
Una lubricación correcta es importante para que las piezas no se agarroten y garantizar una larga duración
del vehículo.
Antes de lubricar, limpie el
c
quite toda la grasa, la suciedad y
el polvo.
Las piezas expuestas, que están
sujetas al herrumbre, deben lubricarse con aceite motor o grasa,
véase 1.7 (TABLA DE LOS LUBRICANTES).
En la “FICHA DE LUBRICACIÓN”
están indicados los puntos por lubricar.
PIE DE LA ILUSTRACIÓN
DE LA FICHA DE LUBRICACIÓN
10) Transmisión taquímetro/cuenta-
11) Eje del basculante
12) Tornillos de fulcro caballete cen-
13) Mecanismos de palanca suspen-
14) Cadena de transmisión
herrumbre de cada pieza y
1) Eje y cojinetes de la rueda delantera
2) Cojinetes de la dirección
3) Perno de la palanca del embrague/cable embrague
4) Cable de la palanca para el
arranque en frío
5) Eje y cojinetes de la rueda trasera
6) Perno reposapiés del pasajero
7) Perno del soporte lateral
8) Mando del acelerador
9) Cables del acelerador
kilómetros
tral
& (n˚ 2 engrasadores)
sión trasera
2.2 POINTS TO LUBRICATE
Correct lubrication is important for a
good performance and long life of the
vehicle.
Before lubricating, com-
c
moving rust, grease, dirt and dust.
The exposed parts subject to rust
are to be lubricated with engine oil
or grease. See 1.7 (LUBRICANT
CHART).
The points to be lubricated are indicated in the "LUBRICATION
CHART"
LUBRICATRION CHART KEY
10) Speedometer/total kilometres
11) Rear fork pin
12) Centre stand fulcrum screws
13) Rear suspension leverage
14) Driving chain
pletely clean all parts, re-
1) Front wheel pin and bearings
2) Steering bearings
3) Clutch lever pin /clutch cable
4) Lever cable for cold starting
5) Rear wheel pin and bearings
6) Passenger footrest pin
7) Side stand pin
8) Accelerator control handgrip
9) Accelerator cables
odemeter transmission
&
(n. 2 lubricators)
2 - 6
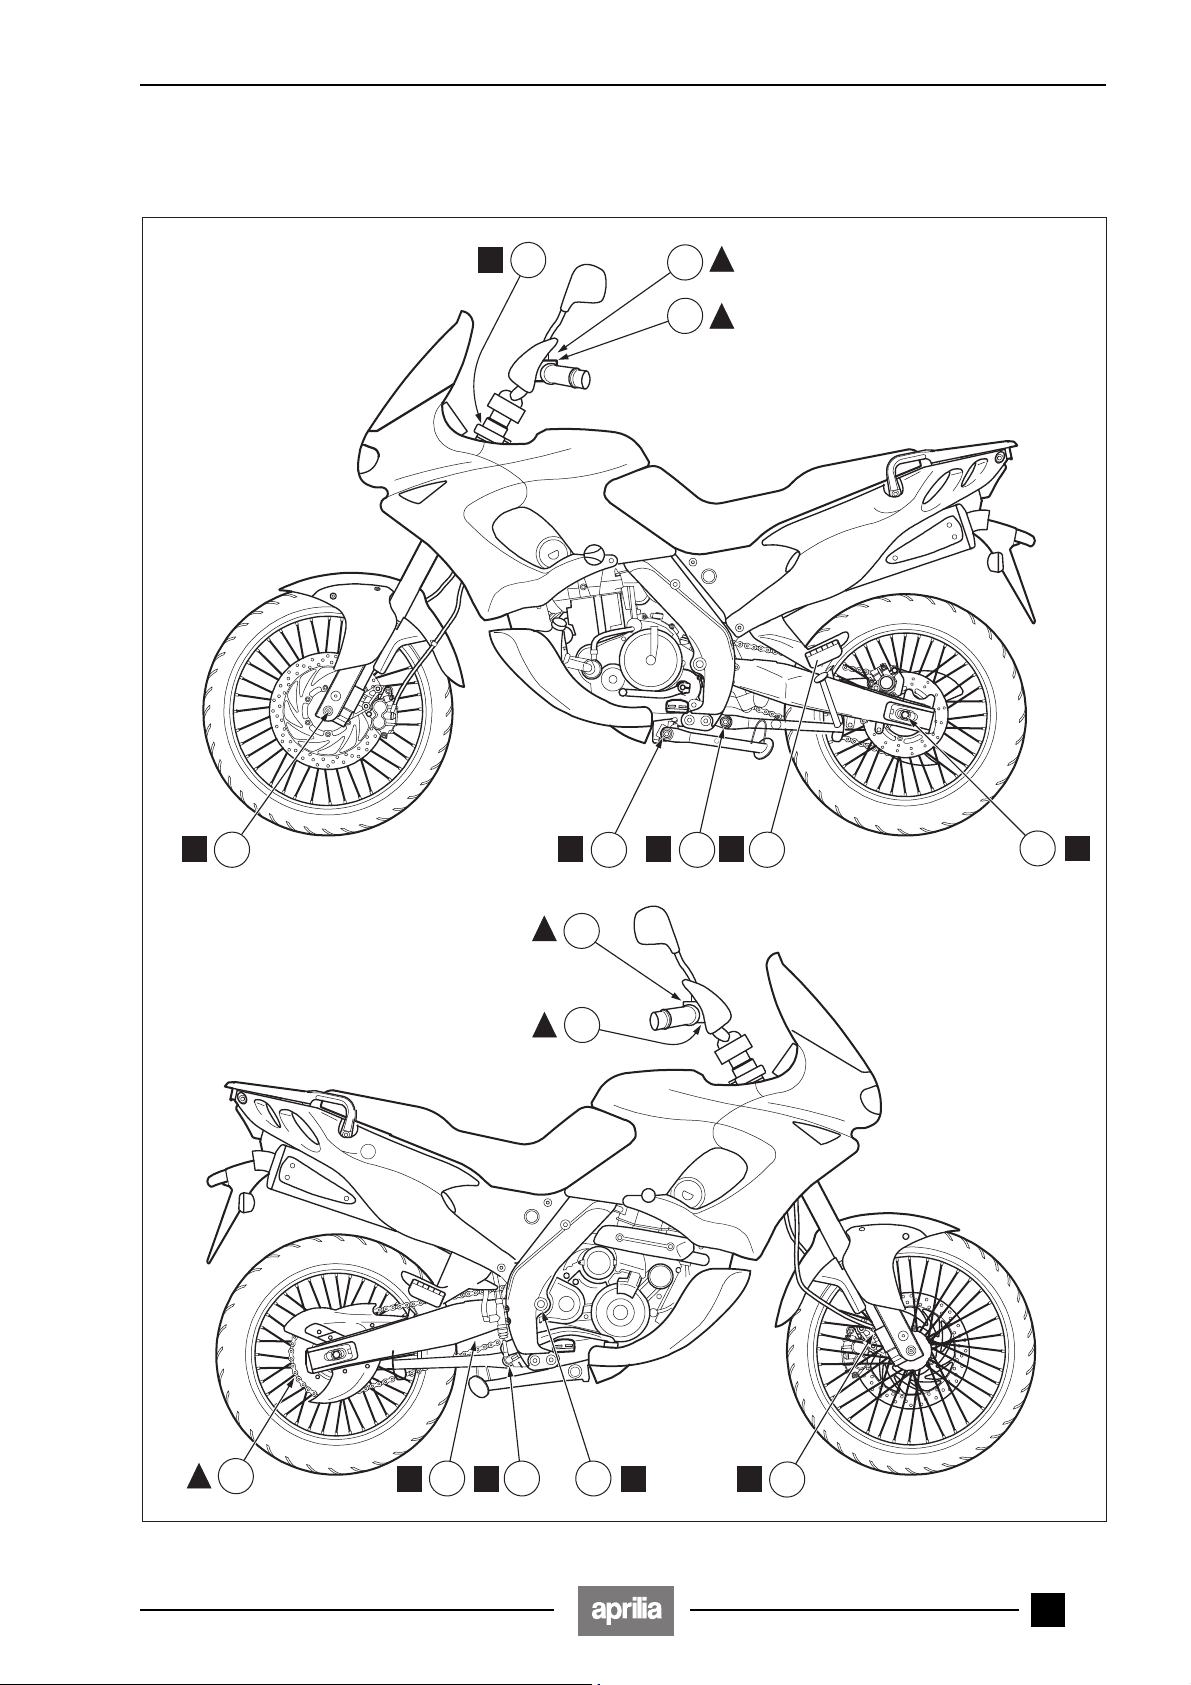
OPERAZIONI DI MANUTENZIONE PERIODICA E DI MESSA A PUNTO /
Y DE PUESTA A PUNTO
/ PERIODIC SERVICE AND SETTING UP OPERATIONS
OPERACIONES DE MANTENIMIENTO PERIÓDICO
SCHEDA DI LUBRIFICAZIONE
■ = Grasso
▲ = Olio
FICHA DE LUBRICACIÓN
■ = Grasa
▲ = Aceite
2
LUBRICATION CHART
■ = Grease
▲ = Oil
3
4
16
7
12
5
8
9
14
13
12
11
10
2 - 7
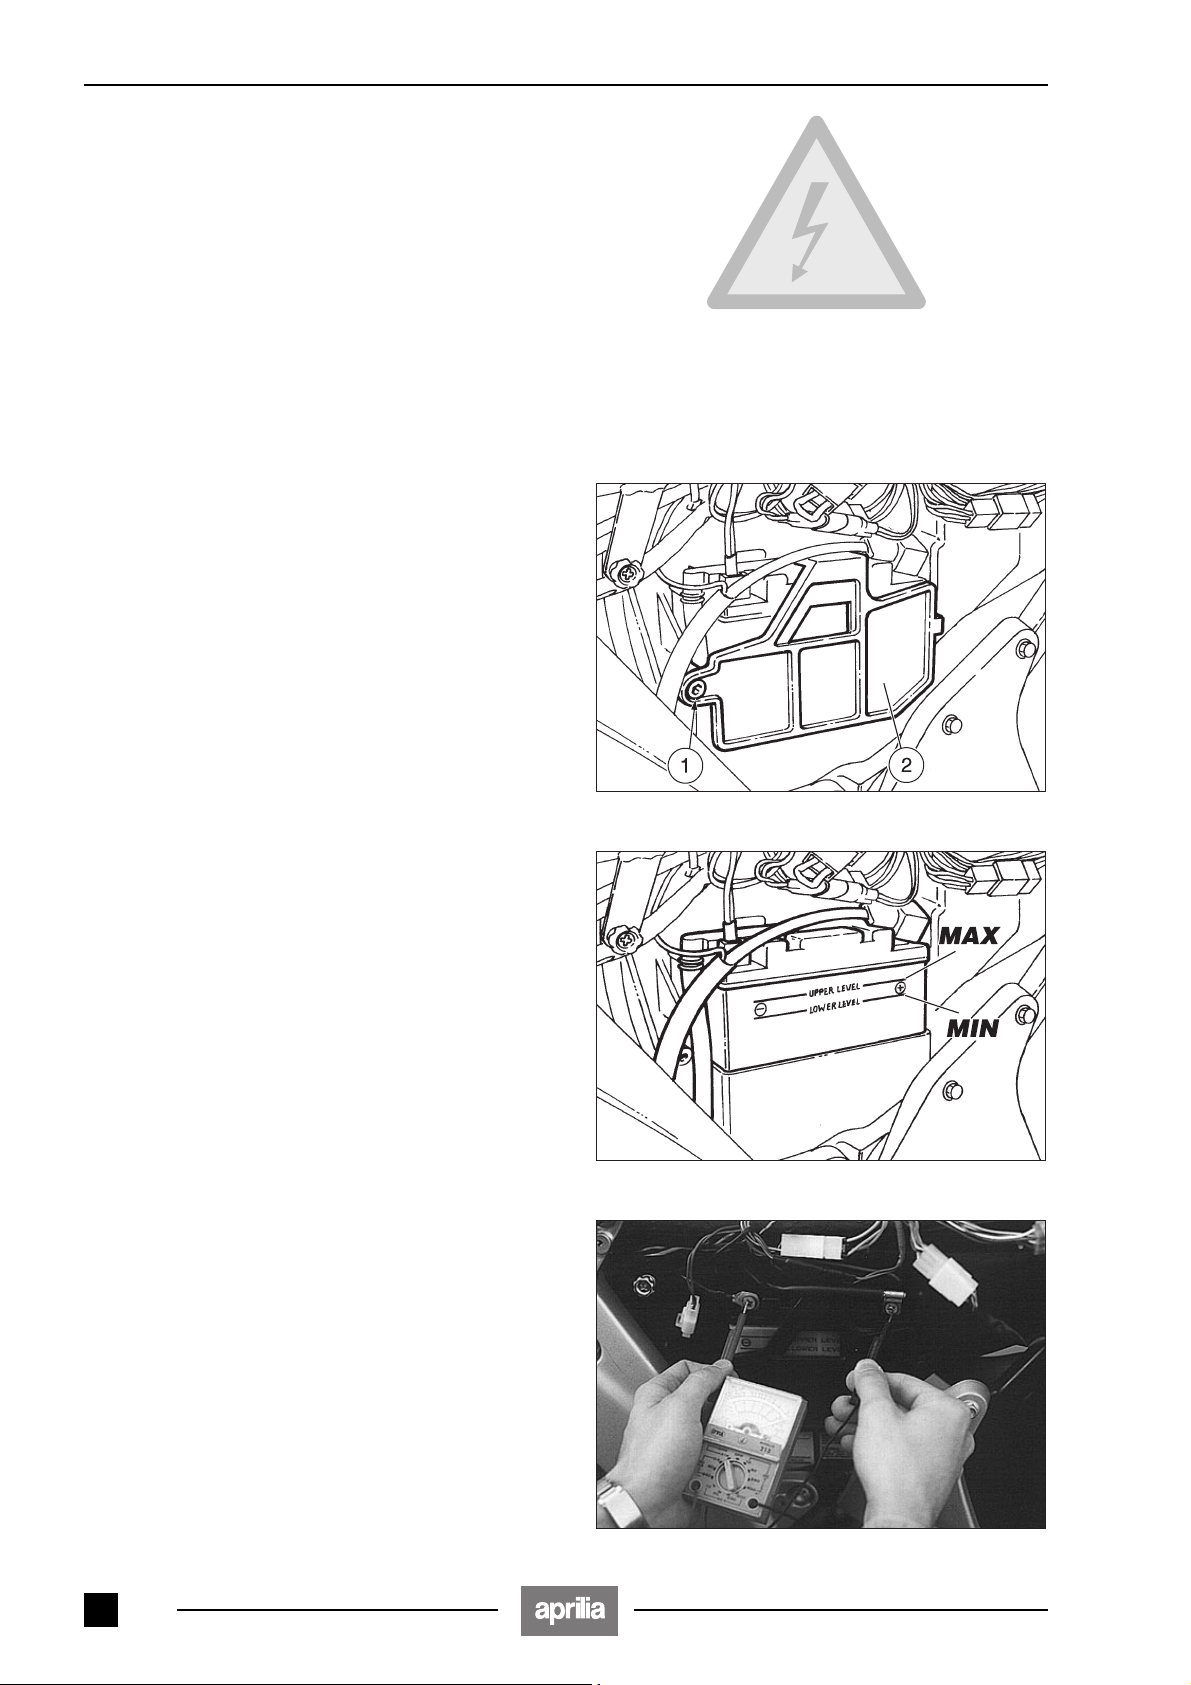
OPERAZIONI DI MANUTENZIONE PERIODICA E DI MESSA A PUNTO
2.3 BATTERIA
Leggere attentamente 1.4 (PRECAUZIONI E INFORMAZIONI GENERALI).
Dopo i primi 1000 km (o 4 mesi) e successivamente ogni
6000 km (o 8 mesi) controllare il livello dell’elettrolita e il
serraggio dei morsetti.
L'elettrolita della batteria è tossico, caustico,
e a contatto con l'epidermide può causare
a
ustioni, in quanto contiene acido solforico.
Indossare abiti protettivi, una maschera per il viso
e/o occhiali nel caso di manutenzione.
Se del liquido elettrolitico venisse a contatto
con la pelle, lavare con abbondante acqua cor-
a
rente. Se venisse a contatto con gli occhi, lavare con acqua abbondante per quindici minuti, quindi rivolgersi tempestivamente a un oculista. Se venisse
ingerito accidentalmente, bere grosse quantità di acqua o latte, continuare con latte di magnesia od olio vegetale, quindi rivolgersi prontamente a un medico.
La batteria emana gas esplosivi (specialmente durante
la fase di attivazione e/o ricarica), è opportuno tenere
lontane fiamme, scintille, sigarette e qualsiasi altra fonte di calore. Durante la ricarica o l'uso, provvedere a
un'adeguata ventilazione del locale, evitare l'inalazione
dei gas emessi durante la ricarica della stessa.
Non invertire mai il collegamento dei cavi della batteria.
Porre attenzione a non inclinare troppo il veicolo onde
evitare pericolose fuoriuscite del liquido della batteria.
Il liquido della batteria è corrosivo.
Non versarlo o spargerlo, in particolare sulle
a
parti in plastica.
TENERE LONTANO DALLA PORTATA DEI BAMBINI.
Collegare e scollegare la batteria con l’inter-
ruttore di accensione in posizione “
a
Collegare prima il prima il cavo positivo (+) e
poi quello negativo (–).
Scollegare seguendo l’ordine inverso.
2.3.1 CONTROLLO LIVELLO ELETTROLITA
Per il controllo del livello dell'elettrolita è necessario:
◆ Rimuovere la fiancatina sinistra, vedi 7.1.4 (RIMO-
ZIONE FIANCATINE LATERALI DESTRA E SINISTRA).
◆ Svitare e togliere la vite (1).
◆ Rimuovere il coperchio batteria (2).
◆ Controllare che il livello del liquido sia compreso fra le
due tacche “MIN” e “MAX”, stampigliate sul lato della
batteria.
Diversamente:
◆ Togliere i tappi degli elementi.
m”.
Non superare il riferimento “MAX”, in quanto
a
il livello aumenta durante la ricarica.
◆ Ripristinare il livello del liquido solo aggiungendo ac-
qua distillata.
Controllare con un tester portatile la tensione
c
della batteria. Se la tensione è inferiore a 12V,
la batteria deve essere ricaricata.
2 - 8

OPERACIONES DE MANTENIMIENTO PERIÓDICO Y DE
c
PUESTA A PUNTO
PERIODIC SERVICE AND SETTING UP OPERATIONS
2.3 BATERÍA
Lea con mucha atención 1.4 (PRECAUCIONES E INFORMACIONES GENERALES).
Controle tras los primeros 1000 km (o 4 meses) y sucesivamente cada 6000 km (o 8 meses) el nivel del electrólito
y el apretamiento de los bornes.
El electrolito de la batería es tóxico, cáustico
y si toca la piel puede causar quemaduras ya
a
mantenimiento, colóquese ropa de protección, una
máscara para la cara y/o gafas.
agua por quince minutos y luego diríjase inmediatamente a un oculista. Si se traga accidentalmente, beba
mucha agua o leche, siga con leche de magnesia o
aceite vegetal, luego diríjase inmediatamente a un médico. La batería emana gases explosivos (especialmente durante la fase de activación y/o recarga), es conveniente mantener alejadas llamas, chispas, cigarrillos y
cualquier otra fuente de calor.
Durante la recarga o el uso, ventile adecuadamente el
local, evite inhalar los gases que emite durante la recarga de la misma. Nunca invierta las conexiones de los
cables de la batería. Tenga cuidado en no inclinar demasiado el vehículo para evitar que el riesgo de que el
líquido salga de la batería.
que contiene ácido sulfúrico. En el caso de
Si el líquido electrolítico tocara la piel, lávese
abundantemente con agua corriente. Si entra en
a
contacto con los ojos, lave abundamente con
2.3 BATTERY
Carefully read 1.4 (PRECAUTIONS AND GENERAL
INFORMATION).
Check the electrolyte level and the tightening of the terminals after the first 1000 km (or 4 months) and then every
6000 km (or 8 months).
The electrolyte in the battery is toxic and
caustic and may cause burns on contact with
a
protective clothing, a face mask and/or goggles during service operations.
with large quantities of water for fifteen minutes and
consult an oculist without delay.
If the liquid is accidentally swallowed, drink large
amounts of water or milk, then continue drinking milk
of magnesia or vegetable oil and promptly call a doctor. The battery gives off explosive gases, particularly during the phase of starting and/or recharging;
keep it away from flames, sparks, cigarettes and any
other source of heat.
During recharging or using, make sure the room is
properly ventilated and avoid inhaling the gases released during recharging. Never invert the connection of the battery cables.
the skin as it contains sulphuric acid. Wear
If electrolyte liquid comes in contact with the
skin, wash with large quantities of running
a
water. In case of contact with the eyes, wash
El líquido de la batería es corrosivo.
No lo vierta o desparrame, en particular, sobre
a
las piezas de plástico.
MANTÉNGASE ALEJADO DEL ALCANCE DE LOS NIÑOS.
Conecte y desconecte la batería con el interruptor de encendido en posición “
a
negativo (–).
Desconecte siguiendo el orden contrario.
2.3.1 CONTROL DEL NIVEL DEL ELECTROLITO
Para controlar el nivel del electrolito es necesario:
◆ Quitar el panel izquierdo, véase 7.1.4 (DESMONTA-
◆ Destornillar y quitar el tornillo (1).
◆ Quitar la tapa batería (2).
◆ Controlar que el nivel del líquido esté comprendido en-
Eventualmente:
◆ Quite los tapones de los elementos.
◆ Restaure el nivel del líquido añadiendo sólo agua des-
recargar la batería.
Conecte antes el cable positivo (+) y luego el
JE PANELES LATERALES DERECHO E IZQUIERDO).
tre las dos muescas "MIN" y "MAX" , impresas sobre el lado de la batería.
No supere la referencia "MAX" , ya que el nivel aumenta durante la recarga.
a
tilada.
Controle con un tester portátil, la tensión de la
c
batería. Si la tensión es inferior a 12V, hay que
m”.
The battery fluid which is very corrosive.
Do not pour or spill it, especially on the plastic
a
parts.
KEEP AWAY FROM CHILDREN.
Connect and disconnect the battery with the
ignition switch in position “
a
the negative cable (–).
Disconnect following the reverse order.
2.3.1 CHECKING THE ELECTROLYTE LEVEL
To check the electrolyte level:
◆ Remove the left side, see 7.1.4 (REMOVING THE
◆ Unscrew and remove the screw (1).
◆ Remove the battery cover (2).
◆ Make sure that the fluid level is included between the
Otherwise:
◆ Remove the element plugs.
◆ Top up by adding distilled water only.
recharged.
Connect first the positive cable (+) and then
RIGHT AND LEFT SIDES).
two "MIN" and "MAX" notches stamped on the battery
side.
Never exceed the "MAX" notch, since the level
increases during the recharge.
a
Check battery voltage with a portable tester.
If voltage is less than 12V, the battery must be
m”.
2 - 9
 Loading...