

Page 1
Apple Qmaster 2
and Compressor 2
Distributed Processing Setup
Page 2

Apple Computer, Inc.
© 2005 Apple Computer, Inc. All rights reserved.
Under the copyright laws, this manual may not be
copied, in whole or in part, without the written consent
of Apple. Your rights to the software are governed by
the accompanying software license agreement.
The Apple logo is a trademark of Apple Computer, Inc.,
registered in the U.S. and other countries. Use of the
“keyboard” Apple logo (Option-Shift-K) for commercial
purposes without the prior written consent of Apple
may constitute trademark infringement and unfair
competition in violation of federal and state laws.
Every effort has been made to ensure that the
information in this manual is accurate. Apple Computer,
Inc., is not responsible for printing or clerical errors.
Apple Computer, Inc.
1 Infinite Loop
Cupertino, CA 95014-2084
408-996-1010
www.apple.com
Apple, the Apple logo, AppleScript, Apple Store,
DVD Studio Pro, Final Cut, Final Cut Pro, FireWire, Mac,
Mac OS, QuickTime, Shake, and Xserve are trademarks of
Apple Computer, Inc., registered in the U.S. and other
countries.
Finder is a trademark of Apple Computer, Inc. AppleCare
is a service mark of Apple Computer, Inc., registered in
the U.S. and other countries.
Dolby is a registered trademark of Dolby Laboratories.
Other company and product names mentioned herein
are trademarks of their respective companies. Mention
of third-party products is for informational purposes
only and constitutes neither an endorsement nor a
recommendation. Apple assumes no responsibility with
regard to the performance or use of these products.
Page 3

1
Contents
Preface 5 Introduction to Distributed Processing
6
Using Distributed Processing to Increase Speed and Efficiency
7
Basic Components of the Apple Qmaster Distributed Processing System
8
Clients
8
Clusters
9
QuickClusters
9
How the Apple Qmaster System Distributes Batches
11
About the Distributed Processing Setup Guide
12
Apple Websites
12
12
12
Compressor and Shake Websites
AppleCare Service and Support Website
Other Apple Websites
Chapter 1 15 Getting Started Quickly
15
Quick and Easy Distributed Processing
Chapter 2 21 Preparing a Network for Distributed Processing
21
The Minimum You Need to Know
22
22
23
24
25
26
27
Example of a Minimal Distributed Processing Network
Using One Computer to Serve Two Distributed Processing Roles
Other Possible Components of a Distributed Processing Network
Example of an Expanded Distributed Processing Network
Sample Setup for Part-Time Processing on Desktop Computers
Configuring Access for Part-Time Distributed Processing
Additional Steps For Part-Time Distributed Processing With Shake
Chapter 3 29 The Interfaces
30
The Interfaces in the Apple Qmaster Distributed Processing System
31
Apple Qmaster Pane in System Preferences
33
Apple Qadministrator
35
Client Interfaces: Compressor and Apple Qmaster
36
36
37
Using Compressor
Using Apple Qmaster
Batch Monitor
3
Page 4

Chapter 4 39 Creating and Administering Clusters
40
An Overview of Configuring a Cluster
40
Configuring Service Nodes and Cluster Controllers
41
42
43
45
46
48
50
50
51
54
55
56
57
57
58
59
60
60
61
Configuring Service Node Processing
Options in the Apple Qmaster Pane in System Preferences
Managed Vs. Unmanaged Services
Turning Cluster Controller Services On or Off
Making the Most of Multi-processor Computers
Creating Clusters With Apple Qadministrator
About QuickClusters
Creating QuickClusters
Advanced Settings in the Apple Qmaster Preferences Pane
Modifying and Deleting Clusters With Apple Qadministrator
Monitoring Cluster Activity
Setting Cluster Preferences
Setting Passwords and Scratch Storage
Setting Cluster Administrator and User Passwords
Setting a Service Password for Including a Computer in a Cluster
Cluster Storage: Setting a Scratch Storage Location
Recovery and Failure Notification Features
Recovery Features
Failure Notification
Appendix 63 Command-Line Usage
63
64
64
66
68
Installing Apple Qmaster from the Command Line
Shell Commands for Configuring Service Nodes and Cluster Controllers
Shell Commands for Submitting Compressor Jobs
Shell Commands for Submitting Apple Qmaster Jobs
Shell Commands for Monitoring Batches
Index 71
4
Contents
Page 5

Introduction to Distributed Processing
Rendering a series of large files on one desktop computer
is processing intensive and time consuming. You can
increase speed and productivity by distributing
processing across multiple computers.
High-volume processing is sometimes addressed by carefully managing multiple
computers; technicians set up batches of processing tasks for each computer, and then
monitor their progress, collect and route the processed files, and start over again with
new batches. While this is an improvement over the single-computer method, the
resource and process management can be laborious and slow.
The Apple Qmaster distributed processing engine provides a more efficient solution,
handling all the work distribution and processing for you, behind the scenes.
Apple Qmaster and the Apple Qmaster features of Compressor 2 manage the
processing across designated computers. They subdivide the work for speed, route
the work to the computers with the most available computing power, and direct
the processing.
Preface
5
Page 6
Using Distributed Processing to Increase Speed and Efficiency
Distributed processing
computers that have been chosen to provide more processing power. You can submit
batches of processing jobs to Apple Qmaster, which allocates those jobs to other
computers in the most efficient way (described in more detail in “How the
Apple Qmaster System Distributes Batches” on page 9).
Computers that submit batches to the Apple Qmaster distributed processing system
are called
clients.
a Shake file, or other file or commands, that use UNIX commands to specify settings
such as rendering instructions and file locations and destinations.
accelerates processing by distributing the work to multiple
A
job
is a processing task such as a Compressor preset-source pair, or
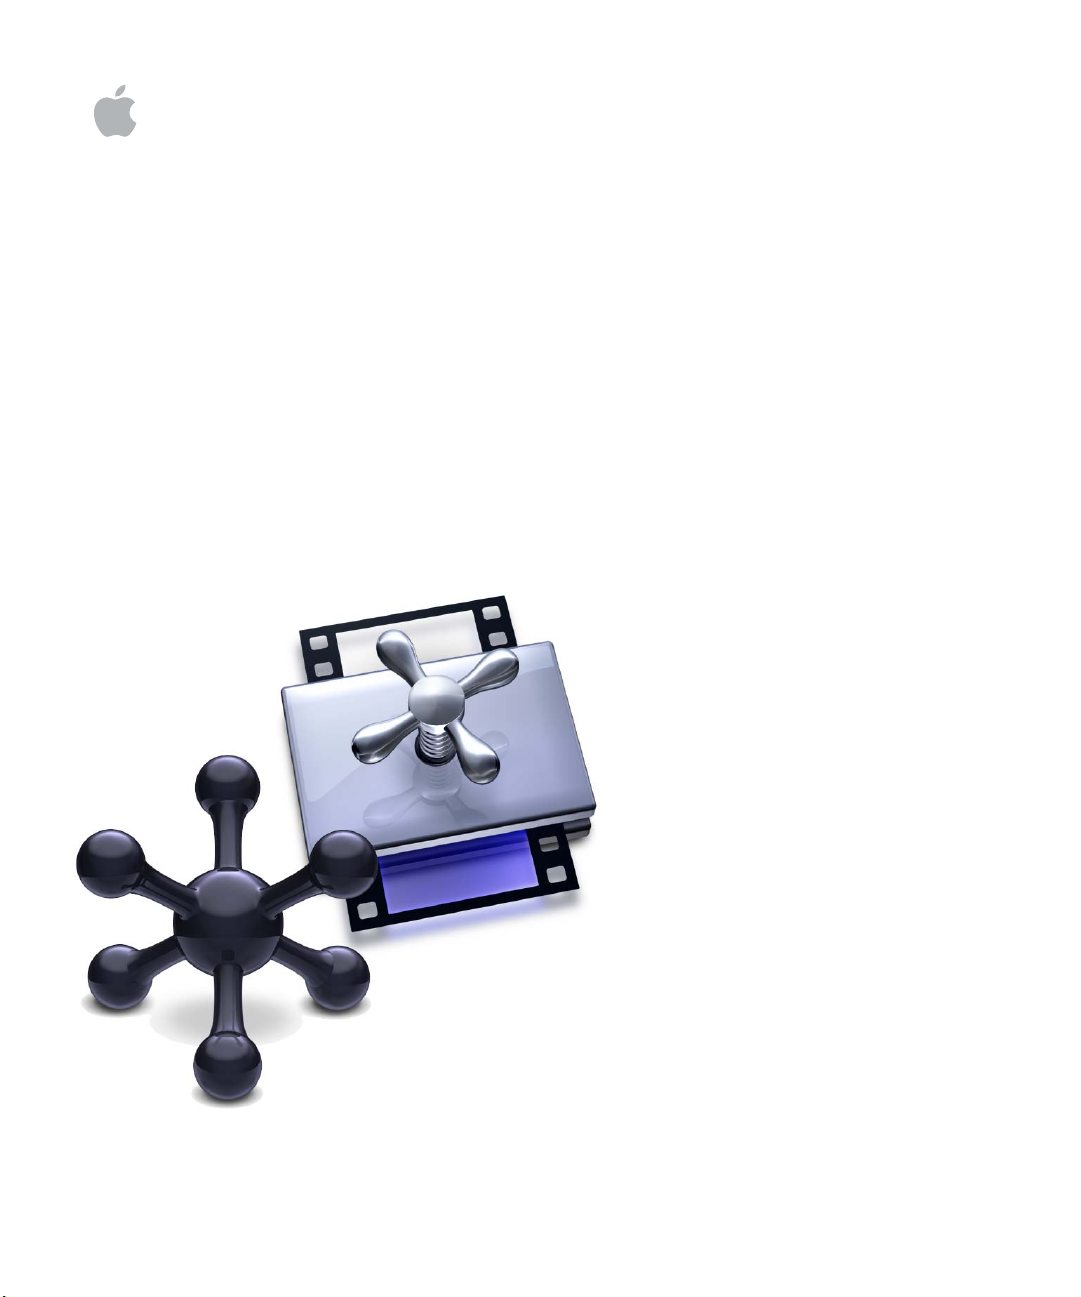
Batch of
processing jobs
Client computer
Jobs are submitted.
A
batch
is one or more jobs submitted for processing at one time. The procedure is
Apple Qmaster cluster
Processing is
performed by cluster.
Processing
files
Destination folder
Files are placed at
specified destination.
analogous to printing multi-page documents from a word processing program; the files
are spooled and processed in the background. Although a batch can include just one
job, you will typically want to submit several jobs at once for processing. Similarly,
several people can use the same Apple Qmaster system at the same time, with several
client computers sending batches in the same time frame. Batches are managed and
distributed by the computer that is designated as the Apple Qmaster
cluster controller,
which is described in the next section.
6 Preface
Introduction to Distributed Processing
Page 7
Basic Components of the Apple Qmaster Distributed Processing System
While the Apple Qmaster software includes a few different applications (see Chapter 3,
“The Interfaces,” on page 29), as a whole it is part of a networked system that includes
the following basic components:
Â
Client(s):
submit jobs for distributed processing. Applications that can use Apple Qmaster
services for processing include Compressor 2, Shake, Alias Maya, and many UNIX
command-line programs.
Â
Apple Qmaster cluster,
Â
Â
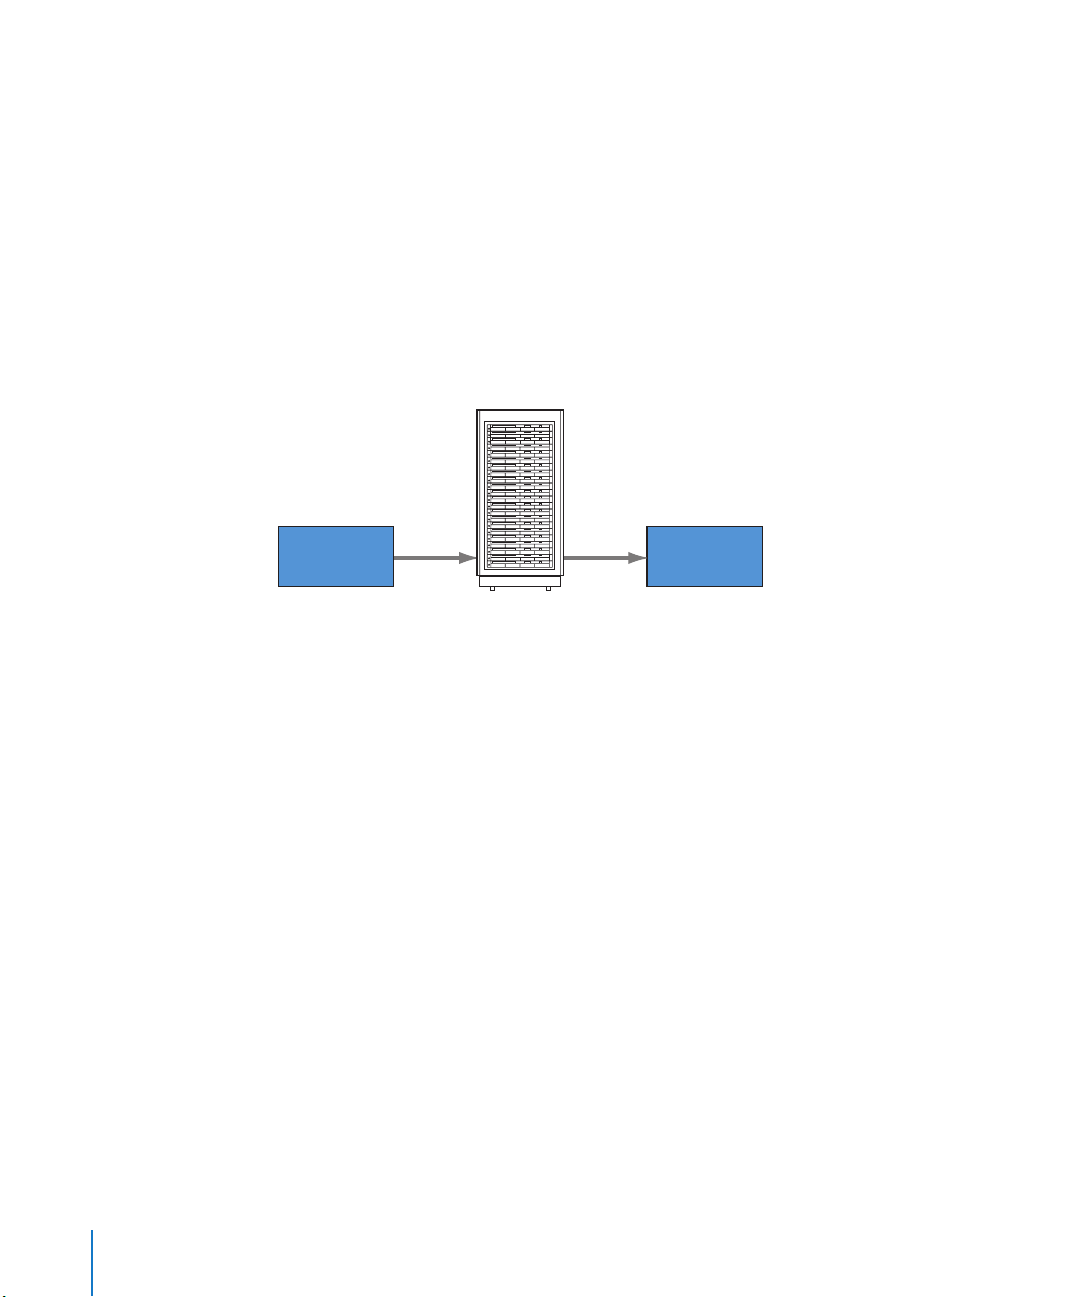
The computer or computers that use Compressor or Apple Qmaster to
which contains:
Service nodes:
The computers that perform the processing of batches submitted
via Compressor or Apple Qmaster. A batch can include one or more jobs.
Cluster controller:
The software, enabled on a computer by means of the
Apple Qmaster pane in System Preferences, that divides up batches, determines
which service nodes to send work to, and generally tracks and directs the processes.
Client computer
from which users work and
send jobs to the cluster
(can contain multiple service nodes, but only one cluster controller)
Cluster controller
manages the
distribution of
client’s jobs
across the cluster
Cluster
Service node
processes jobs
Service node
processes jobs
Service node
processes jobs
Service node
processes jobs
The client computer, the service nodes, and the cluster controller are often on separate
(but network-connected) computers, for the most rapid processing potential. However,
the cluster controller could be on a client computer or a service node. See “Using One
Computer to Serve Two Distributed Processing Roles” on page 22 for more information
on this scenario.
Following is a closer look at the part each component plays in the Apple Qmaster system.
Preface
Introduction to Distributed Processing
7
Page 8

Clients
Batches are submitted for distributed processing from the
computer can be any computer that has Compressor 2 or Apple Qmaster installed and is
on the same network (subnet) as the cluster controller. Multiple client computers can be
on the same subnet, using the same cluster to do the processing for various applications.
You use Compressor 2 or the Apple Qmaster application to submit batches to be
processed for a client. See the
User Manual
for details on using these applications.
Compressor 2 User Manual
client computers.
and the
Apple Qmaster 2
A client
Clusters
When a client sends batches to the Apple Qmaster distributed processing system, all
the processing and subsequent moving of any output files is performed by a group of
Apple Qmaster–configured computers called a
clusters of service nodes, with one cluster controller included in each cluster. Each
computer in the cluster is connected to the other computers in the cluster through a
network connection.
Example of a cluster
cluster.
You can create one or more
Cluster
controller
Note:
are described in Chapter 2, “Preparing a Network for Distributed Processing.”
8 Preface
Service
node
Service
node
Service
node
This illustration provides only one simple example of a cluster. Other possibilities
Introduction to Distributed Processing
Page 9

Service Nodes
The service nodes are where the processing work is done. When you assign a group of
service nodes to a cluster, they function as one very powerful computer because all
their resources are shared. If one service node is overloaded or otherwise inaccessible,
another service node is used.
You make a computer available as a service node by configuring it in the
Apple Qmaster pane in System Preferences. The simple steps involved in using System
Preferences to configure a service node are described in Chapter 4, “Creating and
Administering Clusters,” on page 39.
Note:
The terms
document. The term
Shake, and other frame-based rendering applications) and encoding (or transcoding or
compression) for Compressor. For more information see the
the
Compressor 2 User Manual.
Cluster Controllers
The cluster controller software acts as the manager of a cluster. The cluster controller
directs the distribution of batches within the cluster. It has the ability to determine the
best use of the cluster resources based on work and availability variables. (See “How
the Apple Qmaster System Distributes Batches,” next, for more details.) The cluster
controller is responsible for accepting batch submissions, maintaining and managing
the batch queue, and doling out the work to the appropriate service node. It also tracks
the status of all outstanding batches.
processing
processing
and
rendering
is used here generically to cover both rendering (for
will come up frequently as you read this
Shake 4 User Manual
and
You make a computer available as a cluster controller by turning on the clustercontrolling service in the Apple Qmaster pane in System Preferences.
QuickClusters
The QuickCluster feature of the Apple Qmaster distributed processing system is a
simple and automated alternative to creating and configuring clusters manually. For
more information about QuickClusters, see “Creating QuickClusters” on page 50.
How the Apple Qmaster System Distributes Batches
The Apple Qmaster cluster controller determines the most efficient use of the cluster
resources. It makes this determination based on the availability of each service node
and the number of separable parts (described next) of the batch.
Because Apple Qmaster subdivides individual batches across different service nodes,
the work is shared and completed more quickly. And, because this method uses all the
service nodes as much as possible, you avoid under-utilizing your resources.
Preface
Introduction to Distributed Processing
9
Page 10
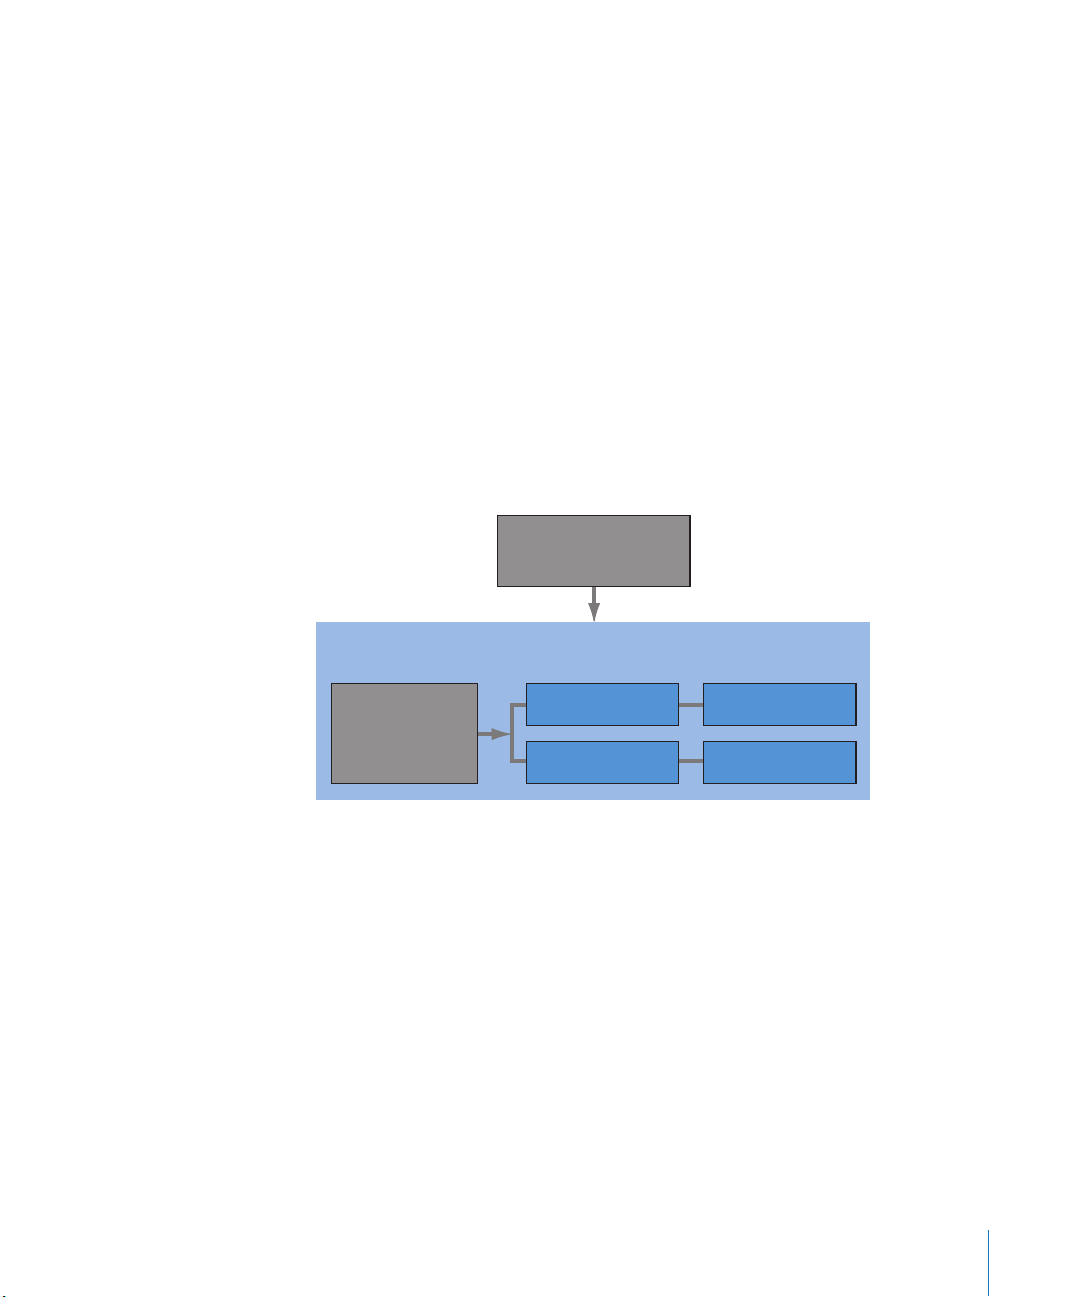
Batches can be distributed to a cluster by the cluster controller in one or both of the
following ways. (Apple Qmaster determines which way is the most efficient for specific
batches, depending on the circumstances.)
Â
The batch is subdivided into data segments:
cluster controller could divide the frames into groups (
For example, for a render batch, the
segments
). Each segment
would be processed in parallel on the service nodes in the cluster.
Â
The batch is subdivided into tasks:
For example, for a render batch, the cluster
controller could subdivide the rendering work into different processing tasks.
Different tasks would be run on different service nodes.
Rather than actually moving segments, Apple Qmaster tells the service nodes which
segments to read via the network, where to find them, and what to do with them.
Below is an example of how one batch could be processed in an Apple Qmaster system.
Batch submitted
by Compressor or
Apple Qmaster
Job request
for frames 1–30
Cluster controller
divides and distributes
job to available
service nodes
Instructions specifying
locations of source files
and frames 01–10
In distributing batches, Apple Qmaster uses the technology built in to Mac OS X to
locate services in a cluster on the same IP subnet and to dynamically share and receive
information. Because the computers can continually transmit their current processing
availability status, Apple Qmaster can distribute (load-balance) the workload evenly
across the cluster.
10 Preface
Instructions specifying
locations of source files
and frames 11–20
Service node 1
Introduction to Distributed Processing
Service node 2
Processed files
placed in specified
destination
Instructions specifying
locations of source files
and frames 21–30
Service node 3
Page 11

About the Distributed Processing Setup Guide
The background information that introduces most of the basic concepts and terms
related to using the Apple Qmaster distributed processing system is contained in this
preface: “Introduction to Distributed Processing.”
 Chapter 1, “Getting Started Quickly,” on page 15, gets you going with a few very
simple steps.
 Chapter 2, “Preparing a Network for Distributed Processing,”on page 21, will help you
make sure that the network part of your Apple Qmaster system is ready.
 Chapter 3, “The Interfaces,” on page 29, introduces each of the applications and
utilities included with the Apple Qmaster distributed processing software, and
describes when you need to use each of them.
 Chapter 4, “Creating and Administering Clusters,” on page 39, tells you how to
configure and administer the clusters, and how to submit and monitor the batches
that you want to have processed by the clusters.
 The Appendix, “Command-Line Usage,” on page 63, explains how you can use the
distributed processing system entirely from the command line.
While all of the chapters should be useful to administrators, client users may only need
to refer to the Compressor 2 User Manual or the Apple Qmaster 2 User Manual, and
possibly to the introductory information in this preface, to understand how to use the
Apple Qmaster distributed processing system for their purposes.
To access the Distributed Processing Setup guide:
m Choose Help > Distributed Processing Setup.
You can also choose either Help > Apple Qmaster User Manual or Help > Compressor
User Manual.
Each user manual contains a homepage that provides quick access to various features,
including Late-Breaking News.
Additionally, a comprehensive bookmark list allows you to quickly choose what you
want to see and takes you there as soon as you click the link.
In addition to these navigational tools, the Help documentation gives you other means
to locate information quickly:
 All cross-references in the text are linked. You can click any cross-reference and jump
immediately to that location. Then, you can use the navigation Back button to return
to where you were before you clicked the cross-reference.
 The table of contents and index are also linked. If you click an entry in either of these
sections, you jump directly to that section of Help.
 You can also use the Find dialog to search the index or text for specific words
or phrases.
Preface
Introduction to Distributed Processing
11
Page 12

Apple Websites
There are a variety of Apple websites that you can visit to find additional information.
Apple Qmaster, Compressor, and Shake Websites
To access the Apple Qmaster support page, go to:
Â
http://www.apple.com/support/appleqmaster
To access the Compressor website, go to:
Â
http://www.apple.com/finalcutpro/compressor.html
To access the Compressor support page, go to:
Â
http://www.apple.com/support/compressor
To access the Compressor discussion page, go to:
Â
http://discussions.info.apple.com/compressor
To access the Shake website, go to:
Â
http://www.apple.com/shake
To access the Shake support page, go to:
Â
http://www.apple.com/support/shake
AppleCare Service and Support Website
For software updates and answers to the most frequently asked questions for all Apple
products, go to:
Â
http://www.apple.com/support
You’ll also have access to product specifications, reference documentation, and Apple
and third-party product technical articles.
Other Apple Websites
Start at the Apple homepage to find the latest information about Apple products:
Â
http://www.apple.com
QuickTime is industry-standard technology for handling video, sound, animation,
graphics, text, music, and 360-degree virtual reality (VR) scenes. QuickTime provides a
high level of performance, compatibility, and quality for delivering digital video. Go to
the QuickTime website for information on the types of media supported, a tour of the
QuickTime interface, and specifications:
Â
http://www.apple.com/quicktime
12 Preface
Introduction to Distributed Processing
Page 13

For information about seminars, events, and third-party tools used in web publishing,
design and print, music and audio, desktop movies, digital imaging, and the media arts
go to:
 http://www.apple.com/pro
For resources, stories, and information about projects developed by users in education
using Apple software, including Compressor, go to:
 http://www.apple.com/education
Go to the Apple Store to buy software, hardware, and accessories direct from Apple.
You can also find special promotions and deals that include third-party hardware and
software products:
 http://www.apple.com/store
Preface Introduction to Distributed Processing 13
Page 14

Page 15

1 Getting Started Quickly
The Apple Qmaster distributed processing system
has default settings that allow you to use distributed
processing immediately.
Whether you are using the distributed processing system for Compressor or
Apple Qmaster, you can get up and running quickly with the following steps.
Note: The Compressor 2 distributed processing feature is limited to computers that
have either Final Cut Studio or DVD Studio Pro 4 installed.
Quick and Easy Distributed Processing
The steps below describe the simplest and quickest way to start using
distributed processing.
1
Step 1: Install the software
Install the appropriate software on the computers you want to include in your
distributed processing network. Each computer in the network will require
Apple Qmaster 2 and/or Compressor 2 software.
15
Page 16

To install the software:
1 Make sure the client software is on at least one computer in your network.
In order to submit jobs and batches to the distributed processing system, you will
need to run client (submission) software (either Compressor or Apple Qmaster). If you
are reading this, you have probably already installed one or both of these. For further
information, see the installation booklet that came with either of these applications.
2 Install Apple Qmaster software on each computer you want to use for distributed
processing. (All computers must be on the same subnet.)
In most standard distributed processing networks, you will need to install
Apple Qmaster software on every computer in the network.
a Locate the folder containing the Apple Qmaster software:
 If you are using Compressor, insert the DVD Studio Pro 4 or the Final Cut Studio
installation disc and locate the “AppleQmasterNode.mpkg” installer package.
 If you are using Shake, insert the Shake 4 installation disc and locate the
“AppleQmasterNode.mpkg” installer package.
b Do one of the following:
 Double-click the “AppleQmasterNode.mpkg” installer package, and follow the
onscreen instructions. By default, this installer will install all the necessary
Apple Qmaster software. You may choose to customize the process by removing
either of the following from the installation: Apple Qmaster Applications (which
installs the Apple Qmaster application, Apple Qadministrator, and Batch Monitor)
or Apple Qmaster Services (which installs the Apple Qmaster pane in System
Preferences, necessary to create QuickClusters and/or service nodes).
 Install Apple Qmaster software from the command line. See “Installing
Apple Qmaster from the Command Line” on page 63 for more information.
Note: In order to use the Apple Qmaster distributed processing system to process
Dolby Digital Professional audio, each node (computer) in your distributed processing
network must have either Final Cut Studio or DVD Studio Pro 4 installed.
If you are unsure which role each computer will play in your network, just install the
Apple Qmaster software on each computer in your network. You can sort out the
details later. See “Basic Components of the Apple Qmaster Distributed Processing
System” on page 7 for additional information on what roles individual computers can
play in the distributed processing system.
Note: Shake users can create distributed processing clusters containing computers that
do not have any Apple Qmaster software installed. See the Apple Qmaster 2 User
Manual for more information.
16 Chapter 1 Getting Started Quickly
Page 17
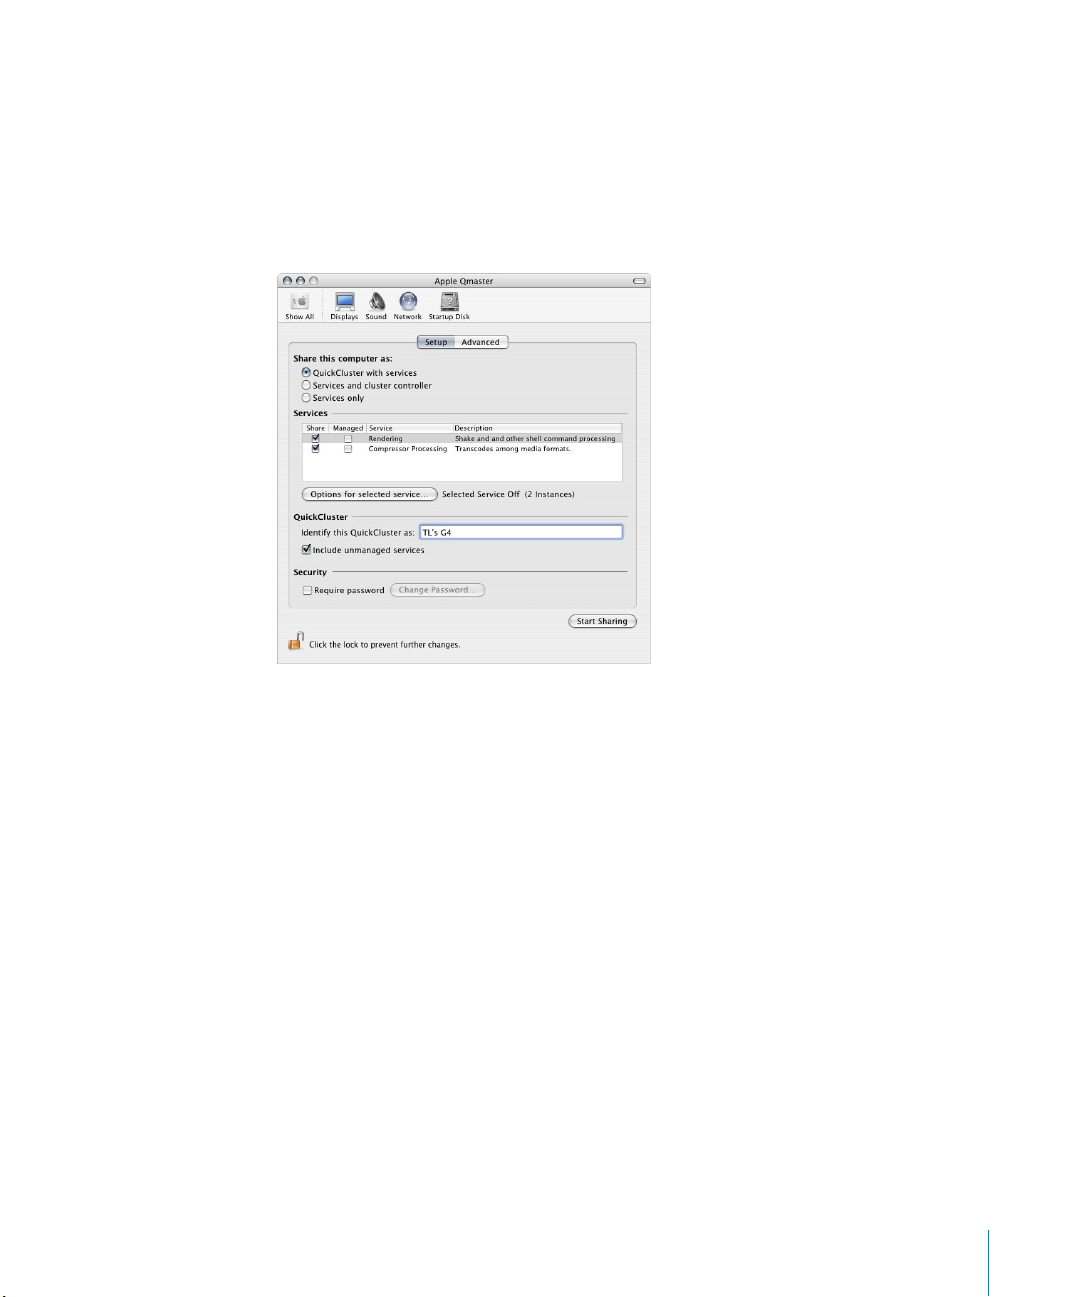
Step 2: Configure a QuickCluster
Use the Apple Qmaster pane in System Preferences to configure the cluster controller
and service node computers.
1 Open System Preferences.
2 Click the Apple Qmaster button, located in the Other section.
The Apple Qmaster pane appears.
3 If the pane is locked, unlock it by clicking the padlock in the lower-left corner to enter
the administrator name and password.
4 Click Start Sharing.
This creates a QuickCluster with this computer as its controller, and an instance of
processing services for each processor on the computer.
Chapter 1 Getting Started Quickly 17
Page 18

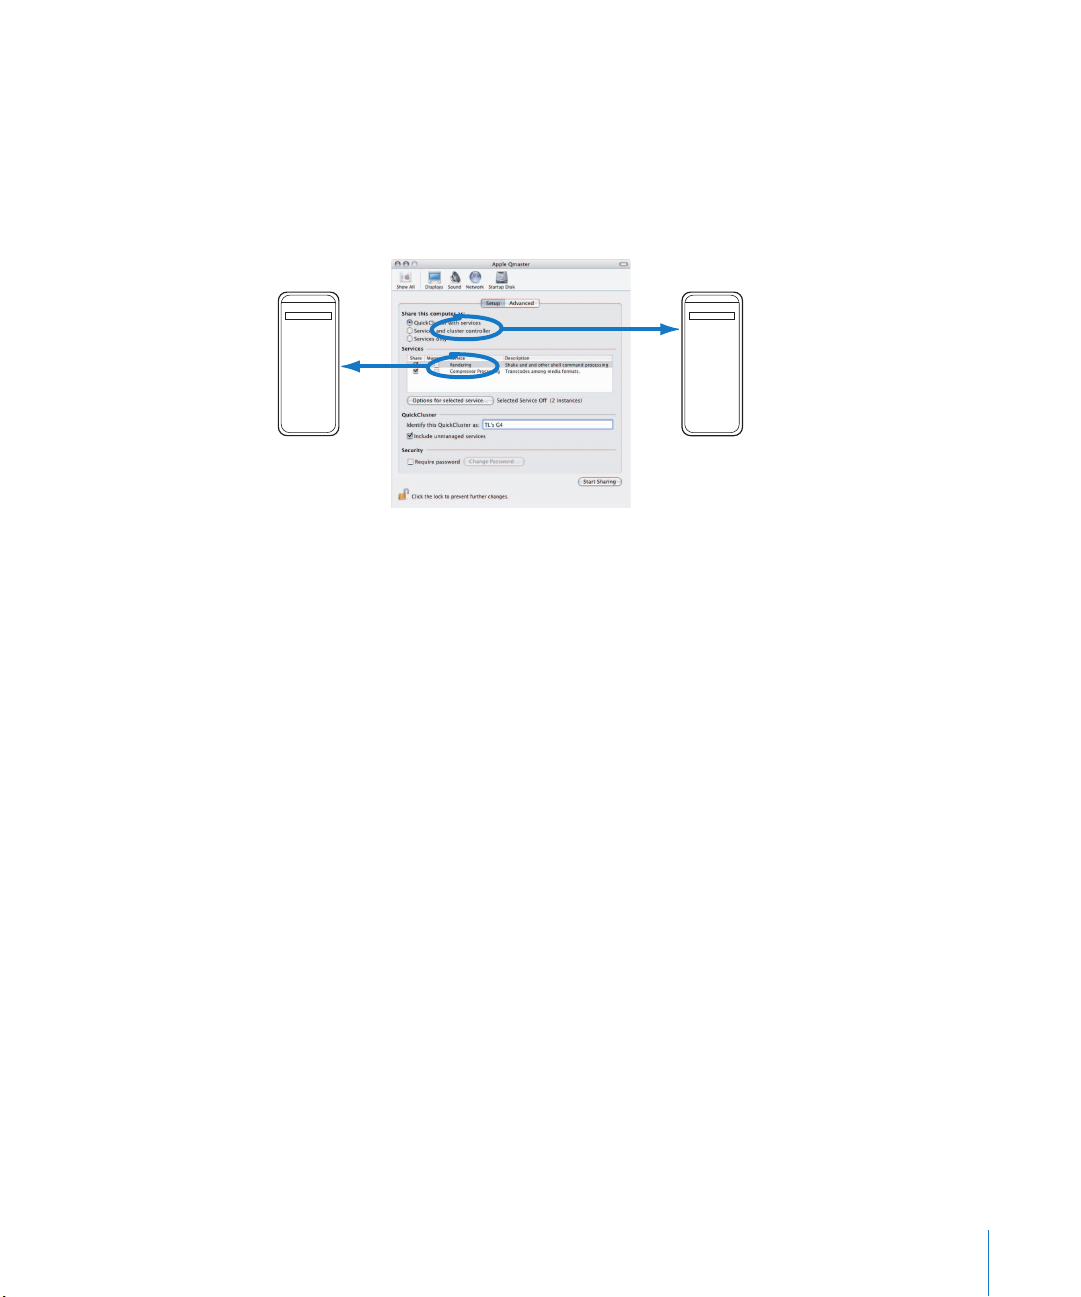
Step 3: Add service nodes to the cluster
On each computer that you would like to make a service node on your cluster, do
the following:
1 Open System Preferences.
2 Click the Apple Qmaster button, located in the Other section.
The Apple Qmaster pane appears.
3 If the pane is locked, unlock it by clicking the padlock in the lower-left corner to enter
the administrator name and password.
4 Click the Services Only radio button.
5 Click Start Sharing.
This creates a service node that will automatically process jobs submitted to the
QuickCluster you set up in “Configure a QuickCluster” on page 17.
Step 4: Create a batch
In the Compressor Batch window, or in the Apple Qmaster window, create a batch with
one or more jobs. See the Compressor 2 User Manual or the Apple Qmaster 2 User
Manual for details.
18 Chapter 1 Getting Started Quickly
Page 19
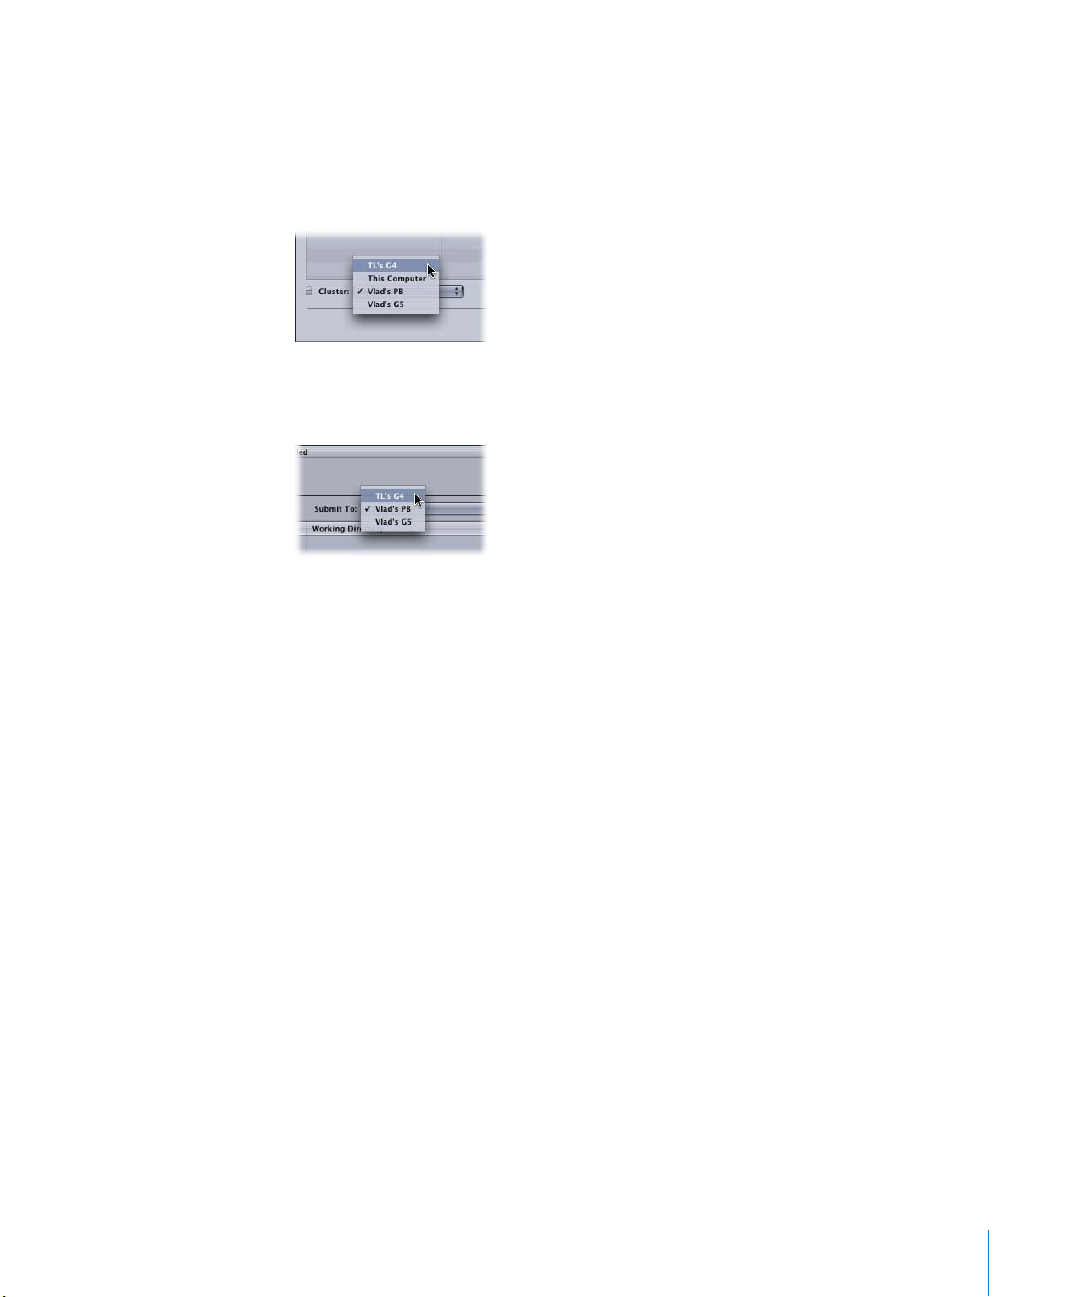
Step 5: Submit the batch
1 Depending on whether you are using Compressor or Apple Qmaster, do one of
the following:
 In the Compressor Batch window, click the Cluster pop-up menu and choose the
cluster you created in Step 2.
 In the Apple Qmaster window, click the Submit To pop-up menu and choose the
cluster you created in Step 2.
2 Click Submit.
The distributed processing system will now process the batch using the cluster you
created.
For more advanced information on creating and controlling clusters and services see
any of the following:
 “Basic Components of the Apple Qmaster Distributed Processing System” on page 7
 “Sample Setup for Part-Time Processing on Desktop Computers” on page 25
 “The Interfaces in the Apple Qmaster Distributed Processing System” on page 30
 “Apple Qmaster Pane in System Preferences” on page 31
 “Apple Qadministrator” on page 33
 “An Overview of Configuring a Cluster” on page 40
 “Configuring Service Nodes and Cluster Controllers” on page 40
 “Creating Clusters With Apple Qadministrator” on page 48
 “About QuickClusters” on page 50
 “Modifying and Deleting Clusters With Apple Qadministrator” on page 54
Chapter 1 Getting Started Quickly 19
Page 20

Page 21

2 Preparing a Network
for Distributed Processing
2
A distributed processing network can consist of as few as
one or two computers, while a high-volume network may
include many computers, an Xserve and Xserve cluster
nodes in a rack, and high-speed networking infrastructures.
You can scale up a distributed processing system as your workload demands by adding
features and devices to the network that supports it. This chapter helps you prepare
your network by describing the following:
 The Minimum You Need to Know (p. 21)
 Other Possible Components of a Distributed Processing Network (p. 23)
 Sample Setup for Part-Time Processing on Desktop Computers (p. 25)
The Minimum You Need to Know
The following are the basic rules for setting up a distributed processing network:
 A cluster must contain one (and only one) computer acting as the cluster controller,
and at least one computer acting as the service node. (These two can be the same
computer, as shown next in “Example of a Minimal Distributed Processing Network.”)
 The client computers and the computers in any cluster that supports them must be
on the same network.
 The network must support the Apple networking technology built in to Mac OS X.
 All the computers in a cluster need Read and Write access to any computers (or
storage devices) that will be specified as output destinations for files.
21
Page 22

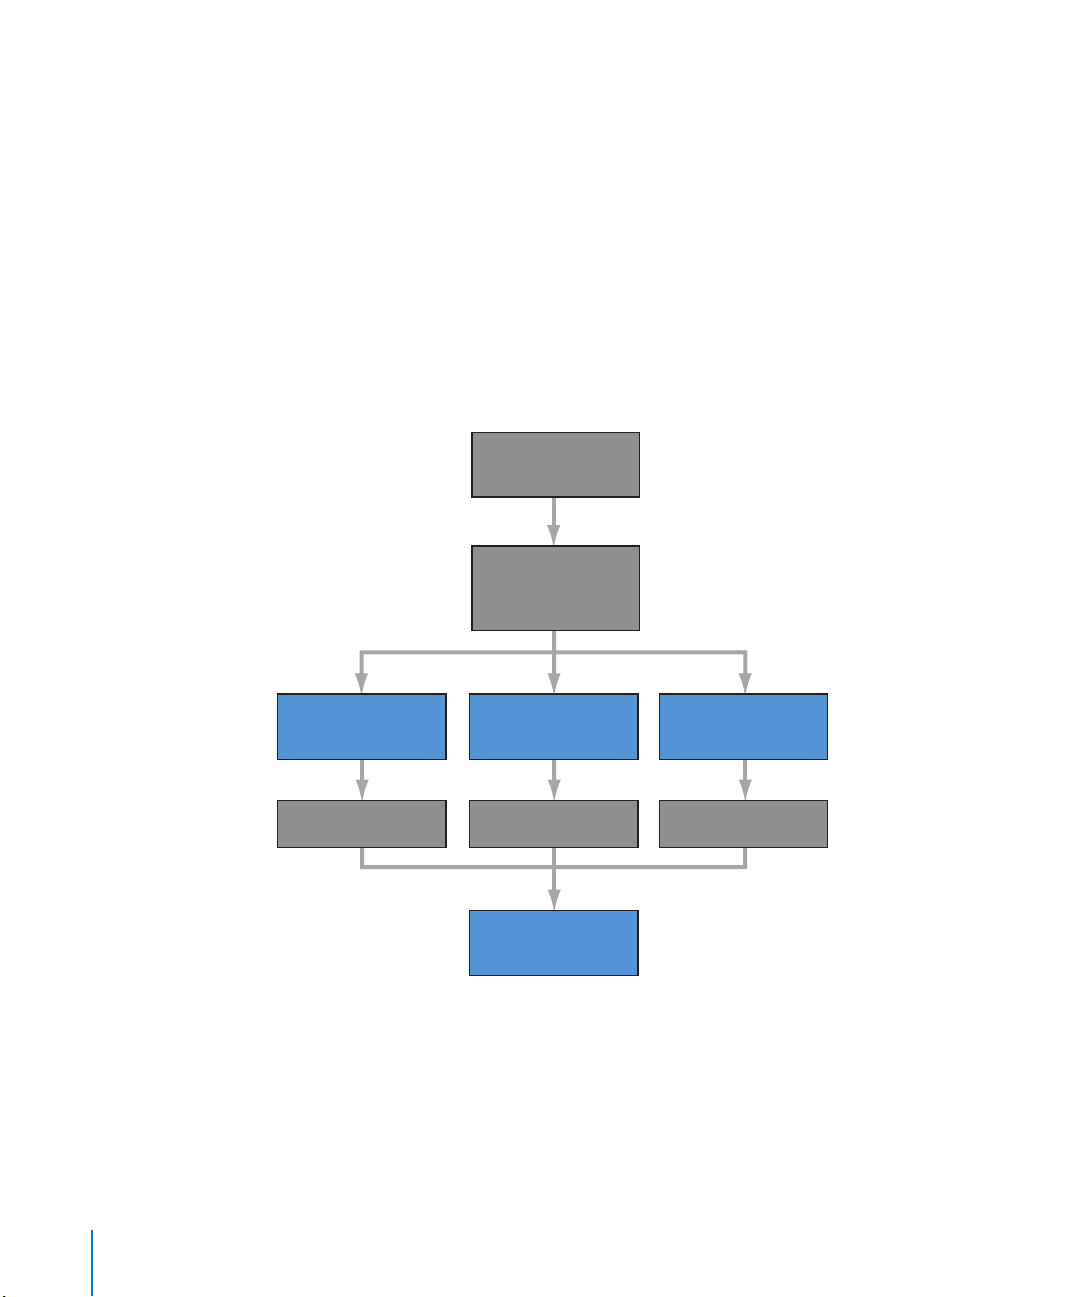
Example of a Minimal Distributed Processing Network
A very small distributed processing setup could include as few as two computers:
 One computer connected to the client and configured to act as both the service
node and the cluster controller
 One client computer
Minimum setup for distributed processing
Client
Service node with
cluster controller enabled
Though simple, this setup is useful in a small-scale environment because it allows the
client computer to off-load a lot of processing work.
See “Example of an Expanded Distributed Processing Network” on page 24 for an
illustration of a more powerful setup.
Using One Computer to Serve Two Distributed Processing Roles
To maximize your resources, you may want to consider using some computers for
more than one distributed processing function.
 Service node and cluster controller: In a small setup, one of the service nodes in a
cluster can also act as the cluster controller so that it performs both functions.
However, in a cluster of many service nodes, the processing load required for the
cluster controller could be so high that it would not be efficient to use one
computer as both a service node and a cluster controller.
 Client computer and cluster controller or service node: You could also set up a client
computer to act as a cluster controller or service node in a cluster, but again, keep
in mind that the more available processing power a computer has, the faster it can
manage or process jobs.
22 Chapter 2 Preparing a Network for Distributed Processing
Page 23

Other Possible Components of a Distributed Processing Network
There are many ways to expand the capacity of a distributed processing network. You
could include any of the following:
 High-speed switch and cables: A 100BaseT or Gigabit Ethernet switch and compatible
cables to allow your data to move over the LAN at maximum speed.
 Multiple clients: Multiple client computers can use the services of the same cluster.
And, you can have multiple client applications on the same client computer, using
the same cluster.
 Multiple clusters: Depending on how extensive your network is and how many clients
it needs to serve, you may want to divide up available computers and create more
than one cluster to serve various clients. (Users select the cluster they want to send a
batch to when they submit the batch.)
 Multiple service nodes: In general, more service nodes means more processing power.
In deciding how many service nodes to have in a cluster, consider the ratio of data
movement time to computing time. If the processing demand is greater than the
network demand required to move job segments throughout the cluster, as is the
case with rendering, more service nodes are a good idea. If the computing load, per
job, is closer to the network load, having a smaller number of service nodes per
cluster may be more efficient. If you are using the Apple Qmaster distributed
processing system with applications other than Shake or Compressor, consult the
application’s user manual on how to optimize the number of service nodes.
 Storage device: A storage device, such as a remote disk or group of disk arrays, can be
used as cluster scratch storage, which is a place for short-term storage of temporary
data generated by the cluster controller, clients, and service nodes. (You set the
scratch storage location in the Apple Qmaster pane in System Preferences. See
“Cluster Storage: Setting a Scratch Storage Location” on page 59.) Alternatively, a
storage device can be used as a final destination for the files after they are processed.
Many of these items are incorporated in the example that follows.
Chapter 2 Preparing a Network for Distributed Processing 23
Page 24

Example of an Expanded Distributed Processing Network
For rendering, a network might include a number of client computers on a LAN,
connected to a cluster using a high-speed switch. A rack of servers plus a shared
storage device, acting as the cluster, would be an extremely strong rendering engine.
The service nodes would each have a local copy of the relevant client application
software so that they could process the rendering jobs.
Example of a network setup for distributed rendering
Client Client Client Client
LAN
High-speed switches (chained together)
Rack of servers containing
cluster controller and service nodes,
plus rack-mounted shared storage device
24 Chapter 2 Preparing a Network for Distributed Processing
Page 25

Sample Setup for Part-Time Processing on Desktop Computers
This section takes you through the basic steps involved in a sample setup for “part-time”
distributed processing. You can use it to get an idea of the kind of distributed processing
environment you want to create, and as a guide in setting up that environment.
This setup is for an environment that uses desktop computers. It is called “part-time”
processing because each computer acts as someone’s workstation, but at the same
time is also part of the distributed processing cluster. The bulk of the processing jobs
can be submitted with Compressor or Apple Qmaster at the end of the day, so that the
computers are busy processing a large queue of distributed processing batches after
everyone has gone home. (See “Advanced Settings in the Apple Qmaster Preferences
Pane” on page 51 for information on scheduling service node availability.)
FireWire
drive
FireWire
drive
Network
FireWire
drive
Each computer acts as:
A client that submits jobs for processing
•
A service node that performs the processing
•
All source and output files are stored on the FireWire drives.
FireWire
drive
FireWire
drive
In this sample setup, as shown above, five computers act as both the clients (user
workstations from which users submit jobs for distributed processing) and cluster
computers (which do the processing). Each computer has an additional volume, such
as a FireWire drive, that is used for media before and after it is rendered, and for the
associated files.
Chapter 2 Preparing a Network for Distributed Processing 25
Page 26

The steps that follow describe how to configure this desktop distributed processing
environment. Before you get started, keep these essentials in mind:
 The cluster computers (cluster controller and service nodes) and the client
computers (user workstations) need to be on the same local network (subnet).
 All the computers in the setup need Read and Write access to any volumes that will be
specified as the source location or output destination for files, including Shake scripts.
(An appropriate way to configure this access is included in the sample steps below.)
Configuring Access for Part-Time Distributed Processing
Step 1: Install Compressor 2 and/or Apple Qmaster
The necessary components of Compressor 2 or Apple Qmaster need to be installed on
each computer. See “Install the software” on page 15 for more information.
Important: The Compressor 2 distributed processing feature is limited to computers
that have either Final Cut Studio or DVD Studio Pro 4 installed. Previous versions of
Compressor are not enabled for distributed processing.
Step 2: Make sure each computer has a volume dedicated to media
Make sure each computer has the necessary available storage, preferably a dedicated
media volume. For example, give each computer a second volume, such as a FireWire
drive, that is used for media. Each computer can use this volume for all source and
destination files associated with distributed processing.
If you are a Compressor user, you can skip to one of the following chapters to complete
the setup of your part time distributed processing system:
 Chapter 1, “Getting Started Quickly,” on page 15
 Chapter 4, “Creating and Administering Clusters,” on page 39
If you are a Shake user and you cannot consolidate all of the necessary source files (Shake
scripts, media files, etc.) on a single-cluster storage volume, skip to “Additional Steps For
Part-Time Distributed Processing With Shake” on page 27 before going on to Step 3.
Step 3: Create a cluster
First, use the Apple Qmaster pane in System Preferences to enable cluster controlling
on one of the computers and enable the processing services on all the computers
(making them service nodes). Then, you can assemble these computers as a cluster.
Apple Qadministrator may not be necessary. See Chapter 4, “Creating and
Administering Clusters,” on page 39, for detailed instructions.
26 Chapter 2 Preparing a Network for Distributed Processing
Page 27

Additional Steps For Part-Time Distributed Processing With Shake
The following additional steps may be necessary for Shake users who cannot
consolidate all of the necessary source files (Shake scripts, media files, etc.) on a single
cluster storage volume.
Step 1: Turn off the UNC (Universal Naming Convention) setting for Shake
To make sharing and volume mounting work smoothly in this setup, you need to turn
off the Shake UNC setting on each computer. The UNC setting uses the entire file
pathname, with the network address, in a convention that starts with
//ComputerName/DriveName/path. You don’t want Shake to use this filenaming
convention because it conflicts with the file sharing and volume mounting used
in this setup.
Note: All the media volumes created in Step 2 of “Configuring Access for Part-Time
Distributed Processing,” above, should have the same name.
The Shake startup .h file
In the three steps below, you make this change in a Shake startup .h file. As described
in the Shake documentation, the startup .h files, located in the startup directory, are
used to customize Shake settings (similar to setting preferences).
To turn off the UNC setting, do the following on each of the computers:
1 Log in as the user who will use Shake on the computer.
2 Double-click the Terminal icon in /Applications/Utilities to open a Terminal window.
3 Enter these two command lines in the Terminal window, pressing Return after each
command line:
mkdir -p ~/nreal/include/startup/
echo 'script.uncFileNames = 0;' > ~/nreal/include/startup/UNC_off.h
Step 2: Turn Personal File Sharing on
On each computer, open System Preferences, click Sharing, and turn on Personal File
Sharing. This allows the computers to share the media volumes.
Step 3: Mount all the media storage volumes
On each computer, log in as the administrator. (The first user account you create when
you set up Mac OS X is an administrator account.) Then, on each computer in the
group, use the Connect to Server command in the Finder’s Go menu to mount each
media volume.
On each computer, you need to:
 Enter another computer’s name in the Connect to Server dialog.
 Choose the associated media volume (FireWire drive) as the volume you want to mount.
Do this until all the computers are mounting all the media volumes in the cluster.
Chapter 2 Preparing a Network for Distributed Processing 27
Page 28

Submitting Processing Jobs in the Sample Part-Time
Distributed Processing Setup
After you finish the final step above, each one of these computers can be used to
submit jobs for distributed processing.
Important: Because of the way access has been configured in this setup, all file
pathnames are conveniently consistent and simple for the purposes of specifying them
in Compressor, in Shake scripts, and in Apple Qmaster, assuming that:
 Users place the source media on a mounted media volume (one of the FireWire drives).
 Users place the Shake scripts on a mounted media volume.
 All folders and files on the shared media volumes have Read and Write access
enabled for everyone (for Owner, Group, and Others). You can make this access
setting by selecting the folder or file and choosing File > Get Info.
The above three assumptions are important because they ensure that all the
computers have Read and Write access to all the source files and output destinations.
Specifying Media File and Script Locations
The following additional configuration guidelines apply to anyone using Shake (or any
other UNIX-based rendering applications).
Specifying the Media File Locations in Shake Scripts
In the above setup, all the Shake render scripts should specify their source media
(File In) locations and output (File Out) destinations as: /Volumes/MediaDiskName.
For example: /Volumes/Media3.
Specifying Shake Script Locations in Apple Qmaster
In the above setup, all the Shake script locations should be specified in Apple Qmaster
as: /Volumes/MediaDiskName/ScriptFilename.
For example: /Volumes/Media3/Script.shk.
28 Chapter 2 Preparing a Network for Distributed Processing
Page 29

3 The Interfaces
Instead of one individual interface, the Apple Qmaster
distributed processing system includes up to four
different applications and utilities for configuring,
monitoring, and managing services.
This chapter introduces the following elements of the Apple Qmaster distributed
processing system:
 The Interfaces in the Apple Qmaster Distributed Processing System (p. 30)
 Apple Qmaster Pane in System Preferences (p. 31)
 Apple Qadministrator (p. 33)
 Client Interfaces: Compressor and Apple Qmaster (p. 35)
 Batch Monitor (p. 37)
3
29
Page 30

The Interfaces in the Apple Qmaster Distributed Processing System
The Apple Qmaster system is a suite of applications that work together to provide
maximum power and flexibility for distributed processing. The elements of the system
can be combined in a variety of different ways to suit your needs.
In general, you use the Apple Qmaster pane in System Preferences to configure service
nodes and cluster controllers, and to create simple clusters. System administrators use
Apple Qadministrator for advanced cluster creation and control. Next, client users use
Compressor or Apple Qmaster to submit batches of jobs for processing. Then, the
Batch Monitor can be used by both administrators and client users to monitor batches.
System Preferences
Users: Administrators
Use to: Create service nodes and
cluster controllers
Batch Monitor
Users: Administrators and client users
Use to: Monitor batches that have
been sent to clusters
Apple Qadministrator
Users: Administrators
Use to: Assemble clusters of service nodes
and cluster controllers
QuickCluster
Compressor or Apple Qmaster
Users: Client users
Use to: Submit jobs to clusters for processing
Note: It is possible to create a simple (personal) distributed processing system and skip
Apple Qadministrator altogether. See “Apple Qmaster Pane in System Preferences”
(next) and “About QuickClusters” on page 50 for more information.
30 Chapter 3 The Interfaces
Page 31
Apple Qmaster Pane in System Preferences
Use the Apple Qmaster pane in System Preferences to activate, create, or make changes
to Apple Qmaster cluster-controlling and processing services (including passwords and
scratch storage locations).
Use Apple Qmaster System Preferences to configure service nodes
and cluster controllers:
Service
node
Cluster
controller
For details about using the Apple Qmaster pane in System Preferences, see:
 “Configuring Service Nodes and Cluster Controllers” on page 40
 “Making the Most of Multi-processor Computers” on page 46
 “Setting a Service Password for Including a Computer in a Cluster” on page 58
 “Cluster Storage: Setting a Scratch Storage Location” on page 59
Also see the Apple Qmaster 2 User Manual for more information, including creating an
extended node cluster which uses nodes without Apple Qmaster installed.
Chapter 3 The Interfaces 31
Page 32

To open the Apple Qmaster pane in System Preferences:
1 Open System Preferences.
2 Click the Apple Qmaster button, located in the Other section.
The Apple Qmaster pane appears.
32 Chapter 3 The Interfaces
Page 33

Apple Qadministrator
Use the Apple Qadministrator application to create and modify Apple Qmaster
clusters. Apple Qadministrator can be used on any computer that is on the same
network as the cluster you want to administer. With the administrative password (if
one was created), you can also use Apple Qadministrator to see and modify existing
clusters on the network.
Use Apple Qadministrator to assemble clusters:
Drag available service
nodes to assign them
to a cluster.
For details about using Apple Qadministrator, see:
 “Creating Clusters With Apple Qadministrator” on page 48
 “Modifying and Deleting Clusters With Apple Qadministrator” on page 54
 “Monitoring Cluster Activity” on page 55
 “Setting Cluster Preferences” on page 56
 “Setting Cluster Administrator and User Passwords” on page 57
Chapter 3 The Interfaces 33
Page 34

To open Apple Qadministrator:
m Double-click the Apple Qadministrator icon in the Applications folder.
The Apple Qadministrator window appears. If a password was created for the currently
selected cluster, you will not be able to see or modify the cluster until you click the
Lock button and then enter the password in the dialog that appears.
34 Chapter 3 The Interfaces
Page 35

Client Interfaces: Compressor and Apple Qmaster
Client computer users use either Compressor, or the interface called Apple Qmaster, to
submit batches for processing.
Batch Batch
Use Compressor to submit
a batch to a cluster:
Batch Batch
Cluster A
Network
Cluster B
Use Apple Qmaster to submit
a batch to a cluster:
Chapter 3 The Interfaces 35
Page 36

Using Compressor
Use the Cluster pop-up menu in the Compressor Batch window to choose a cluster for
any given batch. For more information on submitting batches with Compressor, see the
Compressor 2 User Manual.
To open Compressor:
m Double-click the Compressor icon in the Applications folder.
The Compressor default window layout appears.
Using Apple Qmaster
 For Shake processing batches, you can drag Shake files into the Apple Qmaster
window. A default script for submitting the jobs is automatically created. In
Apple Qmaster, you can then specify certain details, such as which cluster to use, and
make adjustments to certain settings.
 For Maya batches, there is also a special interface within Apple Qmaster for
submitting and customizing Maya jobs.
 You can use the Generic Render command in Apple Qmaster for the distributed
processing of projects from other frame-based rendering applications (such as After
Effects and LightWave).
For details about using Apple Qmaster, see the Apple Qmaster 2 User Manual.
36 Chapter 3 The Interfaces
Page 37

To open Apple Qmaster:
m Double-click the Apple Qmaster icon in the Applications folder.
The Apple Qmaster window appears.
Batch Monitor
As an administrator, you can use the Batch Monitor to track the progress of all the
batch activity for all the clusters on your network. You can see how close to completion
each job is, along with other details, and you can stop, resume, or delete batches as
well. If you are a client user, you can use the Batch Monitor to view and manage your
own batches.
Use the Batch Monitor to see information about batches
that have been sent to specified clusters:
Status of
batches
Cluster Cluster
Status of
batches
Network
For details about using the Batch Monitor, see the Batch Monitor User Manual.
Chapter 3 The Interfaces 37
Page 38

To open the Batch Monitor, do one of the following:
m Use the Batch Monitor that automatically opens after you submit a batch with
Compressor or Apple Qmaster.
m Double-click the Batch Monitor icon in the Utilities folder in the Applications folder.
m Click the Batch Monitor button in the Apple Qmaster window or in the Compressor
batch window.
m In Apple Qadministrator, choose Cluster > Show Batch Monitor.
The Batch Monitor appears. If you don’t see any batches in the cluster, and the lock
icon in the Lock button is closed, you need to click the Lock button and then enter the
cluster user password in the dialog that appears.
38 Chapter 3 The Interfaces
Page 39

4 Creating and
Administering Clusters
4
Once your network is set up and you have installed
the necessary components, you are ready to create
distributed processing clusters.
As the administrator of your distributed processing network, you can set a number
of cluster options and security controls. You may also want to know about failure
notification and recovery features.
This chapter covers the following:
 An Overview of Configuring a Cluster (p. 40)
 Configuring Service Nodes and Cluster Controllers (p. 40)
 Creating Clusters With Apple Qadministrator (p. 48)
 About QuickClusters (p. 50)
 Advanced Settings in the Apple Qmaster Preferences Pane (p. 51)
 Modifying and Deleting Clusters With Apple Qadministrator (p. 54)
 Monitoring Cluster Activity (p. 55)
 Setting Cluster Preferences (p. 56)
 Setting Passwords and Scratch Storage (p. 57)
 Recovery and Failure Notification Features (p. 60)
If you have questions about any concepts and terms used here, refer to the preface,
“Introduction to Distributed Processing” on page 5.
39
Page 40

An Overview of Configuring a Cluster
Assuming Apple Qmaster software is installed on all the computers that you plan to
use as part of the cluster, there are three basic steps involved in configuring a cluster.
Note: If you are an Apple Qmaster user and you want to create a cluster that includes
computers that do not have Apple Qmaster installed, see the Apple Qmaster 2 User
Manual for instructions.
Step 1: Configure service nodes
Configuring a service node to perform distributed processing is a matter of turning on
processing services in the Apple Qmaster pane in System Preferences. Optionally, you
can also set passwords at this time. See “Configuring Service Nodes and Cluster
Controllers,” below, for details.
Step 2: Configure a cluster controller
To configure a computer to control the cluster, turn on the cluster control services in
the Apple Qmaster pane in System Preferences. See “Turning Cluster Controller Services
On or Off” on page 45 for more information.
Step 3: Create a cluster
You can create a simple “QuickCluster” in the Apple Qmaster pane in System Preferences,
or you can create a “managed cluster” from the service nodes and cluster controller
using Apple Qadministrator. After a cluster is created, client applications on the same
network can start sending batches to the cluster. You can use Apple Qadministrator from
any computer (with Apple Qadministrator installed) that is on the same network as an
Apple Qmaster cluster. See any of the following for more details:
 “Getting Started Quickly” on page 15
 “Creating QuickClusters” on page 50
 “Creating Clusters With Apple Qadministrator” on page 48
Configuring Service Nodes and Cluster Controllers
Once service processing or cluster controlling is enabled on a computer, the computer
is advertised on the network as available to be used in a cluster.
There can only be one cluster controller in a cluster. However, a computer can be
designated as both a cluster controller and a service node (see “Using One Computer
to Serve Two Distributed Processing Roles” on page 22).
40 Chapter 4 Creating and Administering Clusters
Page 41

Configuring Service Node Processing
Use the Apple Qmaster pane in System Preferences or Apple Qadministrator to set
processing services on a computer.
To turn on processing services:
1
Open the Apple Qmaster pane in System Preferences.
2
Optionally, you can configure a number of settings before you turn on the processing
services. (See “
Note:
It’s easiest to do this now because you can’t make these settings when
processing services are enabled. To make these settings after services have been
enabled, you need to turn off the services, make the settings, and then turn the
services on again.
3
In the “Share this computer as” section, select one of the following buttons:
Â
“QuickCluster with services”
Â
“Services and cluster controller”
Â
“Services only”
4
In the Services section, do one of the following:
Â
In the Share column, select the checkbox for Compressor Processing (for Compressor
services).
Â
In the Share column, select the checkbox for Rendering (for Apple Qmaster services).
5
Click Start Sharing.
The processing service is enabled, making this computer a service node that can
process batches.
Options in the Apple Qmaster Pane in System Preferences” on page 42.)
Chapter 4
Creating and Administering Clusters
41
Page 42

Options in the Apple Qmaster Pane in System Preferences
You can configure any of the following settings before you turn on processing
services. (In order for you to change any of the following settings, processing services
must be turned off.)
Setting the Name
By default, a computer is identified on the network by its computer name (as it is
entered in the Sharing pane in System Preferences). You can change this name to
something more meaningful if you like, since it is the name used to identify this
computer in the Apple Qmaster distributed processing system. If you are setting up
a QuickCluster, this is the name that will appear in the Compressor Cluster pop-up
menu or the Apple Qmaster Submit To pop-up menu. If you are setting up a
managed cluster controller, this is the name that will appear in the
Apple Qadministrator Controller pop-up menu.
 If you are setting up a QuickCluster, enter the new name for the cluster in the
“Identify this QuickCluster as” field.
 If you are setting up a controller to use with Apple Qadministrator, do the following:
a Click Advanced to open the Advanced pane.
b Enter the new name in the “Identify this computer to Apple Qadministrator as” field.
Unmanaged Services
You can enable unmanaged services for a QuickCluster. For more information, see
“Managed Vs. Unmanaged Services” on page 43.
Setting the Password
To add a password requirement, click the “Require password” checkbox.
 If you are setting up a QuickCluster, other users will be required to enter this
password before being allowed to submit requests to this computer.
 If you are setting up a cluster to use with Apple Qadministrator, an administrator
will be required to enter this password before being allowed to add this computer
to a cluster.
For more information, see “Setting Passwords and Scratch Storage” on page 57. (If
you configure the computer as both a cluster controller and a service node, this
password is used for both.)
Setting Cluster Storage
You can change the default scratch storage for processing that occurs on this
computer in the Advanced pane. For more information, see “Cluster Storage: Setting
a Scratch Storage Location” on page 59.
42 Chapter 4 Creating and Administering Clusters
Page 43

Managed Vs. Unmanaged Services
You have flexibility in how you build clusters for distributed processing with
Compressor or Apple Qmaster. When you turn on processing services (See “Turning
Cluster Controller Services On or Off” on page 45), you can choose to make them either
managed services or unmanaged services (the default).
Managed Services
Managed services can be assigned to serve one particular cluster controller. Once
assigned, managed services remain exclusively dedicated to that cluster until they are
removed with the Apple Qadministrator application. QuickClusters cannot use
managed services, except in the case of extended node clusters. For more information,
see “Modifying and Deleting Clusters With Apple Qadministrator” on page 54. See the
Apple Qmaster 2 User Manual for more information on extended node clusters.
Unmanaged Services
Unmanaged services will automatically assign themselves to the first available
QuickCluster with enabled unmanaged services support. QuickClusters listen for
unmanaged service advertisements and may mark or remember any of them for later
use. A QuickCluster can use any available unmanaged service on the same local
network (subnet). An unmanaged service will remain dedicated to its QuickCluster only
long enough to finish the current job. Once the current job is complete, an unmanaged
service is once again a “free agent,” and will advertise its availability to all QuickClusters.
Note: Managed clusters (those created with Apple Qadministrator) can also use
unmanaged services. When unmanaged services support is enabled on a “managed”
cluster, the cluster will automatically add any available unmanaged services in addition
to its managed services (that were explicitly added using Apple Qadministrator).
Chapter 4 Creating and Administering Clusters 43
Page 44

Enabling Unmanaged Services on QuickClusters
Follow these steps to enable unmanaged services on QuickClusters.
1
Open the Apple Qmaster pane of System Preferences.
2
Select the “QuickCluster with services” button to create a QuickCluster.
3
Click “Include unmanaged services.”
4
Click Start Sharing.
For more information on creating QuickClusters, see “
page 15 and “
About QuickClusters” on page 50.
Getting Started Quickly” on
Enabling Unmanaged Services on Managed Clusters
Follow these steps to enable unmanaged services on Managed Clusters.
1
Select a cluster in the Cluster list, or click the Add (+) button to add a new cluster.
2
Click “Allow use of unmanaged services.”
Â
For more information on creating managed clusters, see “
Creating Clusters With
Apple Qadministrator” on page 48.
To set the type of processing service:
In the Apple Qmaster pane in System Preferences, do one of the following with the
checkbox in the Managed column:
m
For managed services, select the checkbox.
m
For unmanaged services, deselect the checkbox.
Note:
If processing services are enabled, you must turn them off before you can adjust
the processing service type.
44 Chapter 4
Creating and Administering Clusters
Page 45

To turn off processing services
1 In the Apple Qmaster pane in System Preferences, click Stop Sharing.
2 In the dialog that appears, enter the number of minutes you want processing services
to continue before shutting down, then click OK.
The default is 10 minutes, but you can turn off the service immediately by entering 0 in
the field. If you enter any number greater than 0, a countdown appears next to the
Cancel button. The shutdown delay is provided because some computers may be in the
middle of processing batches, and these could be damaged by a premature shutdown.
3 In the Services section, do one of the following:
 Deselect the On checkbox for Compressor Processing (to turn off Compressor services).
 Deselect the On checkbox for Rendering (to turn off Apple Qmaster services).
Turning Cluster Controller Services On or Off
Use the Services pane in the Apple Qmaster pane in System Preferences to turn the
cluster controller on or off on a specific computer.
To turn on cluster controller services:
1 Open the Apple Qmaster pane in System Preferences.
2 Optionally, you can configure a number of settings before you turn on the processing
services. (See “Options in the Apple Qmaster Pane in System Preferences” on page 42.)
Note: It’s easiest to do this now because you can’t make these settings when
processing services are enabled. To make these settings after services have been
enabled, you need to turn off the services, make the settings, and then turn the
services on again.
3 In the “Share this computer as” section, select one of the following buttons:
 “QuickCluster with services”
Choose this option to create an “instant” cluster with unmanaged services.
 “Services and cluster controller”
Choose this option to build a cluster in Apple Qadministrator. (See “Creating Clusters
With Apple Qadministrator” on page 48 for more information.)
Also see “Managed Vs. Unmanaged Services” on page 43 for more information.
Chapter 4 Creating and Administering Clusters 45
Page 46

4 In the Share column, select the checkbox.
5 Click Start Sharing.
The cluster is enabled, making this computer a cluster controller.
To turn off cluster controller services:
1 Open the Apple Qmaster pane in System Preferences.
2 Click Stop Sharing.
3 In the dialog that appears, enter the number of minutes you want controller services to
continue before shutting down, then click OK.
The default is 10 minutes, but you can turn off the service immediately by entering 0 in
the field. If you enter any number greater than 0, a countdown appears next to the
Cancel button. The shutdown delay is provided because some computers may be in
the middle of processing batches, and these could be damaged by a premature
shutdown. No new cluster connections are allowed to occur as the cluster controller is
shutting down.
Making the Most of Multi-processor Computers
If any of the service nodes you are administering have multiple processors, you
may want to adjust the number of instances of processing services. By default, the
Apple Qmaster system will create one instance for each processor. For process-intensive
work, having many instances may increase speed and efficiency, depending on the
processing application. (Consult the documentation that came with the application
to see if using each processor individually is ideal.)
Note: This feature is available only for Shake (with Apple Qmaster), Alias Maya, and
other UNIX command-line programs. It is not available for Compressor processing.
46 Chapter 4 Creating and Administering Clusters
Page 47

Choose Local from this
Add pop-up menu to add
an instance.
To change the number of instances of processing services on a computer:
1 Open the Apple Qmaster pane in System Preferences.
2 Select the Rendering service in the Services section.
3 Click the “Options for selected service...” button.
4 In the dialog that appears, do one of the following:
 Choose Local from the Add ( + ) pop-up menu to add an instance.
 Select an instance in the list and click the Remove ( – ) button to remove an instance.
5 Click OK.
6 In the Services section, select the Share checkbox for Rendering.
Note: The Service Options dialog is also used to add extended nodes to a cluster, as
described in the Apple Qmaster 2 User Manual.
Chapter 4 Creating and Administering Clusters 47
Page 48

Click the Add button,
then rename the
Untitled Cluster.
Creating Clusters With Apple Qadministrator
Once you configure managed service nodes and/or cluster controllers, they are visible
in Apple Qadministrator, which you use to create and modify Apple Qmaster clusters.
There are two basic steps to creating a managed cluster with Apple Qadministrator.
First, you create a new cluster and choose the cluster controller. Then, you add service
nodes to the cluster.
Step 1: Create a new cluster
1 Open Apple Qadministrator, and then do the following:
a Click the Add ( + ) button.
b Select Untitled Cluster and rename it. (The cluster name you create will also appear
in the cluster pop-up menus in the Batch Monitor and Apple Qmaster.)
2 From the Controller pop-up menu, choose a cluster controller from those available on
the network.
Use this pop-up menu to
choose a cluster controller.
Note: If a password was created for the cluster controller in System Preferences, a
password authentication dialog appears.
3 Optionally, create cluster passwords by clicking the Security tab and selecting and
entering the passwords you want.
 Administrator Password: If you create this password, administrators will need to know
it in order to modify this cluster and to view this cluster’s batches in the
Batch Monitor.
 User Password: If you create this password, users will need to know it in order to
submit batches to this cluster and to view those batches in the Batch Monitor.
48 Chapter 4 Creating and Administering Clusters
Page 49

Click this disclosure
available nodes.
Step 2: Assign service nodes to the cluster
1 If the Qmaster Services Browser is not already displayed, click the disclosure triangle to
see it.
triangle to see
2 Add service nodes to the new cluster by dragging them from the Qmaster Service
Browser list at the bottom of the window, up to the cluster’s service nodes list.
 If there is a closed lock icon next to a computer name, click the lock and enter the
password that was assigned to it in the Apple Qmaster pane in System Preferences.
Otherwise, you won’t be able to drag that service node into the cluster.
 Service nodes that are already assigned to another cluster are not shown.
Drag nodes to
this list from the
Service Browser list.
Clicking this disclosure
triangle displays
each instance of the
services set in
System Preferences
for this node.
Note: The computer names you see at the top level of the Name columns may appear
in one of three formats, depending on your configuration: the computer name (for
example, Lemur node), the Apple networking name (for example, Lemur-node.local), or
the network address for the computer (for example, 02030b-dhcp45.company.com).
3 When you have finished adding service nodes, click Apply.
Your cluster is now ready to process batches.
Chapter 4 Creating and Administering Clusters 49
Page 50

About QuickClusters
QuickClusters offer a simple and automated way to create and configure clusters, and
an alternative to creating and configuring clusters manually with Apple Qadministrator.
QuickClusters with enabled unmanaged support will auto-configure themselves and
use any available unmanaged services on the same local network (subnet).
QuickClusters listen for unmanaged service advertisements and may mark or
remember any of them for later use.
Creating QuickClusters
You can create and modify QuickClusters in the Apple Qmaster pane in
System Preferences.
1 Open the Apple Qmaster pane in System Preferences.
2 Under “Share this computer as,” click “QuickCluster with services.”
3 Optionally, you can configure a number of settings before you turn on the processing
services. (See “Options in the Apple Qmaster Pane in System Preferences” on page 42.)
Note: It’s easiest to do this now because you can’t make these settings when
processing services are enabled. To make these settings after services have been
enabled, you need to turn off the services, make the settings, and then turn the
services on again.
4 Click Start Sharing.
This creates a QuickCluster with this computer as its controller.
Note: With an active QuickCluster, Apple Qmaster users can create extended node
clusters, which contain one or more computers that do not have Apple Qmaster
installed. See the Apple Qmaster 2 User Manual for more information.
50 Chapter 4 Creating and Administering Clusters
Page 51

Advanced Settings in the Apple Qmaster Preferences Pane
You can use the Advanced section in the Apple Qmaster Preferences Pane to further
configure your distributed processing system.
Advanced Service Settings
Use these features to schedule service restarts and service availability.
Restart all services every 24 hours
The “Restart all services every 24 hours” checkbox ensures a robust distributed
processing system. Refreshing the services periodically prevents increased virtual
memory sizes and memory leaks in third-party software.
Set schedule for unmanaged services
If you enabled unmanaged services, you can open a calendar interface and schedule
the availability of these services to the distributed processing system.
Chapter 4 Creating and Administering Clusters 51
Page 52

To schedule service availability:
1 Click Set.
The work schedule interface appears.
By default, the services are available 24 hours a day, 7 days a week.
2 To constrain the availability of the services, click the pop-up menu next to a particular
day of the week, and choose one of the following:
 Off makes the service unavailable on that day of the week.
 On between allows you to enter the period of time the service will be available.
 Off between allows you to enter the period of time the service will not be available.
3 Enter any constraining time periods in the appropriate time fields.
4 Click OK to save the settings.
52 Chapter 4 Creating and Administering Clusters
Page 53

Shared Cluster Storage
Use these features to configure scratch storage for this computer’s cluster controller.
For more information on cluster storage, see “Cluster Storage: Setting a Scratch
Storage Location” on page 59.
Delete Files Older Than __ Days
Enter the number of days temporary process files may remain on the cluster’s scratch
location before they are automatically deleted.
Cluster Storage
Enter a local folder directory to change the scratch location for the cluster’s temporary
process files. See “Cluster Storage: Setting a Scratch Storage Location” on page 59 for
more information.
Network
Use these features to configure network settings.
Allow wide area Bonjour in domain
Select this checkbox to have Apple Qmaster use computers beyond the local subnet,
and enter the DNS Domain in the text field. This feature requires Mac OS X v10.4 or later.
Use Network Interface
Restrict distributed processing activity to a particular network interface card by
choosing it from this pop-up menu.
Extras
Use these features to configure additional settings.
Log service activity to file
If selected, an activity log is created and updated regularly with information about the
Apple Qmaster actions on this computer. This log is located in the /Library/Logs/
Apple Qmaster folder.
Show Qmaster service status in menu bar
If selected, an Apple Qmaster icon appears in the computer’s menu bar. The menu bar
item provides Apple Qmaster status and activity information.
Identify this computer to Apple Qadministrator as
By default, a computer is identified on the network by its computer name (as it is
entered in the Sharing pane in System Preferences). You can change this name to
something more meaningful if you like, since it is the name used to identify this
computer in the Apple Qadministrator application. If you are setting up a managed
cluster controller, this is the name that will appear in the Apple Qadministrator
Controller pop-up menu.
Chapter 4 Creating and Administering Clusters 53
Page 54

Modifying and Deleting Clusters With Apple Qadministrator
Using Apple Qadministrator, you can change and delete clusters. Once a cluster is
configured, you can use Apple Qadministrator to deactivate and reactivate the
processing services on a computer in the cluster, to add a service node to the cluster,
or to remove a service node from the cluster.
Note: QuickClusters are not visible in Apple Qadministrator. Only “managed” clusters
can be modified and deleted in Apple Qadministrator. Managed clusters are clusters
that were created in Apple Qadministrator. QuickClusters must be modified in the
Apple Qmaster pane in System Preferences.
Note: If you want to change the cluster controller in a cluster, you need to delete the
cluster and then re-create it with a new cluster controller.
To modify a cluster:
1 Open Apple Qadministrator.
2 In the Cluster list (on the left side of the window), select the cluster you want to change.
If the cluster’s Service Nodes list isn’t already showing individual services, click the
disclosure triangle in the Name column to reveal them.
Make any of the following changes:
 To temporarily turn off the processing services on a computer in the cluster, deselect the
Active checkbox for that service node.
 To remove a computer from the cluster, select the computer and drag it back to the
Qmaster Service Browser at the bottom of the Apple Qadministrator window.
 To add a service node to the cluster, drag it from the service browser list at the bottom
of the window to the service nodes list.
54 Chapter 4 Creating and Administering Clusters
To remove nodes
from a cluster, drag
them to the Qmaster
Service Browser.
Page 55

3
Click Apply Now.
Note:
To turn off the service node or cluster controlling services on any computer
within a cluster, see “Configuring Service Node Processing” on page 41 and “Turning
Cluster Controller Services On or Off” on page 45.
To change a cluster’s name in Apple Qadministrator:
1
In the Cluster list, double-click the cluster name.
2
Type a new name, then press Return.
3
Click Apply Changes.
To delete a cluster in Apple Qadministrator:
1
In the Cluster list, select the cluster you want to delete.
2
Click the Remove ( – ) button.
Monitoring Cluster Activity
You can use Apple Qadministrator to find out what is happening within a cluster by
examining details (such as CPU usage, which batch is being processed, disk space
usage, and data activity) about each node in the cluster.
To monitor cluster activity in Apple Qadministrator:
1
In the Cluster list, select the cluster you want to examine.
2
Select a node in the cluster service nodes list.
3
Click the Info ( I ) button near the bottom of the Cluster list.
4
In the resulting window, click the CPU, Memory, Volume Info, or I/O Activity tabs to see
a variety of details about the selected node.
Chapter 4
Creating and Administering Clusters
55
Page 56

Setting Cluster Preferences
You can use Apple Qadministrator Preferences to configure several aspects of
Apple Qadministrator.
To set cluster preferences:
1 Open Apple Qadministrator.
2 In the Cluster list, select the cluster for which you want to set preferences.
3 Click Preferences.
Click Preferences to display
the Preferences pane.
4 Set any of the following preferences:
Queue
 Maximum number of jobs in the queue: Enter the maximum number of batches that
can be queued up at one time for this cluster. If the maximum number is reached,
the cluster does not accept new batches until there is an opening in the queue.
 Keep job history for: Set how long batches are listed in the History table of the
Batch Monitor.
 Email notification for service down after: Set how much time should pass, after a
service becomes inaccessible, before the cluster controller sends an alert message to
the administrator. (See “Email Notification,” below.)
 Status Interval: Set how often status information about this cluster should be
generated and sent to the Batch Monitor.
Email Notification
To have the cluster controller send service failure alerts to an administrator, enter the
relevant information in the fields provided. See “Recovery and Failure Notification
Features” on page 60 for more information.
 Admin Email: Enter the administrator’s email address.
 Send with mail server: Enter the administrator’s mail server.
 Domain: Enter the cluster controller’s domain.
56 Chapter 4 Creating and Administering Clusters
Page 57

Setting Passwords and Scratch Storage
You can create several different types of passwords for the Apple Qmaster distributed
processing system. All these passwords are optional; you can use the system without
creating them.
 Cluster administrator password: A password required for modifying a cluster in
Apple Qadministrator, and for modifying the status of the cluster’s batches in the
Batch Monitor. See “Setting Cluster Administrator and User Passwords,” next.
 Cluster user password: A password that client users will need in order to submit
batches to a cluster and to modify the status of those batches in the Batch Monitor.
See “Setting Cluster Administrator and User Passwords,” next.
 Service password: A password required for an administrator to add a specific service
node or cluster controller to a cluster. See “Setting a Service Password for Including a
Computer in a Cluster” on page 58.
You can also change the default scratch storage location for a cluster, or for each computer
in a cluster. See “Cluster Storage: Setting a Scratch Storage Location” on page 59.
Setting Cluster Administrator and User Passwords
You can create cluster passwords while creating a new cluster, as described in
“Creating Clusters With Apple Qadministrator” on page 48. However, once the cluster
is created, you can still add or change passwords, using the same settings in
Apple Qadministrator.
To create or change cluster passwords:
1 In Apple Qadministrator, select the cluster from the Cluster list.
2 Click Security.
3 Select and enter or change the passwords you want.
4 Click Apply Changes.
Note: Cluster administrator and cluster user passwords can be stored in a user’s keychain.
Chapter 4 Creating and Administering Clusters 57
Page 58

Setting a Service Password for Including a Computer in a Cluster
If you want to control who is able to include a specific service node or cluster controller
in a cluster, you can create a password called a service password for the computer.
Note: A service password can be stored in a user’s keychain.
To set a service password:
1 On the computer designated as the service node or cluster controller, open the
Apple Qmaster pane in System Preferences.
2 If any Apple Qmaster services are enabled on this computer, temporarily turn them off
by clicking Stop Sharing.
3 Click Require Password.
The password sheet opens.
4 Enter and verify a password, and click OK.
5 Click the relevant checkbox or the Start Sharing button to restart the services you need
on this computer.
58 Chapter 4 Creating and Administering Clusters
Page 59

Cluster Storage: Setting a Scratch Storage Location
By default, the Apple Qmaster distributed processing system saves temporary process
files in the /var/spool/qmaster directory on the cluster controller. You can also choose
any other location on a local disk. Computers in the cluster will access this location as
needed.
To select a new storage location for a cluster:
1
On the cluster controller, open the Apple Qmaster pane in System Preferences.
2
If any Apple Qmaster services are enabled on this computer, click Stop Sharing to
temporarily turn them off.
3
Click Advanced to open the Advanced pane.
Click Set to open a dialog
for choosing a new
storage folder.
4
Click the Set button next to the Cluster Storage field.
5
Navigate to the folder in the dialog, select it, and then click Choose.
Note:
If you are using the default
This Computer
setting in the Cluster pop-up menu in
the Compressor Batch window, and you choose Cluster Storage as the destination, the
output file will be copied to the Source location.
Chapter 4
Creating and Administering Clusters
59
Page 60

Recovery and Failure Notification Features
The Apple Qmaster distributed processing system has a number of built-in features
designed to attempt recovery if there is a problem, and to notify you when it attempts
a recovery.
Recovery Features
The recovery actions described next occur automatically if failures occur in the
Apple Qmaster distributed processing system. There is no need for you, as the
administrator, to enable or configure these features.
If a service stops unexpectedly
If either the cluster controller service or the processing enabled on a service node stops
unexpectedly, the Apple Qmaster distributed processing system restarts the service. To
avoid the risk of endless stopping and restarting, the system restarts the failed service a
maximum of four times. The first two times, it restarts the service right away. If the
service stops abruptly a third or fourth time, the system restarts it only if it had been
running for at least 10 seconds before the service stopped.
If a batch is interrupted
When a service stops suddenly while in the middle of processing an Apple Qmaster
batch, the cluster controller resubmits the interrupted batch in a way that prevents the
reprocessing of any batch segments that were complete before the service stopped.
The cluster controller delays resuming the batch for about a minute from the time it
loses contact with the service.
If a batch fails
When the service is running, but one batch fails to process, a service exception occurs.
When this happens, the cluster controller resubmits the batch immediately. It resubmits
the batch a maximum of two times. If the job fails on the third submission, the
distributed processing system stops resubmitting the job. In the Batch Monitor, the job
is moved to the History table, where the status column indicates that a failure occurred.
60 Chapter 4 Creating and Administering Clusters
Page 61

Failure Notification
There are two different ways that the Apple Qmaster distributed processing system can
provide information about a problem.
Email Notification
When a processing service stops unexpectedly, Apple Qmaster sends a notification
email to the address that was entered in the Apple Qadministrator Cluster Preferences
dialog for that cluster. If no address was entered there, the email is sent to the address
in the Internet settings of the computer on which the cluster controller is enabled.
Log files for individual jobs or batches
If a particular job or batch fails, a log file is generated that describes this failure. You can
find the name and location of this log file through the Batch Monitor. Select the batch
or job in the History table of the Batch Monitor window, and click the Info icon. If any
log files were generated because of failures in the processing of the item, the names
and locations of those logs are shown.
Chapter 4
Creating and Administering Clusters
61
Page 62

Page 63

Command-Line Usage
If you are accustomed to doing your work from Terminal
shells, and need or prefer to run the distributed processing
system from the command line with minimal use of
application interfaces, this appendix is for you.
The appendix includes the following topics:
 “Installing Apple Qmaster from the Command Line” (next)
 “Shell Commands for Configuring Service Nodes and Cluster Controllers” on page 64
 “Shell Commands for Submitting Compressor Jobs” on page 64
 “Shell Commands for Submitting Apple Qmaster Jobs” on page 66
 “Shell Commands for Monitoring Batches” on page 68
Appendix
Installing Apple Qmaster from the Command Line
Follow these steps to install Apple Qmaster software on each computer you want to
use for distributed processing. (All computers must be on the same subnet.)
1 Copy the standalone installer package (AppleQmasterNode.mpkg) to the remote system.
You can either use the Finder, or copy the files using Secure Copy:
scp <source file> <user>@<remote host>:<path>
Note: Do not alter the file hierarchy of the packages.
2 Log into the remote system.
3 Enter the following command:
sudo installer -pkg AppleQmasterNode.mpkg -target /
4 Do one of the following to start the Apple Qmaster processes:
 Enter this command:
sudo systemstarter start Qmaster\ services
 Restart the remote computer
5 Repeat these steps for each computer in your distributed processing network.
63
Page 64

Shell Commands for Configuring Service Nodes and Cluster Controllers
As an alternative to using the Apple Qmaster pane in System Preferences, you can use
the command qmasterprefs, with command-line options for enabling and disabling
service node and cluster controlling services.
In the command-line descriptions below, angle brackets < > indicate a mandatory
argument in a command and brackets [ ] indicate an optional argument.
Synopsis
Below is a synopsis of the command for enabling and disabling cluster controlling
services on a computer. The qmasterprefs command is located in /usr/sbin.
qmasterprefs -cluster <on | off> [-timeout <minutes>] [-servername <name>] [-list] [-help]
Below is a synopsis of the command for enabling and disabling service node
processing on a computer.
qmasterprefs -service “Unix Processing” <on | off> [-instances <n>] [-timeout <minutes>]
[-servername <name>] [-list] [-help]
Command options
This table provides information about each of the enabling and disabling service-node
and cluster-controlling services on a computer.
Preference command option Description
[-cluster] <on | off> Turns cluster-controlling services on or off.
[-service Rendering] <on | off> Turns UNIX Rendering services on or off.
[-list] Lists the current qmasterprefs settings.
[-help] Displays information about supported options for qmasterprefs.
[-restart] Restarts Apple Qmaster service.
[-service name options] Sets service options.
Shell Commands for Submitting Compressor Jobs
You can run the Compressor application from the command line using the Compressor
command, with a number of command-line options for submitting jobs.
In the command-line descriptions below, angle brackets < > indicate a mandatory
argument in a command and brackets [ ] indicate an optional argument.
64 Appendix Command-Line Usage
[timeout min] [servername name] [quickcluster on | off]
[unmanagedservices on | off] [unmanagedmulticapturethreshold
sec] [networkinterface allinterfaces | <bsd name>]
[timeout min] [instances n] [autorestart on | off] [unmanaged on | off]
Page 65

Synopsis
Below is a synopsis of the command for submitting a job to a cluster. The Compressor
command is located in /Applications/Compressor.app/Contents/MacOS.
Compressor [-clustername <name>] [-clusterid <user name:password@IP address:port
number>][-command <command type> -options <XML command> [-wd <working
directory>] [-timeout <seconds>] [-show] [-batchname <name>] [-help]
Once the job is submitted successfully, this command displays the batch ID (identifier)
and job ID (identifier) in the shell, and you can monitor the progress of a batch in the
Batch Monitor.
Command options
This table provides information about each of the command options for submitting jobs.
Submission command option Description
[-clustername <name>] Use to specify the name of the cluster to which you want to send
the job. Using the cluster name, Compressor looks for the cluster
on the network in order to use it.
[-batchname <name>] Use to specify a name for the batch so that you can easily
recognize it in the Batch Monitor.
[-clusterid
<user name:password@IP
address:port number>]
[-priority <value>] Specifies the priority level for a job.
[-jobpath <url>] Specifies the location of the source file.
[-settingpath <url>] Specifies the location of the settings for the job.
[-destinationpath <url>] Specifies the destination file URL for the job.
[-info <xml>] Gives detailed information for a batch or a job.
[-timeout <seconds>] Use to specify the number of seconds before Compressor can quit
[-show] Shows the ID information for the cluster specified with -clustername
[-help] Displays information regarding the required parameters for the
Optionally, you can use -clusterid to enter the cluster ID and port
number instead of using -clustername. (When you enter the cluster
ID and port, less time is required to find the cluster on the
network.)
Or, if you used -clustername and the cluster requires a password,
use -clusterid to specify the user name and password. (You need to
include the IP address: port number as well whenever you use
-clusterid.)
Tip: Use Compressor -show to see a cluster’s IP address and port
number.
when looking for a cluster. The default value is 0, which puts no
limit on the timeout and allows Compressor to browse the network
for as long as it needs to find the cluster.
or -clusterid, or for all clusters if no cluster is specified.
Compressor command.
Appendix Command-Line Usage 65
Page 66

Example of Compressor Command XML
The code below is an example of XML code for submitting a Compressor command.
Notice that because it needs to be entered as one command line, every character after
-options that isn’t alphanumeric must be preceded with a backslash (\).
./Compressor -clusterid tcp://127.0.0.1:51737 -batchname myBatch -jobpath /Volumes/
Source/ShortClips/NTSC24p.mov -settingpath /Users/stomper10/Library/Application\
Support/Compressor/PhotoJPEG.setting -destinationpath /Users/machinename/
myDestinationFilename.mov.
This command has the following elements:
 Cluster address is tcp://127.0.0.1:51737.
 Batchname is myBatch.
 Job path is /Volumes/Source/ShortClips/NTSC24p.mov.
 Setting path is /Users/stomper10/Library/Application\ Support/Compressor/
PhotoJPEG.setting.
 Destination path is /Users/machinename/Movies.
Shell Commands for Submitting Apple Qmaster Jobs
You can use the Apple Qmaster command, Apple\ Qmaster, with a number of
command-line options for submitting jobs.
In the command-line descriptions below, angle brackets < > indicate a mandatory
argument in a command and brackets [ ] indicate an optional argument.
Synopsis
Below is a synopsis of the command for submitting a job to a cluster. The Apple\ Qmaster
command is located in /Applications/Apple Qmaster.app/Contents/MacOS.
Apple\ Qmaster [-clustername <name>] [-clusterid <user name:password@IP
address:port number>][-command <command type> -options <XML command> [-wd
<working directory>] [-timeout <seconds>] [-show] [-batchname <name>] [-help]
Once the job is submitted successfully, this command displays the batch ID (identifier)
and job ID (identifier) in the shell.
66 Appendix Command-Line Usage
Page 67

Command options
This table provides information about each of the command options for submitting jobs.
Submission command option Description
[-clustername <name>] Use to specify the name of the cluster to which you want to send
the job. Using the cluster name, Apple Qmaster looks for the cluster
on the network in order to use it.
[-batchname <name>] Use to specify a name for the batch so that you can easily
recognize it in the Batch Monitor.
[-clusterid
<user name:password@IP
address:port number>]
[-command <command type>] Specifies the kind of command you are entering: Shell, Shake,
[-options <XML command>] Specifies the command with XML code. Enter the XML code after
[-wd <working directory>] Use to specify the working directory path (from which the
[-timeout <seconds>] Use to specify the number of seconds before Apple Qmaster can
[-show] Shows the ID information for the cluster specified with -clustername
[-help] Displays information about supported options for Apple \ Qmaster.
Optionally, you can use -clusterid to enter the cluster ID and port
number instead of using -clustername. (When you enter the cluster
ID and port, less time is required to find the cluster on the network.)
Or, if you used -clustername and the cluster requires a password,
use -clusterid to specify the user name and password. (You need to
include the IP address: port number as well whenever you use
-clusterid.)
Tip: Use Apple\ Qmaster -show to see a cluster’s IP address and
port number.
Maya, or other command, depending on the application you want
to use for distributed processing.
-options, with the necessary qualifiers for entering it in a shell. See
“Example of Shake Command XML,” next, for an example.
If no -option is entered, the values from the application’s
preferences file, in ~/Library/Preferences, are used (which are the
values of the most recent job submitted).
command should be executed). The default working directory is
/Applications/Shake.
quit when looking for a cluster. The default value is 0, which puts
no limit on the timeout and allows Apple Qmaster to browse the
network for as long as it needs to find the cluster.
or -clusterid, or for all clusters if no cluster is specified.
Appendix Command-Line Usage 67
Page 68

Example of Shake Command XML
The code below is an example of XML code for submitting a Shake command. Notice
that because it needs to be entered as one command line, every character after
-options that isn’t alphanumeric must be preceded with a backslash (\).
/Applications/Apple\ Qmaster.app/Contents/MacOS/Apple\ Qmaster -clustername elvis
-command "Shake" -options \<command\ executable\=\"\/Applications\/Shake\/
shake.app\/Contents\/MacOS\/shake\"\ script\=\"\/Volumes\/Jaguar\/scripts\/
applestyle.shk\"\ start\=\"1\"\ end\=\"1000\"\ stepsOf\=\"1\"\ minCount\=\"10\"\
otherOptions\=\"\"\ previewNode\=\"\"\ previewWidth\=\"0\"\ shutterOn\=\"yes\"\
motion\=\"yes\"\ proxyFlags\=\"0\"\ proxyScale\=\"1.000000\"\
proxyRatio\=\"1000.000000\"\ shutter\=\"1.000000\"\>\<\/command\>
Note: Apple Qmaster stores the XML code for the last command you entered in
~Library/Preferences/com.apple.AppleQmaster.plist. You can copy the command in
XML form there, and customize it to use for a new job submission.
Shell Commands for Monitoring Batches
You can use the Batch Monitor command, Batch Monitor, with a number of commandline options for monitoring jobs.
In the command-line descriptions below, angle brackets < > indicate a mandatory
argument in a command and brackets [ ] indicate an optional argument.
Synopsis
Below is a synopsis of the command for monitoring batches. The Batch Monitor
command is located in /Applications/Utilities/Batch Monitor.app/Contents/MacOS.
Batch Monitor [-clustername <name>] [-clusterid <user name:password@IP address:port
number>] [-jobid <identifier> -batchid <identifier>] [-timeout <seconds>] [-query
<seconds>] [-help]
To cancel a job or batch:
m Batch Monitor [-clustername <name>] [-clusterid <IP address> <port number>
<user name> <password>] -kill -jobid <identifier> -batchid <identifier>
68 Appendix Command-Line Usage
Page 69

Command options
This table provides information about each of the command options for
monitoring batches.
Monitoring command option Description
[-clustername <name>] Use to specify the name of the cluster to which the job was sent.
[-clusterid
<user name:password@IP
address:port number>]
[-jobid <identifier> -batchid
<identifier>]
[-timeout <seconds>] Use to specify the number of seconds before Batch Monitor can
[-query <seconds>] Use to specify how frequently, in seconds, the job status should be
[-kill -jobid <identifier> -batchid
<identifier>]
[-help] Displays information about supported options for Batch \ Monitor.
Optionally, you can use -clusterid to enter the cluster ID and port
number instead of using -clustername.
Or, if you used -clustername and the cluster requires a password,
use -clusterid to specify the user name and password. (You need to
include the IP address: port number as well whenever you use
-clusterid.)
Tip: Use Apple Qmaster -show or Compressor -show to see a cluster’s
IP address and port number.
Use to specify the job you want to monitor.
When you use the -jobid option, you must also specify the -batchid,
in the form of the name that was given to the batch when it was
submitted. (The batchid and jobid are displayed after a batch is
submitted.)
If you do not use the -jobid option, all the jobs submitted to the
specified cluster are listed.
quit when looking for a cluster. The default value is 0, which puts
no limit on the timeout and allows Batch Monitor to browse the
network for as long as it needs to find the cluster.
updated.
Cancels the specified job or batch.
Appendix Command-Line Usage 69
Page 70

Page 71

Index
Index
A
activity logs 61
administrator email address 56
administrator mode, Batch Monitor 38
administrator password
Apple Qadministrator 33
cluster administrator 48, 57
Apple Qadministrator
creating clusters 48–49
deleting clusters 54, 55
failure notification 61
modifying clusters 54–55
monitoring cluster activity 55
notification emails to 61
opening 34
overview 33–34
passwords 33
QuickClusters 54
setting cluster preferences 56
setting passwords 57–58
Apple Qmaster
dual processors and 46
failure notification 61
installing 26
installing from command line 63
interfaces 29–38
introduction to 5–11
opening 36–37
preferences. See Apple Qmaster pane in System
Preferences
recovery features 60–61
setting scratch location 59
specifying Shake script locations 28
submitting batches for processing 8
turning cluster controller on/off 45
turning off temporarily 54
turning processing services on/off 41–45
using shell commands 66–68
Apple Qmaster networks 21–28
basic rules for 21
described 21
desktop processing environment 25–28
examples of 22, 24
expanded 24
expanding capacity of 23–24
simple 22
subnet 8
Apple Qmaster pane in System Preferences 17, 31–
32
advanced settings 51–53
opening 17, 32
Services pane 45
settings overview 42
Apple websites 12
B
batches
See also batch jobs
canceling 68
creating 18, 36
described 6
distribution of 9–10
dividing into segments 10
dividing into tasks 10
failure of 60
history 56
interruption of 60
listing in History table 56
log files 61
passwords 48
submitting for processing 8, 19, 35–37
tracking activity of 37–38
batch jobs
See also batches
canceling 68
described 6
for distributed rendering 28
log files 61
Maya 36
monitoring with shell commands 68–69
number of 56
submitting with Apple Qmaster 36
submitting with shell commands 64–68
Batch Monitor
administrator mode 38
batches listed in 56
71
Page 72

cluster status information 56
log files 61
opening 38
overview 37–38
tracking batch activity 37–38
user mode 38
Batch Monitor command 68–69
C
cables, high-speed 23
clients
batches and 8
as cluster controllers 22
described 6, 7
multiple 8, 23
overview 8
passwords 57
as service nodes 22
subnet 8
cluster administrator password 48, 57
cluster controllers
changing 54
choosing 48
clients as 22
configuring 40–47
configuring with shell commands 64
described 7
distributing batches via 9–10
domains 56
enabling/disabling 64
failure alerts 56
illustrated 7
number of 40
overview 9
passwords 48
service exceptions 60
service nodes as 22
service stops unexpectedly 60
turning services on/off 45–46
clusters 39–61
adding service nodes to 18, 54
assigning service nodes to 49
changing cluster controllers in 54
components 7
configuring 40
creating 40, 48–49
deleting 55
distributing batches to 9–10
extended nodes 59
modifying 54–55
monitoring activity 55
multiple 23
names 48, 55
overview 8
passwords 34, 48
preferences 56
removing computers from 54
renaming 55
status information 56
cluster user password 48, 57
command-line usage 63–69
commands
shell 63–69
Compressor
getting started with 15–19
opening 36
workflows. See workflows
computers
client. See clients
cluster. See clusters
desktop rendering environment 25–28
media storage volumes 27
names 42, 49
passwords. See passwords
removing from clusters 54
shutdown delay 45, 46
storage locations for 23, 59
turning off Apple Qmaster 54
configuration
Apple Qmaster clusters 40
cluster controllers 40–47, 64
service nodes 40–47, 64
D
data segments 10
deleting items
clusters 55
desktop rendering environment 25–28
disk arrays 23
distributed processing 6
expanded example 24
installing software 15–16, 26
introduction 6
managed services 43
network configuration 21–28
part-time 25–28
quick and easy steps 15–19
simple example 22
unmanaged services 43
distribution, batches 9–10
domains 56
dual processors 46–47
E
email notification 56, 61
F
failure notification 56, 61
files
log 61
72 Index
Page 73

Maya 36
sharing 27
temporary 59
H
history, batch 56
History table 56
I
installing Compressor/Apple Qmaster 26
J
jobs. See batch jobs
L
lock icon 49
log files 61
M
mail server 56
managed services 43
manual, about 11
Maya batches 36
media storage volumes 27
N
networks. See Apple Qmaster networks
P
passwords 57–58
administrator. See administrator password
cluster administrator 48, 57
cluster controllers 48
clusters 34, 48
cluster users 48, 57
computers 49
service 57, 58
users 48
Personal File Sharing 27
preferences
Apple Qmaster. See Apple Qmaster pane in
System Preferences
clusters 56
processes
directing 7
storage locations for 23, 59
tracking 7
processing
defined 9
desktop processing environment 25–28
distributed part-time 25–28
expanded network for 24
installing software 15–16, 26
quick and easy steps 15–19
submitting batches for 28
processing services
distributed processing 6
failure alerts 56, 60
running dual instances 46–47
service failure 60
time allotted for 45, 46
turning off 45
turning on 41
Q
Qadministrator. See Apple Qadministrator
Qmaster. See Apple Qmaster
qmasterprefs command 64
QuickCluster
configuring 17
QuickClusters
about 9, 50
Apple Qadministrator 54
creating 50
enabling unmanaged services 44
extended node clusters 50
managed vs. unmanaged services 43
R
recovery features 60–61
rendering defined 9
Rendering services 41
turning off 45
S
scratch storage 23, 42, 59
security passwords. See passwords
servers
See also computers
distributed processing and 24
mail 56
rack of 24
service exceptions 60
service nodes
adding to clusters 18, 54
assigning to clusters 49
clients as 22
as cluster controllers 22
configuring with Apple Qmaster 40–47
configuring with shell commands 64
creating 41
described 7
dual processors 46–47
enabling/disabling 64
illustrated 7
inaccessible 9
multiple 23
overloaded 9
overview 9
passwords 58
Index 73
Page 74

processing services 44–45
processing stops unexpectedly 60
turning off processing services 45
turning on processing services 41, 45
Service Options dialog 47
service passwords 57, 58
Services pane 45
Shake
dual processors 46
installing distributed processing 27
media file locations 28
script locations 28
source files 26
startup .h file 27
UNC setting 27
shell commands 64–69
shutdown delay 45, 46
storage devices 23
subnet 8, 10
switches, high-speed 23, 24
System Preferences 17, 31–32
T
tasks 5, 6, 10
See also batches
Terminal shell commands 63–69
U
unmanaged services 43
enabling on managed clusters 44
enabling on QuickCluster 44
user mode, Batch Monitor 38
users
cluster 48, 57
passwords 48, 57
V
video codecs
See also codecs
W
websites
Apple 12
Apple Store 13
X
XML code 66, 68
74 Index
 Loading...