

Page 1

PowerBook G4 / PowerBook G4 (Gigabit Ethernet)
Bottom Case
Replacement Instructions
Follow the instructions in this sheet carefully. Failure to follow these instructions could
damage your equipment and void its warranty.
Note:
Written and video instructions covering customer-installable parts are available at
http://www.info.apple.com/installparts/.
Warning: Sharp edges can exist inside your computer and on any parts being
removed or installed. Use caution to avoid injury. Keep small parts away from
children.
Tools Required
• Soft towel or cloth, larger than the PowerBook
• PowerBook G4: #1 Phillips screwdriver
• PowerBook G4 (Gigabit Ethernet):Torx T8 screwdriver (provided with bottom case)
Removing the Bottom Case
Warning: Always shut down your computer before opening it to avoid damaging its
internal components or causing injury. After you shut down the computer, the
internal components can be very hot. Let the computer cool down before
continuing.
1. Place your computer on a clean, flat surface.
2. Shut down your computer and wait thirty minutes before continuing.
3. Disconnect the power cord and any other cables connected to the computer.
073-0600 Rev. D
Page 2
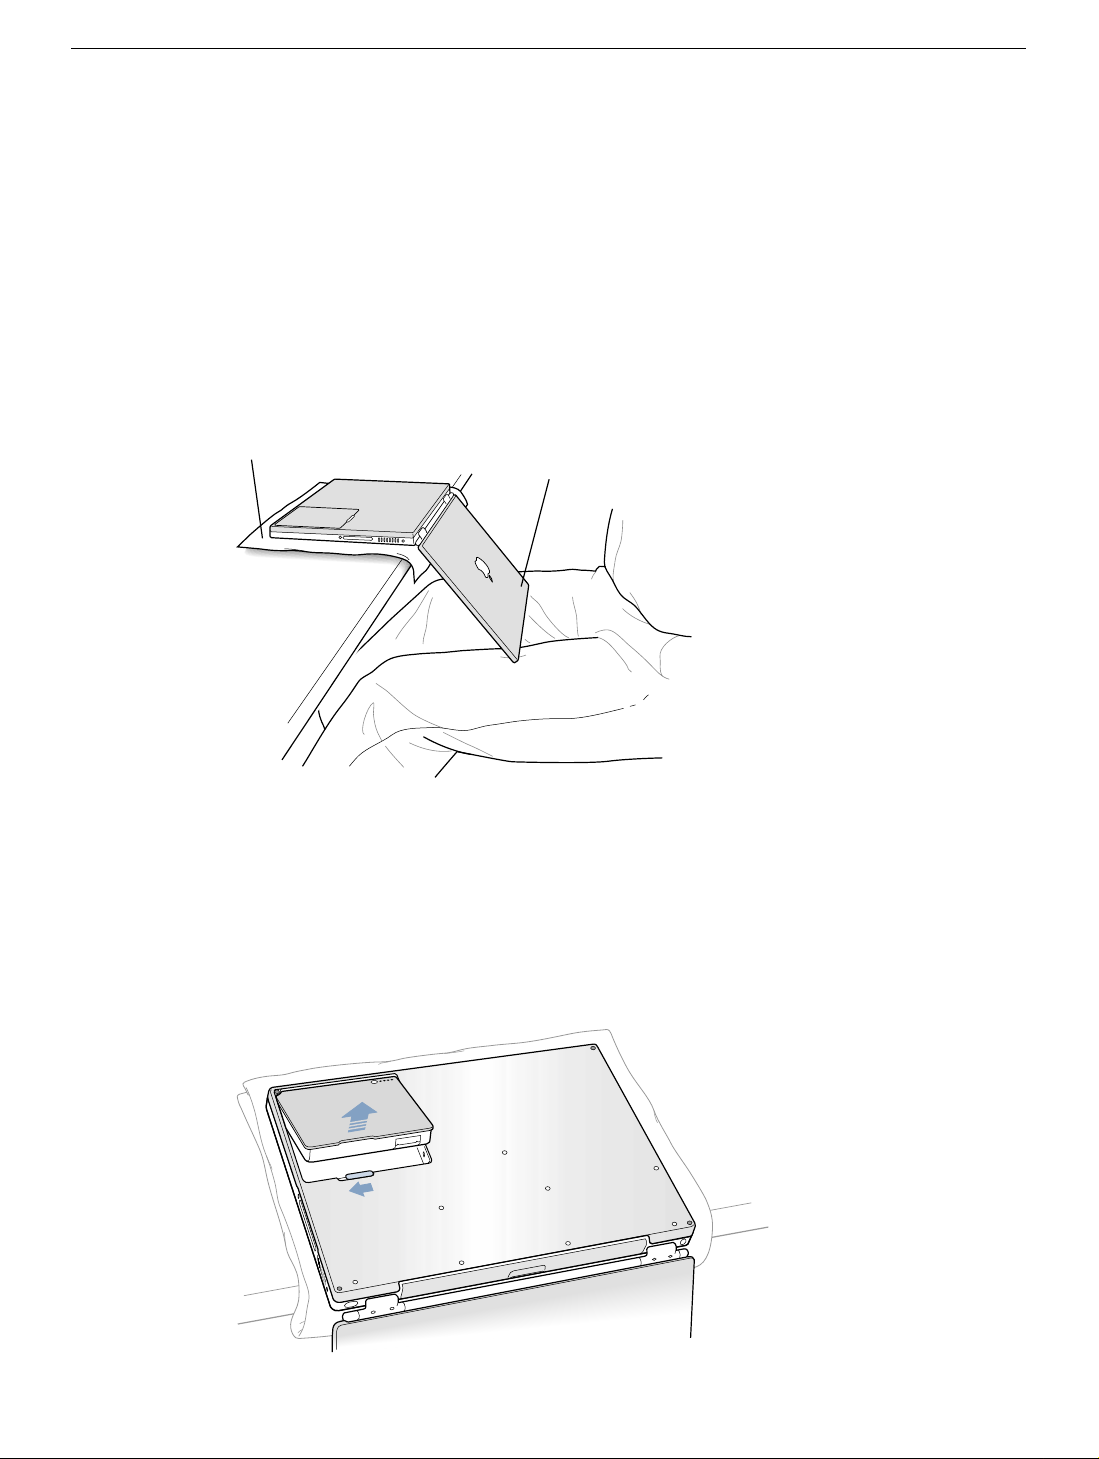
4. Place a towel or soft cloth on a table in front of you.
(Figure 1A)
The towel or cloth will protect the keyboard and display area of the PowerBook when
you flip it over to remove the battery and bottom case. Make sure it covers an area
large enough for your PowerBook and that it hangs over the edge of the table.
5. With the display open at an angle greater than 90 degrees, carefully flip the
Pow erBook o v er and la y it flat, fully on the tab le . Make sure the display hangs o v er the
edge of the table and rests lightly on your lap.
(Figure 1B)
Important:
Do not open the display farther than the angle shown.
Figure 1
A
B
6. Remove the battery by sliding the battery latch to the left. Mak e sure to return the latch
fully to the right.
(Figure 2)
Removing the battery will prevent you from accidentally turning on the computer.
Warning: Removing the battery before shutting down your computer may
result in data loss.
Figure 2
PowerBook G4 / PowerBook G4 (Gigabit Ethernet) Bottom Case -
2
Page 3
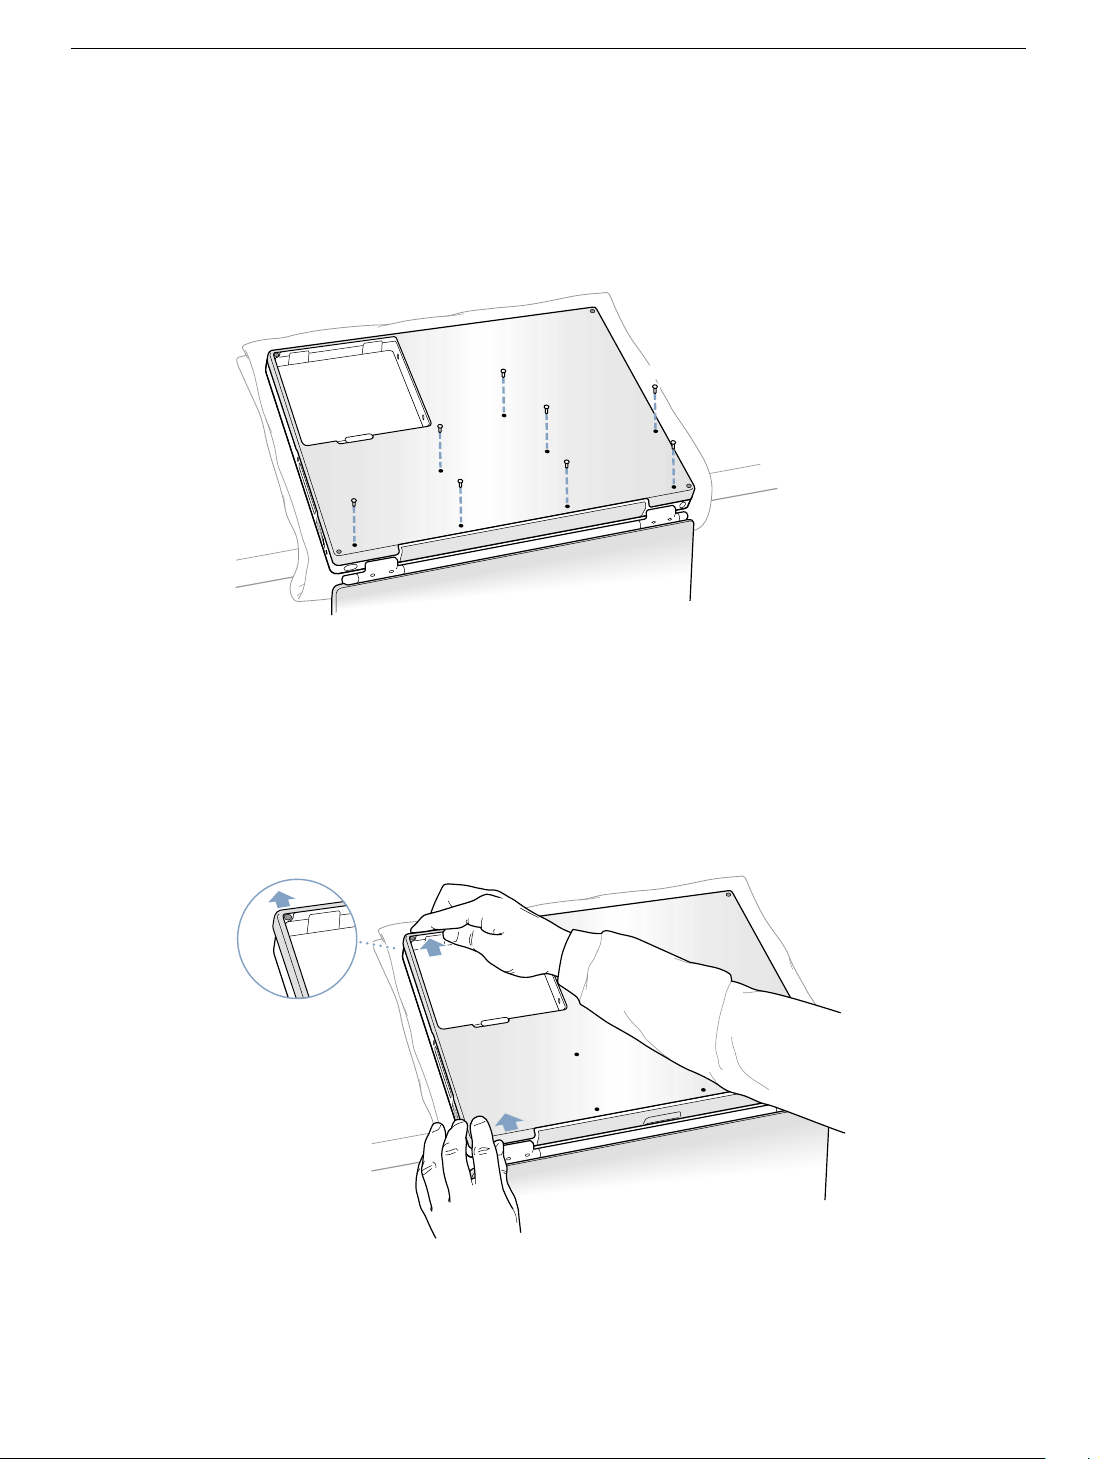
7. Using the appropriate screwdriver, remove the eight bottom case screws in the order
shown in the illustration.
(Figure 3)
Important:
To avoid damaging the case, be careful that the screwdriver tip does not
slip out of the screw head during removal.
Figure 3
1
2
6
Note:
The following three steps explain how to remove the bottom case by disengaging it
7
3
8
4
5
at the left and right sides and then carefully pivoting it forward.
Important:
During this procedure, do not push on the rubber feet of the bottom case.
8. Place your hands on the bottom case as shown
until the left side releases.
Figure 4
(Figure 4)
and push away from you
PowerBook G4 / PowerBook G4 (Gigabit Ethernet) Bottom Case -
3
Page 4

9. Place your hands on the bottom case as shown
until the right side releases.
Figure 5
10. When both sides have released, lift up on the edge of the bottom case that is closest
to you; carefully and ev enly piv ot it ov er the front edge of the computer until it releases.
(Figure 6)
Important: Do not twist the bottom case from side to side. Slide the case forward
completely before lifting it up. If you feel any resistance when lifting the bottom case,
double-check to make sure the case is slid all the way forward and releases from the
front edge.
(Figure 5)
and push away from you
Figure 6
PowerBook G4 / PowerBook G4 (Gigabit Ethernet) Bottom Case -
4
Page 5

Installing the Replacement Bottom Case
1. To install the new bottom case, place it over the bottom of the computer in the same
orientation as the original bottom case.
2. Align the notches on the right and left sides of the case (some of these can be viewed
through the battery opening). Then press down and toward you slightly to secure the
case.
Important: Make sure that the seams between the bottom case and the frame are
closed. Verify that the case lies flat and fits properly around the battery latch and that
the alignment tab that protrudes on the underside of the bottom case, shown in the
illustration
Note:
battery compartment opening, near the latch, and on the front and back outside
edges of the case.
3. Check that the eight screw holes on the case align with the holes on the computer.
(Figure 7A)
, is seated properly.
To help with alignment, apply pressure to the bottom case at the back of the
4. Replace the eight screws in the order shown in the illustration
overtighten the screws or damage could result.
Note:
The screws must go in straight and easily; if they do not, readjust the bottom
case for proper alignment.
Important:
To avoid damaging the case, be careful that the screwdriver tip does not
slip out of the screw head during tightening.
Figure 7
8
A
7
1
3
6
2
5
4
(Figure 7)
. Do not
PowerBook G4 / PowerBook G4 (Gigabit Ethernet) Bottom Case -
5
Page 6

5. Replace the battery.
(Figure 8)
Important: Make sure that the battery locks securely into place and that the battery
latch is slid all the way into the locked position.
Figure 8
6. Turn the computer over so that the optical drive slot faces you. Verify that the bottom
case is flush with the front edge of the slot. If the case is slightly bowed and there is a
gap near the center of the slot, carefully pull the bottom edge of the slot until it clicks
into place and becomes flush with the bottom case.
(Figure 9)
Figure 9
®
PowerBook G4 / PowerBook G4 (Gigabit Ethernet) Bottom Case -
6
Page 7

7. Reconnect the power cord and any other cables that w ere connected, and restart your
computer.
Warning: Never turn on your computer unless all of its internal and external
parts are in place and it is closed. Operating the computer when it is open or
missing parts can damage your computer or cause injury.
Apple Computer, Inc.
© 2001 Apple Computer, Inc. All rights reserved.
Under the copyright laws, this document ma y not be copied, in whole or in part, without the
written consent of Apple.
The Apple logo is a trademark of Apple Computer, Inc., registered in the U.S. and other
countries. Use of the “keyboard” Apple logo (Option-Shift-K) for commercial purposes
without the prior written consent of Apple may constitute trademark infringement and
unfair competition in violation of federal and state laws.
Every effort has been made to ensure that the information in this document is accurate.
Apple is not responsible for printing or clerical errors.
Apple Computer, Inc.
1 Infinite Loop
Cupertino, CA 95014-2084
USA
+ 1 408 996 1010
http://www.apple.com
Apple, the Apple logo, and PowerBook are trademarks of Apple Computer , Inc., registered
in the U.S. and other countries.
PowerBook G4 / PowerBook G4 (Gigabit Ethernet) Bottom Case -
7
 Loading...