

Page 1

Welcome
to Tiger
Find out what you can do
with Mac OS X v10.4
Page 2

Apple Computer, Inc.
© 2005 Apple Computer, Inc. All rights reserved.
The Apple logo is a trademark of Apple Computer, Inc.,
registered in the U.S. and other countries. Use of the
“keyboard” Apple logo (Option-Shift-K) for commercial
purposes without the prior written consent of Apple
may constitute trademark infringement and unfair
competition in violation of federal and state laws.
Apple, the Apple logo, FireWire, iCal, iLife, iMovie, iPod,
iTunes, Mac, Mac OS, and QuickTime are trademarks of
Apple Computer, Inc., registered in the U.S. and other
countries. Exposé, Finder, GarageBand, iDVD, iPhoto,
iSight, Safari, SnapBack, Spotlight, SuperDrive, and Tiger
are trademarks of Apple Computer, Inc. iTunes Music
Store is a service mark of Apple Computer, Inc.,
registered in the U.S. and other countries. .Mac is a
service mark of Apple Computer, Inc.
Because Apple frequently releases new versions and
updates to its software, images shown in this book may
be slightly different from what you see on your screen.
Page 3
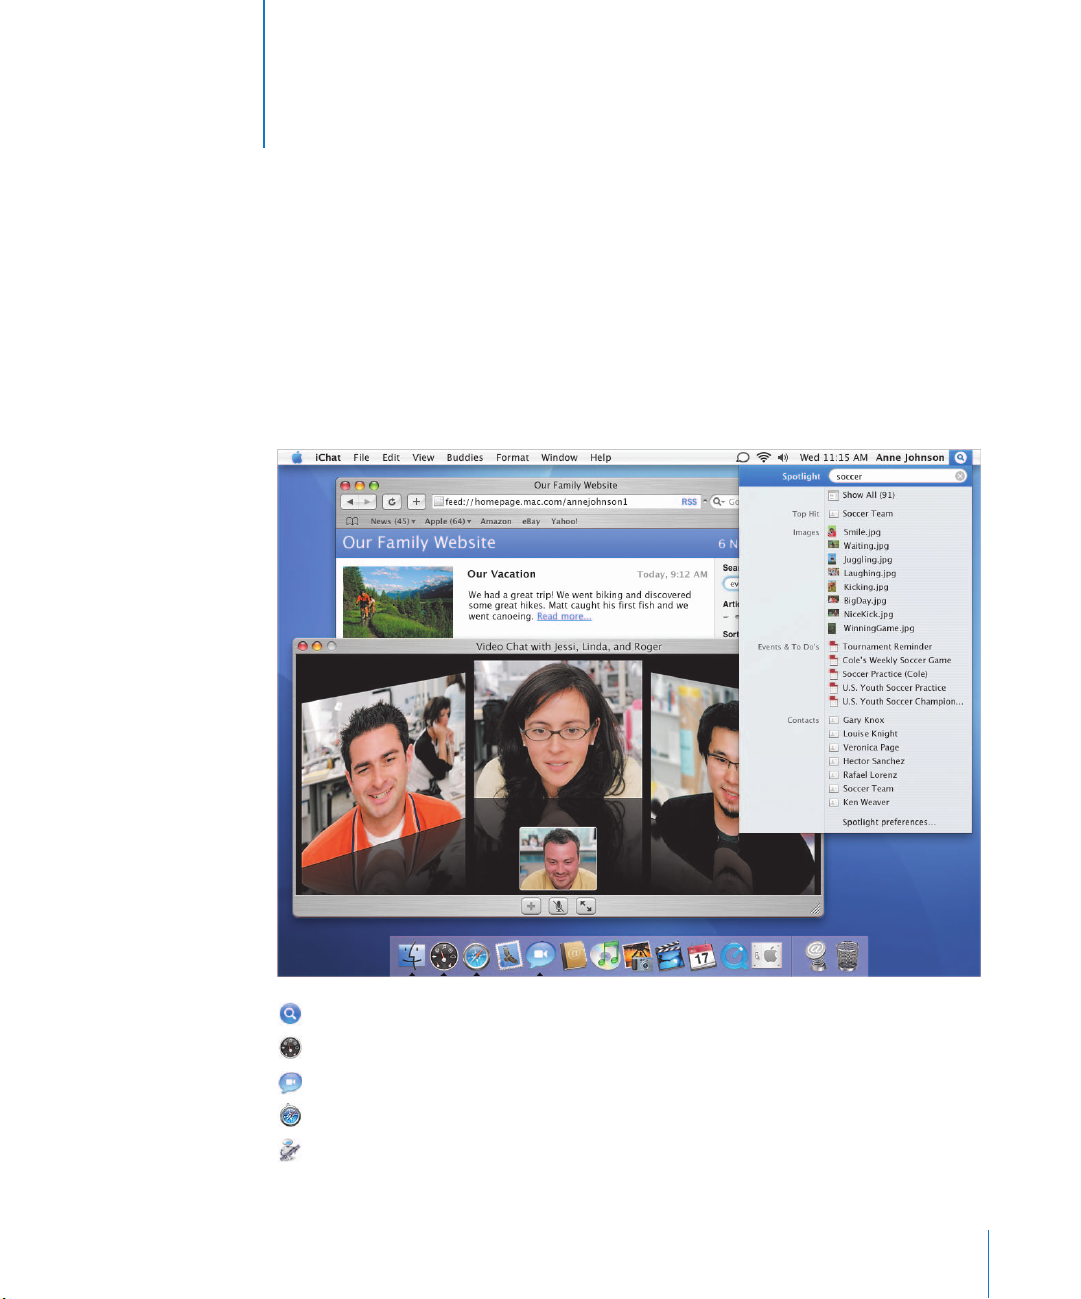
Welcome to Tiger
1
Mac OS X puts power at your fingertips with Spotlight
searching, Dashboard widgets, custom web news, and
four-way video conferencing.
Spotlight
Dashboard
iChat AV
Safari RSS
Automator
Find anything, anywhere, anytime. Instantly.
Instant access to a new kind of application called widgets.
Video conference with up to three other people.
Scan the latest news, information, and articles from the Internet.
Automate tasks with point-and-click simplicity.
3
Page 4
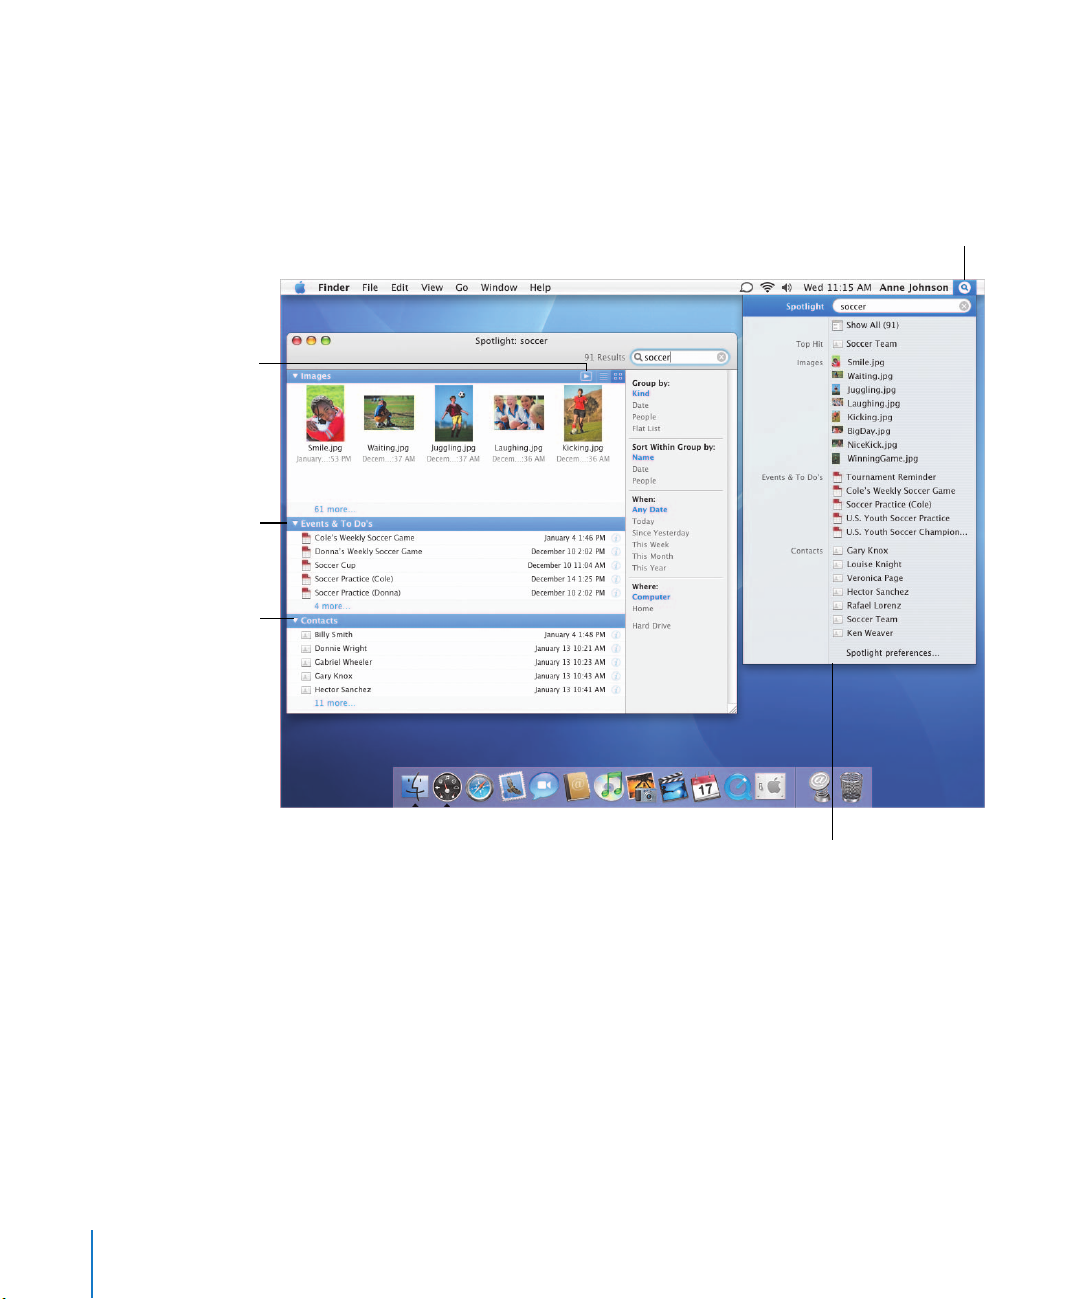
Click to view a slideshow
of your images.
The Spotlight window
shows all the search
results in groups.
Spotlight
Find anything, anytime on your computer as quickly as you can type. Search your entire
system from anywhere to find documents, email, contacts, calendars, music, movies,
photos, bookmarks, and applications.
To find something, click the
Spotlight icon, then type a
few letters or words.
Click to show or hide a
group of items.
The Spotlight menu shows the
top 20 items you have opened
recently. Click an item to open it.
4
Page 5
Organized results
To view all the results of
your search, choose
Show All in the Spotlight
menu to open the
Spotlight window. You
can group items, sort
them, and limit the
results. You can preview
images and see
additional information
about items.
Customize Spotlight
Use Spotlight preferences
to select and prioritize
the types of items you
want to search for. If you
don’t want to search
certain folders or disks,
click Privacy and then
select them.
Click to select the way you
want to group the results.
Click to view additional
information about an item.
This is the metadata that
Spotlight uses to search
for this image.
Click to group, sort, or
limit search results.
Drag items to prioritize
search results. Click to
deselect items you don’t
want displayed.
Choose a shortcut to show
the Spotlight search field.
5
Page 6
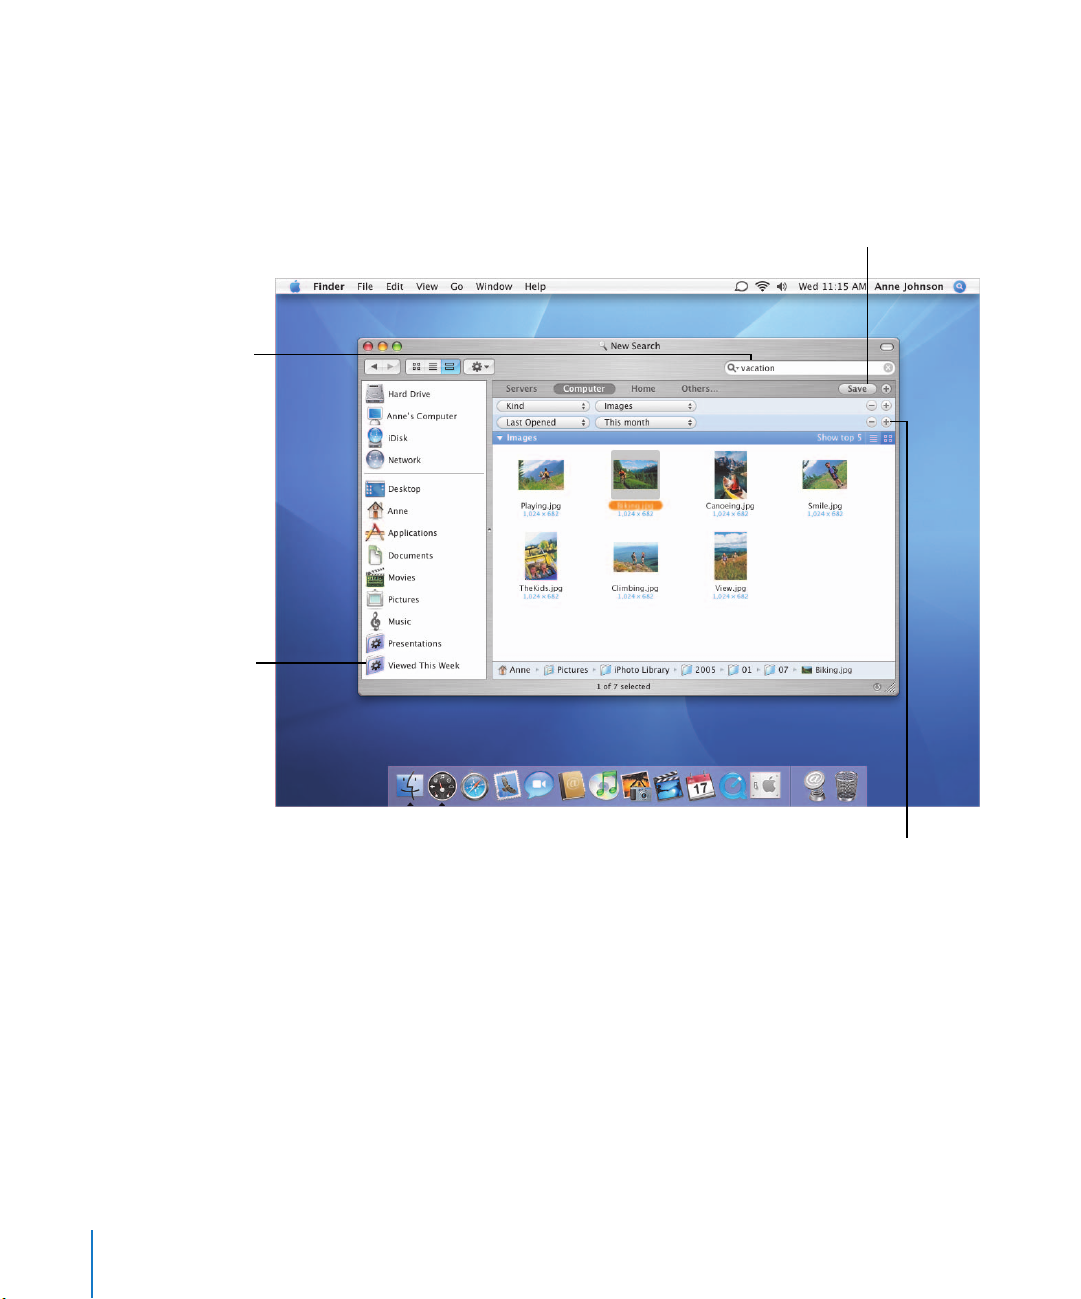
or words to search
Spotlight… Everywhere
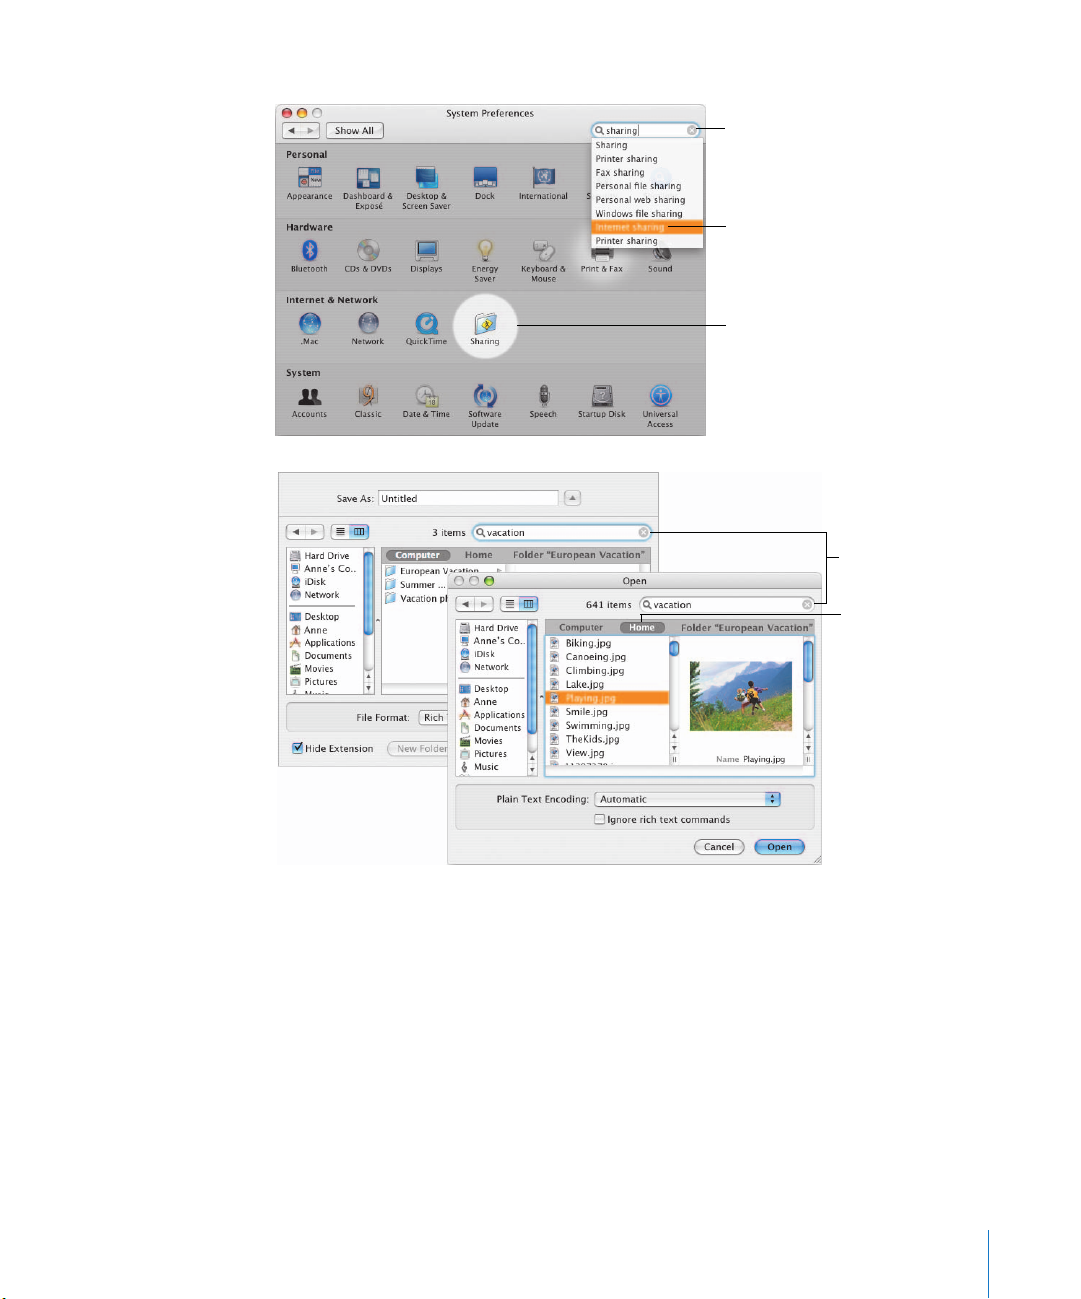
You’ll find Spotlight throughout Mac OS X Tiger, including the Finder, System
Preferences, Mail, Address Book, and elsewhere. You can also save search criteria to
create a Smart Folder that updates its contents automatically each time you open it.
After you specify a
search, click Save to
create a Smart Folder.
Type a few letters
your files.
Click a Smart Folder to
see the current contents
or edit its search criteria.
Click the Add (+)
button to search using
additional criteria.
6
Page 7
Finding preferences
To find and change a
preferences setting, open
System Preferences and
type a few letters or
words in the search
field. Spotlight even
understands Windows
terms.
Finding documents
You can use Spotlight to
find items when you’re
using any application.
You can also use the
search field in the Open
and Save dialogs to find
files and folders on your
computer.
Type a few letters or words
to find the preference you
want to set.
Choose a term in this
menu to see where the
setting is located.
When the preferences pane
you want is highlighted,
press Return to open it.
Type a few letters or
words to search for
items on your
computer.
Click to select where
you want to search.
7
Page 8
Click anywhere on the
desktop to close
Dashboard.
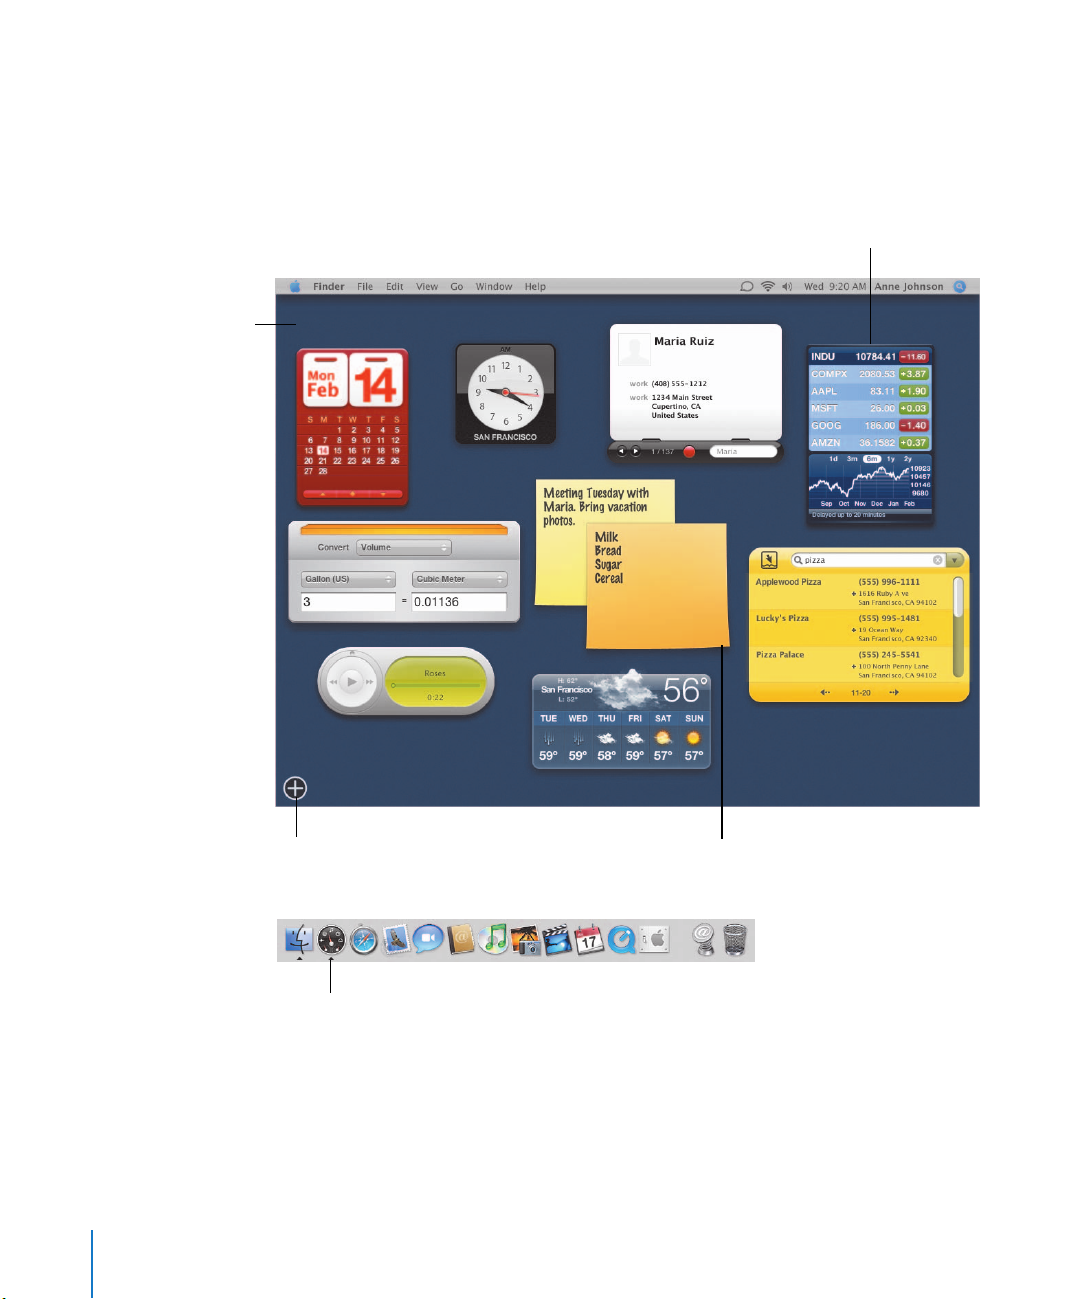
Dashboard
Dashboard zooms onto your desktop with the click of a mouse and, like Exposé,
disappears just as quickly. You can use widgets to get up-to-date information, quickly
look up contacts, check your stock portfolio, see what’s playing on iTunes, and more.
Some widgets get
information from
the Internet.
Click to open the
Dashboard widget bar
to add more widgets.
Click the Dashboard
icon to open it.
You can open more than
one copy of a widget.
8
Page 9
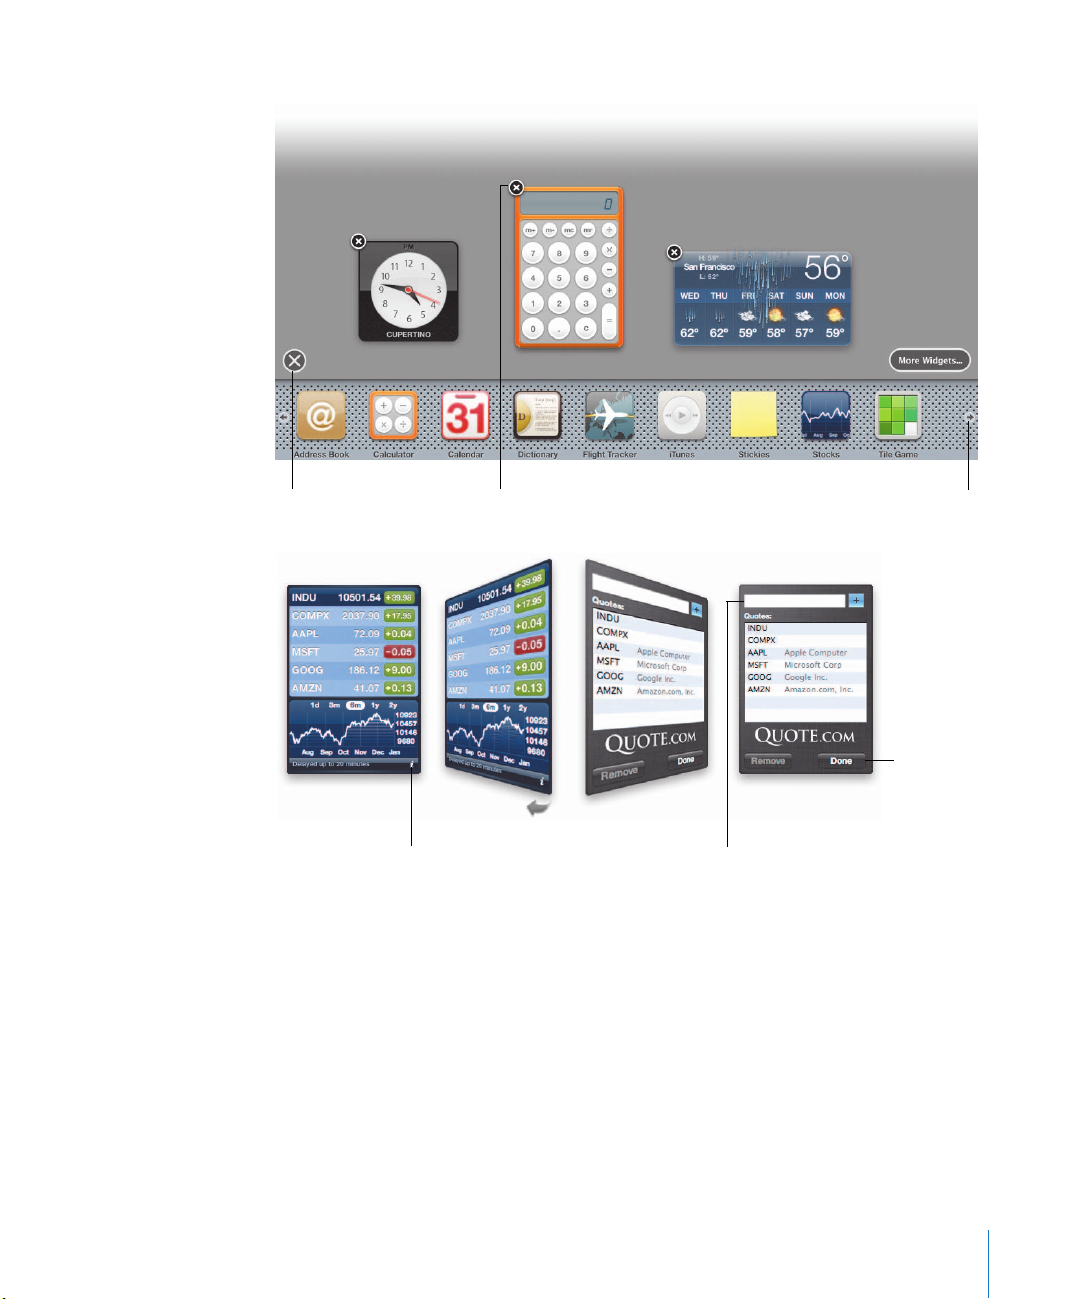
Expanding Dashboard
It’s a snap to get more
widgets. When you open
Dashboard, click the
Open (+) button to show
the widget bar. To add a
widget to Dashboard,
just click it.
Customizing widgets
Most widgets are simple
and customizable to fit
your needs. To see the
settings you can change,
click the Info button
in the bottom right
corner. For example, in
the Stock widget, you
can specify the stocks
you want to see.
Click to close the
widget bar.
Click to close the widget.
Click the Info button to
select options for a widget.
If this icon appears, click it
to see other widgets.
When you’re
finished, click
Done.
To add a stock, type a company’s
name or symbol, then press Return.
Select a name in the menu, then
click the Add (+) button.
9
Page 10
Chat with family,
friends, and colleagues.
All you need is their
.Mac member name,
AIM screen name,
or Jabber ID.
The 3D view practically
puts your guests in the
room with you, right
down to the reflection on
the table.
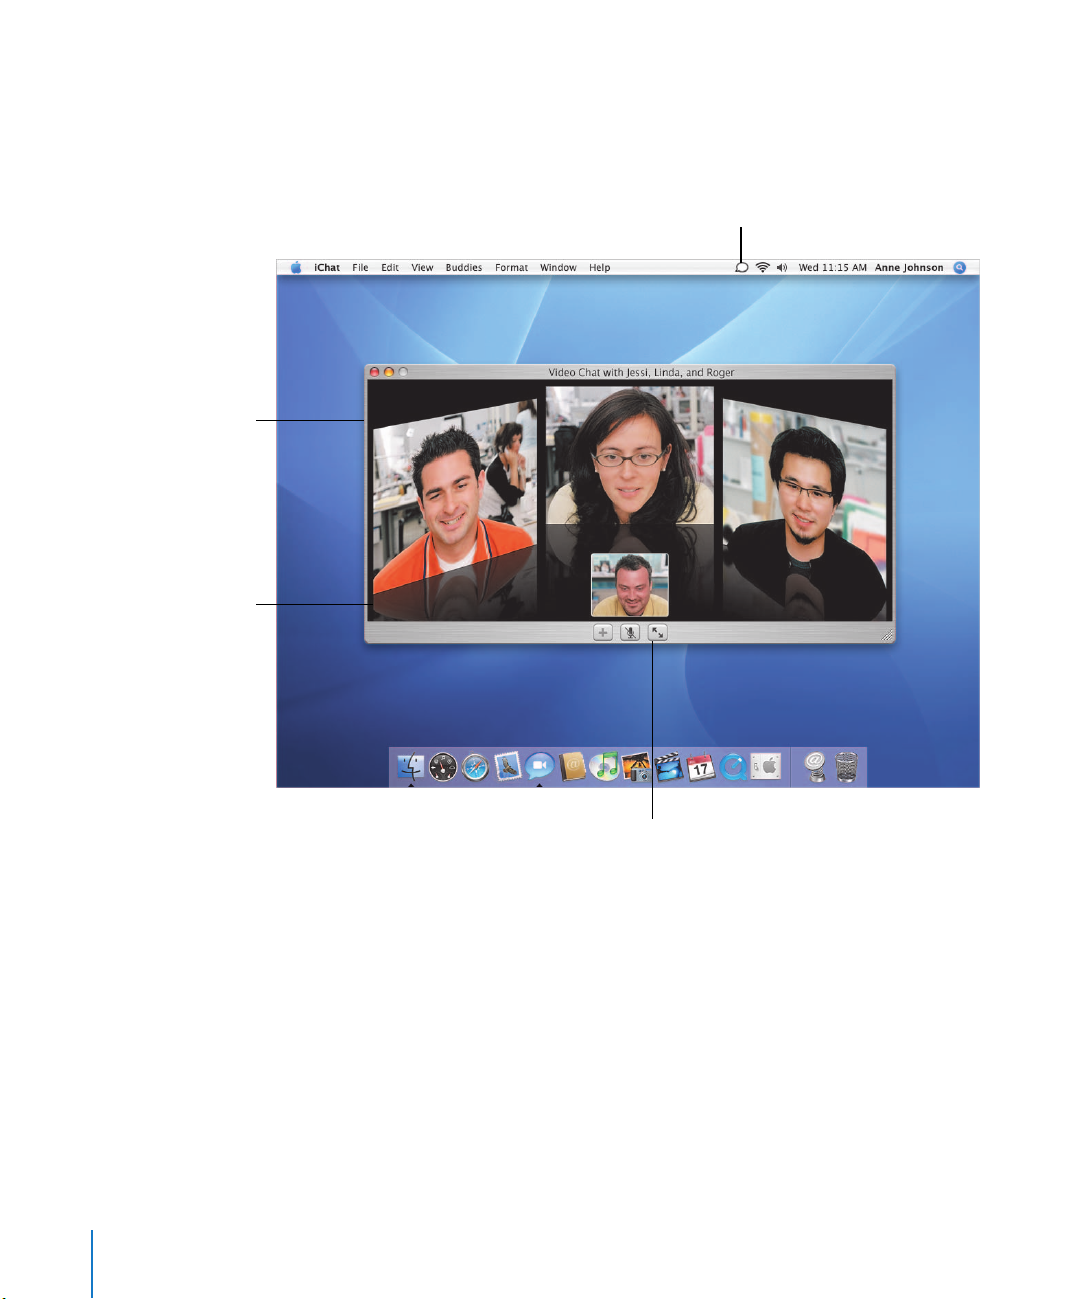
iChat AV
Use multiway video and audio conferencing to chat live with friends and colleagues.
Video conference with up to three other people with stunning, true-to-life pictures and
crystal-clear conversation.
Change your availability
with the iChat status icon.
10
Click to view your video
conference full screen.
Page 11

Audio chats
You can hold audio chats
with up to nine other
people. Just select their
names and click the
telephone icon at
the bottom of the
Buddy List.
Instant messaging
You can use iChat instant
messaging to chat with
one person or many.
While you’re chatting,
you can send web links,
files, and photos by
simply dragging them
into the chat. Web links
open with a click.
This person is available
for a multiperson audio
chat.
The bar indicates
who is talking.
Participants can leave
the chat at any time. If
you need to remove
someone, select the icon
and press Delete.
Click to mute the chat if you
need to answer the phone or
talk to someone in your office.
Choose View > Show Chat
Participants to see
everyone in the chat.
This person is available for
a multiperson video chat.
Type your message here. Click
the Smiley menu icon to add a
Smiley to your message.
Click to add buddies
to your chat.
11
Page 12

The number of unread
RSS articles appears next
to the bookmark.
View RSS articles in the
Safari browser window,
then click “Read more” to
read the full article.
Safari RSS
Now Safari brings you up-to-the-minute RSS news, headlines, and summaries from the
web. Scan thousands of articles in one easy-to-read, searchable list. Then bookmark
your search to quickly find similar articles in the future.
Click to view the
webpage. Click again
to see the RSS feeds.
12
Bookmark article
searches to use the
search again and again.
Page 13

Display PDFs
You can view PDFs right
in the webpage so that
you don’t have to
download the file to use
it. The contextual menu
lets you choose how you
want to view the PDF.
Private browsing
When you browse the
Internet using a public
computer, turn on Private
Browsing to protect your
information. When it’s
on, the websites you visit
aren’t added to the
history, your information
isn’t saved for AutoFill,
and searches aren’t
added to the Google
search box.
Hold down the Control
key and click the PDF to
select viewing options.
Choose Auto Size to scale
the PDF to fit in the
window as you resize it.
You can also reset
Safari or empty
the cache.
Choose Private Browsing from
the Safari menu to protect your
personal information.
13
Page 14

Create a Smart Mailbox
to automatically organize
email messages.
Take control of your inbox. With Spotlight searching, find messages instantly and
organize them using Smart Mailboxes. Slideshows make it easy to view images you
receive in messages and then save them directly to your iPhoto library.
Type a few letters or words
to search your mailboxes.
14
Click Slideshow to view
the images attached to
a message.
Page 15

y
Instant searching
When you type a few
letters or words in the
search field, Mail
immediately starts
finding messages. You
can then change where
Mail is searching and
save your search as a
Smart Mailbox.
Slideshow viewing
When you view images
in an email message as a
slideshow, you can view
them as thumbnails on
an index sheet or as
individual pictures. As
you view individual
pictures, click to add
them to your iPhoto
library.
Select to search all mailboxes
or the current mailbox and
the field to search in.
Click Save to create a
Smart Mailbox with
this search.
Click an image in index
view to see it full size.
Click to see images
on an index sheet.
Click to add the
current image to
our iPhoto library.
15
Page 16

groups to organize
Address Book and iCal
Address Book and iCal make it easy to organize and share information so that you can
collaborate with others. iCal lets you invite guests to events, while calendar groups help
you organize your meetings and events.
This icon indicates that
everyone invited to the
meeting has accepted.
Create calendar
your calendars.
Double-click an event to
see it in your calendar.
Click to check the status
of events you are invited
to or have invited other
people to.
Type a word or two to find
events in your calendars.
16
Page 17

Event invitations
You can invite Address
Book contacts to events
you create in iCal. When
you do, iCal sends them
an email invitation. When
they reply, you receive an
email from them and iCal
is updated.
Finding contacts
Address Book provides
several ways to organize
and find your contacts.
Use Spotlight searching
to quickly locate any
person in your address
book. Create a Smart
Group to quickly find
contacts based on
information in
Address Book.
To invite people to
an event, type their
names the same way
you address
messages in Mail.
If your guests use
iCal, they can choose
their status and send
you a reply.
Type a few letters
or words to search
your contacts.
Click a Smart Group to see
the contacts in the group.
17
Page 18

.Mac Sync
.Mac sync* makes it simple to keep your information synchronized on several Mac
computers. You can synchronize bookmarks, calendars, contacts, and more so that you
always have current information available.
Sync your iDisk automatically
so that you can access your
files from several computers.
synchronize contacts and
iSync lets you
calendars on your iPod,
phone, or PDA.
Use .Mac preferences to
select the information you
want to synchronize.
* To use iDisk and .Mac syncing, you need a .Mac membership.
18
Page 19

.Mac syncing
You can select the
information you want to
synchronize and how you
want to do it. Choose to
sync automatically; every
hour, day, or week; or
manually. To sync your
information immediately,
click Sync Now.
Syncing your iPod
iSync lets you select how
you want to synchronize
your contacts and
calendars on your iPod.
You can sync all your
contacts and calendars,
or you can select a
specific group or
calendar.
Choose whether you
want to sync your
information automatically
or do it yourself.
Select the information
you want to synchronize.
Select to sync your iPod
automatically when you
connect it to your Mac.
Choose the group of contacts
you want to sync.
Select the iCal calendars you
want to sync on your iPod.
19
Page 20

QuickTime 7
The new H.264 codec in QuickTime 7 delivers crystal-clear video and smooth playback
even when you change the size of the player window. Upgrade to QuickTime 7 Pro to
capture movies and share them with your friends.
Get up to four times
the frame size of
MPEG-4 video.
Select the part of the
20
movie you want
to review.
Using QuickTime 7 Pro, capture
video live using your iSight or
other FireWire camera.
Page 21
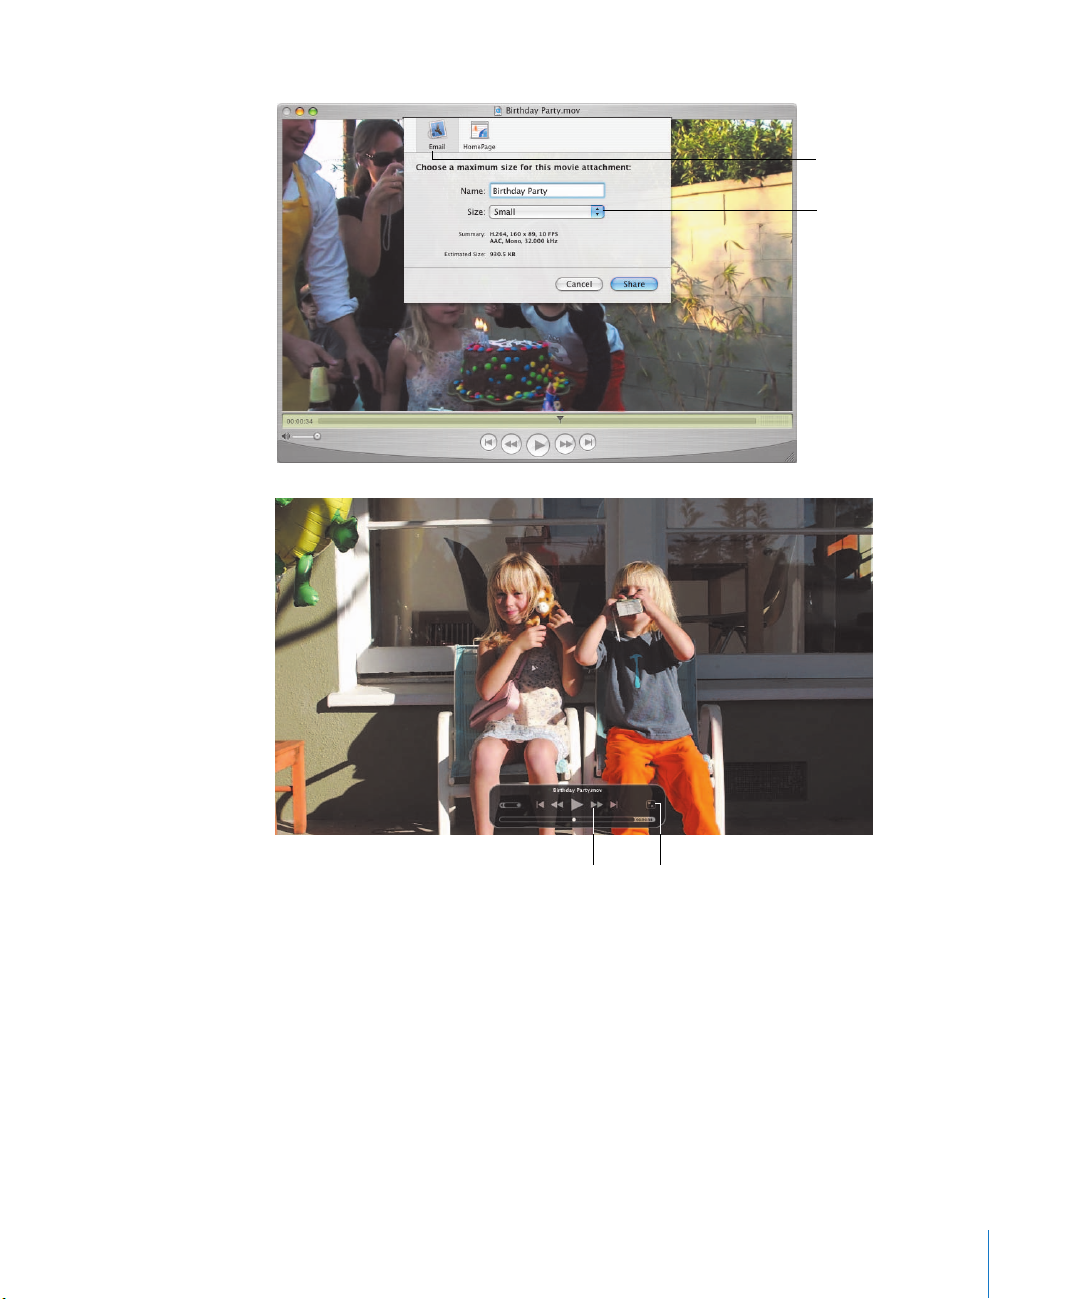
Sharing
Share your QuickTime
movies effortlessly.
Choose Share from the
File menu to send your
movie in an email or put
it on your .Mac website.
Easy controls
QuickTime 7 Pro gives
you great control of your
movies. When you’re
viewing a movie in fullscreen mode, move your
mouse to see the control
panel.
Send your movie in an
email or save it on your
.Mac HomePage.
Choose a size that works
best with your Internet
connection.
Control playback using
familiar video controls.
Click to return to
normal viewing.
21
Page 22

Use your iDisk to share
files with Windows users
on the Internet.
Works With Windows
Your Mac fits seamlessly into Windows networks so you can share documents and
printers with everyone. You can establish a secure connection to a Windows network
over the Internet and access Microsoft Exchange servers.
Click Network in the
Finder to browse for
Windows workgroups.
22
Browse Mac and
Windows file shares
in the same window.
Log in to Windows shares
just as you would on a
Windows computer.
Page 23

Windows printers
If you have a printer
connected to a Windows
computer, you can share
it with Mac computers on
your network. To add a
Windows printer to the
list of available printers
on your Mac, open
Printer Setup Utility.
Exchange services
Mail and Address Book
work with Microsoft
Exchange servers so you
can access the same
addresses available on an
Exchange server.
To begin, click Add in the
toolbar to open the Printer
Browser.
Click More Printers at the
bottom of the Printer
Browser, then choose
Windows Printing and
select the workgroup for
the printer.
Click More Printers to
add a Windows printer.
When you create a new account in
Mail, choose Exchange from the
Account Type pop-up menu.
In Address Book, open
Preferences and select
this option.
23
Page 24

To find actions, type a
word or two here.
You’ll find actions
available for many
Mac OS X applications.
Automator
Automator lets you automate the tasks you do most often. It’s simple to create
Automator “workflows” by dragging “actions” and selecting options. Then share your
workflows in several convenient formats.
Drag actions here to create
a workflow. Click Run to
test your workflow.
24
When you select an action,
the description provides
information to help you
use the action.
Page 25

Building a workflow
As you add actions to
your workflow, they are
linked together to
indicate the flow. To
customize actions to
perform the task you
want, you can set values
and select options. If an
action doesn’t have the
data it requires to work
correctly, you will see an
indication at the top of
the action.
Drag actions to change
their order.
Shows that files will flow
from the action above to
the following action.
Click to remove an action
from the workflow.
Select the options you
want the action to use
in this workflow.
Putting them to work
There are several ways
you can put your
workflow to work for
you. You can save it as a
workflow document or
an application and then
share it with friends by
mailing it to them. If you
save a workflow as a
plug-in, you can choose
how you want to use it
on your computer, such
as Folder Actions or iCal
alarms.
Choose the type
of plug-in you
want to create.
Double-click a workflow
application to run it.
25
Page 26

Parental Controls
You can create a user account for each person using your Mac and select appropriate
privileges for each one. You have complete control of your children’s access to your
computer, the Internet, and who they communicate with.
Select appropriate
privileges for each
user you create.
Click to add a new user
account for each person
using your computer.
Select the applications
you want to control.
To quickly change users,
turn on fast user switching.
26
Only users with an
administrator password can
change these settings.
Click to specify the people
this user can chat with.
Page 27
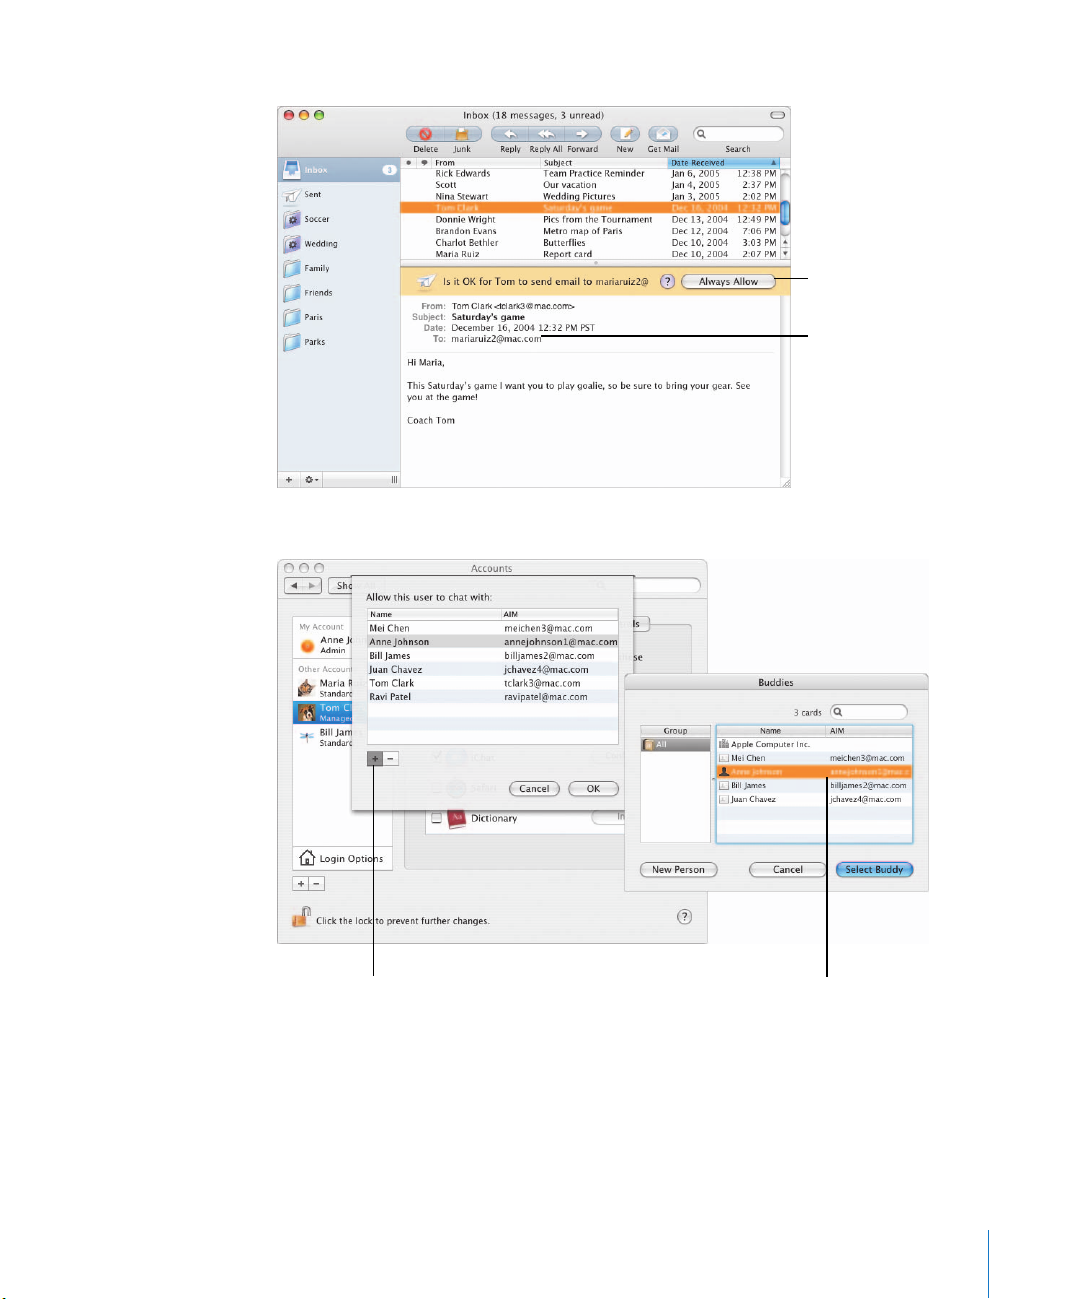
Controlling email
To protect your children
from receiving unwanted
email messages, turn on
parental controls for Mail
and then specify the
email addresses of users
they can exchange
messages with. If
someone who isn’t on
the list sends your child a
message, you get
notified automatically.
Before your child can
send a message to
someone not on the list,
you have to give
permission.
Controlling chats
When you turn on
parental controls for
iChat, you can specify
which users your child
can chat with. Your child
will not be able to chat
with someone without
your permission.
Click here to allow your
child to receive messages
from this person.
The notification message is
sent to the email address
you specify.
To allow this user to chat
with someone, click the
Add (+) button.
Select a name from
Address Book or click New
Person to add someone.
27
Page 28

iTunes
iTunes makes it easy to organize, share, and listen to your music. Shop for music on the
iTunes Music store*. Create playlists of your favorite songs, then copy them to your
iPod. Or burn CDs to share your music with your friends.
Type a word or two to
search your music library or
the iTunes Music Store.
Click to visit the iTunes
Music Store.
Create Smart Playlists to
organize your music.
To mix it up, click
the Shuffle icon.
* The iTunes Music Store may not be available in your country.
28
Page 29
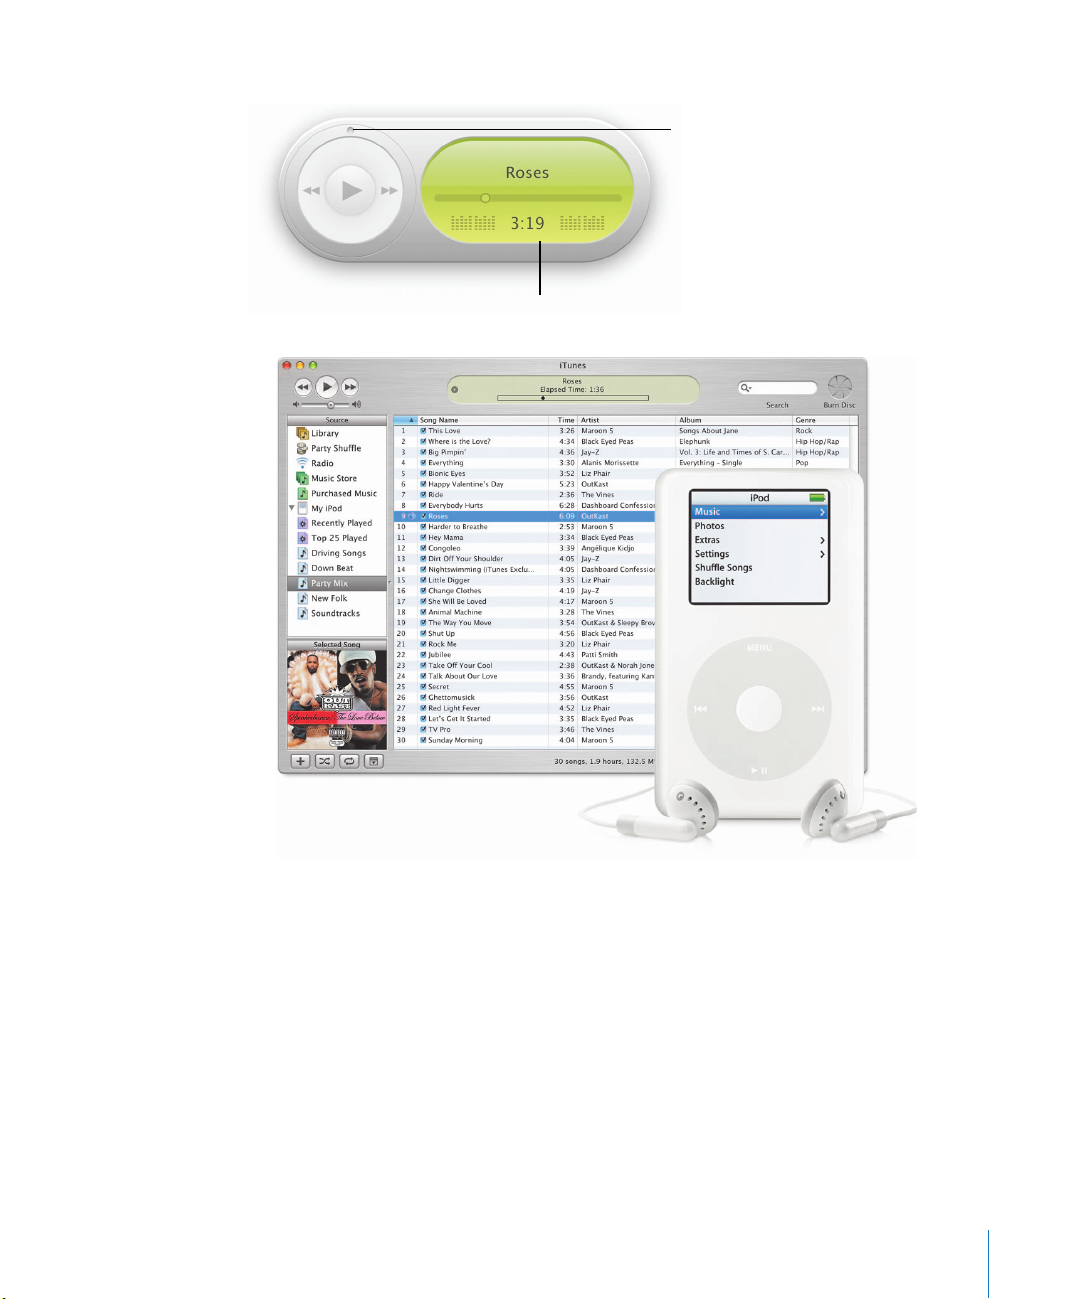
iTunes widget
Dashboard includes the
iTunes widget that lets
you check what’s playing
and control playback
while you work without
opening iTunes.
Works with iPod
iTunes, iPod, and your
Mac were made for each
other. Simply plug iPod,
iPod mini, or iPod shuffle
into your Mac and iTunes
opens automatically.
You can then copy your
favorite songs to iPod so
you can have them with
you all the time.
Drag the outside ring
to change volume.
See what’s playing and
how long it’s been playing.
29
Page 30

Create a Smart Album to
organize photos by the
criteria you specify.
Use the calendar view
to find the photos you
want to work with.
iLife
iLife applications* work together to help you unleash your creativity. Create photo
albums and slideshows, make your own high-definition digital videos, compose your
own music, then author DVDs to share your creations with others.
Double-click an image
to begin editing it.
30
Create a slideshow of
your photos complete
with effects and music.
* iLife applications are not included with Mac OS X, but may be installed on your computer. Some iPhoto services may
not be available in your country. To use some iPhoto services, you need a .Mac membership. To burn a DVD, your
computer must have a SuperDrive.
Page 31

iMovie HD
iMovie HD brings you
powerful, yet easy-to-use
digital video editing.
Choose Make a Magic
iMovie from the File
menu to create a movie
from the clips on your
camera instantly. You can
use digital video film
clips in many formats,
including HD and
MPEG-4.
iDVD
iDVD makes creating
your own DVDs a snap.
Now with new themes
that include animated
drop zones, you can use
photos, slideshows, and
movie clips to create
exciting DVDs. And
easiest of all, choose
OneStep DVD from the
File menu to turn the
clips on your camera into
a DVD instantly.
Use the Media
Browsers to add
clips, photos, and
music, or prepare to
burn your own DVD.
Click the Trash to
restore media you
have deleted.
Select to record a movie
using your digital camera.
Select an Apple-designed
theme to start your project.
View a map of your
DVD project to help
you keep organized.
31
Page 32

GarageBand
Turn your Mac into an
anytime, anywhere
recording studio with
hundreds of instruments.
GarageBand is the easiest
way to create, perform,
and record your own
music.
Click to open the Track
Info window, loop
browser, or editor.
View the notation
for your song as
you record it.
32
 Loading...