

Page 1

1
Lesson 1:
Building a Basic Arrangement
There are many ways you can work as you create a song in GarageBand. You can freely move
back and forth between adding loops, recording Real and Software Instruments, arranging
regions in the timeline, and mixing the song, as ideas and inspiration strike you.
Most popular music today is based on repeating rhythmic patterns (sometimes called “grooves”
or “riffs”), especially in the drum and bass parts. To create a song in a groove-based style, an
effective way of working is to add loops for the drum parts, then add loops for bass and other
rhythm parts. This lets you define the rhythmic feel of the song, and also lets you build the basic
arrangement of the song by blocking out sections with different grooves. Once the basic rhythm
parts are in place, you can record Real and Software Instrument regions to add lead, solo, and
harmony parts.
You start building an arrangement by creating a new song, and setting the tempo, time
signature, and key for the song. Then you add loops for the drum and other rhythm parts, and
arrange the loop regions in the timeline.
1
Tutorial
Before You Begin
To make it easier to follow the lesson as you work, print the lesson before you start.
In many of the tasks shown in this lesson you need to choose menu commands. In the lessons,
and in GarageBand Help, menu commands appear like this:
Choose Edit > Join Selected.
The first term after
terms) following the angle bracket are the items you choose from that menu.
Choose
is the name of the menu in the GarageBand menu bar. The term (or
Creating a New Song
To start working in GarageBand, you create a new song. Songs are the documents that hold your
music and all the changes you make.
To create a new song:
1
Choose File > New.
2
In the New Song dialog, browse to the location where you want to store the song, then type a
name for the song in the name field.
3
Set the song’s tempo, time signature, and key as described in the following section.
1
Page 2
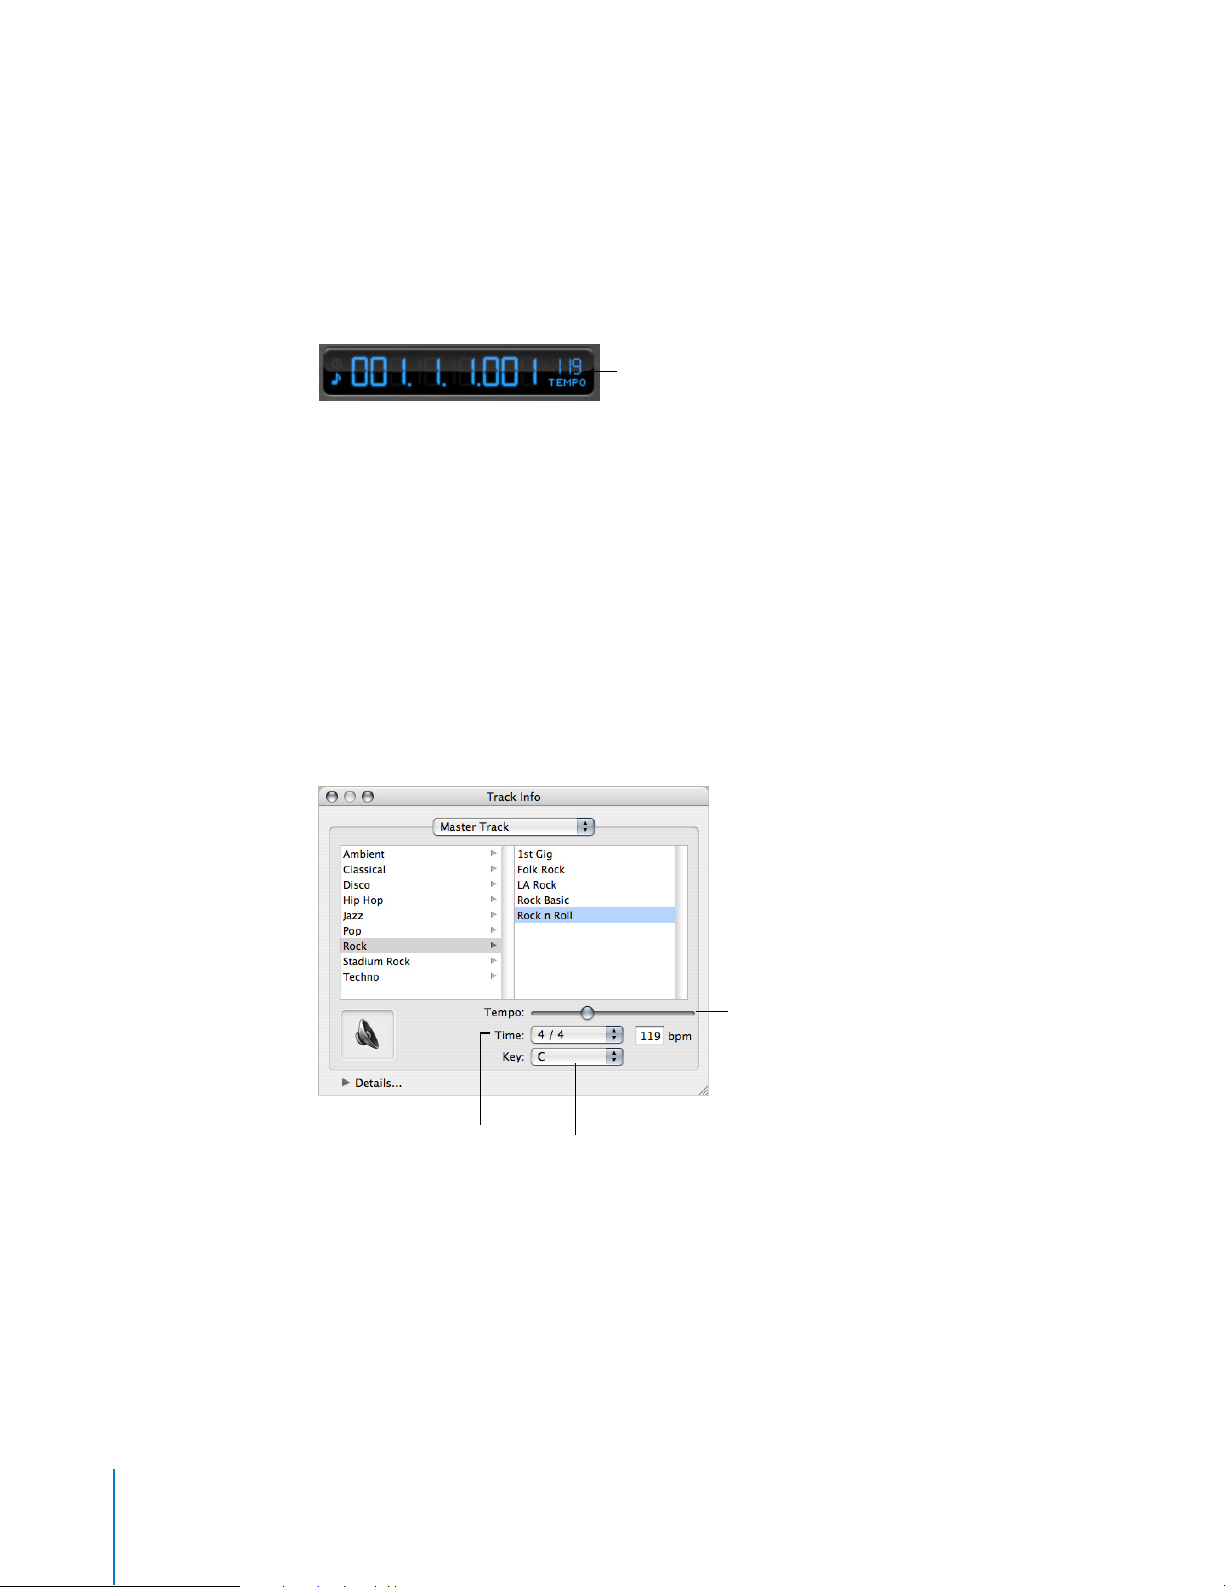
Setting the Tempo, Time Signature, and Key
Each song has a tempo, a time signature, and a key, which last for the entire length of the song.
Tempo
Each song has a speed, or
pulse, occur in the song. The tempo is measured in beats per minute, or
tempo to any speed between 60 and 240 bpm. The default tempo is 120 bpm, which is a
common tempo used in popular music.
To set the tempo:
m
In the New Song dialog, drag the Tempo slider left to slow down the tempo, or right to speed up
the tempo.
Note:
You can change the tempo later in the Track Info window.
Time Signature
Each song also has a time signature, which controls the relationship between beats and
measures. A song's time signature consists of two numbers separated by a forward slash, which
look similar to a fraction. The number on the left controls the number of beats in each measure,
and the number on the right controls the beat value (the length of the note that gets one beat).
tempo
. The tempo defines the rate at which beats, the basic rhythmic
bpm
. You can set the
Click here to set the tempo.
You can use any of the following time signatures in a GarageBand song: 2/2, 2/4, 3/4, 4/4, 5/4, 7/
4, 6/8, 7/8, 9/8, or 12/8. The default is 4/4, the most commonly used time signature.
Tempo slider
Time signature
pop-up menu
Key pop-up menu
To set the time signature:
m
In the New Song dialog, choose a time signature from the Time pop-up menu.
Note:
You can change the time signature later in the Track Info window.
2 Lesson 1: Building a Basic Arrangement
Page 3

Key
Each song has a key, which defines the central note to which the other notes in the music relate.
You can set the song to use any musical key.
To set the key:
m
In the New Song dialog, choose a key from the Key pop-up menu.
Note:
You can change the key later in the Track Info window.
If you change the key of a song after recording instruments or adding loops, all Software
Instrument recordings and loops are transposed to the new key. Real Instrument recordings are
not transposed.
Adding Loops for Drum and Rhythm Tracks
You can quickly define the feel of a song by adding Apple Loops. Apple Loops are prerecorded
music files designed to seamlessly repeat a rhythmic pattern. When you add a loop to the
timeline, you can extend it to fill any amount of time, making it easy to create drum parts and
other rhythm parts.
When you add a loop to a song, GarageBand matches the loop’s tempo and key to the tempo
and key of the song. This lets you use loops that were originally recorded at different speeds, and
in different keys, and have them sound as though they were made to be played together.
Finding Loops With the Loop Browser
GarageBand includes a loop browser that lets you find loops by musical instrument, genre, or
mood. You can also perform text searches, and refine your searches for loops in several other
ways. No matter how large your collection of loops becomes, you can quickly find loops with the
sound you want using the loop browser.
To show the loop browser:
m
Click the Loop Browser button (the button with the open eye).
The loop browser has two views: button view and column view. In button view, you click
keyword buttons to show loops that match the keywords. In column view, you choose from
different keyword types, categories, and keywords to show matching loops. In the lower-left
corner of the loop browser are two view buttons you use to select button or column view.
To choose button view or column view:
m
Click the column button to show column view, or click the grid button to show button view.
Lesson 1: Building a Basic Arrangement
3
Page 4
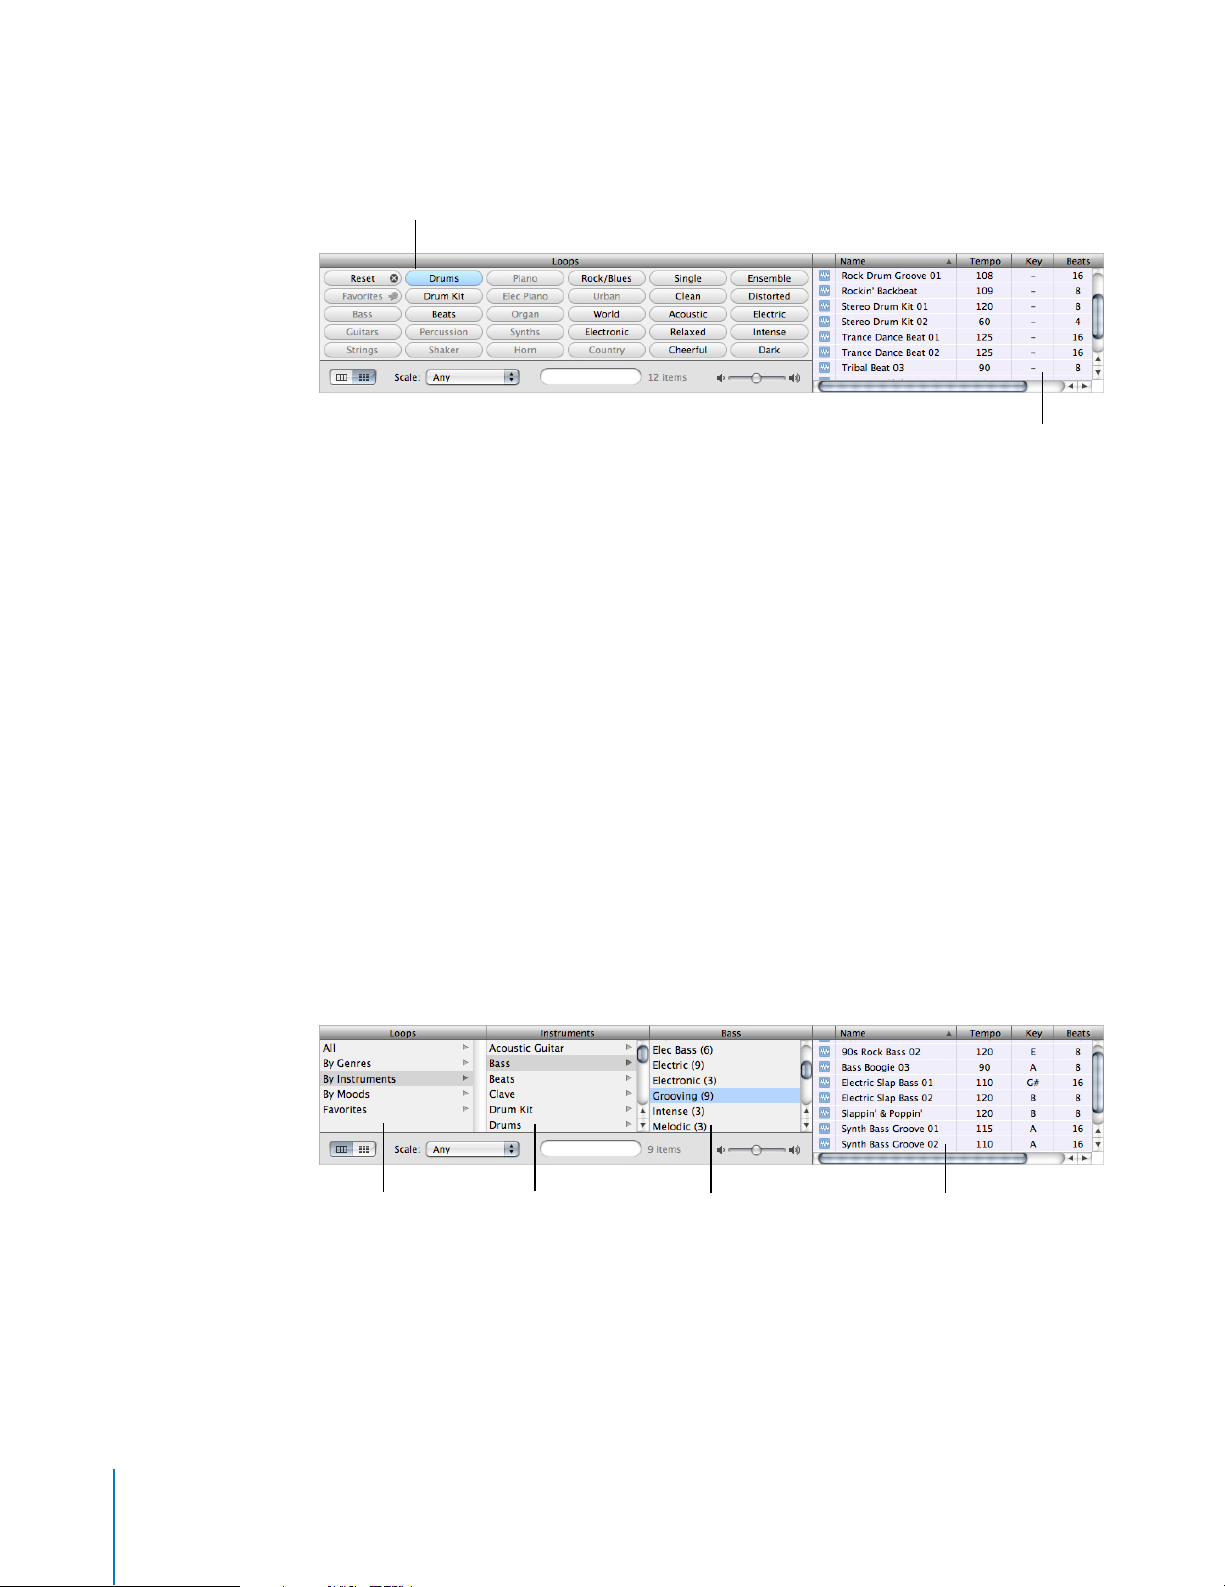
Click a keyword button.
Matching loops appear in the results list.
Results listKeyword type
column
Keyword column
Category column
Finding Loops in Button View
Button view features a grid of keyword buttons. You click a button to see the loops matching the
keyword in the results list to the right. You can narrow your results by clicking multiple buttons.
To find loops in button view:
1
Click the grid button in the lower-left corner of the loop browser to switch to button view.
2
Click a keyword button to show matching loops in the results list. The columns in the results list
show the type of loop, name, tempo, key, and number of beats for each loop.
3
To refine your results, click multiple keyword buttons. This narrows the matching loops to only
those that match all of the selected keywords.
4
To end a search, either click the selected keyword again to deselect it, or click the Reset button to
deselect all selected keywords.
When you click a keyword, incompatible keywords (those that share no loop with the selected
keyword) are dimmed.
Now find some drum loops in button view by clicking the Drums keyword button. Scroll through
the list to see all the matching loops. Notice that the number of matching loops is shown next to
the search field.
Finding Loops in Column View
In column view, clicking a keyword type in the left column shows categories for that keyword
type in the middle column. Clicking a category shows keywords for that category in the right
column. Clicking a keyword shows matching loops in the results list. You can expand your results
by clicking multiple keywords.
4 Lesson 1: Building a Basic Arrangement
Page 5

To find loops in column view:
1
Click the column button in the lower-left corner of the loop browser to switch to column view.
2
Click a keyword type in the left column.
3
Click a category in the middle column.
4
Click a keyword in the right column to show matching loops in the results list.
5
To refine your results, click multiple categories or keywords. This expands the matching loops to
include those that match any of the selected categories or keywords.
Now find some bass loops in column view by first choosing the By Instruments keyword type,
then the Bass category, then the Grooving keyword.
When you find loops in either button view or column view, the total number of matching loops
is shown next to the search field at the bottom of the loop browser.
Previewing Loops in the Loop Browser
When you find loops that fit the criteria you want, you can preview them in the loop browser to
hear which loop will sound best in your song. You can preview the loop by itself (solo), or hear it
playing together with the song.
To preview a loop:
m
Click the loop in the results list. Click the loop again to stop previewing it.
Once you have added loops or recorded instruments in your song, you can preview a loop
together with the song by clicking the Play button before you click the loop. When you preview a
loop with a song, GarageBand matches the tempo and key of the loop to the song’s tempo and
key, and syncs the loop with the song so it starts playing on the beat.
When you preview a loop, you can also control the volume of the loop using the volume slider in
the loop browser.
Drag the volume slider to adjust
the volume of the loop.
To adjust the volume of a loop being previewed:
m
Drag the volume slider in the loop browser left to lower the loop’s volume, or right to raise the
loop’s volume.
If you adjust the volume of a loop in the loop browser, then add the loop to your song by
dragging it to an empty part of the timeline, the volume of the track created for the loop is set to
the same volume.
Now try previewing the loops you found earlier, and see which ones you like.
Refining Your Results in the Loop Browser
There are several ways you can refine your results in the loop browser. You can:
Display loops using a particular scale type
•
•
Display only loops in keys near the song’s key
•
Perform text searches
Lesson 1: Building a Basic Arrangement
5
Page 6

Refining Results by Scale Type
Most loops other than drum loops are recorded using a particular musical scale. In most cases,
when you arrange several loops so that they play together, you’ll want to use loops with the
same scale type. The Scale pop-up menu lets you narrow the loops shown in the results list to
those using either the major or minor scale, those using neither scale, or those good for both.
Choose a scale type here. Enter search text here.
To display only loops with a particular scale type:
m
Choose the scale type from the Scale pop-up menu.
Drum loops don’t usually have a scale type, so try refining the bass loops you found earlier to
show only those using the major scale.
Refining Results to Nearby Keys
Loops with melody and harmony instruments are recorded in a specific musical key. When you
add a loop to a song, GarageBand matches the loop’s key with the key of the song. The closer the
loop’s original key is to the key of the song, the more natural the loop will sound when
transposed to the song’s key. When a loop is transposed by a large number of semitones, the
result can sometimes sound unnatural or distorted.
To display loops only in keys near the song’s key:
1
Choose GarageBand > Preferences, then click the General tab.
2
In the General pane, click the “Filter for more relevant results” checkbox.
Refining Results with Text Searching
You can quickly find loops with specific text in their file name or path using the search field. This
makes it easy to find a loop by name, or to find all loops in a specific folder.
To perform text searches for loops:
m
Type the text you want to search for in the search field, then press Return. Loops with the text in
either their file name or path will be shown in the results list.
Try refining the drum loops you found earlier by typing “acoustic”, “club”, or “funk” in the search
field. You can try typing other words to see what results you get.
You can use several methods together to find specific loops. For instance, you can use keywords
with the Scale pop-up menu, or with the search field, to find only bass loops using the major
scale, or to find only percussion loops with “latin” in the file name.
6 Lesson 1: Building a Basic Arrangement
Page 7

Adding Loops to the Timeline
When you find a loop you want to use in your song, you add the loop to the timeline.
Drag a loop to an empty part of the
timeline to create a new track for the loop.
To add a loop to the timeline:
m
Drag the loop from the loop browser to an empty part of the timeline where there is no track. A
new track of the appropriate type is created, and the loop is added to the new track.
You can also create a new track, then drag a loop of the same type (Real or Software Instrument)
to the track. To learn about creating tracks, see Lesson 2 and Lesson 3.
There are two types of Apple Loops: Real Instrument loops or Software Instrument loops. In the
loop browser, the loop’s icon shows which type each loop is. Real Instrument loops can be
dragged only to a Real Instrument track, and Software Instrument loops can be dragged only to a
Software Instrument track. Either type can be dragged to an empty part of the timeline to create
a new track.
When you add a loop to a song, a region is created from the loop in the timeline. The edits you
make to the region do not change the original loop, so you can always return to the original
sound of the loop or use it in another song.
Now try adding some of the drum and bass loops you found earlier to the timeline.
Arranging Regions in the Timeline
Once you’ve added several loops to the timeline, you can make changes to their regions in the
timeline to start building the arrangement of the song.
There are several ways you can arrange regions in the timeline. You can:
Cut, copy, and paste them
•
•
Loop them
Lengthen or shorten them
•
•
Move them to another part of the timeline or to another track
Transpose them to a different key
•
Note:
To select regions and perform other actions such as looping and resizing, you may need to
zoom in on the region so that it is large enough to select.
Lesson 1: Building a Basic Arrangement
7
Page 8

Selecting Regions
In order to edit a region, you must first select it in the timeline.
To select a region, do one of the following:
Select a single region by clicking it.
•
•
Select multiple regions by Shift-clicking.
Drag from a point before the first region to a point after the last one to select the regions in
•
between.
Cutting, Copying, and Pasting Regions
You can cut, copy, and paste regions using the standard Mac OS menu commands and keyboard
shortcuts.
To cut a region:
m
Select the region, then choose Edit > Cut.
To copy a region, do one of the following:
Select the region, then choose Edit > Copy.
•
•
Option-drag a loop to create a copy.
To paste a region:
m
Move the playhead to the point in the timeline where you want the region to start, then choose
Edit > Paste.
When you paste a region, the playhead moves to the end of the pasted region. You can paste
additional copies of the region, and each one starts at the point in the timeline where the
previous one ends.
Looping Regions
You can loop a region so that it plays repeatedly. When you loop a region, it plays repeatedly
from the start point to the end point.
To loop a region:
1
Move the pointer over the upper half of the right edge of the region. The pointer changes to a
loop pointer, with a circular arrow.
2
Drag the edge of the region to the point where you want it to stop playing. The region will loop
repeatedly to that point.
Loop pointer
When you loop a region, the notches at the top and bottom of the region show the beginning
and end of each repetition. You can drag to the end of a repetition, or have it end in the middle
of a repetition.
Try looping the drum and bass regions you added to the timeline. Rhythm patterns in most
popular music last for some multiple of four measures. For example, the verse and chorus of a
popular song often last for 16 or 32 measures each.
8 Lesson 1: Building a Basic Arrangement
Page 9

Resizing Regions
You can resize regions by either shortening or lengthening them.
When you shorten a region, only the visible part of the loop plays.
•
•
When you lengthen a region, you add silence (blank space) to its beginning or end.
To resize a region:
1
Move the pointer over the lower half of either edge of the region. The pointer changes to a resize
pointer, with an arrow pointing away from the region.
2
Drag the edge of the region to shorten it or lengthen it.
Resize pointer
Resizing a region by lengthening adds silence to the region. This can be useful if you want to
make copies of the region, each lasting for a certain number of beats.
Note:
You can’t lengthen a Real Instrument region beyond its original length.
Moving Regions
You can move a region by dragging it to a new point in the timeline. You can also move a region
to another track of the same type as the region (Real Instrument regions can only be moved to
Real Instrument tracks, and Software Instrument regions can only be moved to Software
Instrument tracks).
To move a region:
•
Drag the region left or right to a new point in the timeline.
•
Drag the region up or down to another track of the same type.
Two regions cannot overlap in the same track. If you drag a region over part of another region,
the region being covered is shortened to the edge of the overlapping region. If one region
completely covers another region, the region being covered is deleted from the track.
Try adding a new drum or bass loop to the timeline. Move it so it starts at the end of the one
you’ve added earlier, then loop it to create a new rhythmic groove.
Transposing Regions
When you add a loop to the timeline, the loop’s region is matched, or
the song. In most situations, you’ll want regions to be in the same key as the song. You can
transpose a region to a different key when you want the song to temporarily move to a new key,
or to create tension between the region and the rest of the song (called
Drag the Transpose slider, or type the
number of semitones in the field.
transposed
dissonance
, to the key of
).
Lesson 1: Building a Basic Arrangement
9
Page 10

To transpose a region:
1
Select the region in the timeline, then click the Track Editor button to open the track editor. You
can also double-click the region to open the track editor.
2
Drag the Transpose slider to transpose the region up or down. You can also type the number of
semitones you want to transpose the region in the Transpose field. A
semitone
is the smallest
distance between two musical notes.
Try adding a new bass loop after the one that you have already dragged to the timeline, then
transposing it. The most common transpositions are five and seven semitones up or down, but
feel free to try whatever sounds good.
Note:
You can transpose regions created from loops or from Software Instrument recordings, but
not regions from Real Instrument recordings. For information about Real Instrument regions, see
Lesson 2.
Renaming Regions
You can rename a region in the track editor.
To rename a region:
1
Click the region in the timeline to select it, then click the Track Editor button. You can also
double-click the region to open the track editor. The waveform of the region appears in the track
editor. Be sure the header over the field says Region, not Track, before you type the new name.
2
Select the text in the name field, then type the new name in the field.
Using the Timeline Grid
When working with regions in the timeline, you usually want them to align with the beats and
measures in the beat ruler, so they start playing on the beat. GarageBand includes a timeline grid
that makes it easy to align regions with beats and measures in the beat ruler, and with other
musical note values.
When you turn on the grid, the playhead, regions, and other items in the timeline snap to the
nearest grid position in the timeline and the track editor when you move or resize them.
To turn the grid on or off:
m
Choose Control > Snap to Grid.
The grid can be set to any of the following note values:
•
1/4 notes, 1/8 notes, 1/16 notes, or 1/32 notes
1/4 note triplets, 1/8 note triplets, or 1/16 note triplets
•
•
1/8 note swing light or swing heavy, 1/16 note swing light or swing heavy
The grid can also be set to Automatic. When set to Automatic, the grid changes when you zoom
in or zoom out. The grid division moves between measures, 1/4 notes, 1/8 notes, 1/16 notes, and
1/32 notes, depending on the zoom level.
To set the timeline grid value:
m
Click the Timeline Grid button, then choose a note value from the menu, or choose Automatic.
10 Lesson 1: Building a Basic Arrangement
Page 11

Using Undo and Redo
As you build your arrangement in the timeline, you may want to undo or redo some of the
changes you make. If you decide you don’t like the last change you made to a song, it can usually
be undone. After undoing it, if you decide you like the song better with the change, you can
redo the last command.
You can also use the Undo and Redo commands as a quick way of trying out changes to a song.
You can make several changes to the song, then step back through the changes using Undo. If
you change your mind after undoing a step, you can recover the changes using Redo. You can
undo or redo any number of actions, since the last time you saved. At any point, you can save a
new version of the song by choosing File > Save As.
To undo the last change:
m
Choose Edit > Undo.
To redo the last change:
m
Choose Edit > Redo.
2004 Apple Computer, Inc. All rights reserved.
©
Apple and the Apple logo are trademarks of Apple Computer, Inc., registered in the U.S. and other countries. GarageBand is a trademark of
Apple Computer, Inc. The owner or authorized user of a valid copy of the GarageBand software may reproduce this publication for the
purpose of learning or teaching to use the software, excluding commercial or paid-for purposes. 022-1386.
 Loading...