Page 1

1
GarageBand at a Glance
At a Glance
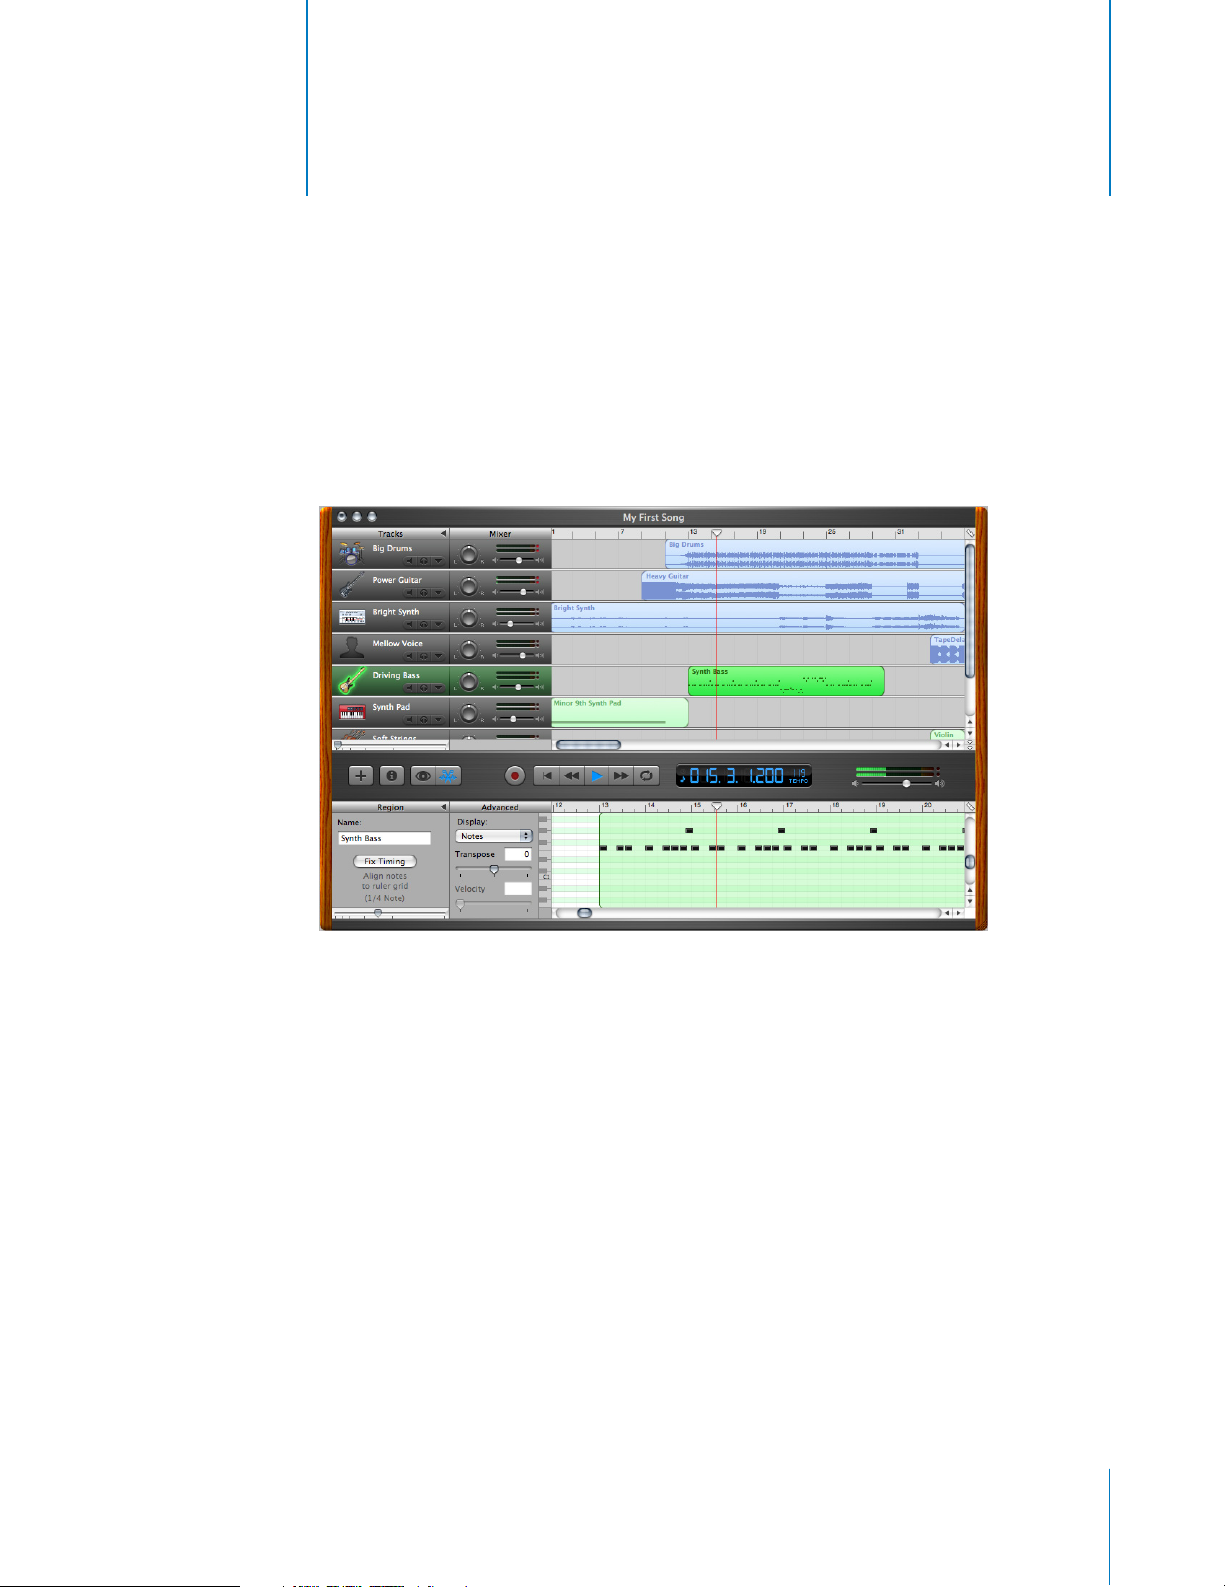
“GarageBand at a Glance” introduces you to the features and controls in the GarageBand
windows. You use these controls to create your songs in GarageBand. Take a look at these pages
even if you don’t plan to complete the tutorial, because knowing the names and functions of the
GarageBand controls will make it easier to find answers to your questions in GarageBand Help.
The pages that follow introduce you to the main GarageBand window–including the timeline,
the track editor, and the loop browser–and to the Track Info window. You record Real and
Software Instruments, add loops, and arrange and mix your songs in the main window, and
change track instrument, effects, and input settings in the Track Info window.
1
Page 2

GarageBand Window
A
D
E
F
A
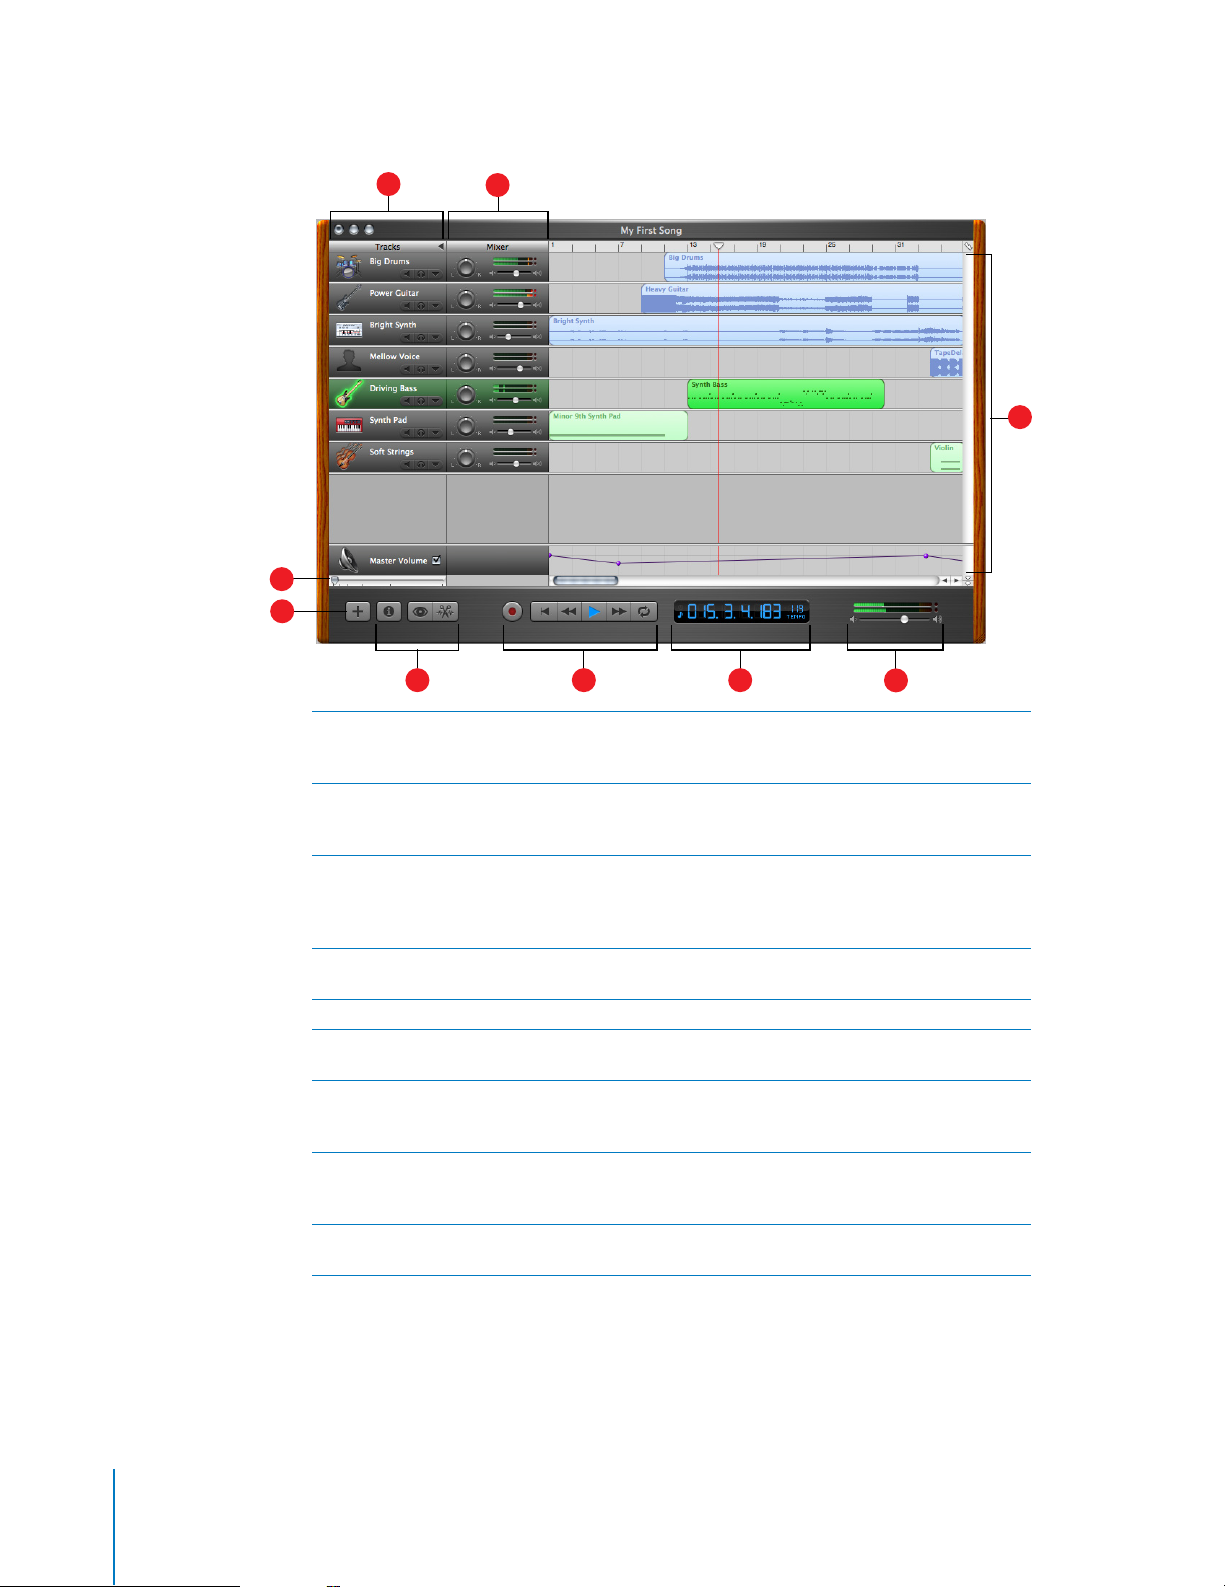
Track headers:
Click the Mute button (with the speaker icon) to silence the track. Click the Solo button (with the
headphone icon) to hear the track by itself.
B
Track mixer:
placement in the stereo field). Drag the volume slider to adjust the track’s volume. Watch the
level meters to see the track’s volume level as you record and play.
C
Timeline:
arrange regions. Also includes the beat ruler, which you use to move the playhead and align
items in the timeline with beats and measures. See “Timeline” on page 3 for a description of the
features and controls in the timeline.
D
Zoom slider:
out to see more of the timeline.
E
New Track button:
F
Track Info, Loop Browser, and Track Editor buttons:
browser, or track editor.
G
Transport controls:
stop the song playing. Click the Go to Beginning, Rewind, or Fast Forward buttons to move the
playhead to different parts of the song. Click the Cycle button to turn on the cycle region.
H
Time display:
absolute time (hours, minutes, seconds, fractions). Also shows the song’s tempo. Includes
buttons for changing the format of the time display.
I
Master volume slider and level meters:
the song. Watch the level meters to see if clipping is occurring before you export a song.
Drag the pan wheel to adjust the pan position of the track (the left-to-right
Contains the tracks where you record Real and Software Instruments, add loops, and
B
G
The instrument icon and name are shown on the left of each track’s header.
Drag the zoom slider to zoom in for a closer view of part of the timeline, or to zoom
Click to add a track below the existing tracks in the timeline.
Click the Record button to start recording. Click the Play button to start or
Shows the playhead’s position in either musical time (measures, beats, ticks) or
Drag the volume slider to adjust the output volume level of
H
Click to open the Track Info window, loop
I
C
2 GarageBand at a Glance
Page 3

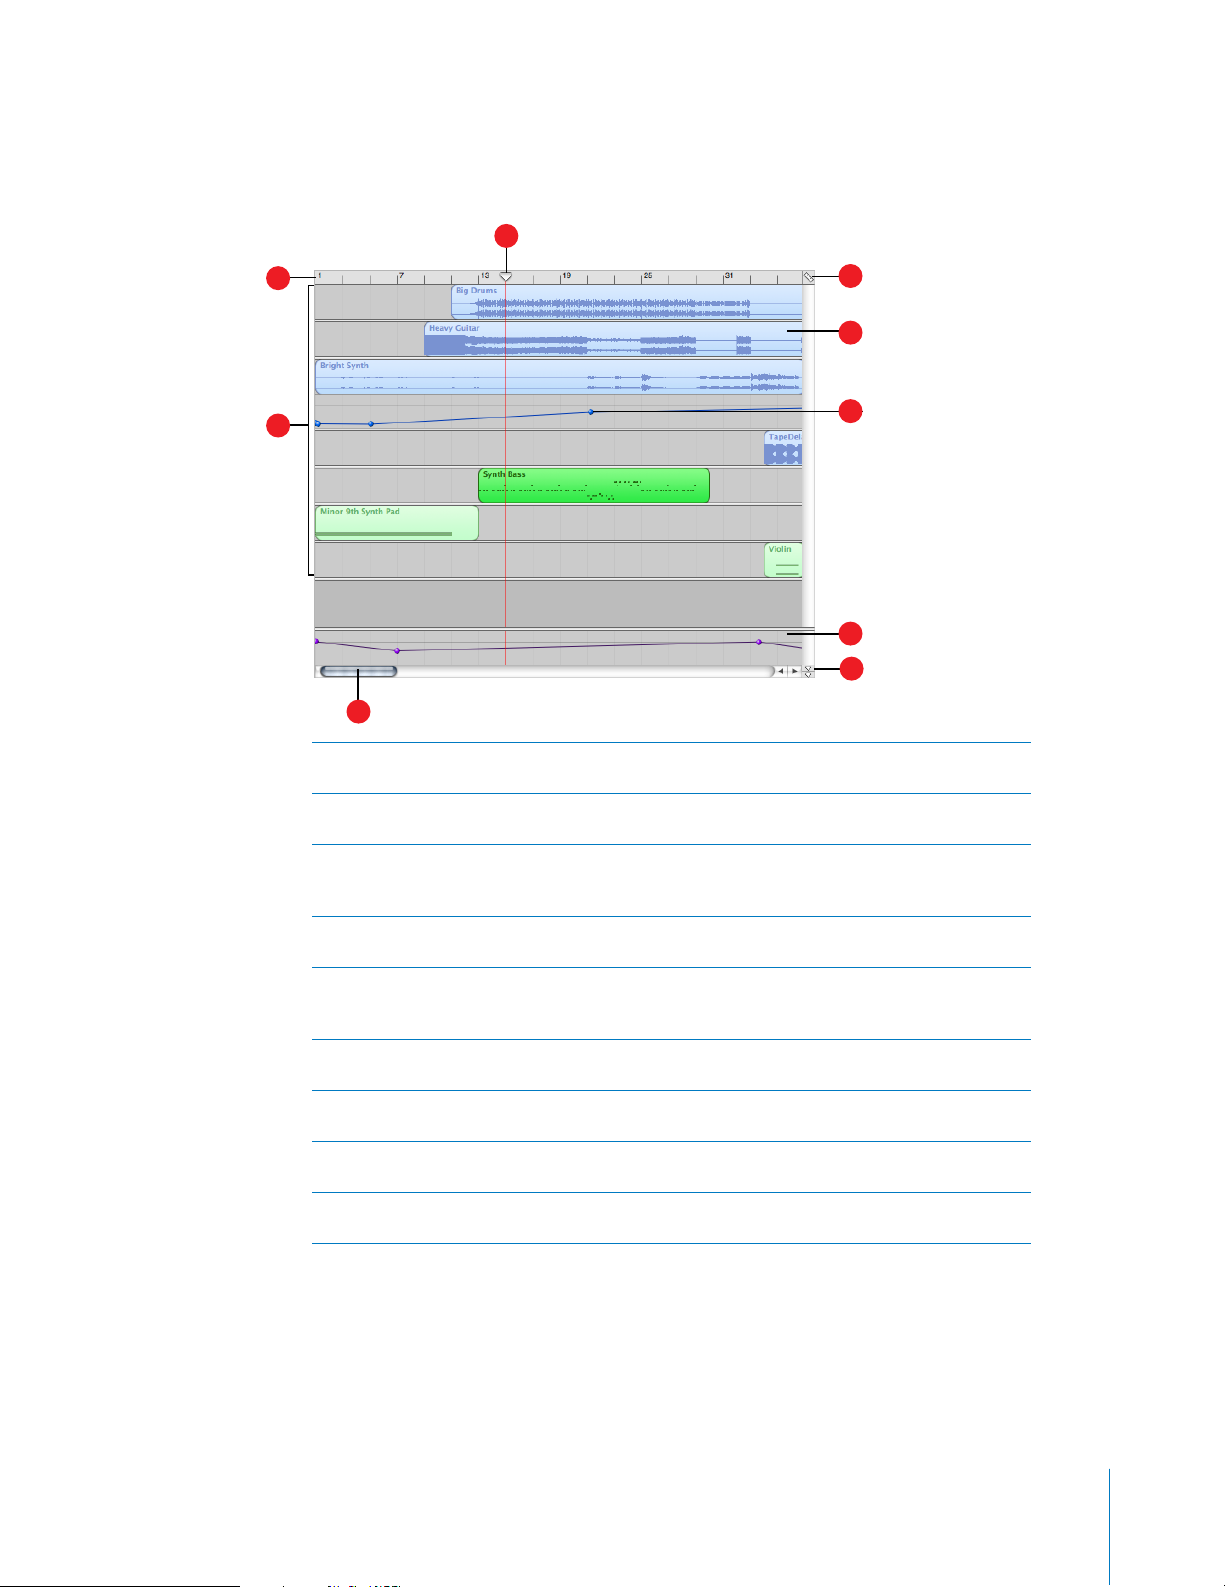
Timeline
The timeline contains the tracks where you record Real and Software Instruments, add loops, and
arrange regions.
C
A
B
I
A
Beat ruler:
beat ruler to move the playhead to a precise beat or measure.
B
Tracks:
to a song. You arrange the song by working with loops and regions in tracks in the timeline.
C
Playhead:
when you click the Play button. Also shows where cut and copied items are pasted in the
timeline. You can move the playhead to change what part of the song is playing.
D
Timeline grid button:
value change when you zoom in or out.
E
Regions:
region in the timeline. You can cut, copy, and paste regions, resize and move them, transpose
them, and make other changes to build the arrangement of the song.
F
Volume curves:
curve to add dynamic changes to different parts of a song.
G
Master track:
to the master track.
H
Playhead lock button:
the you can see a different part of the song in the track editor than in the timeline.
I
Scroll bars:
scroll bar to see tracks not currently visible.
Shows beats and measures, the units of musical time in the timeline. You can click the
You record Real and Software Instruments in tracks, and drag loops to tracks to add them
Shows the point in the song currently playing, or the point where playback starts
Choose a note value for the timeline grid, or choose Automatic to have the
When you record a Real Instrument or Software Instrument, or add a loop, you create a
Add a volume curve to a track, then add and adjust control points on the volume
You can change the sound of the overall song by adding effects or a volume curve
Click to unlock the playheads in the timeline and the track editor, so that
Drag the horizontal scroll bar to move to a different part of a song. Drag the vertical
D
E
F
G
H
GarageBand at a Glance
3
Page 4

Track Editor
The track editor is like a microscope showing a close-up view of part of a track. You can edit Real
and Software Instrument regions in a variety of ways in the track editor.
For Real Instruments
When you select a Real Instrument track, the track editor shows the waveform of the regions in
the track. You can rename regions and transpose loop regions (but not recorded Real Instrument
regions) in the track editor.
C
A
B
A
Name field:
selected in the timeline, type a new name for the region in the field.
B
Zoom slider:
selected region. Zooming in the track editor is independent of the timeline.
C
Transpose slider and field:
down by up to 12 semitones. You can also type the number of semitones in the field. Only Real
Instrument regions created from loops can be transposed.
D
Beat ruler:
E
Playhead:
F
Waveform display:
G
Scroll bar:
When a track is selected, type a new name for the track in the field. When a region is
Drag to zoom in for a closer view or to zoom out to see more of the track or
Drag the slider to transpose the selected Real Instrument region up or
Shows beats and measures for the area visible in the track editor.
Shows the point in the song currently playing.
Shows the waveform of the regions in the track.
Drag the scroll bar to move to a different part of the track.
ED F
G
4 GarageBand at a Glance
Page 5

For Software Instruments
When you select a Software Instrument track, the track editor shows a graphic display of the
notes in the track or selected region. You can edit individual notes in Software Instrument
regions, fix the timing of notes, and transpose and rename regions. You can also show and edit
controller data, such as pitch bend, modulation wheel, and sustain data, recorded when you play
your music keyboard.
D
G H I
A
B
C
E F
A
Name field:
selected in the timeline, type a new name for the region in the field.
B
Fix Timing button:
grid position.
C
Zoom slider:
D
Display pop-up menu:
E
Velocity slider and field:
type the velocity value in the field. A note’s velocity reflects how hard the key is pressed when
you play the note.
F
Transpose slider and field:
up or down by up to 36 semitones. You can also type the number of semitones in the field.
G
Beat ruler:
H
Notes/controller data display:
graphic format. You can move and resize notes to adjust their pitch, where they start playing,
and how long they play. Shows controller data when chosen in Display pop-up menu.
I
Playhead:
J
Scroll bar:
When a track is selected, type a new name for the track in the field. When a region is
Click to fix the timing of the selected region so that notes move to the nearest
Drag to zoom in for a closer view or to zoom out to see more of the track.
Choose whether to show notes or controller data in the track editor.
Drag the slider to change the velocity of selected notes. You can also
Drag the slider to transpose the selected Software Instrument region
Shows beats and measures for the area visible in the track editor.
Shows the individual notes of Software Instrument regions in a
Shows the point in the song currently playing.
Drag the scroll bar to move to a different part of a track.
J
GarageBand at a Glance
5
Page 6

Loop Browser
The loop browser lets you quickly find loops to add to your songs. You can find loops using
keywords for instrument, musical genre, or mood. You can also perform text searches, and refine
your results in several ways. The loop browser shows the tempo, key, and number of beats for
each matching loop. You can preview loops in the loop browser before you add them to a song.
The loop browser gives you two ways to find loops: button view and column view.
Button View
In button view, the loop browser contains a set of keyword buttons. Click a button to show
matching loops in the results list. Clicking multiple buttons narrows the results to those loops
that match all of the selected keywords.
A
C ED FB
A
Keyword buttons:
click multiple keyword buttons to narrow your results.
B
View buttons:
button view.
C
Scale type pop-up menu:
D
Search text field:
E
Preview volume slider:
F
Results list:
number of beats for each loop. Click a loop in the results list to preview it. Click the Favs
checkbox for a loop to add it to your favorites.
Click a keyword button to display matching loops in the results list. You can
Click the column button to show column view, or click the grid button to show
Choose a scale type to see only loops using that musical scale.
Type text in the field to see loops with the text in their file name or path.
Drag the slider to adjust the volume of the loop being previewed.
Shows loops that match the selected keywords. Also displays the tempo, key, and
6 GarageBand at a Glance
Page 7

Column View
In column view, the loop browser features columns for keyword type, categories, and keywords.
Click a keyword type to show categories for that type, click a category to show keywords, then
click a keyword to show matching loops in the results list. Clicking multiple keywords expands
the results to those loops matching any of the selected keywords.
A B C
D
A
Keyword type column:
middle column.
B
Category column:
C
Keyword column:
multiple keywords to expand your results.
D
View buttons:
button view.
E
Scale type pop-up menu:
F
Search text field:
G
Preview volume slider:
H
Results list:
and number of beats for each loop. Click a loop in the results list to preview it. Click the Favs
checkbox for a loop to add it to your favorites.
E GF H
Click a keyword type to show the categories for that keyword type in the
Click a category to show keywords for that category in the right column.
Click a keyword to show matching loops in the results list. You can click
Click the column button to show column view, or click the grid button to show
Choose a scale type to see only loops using that scale.
Type text in the field to see loops with the text in their file name or path.
Drag the slider to adjust the volume of the loop being previewed.
Shows the loops that match the selected keywords. Also displays the tempo, key,
GarageBand at a Glance
7
Page 8

Track Info window
The Track Info window shows the current instrument and effects settings for the selected track.
You can change these settings in the Track Info window. Some controls in the Track Info window
are different for Real Instrument tracks than for Software Instrument tracks (as noted below).
A B
C
D
E
G
A
Instrument category list:
the instrument list.
B
Instrument list:
C
Instrument icon pop-up menu:
D
Details triangle:
E
Effect checkboxes, sliders, and pop-up menus:
Drag the sliders to adjust the level of the effects, or choose an item from the pop-up menus.
The Track Info window includes the following effects for Real and Software Instruments:
Noise gate slider (Real Instrument tracks only):
Module and module setting pop-up menus (Software Instrument tracks only–not pictured):
an instrument module (preset) from the menu.
Compression slider:
Equalizer pop-up menu:
Effect and effect setting pop-up menus:
Choose an effect from a pop-up menu on the left, then choose an effect preset from the pop-up
menu on the right.
Echo slider:
Reverb slider:
Click an instrument from the list.
Drag the slider to adjust the amount of echo.
Drag the slider to adjust the amount of reverb.
Click an instrument category to see the instruments for that category in
Click to choose an instrument icon from the icon menu.
Click to show the instrument, effects, and channel settings.
Click an effect checkbox to turn the effect on or off.
Drag the slider to adjust the amount of gating.
Drag the slider to adjust the amount of compression.
Choose an EQ setting from the pop-up menu.
Click a checkbox to turn additional effects on or off.
F
Choose
8 GarageBand at a Glance
Page 9

F
Input channel pop-up menu and buttons (Real Instrument tracks only):
or channels for the instrument from the pop-up menu. Click the Mono button for an instrument
with mono (single) output, or click the Stereo button for an instrument with stereo outputs. Click
the Monitor On button to turn on monitoring for the track, or click the Monitor Off button to
turn off monitoring.
G
Save Instrument and Delete Instrument buttons:
Click the Save Instrument button to save an
instrument. Click the Delete Instrument button to delete a saved instrument.
Choose the input channel
2004 Apple Computer, Inc. All rights reserved.
©
Apple and the Apple logo are trademarks of Apple Computer, Inc., registered in the U.S. and other countries. GarageBand is a trademark of
Apple Computer, Inc. The owner or authorized user of a valid copy of the GarageBand software may reproduce this publication for the
purpose of learning or teaching to use the software, excluding commercial or paid-for purposes. 022-1397
 Loading...