Page 1

GarageBand 3
Getting Started
Includes a complete tour of the
GarageBand window, plus step-by-step
lessons on working with GarageBand
Page 2

1
Contents
Chapter 1 7 Welcome to GarageBand
8
What’s New in GarageBand 3
9
Before You Begin
9
What You’ll Learn
9
What You Need
10
Finding Out More
Chapter 2 11 GarageBand at a Glance
12
GarageBand Window
14
Timeline
16
Editor
16
For Real Instruments
17
For Software Instruments—Graphic View
18
For Software Instruments—Notation View
19
For Podcasts and Video—Marker View
20
Loop Browser
20
Button View
21
Column View and Podcast Sounds View
22
Track Info Pane
22
Real and Software Instrument Tracks
24
Master Track
26
Media Browser
Chapter 3 27 Working With Projects
27
Creating a Project
28
Setting the Tempo
29
Setting the Key
29
Setting the Time Signature
29
Opening an Existing Project
30
Saving a Project
31
Sending a Project to iTunes
2
Page 3

Chapter 4 32 Using Apple Loops
33
Finding Loops With the Loop Browser
33
34
34
35
35
36
36
36
37
37
38
39
Finding Loops in Column View
Finding Loops in Button View
Finding Loops in Podcast Sounds View
Previewing Loops in the Loop Browser
Refining Your Searches
Displaying Loops From a Jam Pack or Folder
Searching by Scale Type
Limiting Searches to Nearby Keys
Searching for Specific Text
Adding Loops to the Timeline
Creating Your Own Apple Loops
Adding Loops to the Loop Library
Chapter 5 40 Working in the Timeline
40
About Regions
41
Selecting Regions
41
Cutting, Copying, and Pasting Regions
42
Looping Regions
42
Resizing Regions
43
Moving Regions
43
Transposing Regions
44
Splitting Regions
44
Joining Regions
44
Fixing the Timing of Software Instrument Regions
45
Setting Real Instrument Regions to Keep Their Original Tempo
45
Renaming Regions
45
Using the Grid
46
Using Undo and Redo
Chapter 6 47 Working With Real Instruments
47
Adding a Real Instrument Track
48
Monitoring Real Instrument Input
48
Getting Ready to Record
49
Recording a Real Instrument
50
51
51
51
Recording a Real Instrument With the Cycle Region
Recording Multiple Real Instrument Tracks
Changing Real Instrument Settings
Changing the Instrument
Contents
3
Page 4

52
53
53
54
Changing the Input Channel
Adjusting Input Volume
Using the Instrument Tuner
Adding an Audio File From the Finder
Chapter 7 55 Working With Software Instruments
55
Using Musical Typing
56
Using the Onscreen Music Keyboard
57
Adding a Software Instrument Track
57
Getting Ready to Record
58
Recording a Software Instrument
58
59
Recording a Software Instrument With the Cycle Region
Changing Software Instrument Settings
Chapter 8 60 Working in the Editor
60
Selecting Regions
61
Editing Real Instrument Regions
61
61
62
62
62
63
63
64
Moving Real Instrument Regions
Cropping Part of a Real Instrument Region
Joining Real Instrument Regions
Enhancing the Tuning of Real Instrument Tracks
Enhancing the Timing of Real Instrument Tracks
Editing Software Instrument Regions
Editing Notes in a Software Instrument Region
Editing Controller Information in a Software Instrument Region
Chapter 9 66 Working in Notation View
66
About Notation View
68
Editing Notes in Notation View
69
69
69
69
70
70
70
70
70
Adding Notes
Selecting Notes
Moving Notes
Copying Notes
Changing the Pitch of Notes
Changing the Duration of Notes
Deleting Notes
Changing Note Velocity
Adding Pedal Down and Pedal Up Symbols
Chapter 10 72 Mixing and Adding Effects
72
What Is Mixing?
73
Setting Track Volume Levels
73
Setting Track Pan Position
4
Contents
Page 5

73
Using Volume and Pan Curves
74
Setting the Output Volume
75
Adding Fade Ins and Fade Outs
75
Transposing Part of a Project to a Different Key
76
Using Effects
76
77
78
78
78
79
79
Types of Effects
Adding Effects
Adjusting Effects
Turning Effects On and Off
Choosing Effect Presets
Editing Effect Presets
Saving Effect Presets
Chapter 11 80 Creating Podcasts in GarageBand
81
Creating a Podcast Episode
81
83
83
84
85
85
85
Creating the Podcast Audio
Ducking Backing Tracks
Adding and Editing Markers
Adding Marker Region Artwork
Adding a URL to a Marker
Adding Chapter Titles
Deleting Markers
86 Adding Episode Artwork
86 Editing Artwork
86 Editing Episode Information
87 Creating a Video Podcast Episode
87 Sending a Podcast to iWeb
87 Exporting a Podcast Episode
Chapter 12 88 Creating a Musical Score for an iMovie or Video
88 Sending an iMovie Project to GarageBand
89 Importing a Video File From the Media Browser
90 Viewing the Video
90 Working With the Video’s Audio Track
90 Adding and Editing Markers
91 Adding a URL to a Marker
91 Adding a Chapter Title
91 Sending a Movie to iDVD
92 Sending a Video Podcast to iWeb
92 Exporting a Project as a QuickTime Movie
Contents
5
Page 6

Appendix A 93 Keyboard Shortcuts
Appendix B 96 Connecting Music Equipment to Your Computer
96 Connecting a Musical Instrument or Microphone
97 Connecting a Music Keyboard to Your Computer
6 Contents
Page 7

1 Welcome to GarageBand
1
This document gives you useful information and step-bystep instructions for creating projects with GarageBand.
The following chapters give you a tour of the GarageBand windows and a series of
lessons to help you create your own music projects. The chapters in GarageBand
Getting Started cover the following topics:
 “GarageBand at a Glance” provides a tour of the windows and controls in
GarageBand.
 “Working With Projects” describes how to create a new project, as well as how to
save, archive, and export your projects.
 “Using Apple Loops” describes how to find and preview Apple Loops in the loop
browser, add them to the timeline, and create your own Apple Loops.
 “Working in the Timeline” describes how to build your project by arranging regions
in the timeline.
 “Working With Real Instruments” describes how to add a Real Instrument track, turn
on monitoring, set the input channel and format, record a Real Instrument, and
change Real Instrument settings.
 “Working With Software Instruments” describes how to add a Software Instrument
track, record a Software Instrument, and change Software Instrument settings.
 “Working in the Editor” describes the different ways you can edit Real and Software
Instrument regions.
 “Working in Notation View” describes how to view Software Instrument regions as
music notation, and how to edit notes, note velocity, and pedal markings in notation
view.
 “Mixing and Adding Effects” describes the steps to follow in mixing your project, and
how to use the effects included with GarageBand.
 “Creating Podcasts in GarageBand” describes how to create audio and video podcast
episodes and send them to iWeb or export them.
7
Page 8

 “Creating a Musical Score for an iMovie or Video” describes how to import a video file
into a project, view the video, edit the video’s audio, add markers, URLS, and chapter
titles, and send the finished movie to iDVD or to iWeb, or export it as a QuickTime
movie.
GarageBand Getting Started also includes appendixes listing keyboard shortcuts and
describing how to connect music equipment to your computer.
What’s New in GarageBand 3
GarageBand 3 includes the following new features and enhancements:
 Using the Media Browser, you can find and preview photos from your iPhoto library,
songs from your iTunes library, and iMovie projects from your Movies folder, then
import them into a project. You can also import other GarageBand projects saved
with an iLife preview into a project.
 You can create podcasts in GarageBand, including enhanced podcasts and video
podcasts. You can view your podcast in the podcast preview pane as you record and
mix the audio. You can also add and edit markers, which can include artwork, URLs,
and chapter titles. When you finish creating your podcast episode, you can send it to
iWeb to publish on the Internet, or export it and publish it using another application.
 You can send an iMovie project to GarageBand, or import a video file, and create a
musical score for the video. You can view the video as you work, edit the video's
audio track, and add markers. When you finish creating your musical score, you can
send the project to iDVD, export it as a video podcast, or export it as a QuickTime
movie.
 You can record iChat audio and video conferences in a GarageBand project.
 GarageBand includes new Apple Loops designed to be used in podcast episodes.
You can add podcast sounds from the loop browser, and use them with the new
Sound Effects Software Instrument when you create a podcast.
 The Track Info pane is now integrated into the main GarageBand window. When you
show the Track Info pane, it appears on the right side of the timeline, without
covering other parts of the main window.
 By default, Real Instrument recordings and loops match the song tempo. Now you
can set individual Real Instrument regions to follow their original tempo.
 You can compact a project to reduce the file size for easier sharing.
 GarageBand projects can now be up to 1999 measures long (twice as long as before).
8 Chapter 1 Welcome to GarageBand
Page 9

Before You Begin
To make it easier to follow the lessons as you work, print each lesson before you start.
In many of the tasks shown in this document you need to choose menu commands. In
the lessons, and in GarageBand Help, menu commands appear like this:
Choose Edit > Join Selected.
The first term after Choose is the name of the menu in the GarageBand menu bar. The
term (or terms) following the angle bracket are the items you choose from that menu.
What You’ll Learn
GarageBand lets you be the composer, the bandleader, and the mixing engineer as you
create your own original projects. You can create projects by adding Apple Loops, by
connecting a musical instrument or microphone to your computer and recording it in a
Real Instrument track, by playing the Software Instruments included with GarageBand,
or using any combination of these methods. You’ll learn how to:
 Create, open, and save projects
 Set project tempo, key, time signature, and length
 Find and preview Apple Loops using the loop browser, then add them to your
projects
 Play and record both Real and Software Instruments
 Arrange Real and Software Instrument regions in the timeline, and edit them in the
editor
 View and edit Software Instrument regions as music notation
 Send a movie from iMovie so you can create a soundtrack in GarageBand, edit the
movie’s audio track, add markers, and send the movie to iDVD
 Create an enhanced podcast or enhanced video podcast in GarageBand and send it
to iWeb, or export it as a podcast episode
What You Need
All you need to create music in GarageBand is a Macintosh computer that meets the
system requirements, as listed in the Read Me file. Optionally, you can use any of the
following equipment to expand your music creation possibilities:
 A microphone to record your voice or any acoustic musical instrument
 Electronic musical instruments, including guitars, basses, and keyboards
 A music keyboard (USB or MIDI) to play and record Software Instruments
 An audio interface to connect musical instruments or microphones
 A pair of speakers or monitors to hear the music you create with greater audio
quality
Chapter 1 Welcome to GarageBand 9
Page 10

Finding Out More
For complete and up-to-date information on GarageBand, including news about new
features, user tips, and a list of supported music equipment, go to the GarageBand
website at www.apple.com/ilife/garageband.
To get help while you’re using GarageBand, look in GarageBand Help, available in
the Help menu when GarageBand is open. You'll find more information about the
topics covered in this document, as well as information and instructions for many
more topics.
For support, go to the GarageBand support site at
www.apple.com/support/garageband.
10 Chapter 1 Welcome to GarageBand
Page 11
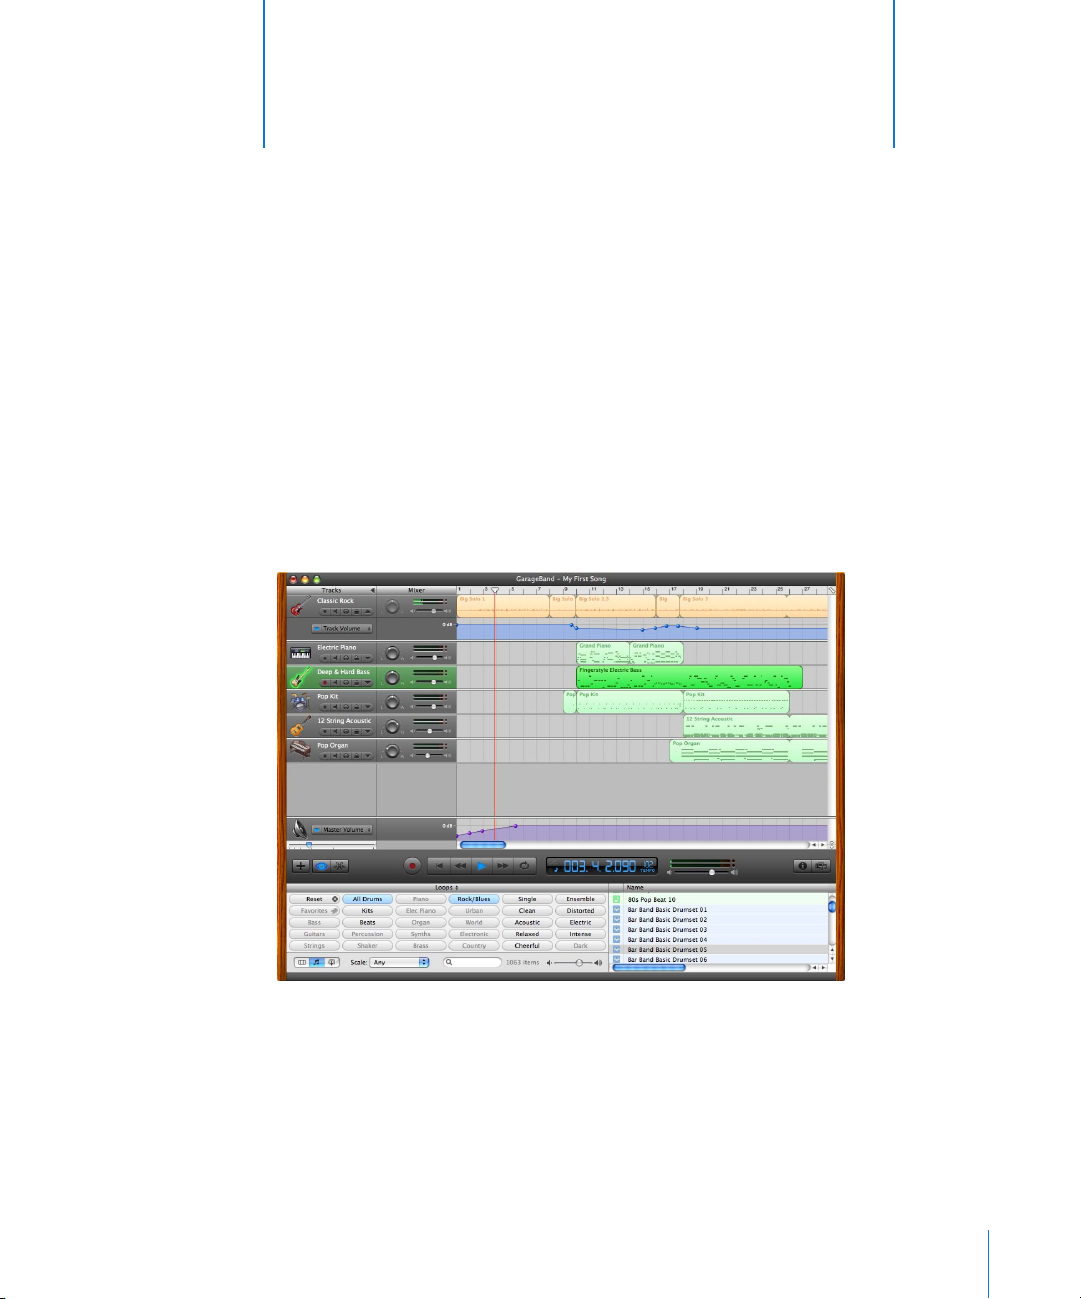
2 GarageBand at a Glance
“GarageBand at a Glance” introduces you to the features
and controls in the GarageBand windows. You use these
controls to create your projects in GarageBand.
Take a look at these pages even if you don’t plan to complete the lessons in
GarageBand Getting Started, because knowing the names and functions of the
GarageBand controls will make it easier to find answers to your questions in
GarageBand Help.
2
The pages that follow introduce you to the GarageBand window—including the
timeline, the loop browser, and the editor—and to the Track Info pane. You record Real
and Software Instruments and arrange and mix your projects in the timeline, find and
preview loops in the loop browser, and change track instrument, effects, and input
settings in the Track Info pane.
11
Page 12
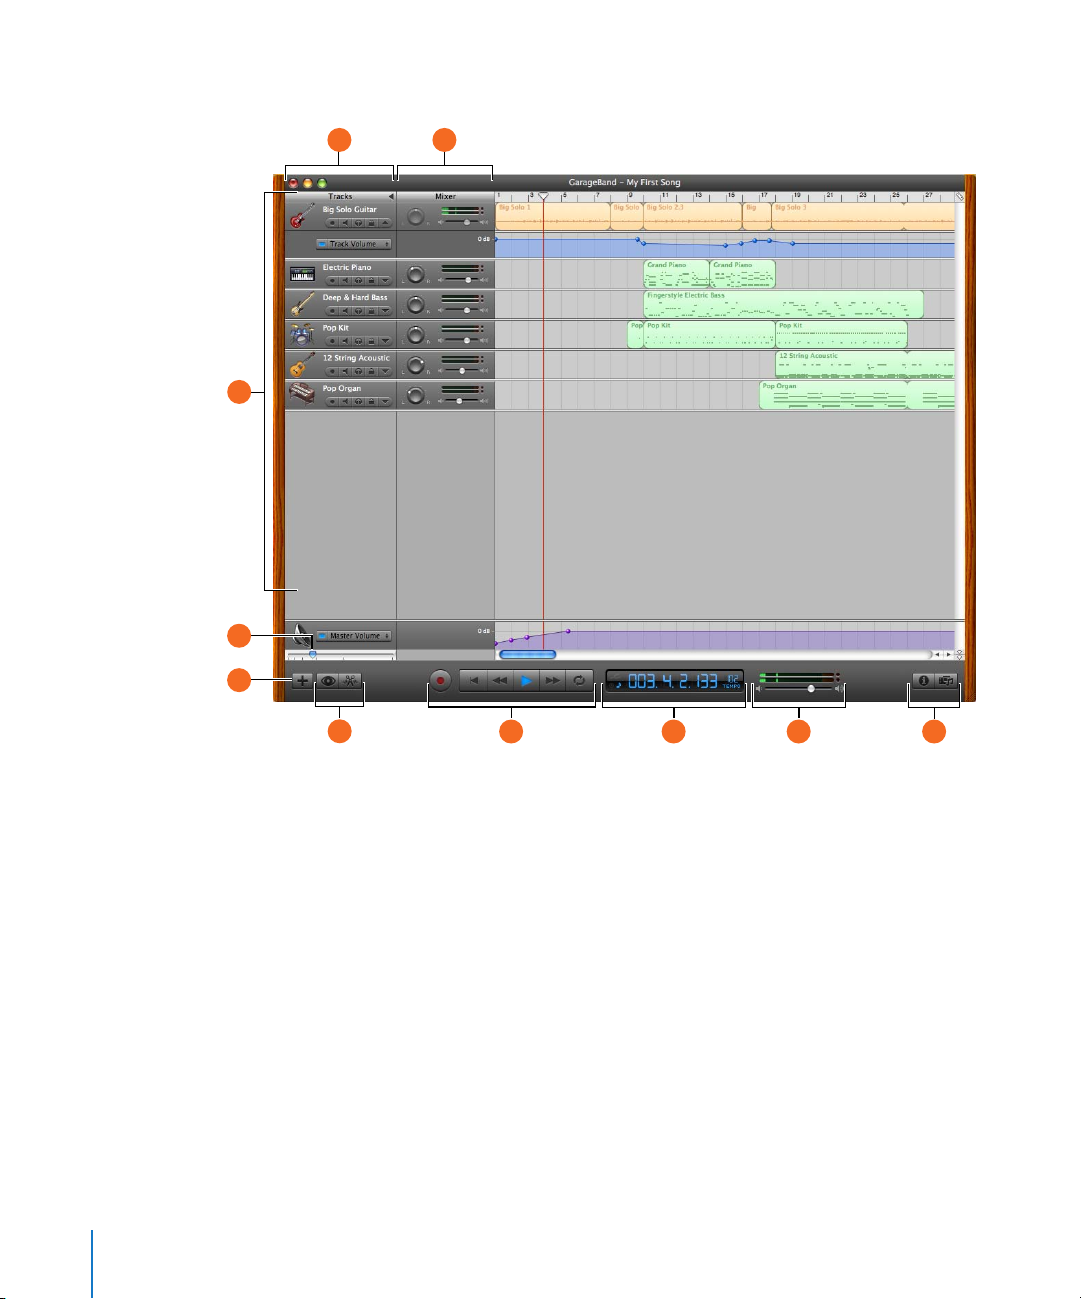
GarageBand Window
A
C
D
E
B
F
12 Chapter 2 GarageBand at a Glance
JIHG
Page 13

Track headers: The instrument icon and name are shown at the left of each track’s header. Click
A
the name to type a new track name. Click the Record Enable button (with the red circle) to turn
on the track for recording. Click the Mute button (with the speaker icon) to silence the track.
Click the Solo button (with the headphone icon) to hear the track by itself. Click the Lock Track
button to lock the track. Click the triangle to show the track’s volume curve.
Track mixer: Drag the pan dial to adjust the pan position of the track (the left-to-right
B
placement in the stereo field). Drag the volume slider to adjust the track’s volume. Watch the
level meters to see the track’s volume level as you record and play.
Timeline: Contains the tracks where you record Real and Software Instruments, add loops, and
C
arrange regions. Also includes the beat ruler, which you use to move the playhead and align
items in the timeline with beats and measures. See “Timeline” on page 14 for a description of the
features and controls in the timeline.
Zoom slider: Drag the zoom slider to zoom in for a closer view of part of the timeline, or to
D
zoom out to see more of the timeline.
Add Track button: Click to add a track below the existing tracks in the timeline.
E
Loop Browser and Editor buttons: Click to open the loop browser or the editor.
F
Transport controls: Click the Record button to start recording. Click the Play button to start or
G
stop the project playing. Click the Go to Beginning, Rewind, or Fast Forward buttons to move the
playhead to different parts of the project. Click the Cycle button to turn the cycle region on or
off.
Time display/instrument tuner: The time display shows the playhead’s position in musical time
H
(measures, beats, ticks) or absolute time (hours, minutes, seconds, fractions). Drag or double-click
the numerals to enter a new playhead position.
The right side of the time display shows the project’s tempo. Press and hold the tempo, then
drag the slider to set a new tempo.
You can also show the instrument tuner in the time display by clicking the small tuning fork,
and use it to check the tuning of a Real Instrument connected to your computer.
Master volume slider and level meters: Drag the volume slider to adjust the project’s master
I
output volume level. Watch the level meters to see if clipping is occurring before you export a
project.
Track Info and Media Browser buttons: Click to open the Track Info pane or the Media Browser.
J
Chapter 2 GarageBand at a Glance 13
Page 14
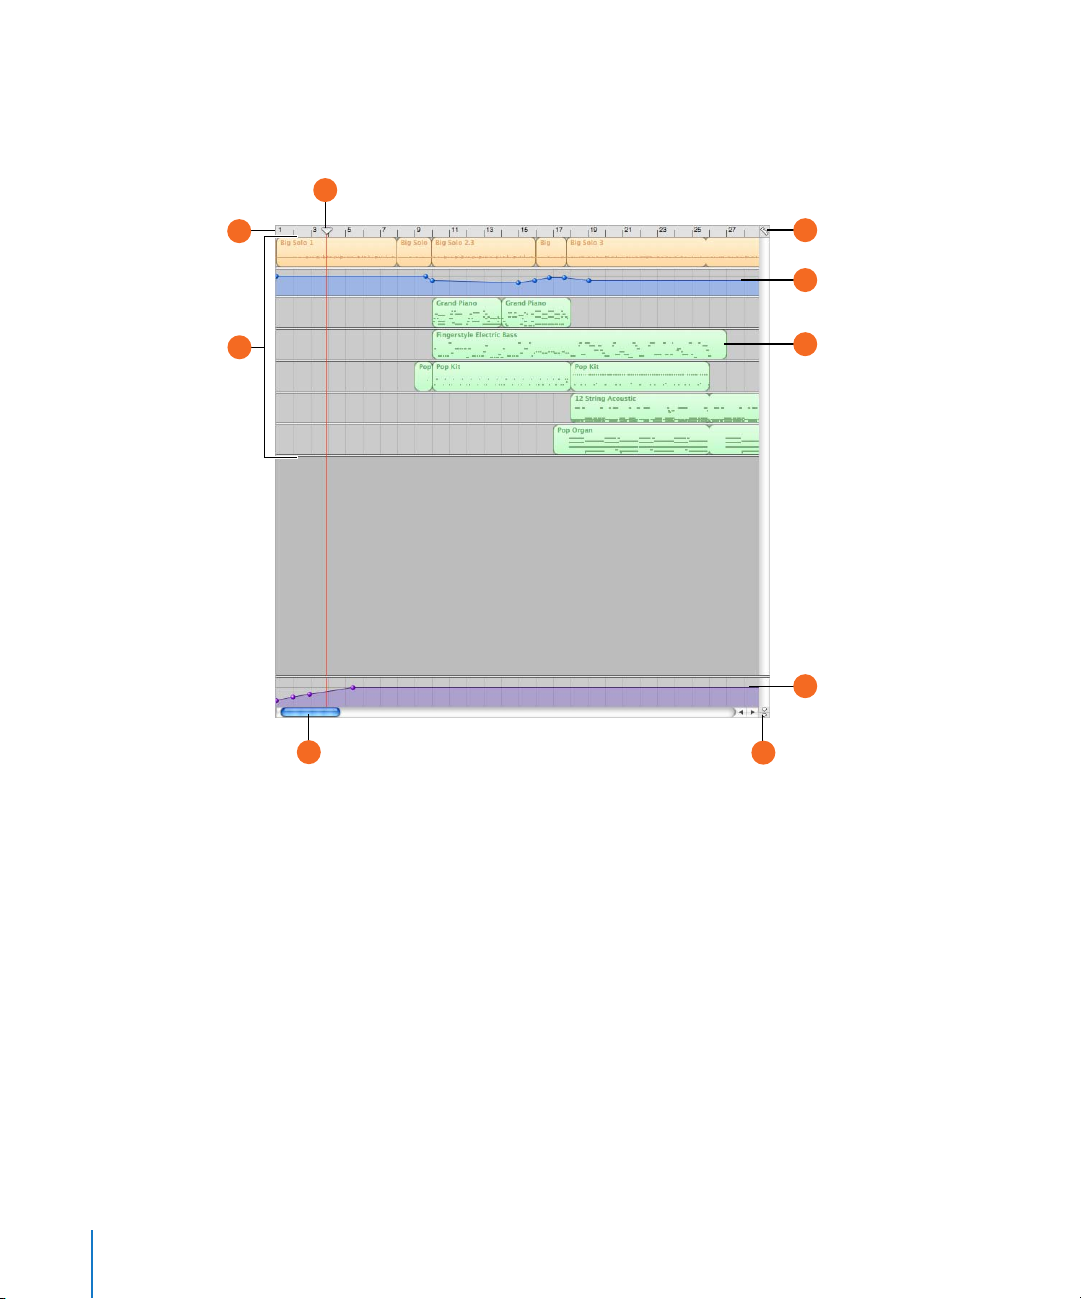
Timeline
The timeline contains the tracks where you record Real and Software Instruments, add
loops, and arrange regions.
C
A
B
I
D
E
F
G
H
14 Chapter 2 GarageBand at a Glance
Page 15

Beat ruler: Shows beats and measures, the units of musical time in the timeline. You can click
A
the beat ruler to move the playhead to a specific point in the timeline.
Tracks: You record Real and Software Instruments in tracks, and drag loops to tracks to add
B
them to a project. You arrange the project by working with regions in the tracks in the timeline.
Playhead: Shows the point in the project currently playing, or the point where playback starts
C
when you click the Play button. Also shows where cut and copied items are pasted in the
timeline. You can move the playhead to change what part of the project is playing.
Grid button: Choose a note value for the timeline grid, or choose Automatic to have the value
D
change when you zoom in or out.
Volume and pan curves: Add a volume or pan curve to a track, then add and adjust control
E
points on the volume or pan curve to add dynamic changes to different parts of a project.
Regions: When you record a Real Instrument or Software Instrument, or add a loop, you create a
F
region in the timeline. You can cut, copy, and paste regions, loop and resize them, move and
transpose them, and make other changes to build the arrangement of the project.
Master track: You can change the loudness of the overall project by adding a volume curve to
G
the master track. and transpose parts of your project to a different key by adding a pitch curve.
Playhead Lock button: Click to unlock the playheads in the timeline and the editor, so that you
H
can see different parts of the project in the editor and the timeline.
Scroll bars: Drag the horizontal scroller to move to a different part of a project. Drag the vertical
I
scroller to see tracks not currently visible.
Chapter 2 GarageBand at a Glance 15
Page 16
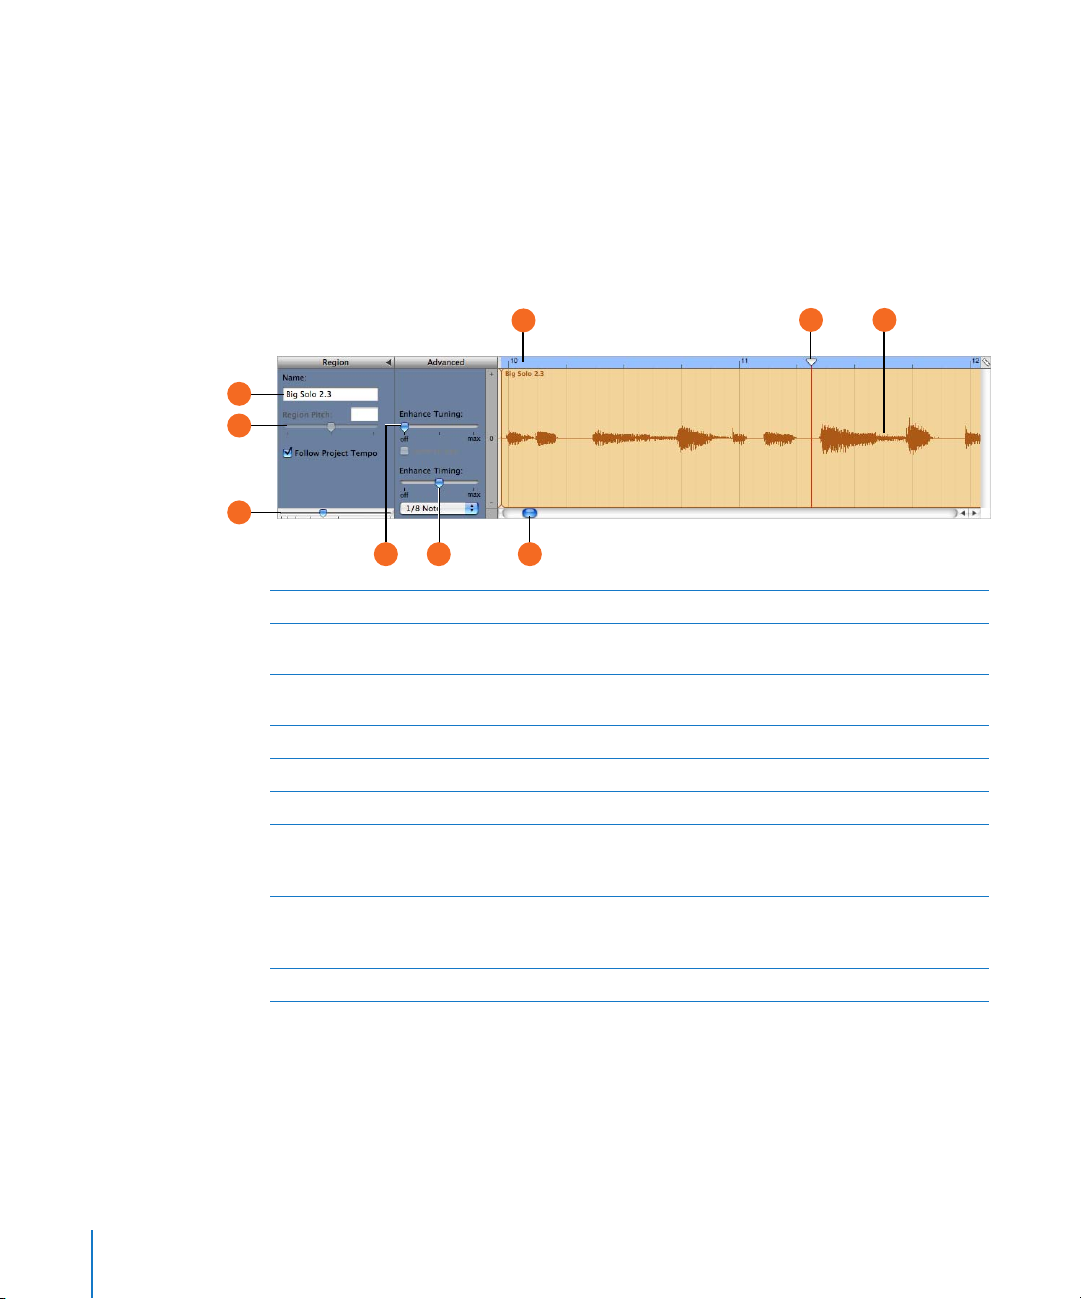
Editor
The editor is like a microscope showing a close-up view of part of a track. You can edit
Real and Software Instrument regions in a variety of ways in the editor.
For Real Instruments
When you select a Real Instrument track, the editor shows the waveform of the track or
selected region. You can move, crop, join, transpose, and rename regions in the editor.
D
A
B
C
G I
H
Region Name field: Type a new name for the selected region in the field.
A
Region Pitch slider and field: Drag the slider to transpose the selected Real Instrument region
B
up or down by up to 12 semitones. You can also type the number of semitones in the field.
Zoom slider: Drag to zoom in for a closer view or to zoom out to see more of the track or
C
selected region. Zooming in the editor is independent of the timeline.
Beat ruler: Shows beats and measures for the area visible in the editor.
D
Playhead: Shows the point in the project currently playing.
E
Waveform display: Shows the waveform of the regions in the track.
F
Enhance Tuning slider and checkbox: Drag right to increase the amount of tuning
G
enhancement, or drag left to lower the amount. The limit to key checkbox limits tuning
enhancement to the project’s key.
Enhance Timing slider and pop-up menu: Drag right to increase the amount of timing
H
enhancement, or drag left to lower the amount. Choose the note value to use and the basis for
timing enhancement from the pop-up menu.
Scroll bar: Drag the scroller to move to a different part of the track.
I
E F
16 Chapter 2 GarageBand at a Glance
Page 17
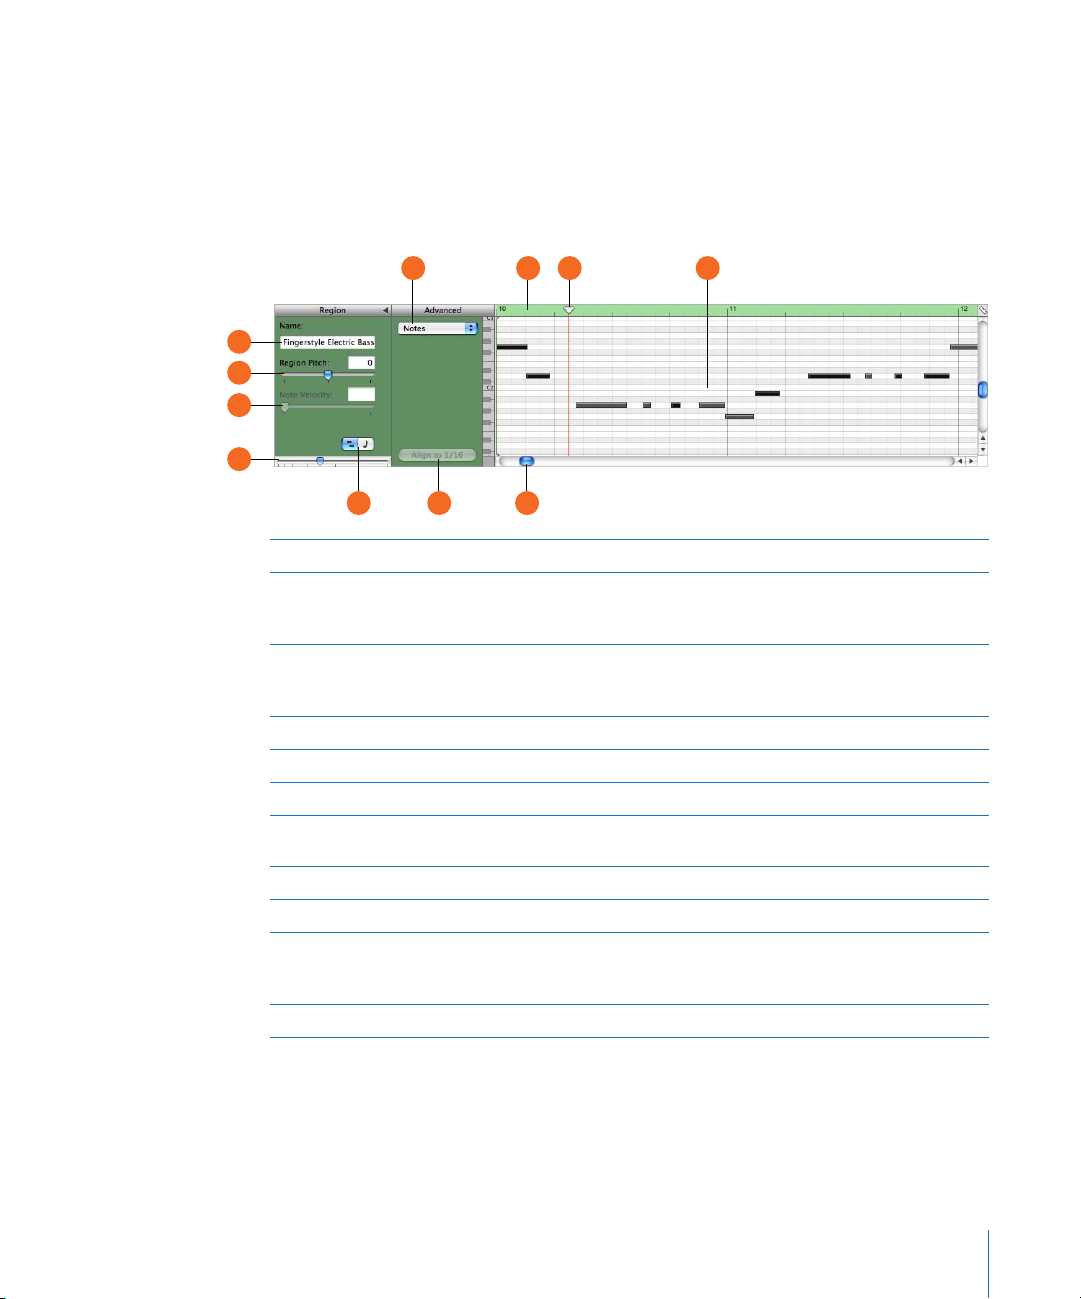
For Software Instruments—Graphic View
When you select a Software Instrument track, the editor shows a graphic display of the
track or selected region. You can edit individual notes in Software Instrument regions,
fix the timing of notes, and transpose and rename regions. You can also show and edit
controller data for pitch bend, a modulation wheel, or a sustain pedal, recorded when
you play your music keyboard.
F H I
A
B
C
D
GE K
Region Name field: Type a new name for the selected region in the field.
A
Region Pitch slider and field: Drag the slider to transpose the selected Software Instrument
B
region up or down by up to 36 semitones. You can also type the number of semitones in the
field.
Velocity slider and field: Drag the slider to change the velocity of selected notes. You can also
C
type the velocity value in the field. A note’s velocity reflects how hard the key is pressed when
you play the note.
Zoom slider: Drag to zoom in for a closer view or to zoom out to see more of the track.
D
Graphic/Notation View buttons: Click to change the editor to graphic view or notation view.
E
Display pop-up menu: Choose whether to show notes or controller data in the editor.
F
Fix Timing button: Click to fix the timing of notes in the selected region, or notes selected in the
G
editor, so that notes move to the nearest grid position.
Beat ruler: Shows beats and measures for the area visible in the editor.
H
Playhead: Shows the point in the project currently playing.
I
Notes/controller data display: Shows the individual notes of Software Instrument regions in a
J
graphic format. You can move and resize notes to adjust their pitch, where they start playing,
and how long they play. Shows controller data when chosen in the Display pop-up menu.
Scroll bar: Drag the scroller to move to a different part of a track.
K
J
Chapter 2 GarageBand at a Glance 17
Page 18
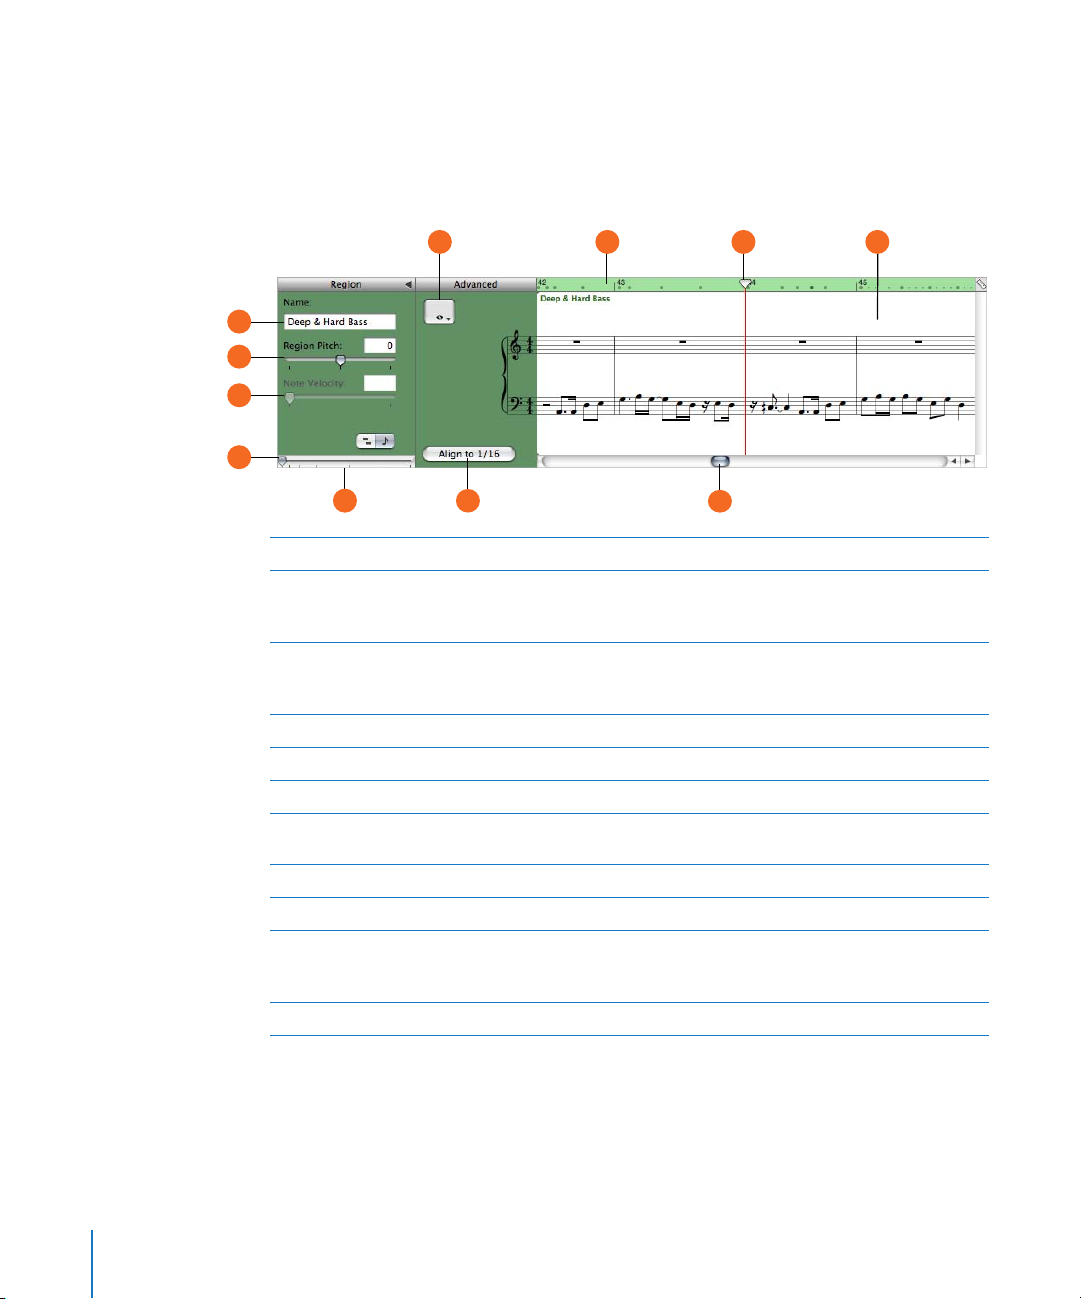
For Software Instruments—Notation View
You can also view Software Instrument tracks and regions in notation view. In notation
view, notes and other musical events are shown in standard music notation. You can
edit notes and edit controller information (including velocity and pedal markings for
sustain) in notation view.
F H I J
A
B
C
D
E
Region Name field: Type a new name for the selected region in the field.
A
Region Pitch slider and field: Drag the slider to transpose the selected Software Instrument
B
region up or down by up to 36 semitones. You can also type the number of semitones in the
field.
Velocity slider and field: Drag the slider to change the velocity of selected notes. You can also
C
type the velocity value in the field. A note’s velocity reflects how hard the key is pressed when
you play the note.
Zoom slider: Drag to zoom in for a closer view or to zoom out to see more of the track.
D
Graphic/Notation View buttons: Click to change the editor to graphic view or notation view.
E
Note Value button: Click to choose the note value for notes you add.
F
Fix Timing button: Click to fix the timing of notes in the selected region, or notes selected in the
G
editor, so that notes move to the nearest grid position.
Beat ruler: Shows beats and measures for the area visible in the editor.
H
Playhead: Shows the point in the project currently playing.
I
Notation display: Shows the musical events of Software Instrument regions in standard music
J
notation. You can move notes to adjust their pitch and where they start playing, and change
how long they play.
Scroll bar: Drag the scroller to move to a different part of a track.
K
G
K
18 Chapter 2 GarageBand at a Glance
Page 19
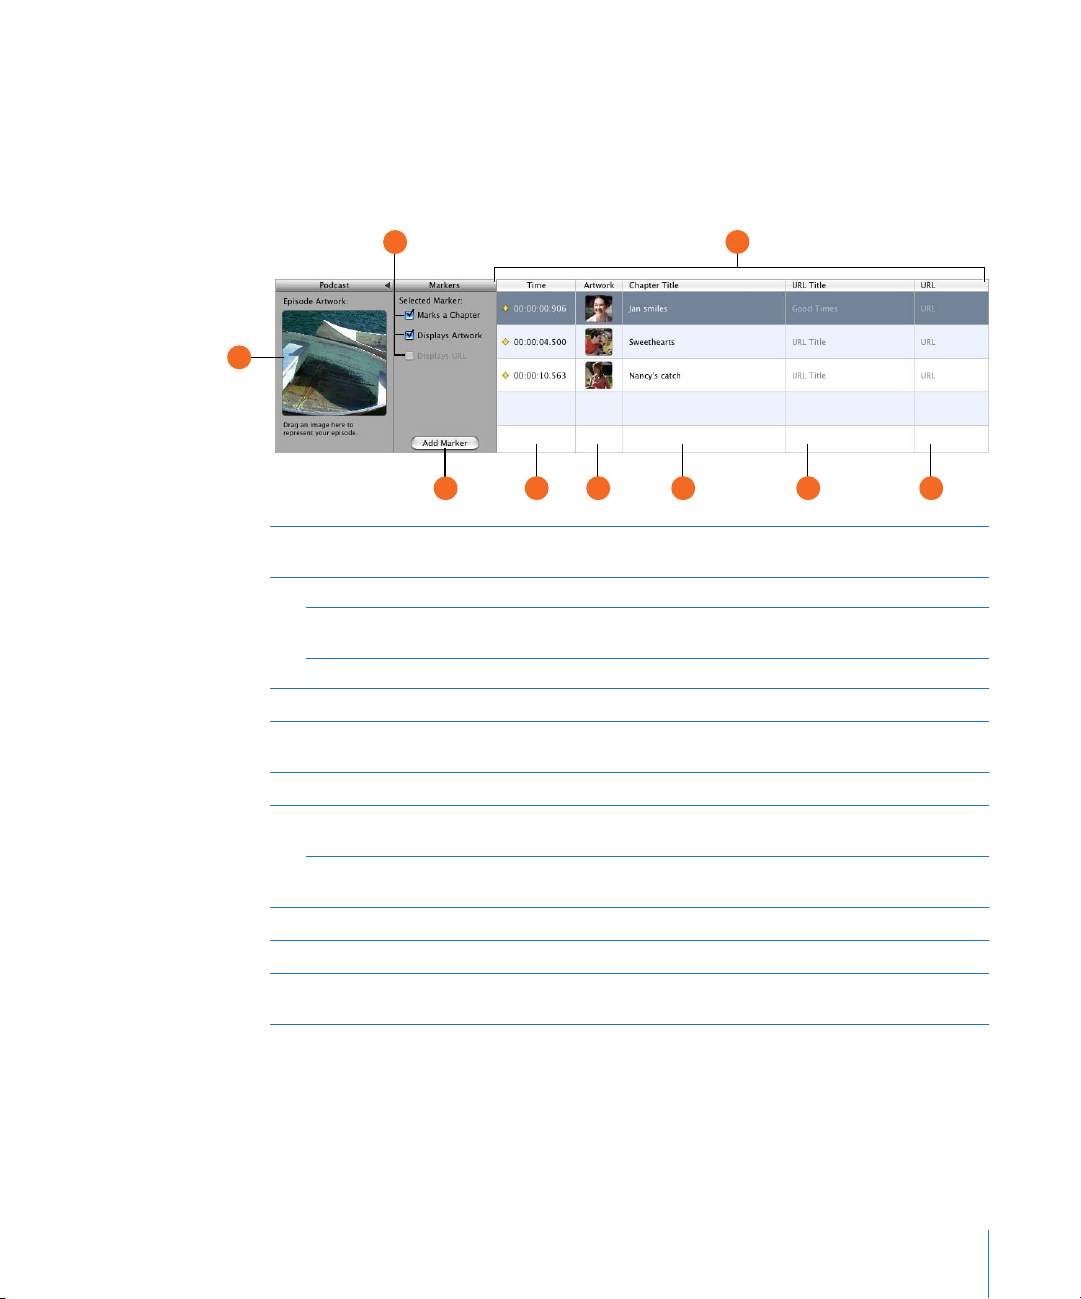
For Podcasts and Video—Marker View
When you are working on a podcast episode, you can view and edit markers in the
editor. In the marker list you can edit each marker’s time position, marker region
artwork, URL, URL title, and chapter title. You can also add episode artwork in the
editor.
DB
A
C
Episode Artwork well: Drag artwork here to represent the podcast.
A
(Appears only when creating a podcast.)
Marks a Chapter checkbox: Shows whether the selected marker marks a chapter.
B
Displays Artwork checkbox: Shows whether the selected marker contains marker region
artwork. (Appears only when creating a podcast.)
Displays URL checkbox: Shows whether the selected marker has a URL.
Add Marker button: Add a marker at the playhead position.
C
Marker list: Shows each marker’s start time, artwork (for podcasts) or video frame (for videos),
D
chapter title, URL, and URL title.
Time column: Shows the start time for each marker.
E
Artwork column: Shows the artwork for each marker region. Add artwork by dragging image
F
files from the Media Browser. (Appears only when creating a podcast.)
Still Frame column: Shows the video frame at the position of each marker.
(Appears only when working with a video.)
Chapter Title column: Shows the title of each chapter marker. Click and type a title for a marker.
G
URL Title column: Shows the title of each marker region’s URL. Click and type a title for the URL.
H
URL column: Shows the URL for each marker region. Type a URL (address) for the website for
I
which you want to show a link.
FE G H I
Chapter 2 GarageBand at a Glance 19
Page 20
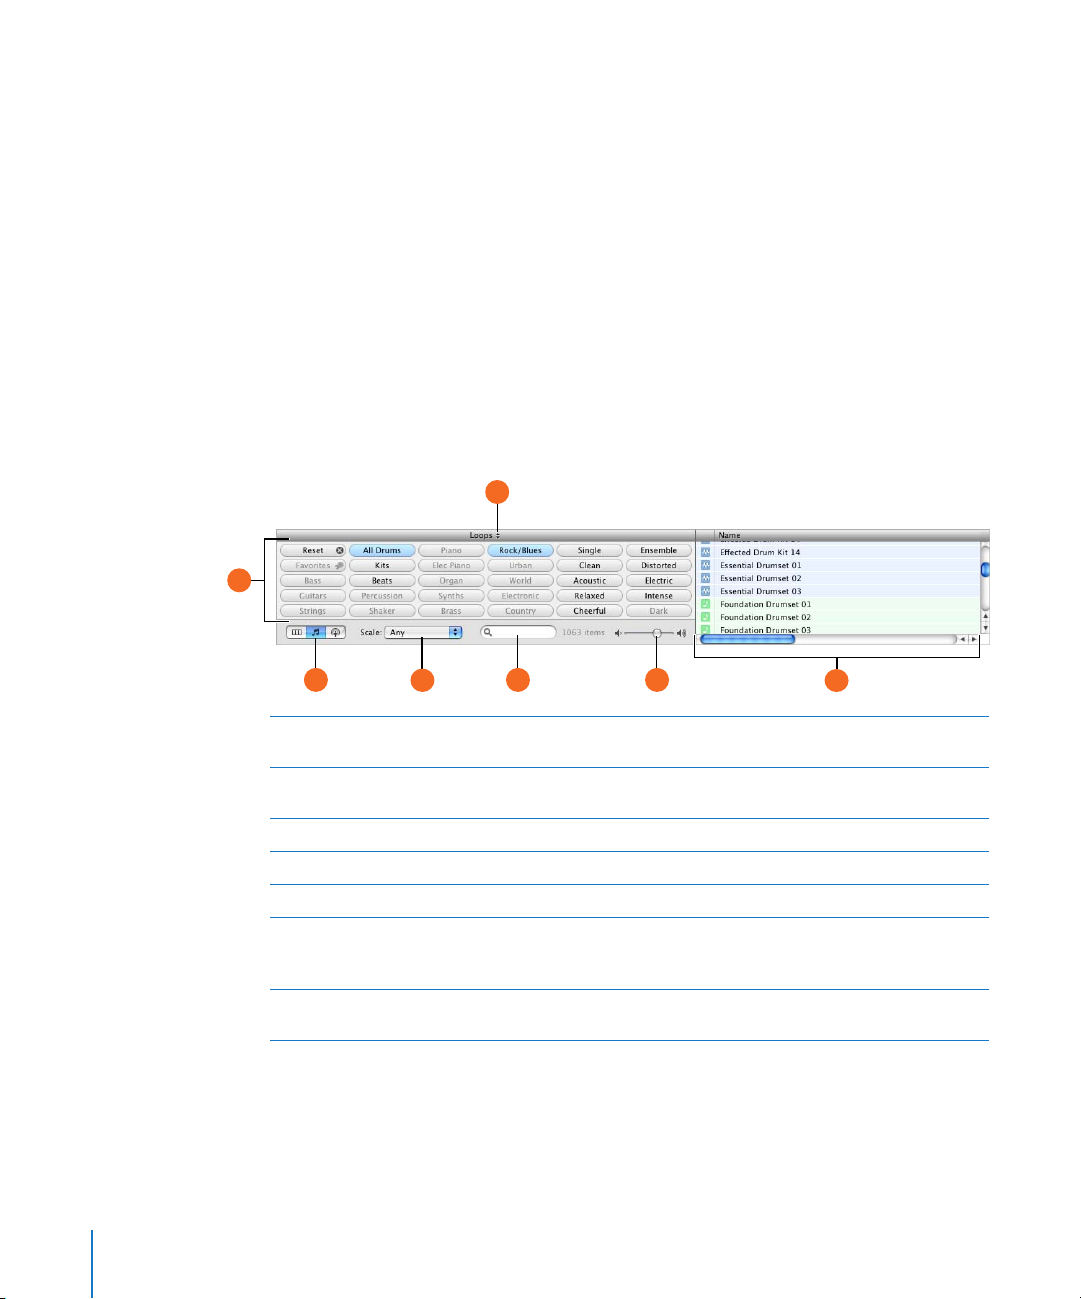
Loop Browser
The loop browser lets you quickly find loops to add to your projects. You can find loops
using keywords for instrument, musical genre, or mood. You can also perform text
searches, and refine your results in several ways. The loop browser shows the tempo,
key, and number of beats for each matching loop. You can preview loops in the loop
browser before you add them to a project, and add more loops to GarageBand by
dragging them onto the loop browser.
The loop browser gives you two ways to find loops: button view and column view.
Button View
In button view, the loop browser contains a set of keyword buttons. Click a button to
show matching loops in the results list. Clicking multiple buttons narrows the results to
those loops that match all of the selected keywords.
G
A
B D
Keyword buttons: Click a keyword button to display matching loops in the results list. You can
A
click multiple keyword buttons to narrow your results.
View buttons: Click one of the buttons to show column view, button view, or podcast sounds
B
view.
Scale pop-up menu: Choose a scale type to see only loops using that musical scale.
C
Search field: Type text in the field to see loops with the text in their file name or path.
D
Preview volume slider: Drag the slider to adjust the volume of the loop being previewed.
E
Results list: Shows loops that match the selected keywords. Also displays the tempo, key, and
F
number of beats for each loop. Click a loop in the results list to preview it. Click the Favs
checkbox for a loop to add it to your favorites.
Loop library pop-up menu: Choose the loops you want to show in the loop browser from the
G
pop-up menu.
20 Chapter 2 GarageBand at a Glance
C
E
F
Page 21
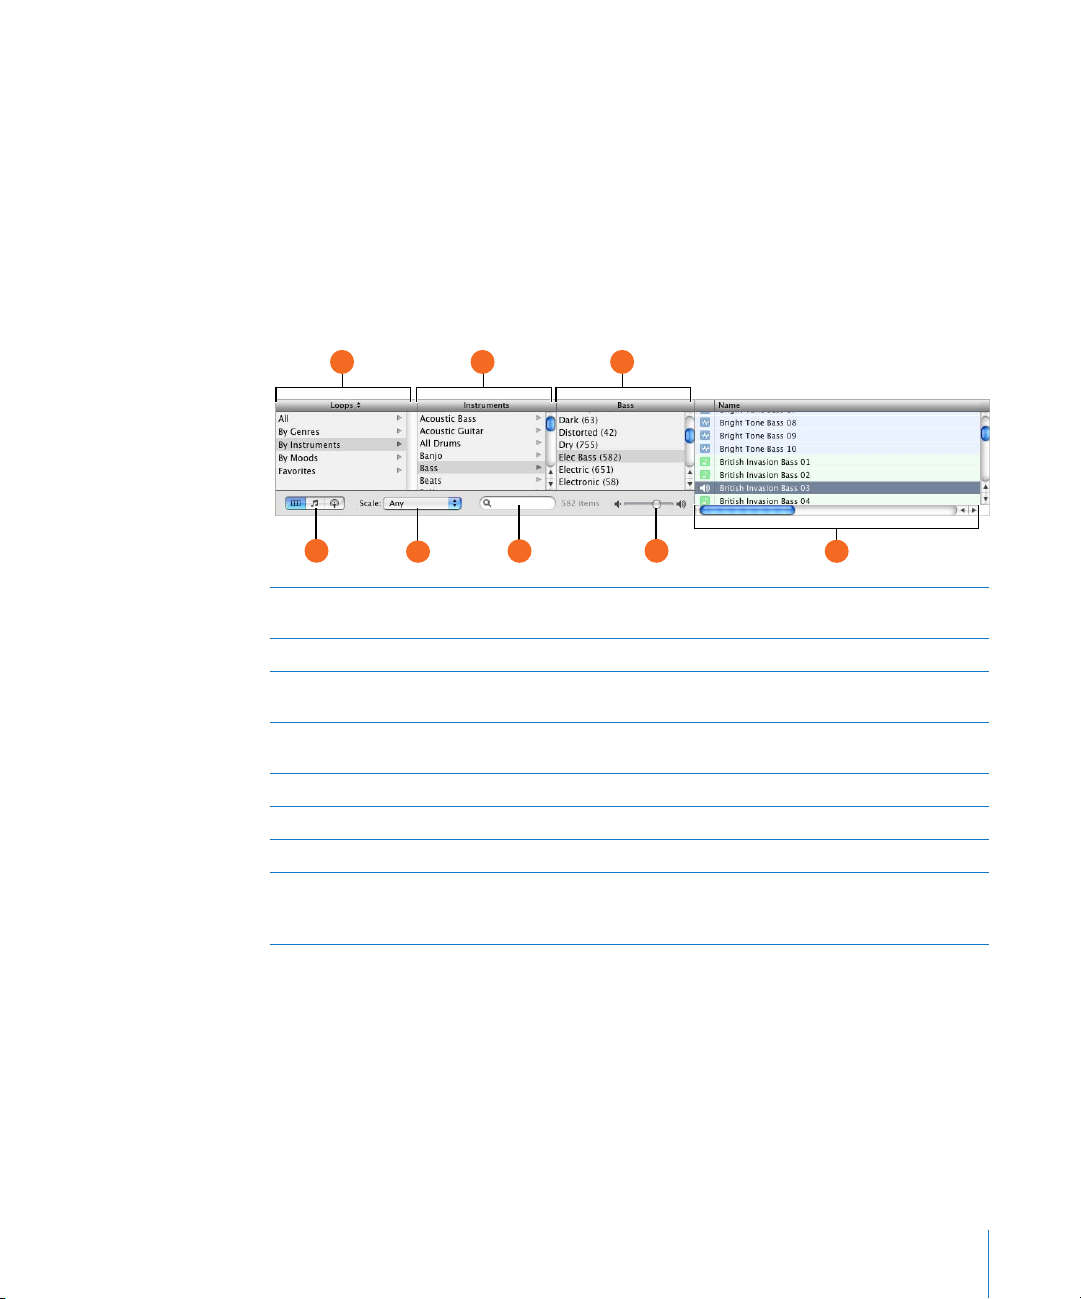
Column View and Podcast Sounds View
In column view, the loop browser features columns for keyword type, categories, and
keywords. Click a keyword type to show categories for that type, click a category to
show keywords, then click a keyword to show matching loops in the results list.
Clicking multiple keywords expands the results to those loops matching any of the
selected keywords.
In podcast sounds view, the loop browser shows a different set of columns, featuring
sound effects, jingles, and other loops suitable for podcasts. You work with the columns
in podcast sounds view the same way you do in columns view.
BA C
E
Keyword type column: Click a keyword type to show the categories for that keyword type in
A
the middle column.
Category column: Click a category to show keywords for that category in the right column.
B
Keyword column: Click a keyword to show matching loops in the results list. You can click
C
multiple keywords to expand your results.
View buttons: Click one of the buttons to change the view between column, button, or podcast
D
sounds view.
Scale pop-up menu: Choose a scale type to see only loops using that scale.
E
Search field: Type text in the field to see loops with the text in their file name or path.
F
Preview volume slider: Drag the slider to adjust the volume of the loop being previewed.
G
Results list: Shows the loops that match the selected keywords. Also displays the tempo, key,
H
and number of beats for each loop. Click a loop in the results list to preview it. Click the Favs
checkbox for a loop to add it to your favorites.
F
GD
H
Chapter 2 GarageBand at a Glance 21
Page 22
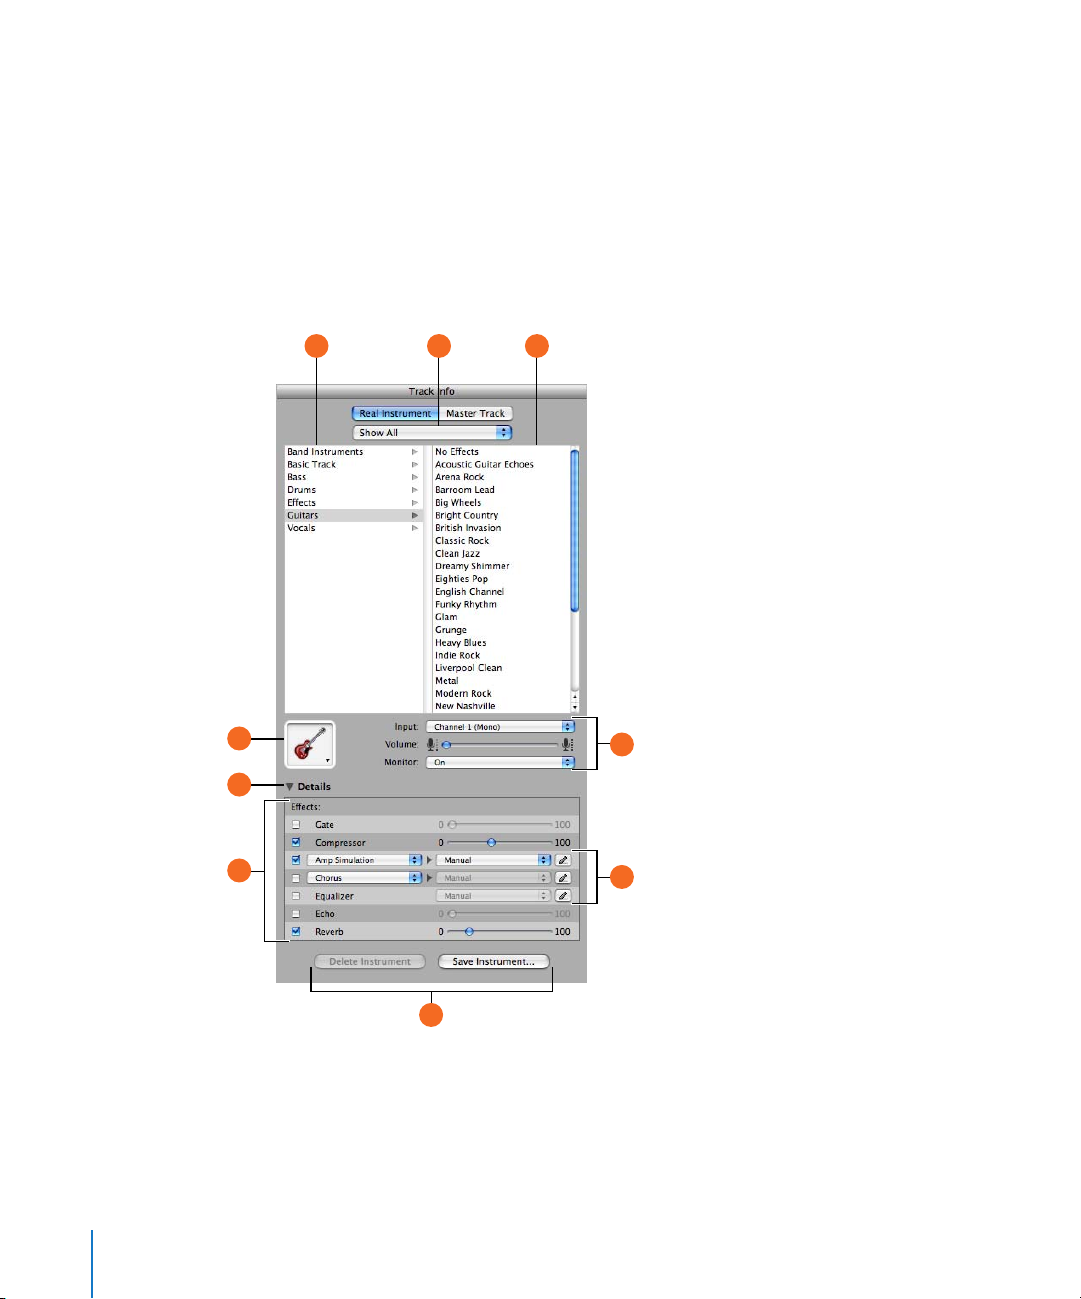
Track Info Pane
The Track Info pane shows the current instrument, effects, and input settings for the
selected track, or the master effects settings for the master track. You can change these
settings in the Track Info pane.
Real and Software Instrument Tracks
Some controls in the Track Info pane are different for Real Instrument tracks than for
Software Instrument tracks (as noted below).
A C
D
E
F
B
G
H
I
22 Chapter 2 GarageBand at a Glance
Page 23

Instrument category list: Click an instrument category to see the instruments for that category
A
in the instrument list on the right.
B Instrument library pop-up menu: Choose which instruments you want to see in the category
and instrument lists from the pop-up menu.
Instrument list: Click an instrument from the list.
C
Instrument icon pop-up menu: Click to choose a new instrument icon from the icon menu that
D
appears. Icons make it easy to distinguish tracks that use similar instruments.
Details triangle: Click to show the instrument and effects settings.
E
Effect checkboxes, sliders, and pop-up menus: Click an effect checkbox to turn the effect on or
F
off. Drag the sliders to adjust the level of the effects, or choose an item from the pop-up menus.
The Track Info pane includes the following effects for Real and Software Instruments:
 Noise gate slider (Real Instrument tracks only): Drag the slider to adjust the amount of
gating.
 Generator and generator preset pop-up menus (Software Instrument tracks only):
Choose an instrument generator, and generator preset, from the menus.
 Compression slider: Drag the slider to adjust the amount of compression.
 Equalizer pop-up menu: Choose an EQ setting from the pop-up menu.
 Effect and effect setting pop-up menus: Click a checkbox to turn additional effects on or off.
Choose an effect from a pop-up menu on the left, then choose an effect preset from the popup menu on the right.
 Echo slider: Drag the slider to adjust the amount of echo.
 Reverb slider: Drag the slider to adjust the amount of reverb.
Input channel pop-up menu and buttons (Real Instrument tracks only): Choose the input
G
channel or channels for the instrument from the Input pop-up menu. Drag the Volume slider to
set the input volume for the selected channel. Turn monitoring on or off using the Monitor popup menu.
Effect edit buttons: Click to show an effect’s preset window, where you can edit the effect
H
preset.
Save Instrument and Delete Instrument buttons: Click the Save Instrument button to save an
I
instrument. Click the Delete Instrument button to delete a saved instrument.
Chapter 2 GarageBand at a Glance 23
Page 24
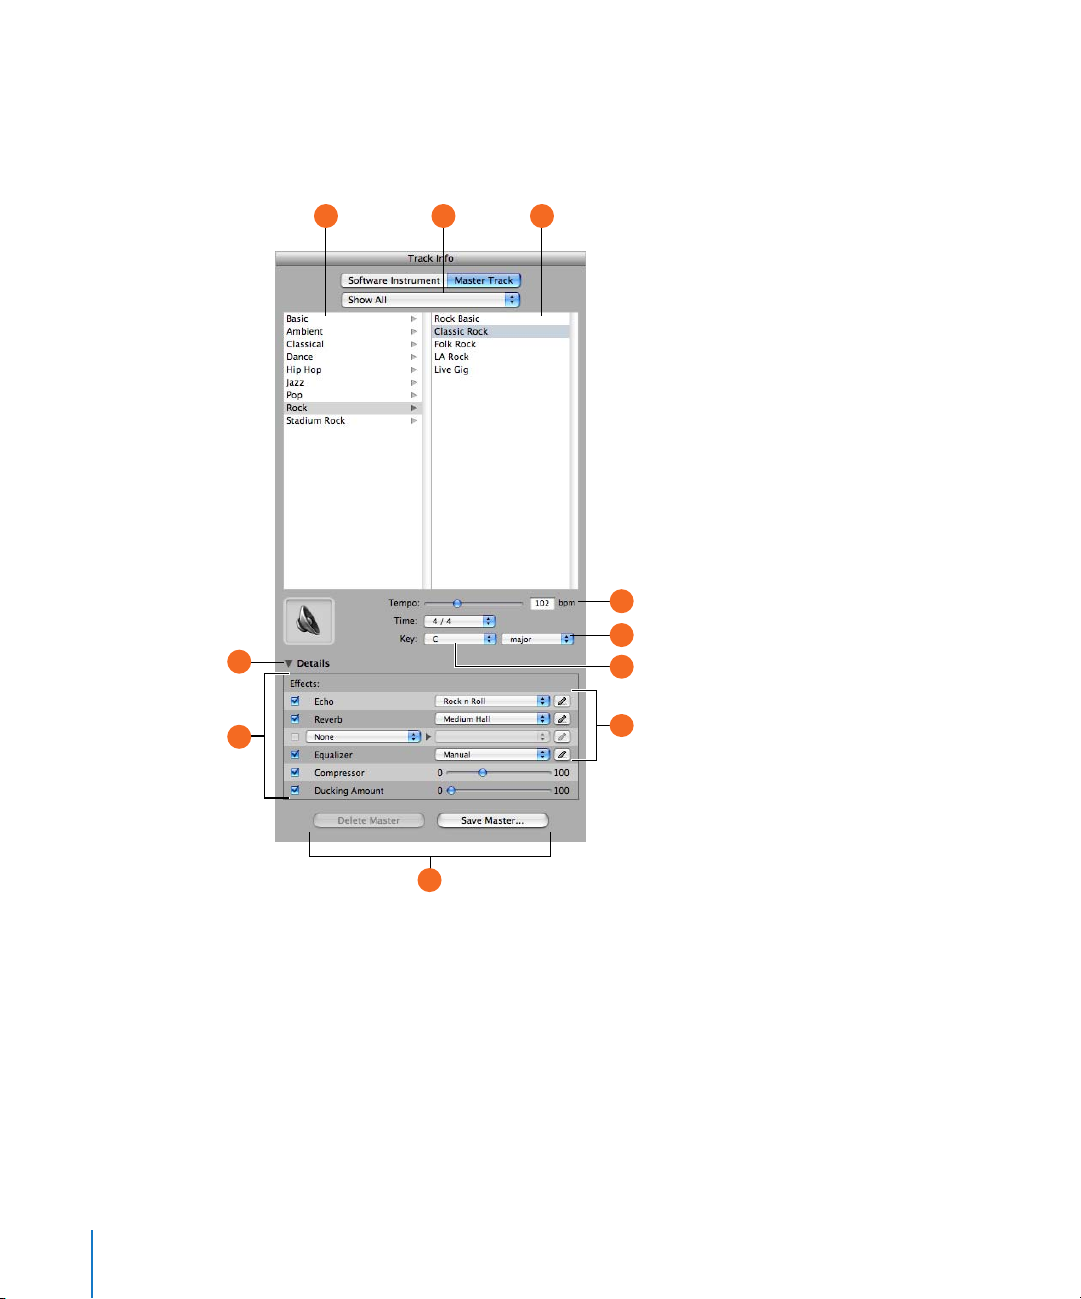
Master Track
The Track Info pane for the master track shows the global project settings and effects
settings for the overall project. Global project settings include tempo, time signature,
and key. Global effects settings include master echo, reverb, equalizer, and compressor.
A CB
D
E
G
F
H
I
J
24 Chapter 2 GarageBand at a Glance
I
Page 25

The Echo and Reverb sliders for each track control the amount of echo and reverb sent
from that track to the master echo and reverb effects. In the Track Info pane for the
master track, you can change the master echo and reverb effects.
Master effects category list: Click a category to see the effects for that category in the master
A
effects list on the right.
Master effects pop-up menu: Choose which master effects you want to see in the category and
B
effects lists from the pop-up menu.
Master effects list: Click a set of master effects from the list.
C
Tempo slider and field: Drag the slider to change the project’s tempo, or type a new tempo in
D
the field.
Time pop-up menu and field: Choose a time signature from the pop-up menu.
E
Key pop-up menu: Choose a key from the pop-up menu.
F
Details triangle: Click to show the global effects settings.
G
Effect checkboxes, pop-up menus, and slider: Click an effect checkbox to turn the effect on or
H
off. Choose an item from the pop-up menus, or drag the slider, to adjust an effect. The Track Info
pane includes the following effects for the master track:
 Echo pop-up menu: Choose a global echo preset.
 Reverb pop-up menu: Choose a global reverb preset.
 Effect and effect setting pop-up menus: Click a checkbox to turn an additional effect on or
off. Choose an effect from a pop-up menu on the left, then choose an effect preset from the
pop-up menu on the right.
 Equalizer pop-up menu: Choose a global equalizer setting from the pop-up menu.
 Compression slider: Drag the slider to adjust the amount of global compression.
 Ducking Amount slider: When ducking is enabled, drag the slider to adjust the amount of
ducking applied to backing tracks.
Effect edit buttons: Click to show an effect’s preset window, where you can edit the effect
I
preset.
Save Master and Delete Master buttons: Click the Save Master button to save a set of master
J
effects. Click the Delete Master button to delete a saved set of master effects.
Chapter 2 GarageBand at a Glance 25
Page 26
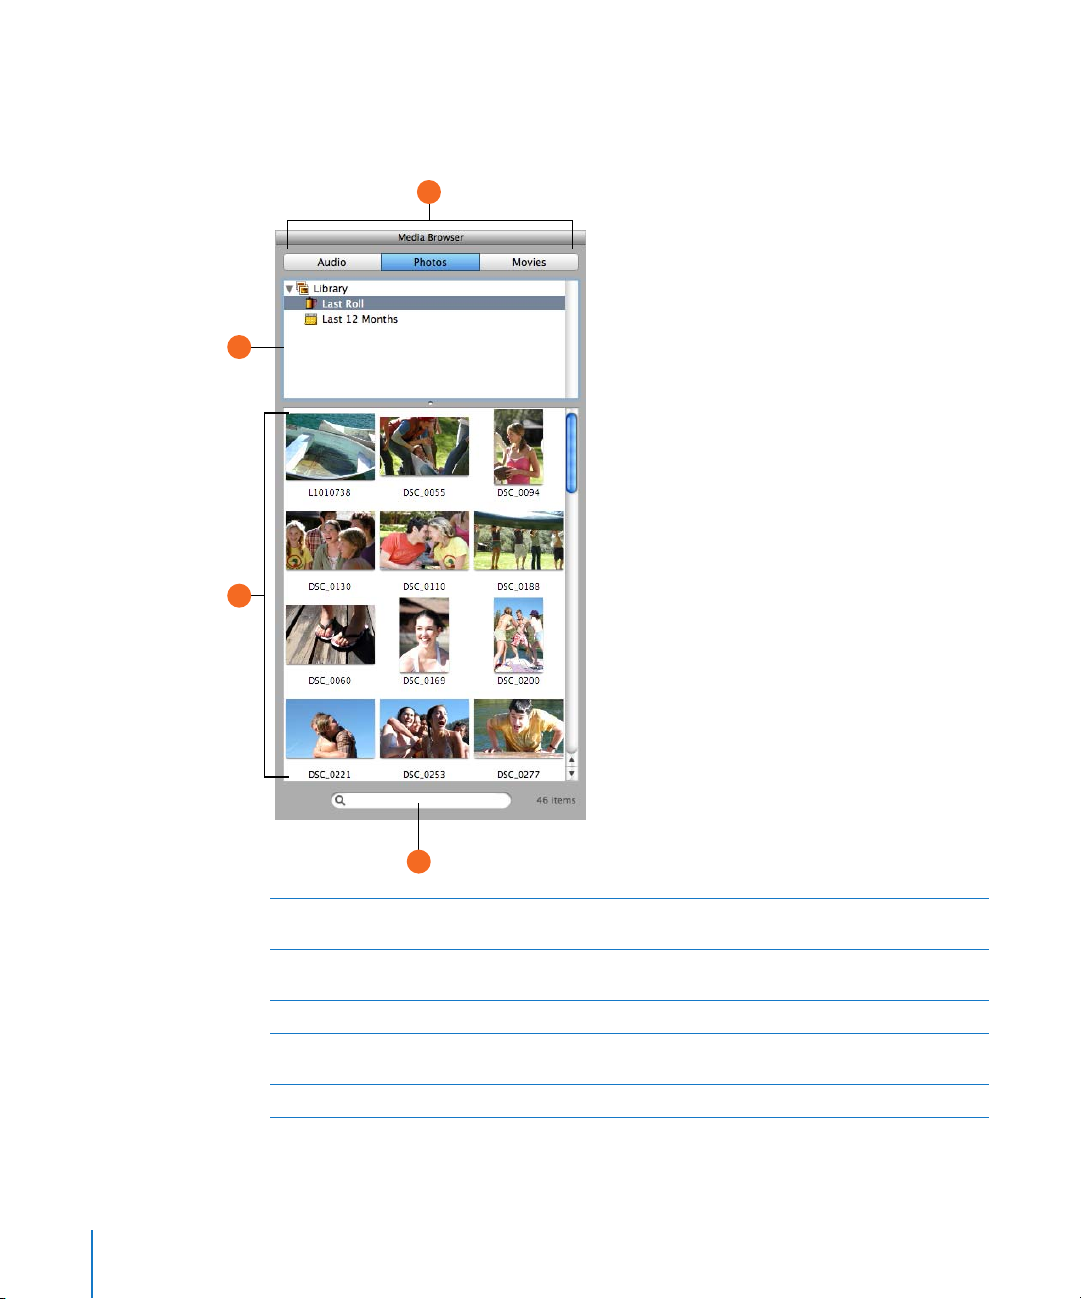
Media Browser
The Media Browser lets you find and add songs from your iTunes library, photos from
your iPhoto library, iMovie projects, and other video files.
A
B
C
E
Audio, Photos, and Movies buttons: Click the button for the type of media files you want to
A
work with.
Source list: Navigate to the folder containing the files you want to use. You can also add folders
B
by dragging them from the Finder.
Media list: View, preview, and select media files to add to your project.
C
Play button: Click to preview the selected audio or video file. (not shown–only visible when
D
viewing audio files or movies).
Search field: Type text to search for files with matching names.
E
26 Chapter 2 GarageBand at a Glance
Page 27

3 Working With Projects
3
You start working in GarageBand by creating a project.
Projects hold your music and all the changes you make.
Each project has a tempo, a time signature, and a key, which last for the entire length
of the project. When you create a project, you set the tempo, time signature, and key in
the New Project dialog. You can save a project as an archive, and export a project to
iTunes or another iLife application.
In this lesson, you’ll learn how to:
 Create a new project
 Set a project’s tempo, key, and time signature
 Open existing projects
 Save projects
Creating a Project
You start working in GarageBand by creating a new project.
To create a new project:
1 Choose File > New.
2 In the New Project dialog, select the type of project you want to create.
3 In the dialog that appears, browse to the location where you want to store the project,
then type a name for the project in the Name field.
4 Set the project’s tempo, key, and time signature as described in the following sections.
27
Page 28
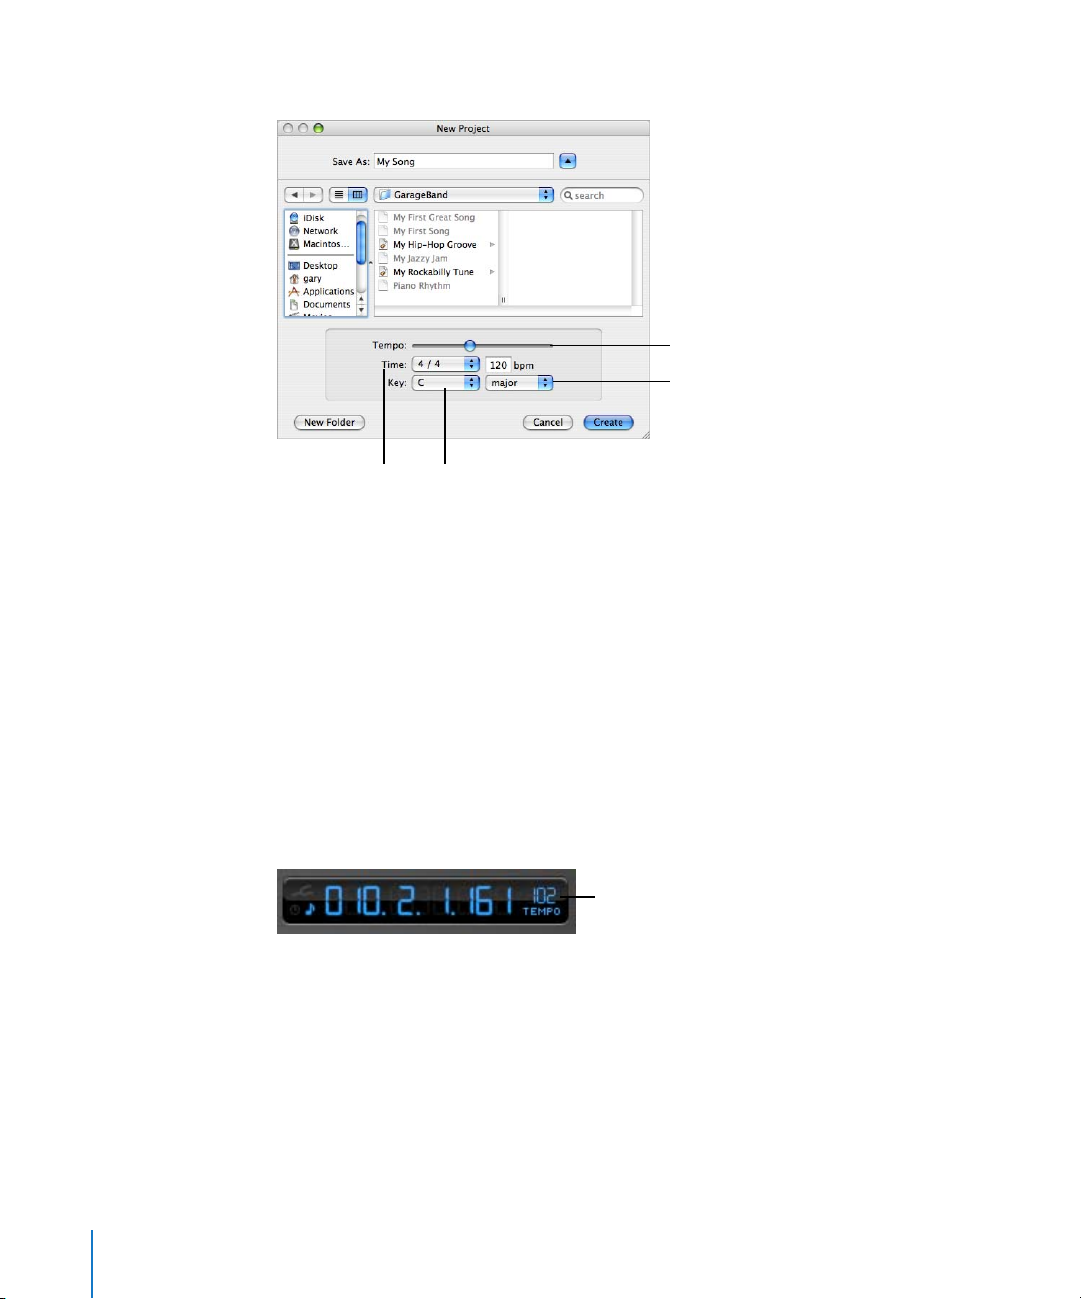
5 When you have finished making the project settings, click Create.
Tempo slider
Scale pop-up menu
pop-up menu
Key pop-up menuTime signature
Setting the Tempo
Each project has a speed, or tempo. The tempo defines the rate at which beats, the
basic rhythmic pulse, occur in the project. The tempo is measured in beats per minute,
or bpm. You can set the tempo to any speed between 60 and 240 bpm. The default
tempo is 120 bpm, which is a common tempo used in popular music.
To set the tempo:
m In the New Project dialog, drag the Tempo slider left to slow down the tempo, or right
to speed up the tempo.
Note: You can change the tempo later in the time display, located below the timeline,
or in the Track Info pane for the master track.
Click here to change the tempo.
28 Chapter 3 Working With Projects
Page 29

Setting the Key
Each project has a key, which defines the central note to which the other notes in the
music relate, and the scale used (either “major” or “minor”).
To set the key:
1 In the New Project dialog, choose a key from the Key pop-up menu.
2 Choose the scale from the Scale pop-up menu to the right of the Key pop-up menu.
Note: You can change the key later in the Track Info pane for the master track.
If you change the key of a project after recording instruments or adding loops, all
Software Instrument recordings and loops are transposed to the new key. Real
Instrument recordings are not transposed.
Setting the Time Signature
Each project also has a time signature, which controls the relationship between beats
and measures. A project’s time signature consists of two numbers separated by a
forward slash, which look similar to a fraction. The number on the left controls the
number of beats in each measure, and the number on the right controls the beat value
(the length of the note that gets one beat).
You can use any of the following time signatures in a GarageBand project: 2/2, 2/4, 3/4,
4/4, 5/4, 7/4, 6/8, 7/8, 9/8, or 12/8. The default is 4/4, the most commonly used time
signature.
To set the time signature:
m In the New Project dialog, choose a time signature from the Time pop-up menu.
Note: You can change the time signature later in the Track Info pane for the
master track.
Opening an Existing Project
You can open an existing project to continue working.
To open an existing project:
m Choose File > Open, locate and select the project you want to open, then click OK.
You can also open a recently open project by choosing File > Open Recent and
choosing a project from the submenu.
If you close the currently open project, a dialog appears, asking if you want to create a
new project or open an existing project.
Chapter 3 Working With Projects 29
Page 30

Saving a Project
As you work, it’s important to save your project often so you don’t lose your changes.
To save a project:
m Choose File > Save (or press Command-S).
When you save a project, by default GarageBand creates an iLife preview that is saved
with the project. An iLife preview lets you preview the project in the Media Browser
and in other iLife applications, but can increase the project’s file size. You can select
whether to create an iLife preview for projects in the General pane of GarageBand
Preferences.
You can also save a project as an archive. When you save a project as an archive, all the
audio files, loops, and other media the project uses are saved in the project file. This is
especially useful if you want to copy the project to another computer, or are
duplicating a project with your own Real Instrument recordings.
To save a project as an archive:
1 Choose File > Save as.
2 In the Save As dialog, select the Save As Archive checkbox.
You can also compact projects to make sharing easier. Compacting a project reduces
the file size by compressing audio in the project. Compacting can result in some loss of
audio quality.
To compact a project:
1 Choose File > Save as.
2 In the Save As dialog, select the Compact Project checkbox.
3 Choose the compression settings you want to use from the pop-up menu next to the
Compact Project checkbox.
30 Chapter 3 Working With Projects
Page 31

Sending a Project to iTunes
You can send a project to an iTunes playlist, then play your exported projects in iTunes,
download them to an iPod, or burn the playlist to a CD. Files are exported to iTunes in
AIFF format. You can convert the exported file to another format, such as AAC or MP3,
from within iTunes.
To send a project to an iTunes playlist:
m Choose Share > Send to iTunes. The entire project, from the beginning (measure 1) to
the end of the last region, is exported.
You can set the name of the iTunes playlist to which files will be exported, and also set
the name of the album and composer, in the Export pane of GarageBand Preferences.
You can also export a single track, or a group of tracks, to an iTunes playlist. To export a
single track, solo the track (or mute all other tracks) before exporting. To export a group
of tracks, solo the tracks (or mute all other tracks) before exporting.
Chapter 3 Working With Projects 31
Page 32

4 Using Apple Loops
4
You can use Apple Loops to add backing and rhythm
tracks to your projects. You can also add Apple Loops to
your loop library, and create your own Apple Loops.
Most popular music today is based on repeating rhythmic patterns (sometimes called
“grooves” or “riffs”), especially in the drum and bass parts. To create music in a groovebased style, an effective way of working is to add loops for the drum parts, then add
loops for bass and other rhythm parts. This lets you define the rhythmic feel of the
project, and also lets you build the basic arrangement of the project by blocking out
sections with different grooves. Once the basic rhythm parts are in place, you can
record Real and Software Instrument regions to add lead, solo, and harmony parts.
You can quickly define the feel of a project by adding Apple Loops. Apple Loops are
prerecorded music files designed to seamlessly repeat a rhythmic pattern. When you
add a loop to the timeline, you can extend it to fill any amount of time, making it easy
to create drum parts and other rhythm parts.
32
When you add a loop to a project, GarageBand matches the loop’s tempo and key to
the tempo and key of the project. This lets you use loops that were originally recorded
at different speeds, and in different keys, and have them sound as though they were
made to be played together.
In this lesson, you’ll learn how to:
 Find and preview loops in the loop browser
 Add loops to the timeline
 Create your own Apple Loops
 Add loops to the loop library
Page 33

Finding Loops With the Loop Browser
GarageBand includes a loop browser that lets you find loops by musical instrument,
genre, or mood. You can also perform text searches, and refine your searches for loops
in several other ways. No matter how large your collection of loops becomes, you can
quickly find loops with the sound you want using the loop browser.
To show the loop browser:
m Click the Loop Browser button (the button with the open eye).
The loop browser has three views: column view, button view, and podcast sounds view.
In button view, you click keyword buttons to show loops that match the keywords. In
column view and podcast sounds view, you choose from different keyword types,
categories, and keywords to show matching loops. You can select the loop browser
view you want using the view buttons in the lower-left corner of the loop browser.
To choose the type of view:
m Click the button with columns to show column view, click the button with musical
notes to show button view, or click the button with a bell to show podcast sounds
view.
Finding Loops in Column View
In column view, clicking a keyword type in the left column shows categories for that
keyword type in the middle column. Clicking a category shows keywords for that
category in the right column. Clicking a keyword shows matching loops in the results
list. You can expand your results by clicking multiple keywords.
column
Category
column
Keyword
column
Results listKeyword type
To find loops in column view:
1 Click the column button in the lower-left corner of the loop browser to switch to
column view.
2 Click a keyword type in the left column.
3 Click a category in the middle column.
4 Click a keyword in the right column to show matching loops in the results list.
5 To refine your results, click multiple categories or keywords. This expands the matching
loops to include those that match any of the selected categories or keywords.
Chapter 4 Using Apple Loops 33
Page 34

Now find some bass loops in column view by first selecting the By Instruments
keyword type, then the Bass category, then the Grooving keyword.
When you find loops in either button view or column view, the total number of
matching loops is shown next to the search field at the bottom of the loop browser.
Finding Loops in Button View
Button view features a grid of keyword buttons. You click a button to see the loops
matching the selected keyword in the results list to the right. You can narrow your
results by clicking multiple buttons.
Click a keyword button.
Matching loops appear
in the results list.
To find loops in button view:
1 Click the button with musical notes in the lower-left corner of the loop browser to
switch to button view.
2 Click a keyword button to show matching loops in the results list. The columns in the
results list show the type of loop, name, tempo, key, and number of beats for each
loop.
3 To refine your results, click multiple keyword buttons. This narrows the matching loops
to only those that match all of the selected keywords.
4 To end a search, either click the selected keyword again to deselect it, or click the Reset
button to deselect all selected keywords.
When you click a keyword, incompatible keywords (those that share no loop with the
selected keyword) are dimmed.
Now find some drum loops in button view by clicking the Drums keyword button.
Scroll through the list to see all the matching loops. Notice that the number of
matching loops is shown next to the search field.
Finding Loops in Podcast Sounds View
Podcast sounds view features a different set of columns letting you easily find and add
podcast sounds. You find loops in podcast sounds view in the same way as in column
view. For more information about creating podcasts, see “Creating Podcasts in
GarageBand” on page 80.
34 Chapter 4 Using Apple Loops
Page 35

Previewing Loops in the Loop Browser
When you find loops that fit the criteria you want, you can preview them in the loop
browser to hear which loop will sound best in your project. You can preview the loop
by itself (solo), or hear it playing together with the project.
To preview a loop:
m Click the loop in the results list. Click the loop again to stop previewing it.
Once you have added loops or recorded instruments in your project, you can preview a
loop together with the project by clicking the Play button before you click the loop.
When you preview a loop with a project, GarageBand matches the tempo and key of
the loop to the project’s tempo and key, and syncs the loop with the project so it starts
playing on the beat.
When you preview a loop, you can also control the volume of the loop using the
volume slider in the loop browser.
Drag the volume slider to
adjust the volume of the loop.
To adjust the volume of a loop being previewed:
m Drag the volume slider in the loop browser left to lower the loop’s volume, or right to
raise the loop’s volume.
If you adjust the volume of a loop in the loop browser, then add the loop to your
project by dragging it to an empty part of the timeline, the volume of the track created
for the loop is set to the same volume.
Now try previewing the loops you found earlier, and see which ones you like.
Refining Your Searches
There are several ways you can refine your searches in the loop browser. You can:
 Display only loops from a specific Jam Pack or folder
 Display loops using a particular scale type
 Display only loops in keys near the project’s key
 Perform text searches
Chapter 4 Using Apple Loops 35
Page 36

Displaying Loops From a Jam Pack or Folder
If you have installed one or more of the GarageBand Jam Packs on your computer, your
loop library can contain many thousands of loops. To make searching for loops easier,
you can choose to display only loops from a specific Jam Pack, or only the loops
included with GarageBand. If you have created your own loops or added loops from
another source, you can also choose to display only those loops.
Click here to show the
loop library pop-up menu.
To display loops from a specific Jam Pack or folder:
m Choose the Jam Pack or folder with the loops you want to see from the loop library
pop-up menu, located to the right of the word “Loops” at the top of the loop browser.
Searching by Scale Type
Most loops other than drum loops are recorded using a particular musical scale. In
most cases, when you arrange several loops so that they play together, you’ll want to
use loops with the same scale type. You can narrow the loops shown in the results list
to those using either the major or minor scale, those using neither scale, or those good
for both.
Choose a scale
type here.
To display only loops with a particular scale type:
m Choose the scale type from the Scale pop-up menu.
Drum loops don’t usually have a scale type, so try refining the bass loops you found
earlier to show only those using the major scale.
Limiting Searches to Nearby Keys
Loops with melody and harmony instruments are recorded in a specific musical key.
When you add a loop to a project, GarageBand matches the loop’s key with the key of
the project. The closer the loop’s original key is to the key of the project, the more
natural the loop will sound when transposed to the project’s key. When a loop is
transposed by a large number of semitones, the result can sometimes sound unnatural
or distorted.
36 Chapter 4 Using Apple Loops
Enter search
text here.
Page 37

To display loops only in keys near the project’s key:
1 Choose GarageBand > Preferences, then click Loops.
2 In the Loops pane, click the “Filter for more relevant results” checkbox.
Note: The “Filter for more relevant results” checkbox is selected by default. To see loops
in keys farther away from the project’s key, deselect the checkbox.
Searching for Specific Text
You can quickly find loops with specific text in their file name or path using the search
field. This makes it easy to find a loop by name, or to find all loops in a specific folder.
To perform text searches for loops:
m Type the text you want to search for in the search field, then press Return. Loops with
the text in either their file name or path will be shown in the results list.
Try refining the drum loops you found earlier by typing “acoustic”, “club”, or “funk” in the
search field. You can try typing other words to see what results you get.
You can use several methods together to find specific loops. For instance, you can use
keywords with the Scale pop-up menu, or with the search field, to find only bass loops
using the major scale, or to find only percussion loops with “latin” in the file name.
Adding Loops to the Timeline
When you find a loop you want to use in your project, you add the loop to the timeline.
Drag a loop to an empty
part of the timeline to create
a new track for the loop.
To add a loop to the timeline:
m Drag the loop from the loop browser to an empty part of the timeline where there is
no track. A new track of the appropriate type is created, and the loop is added to the
new track.
You can also create a new track, then drag a loop of the same type (Real or Software
Instrument) to the track. To learn about creating tracks, see Chapter 6 and Chapter 7.
There are two types of Apple Loops: Real Instrument loops or Software Instrument
loops. In the loop browser, the loop’s icon shows which type each loop is. Real
Instrument loops can be dragged only to a Real Instrument track, and Software
Instrument loops can be dragged to either a Real or Software Instrument track. Either
type can be dragged to an empty part of the timeline to create a new track.
Chapter 4 Using Apple Loops 37
Page 38

You can also convert a Software Instrument loop to a Real Instrument loop when you
drag it to the timeline. Real Instrument loops require less processing power for
playback, which can allow you to use more tracks and effects in your project, especially
for projects with many loops.
To convert a Software Instrument loop to a Real Instrument loop:
m Option-drag the loop from the loop browser to the timeline.
By default, Option-dragging a Software Instrument loop converts it to a Real
Instrument loop. You can change the default so that dragging a Software Instrument
loop converts it to a Real Instrument loop, and Option-dragging does not convert it.
To change the default behavior for converting Software Instrument loops:
1 Choose GarageBand > Preferences, then click Loops.
2 Select the “Convert to Real Instrument” checkbox next to “Adding Loops to the
Timeline.”
When you add a loop to a project, a region is created from the loop in the timeline. The
edits you make to the region do not change the original loop, so you can always return
to the original sound of the loop or use it in another project.
Now try adding some of the drum and bass loops you found earlier to the timeline.
Creating Your Own Apple Loops
You can save Real and Software Instrument regions you record as Apple Loops. When
you save a region as an Apple Loop, it is added to the loop library and appears in the
loop browser, so you can use it in other projects.
Apple Loops you create from recorded regions match the tempo and key of the
project, just like the Apple Loops included with GarageBand.
To save a region as an Apple Loop:
1 Select the region in the timeline.
2 Choose Edit > Add To Loop Library, or drag the region over the loop browser.
3 In the Add Loop dialog, do the following:
a Type a name for the loop.
b Choose the scale and genre from the pop-up menus.
c Choose an instrument category and instrument name from the list.
d Click the appropriate mood buttons for easy searching.
4 Click Create.
For information about recording Real and Software Instruments and creating regions,
see Chapter 6 and Chapter 7.
38 Chapter 4 Using Apple Loops
Page 39

Adding Loops to the Loop Library
When you install GarageBand, the loops included with the application are installed in
the Apple Loops library. When you add more loops to your collection, they are installed
in the loop library, and appear in the loop browser for you to use.
To add Apple Loops to your loop library:
m Drag the loops, or the folder containing the loops, over the loop browser. The loops are
added to the Apple Loops library and are immediately available to use in your projects.
If you add loops located on a different hard disk or partition, a dialog appears asking
whether you want to copy them to the loop library, or index them in their current
location. If you add loops from the desktop, a dialog asks if you want to move them or
index them in their current location.
If you add loops located on a CD or DVD, GarageBand copies them to the loop library.
Chapter 4 Using Apple Loops 39
Page 40

5 Working in the Timeline
5
You build your projects by arranging Real and Software
Instrument regions in the timeline.
Once you’ve added several loops to the timeline, you can make changes to their
regions in the timeline to start building the arrangement of the project.
You can arrange regions in the timeline by cutting, copying, and pasting, moving and
resizing, looping, and transposing them, by splitting and joining them, by fixing the
timing of Software Instrument regions, and by renaming regions.
In this lesson, you’ll learn how to:
 Select a single region or multiple regions
 Cut, copy, and paste regions
 Loop, resize, and move regions
 Transpose regions
 Split and join regions
 Fix the timing of Software Instrument regions
 Set Real Instrument regions to keep their original tempo
 Rename regions
 Use the timeline grid to snap regions to measures, beats, and other units of time
 Use Undo and Redo in GarageBand
40
About Regions
Each time you record a Real or Software Instrument, you create a region in the
instrument’s track containing the music you record. When you drag a loop to the
timeline, you create a region from the loop. Any changes you make to the region, such
as splitting or transposing it, do not change the original recording or loop.
A region’s color indicates what type of region it is:
 Purple—Real Instrument regions you record
 Blue—Real Instrument regions created from loops
Page 41

 Orange—Regions from imported audio files
 Green—Software Instrument regions from both recordings and loops
Regions are the building blocks of a project. You define the feeling, build the structure,
and create change and interest in a project by arranging regions in the timeline.
Selecting Regions
In order to make changes to a region, you must first select it in the timeline.
To select a region, do one of the following:
 Select a single region by clicking it.
 Select multiple regions by Shift-clicking.
 Drag from a point before the first region to a point after the last one to select the
regions in between.
Note: To select regions and perform other actions such as looping and resizing, you
may need to zoom in on the region so that it is large enough to select.
Cutting, Copying, and Pasting Regions
You can cut, copy, and paste regions using the standard Mac OS menu commands and
keyboard shortcuts.
To cut a region:
m Select the region, then choose Edit > Cut.
To copy a region, do one of the following:
 Select the region, then choose Edit > Copy.
 Option-drag the region.
To paste a region:
m Move the playhead to the point in the timeline where you want the region to start,
then choose Edit > Paste.
When you paste a region, the playhead moves to the end of the pasted region. You can
paste additional copies of the region, and each one starts at the point in the timeline
where the previous one ends.
Chapter 5 Working in the Timeline 41
Page 42
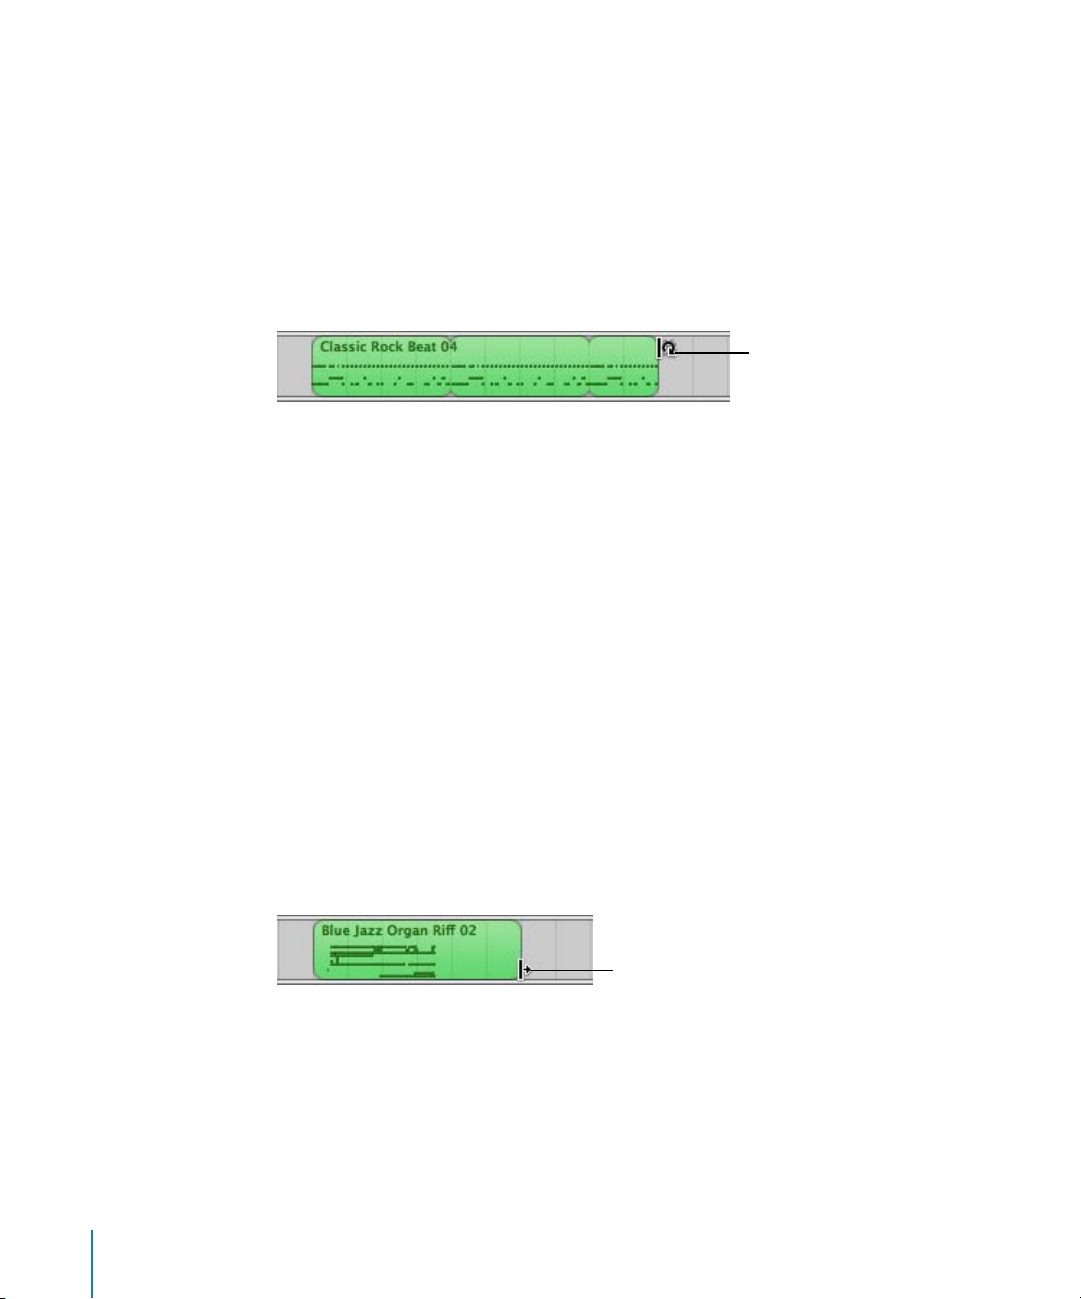
Looping Regions
You can loop a region so that it repeats. When you loop a region, it plays for as much
time as you extend it in the timeline.
To loop a region:
1 Move the pointer over the upper half of the right edge of the region. The pointer
changes to a loop pointer, with a circular arrow.
2 Drag the edge of the region to the point where you want it to stop playing. The region
will loop repeatedly to that point.
Loop pointer
When you loop a region, the notches at the top and bottom of the region show the
beginning and end of each repetition. You can drag to the end of a repetition, or have
it end in the middle of a repetition.
Try looping the drum and bass regions you added to the timeline. Rhythm patterns in
most popular music last for some multiple of four measures. For example, the verse and
chorus of a popular project often last for 16 or 32 measures each.
Resizing Regions
You can resize regions by either shortening or lengthening them.
 When you shorten a region, only the visible part of the loop plays.
 When you lengthen a region, you add silence (blank space) to its beginning or end.
To resize a region:
1 Move the pointer over the lower half of either edge of the region. The pointer changes
to a resize pointer, with an arrow pointing away from the region.
2 Drag the edge of the region to shorten it or lengthen it.
Resize pointer
Resizing a region by lengthening adds silence to the region. This can be useful if you
want to make copies of the region, each lasting for a certain number of beats.
Note: You can’t lengthen a Real Instrument region beyond its original length.
42 Chapter 5 Working in the Timeline
Page 43
Moving Regions
You can move a region by dragging it to a new point in the timeline. You can also
move a region to another track of the same type as the region (Real Instrument regions
can only be moved to Real Instrument tracks, and Software Instrument regions can
only be moved to Software Instrument tracks).
To move a region:
 Drag the region left or right to a new point in the timeline.
 Drag the region up or down to another track of the same type.
Two regions cannot overlap in the same track. If you drag a region over part of another
region, the region being covered is shortened to the edge of the overlapping region. If
one region completely covers another region, the region being covered is deleted from
the track.
Try adding a new drum or bass loop to the timeline. Move it so it starts at the end of
the one you added earlier, then loop it to create a new rhythmic groove.
Transposing Regions
When you add a region to the timeline, the region is matched, or transposed, to
the key of the project. In most situations, you’ll want regions to be in the same key as
the project. You can transpose a region to a different key when you want the project to
temporarily move to a new key, or to create tension between the region and the rest
of the project (called dissonance).
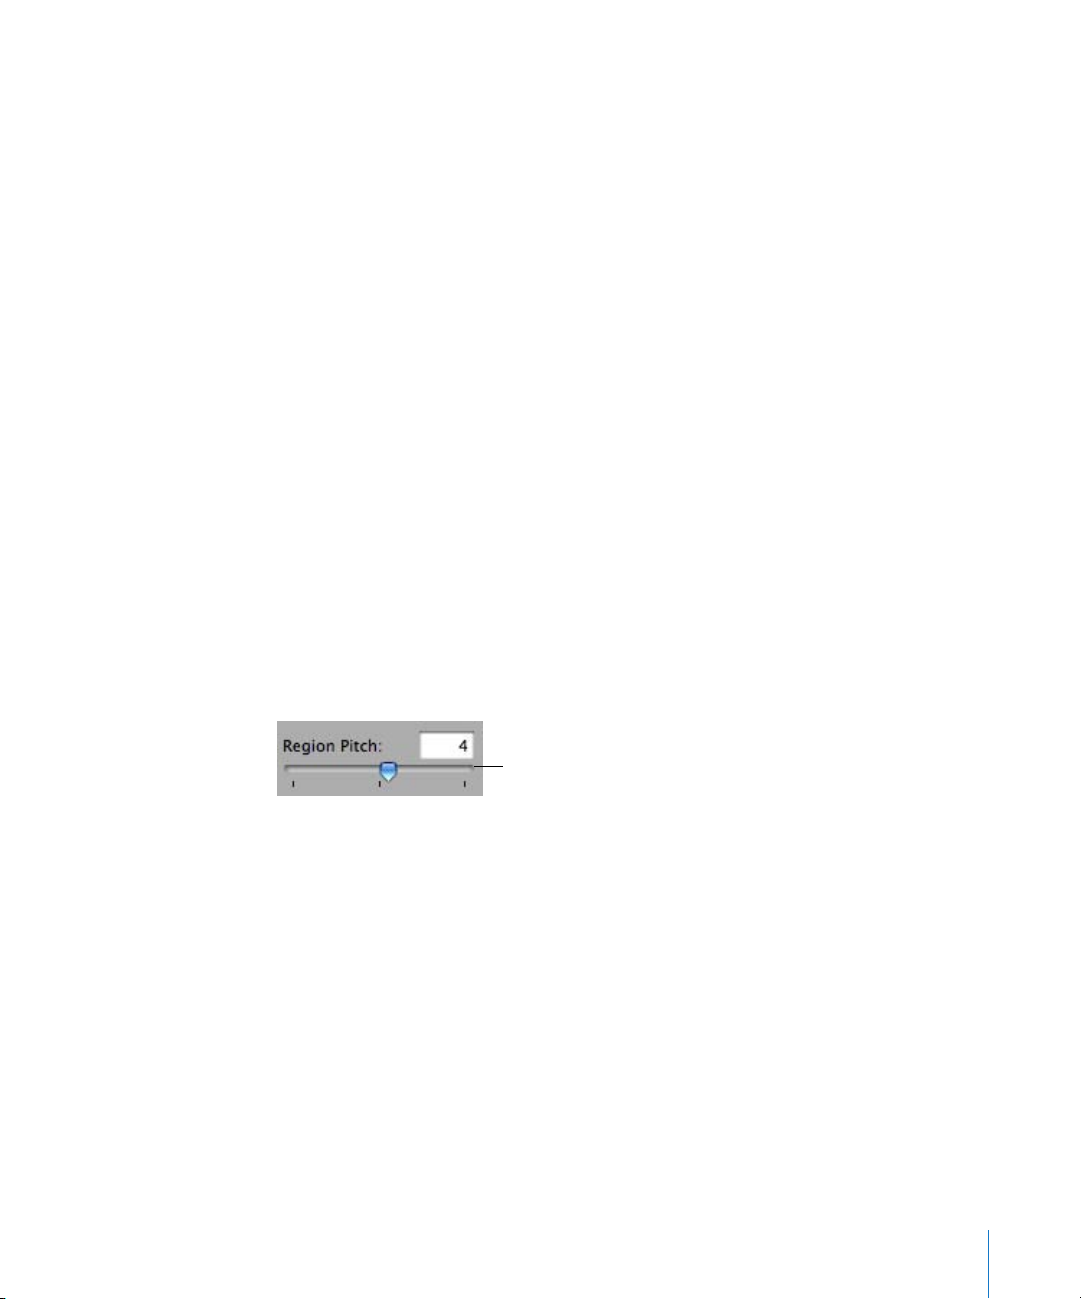
Drag the Region Pitch
slider, or type the number
of semitones in the field.
To transpose a region:
1 Select the region in the timeline, then click the Editor button to open the editor. You
can also double-click the region to open the editor.
2 Drag the Region Pitch slider to transpose the region up or down. You can also type the
number of semitones you want to transpose the region in the field next to the slider. A
semitone is the smallest distance between two musical notes.
Try adding a new bass loop after the one that you already dragged to the timeline,
then transposing it. The most common transpositions are five and seven semitones up
or down, but feel free to try whatever sounds good.
Chapter 5 Working in the Timeline 43
Page 44

Splitting Regions
You can split a region in the timeline. Splitting a region lets you start playing the region
from a point other than the beginning, or use parts of a region in different places in the
timeline.
1 Select the region you want to split.
2 Move the playhead over the point in the region where you want to split it.
3 Choose Edit > Split.
The selected region is split into two regions at the playhead. Only the selected region is
split, even if regions in other tracks are under the playhead as well. If multiple regions
are selected and are under the playhead, they will all be split.
When you split a Software Instrument region, any notes at the split point are shortened
to that point.
Joining Regions
You can join multiple regions into a single region. To be joined, the regions must be
adjacent to each other on the same track, with no space between them.
Real Instrument regions from loops (blue) can't be joined. Recorded Real Instrument
regions (purple) can only be joined to other Real Instrument regions, and Software
Instrument regions (green) can only be joined to other Software Instrument regions.
1 Make sure the regions are the same type, on the same track, and adjacent to each
other.
2 Select the regions.
3 Choose Edit > Join.
When you join Real Instrument regions, a dialog appears asking if you want to create a
new audio file. Click Create to join the regions in a new Real Instrument region.
Fixing the Timing of Software Instrument Regions
You can fix the timing of Software Instrument regions you record. When you fix the
timing of a region, the notes in the region move to the nearest grid position, as set in
the timeline grid menu in the upper-right corner of the editor.
To fix the timing of a recorded region:
m Select the region, then click the Fix Timing button (with the words “Align to” followed
by the current note value).
44 Chapter 5 Working in the Timeline
Page 45

To set the note value for Fix Timing:
m Click the Grid button at the upper-right corner of the editor, then choose a note value
from the menu, or choose Automatic.
Setting Real Instrument Regions to Keep Their Original Tempo
By default, Real Instrument recordings (purple) and Real Instrument loops (blue) in the
timeline follow the project tempo. You can set a Real Instrument region to keep its
original tempo.
To set a Real Instrument region to follow its original tempo:
1 In the timeline, select the Real Instrument region.
2 Open the editor.
3 Deselect the Follow Project Tempo checkbox.
4 If you decide you want the region to follow the project tempo, select the region, then
select the Follow Project Tempo checkbox.
The Follow Project Tempo checkbox is unavailable when an audio file (orange), a Real
Instrument loop tagged as a “one-shot,” or a Software Instrument region (green) is
selected. You can convert a Software Instrument loop to a Real Instrument loop when
you add it to the timeline, then set the Real Instrument loop to keep its original tempo.
Renaming Regions
You can rename a region in the editor.
To rename a region:
1 Click the region in the timeline to select it, then click the Editor button. You can also
double-click the region to open the editor. The waveform of the region appears in the
editor. Be sure the header over the Name field says Region before you type the new
name.
2 Select the text in the Name field, then type the new name in the field.
Using the Grid
When working with regions in the timeline, you usually want them to align with the
beats and measures in the beat ruler, so they start playing on the beat. GarageBand
features a grid that makes it easy to align regions with beats and measures in the beat
ruler, and with other musical note values.
When you turn on the grid, the playhead, regions, and other items in the timeline snap
to the nearest grid position in the timeline and the editor when you move or resize
them.
Chapter 5 Working in the Timeline 45
Page 46

To turn the grid on or off:
m Choose Control > Snap to Grid.
The grid can be set to any of the following note values:
 1/4 notes, 1/8 notes, 1/16 notes, or 1/32 notes
 1/4 note triplets, 1/8 note triplets, or 1/16 note triplets
 1/8 note swing light or swing heavy, 1/16 note swing light or swing heavy
The grid can also be set to Automatic. When set to Automatic, the grid changes when
you zoom in or zoom out. The grid division moves between measures, 1/4 notes, 1/8
notes, 1/16 notes, and 1/32 notes, depending on the zoom level.
To set the grid value:
m Click the Grid button in the upper-right corner of the timeline, then choose a note
value from the menu, or choose Automatic.
Using Undo and Redo
As you build your arrangement in the timeline, you may want to undo or redo some of
the changes you make. If you decide you don’t like the last change you made to a
project, it can usually be undone. After undoing it, if you decide you like the project
better with the change, you can redo it.
You can also use the Undo and Redo commands as a quick way of trying out changes
to a project. You can make several changes to the project, then step back through the
changes using Undo. If you change your mind after undoing a step, you can recover
the changes using Redo. You can undo or redo any number of actions, since the last
time you saved. At any point, you can save a new version of the project by choosing
File > Save As.
To undo the last change:
m Choose Edit > Undo.
To redo the last change:
m Choose Edit > Redo.
46 Chapter 5 Working in the Timeline
Page 47

6 Working With Real Instruments
6
You can play and record guitars, basses, and any musical
instrument you can capture using a microphone in Real
Instrument tracks.
When you record a microphone or musical instrument, the recording appears as a Real
Instrument region in the Real Instrument track. You can change input settings and add
effects to a Real Instrument track in the Track Info pane.
In this lesson, you’ll learn how to:
 Add a Real Instrument track or a basic track
 Monitor Real Instrument input
 Record a Real Instrument
 Use the cycle region to record over a specific part of a project
 Change Real Instrument settings
 Use the instrument tuner with Real Instruments
 Add audio files from the Finder
Adding a Real Instrument Track
To record a Real Instrument, you can add a new Real Instrument track or record on an
existing Real Instrument track.
To add a Real Instrument track:
1 Click the Add Track button, or choose Track > New Track.
2 In the New Track dialog, click Real Instrument, then click Create.
The new track appears in the timeline, and the Track Info pane opens.
3 In the Track Info pane, select an instrument category from the Category list, then select
an instrument from the Instrument list.
4 Select the input format by clicking either the Mono or Stereo format button, then
choose the input channel from the Input pop-up menu.
47
Page 48

If the instrument you are recording has a single input, select the Mono format. If the
instrument has left and right inputs, select the Stereo format. If only mono inputs are
available, you can’t select Stereo.
You can also add a basic track. A basic track is a stereo Real Instrument track containing
no effects. You can change the input format and effects settings of a basic track after
adding it to the project.
To add a basic track:
m Choose Track > New Basic Track.
Monitoring Real Instrument Input
Hearing your instrument while you play and record is called monitoring. When you
create a Real Instrument track, you can turn on monitoring for the track in the New
Track dialog. You can turn monitoring on or off in the Track Info pane.
To turn monitoring on or off for a Real Instrument track:
1 Select a Real Instrument track, then click the Track Info button to open the Track Info
pane.
2 Choose On or Off from the Monitor pop-up menu.
Turning on monitoring can produce feedback (loud, sharp noise) if the audio input
picks up the sound being output through your speakers. This is the reason monitoring
is off by default. You may want to turn off monitoring for a Real Instrument track when
you are not singing into the microphone or playing the instrument connected to the
track. If you are recording multiple Real Instrument tracks, be sure to turn off
monitoring when you finish recording a track to prevent feedback.
Getting Ready to Record
Once you have connected your instrument and added a track to record in, there are a
few things to check before you start recording:
 Make sure the microphone or instrument is connected properly and is working.
 Make sure the correct audio drivers are selected in the Audio/MIDI pane of
GarageBand Preferences.
 Open the Track Info pane to make sure the instrument has the instrument and effects
settings you want, and is using the correct input channel (or pair of channels). See
“Changing Real Instrument Settings” on page 51 for more information.
 Sing or play a few notes and watch the track's level meters in the track mixer to make
sure the track is receiving input, and isn't clipping. If the red dots at the right of the
level meters (called clipping indicators) light up, try dragging the volume slider to the
left a little to lower the input volume.
48 Chapter 6 Working With Real Instruments
Page 49

 You may want to set the project tempo and key before recording a Real Instrument.
Real Instrument recordings are fixed in tempo and key, unlike loops and Software
Instrument recordings, and cannot be changed after they are recorded.
Recording a Real Instrument
Now you’re ready to record your Real Instrument. You can record one Real Instrument
track at a time.
To record a Real Instrument:
1 Click the header of the Real Instrument track you want to record in to select the track.
2 Move the playhead to the point in the timeline where you want to start recording.
3 Choose Control > Count In to have the metronome play a one-measure count-in before
recording starts. You can also set the playhead a few beats before the point where you
want the music to come in to make it easier to start playing on the beat.
4 Click the Record button to start recording.
Play button
Cycle button
Record button
5 Start playing your instrument, or singing into your microphone. As you record, a new
region appears in the selected Real Instrument track with the music you record.
6 When you are finished, click the Play button to stop recording.
An audio waveform appears in the newly recorded region.
After you record, you can listen to your new recorded part to see how you like it.
To hear the new recording:
1 Move the playhead to the point in the timeline where the new region starts (align it
with the left edge of the region). You can also move the playhead to an earlier point in
the project, or to the beginning of the project, to hear the new recording in the
context of the project.
2 Click the Play button, or press the Space bar.
Chapter 6 Working With Real Instruments 49
Page 50

Recording a Real Instrument With the Cycle Region
GarageBand lets you record over a specific part of a project. Musicians sometimes call
this “punching in” and “punching out,” and call the points where you start and stop
recording “punch points.”
To record over a specific part of a project, you set the cycle region in the timeline.
To set the cycle region:
1 Click the Cycle button. The cycle region appears as a yellow strip just below the beat
ruler.
2 Move the cycle region to the point in the timeline where you want to start recording,
then drag the end of the cycle region to the point in the timeline where you want to
end recording. You can drag in the cycle region ruler (below the beat ruler) to move the
cycle region to a new part of the timeline.
You may want to have the cycle region start a few extra beats before the point where
you want to start recording, to make it easier to start playing on the beat, and end a
few beats after you want to stop recording, in case your last note extends past the end
of the cycle region.
To record using a cycle region:
1 Select the Real Instrument track you want to record in.
2 Click the Record button to start recording.
3 Play your musical instrument, or sing into your microphone. As you record, a new
region appears in the selected Real Instrument track.
Real Instruments only record the first time through the cycle region. When the cycle
region repeats, you hear the newly recorded region.
4 When you are finished, click the Play button to stop the cycle region.
5 If you want to replace the recorded region, click the Record button and play the part
again.
6 When you have finished using the cycle region, click the Cycle button again to turn
it off.
50 Chapter 6 Working With Real Instruments
Page 51

Recording Multiple Real Instrument Tracks
You can record up to eight Real Instruments and one Software Instrument at the same
time. This lets you record voices and instruments together, and simultaneously record a
backing track, for example.
When you select a track, recording is enabled for that track (meaning that recording
will start on that track when you click the Record button). You can enable up to seven
additional tracks by clicking the round Record Enable button in each track’s header. The
Record Enable button turns red to show that the track is enabled for recording.
To disable a track for recording, click the Record Enable button in the track’s header
again.
To record multiple Real instruments at the same time:
1 Be sure each Real Instrument track is set to use a different input channel (or pair of
channels) in the Track Info pane.
2 Enable the tracks you want to record by clicking their Record Enable buttons.
3 Click the Record button in the transport controls to start recording.
To record a Software Instrument at the same time as one or more Real Instruments:
1 Enable the Software Instrument track for recording by clicking its Record Enable
button.
2 Click the Record button in the transport controls to start recording.
If you enable more than eight Real Instrument tracks or more than one Software
Instrument track, the track farthest from the last track you enable is disabled for
recording, so as not to exceed the maximum number of recording tracks.
To record on multiple tracks, you need to have an audio interface with at least two
input channels for recording.
Changing Real Instrument Settings
When you create a Real Instrument track, you select an instrument for the track in the
New Track dialog. You can change the instrument, effects, and input settings in the
Track Info pane.
Changing the Instrument
You can change the instrument for a Real Instrument track. Each instrument includes
preset effects optimized for the instrument.
Chapter 6 Working With Real Instruments 51
Page 52

To change the instrument for a Real Instrument track:
1 Select the track, then click the Track Info button to open the Track Info pane.
2 Select an instrument category from the list on the left, then select a track instrument
from the list on the right.
Select an instrument
category from this list.
Select an instrument
from this list.
Use these controls to set
the input format and input
channel and to turn
monitoring on or off.
Changing the Input Channel
When you create a Real Instrument track, you set the input channel (for mono input) or
pair of channels (for stereo input). You can change these settings in the Track Info pane.
To change the input channel:
1 Select the track, then click the Track Info button to open the Track Info pane.
2 Choose an input channel, or pair of channels, from the Input pop-up menu.
The number and format of input channels varies, depending on what type of audio
interface is connected to your computer.
52 Chapter 6 Working With Real Instruments
Page 53

Adjusting Input Volume
You can adjust the input volume for a Real Instrument track. The input volume controls
the volume of the signal coming from the instrument or microphone. In general, set
the input volume as high as possible without causing clipping or distortion for the best
results.
To adjust the input volume, do one of the following:
 If the instrument or microphone has a volume control, adjust the volume control on
the device.
 If the instrument or microphone is connected to an audio interface, adjust the
volume control on the audio interface.
 In the Track Info pane, drag the Volume slider left to lower the input volume for the
selected channel, or drag it right to raise the input volume.
Note: You can’t control the volume of some audio interfaces and other devices from
GarageBand. If the Volume slider in the Track Info pane is dimmed, you cannot adjust
the input volume in GarageBand.
You can also add and adjust effects for a Real Instrument track. For information about
using effects, see “Mixing and Adding Effects” on page 72.
Using the Instrument Tuner
GarageBand includes an instrument tuner that you can use to check the tuning of any
Real Instrument connected to your computer. The tuner is especially helpful when
playing and recording guitars, basses, and other instruments that may need regular
retuning.
The instrument tuner shows a horizontal scale with zero (0) in the center. The note
name is displayed to the left of the scale. When you play a single note on your Real
Instrument, the pitch is shown in relation to the correct pitch for the note displayed.
Chapter 6 Working With Real Instruments 53
Page 54

To use the instrument tuner:
1 Make sure the Real Instrument you want to tune is connected to your computer.
2 Select the Real Instrument track for the instrument you want to tune.
3 Click the tuner icon (the tuning fork) at the left of the time display, or choose
Control > Show Instrument Tuner.
Be sure to play only a single note while tuning. The instrument tuner can’t tune to
a chord, or if you play different notes rapidly.
The instrument tuner works for Real Instruments, but not for Software Instruments.
Adding an Audio File From the Finder
In addition to recording audio in a Real Instrument track, you can add audio files from
the Finder to your projects. You can add an audio file in any of the following formats:
 AIFF
 WAV (including Sony ACID WAV files)
 AAC (except protected AAC files)
 Apple Lossless
 MP3
When you add a compressed file to a project, it stays compressed, saving space and
time.
To add an audio file:
m Drag the file from the Finder to the timeline, either to a Real Instrument track or to the
empty area below the existing tracks.
If you drag an audio file to the empty area below the existing tracks, a new basic track
is added to the timeline, and the audio file is placed in the new track.
Note: Audio files you drag from the Finder will not change to match the tempo or key
of the project.
54 Chapter 6 Working With Real Instruments
Page 55

7 Working With Software
Instruments
7
GarageBand includes an extensive set of Software
Instruments, including drums, guitars, pianos, organs,
and synthesizers.
You can play and record Software Instruments using the onscreen music keyboard in
GarageBand, or by connecting a MIDI-compatible music keyboard to your computer.
You can add effects to a Software Instrument, and edit Software Instrument regions in
the editor.
In this lesson, you’ll learn how to:
 Play and record Software Instruments using Musical Typing, the onscreen keyboard,
or a connected music keyboard
 Change Software Instrument settings
Using Musical Typing
Using Musical Typing, you can play and record Software Instruments using your
computer keyboard. When you show the Musical Typing window, you can play the top
and middle row of your computer keyboard just like the keys on a music keyboard to
play notes.
To show the Musical Typing keyboard:
m Choose Window > Musical Typing (or press Command–Shift–K).
55
Page 56
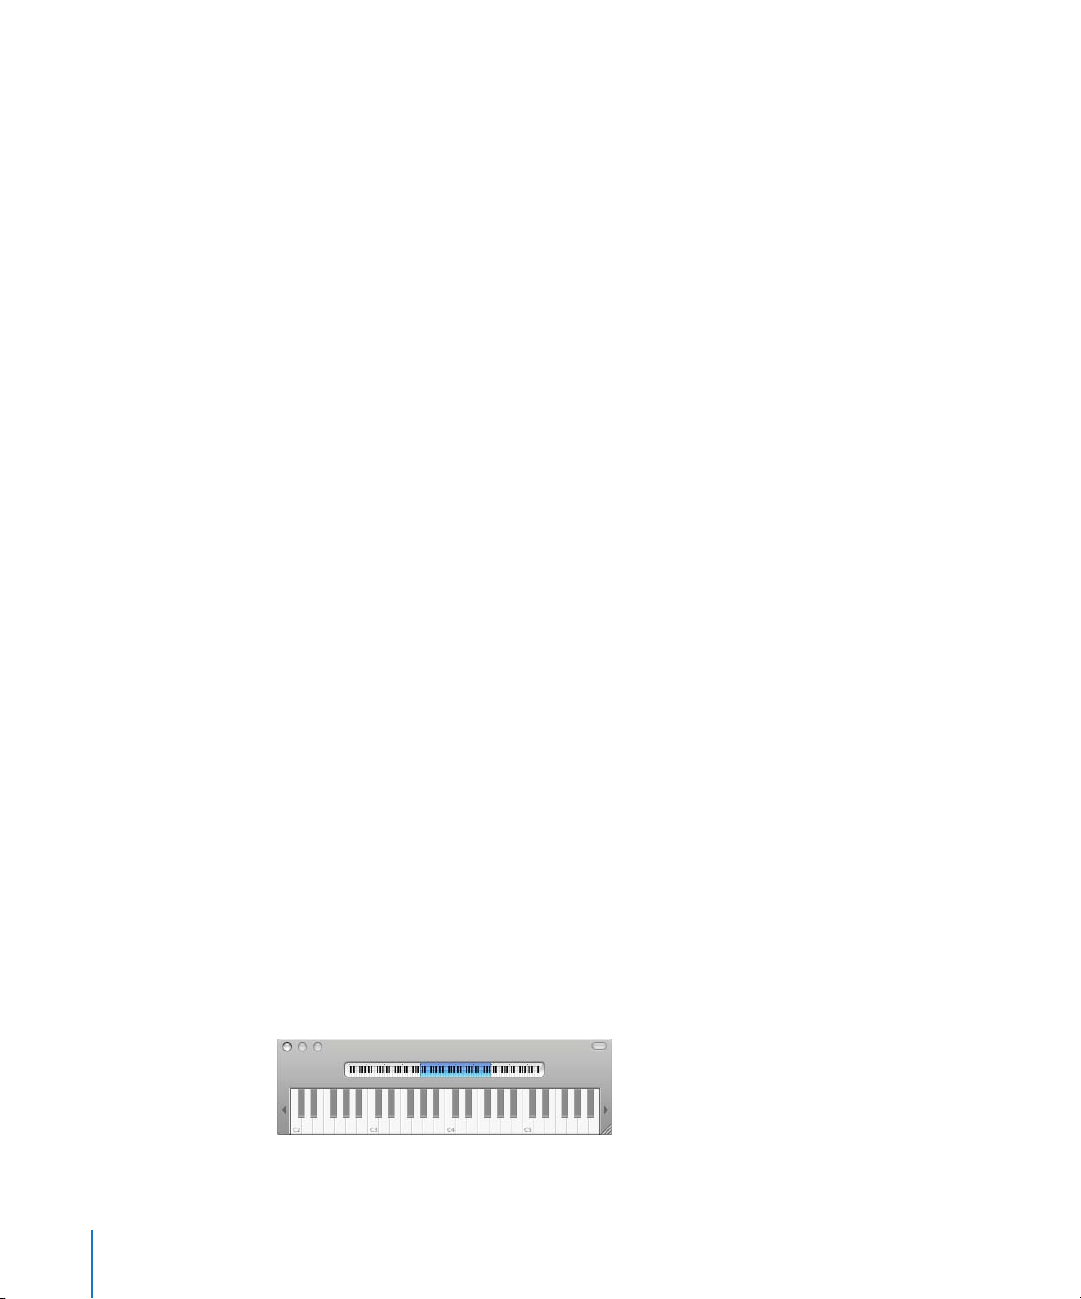
To play notes using Musical Typing:
m With the Musical Typing window open, play the keys shown on the Musical Typing
keyboard.
 The keys in the middle row of your computer keyboard play the “white keys” on the
piano keyboard, in a one and one-half octave range from C through F.
 The keys W, E, T, Y, U, O, and P in the top row of your computer keyboard play the
“black keys” (sharps and flats).
To move up or down by octaves, do one of the following:
 Press Z to move down by an octave.
 Press X to move up by an octave.
 Click the small keyboard at the top of the Musical Typing window to move to the
octave shown, or drag the blue rectangle. The blue rectangle shows the current
range of Musical Typing.
To change the velocity level of notes you play using Musical Typing:
 Press C to lower the velocity level.
 Press V to raise the velocity level.
To add pitch bend to notes you play using Musical Typing:
 Press 1 to lower the pitch of notes.
 Press 2 to raise the pitch of notes.
The pitch is bent for as long as you press the key.
To add modulation to notes you play using Musical Typing:
 Press 4 through 8 to add increasing amounts of modulation. Press 3 to turn off
modulation.
The level of modulation lasts until you change it or turn it off by pressing another key.
Using the Onscreen Music Keyboard
You can use the onscreen music keyboard to play and record Software Instruments.
When you show the onscreen music keyboard, by default it displays a four-octave
range of keys. You can resize the keyboard to display up to 10 octaves.
To show the onscreen music keyboard:
m Choose Window > Keyboard.
56 Chapter 7 Working With Software Instruments
Page 57

To play the onscreen music keyboard:
m Click the notes on the keyboard. You can click when the project is playing, when it is
stopped, or when recording.
Clicking a note lower on the key plays the note with a higher velocity (equivalent to
pressing the key harder), and clicking a note higher on the key plays the note with a
lower velocity (equivalent to pressing the key more softly).
To move the keyboard:
m Place the pointer anywhere in the space above the keys and drag.
To resize the keyboard:
m Drag the resize control in the lower-right corner of the keyboard window.
To change the range of notes you can play:
m Click the small triangle to the left or right of the keys. Clicking the triangle to the left
lowers the keys by an octave, and clicking the triangle on the right raises the keys by
an octave.
Adding a Software Instrument Track
To record a Software Instrument, you can add a new Software Instrument track or
record on an existing Software Instrument track.
To add a Software Instrument track:
1 Click the Add Track button, or choose Track > New Track.
2 In the New Track dialog, click Software Instrument, then click Create.
The new track appears in the timeline, and the Track Info pane opens.
3 In the Track Info pane, select an instrument category from the Category list, then select
the instrument you want to use from the Instrument list.
Getting Ready to Record
If you are recording Software Instruments using a music keyboard, there are a few
things to check before you start recording:
 Make sure your music keyboard is connected to your computer and is working.
 Select a Software Instrument track and try playing your music keyboard, clicking
notes on the onscreen music keyboard, or using Musical Typing. You should hear the
Software Instrument as you play.
Chapter 7 Working With Software Instruments 57
Page 58
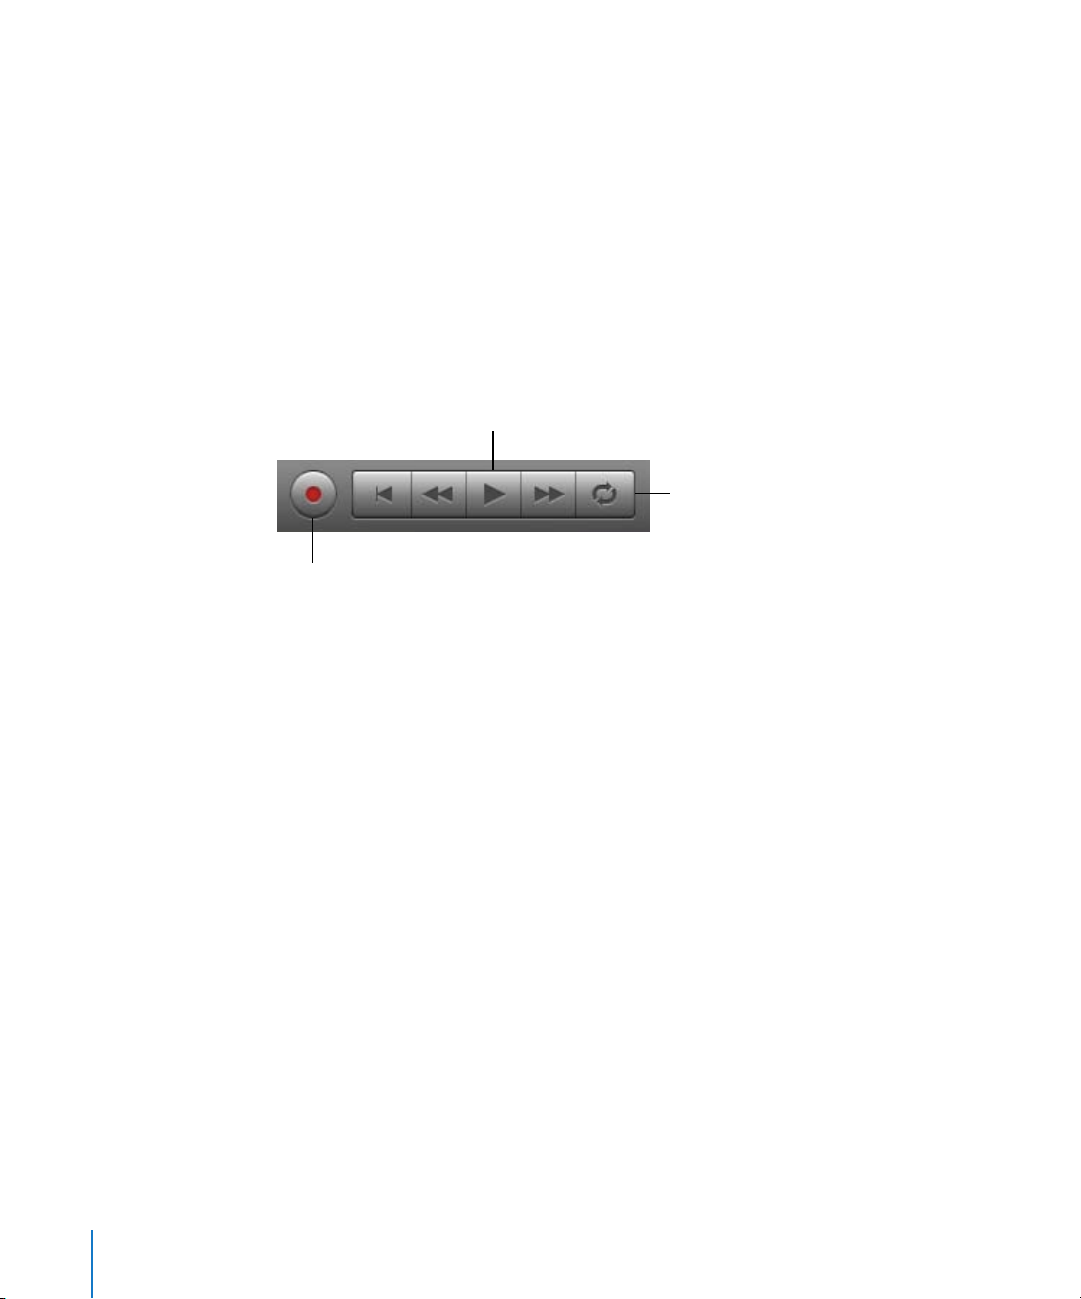
Recording a Software Instrument
Now you’re ready to record a Software Instrument. You can record one Software
Instrument track at a time.
To record a Software Instrument:
1 Click the header of the Software Instrument track you want to record in to select the
track.
2 Move the playhead to the point in the timeline where you want to start recording.
3 Choose Control > Count In to have the metronome play a one-measure count-in before
recording starts. You can also set the playhead a few beats before the point where you
want the music to come in to make it easier to start on the beat.
4 Click the Record button to start recording.
Play button
Cycle button
Record button
5 Start playing your music keyboard, clicking notes on the onscreen music keyboard, or
using Musical Typing. As you record, a new region appears in the selected Software
Instrument track.
6 When you are finished, click the Record button again to stop recording. Click the Play
button to stop the project playing.
After you record, you can listen to your new recorded part to see how you like it.
To hear the new recording:
1 Move the playhead to the point in the timeline where the new region starts (align it
with the left edge of the region). You can also move the playhead to an earlier point in
the project, or to the beginning of the project, to hear the new recording in the
context of the project.
2 Click the Play button, or press the Space bar.
Recording a Software Instrument With the Cycle Region
You can record a Software Instrument using a cycle region, similar to how you would
with a Real Instrument. When you record a Software Instrument with a cycle region,
you can keep recording for as many times as the cycle region repeats. Each new cycle is
merged with the region created the first time through the cycle region. For information
on recording using a cycle region, see “Recording a Real Instrument With the Cycle
Region” on page 50.
58 Chapter 7 Working With Software Instruments
Page 59
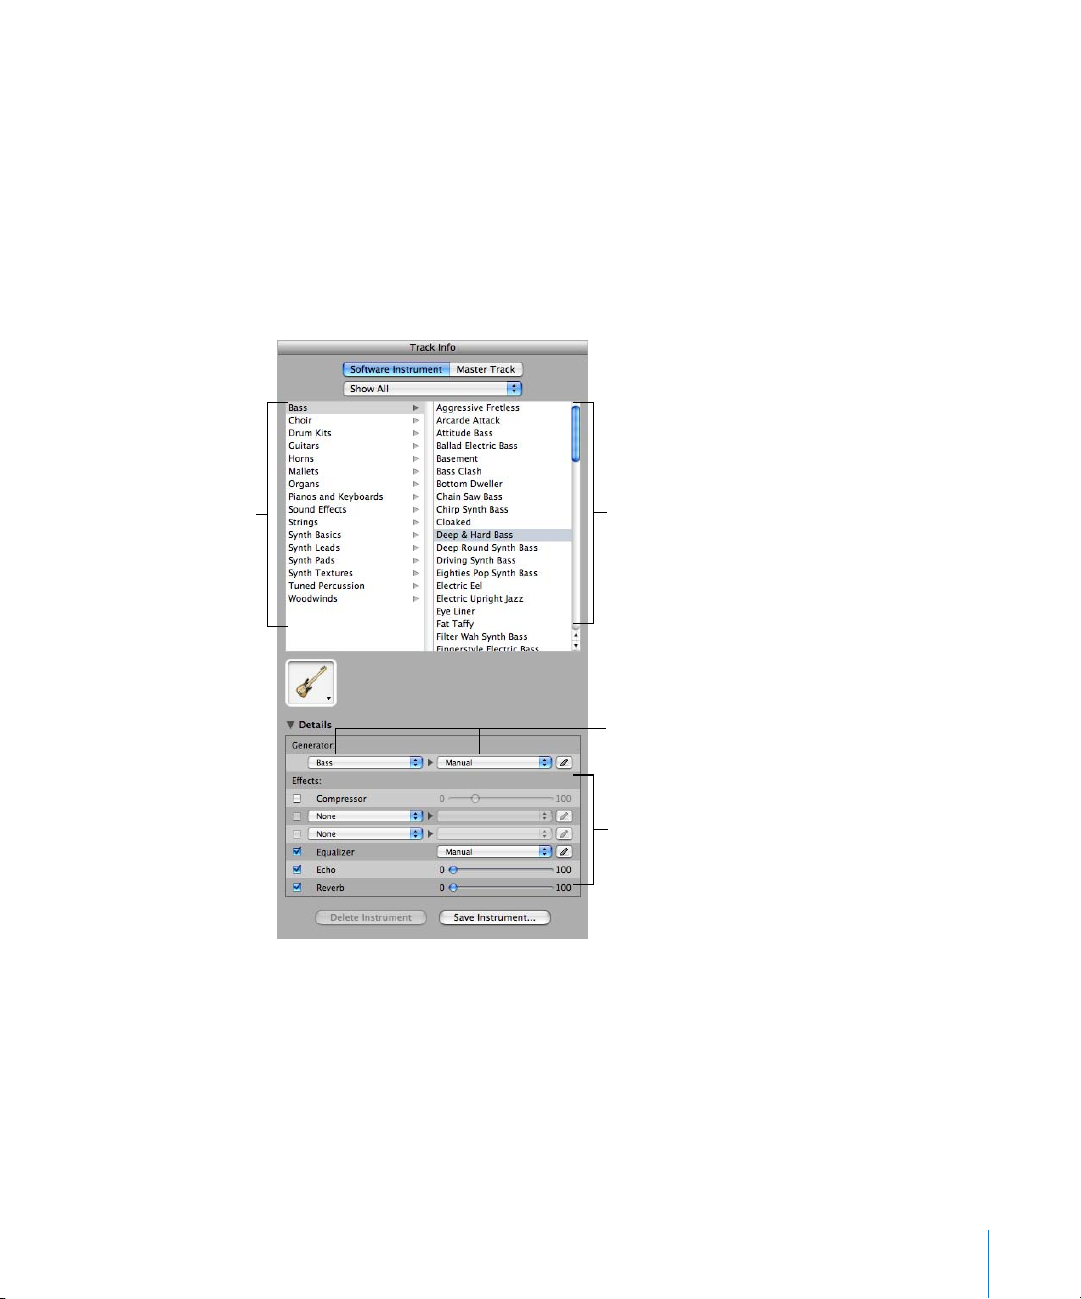
Changing Software Instrument Settings
When you create a Software Instrument track, you select an instrument for the track in
the New Track dialog. You can change the instrument in the Track Info pane.
To change the instrument for a Software Instrument track:
1 Select the track, then click the Track Info button to open the Track Info pane.
2 Select an instrument category from the list on the left, then select a track instrument
from the list on the right.
The output of a Software Instrument is always stereo.
Select an instrument
category from this list.
Select an instrument
from this list.
Choose a new instrument
generator and generator
preset from these pop-up
menus.
Use these controls to add
and adjust effects.
You can also add and adjust effects for a Software Instrument track. For information
about using effects, see “Mixing and Adding Effects” on page 72.
Chapter 7 Working With Software Instruments 59
Page 60

8 Working in the Editor
8
The editor, located below the timeline, is where you edit
Real and Software Instrument regions. You can edit each
type of region in a variety of ways.
In the editor, Real Instrument regions appear as audio waveforms. Software Instrument
regions appear as either a graphic note display, or as music notation, depending on
which view you select. For both Real and Software Instrument regions, the editor
features a beat ruler to help you make precise edits, and a playhead which you can lock
to the timeline playhead, or unlock to see a different part of the project in the editor.
In this lesson, you’ll learn how to:
 Select a single region or multiple regions
 Edit Real Instrument regions in the editor (by moving, cropping, and joining them)
 Enhance the tuning and timing of Real Instrument tracks
 Edit notes and controller information in a Software Instrument region
60
Selecting Regions
In order to edit a region in the editor, you first select the region in the timeline.
To select a region, do one of the following:
 Select a single region by clicking it.
 Select multiple regions by Shift-clicking.
 Drag from a point before the first region to a point after the last one to select the
regions in between.
Page 61

Editing Real Instrument Regions
You can edit Real Instrument regions in the editor in several ways. You can:
 Move regions
 Crop part of a region
 Join regions
 Enhance the tuning of single-note (monophonic) regions
 Enhance the timing of regions
The editor includes its own grid, which you can set independently of the grid for the
timeline, using the Grid button in the upper-right corner of the editor.
Moving Real Instrument Regions
You can move Real Instrument regions in the editor in order to align them precisely
with measures and beats, or with other regions.
To move a Real Instrument region in the editor:
1 Move the pointer over the top part of the region, close to the beat ruler.
The pointer becomes a move pointer (a vertical line with arrows pointing left and
right).
2 Drag the region to its new position.
Cropping Part of a Real Instrument Region
You can easily cut part of a Real Instrument region, whether at the beginning, the end,
or in the middle of the region. This is especially useful if you want to delete, move, or
copy an individual note, chord, or phrase in a region.
To crop part of a Real Instrument region:
1 Move the pointer over the place where you want to cut the region (except at the top).
The pointer becomes a crop pointer (a crosshair).
2 Drag to select the part of the region you want to crop.
The selected part of the region appears darker blue.
3 Click the selected part of the region.
4 The selected part is cropped from the rest of the region, and is now a separate region.
You can select it, delete it, move it, or copy it, just as you would any Real Instrument
region.
Chapter 8 Working in the Editor 61
Page 62

Joining Real Instrument Regions
You can join Real Instrument regions that are next to each other in the editor.
To join regions:
m Select the regions, then choose Edit > Join (or press Command-J).
Enhancing the Tuning of Real Instrument Tracks
You can enhance the tuning of a Real Instrument track. This is especially useful when
you record Real Instrument regions that have the right “feel” and timing but are not
perfectly in tune.
When you use the Enhance Tuning slider, all regions on the selected track (both your
own recordings and loops) are enhanced. Enhance Tuning can only produce accurate
results on single-note (monophonic) Real Instrument regions, so be sure the track does
not include regions with chords or unpitched sounds.
By default, Enhance Tuning enhances the tuning of notes by moving them to the
closest note in the project’s key. You can limit the enhancement to the notes of the
chromatic scale instead by deselecting the “Limit to key” checkbox.
To enhance the tuning of a Real Instrument track:
1 In the timeline, select the Real Instrument track you want to enhance.
2 Drag the Enhance Tuning slider right to increase the amount of tuning enhancement,
or drag it left to decrease the amount of enhancement.
3 To limit tuning enhancement to the chromatic scale, deselect the “Limit to key”
checkbox below the slider.
You hear the results immediately as the project plays.
Setting the Enhance Tuning slider to higher values can sometimes lead to undesirable
results. Listen carefully to the results of using the slider and set it to the value that
sounds best.
Enhancing the Timing of Real Instrument Tracks
You can enhance the timing of a Real Instrument track. This is especially useful when
you record Real Instrument regions where the notes are the right pitch, but are not
perfectly in time with the project.
When you use the Enhance Timing slider, all regions on the selected track (both your
own recordings and loops) are enhanced. You can enhance the timing of single-note,
chordal, and percussion (unpitched) Real Instrument regions. Enhance Timing works
better with regions that contain distinct patterns of notes than with pads or ambient
sounds.
62 Chapter 8 Working in the Editor
Page 63

To enhance the timing of a Real Instrument track:
1 In the timeline, select the Real Instrument region you want to enhance.
2 Drag the Enhance Timing slider to the right to increase the amount of timing
enhancement, or drag it left to decrease the amount of enhancement.
If you move the Enhance Timing slider while the project is playing, it may take a
moment for it to “catch up” with the music.
The Enhance Timing slider may not work equally well with all musical material,
especially when set to higher values. Listen carefully to the results of using the slider
and set it to the value that sounds best.
Editing Software Instrument Regions
You can edit Software Instrument regions in the editor in several ways. You can:
 Edit individual notes (including the note’s pitch, duration, and timing)
 Edit controller information (including velocity, mod wheel, pitch bend, and sustain)
Editing Notes in a Software Instrument Region
You can edit individual notes of a Software Instrument region. When you view the
region in the editor, individual notes in the region are displayed in a graphic format:
 The left edge of the note shows the point in the timeline it starts playing.
 The width of the note shows how long it plays.
 The vertical position of the note shows its pitch, in relation to the piano keyboard
displayed vertically along the left edge of the editor.
You can drag notes to a new starting point, resize notes to shorten or lengthen how
long they play, and drag notes up or down to a different pitch. You can also select
multiple notes and edit them at the same time.
Note: To edit notes in the editor, you may need to zoom in so that the notes are large
enough to select and edit.
To edit notes in a Software Instrument region:
 Drag the note left or right to a new starting point. You can use the beat ruler in the
editor to align the note with a specific beat or measure.
 Drag the lower-right corner of the note to resize it.
 Drag the note up or down to raise or lower its pitch. Use the piano keyboard along
the left edge of the editor to see the pitches.
You can also select multiple notes in the editor, and edit them at the same time.
Chapter 8 Working in the Editor 63
Page 64

To select multiple notes:
 Shift-click or Command-click the notes you want to select.
 Drag from a point before the first note to a point after the last note, enclosing the
notes you want to select.
When you edit multiple notes, each note is changed by the same amount. For example,
if you select several notes and drag them to a new starting point, each note is moved
by the same number of beats. If you resize several notes at the same time, each note is
shortened or lengthened by the same amount. If you drag several notes up or down to
a different pitch, each note is changed by the same number of semitones.
You can also fix the timing of individual notes in the editor. When you fix the timing of
notes in the editor, the selected notes move to the nearest grid position, as set in the
timeline grid menu in the upper-right corner of the editor.
To fix the timing of individual notes:
m Select the notes you want to fix in the editor, then click the Fix Timing button (with the
text “Align to” followed by a note value).
Editing Controller Information in a Software Instrument Region
Most music keyboards designed to be used with computer music programs include
“controllers” for pitch bend and modulation. These controllers are often circular
“wheels” placed at the left end of the keyboard. Some keyboards also include other
controllers, such as a sustain pedal, a foot controller, or an expression control.
Moving the pitch bend wheel while you play causes the notes you play to bend up or
down in pitch, like a guitar. Moving the modulation wheel creates changes in the
sound of the Software Instrument. The changes are different for different instruments,
but often involve changing the frequency, rate, or intensity of a filter applied to the
instrument.
If you move a controller while recording a Software Instrument, the movements are
recorded in the Software Instrument region. You can see the movements you recorded
and edit them in the editor.
To display controller information for a Software Instrument region:
1 Double-click the region to open it in the editor.
2 Choose the type of controller information you want to see from the Display pop-up
menu.
64 Chapter 8 Working in the Editor
Page 65

Controller information is displayed as a line with “dots” at different points in time,
similar to the way volume and pan curves are displayed in the timeline. Each “dot”
(called a control point) shows a change in value (in this case the movements of the
controller) at that point in time. You can edit the controller information by adding new
control points, and by adjusting control points to change their value or to change
where in the timeline they occur.
To add a control point:
m Click the line in the editor at the point where you want to add a control point.
To adjust a control point, do one of the following:
 Drag the control point up or down to a new value.
 Drag the control point left or right to move it to a different point in time.
You can also view and edit Software Instrument regions in notation view in the editor.
For information about notation view, see “Working in Notation View” on page 66.
Chapter 8 Working in the Editor 65
Page 66

9 Working in Notation View
You can view and edit Software Instrument regions in
standard music notation format. In notation view, you
can edit notes and other musical events, including
adding pedal markings.
In this lesson, you’ll learn some basics about music notation, and learn how to:
 View Software Instrument regions as musical notation
 Choose the note value for notation view
 Add, select, and edit notes in notation view
 Add pedal symbols
9
66
About Notation View
In addition to the editor’s graphic “piano roll” view, you can view Software Instrument
regions (both those you record and those from loops) in notation view. In notation
view, the notes in a region are shown as musical notes. Notation view includes other
musical symbols such as rests, staves, clef signs, time signatures, key signatures, and
pedal markings. The following section briefly describes some of these symbols, for
users unfamiliar with music notation.
 Notes: A musical note has several parts, including the note head and stem. The note
head (the round part of the note) indicates the note’s duration (how long the note
lasts). Notes of shorter duration (shorter than a quarter note) have flags, and
sometimes these notes are joined together by beams. Each note shown below is half
as long as the note to its left (from left to right, the notes are: whole note, half note,
quarter note, and eighth note).
Page 67

 Rests: When reading music while playing, it is as important to know the space
between notes as the notes themselves. The silences between notes are shown by
rests. Rests, like notes, have different symbols for different lengths of time, and
shorter rests use flags.
Each rest shown below is half as long as the rest to its left (from left to right, the rests
are half rest, quarter rest, eighth rest, and sixteenth rest).
 Staves: The set of five horizontal lines on which the notes appear is called a staff (the
plural is staves). The lines of the staff let you see the pitch of the notes from high to
low, like a grid. In notation view, GarageBand always shows two staves, similar to
piano notation. This shows a range of three octaves with middle C in the center
(between the two staves). Most instruments and voices except the lowest bass
instruments fall in this range.
 Clefs: The symbol at the left edge of each staff is called a clef. Clefs indicate the
range of notes the lines of the staff display. The staves in notation view use the two
most common clefs, the treble and bass clef.
 Key signs: If the project is in a key other than C, the sharps or flats in the key appear
between the clef and the time signature. Sharps are raised a semitone above the
natural note (so, for instance, C# is a semitone higher than C), and flats are lowered a
semitone (so Bb is a semitone lower than B). The symbols for sharps and flats are
shown below, followed by the “natural” symbol that cancels a sharp or flat.
 Bar lines: The vertical lines extending through both staves show the beginning of
each measure (measures are also called bars).
Chapter 9 Working in Notation View 67
Page 68

In addition to standard music notation symbols, notation view includes the following
features to make working easier:
 Duration bars: In addition to the musical note itself, each note has a duration bar
that graphically displays the note’s duration (the amount of time the note lasts).
 Beat guides: In notation view, the beat ruler not only shows measures and beats,
but also includes beat guides. Beat guides help you see the exact position of notes in
time. A beat guide appears as a small gray circle or dot above each note; when you
move a note, the beat guide moves with it to indicate the note’s position.
To view a Software Instrument region in notation view:
1 In the timeline, select a Software Instrument region.
2 Click the Notation View button (the musical note icon) in the lower-right corner of the
editor’s Region area.
In music notation, the position of notes is shown in terms of musical values (note
values). When you play music, you may play some notes slightly off the beat (ahead of
the beat or behind the beat) to achieve different types of feeling. These small
differences are not shown in musical notation.
In notation view, GarageBand shows the position of notes “rounded” to the nearest
note value. You can choose the note value to round the display of notes to from the
timeline grid menu at the upper-right corner of the editor. This does not change how
the note plays; it only changes the display, so that notes slightly out of time are shown
at the intended position.
To choose the note value for notation view:
m Click the Grid button in the upper-right corner of the editor, then choose a note value
from the timeline grid menu.
Editing Notes in Notation View
You can edit notes and controller information for a Software Instrument region in
notation view, just as you can in graphic view. You can:
 Add notes
 Select notes
 Move notes in time
 Cut and copy notes
 Change the pitch of notes
 Change the duration of notes
68 Chapter 9 Working in Notation View
Page 69

 Change the velocity of notes
 Add pedal markings to sustain notes
Adding Notes
You add a note by choosing the note value for the note, then clicking in the editor.
In notation view, a square Note Value button appears at the upper-right corner of the
Advanced area of the editor. The Note Value button displays a musical note showing
the current note value.
To choose a note value:
m Click the Note Value button, then choose the note value you want from the menu that
appears.
To add a note:
m In the editor, Command-click at the point you want to add the note.
Selecting Notes
Before editing notes in notation view, you must first select them.
To select a note:
m Click the note head (the round part of the note). You can select multiple notes by Shift-
clicking or by dragging around the notes to enclose them.
Moving Notes
You can move notes in time in notation view, in the same way as in the editor’s graphic
view.
To move a note in time:
m Select the note, then drag it left or right. You can also move selected notes by pressing
the Left or Right Arrow keys.
Above each note in the beat ruler is a beat guide. As you move a note, the beat guide
moves to help you see the note’s exact position in time.
Copying Notes
You can copy notes in notation view.
To copy a note:
m Option-drag the note head to a new position.
Chapter 9 Working in Notation View 69
Page 70

Changing the Pitch of Notes
You can change the pitch of, or transpose, notes in notation view.
To change the pitch of a note:
m Select the note, then drag it up or down. You can also change the pitch of selected
notes by pressing the Up or Down Arrow keys.
You hear the note’s new pitch as it moves.
Changing the Duration of Notes
When you select a note, a duration bar for the note appears. You can change the note’s
duration (how long the note lasts) using the duration bar.
To change the duration of a note:
1 Select the note.
2 Drag the right edge of the duration bar left (to shorten the note) or right (to lengthen
the note). Duration bars work just like the notes in graphic view.
Deleting Notes
You can delete notes that you no longer want to include in your project.
To delete a note:
m Select the note, then press the Delete key.
Changing Note Velocity
For many Software Instruments, the sound changes depending on the note’s velocity.
You can change the velocity of notes in notation view, in the same way as in graphic
view.
To change a note’s velocity:
m Select the note, then drag the Velocity slider left (to lower the velocity) or right (to raise
the velocity). You can also change a selected note’s velocity by holding down the
Command key and dragging the note up or down.
Adding Pedal Down and Pedal Up Symbols
Music notation for piano and some other instruments includes symbols for the sustain
pedal. When the sustain pedal is down, the instrument sustains all notes until the pedal
is released (up). You can add pedal down and pedal up symbols, which control whether
the notes are sustained in GarageBand.
When you add pedal symbols, you can either place the pedal up symbol manually, or
have GarageBand place the pedal up symbol automatically.
70 Chapter 9 Working in Notation View
Page 71

To add pedal symbols and place the pedal up symbol manually:
1 Click the Note Value button and choose the pedal symbol from the menu.
2 Hold down the Command key and place the pointer in the editor at the point where
you want the pedal down marker.
3 Press the mouse button.
The pedal down symbol appears at the current position of the pointer.
4 Without releasing the mouse button, drag to the point where you want the pedal up
marker.
5 Release the mouse button.
The pedal up symbol appears at the current position of the pointer.
To add pedal symbols with the pedal up symbol placed automatically:
1 Click the Note Value button and choose the pedal symbol from the menu.
2 Hold down the Command key and place the pointer in the editor at the point where
you want the pedal down marker.
3 Press the mouse button.
The pedal down symbol appears at the current position of the pointer.
4 Release the mouse button.
The pedal up symbol appears at the next sixteenth note after the pedal down symbol.
You can move it to a new position.
To move the pedal up symbol:
1 Click the pedal symbol to select it.
The pedal down and pedal up symbols become green, indicating that they are
selected.
2 Drag the pedal up symbol to its new position, then release the mouse button.
Chapter 9 Working in Notation View 71
Page 72

10 Mixing and Adding Effects
GarageBand puts a complete recording studio on your
desktop, so you can mix your projects and add
professional-sounding effects.
In this lesson, you’ll learn some basics about mixing and effects, and learn how to:
 Set track volume levels and pan position
 Add dynamic changes using volume and pan curves
 Set the output (master) volume
 Add fade ins and fade outs to the master track
 Transpose parts of a project to different keys
 Add and adjust track effects
 Turn effects on and off
 Edit and save effect presets
10
72
What Is Mixing?
When you’ve built the arrangement of your project, the next step is to mix the project.
Mixing is where you step back and listen to the overall sound of the music, and make
changes to tracks and the project to balance the different parts, bring the music into
focus, and give it the right “sound.”
Mixing typically consists of the following steps:
 Balancing volume levels
 Setting pan positions
 Creating dynamic changes with volume and pan curves
 Shaping the music with effects
Page 73

Setting Track Volume Levels
The instruments and loops you use in your project may have different volume
(loudness) levels. In order to hear all the parts you’ve added, you balance the volume
levels so that no track overwhelms the others, and no track is lost in the mix.
This doesn’t mean that every track should be set to the same volume level. In
commercial mixes, certain tracks (typically the lead vocals, drums, and lead or solo
instruments) are louder, while other tracks (the backing instruments and vocals) are
softer.
To set track volume levels:
m For each track, drag the volume slider left to lower the volume level, or drag it right to
raise the volume level.
Setting Track Pan Position
Setting different tracks to different positions in the stereo field (panning) helps make it
easier to distinguish each track in the mix, and create a sense of three-dimensional
space to your project.
In commercial music, the most important tracks (typically the lead vocals, drums, and
lead or solo instruments) are panned to the center or close to center, while other tracks
(the backing instruments and vocals) are panned left and right. Panning tracks no
farther than 50 percent left or right creates a natural sense of space, while panning
tracks to the extreme left or right creates a more unusual, artificial sound.
To set track pan positions:
m For each track, drag the pan dial left to pan the track farther to the left, or drag it right
to pan the track farther to the right. You can also click along the edge of the dial to set
it to a specific position.
Using Volume and Pan Curves
In addition to setting track volume and pan, you can add volume and pan changes
over time using volume curves and pan curves. Making changes over time is called
automation, and GarageBand lets you automate volume and pan changes for each
track.
To turn on a track’s volume or pan curve:
1 Click the triangle to the right of the Solo button in the track’s header.
A blank row for the track’s volume and pan curves appears below the track.
2 From the pop-up menu on the left side of the row, choose Track Volume or Track Pan.
Chapter 10 Mixing and Adding Effects 73
Page 74
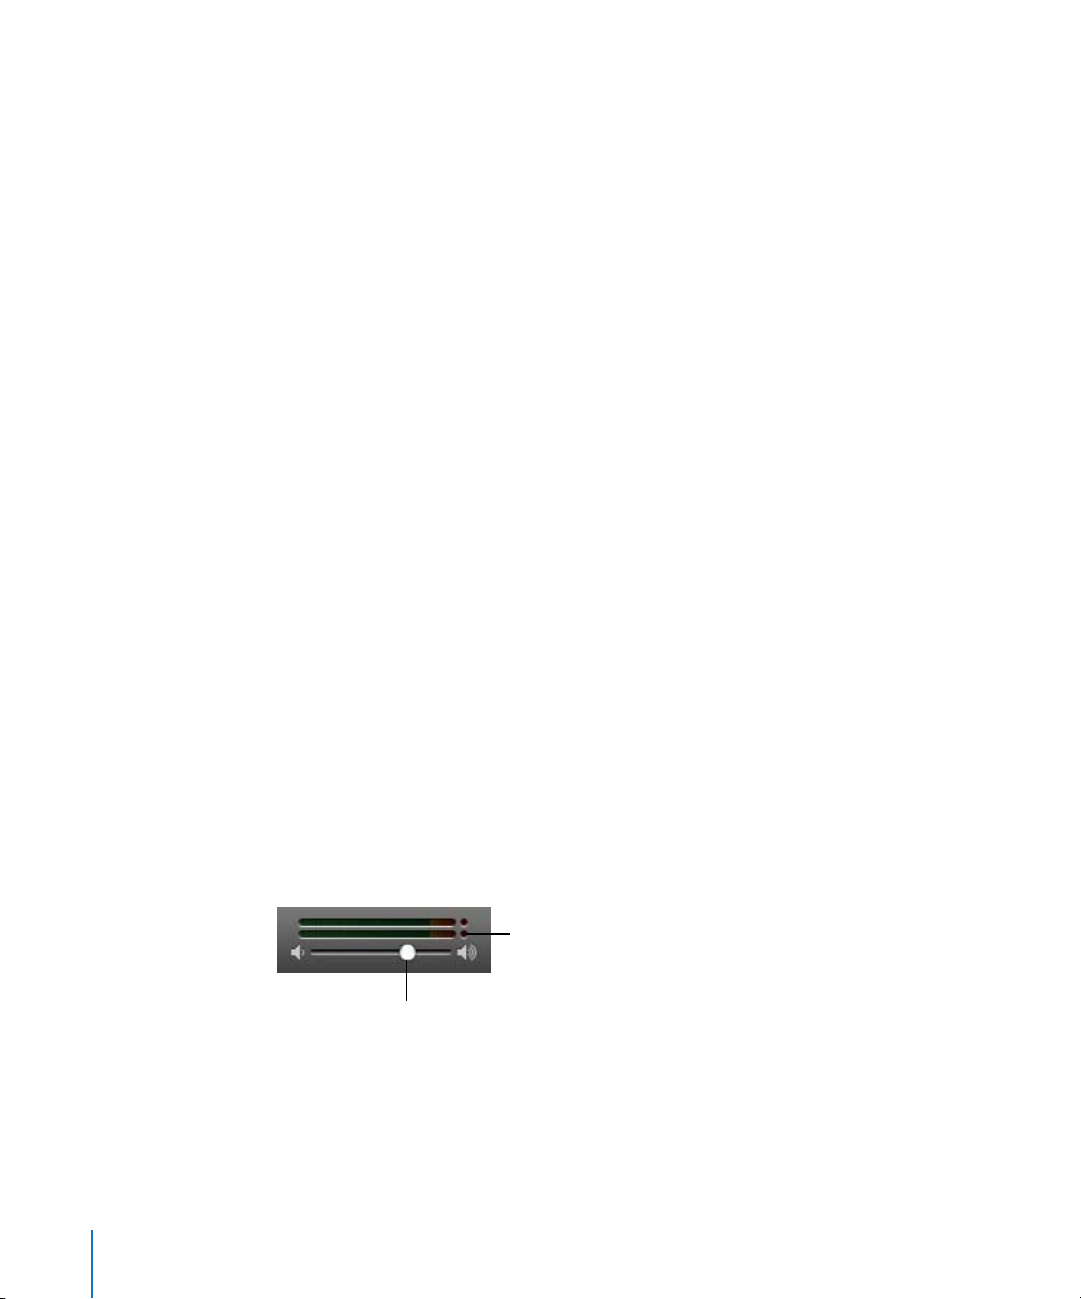
Once you turn on a track’s volume or pan curve, you make changes by adding control
points to the curve, then dragging the control points to change the value for volume or
pan at that point in time.
To add a control point:
m Click the line in the editor at the point in time where you want to add a control point.
To adjust a control point, do one of the following:
 Drag the control point up or down to a new value.
 Drag the control point left or right to move it to a different point in time.
You can use the vertical lines in the row to line control points up with measures and
beats in the timeline.
Setting the Output Volume
You can set the output volume of a project using the master volume slider, located
below the lower-right corner of the timeline. You should adjust the output volume to a
level high enough to eliminate background noise, but not high enough to cause
clipping.
The master volume slider controls the volume of the project when it is exported. Use
your computer’s volume control to adjust the volume at which you listen to the project
play.
To set the master volume:
 Drag the master volume slider left to lower the output volume, or right to raise the
output volume. Option-click the slider to return it to a neutral value (0 dB gain).
 As the project plays, watch the master level meters located above the master volume
slider. Before you export a project, make sure the small red dots to the right of the
level meters are not lit. These dots (called clipping indicators) light to show that the
volume level of the project at some point is too high, which will cause distortion or
“clipping” in the exported project.
Make sure the clipping indicators
are not lit before exporting a project.
Drag the master volume slider
to adjust the overall loudness.
74 Chapter 10 Mixing and Adding Effects
Page 75

Adding Fade Ins and Fade Outs
A very common mixing technique is to add a fade in at the beginning of a project, and
a fade out at the end of the project. Fade ins make the music seem to “come out of
nowhere,” and fade outs create the feeling that the project continues playing. You can
easily add fade ins and fade outs to your projects, and add other volume changes to
the project over time.
To add a fade in:
1 Choose Track > Show Master Track.
The master track appears at the bottom of the timeline.
2 From the pop-up menu in the master track’s header, choose Master Volume.
The master volume curve appears in the master track.
3 Click the master volume curve at the point you want the fade in to end.
4 Drag the control point at the beginning of the master track down to the volume level
at which you want the fade in to start. To start with complete silence, drag it all the way
down.
Now play the project from the beginning. You’ll hear all the tracks in the project fade in
gradually to their final volume level.
To add a fade out:
1 Choose Track > Show Master Track.
The master track appears at the bottom of the timeline.
2 From the pop-up menu in the master track’s header, choose Master Volume.
The master volume curve appears in the master track.
3 Click the master volume curve at the point you want the fade out to begin, then click
at the point you want the fade out to end.
4 Drag the second control point down to the volume level at which you want the fade
out to end. To end with complete silence, drag it all the way down.
Now play the project from a point before the fade out begins. You’ll hear all the tracks
in the project fade out gradually to their final volume level.
Transposing Part of a Project to a Different Key
Many projects move to different keys at some point in the project; they may stay in the
new key, or return to the original key at a later point in time. You can move an entire
project to a new key, called transposing (or modulating), in the project’s master track.
Chapter 10 Mixing and Adding Effects 75
Page 76

To transpose part of a project to a different key:
1 Choose Track > Show Master Track.
The master track appears at the bottom of the timeline.
2 From the pop-up menu in the master track’s header, choose Master Pitch.
The master pitch curve appears in the master track.
3 Click the box to the left of the words “Master Pitch” to turn on the master pitch curve.
4 Click the master pitch curve at the point you want to change the pitch of the project.
5 Drag the control point up or down to the new key. Unlike with volume and pan curves,
the control points on the master pitch curve move in discrete steps of a semitone.
Note: When you transpose a project to a new key, Real and Software Instruments (both
those you’ve recorded and loops) are transposed. Any audio files added from the Finder
are not transposed.
Using Effects
Effects let you shape and enhance the sound of your music in a variety of ways. Anyone
who’s listened to popular music on the radio, or listened to the soundtrack of a movie,
has heard the different effects used in contemporary music. GarageBand includes a
complete set of studio-quality effects that you can use on individual tracks or the
overall project to shape the sound of your music.
Types of Effects
GarageBand includes the following types of effects:
Equalization (EQ): EQ is a powerful and versatile effect that lets you change the level
of selected frequencies. You can use EQ to make both subtle and dramatic changes to
your projects. EQ is likely the most commonly used effect in popular music.
Dynamics: Dynamics effects, which include compressors and noise gates, let you
control the volume of your music over time.
Reverb and Echo: Reverb and echo are both time-based effects. Time-based effects
store a copy of the sound and play it back at a later point in time, creating a sense of
space.
Modulation: Modulation effects, which include chorus, flangers, and phasers, build on
the time-based effects by shifting or modulating when the copied signal plays back.
They can also involve detuning the copied signal relative to the original.
Distortion: Distortion effects, which include amp simulation and overdrive (and, of
course, distortion!), change the tone of the original sound to recreate analog or digital
distortion.
76 Chapter 10 Mixing and Adding Effects
Page 77
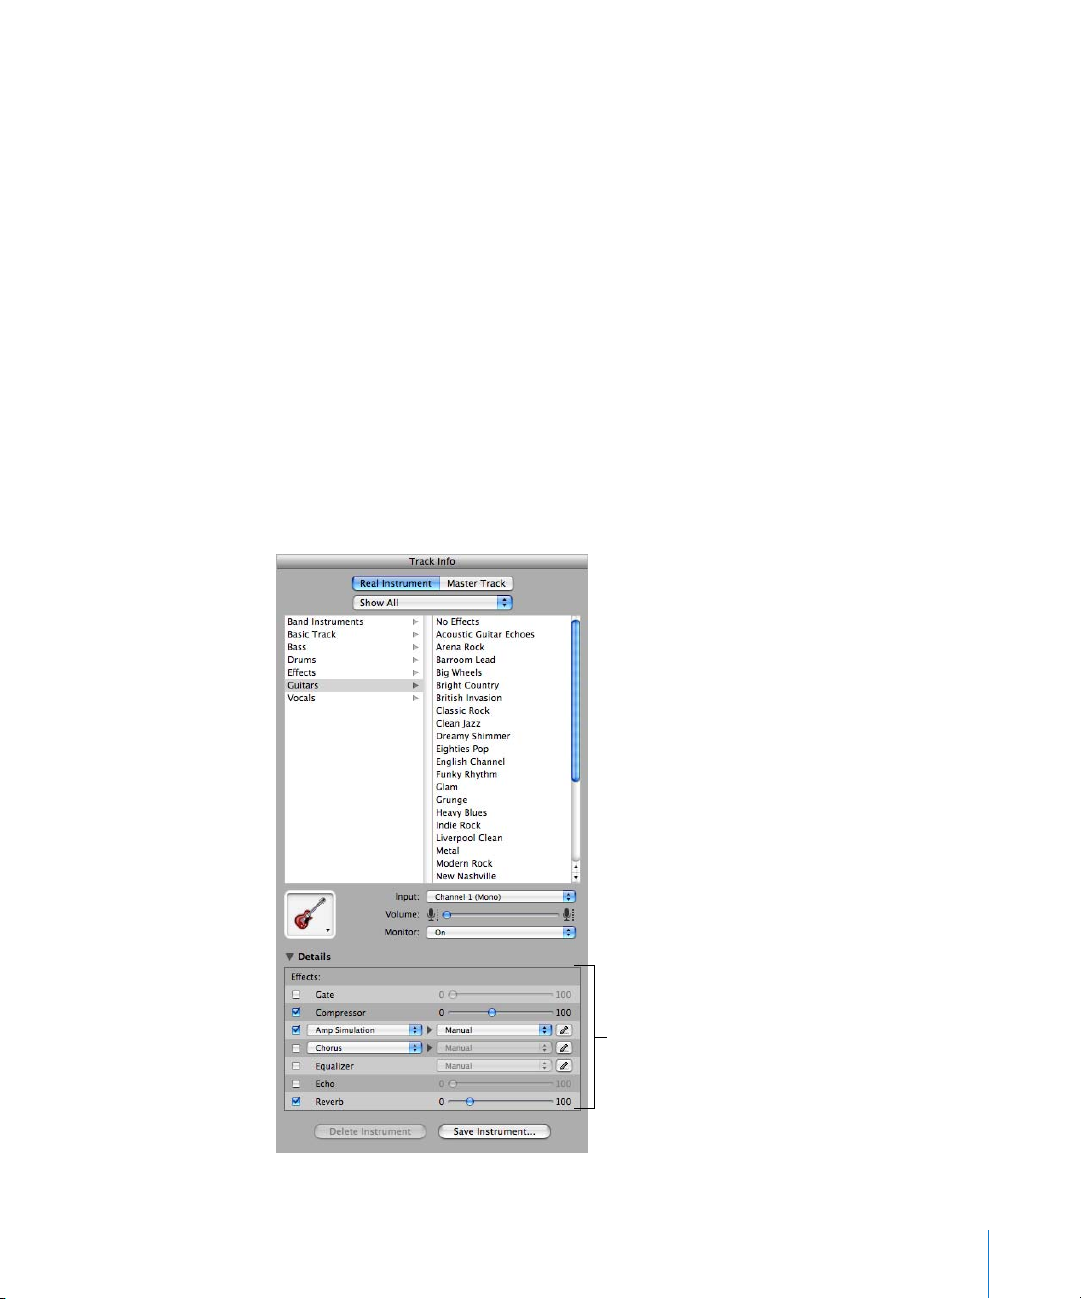
Other effects: Other effects included with GarageBand, such as tremolo and Auto
Filter, change the sound in different ways.
Adding Effects
Each Real and Software Instrument track has a set of effects, which include a
compressor, equalizer (EQ), echo, and reverb. You can adjust a track's effects, and add
up to two additional effects, in the Track Info pane. Real Instrument tracks also include
a noise gate effect.
The master track includes its own effects. You can adjust the master effects and add
one additional effect to the master track in the Track Info pane.
To add an effect:
1 Click the Track Info button (the letter “i”) or choose Track > Show Track Info to show the
Track Info pane.
2 If needed, click the Details triangle to show the Effects section of the window.
3 Choose the effect you want to add from one of the pop-up menus along the left.
Instrument tracks have two effect pop-up menus, and the master track has one.
Use these controls to
add and adjust effects.
Chapter 10 Mixing and Adding Effects 77
Page 78

Adjusting Effects
Each effect has either a slider that you can use to adjust the amount of the effect, or a
pop-up menu from which you can choose different effect presets.
To adjust a track’s effects:
1 Select the track, then click the Track Info button to open the Track Info pane.
2 Click the Details triangle to reveal the track’s effects settings.
3 Drag the sliders for the Gate, Compressor, Echo, and Reverb effects to adjust the
amount of each effect. Choose a new setting from the Equalizer pop-up menu to adjust
the equalization. If your project is playing, you hear the changes in real time.
4 Choose an effect from one of the effect pop-up menus on the left, then choose an
effect setting for the effect from the preset pop-up menu on the right.
Additional effects you can add include treble reduction, bass reduction, amp
simulation, chorus, flanging, phase shifting, and tremolo.
Turning Effects On and Off
You can turn individual effects on or off (turning an effect off temporarily is called
bypassing the effect). This has several advantages: It lets you hear how each effect
changes the sound of your music, and lets you see which effects have the greatest
impact on your computer’s performance.
When you turn off an effect, the effect’s current settings are retained, so any
adjustments you have made are not lost.
To turn an effect off:
m In the Effects section of the Track Info pane, deselect the checkbox next to the effect.
Select the checkbox to turn the effect on again.
Choosing Effect Presets
Some effects includes several presets, which let you easily adjust the effect’s settings to
achieve a particular sound.
To choose an effect preset:
m Choose the preset you want from the pop-up menu to the right of the effect.
78 Chapter 10 Mixing and Adding Effects
Page 79

Editing Effect Presets
You can adjust effect presets to fine tune the sound of the effect, and save your own
presets to use with other instruments or in another project.
To edit an effect preset:
1 Click the Edit button (with the pencil icon) to the right of the effect’s preset pop-up
menu.
The effect’s Preset window appears. Each preset setting has a slider, button, or other
control, which is labeled to indicate its purpose.
2 Drag the sliders in the Preset window to adjust the settings for the preset.
When you adjust an effect preset, it appears as “Manual” in the pop-up menu, so you
know you’ve changed it from the original preset. You can go back and forth between
your Manual settings and other presets to compare them before saving the new preset.
Saving Effect Presets
You can create your own effect presets and save them to use on another track or in
another project.
To save an effect preset:
1 Adjust the settings for the preset to get the sound that you want.
2 Choose Make Preset from the pop-up menu, then type a name for the preset in the
Save dialog.
Chapter 10 Mixing and Adding Effects 79
Page 80

11 Creating Podcasts in GarageBand
11
You can create podcasts in GarageBand, then send them
to iWeb to publish over the Internet.
Podcasts are like radio or TV shows that people can download over the Internet. Users
can download an individual podcast episode or subscribe to a podcast series. You can
create podcast episodes in GarageBand, then publish them on the Internet using iWeb
or another application.
There are several types of podcast you can create in GarageBand:
 Audio podcast episodes contain an audio file.
 Enhanced podcast episodes contain audio along with markers, artwork, and URLs.
 Video podcast episodes contain a movie and can also contain audio.
 Enhanced video podcast episodes contain a movie along with audio, markers, and
URLs.
80
In this lesson, you’ll learn how to:
 Find, preview, and import iTunes songs and GarageBand projects using the Media
Browser
 Duck backing tracks to make narration and dialogue easier to hear
 Show the podcast track
 Add and edit markers and marker regions
 Add artwork, URLs, URL titles, and chapter titles to markers
 Add episode artwork and episode information
 Edit marker region and episode artwork
 Send a podcast to iWeb
 Export a podcast episode
Page 81

Creating a Podcast Episode
You can create an enhanced podcast episode in GarageBand using the following steps:
1 Create the podcast audio by recording and adding audio in GarageBand.
2 Apply ducking to backing tracks.
3 Show the podcast track.
4 Add and edit marker regions.
5 Add artwork and/or URLs to marker regions.
6 Add episode artwork.
7 Edit episode information.
When you have created your podcast in GarageBand, you can send it to iWeb or export
it and publish it using another application.
Creating the Podcast Audio
You can create podcasts with only spoken narration or dialog, or add musical backing
tracks, sound effects, and other sounds. You record narration by connecting a
microphone to your computer (or using your computer’s built-in microphone, if it
has one), enabling a Real Instrument track for recording, then recording from the
microphone to the Real Instrument track, as described in “Working With Real
Instruments” on page 47.
You can add Apple Loops and record Real and Software Instruments to use as backing
tracks for your podcast. The loop browser includes a variety of loops created for use in
your podcasts. For information about working with Apple Loops, see “Using Apple
Loops” on page 32. For information about recording Real Instruments, see “Working
With Real Instruments” on page 47. For information about recording Software
Instruments, see “Working With Software Instruments” on page 55.
You can add and adjust effects, including the Speech Enhancer effect, which is
especially useful for recorded narration and dialogue.
You can also import songs from your iTunes library and import other GarageBand
projects that have been saved with an iLife preview into your podcast. You can find and
preview iTunes songs and GarageBand projects in the Media Browser.
To find audio files in the Media Browser:
1 Choose Control > Media Browser.
The Media Browser opens to the right of the timeline.
2 Click the Audio button.
3 In the file area, navigate to the folder containing the audio files you want to use. You
can also search for files by name by typing in the search field.
Chapter 11 Creating Podcasts in GarageBand 81
Page 82

To preview an audio file in the Media Browser, do one of the following:
 Select the file in the media list, then click the Play button at the bottom of the Media
Browser.
 Double-click the file in the media list.
The audio file starts playing.
Select a folder or playlist.
Click to preview the
selected song or project.
Select a song, project, or
other audio file from this list.
To stop preview playback, do one of the following:
 Click the Play button at the bottom of the Media Browser.
 Select another audio file.
To import an audio file:
m Drag the audio file from the Media Browser to the timeline.
You can add other folders to the Media Browser so you can add media files in the
folders to your projects.
To add a folder to the Media Browser:
m Drag the folder from the Finder to the middle area of the Media Browser.
82 Chapter 11 Creating Podcasts in GarageBand
Page 83

Ducking Backing Tracks
When you are creating a podcast, you may sometimes want to lower the volume of
backing tracks to hear spoken narration or dialogue more easily. Lowering the volume
of some tracks to make others easier to hear is called “ducking.”
You apply ducking by setting which tracks are lead tracks and which are backing tracks.
Whenever there is sound on a lead track, the volume of the backing tracks is lowered
while the volume of all other tracks stays the same. You can apply ducking to any Real
or Software Instrument track in your podcast.
To make a track a lead track:
1 Choose Control > Ducking.
A ducking control appears in each track’s header, with arrows pointing up and down.
2 Click the upper part of the track’s ducking control (the arrow pointing up).
To make a track a backing track:
1 Choose Control > Ducking.
A ducking control appears in each track’s header, with arrows pointing up and down.
2 Click the lower part of the track’s ducking control (the arrow pointing down).
When you play the project, send it to iWeb, or export it, the backing tracks are ducked
whenever there is sound on any lead track. You can adjust the amount of ducking
(volume reduction) on these tracks using the Ducking Amount slider.
To adjust the amount of ducking:
1 Open the Track Info pane.
2 Click Master Track, then click the Details triangle.
3 Drag the Ducking Amount slider right to increase the amount of ducking, or drag it left
to decrease it.
Adding and Editing Markers
You can add markers to an podcast, making it an enhanced podcast. When you add a
marker to a podcast, it appears in the podcast track as a marker region. Marker regions
show how long the artwork or URLs you add to a marker last, and you can move them
or resize them to change their duration.
To show the podcast track:
m Choose Track > Show Podcast Track.
The podcast track appears above the other tracks in the timeline, and the editor opens
showing the marker list, with columns for the start time, artwork, chapter title, URL title,
and URL for each marker.
Chapter 11 Creating Podcasts in GarageBand 83
Page 84

Note: A project can have either a podcast track or a video track, but not both. If you try
to show the podcast track for a project that contains a video track, a dialog appears
asking if you want to replace the video track with a podcast track.
To add a marker:
1 Move the playhead to the place where you want to add the marker.
2 Click the Add Marker button.
The marker appears in the editor, and the start time for the marker appears in the Time
column in the marker’s row. The marker also appears as a marker region in the podcast
track. You can edit marker regions just like other regions in the timeline to control
when artwork and URLs appear and how long they are visible when you play the
podcast.
Click here to
add a marker.
Edit the start time for markers and
add artwork, URLs, URL titles, and
chapter titles in the marker list.
To move a marker region, do one of the following:
 In the podcast track, drag the marker region to a new position.
 In the editor, click the start time for the marker region and enter a new start time.
To resize a marker region:
m Drag either the left or right edge of the marker region to the point where you want to
resize it.
You can’t loop a marker region.
Adding Marker Region Artwork
You can add artwork to individual marker regions. When you play the podcast, the
marker region artwork appears from the start to the end of the marker region.
To add artwork to a marker region:
1 Open the Media Browser, then click the Photos button.
2 In the Media Browser, locate the artwork you want to add.
84 Chapter 11 Creating Podcasts in GarageBand
Page 85

3 Drag the artwork from the Media Browser to the Artwork box in the marker’s row in the
editor. You can also drag artwork directly to the podcast track, which adds a new
marker region with the artwork.
The artwork appears in the marker region in the podcast track and in the Artwork
column for the region in the editor. The Displays Artwork checkbox is selected. You can
change the artwork for a marker by dragging a new image to the Artwork column in
the marker’s row.
Adding a URL to a Marker
You can add a URL to a marker and give the URL a title. When you play the podcast, the
URL is visible from the start to the end of the marker region. When you click the URL,
your web browser opens and displays the webpage for the URL.
To add a URL to a marker:
1 In the editor, click the placeholder text in the URL column of the marker’s row, then
type the URL.
The Displays URL checkbox is selected for the marker.
2 In the editor, click the placeholder text in the URL Title column of the marker’s row,
then type the title.
When you add a URL title, the title appears in place of the actual URL when you play
the podcast, but clicking the title opens your web browser to the webpage for the URL.
Adding Chapter Titles
You can add a chapter title to a marker, making it a chapter marker. When you play the
movie in iTunes, iDVD, or QuickTime Player, you can easily move back and forth
between chapters.
To add a chapter title to a marker:
m In the editor, select the placeholder text in the Chapter Title column of the marker’s
row, then type a title.
Deleting Markers
You can delete a marker if you decide you no longer want it in your podcast.
To delete a marker, do one of the following:
 In the podcast track, select the marker region, then press the Delete key.
 In the editor, select the marker in the marker list, then press the Delete key.
Chapter 11 Creating Podcasts in GarageBand 85
Page 86

Adding Episode Artwork
You can add episode artwork to the podcast track. When you play the podcast in
iTunes or view it in iWeb, the episode artwork is visible whenever there is no marker
region with its own artwork.
To add episode artwork:
1 In the Media Browser, locate the artwork you want to add.
2 Drag the artwork from the Media Browser to the Episode Artwork well in the editor.
The episode artwork appears in the Episode Artwork well. When you play the podcast,
the episode artwork appears when there is no marker region with artwork.
Editing Artwork
You can resize and crop both marker region and episode artwork. In the image editor,
you can resize and crop your artwork to show all or part of the original image.
To edit artwork:
1 Double-click artwork in either the Episode Artwork well or the marker list.
The image editor opens, showing the artwork.
2 Drag the size slider to resize the artwork as large or small as you want. The black square
shows what part of the artwork will be displayed when you play the podcast.
3 Drag the artwork so that the part you want to display is within the borders of the
square.
4 You can replace the artwork by dragging a new image to the image editor.
5 When you are finished, click Set.
Editing Episode Information
Each podcast episode can contain information, including the episode title, author, and
description. An episode can also have a parental advisory, which appears when you
play the podcast in iTunes.
To edit episode information:
1 Select the podcast track.
2 Open the Track Info pane by choosing Track > Show Track Info.
The Track Info pane appears, showing the Episode Info pane.
3 To give the podcast episode a title, click the Title field, then type a title.
4 To add artist information, click the Artist field, then type the artist’s name.
5 Choose a parental advisory from the Parental Advisory pop-up menu. The choices are
“none,” “clean,” and “explicit.” The default is “none.”
6 To include a description of the podcast episode, click the Description field, then type a
description.
86 Chapter 11 Creating Podcasts in GarageBand
Page 87

Creating a Video Podcast Episode
Creating a video podcast is similar to creating an audio podcast, except that the video
podcast includes a video file and does not include artwork. You can create an
enhanced video podcast episode in GarageBand using the following steps:
1 Send an iMovie project to GarageBand or import a video file from the Media Browser.
2 Create the podcast audio in GarageBand.
3 Apply ducking to backing tracks.
4 Add and edit marker regions.
5 Add URLs and chapter titles.
6 Edit episode information.
You create the podcast audio using the same steps described in “Creating a Podcast
Episode” on page 81. For information about sending an iMovie project to GarageBand,
importing a video file, and working with video in a GarageBand project, see “Creating a
Musical Score for an iMovie or Video” on page 88.
When you have created your video podcast in GarageBand, you can send it to iWeb or
export it and publish it using another application.
Sending a Podcast to iWeb
You can send a podcast to iWeb, where you can publish it as part of a series.
To send a podcast to iWeb:
m Choose Share > Send Podcast to iWeb.
The entire project, from the beginning to the end of the last region, is exported.
Exporting a Podcast Episode
You can export a project as a podcast episode, and publish it using another podcasting
application. By default, the Share menu lets you export podcasts to iWeb. If you want
to export podcasts using another application, you can change the menu command to
let you save your podcast episode to disk.
To export a project as a podcast episode:
1 Choose GarageBand > Preferences, then click Export.
2 In the Export pane, select the “Save to Disk” button under Publish Podcast.
3 Close the Preferences window.
4 Choose Share > Export as Podcast.
The file is exported using the current video and audio compression settings.
Chapter 11 Creating Podcasts in GarageBand 87
Page 88

12 Creating a Musical Score for an
iMovie or Video
12
GarageBand makes it easy to create music for your
iMovie projects and other video files.
You can work with an iMovie project or other QuickTime-compatible video file in a
GarageBand project, view the video as you create the score, add and edit markers, and
send the finished movie (containing both video and audio) to iDVD to burn to a DVD
or send it to iWeb to publish as a video podcast. You can also export it as a QuickTime
movie.
In this lesson, you’ll learn how to:
 Send an iMovie project to GarageBand
 Find and preview video files in the Media Browser
 Import a video file into a project
 View the video as you work
 Edit the video’s audio track
 Add and edit markers
 Add URLs, URL titles, and chapter titles to markers
 Add episode information
 Send a movie to iDVD
 Export a movie as a QuickTime movie
m In iMovie, choose Share > GarageBand.
88
Sending an iMovie Project to GarageBand
You can send an iMovie project from iMovie to GarageBand. When you send an iMovie
project, GarageBand opens and a new project is created that contains the iMovie
project. If GarageBand is already open, the current project closes before the new
project is created.
To send an iMovie project from iMovie to GarageBand:
Page 89

Importing a Video File From the Media Browser
You can import an iMovie project or other video file from the Media Browser. The
Media Browser lets you quickly locate iMovie projects and other video files in your
computer’s Movies folder, as well as other media files. You can search for files by name,
and preview video files before you add them to your GarageBand project.
To open the Media Browser, do one of the following:
 Choose Control > Show Media Browser.
 Click the Media Browser button (next to the Track Info button).
The Media Browser contains buttons for different types of media files, a browser where
you can navigate to the media files you want to use, and a media list showing the
media files in the current location. You can preview movies in the Media Browser to
find the one you want to work with in GarageBand. Once you find the movie you want
to work with, you drag it to the timeline to import it into the project.
To find video files using the Media Browser:
1 Click the Movies button.
2 Navigate to the folder containing the movie you want to use.
3 Optionally, you can also search for movies by name by typing in the search field.
To preview a video file in the Media Browser, do one of the following:
 Select the file in the media list, then click the Play button at the bottom of the Media
Browser.
 Double-click the file in the media list.
The movie icon becomes a small preview of the movie.
To stop preview playback, do one of the following:
 Click the Play button at the bottom of the Media Browser.
 Select another video file.
To import a video file:
m Drag the video file from the Media Browser to the timeline.
The video file appears in the video track, beginning at the start of the project. You can’t
change the position of the video in a project.
Note: A project can contain only one video file. If you import a video file into a project
that already contains one, a dialog appears asking if you want to replace the existing
video with the new one.
The Media Browser shows the movies in your Movies folder. You can add other folders
to the Media Browser so you can add media files in the folders to your projects.
To add a folder to the Media Browser:
m Drag the folder from the Finder to the middle area of the Media Browser.
Chapter 12 Creating a Musical Score for an iMovie or Video 89
Page 90

Viewing the Video
When you import a video file into a project, the video track appears at the top of the
timeline, showing still frames from the video file. The Track Info pane appears in place
of the Media Browser, with a video preview at the top where you can view the video as
you play the project.
To show the video track and video preview:
m Choose Track > Show Video Track.
To hide the video track and video preview:
m Choose Track > Hide Video Track.
Working With the Video’s Audio Track
If the video contains an audio track, a new Real Instrument track named Video Sound is
created below the video track for the video’s audio. You can edit the Video Sound track
exactly like any Real Instrument track: You can mute or solo it, adjust the volume level
and pan position, and add effects.
Note: If you mute the Video Sound track, the video’s audio will not be included when
you send the movie to iDVD or iWeb or when you export as a QuickTime movie.
Adding and Editing Markers
You can add markers to a project, and then add URLs and chapter titles to markers.
Markers make it easy to navigate to different parts of the finished movie, and let you
add links to webpages. You can add and edit markers in the editor.
To show marker information in the editor:
m Select the video track, then choose Control > Show Editor or click the Editor button.
The editor opens. In marker view, the editor contains the marker list, with columns
showing the start time, still video frame, and chapter title for each marker.
To add a marker:
1 Move the playhead to the place where you want to add the marker.
2 Click the Add Marker button at the bottom of the editor.
In the editor, the time position where you added the marker appears in the Time
column, and the frame of the video at that position appears in the Still Frame column.
90 Chapter 12 Creating a Musical Score for an iMovie or Video
Page 91

Adding a URL to a Marker
You can add a URL to a marker and give the URL a title. When you play the movie in
iTunes, iDVD, or QuickTime Player, the URL appears until the start point of the next
marker. When a user clicks the URL, their web browser opens to the webpage for the
URL.
To add a URL to a marker:
1 In the editor, click the placeholder text in the URL column of the marker’s row, then
type the URL.
The Displays URL checkbox is selected for the marker.
2 In the editor, click the placeholder text in the URL Title column of the marker’s row,
then type the title.
When you add a URL title, the title appears in place of the actual URL when you play
the movie, but clicking the title opens your web browser to the webpage for the URL.
Adding a Chapter Title
You can add a chapter title to a marker, making it a chapter marker. When you play the
movie in iTunes, iDVD, or QuickTime Player, you can move back and forth between
chapters.
To add a chapter title to a marker:
m In the editor, select the placeholder text in the Chapter Title column of the marker’s
row, then type a new title.
In the time ruler, a yellow diamond appears at the marker’s start position. In the editor,
the Marks a Chapter checkbox is selected.
Sending a Movie to iDVD
You can send the project containing both video and audio to iDVD so you can burn it
to a DVD disc. Viewers watching the DVD can use the chapter markers in the project to
move to different parts of the movie. URLs and URL titles will not appear in the movie
on DVD.
To send a movie to iDVD:
m Choose Share > Send Movie to iDVD.
Note: When you send a project to iDVD, no video compression is applied to the
project. In most cases, you’ll want to make these changes in iDVD.
Chapter 12 Creating a Musical Score for an iMovie or Video 91
Page 92

Sending a Video Podcast to iWeb
You can send a project containing a video to iWeb as a video podcast, and publish it on
the Internet. When subscribers view the video podcast, they can click a URL to have a
relevant webpage appear in their web browser, and move back and forth between
chapters. For information about creating video podcasts, see “Creating Podcasts in
GarageBand” on page 80. For information about exporting video podcasts, see
“Sending a Podcast to iWeb” on page 87.
Exporting a Project as a QuickTime Movie
You can export a project containing a video as a QuickTime movie (.mov). When
you export a project as a movie, the exported movie includes both the video and
the soundtrack you created in GarageBand. The video’s audio is also included unless
the Video Sound track is muted when you export the movie.
To export a project as a QuickTime movie:
m Choose Share > Export as QuickTime Movie.
The project is exported using the current movie compression settings. Movie
compression settings compress both the video and audio in the exported movie.
You can change the compression settings to suit how you want to use the exported
movie. Compression settings are stored as part of the GarageBand project until you
change them while the project is open.
To choose the video compression settings:
1 Choose GarageBand > Preferences, then click Export.
2 In the Export pane, choose the settings you want to use from the Movie Settings
pop-up menu.
92 Chapter 12 Creating a Musical Score for an iMovie or Video
Page 93

A Keyboard Shortcuts
A
Action Shortcut
Navigation/Moving the playhead
Play/Pause Space bar
Go to beginning Home or Z
Go to end End or Option-Z
Move back by one measure Left Arrow
Move forward by one measure Right Arrow
Move back by the visible width of the timeline Page Up
Move forward by the visible width of the timeline Page Down
Zoom out Control-Left Arrow
Zoom in Control-Right Arrow
Tracks
Create new track Command-Option-N
Duplicate track Command-D
Delete selected track Command-Delete
Select next higher track Up Arrow
Select next lower track Down Arrow
Mute/Unmute selected track M
Solo/Unsolo selected track S
Show/Hide track volume curve A
Show/Hide master track Command-B
Show/Hide podcast track Command-Shift-B
Show/Hide video track Command-Option-B
Track Info pane
Show/Hide Track Info Command-I
Select next higher category or instrument Up Arrow (when Track Info pane
is open and either a category or
an instrument is selected)
Appendix
93
Page 94

Action Shortcut
Select next lower category or instrument Down Arrow (when Track Info
pane is open and either a
category or an instrument is
selected)
Move from instrument column to category column Left Arrow (when Track Info
pane is open and an instrument
is selected)
Move from category column to instrument column Right Arrow (when Track Info
pane is open and a category is
selected)
Editing and arranging
Undo Command-Z
Redo Command-Shift-Z
Cut Command-X
Copy Command-C
Paste Command-V
Delete Delete
Select all Command-A
Split region Command-T
Join selected regions Command-J
Snap to grid Command-G
Enable/disable ducking Command-Shift-F
Recording
Record Start/Stop R
Turn cycle region on/off C
Turn metronome on/off Command-U
Turn count in on/off Command-Shift-U
Show/Hide instrument tuner Command-F
Notation view
Move selected notes to previous grid position Left Arrow
Move selected notes to next grid position Right Arrow
Move selected notes back one measure Shift-Left Arrow
Move selected notes forward one measure Shift-Right Arrow
Transpose selected notes up a semitone Up Arrow
Transpose selected notes down a semitone Down Arrow
Transpose selected notes up an octave Shift-Up Arrow
Transpose selected notes down an octave Shift-Down Arrow
Adjusting master volume
94 Appendix A Keyboard Shortcuts
Page 95

Action Shortcut
Raise master volume Command-Up Arrow
Lower master volume Command-Down Arrow
Showing windows and editors
Show track mixer Command-Y
Show Track Info pane Command-I
Show editor Command-E
Show Media Browser Command-R
Show loop browser Command-L
Show onscreen keyboard Command-K
Show Musical Typing window Command-Shift-K
File menu functions
New Command-N
Open Command-O
Close Command-W
Save Command-S
Save As Command-Shift-S
Application menu functions
Show/Hide GarageBand Preferences Command-comma (,)
Hide GarageBand Command-H
Hide other applications Command-Option-H
Quit GarageBand Command-Q
Help menu functions
GarageBand Help Command-question mark (?)
Appendix A Keyboard Shortcuts 95
Page 96

B Connecting Music Equipment
to Your Computer
B
If you sing or play a musical instrument, you can connect
a musical instrument or a microphone to your computer
and record your performances in your GarageBand
projects.
Each recording appears as a region in a track in the timeline. You can add effects to the
track, and edit the region in the editor.
Connecting a Musical Instrument or Microphone
You can connect an electric musical instrument or microphone to your computer and
record it in a Real Instrument track.
You can connect a microphone to your computer using the computer’s audio input
port, if your computer has one. You can also connect an audio interface to your
computer, then connect instruments and microphones to the audio interface for
recording. Audio interfaces are available in a variety of compatible formats, including
USB, FireWire, PCI, and PC card formats. You can also connect an audio mixer or console
to your computer, and record microphones or instruments through the mixer.
Appendix
96
If you use an audio interface to connect musical instruments, check the manufacturer’s
specifications to make sure the interface is compatible with Mac OS X 10.2.6 or later.
Also make sure the audio interface uses a format supported by your computer. Follow
the manufacturer’s instructions, which may include installing the correct driver on your
computer.
If you connect an instrument or microphone to your computer’s audio input port, open
System Preferences, click the button for Sound preferences, click the Input tab in the
Sound pane, select Line In in the sound input list, then drag the Input volume slider to
set the input level.
Page 97

Connecting a Music Keyboard to Your Computer
If you play a keyboard instrument, you can connect a MIDI-compatible music keyboard
to your computer to play and record Software Instruments.
To connect a music keyboard to play Software Instruments:
 If the keyboard is a USB MIDI keyboard, connect the USB cable to the keyboard and
to your computer.
 If the keyboard is a standard MIDI keyboard, connect the keyboard to a MIDI
interface using standard MIDI cables, and connect the interface to your computer.
Be sure to follow the instructions that came with the keyboard, which may include
installing the correct driver on your computer.
Connecting Other Music Equipment
You may also want to connect speakers or monitors to your computer to hear your
projects play back with greater audio quality than possible from your computer’s
speaker. A variety of monitors and speakers are available, including speakers you can
connect directly to your computer's audio out port, through a USB port, or using an
audio interface.
If you connect an audio interface to your computer, you set the audio interface as the
audio input device for GarageBand. Before setting the audio input device, be sure to
install any necessary driver software for the audio interface.
To set an audio interface as the audio input device:
1 Choose GarageBand > Preferences, then click Audio/MIDI.
2 In the Audio/MIDI pane, choose the audio interface from the Audio Input pop-up
menu.
If you connect a microphone, an instrument, or other audio device directly to your
computer’s audio input port, you set may need to configure input settings for it in the
Sound pane of System Preferences.
To configure input settings in System Preferences:
1 Choose Apple () > System Preferences, then click Sound.
2 In the Sound pane, click the Input button.
3 Select Line In from the sound input devices list, then drag the Input volume slider to
set the input level.
Appendix B Connecting Music Equipment to Your Computer 97
Page 98

www.apple.com/garageband
© 2006 Apple Computer, Inc. All rights reserved.
Apple, the Apple logo, iDVD, iLife, iMovie, iPhoto, iPod, iTunes, Macintosh, and QuickTime are trademarks of Apple Computer, Inc.,
registered in the U.S. and other countries. Finder, GarageBand, and iWeb are trademarks of Apple Computer, Inc.
019-0541 01/2006
 Loading...