


HP Photosmart 8700 series User's Guide
English

Copyrights and trademarks
© Copyright 2005 Hewlett-Packard Development Company, L.P.
The information contained herein is subject to change without notice. Reproduction, adaptation or translation without prior written permission is prohibited, except as allowed under the copyright laws.
Notice
The only warranties for HP products and services are set forth in the express warranty statements accompanying such products and services. Nothing herein should be construed as constituting an additional warranty. HP shall not be liable for technical or editorial errors or omissions contained herein.
The Hewlett-Packard Development Company, L.P. shall not be liable for incidental or consequential damages in connection with, or arising out of the furnishing, performance, or use of this document and the program material which it describes.
Trademarks
HP, the HP logo, and Photosmart are property of Hewlett-Packard Development Company, L.P.
The Secure Digital logo is a trademark of the SD Association.
Microsoft and Windows are registered trademarks of Microsoft Corporation.
CompactFlash, CF, and the CF logo are trademarks of the CompactFlash Association (CFA).
Memory Stick, Memory Stick Duo, Memory Stick PRO, and Memory Stick PRO Duo are trademarks or registered trademarks of Sony Corporation.
MultiMediaCard is a trademark of Infineon Technologies AG of Germany, and is licensed to the MMCA (MultiMediaCard Association).
Microdrive is a trademark of Hitachi Global Storage Technologies.
xD-Picture Card is a trademark of Fuji Photo Film Co., Ltd., Toshiba Corporation, and Olympus Optical Co., Ltd.
Mac, the Mac logo, and Macintosh are registered trademarks of Apple Computer, Inc.
The Bluetooth word mark and logos are owned by the Bluetooth SIG, Inc.
and any use of such marks by Hewlett-Packard Company is under license.
PictBridge and the PictBridge logo are trademarks of the Camera & Imaging Products Association (CIPA).
Other brands and their products are trademarks or registered trademarks of their respective holders.
The embedded software in the printer is based in part on the work of the Independent JPEG Group.
The copyrights to certain photos within this document are retained by the original owners.
Regulatory model identification number VCVRA-0402
For regulatory identification purposes, the product is assigned a Regulatory Model Number. The Regulatory Model Number for the product is VCVRA-0402. This regulatory number should not be confused with the marketing name (HP Photosmart 8700 series printer) or product number (Q5745A).
Safety information
Always follow basic safety precautions when using this product to reduce risk of injury from fire or electric shock.
Warning To prevent fire or shock hazard, do not expose this product to rain or any type of moisture.
●Read and understand all instructions in the setup instructions that came in the box with the printer.
●Use only a grounded electrical outlet when connecting the unit to a power source. If you do not know whether the outlet is grounded, check with a qualified electrician.
●Observe all warnings and instructions marked on the product.
●Unplug this product from wall outlets before cleaning.
●Do not install or use this product near water or when you are wet.
●Install the product securely on a stable surface.
●Install the product in a protected location where no one can step on or trip over the power cord, and where the power cord will not be damaged.
●If the product does not operate normally, see the troubleshooting information in the onscreen HP Photosmart Printer Help.
●There are no operator serviceable parts inside. Refer servicing to qualified service personnel.
●Use in a well-ventilated area.
Environmental statements
Hewlett-Packard Company is committed to providing quality products in an environmentally sound manner.
Protecting the environment
This printer has been designed with several attributes to minimize impact on our environment. For more information, go to HP's Commitment to the Environment web site at www.hp.com/hpinfo/globalcitizenship/ environment/.
Ozone production
This product generates no appreciable ozone gas (O3).
Paper use
This product is suited for the use of recycled paper according to DIN 19309.
Plastics
Plastic parts over 24 grams (0.88 ounces) are marked according to international standards that enhance the ability to identify plastics for recycling purposes at the end of the printer life.
Material safety data sheets
Material Safety Data Sheets (MSDS) can be obtained from the HP web site at www.hp.com/go/msds. Customers without Internet access should contact HP Customer Care.
Recycling program
HP offers an increasing number of product return and recycling programs in many countries, and partners with some of the largest electronics recycling centers throughout the world. HP conserves resources by

reselling some of its most popular products.
This HP product contains lead in the solder, which may require special handling at the end of its life.
Important recycling information for our customers in the European Union: To preserve the environment, this product must be recycled after its useful life as required by law. The symbol below indicates that this product may not be disposed in the general trash. Please return the product for proper recovery/disposal to the authorized collection location nearest to you. For more information regarding return and recycling of HP products generally, please visit: www.hp.com/hpinfo/globalcitizenship/ environment/recycle/index.html.
Contents
1 |
Welcome................................................................................................................ |
3 |
|
Finding more information........................................................................................ |
4 |
|
Printer parts............................................................................................................ |
4 |
|
Printer menu........................................................................................................... |
7 |
2 Getting ready to print........................................................................................... |
9 |
|
|
Loading paper......................................................................................................... |
9 |
|
Choosing the right paper................................................................................. |
9 |
|
Using specialty papers.................................................................................. |
10 |
|
Loading your paper........................................................................................ |
11 |
|
Inserting print cartridges....................................................................................... |
13 |
3 Basic printing from a computer........................................................................ |
17 |
|
4 |
Using color management................................................................................... |
19 |
|
Using printer-based color management................................................................ |
19 |
|
Using application-based color management......................................................... |
22 |
5 |
Exploring creative projects................................................................................ |
25 |
|
The large-format templates................................................................................... |
25 |
|
The HP Image Zone............................................................................................. |
26 |
|
Printing borderless photos from a computer......................................................... |
27 |
6 Printing photos without a computer................................................................. |
29 |
|
|
Connecting to other devices................................................................................. |
29 |
|
Printing photos from a memory card..................................................................... |
30 |
|
Inserting memory cards................................................................................. |
30 |
|
Supported file formats............................................................................ |
30 |
|
Inserting a memory card......................................................................... |
31 |
|
Saving photos to a computer from a memory card................................. |
32 |
|
Removing a memory card...................................................................... |
33 |
|
Deciding which photos to print....................................................................... |
33 |
|
Selecting a photo layout................................................................................ |
33 |
|
Selecting photos to print................................................................................ |
36 |
|
Improving photo quality................................................................................. |
37 |
|
Doing common printing tasks from a memory card....................................... |
37 |
|
Printing photos from a digital camera................................................................... |
39 |
|
Using a PictBridge camera............................................................................ |
39 |
|
Using a Bluetooth camera............................................................................. |
39 |
|
Printing from other Bluetooth devices................................................................... |
40 |
7 |
Care and maintenance....................................................................................... |
41 |
|
Cleaning and maintaining the printer.................................................................... |
41 |
|
Cleaning the outside of the printer................................................................. |
41 |
|
Automatically cleaning the print cartridges.................................................... |
41 |
|
Manually cleaning the print cartridge contacts............................................... |
42 |
|
Printing a test page........................................................................................ |
42 |
|
Aligning the print cartridges........................................................................... |
43 |
|
Printing a sample page.................................................................................. |
43 |
|
Updating the software........................................................................................... |
43 |
|
Storing the printer................................................................................................. |
44 |
HP Photosmart 8700 series User's Guide |
1 |
|
Maintaining the supplies....................................................................................... |
44 |
|
Storing photo paper....................................................................................... |
45 |
|
Handling photo paper.................................................................................... |
45 |
|
Storing the print cartridges............................................................................ |
45 |
8 |
Troubleshooting................................................................................................. |
47 |
|
Printer software installation problems................................................................... |
47 |
|
Printer hardware problems................................................................................... |
48 |
|
Printing problems.................................................................................................. |
50 |
|
Error messages.................................................................................................... |
54 |
|
Paper errors.................................................................................................. |
54 |
|
Print cartridge errors...................................................................................... |
55 |
|
Memory card errors....................................................................................... |
57 |
|
Computer printing errors................................................................................ |
60 |
|
Network errors............................................................................................... |
60 |
9 |
HP Customer Care.............................................................................................. |
61 |
|
HP Customer Care by phone................................................................................ |
61 |
|
Placing a call................................................................................................. |
64 |
|
Return to HP repair service (North America only)................................................. |
64 |
|
Additional warranty options................................................................................... |
64 |
a |
Networking.......................................................................................................... |
65 |
|
Networking basics (Windows and Macintosh)...................................................... |
65 |
|
Internet connection........................................................................................ |
66 |
|
Recommended network configurations......................................................... |
66 |
|
Ethernet network without Internet access............................................... |
66 |
|
Ethernet network with Internet access by dial-up modem...................... |
66 |
|
Ethernet network with broadband Internet access provided by a |
|
|
router...................................................................................................... |
66 |
|
Connecting the printer to the network................................................................... |
66 |
|
Installing the printer software on a Windows computer......................................... |
67 |
|
Installing the printer software on a Macintosh....................................................... |
69 |
|
Using the embedded web server.......................................................................... |
70 |
|
Printing a network configuration page.................................................................. |
70 |
b |
Specifications..................................................................................................... |
71 |
|
System requirements............................................................................................ |
71 |
|
Printer specifications............................................................................................ |
71 |
c |
HP Warranty........................................................................................................ |
75 |
Index........................................................................................................................... |
77 |
|
2 |
HP Photosmart 8700 series |

1 Welcome
Thank you for purchasing an HP Photosmart 8700 series printer! With this new photo printer, you can print professional color and black-and-white photos to sell or display for generations.
This guide primarily provides details about specific printing tasks, including when printing from a computer. For more information about connecting the printer to a computer or printing from a computer, install the printer software and view the onscreen HP Photosmart Printer Help. For information about installing the software, see the setup instructions that came in the box with the printer.
The HP Photosmart 8700 series has features that appeal to serious professional and advanced amateur photographers as well as to creative home users:
Professional and advanced amateur photographers
(Digital photography, fine arts)
●Turn the color management features of the printer on or off
●Use color management to ensure that what you see on the computer screen matches the photos printed on the HP Photosmart
●Use the color management features in concert with professional software such as Adobe® Photoshop® to produce high-quality, professional prints
For more information, see Using color management.
Creative home users
(Scrapbooking, arts and crafts, creative projects)
●Print borderless photos from the printer's control panel or from a computer
●Use the HP Image Zone software for creative projects
●Use special large-format templates for use in scrapbooking
For more information, see Exploring creative projects.
The printer comes with the following documentation:
●Quick Start booklet or Setup Guide: The HP Photosmart 8700 series printer comes with setup instructions that explain how to set up the printer and install the printer software. Which document you receive with the printer varies by country/ region.
●User's Guide: The HP Photosmart 8700 series User's Guide is the book you are reading. This book describes the basic features of the printer, explains how to use the printer without connecting a computer, and contains troubleshooting information.
●HP Photosmart Printer Help: The onscreen HP Photosmart Printer Help describes how to use the printer with a computer and contains software troubleshooting information.
HP Photosmart 8700 series User's Guide |
3 |
Chapter 1
Finding more information
After you have installed the HP Photosmart printer software on a computer, you can view the onscreen HP Photosmart Printer Help:
●Windows PC: From the Start menu, select Programs (in Windows XP, select All Programs) > HP > Photosmart 320, 370, 7400, 8100, 8400, 8700 series > Photosmart Help.
●Macintosh: Select Help > Mac Help in the Finder, then select Library >
HP Photosmart Printer Help.
Printer parts
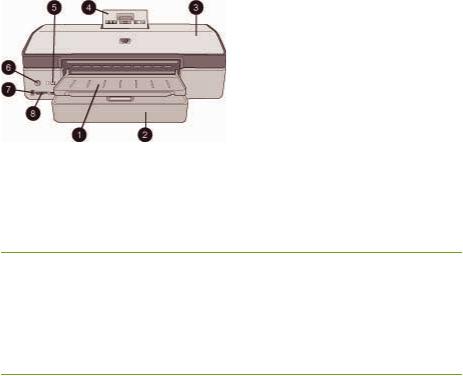
Front of printer
1 Out tray: Lift to access the Main tray.
2Main tray: Place photo paper, plain paper, transparencies, envelopes, or other media in this tray for printing.
3Top cover: Lift this cover to access the print cartridges and the print cartridge storage area, and to clear paper jams.
4Control panel access door: Push down and release to access the printer control panel and screen. The panel pops up.
5Cancel: Press this button to deselect photos, to exit a menu, or to stop an action you have requested. There is also a Cancel button on the printer control panel.
6 On: Press this button to turn on the printer or put it into power save mode.
7Camera port: Use this port to connect a PictBridge™ digital camera to the printer, or to insert the optional HP Bluetooth® wireless printer adapter.
8 Memory card slots: Insert memory cards here.
4 |
HP Photosmart 8700 series |

Back of printer
1 Ethernet port: Use this port to connect the printer to a network.
2 USB port: Use this port to connect the printer to a computer.
3 Power cord connection: Use this port to connect the power cord included with the printer.
4 Rear access door: Remove this door to clear paper jams.
5Rear feed slot: Use this slot for supported stiff stock media. Printing through this slot is possible only from the computer. The rear feed slot does not support photo board or banner printing. Be sure to load paper straight into the slot and guide it in so the paper does not skew. For more information, see Loading your paper.
6Rear feed slot paper-width guide: Adjust this guide to fit close to the edge of the paper in the rear paper slot.
Paper trays
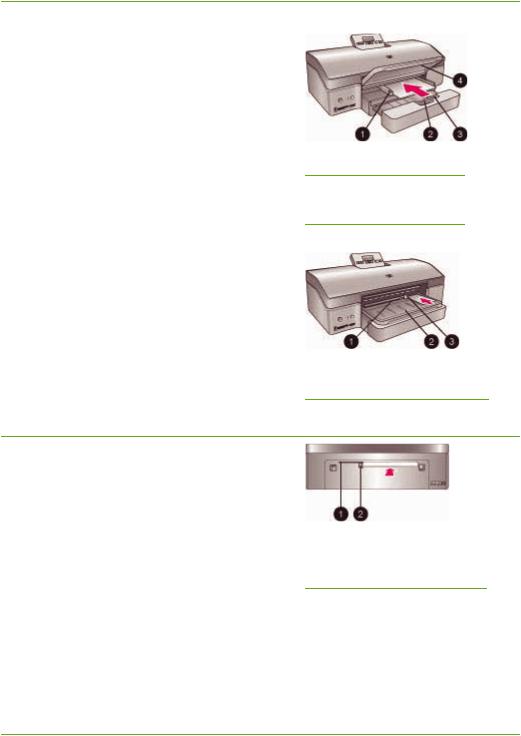
1 Out tray: Lift to access the Main tray.
2Front feed slot: Place paper here when you want to bypass the Main tray for a single print job. For photo media, have the emulsion (glossy) side down. Ideal for envelopes.
3Front feed slot paper-width guide: Adjust this guide to fit close to the edge of the paper in the front feed slot.
4Out tray extender: Pull it towards you to extend the Out tray to catch the printed paper as it is ejected from the printer.
5Main tray: Place photo paper, plain paper, transparencies, envelopes, or other media in this tray for printing. For photo media, have the emulsion (glossy) side down.
6Paper-length guide: Extend and adjust this guide to fit close to the end of small media in the Main tray.
7Main tray release: Press and pull toward you to release and extend the Main tray. This lets you load large media that could not normally fit in the tray.
8Main tray paper-width guide: Adjust this guide to fit close to the edge of the paper in the Main tray. This helps prevent paper skew.
HP Photosmart 8700 series User's Guide |
5 |
Chapter 1
Control panel
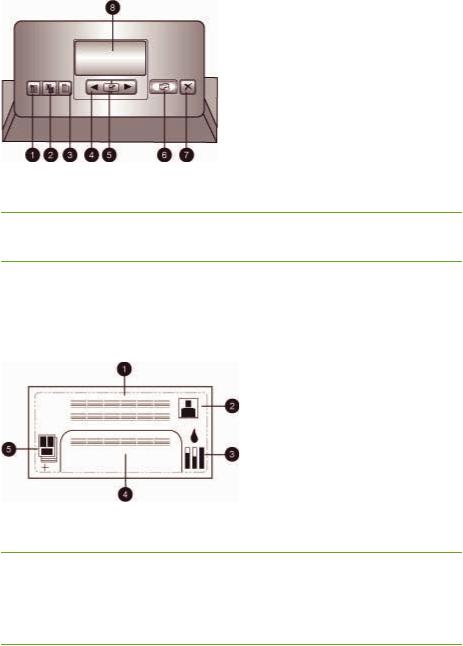
1 Index page: Press to print an index page (contact sheet) of photos on a memory card.
2 Layout: Press to select the print layout for your photos.
3 Menu: Press to view the printer menu.
4 Navigation arrows: Press to navigate through menu options or photo numbers.
5
 : Press to select a photo number or menu option.
6 Print: Press to print selected photos from the inserted memory card.
7Cancel: Press to deselect photos, to exit a menu, or to stop an action you have requested. There is also a Cancel button on the front left of the printer to the right of the On button.
8 Printer screen: Use this screen to view menus, page layout, ink status, and messages.
Printer screen
1 Messaging area: Displays printer messages and menus.
2 Animations: Displays printer activity animations.
3 Ink level: Displays the current ink level for each cartridge in the printer.
4Selected photos: Displays the index numbers of photos selected from the printer control panel for printing.
5Layout/print job status: Displays the current photo layout, number of pages to print, and layout slots being used.
6 |
HP Photosmart 8700 series |
Indicator lights
1 On light: Solid blue if the printer is on, otherwise off.
2Memory card light: Solid green if a memory card is correctly inserted, flashing green if the printer is accessing a memory card, flashing red to indicate memory card errors, and off if no memory card is inserted or more than one card is inserted.
3Status light: Flashing green if the printer is busy (non-printing activity), flashing red if there is an error or if some user action is required, solid amber if an nonrecoverable error has occurred.
4Print light: Solid blue if the printer is ready to print, pulsing blue if the printer is busy printing.
Printer menu
Press Menu to access the printer menu.
To navigate the printer menu:
●Press  or
or  to scroll through the menus or options displayed on the printer screen.
●Any menu with a triangle next to it has submenus or options. Press  to display the submenus or options.
●Press Cancel to exit the current menu.
The print menu structure
●Print all: Select to print all the photos on the memory card inserted in the printer.
●Date/time stamp option
–Date/time
–Date only
–Off (default)
HP Photosmart 8700 series User's Guide |
7 |
Chapter 1
●SmartFocus: Turn on to focus images for clearer, sharper detail.
–On
–Off (default)
●Digital Flash: Turn on to improve photos with poor lighting and contrast.
–On
–Off (default)
●Change the print quality
–Normal
–Best (default)
Normal uses less ink than Best, and applies only to the current print job. The setting then automatically resets to Best.
●Print a sample page: Select to print a sample page useful for checking the print quality of the printer.
●Print a test page: Select to print a test page containing information about the printer that can help in troubleshooting problems.
●Network settings
–Display network IP address: Select to display the IP address of the printer.
–Print network settings page: Select to print a network configuration page that you can use for troubleshooting network connections or for the initial network setup.
–Reset network settings: Select to reset the network settings to the factory defaults.
–Reset Bluetooth settings: Select to reset the Bluetooth settings to the factory defaults.
●Clean the print cartridges: Select to clean the print cartridges. After the cleaning finishes, the printer prints a test page. You have the option to clean the cartridges again if the test page shows that they are still not clean.
●Calibrate the printer: Select to calibrate the printer.
●Select paper settings
–Auto-detect (default): Lets the printer auto-detect paper type and width.
–Manually set: Lets the user manually select paper type and width.
●Select language: Select to indicate the language you want used on the printer display.
●Reset all menu settings: Restores factory settings for all menu items except
Select language.
8 |
HP Photosmart 8700 series |

2 Getting ready to print
This section includes information on the following:
●Loading paper
●Inserting print cartridges
Loading paper
Learn how to choose the right paper for your print job and how to load it into the correct tray for printing.
Choosing the right paper
For a list of available HP inkjet paper, or to purchase supplies, go to:
●www.hpshopping.com (U.S.)
●www.hp.com/go/supplies (Europe)
●www.hp.com/jp/supply_inkjet (Japan)
●www.hp.com/paper (Asia/Pacific)
To get the best and longest-lasting results from the printer, choose from these highquality HP photo papers.
To print |
Use this paper |
High-quality, long-lasting prints and |
HP Premium Plus photo paper |
enlargements |
|
Medium to high resolution images— |
HP Premium photo paper |
instant-dry, water resistant casual and |
|
business photos |
|
Casual photos from e-mail and the web |
HP Advanced Photo paper |
|
HP Photo paper |
|
HP Everyday photo paper |
Text documents, draft versions, test and |
HP Premium inkjet paper |
alignment pages |
|
HP Photosmart 8700 series User's Guide |
9 |

Chapter 2
Note HP designs its photo papers to resist fading so your photos remain vibrant for years to come. For more detailed information on this subject, visit the HP web site. Go to www.hp.com/support, select your country/region and your language, then type HP Photosmart 8700 in the product/name search box. Press ENTER and then select the HP Photosmart 8700 series printer. In the Question or keywords search box enter lightfastness or permanence and then press ENTER. Click the topic you want to review.
To keep your paper in good condition for printing:
●Store the photo paper in its original packaging or in a resealable plastic bag.
●Keep the paper flat in a cool, dry place. If the corners curl, place the paper in a plastic bag and gently bend it in the opposite direction until it lies flat.
●Hold photo paper by the edges to avoid smears.
Using specialty papers
Note HP recommends using the Main tray for these specialty medias, but the rear feed slot can be used for stiffer medias. Check the HP web site at www.hp.com/support for more information about printing with fine art media.
Your HP printer also prints on a variety of non-HP specialty media. Experiment with some of the types listed here for special effects:
●Smooth Fine Art Paper
●William Turner Textured Surface
●German Etching
●Photo Rag
●Photo Rag Smooth Surface
●Fine Art Water Color
●Soft Fine Art Water Color
●Photo Rag Duo
●Soft Suede
●Gallery Gloss
Some media types may not be available in all countries/regions. Check with your local media provider.
Warning Do not use photo board as it can damage the printer.
10 |
HP Photosmart 8700 series |

Loading your paper
The HP Photosmart 8700 series supports the following paper sizes:
Supported paper sizes |
|
|
When printing from a computer |
When printing from the printer |
|
|
control panel |
|
● From 76 x 127 mm (3 x 5 inches) |
● |
3.5 x 5 inches |
up to 324 x 476 mm (13 x 19 inches) |
● |
4 x 6 inches |
● 216 mm (8.5 inch-wide) banner |
● |
5 x 7 inches |
paper |
● 8 x 10 inches |
|
|
||
|
● 8.5 x 11 inches |
|
|
● 11 x 14 inches |
|
|
● 13 x 19 inches |
|
|
● 10 x 15 cm (with or without tab) |
|
|
● 13 x 18 cm |
|
|
● |
A3 |
|
● |
A4 |
|
● |
A6 |
|
● |
L |
|
● |
2L |
|
● |
Hagaki |
Paper loading tips:
●Before loading paper, slide out the paper-width and length guides to make room for the paper. After loading paper, adjust the guides to fit close to the edges of the paper without bending the paper.
●Load only one type and size of paper at a time in the same tray.
●After loading paper, extend the Out tray extension to hold your printed pages. This prevents printed pages from dropping off of the Out tray.
Use the directions in the following table to load the most commonly used paper sizes into the printer.
HP Photosmart 8700 series User's Guide |
11 |
Chapter 2 |
|
|
Paper type |
How to load |
|
Any supported |
1. |
Raise the Out tray (4). |
photo or plain |
2. |
Load paper print-side |
paper media |
|
down. Press the Main tray |
|
|
release (2) and pull out |
|
|
the tray if needed for |
|
|
easier access. Check that |
|
|
the stack of paper is no |
|
|
higher than the top of the |
|
|
paper-length guide (3). |
|
3. |
Adjust the Main tray |
|
|
paper-width guide (1), as |
|
|
needed. |
|
4. |
Lower the Out tray (4). |
Any supported |
1. |
Load paper print-side |
photo or plain |
|
down into the front feed |
paper media—ideal |
|
slot (1). If you are using |
for envelopes |
|
tabbed paper, insert the |
|
|
paper so the tab feeds in |
|
|
last. |
|
2. |
Adjust the front feed slot |
|
|
paper-width guide (3), as |
|
|
needed. |
Stiff media, such as |
1. |
Load paper print-side up |
cardstock (Not |
|
into the rear feed slot (1). |
supported: photo |
2. |
Adjust the rear feed slot |
board and banner |
|
paper-width guide (2), as |
printing) |
|
needed. |
Tips
●To avoid jams and paper skewing, load one sheet at a time straight into the slot
●Use only stiff stock media
●Do not use for photo board or banner printing
●Only use this slot when printing from a computer. Not for use when printing from the printer's control panel.
 Tray to load
Main tray
1  Main tray paper-width guide
2 Main tray release
3  Paper-length guide
4 Out tray
Front feed slot
1  Front feed slot
2 Out tray
3  Front feed slot paper-width guide
Rear feed slot
1  Rear feed slot
2 Rear feed slot paper-width guide
12 |
HP Photosmart 8700 series |
Inserting print cartridges
The HP Photosmart 8700 series printer can print color and black-and-white photos, as well as documents. HP provides different types of print cartridges so you can choose the best cartridges for your project. The HP Photosmart 8700 series supports the
HP Blue Photo print cartridge for color prints with richer blues and better color transitions.
Note The cartridge numbers you can use with this printer appear on the back cover of the printed HP Photosmart 8700 series User's Guide. If you have already used the printer several times, you can find the cartridge numbers in the HP Photosmart 8700 series Toolbox. Windows users: Right-click the small printer icon on the far right of the Windows taskbar, and select Open HP Photosmart 8700 series Toolbox. Click the Estimated Ink Level tab and then click the Print Cartridge Ordering Information button. Macintosh users: Click HP Image Zone in the Dock. Choose Maintain Printer from the
Settings pop-up menu. Click Utilities, and then choose Supplies from the pop-up menu.
For optimum printing results, HP recommends using only HP print cartridges. Inserting a cartridge that is not in this table may invalidate the printer warranty.
Use the correct print cartridges |
|
|
|
To print… |
Insert this print |
Insert this print |
Insert this print |
|
cartridge in the |
cartridge in the |
cartridge in the |
|
left stall |
middle stall |
right stall |
Full-color photos |
|
|
|
|
HP Blue Photo |
HP Tri-color |
HP Gray Photo |
Black-and-white |
|
|
|
photos |
|
|
|
|
HP Blue Photo |
HP Tri-color |
HP Gray Photo |
Sepia or antique |
|
|
|
photos |
|
|
|
|
HP Photo |
HP Tri-color |
HP Gray Photo |
Text and colored |
|
|
|
line drawings |
|
|
|
|
HP Photo |
HP Tri-color |
HP Black |
Caution Check that you are using the correct print cartridges. Also, note that HP does not recommend modifying or refilling HP cartridges. Damage that
HP Photosmart 8700 series User's Guide |
13 |

Chapter 2
results from modifying or refilling HP cartridges is not covered by the HP warranty.
For best print quality, HP recommends that you install all retail print cartridges before the date stamped on the box.
Insert or replace the print cartridges
Prepare the printer and cartridges
Remove the pink tape
Do not touch here
1.Make sure you have removed the cardboard from inside the printer and the power is on.
2.Lift the main cover of the printer.
3.Remove the bright pink tape from all cartridges.
Do not touch the ink nozzles or the copper-colored contacts, and do not re-tape the cartridges.
Insert the cartridges
1.If you are replacing a cartridge, push down and pull outward on the cartridge stall cover to open it and then pull the cartridge out.
2.Match the symbol on the cartridge label to the correct stall.
3.Hold the cartridge with the label on top and slide it at a slight upward angle into the stall so the copper-colored contacts go in first. Push the cartridge until it snaps into place.
4.Close the cartridge stall cover.
5.Repeat the previous steps to install the other cartridges, if necessary.
6.When you are finished installing cartridges, close the main cover.
You must install all three cartridges in order for the printer to work as intended.
Tip Ink-backup printing mode lets you keep printing even if one of the cartridges fails or runs out of ink. Remove the cartridge and close the main cover to enter ink-backup printing mode. The printer continues to print, but at a slower speed and with inferior print quality. A message reminds you that the printer is in ink-backup printing mode. Replace the cartridge as soon as possible.
The idle screen of the printer displays three icons showing the approximate ink level for each
14 |
HP Photosmart 8700 series |

Insert or replace the print cartridges (continued)
cartridge (100%, 75%, 50%, 25%, and nearly empty). Ink-level icons do not appear if any of the installed cartridges are not genuine HP cartridges.
Each time you install or replace a print cartridge, a message prompts you to print an alignment page. This ensures high-quality prints.
Align the cartridges
1.Load paper in the Main tray.
2.Follow the onscreen instructions to complete the cartridge alignment.
See Aligning the print cartridges.
When you are not using a print cartridge
Whenever you remove a print cartridge from the printer, store it in a print cartridge protector. The cartridge protector keeps the ink from drying out. Storing the cartridge improperly can cause the cartridge to malfunction. A print cartridge protector comes in the box with the printer.
To insert a cartridge into the cartridge protector, slide the cartridge into the protector at a slight angle and snap it securely into place.
Once you have inserted a cartridge into the cartridge protector, place it in the storage area located under the top cover.
HP Photosmart 8700 series User's Guide |
15 |
Chapter 2
16 |
HP Photosmart 8700 series |
3 |
Basic printing from a |
||||
|
computer |
||||
|
You'll need to save your photos to the computer before you can use them with the |
||||
|
printer driver software that lets you print photos from a computer. For more |
||||
|
information, see Saving photos to a computer from a memory card. |
||||
|
For information on installing the printer driver software, see the setup instructions that |
||||
|
came in the box with the printer. |
||||
|
Be sure to download the latest printer software update every couple of months to |
||||
|
ensure you have the latest features and improvements. For more information, see |
||||
|
Updating the software. |
||||
|
The print driver software is the interface that appears whenever you print. This section |
||||
|
describes the print quality settings available for the HP Photosmart 8700 series in the |
||||
|
print driver and how to select the most appropriate setting for the current print job. |
||||
|
|
|
|
|
Note The onscreen HP Photosmart Printer Help provides more information |
|
|
|
|
|
on the many print settings available when you print from a computer. To learn |
|
|
|
|
|
|
|
|
|
|
|
|
|
|
|
|
|
how to access the onscreen help, see Finding more information. |
|
To set print quality settings |
||||
|
1. Open the Print dialog box. |
||||
|
|
|
|
If you are using a Windows computer |
|
|
|
|
|
|
Click the Paper/Quality tab in the Print dialog box (Windows 2000/XP) or |
|
|
|
|
|
click Properties in the Print dialog box and then click the Paper/Quality tab |
|
|
|
|
|
(Windows 98). |
|
|
|
|
If you are using a Macintosh |
|
|
|
|
|
a. |
Choose Paper Type/Quality in the Copies & Pages pop-up menu. |
|
|
|
|
b. |
Click the Paper tab. |
|
2. Select a setting from the Print quality (Windows) or Quality (Macintosh) pop-up |
||||
|
|
|
|
menu: |
|
|
|
|
|
– |
Fast Draft: This 300 dpi setting provides the fastest speed and the most |
|
|
|
|
|
economical use of ink. Use it for proof copies of your photo or creative |
|
|
|
|
|
project. Print outs appear light. |
|
|
|
|
– |
Fast Normal: This 300 dpi setting provides the fastest speed for good quality |
|
|
|
|
|
prints. Use it for proof copies of your photos. |
|
|
|
|
– |
Normal: This 600 dpi setting provides the best balance between print quality |
|
|
|
|
|
and speed. Use it for your final prints. |
|
|
|
|
– |
Best: This 600 dpi setting provides the best balance between high quality |
|
|
|
|
|
and speed, and uses PhotoREt color enhancement. Use it for high quality |
|
|
|
|
|
prints. |
|
|
|
|
– |
Maximum dpi: This 4800 x 1200 dpi setting provides the highest quality |
|
|
|
|
|
prints possible, but requires long print times and a large amount of free disk |
|
|
|
|
|
space. |
HP Photosmart 8700 series User's Guide |
17 |

Chapter 3
For more information on the HP print driver, do the following:
●Windows: From the Start menu, select Programs (in Windows XP, select All Programs) > HP > Photosmart 320, 370, 7400, 8100, 8400, 8700 series > Photosmart Help, then click HP Photosmart Printer Help. In the print dialog itself, right-click any option and click the What's This? box to learn more about that option.
●Macintosh: Select Help > Mac Help in the Finder, then select Library >
HP Photosmart Printer Help.
Note For more information on color settings in the print driver, see Using color management.
18 |
HP Photosmart 8700 series |

4 Using color management
Note This section provides some basic information about using color management with the HP Photosmart 8700 series. For more detailed information on this complex subject, visit the HP web site. Go to www.hp.com/ support, select your country/region and your language, then type
HP Photosmart 8700 in the product/name search box. Press ENTER and then select the HP Photosmart 8700 series printer. In the Question or keywords search box enter color management and then press ENTER. Click the topic you want to review.
In many cases, the default printer-based color management of the HP Photosmart 8700 series delivers good results, but if you need to have greater control over color management in your workflow, see Using application-based color management.
Color management allows the colors in images or graphics to pass accurately between applications, operating systems, and imaging devices, such as cameras, scanners, monitors, and printers.
Digital cameras, scanners, and monitors use the RGB1 color model, while commercial printers use the CMYK2 color model. The differences between the two color models can cause printed photos to look markedly different from what you see on the monitor.
Warning It's possible to have color management features turned on both in the printer driver and in an application such as Adobe® Photoshop.® This double correction produces unsatisfactory results. Use either printer-based or application-based color management, but not both at the same time.
Note Color management is a complex subject and a detailed discussion is beyond the scope of this user guide. The HP Photosmart 8700 series User Guide provides a couple of typical examples, but for more information, see the documentation that came with your third-party image-editing software.
Using printer-based color management
The HP Photosmart 8700 series offers built-in automatic color management that's easy to configure. Printer-based color management produces attractive results and should be adequate for many users.
For information on a more advanced, professional-level form of color management, see Using application-based color management.
1The RGB color model is so-named because it creates colors by mixing red, green, and blue colored light. Technologies that rely on light (monitors, scanners, or digital cameras) use this model.
2The CMYK color model used in the printing industry is based on the light-absorbing qualities of ink printed on paper. CMYK stands for cyan, magenta, yellow, and black, the colors used in four-color process printing.
HP Photosmart 8700 series User's Guide |
19 |

Chapter 4
Printer driver color mode settings |
|
Setting |
When to use it |
Colorsmart/sRGB
Most imaging devices, such as monitors, cameras, and scanners, normally use sRGB. The printer is also set to Colorsmart/sRGB by default. When set to this mode, the printer converts colors from sRGB to the printer's ink colors.
Tip You should not have the printer set to this mode if you are also using ICC profiles and your application to manage color. This can result in decreased color fidelity since the colors are converted twice—first by the application and then by the printer.
Adobe RGB or Adobe RGB (1998)
You can set some imaging devices to Adobe RGB, an enhanced version of the sRGB color space, developed for highfidelity digital photography. When set to this mode, the printer converts colors from Adobe RGB to the printer's ink colors.
Tip You should not have the printer set to this mode if you are also using ICC profiles and your application to manage color. This can result in decreased color fidelity since the colors are converted twice—first by the application and then by the printer.
Managed by Application (Windows) Application Managed Colors (Mac OS)
When set to this mode, the printer does not do any color management.
Application-based color management lets image editing software handle color conversions from image color space to the printer ink colors. The conversion takes place in the image-editing software.
Using application-based color management involves changing settings
●When your digital camera, scanner, or image editing software is set to sRGB
●For the easiest, most basic form of color management
●When you are not using ICC profiles
●When your digital camera, scanner, or image editing software is set to Adobe RGB
●For high-quality digital photography
●When you are not using ICC profiles
●When you want to use ICC profiles
●When you want to use the color management features of imaging editing software, such as Adobe Photoshop
●For the greatest level of control over color quality
20 |
HP Photosmart 8700 series |

Printer driver color mode settings (continued)
Setting |
When to use it |
both in the printer driver and in your applications, and requires ICC profiles for all your devices. For more information, see Using applicationbased color management.
In order to print using the color management features built into the HP Photosmart 8700 series, you have to change settings in the printer driver software and in the image editing software. Here is one example of a typical print job using printer-based color management with Adobe Photoshop (version 7 or CS).
To print using printer-based color management
1.Open the file you want to print in Adobe Photoshop.
2.Select File > Print with Preview in Adobe Photoshop. Make sure Show More Options is selected in the Print with Preview dialog box, then select Color Management from the pop-up menu.
3.In the Print Space area of the Print with Preview dialog box, select the same RGB color space setting you intend to use in the print driver (Windows). In most cases this is sRGB or Adobe RGB. On a Macintosh, choose Printer Color Management instead.
4.Click Page Setup in the Print with Preview dialog box, set up the page for the current image, as desired, then click OK.
5.Click Print.
If you are using a Windows computer
a.Click Properties in the Print dialog box.
b.Click the Color tab in the Properties dialog box.
c.Select a color mode from the Color management pop-up menu in the Print dialog box:
–Colorsmart/sRGB (default)
–AdobeRGB
Select the same color mode you selected as an RGB working space in the Adobe Photoshop Color Settings dialog box.
d.Click the Paper/Quality tab, select the desired paper type from the Type is pop-up menu, then click OK.
If you are using a Macintosh
a.Choose Paper Type/Quality in the Print dialog box.
b.Choose a color mode from the Color pop-up menu in the Print dialog box:
–Colorsmart/sRGB
–AdobeRGB
Select the same color mode you selected as an RGB working space in the Adobe Photoshop Color Settings dialog box.
6.Click OK in the Print dialog box to begin printing.
HP Photosmart 8700 series User's Guide |
21 |
 Loading...