

Page 1
NSA-2400
Network Storage Appliance
Quick Start Guide
Version 1.00
12/2006
Edition 2
Table of Contents
ENGLISH 1
DEUTSCH 19
FRANÇAIS 37
ITALIANO 55
SVENSKA 73
繁體中文 91
Copyright © 2006. All rights reserved.
Page 2
ENGLISH
ENGLISH
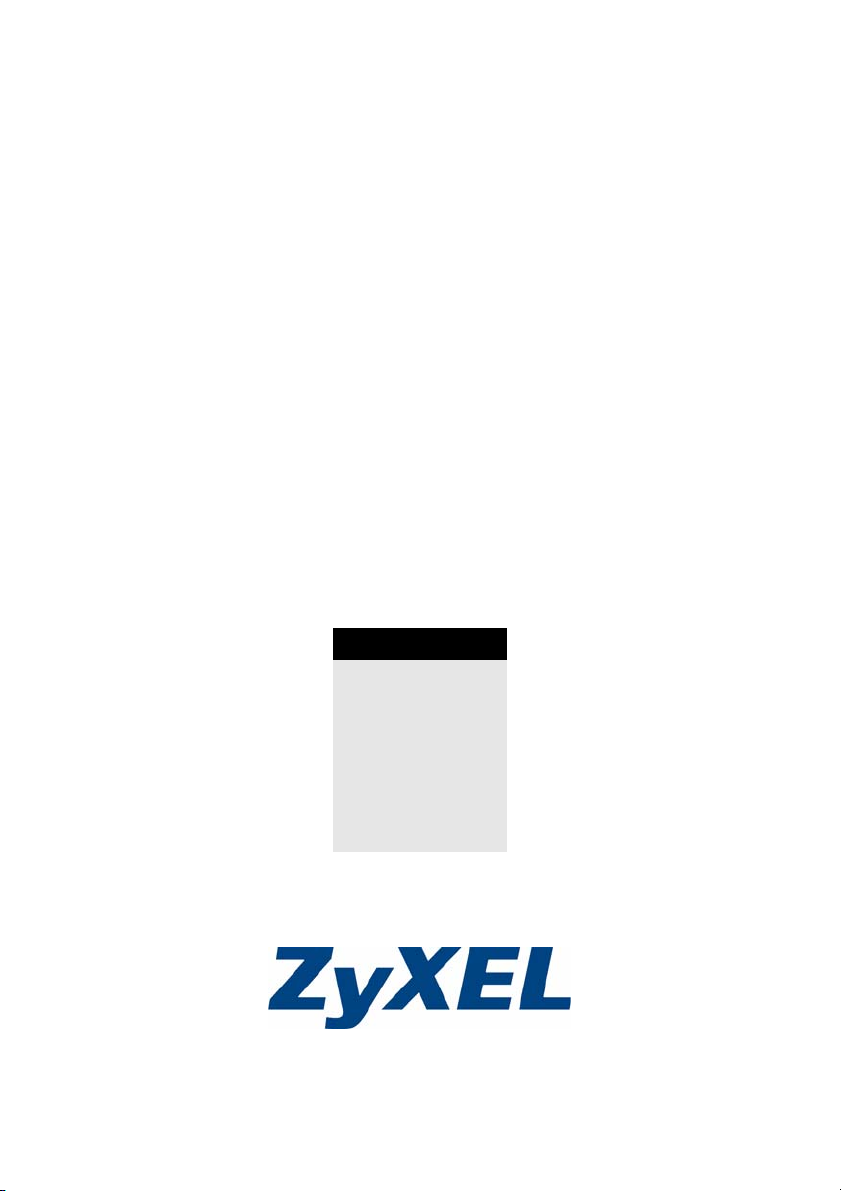
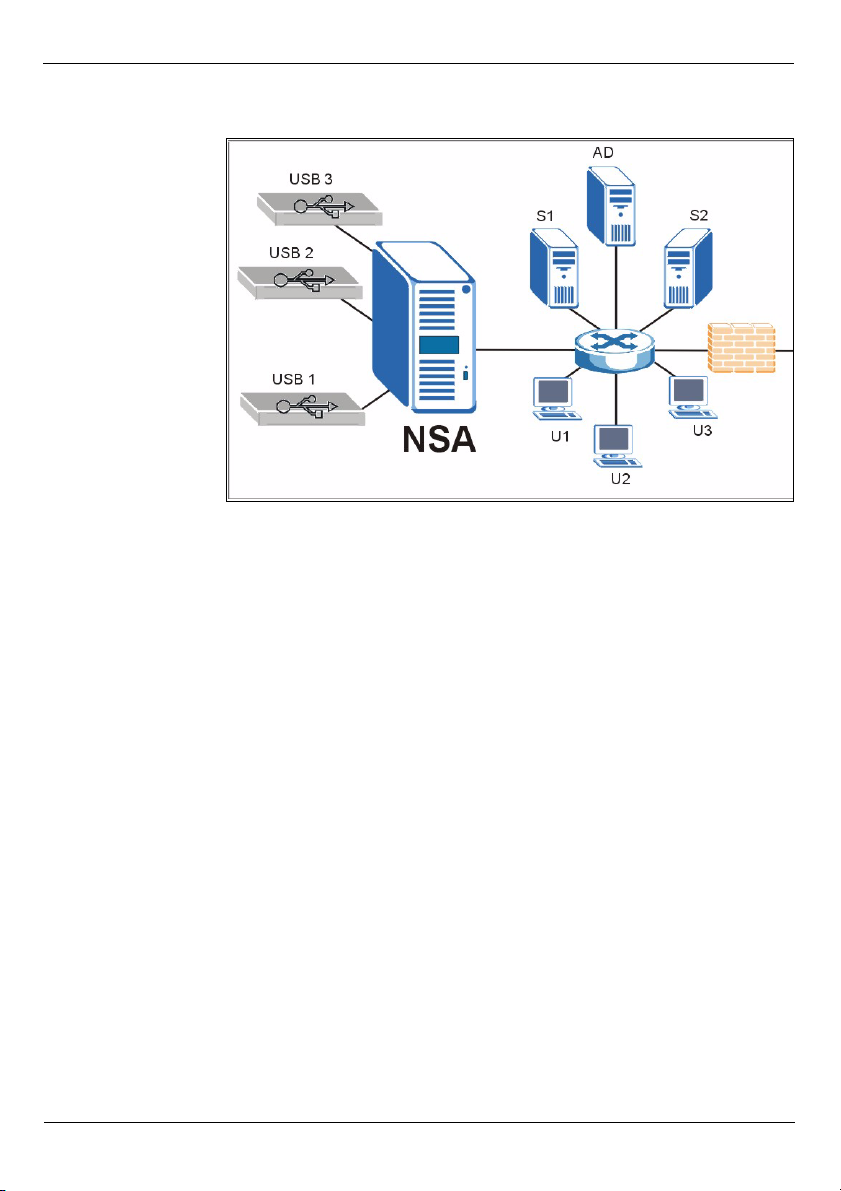
Overview
The NSA-2400 (the NSA) is
a network storage device
for file sharing, data backup
and data protection in small
(home) offices and/or
medium-sized offices.
This guide shows you how
to:
1 Install hard drives
2 Make NSA Connections
3 Access the NSA using
NDU (NSA Discovery
Utility) or your web
browser
4 Set up the NSA using the wizard
5 Map the NSA to a network drive from any computer
Note: See the User’s Guide for more details and specifications on the NSA.
Requirements
You need the following before you start:
•NSA
• Included CD containing the NDU (NSA Discovery Utility) and Genie Backup Manager
• Power cord and power supply (external)
• 8-wire Ethernet cable for Gigabit Ethernet
• Up to four SATA-1 or 2 (Serial Advanced Technology Attachment) compatible hard disk(s)
• Screwdriver to install the hard disks in the disk trays
• USB cable (optional: you only need this if you want to expand storage capacity by connecting compatible USB 2.0 drives
• Computer with Network Interface Card (NIC) and TCP/IP installed
• Network access device such as a switch or hub.
1
Page 3
ENGLISH
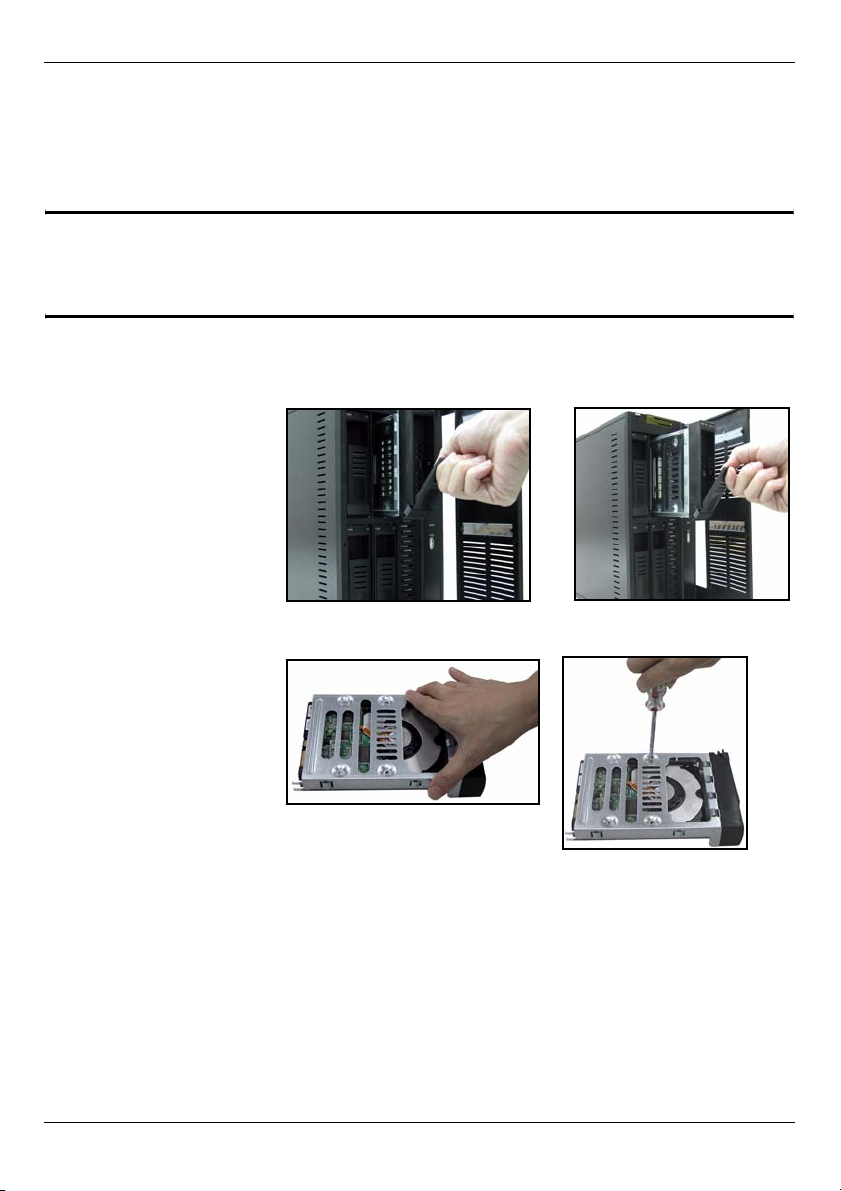
1 Install Hard Drives
Note: Hard drives are NOT hot swappable. The NSA must be turned off before you
remove or install hard drive(s).
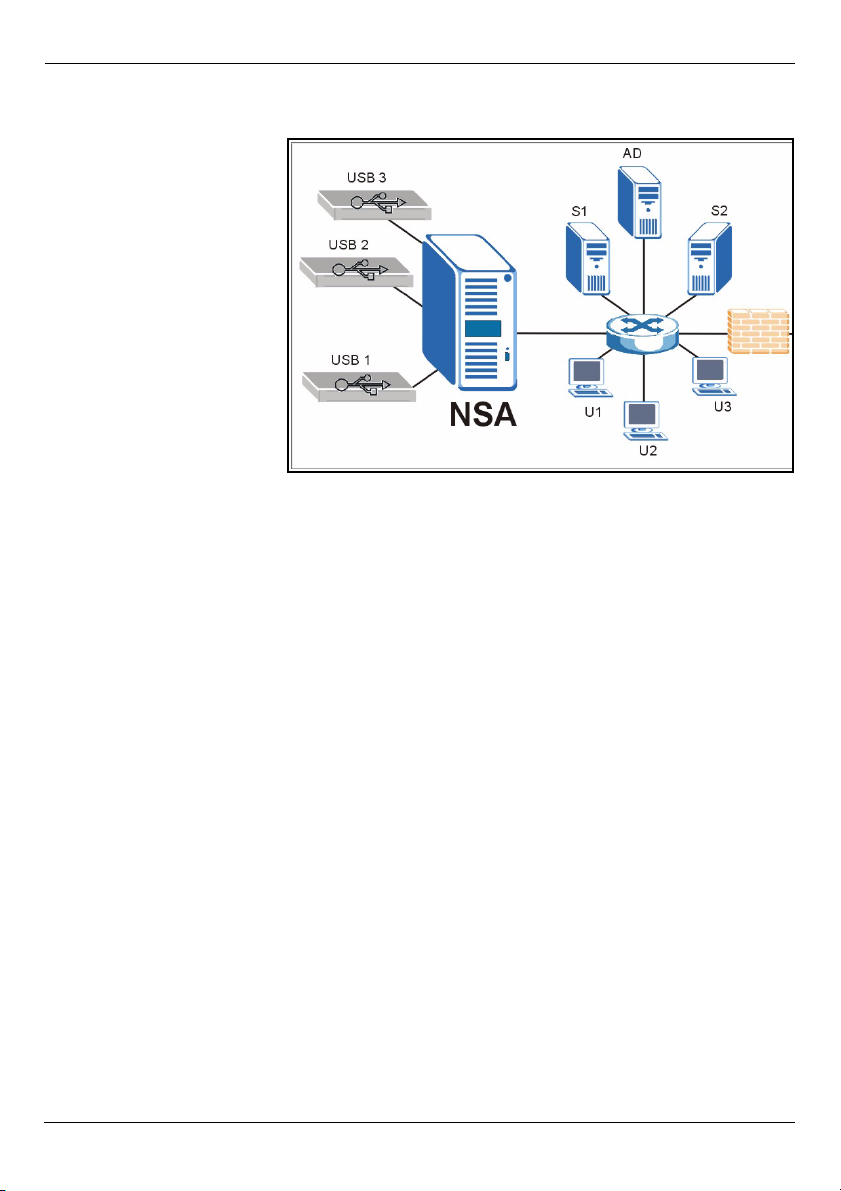
1 Pull the tab on the left of the front door of the NSA to open it.
2 Pull out the latch and
grip the sides of the
tray to remove disk tray
1. Be careful not to
break the latch. Disk
bay 1 is labelled on
your NSA (the top-left
bay).
3 Place the disk tray on a
flat surface with the
panel facing up. Place
a hard disk with the
screw holes facing up
on the same surface
and slide it into the disk
tray. Secure it with the
screws as shown.
4 Push the top of the tray
back into NSA disk bay
1 until it snaps into
place and push the
latch up as shown.
5 Repeat steps 1 to 3 for
other hard drives that
you may have.
2 Make the NSA Connections
1 Connect the Ethernet port on the rear of the NSA to a
hub, switch, or router on your network using an
Ethernet cable. Use an 8-wire Ethernet cable for
Gigabit connections.
2
Page 4
ENGLISH
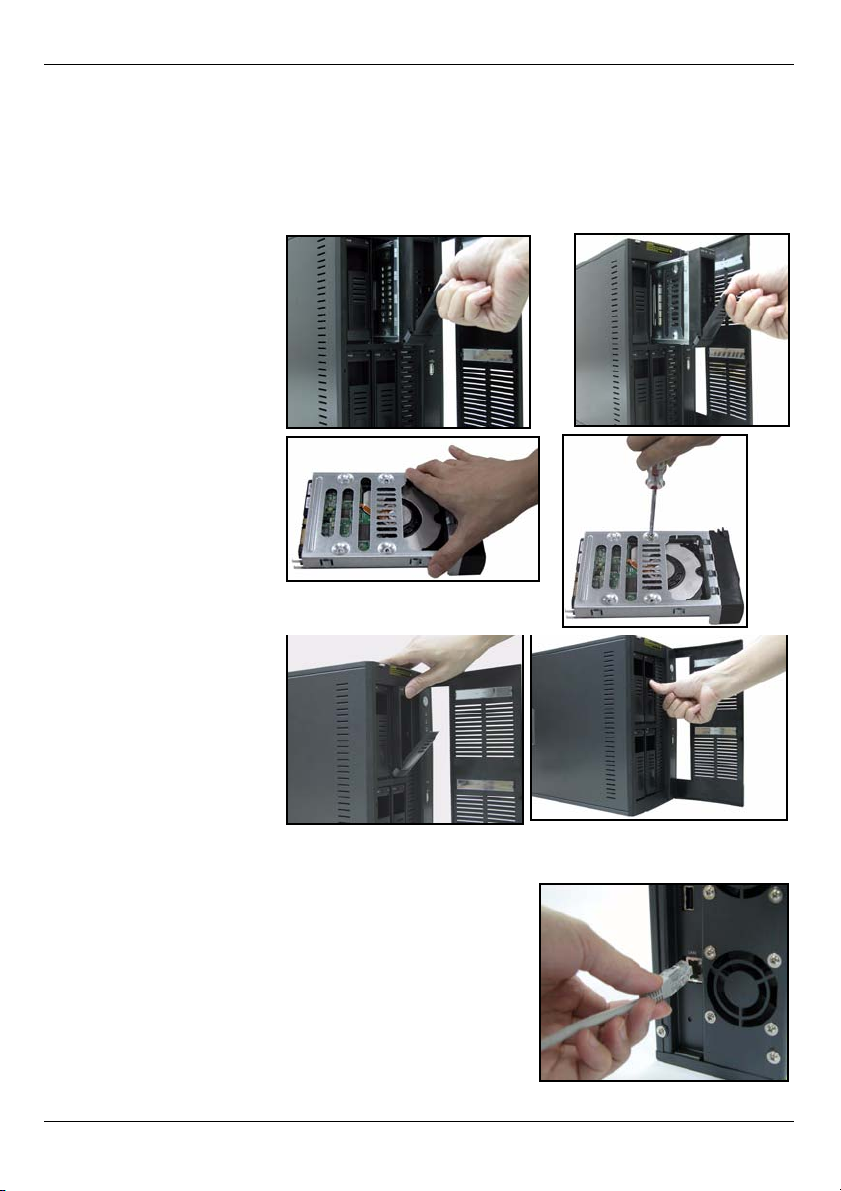
2 Connect one end of the power cord to the power socket
on the rear of the NSA and the other end to the external
power supply. Connect the external power supply to a
power outlet.
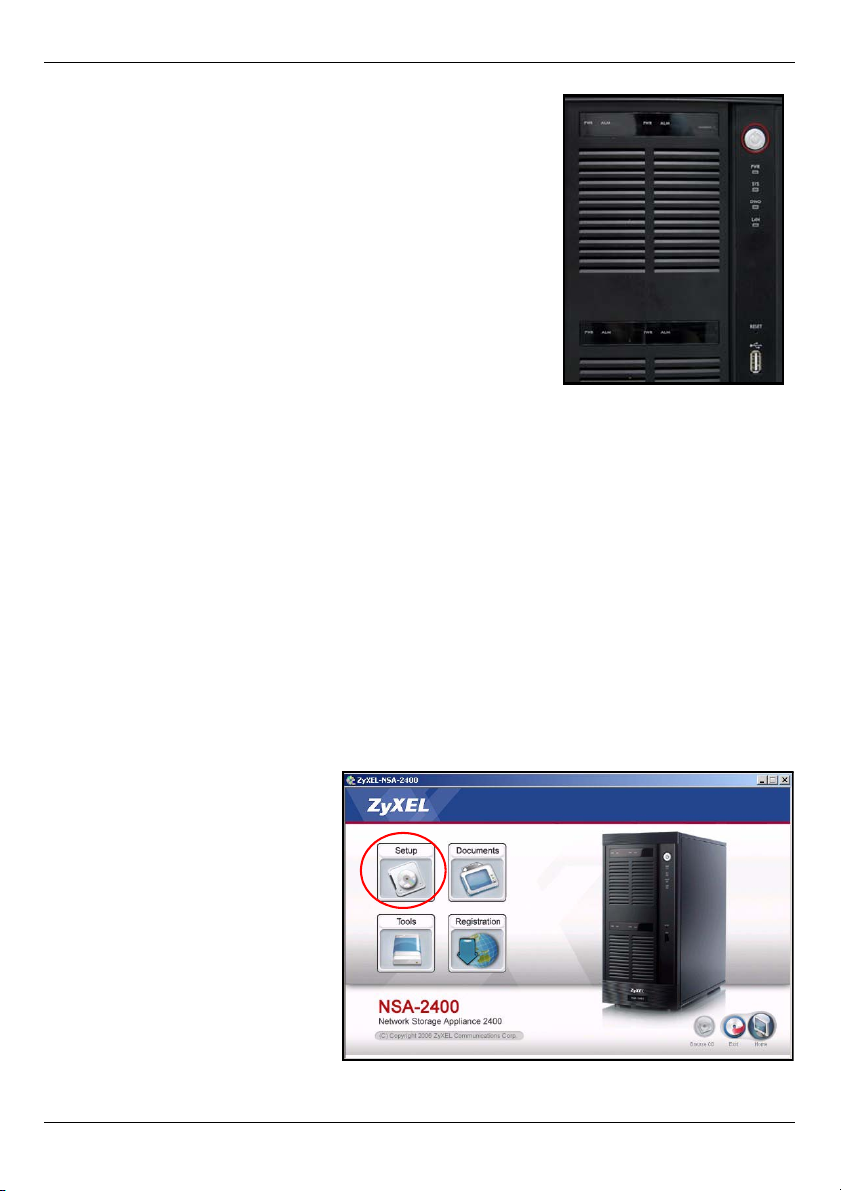
3 Turn on the power by pressing in the power
button on the front of the NSA. Look at the front
panel lights. The PWR light turns steady green.
The SYS light turns steady green after the NSA
has booted successfully (it takes about 50
seconds). The LAN light turns on if the NSA
Ethernet port is properly connected to your
network. It blinks while transmitting or receiving
traffic.
Note: To turn off the NSA, press the power
button in once only. The SYS light blinks
red indicating the NSA is shutting down.
3 Access the NSA
You can access the NSA in one of two ways: using
the NDU (NSA Discovery Utility) or directly entering
the NSA IP address into your web browser.
3.1 Use the NDU to Discover the NSA IP Address
Use the NDU (NSA Discovery Utility) on a Windows computer if your network has a DHCP
server that will assign the NSA an IP address and/or if you have many NSAs in your
network.
Note: The Genie Backup program uses the same network port as the NDU to
discover the NSA. To avoid a port conflict, do not run the Genie Backup at the
same time as the NDU.
3
Page 5
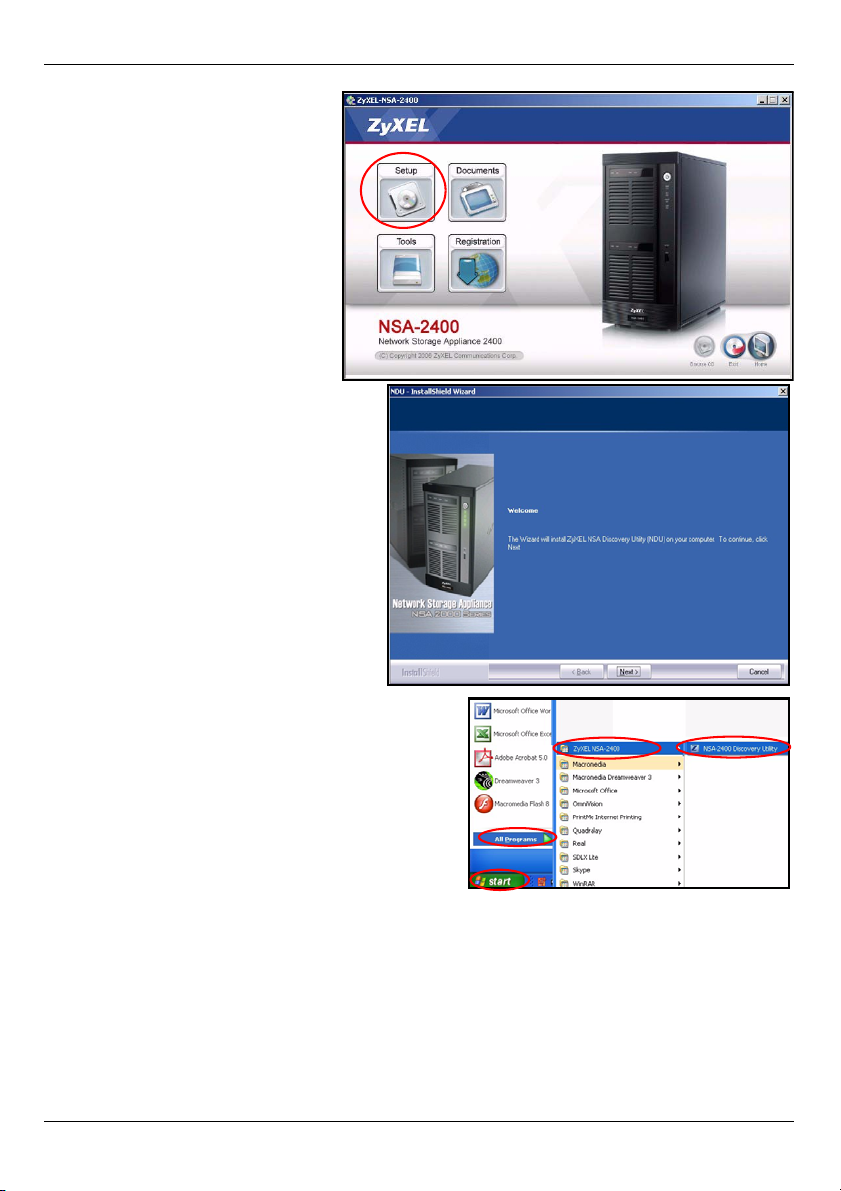
1 Insert the included CD into
your CD-ROM drive. The next
screen should automatically
display (autorun). Click the
Setup icon.
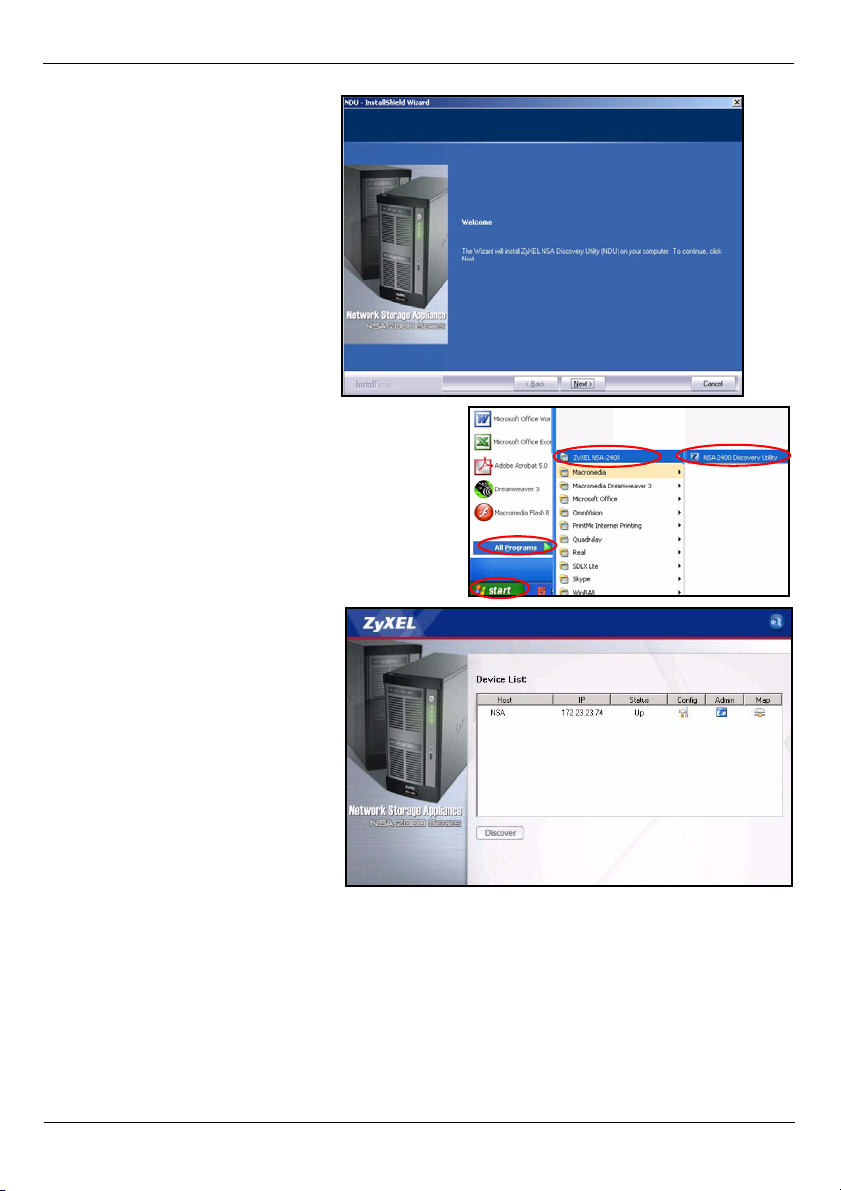
2 The NDU installation wizard
begins. Follow the installer
instructions. Click Finish to
complete the installation.
ENGLISH
3 In Windows XP, click start, All
Programs, ZyXEL NSA-2400, ZyXEL NSA2400 Discovery Utility to run the NDU. For
other Windows operating systems,
procedures should be similar. If your
computer has more than one network card,
then you will first be prompted to select a
network interface card.
4
Page 6
ENGLISH
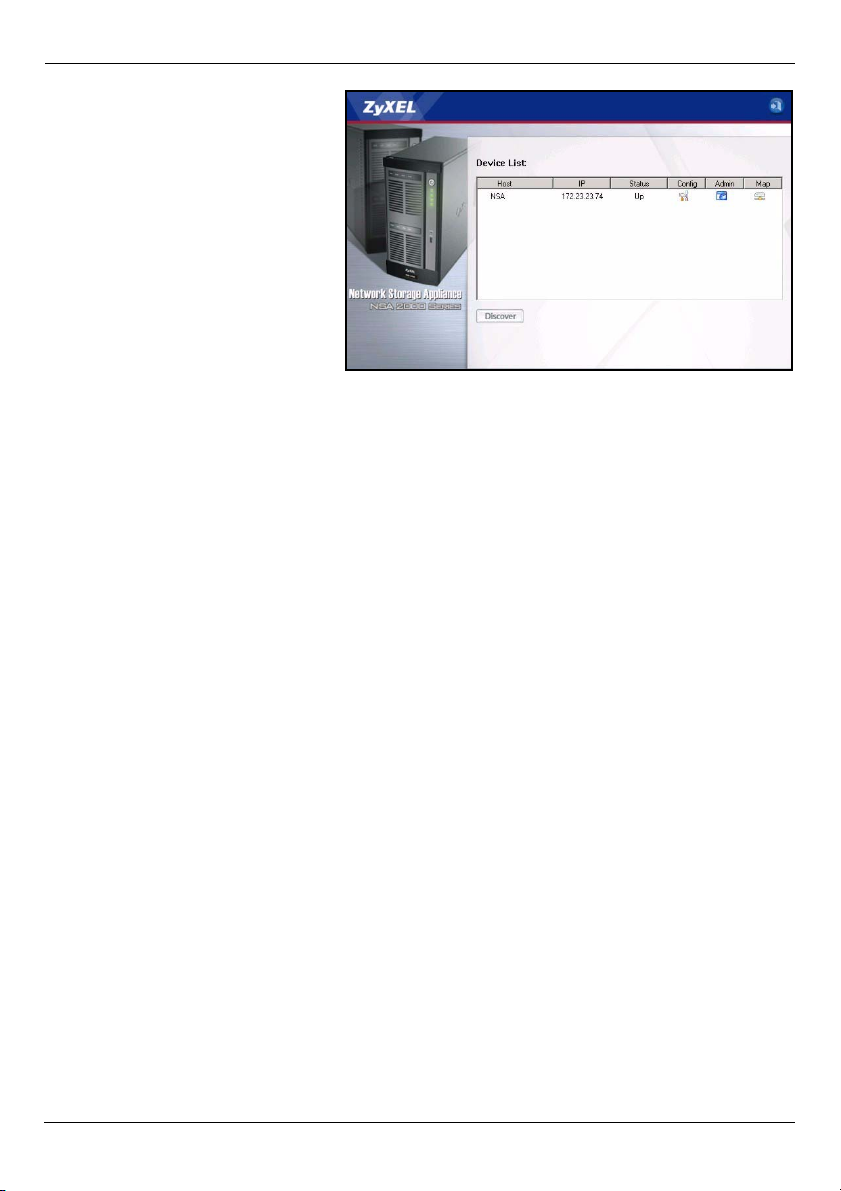
4 The NDU main screen
appears listing all hostnames,
IP addresses and status of all
NSAs in your network. Click
the icon under Admin to see
the main web configurator
screen as shown in section 4.
(If you want to change the
NSA IP address, click the icon
under Config. If you want to
map the NSA to a Windows
network drive, click the icon
under Map (see section 5). To
refresh the screen, click
Discover.)
3.2 Direct Access Via Web Browser
If the NSA cannot get an IP address from a DHCP server, then the default IP address of
the NSA reverts to 192.168.1.3. Before directly entering the NSA IP address into your web
browser, you must make sure that your computer and the NSA are in the same subnet.
This section shows you how to set your Windows NT/2000/XP computer to have an IP
address in the same subnet as the NSA. Refer to your User’s Guide for detailed IP address
configuration for other operating systems.
1 In Windows XP, click start, Control Panel. In Windows 2000/NT, click Start, Settings,
Control Panel.
2 In Windows XP, click Network Connections. In Windows 2000/NT, click Network and
Dial-up Connections.
3 Right-click Local Area Connection and then click Properties.
5
Page 7
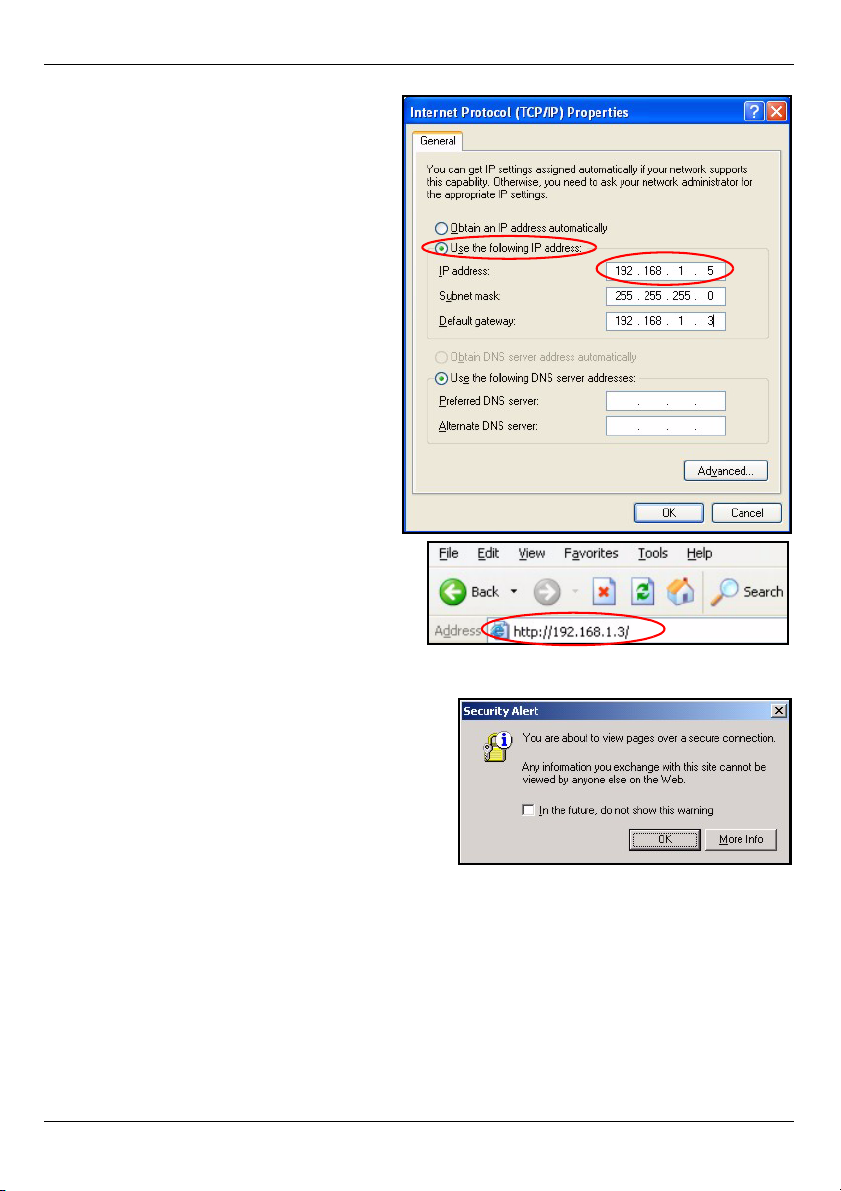
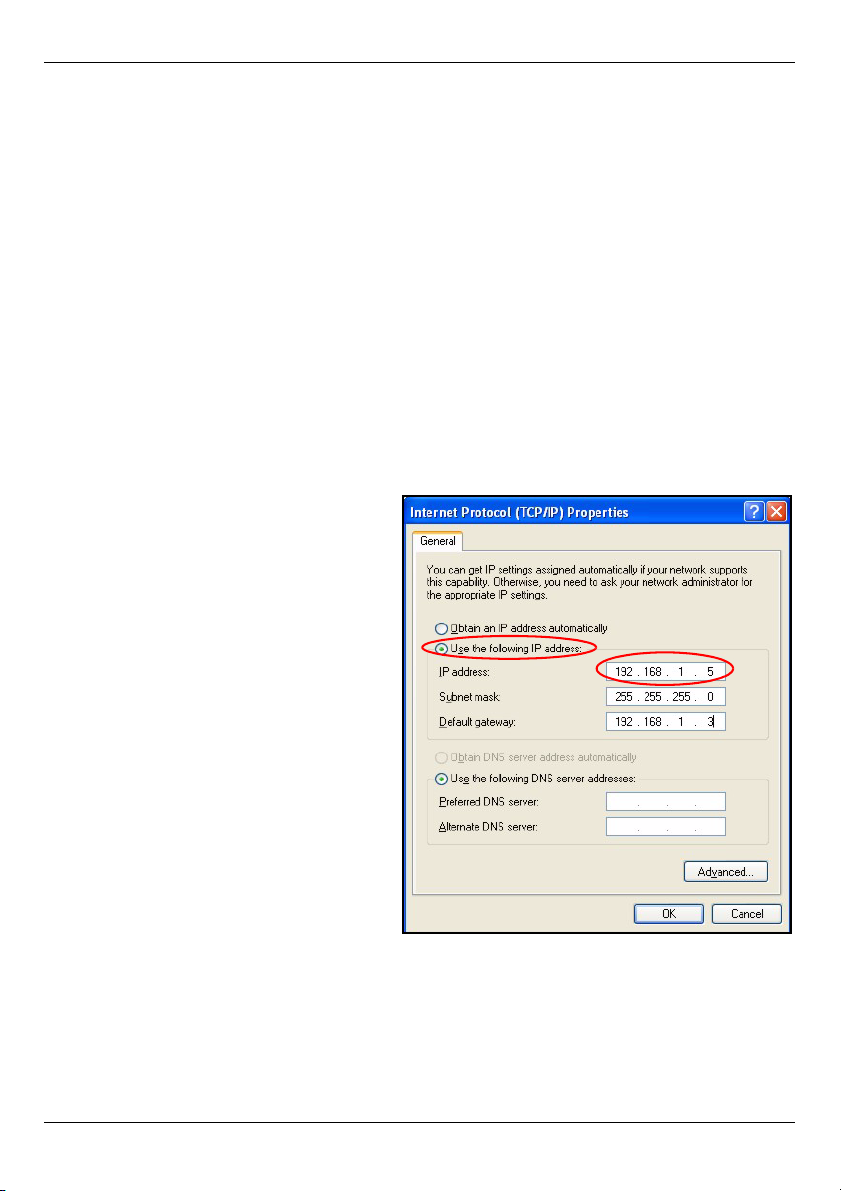
4 Select Internet Protocol (TCP/IP)
(under the General tab in Win XP)
and click Properties.
5 The Internet Protocol TCP/IP
Properties screen opens (the
General tab in Windows XP).
6 Select Use the following IP address
and enter an IP address from
192.168.1.1 to 192.168.1.254
excluding 192.168.1.3 (the NSA) and
any other IP addresses in this range
already being used by a device on
your network.
7 Click OK to close the Internet
Protocol (TCP/IP) Properties
window.
8 Close the Local Area Connection
Properties window and then the
Network Connections screen.
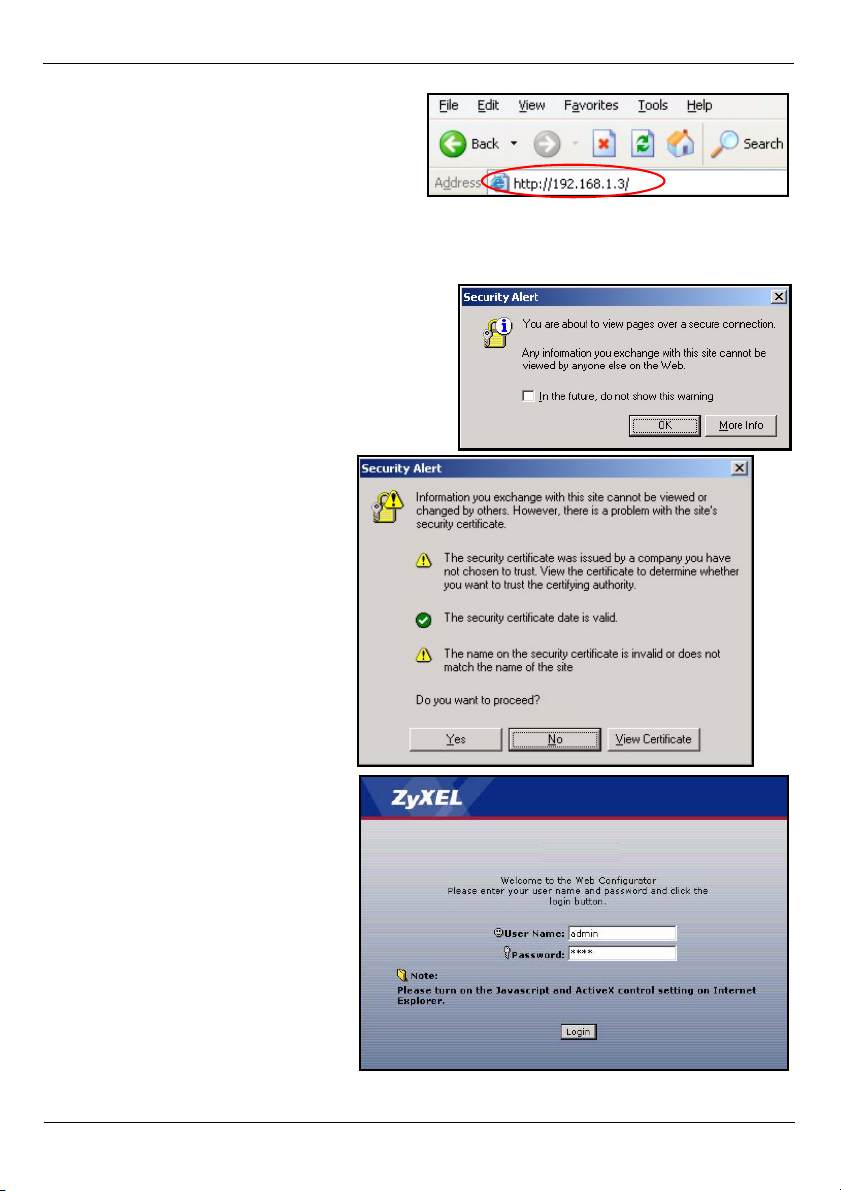
9 Launch your web browser and enter
“192.168.1.3” as the web site address.
4 NSA Wizard Setup
1 Access the NSA using the NDU or web
configurator directly.
2 When you first access the NSA web
configurator, you may see this screen telling
you that this is a secure connection using
HTTPS. Click OK to continue.
ENGLISH
6
Page 8
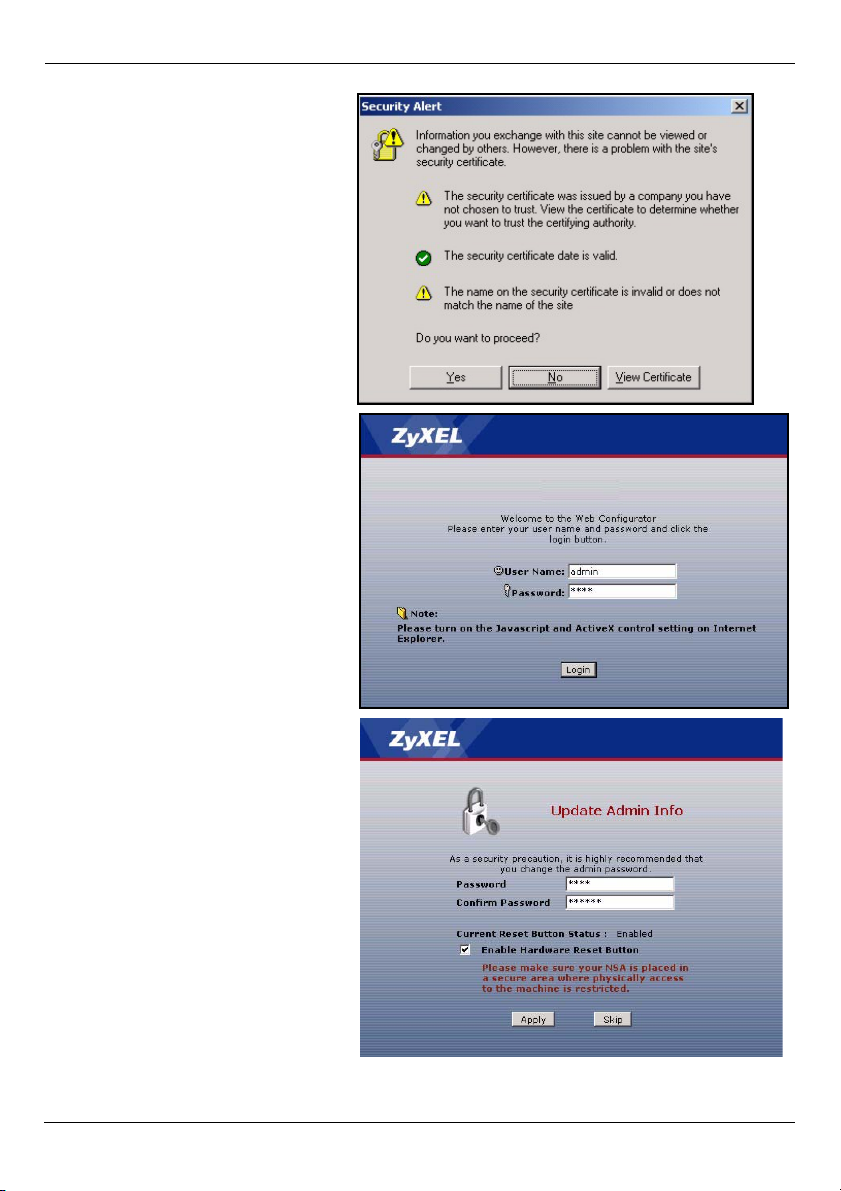
3 The web browser client uses
certificates to authenticate the
NSA. The default NSA
certificate will most likely show a
name and certification authority
mis-match; however encryption
is still performed. Click Yes to
proceed.
4 When you access the NSA web
configurator, the login screen
appears. The default user name
and password are ‘admin’ and
‘1234’ respectively. Click Login.
ENGLISH
5 It is recommended that you
change the default password.
The hardware reset button
allows you to return the device
to the default IP address and the
admin password to 1234 (you
will not lose any data stored).
Click Apply to save your
changes and go to the next
screen or ignore this screen and
click Skip to go to the next
screen.
7
Page 9
ENGLISH
6 The first time you access the
NSA web configurator, you are
prompted to run the setup
wizard. Click Run Setup
Wizard.
4.1 Setup Wizard
Each time you click Next in the
wizard, your settings are saved to
the NSA. Click Back to return to a previous screen in the wizard.
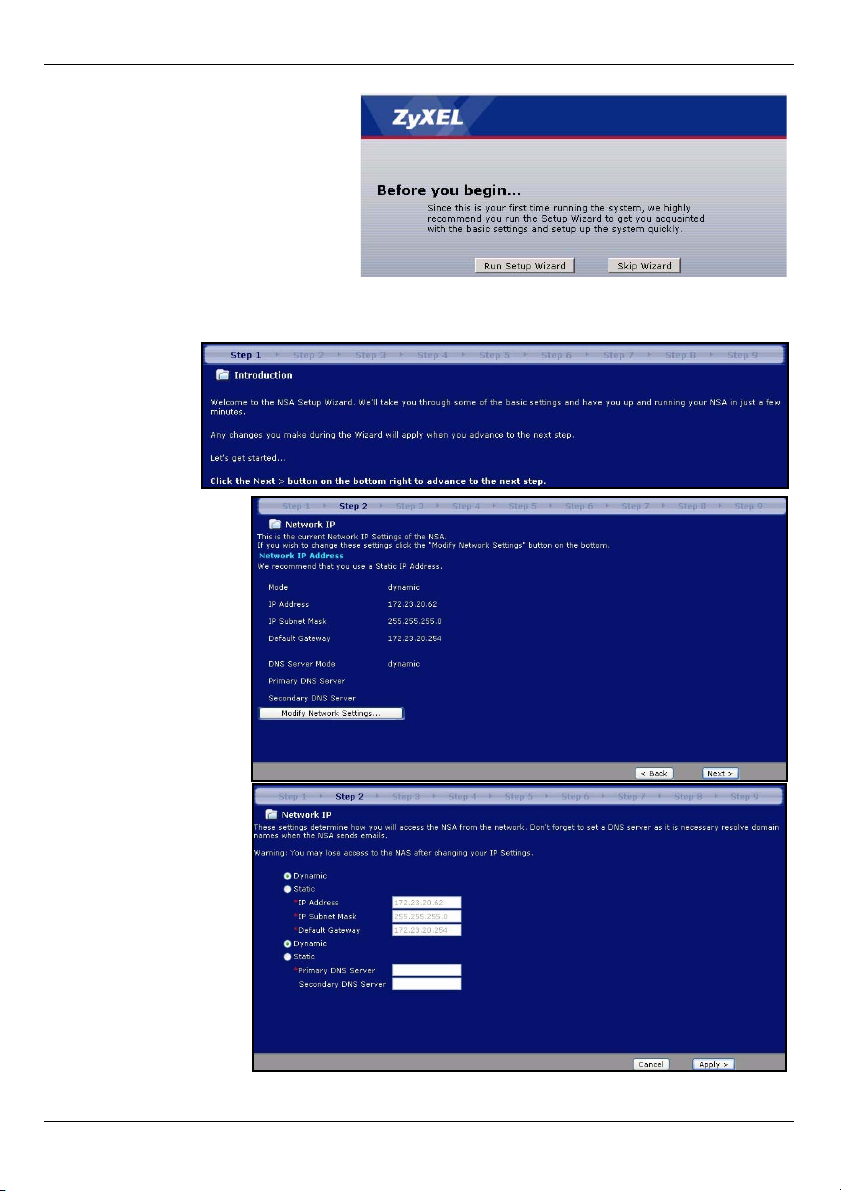
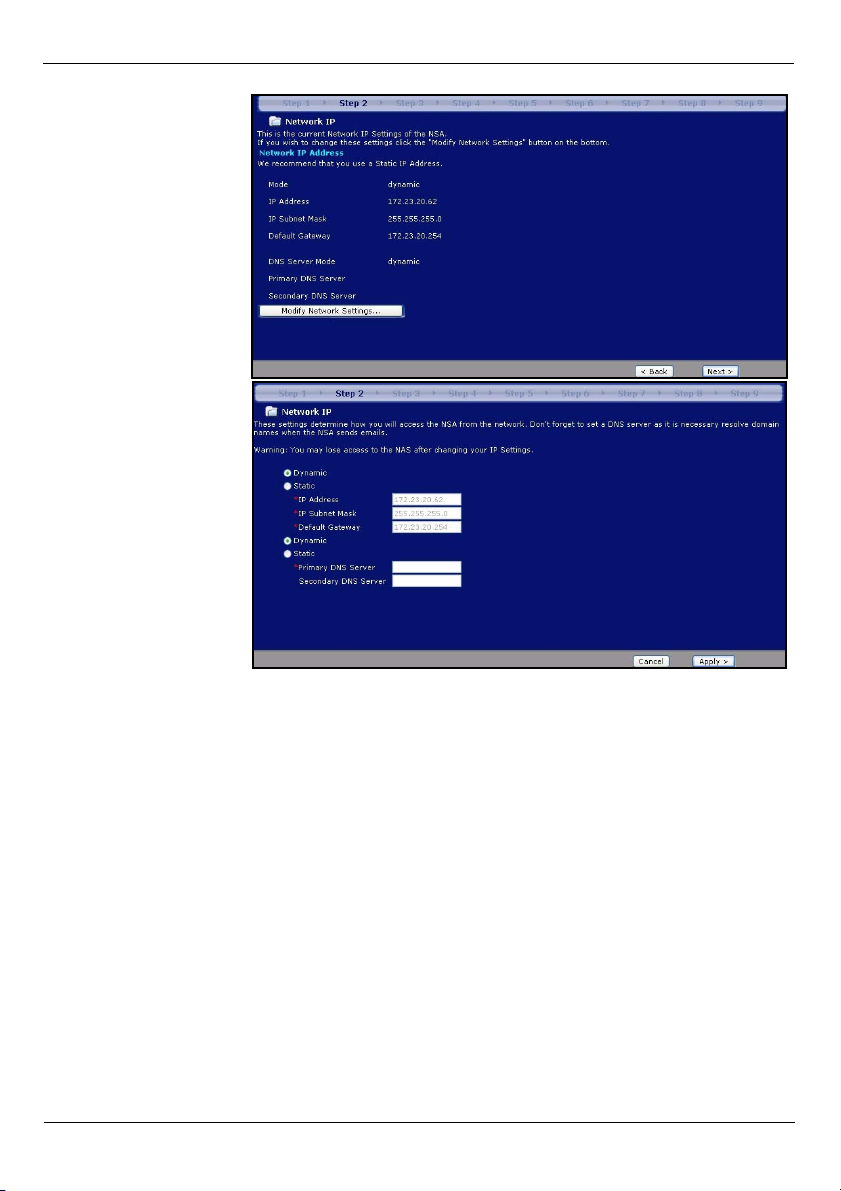
1 Click Next to
begin the
wizard.
2 If you want to
change the
network settings of
the NSA, click
Modify Network
Settings. You can
also do this using
the NDU
(recommended). If
you change the IP
address, then you
will have to use
the new IP
address to access
the web
configurator again.
Click Next to
continue.
8
Page 10

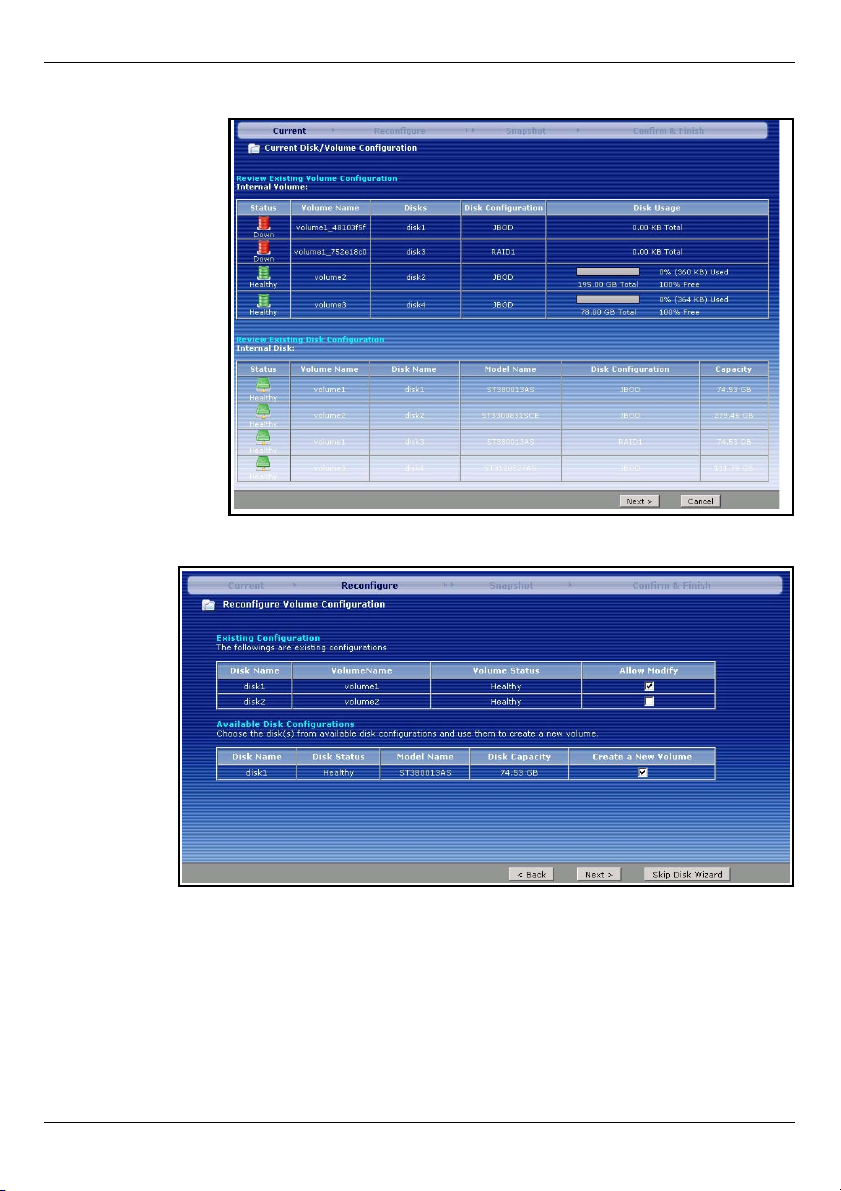
4.1.1 Disk Setup Wizard
3 This screen is the
Disk Setup
Wizard (this
screen can be
accessed
separately from
the main NSA
screen). Skip this
wizard to have
the NSA use the
current or default
volume
configuration.
• If you have
created
volumes
already, the
select
which
(existing)
ones to
modify and
click Next.
ENGLISH
9
Page 11
ENGLISH
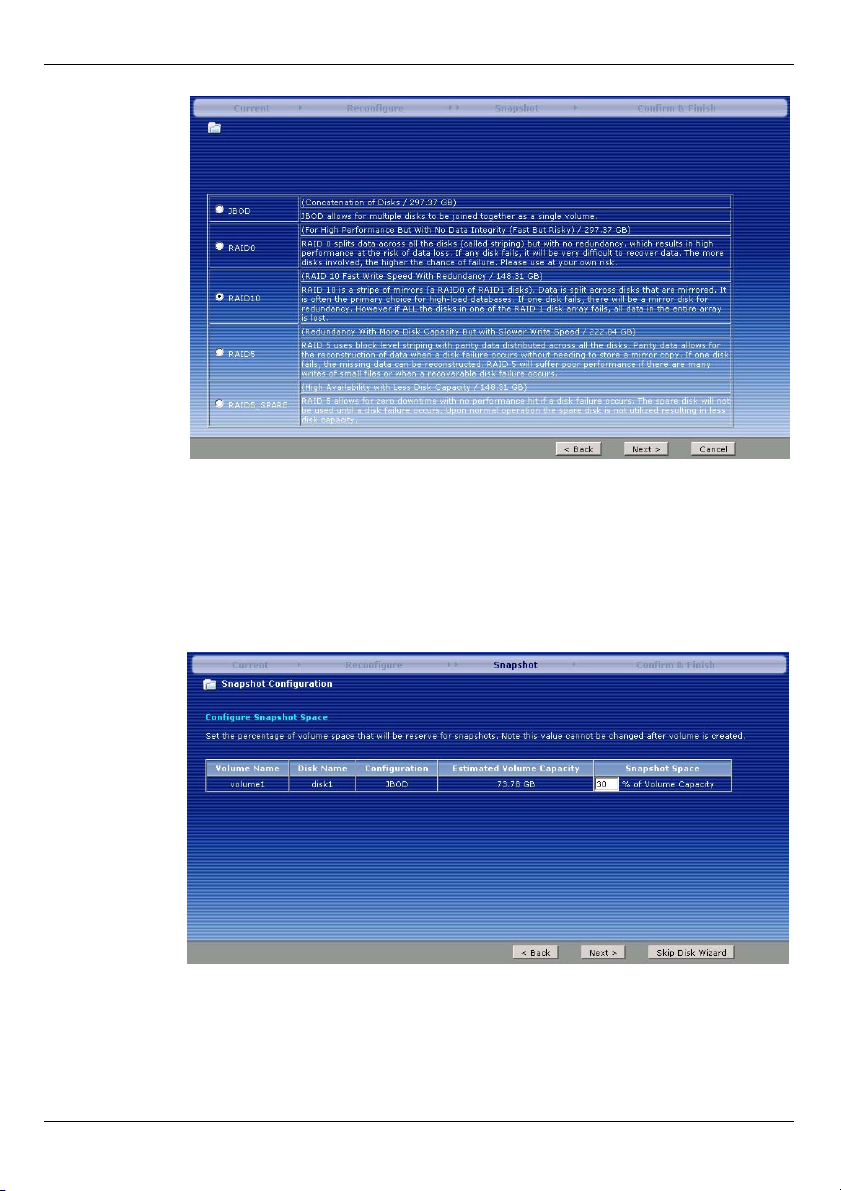
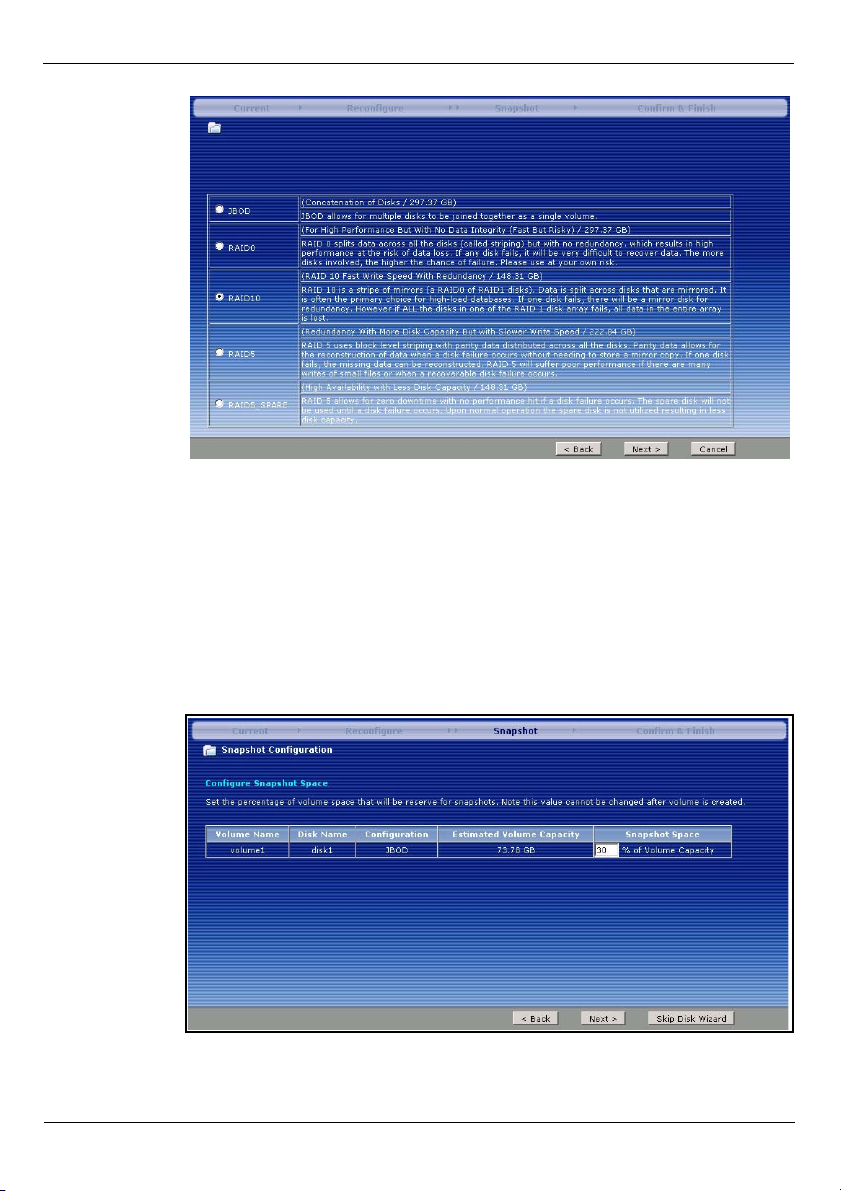
• This screen
shows you
the possible
volume configurations
available
depending
on how
many hard
disks you
have
installed.
You can only
create one
volume in
the wizard.
A recommended
default volume has been chosen for you. Choose RAID0 for best performance but no data
protection in the event that a dsk fails. Choose RAID10 if you have four disks, want good
write performance with data redundancy. Choose RAID1 if you have two or four disks in the
NSA; half the disk space is used for data backup. If you have four disks, you could choose
RAID5 where data parity and striping allow you to recover data even if one disk
fails.Choose RAID5_SPARE to have one disk in the RAID5 volume on permanent standby
in the event that a disk fails.Click Next to continue (without saving anything yet).
• The next
screen asks
you how
much volume space
you want to
reserve for
snapshots.
A snapshot
is a static
picture of
your data
stored in an
NSA volume at a
particular
moment in time.
10
Page 12
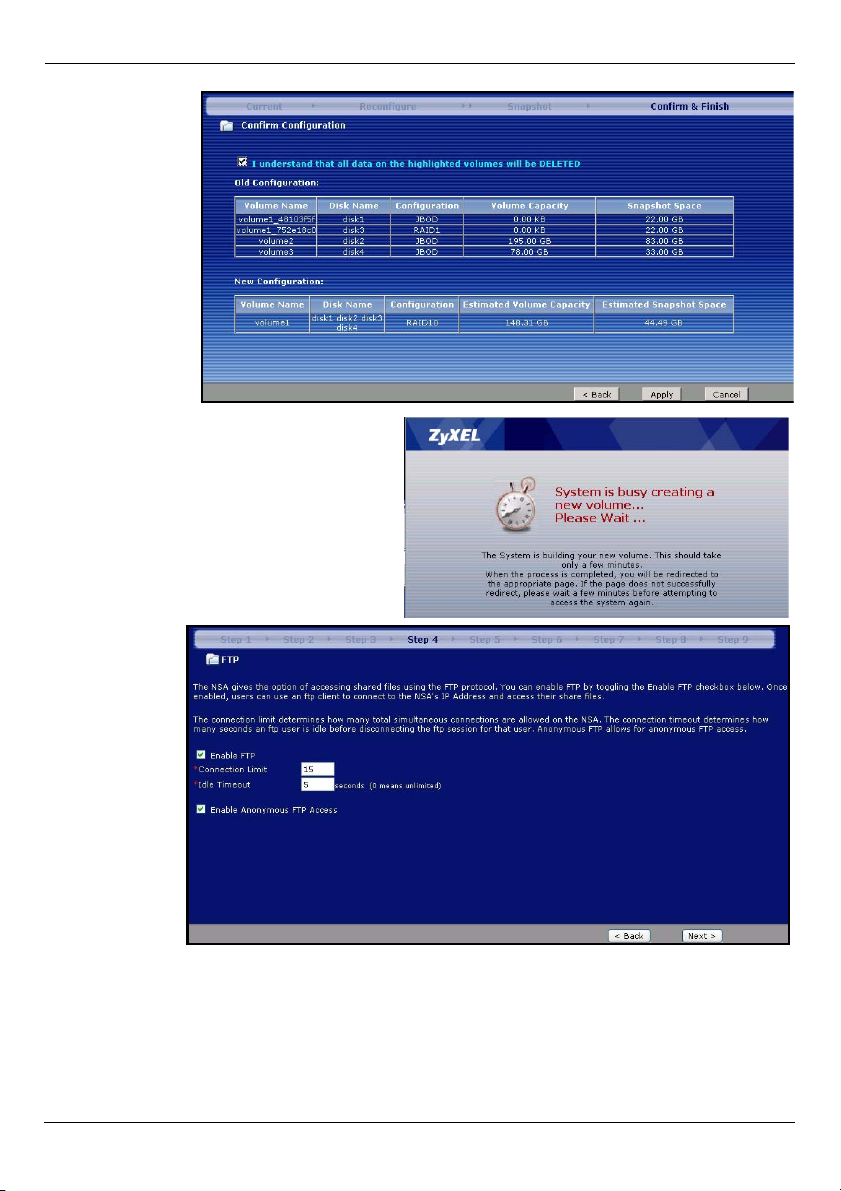
• Disk data is
lost if you
reconfigure a
volume.
Select the I
Understand...
checkbox
and then click
Apply to
save the Disk
Setup Wizard settings.
• A new volume is created. You then return
to the main installation wizard.
4.1.2 Return to Main Wizard
ENGLISH
4 The next
screen
allows you
to enable
FTP on the
NSA. You
can use
FTP and/or
Windows
explorer
(CIFS) to
transfer
files to or
from the
NSA.
Select
Enable Anonymous FTP Access to allow any user to log into the NSA using an ‘FTP’
user name or ‘anonmyous’ without giving a password. If you clear Enable Anonymous
FTP Access then you must create a user account and associated password. Use that
username and password to log into the NSA via FTP.
11
Page 13
ENGLISH
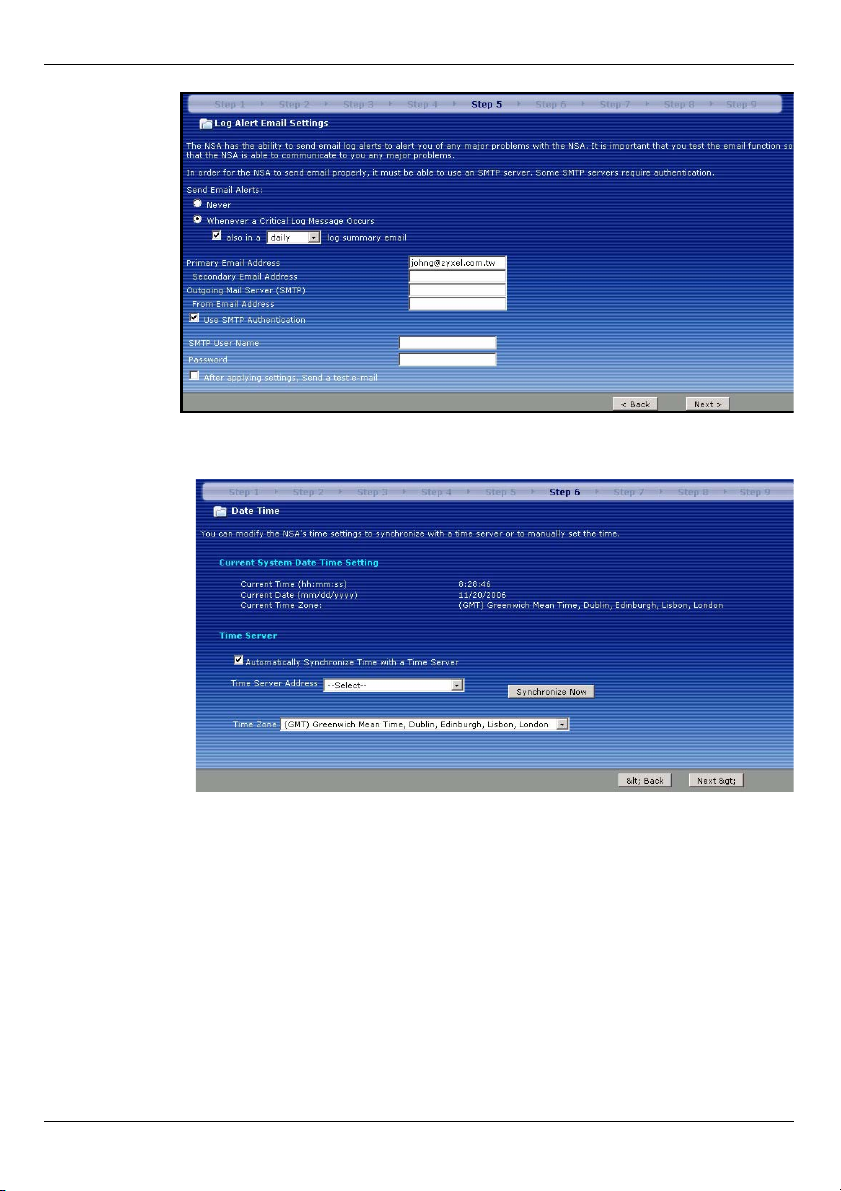
5 You mu s t
configure
e-mail
address(e
s), an email server
and how
often the
NSA
should
send alerts
in this
screen. An
alert is an
event,
such as
hard disk failure, that may require your immediate attention.
6 Select a time
server and a
time zone in
this screen.
The NSA
updates its
date and
time from the
time server.
This time is
used in NSA
log and alert
time stamps.
The NSA
time and
date must be
the same as the time and date on the external domain controller if the NSA is using one
to import users and groups.
12
Page 14
ENGLISH
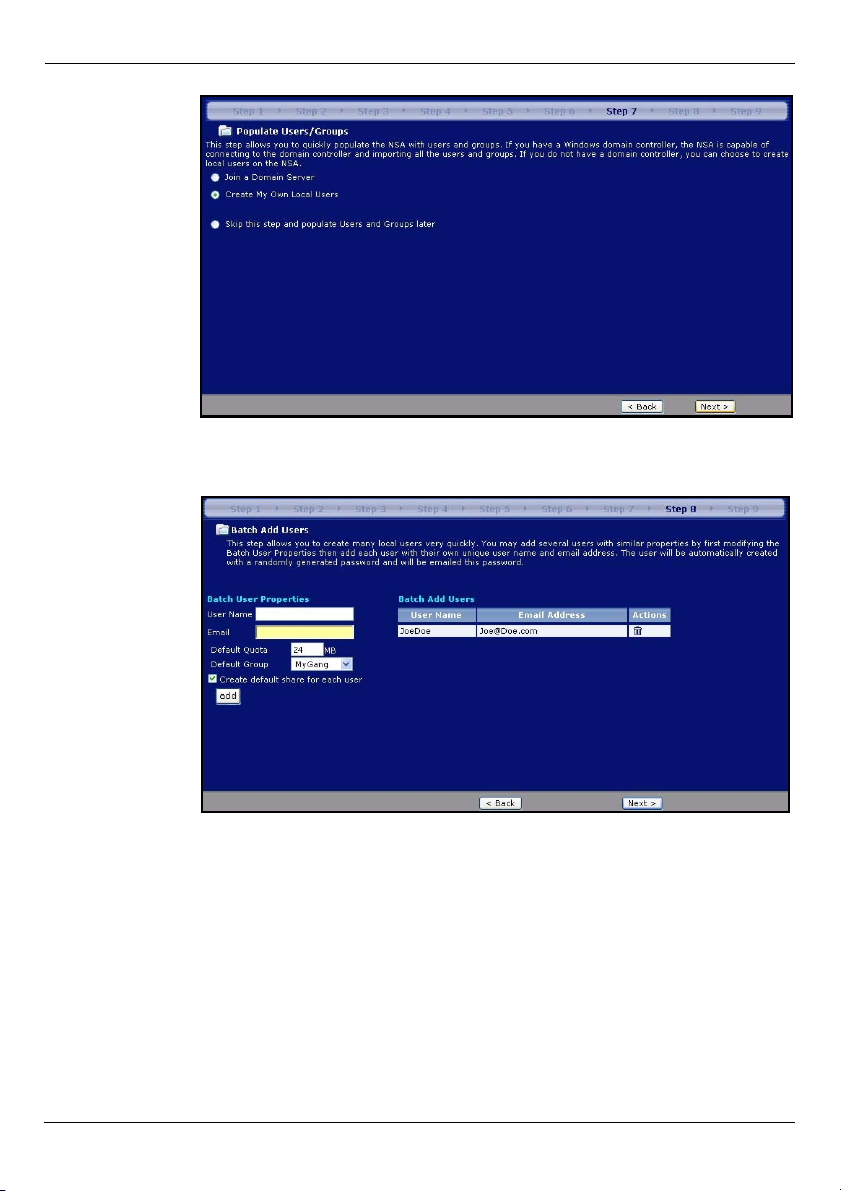
7 Add users
that may
access the
NSA in this
screen. The
NSA can
import users
from an
external
domain
controller or
you can add
users on the
NSA. If you
have an
external
domain controller, select Join a Domain Server. To create users on the NSA, select
Create My Own Local Users.
• Local Users:
Click add to
configure
each new
local user
and then
click Next to
mass create
them all on
the NSA.
Enter a user
name from
one to 32
alphanumeric
characters;
the first character must be alphabetical. See your User Guide for user name details. If you
return to this screen later, you will not see the users you added to the NSA in the screen but
the users have been added to the NSA.
13
Page 15
ENGLISH
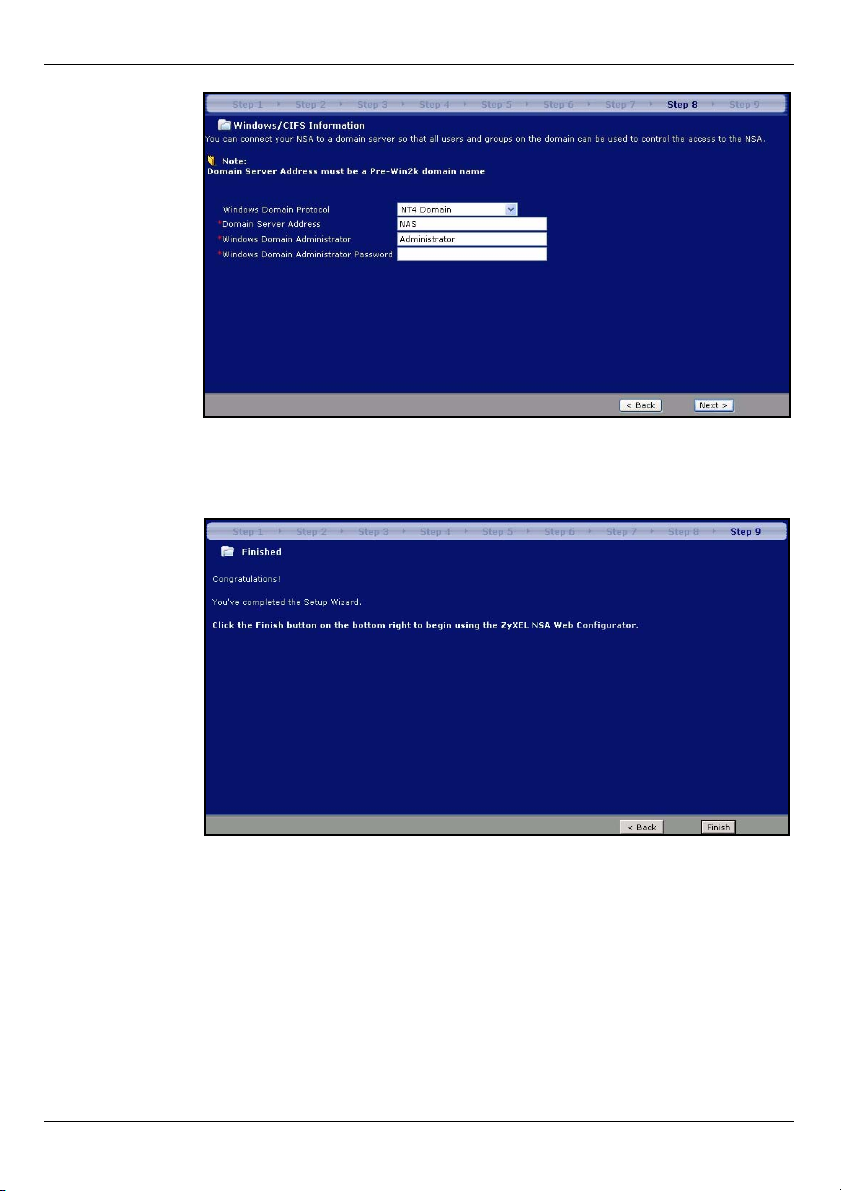
• Domain:
Choose NT4
Domain if
your server
uses a Windows NT
operating
system.
Choose
Active Directory Domain
if it uses a
Windows
2000 or later
operating
system. Type
the IP address of the Windows server domain controller, the Windows domain administrator (Administrator is the default) and an associated password. You can use a domain
name if the server uses an operating system earlier than Windows 2000,
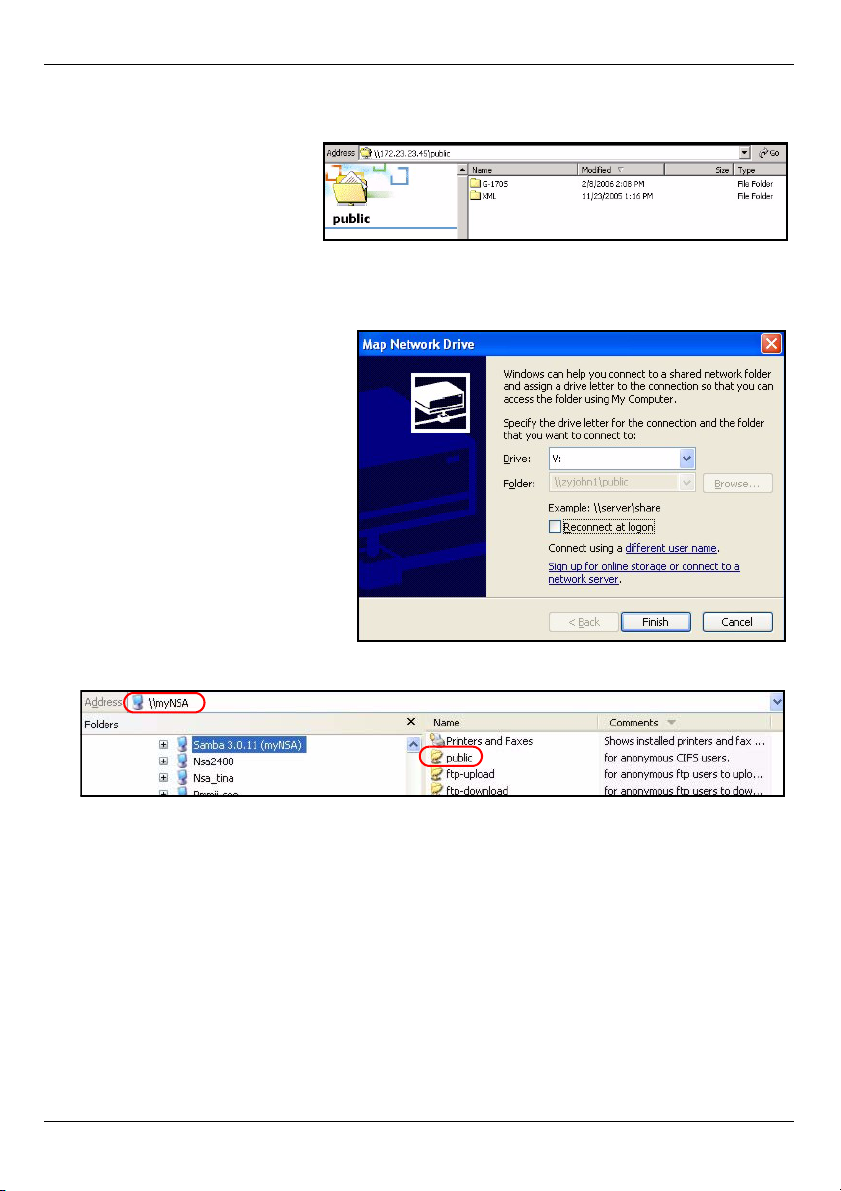
8 Click Finish
for the NSA
to complete
the
configuration.
Restart the
NSA if
prompted.
14
Page 16

ENGLISH
• If you deleted the default volume
and didn’t create another volume,
or you don’t have an internal hard
disk installed, you will see the following Maintenance Mode
screen. In Maintenance Mode,
you MUST create an internal volume.
Note: You must install at least
one hard disk and create
an internal volume before
you can use external USB
hard drive(s) with the NSA.
9 The next time you log into the NSA, you go directly to the Status Overview screen. You
may access the wizard again by clicking on the icon in the top-right of the screen as
shown. Access any of the menus in the navigation panel on the left for more advanced
configuration.
Note: See your User’s Guide for more information on these advanced screens.
15
Page 17
ENGLISH
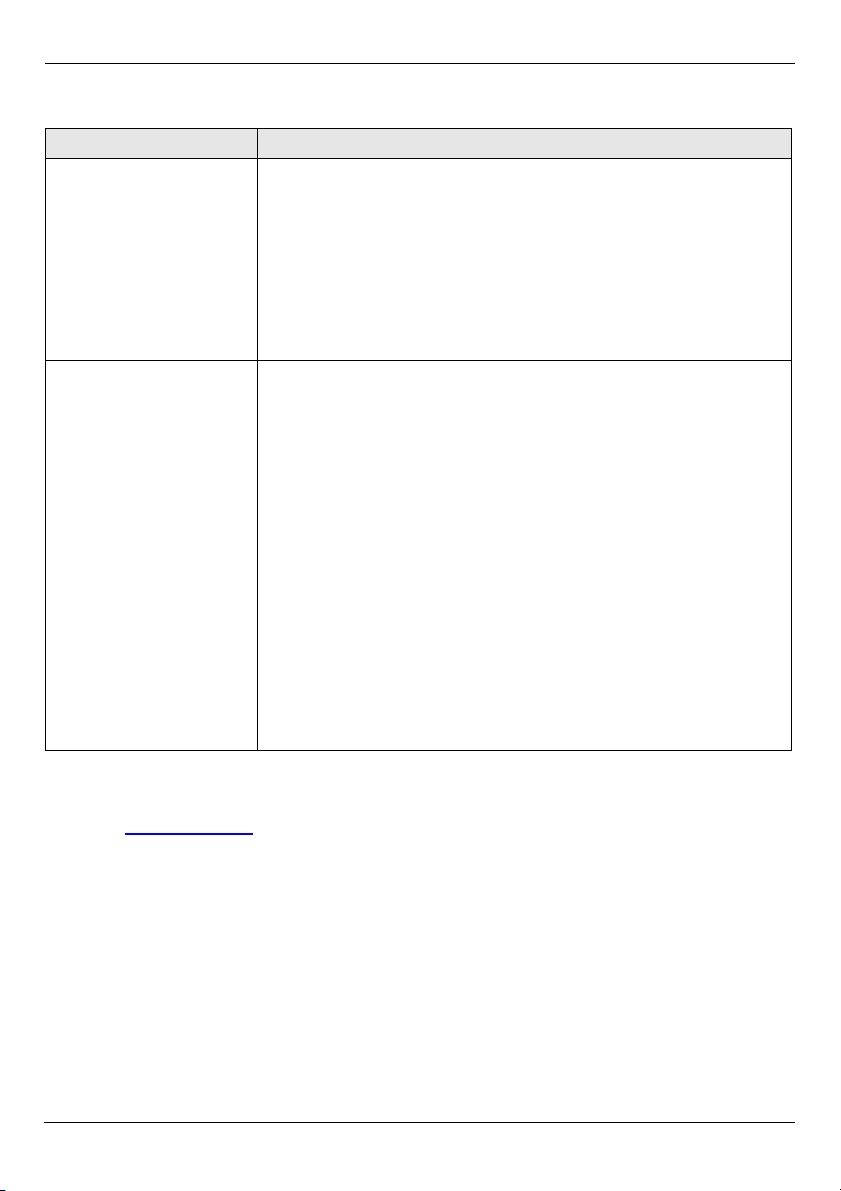
5 Map the NSA to Your Computer Network Drive
Mapping a share (a folder
where you store data) on the
NSA to a Windows network
drive makes it easy for
Windows users to transfer files
to and from the NSA (using
CIFS). Click the MAP icon in the NDU (see section 3.1) to display the NSA public folder in
Windows Explorer.
Click Tools, Map Network Drive.
Select the network drive that you
want to map NSA to from the Drive
list box and browse to the share on
the NSA (Public is the only one
available if you have not created
shares on the NSA yet). You can
then simply drag files from/to your
local computer’s drives to or from
this network folder.
Alternatively (from another
computer that does not have NDU
installed for example), open
Windows Explorer and type two
back slashes followed by the NSA
system name or IP address.
16
Page 18
ENGLISH
6 Troubleshooting
PROBLEM CORRECTIVE ACTION
None of the LEDs turn on
when you connect the
power.
Cannot access the NSA
from my computer.
Make sure that the NSA is turned on.
Check that there are no loose cable connections, that there are no
faulty cables and that Ethernet cable connections do not exceed
100m.
Make sure that you have the power cord connected to an active
power source.
If the LEDs still do not turn on, you may have a hardware problem.
In this case, you should contact your local vendor.
Check the Ethernet cable connection from your network to the
NSA.
If the NSA’s IP address has changed, then enter the new one as
the website address.
Make sure your computer’s IP address is in the same subnet as
the NSA’s IP address (see section 3.2).
Ping the NSA from your computer. Make sure your computer’s
Ethernet adapter is installed and functioning properly. In a
(Windows) computer, click Start, (All) Programs, Accessories
and then Command Prompt. In the Command Prompt window,
type “ping” followed by the NSA’s IP address (192.168.1.3 is the
default) and then press [ENTER].
Use Internet Explorer 6.0 (and later) or Firefox 1.07 (and later) with
JavaScript enabled.
Make sure you enter the user name and password correctly (these
fields are case sensitive).
Viewing Your Product’s Certifications
1 Go to www.zyxel.com.
2 Select your product from the drop-down list box on the ZyXEL home page to go to that
product's page.
3 Select the certification you wish to view from this page.
17
Page 19

ENGLISH
18
Page 20
DEUTSCH
DEUTSCH
Übersicht
Der NSA-2400 ist
ein
Netzwerkspeicher
(NSA), auf den in
kleinen und
mittleren Büros von
mehreren Geräten
aus auf Daten
zugegriffen werden
kann und auf den
Daten gespeichert
werden können.
Diese Anleitung
beschreibt die
folgenden Schritte:
1 Installieren der
Festplatten
2 Anschließen des NSA
3 Zugreifen auf den NSA mit dem NSA Discovery Utility (NDU) oder dem Internetbrowser
4 Einrichten des NSA mit dem Assistenten
5 Abbilden des NSA auf ein Netzwerklaufwerk eines Computers
Hinweis: Eine ausführliche Beschreibung sowie die Spezifikationen finden Sie im
Benutzerhandbuch zum NSA.
Was Sie benötigen
Bevor Sie beginnen, benötigen Sie Folgendes:
•den NSA
• die mitgelieferte CD mit dem NDU (NSA Discovery Utility) und dem Genie Backup Manager
• das Netzkabel und das Netzteil (extern)
• das 8-polige Ethernet-Kabel für Gigabit Ethernet
• bis zu vier mit SATA-1 (Serial Advanced Technology Attachment) kompatible Festplatten
mit 15-poligen SATA-Stromanschlüssen
• einen Schraubendreher für die Installation der Festplatten in den Festplattenschächten
• ein USB-Kabel (optional: Sie benötigen es nur, wenn Sie die Speicherkapazität mit kompatiblen USB-Laufwerken (Version 2) noch erweitern möchten.)
19
Page 21
DEUTSCH
• einen Computer mit installierter Netzwerkkarte (NIC) und TCP/IP
• ein Gerät für den Netzwerkzugriff wie einen Switch oder Hub
1 Installieren der Festplatten
" Die Festplatten dürfen NICHT bei laufendem Gerät angeschlossen und
entfernt werden. Wenn Sie die Festplatte(n) anschließen oder entfernen
möchten, muss der NSA vorher ausgeschaltet werden.
1 Um den NSA zu öffnen, ziehen Sie an der Verriegelungslasche links an der
Frontklappe.
2 Ziehen Sie die Lade 1
heraus, indem Sie den
Riegel herausklappen,
und die Lade an beiden
Seiten festhalten und
herausziehen. Seien
Sie vorsichtig, dass der
Riegel nicht abbricht.
Der Festplattenschacht
1 des NSA ist
gekennzeichnet (oben links).
3 Legen Sie die Lade mit
dem Bedienfeld nach
oben zeigend auf eine
flache Unterlage.
Legen Sie eine
Festplatte mit den
Schraublöchern nach
oben auf dieselbe
Unterlage und
schieben Sie sie in die
Lade hinein. Schrauben Sie sie fest (siehe Abbildung).
20
Page 22

DEUTSCH
4 Schieben Sie die Lade
so weit in den
Festplattenschacht 1
des NSA, bis sie
einrastet, und klappen
Sie den Riegel nach
oben (siehe
Abbildung).
5 Wiederholen Sie die
Schritte 1 bis 3 für alle
anderen Festplatten, die Sie verwenden möchten.
2 Anschließen des NSA
1 Verbinden Sie den Ethernet-Anschluss an der
Rückseite des NSA mit einem Ethernet-Kabel an
einen Hub, Switch oder Router des Netzwerks.
Verwenden Sie für Gigabit-Verbindungen ein 8poliges Ethernet-Kabel.
2 Schließen Sie das eine Ende des Netzkabels an den
Netzanschluss an der Rückseite des NSA und das
andere Ende an das externe Netzteil an. Schließen Sie
das externe Netzteil an eine Netzsteckdose an.
21
Page 23
DEUTSCH
3 Schalten Sie das Gerät ein, indem Sie auf die Ein/Aus-
Taste an der Vorderseite des NSA drücken. An der
Gerätevorderseite befinden sich LED-Anzeigen. Die
PWR-LED beginnt grün zu leuchten. Wenn der NSA
erfolgreich hochgefahren ist, beginnt auch die SYS-LED
grün zu leuchten (das dauert etwa 50 Sekunden). Die
LAN-LED beginnt zu leuchten, wenn der NSA-EthernetAnschluss richtig an das Netzwerk angeschlossen ist.
Sie blinkt, wenn Daten empfangen und versendet
werden.
Hinweis: Um den NSA auszuschalten, drücken Sie nur
einmal auf die Ein/Aus-Taste. Die SYS-LED blinkt
rot, wenn der NSA abschaltet.
3 Zugreifen auf den NSA
Sie können auf zwei Arten auf den NSA zugreifen: mit dem NSA Discovery Utility (NDU),
oder indem Sie die IP-Adresse des NSA direkt in den Internetbrowser eingeben.
3.1 Ermitteln der IP-Adresse des NSA mit dem NDU
Wenn Ihr Netzwerk einen DHCP-Server hat, der dem NSA eine IP-Adresse zuweist, und/
oder wenn Sie mehrere NSAs in Ihrem Netzwerk einsetzen, verwenden Sie auf einem
Windows-Computer das NDU.
Hinweis: Das Programm Genie Backup verwendet denselben Netzwerkanschluss
wie das NDU, um den NSA zu erkennen. Um einen Konflikt am Anschluss zu
vermeiden, sollten Sie das Programm Genie Backup und das NDU nicht
gleichzeitig laufen lassen.
1 Legen Sie die mitgelieferte
CD in das CD-ROM-Laufwerk
ein. Die Installation wird
automatisch gestartet
(Autostart). Klicken Sie auf
das Symbol Setup
(Installation).
22
Page 24
DEUTSCH
2 Der NDU-
Installationsassistent wird
gestartet. Führen Sie die
Anweisungen des
Installationsassistenten aus.
Klicken Sie auf Finish (Fertig
stellen) um die Installation
abzuschließen.
3 Um das NDU zu starten,
klicken Sie bei Windows XP auf Start
(Start),All Programs (Alle Programme),
ZyXEL NSA-2400, ZyXEL NSA-2400
Discovery Utility. Bei den anderen Windows-
Betriebssystemen ist der Vorgang ähnlich.
Wenn Ihr Computer mehr als eine
Netzwerkkarte hat, müssen Sie zuerst eine
Netzwerkkarte auswählen.
4 Im nun erscheinenden NDU-
Hauptfenster werden alle
Hostnamen, IP-Adressen und
der Status aller NSAs im
Netzwerk angezeigt. Klicken
Sie auf das Symbol unter
Admin (Admin), um das
Webkonfiguratorfenster
aufzurufen, das in Abschnitt 4
abgebildet ist. (Wenn Sie die
IP-Adresse des NSA ändern
möchten, klicken Sie auf das
Symbol unter Config
(Konfiguration). Wenn Sie
den NSA auf ein Windows-Netzwerklaufwerk abbilden möchten, klicken Sie auf das
Symbol unter Map (Abbilden) (siehe Abschnitt 5). Um die Bildschirmanzeige zu
aktualisieren, klicken Sie auf Discover (Erkennen))
23
Page 25
DEUTSCH
3.2 Direktzugriff mit dem Internetbrowser
Wenn der NSA die IP-Adresse nicht von einem DHCP-Server erhalten kann, wird die IPStandardadresse des NSA 192.168.1.3. Bevor Sie die IP-Adresse des NSA in den
Internetbrowser eingeben, müssen Sie sicherstellen, dass sich der Computer und der NSA
im selben Subnetz befinden. In diesem Abschnitt wird beschrieben, wie Sie Ihren Windows
NT/2000/XP-Computer einrichten müssen, damit sich seine IP-Adresse im selben Subnetz
befindet wie die des NSA. Eine ausführliche Beschreibung der Konfiguration der IPAdresse bei anderen Betriebssystemen finden Sie im Benutzerhandbuch.
1 Klicken Sie bei Windows XP auf Start (Start), Control Panel (Systemsteuerung).
Klicken Sie bei Windows 2000/NT auf Start (Start), Settings (Einstellungen), Control
Panel (Systemsteuerung).
2 Klicken Sie bei Windows XP auf Network Connections (Netzwerkverbindungen).
Klicken Sie bei Windows 2000/NT auf Network and Dial-up Connections (Netzwerk
und DFÜ-Verbindungen).
3 Klicken Sie mit der rechten Maustaste auf Local Area Connection (LAN-Verbindung)
und dann auf Porperties (Eigenschaften).
4 Wählen Sie Internet Protocol (TCP/
IP) (bei Windows XP auf der
Registerkarte General (Allgemein)
und klicken Sie auf Properties
(Eigenschaften).
5 Auf dem Bildschirm erscheint das
Dialogfeld Internet Protocol TCP/IP
Properties
(Internetprotokolleigenschaften
(TCP/IP)) (bei Windows XP die
Registerkarte Allgemein).
6 Wählen Sie die Option Use the
following IP address (Folgende IPAdresse verwenden) und geben Sie
eine IP-Adresse zwischen
192.168.1.1 und 192.168.1.254
(außer die 192.168.1.3 des NSA) und
alle beliebigen IP-Adressen in diesem
Bereich ein, die von einem Gerät in
Ihrem Netzwerk verwendet werden.
7 Klicken Sie auf OK (OK), um das
Fenster Internet Protocol (TCP/IP) Properties (Internetprotokolleigenschaften (TCP/
IP)) zu schließen.
8 Schließen Sie das Fenster Local Area Connection Properties (Eigenschaften der
lokalen Netzwerkverbindung) und dann das Fenster Network Connections
(Netzwerkverbindungen).
24
Page 26
DEUTSCH
9 Starten Sie Ihren Internetbrowser und
geben Sie als Websiteadresse
“192.168.1.3” ein.
4 Der NSAInstallationsassistent
1 Sie können mit dem NDU oder direkt mit dem Webkonfigurator auf den NSA zugreifen.
2 Wenn Sie das erste Mal auf den NSA-
Webkonfigurator zugreifen, werden Sie
darüber informiert, dass es sich um eine
sichere Verbindung mit HTTPS handelt.
Klicken Sie zum Fortfahren auf OK.
3 Der Client des Internetbrowsers
verwendet für die
Authentifizierung des NSA
Zertifikate. Das NSAStandardzertifikat wird
höchstwahrscheinlich einen
Namen anzeigen, der von der
Zertifizierungsautorität
abweicht. Die Verschlüsselung
wird dennoch ausgeführt.
Klicken Sie zum Fortfahren auf
Yes (Ja).
4 Wenn Sie den NSA-
Webkonfigurator starten,
erscheint zunächst das
Anmeldefenster. Der
Standardbenutzername ist
‘admin’ und das
Standardkennwort ‘1234’.
Klicken Sie auf Login
(Anmelden).
25
Page 27

• Es wird empfohlen, das Standardkennwort zu ändern. Die
Hardware-Reset-Taste dient
dazu, das Gerät auf die IP-Standardadresse und das Administratorkennwort auf 1234
zurückzusetzen (die gespeicherten Daten gehen dabei
nicht verloren). Klicken Sie auf
Apply (Übernehmen), um die
Änderungen zu speichern und
zum nächsten Fenster zu gehen,
oder überspringen Sie dieses
Fenster, indem Sie auf Skip
(Überspringen) klicken.
5 Wenn Sie das erste Mal den
NSA-Webkonfigurator aufrufen,
müssen Sie den
Installationsassistenten starten.
Klicken Sie auf Run Setup
Wizard
(Installationsassistenten
starten).
DEUTSCH
4.1 Setup Wizard (Installationsassistent)
Sobald Sie im Assistenten auf Next (Weiter) klicken, werden die Einstellungen im NSA
gespeichert. Wenn Sie auf Back (Zurück) klicken, kehren Sie zum vorhergehenden
Fenster des Assistenten zurück.
1 Klicken Sie auf
Next (Weiter), um
den Assistenten zu
starten.
26
Page 28
2 Wenn Sie die
Netzwerkeinstellun
gen des NSA
ändern möchten,
klicken Sie auf
Modify Network
Settings
(Netzwerkeinstellungen ändern).
Dasselbe können
Sie auch mit dem
NDU tun
(empfohlen).
Wenn Sie die IPAdresse ändern,
müssen Sie beim
nächsten Zugriff
auf den
Webkonfigurator
die neue IPAdresse
verwenden.
Klicken Sie zum
Fortfahren auf
Next (Weiter).
DEUTSCH
27
Page 29
DEUTSCH
4.1.1 Disk Setup Wizard (Disk-Installationsassistent)
3 Dieses Fenster
ist der Disk
Setup Wizard
(DiskInstallationsassistent) (dieses
Fenster kann
unabhängig vom
NSA-Fenster
geöffnet
werden).
Überspringen
Sie diesen
Assistenten,
wenn der NSA
die aktuelle oder
die
Standardkonfigur
ation für
Volumes verwenden soll.
• Wenn Sie
bereits Volumen
erstellt
haben,
wählen Sie
das aus,
das Sie
ändern
möchten,
und klicken
Sie auf
Next
(Weiter).
28
Page 30
DEUTSCH
• In diesem
Fenster werden die
entsprechend der
Anzahl der
installierten
Festplatten
verfügbaren
Volumenkonfigurationen
angezeigt.
Mit dem
Assistenten
kann nur ein
Volumen
erstellt werden. Für Sie wurde ein empfohlenes Standardvolumen gewählt.Wählen Sie RAID0 für eine
optimale Leistung, wobei aber im Fall eines Diskfehlers die Daten nicht gesichert sind.
Wählen Sie RAID10, wenn Sie vier Disks haben und eine gute Schreibleistung mit
Datenredundanz benötigen. Wählen Sie RAID 1, wenn sich zwei oder vier Festplatten im
NSA befinden. Die Hälfte des Speicherplatzes wird für die Datensicherung verwendet.
Wenn Sie vier Laufwerke haben, können Sie RAID 5 wählen, da Sie durch Datenparität
und Striping auch dann Daten wieder-herstellen können, wenn eine Festplatte nicht funktioniert. Wählen Sie RAID5_SPARE, damit eine Disc im RAID5-Volumen beim Ausfall einer
Disk dauerhaft im Standby ist.Klicken Sie zum Fortfahren auf Next (Weiter) (ohne etwas
zu speichern).
•Im nächsten Fenster
müssen Sie
festlegen,
wie viel Volumen-Speicherplatz
für Snapshots
reserviert
werden soll.
Ein Snapshot ist ein
statisches
Bild der
Daten, die
sich zu einem bestimmten Zeitpunkt auf einem NSA-Volumen befinden.
29
Page 31

DEUTSCH
• Die Daten der
Festplatte
gehen verloren, wenn
Sie ein Volume neu
konfigurieren. Markieren Sie das
Kontrollfeld
bei I Under-
stand..., und
klicken Sie
dann auf
Apply
(Übernehmen), um die Einstellungen des Disk Setup Wizard (Disk-Installationsassistent) zu
speichern. Jetzt kehren Sie zum Hauptinstallationsassistenten zurück.
4.1.2 Zurückkehren zum Hauptassistenten
4 Im
nächsten
Fenster
können Sie
am NSA
die Option
FTP
aktivieren.
Sie können
mit FTP
und/oder
dem
WindowsExplorer
(CIFS)
Dateien auf
den und vom NSA übertragen. Wenn Sie Enable Anonymous FTP Access (Anonymen
FTP-Zugriff aktivieren), kann sich jeder Benutzer ohne die Eingabe eines Kennworts mit
einem ‘FTP’-Benutzernamen oder ‘anonym’ beim NSA anmelden. Wenn Sie die
Markierung bei Enable Anonymous FTP Access (Anonymen FTP-Zugriff aktivieren)
entfernen, müssen Sie ein Benutzerkonto mit dazugehörigem Kennwort einrichten. Mit
diesem Benutzernamen und Kennwort können Sie sich dann mit der FTP-Funktion
beim NSA anmelden.
30
Page 32

DEUTSCH
5 In diesem
Fenster
müssen
Sie EMailAdressen,
einen EMailServer
und die
Anzahl der
Warnunggen
festlegen,
die der
NSA
senden soll. Eine Warnung erfolgt bei Ereignissen wie Festplattenfehlern, die eine
sofortige Beachtung erfordern.
6 Wählen Sie
in diesem
Fenster einen
Zeitserver
und eine
Zeitzone. Der
NSA
aktualisiert
sein Datum
und die
Uhrzeit über
den
Zeitserver.
Diese Zeit
wird in den
NSAProtokollen und -Warnungen verwendet. Die Uhrzeit und das Datum des NSA müssen
mit der Uhrzeit und dem Datum des externen Domain-Controllers übereinstimmen,
wenn der NSA einen zum Importieren von Benutzern und Gruppen verwendet.
31
Page 33

DEUTSCH
7 In diesem
Fenster
können Sie
die Benutzer
festlegen,
die Zugriff
auf den NSA
haben
dürfen. Der
NSA kann
Benutzer
von externen
DomainControllern
importieren,
aber Sie
können auch selbst Benutzer hinzufügen. Wenn Sie einen externen Domain-Controller
haben, wählen Sie Join a Domain Server (Verbindung zu einem Domain-Server
herstellen). Um einen Benutzer zum NSA hinzuzufügen, wählen Sie Create My Own
Local Users (Eigene lokale Benutzer erstellen).
• Local Users
(Lokale
Benutzer):
Klicken Sie
auf add (hin-
zufügen),
um jeden
neuen
lokalen
Benutzer zu
konfigurieren, und
klicken Sie
dann auf
Next
(Weiter), um
diese alle gleichzeitig auf dem NSA zu erstellen. Geben Sie einen Benutzernamen ein.
Er kann aus 1 bis 32 alphanumerischen Zeichen bestehen, wobei das erste Zeichen ein
Buchstabe sein muss. Hinweise zum Benutzernamen finden Sie im Benutzerhandbuch.
Wenn Sie später zu diesem Fenster zurückkehren, werden die Benutzer, die Sie hier hinzugefügt haben, nicht angezeigt. Sie wurden jedoch zum NSA hinzugefügt.
32
Page 34

DEUTSCH
• Domain
(Domain):
Wählen Sie
NT4 Domain
(NT4
Domain),
wenn Ihr
Server als
Betriebssystem Windows
NT verwendet. Wählen
Sie Active
Directory
Domain
(Active
Directory Domain), wenn er mit Windows 2000 oder einem neueren Betriebssystem
arbeitet. Geben Sie die IP-Adresse des Server-Domaincontrollers von Windows, den Windows-Domainadministrator (Standard ist Administrator) und das dazugehörige Kennwort
ein. Sie können einen Domainnamen verwenden, wenn der Server ein Betriebssystem verwendet, dass älter ist als Windows 2000.
8 Klicken Sie
für den NSA
auf Finish
(Fertig
stellen), um
die
Konfiguration
abzuschließen. Starten
Sie den NSA
neu, wenn
Sie dazu
aufgefordert
werden.
33
Page 35

DEUTSCH
• Wenn Sie das Standard-Volume
gelöscht und kein anderes erstellt
haben, oder wenn keine interne
Festplatte installiert ist, erscheint
das Fens-ter Maintenance Mode
(Wartungsmodus). Im Maintenance Mode (Wartungsmodus)
MÜSSEN Sie ein internes Volume erzeugen.
Hinweis: Sie müssen
mindestens eine Festplatte
installieren und ein
internes Volume erstellen, damit Sie mit dem NSA externe USB-Festplatten
verwenden können.
9 Wenn Sie sich das nächste Mal beim NSA anmelden, gelangen Sie direkt zum Fenster
Status Overview (Statusübersicht). Sie können den Assistenten wieder aufrufen,
indem Sie auf das Symbol in der rechten oberen Ecke des Bildschirms klicken (siehe
Abbildung). Für eine erweiterte Konfiguration können Sie im Navigationsfeld die Menüs
auf der linken Seite aufrufen.
Hinweis: Weitere Informationen zur erweiterten Konfiguration finden Sie im
Benutzerhandbuch.
34
Page 36

DEUTSCH
5 Abbilden des NSA auf das Computerlaufwerk
Durch die Möglichkeit, einen
Share-Ordner (einen Ordner, in
dem Daten gespeichert
werden) im NSA auf ein
Windows-Netzwerklaufwerk
abzubilden, wird das
Übertragen von Dateien für Windows-Benutzer von und zum NSA (mit CIFS) sehr
vereinfacht. Klicken Sie im NDU auf das Symbol MAP (Übertragen) (siehe Abschnitt 3.1),
um den offenen NSA-Ordner im Windows Explorer anzuzeigen.
Klicken Sie auf Tools (Extras),
Map Network Drive
(Netzwerklaufwerk abbilden).
Wählen Sie aus dem Listenfeld
Drive (Laufwerk) das
Netzwerklaufwerk aus, auf das der
NSA abgebildet werden soll, und
suchen Sie den Share auf dem
NSA (wenn Sie auf dem NSA noch
keine Shares erzeugt haben, ist
Public (Offen) die einzig
verfügbare Option). Ziehen Sie
dann die Dateien von/zu den
lokalen Laufwerken des Computers
zu oder von diesem
Netzwerkordner.
Sie können auch (z. B. auf einem anderen Computer, auf dem das NDU nicht installiert ist)
den Windows Explorer öffnen und dort zwei linksseitige Schrägstriche und den NSASystemnamen oder die IP-Adresse eingeben.
35
Page 37

DEUTSCH
6 Problembeseitigung
PROBLEM LÖSUNGSMÖGLICHKEIT
Beim Einschalten des
Geräts leuchtet keine der
LED-Anzeigen.
Ich kann von meinem
Computer aus nicht auf
den NSA zugreifen.
Stellen Sie sicher, dass der NSA eingeschaltet wurde.
Stellen Sie sicher, dass alle Kabel richtig angeschlossen sind,
dass die Kabel in Ordnung sind und dass die EthernetKabelverbindungen 100 m nicht überschreiten.
Stellen Sie sicher, dass die verwendete Netzsteckdose
funktioniert.
Wenn die LED-Anzeigen auch dann nicht leuchten, besteht
möglicherweise ein Problem mit der Hardware. In diesem Fall
sollten Sie sich an Ihren Händler wenden.
Prüfen Sie die Ethernet-Kabelverbindung vom Netzwerk zum
NSA.
Wenn sich die IP-Adresse des NSA geändert hat, geben Sie die
neue IP-Adresse als Website-Adresse ein.
Stellen Sie sicher, dass sich die IP-Adresse des Computers im
selben Subnetz wie die des NSA befindet (siehe Abschnitt
Abschnitt 3.2).
Versuchen Sie den NSA mit einem Ping von Ihrem Computer aus
zu erreichen. Stellen Sie sicher, dass der Ethernet-Adapter des
Computers angeschlossen ist und richtig funktioniert. Klicken Sie
am Computer (Windows) auf Start (Start),All Programs (Alle
Programme), Accessories (Zubehör) und dann Command
Prompt (Eingabeaufforderung). Geben Sie im Fenster
Eingabeaufforderung "ping" gefolgt von der LAN-IP-Adresse
des NSA ein (192.168.1.3 ist die Standardadresse) und drücken
Sie dann auf [ENTER].
Verwenden Sie Internet Explorer 6.0 (und neuere Versionen)
oder Firefox 1.07 (und neuere Versionen) mit aktiviertem
JavaScript.
Achten Sie darauf, dass Sie den Benutzernamen und das
Kennwort richtig eingeben (achten Sie auf Klein- und
Großbuchstaben).
Ansehen der Produktzertifizierungen
1 Besuchen Sie www.zyxel.com.
2 Wählen Sie Ihr Produkt aus der Drop-down-Liste in dem Feld auf der ZyXEL
Homepage und gehen Sie auf diese Produktseite.
3 Wählen Sie auf dieser die Zertifizierung aus, die angezeigt werden soll.
36
Page 38

FRANÇAIS
FRANÇAIS
Présentation
Le NSA-2400 (le
NSA) est un
périphérique de
stockage pour
partage de fichiers,
sauvegarde de
données et
protection de
données pour les
petites entreprises
(à domicile) et/ou
entreprises de taille
moyenne.
Ce guide vous
indique comment :
1 Installer les
disques durs
2 Effectuer les connexions du NSA
3 Accéder au NSA à l'aide de NDU (NSA Discovery Utility) ou de votre navigateur web
4 Installer le NSA à l'aide de l'assistant
5 Mapper le NSA à un lecteur de réseau à partir d'un ordinateur
Remarque: Voir le guide de l'utilisateur pour plus de détails et les spécifications
concernant le NSA.
Configuration requise
Vous aurez besoin des éléments suivants pour démarrer :
•NSA
• Le CD inclus contenant le NDU (NSA Discovery Utility) et Genie Backup Manager
• Cordon d'alimentation et alimentation (externe)
• Câble Ethernet à 8 fils pour Gigabit Ethernet
• Jusqu'à quatre disques durs compatibles SATA-1 (Serial Advanced Technology Attachment) avec connecteurs d'alimentation SATA 15 broches
• Tournevis pour installer les disques durs dans les tiroirs de disque
• Câble USB (optionnel: ces éléments sont nécessaire seulement si vous voulez augmenter
la capacité de stockage en connectant des lecteurs USB compatibles (version 2))
37
Page 39

FRANÇAIS
• Ordinateur avec carte d'interface réseau (NIC) et TCP/IP installé
• Périphérique d'accès réseau tel qu'un commutateur ou un hub.
1 Installer les disques durs
Remarque: Les disques durs NE SONT PAS échangeables à chaud. Le NSA doit
être éteint avant de retirer ou d'installer le(s) disque(s) dur(s).
1 Tirez sur l'onglet à gauche de la porte avant du NSA pour l'ouvrir.
2 Tirez le taquet vers
l'extérieur et saisissez
les côtés du tiroir pour
retirer le tiroir de
disque 1. Faites
attention à ne pas
briser le taquet. La
baie de disque 1 porte
une étiquette sur votre
NSA (la baie
supérieure gauche).
3 Placez le tiroir du
disque sur une surface
plane avec le panneau
dirigé vers le haut.
Placez un disque dur
avec les trous de vis
dirigés vers le haut sur
la même surface et
faites-le coulisser à
l'intérieur du tiroir du
disque. Fixez-le avec les vis comme indiqué.
4 Repoussez le sommet
du tiroir à l'intérieur de
la baie du disque 1
jusqu'à ce qu'il se
mette en place avec un
déclic et poussez le
taquet vers le haut
comme indiqué.
5 Répétez les étapes 1 à
3 pour les autres
disques durs que vous voudriez installer.
38
Page 40

FRANÇAIS
2 Effectuer les connexions du NSA
1 Connectez le port Ethernet au dos du NSA à un hub,
commutateur, ou routeur sur votre réseau à l'aide d'un
câble Ethernet. Utilisez un câble Ethernet à 8 fils pour
les connexions Gigabit.
2 Connectez une extrémité du cordon d'alimentation à la
prise d'alimentation située au dos du NSA et l'autre
extrémité à l'alimentation externe. Connectez
l'alimentation externe à une prise de courant.
3 Mettez sous tension en appuyant sur le bouton
d'alimentation situé sur la façade du NSA. Observez les
voyants en façade. Le voyant PWR s'allume en vert. Le
voyant SYS s'allume en vert une fois que le NSA a
démarré (cela prend environ 50 secondes). Le voyant
LAN s'allume si le port Ethernet du NSA est
correctement connecté à votre réseau. Il clignote lors de
la transmission ou de la réception de données.
Remarque: Pour éteindre le NSA, appuyez une seule
fois sur le bouton d'alimentation. Le voyant SYS
clignote en rouge indiquant que le NSA est en
cours de fermeture.
3 Accéder au NSA
Vous pouvez accéder au NSA de l’une des deux manières suivantes : à l'aide de NDU
(NSA Discovery Utility) ou directement en entrant l'adresse IP du NSA dans votre
navigateur web.
39
Page 41

FRANÇAIS
3.1 Utilisez le NDU pour découvrir l'adresse IP du NSA
Utilisez le NDU (NSA Discovery Utility) sur un ordinateur utilisant Windows si votre réseau
possède un serveur DHCP qui attribuera une adresse IP au NSA et/ou si vous avez
plusieurs NSA sur votre réseau.
" Le programme Genie Backup utilise pour reconnaître le NSA le même port
réseau que le NDU pour découvrir le NSA. Pour éviter les conflits de port,
ne lancez pas le Genie Backup en même temps que le NDU.
1 Insérez le CD inclus dans
votre lecteur de CD-ROM.
L'écran suivant devrait
s'afficher automatiquement
(exécution automatique).
Cliquez sur l'icône Setup (
Installation).
2 L'assistant d'installation du
NDU démarre. Suivez les
instructions de l'installateur.
Cliquez sur Finish (Terminer)
pour terminer l'installation.
40
Page 42

FRANÇAIS
3 Dans Windows XP, cliquez sur start
(Démarrer), All Programs (Tous les
programmes), ZyXEL NSA-2400, ZyXEL
NSA-2400 Discovery Utility pour lancer le
NDU. Pour les autres systèmes
d'exploitations Windows, les procédures
seront similaires. Si votre ordinateur est
équipé de plusieurs cartes réseau, vous
serez d'abord invité à sélectionner une carte
d'interface réseau.
4 L'écran principal de NDU
apparaît affichant la liste de
tous les noms de réseau, les
adresses IP et l'état de tous
les NSA dans votre réseau.
Cliquez sur l'icône sous
Admin pour voir l'écran du
configurateur web principal
comme indiqué dans la
Section 4. (Si vous voulez
changer l'adresse IP du NSA,
cliquez sous l'icône sous
Config. Si vous voulez
mapper le NSA à un lecteur
de réseau Windows, cliquez sur l'icône sous Map (Mappe) (voir la Section 5). Pour
actualiser l'écran, cliquez sur Discover (Découvrir).)
3.2 Accès direct via le navigateur web
Si le NSA n'obtient pas d'adresse IP d'un serveur DHCP, alors l'adresse IP par défaut du
NSA sera restaurée à 192.168.1.3. Avant d'entrer directement l'adresse IP du NSA dans
votre navigateur web, vous devez vous assurer que votre ordinateur et le NSA sont dans le
même sous-réseau. Cette section vous montre comment paramétrer votre ordinateur
Windows NT/2000/XP pour obtenir une adresse IP dans le même masque de sous réseau
que le NSA. Reportez-vous à votre guide de l'utilisateur pour la configuration détaillée de
l'adresse IP pour les autres systèmes d'exploitation.
1 Dans Windows XP, cliquez sur Start (Démarrer), Control Panel (Panneau de
configuration). Dans Windows 2000/NT, cliquez sur Start (Démarrer), Settings
(Paramètres), Control Panel (Panneau de configuration).
2 Dans Windows XP, cliquez sur Network Connections (Connexions réseau). Dans
Windows 2000/NT, cliquez sur Network and Dial-up Connections (Connexions
réseau et accès à distance).
3 Cliquez avec le bouton droit de la souris sur Local Area Connection (Connexion de
réseau local) et cliquez sur Properties (Propriétés).
41
Page 43

FRANÇAIS
4 Sélectionnez Internet Protocol
(Protocole Internet) (TCP/IP) (dans
l'onglet General (Général) dans
Windows XP) et cliquez sur
Properties (Propriétés).
5 L'écran Internet Protocol TCP/IP
Properties (Propriétés TCP/IP de
Protocole Internet) s'ouvre (General
tab (l'onglet Général) dans Windows
XP).
6 Sélectionnez Use the following IP
address (Utilisez l'adresse IP
suivante) et entrez une adresse IP
comprise entre 192.168.1.1 et
192.168.1.254 sauf 192.168.1.3 (le
NSA) et toutes les autres adresses IP
dans cette plage déjà utilisées par un
périphérique sur votre réseau.
7 Cliquez sur OK pour fermer la fenêtre
Internet Protocol (TCP/IP)
Properties (Propriétés de protocole
(TCP/IP) Internet).
8 Fermez la fenêtre Local Area Connection Properties (Propriétés de connexion de
réseau local) et ensuite l'écran Network Connections (Connexions réseau).
9 Lancez votre navigateur web et entrez
“192.168.1.3” comme adresse de site
web.
4 Assistant d'installation
du NSA
1 Accédez au NSA à l'aide du NDU ou directement via le configurateur web.
2 Quand vous accédez pour la première fois
au configurateur web du NSA, vous verrez
probablement cet écran vous indiquant que
c'est une connexion sécurisée utilisant
HTTPS. Cliquez sur OK pour continuer.
42
Page 44

3 Le client du navigateur web
utilise des certificats pour
authentifier le NSA. Le certificat
par défaut de NSA indiquera
probablement un nom et une
autorité de certification ne
correspondant pas; cependant
le cryptage est quand-même
effectué. Cliquez sur Yes (Oui)
pour continuer.
4 Quand vous accédez au
configurateur web du NSA,
l'écran d'ouverture de session
apparaît. Le nom d'utilisateur et
le mot de passe par défaut sont
respectivement ‘admin’ et
‘1234’. Cliquez sur Login
(Ouvrir une session).
FRANÇAIS
• Il est recommandé de changer le
mot de passe par défaut. Le bouton de réinitialisation matérielle
vous permet de rétablir le
périphérique à son adresse IP
par défaut et le mot de passe à
1234 (vous ne perdrez aucune
des données stockées). Cliquez
sur Apply (Appliquer) pour
enregistrer vos modifications et
aller à l'écran suivant ou ignorez
cet écran et cliquez sur Skip
(Sauter) pour aller à l'écran suivant.
43
Page 45

FRANÇAIS
5 La première fois que vous
accédez au configurateur web
du NSA, vous êtes invité à
lancer l'assistant d'installation.
Cliquez sur Run Setup Wizard
(Lancer l'assistant
d’installation).
4.1 Assistant
d’installation
Chaque fois que vous cliquez sur Next (Suivant) dans l'assistant, vos paramètres sont
enregistrés sur le NSA. Cliquez sur Back (Retour) pour retourner à un écran précédent
dans l'assistant.
1 Cliquez sur
Next
(Suivant)
pour lancer
l'assistant.
44
Page 46

2 Si vous voulez
changer les
paramètres du
réseau du NSA,
cliquez sur Modify
Network Settings
(Modifier les
paramètres du
réseau). Vous
pouvez aussi
utiliser le NDU
(recommandé). Si
vous changez
l'adresse IP, vous
devrez alors
utiliser la nouvelle
adresse IP pour
accéder à
nouveau au
configurateur web.
Cliquez sur Next
(Suivant) pour
continuer.
FRANÇAIS
45
Page 47

FRANÇAIS
4.1.1 Assistant d'installation de disque
3 Cet écran est le
Disk Setup
Wizard
(l'assistant
d'installation de
disque) (vous
pouvez accéder
à cet écran
indépendamment de l'écran
du NSA
principal).
Sautez cet
assistant pour
que le NSA
utilise la
configuration
actuelle ou de
volume par
défaut.
• Si vous
avez déjà
créé des
volumes,
sélectionnez ceux
(existants)
à modifier
et cliquez
sur Next
(Suivant).
46
Page 48

FRANÇAIS
• Cet écran
vous indique
les configurations possibles du
volume disponibles suivant le
nombre de
disques durs
installés.
Vous pouvez uniquement créer
un volume
dans l'assistant. Un volume par
défaut recommandé a été choisi pour vous. Choisissez RAID0 pour obtenir de meilleures
performances mais pas de protection de données dans le cas d'un échec de disque.
Choisissez RAID10 si vous avez quatre disques, que vous voulez de bonnes performances
en écriture avec redondance de données. Choisissez RAID 1 si vous avez deux ou quatre
disques dans le NSA; la moitié de l'espace disque est utilisé pour la sauvegarde des données. Si vous avez quatre disques, vous pouvez choisir RAID 5 où la parité des données et
l'entrelacement vous permettent de récupérer des données même si un disque tombe en
panne. Choisissez RAID5_SPARE pour avoir un disque dans le volume RAID5 en veille
permanente en cas d'échec d'un disque. Cliquez sur Next (Suivant) pour continuer (sans
rien enregistrer pour l'instant).
• L'écran suivant vous
demande la
taille du volume que
vous voulez
réserver
pour les
instantanés. Un
instantané
est une
image statique de vos
données
stockées
dans un volume NSA à un moment particulier.
47
Page 49

FRANÇAIS
• Les données
du disque
sont perdues
si vous reconfigurez un volume. Sélectionnez la
case à cocher
I Understand... (Je
comprends…) et
cliquez sur
Apply (Appliquer) pour
enregistrer les
paramètres de l'Disk Setup Wizard (assistant d'installation du disque). Vous pouvez
maintenant retourner à l'assistant d'installation principal.
4.1.2 Retourner à l'assistant principal
4 L'écran
suivant
vous
permet
d'activer
FTP sur
NSA. Vous
pouvez
utiliser FTP
et/ou
Explorateur
Windows
(CIFS)
pour
transférer
des fichiers vers ou depuis le NSA. Sélectionnez Enable Anonymous FTP Access
(Activer l'accès FTP anonyme) pour permettre à tout utilisateur d'ouvrir une session sur
le NSA à l'aide d'un nom d'utilisateur ‘FTP’ ou ‘anonyme’ sans donner de mot de passe. Si
vous effacez Enable Anonymous FTP Access (Activer l'accès FTP anonyme) vous
devez alors créer un compte d'utilisateur et un mot de passe associé. Utilisez ce nom
d'utilisateur et mot de passe pour ouvrir une session dans le NSA via FTP.
48
Page 50

FRANÇAIS
5 Vous
devez
configurer
une (des)
adresses(s
) de
messagerie, un
serveur de
messageri
e et la
fréquence
à laquelle
le NSA doit
envoyer
des alertes
dans cet écran. Une alerte est un événement, tel qu'une panne de disque dur, qui peut
demander votre attention immédiate.
6 Sélectionnez
un serveur de
temps et un
fuseau
horaire dans
cet écran. Le
NSA met à
jour sa date
et son heure
à partir du
serveur de
temps. Cette
heure est
utilisée dans
les
horodatages
de journal et d'alerte de NSA. L'heure et la date de NSA doit être la même que l'heure
et la date sur le contrôleur de domaine externe si le NSA en utilise une pour importer
des utilisateurs et des groupes.
49
Page 51

FRANÇAIS
7 Ajoutez des
utilisateurs
pouvant
accéder au
NSA dans
cet écran. Le
NSA peut
importer des
utilisateurs
provenant
d'un
contrôleur
de domaine
externe ou
vous pouvez
ajouter des
utilisateurs sur le NSA. Si vous avez un contrôleur de domaine externe, sélectionnez Join
a Domain Server (Joindre un serveur de domaine). Pour créer des utilisateurs sur le
NSA, sélectionnez Create My Own Local Users (Créer mes propres utilisateurs
locaux).
• Utilisateurs
locaux :
Cliquez sur
ajouter pour
configurer
chaque nouvel utilisateur local
et cliquez
ensuite sur
Next (Suivant) pour les
créer tous
ensemble sur
le NSA.
Entrez un
nom d'utilisateur de un à 32 caractères alphanumériques, le premier caractère doit être
une lettre. Consultez votre guide pour les détails de noms d'utilisateur. Si vous retournez à
cet écran plus tard, vous ne verrez pas les utilisateurs que vous avez ajoutés au NSA dans
l'écran mais les utilisateurs ayant été ajoutés au NSA.
50
Page 52

FRANÇAIS
• Domaine:
Choisissez le
domaine NT4
si votre
serveur utilise un
système
d'exploitation
Windows NT.
Choisissez un
domaine de
Active Directory s'il uti-
lise un
système
d'exploitation
Windows 2000 ou un système supérieur. Tapez l'adresse IP du contrôleur de domaine du
serveur de Windows, l'administrateur du domaine de Windows (Administrateur est la
valeur par défaut) et un mot de passe associé. Vous pouvez utiliser un nom de domaine si
le serveur utilise un système d'exploitation antérieur à Windows 2000.
8 Cliquez sur
Finish
(Terminer)
pour que le
NSA termine
la
configuration.
Redémarrez
le NSA si
vous y êtes
invité.
51
Page 53

FRANÇAIS
• Si vous avez supprimé le volume par
défaut et que vous n'avez pas créé
d'autre volume, ou síil níy a pas de
disque dur interne installé, vous verrez
l'écran de (Maintenance Mode) mode
Maintenance suivant. En mode Maintenance, vous DEVEZ créer un vol-
ume interne.
Remarque: Vous devez installer au
moins un disque dur et créer un
volume interne avant de pouvoir
utiliser un (des) disque(s) dur(s) USB externe(s) avec le NSA.
9 La prochaine fois que vous ouvrirez une session dans le NSA, vous pourrez aller
directement dans l'écran Status Overview (aperçu de l'état).Vous pouvez à nouveau
accéder à l'assistant en cliquant sur l'icône dans la partie supérieure droite de l'écran
comme indiqué. Accédez à l'un des menus dans le panneau de navigation sur la
gauche pour une configuration plus avancée.
Remarque: Consultez votre guide de l'utilisateur pour plus d'informations sur ces
écrans avancés.
52
Page 54

FRANÇAIS
5 Mapper le NSA au lecteur réseau de votre ordinateur
Le fait de mapper un partage
(un dossier où vous stockez
des données) sur le NSA à un
lecteur réseau de Windows
permet aux utilisateurs de
Windows de transférer plus
facilement des fichiers vers et à partir du NSA (à l'aide de CIFS). Cliquez sur l'icône MAP
dans le NDU (voir la Section 3.1) pour afficher le dossier public de NSA dans l'Explorateur
de Windows.
Cliquez sur Too l s (Outils), Map
Network Drive (Connecter le
lecteur réseau). Sélectionnez le
lecteur réseau auquel vous voulez
mapper le NSA depuis la boîte de
liste Drive (Lecteur) et parcourez
pour partager sur le NSA (Public
est le seul disponible si vous n'avez
pas encore créé de partages sur le
NSA). Vous pouvez ensuite
simplement faire glisser des
fichiers depuis/vers les lecteurs de
votre ordinateur local vers ou
depuis ce dossier réseau.
Vous pouvez aussi (à partir d'un
autre ordinateur n'ayant pas NDU installé par exemple) ouvrir l'explorateur de Windows et
taper deux barres obliques inversées suivies du nom système ou de l'adresse IP du NSA.
53
Page 55

FRANÇAIS
6 Dépannage
PROBLÈME ACTION CORRECTIVE
Aucune des LED ne
s'allume quand vous
connectez l'alimentation.
Impossible d'accéder au
NSA à partir de mon
ordinateur.
Vérifiez que le NSA est allumé.
Vérifiez que les câbles sont bien branchées, qu'il n'y a pas de
câbles défectueux et que les connexions du câble Ethernet ne
dépassent pas 100m.
Vérifiez que le cordon d'alimentation est connecté à une source
d'alimentation qui fonctionne.
Si les LED ne s'allument toujours pas, vous avez peut-être un
problème matériel. Dans ce cas-là, vous devez contacter votre
vendeur local.
Vérifiez la connexion du câble Ethernet entre votre réseau et le
NSA.
Si l'adresse IP du NSA a changé, entrez la nouvelle comme
adresse du site web.
Vérifiez que l'adresse IP de votre ordinateur se trouve dans le
même sous-réseau que l'adresse IP du NSA (voir la section la
Section 3.2).
Envoyez une requête ping au NSA depuis votre ordinateur.
Vérifiez que l'adaptateur Ethernet de votre ordinateur est installé
et fonctionne correctement. Dans un ordinateur (Windows),
cliquez sur Start (Démarrer), (All) Programmes ((Tous)
Programmes), Accessories (Accessoires) et ensuite sur
Command Prompt (Invite de commandes). Dans la fenêtre
Invite de Commande, tapez "ping" suivi de l'adresse IP du NSA
(192.168.1.3 est l'adresse par défaut) et appuyez ensuite sur
[ENTER] (ENTRÉE).
Utilisez Internet Explorer 6.0 (et plus récent) ou Firefox 1.07 (et
plus récent) avec JavaScript activé.
Vérifiez que vous entrez correctement le nom d'utilisateur et le
mot de passe (les champs respectent la casse)
Visualiser les certifications de votre produit
1 Allez sur www.zyxel.com.
2 Sélectionnez votre produit dans la liste déroulante dans la page d'accueil de ZyXEL
pour aller à la page de ce produit.
3 Sélectionnez la certification que vous désirez consulter dans cette page.
54
Page 56

ITALIANO
ITALIANO
Panoramica
L' NSA-2400 (l'
NSA) è un
dispositivo di
archiviazione in
rete per la
condivisione dei
file, backup e
protezione dei dati
per uffici piccoli
(casa) o di medie
dimesioni.
Questa guida
presenta come:
1 Installare i
dischi duri
2 effettuare delle
connessioni NSA
3 Accedere a NSA utilizzando NDU (NSA Discovery Utility) o il proprio web browser
4 Installare l'NSA con l'assistente
5 Mappare l'NSA in un disco di rete a partire da qalsiasi computer
Nota: Vedere la Guida utilizzatore per ulteriori dettagli e specifiche tecniche a
proposito dell'NSA.
Requisiti
Necessario cio' che segue prima di cominciare:
•NSA
• Compreso il CD contenent l' NDU (NSA Discovery Utility) e il Genie Backup Manager
• Il cavo di alimentazione e l'alimentazione (esterna)
• 8-wire cavo Ethernet per Gigabit Ethernet
• Fino a quattro SATA-1 (Serial Advanced Technology Attachment) dischi rigidi compatibili
con connettori 15-pin SATA power
• Cacciavite per installare i dischi rigidi nello scomparto disco
• Cavo USB (facoltativo: necessario solo se si vuole espandere la propria capacità di archiviazione con delle unità USB (versione 2))
• Computer con scheda di interfaccia rete(NIC) e TCP/IP installato
55
Page 57

ITALIANO
• Dispositivo di accesso alla rete come un switch o hub.
1 Installare i dischi duri
Nota: I dischi rigidi NON sono hot swappable. L' NSA deve essere spento prima di
rimuovere o installare i dischi rigidi.
1 Tirare la linguetta sulla sinistra della porta frontale dell'NSA per aprirlo.
2 Togliere la sicura e
afferrare i lati dello
scomparto per
rmuovere lo scomparto
disco 1. Attezione a
non rompere la sicura.
Il compartimento per il
disco 1è etichettato
sul proprio NSA (il
compartimento in alto a
sinistra).
3 Porre lo scomparto
disco su una superficie
piana con il pannello
rivolto verso l'alto.
Porre un disco rigido
con i fori per le viti
rivolte verso l'alto sulla
stessa superficie e
farlo scivolare nello
scomparto del disco.
Assicurarlo con le viti come mostrato.
4 Spingere l'alto dello
scomparto di nuovo
all'interno del NSA del
compartimento
disco1fino a quando
non scatti e rimettere la
sicura come mostrato.
5 Ripetere le fasi da 1 a 3
per gli altri dischi rigidi
che si possono avere.
56
Page 58

ITALIANO
2 Effettuare le connessioni NSA
1 Connettere il porto Ethernet sul retro dell' NSA ad un
hub, switch, o router della propria rete con un cavo
Ethernet. Utilizzare un cavo 8-wire Ethernet per le
connessioni Gigabit.
2 Connettere una estremità del cavo di alimentazione
alla presa sul retro dell'NSA e l'altra estremità ad una
fonte di alimentazione elettrica esterna . Connettere
l'alimentazione elettrica esterna alla presa elettrica.
3 Accendere premendo il pulsante di accensione su
davanti dell'NSA. Verificare le luci sul pannello frontale.
La luce PWR diventa verde fissa. la luce SYS diventa
verde fissa dopo che l' NSA sia avviato correttamente
(prenderà circa 50 secondi). La luce LAN si accende se
il porto NSA Ethernet è connesso correttamente alla
propria rete. Lampeggia se trasmette o riceve traffico.
Nota: Per spegnere l'NSA, premereil pulsante di
accensione una sola volta. La luce SYS
lampeggia rossa indicando che l'NSA è arrestato.
3 Accedere l' NSA
E' possibile accedere l' NSA in due modi: utilizzado l'NDU
(NSA Discovery Utility) o inserendo direttamente l'idirizzo IP dell'NSA nel proprio web
browser.
3.1 Utilizzare l'NDU per rivelare l'indirizzo IP dell'NSA
Utilizzare NDU (NSA Discovery Utility) su un computer Windows se la propria rete è
dotata di server DHCP che assegni un indirizzo IP e/o se si hanno più NSA nella propria
rete.
57
Page 59

ITALIANO
Nota: Il programma Genie Backup utilizza lo stesso porto di rete di NDU per trovare
l'NSA. per evitare un conflitto di porto, non eseguire il Genie Backup allo
stesso tempo dell'NDU.
1 Inserire il CD incluso nell'unità
CD-ROM. Lo schermo
successivo viene visualizzato
automaticamente (autorun).
Cliccare l'icona Setup
(configurazione) .
2 Si avvia l'assistente di
installazione NDU. Seguire le
istruzioni dell'installazione.
Cliccare su Finish (Fine) per
completare l'installazione.
3 In Windows XP, cliccare Start
(avvio), All Progranes (Tutti i programmi),
ZyXEL NSA-2400, ZyXEL NSA-2400
Discovery Utility per eseguire NDU. Per gli
altri sistemi operati di Windows, le procedure
sono simili. Se il proprio computer ha più di
una scheda di rete,allora si sarà invitati con
un prompt a selezionare una scheda di
interfaccia rete.
58
Page 60

ITALIANO
4 Sullo schermo principale di
NDU appare l'elenco di tutti gli
hostnames, indirizzi IP e stato
di tutti gli NSA della propria
rete. Cliccare l'icona sotto
Admin (Admin) per vedere lo
schermo principale del
configuratore come mostrato
in Sezione 4. (Se si vuole
cambiare l'indirizzo IP
dell'NSA, cliccare l'icona sotto
Config (Config). Se si vuole
mappare l'NSA su una unità di
rete Windows, cliccare l'icona
sotto er Map (Mappa) (vedere Sezione 5). Per riattualizzare lo schermo, cliccare
Discover (Ricerca).
3.2 Accesso diretto Via Web Browser
Se l'NSA non puo ottenere un indirizzo IP da un server DHCP, allora l'indirizzo IP
predefinito dell' NSA diventa 192.168.1.3. Prima di inserire l'indirizzo IP dell'NSA nel
proprio web browser, ci si deve assicurare che il proprio computer e l'NSA siano sullo
stesso subnet. Questa sezione mostre come impostare sul proprio computer Windows NT/
2000/XP un indirizzo IP dello stesso subnet dell'NSA. Riferirsi alla Guida Utilizatore per la
configurazione dettagliate dell'indirizzo IP di altri sistemi operativi.
1 In Windows XP, click Start (Avvia), Control Panel (Panello di controllo). In Windows
2000/NT, fare clic su Start (Avvia), Setting (Impostazioni) , Control Panel (Pannello
di controllo).
2 In Windows XP, fare clic su Network Connections (Connessioni di rete). In Windows
2000/NT, fare clic su Network (Reti) e Dial-up Connection (connessioni remota).
3 Fare clic con il pulsante destro del mouse su Local Area Connection (Connessione
alla rete locale) e scegliere Properties (Proprietà).
59
Page 61

ITALIANO
4 Selezionare Internet Protocol
(Protocollo Internet) (TCP/IP) (nella
scheda General (Generale) in Win
XP) e fare clic su Properties
(Proprietà).
5 Viene aperta la schermata Internet
Protocol TCP/IPProperties
(Proprietà Protocollo Internet TCP/
IP) (la General tab (scheda
generale) in Windows XP).
6 Selezionare Use the following IP
address (Usare il seguente
indirizzo IP) e inserire un indirizzo IP
tra 192.168.1.1 a 192.168.1.254
escludendo 192.168.1.3 (l' NSA) e
qualsiasi altro indirizzo IP già
utilizzato da un altro dispositivo della
propria rete.
7 Fare clic su OK (OK) per chiudere la
finestra Internet Protocol
(Protocollo Internet)(TCP/IP) -
Properties (Proprietà).
8 Chiudere la finestra Local Area Connection Properties (Proprietà di connessione
area locale) e poi lo schermo Network Connections (Connessioni di rete).
9 Lanciare il proprio web browser e
inserire “192.168.1.3” come indirizzo
web.
4 Configurazione guidata
NSA
1 Accedere a NSA via NDU o direttamente attraverso il web configurator.
2 Quendo si accede a NSA web configurator
per la prima volta, è possibile vedere questo
schermo che indica che si tratta di una
connessione sicura che utilizza HTTPS.
Fare clic su OK per continuare.
60
Page 62

3 Il client web browser utilizza
certificazioni per autentificare
l'NSA. La certificazione NSA
predefinita preseterà quasi
certamente un nome e un
oraganismo di certicficazione
con corrispondenti; la
crittografia viene comunque
effettuata. Fare clic su Yes (Si)
per procedere.
4 Quando si accede al
configuratore web NSA: appare
lo schermo per la connessione.
Il nome utilizzatore e la
password predefiniti sono
rispettivamente 'admin' e '1234'
Fare clic su Login.
ITALIANO
5 Si raccomanda di cambiare la
password predefinita. Il pulsante
di reset hardware consente di
riportare il dispositivo
all'indirizzo IP predefinito e la
password di admin a 1234 (i dati
memorizzati non verranno
persi). Fare clic su Apply
(Applica) per salvare i
cambiamenti e andare alla
schermata successiva o
ignorare questa schermata
facendo clic su Skip (Ignora) e
andare allo schermo che segue.
61
Page 63

ITALIANO
6 La prima volta che si accede all'
NSA web configurator,si viene
invitati a eseguire la
configurazione guidata. Fare
clic su Run Setup Wizard
(esegui configurazione
guidata).
4.1 Configurazione
guidata
Ogni volta che si fa clic su Next (successivo) nella configurazione guidata, le proprie
impostazioni sono salvate sull'NSA. Fare clic su Back (indietro) per tornare alla
schermata precedente della configurazione guidata.
1 Fare clic su
Next
(successivo)
per avviare la
configurazion
e guidata.
62
Page 64

2 ISe si vogliono
cambiare le
impostazioni
dell'NSA, fare clic
su Modify
Network Settings
(Modifica
impostazioni di
rete). E' anche
possibile
effattuarlo
utilizzando NDU
(raccomandato).
Se si cambia di
indirizzo IP, allora
si dovrà utilizare il
nuovo indirizzo IP
per accedere di
nuovo al
configuratore web.
Fare clic su Next
(successivo) per
continuare..
4.1.1 Configurazion
e guidata disco
ITALIANO
3 Questa
schermata è
Disk Setup
Wizard ( la
Configurazione
guidata del
disco) (è
possibile
accedere a
questo schermo
separatamente
dallo schermo
NSA principale).
63
Page 65

ITALIANO
• Se sono
già stati
creati
volumi,
selezionare quale
di quelli
esistenti
modificare
e poi scegliere Next
(avanti).
•Questa
schermata
mostra le
configurazioni di volumi
disponibili
che dipendono da
come sono
stati installati i
diversi dischi
rigidi. Nella
procedura
guidata è
possibile
creare un volume. È stato
scelto un volume predefinito consigliato. Scegliere RAID0 per le migliori prestazioni ma nessuna protezione dei dati in caso di guasto di un disco. Scegliere RAID10 se si hanno quattro dischi e si
desidera ottenere buone prestazioni di scrittura con ridondanza dei dati. Scegliere RAID 1
se si hanno due o quattro dischi nell' NSA; la metà dello spazio disco viene utilizzata per il
backup dei dati. Se si hanno quattro dischi, si potrebbe scegliere RAID 5 wdove parità e
data striping permettono di recuperare i dati anche quando un discosubisca un guasto.
Scegliere RAID5_SPARE per avere un disco nel volume RAID5 in standby permanente nel
caso di guasto di un disco. Fare clic su Next (Successivo) per continuare (senza ancora
salvare nulla).
64
Page 66

ITALIANO
• La prossima
schermata
schede
quando
spazio di
volume si
desidera riservare per
le istantanee.
Un'istantanea è
un'immagine statica
dei dati
memorizzati in un volume NSA in un particolare istante nel tempo.
• I dati del disco
saranno persi
se si riconfigura un volume.
Selezionare la
casella I
Understand...
(Capisco...)
poi fare clic su
Apply
(Applica) per
salvare le
impostazioni
di Disk Setup
Wizard (Configurazione guidata del disco). Si ritorna all'assistente di configurazione
principale
65
Page 67

ITALIANO
4.1.2 Ritorna all'assistente di configurazione principale
4 La
schermata
succcessiv
a permette
di attivare l'
FTP
sull'NSA.
Si puo'
utilizzare
un FTP e/o
Windows
explorer
(CIFS) per
trasferire i
file da e a
NSA.
Selezionare Enable Anonymous FTP Access (Attiva accesso FTP Anonymous) per
permettere a qualsiasi utilizzatore di conettersi all' NSA utilizzando un nome utilizatore
‘FTP’ o ‘anonmyous’ senza dare una password. Se si elimina Enable Anonymous FTP
Access (Attiva accesso FTP Anonymous) tallora si deve creare un conto utilizzatore e
la password corrispondente. Utilizzare un nome utilizzatore e una password per
connettersi all'NSA via FTP.
5 Si deve
configurar
e uno o
più
indirizzi
email, un
server email e
quato
spesso
l'NSA
debba
inviare
allerte su
questa
schermata
. Un' allerta è un evento come la rottura di un disco, che richieda un'attenzione
immediata.
66
Page 68

ITALIANO
6 Selezionare
un server
dell'ora e un
fuso orario in
quest
schermo.
L'NSA
aggiorna la
sua data e
ora a partire
dal'ora del
server.
Questa ora
apparirà sui
log NSA log e
sigilli di
allerta ora. l'ora e la data dell' NSA devono essere le stesse del controller di domionio
esterno quando l' NSA utilizzi uno degli utilizzatori o gruppi.
7 Aggiungere
utilizzatori
che possano
accedere
all'NSA da
questo
schermo.
L'NSA puo'
importare gli
utilizzatori
da un
controller di
dominio
esterno o è
possibile
aggiungre
utilizzatori sull' NSA. Nel caso sia esterno il controller di dominio, selezionare Join a
Domain Server (Connettersi ad un server di dominio). Per creare utilizzatori sull'NSA,
selezionare Create My Own Local Users (Creare i miei utilizzatori locali).
67
Page 69

ITALIANO
• Utilizzatore
locale: fare
clic su add
(aggiungere) per
configurare
ogni nuovo
utilizzatore
locale poi
fare clic su
Next (Successivo) per
crearli tutti
insieme sull'
NSA. Inserire un nome
da uno a 32 caratteri alfanumerici; il primo carattere deve essere alfabetico. Vedere la propria guida Utilizzatore per i dettagli dele nome utilizzatore. Se si ritornerà su questa schermata in seguito, non si vedranno più gli utilizzatori che si è aggiunti all' NSAma tutti gli
utilizzatori aggiunti a NSA.
• Dominio:
Scegliere NT4
Domain
(Dominio
NT4) se i pro-
pri server utilizzano un
sistema operativo Windows NT.
Scegliere
Active Directory Domain
(Active
Directory
Domain) se si
utilizza un sistema operativo Windows 2000 o successivi. Digitare l'indirizzo IP del controler di dominio del server di Windows, l'anninistratore di dominio (Amministratore è predefinito) e la password corrispondente. Si puo' utilizzare un nome di dominio nel caso il
server utilizzi un sistema operativo precedente a Windows 2000,
68
Page 70

ITALIANO
8 Fare clic su
Finish (Fine)
per
completare la
configurazion
e dell'NSA.
Riavvivare l'
NSA se
appare la
finestra di
invito.
• Se si cancella
il volume predefinito senza crearne un
altro e non si è installato nessun disco
rigido, vedere la schermata seguente
Maintenance Mode (Modalità
Manutenzione). In Maintenance Mode
(Modalità Manutenzione), si DEVE
creare un volume interno.
Nota: deve essere installato almento
un disco rigido e creare un
volume interno prima che si
possa utilizare dischi rigidi esterni USB con l'NSA.
9 La prossima volta che ci si connette all'NSA, si va direttamente alla schermata Status
Overview (Stato generale) . E' possibile accedere nuovamente all'assitente di
isntallazione facendo clic sull'icona in alto a destra della schermata come mostrato.
69
Page 71

ITALIANO
Accedere a qualsiasi menu del pannello di navigazione sulla sinisre perulteriori
configurazioni avanzate.
Nota: Vedere la propria Guida Utilizzatore per ulteriori informazioni su queste
schermate di configurazione avanzata.
5 Mappare l'NSA sull'unità di rete del proprio computer
Mappare una condivisione
(una cartella dove si
immagazzinino i dati) sull'NSA
ad una unità di rete Windows
network rende più facile per gli
utilizzatori di Windows
trasferire i file da e per l'NSA (utilizzando CIFS). Fare clic sull'icona MAPPA di NDU
(vedere Sezione 3.1) per visualizzare la cartella pubblica NSA in Windows Explorer.
70
Page 72

ITALIANO
Fare clic su Tools (strumenti),
Map Network Drive (Mappare
Unità di rete). Selezionare l'unità di
rete che si desidera per mappare l'
NSA a e da la casella elenco Drive
(Unità) e browse fino alla cartella
condivisa sull' NSA (Pubblico
l'unico disponibile se non se ne
sono già create altre su NSA). In
seguito si potrà semplicemente
trascinare i file da e a le proprie
unità sul computer o da e a questa
cartella di rete.
Alternativamente (ad esempio da
un altro computer che non abbia
NDU installato) aprire Windows Explorer e digitare due back slash seguiti dal nome
sistema o indirizzo IP del'NSA.
71
Page 73

ITALIANO
6 Risoluzione dei problemi
PROBLEM (problema) CORRECTIVE ACTION (azione correttiva)
Nessuno dei LED si
accende quando si
collega l'alimentazione.
Non posso accedere
all'NSA dal mio computer.
Assicurarsi che l'NSA è accesso
Verificare che non ci siano cavi mal collegati, che non ve ne siano
di diffettosi e che i cavi per la connessione Ethernet non
eccedano i 100m.
Assicurarsi che il cordone di alimentazione sia collegato a una
sorgente elettrica attiva.
Se i LED continuano a non accendersi, potrebbe esserci un
guasto hardware. In questo caso, è opportuno rivolgersi al
rivenditore locale.
Verificare la connessione del cavo Ethernet dalla propria rete
all'NSA.
Se l'indirizzo IP dell' NSAviene cambiato,allora inserire il nuovo
come indirizzo del sito web.
Assicurarsi che l'indirizzo IP del proprio computer sia nello stesso
subnet dell'indirizzo IP del NSA(vedere sezione Sezione 3.2).
Fare ping sull'NSA dal proprio computer. Assicurarsi che
l'adattatore Ethernet del proprio computer sia installato e funzioni
correttamente. in un computer (Windows), fare clic su Start
(Avvia), (All)Programs (Tutti) Programmi, Accessories
(Accessori) e poi Command Prompt. Nella finestra di invito
Command Prompt, digitare “ping” seguito dall'indirizzo NSA
(192.168.1.3 è quello predefinito) quindi premere [ENTER].
Utilizzare Internet Explorer 6.0 (e seguenti) o Firefox 1,07 (e
seguenti) con JavaScript attivato.
Assicurarsi di inserire correttamente il nome utilizzatore e la
password (questi campi sono case sensitive).
Visualizzare Certificazioni del Loro Prodotto
1 Andare a www.zyxel.com.
2 Selezionare il prodotto dall'elenco di riepilogo a discesa nella Home Page di ZyXEL per
passare alla pagina del prodotto in questione.
3 Selezionare da questa pagina la certificazione che si desidera visualizzare.
72
Page 74

SVENSKA
SVENSKA
Översikt
NSA-2400 (NSA) är
en
nätverkslagringsenhe
t för fildelning, databackup och
datasäkerhet för små
(hem-) kontor och/
eller medelstora
kontor.
Denna bruksanvisning
beskriver hur du:
1 Installerar
hårddiskenheter
2 Gör NSA-
anslutningar
3 Får åtkomst till
NSA med hjälp av NDU (NSA Discovery Utility) eller din webbläsare
4 Ställer in NSA med hjälp av guiden
5 Mappar NSA till en nätverksenhet från valfri dator
Kommentar: Se bruksanvisningen för mer detaljer och specifikationer för NSA.
Krav
Du behöver följande innan du kan komma igång:
•NSA
• Medföljande CD-skiva med NDU (NSA Discovery Utility) och Genie Backup Manager
• Strömsladd och strömkälla (extern)
• 8-trådars Ethernet-sladd för Gigabit Ethernet
• Upp till fyra SATA-1 (Serial Advanced Technology Attachment) -kompatibla hårddiskar
med 15-stifts SATA-strömkontakter
• Skruvmejsel för att montera hårddiskarna i diskfacken
• USB-sladd (tillval: Du behöver bara denna ifall du vill utöka lagringskapaciteten genom att
ansluta kompatibla USB-enheter (version 2))
• Dator med NIC-kort (Computer with Network Interface) och TCP/IP installerat
• Nätverksåtkomstenhet som exempelvis en switch eller hubb.
73
Page 75

SVENSKA
1 Installera hårddiskenheter
Kommentar: Hårddiskenheter medger INTE utbyte under drift (hot swap). NSA
måste stängas av innan du tar bort eller installerar en eller flera
hårddiskenheter.
1 Dra i fliken på vänster sida av NSA:s frontlucka för att öppna enheter.
2 Dra ut spärren och grip
tag i fackets sidor för
att ta ut diskfack 1. Var
försiktig så att du inte
bryter av spärren.
Diskfack 1 är märkt på
din NSA (facket uppe
till vänster).
3 Placera diskfacket på
ett plant underlag med
panelen vänd uppåt.
Placera en hårddisk
med skruvhålen vända
uppåt på samma
underlag och skjut in
den i diskfacket. Fäst
den med skruvarna
enligt bild.
4 Tryck in ovandelen av
facket i NSA-diskfack 1
tills det snäpper fast
och tryck upp spärren
enligt bild.
5 Upprepa steg 1 till 3 för
eventuella andra
hårddiskenheter.
74
Page 76

SVENSKA
2 Göra NSA-anslutningar
1 Anslut Ethernet-porten baktill på NSA till en hubb,
switch eller router i ditt nätverk med en Ethernetsladd. Använd en 8-trådig Ethernet-sladd för Gigabitanslutningar.
2 Anslut ena änden av strömsladden till strömuttaget
baktill på NSA, och den andra änden till den externa
strömkällan. Anslut den externa strömkällan till ett
eluttag.
3 Sätt på strömmen genom att trycka in strömknappen
framtill på NSA. Titta på frontpanelens lampor. Lampan
PWR lyser grön. Lampan SYS lyser grön sedan NSA
startat upp (det tar ungefär 50 sekunder). Lampan LAN
tänds om NSA Ethernet-porten är rätt ansluten till
nätverket. Den blinkar medan den överför eller tar emot
trafik.
Kommentar: Du stänger av NSA genom att trycka in
strömknappen en gång. SYS-lampan
blinkar röd och indikerar att NSA stängs
av.
3 Åtkomst till NSA
Du kan få åtkomst till NSA på ett av följande två sätt: genom att använda NDU (NSA
Discovery Utility) eller direkt ange NSA:s IP-adress i din webbläsare.
3.1 Använda NDU för att hitta NSA:s IP-adress
Använd NDU (NSA Discovery Utility) på en Windows-dator om ditt nätverk har en DHCPserver som tilldelar NSA en IP-adress och/eller om du har många NSA:s i ditt nätverk.
75
Page 77

SVENSKA
Kommentar: Genie Backup-programmet använder samma nätverksport som NDU
för att hitta NSA. Undvik portkonflikt genom att inte köra Genie Backup
samtidigt som NDU.
1 Sätt in den medföljande CD-
skivan i din CD-ROM-enhet.
Nästa skärm ska visas
automatiskt (autokörning).
Klicka på ikonen Setup.
2 NDU-installationsguiden
öppnas. Följ
installationsprogrammets
instruktioner. Klicka på Finish
för att slutföra installationen.
3 I Windows XP, klicka på start,
All Program (alla program), ZyXEL NSA2400, ZyXEL NSA-2400 Discovery Utility för
att köra NDU. Procedurerna är snarlika för
övriga Windows operativsystem. Om din
dator har mer än ett nätverkskort, uppmanas
du först att välja ett nätverksgränssnittskort.
76
Page 78

SVENSKA
4 NDU:s huvudskärm visas med
en lista över alla värdnamn,
IP-adresser och status för alla
NSA i ditt nätverk. Klicka på
ikonen under Admin för att se
den huvudsakliga
webbkonfiguratorskärmen
enligt Section 4. (Om du vill
ändra NSA-enhetens IPadress, klicka på ikonen under
Config. Om du vill mappa
NSA till en Windowsnätverksenhet, klicka på
ikonen under Map (se Section
5). TDu uppdaterar skärmen genom att klicka på Discover (hitta).)
3.2 Direkt åtkomst via webbläsare
Om NSA inte kan få en IP-adress från en DHCP-server, återgår standard-IP-adressen för
NSA till 192.168.1.3. Innan du anger NSA:s IP-adress direkt i din webbläsare, måste du
kontrollera att din dator och NSA finns i samma subnet. Detta avsnitt beskriver hur du
ställer in din Windows NT/2000/XP-dator till att ha en IP-adress i samma subnet som NSA.
Se bruksanvisningen för detaljerad IP-adresskonfiguration för andra operativsystem.
1 I Windows XP, klicka på start, Control Panel (kontrollpanelen). I Windows 2000/NT,
klicka på Start, Settings (inställningar), Control Panel (kontrollpanelen).
2 I Windows XP, klicka på Network Connections (nätverksanslutningar). I Windows
2000/NT, klicka på Network and Dial-up Connections (nätverk och uppringda
anslutningar).
3 Högerklicka på LAN-anslutning och klicka sedan på Egenskaper.
77
Page 79

SVENSKA
4 Välj Internetprotokoll (TCP/IP)
(under fliken General (allmänt) i
Windows XP) och klicka på
Properties (egenskaper).
5 Skärmen Internet Protocol TCP/IP
Properties (Internetprotokoll TCP/
IP Egenskaper) öppnar fliken
(General (allmänt) i Windows XP).
6 Välj Use the following IP address
(använd följande IP-adress) och
ange en IP-adress från 192.168.1.1
till 192.168.1.254 exklusive
192.168.1.3 (NSA) och eventuella
andra IP-adresser i detta intervall
som redan används av enheter i ditt
nätverk.
7 Klicka på OK för att stänga fönstret
Internet Protocol (TCP/IP)
Properties (Internetprotokoll (TCP/
IP) Egenskaper).
8 Stäng fönstret Local Area Connection Properties (LAN-anslutning Egenskaper)
och stäng sedan skärmen Network Connections (nätverksanslutningar).
9 Öppna din webbläsare och ange
"192.168.1.3" som webbplatsadress.
4 NSA-guideinställning
1 Öppna NSA med hjälp av NDU eller
direkt genom webbkonfiguratorn.
2 När du först får åtkomst till NSA-
webbkonfiguratorn, kan du få se denna
skärm som upplyser dig om att detta är en
säker anslutning som använder sig av
HTTPS. Klicka på OK för att fortsätta.
78
Page 80

3 Webbläsarklienten använder
certifikat för att autentisera
NSA. Standard NSA-certifikatet
visar högst sannolikt ett
behörighetsfel mellan namn och
certifiering; men kryptering
utförs ändå. Klicka på Yes för att
fortsätta.
4 När du får åtkomst till NSA-
webbkonfiguratorn, visas
inloggningsskärmen. Standard
användarnamn och lösenord är
"admin" respektive "1234".
Klicka på Login (inloggning).
SVENSKA
5 Det rekommenderas att du
ändrar standardlösenordet.
Knappen för
m-askinvaruåterställning låter dig
återställa enheten till standardIP-adress och
administratörslösenordet till
1234 (du kommer inte att förlora
eventuella lagrade data). Klicka
på Apply (tillämpa) för att spara
dina ändringar och gå till nästa
skärm eller ignorera denna
skärm och klicka på Skip
(hoppa över) för att gå till nästa
skärm.
79
Page 81

SVENSKA
6 Första gången du får åtkomst till
NSA-webbkonfiguratorn
uppmanas du att köra
installationsguiden. Klicka på
Run Setup Wizard (kör
installationsguide).
4.1 Installationsguide
Varje gång du klickar på Next
(nästa) i guiden, sparas dina inställningar i NSA. Klicka på Back (bakåt) för att återgå till
föregående skärm i guiden.
1 Klicka på
Next (nästa)
för att starta
guiden.
80
Page 82

2 Om du vill ändra
nätverksinställning
ar för NSA, klicka
på Modify
Network Settings
(modifiera
nätverksinställni
ngar). Du kan
även göra detta
med NDU
(rekommenderas).
Om du ändrar IPadressen måste
du använda den
nya IP-adressen
för att få åtkomst
till
webbkonfiguratorn
igen. Klicka på
Next (nästa) för
att fortsätta.
4.1.1 Diskinställnin
gsguide
SVENSKA
3 Denna skärm är
Disk Setup
Wizard
(diskinställnings
guide) (och kan
öppnas separat
från NSA:s
huvudskärm).
Hoppa över
denna guide om
du vill att NSA
ska använda
aktuell eller
standard
volymkonfigurati
on.
81
Page 83

SVENSKA
• Om du
redan har
skapat volymer, kan du
välja vilka
(befintliga)
du vill modifiera och
klicka på
Next
(nästa)..
• Denna
skärm visar
dig de
möjliga
volymkon-figurationer
som är
tillgängliga
beroende på
hur många
hårddiskar
du har
installerat.
Du kan bara
skapa en
volym i
guide-n. En
rek-ommenderad standardvolym har valts åt dig. Välj RAID0 för bästa prestanda men inget dataskydd
ifall en disk kraschar. Välj RAID10 om du har fyra diskar, vill ha bra skrivprestanda med
dataredundans. Välj RAID 1 om du har två eller fyra diskar i NSA; halva diskutrymmet
används för data-backup. Om du har fyra diskar kan du välja RAID 5 där dataparitet och
strimling låter dig återställa data även om en disk havererar. Välj RAID5_SPARE för att ha
en disk RAID5-volymen i permanent standby-läge ifall en disk kraschar. Klicka på Next för
att fortsätta (utan att ha sparat något ännu).
82
Page 84

SVENSKA
•Nästa
skärm
frågar hur
mycket
vol-ymutrym
me du vill
avsätta för
snapshots.
En
snapshot är
en statisk
bild av dina
data
lagrade i en
NSA-vol-ym
vid ett
specifikt ögonblick i tiden.
• Diskdata går
förlorade om
du omkonfigurerar en
volym. Välj
kryssrutan I
Understand... (jag
förstår...) och
klicka sedan
på Apply
(tilllämpa) för
att spara
inställningarna för Disk
Setup Wizard. Nu återgår du till huvudinstallationaguiden.
83
Page 85

SVENSKA
4.1.2 Återgå till huvudguide
4 På nästa
skärm kan
du aktivera
FTP på
NSA. Du
kan
använda
FTP och/
eller
Windows
Explorer
(CIFS) för
att
överföra
filer till
eller från
NSA. Välj Enable Anonymous FTP Access (aktivera anonym FT-inloggning) för att
göra det möjligt för alla användare att logga in i NSA med ett "FTP"-användarnamn
eller "anonymt" utan att ange ett lösenord. Om du inaktiverar Enable Anonymous FTP
Access måste du skapa ett användarkonto och ett tillhörande lösenord. Använd detta
användarnamn och lösenord för att logga in i NSA via FTP.
5 Du måste
konfigurer
a epostadress
(er), en epostserver
och hur
ofta NSA
ska skicka
meddeland
en på
denna
skärm. Ett
meddeland
e är en
händelse, t
ex en hårddiskrasch, som kan kräva din omedelbara uppmärksamhet.
84
Page 86

SVENSKA
6 Välj tidserver
och tidzon på
skärmen.
NSA
uppdatera
sitt datum
och sin tid
från
tidservern.
Denna tid
används i
NSA:s logg
och
meddelandes
tämplar.
NSA:s tid
och datum måste vara desamma som tid och datum på den externa domänkontrollern
om NSA använder en sådan för att importera användare och grupper.
7 Lägg till
användare
som kan få
åtkomst till
NSA på
denna
skärm. NSA
kan
importera
användare
från en
extern
domainkontr
oller eller så
kan du lägga
till användare
i NSA. Om du har en extern domänkontroller, välj Join a Domain Server (gå med i en
domänserver). För att skapa användare i NSA, välj Create My Own Local Users (skapa
mina egna lokala användare).
85
Page 87

SVENSKA
• Lokala
användarer:
Klicka på
add (lägg
till) för att
konfigurera
varje ny lokal
användare
och klicka
sedan på
Next (nästa)
för att
masskapa
dem alla i
NSA. Ange
ett användarnamn från ett till 32 alfanumeriska tecken; det första tecknet måste vara alfabetiskt. Se din bruksanvisning för mer information om användarnamn. Om du återvänder till
denna skärm senare, ser du inte de användare du lade till i NSA på skärmen, men användarna har lagts till i NSA.
• Domän: Välj
NT4 Domain
(NT4-domän)
om din server
använder
operativsystemet Windows
NT. Välj
Active Directory Domain
(aktiv katalogdomän)
om den
använder
operativsystemet Windows
2000 eller senare. Ange IP-adressen för Windows serverdomänkontroller, Windows domänadministratör (Administrator är standard) och ett tillhörande lösenord. Du kan använda
ett domännamn om servern använder ett operativsystem äldre än Windows 2000.
86
Page 88

8 Klicka på
Finish
(slutför) så
att NSA
slutför
konfiguratione
n. Starta om
NSA om du
uppmanas till
det.
• Om du raderade standardvolymen utan att skapa
en annan volym, eller om du inte har en
intern hårddisk installerad, ser du följande skärm Maintenance Mode
(underhållsläge). I underhållsläget,
MÅSTE du skapa en intern volym.
Kommentar: Du måste installera
minst en hårddisk och
skapa en intern volym
innan du kan använda
en eller flera externa USB-hårddiskenheter tillsammans med NSA.
SVENSKA
9 Nästa gång du loggar in i NSA, går du direkt till skärmen Status Overview
(statusöversikt). Du kan öppna guiden igenom genom att klicka på ikonen i övre högra
87
Page 89

SVENSKA
hörnet av skärmen, enligt bild. Öppna någon av menyerna på navigationspanelelen till
vänster för mer avancerad konfiguration.
Kommentar: Se din bruksanvisning för mer information om dessa avancerade
skärmar.
5 Mappa NSA till datorns nätverksenhet
Att mappa en delning (en mapp
där du lagrar data) i NSA till en
Windows-nätverksenhet gör
det enkelt för Windowsanvändare att överföra filer till
och från NSA (med hjälp av
CIFS). Klicka på MAP-ikonen i NDU (se Section 3.1) för att visa den gemensamma NSAmappen i Windows Explorer.
88
Page 90

SVENSKA
Klicka på Tools (verktyg), Map
Network Drive (mappa
nätverksenhet). Välj den
nätverksenhet som du vill mappa
NSA till från listrutan Drive (enhet)
och bläddra till delningen i NSA
(Public (gemensam) är det enda
som finns tillgängligt om du inte har
skapat delningar i NSA ännu).
Sedan kan du enkelt dra filer från/
till dina lokala datorenheter till eller
från denna nätverksmapp.
Alternativt (från en annan dator
som t ex inte har NDU installerat),
öppna Windows Explorer och skriv
in två snedstreck följda av NSA:s systemnamn eller IP-adress.
89
Page 91

SVENSKA
6 Felsökning
PROBLEM MÖJLIG ÅTGÄRD
Ingen indikatorlampa
tänds när du slår på
strömmen.
Det går inte att öppna
NSA från min dator.
Kontrollera att NSA är påslagen.
Kontrollera att det inte finns några lösa sladdanslutningar, att inga
sladdar är trasiga och att Ethernet-sladdanslutningar inte
överstiger 100 m.
Kontrollera att strömsladden är ansluten till en aktiv strömkälla.
Om indikatorlamporna fortfarande inte tänds, kan du stå inför ett
maskinvaruproblem. I sådant fall bör du kontakta din lokala
återförsäljare.
Kontrollera Ethernet-sladdanslutningen från ditt nätverk till NSA.
Om NSA:s IP-adress har ändrats, ange den nya adressen som
webbplatsadress.
Kontrollera att datorns IP-adress finns i samma subnet som
NSA:s IP-adress (se avsnitt Section 3.2).
Pinga NSA från din dator. Kontrollera att datorns Ethernet-
adapter är installerad och fungerar som den ska. I en (Windows)
datorn, klicka på Start, (All) Programs, Accessories (tillbehör)
och sedan på Command Prompt (kommandoprompt). I
fönstret Command Prompt, ange "ping" följt av NSA:s LAN IPadress (192.168.1.3 är standard) och tryck sedan på [ENTER].
Använd Internet Explorer 6.0 (och senare) eller Netscape
Navigator 1.07 (och senare) med JavaScript aktiverat.
Se till att du anger användarnamn och lösenord korrekt (dessa
fält är skiftlägeskänsliga).
Visa din produkts certifikat
1 Gå till www.zyxel.com.
2 Välj din produkt från rullgardinslistrutan på ZyXEL:s hemsida för att gå till denna
produkts sida.
3 Välj det certifikat du vill titta på från denna sida.
90
Page 92

繁體中文
繁體中文
概覽
NSA-2400 ( 簡稱
NSA) 是兼具檔案分
享、資料備份及資料
保護功能的網路儲存
裝置,適合中小企業
及在家工作者使用。
本指引手冊說明如
何:
1 安裝硬碟
2 建立 NSA 連線
3 使用 NDU (NSA
探索公用程式 )
或網路瀏覽器存
取 NSA
4 使用精靈設定
NSA
5 從任何電腦將 NSA 對應至網路磁碟機
注意 : 請參閱 《使用手冊》,了解更多資訊以及 NSA 的規格。
安裝需求
開始作業之前您需要準備下列項目:
• NSA
• NSA 隨附的光碟,內含 NDU (NSA Discovery Utility ) 及 Genie Backup Manager 備份管
理軟體
• 電源線和電源供應系統 ( 外部 )
• 8 股金屬線的 Gigabit 乙太網路專用乙太網路線
• 最多 4 個 SATA-1 或 II 相容硬碟
• 螺絲起子,用來將硬碟安裝在磁碟托盤上
• USB 纜線 ( 選擇性:除非您要以連接相容 USB 2.0 磁碟機 的方式擴充儲存容量,否則不需
準備 )
• 安裝網路介面卡 (NIC) 和 TCP/IP 的電腦
• 網路接取裝置,例如交換器或集線器
91
Page 93

繁體中文
1 安裝硬碟
注意 : 硬碟並不支援熱插拔, 因此在移除或安裝硬碟之前,必須關閉 NSA 電源。
1 拉住 NSA 前門左側的耳片打開該裝置。
2 將閂鎖拉出,再抓緊托
盤兩側將磁碟托盤 1 移
出。小心不要弄壞閂
鎖。NSA 上貼有磁碟機
架 1 的標籤 ( 左上方
機架 )。
3 將磁碟托盤放置在平坦
表面上,面板朝上。將
附有螺絲孔的硬碟正面
朝上,放置在相同表面
上,然後將它滑入磁碟
托盤中。用螺絲固定硬
碟,如圖所示。
4 將托盤頂端推回 NSA 磁
碟機架 1,直到它卡在
適當位置為止,然後再
推上閂鎖,如圖所示。
5 重複步驟 1 至 3,將您
準備的其他硬碟裝上。
2 建立 NSA 連線
1 使用乙太網路線將 NSA
背面的乙太網路埠連接至您網路上的集線器、交換器或
路由器。請使用 8 股金屬線的乙太網路線進行 Gigabit
連線。
92
Page 94

繁體中文
2 將電源線一端連接至 NSA 背面的電源插槽,另一端則連接
至外部電源供應系統。將外部電源供應系統連接至電源插
座。
3 按下 NSA 前面的電源按鈕,開啟電源。請檢視前面板的指
示燈。PWR 指示燈亮起穩定的綠燈。在 NSA 成功開機之
後,SYS 指示燈會亮起穩定的綠燈 ( 需時約 50 秒 )。如
果 NSA 乙太網路埠正確連接至您的網路,LAN 指示燈會亮
起; 當 NSA 傳送或接收傳輸流量時,該指示燈便會閃爍。
注意 : 若要關閉 NSA 電源,按一下電源按鈕即可。SYS
指示燈閃爍代表 NSA 正在關機。
3 存取 NSA
您可以使用下列兩種方式的其中一種存取 NSA:使用 NDU
(NSA Discovery Utility) 或直接將 NSA 的 IP 位址輸入您
的網路瀏覽器中。
3.1 使用 NDU 探索 NSA 的 IP 位址
如果您的網路有 DHCP 伺服器可以為 NSA 指派 IP 位址及 / 或您的網路中有多台 NSA,請使
用 Windows 電腦上的 NDU (NSA 探索公用程式 )。
注意 : Genie Backup 備份程式探索 NSA 所使用的網路埠與 NDU 相同, 為避免發生
埠衝突,使用 NDU 時請勿執行 Genie Backup。
1 將隨附的光碟片置入 CD-ROM
機。下一個畫面應該會自動顯
示 ( 自動執行 )。按一下
Setup ( 設定 ) 圖示。
93
Page 95

繁體中文
2 NDU 安裝精靈開始執行。請遵
循安裝程式的指示。按一下
Finish ( 完成 ) 完成安裝程
序。
3 在 Windows XP 中,按一下開
始、所有程式、ZyXEL NSA-2400、ZyXEL NSA2400 Discovery Utility (NDU) 執行 NDU。若
是其他 Windows 作業系統,操作程序應該相類
似。如果電腦安裝的網路卡超過一張,則畫面
會先顯示提示,提醒您選取一張網路介面卡。
4 NDU 主畫面出現時會列出您網
路上所有的主機名稱、IP 位址
和所有 NSA 的狀態。按一下
Admin ( 管理員 ) 之下的圖示,
檢視網頁設定介面的主畫面,
如 章節 4 所示。( 如果您要變
更 NSA 的 IP 位址,按一下
Config ( 設定 ) 之下的圖示。
如果您要將 NSA 對應至
Windows 網路磁碟機,按一下
Map ( 對應 ) 之下的圖示 ( 請
參閱 章節 5)。若要重新整理畫
面,按一下 Discover ( 尋找
)。
3.2 透過網路瀏覽器直接存取
如果 NSA 無法從 DHCP 取得 IP 位址,則 NSA 的預設 IP 位址會還原為 192.168.1.3。將
NSA 的 IP 位址直接輸入網路瀏覽器之前,您必須確認您的電腦和 NSA 位在相同子網路下。
本節說明如何設定 Windows NT/2000/XP 電腦,使您取得的 IP 位址與 NSA 位在相同子網路
下。請參閱 《使用手冊》,取得其他作業系統的詳細 IP 位址設定。
94
Page 96

繁體中文
1 在 Windows XP 中,按一下開始,然後按一下控制台。在 Windows 2000/NT 中,按一下
開始、設定、控制台。
2 在 Windows XP 中,按一下網路連線。在 Windows 2000/NT 中,按一下網路和撥號連線。
3 用滑鼠右鍵按一下區域連線,然後在按一下內容。
4 選取網際網路通訊協定 (TCP/IP) ( 在
Win XP 一般索引標籤之下 ),然後按
一下內容。
5 網際網路通訊協定 TCP/IP 內容畫面開
啟 (Windows XP 中的一般索引標籤 )。
6 選取使用下列 IP 位址,再輸入一個介
於 192.168.1.1 至 192.168.1.254 之
間的 IP 位址,但 192.168.1.3 除
外,這是 NSA 的 IP 位址,在此範圍
之內的其他 IP 都可供您網路上的裝置
使用。
7 按一下確定關閉網際網路通訊協定
TCP/IP 內容視窗。
8 關閉區域連線內容視窗,然後再關閉網
路連線視窗。
9 啟動網路瀏覽器,輸入
「192.168.1.3」做為網站位址。
4 NSA 精靈設定
1 使用 NDU 或直接使用網路設定介面存取
NSA。
2 第一次存取 NSA 網路設定介面時,此畫面會
出現提示,告訴您這是使用 HTTPS 的安全連
線。按一下 OK ( 確定 ) 繼續進行下一個步
驟。
95
Page 97

3 網路瀏覽器用戶端使用憑證對
NSA 進行認證。預設 NSA 憑證最
可能出現名稱和憑證授權單位不
符;不過加密作業仍然會執行。
按一下 Yes ( 是 ) 繼續進行下一
個步驟。
4 當您存取 NSA 網路設定介面時,
會出現登入畫面。預設使用者名
稱和密碼分別為 「admin」和
「1234」。按一下 Login ( 登入
)。
繁體中文
5 建議您更換預設密碼。您可以使
用硬體重設按鈕,將裝置的 IP
位址恢復為預設設定,將管理員
密碼恢復為 1234 ( 您不會遺失
已儲存的任何資料 )。按一下
Apply ( 套用 ) 儲存您的變更然
後再前往下一個畫面,或忽略此
畫面,按一下 Skip ( 跳過 ) 前
往下一個畫面。
96
Page 98

6 第一次存取 NSA 網路設定介面
時,畫面會出現提示,指示您執
行設定精靈。按一下 Run Setup
Wizard ( 執行設定精靈 )。
4.1 設定精靈
每次在精靈中按一下 Next ( 下一步
) 時,您的設定就會儲存至 NSA。按
一下 Back ( 返回 ) 可返回精靈的前
一個畫面。
1 按一下 Next
( 下一步 ) 則
啟動精靈。
2 如果您要變更
NSA 的網路設定,
按一下 Modify
Network Settings
( 修改網路設定 )。
您也可以使用 NDU
進行此作業 ( 建議
作法 )。如果變更
IP 位址,則必須使
用新的 IP 位址才
能再存取網頁設定
介面。按一下 Next
( 下一步 ) 繼續進
行下一個步驟。
繁體中文
97
Page 99

4.1.1 磁碟設定精靈
3 此畫面為 Disk
Setup Wizard (
磁碟設定精靈 ) (
此畫面可以從
NSA 主畫面個別
存取 )。跳過此精
靈可讓 NSA 使用
目前或預設的磁
碟區設定。
功 t 如果您已
經建立磁碟
區,請選取
要修改的 (
現有 ) 磁
碟區,再按
一下 Next
( 下一步
)。
繁體中文
98
Page 100

繁體中文
• 此畫面會根據
您安裝的硬碟
數量顯示可能
的磁碟區設
定。在精靈中
您可以只建立
一個磁碟區。
已為您選擇建
議使用的預設
磁碟區。如果
您想要得到最
佳效能,請選
擇 RAID0,但
萬一發生磁碟
故障,資料將
沒有任何保
護。如果您有
四個磁碟,而
且想要有良好的寫入效能及資料重複功能,請選擇 RAID10。如果您在 NSA 中有兩個或四個
磁碟,請選擇 RAID 1;半數磁碟空間會用來備份資料。如果您有四個磁碟,則可選擇 RAID
5 ,其所提供的資料同位檢查和分割功能可在某個磁碟故障時幫您復原資料。選擇
RAID5_SPARE,則在 RAID5 磁碟區會有一個磁碟永遠處於待命狀態,以防磁碟故障。按一下
Next ( 下一步 ) 繼續進行下一個步驟 ( 不做任何儲存 )。
功 t 下一個畫
面會詢問您
要在磁碟區
保留多少快
照空間。快
照如同是資
料在特定時
間點的靜態
圖片,可儲
存於 NSA 磁
碟區中。
99
 Loading...