

Page 1
Operation Manual
© ZOOM Corporation
Reproduction of this manual, in whole or in part, by any means, is prohibited.
Page 2
USAGE AND SAFETY PRECAUTIONS
W
W
W
W
W
USAGE AND SAFETY PRECAUTIONS
•Pay close attention to the labelling of the battery to
SAFETY PRECAUTIONS
In this manual, symbols are used to highlight warnings and
cautions for you to read so that accidents can be prevented.
The meanings of these symbols are as follows:
This symbol indicates explanations about
extremely dangerous matters. If users
arning
ignore this symbol and handle the device
the wrong way, serious injury or death could
result.
This symbol indicates explanations about
dangerous matters. If users ignore this
Caution
symbol and handle the device the wrong
way, bodily injury and damage to the
equipment could result.
Please observe the following safety tips and precautions to
ensure hazard-free use of the MRS-8.
• Power requirements
Since power consumption of this unit is fairly high,
we recommend the use of an AC adapter whenever
arning
possible. When powering the unit from batteries, use
only alkaline types.
[AC adapter operation]
• Be sure to use only an AC adapter which supplies
9 V DC, 300 mA and is equipped with a "center
minus" plug (Zoom AD-0006). The use of an
adapter other than the specified type may damage
the unit and pose a safety hazard.
• Connect the AC adapter only to an AC outlet that
supplies the rated voltage required by the adapter.
• When disconnecting the AC adapter from the AC
outlet, always grasp the adapter itself and do not
pull at the cable.
• During lightning or when not using the unit for an
extended period, disconnect the AC adapter from
the AC outlet.
[Battery operation]
• Use four conventional IEC R6 (size AA) batteries
(alkaline).
• The MRS-8 cannot be used for recharging.
make sure you choose the correct type.
• When not using the unit for an extended period,
remove the batteries from the unit.
• If battery leakage has occurred, wipe the battery
compartment and the battery terminals carefully to
remove all remnants of battery fluid.
• While using the unit, the battery compartment
cover should be closed.
• Environment
To prevent the risk of fire, electric shock or
malfunction, avoid using your MRS-8 in
arning
environments where it will be exposed to:
• Extreme temperatures
• Heat sources such as radiators or stoves
• High humidity or moisture
• Excessive dust or sand
• Excessive vibration or shock
• Handling
•Never place objects filled with liquids, such as
vases, on the MRS-8 since this can cause electric
arning
shock.
• Do not place naked flame sources, such as lighted
candles, on the MRS-8 since this can cause fire.
The MRS-8 is a precision instrument. Do not exert
undue pressure on the keys and other controls. Also
Caution
take care not to drop the unit, and do not subject it to
shock or excessive pressure.
• Connecting cables and input and output jacks
You should always turn off the power to the MRS-8
and all other equipment before connecting or
Caution
disconnecting any cables. Also make sure to
disconnect all connection cables and the power cord
before moving the MRS-8.
• Alterations
Never open the case of the MRS-8 or attempt to
modify the product in any way since this can result in
arning
damage to the unit.
•Volume
Do not use the MRS-8 at a loud volume for a long
time since this can cause hearing impairment.
Caution
2
ZOOM MRS-8
Page 3

Usage Precautions
USAGE AND SAFETY PRECAUTIONS
* MIDI is a registered trademark of Association of
Musical Electronics Industry(AMEI).
• Electrical interference
For safety considerations, the MRS-8 has been designed to
provide maximum protection against the emission of
electromagnetic radiation from inside the device, and
protection from external interference. However, equipment
that is very susceptible to interference or that emits powerful
electromagnetic waves should not be placed near the MRS-
8, as the possibility of interference cannot be ruled out
entirely.
With any type of digital control device, the MRS-8 included,
electromagnetic interference can cause malfunctioning and
can corrupt or destroy data. Care should be taken to
minimize the risk of damage.
• Cleaning
Use a soft, dry cloth to clean the MRS-8. If necessary,
slightly moisten the cloth. Do not use abrasive cleanser, wax,
or solvents (such as paint thinner or cleaning alcohol), since
these may dull the finish or damage the surface.
• Backup
The data of MRS-8 can be lost because of malfunction or
incorrect operation. Backup your data.
• Copyrights
Except for personal use, unauthorized recording from
copyrighted sources(CDs, records, tapes, video clips,
broadcast material and so on) is prohibited.
ZOOM Corporation does not bear any liability for
injunctions regarding the copyright law infringement.
* SD Logo is a trademark.
* All trademarks and registered trademarks mentioned
in this manual are for identification purposes only and
are not intended to infringe on the copyrighted
properties of their respective owners.
Please keep this manual in a convenient place for
future reference.
ZOOM MRS-8
3
Page 4

Contents
USAGE AND SAFETY
PRECAUTIONS . . . . . . . . . . . . . . . . . . . . . 2
Introduction . . . . . . . . . . . . . . . . . . . . . . . . 7
Introducing the MRS-8 . . . . . . . . . . . . . . 8
Recorder . . . . . . . . . . . . . . . . . . . . . . . . . . . . . . 8
Rhythm section. . . . . . . . . . . . . . . . . . . . . . . . . 9
Mixer . . . . . . . . . . . . . . . . . . . . . . . . . . . . . . . . . .9
Effects . . . . . . . . . . . . . . . . . . . . . . . . . . . . . . . . 9
Names of Parts . . . . . . . . . . . . . . . . . . . . 10
Front panel . . . . . . . . . . . . . . . . . . . . . . . . . . . .10
Rear panel. . . . . . . . . . . . . . . . . . . . . . . . . . . . 11
Connections . . . . . . . . . . . . . . . . . . . . . . 12
Inserting SD Card and Batteries. . . . . . 13
Inserting an SD card. . . . . . . . . . . . . . . . . . . . 13
Inserting the batteries . . . . . . . . . . . . . . . . . . 13
Power On/Off. . . . . . . . . . . . . . . . . . . . . . 14
Power-on. . . . . . . . . . . . . . . . . . . . . . . . . . . . . 14
Power-off . . . . . . . . . . . . . . . . . . . . . . . . . . . . 14
Let’s Record . . . . . . . . . . . . . . . . . . . . . . 15
Quick Tour . . . . . . . . . . . . . . . . . . . . . . . . 17
Step 1: Preparations. . . . . . . . . . . . . . . . . . . . 17
1.1 Creating a new project . . . . . . . . . . . . . . . 17
1.2 Selecting the rhythm pattern to use. . . . . 18
Step 2: Recording the first track . . . . . . . . . . 20
2.1 Adjusting input sensitivity. . . . . . . . . . . . . 20
2.2 Applying the insert effect . . . . . . . . . . . . . 21
2.3 Selecting a track and recording . . . . . . . . 23
Step 3: Overdubbing . . . . . . . . . . . . . . . . . . . 25
3.1 Making settings for input sensitivity and
insert effect . . . . . . . . . . . . . . . . . . . . . . . . 25
3.2 Selecting a track and recording . . . . . . . . 25
Step 4: Mixing . . . . . . . . . . . . . . . . . . . . . . . . 26
4.1 Adjusting volume, panning, and EQ. . . . . . 26
4.2 Applying the send/return effect . . . . . . . . . 27
4.3 Applying the insert effect to a track. . . . . . 28
Step 5: Mixdown . . . . . . . . . . . . . . . . . . . . . . 29
5.1 Using the mastering effect . . . . . . . . . . . . . 29
5.2 Mixdown onto the master track . . . . . . . . . 30
Reference [Recorder] . . . . . . . . . . . . . . . 32
V-takes . . . . . . . . . . . . . . . . . . . . . . . . . . . . . . 32
Switching V-takes . . . . . . . . . . . . . . . . . . . . . . . . . 32
Changing the V-take name . . . . . . . . . . . . . . . . . . 32
Moving to a desired point in the song
(locate function) . . . . . . . . . . . . . . . . . . . . . 35
Setting marks in a song (marker function)
. . . . . . . . . . . . . . . . . . . . . . . . . . . . . . . . . . . 35
Setting a mark . . . . . . . . . . . . . . . . . . . . . . . . . . . . 35
Locating a mark. . . . . . . . . . . . . . . . . . . . . . . . . . . 36
Deleting a mark . . . . . . . . . . . . . . . . . . . . . . . . . . . 36
Playing back the same passage repeatedly
(A-B repeat function). . . . . . . . . . . . . . . . . . 36
Re-recording only a specified region
(punch-in/out function) . . . . . . . . . . . . . . . . 37
Manual punch-in/out . . . . . . . . . . . . . . . . . . . . . . . 37
Auto punch-in/out . . . . . . . . . . . . . . . . . . . . . . . . . 37
Recording several tracks on a master track
(mixdown function) . . . . . . . . . . . . . . . . . . . 38
About the master track . . . . . . . . . . . . . . . . . . . . . 38
Master track mixdown steps. . . . . . . . . . . . . . . . . 39
Playing the master track . . . . . . . . . . . . . . . . . . . . 39
Combining multiple tracks on one or two
tracks (bounce function) . . . . . . . . . . . . . . . 40
Making bounce settings . . . . . . . . . . . . . . . . . . . . 40
Executing bounce recording . . . . . . . . . . . . . . . . . 41
Recording drum/bass sound on audio tracks
(rhythm recording) . . . . . . . . . . . . . . . . . . . . 42
Selecting the recording source . . . . . . . . . . . . . . . 42
Rhythm recording procedure . . . . . . . . . . . . . . . . 42
Making settings for pre-count operation . . . 43
4
ZOOM MRS-8
Page 5

Contents
Reference [Track Editing] . . . . . . . . . . . 44
Editing a range of data . . . . . . . . . . . . . . . . . . 44
Basic steps for range editing. . . . . . . . . . . . . . . . 44
Copying a specified range of data. . . . . . . . . . . . 45
Moving a specified range of data . . . . . . . . . . . . 46
Erasing a specified range of data . . . . . . . . . . . . 47
Trimming a specified range of data. . . . . . . . . . . 47
Fade-in/fade-out of specified data range . . . . . . 48
Reversing a specified range of audio data . . . . . 49
Editing using V-takes . . . . . . . . . . . . . . . . . . . 50
Basic steps for V-take editing . . . . . . . . . . . . . . . 50
Erasing a V-take . . . . . . . . . . . . . . . . . . . . . . . . . 51
Copying a V-take. . . . . . . . . . . . . . . . . . . . . . . . . 51
Moving a V-take. . . . . . . . . . . . . . . . . . . . . . . . . . 51
Exchanging V-takes. . . . . . . . . . . . . . . . . . . . . . . 52
Importing a V-take from another project . . . . . . . 52
Track capture and swap. . . . . . . . . . . . . . . . . 53
Capturing a track. . . . . . . . . . . . . . . . . . . . . . . . . 53
Swapping track data . . . . . . . . . . . . . . . . . . . . . . 54
Reference [Mixer] . . . . . . . . . . . . . . . . . . 55
About the mixer . . . . . . . . . . . . . . . . . . . . . . . 55
Assigning input signals to recording
tracks . . . . . . . . . . . . . . . . . . . . . . . . . . . . . . 56
Adjusting the signal for each track
(track parameters) . . . . . . . . . . . . . . . . . . . 59
Linking two tracks (stereo link) . . . . . . . . . . . 60
Reference [Rhythm] . . . . . . . . . . . . . . . . 61
About the rhythm section. . . . . . . . . . . . . . . . 61
Drum kits and bass programs . . . . . . . . . . . . . . . 61
Rhythm patterns . . . . . . . . . . . . . . . . . . . . . . . . . 62
Rhythm song . . . . . . . . . . . . . . . . . . . . . . . . . . . . 62
Rhythm pattern mode and rhythm song
mode . . . . . . . . . . . . . . . . . . . . . . . . . . . . . . . . . 62
Playing rhythm patterns . . . . . . . . . . . . . . . . . 63
Selecting a rhythm pattern . . . . . . . . . . . . . . . . . 63
Changing the tempo . . . . . . . . . . . . . . . . . . . . . . 63
Changing the drum kit / bass program . . . . . . . . 64
Using the pads to play drum/bass sounds . . . . . 64
Creating a rhythm pattern . . . . . . . . . . . . . . . 66
Preparations . . . . . . . . . . . . . . . . . . . . . . . . . . . . 66
Drum sequence real-time input . . . . . . . . . . . . . . 67
Bass sequence real-time input . . . . . . . . . . . . . . 69
Drum sequence step input . . . . . . . . . . . . . . . . . 70
Bass sequence step input . . . . . . . . . . . . . . . . . . 71
Entering rhythm pattern chord information . . . . . 73
Changing the drum/bass sequence volume
level . . . . . . . . . . . . . . . . . . . . . . . . . . . . . . . . . 74
Assigning a name to a rhythm pattern. . . . . . . . . 75
Editing rhythm patterns . . . . . . . . . . . . . . . . . 75
Copying a rhythm pattern . . . . . . . . . . . . . . . . . . . 75
Erasing a rhythm pattern. . . . . . . . . . . . . . . . . . . . 76
Creating a rhythm song . . . . . . . . . . . . . . . . . 76
Selecting a rhythm song . . . . . . . . . . . . . . . . . . . . 76
Entering pattern information using step input. . . . 77
Using FAST for pattern information input . . . . . . . 79
Entering chord information . . . . . . . . . . . . . . . . . . 81
Entering other information. . . . . . . . . . . . . . . . . . . 83
Playing a rhythm song . . . . . . . . . . . . . . . . . . 84
Editing a rhythm song . . . . . . . . . . . . . . . . . . 85
Copying a specified range of measures . . . . . . . 85
Transposing the entire rhythm song . . . . . . . . . . 85
Copying a rhythm song . . . . . . . . . . . . . . . . . . . . 86
Erasing the rhythm song . . . . . . . . . . . . . . . . . . . 87
Assigning a name to a rhythm song . . . . . . . . . . 87
Importing rhythm patterns and rhythm songs
from another project . . . . . . . . . . . . . . . . . 88
Editing various settings of the rhythm
section . . . . . . . . . . . . . . . . . . . . . . . . . . . . . 89
Basic procedure . . . . . . . . . . . . . . . . . . . . . . . . . 89
Changing the length of the pre-count . . . . . . . . . 89
Changing the metronome volume. . . . . . . . . . . . 90
Adjusting the sensitivity of the pads . . . . . . . . . . 90
Checking the remaining amount of memory . . . . 90
Swapping the left/right pan position . . . . . . . . . . 90
Reference [Effects] . . . . . . . . . . . . . . . . 91
About the effects . . . . . . . . . . . . . . . . . . . . . . 91
Using the insert effect . . . . . . . . . . . . . . . . . . 92
About insert effect patches . . . . . . . . . . . . . . . . . 92
Changing the insert location of the insert
effect . . . . . . . . . . . . . . . . . . . . . . . . . . . . . . . . . 93
Selecting the patch for the insert effect . . . . . . . 93
Editing an insert effect patch . . . . . . . . . . . . . . . 95
Storing or swapping insert effect patches . . . . . 98
Assigning a name to an insert effect patch. . . . . 98
Applying the insert effect only to the monitor
signal. . . . . . . . . . . . . . . . . . . . . . . . . . . . . . . . . 99
Using the send/return effect . . . . . . . . . . . . 100
About the send/return effect patches . . . . . . . . . 100
Selecting a send/return effect patch. . . . . . . . . . 100
Editing a send/return effect patch. . . . . . . . . . . . 100
Storing or swapping send/return effect
patches . . . . . . . . . . . . . . . . . . . . . . . . . . . . . . . 101
Assigning a name to a send/return effect
patch . . . . . . . . . . . . . . . . . . . . . . . . . . . . . . . . . 102
Importing patches from another project . . . . 102
ZOOM MRS-8
5
Page 6

Contents
Reference [Projects]. . . . . . . . . . . . . . . 104
About projects . . . . . . . . . . . . . . . . . . . . . . . 104
Working with projects. . . . . . . . . . . . . . . . . . 104
Basic procedure . . . . . . . . . . . . . . . . . . . . . . . . 104
Loading a project . . . . . . . . . . . . . . . . . . . . . . . 105
Creating a new project . . . . . . . . . . . . . . . . . . . 105
Copying a project . . . . . . . . . . . . . . . . . . . . . . . 106
Erasing a project . . . . . . . . . . . . . . . . . . . . . . . . 106
Changing the project name . . . . . . . . . . . . . . . . 107
Protecting a project . . . . . . . . . . . . . . . . . . . . . . 107
Reference [MIDI]. . . . . . . . . . . . . . . . . . 108
About MIDI . . . . . . . . . . . . . . . . . . . . . . . . . . 108
What you can do using MIDI . . . . . . . . . . . . 108
Making MIDI-related settings . . . . . . . . . . . 108
Basic procedure . . . . . . . . . . . . . . . . . . . . . . . . 108
Setting the drum kit/bass program MIDI
channel . . . . . . . . . . . . . . . . . . . . . . . . . . . . . . 109
Turning Timing Clock messages on or off. . . . . 109
Turning Song Position Pointer messages on or
off . . . . . . . . . . . . . . . . . . . . . . . . . . . . . . . . . . 110
Turning Start/Stop/Continue messages on or
off . . . . . . . . . . . . . . . . . . . . . . . . . . . . . . . . . . 110
Turning MIDI Time Code (MTC) messages on or
off . . . . . . . . . . . . . . . . . . . . . . . . . . . . . . . . . . 110
Reference [Other Functions] . . . . . . . 111
Playing several projects continuously
(sequence play) . . . . . . . . . . . . . . . . . . . . . 111
Creating a playlist . . . . . . . . . . . . . . . . . . . . . . . 111
Playing a playlist . . . . . . . . . . . . . . . . . . . . . . . . 112
Using the tuner function . . . . . . . . . . . . . . . 114
Using the chromatic tuner . . . . . . . . . . . . . . . . . 114
Using other tuning types . . . . . . . . . . . . . . . . . . 115
Switching the level meter display type . . . . 116
Adjusting the display contrast and
backlight . . . . . . . . . . . . . . . . . . . . . . . . . . 116
Changing the SD card . . . . . . . . . . . . . . . . . 117
Formatting an SD card . . . . . . . . . . . . . . . . . 118
Checking the available SD card capacity/
project size . . . . . . . . . . . . . . . . . . . . . . . . . 118
Troubleshooting. . . . . . . . . . . . . . . . . . . 120
Problems during playback. . . . . . . . . . . . . . 120
Problems during recording . . . . . . . . . . . . . 120
Problems with effects . . . . . . . . . . . . . . . . . 121
Problems with the rhythm section . . . . . . . 121
Problems with MIDI . . . . . . . . . . . . . . . . . . . 121
Other problems . . . . . . . . . . . . . . . . . . . . . . 122
Appendix . . . . . . . . . . . . . . . . . . . . . . . . 123
Specifications. . . . . . . . . . . . . . . . . . . . . . . . 123
Effect Parameters . . . . . . . . . . . . . . . . . . . . 125
Insert Effect . . . . . . . . . . . . . . . . . . . . . . . . . . . . 125
Send/return Effect . . . . . . . . . . . . . . . . . . . . . . . 133
Effect Patch . . . . . . . . . . . . . . . . . . . . . . . . . 134
Insert Effect . . . . . . . . . . . . . . . . . . . . . . . . . . . . 134
Send/return Effect . . . . . . . . . . . . . . . . . . . . . . . 139
Rhythm Pattern . . . . . . . . . . . . . . . . . . . . . . 140
Drum Kits/Bass Programs . . . . . . . . . . . . . . 142
Instrument/MIDI note number chart . . . . . . 142
Files on SD card . . . . . . . . . . . . . . . . . . . . . 142
MIDI implementation . . . . . . . . . . . . . . . . . . 143
MIDI implementation chart . . . . . . . . . . . . . 144
INDEX . . . . . . . . . . . . . . . . . . . . . . . . . . 145
6
ZOOM MRS-8
Page 7

Introduction
Thank you for selecting the
The MRS-8 is a fascinating product with the following features.
• Four major functions in a compact unit
The MRS-8 combines an 8-track SD card recorder, effect device, digital mixer, and drum/bass machine in a single
unit of amazingly compact dimensions. Everything you need to create music is right there. Use it to pre-produce a
song at home or take it into the studio for some serious recording work. The MRS-8 is a great tool that will go
anywhere.
•Versatile input configuration handles a wide variety of sources
In addition to the standard phone type jack, the MRS-8 features a combo type connector that can handle XLR plug
leads (balanced) as well as phone plug leads (balanced and unbalanced). Guitar, bass, synthesizer and various other
sources as well as microphones and direct boxes can be connected easily. A high-performance microphone is also
built in, which is great for recording acoustic guitar or vocals.
• Recorder with 8 tracks x 10 virtual takes
The recorder section provides four mono tracks and two stereo tracks, resulting in a total of eight tracks. Each track
has ten virtual tracks (V-takes). A bounce function lets you play all tracks and record the result on an empty V-take.
• Dedicated master track for mixdown
The master track is separate from the regular recording tracks and is optimized for mixdown with a minimum of
fuss. A sequence play function lets you play the master tracks of multiple songs in succession, which is convenient
for moving mixed-down songs onto an external recorder in one go.
• Full-function mixer
The built-in digital mixer handles the audio tracks and drum/bass sounds and allows adjusting parameters such as
level, panning, EQ, and effect intensity. The result is a full-fledged stereo mix to which the input signal can also be
added.
•Two versatile effects
The MRS-8 provides an insert effect for processing the input signal and/or any track, and a send/return effect that
is used via the mixer send/return loop. The insert effect can be used as mastering effect for the stereo mix, for
adjusting the sound pressure and tonal quality during mixdown.
• Rhythm section can be used to provide guide rhythm or accompaniment
Realistic PCM sources produce drum and bass sounds that can be played in more than 500 rhythm patterns. By
programming a combination of patterns and setting a chord progression, you can build the rhythm accompaniment
to an entire song.
• Compatible with system-wide synchronization
The MIDI OUT connector can supply synchronization messages such as MIDI time code information and MIDI
clock information. In combination with a computer, MIDI sequencer or similar device, this lets you create a system
with professional-level synchronization.
• Built-in tuner with support for various tuning methods
Besides the standard chromatic type, the tuner function of the MRS-8 also caters for 7-string guitar, 5-string bass,
and other special tuning needs.
In order to take full advantage of the MRS-8’s versatile functions and to ensure trouble-free enjoyment, please
read this manual carefully. Keep this manual in a safe place together with the warranty card.
ZOOM MRS-8 MultiTrak Recording Studio
(simply called the “
MRS-8
” in this manual).
ZOOM MRS-8
7
Page 8
Introducing the MRS-8
The MRS-8 is internally divided into the following four sections.
●
Recorder
Records and plays back audio signals.
●
Rhythm section
Uses the internal drum/bass sound source to play
rhythms.
●
Mixer
Mixes the signals from the recorder and the drum/bass
sound source into a stereo signal, for output via the output
jacks and for mixdown on dedicated master tracks.
●
Effects
Process input signals, recorder playback signals, or drum/
bass sound source signals in various ways, to achieve
various sound characteristics.
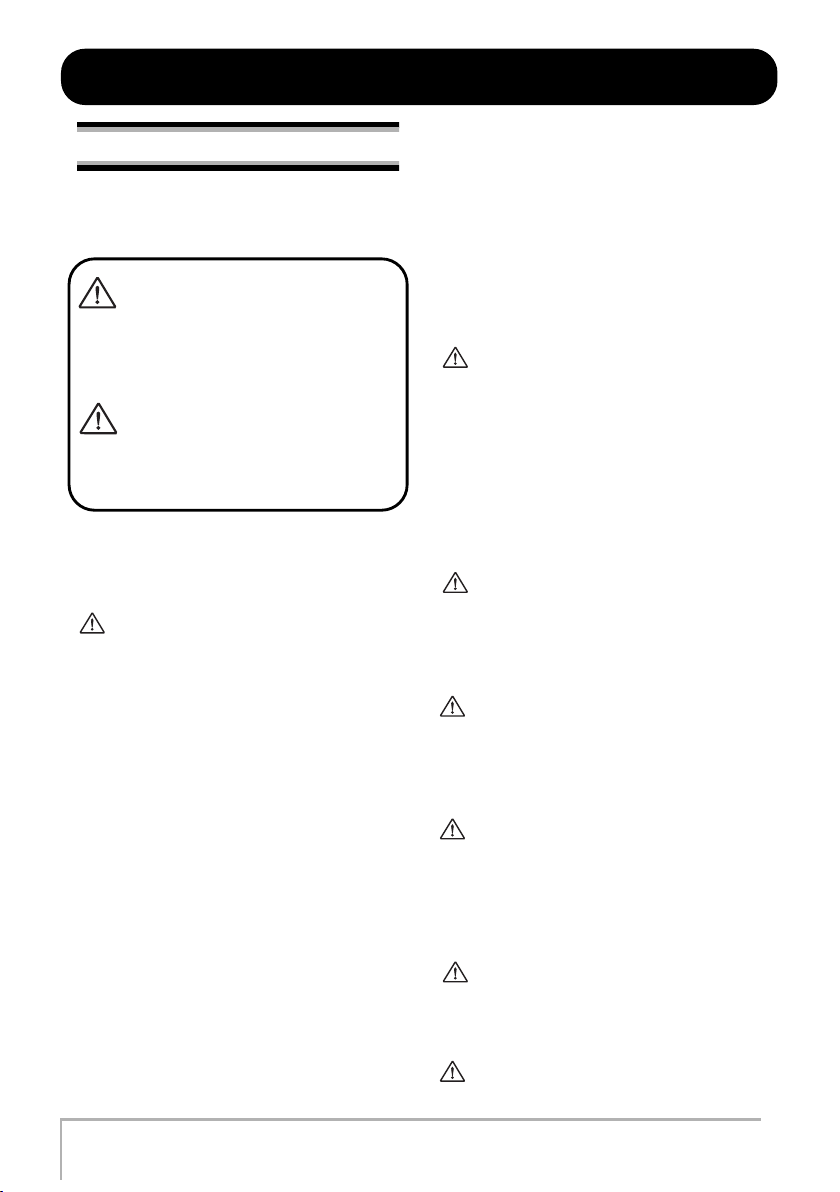
The following diagram shows the relationship and signal
flow between each section.
Recorder
The recorder section of the MRS-8 has eight audio tracks.
(A “track” is a separate section for recording audio data.)
There are four mono tracks (track 1 – 4) and two stereo
tracks (tracks 5/6 and 7/8). Up to 2 tracks can be recorded
simultaneously and up to 8 tracks can be played back
simultaneously.
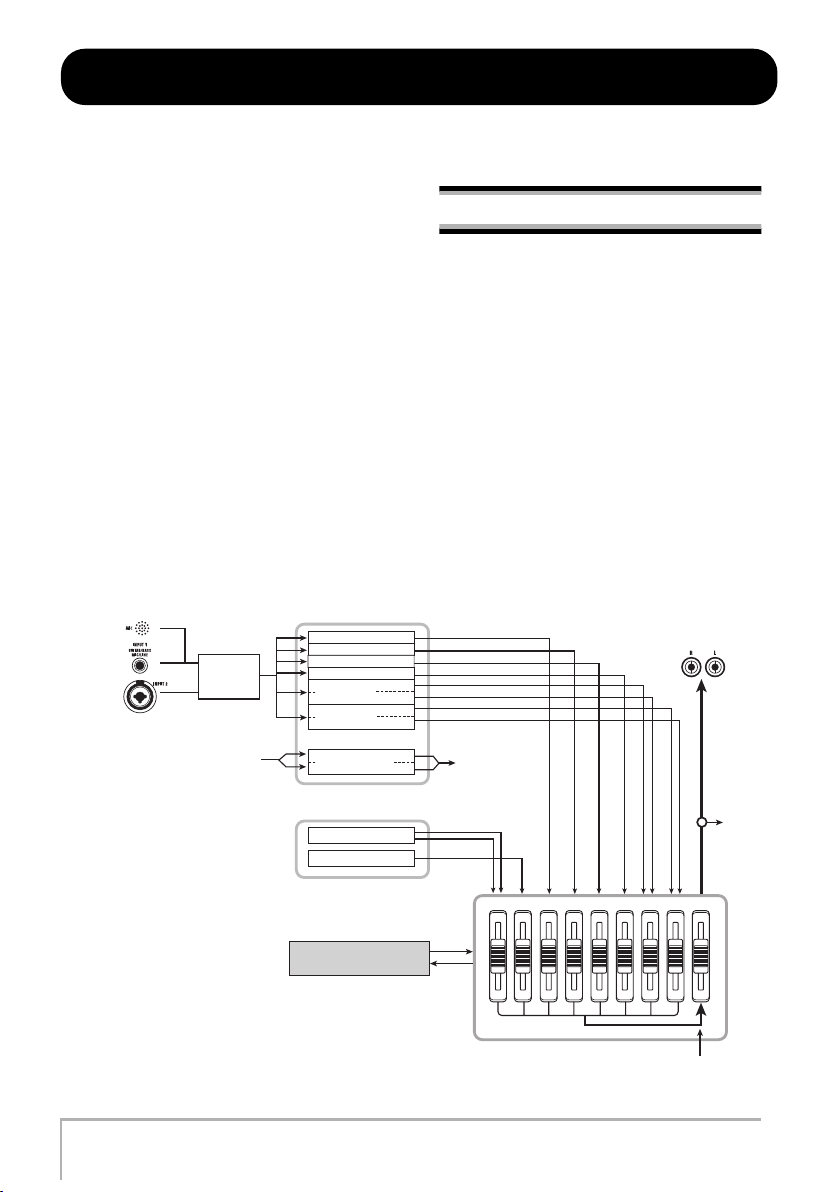
Each of the tracks has ten switchable virtual tracks (called
“V-takes”). For each track, one V-take can be selected for
recording/playback.
INPUT 1
Built-in
mic
INPUT 2
8
or
after [MASTER] fader
Insert
effect
From immediately
Recorder
Tra ck 1
Tra ck 2
Tra ck 3
Tra ck 4
Tracks 5/6
Tracks 7/8
Master Track
Rhythm section
Drum sound source
Bass sound source
Send/return effect
To immediately
before
[MASTER] fader
BASSDRUM
Mixer
MASTER OUTPUT
To
master
track
MASTER
7/85/64321
From master track
ZOOM MRS-8
Page 9
Introducing the MRS-8
V
Currently selected V-take on tracks 1 – 8
and master track
Mixer
-take
1
2
3
4
5
6
7
8
9
10
1
234 5/6 7/8
Tra cks
Master track
The recorder section also provides a set of stereo tracks
The playback signals from the audio tracks and the drum/
bass sounds are sent to the built-in digital mixer to create
a stereo mix. For each track/sound, parameters such as
volume, panning, and 2-band EQ (Hi and Lo) can be
controlled independently.
The resulting stereo mix is sent to the output jacks and
can be sent to an empty V-take of the master track or any
other tracks, for mixdown and bounce operation.
Effects
which are separate from the normal audio tracks. This is
called the master track. The master track is reserved for
use in mixdown.
The MRS-8 provides two types of effects: insert effect
and send/return effect. These effects have the
characteristics described below.
Rhythm section
The MRS-8 contains a rhythm section that operates in
sync with the recorder. It offers 511 accompaniment
patterns (called “rhythm patterns”) that use the internal
drum/bass sound generator. You can use the
preprogrammed patterns, modify them in part, or create
entirely new patterns from scratch.
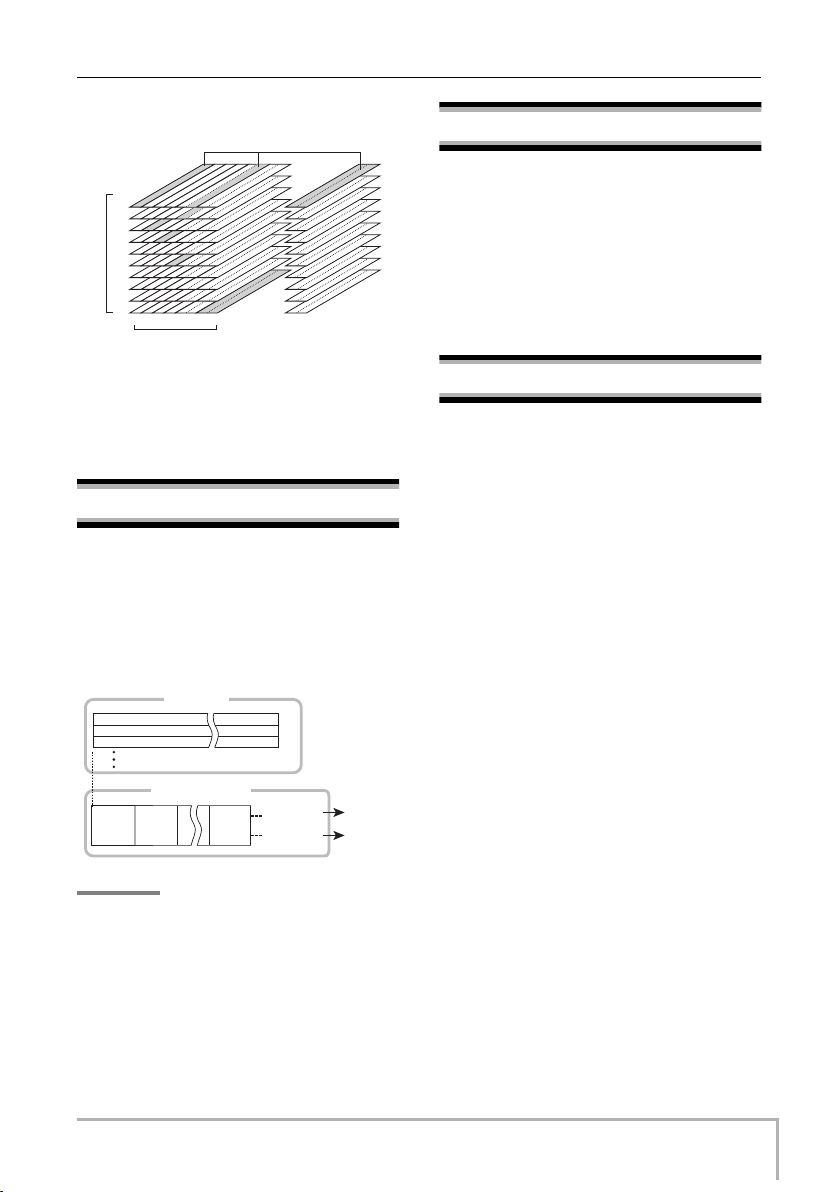
■
Insert effect
This effect can be inserted at one of the following three
points in the signal path.
(1) Immediately after the input
(2) In the output of any audio track or drum
track/bass sound
(3) Immediately before the [MASTER] fader
In the default condition, position (1) (immediately after
input) is selected. When the setting is changed to (2), only
a selected track or drum/bass sound is processed by the
Track 1
Track 2
Track 3
Recorder
effect. When the setting is changed to (3), the final stereo
Rhythm section
Rhythm
pattern
Rhythm
pattern
Rhythm
pattern
Drum sound
Bass sound
To mixer
To mixer
HINT
The drum/bass sound sources can be also played with the
pads on the top panel.
You can arrange rhythm patterns in the desired order of
mix can be processed.
■
Send/return effect
This effect is internally connected to the send/return loop
of the mixer section. The effect includes reverb, chorus
and other processing types.
The level of the signal supplied to the send/return effect
(send level) for each track/sound adjusts the depth of the
effect. Raising the send level will produce a deeper effect
for that track or sound.
playback, and program chords and tempo to create the
rhythm accompaniment for an entire song. (This is called
a “rhythm song”.) Up to 10 rhythm songs can be created,
among which one is selected for editing/playback.
ZOOM MRS-8
9
Page 10
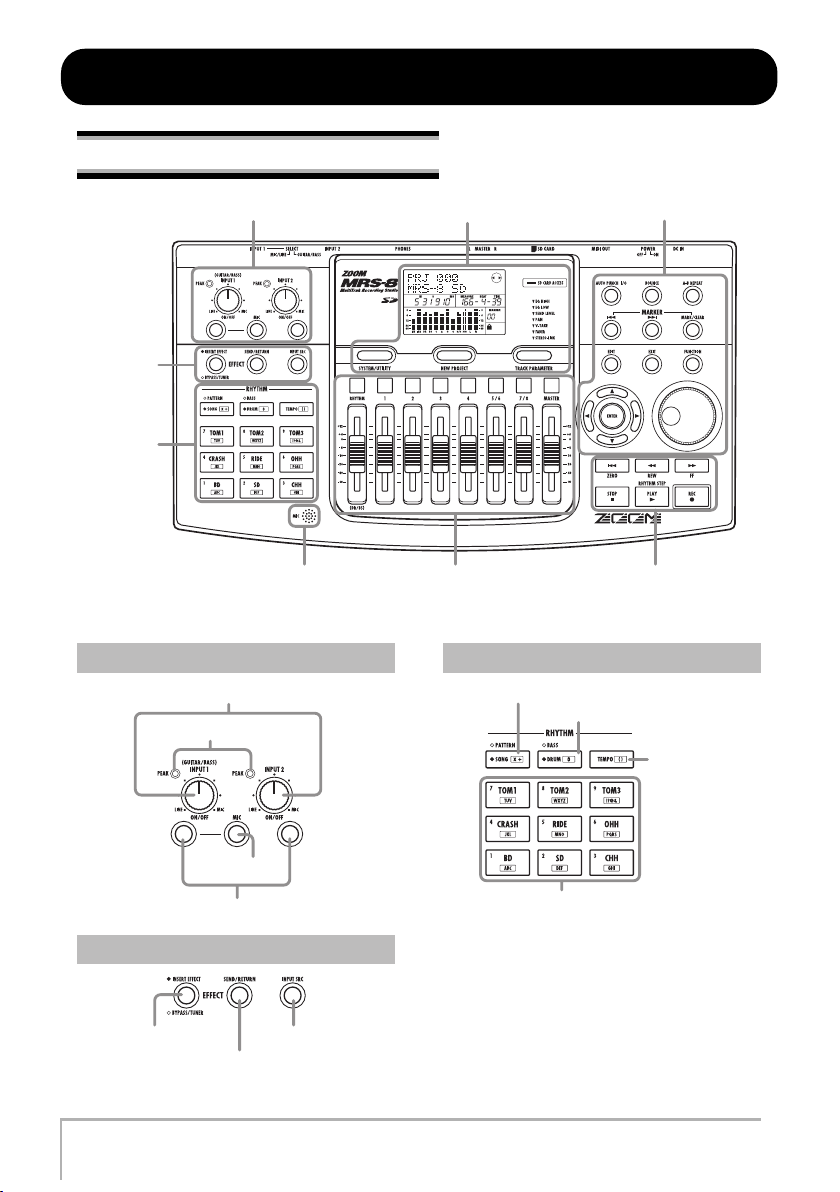
Front panel
Names of Parts
Effect
section
Rhythm
section
Input section
[INPUT] controls 1/2
[PEAK] indicators
Input section
Built-in mic
Display section
Fader section Transport section
Control section
Rhythm section
[SONG/PATTERN] key
[DRUM/BASS] key
[TEMPO] key
[MIC] key
INPUT [ON/OFF] keys 1/2
Effect section
[INSERT EFFECT] key [INPUT SRC] key
[SEND/RETURN] key
10
Pads 1 – 9
ZOOM MRS-8
Page 11
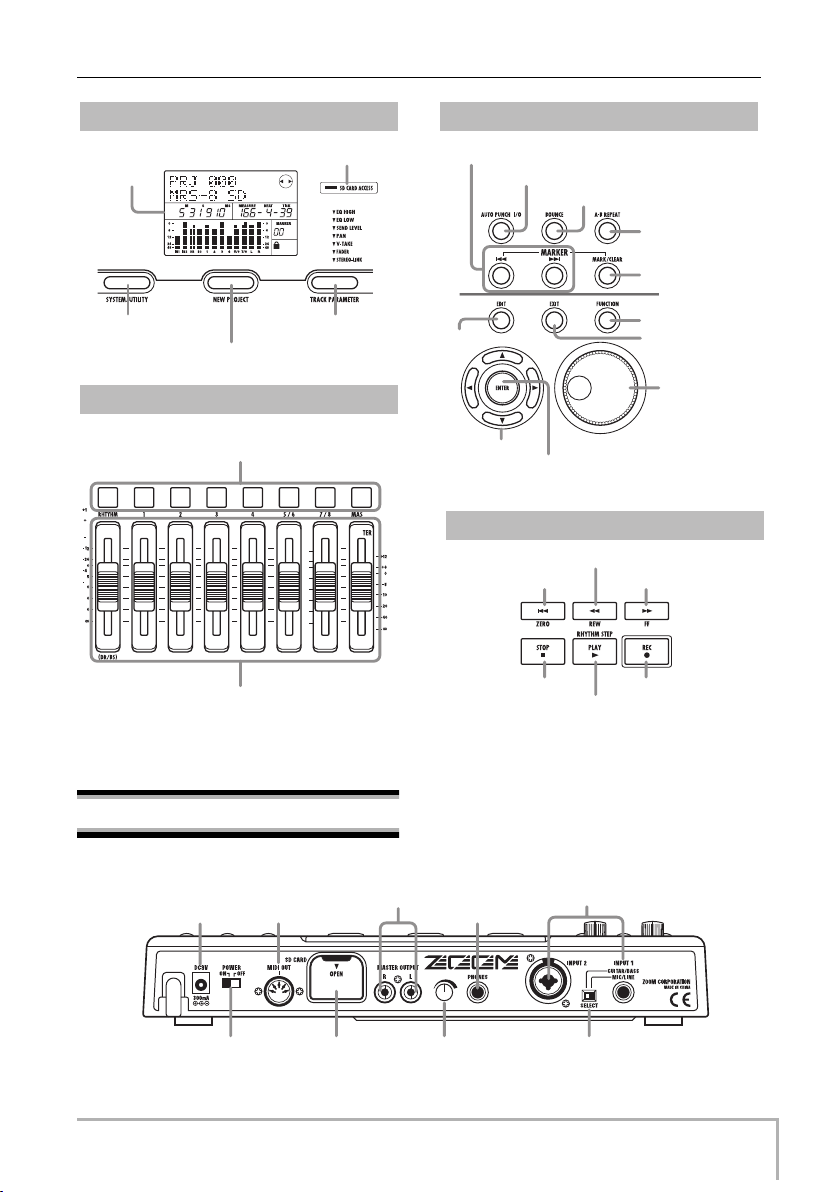
Names of Parts
Display section
[SD CARD ACCESS] indicator
Display
[SYSTEM/UTILITY] key
[NEW PROJECT] key
[TRACK PARAMETER] key
Fader section
([RHYTHM], 1 – 4, 5/6, 7/8, [MASTER])
Faders ([RHYTHM], 1 – 4, 5/6, 7/8, [MASTER])
Status keys
Control section
MARKER [U] / [I] keys
[AUTO PUNCH I/O] key
[BOUNCE] key
[EDIT] key
Cursor keys
[ENTER] key
Transport section
REW [T] key
ZERO [U] key
STOP [P] key REC [O] key
[A-B REPEAT] key
[MARK/CLEAR] key
[FUNCTION] key
[EXIT] key
Dial
FF [Y] key
PLAY [R] key
Rear panel
DC 9V jack
[POWER ON/OFF]
ZOOM MRS-8
switch
MIDI OUT
connector
OUTPUT jacks
Card slot [PHONES]
MASTER
volume control
PHONES jack
INPUT 1/2
connectors
[INPUT 1 SELECT]
switch
11
Page 12
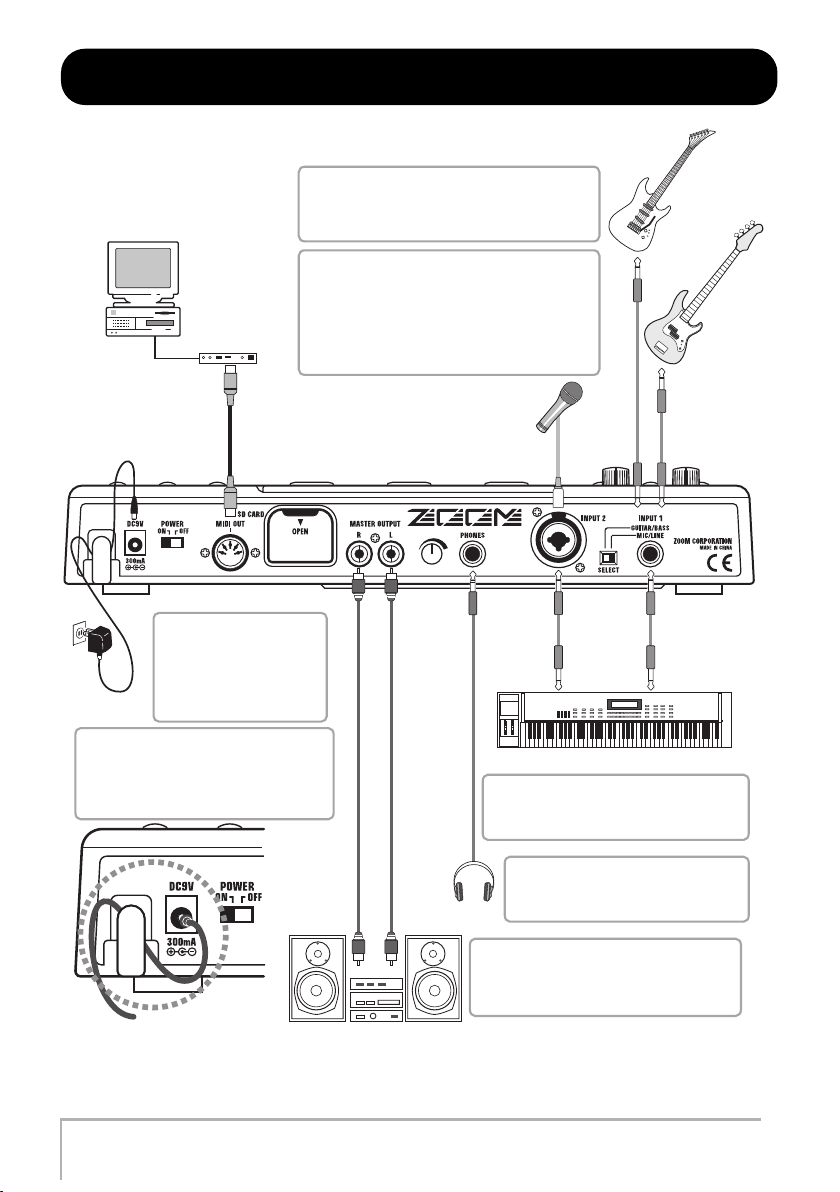
MIDI sequencer (computer etc.)
MIDI interface
MIDI IN
Connections
The INPUT 1 connector accepts a standard phone
plug cable (unbalanced). The INPUT 2 connector
accepts an XLR plug cable (balanced) or a phone
plug cable (balanced or unbalanced).
When a passive electric guitar/bass or other
instrument with high output impedance is
connected to INPUT 1, set the [INPUT 1 SELECT]
switch to GUITAR/BASS.
When an active electric guitar/bass, a dynamic
microphone, synthesizer or other device with low
output impedance is connected to INPUT 1, set
the [INPUT 1 SELECT] switch to MIC/LINE.
Guitar
Bass
Rear panel
To power the MRS-8 from
an AC outlet, be sure to use
only the ZOOM AD-0006
(available separately). Using
another AC adapter can
AC adapter
Loop the cable of the AC adapter around
the hook as shown in the diagram before
connecting it to the [DC 12V] jack. This
will prevent the plug from being pulled out
if the AC adaptor cable is accidentally
pulled.
lead to malfunction and
damage.
Monitor system (audio components or amplified speakers etc.)
Dynamic or condenser microphone
R
Synthesizer or sampler etc.
When connecting stereo output devices
such as a synthesizer or CD player, connect
the L output of the external device to INPUT
1 and the R output to INPUT 2.
To monitor the sound with headphones,
connect a pair of headphones to the
PHONES jack. The listening volume can
Headphones
be adjusted with the PHONES control.
To prevent damage to the speakers of your
monitor system, turn off the power of the
system connected to the output jacks (or
turn the volume all the way down) before
you make connections.
L
12
ZOOM MRS-8
Page 13
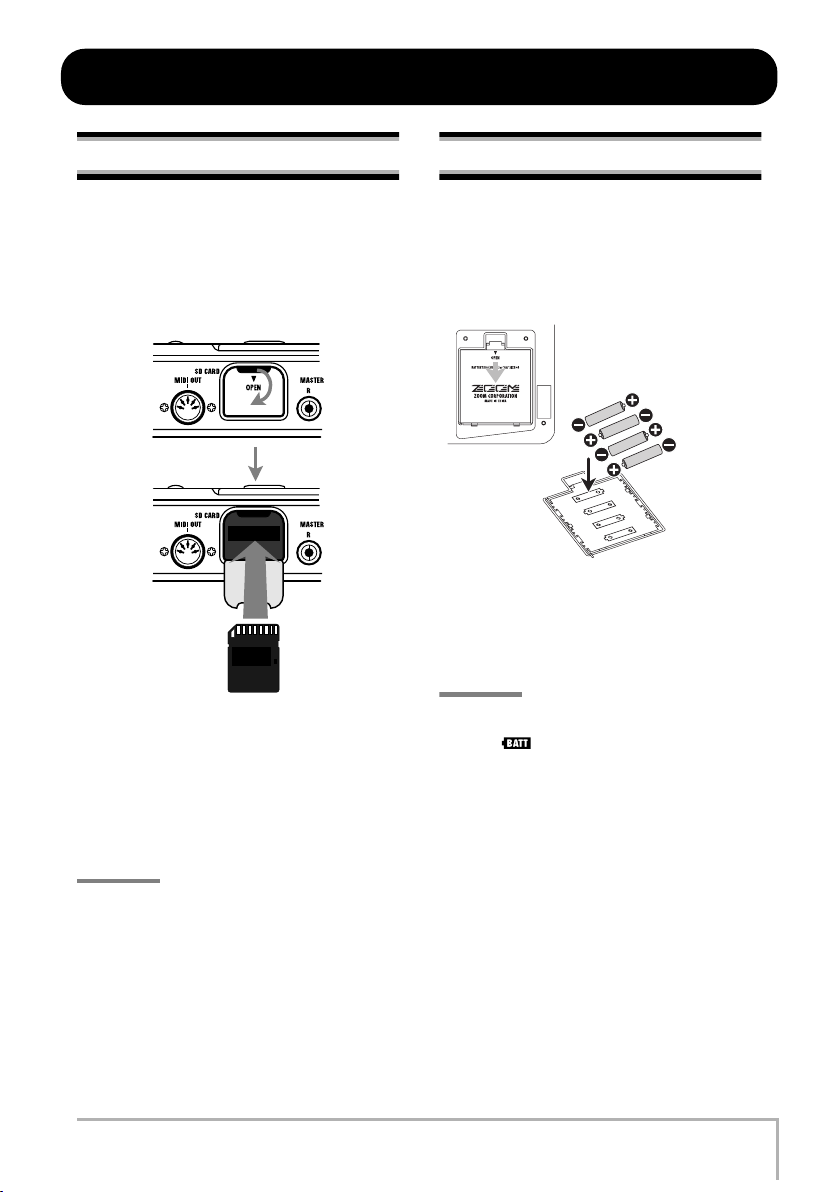
Inserting SD Card and Batteries
Inserting an SD card
For operating the MRS-8, an SD card or a miniSD card
with adapter (capacity 16 MB or more) must be inserted
as storage media. Before inserting a card, verify that the
write protect feature is turned off. Make sure that power
to the MRS-8 is turned off, and then insert the card as
shown below.
SD card
When inserting the card, push it all the way into the slot.
To remove the card, turn power off and then pull the card
out.
To remove or insert a card with the power turned on, be
sure to follow the procedure described on page 117.
Otherwise data may be permanently destroyed.
NOTE
• If the card is inserted with wrong orientation, it will not go all
the way in. Never try to force the card, as this may damage it.
Inserting the batteries
The MRS-8 can be powered from batteries. Purchase the
correct batteries and insert them as described below.
1.
Turn the unit over and open the battery
compartment cover.
IEC R6 (size AA) battery x 4
MRS-8 bottom view
Battery compartment
2.
Insert four IEC R6 (size AA) batteries into
the compartment. (Use alkaline batteries.)
3.
Close the battery compartment cover.
NOTE
If you are operating the unit on battery power and the
indication [ ] appears in the bottom right of the
display, the batteries are almost exhausted. Replace all four
batteries with fresh ones as soon as possible.
ZOOM MRS-8
13
Page 14
Power On/Off
PRJ 000
MRS-8 SD
To turn the MRS-8 on and off, follow the steps described below.
Power-on
1.
Make sure that the MRS-8 and peripheral
equipment is turned off.
Turn down the volume controls of connected equipment,
the MRS-8, and the monitor system.
2.
Insert an SD card into the card slot.
3.
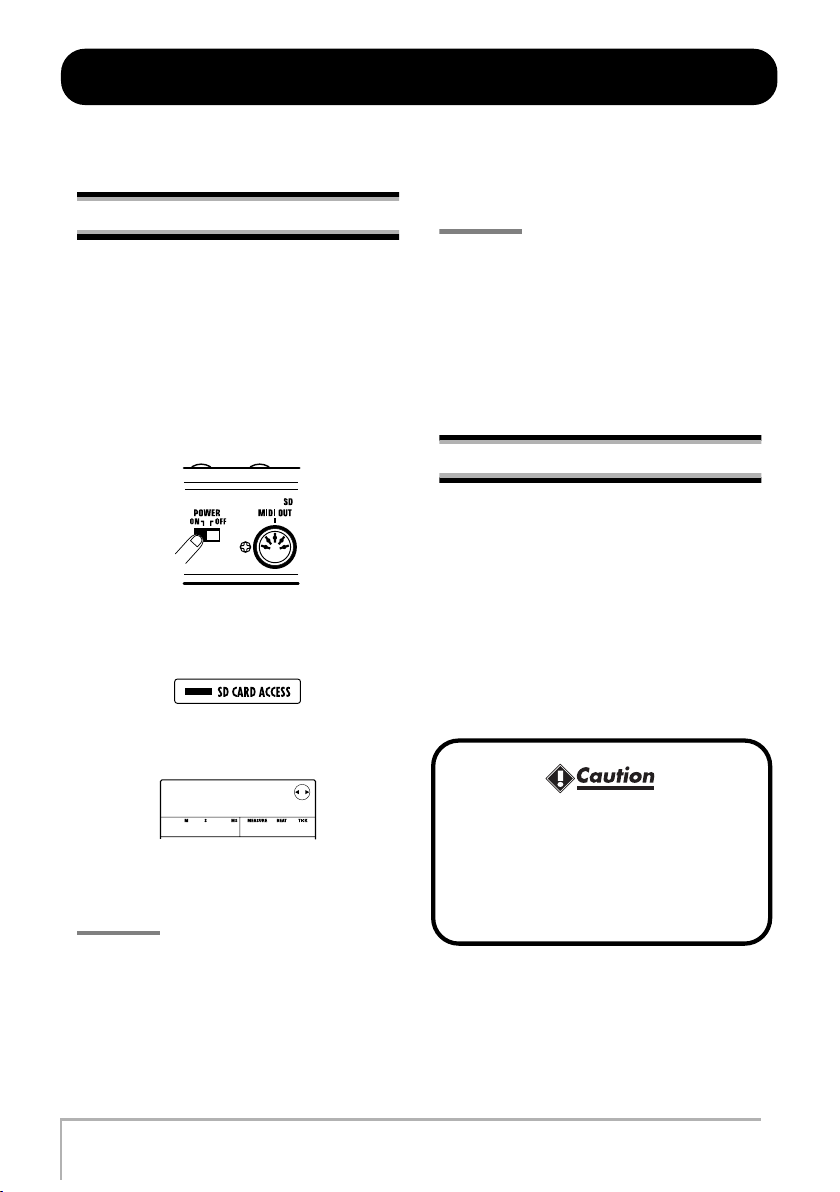
Set the [POWER ON/OFF] switch of the
MRS-8 to ON.
Data loading for the inserted SD card starts. During this
interval, the [SD CARD ACCESS] indicator lights up.
After a while, the following screen appears.
complete, the main screen appears.
HINT
•You can also format an SD card after the MRS-8 has started
up, as described on page 118.
• Changing the SD card while the MRS-8 is operating is
possible by following the procedure described on page 117.
4.
Turn on the connected instrument and the
monitor system in that order.
Power-off
1.
Turn down the volume at the monitor
system.
2.
Turn off the monitor system and the
connected instrument in that order.
3.
Set the [POWER ON/OFF] switch of the
MRS-8 to OFF.
The indication “GoodBye See You!” appears on the
display and the unit is turned off. Any settings and other
information are stored automatically on the SD card.
This is called the main screen. From this screen, you can
access various recording and playback functions.
HINT
To return to the main screen from other screens, press the
[EXIT] key repeatedly.
If an SD card that is not ready for use in the MRS-8 is
inserted, the indication “FORMAT?” appears when you
turn the MRS-8 on. If you press the [ENTER] key at this
point, the SD card will be formatted. When formatting is
14
PRJ 000
MRS-8 SD
1-00 0 1-0
• Never turn power on or off by connecting or
disconnecting the AC adapter. Otherwise data
may be destroyed.
• In particular, if you disconnect the AC adapter
while the [SD CARD ACCESS] indicator is lit,
all data may be permanently destroyed.
ZOOM MRS-8
Page 15
Let’s Record
INPUT
REC LVL
This section demonstrates the basics of recording and playback with the MRS-8. As an example, we explain how to record
an electric guitar connected to the INPUT 1 connector.
1.
Connect the guitar to the INPUT 1
connector and set the [INPUT 1 SELECT]
switch to GUITAR/BASS (for a passive
guitar) or MIC/LINE (for an active guitar).
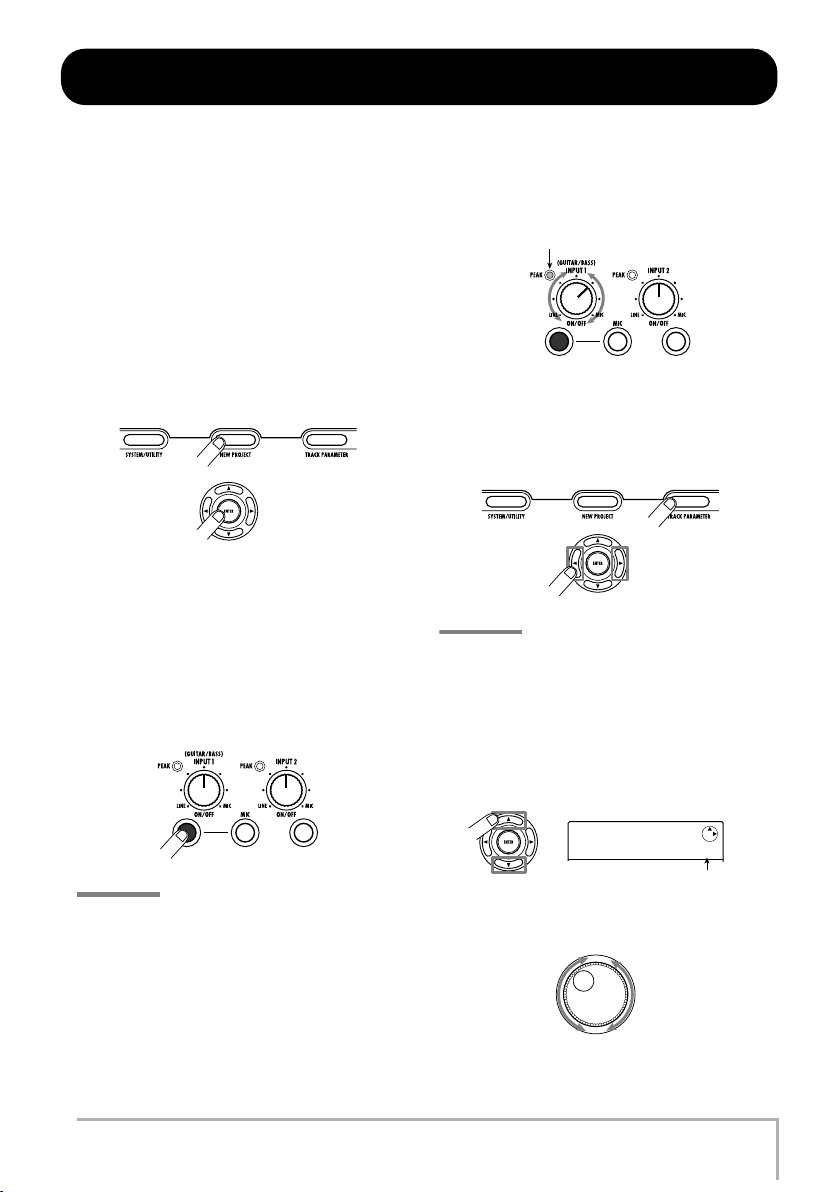
2.
Press the [NEW PROJECT] key in the
display section. Verify that the indication
“PRJNOxxx (where xxx is the project
number) is shown on the first line of the
display. Then press the [ENTER] key.
A new project is created, and the unit goes into recording
standby mode. If necessary, you can edit the project name
in this condition (→ p. 105).
3.
Verify that the [MIC] key is flashing or out.
Then press the INPUT [ON/OFF] key 1 so
that the key is lit.
In this condition, the INPUT 1 connector is active.
5.
NOTE
If “INPUT” is not shown on the first line of the display, check
whether the INPUT [ON/OFF] key is lit.
6.
From this screen, you can adjust the input signal
recording level (the signal level sent to the track).
Flickers occasionally
Press the [TRACK PARAMETER] key in the
display section, and use the cursor left/
right keys to bring up the indication
“INPUT” on the first line of the display.
Use the cursor up/down keys to bring up
the following indication on the display.
HINT
If the [MIC] key is lit, the built-in microphone is active instead
of the INPUT 1 connector. In such a case, press the [MIC] key
once to switch the key to flashing status.
4.
While playing your guitar, use the [INPUT]
control 1 to adjust the input sensitivity.
Make the adjustment so that the [PEAK] indicator
flickers slightly when you play your instrument at its
loudest volume.
ZOOM MRS-8
INPUT
REC LVL
Recording level setting
7.
Turn the dial to adjust the recording level.
The current signal level can be checked using the meter
100
15
Page 16
Let’s Record
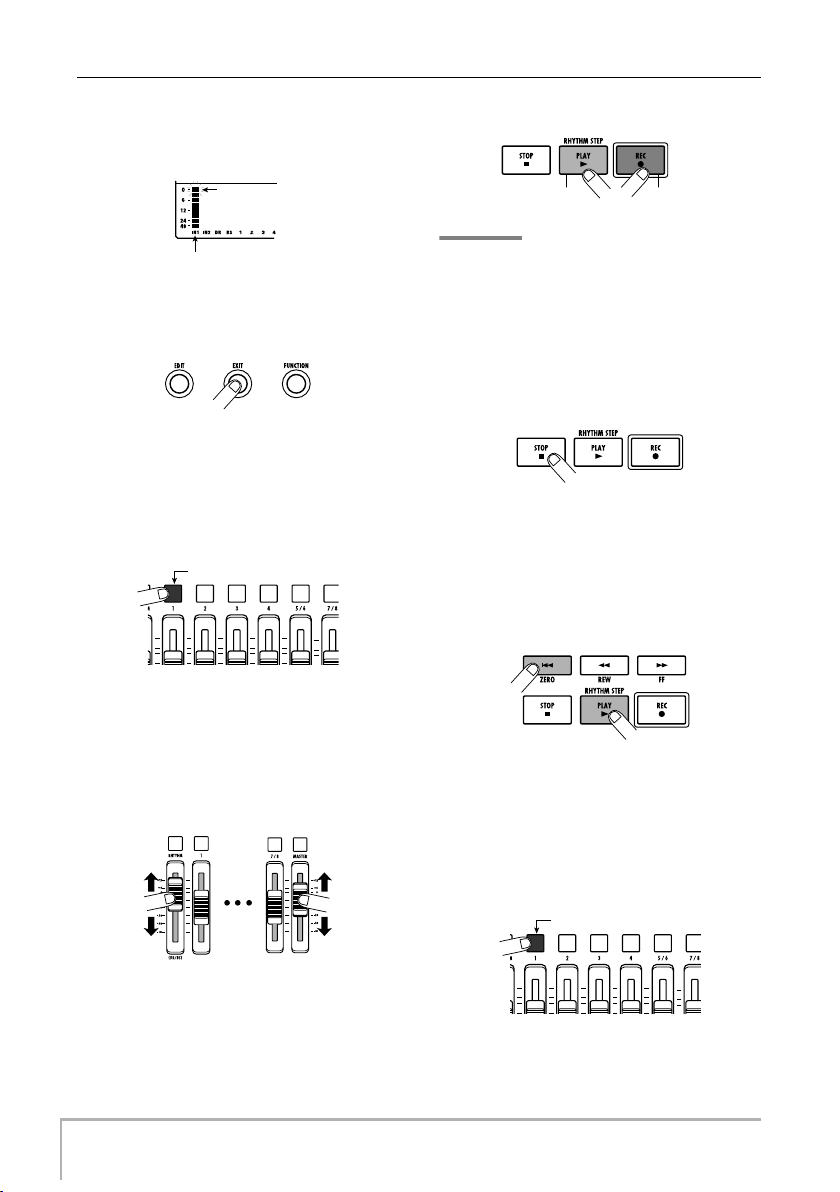
Lit in green Lit in red
in the lower part of the display. Adjust the recording level
so that the 0 (dB) segment for IN 1 flashes slightly when
the guitar is at maximum volume.
0 (dB) segment
Input 1 recording level
8.
Press the [EXIT] key repeatedly to return to
the main screen.
9.
Press status key 1 repeatedly until the key
is lit in red.
When a status key is lit in red, the respective audio track
(track 1 in this example) is selected as recording
destination.
Lit in red
your instrument along with the rhythm pattern.
HINT
• If you do not want a rhythm pattern, select an empty rhythm
pattern (→ p. 18) or mute the drum/bass sound (→ p. 19).
• In the default condition of a project, the insert effect
processes the input signal. You can bypass the effect
(→ p. 22) or select another effect patch (→ p. 21).
12.
When recording is complete, press the
STOP [P] key.
The REC [O] key and PLAY [R] key go out, and
recording stops.
13.
To check the recorded contents, press the
ZERO [U] key and then press the PLAY [R]
key.
10.
Operate fader 1 and the [MASTER] fader to
adjust the input signal monitor level.
Faders 1 – 4, 5/6, and 7/8 adjust the volume for the
respective track. When the input signal is sent to a track,
the monitor level can be adjusted. The [MASTER] fader
can be used to adjust the final output level.
11.
To start recording, press the PLAY [R] key
while holding down the REC [O] key.
A four-beat pre-count is heard, and recording starts. In
the default condition of a project, an 8-beat rhythm
pattern is played during recording and playback. Play
16
By operating the [MASTER] fader you can adjust the
volume of the entire song (stereo mix signal level).
14.
To cancel the recording condition, press
the status key 1 so that the key is lit in
green.
Lit in green
ZOOM MRS-8
Page 17
Quick Tour
PRJNo001
PRJ001
Now let’s use your MRS-8 to do some actual recording. This Quick Tour describes the five steps that cover the entire
process from preparation until the completion of a song.
• Step 1: Preparations
Shows how to create a new project, select a guide rhythm,
and perform other steps necessary for recording.
• Step 2: Recording the first track
Shows how to record the first track while using the insert
effect on the input signal.
• Step 3: Overdubbing
Shows how to record further tracks while listening to a
track already recorded (overdubbing).
• Step 4: Mixing
Shows how to adjust the level, panning, and EQ of each
track, apply the send/return effect, and mix the recorded
material to a pair of stereo tracks.
• Step 5: Mixdown
Finally the completed stereo mix is recorded on the
master track to create the finished song.
Step 1: Preparations
1.1 Creating a new project
On the MRS-8, song data are managed in units called
“projects”. A project comprises recorded audio data as
well as various rhythm and effect settings. By loading a
project, the same condition as when the song was last
saved can be recreated.
To start recording with the MRS-8, you must first create
a project.
1.
Connect the instrument to record and the
monitor system to the MRS-8 (→ p. 12).
2.
Insert the SD card to use for recording
(→ p. 13).
3.
Turn power on in the order MRS-8 →
monitor system.
When the MRS-8 starts up, the last handled project is
automatically loaded.
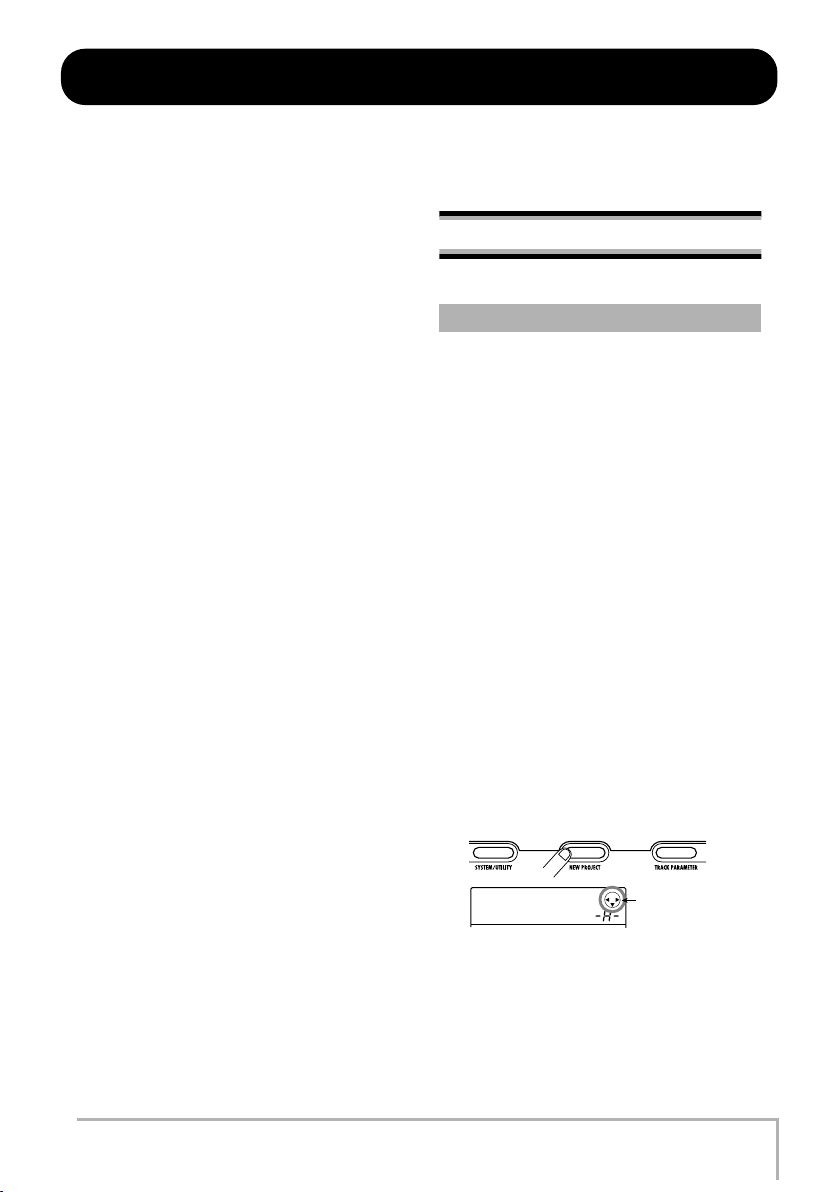
4.
Press the [NEW PROJECT] key in the
display section.
When you press the [NEW PROJECT] key from the main
screen, the display changes as follows.
ZOOM MRS-8
PRJNo001
PRJ001
In this condition, a new project can be created.
The top right of the display shows the cursor keys that can
be used on this screen.
Cursor keys that
be used
17
Page 18
Quick Tour
PRJ 001
PRJ001
001#117
MTNs1Vb
HINT
• When creating a new project, the lowest free project number
is automatically selected.
• It is also possible to create a new project from the project
p. 105).
menu (
→
5.
Press the [ENTER] key.
A new project is created, and the main screen for audio
track recording/playback appears.
PRJ 001
PRJ001
HINT
• When selecting a different project or creating a new project,
the project you were working on up to that point is
automatically saved.
• When performing the power-off procedure for the MRS-8
p. 14), the last project is automatically saved.
(
→
• When creating a new project, you can edit the project name
p. 105).
(
→
NOTE
While the MRS-8 is operating, do not remove the SD card.
Otherwise data may be destroyed and malfunction may
occur. If you want to remove the SD card while the MRS-8 is
on, be sure to follow the correct procedure (
1.2 Selecting the rhythm
pattern to use
The MRS-8 has a built-in rhythm function that operates
in sync with the recorder. This lets you use drum sounds
(drum kits) and bass sounds (bass programs) to create
repeated rhythm patterns of several measures. By
combining various patterns, you can create the rhythm
accompaniment for an entire song (rhythm song).
This section explains how to select a rhythm pattern for
use as guide rhythm during recording.
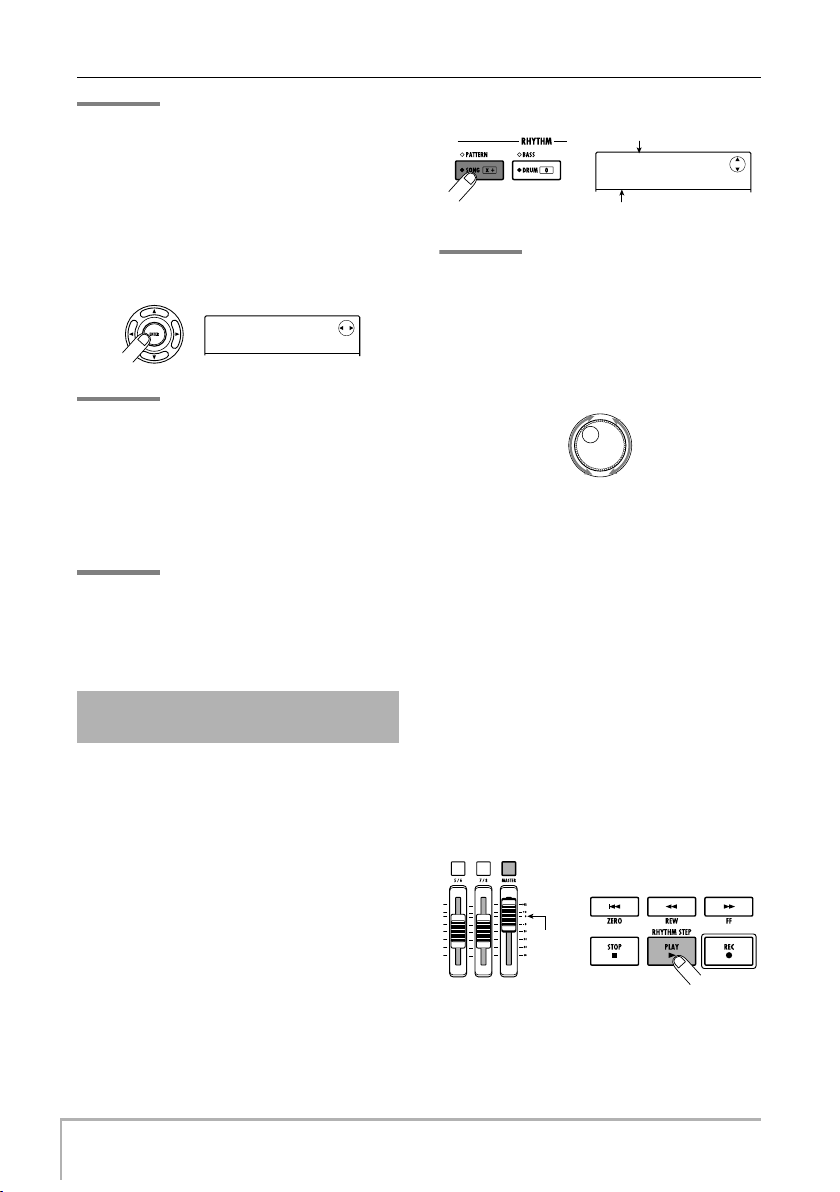
1.
From the main screen, press the [SONG/
PATTERN] key repeatedly, until the key
goes out.
The rhythm pattern selection screen appears.
p. 117).
→
Rhythm pattern number
001#117
MTNs1Vb
Rhythm pattern name
1
HINT
To return to the main screen from other screens, press the
[EXIT] key repeatedly. The [EXIT] key always serves to return
to the previous screen.
2.
Turn the dial to select a pattern to use as
guide rhythm.
Up to 511 types of rhythm pattern can be used in a
project. (More than 450 of these are preprogrammed.)
You select a pattern by turning the dial.
When you turn the dial to select another rhythm pattern
while a pattern is playing, the new pattern will start after
the current pattern has finished. When you select a new
pattern with the cursor up/down keys, the new pattern
begins playing immediately.
In this example, we will select a simple rhythm pattern as
guide rhythm for use during recording. If you select for
example the rhythm pattern number 510, a 4/4-beat
metronome sound is heard.
3.
Set the [MASTER] fader to 0 (dB) and press
the PLAY [R] key in the transport section.
0dB
The selected rhythm pattern is played in sync with the
recorder operation. The [TEMPO] key flashes according
to the current tempo setting.
18
ZOOM MRS-8
Page 19
Quick Tour
TEMPO
BPM=
In the default condition of a project, the sound the bass
program (bass track) is muted. Therefore only the drum
kit (drum track) is heard when the rhythm pattern plays.
HINT
During rhythm pattern play, the pads corresponding to the
currently produced sound of the drum kit (or pitch of the bass
program) are flashing. You can also tap the pads to play the
drum sounds/bass notes.
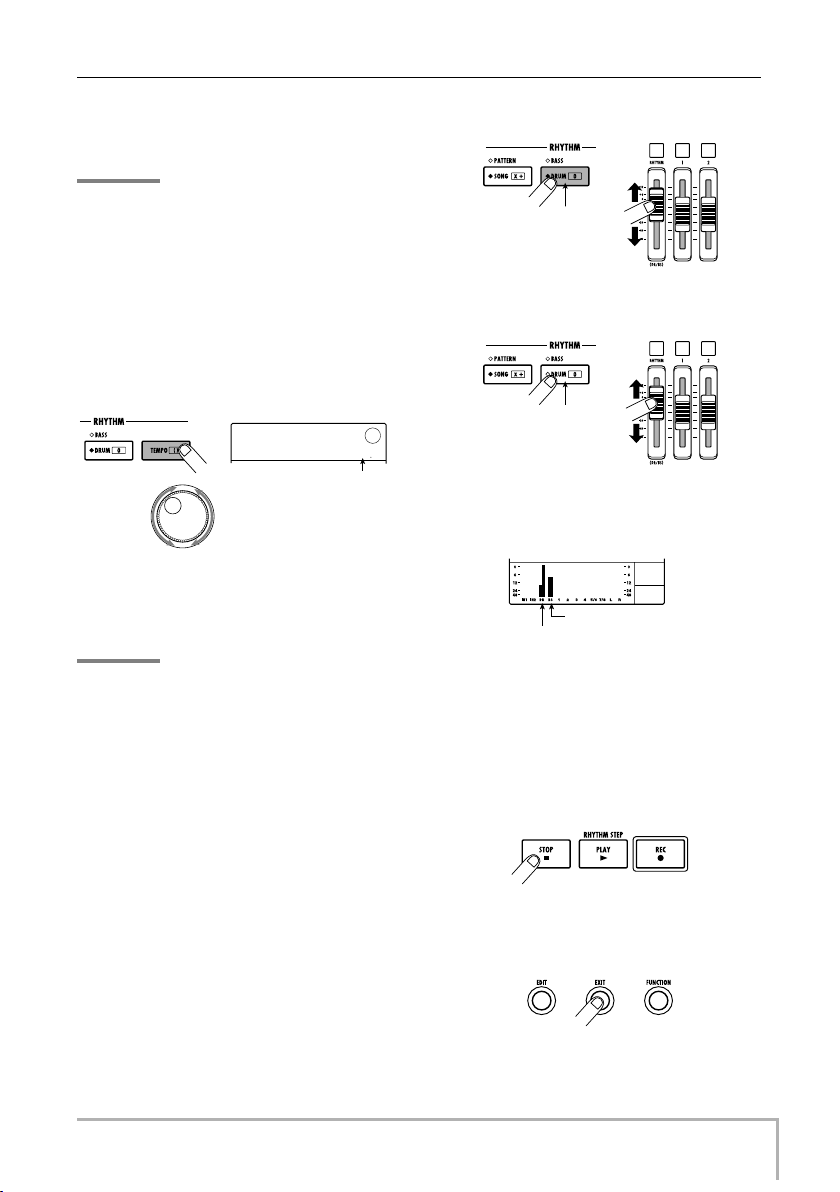
4.
To change the tempo, press the [TEMPO]
key in the rhythm section and then turn the
dial to change the tempo value shown on
the display.
TEMPO
BPM=
The tempo value can be set in 0.1 BPM steps. When the
setting is complete, press the [EXIT] key to return to the
previous screen.
1200
Te mpo value
HINT
You can also set the tempo by hitting the [TEMPO] key
repeatedly.
5.
To adjust the volume of the drum/bass
track, use the [DRUM/BASS] key in the
rhythm section to select the sound (drum or
bass), and then operate the [RHYTHM]
fader.
The [RHYTHM] fader serves for controlling either the
drum track or the bass track. When the key is lit, the drum
track is selected. When the key is out, the bass track is
selected. The [RHYTHM] fader then controls the
respective level.
• When drum track is selected
Lit
• When bass track is selected
Out
The signal level of the respective channel can be checked
with the level meter in the lower part of the display.
Bass track signal level
Drum track signal level
In the same way, the [DRUM/BASS] key can be used to
select the sound (drum or bass), and then the [RHYTHM]
status key can be used to control muting on/off for the
drum track/bass track.
6.
To stop playback, press the STOP [P]key in
the transport section.
7.
To return to the main screen, press the
[EXIT] key.
ZOOM MRS-8
19
Page 20

Quick Tour
Lit Flashing
or out
Out
Lit Flashing
or out
Out
Lit Lit Flashing
or out
Step 2: Recording the first
track
In this step, we explain how to select an audio track for
recording, how to record while listening to the guide
rhythm of the rhythm section, and how to use the insert
effect on the input signal.
is selected as input source.
To use two input sources simultaneously, hold down one
INPUT [ON/OFF] key while pressing the other one.
2.1 Adjusting input sensitivity
1.
Connect an instrument to the INPUT 1/2
connector.
The MRS-8 can handle up to two input sources at a time,
from INPUT 1, INPUT 2, and the built-in mic.
INPUT 1 and the built-in mic are mutually exclusive. A
switch selects one of these for use as input source.
2.
To use the built-in mic, press the [MIC] key
in the input section so that the key is lit.
When the unit is in a mode where the built-in mic can be
used, the [MIC] key in the input section flashes. If you
press the key so that it is lit, the built-in mic will be active
instead of INPUT 1.
Depending on the insert effect settings, the built-in mic
may not be available. In this case, the [MIC] key is out.
[MIC] key
[MIC] key
lit
lit
[MIC] key
[MIC] key
flashing
flashing
[MIC] key
[MIC] key
out
out
The INPUT [ON/OFF] keys 1/2 and [MIC] key lighting
status with various input selections is shown below.
• Input source = INPUT 1 connector
• Input source = INPUT 2 connector
• Input source = Built-in mic
Lit Lit Out
• Input source = INPUT 1 connector + INPUT 2
connector
Built-in mic is
Built-in mic is
active
active
(INPUT 1 is
(INPUT 1 is
inactive)
inactive)
3.
Use the INPUT [ON/OFF] keys 1/2 to select
the input source.
The INPUT [ON/OFF] keys 1/2 control the INPUT 1
connector (or built-in mic) and INPUT 2 connector
respectively. When a key is lit, the signal from that input
20
Built-in mic is
Built-in mic is
available
available
(INPUT 1 is
(INPUT 1 is
active)
active)
Built-in mic is
Built-in mic is
not available
not available
(INPUT 1 is
(INPUT 1 is
active)
active)
• Input source = Built-in mic + INPUT 2
connector
Lit Lit Lit
ZOOM MRS-8
Page 21
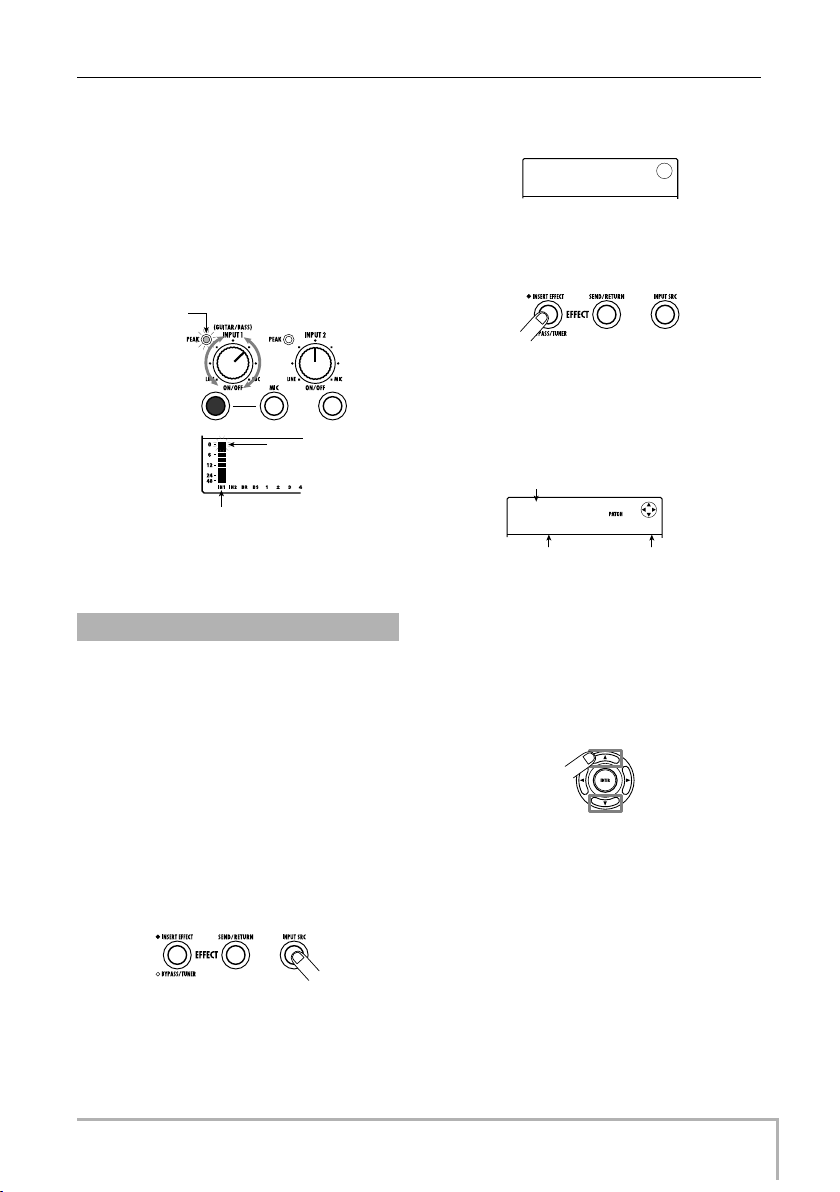
4.
IN SRC
IN
CLEAN
Standard
While playing your instrument, adjust the
[INPUT] control for the input(s) selected in
step 2, to adjust the input sensitivity.
The sensitivity of INPUT 1 and the built-in mic is
adjusted with the [INPUT] 1 control. The sensitivity of
INPUT 2 is adjusted with the [INPUT] 2 control.
Make adjustments so that the [PEAK] indicator in the
input section flickers slightly when you play your
instrument at its loudest volume.
Flickers
occasionally
0 (dB) segment
Input 1 recording level
The input signal level can be checked with the level meter
IN 1/IN 2 bars in the display.
2.2 Applying the insert effect
The insert effect can be applied to a point immediately
after the input, to the output of any track, or immediately
before the [MASTER] fader. The insert effect actually is
a multi-effect unit that contains a number of single effects
(effect modules) such as compressor, distortion, and
delay, connected in series.
When you apply the insert effect to the input signal, you
can record the processed signal on a track. The following
steps show how to apply an insert effect suitable for
guitar/bass.
1.
Press the [INPUT SRC] key in the effect
section.
The indication “IN” (input) appears on the second line of
the display. In this condition, you can select the insert
effect position.
In the default condition of a patch, “IN” is selected. If
Quick Tour
another setting is currently displayed, turn the dial to
select “IN”.
IN SRC
IN
2.
Press the [INSERT EFFECT] key in the
effect section.
The display changes as follows. From this screen, you
can select the insert effect algorithm (combination of
effect modules used simultaneously) and patch (effect
program).
Algorithm name
CLEAN
Standard
Patch name Patch number
The MRS-8 has eight algorithms with multiple patch
selections for each algorithm. To use the insert effect,
select the algorithm first and then call up one of the
patches in that algorithm.
3.
Use the cursor up/down keys to select the
algorithm.
The following algorithms are available.
• CLEAN
• DIST
• ACO/BASS SIM (shown on the display as “Ac/
BsSIM”)
• BASS
These algorithms are suitable for recording guitar/bass.
• MIC
An algorithm suitable for vocals and other microphone
recordings.
0
ZOOM MRS-8
21
Page 22
Quick Tour
INPUT
REC LVL
• LINE
An algorithm suitable mainly for recording line-level
output instruments such as synthesizer or electric piano.
• Dual MIC
An algorithm for two entirely separate mono input and
mono output channels, for use with two microphones.
• MASTERING (shown on the display as
“MASTRING”)
An algorithm suitable for processing the final stereo
mixdown signal.
HINT
In the default condition of a project, the CLEAN algorithm is
selected for the insert effect.
NOTE
When a patch of the CLEAN, DIST, ACO/BASS SIM, or BASS
algorithms is selected, the built-in mic cannot be used. But
when the insert effect is temporarily bypassed, when
“CABINET” is selected on the PRE AMP/DRIVE module, or
when the module is turned off, you can use the built-in mic.
4.
Set the [MASTER] fader to 0 (dB). While
playing your instrument to check the
sound, use the dial to select the patch.
0 dB
300 patches can be used with the insert effect. The effect
type and intensity for a patch can be adjusted as needed.
The patches available with the different algorithms are
listed below.
Algorithm
CLEAN
DIST
ACO/BASS SIM
BASS
MIC
LINE
DUAL MIC
MASTERING
Patch number
0 – 29
0 – 49
0 – 19
0 – 19
0 – 49
0 – 49
0 – 49
0 – 29
HINT
When “EMPTY” is shown as the patch name, the patch is
empty. Selecting such a patch will have no effect.
NOTE
Depending on the selected algorithm, the input/output signal
routing will change (
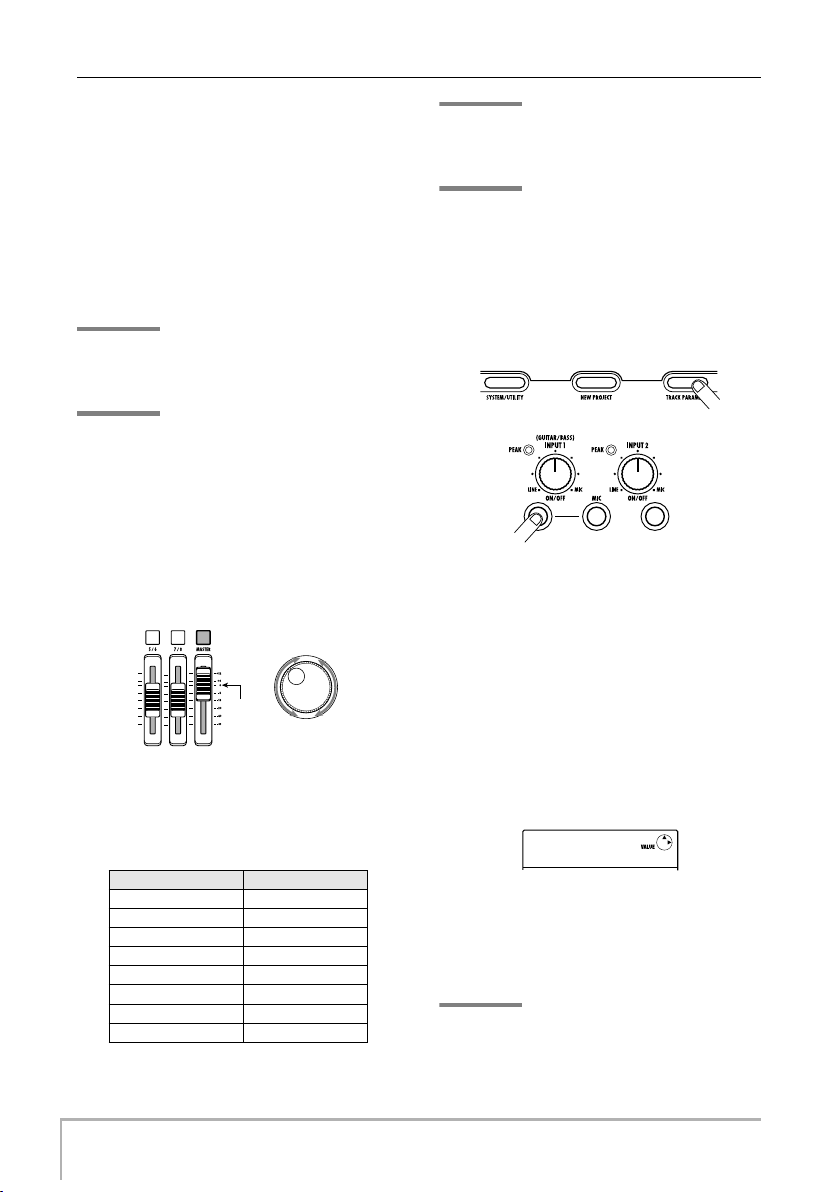
5.
To adjust the signal level recorded on a
track, press the [TRACK PARAMETER] key
in the control section and then press the
INPUT [ON/OFF] key.
The insert effect output level may change according to the
selected patch. When recording with the insert effect
applied, you will have to adjust the recording level
according to the selected patch.
6.
Press the cursor down key repeatedly to
bring up the indication “REC LVL” on the
second line of the display.
The display changes as follows. The REC LVL parameter
shown on this screen indicates the signal level after
passing the insert effect, which will be recorded on the
track.
7.
Turn the dial to adjust the recording level.
8.
To return to the main screen, press the
[EXIT] key.
p. 94).
→
INPUT
REC LVL
100
HINT
•To record without using the insert effect, press the [INSERT
EFFECT] key in the effect section repeatedly until the key goes
out. While the key is out, the insert effect is bypassed.
22
ZOOM MRS-8
Page 23
Quick Tour
• When the insert effect is bypassed for recording, setting the
REC LVL parameter to 100 (default) results in unity gain (the
recording level same as the input level).
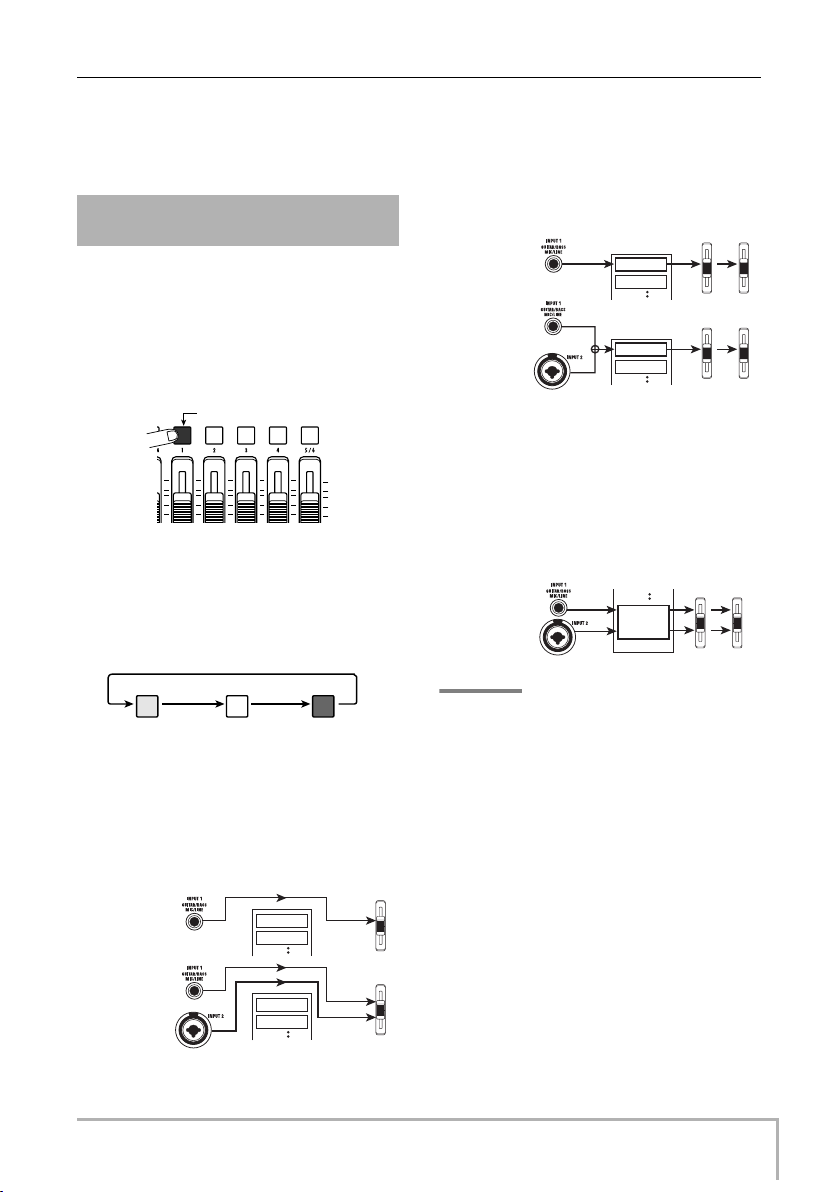
2.3 Selecting a track and
recording
Now we will select a track and record the input sound
(with the insert effect applied) on that track.
1.
From the main screen, repeatedly press the
status key of the recording track until the
key is lit in red.
Lit in red
The audio track status keys are used to select the
recording track and to switch muting for each track on
and off. Each time you press a status key, the key will
cycle through the following states.
Status key
Lit in green Out Lit in red
Mute off Mute on Selected as
When all status keys are green, the input signal will not
be sent to the tracks and will go directly to the
[MASTER] fader. (Panning and send/return effect depth
can be adjusted in this case.)
Recording track not selected
One Input source
Two Input sources
recording track
MASTER
Track 1
Track 2
MASTER
Track 1
Track 2
When a status key is red, the track is in the recording
standby condition and the input signal is assigned to that
track.
If a mono track (1 – 4) has been selected as recording
track, the signal routing will be as follows.
Mono track selected
One Input source
Two Input sources
Track 1
Track 2
Track 1
Track 2
MASTER
1
MASTER
1
If a stereo track has been selected as recording track, the
signal routing will change as shown below. Except for the
V-take selection, the parameters for left/right stereo
tracks are set to the same values. This is useful for
recording from a stereo source such as a synthesizer or
CD player.
Stereo track selected
MASTER
7/8
Tw o Input sources
Track 7/8
HINT
•You can select up to two tracks for recording, either one
stereo track or two mono tracks. To select two mono tracks,
press the first status key of an odd/even-numbered pair so
that it is lit in red, and then hold down that key and press the
other key so that it also is lit in red.
• If the input signal is mono, selecting a pair of stereo tracks as
target will ensure that the left/right spread added by certain
insert effect settings is preserved in recording.
2.
Set the fader for the recording track and the
[MASTER] fader to 0 (dB). Then adjust the
volume of the monitor system while playing
your instrument.
3.
To begin recording, press the ZERO [U]
key to return to the beginning of the song.
Then hold down the REC [O] key and press
the PLAY [R] key.
ZOOM MRS-8
23
Page 24

Quick Tour
Both keys light up, and a pre-count of 4 beats is heard.
Then recording will begin. Record the first instrument
track while listening to the guide rhythm from the rhythm
section.
HINT
• The number and the sound of the pre-count clicks can be
changed (→ p. 43).
• If the input signal is distorted, refer to steps 2.1 and 2.2 to
readjust the input sensitivity and recording level.
4.
When you have finished recording, press
the STOP [P] key.
The REC [O] key and PLAY [R] key go out, and
recording will stop. The indication “wait...” is briefly
shown on the display, and then the main screen reappears.
HINT
The duration of the “wait...” period may differ. Never turn
power to the unit off while “wait...” is being shown on the
display. Otherwise recorded data may be lost and damage to
the unit may occur.
5.
To listen to the recorded content, press the
ZERO [U] key to return to the beginning of
the song (counter zero position), and then
press the PLAY [R] key.
The track will be played back together with the selected
guide rhythm from the rhythm section.
HINT
•You can specify a position in minutes/seconds/milliseconds
or measures/beats/ticks and move directly to that point (
35).
• By setting marks at the desired points, you can quickly jump
to these points (
→
p. 35).
→
p.
6.
To stop playback, press the STOP [P] key.
To redo the recording, repeat steps 3 – 5.
7.
When you are satisfied with the recorded
content, press the status key of the
recording track until it is lit in green.
The recording standby condition of the track is canceled.
HINT
•A recorded track can be copied, deleted, or edited (
• By switching the V-take for the track on which you have
recorded, you can record again on the track without erasing
the current recording.
→
p. 44).
Basic operation of transport keys
REW [T] key
Moves the current position back in 1-second steps. Movement speed can be
increased by holding down the REW [T] key and pressing the FF [Y] key.
ZERO [U] key
Returns the recorder to the
start position (counter zero
position).
STOP [P] key
Stops the recorder.
PLAY [R] key
Starts recorder playback
from the current position.
24
FF [Y] key
Moves the current position forward in 1-second steps.
Movement speed can be increased by holding down
the FF [Y] key and pressing the REW [T] key.
REC [O] key
If you press the PLAY [R] key while holding down this
key, recording starts. Pressing the key during
playback causes punch-in and pressing the key
during recording causes punch-out (→p. 37).
ZOOM MRS-8
Page 25

Step 3: Overdubbing
In this step, you will learn how to record another
instrument on another track, while listening to the content
you recorded in step 2. Adding parts in this way is called
“overdubbing”.
3.1 Making settings for input
sensitivity and insert
effect
As in step 2, select the input source, adjust input
sensitivity and recording level, and make settings for the
insert effect.
1.
Connect the next instrument you want to
record, and adjust input sensitivity in the
same way as in step 2.1.
2.
Select the algorithm and patch for the
insert effect in the same way as in step 2.2.
3.
When the setting is complete, press the
[EXIT] key to return to the main screen.
3.2 Selecting a track and
recording
Now you’re ready to record the second instrument on
another track, while listening to the content of the first
track and the guide rhythm.
1.
Repeatedly press the status key of the
track on which to record, until the key is lit
in red.
This track is now in the recording standby condition.
Verify that the status key of the recorded track and the
[RHYTHM] status key are lit in green.
2.
Set the [MASTER] fader to 0 (dB) and use
the fader of the recording track to adjust
the monitoring level.
If necessary, set the recorder to playback and operate the
faders to adjust the monitor level balance between the
recorded track and the track to record.
3.
To begin recording, press the ZERO [U]
key to return to the beginning of the song.
Quick Tour
Then hold down the REC [O] key and press
the PLAY [R] key.
After the pre-count, recording on the new track will
begin. Record your instrument while listening to the
guide rhythm and the recorded track.
4.
When you have finished recording, press
the STOP [P] key.
The indication “wait...” is briefly shown on the display,
and then the main screen reappears.
5.
To check the recorded content, press the
ZERO [U] key once more to return to the
beginning of the song, and press the PLAY
[R] key.
The guide rhythm of the rhythm section and the
previously recorded track will be played back along with
the newly recorded track. Use the faders as necessary to
adjust the level balance.
6.
To stop playback, press the STOP [P] key.
HINT
To r edo the recording, repeat steps 3 – 5. You can also start
rerecording from partly into the track and use the punch-in/
punch-out function (
7.
When you are satisfied with the recorded
content, press the status key of the
recording track until it is lit in green.
The recording condition for that track is turned off. You
can now record more tracks in the same way.
p. 37) to redo a limited passage only.
→
HINT
The maximum number of tracks that can be recorded is 8.
But even when all 8 tracks have been filled, you can still use
the bounce function (also called ping-pong recording) to
move the contents from multiple tracks onto 1 or 2 tracks.
Then you can select another V-take for the bounce source
tracks and record more (
p. 40).
→
ZOOM MRS-8
25
Page 26
Quick Tour
TR2
EQ HI G
TR2
PAN
Step 4: Mixing
When you have finished recording all tracks, you can use
the built-in mixer to adjust parameters such as volume
level, EQ (equalizer), and panning (stereo left/right
positioning) to create the stereo mix.
4.1 Adjusting volume,
panning, and EQ
Adjust the volume, panning, and equalization for each
track by controlling the track parameters of the built-in
mixer.
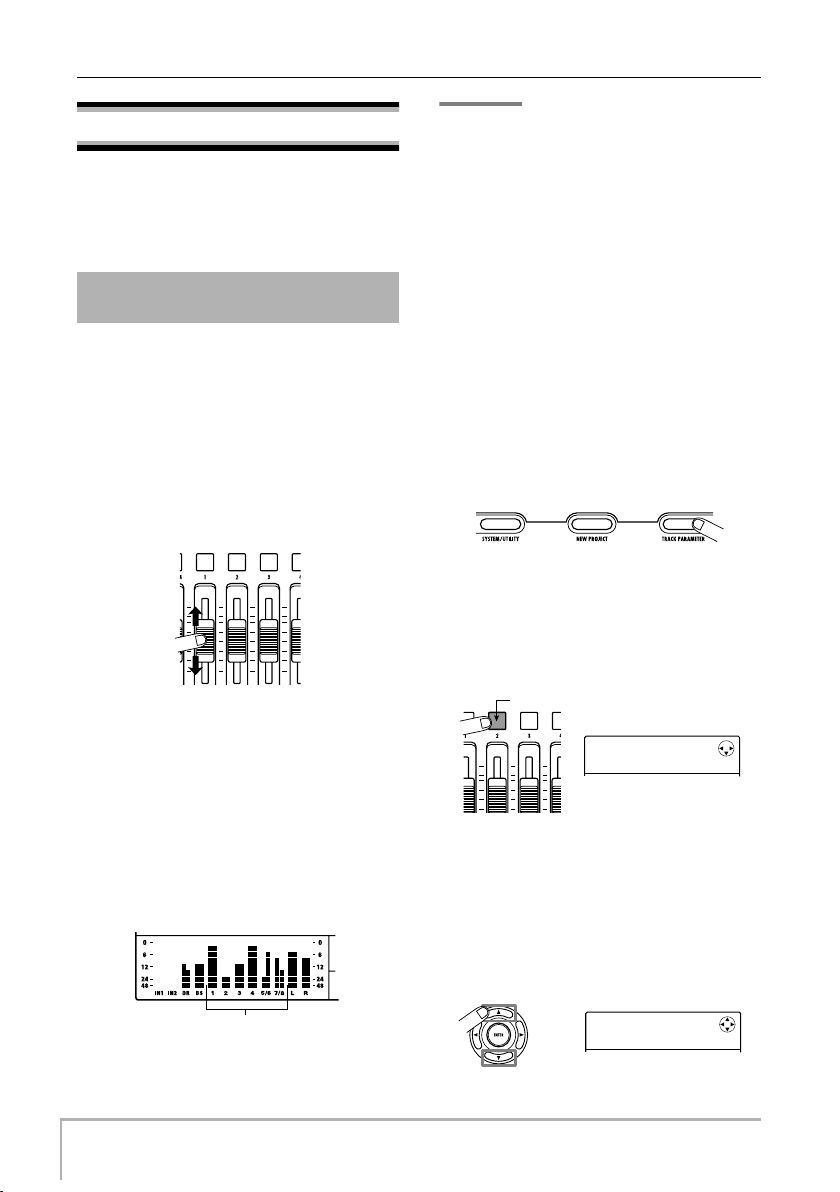
1.
To adjust the volume balance between
tracks, operate the faders in the fader
section.
By operating the faders of a pair of stereo tracks, you can
adjust the left/right level together.
NOTE
In some cases, the current fader position may not match the
volume setting value for a track stored in a project (such as
when the fader was moved for another project and then the
previous project was called again). In such a case, the
volume may not change until the fader setting has been
changed to a certain extent.
2.
If an input signal is not required, press the
lit INPUT [ON/OFF] key so that the key goes
out.
While the INPUT [ON/OFF] key is lit, the signal from
that input will be added to the stereo mix. If the input
signal is not required, the key should be turned off.
3.
To adjust EQ and panning for each track,
press the [TRACK PARAMETER] key in the
display section.
You now can adjust various track parameters such as
equalization and panning for each track.
4.
Use the cursor left/right keys or the status
keys to select the track for which you want
to make a setting.
The status key for the currently selected track is lit in
orange.
To add the drum/bass track to the mix, operate the
[RHYTHM] fader after switching the [DRUM/BASS]
key between lit (drum track selected) and out (bass track
selected). This will adjust the drum/bass track mixing
balance.
To control the mute/on status, select the drum or bass
track with the [DRUM/BASS] key and then press the
[RHYTHM] status key.
The signal level for each track can be checked with the
respective bars in the display.
Track 1 – 8 signal level
26
Lit in orange
TR2
EQ HI G
While a track parameter is shown, you can use the status
keys and cursor left/right keys to switch tracks. The
cursor left/right keys cycle through the following
selections: drum track → bass track → audio track 1 – 8.
5.
Use the cursor up/down keys to bring up
the parameter that you want to adjust.
TR2
PAN
0
0
ZOOM MRS-8
Page 27

The parameters that can be selected for tracks 1 – 8 and
for drum/bass track are listed in the table below.
■
Track parameter list
Quick Tour
Parameter
EQ HI GAIN
EQ HI FREQUENCY
EQ LOW GAIN
EQ LOW FREQUENCY
EFX SEND LEVEL
PAN
V-TAKE
(tracks 1 – 8 only)
FADER
STEREO LINK
(tracks 1 – 4 only)
6.
Turn the dial to select the setting value.
Display Setting range Description
EQ HI G
EQ HI F
EQ LO G
EQ LO F
EFX SEND
PAN
TR x-y
FADER
ST LINK
-12 – +12dB
500 – 18000(Hz)
-12 – +12dB
40 – 1600(Hz)
0 – 100
L100 – 0 – R100
x=1 – 8, y=1 – 10
0 – 127
ON/OFF
HINT
By pressing the [ENTER] key while an EQ parameter or the
EFX SEND LEVEL parameter is displayed, you can switch
that parameter (EQ HI, EQ LO, effect send) on and off.
7.
Repeat steps 4 – 6 to adjust other
parameters.
By using the cursor left/right keys or the status keys to
select other tracks, you can adjust the parameters for
these tracks.
8.
To return to the main screen, press the
[EXIT] key.
HINT
Some track parameters (EQ, panning etc.) can also be used
for the drum/bass track and input signals.
Adjusts high frequency EQ boost/cut.
Selects turnover frequency for high frequency EQ.
Adjusts low frequency EQ boost/cut.
Selects turnover frequency for low frequency EQ.
Adjusts signal level sent to send/return effect.
Adjusts panning (left/right positioning) for the track. For tracks 5/6,
7/8, and the drum track, this adjusts the left/right balance.
Selects the V-take to use for the track (→p. 32). x is the track number
and y is the V-take number.
Adjusts the fader setting.
Links the parameters for tracks 1/2 or 3/4 (→p. 60).
4.2 Applying the send/return
effect
The track signals sent to the internal mixer can be
individually processed by an effect that is connected
internally to the send/return loop of the mixer. (This is
called the send/return effect.)
SEND LEVEL
Send/return
effect
The intensity of the send/return effect can be adjusted for
each track by using the send level parameter (which
controls the signal level that is sent to the effect).
Increasing this parameter will result in stronger effect
action.
This section describes how to adjust the send level for
each track.
Send
Return
BASSDRUM
7/821
MASTER
ZOOM MRS-8
27
Page 28
Quick Tour
SEND
VoChorus
TR4
EFX SEND
IN SRC
IN
IN SRC
TR1
■
Selecting the send/return effect patch
1.
From the main screen, press the [SEND/
RETURN] key in the effect section.
The display changes as follows. From this screen, you
can select the send/return effect patch.
8.
To return to the main screen, press the
[EXIT] key.
HINT
If no recording track is selected, you can apply the insert
effect to the input signal.
SEND
VoChorus
Patch name Patch number
2.
Turn the dial to select the patch.
The send/return effect has 60 patches (of which 40 are
preprogrammed).
HINT
In the default condition of a project, the send level for the
send/return effect is set to zero for each track. Therefore you
need to raise the setting to verify the sound produced by the
effect.
3.
To return to the main screen, press the
[EXIT] key.
■
Adjusting the send/return effect intensity
4.
From the main screen, press the [TRACK
PARAMETER] key in the display section,
and then use the cursor left/right keys or
the status keys to select the track for which
you want to adjust the send level.
5.
Use the cursor up/down keys to bring up
the indication “EFX SEND” onto the second
line of the display.
In this condition, you can adjust the send level for the
track.
TR4
EFX SEND
6.
While playing the song, turn the dial to
adjust the send level value for the track.
7.
Adjust the send level for other tracks in the
same way.
0
Send level value
0
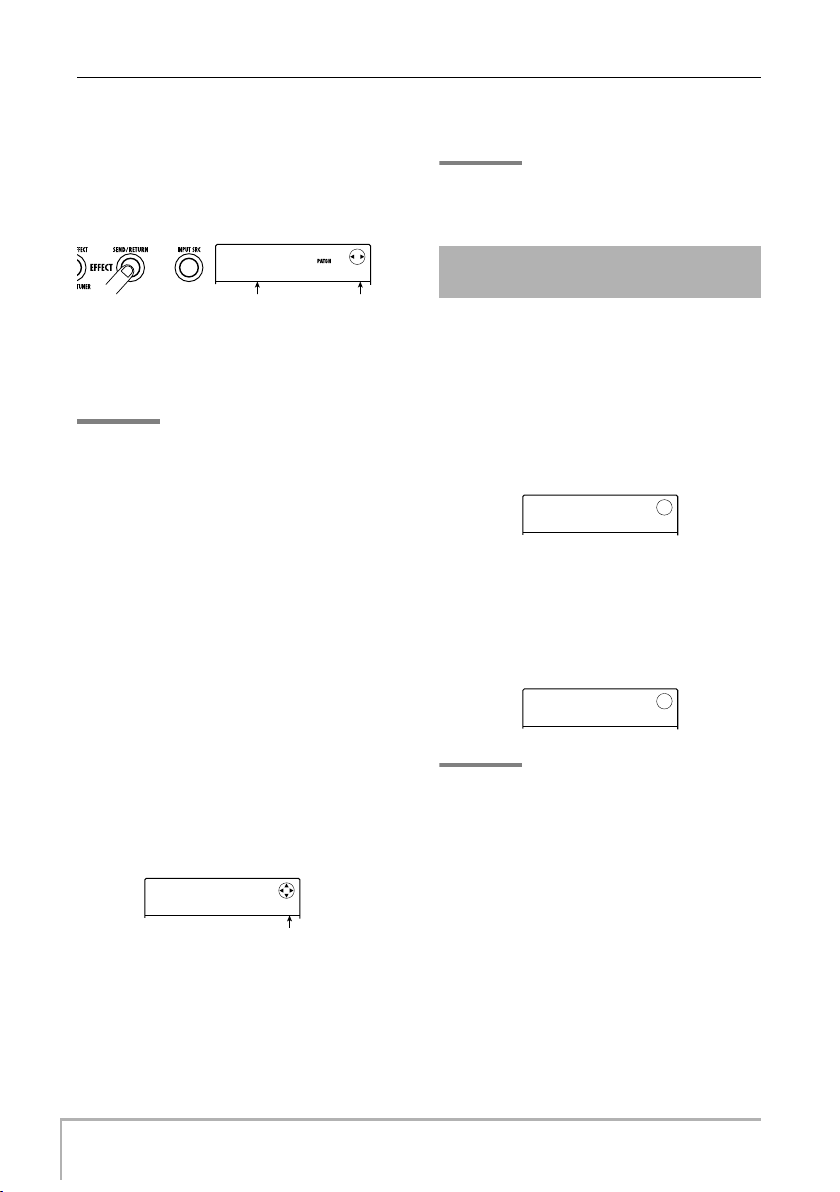
4.3 Applying the insert effect
to a track
You can apply the insert effect to the output of any track
(audio track or drum/bass track), so that it post-processes
the output signal of the track.
1.
From the main screen, press the [INPUT
SRC] key in the effect section.
The currently selected insert location appears on the
display.
IN SRC
IN
2.
Use the status keys or turn the dial to bring
up the track to which you want to apply the
insert effect on the second line of the
display.
The status key of the selected track lights up.
IN SRC
TR1
HINT
If required, you can use the effect on two mono tracks. To do
this, press the status keys for an odd-numbered and evennumbered track together, or turn the dial to select a mono
track x 2 as insert target (TR 1/2, TR 3/4).
3.
Press the [INSERT EFFECT] key in the
effect section.
The screen for selecting the insert effect algorithm/patch
appears.
28
ZOOM MRS-8
Page 29
Quick Tour
CLEAN
Standard
CLEAN
Standard
Use the cursor up/down keys to select the
4.
algorithm, and turn the dial to select the
patch.
The currently selected algorithm/patch is shown on the
display.
If required, switch the patch while playing the song to
check the sound. When you finish checking it, stop the
song and press the [EXIT] key to return to the main
screen.
0
HINT
By using the bounce function (→ p. 40), you can record the
processed track on an empty V-take. This lets you retain the
processed sound and then apply the insert effect at another
position.
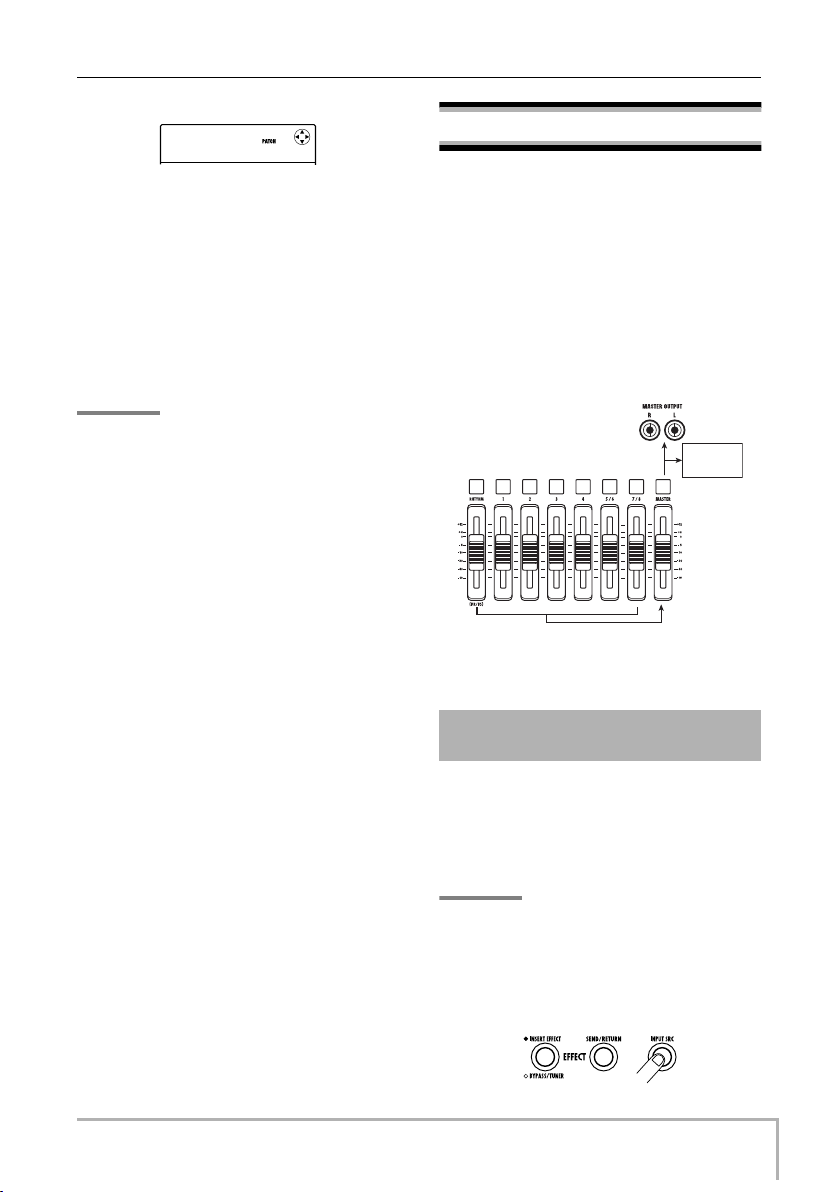
Step 5: Mixdown
When the mix is ready, you can transfer it onto two tracks
to create the finished song. This procedure is called
“mixdown”.
For mixdown, you can either use the MASTER OUTPUT
connectors and record the song on an external recorder, or
you can record the song on the internal master track of the
MRS-8.
The master track is a dedicated pair of stereo tracks that
is separate from the normal audio tracks. When you select
the master track as recording track, the signal
immediately after the [MASTER] fader is recorded.
To master
track
This section explains the mixdown procedure for
recording on the master track.
ZOOM MRS-8
5.1 Using the mastering
effect
By applying the insert effect immediately before the
[MASTER] fader, you can process the stereo mix signal
for mixdown. If you select a patch of the MASTERING
algorithm, you can adjust the sound pressure and tonal
quality of the final mix during mastering.
NOTE
While the insert effect is inserted immediately before the
[MASTER] fader, you cannot use the effect for processing the
input signal or for post-processing a recorded track.
1.
Press the [INPUT SRC] key.
29
Page 30
Quick Tour
IN SRC
MASTER
MASTRING
PlusAlfa
y
The current insert effect position is shown on the display.
2.
Turn the dial to bring up the indication
“MASTER” on the second line of the
display.
IN SRC
MASTER
The insert effect is now inserted immediately before the
[MASTER] fader.
3.
When the setting is complete, press the
[EXIT] key to return to the main screen.
4.
Press the [INSERT EFFECT] key and use
the cursor up/down keys to bring up the
indication “MASTRING” on the first line of
the display.
The insert effect algorithm is switched to MASTERING.
The second line of the display shows the currently
selected patch.
MASTRING
PlusAlfa
5.
While playing the song, turn the dial to
select the patch.
If desired, you can edit the patch to modify the effect
further (→ p. 95).
If the sound is distorted when you apply the mastering
effect, verify that the sound of each track is not distorted
and then lower the overall fader setting.
6.
When you have checked the sound, stop
the song and press the [EXIT] key.
The main screen returns.
0
5.2 Mixdown onto the master
track
After the mastering effect settings have been made,
record the final mix on the master track.
1.
From the main screen, press the ZERO [U]
key to return to the beginning of the song.
2.
Press the PLAY [R] key to play the song,
and operate the [MASTER] fader to adjust
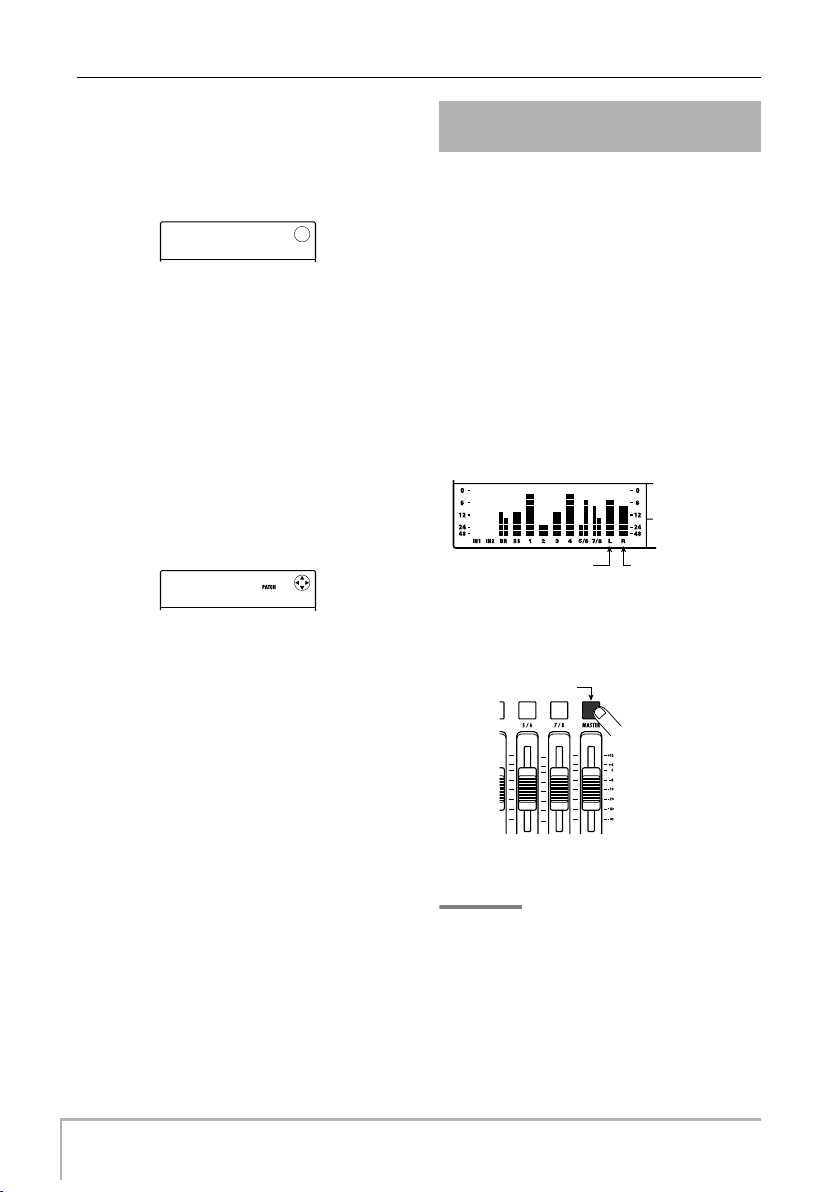
the volume of the stereo mix.
The signal level after the [MASTER] fader can be
checked by observing the rightmost bars of the level
meter in the display. If the 0 dB segment lights up during
play, fine-tune the signal level by turning down the
[MASTER] fader.
After checking the level, press the STOP [P] key.
Left channel signal level Right channel signal
3.
Repeatedly press the [MASTER] status key
until the key lights up in red.
Lit in red
The master track is now selected for recording.
HINT
While the [MASTER] status key is lit in red, the other tracks
can be operated normally. This lets you fine-tune the mixing
balance also at this stage.
4.
Press the ZERO [U] key to return to the
beginning of the song. Then hold down the
REC [O] key and press the PLAY [R] key.
Recording on the master track starts.
level
Press repeatedl
30
ZOOM MRS-8
Page 31

5.
y
When recording is completed, press the
STOP [P] key.
6.
To play the master track, repeatedly press
the [MASTER] status key until it is lit in
green.
Quick Tour
Lit in green
While the [MASTER] status key is lit in green, the master
track can be played. During this period, the signals from
all other tracks are muted. The insert and send/return
effects are also disabled.
7.
Return to the beginning of the song, and
press the PLAY [R] key.
The master track is played back. The playback volume
can be adjusted with the [MASTER] fader.
8.
To stop playback, press the STOP [P] key.
9.
To return the tracks and effects to normal
operation, press the [MASTER] status key
so that the key goes out.
Muting of the tracks and the effect bypass condition is
canceled, and the unit reverts to the original condition.
Press repeatedl
HINT
• Like the other tracks, the master track also has 10 V-takes.
This lets you switch the V-take and create different versions
with different mixing balance (
• The contents of the master track can be edited later (→ p. 44).
•You can play the master tracks of multiple projects in
succession (
→
p. 111).
→
p. 32).
ZOOM MRS-8
31
Page 32

Reference [Recorder]
V
TR 1- 1
GTR 1- 1
V
TR 3- 1
GTR 3- 1
This chapter explains the various audio recording and playback functions.
V-takes
Each audio track (1 – 8) and the master track contains ten
virtual tracks, called “V-takes”. For each track, you can
select one such take, which will be used for recording and
playback. For example, you can switch V-takes as you
record multiple vocal or guitar solos on the same track,
and later compare them and select the best V-take.
V-takes selected for tracks 1 - 8 and master track
-takes
1
2
3
4
5
6
7
8
9
10
1
234 5/6 7/8
Tracks
Master track
HINT
For stereo tracks (tracks 5/6, 7/8), you can select a separate
V-take for the odd-numbered and even-numbered track.
Switching V-takes
Here’s how to switch the V-take used by the audio tracks
or the master track.
1.
From the main screen, press the [TRACK
PARAMETER] key in the display section.
You can now select various track parameters.
2.
Use the cursor up/down keys to bring up
the indication “TR x-yy” on the display
(where x is the track number and yy is the
V-take number).
The V-take name is shown on the second line of the
display.
HINT
• If you select a V-take on which nothing is recorded, the
• If you select the master track, “M” is shown as the track
3.
HINT
When you select a stereo track with a status key, each push
of the key toggles between the odd-numbered track and
even-numbered track.
4.
5.
6.
The main screen appears again.
A V-take that has been recorded will be automatically
assigned an 8-character name, according to the following
pattern. (x denotes the track number, and yy the V-take
number.)
• GTR x-yy
V-take recorded through CLEAN, DIST, or ACO/BS SIM
algorithm of insert effect
Track number
-take name
indication “NO DATA” appears.
number.
Use the cursor left/right keys or the status
keys to select the track for which to switch
the V-take.
TR 1- 1
GTR 1- 1
TR 3- 1
GTR 3- 1
Turn the dial to select the V-take.
Repeat steps 3 – 4 as necessary, to select a
V-take for each track.
To finish, press the [EXIT] key.
Changing the V-take name
V-take number
32
ZOOM MRS-8
Page 33

• BAS x-yy
TR 1- 1
GTR 1- 1
TakeName
TR 2- 1
V-take recorded through BASS algorithm of insert effect
• MIC x-yy
V-take recorded through MIC algorithm of insert effect
• LIN x-yy
V-take recorded through LINE algorithm of insert effect
• DUL x-yy
V-take recorded through DUAL MIC algorithm of insert
effect
• MAS x-yy
V-take recorded through MASTERING algorithm of
insert effect
• BYP x-yy
V-take recorded without passing through insert effect
• BOU x-yy
V-take recorded using the bounce function or rhythm
recording function
You can change the assigned name of a V-take as follows.
1.
From the main screen, press the [TRACK
PARAMETER] key in the display section.
2.
Use the cursor up/down keys to bring up
the indication “TR x-yy” on the display
(where x is the track number and yy is the
V-take number).
TR 1- 1
GTR 1- 1
3.
Use the cursor left/right keys or the status
keys to select the track for which to change
the V-take name.
NOTE
If you select a V-take on which nothing is recorded, the
indication “NO DATA” appears and the name cannot be
edited.
4.
Press the [EDIT] key.
The cursor (flashing box) appears on the first character of
the V-take name. This indicates that you can change the
V-take name.
Reference [Recorder]
TakeName
Cursor
±TR 2- 1
5.
Use the cursor left/right keys to move the
cursor to the character to change, and use
the dial or the pads and keys in the rhythm
section to select the character.
During character input, you can use the cursor left/right
keys to move the input position. Characters can be input
either by turning the dial or pressing the pads and keys of
the rhythm section, as described below.
• Deleting a character
Move the cursor to the character to delete, and press the
[EDIT] key. The character is deleted and subsequent
characters move one position to the left.
• Entering a character with the dial
The dial changes the character under the cursor. Turn the
dial until the desired character is shown. The following
characters can be selected.
Numerals:
Letters:
Symbols:
• Entering a character with the rhythm section
pads and keys
Move the cursor to the input position and repeatedly press
the respective pad or key to enter a numeral, letter, or
symbol. The pad/key assignments are shown below.
Pad 8
Letter:
WXYZ wxyz
Numeral: 8
Pad 7
Letter:
TUV tuv
Numeral: 7
Pad 4
Letter:
JKL jkl
Numeral: 4
Pad 1
Letter: ABC abc
Numeral: 1
When you press a pad or key, the character is inserted and
0 – 9
A – Z, a – z
(space) ! “ # $ % & ‘ ( ) * + , – . / : ; < >
= ? @ [ ] ^ _ ` { } \ ˜
[SONG/PATTERN] key
Symbol: x +
Pad 2
Letter: DEF def
Numeral: 2
[DRUM/BASS] key
Numeral: 0
[TEMPO] key
Symbol: ( )
Pad 9
Symbol: !?@&
Numeral: 9
Pad 5
Letter:
MNO mno
Numeral: 5
Pad 6
Letter:
PQRS pqrs
Numeral: 6
Pad 3
Letter: GHI ghi
Numeral: 3
ZOOM MRS-8
33
Page 34

Reference [Recorder]
TakeName
TR 1- 1
TakeName
TakeName
TakeName
TakeName
TakeName
TakeName
TakeName
TakeName
TakeName
TakeName
TakeName
TakeName
BA
TakeName
BAS
TakeName
BAS
TakeName
BASS
subsequent characters move one position to the right. To
clear the old name first, press the [EDIT] key repeatedly
until all characters are erased, and then start the input
procedure.
When all characters are cleared and you press pad 1
repeatedly, the character under the cursor changes in the
order A → B → C → 1 → A → B ...
TakeName
TR 1- 1
[EDIT] key
TakeName
±
Press repeatedly
Pad 1
TakeName
A
TakeName
B
TakeName
C
TakeName
1
To switch between upper and lower case, press the cursor
down key. The currently selected case is indicated by the
“A” or “a” shown on the second line of the display. You
can change the case of a letter after you have already
input it by pressing the cursor down key immediately
afterwards.
TakeName
A
Upper case
character
Lower case
character
TakeName
A
Cursor down key
TakeName
a
Case
indication
Case
indication
By pressing another pad or key after entering a character,
the cursor will move to the next position, without the
need for pressing the cursor key. If the next character to
input is assigned to the same pad, you must first press the
cursor right key once to move the cursor, and then enter
the character. An example for entering “BASS” from
scratch is shown below.
TakeName
±
Pad 1
Cursor [R] key
Pad 1
Pad6
Cursor [
Pad 6
NOTE
The space character and some symbols (“ # $ % ‘, – . / : ; <
> = [ ] ^ _ ` { } \ ˜ ) cannot be entered with the pads and keys
of the rhythm section.
6.
Repeat step 5 to complete the desired
name.
7.
To finish, press the [EXIT] key.
The main screen appears again.
HINT
If the contents of a V-take are erased, the name reverts to
“NO DATA”.
Press x2
Press x1
Press x4
R
Press x4
TakeName
B
TakeName
B
TakeName
BA
TakeName
BAS
TakeName
BAS
] key
TakeName
BASS
34
ZOOM MRS-8
Page 35

Reference [Recorder]
Moving to a desired point in
the song (locate function)
Using the counter indication on the display, you can
specify a location within the song in time units (minutes/
seconds/milliseconds) or in measure units (measures/
beats/ticks), and move to that location.
Seconds
Minutes Milliseconds Beats
1.
Verify that the transport is stopped and the
main screen is shown.
The locate function can only be used when the transport
is stopped.
2.
Use the cursor left/right keys to move the
flashing part to the unit to change.
The unit that can be changed is indicated by the flashing
value.
3.
Turn the dial to change the value.
When you change the displayed value, the recorder
immediately moves to the new location. Pressing the
PLAY [R] key starts playback from that point.
HINT
• While the transport is stopped, the REW [T
can be used to move backward or forward in 1-second steps.
• If you have set marks using the marker function, you can use
the locate function to move among marks. For details, see the
next section.
Measures Ticks
6- 0 13 240 2- 8
6- 0 13 240 2- 8
] / FF [Y
] keys
Setting marks in a song
(marker function)
This function lets you set index information (marks) at
any position in a song. Up to 100 marks can be set in one
project. When you have specified marks, it is easy to
jump to them at any time. This is useful to quickly repeat
playback from a certain point during a mixing operation.
Setting a mark
Here’s how to assign a mark at the desired location in a
song.
1.
Locate the point where you want to assign
a mark.
A mark can be assigned either during playback or when
the transport is stopped.
2.
Press the [MARK/CLEAR] key in the control
section.
A mark is assigned to the current location. The mark
number appears in the MARKER field at the bottom right
of the display.
When the current position matches the mark, a marker
icon appears to the right of the mark number.
06- 2- 8
01
Mark number
Mark numbers (01 – 99) are assigned automatically in
ascending order from the beginning of the song. If you
add a new mark between two existing marks, the
subsequent marks will be renumbered.
Mark
00 01 02 03 04
number
Song
Mark
00
number
Song
01 02 03 04 05
HINT
Mark number 00 is already set at the beginning of the song
(the counter zero location).
Marker icon
Add a mark
ZOOM MRS-8
35
Page 36

Reference [Recorder]
Locating a mark
This section explains how to select a mark and move to
its position. This can be done in two ways: you can use
dedicated keys to jump to marks in the vicinity, or you
can specify the mark number directly.
■
Locating the next or previous mark
1.
From the main screen, press either the
MARKER [U] or [I] key in the control
section.
Each time you press the key, the unit jumps to the next
mark before or after the current location.
Mark
Song
■
Specifying the mark number to locate
1.
From the main screen, use the cursor left/
right keys to cause the mark number to
flash.
In this condition, the mark number can be changed.
06- 2- 8
2.
Turn the dial to select the desired mark
number.
As soon as the number is changed, the recorder jumps to
that number.
Current location
01
Mark number flashes
Deleting a mark
Here’s how to delete a mark that you assigned.
1.
Locate the mark to delete.
The mark whose number is shown in the MARKER field
can be deleted. A mark can only be deleted when it
exactly matches the current location. Make sure that the
mark icon is shown. If not, use the MARKER [U] / [I]
keys to jump to the exact marker point.
2.
Press the [MARK/CLEAR] key in the control
section.
The selected mark will be deleted, and subsequent marks
will be renumbered.
HINT
• It is not possible to delete the mark (number 00) located at the
beginning of the song.
•A deleted mark cannot be recovered.
Playing back the same
passage repeatedly (A-B
repeat function)
A-B repeat is a function that automatically plays only a
specified section of a song. This is useful to listen to the
same passage repeatedly.
1.
Move to the point where repeat playback
should start, and press the [A-B REPEAT]
key in the control section.
The key flashes, and the repeat start location (point A) is
set.
HINT
The A/B point can be specified either during playback or
when the MRS-8 is stopped.
2.
Move to the point where repeat playback
should end, and press the [A-B REPEAT]
key once more.
The [A-B REPEAT] key changes from flashing to
constantly lit, and the repeat end location (point B) is set.
NOTE
If you specify a point B that is located earlier than point A, the
region from points B
3.
To redo the A/B point setting, press the [AB REPEAT] key so that it goes out, and then
repeat the procedure from step 1.
4.
To begin repeat playback, press the PLAY
[R] key.
When point B is reached, the recorder jumps to point A,
and playback resumes.
A will be played repeatedly.
→
36
ZOOM MRS-8
Page 37

Reference [Recorder]
5.
To stop repeat playback, press the STOP
[P] key.
6.
To turn off repeat playback, press the [A-B
REPEAT] key.
The key goes out, and repeat playback is turned off. The
A/B point locations will be erased.
Re-recording only a
specified region (punch-in/
out function)
Punch-in/out is a function that lets you re-record just a
specified region of a previously recorded track. The
action of switching a currently-playing track to record
mode is called “punch-in”, and the action of switching
back from recording to playback is called “punch-out”.
The MRS-8 provides two ways to do this. You can use the
panel keys to punch-in/out manually (“manual punch-in/
out”), or you can cause punch-in/out to occur
automatically at previously specified points (“auto
punch-in/out”).
Manual punch-in/out
To re-record a part of a track using the panel keys,
proceed as follows.
1.
Raise the fader of the track on which to
perform punch-in/out to a suitable position.
2.
Press the status key of that track
repeatedly, until the key is lit in red.
3.
Play your instrument connected to the
INPUT jack and adjust the input sensitivity
and recording level as required.
For information on how to adjust input sensitivity and
recording level, see page 15.
4.
Locate a point shortly before the intended
punch-in point, and press the PLAY [R] key
to begin playback.
5.
When you come to the punch-in point,
press the REC [O] key.
The REC [O] key lights up, and the MRS-8 switches
from playback to recording.
6.
When you come to the intended punch-out
point, press the REC [O] key once more.
The REC [O] key goes out, and the MRS-8 switches
from recording to playback.
7.
To stop the recorder, press the STOP [P]
key.
8.
To check the newly recorded content,
locate to a point before the punch-in point,
and press the PLAY [R] key.
Auto punch-in/out
Auto punch-in/out is a function that lets you specify
beforehand the region to be re-recorded. This is
convenient when you cannot operate the MRS-8 because
you are playing the instrument yourself, or when very fast
playback/record switching is required.
In point Out point
Tra ck
In order to perform auto punch-in/out, you must first
specify the In point (the point where the recorder
switches from playback to record) and Out point (the
point where the recorder switches from record to
playback), and then perform the recording operation.
1.
Raise the fader of the track on which to
perform punch-in/out to a suitable position.
2.
Play your instrument connected to the
INPUT jack and adjust the input sensitivity
and recording level as required.
For information on how to adjust input sensitivity and
recording level, see page 15.
3.
Locate the point where punch-in should
occur, and press the [AUTO PUNCH I/O]
key.
The key flashes. This sets the “In point” at which
recording will begin.
4.
Locate the point where punch-out should
occur, and press the [AUTO PUNCH I/O]
key once more.
The key changes from flashing to solidly lit. This sets the
“Out point” at which recording will end.
While the key is lit, auto punch-in/out is active.
PlaybackPlayback Recording
ZOOM MRS-8
37
Page 38

Reference [Recorder]
5.
Repeatedly press the status key for the
track on which to perform punch-in/out,
until the key is lit in red.
Use the Locate function to go to a spot
6.
before the In point.
If the current location is outside the region between the In
and Out points, the status key flashes in red. When the
current location is between the In point and Out points,
the status key is lit in red. In this case, use the locate
function once again to go to a point that is earlier than the
In point.
7.
To rehearse the auto punch-in/out process,
press the PLAY [R] key.
The MRS-8 will begin playing. When you reach the In
point, the track on which you are punching in/out will be
muted. When you reach the Out point, muting is defeated.
(You are always able to monitor the input signal during
this time.) Performing this action does not delete or
record anything on the track.
To change the positions of the In point or Out point, press
the [AUTO PUNCH I/O] key so that the key goes out, and
then repeat steps 3 – 4.
When you are finished rehearsing, move again to a
location earlier than the In point.
8.
To actually perform auto punch-in/out, hold
down the REC [O] key and press the PLAY
[R] key.
The MRS-8 will begin playing. When you reach the In
point, recording begins automatically (punch-in). When
you reach the Out point, recording ends automatically
and playback resumes (punch-out).
9.
When you are finished recording, press the
STOP [P] key.
10.
To listen to the recorded result, repeatedly
press the status key for the track on which
you recorded, until the key is lit green. Then
move to a location earlier than the In point,
and press the PLAY [R] key.
To re-do the punch-in/punch-out recording, repeat steps 5
– 9.
11.
When you are satisfied with the recording,
press the [AUTO PUNCH I/O] key so that
the key goes out.
The auto punch-in/out function is canceled, and the In
point and Out point settings are discarded.
Recording several tracks
on a master track (mixdown
function)
This section explains how to play recorded audio tracks
as well as drum/bass track sounds and record them as a
stereo mix on a master track (mixdown).
About the master track
The master track is a set of stereo tracks that is separate
from the normal audio tracks. The most common use of
the master track is as a track on which the end result of a
mixdown process is recorded.
The MRS-8 offers one master track for each project.
Similar to the regular audio tracks, the master track also
has ten virtual tracks (V-takes). This allows you to record
different mixes on several V-takes and select the optimum
take later.
When you switch the master track to the recording
condition, the signal after passing the [MASTER] fader
(the same signal as available from the MASTER
OUTPUT jacks) is recorded on the master track.
Master
track
HINT
It is possible to play the master tracks of several projects in
succession (
p. 111).
→
38
ZOOM MRS-8
Page 39

Reference [Recorder]
TR 4- 1
GTR 4- 1
TR M- 1
NO DATA
Master track mixdown steps
Here’s how to mix audio tracks and the drum/bass track
sound onto two stereo channels and record these on the
master track.
1.
Press the [TRACK PARAMETER] key in the
display section and use the cursor up/down
keys to bring up the indication “TR x-yy” on
the display (where x is the track number
and yy is the V-take number).
TR 4- 1
GTR 4- 1
2.
Use the [MASTER] status key or the cursor
left/right keys to select the master track.
The name of the V-take selected for the master track is
shown. (If there is noting recorded on the V-take, the
indication “NO DATA” is shown.)
TR M- 1
NO DATA
3.
Use the dial to select the V-take.
When you have selected the V-take, press the [EXIT] key
to return to the main screen.
4.
From the main screen, press the [MASTER]
status key so that the key is lit in red.
The master track is now ready for recording. The signal
after passing the [MASTER] fader will be sent to the
master track.
The other tracks operate normally, also while the
[MASTER] status key is lit in red.
5.
Press the PLAY [R] key to start playback
and adjust the mixing balance.
The individual track level settings as well as panning,
insert effect, and send/return effect settings all have an
influence on the signal that is sent to the master track.
Adjust levels while watching the L/R level meter, and
make sure that no signal clipping occurs.
6.
To carry out the mixdown operation, press
the ZERO [U] key to return to the
beginning of the song, and then press the
PLAY [R] key while holding down the REC
[O] key.
Recording on the master track starts.
7.
When recording is complete, press the
STOP [P] key.
Playing the master track
To play the recorded master track, proceed as follows.
1.
From the main screen, press the [MASTER]
status key repeatedly until the key is lit in
green.
The master track is now ready for playback. In this mode,
all other status keys are out and the audio tracks and
drum/bass track are muted. The insert and send/return
effects are also switched off.
Master
track
2.
Press the ZERO [U] key to return to the
beginning of the song, and then press the
PLAY [R] key.
Playback of the master track starts. To adjust the playback
volume, use the [MASTER] fader.
3.
To stop recorder playback, press the STOP
[P] key.
4.
To cancel the master track playback mode,
press the [MASTER] status key so that the
key goes out.
Muting for the audio tracks and drum/bass track is
canceled, and the unit returns to the previous condition.
ZOOM MRS-8
39
Page 40

Reference [Recorder]
RECTRACK
MUTE
Combining multiple tracks
on one or two tracks
(bounce function)
3.
Use the cursor left/right keys to bring up
the indication “BOUNCE RECTRACK” on
the display, and press the [ENTER] key.
The current setting is shown.
“Bounce” is a function that mixes the sound from the
audio tracks and drum/bass track, and records them on a
mono or stereo audio track. (This is sometimes called
“ping-pong recording”.)
You might bounce the contents of tracks 1 – 6 onto tracks
7/8 and then switch the V-takes of tracks 1 – 6 to record
new versions of your performance.
If necessary, you can play back all tracks 1 – 8, and
bounce the signal onto an empty V-take of a selected
track.
HINT
•You can mix the signals from the [INPUT] jacks into the
bounce recording.
•You can bounce the drum/bass track only, while playing back
all other tracks (
hitting the pads while listening to the audio tracks.
→
p. 42). This lets you record a drum fill-in by
Making bounce settings
Before using the bounce function, make the required
settings as follows.
■
Selecting operation status of bounce
destination track(s)
By default, the bounce destination recording track(s) will
be automatically muted. This is to prevent the content of
the track being mixed to the bounced signal.
To play back the V-take of a track while you bouncerecord onto another V-take of that track, use the following
procedure to change the internal setting so that the
recording track(s) will also play back.
1.
From the main screen, press the [SYSTEM/
UTILITY] key.
The indication “SYSTEM PROJECT” appears on the
display.
2.
Use the cursor left/right keys to bring up
the indication “SYSTEM BOUNCE” on the
display, and press the [ENTER] key.
RECTRACK
MUTE
The indications have the following meaning.
• MUTE:
The recording track(s) will be muted (default setting).
• PLAY:
The recording track(s) will play back.
4.
To play the bounce destination track, turn
the dial to change the setting to “PLAY”.
5.
To return to the main screen, press the
[EXIT] key repeatedly.
■
Selecting the recording destination
V-take
By default, the result of the bounce operation will be
recorded on the V-take that is currently selected for the
recording track(s). To play back a track while bouncing
onto another V-take of that track, you can use the
following procedure to change the recording destination
V-take.
1.
From the main screen, press the [SYSTEM/
UTILITY] key.
The indication “SYSTEM PROJECT” appears on the
display.
2.
Use the cursor left/right keys to bring up
the indication “SYSTEM BOUNCE” on the
display, and press the [ENTER] key.
3.
Verify that the indication “BOUNCE REC
TAKE” is shown on the display, and press
the [ENTER] key.
The V-take currently selected as bounce destination is
shown.
40
ZOOM MRS-8
Page 41

Reference [Recorder]
REC TAKE
CURRENT
REC TAKE
CURRENT
The following settings are available.
• CURRENT (default)
The bounce result will be recorded on the V-take
currently selected for the recording track.
•1 – 10
Regardless of the V-take currently selected for the track,
the bounce result will be recorded on the specified V-take.
4.
Turn the dial to specify the recording
destination V-take.
5.
To return to the main screen, press the
[EXIT] key repeatedly.
HINT
By setting the operation for the bounce destination track(s)
to “PLAY” and selecting an unused V-take as recording
destination, you can play all tracks and bounce the result as
an entire song onto the V-take.
Executing bounce recording
This example explains how to bounce the contents of all
tracks onto V-take 10 of tracks 7/8.
1.
Refer to “Making bounce settings” and set
the BOUNCE RECTRACK parameter to
“PLAY”.
2.
Refer to “Making bounce settings” and set
the BOUNCE REC TAKE parameter to “10”.
3.
Press the status key of tracks 7/8
repeatedly, until the key is lit in red.
In this condition, V-takes 10 of tracks 7/8 are selected as
bounce destination.
HINT
• When a single mono audio track is selected as bounce
destination, the bounce signal is mixed to mono for recording.
• When a pair of mono tracks with odd/even numbers is
selected as bounce destination, the bounce signal is recorded
in stereo. To achieve correct left/right positioning of the
bounced result, set the Pan parameter for the odd-numbered
and even-numbered tracks to separate left and right settings.
4.
Press the [BOUNCE] key.
The key lights up and the bounce function for the
destination tracks is turned on. While the key is lit, the
track(s)/V-take(s) selected in steps 2 and 3 are used as
recording destination. Other tracks and effects are
unchanged.
5.
Play the song from the beginning and
adjust the mixing balance of the various
tracks.
The individual track level and panning settings as well as
the insert effect and send/return effect settings all have an
influence on the mixed signal that is sent to the bounce
destination tracks. Adjust levels while watching the L/R
level meter, and make sure that no signal clipping occurs.
6.
Press the ZERO [U] key to return to the
counter zero position, and press the PLAY
[R] key while holding down the REC [O]
key.
Bounce recording starts.
7.
When recording is complete, press the
STOP [P] key.
HINT
It is also possible to combine the bounce function and the
auto punch-in/out function (
p. 37).
→
ZOOM MRS-8
41
Page 42

Reference [Recorder]
SYSTEM
PROJECT
REC SRC
MASTER
Recording drum/bass
sound on audio tracks
(rhythm recording)
The MRS-8 allows you to bounce only the drum track or
bass track onto any track, while playing all tracks. This
function is called “rhythm recording”.
This lets you record a drum fill-in by hitting the pads
while listening to the audio tracks.
Selecting the recording
source
In the default condition of a project, the signal
immediately after the [MASTER] fader is selected as
recording source for bouncing. To record the drum/bass
track, you must switch the recording source to the drum
track or bass track.
1.
From the main screen, press the [SYSTEM/
UTILITY] key in the display section.
SYSTEM
PROJECT
2.
Use the cursor left/right keys to bring up
the indication “SYSTEM BOUNCE” on the
display, and press the [ENTER] key.
3.
Use the cursor left/right keys to bring up
the indication “BOUNCE REC SRC” on the
display, and press the [ENTER] key.
The currently selected bounce recording source is shown.
REC SRC
MASTER
The following settings are available.
• MASTER
Signal immediately after [MASTER] fader
• DRUM TR
Drum track
• BASS TR
Bass track
4.
Turn the dial to select “DRUM TR” or “BASS
TR” as recording source.
5.
Press the [EXIT] key repeatedly to return to
the main screen.
Rhythm recording procedure
While playing the audio tracks, you can now record the
drum/bass track on any audio track.
1.
From the main screen, press the [BOUNCE]
key.
The key lights up, and bounce recording is active.
2.
Repeatedly press the status key for the
track on which to record, until the key is lit
in red.
In this condition, the signal of the track selected in step 4
of “Selecting the recording source” will be recorded.
HINT
To record the drum track in stereo, select a pair of stereo
tracks (or two mono tracks) as recording destination. If only
one mono track is selected, the left/right signals will be
mixed to mono.
3.
Press the [SONG/PATTERN] key in the
rhythm section, and turn the dial to select
the rhythm pattern/rhythm song.
To record your pad play, select an empty rhythm pattern/
rhythm song. Check that the sounds to play are assigned
to the pads.
4.
Press the PLAY [R] key and adjust the
drum/bass track output level.
Adjust levels while watching the level meter, and make
sure that no signal clipping occurs.
5.
Press the ZERO [U] key to return to the
counter zero position, and start recording.
The rhythm pattern/rhythm song play is recorded on the
audio track. If you hit the pads during recording, this
sound will also be captured.
42
ZOOM MRS-8
Page 43

6.
SYSTEM
PROJECT
PreCount
COUNT
COUNT
VOLUME
10
When play is complete, press the STOP [P]
key.
7.
Press the [BOUNCE] key.
The key goes out, and bounce recording is canceled. To
return to the normal condition, switch the recording
source back to “MASTER”, as described in “Selecting
the recording source”.
Making settings for precount operation
In the default condition of a project, a pre-count of four
beats is heard before the start of recording. The number
of beats and the pre-count volume can be changed as
follows.
1.
From the main screen, press the [SYSTEM/
UTILITY] key in the display section.
SYSTEM
PROJECT
2.
Use the cursor left/right keys to bring up
the indication “SYSTEM PreCount” on the
display, and press the [ENTER] key.
The display changes as follows.
PreCount
COUNT
3.
To change the number of pre-count beats,
press the [ENTER] key.
The current setting is shown. Turn the dial to make the
selection from the following choices.
• OFF
The pre-count is turned off.
•1 – 8
A pre-count of 1 – 8 beats is heard.
• SPECIAL
A special pre-count as follows is heard.
Reference [Recorder]
COUNT
4
Number of pre-count beats
When the setting is complete, press the [EXIT] key to
return to the screen of step 2.
4.
To change the volume of the pre-count
sound, use the cursor left/right keys to
bring up the indication “PreCount
VOLUME” on the display, and press the
[ENTER] key.
The display changes as follows. Turn the dial to set the
volume (0 – 15).
VOLUME
10
Pre-count volume
5.
When the setting is complete, press the
[EXIT] key repeatedly to return to the main
screen.
When you initiate a recording, the selected number of
pre-count beats will be heard at the selected volume.
ZOOM MRS-8
43
Page 44

Reference [Track Editing]
SYSTEM
PROJECT
SYSTEM
TR EDIT
TR EDIT
Copy
Copy Src
TR 1- 1
Copy Src
TR 3- 1
Copy Src
TR1/2
This section explains how to edit audio data contained on tracks 1 – 8 of the recorder section. There are two major types
of editing functions: specifying a range within a track for editing, or editing an entire V-take.
•Trim
Editing a range of data
The procedure for specifying a range within a track and
then performing an editing action is explained below.
Basic steps for range editing
When performing editing for a specified range of data,
some steps are similar for each action. These are as
follows.
1.
From the main screen, press the [SYSTEM/
UTILITY] key in the display section.
The indication “SYSTEM PROJECT” appears on the
display.
SYSTEM
PROJECT
2.
Use the cursor left/right keys to bring up
the indication “SYSTEM TR EDIT” on the
display.
SYSTEM
TR EDIT
3.
Press the [ENTER] key.
The track edit menu for operating on a range of data
appears.
Retain only a specified range of audio data and erase the
rest.
• Fade I/O (Fade-in/out)
Perform fade-in/fade-out over a specified audio data
interval.
• Reverse
Reverse a specified range of audio data.
5.
Press the [ENTER] key.
The screen for selecting the track and V-take for editing
appears. The display shown below is an example for
selecting the Copy command in step 4.
Copy Src
TR 1- 1
6.
Use the dial or the status keys to select the
track (1 – 8, MASTER), and use the cursor
up/down keys to select the V-take number
(1 – 10).
Copy Src
TR 3- 1
A V-take that is not currently selected for the track can
also be selected for editing. When track 8 is selected,
turning the dial clockwise lets you select odd/even track
pairs (track 1/2, track 7/8 etc.) or the master track.
4.
• Copy
Copy a specified range of audio data.
• Move
Move a specified range of audio data.
• Erase
Erase a specified range of audio data.
44
TR EDIT
Copy
Use the cursor left/right keys to select one
of the following editing commands.
Copy Src
TR1/2
NOTE
•You can press the status keys for two adjacent odd/evennumbered mono tracks together to select these tracks.
• Repeatedly pressing the status keys for stereo tracks selects
the odd-numbered track, even-numbered track, and stereo
track in sequence.
• When two tracks or the master track have been selected as
editing source, the editing destination must also be two tracks
or the master track. The currently selected V-take for each
track will be the destination.
ZOOM MRS-8
Page 45

Reference [Track Editing]
Copy Src
START
Copy Src
END
Copy Dst
TR 1- 1
7.
Press the [ENTER] key.
The subsequent steps will differ, depending on which
command was selected in step 4. See the sections for the
respective commands.
8.
When the editing command has been
carried out, press the [EXIT] key repeatedly
to return to the main screen.
NOTE
After executing an edit command for rewriting audio data,
the original data cannot be restored. To retain the condition
before editing, use the capture and swap function (
p. 53).
→
Copying a specified range of
data
You can copy the audio data of a specified range to a
specified position on a specified track/V-take. This action
will overwrite the existing data at the destination
location. The copy source data will be unchanged.
Copy source track
Copy
Copy destination track
1.
Refer to steps 1 – 6 of “Basic steps for
range editing” to select the copy source
track/V-take, and press the [ENTER] key.
The display changes as follows. In this condition, you can
specify the copy start point.
2.
Use the cursor left/right keys to move the
flashing section of the counter, and turn the
dial to specify the copy start point.
The point can be specified in minutes/seconds/
milliseconds, or in measures/beats/ticks. You can also use
the MARKER [U] / [I] keys to jump to a mark (→ p.
36) and use this as starting point.
HINT
If you specify a point where no audio data exist, the second
line of the display shows *.
3.
Press the [ENTER] key.
The display changes to “Copy Src END”. This screen lets
you specify the copy range end point.
Copy Src
END
HINT
The specified range is memorized until another entry is
made. This lets you keep using the setting for editing the
same range on a number of tracks.
4.
Specify the copy end point in the same way
as described in step 2.
If you press the PLAY [R] key at this point, the specified
range will be played.
5.
Press the [ENTER] key.
The display now shows “Copy Dst TR x-yy” (where x is
the track number and yy the V-take number). From this
screen, you can specify the copy destination track/V-take.
75- 3 15 0 4- 0
00
The copy range start point is shown on the counter in
minutes, seconds, milliseconds, and in measures, beats,
and ticks.
ZOOM MRS-8
Copy Src
START
1- 0 0 0 1- 0
00
Copy Dst
TR 1- 1
HINT
You can select the same track as copy source and copy
destination, and the copy destination range may overlap the
copy source range.
6.
Select the copy destination track/V-take in
the same way as for the copy source, and
press the [ENTER] key.
45
Page 46

Reference [Track Editing]
Copy Dst
TO
Move Src
START
Move Src
END
Move Dst
TR 1- 1
Move Dst
TO
The display changes as follows. From this screen, you
can specify the copy destination start point.
Copy Dst
TO
7.
Specify the copy destination start point in
the same way as in step 2, and press the
[ENTER] key.
The indication “Copy SURE?” appears on the display.
8.
To carry out the copy operation, press the
[ENTER] key.
When the copy operation is completed, the unit returns to
the track edit menu.
By pressing the [EXIT] key instead of the [ENTER] key,
you can cancel the operation and back up one step at a
time.
Moving a specified range of
data
You can move the audio data of a specified range to a
specified position on a specified track/V-take. This action
will overwrite the existing data at the destination
location. The move source data will be erased.
75- 3 15 0 4- 0
00
2.
Use the cursor left/right keys to move the
flashing section of the counter, and turn the
dial to specify the move start point.
The point can be specified in minutes/seconds/
milliseconds, or in measures/beats/ticks.
HINT
If you specify a point where no audio data exist, the second
line of the display shows *.
3.
Press the [ENTER] key.
The display changes to “Move Src END”. This screen lets
you specify the move range end point.
Move Src
END
4.
Specify the move end point in the same way
as described in step 2.
If you press the PLAY [R] key at this point, the specified
range will be played.
5.
Press the [ENTER] key.
The display now shows “Move Dst TR x-yy” (where x is
the track number and yy the V-take number). From this
screen, you can specify the move destination track/Vtake.
103- 4 28 0 3-44
00
Move source track
Move destination track
1.
The display changes as follows. In this condition, you can
specify the move start point.
46
Move
Refer to steps 1 – 6 of “Basic steps for
range editing” to select the move source
track/V-take, and press the [ENTER] key.
Move Src
START
1- 0 0 0 1- 0
00
Move Dst
TR 1- 1
HINT
You can select the same track as move source and move
destination.
6.
Select the move destination track/V-take in
the same way as for the move source, and
press the [ENTER] key.
The display changes as follows. From this screen, you
can specify the move destination start point.
Move Dst
TO
103- 4 28 0 3-44
00
ZOOM MRS-8
Page 47

7.
Ers Src
START
Ers Src
END
Trim Src
START
Specify the move destination start point in
the same way as for the move source, and
press the [ENTER] key.
The indication “Move SURE?” appears on the display.
8.
To carry out the move operation, press the
[ENTER] key once more.
When the move operation is completed, the unit returns
to the track edit menu.
By pressing the [EXIT] key instead of the [ENTER] key,
you can cancel the operation and back up one step at a
time.
Erasing a specified range of
data
You can erase the audio data of a specified range and
return the range to the mute (non-recorded) condition.
Erase
Reference [Track Editing]
Ers Src
END
4.
Specify the erase end point in the same way
as described in step 2.
If you press the PLAY [R] key at this point, the specified
range will be played.
5.
Press the [ENTER] key.
The indication “Erase SURE?” appears on the display.
6.
To carry out the erase operation, press the
[ENTER] key.
When the erase operation is completed, the unit returns to
the track edit menu.
By pressing the [EXIT] key instead of the [ENTER] key,
you can cancel the operation and back up one step at a time.
40- 1 44 0 4-23
00
1.
Refer to steps 1 – 6 of “Basic steps for
range editing” to select the track/V-take for
erasing, and press the [ENTER] key.
The display changes as follows. In this condition, you can
specify the erase start point.
Ers Src
START
2.
Use the cursor left/right keys to move the
flashing section of the counter, and turn the
dial to specify the erase start point.
The point can be specified in minutes/seconds/
milliseconds, or in measures/beats/ticks.
HINT
If you specify a point where no audio data exist, the second
line of the display shows *.
3.
Press the [ENTER] key.
The display changes to “Ers Src END”. This screen lets
you specify the erase range end point.
1- 0 0 0 1- 0
00
Trimming a specified range of
data
You can erase the audio data outside of a specified range
and adjust the data start/end point (trimming). This is
useful to eliminate unnecessary portions from a
completed master track.
Tri m Trim
NOTE
When data before a specified section are erased (trimmed),
the remaining audio data will move up by that amount.
Therefore the timing may become mismatched with regard to
other tracks.
1.
Refer to “Basic steps for range editing” to
select the track/V-take from which to trim
data, and press the [ENTER] key.
The display changes as follows. In this condition, you can
specify the start point of the range that you want to keep.
Trim Src
START
1- 0 0 0 1- 0
00
ZOOM MRS-8
47
Page 48

Reference [Track Editing]
Trim Src
END
Fade Src
START
Fade Src
END
Fade Src
CURVE
2.
Use the cursor left/right keys to move the
flashing section of the counter, and turn the
dial to specify the start point.
The point can be specified in minutes/seconds/
milliseconds, or in measures/beats/ticks.
HINT
If you specify a point where no audio data exist, the second
line of the display shows *.
3.
Press the [ENTER] key.
The display changes to “Trim Src END”. This screen lets
you specify the end point of the range that you want to
keep.
Trim Src
END
4.
Specify the end point in the same way as
described in step 2.
If you press the PLAY [R] key at this point, the specified
range will be played.
5.
Press the [ENTER] key.
The indication “Trim SURE?” appears on the display.
6.
To carry out the trimming operation, press
the [ENTER] key.
When the trimming operation is completed, the unit
returns to the track edit menu.
By pressing the [EXIT] key instead of the [ENTER] key,
you can cancel the operation and back up one step at a
time.
96- 4 10 0 4-16
00
The display changes as follows. In this condition, you can
specify the fade-in/out start point.
Fade Src
START
2.
Use the cursor left/right keys to move the
flashing section of the counter, and turn the
dial to specify the fade-in/out start point.
The point can be specified in minutes/seconds/
milliseconds, or in measures/beats/ticks.
HINT
If you specify a point where no audio data exist, the second
line of the display shows *.
3.
Press the [ENTER] key.
The display changes to “Fade Src END”. This screen lets
you specify the fade-in/out end point.
1- 0 0 0 1- 0
00
Fade Src
END
4.
Specify the fade-in/out end point in the
same way as described in step 2.
If you press the PLAY [R] key at this point, the specified
range will be played.
5.
Press the [ENTER] key.
The display changes as follows.
4- 0 10 0 4-17
00
You can fade in or fade out the audio data over a specified
range.
1.
48
Fade-in/fade-out of specified
data range
Fade-in
Refer to steps 1 – 6 of “Basic steps for
range editing” to select the track for fadein or fade-out, and press the [ENTER] key.
Fade Src
CURVE
6.
Turn the dial to select the fade-in or fadeout curve.
Curves I-1 to I-3 are for fade-in, and curves o-1 to o-3 are
for fade-out. The different kinds of curves look as
follows.
1-1
Volume change curve
ZOOM MRS-8
Page 49

Fade-in
Rvrs Src
START
Rvrs Src
END
I-1 I-2 I-3
Fade-out
o-1 o-2 o-3
Reference [Track Editing]
2.
Use the cursor left/right keys to move the
flashing section of the counter, and turn the
dial to specify the reverse start point.
The point can be specified in minutes/seconds/
milliseconds, or in measures/beats/ticks.
HINT
If you specify a point where no audio data exist, the second
line of the display shows *.
3.
Press the [ENTER] key.
The display changes to “Rvrs Src END”. This screen lets
you specify the reverse end point.
7.
Press the [ENTER] key.
The indication “Fade SURE?” appears on the display.
8.
To carry out the fade-in/fade-out operation,
press the [ENTER] key once more.
When the fade-in/fade-out operation is completed, the
unit returns to the track edit menu.
By pressing the [EXIT] key instead of the [ENTER] key,
you can cancel the operation and back up one step at a
time.
Reversing a specified range of
audio data
You can reverse the order of a specified range of audio
data.
Reverse
A B C D E E D C B A
1.
Refer to steps 1 – 6 of “Basic steps for
range editing” to select the track/V-take for
reversing, and press the [ENTER] key.
The display changes as follows. In this condition, you can
specify the reverse start point.
Rvrs Src
START
1- 0 0 0 1- 0
00
Rvrs Src
END
4.
Specify the reverse end point in the same
way as described in step 2.
If you press the PLAY [R] key at this point, the specified
range will be played.
5.
Press the [ENTER] key.
The indication “Reverse SURE?” appears on the display.
6.
To carry out the reversing operation, press
the [ENTER] key.
When the reverse operation is completed, the unit returns
to the track edit menu.
By pressing the [EXIT] key instead of the [ENTER] key,
you can cancel the operation and back up one step at a
time.
42- 1 18 0 2- 0
00
ZOOM MRS-8
49
Page 50

Reference [Track Editing]
TR 1- 1
GTR 1- 1
V
ERASE
TR 1- 2
Editing using V-takes
Recorded audio data can also be edited in V-take units.
This is convenient to exchange the data on two V-takes or
delete a V-take that is no longer needed. The procedure is
explained in this section.
Basic steps for V-take editing
When editing audio data in V-take units, some steps are
similar for each action. These are as follows.
1.
From the main screen, press the [TRACK
PARAMETER] key in the display section.
2.
Use the cursor up/down keys to bring up
the following indication on the display.
V-take number Track number
-take name
This screen lets you select the V-take. While the screen is
shown, the V-take for the audio tracks (1 – 8, master
track) can be switched.
HINT
If you select a V-take on which nothing is recorded, the
indication “NO DATA” is shown.
3.
Use the cursor left/right keys or the status
keys and the dial to select the track and Vtake.
The status key for the currently selected track is lit in
orange. It is also possible to select the master track. In this
case, the track number indication shows “M”.
HINT
Pressing the status key for a stereo track repeatedly selects
the odd-numbered track and even-numbered track in
sequence.
4.
Press the [FUNCTION] key in the control
section.
Commands for editing audio data in V-take units appear
on the display.
TR 1- 1
GTR 1- 1
ERASE
TR 1- 2
5.
Repeatedly press the [FUNCTION] key to
call up the command to use. The following
editing commands are available.
• Erase
Erase the audio data on a specified V-take.
• Copy
Copy the audio data of a specified V-take to another Vtake.
• Move
Move the audio data of a specified V-take to another Vtake.
• Exchg (Exchange)
Exchange the audio data of a specified V-take with the
data of another V-take.
• Import
Import any V-take from another project saved on SD card.
HINT
You can still change your track and V-take selection while
selecting an editing command.
6.
Press the [ENTER] key.
The subsequent steps will differ, depending on which
command was selected in step 5. See the sections for the
respective commands.
7.
When the editing command has been
carried out, press the [EXIT] key repeatedly
to return to the main screen.
NOTE
After executing an edit command for rewriting audio data,
the original data cannot be restored. To retain the condition
before editing, use the capture and swap function (
p. 53).
→
50
ZOOM MRS-8
Page 51

Reference [Track Editing]
COPY TO
TR 1- 2E
MOVE TO
TR 1- 2E
Erasing a V-take
You can erase the audio data on a specified V-take. The Vtake is returned to the non-recorded condition.
Erase
1.
Refer to steps 1 – 5 of “Basic steps for Vtake editing” to select the track/V-take to
erase and to bring up the indication
“ERASE” on the display. Then press the
[ENTER] key.
The indication “ERASE SURE?” appears on the display.
2.
To carry out the erase operation, press the
[ENTER] key once more.
The V-take name changes to “NO DATA” and the V-take
reverts to the non-recorded condition. When the erase
operation is completed, the V-take selection screen
appears again.
By pressing the [EXIT] key instead of the [ENTER] key,
you can cancel the operation and back up one step at a
time.
Copying a V-take
You can copy the audio data of a specified V-take to any
other V-take. This action will overwrite any existing data
on the destination V-take. The data on the copy source Vtake will be unchanged.
Copy source track
Copy
Copy destination track
1.
Refer to steps 1 – 5 of “Basic steps for Vtake editing” to select the track/V-take to
copy and to bring up the indication “COPY”
on the display. Then press the [ENTER] key.
The display changes as follows. In this condition, you can
specify the copy destination track/V-take.
HINT
If nothing is recorded on the V-take selected as editing
destination, the indication “E” is shown next to the V-take
number.
2.
Use the cursor left/right keys or the status
keys and the dial to select the destination
track/V-take, and press the [ENTER] key.
If no audio data exist at the copy destination, the
indication “COPY SURE?” appears on the display. If
audio data exist, the indication “OverWrt?” is shown.
When the copy operation is performed, these data will be
overwritten.
3.
To carry out the copy operation, press the
[ENTER] key once more.
When the copy operation is completed, the unit returns to
the V-take selection menu.
By pressing the [EXIT] key instead of the [ENTER] key,
you can cancel the operation and back up one step at a
time.
Moving a V-take
You can move the audio data of a specified V-take to any
other track/V-take. This action will overwrite any existing
data on the destination V-take. The data on the move
source V-take will be erased.
Move source track
Move
Move destination track
1.
Refer to steps 1 – 5 of “Basic steps for Vtake editing” to select the track/V-take to
move and to bring up the indication
“MOVE” on the display. Then press the
[ENTER] key.
The display changes as follows. In this condition, you can
specify the move destination track/V-take.
MOVE TO
TR 1- 2E
ZOOM MRS-8
COPY TO
TR 1- 2E
HINT
If nothing is recorded on the V-take selected as editing
51
Page 52

Reference [Track Editing]
EXCHG TO
TR 1- 3
IMPORT
PRJ002
r
destination, the indication “E” is shown next to the V-take
number.
2.
Use the cursor left/right keys or the status
keys and the dial to select the destination
track/V-take, and press the [ENTER] key.
If no audio data exist at the move destination, the
indication “MOVE SURE?” appears on the display. If
audio data exist, the indication “OverWrt?” is shown.
When the move operation is performed, these data will be
overwritten.
To carry out the move operation, press the
3.
[ENTER] key once more.
When the move operation is completed, the unit returns
to the V-take selection menu.
By pressing the [EXIT] key instead of the [ENTER] key,
you can cancel the operation and back up one step at a
time.
Exchanging V-takes
You can exchange the audio data of two specified V-takes.
Exchange
NOTE
You cannot exchange V-takes of the master track.
1.
Refer to steps 1 – 5 of “Basic steps for Vtake editing” to select the track/V-take to
exchange and to bring up the indication
“EXCHG” on the display. Then press the
[ENTER] key.
You can now select the other track/V-take.
EXCHG TO
TR 1- 3
2.
Use the cursor left/right keys or the status
keys and the dial to select the exchange
destination track/V-take, and press the
[ENTER] key.
The indication “EXCHG SURE?” appears on the display.
3.
To carry out the exchange operation, press
the [ENTER] key once more.
When the exchange operation is completed, the unit
returns to the V-take selection menu.
By pressing the [EXIT] key instead of the [ENTER] key,
you can cancel the operation and back up one step at a
time.
Importing a V-take from
another project
You can import any V-take from another project into a
specified track/V-take of the current project. Any audio
data on the destination V-take are overwritten by the
imported V-take.
Track of import source project
Import
Import destination track
NOTE
The master track cannot be specified as import destination
or import source.
1.
Refer to steps 1 – 5 of “Basic steps for Vtake editing” to select the import
destination track/V-take and to bring up the
indication “IMPORT” on the display. Then
press the [ENTER] key.
The name of the import source project is shown on the
display.
IMPORT
PRJ002
Import source project name
2.
Turn the dial to select the import source
project, and press the [ENTER] key.
The display changes as follows. In this condition, you can
specify the import source track/V-take.
2
Project numbe
52
ZOOM MRS-8
Page 53

Reference [Track Editing]
TR 6- 1
T06-LdVo
V
Track/V-take number
TR 6- 1
T06-LdVo
-take name
3.
Use the cursor left/right keys and the dial to
select the track/V-take to import, and press
the [ENTER] key.
When an unrecorded track/V-take is selected, the
indication “NO DATA” is shown instead of the V-take
name.
4.
Press the [ENTER] key.
The indication “IMPORT SURE?” appears on the
display. If audio data exist at the import destination, the
indication “OverWrt?” is shown. When the import
operation is performed, these data will be overwritten.
5.
To carry out the import operation, press the
[ENTER] key once more.
When the import operation is completed, the unit returns
to the V-take selection menu.
By pressing the [EXIT] key instead of the [ENTER] key,
you can cancel the operation and back up one step at a
time.
2
Track capture and swap
You can capture the audio data of any track and
temporarily store them. Later you can swap the captured
data with the current data of the track. This lets you save
the state of a track before an editing operation. If the
result of the operation is not as desired, you can then
easily restore the track to its previous state.
Capture
Recorder
Track 1
Track 2
Track 3
Captured
data of
track 1
Swap
Recorder
Track 1
Track 2
Track 3
Captured
data of
track 1
Recorder
Track 1
Track 2
Track 3
Recorded data
Capture operation for track 1
Rerecorded data
Swap operation for track 1
ZOOM MRS-8
Captured
data of
track 1
Capture/swap is performed on a track basis. If required,
you can capture all audio tracks.
Captured audio data will be retained on the SD card until
another project is loaded or the power is turned off.
Capturing a track
You can capture the audio data of any specified track.
1.
From the main screen, press the [SYSTEM/
UTILITY] key in the display section.
The indication “SYSTEM PROJECT” appears on the
display.
53
Page 54

Reference [Track Editing]
SYSTEM
PROJECT
CAPTURE
TR1
SWAP
TR1
SYSTEM
PROJECT
2.
Use the cursor left/right keys to bring up
the indication “SYSTEM CAP/SWAP” on the
display, and press the [ENTER] key.
The display changes as follows.
CAPTURE
TR1
3.
Use the status keys or the dial to select a
track for capture.
The status key for the currently selected track is lit in
orange. It is also possible to select the master track. In this
case, the indication shows “MASTER” and the
[MASTER] status key is lit.
HINT
•Tracks for which stereo link is active, stereo tracks, and the
master track can only be captured in stereo.
•A track for which an unrecorded V-take is selected cannot be
captured.
4.
Press the [ENTER] key.
The indication “CAPTURE SURE?” appears on the
display.
5.
To carry out the capture operation, press
the [ENTER] key once more.
When capture is completed, the indication “SWAP TR x”
(where x is the track number) appears on the display. This
indicates that the track has been captured and can be
swapped if necessary.
By pressing the [EXIT] key instead of the [ENTER] key,
you can cancel the operation and back up one step at a
time.
6.
To return to the main screen, press the
[EXIT] key repeatedly.
Swapping track data
You can swap the current data of a track with the captured
data.
From the main screen, press the [SYSTEM/
1.
UTILITY] key in the display section.
The indication “SYSTEM PROJECT” appears on the
display.
2.
Use the cursor left/right keys to bring up
the indication “SYSTEM CAP/SWAP” on the
display, and press the [ENTER] key.
Use the status keys or the dial to select a
3.
track that was previously captured.
When you select a captured track, the indication “SWAP”
appears on the display.
SWAP
TR1
HINT
If you select a track that was not captured, the indication
“CAPTURE” appears.
NOTE
Captured audio data can only be swapped with the original
track.
4.
Press the [ENTER] key.
The indication “SWAP SURE?” appears on the display.
5.
To carry out the swap operation, press the
[ENTER] key once more.
When the operation is completed, the audio data of the
selected track will have been replaced by the previously
captured audio data.
By pressing the [EXIT] key instead of the [ENTER] key,
you can cancel the operation and back up one step at a
time.
HINT
By performing the swap operation once more, you can return
the track contents to the previous condition.
6.
To return to the main screen, press the
[EXIT] key repeatedly.
54
ZOOM MRS-8
Page 55

Reference [Mixer]
This section explains the functions and operation of the mixer built into the MRS-8.
Similarly, mute on/off for the audio tracks is switched
About the mixer
The MRS-8 incorporates a mixer that processes the audio
track output signals as well as the drum kit/bass program
output signals (the drum track/bass track) into a stereo
mix that is supplied to the MASTER OUTPUT jacks.
The mixer adjusts parameters such as level, panning, EQ,
and send/return effect intensity for each track.
The level for the audio tracks is adjusted with the
corresponding faders in the fader section.
The [MASTER] fader adjusts the stereo mix/master track
volume.
The level of the drum track and bass track is adjusted with
the [RHYTHM] fader after selecting either drum track or
bass track with the [DRUM/BASS] key.
using the status keys (1 – 4, 5/6, 7/8), and mute on/off for
the drum/bass track is switched using the [RHYTHM]
status key.
The [MASTER] status key switches the master track
between recording and playback.
Control of drum track/bass track
Control of tracks 1 - 8
Control of stereo mix or master
track
INPUT
No recording
standby track
ZOOM MRS-8
Recording
standby tracks
immediately
[MASTER]
Recorder
From
after
fader
Rhythm section
Send/return effect
Tra ck 1
Tra ck 2
Tra ck 3
Tra ck 4
Tracks 5/6
Tracks 7/8
Master Track
Drum kits
Bass program
To immediately
before
[MASTER] fader
BASSDRUM
Mixer
MASTER OUTPUT
MASTER
7/85/64321
From master track
To
master
track
55
Page 56

Reference [Mixer]
If no recording track is selected, the signal from the
inputs can be sent to the mixer and mixed to the output
signal during bounce and mixdown. In this case, track
parameters such as panning and send/return effect depth
can be set for the input signal.
Assigning input signals to
recording tracks
This section explains how to select the input source signal
from the INPUT 1/2 connectors and the built-in
microphone, and how to send it to the audio tracks for
recording.
The MRS-8 allows you to select up to two signals from
the INPUT 1/2 connectors and the built-in mic. The
INPUT 1 connector and the built-in mic are switchable,
and one of these can be used at a time. The following
combinations are possible.
Input source
INPUT 1 connector
INPUT 2 connector
Built-in mic
INPUT 1/2 connectors
Built-in mic + INPUT 2
connector
NOTE
• The built-in mic can normally only be used when an algorithm
other than CLEAN, DIST, or ACO/BS SIM is selected for the
insert effect.
• When the PRE AMP/DRIVE module is set to CABINET or OFF,
the built-in mic can be used also when one of the above
algorithms is selected for the insert effect.
• The status of the [MIC] key indicates whether the built-in mic
can be used. When the key is flashing, the mic can be used.
When the key is out, the mic cannot be used.
1.
When using the INPUT 1/2 connectors,
make sure that the instrument or mic that is
to be recorded is connected to the
respective input.
NOTE
When using the INPUT 1 connector, the [INPUT1 SELECT]
switch on the rear panel must be set to the correct position
for the instrument.
Signal type
Mono
Mono
Mono
Stereo
Stereo
2.
Select the input source as follows.
The input source selection is made using the INPUT
[ON/OFF] 1/2 keys and the [MIC] key. Repeatedly
pressing a key toggles between the lit/out (or flashing)
conditions.
• Selecting one INPUT connector
Verify that the [MIC] key is flashing or out. Then press
the INPUT [ON/OFF] key for the connector to which the
instrument is connected, so that the key is lit.
INPUT [ON/OFF] key
• Selecting two INPUT connectors
Verify that the [MIC] key is not lit. Then press one
INPUT [ON/OFF] key so that the key is lit. Next, hold
down the lit INPUT [ON/OFF] key and press the other
INPUT [ON/OFF] key.
INPUT
[ON/OFF]
key
INPUT
[ON/OFF]
key
• Selecting only the built-in mic
Press the [MIC] key so that the key is lit. Then press the
INPUT [ON/OFF] 1 key so that the key is lit.
[MIC] key
INPUT
[ON/OFF]
key
56
ZOOM MRS-8
Page 57

• Selecting the built-in mic and INPUT 2
CLEAN
Standard
INPUT
EFX SEND
INPUT
REC LVL
Press the [MIC] key so that the key is lit. Then hold the
INPUT [ON/OFF] 1 key and press the INPUT [ON/OFF]
2 key so that both keys are lit.
[MIC]キー
INPUT
[ON/OFF]
key
3.
While playing your instrument, adjust the
[INPUT] control for the input(s) selected in
step 2, to adjust the input sensitivity.
The sensitivity of the built-in mic can be adjusted using
[INPUT] control 1. Make adjustments so that the [PEAK]
indicator flickers slightly when you play your instrument
at its loudest volume.
4.
To record the sound through the insert
effect, press the [INPUT SRC] key in the
effect section and turn the dial to set the
insert position for the effect to IN.
The insert effect will be applied to the input source. To
record without the insert effect, press the [INSERT
EFFECT] key in the effect section repeatedly until the
key is out. (While the key is out, the insert effect will be
bypassed.)
When the setting is complete, press the [EXIT] key to
return to the main screen.
HINT
In the default condition of a project, the insert effect is
inserted into the input, and a patch suitable for guitar/bass
recording is selected.
5.
To select the patch for the insert effect,
press the [INSERT EFFECT] key in the
effect section.
The display changes as follows. In this condition, the
cursor up/down keys select the insert effect algorithm,
and the dial selects the effect patch for the algorithm.
INPUT
[ON/OFF]
key
Reference [Mixer]
CLEAN
Standard
6.
Use the cursor up/down keys and the dial
to select the effect patch, and press the
[EXIT] key.
The main screen returns.
The level of the signal sent to the recording track(s)
changes according to the insert effect setting. After
switching a patch or changing an effect setting, you
should readjust the recording level as described in steps 7
– 9.
From the main screen, press the [TRACK
7.
PARAMETER] key in the display section,
and then press the INPUT [ON/OFF] key 1
or 2.
The indication “INPUT” appears on the first line of the
display. This indicates that the track parameters for the
input signal are being called up.
INPUT
EFX SEND
8.
Press the cursor down key repeatedly, until
“REC LVL” is shown on the second line of
the display.
The input signal recording level can now be adjusted.
INPUT
REC LVL
9.
While playing your instrument at its loudest
volume, turn the dial to adjust the recording
level.
The REC LVL parameter determines the level of the
signal sent to the recording track via the insert effect. The
level after adjustment can be checked on the level meter.
At the highest volume, the 0 (dB) segment of the level
meter should flicker slightly.
0
0
100
ZOOM MRS-8
57
Page 58

Reference [Mixer]
0 (dB) segment
Input 1 recording level
Input 2 recording level
After setting the recording level, press the [EXIT] key to
return to the main screen.
HINT
When the insert effect is bypassed for recording, setting the
REC LVL parameter to 100 results in unity gain (recording
level same as input level).
10.
Press the status key for the track to be
used for recording until the key is lit in red.
The signal of the selected input source will be sent to the
track(s). Up to two mono tracks or one stereo track can be
selected.
When selecting two mono tracks, only odd/evennumbered pairs can be selected (tracks 1/2 or 3/4). To
select two tracks, repeatedly press the status key for one
track until the key is lit in red, and then hold the key while
pressing the status key for the other track so that it is also
lit in red.
The signal flow will change as follows, depending on the
destination track selection.
• One mono track selected
One Input source
INPUT 1 (built-in mic)
or
INPUT 2
Two Input sources
INPUT 1 (built-in mic)
INPUT 2
Recorder
Track
Recorder
Track
• Stereo track or two mono tracks selected
One Input source
INPUT 1 (built-in mic)
or
INPUT 2
Two Input sources
INPUT 1 (built-in mic)
INPUT 2
Recorder
Odd-numbered track
Even-numbered track
Recorder
Odd-numbered track
Even-numbered track
• Recording destination not selected
One Input source
INPUT 1 (built-in mic)
or
INPUT 2
Tracks 1 - 8
Drum/bass track
Two Input sources
INPUT 1 (built-in mic)
INPUT 2
Tracks 1 - 8
Drum/bass track
PAN
MASTER
MASTER
OUTPUT
PAN
MASTER
MASTER
OUTPUT
HINT
You can link two mono tracks and use them as a stereo track
p. 60). In this case, the track parameter PAN functions as
→
(
a BALANCE parameter that adjusts the left/right level
balance.
58
ZOOM MRS-8
Page 59

2.
TR 3
EQ HI G
Use the cursor left/right keys or the status
Adjusting the signal for
keys to select the track/input to be set.
each track (track
parameters)
TR 3
EQ HI G
The mixer of the MRS-8 lets you adjust various aspects
for each track (called track parameters), such as level,
panning, EQ, and send/return effect intensity.
NOTE
The audio tracks 5/6 and 7/8 and the drum track are stereo
tracks. Except for the V-take selection (audio tracks only),
the track parameters for these tracks are the same for left
and right.
1.
From the main screen, press the [TRACK
PARAMETER] key in the display section.
■
Track parameter list
Parameter
EQ HI GAIN (*)
EQ HI
FREQUENCY
(*)
EQ LOW
GAIN (*)
EQ LOW
FREQUENCY
(*)
EFX SEND
LEVEL (*)
PAN
V-TAKE
FADER
REC LVL
STEREO
LINK
: denotes a parameter that can be switched on and off by pressing the [ENTER] key.
(*)
O
: Valid parameter for this track/input
Display
EQ HI G
EQ HI F
EQ LO G
EQ LO F
EFX SEND
PAN
TR x-y
FADER
REC LVL
ST LINK
Setting
range
-12 – +12dB
500 – 18000
(Hz)
-12 – +12dB
40 – 1600 (Hz)
0 – 100
L100 – 0
–R100
x=1 – 8,
y=1 – 10
0 – 127
0 – 127
ON/OFF
Adjusts high-frequency boost or
cut in the range from -12 to +12
dB. This parameter is only shown
when HI EQ is on.
Adjusts turnover frequency for
high-frequency boost/cut. This
parameter is only shown when HI
EQ is on.
Adjusts low-frequency boost or
cut in the range from -12 to +12
dB. This parameter is only shown
when LOW EQ is on.
Adjusts turnover frequency for
low-frequency boost/cut. This
parameter is only shown when
LOW EQ is on.
Adjusts the level of the signal sent
to the send/return effect.
Adjusts the panning value (left/
right position) of the track/input
signal. For stereo tracks, the
parameter adjusts the left/right
level balance.
Selects the V-take to use for the
→
p. 32). x stands for the
track (
track number and y for the V-take
number.
Adjusts the fader setting. O O O O ---
Adjusts the recording level. --- --- --- --- O
Controls the stereo link function
for linking the parameters of mono
tracks 1/2 or 3/4 (
HINT
• When selecting the V-take of stereo tracks (5/6, 7/8), the track
is toggled between odd-numbered track and even-numbered
track with each push of the key.
• When selecting the drum track/bass track with the [RHYTHM]
status key, each push of the key toggles the track. The track
operated with pads or faders is also switched.
3.
Use the cursor up/down keys to select the
track parameter to adjust.
The selectable parameters for the respective tracks and
inputs are listed below.
Description
→
p. 60).
Track
1 - 4
OO --- O ---
OO --- O ---
OO --- O ---
OO --- O ---
OO --- O O
OO --- O O
OO O --- ---
O --- --- --- ---
Track
5 - 8
Master
track
Reference [Mixer]
0
Drum/
bass
Input
track
ZOOM MRS-8
59
Page 60

Reference [Mixer]
TR1
EQ HI G
TR1
EQ HI
TR1
ST LINK
TR1/2
ST LINK
NOTE
When the recording track is selected, the input signal does
not pass through the mixer but is supplied directly to the
track. Therefore, if a track is in recording standby mode, the
input track parameter settings will have no effect. (However,
the REC LVL parameter is always active.)
4.
Turn the dial to adjust the value.
5.
To switch EQ HI, EQ LO, or effect send
between on and off, select the respective
parameter (marked with an asterisk in the
table on the previous page) and press the
[ENTER] key.
Each push of the [ENTER] key toggles between on and
off. For example, when switching EQ HI from on to off,
the display changes as follows.
• On condition
TR1
EQ HI G
•Off condition
TR1
EQ HI
6.
Repeat steps 3 – 5 until all desired
parameters are adjusted.
If required, you can use the cursor left/right keys or the
status keys to change to another track and adjust its
parameters. This is useful to adjust the same parameter
for several tracks.
7.
To return to the main screen, press the
[EXIT] key.
4
OFF
Linking two tracks
(stereo link)
In the MRS-8, the parameters of adjacent odd-numbered/
even-numbered mono tracks (1/2 or 3/4) can be linked,
resulting in a pair of stereo tracks. This function is
referred to as “stereo link”. The setting procedure is as
follows.
1.
From the main screen, press the [TRACK
PARAMETER] key in the display section
2.
Use the cursor left/right keys or the status
keys to select one of the two tracks to
stereo-link.
3.
Use the cursor up/down keys to bring up
the following indication on the display.
TR1
ST LINK
4.
Turn the dial to set the parameter to ON.
Stereo linking will be enabled immediately, so that the
selected track and the adjacent odd-numbered/evennumbered track are linked. To defeat stereo linking,
return the setting to OFF.
TR1/2
ST LINK
When stereo link is on, track operation will be as follows.
•To adjust the track volume, use the odd-numbered
fader. (The even-numbered fader will have no
effect.)
• The PAN parameter of two stereo-linked tracks will
function as a balance parameter that adjusts the
volume balance between the tracks.
• Except for PAN and V-TAKE, the track parameters
for the odd-numbered track will also apply to the
even-numbered track.
5.
To return to the main screen, press the
[EXIT] key.
OFF
ON
60
ZOOM MRS-8
Page 61

Reference [Rhythm]
This section explains the functions and operation of the built-in rhythm section of the MRS-8.
About the rhythm section
The rhythm section of the MRS-8 uses internal drum
sound and bass sound sources to generate rhythm
accompaniment. It can be used instead of a metronome
by playing simple rhythm patterns, or you can program a
sequence of rhythm patterns and chord progression into
the rhythm accompaniment for an entire song.
Drum kits and bass programs
The rhythm section has two different types of sound,
created by a “drum kit” and a “bass program”.
The drum kit is a set of 27 drum/percussion sounds such
as kick, snare, and hihat. The MRS-8 contains 8 different
drum kits. You can select one of these drum kits and play
it manually with the pads on the top panel, or you can use
it as a sound source for rhythm accompaniment.
When you select a drum kit, its sounds are assigned to the
nine pads. Such a combination of sounds assigned to the
pads is called a “pad bank”. One drum kit gives access to
three pad banks. Simply by switching the pad bank you
can play other sounds from the current drum kit.
A bass program is a single bass sound, such as an electric
bass or acoustic bass, which can be played as a scale with
the pads on the top panel. The MRS-8 has five bass
programs. You can choose one of these and play a scale
with the pads, or use it as a sound source for rhythm
accompaniment.
When you select a bass program, a sound of a certain
pitch is assigned to each pad, and you can play it by
selecting a scale. By switching the scale type, key, and
range, you can cover up to four octaves.
For the rhythm section, you select either the drum kit or
bass program to be played with the pads. Immediately
after creating a new project, the drum kit is selected. The
[DRUM/BASS] key is used to toggle between the two
sound types. When the [DRUM/BASS] key is lit, the
drum kit is selected. When the key is out, the bass
program is selected for playing.
■
Drum kit selected
Lit
■
Bass program selected
Out
The output signal from the drum kit (drum track) and the
output signal from the bass program (bass track) are sent
to the internal mixer, where you can use the [RHYTHM]
fader and [RHYTHM] status key to adjust the volume
and switch the signal on and off. (This affects the sound
type currently selected with the [DRUM/BASS] key.
ZOOM MRS-8
61
Page 62

Reference [Rhythm]
Out
Lit
Rhythm patterns
A project can contain over 500 accompaniment patterns
with drum/bass performance data for up to 99 measures
each. This is called a rhythm pattern. Inside each rhythm
pattern, the area that holds the drum performance data is
called the “drum sequence”, and the area that holds the
bass performance data is called the “bass sequence”.
In the default condition, a project contains preprogrammed
rhythm patterns in numbers 000 – 472, 509, 510. You can
edit a portion of a rhythm pattern, or use an empty slot to
create an entirely original rhythm pattern. The rhythm
patterns you modify or create are saved on the SD card as
part of the project.
1234
Rhythm
PATTERN PATTERN
section
Drum sequence
Bass sequence
Drum sequence
Bass sequence
Rhythm song
Multiple rhythm patterns arranged in a desired order of
playback are collectively called a “rhythm song”. Besides
the rhythm pattern data, a rhythm song comprises
information about various aspects such as chord, tempo,
and time signature to create the accompaniment for an
entire song. Up to 10 rhythm songs can be programmed
in one project.
Rhythm pattern mode and
rhythm song mode
The rhythm section can operate in one of two modes:
“rhythm pattern mode”, in which the currently selected
rhythm pattern is constantly repeated, and “rhythm song
mode”, in which you can create and play an entire rhythm
song consisting of a sequence of patterns.
Immediately after creating a new project, the rhythm
pattern mode is selected. By pressing the [SONG/
PATTERN] key, you can toggle between the rhythm
pattern mode and rhythm song mode. When the [SONG/
PATTERN] key is out, the rhythm pattern mode is
selected. When the key is lit, the rhythm song mode is
selected.
■
Rhythm pattern mode
■
Rhythm song mode
Rhythm
song
Measure
number
123456
PATTERN A PATTERN E PATTERN B
Drum sequence
Bass sequence
Chords
Am Dm7 G7 C
Drum sequence
Bass sequence
Drum sequence
Bass sequence
62
PATTERN A
PATTERN B
PATTERN C
PATTERN D
PATTERN E
ZOOM MRS-8
Page 63

Playing rhythm patterns
001#117
MTNs1Vb
TEMPO
BPM=
This section explains how to select a rhythm pattern for
playback, and how to change the tempo and sound.
Selecting a rhythm pattern
Proceed as follows to select and play one of the more than
500 rhythm patterns.
1.
From the main screen, press the [SONG/
PATTERN] key in the rhythm section
repeatedly, until the key is out.
The rhythm pattern selection screen appears. In this
condition, the following information is displayed.
Number of measures of rhythm pattern
Rhythm pattern number
001#117
MTNs1Vb
Rhythm pattern name
The indication to the right of the rhythm pattern name
shows the pad bank (if a drum kit is selected) or the range
(if a bass program is selected). These items can be
changed if desired (→ p. 65).
HINT
While the display shows the rhythm section screen, the audio
track status keys (1 – 8 and [MASTER]) are out and cannot
be used.
2.
Turn the dial to select the rhythm pattern to
play.
In the default condition of a project, patterns are
programmed in rhythm pattern numbers 000 – 472, 509,
510.
3.
Press the PLAY [R] key.
The selected rhythm pattern will begin playing
repeatedly. If there is one or more recorded audio tracks,
these will also be played back. To play the rhythm pattern
only, turn down the faders of the audio tracks.
1
Reference [Rhythm]
4.
To adjust the volume of the drum/bass
track, use the [RHYTHM] fader.
The [RHYTHM] fader serves to adjust the drum track or
bass track level. When the [DRUM/BASS] key is lit, the
fader adjusts the drum track. When the key is out, the
fader adjusts the bass program.
Use the [DRUM/BASS] key to toggle the desired setting,
and then operate the [RHYTHM] fader.
5.
To mute the sound of the drum track or
bass track, repeatedly press the [RHYTHM]
status key, until the key is flashing.
The [RHYTHM] status key can be used to switch muting
on or off for the sound that is currently selected for the
rhythm section. To cancel muting, press the [RHYTHM]
status key once more so that the key is lit.
6.
To stop rhythm pattern playback, press the
STOP [P] key.
7.
To return to the main screen, press the
[EXIT] key.
HINT
During rhythm pattern playback, it is also possible to play
drum kit/bass program sounds by hitting the pads.
Changing the tempo
You can change the tempo of the rhythm pattern.
HINT
The tempo set here applies to all rhythm patterns. A rhythm
song for which no tempo information is programmed also will
use this tempo.
1.
From the main screen or the rhythm pattern
screen, press the [TEMPO] key.
The display changes as follows, and the current tempo is
shown.
TEMPO
BPM=
HINT
You can change the tempo either in playback or stop mode.
120.0
ZOOM MRS-8
63
Page 64

Reference [Rhythm]
001#117
MTNs1Vb
UTILITY
DRUM KIT
DRUM KIT
Standard
BASS PRG
Finger
Pad=DRUM
PadBank=
2.
Turn the dial to adjust the tempo.
The tempo can be adjusted over a range of 40.0 – 250.0
(BPM).
To change the tempo manually, hit the
3.
[TEMPO] key repeatedly at the desired
tempo.
The average of the key press intervals is determined and
set as the new tempo.
4.
To return to the main screen, press the
[EXIT] key repeatedly.
NOTE
If you record on the audio tracks while listening to the rhythm
pattern, and then later change the tempo, the audio track
content and the rhythm pattern will no longer be
synchronized. Be sure to decide on the tempo first.
Changing the drum kit / bass
program
You can change the drum kit/bass program used by the
rhythm section.
1.
From the main screen, press the [SONG/
PATTERN] key.
001#117
MTNs1Vb
HINT
Drum kit/bass program switching can be done in rhythm
pattern mode or rhythm song mode.
2.
Press the [SYSTEM/UTILITY] key.
The RHYTHM mode utility menu appears.
1
UTILITY
DRUM KIT
The currently selected drum kit/bass program name is
shown.
DRUM KIT
Standard
Drum kit name
BASS PRG
Finger
Bass program name
4.
Turn the dial to select the drum kit/bass
program to use.
The change becomes active immediately.
For a list of drum kits/bass programs that can be selected,
see the appendix at the end of this manual.
HINT
The drum kit/bass program selected here is saved for each
rhythm pattern. For rhythm songs which do not have drum
kit/bass program information programmed, the sound
selected here will be used.
5.
To return to the main screen, press the
[EXIT] key repeatedly.
Using the pads to play drum/
bass sounds
Using the pads on the top panel, you can manually play a
drum kit or bass program.
■
Playing a drum kit with the pads
When playing a drum kit, you can switch between pad
banks, giving you a total of 27 drum/percussion sounds.
1.
From the main screen, press the [DRUM/
BASS] key repeatedly, until the key is lit.
When the [DRUM/BASS] key is lit, the pads can be used
to play a drum kit. The display changes as follows.
3.
64
Use the cursor left/right keys to bring up
the indication “UTILITY DRUM KIT” or
“UTILITY BASS PRG” on the display. Then
press the [ENTER] key.
Sound assigned to pads
Pad=DRUM
PadBank=
1
ZOOM MRS-8
Page 65

Reference [Rhythm]
r
Pad=BASS
Major
HINT
Immediately after creating a new project, the pad bank 1 is
selected.
2.
Turn the dial to select the pad bank to use
(1 – 3).
The sounds assigned to the nine pads are switched
immediately. For a list of drum/percussion sounds in each
pad bank, see the appendix at the end of this manual.
HINT
•You can also use the cursor up/down keys to switch the pad
bank.
• The currently selected pad bank number is also shown on the
rhythm pattern selection screen.
3.
Hit the pads to play.
Use the [RHYTHM] fader and [RHYTHM] status key to
control the drum kit volume and switch mute on and off
as necessary.
4.
To switch the pad bank during play, repeat
steps 2 and 3.
The pad bank can also be switched while a rhythm pattern
or rhythm song is playing.
When you press the [EXIT] key, the rhythm pattern or
rhythm song selection screen appears again.
5.
To return to the main screen, press the
[EXIT] key repeatedly.
■
Playing a bass program with the pads
By switching the scale and range assigned to the pads,
you can play bass programs covering up to four octaves.
NOTE
With a bass program, there can be no overlapping of multiple
sounds. If you press another pad while holding down a pad,
the sound of the first pad will stop and the sound of the other
pad is heard.
1.
From the main screen, press the [DRUM/
BASS] key repeatedly, until the key is out.
When the [DRUM/BASS] key is out, the pads can be
used to play a bass program. The display changes as
follows.
Pad=BASS
Major
To change the key-note of the scale, use
2.
the cursor up/down keys.
The setting range is C – B in semitone steps. The key-note
specified here is the note that will be played by pad 1.
E 1
Scale key-note Scale type
Range numbe
HINT
The sharp symbol is shown as , such as in F# = ,
G# = .
3.
To change the type of the scale, use the
cursor left/right keys.
The scale type can be set to Major or Minor.
For example, when the key-note of “E” is selected, the
pitch of the pads changes as follows, depending on the
scale type selection.
Major
D# E F#
A B C#
E F# G#
Minor
D E F#
A B C
E F# G
4.
Turn the dial to change the range to be
played by the pads.
The range of the pads can be selected in four steps (1 – 4).
For example, a change from 1 to 2 will shift the pitch
assigned to the pads up by 1 octave.
5.
Hit the pads to play.
Use the [RHYTHM] fader and [RHYTHM] status key to
control the bass program volume and switch mute on and
off as necessary.
ZOOM MRS-8
65
Page 66

Reference [Rhythm]
001#117
MTNs1Vb
---#500
EMPTY
6.
To switch the scale type and range during
play, repeat steps 2 – 4.
The scale type and range can also be switched while a
rhythm pattern or rhythm song is playing.
When you press the [EXIT] key, the rhythm pattern or
rhythm song selection screen appears again.
To return to the main screen, press the
7.
[EXIT] key repeatedly.
Creating a rhythm pattern
This section explains how you can create your own
rhythm patterns. There are two ways of doing this: realtime input where you record your play on the pads, and
step input where play is stopped and you enter the sounds
one by one.
Preparations
Before starting to record, you must make various settings
for the rhythm pattern, such as bar length and time
signature, and quantize value (shortest unit for
recording). By default, an empty rhythm pattern has a 4/
4 time signature and a length of 2 measures.
NOTE
After you have started the rhythm pattern input procedure,
you can no longer change the time signature and number of
measures. Be sure to make these settings beforehand.
1.
From the main screen, press the [SONG/
PATTERN] key to call up the rhythm pattern
selection screen.
If the [SONG/PATTERN] key is lit, press the key once
more so that it goes out.
66
001#117
MTNs1Vb
2.
Turn the dial to select an empty rhythm
pattern.
The indication “EMPTY” appears on the display when an
empty pattern is selected.
---#500
EMPTY
HINT
If there is no empty rhythm pattern, erase an unneeded
p. 76).
pattern (
→
3.
Press the [EDIT] key.
The rhythm pattern edit menu for making various rhythm
pattern settings appears.
1
1
ZOOM MRS-8
Page 67

PTN EDIT
PTN EDIT
QUANTIZE
QUANTIZE
16
BarLen
TimSig
QUANTIZE
4.
To set the quantize value, make sure that
the indication “PTN EDIT QUANTIZE” is
shown on the display, and press the
[ENTER] key.
The display changes as follows.
QUANTIZE
16
Quantize value
The quantize value is the smallest note unit for recording
a pattern. When performing real-time input, your play is
recorded using the note steps selected here.
The default setting is “16” (a sixteenth note).
5.
Turn the dial to select one of the following
quantize values. Then press the [EXIT] key.
4........... Quarter note
8........... Eighth note
12......... Eighth triplet note
16......... Sixteenth note (default)
24......... Sixteenth triplet note
32......... Thirty-second note
Hi......... 1 tick (1/48 of quarter note)
When you press the [EXIT] key, the rhythm pattern edit
menu appears again.
6.
To set the number of measures of the
rhythm pattern, use the cursor left/right
keys to bring up the indication “PTN EDIT
BarLen” on the display, and press the
[ENTER] key.
The current length of the pattern is shown as number of
measures.
BarLen
2
Number of measures
HINT
When an already created rhythm pattern is selected, the
number of measures is enclosed in parenthesises. This
Reference [Rhythm]
indicates that the setting has already been fixed and cannot
be changed.
7.
Turn the dial to select the desired setting.
The setting range is 1 – 99 measures.
When the setting is complete, press the [EXIT] key to
return to the rhythm pattern edit menu.
8.
To set the rhythm pattern time signature,
use the cursor left/right keys to bring up the
indication “PTN EDIT TimSig” on the
display, and press the [ENTER] key.
The current time signature setting appears on the display.
TimSig
4
4/4 beat
HINT
When an already created rhythm pattern is selected, the time
signature is enclosed in parenthesises. This indicates that
the setting has already been fixed and cannot be changed.
9.
Turn the dial to select the beat.
The setting range is 1 – 8 (1/4 – 8/4 beats). When the
setting is complete, press the [EXIT] key twice to return
to the rhythm pattern selection screen.
Drum sequence real-time
input
For real-time input of a drum sequence, you play the
rhythm pattern on the pads of the MRS-8.
1.
At the rhythm pattern screen, select an
empty rhythm pattern number.
If necessary, select a drum kit (→ p. 64) before carrying
out the following steps.
2.
Press the [DRUM/BASS] key repeatedly,
until the key is lit.
The pads can now be used to play a drum kit.
Immediately after switching the sound, the pad bank
selection screen is shown.
3.
If necessary, use the cursor up/down keys
to switch the pad bank.
When the setting is complete, press the [EXIT] key to
return to the rhythm pattern selection screen.
ZOOM MRS-8
67
Page 68

Reference [Rhythm]
4.
Hold down the REC [O] key and press the
PLAY [R] key.
A four-beat pre-count (one measure) is heard, and rhythm
pattern recording starts. During recording, a click sound
(metronome sound) is heard, according to the tempo and
time signature setting. The current position is shown on
the counter in measures/beats/ticks.
HINT
The number and the sound level of the pre-count clicks can
be changed (
5.
Your performance on the pads will be recorded as a drum
sequence according to the quantization setting. The
intensity with which you hit the pads will also be
recorded.
When you reach the end of the pattern, the unit
automatically returns to the first measure, and real-time
input continues.
p. 90).
→
While listening to the metronome, tap the
pads.
HINT
•You can use step input to add playing information to a rhythm
pattern recorded with real-time input.
• After concluding real-time input, you can change the quantize
setting and then record on top of the existing sequence.
(Changing the quantize value will not affect the existing
playing information.)
6.
To edit the recorded contents during realtime input, proceed as follows.
•To erase the performance of a specific pad
While holding down the [FUNCTION] key, press the pad
whose sound you want erase. While you are holding
down both keys, the performance of the corresponding
pad is erased from the rhythm pattern.
Drum sequence
Snare
Kick
Pad Pad
Pre-count
Recorded repeatedly
• Switching the pad bank during real-time input
of a drum sequence
Press the [DRUM/BASS] key once to bring up the pad
bank selection screen, and use the cursor up/down keys to
select the pad bank. To return, press the [EXIT] key.
• Switching to a bass sequence during realtime input of a drum sequence
Press the [DRUM/BASS] key once to bring up the pad
bank selection screen, and then press the [DRUM/BASS]
key once more so that the key goes out.
•Temporarily pausing real-time input
Press the REC [O] key during recording so that the key
is flashing. In this state you can tap the pads to check
which sound is assigned to each pad. Recording resumes
when you press the REC [O] key once more.
68
Snare
Kick
•To erase the performance of all pads
While holding down the [FUNCTION] key, press the
[RHYTHM] status key. While you are holding down both
keys, the performance of all pads is erased from the drum
sequence.
Drum sequence
Snare
Kick
Snare
Kick
7.
When you have finished real-time
recording, press the STOP [P] key.
Rhythm pattern recording will stop. Press the PLAY [R]
key to hear the pattern that you recorded.
ZOOM MRS-8
Page 69

Reference [Rhythm]
HINT
When you select an empty pattern and record it, the pattern
name “Patxxx” (where xxx is the pattern number) is
automatically assigned. You can edit this pattern name as
necessary (
→
p. 75).
Bass sequence real-time
input
For real-time input of a bass sequence, you play the pads
of the MRS-8.
1.
At the rhythm pattern screen, select an
empty rhythm pattern number or a rhythm
pattern number where only a drum
sequence has been recorded.
If necessary, select a bass program (→ p. 64) before
carrying out the following steps.
2.
Press the [DRUM/BASS] key repeatedly,
until the key is out.
The pads can now be used to play a bass program.
Immediately after switching the sound, the range and
scale selection screen is shown.
3.
If necessary, select the scale type, keynote, and range.
Use the cursor keys to select the scale type and key-note,
and use the dial to select the range. When the setting is
complete, press the [EXIT] key to return to the rhythm
pattern selection screen.
4.
Hold down the REC [O] key and press the
PLAY [R] key.
A four-beat pre-count (one measure) is heard, and rhythm
pattern recording starts. (During recording, the
metronome click sound is heard, according to the tempo
and time signature.)
The current position is shown on the counter in measures/
beats/ticks.
HINT
The number and the sound level of the pre-count clicks can
be changed.
5.
While listening to the metronome, tap the
pads.
Your performance on the pads will be recorded as a bass
sequence according to the quantization setting. The
duration and intensity with which you hit the pads will
also be recorded.
When you reach the end of the pattern, the unit
automatically returns to the first measure, and real-time
input continues.
• Switching the range and scale during realtime input of a bass sequence
Press the [DRUM/BASS] key once to bring up the range/
scale selection screen, and use the cursor keys and the
dial to select the range and scale. To return, press the
[EXIT] key.
• Switching to a drum sequence during realtime input of a bass sequence
Press the [DRUM/BASS] key once to bring up the range/
scale selection screen, and then press the [DRUM/BASS]
key once more so that the key is lit.
•Temporarily pausing real-time input
Press the REC [O] key during recording so that the key
is flashing. In this state you can tap the pads to check
which note is assigned to each pad. Recording resumes
when you press the REC [O] key once more.
HINT
You can use step input to add playing information to a
rhythm pattern recorded with real-time input.
6.
To edit the recorded contents during realtime input, proceed as follows.
•To erase the performance of a specific pad
While holding down the [FUNCTION] key, press the pad
whose note you want erase. While you are holding down
both keys, the performance of the corresponding pad is
erased from the rhythm pattern.
Bass sequence
•To erase the performance of all pads
While holding down the [FUNCTION] key, press the
[RHYTHM] status key. While you are holding down both
ZOOM MRS-8
69
Page 70

Reference [Rhythm]
Q=16
keys, the performance of all pads is erased from the bass
sequence.
Bass sequence
7.
When you have finished real-time
recording, press the STOP [P] key.
Rhythm pattern recording will stop. Press the PLAY [R]
key to hear the pattern that you recorded.
HINT
You can switch the drum kit/bass program during real-time
recording (
metronome click (
p. 64), and you can change the volume of the
→
p. 90).
→
Drum sequence step input
For step input, you enter each note separately, while the
rhythm pattern is in the stop condition. This makes it easy
to enter even complex drum patterns or bass lines that
might be difficult to achieve with real-time input.
For drum sequence step input, you specify the step length
(interval to next note or rest) using the quantize value.
Then you enter notes and rests.
When you hit a pad and then press the PLAY [R]
(RHYTHM STEP) key, playing (note) information is
entered at that point, and the step advances by an interval
corresponding to the current quantize value. The intensity
with which you hit the pad is also recorded.
If you only press the PLAY [R] (RHYTHM STEP) key,
no playing information is entered, but the step advances
by an interval corresponding to the current quantize
value. This becomes a rest (see illustration below).
At the rhythm pattern screen, select an
1.
empty rhythm pattern number.
2.
Press the [DRUM/BASS] key repeatedly,
until the key is lit.
The pads can now be used to play a drum kit.
Immediately after switching the sound, the pad bank
selection screen is shown.
If necessary, select the pad bank to use.
3.
When the setting is complete, press the [EXIT] key to
return to the rhythm pattern selection screen.
4.
Press the REC [O] key.
The key lights up and the display changes as follows. In
this condition, drum sequence step input is possible.
Quantize setting
Q=16
During drum sequence step input, the first line of the
display shows the quantize value, and the second line
shows the currently selected pad bank number. The
counter shows the current position in measures/beats/
ticks.
Current pad bank
1
1- 1- 0
Beat
Tick
Measure
70
Drum sequence step input
Quantize: quarter note Quantize: sixteenth note
ZOOM MRS-8
Page 71

5.
Q=4
Q=4
Use the cursor up/down keys to select the
quantize value.
This setting becomes the length of one step. The quantize
setting can be changed at any time during step input,
using the cursor up/down keys.
4........... Quarter note
8........... Eighth note
12......... Eighth triplet note
16......... Sixteenth note
24......... Sixteenth triplet note
32......... Thirty-second note
Hi......... 1 tick (1/48 of quarter note)
HINT
The quantize value setting is linked to the quantize setting for
real-time input. If you change one setting, the other will also
change.
6.
To enter a note, hit the pad corresponding
to the note, and then press the PLAY [R]
(RHYTHM STEP) key.
The pad lights up, and the unit advances by one step.
Q=4
1
1- 2- 0
HINT
• The intensity with which you hit the pad is also recorded in the
drum sequence.
• If you hit several pads during input, multiple sounds will be
recorded at the same position.
7.
To enter a rest, press only the PLAY [R]
(RHYTHM STEP) key.
If you press the PLAY [R] (RHYTHM STEP) key by
itself, the position advances by one step, but no play
information is recorded.
Q=4
8.
Repeat steps 5 – 7 while changing the step
length as necessary, to enter the desired
rhythm pattern.
When you reach the end of the pattern, the unit
automatically returns to the first measure, letting you
1
1- 3- 0
Reference [Rhythm]
enter more sounds.
When you use the PLAY [R] (RHYTHM STEP) key to
move step by step through a recorded rhythm pattern, the
pad recorded at the respective position lights up.
You can edit the recorded sequence as follows.
• Erasing an entered note
Repeatedly press the PLAY [R] (RHYTHM STEP) key
to move to the position to erase. Then hold down the
[FUNCTION] key and press the respective pad. The note
recorded at that point is erased, and the pad goes out.
HINT
During step input, you can use the [DRUM/BASS] key to call
up the pad bank selection screen and switch the pad bank.
(To return, press the [EXIT] key.)
NOTE
When searching for a note to erase, set the quantize value to
the same value as the smallest value used during recording,
or to a smaller value. Otherwise the start of a note may be
missed.
9.
When you have finished step input, press
the STOP [P] key.
The REC [O] key goes out and the rhythm pattern
selection screen appears again. By pressing the PLAY
[R] key you can check the rhythm pattern that you
recorded.
10.
To return to the main screen, press the
[EXIT] key repeatedly.
Bass sequence step input
Compared to the drum sequence step input, the step input
procedure for a bass sequence is somewhat more
complex, because there are the additional elements of
“pitch” and “duration”.
As for drum track step input, you specify the step length
(interval to next note or rest) using the quantize value, and
you use the pads and the PLAY [R] (RHYTHM STEP)
key to enter notes and rests. But when you input a note,
you must also specify the duration parameter. This
parameter allows you to vary the actual duration for each
note, while keeping the step length the same (see diagram
on next page).
ZOOM MRS-8
71
Page 72

Reference [Rhythm]
Q=16
D= x1/4
Q=4
D= x1
Bass sequence step input
Quantize: quarter note
Duration: quarter note
Quantize: eighth note
Duration: eighth note
Quantize: quarter note
Duration: quarter note
Quantize: eighth note
Duration: sixteenth note
1.
At the rhythm pattern screen, select an
empty rhythm pattern number or a rhythm
pattern number where only a drum
sequence has been recorded.
2.
Press the [DRUM/BASS] key repeatedly,
until the key is out.
The pads can now be used to play a bass program.
Immediately after switching the sound, the range and
scale selection screen is shown.
3.
If necessary, select the scale type, key, and
range.
When the setting is complete, press the [EXIT] key to
return to the rhythm pattern selection screen.
4.
Press the REC [O] key.
The key lights up and the display changes as follows. In
this condition, bass sequence step input is possible.
Quantize setting
Q=16
D= x1/4
Duration setting
During bass sequence step input, the first line of the
display shows the quantize value, and the second line
shows the duration setting and the currently selected
range. The counter shows the current position in
measures/beats/ticks.
5.
Use the cursor up/down keys to select the
quantize value.
This setting becomes the length of one step.
Current range number
E1
1- 1- 0
Beat
Tick
Measure
72
6.
Turn the dial to select the duration value, as
listed below.
The duration is specified as “ x 1”, i.e. as multiples of a
quarter note. Depending on the value, the actual duration
becomes as follows.
1 – 8..... quarter note x 1 – 8
3/2........ dotted quarter note
1/2........ 8th note
3/4........ dotted 8th note
1/3........ 8th note triplet
1/4........ 16th note
1/6........ 16th note triplet
1/8........ 32nd note
1/12...... 32nd note triplet
1/16...... 64th note
1/24...... 64th note triplet
7.
To enter a note, hit the pad corresponding
to the note, and then press the PLAY [R]
(RHYTHM STEP) key.
The note is recorded, and the unit advances by the step
duration set in step 5.
Q=4
D= x1
E1
1- 2- 0
HINT
The intensity with which you hit the pad is also recorded in
the bass sequence.
ZOOM MRS-8
Page 73

8.
Q=4
D= x1
PTN EDIT
QUANTIZE
Org Root
To enter a rest, press only the PLAY [R]
(RHYTHM STEP) key.
If you press the PLAY [R] (RHYTHM STEP) key by
itself, the position advances by one step (duration of
quantize value) but no play information is recorded.
Q=4
D= x1
9.
Repeat steps 5 – 8 while changing the
quantize value and duration as necessary,
to enter the desired bass pattern.
When you reach the end of the pattern, the unit
automatically returns to the first measure, letting you
continue the input.
You can edit the recorded sequence as follows.
• Erasing an entered note
Repeatedly press the PLAY [R] (RHYTHM STEP) key
to move to the position to erase. Then hold down the
[FUNCTION] key and press the respective pad. The note
recorded at that point is erased, and the pad goes out.
HINT
During step input, you can use the [DRUM/BASS] key to call
up the range selection screen and switch the range and
scale. (To return, press the [EXIT] key.)
NOTE
When searching for a note to erase, set the quantize value to
the same value as the smallest value used during recording,
or to a smaller value. Otherwise the start of a note may be
missed.
10.
When you have finished step input, press
the STOP [P] key.
The REC [O] key goes out and the rhythm pattern
selection screen appears again. By pressing the PLAY
[R] key you can check the rhythm pattern that you
recorded.
11.
To return to the main screen, press the
[EXIT] key repeatedly.
E1
1- 3- 0
Reference [Rhythm]
Entering rhythm pattern
chord information
When you have recorded a rhythm pattern, and you later
set the chord information (root + chord type), the bass
sequence of the rhythm pattern will also be transformed
according to the chord information programmed in a
rhythm song.
HINT
For patterns not used in a rhythm song or for which no bass
sequence is input, this procedure is not necessary.
1.
From the main screen, press the [SONG/
PATTERN] key in the rhythm section
repeatedly, until the key is out.
The rhythm pattern selection screen appears.
2.
Turn the dial to select the pattern for which
to specify chord information, and press the
[EDIT] key.
The rhythm pattern edit menu appears.
PTN EDIT
QUANTIZE
3.
Use the cursor left/right keys to bring up
the indication “EDIT OrgRoot” on the
display, and press the [ENTER] key.
This screen allows you to specify the root for the selected
rhythm pattern.
Org Root
E
Chord root
4.
Turn the dial to select the root for the chord.
The available range is C – B (default setting: E). When
setting chord information for a rhythm song, the value
specified here will become the root for transposing up or
down.
5.
When the setting is complete, press the
[EXIT] key.
The rhythm pattern edit menu appears again.
ZOOM MRS-8
73
Page 74

Reference [Rhythm]
OrgChord
Major
PTN EDIT
QUANTIZE
DR LEVEL
15
BS LEVEL
15
6.
Use the cursor left/right keys to bring up
the indication “PTN EDIT OrgChord” on the
display, and press the [ENTER] key.
The display changes as follows.
OrgChord
Major
This screen allows you to specify the chord type for that
rhythm pattern.
7.
Turn the dial to select the chord.
For the chord type, you can select Major or Minor.
For example, if you have entered a bass phrase with a G
major chord in mind, set the root to “G” and the chord
type to “Major”.
8.
When the setting is complete, press the
[EXIT] key.
The setting is entered and the rhythm pattern edit menu
appears again.
9.
To return to the main screen, press the
[EXIT] key repeatedly.
Changing the drum/bass
sequence volume level
The playback volume of the rhythm pattern can be
adjusted separately for the drum and bass with the
[RHYTHM] fader. If necessary, the volume levels can
also be individually programmed for each rhythm
pattern.
1.
From the main screen, press the [SONG/
PATTERN] key in the rhythm section
repeatedly, until the key is out.
The rhythm pattern selection screen appears.
2.
Turn the dial to select the rhythm pattern
for which to specify volume information,
and press the [EDIT] key.
The rhythm pattern edit menu appears.
3.
Use the cursor left/right keys to bring up
the indication “PTN EDIT DR LEVEL” on the
display, and press the [ENTER] key.
The display changes as follows. This screen allows you to
specify the drum sequence volume.
The display shows the current volume setting (0 – 15).
DR LEVEL
15
4.
Turn the dial to select the desired setting,
and then press the [EXIT] key.
The setting is entered, and the previous screen appears
again.
5.
Use the cursor left/right keys to bring up
the indication “PTN EDIT BS LEVEL” on the
display, and press the [ENTER] key.
The display changes as follows. This screen allows you to
specify the bass sequence volume. The display shows the
current volume setting (0 – 15).
BS LEVEL
15
6.
Turn the dial to select the desired setting,
and then press the [EXIT] key.
The setting is entered, and the previous screen appears
again.
7.
To return to the main screen, press the
[EXIT] key repeatedly.
74
PTN EDIT
QUANTIZE
ZOOM MRS-8
Page 75

Reference [Rhythm]
PTN EDIT
QUANTIZE
PTN NAME
Pat 500
COPY
117
420E
Assigning a name to a rhythm
pattern
When an empty rhythm pattern is selected and used for
input, the pattern name “Pat xxx” (where xxx is the
pattern number) is automatically assigned. You can edit
this pattern name as necessary.
1.
From the main screen, press the [SONG/
PATTERN] key in the rhythm section
repeatedly, until the key is out.
The rhythm pattern selection screen appears.
2.
Turn the dial to select the rhythm pattern
for which to edit the name, and press the
[EDIT] key.
The rhythm pattern edit menu appears.
PTN EDIT
QUANTIZE
3.
Use the cursor left/right keys to bring up
the indication “PTN EDIT NAME” on the
display, and press the [ENTER] key.
The display changes as follows. This screen allows you to
specify a name for the selected rhythm pattern.
PTN NAME
Pat 500
4.
Use the cursor left/right keys to move the
flashing position to the character to
change, and turn the dial or use the rhythm
section pads and keys to select a
character.
For information on how to input characters, refer to page
33.
HINT
By repeatedly pressing the [EDIT] key, you can clear all
characters.
5.
Repeat step 4 until the name is as desired.
6.
To return to the main screen, press the
[EXIT] key repeatedly.
Editing rhythm patterns
This section explains how to copy an existing rhythm
pattern or how to erase the playing information and return
the pattern to the blank condition.
Copying a rhythm pattern
You can copy the currently selected rhythm pattern to
another pattern number. This is useful to create variations
of a rhythm pattern.
1.
From the main screen, press the [SONG/
PATTERN] key repeatedly, until the key is
out.
The rhythm pattern selection screen appears.
2.
Turn the dial to select the rhythm pattern to
use as copy source.
3.
Press the [FUNCTION] key in the control
section twice.
The display changes as follows. In this condition, you can
select the number of the copy destination rhythm pattern.
COPY
117
å420E
4.
Turn the dial to select the number of the
rhythm pattern to use as copy destination.
When an empty pattern is selected, the indication “E” is
shown to the right of the pattern number.
NOTE
When you select a recorded rhythm pattern as destination,
its contents will be overwritten with the data of the copy
source.
5.
To carry out the copy operation, press the
[ENTER] key. When the indication “COPY
SURE?” appears, press the [ENTER] key
once more.
When the copy operation is completed, the display
returns to the rhythm pattern selection screen. By
pressing the [EXIT] key instead of the [ENTER] key, you
can cancel the operation and back up one step at a time.
ZOOM MRS-8
75
Page 76

Reference [Rhythm]
DELETE
SURE?
6.
To return to the main screen, press the
[EXIT] key repeatedly.
Erasing a rhythm pattern
This section explains how to erase all data from a
specified rhythm pattern, returning it to the blank state.
NOTE
It is not possible to restore data once the rhythm pattern has
been erased. Use this operation with care.
1.
From the main screen, press the [SONG/
PATTERN] key repeatedly, until the key is
out.
The rhythm pattern selection screen appears.
2.
Turn the dial to select the rhythm pattern to
erase.
3.
Press the [FUNCTION] key in the control
section.
The display changes as follows.
DELETE
SURE?
4.
To carry out the erase operation, press the
[ENTER] key.
When the erase operation is completed, the display
returns to the rhythm pattern selection screen. By
pressing the [EXIT] key instead of the [ENTER] key, you
can cancel the operation and back up one step at a time.
5.
To return to the main screen, press the
[EXIT] key repeatedly.
Creating a rhythm song
A rhythm song consists of a sequence of rhythm patterns
with programmed chord and tempo information. The
MRS-8 allows you to save up to 10 rhythm songs per
project. While the [SONG/PATTERN] key is lit, one of
these can be selected for editing or playing.
The following two methods are available for entering
rhythm pattern information into a rhythm song.
■
Step input
With this method, you line up rhythm patterns one by one
by specifying a pattern and the number of measures.
Input can be performed at any point in the song. It is also
possible to switch to another pattern while the previous
pattern is still playing. This mode is suitable for
specifying patterns in detail.
■
FAST (Formula Assisted Song Translator)
This method uses simple formulas to specify rhythm
pattern playback from start to end. The result is written to
the song in a single operation. Because input midway
through a song is not possible with this method, it is most
suitable for cases where the configuration of the entire
song has been decided beforehand.
HINT
There is no difference in the completed rhythm song due to
input method that was used, i.e. a song will be the same,
regardless of whether it was created using step input or the
FAST method. If necessary, you can first create a rough
version of a song using FAST and then perform detailed
editing using step input.
Selecting a rhythm song
Out of the 10 available songs, select the rhythm song for
editing or playing as follows.
HINT
In the default condition of a project, all rhythm songs are
empty.
1.
From the main screen, press the [SONG/
PATTERN] key in the rhythm section
repeatedly, until the key is lit.
The rhythm section switches to rhythm song mode, and
76
ZOOM MRS-8
Page 77

the rhythm song selection screen appears.
SongNo0E
EMPTY
EOS
PTN
EOS
INSERT?
P000x 4
When the rhythm song is empty, the indication
“EMPTY” is shown in the rhythm song name field, and
the indication “E” is shown to the right of the rhythm
song number.
2.
3.
This section explains how to input rhythm pattern data
into an empty rhythm song by specifying the rhythm
pattern number and number of measures.
1.
The rhythm section switches to rhythm song mode, and
the rhythm song selection screen appears.
2.
The key lights up and the display changes as follows. In
this condition, you can perform rhythm song step input.
The indication “EOS” (End of Song) shows the position
where the rhythm song ends. For an empty song, “EOS”
will be located at the beginning. Therefore nothing
happens if you play the song.
ZOOM MRS-8
Rhythm song number
SongNo0E
EMPTY
Rhythm song name
Turn the dial to select a rhythm song
number from 0 – 9.
To return to the main screen, press the
[EXIT] key.
Entering pattern information
using step input
From the main screen, press the [SONG/
PATTERN] key repeatedly, until the key is lit.
Press the REC [O] key in the transport
section.
EVEVå
EOS
End-of-song indication Current position
1- 1- 0
Reference [Rhythm]
Current position
1 (measure number)
Rhythm
End of Song
song
3.
Use the cursor up/down keys to bring up
the indication “←PTN” on the first line of
the display.
PTN
å
EOS
During step input, the cursor up/down keys serve to bring
up various kinds of information about events that are
programmed at the current point. For example, when
“PTN” is shown, rhythm pattern information can be
entered for the rhythm song. The following items can be
selected.
Parameter
EV
→
PTN
TimSig
ROOT
CHORD
TEMPO
DrLevel
BsLevel
Dr KIT
Bs PRG
1- 1- 0
Description
Event information at current point
Rhythm pattern number
Time signature
Chord root
Chord type
Tempo
Drum sequence volume
Bass sequence volume
Drum kit number
Bass program number
HINT
When an item other than “EV→” is selected and no
information is input for the current position, the arrow “
shown before the item name. This indicates that information
input at a preceding point continues to be valid.
4.
Press the [FUNCTION] key in the control
section.
The indication “INSERT?” appears on the first line of the
display.
” is
←
INSERT?
P000x 4
Rhythm pattern
number to insert
Number of measures to insert
77
Page 78

Reference [Rhythm]
PTN 002
08Beat03
PTN
EOS
In this condition, you can input rhythm pattern
information for the current point.
5.
Turn the dial to select the rhythm pattern to
insert.
6.
Use the cursor up/down keys to specify the
number of measures to insert.
If you specify more measures than the original length of
the rhythm pattern, the rhythm pattern will be repeated. If
you specify fewer measures, the song will switch to the
next rhythm pattern before the current pattern has
finished playing.
To finalize the setting, press the [ENTER]
7.
key.
The rhythm pattern information will be input at the
current location, and the display reverts to the original
screen. The “EOS” indication is moved back by the
number of measures that were inserted.
PTN 002
08Beat03
Current position
(measure number)
Rhythm
song
By pressing the PLAY [R] key while this display is
shown, you can repeatedly play the rhythm pattern
entered at the current point.
8.
Repeatedly press the cursor right key to
move to the measure number for which
“EOS” is shown on the second line of the
display.
During rhythm song step input, you can use the cursor
left/right keys to move the input position in measure
units. When you reach the end of the song, the indication
“EOS” is shown on the second line of the display.
PATTERN 002 End of Song
PTN
å
EOS
1- 1- 0
321
3- 1- 0
Rhythm
(Measure number)
song
PATTERN 002
21
Current position
3
End of Song
HINT
] keys in the transport section can be
• The REW [T
used to move the current position in beat units.
• When “EV
the current position in sixteenth note units. By bringing up the
“EV
then using the cursor up/down keys to display event
information, you can enter event information in sixteenth note
units (→ p. 83).
9.
10.
The REC [O] key goes out and the rhythm song selection
screen appears again. If you press the PLAY [R] key, the
created rhythm song will be played.
To edit the entered rhythm pattern information, proceed
as follows.
• Selecting a different rhythm pattern
Use the cursor left/right keys to move to the point where
the respective rhythm pattern information is input, and
then turn the dial to select the new rhythm pattern.
By turning the dial at a point where no rhythm pattern
information is input (“
new rhythm pattern information for this point.
The newly selected rhythm pattern information will
always be valid until the point where the next rhythm
pattern information is input.
• Deleting entered rhythm pattern information
Use the cursor left/right keys to move to the position of
the rhythm pattern information to delete, and press the
[FUNCTION] key twice. (The indication “EV ERASE
SURE?” appears.) Then press the [ENTER] key. When
rhythm pattern information was deleted, the previous
pattern will remain valid until the point where the next
rhythm pattern information is input.
] and FF [Y
” is shown on the display, turning the dial moves
→
” indication to move to a point within a measure and
→
Repeat steps 4 – 8 to enter all required
pattern information.
When all required pattern information has
been entered, press the STOP [P] key.
←
PTN” is shown), you can add
Delete
PATTERN A PATTERN B PATTERN C
78
PATTERN A PATTERN C
ZOOM MRS-8
Page 79

Reference [Rhythm]
• Inserting a rhythm pattern in a song
Use the cursor left/right keys to move to the point where
the rhythm pattern should be inserted, and perform steps
4 – 7. A new rhythm pattern is inserted at the current
location, and all subsequent patterns are moved back by
the duration of the inserted pattern.
Insert
PATTERN D
PATTERN A PATTERN B PATTERN C
PATTERN A PATTERN B
PATTERN D PATTERN C
• Deleting a specific measure
Use the cursor left/right keys to move to the start position
of the measure to delete. Press the [FUNCTION] key
three times. (The indication “MEAS DEL SURE?”
appears.) Then press the [ENTER] key. The measure at
the current position is deleted, and subsequent rhythm
pattern information moves forward. When a measure at
the beginning of a rhythm pattern (such as the first
measure of a 2-measure pattern) is deleted, that measure
only is deleted, and the indication changes to “←PTN”
for the second measure.
Delete 1 measure
PATTERN A PATTERN B PATTERN D PATTERN C
PATTERN A PATTERN B PATTERN C
Using FAST for pattern
information input
The FAST (Formula Assisted Song Translator) method
developed by ZOOM uses simple formulas to specify
rhythm pattern sequences and write an entire rhythm
song in one operation.
The following keys and pads can be used for numeric
input.
[x+] key
Enters the "+" (plus symbol)
for lining up patterns and
the "x" (multiplication
symbol) for repeated play of
the same pattern.
Pads 1 - 9 / [0] key
Serve for specifying pattern numbers and
repetition count.
The basic rules for creating a rhythm pattern sequence are
as follows.
• Line up patterns
Use the “+” symbol to line up rhythm patterns. For
example, entering 0 + 1 + 2 will result in the following
rhythm pattern play sequence.
[( )] key
Enters the opening and
closing brackets used
for linking several
patterns.
ZOOM MRS-8
PATTERN 0 PATTERN 1 PATTERN 2
• Repeat patterns
Use the “x” (multiplication) symbol to specify pattern
repetitions. As in normal arithmetic, “x” takes
precedence over “+”. For example, entering 0 + 1 x 2 + 2
will result in the following rhythm pattern play sequence.
PATTERN 0 PATTERN 1 PATTERN 1 PATTERN 2
79
Page 80

Reference [Rhythm]
0
0+
0+(
0+(1+2
0+(1+2)
0+(1+2)x
0+(1+
0+(1+2)x
4
0+(1
SongEdit
TRANSPOS
0+(1+2)x
• Repeat multiple patterns
Use the “(“ and “)” symbols (opening and closing
brackets) to link a group of patterns for repetition.
Formulas enclosed in brackets take precedence over other
formulas. For example, entering 0 + (1 + 2) x 2 + 3 will
result in the following rhythm pattern play sequence.
PATTERN 1PATTERN 0 PATTERN 2
PATTERN 1 PATTERN 2 PATTERN 3
An example for creating the rhythm pattern sequence
0 + (1+2) x 4 is shown below.
0
0+
Press twice
0+(
0+(1
HINT
• If the formula does not fit on two lines, the indication scrolls
by one character each. If you use the cursor left/right keys to
move the input position, the line scrolls left and right
accordingly.
• For FAST input, the leading zeros 0 and 00 can be omitted. For
example, pattern 001 is specified as “1”, and pattern 050 as
“50”.
• The entered formula is saved as part of a project. By calling up
the formula later, you can edit it or use it to write the song.
NOTE
• The FAST method can only be used to write a song in one go,
from beginning to end. Entering rhythm patterns partly into
the song is not possible.
•To edit a rhythm song that was written with this method, edit
the formula and then write the entire song again, or use step
input.
1.
Press the [SONG/PATTERN] key
repeatedly, until the key is lit.
The rhythm section switches to the rhythm song mode,
and the rhythm song selection screen appears.
2.
Press the [EDIT] key.
The rhythm song edit menu appears.
SongEdit
TRANSPOS
80
Press twice
Press twice
0+(1+
0+(1+2
0+(1+2)
0+(1+2)x
0+(1+2)x
4
3.
Use the cursor left/right keys to bring up
the indication “SongEdit FAST” on the
display, and press the [ENTER] key.
A cursor appears on the first line of the display, and FAST
input is possible.
±
Cursor
4.
Use the pads and keys of the rhythm
section to enter the formula for creating the
rhythm song.
0+(1+2)x
4
ZOOM MRS-8
Page 81

Reference [Rhythm]
SaveSong
0E
ROOT
E --
If you make a mistake during input, you can correct it as
follows.
• Deleting a number/symbol
Use the cursor left/right keys to move the flashing
segment to the number/symbol to delete, and press the
[EDIT] key.
• Inserting a number/symbol
Use the cursor left/right keys to move the flashing
segment to the point where you want to insert a number
or symbol, and input the new number/symbol with the
pads and keys.
5.
The display changes as follows. In this condition, you can
select the rhythm song number into which to write the
song.
HINT
When you select an empty rhythm song number, the
indication “E” is shown to the right of the number.
NOTE
When you select an existing rhythm song as write
destination, the contents of that rhythm song will be
overwritten.
6.
The write operation is carried out, and the rhythm song
edit menu appears again.
To check the result, press the [EXIT] key to return to the
rhythm song selection screen, select the rhythm song that
you have written, and press the PLAY [R] key.
7.
ZOOM MRS-8
When formula input is completed, press the
[ENTER] key.
SaveSong
0E
Rhythm song number
Turn the dial to select the destination
rhythm song, and press the [ENTER] key.
To return to the main screen, press the
[EXIT] key repeatedly.
Entering chord information
This section explains how to add chord information (root
and chord type) data to the rhythm song that you have
created by inputting rhythm pattern data. When playing a
rhythm song for which chord information was input, the
bass sequence will change according to the chord
progression.
HINT
• If the original root of the rhythm pattern and the root specified
for the rhythm song are different, the bass sequence phrase
will be transposed according to the root input for the rhythm
song.
• If the original chord type of the rhythm pattern and the chord
type specified for the rhythm song are different, the bass
sequence phrase will be converted according to the chord
type input for the rhythm song. (Depending on the phrase and
chord type, there may be no change.)
1.
Bring up the rhythm song selection screen
and turn the dial to select the rhythm song
for which to enter chord information.
2.
Press the REC [O] key.
The key lights up and rhythm song step input becomes
possible.
3.
Use the cursor up/down keys to bring up
the indication “ROOT” on the first line of the
display.
You can now enter the chord root for the rhythm pattern
played at this point.
At a point where rhythm pattern information is already
input, the chord information “E--” (root: E, chord type:
no conversion) is automatically assigned. Therefore, for a
rhythm song without entered chord information, the
phrase of the pattern is unchanged and the root is
transposed to E.
ROOT
E --
Chord type
Chord root
4.
Turn the dial to specify the note name (C –
B) that will be the root of the chord.
The following screen shows an example of changing the
chord root to A.
1- 1- 0
81
Page 82

Reference [Rhythm]
ROOT
A --
CHORD
A --
ROOT
A --
HINT
During chord information input, you can press the PLAY [R
key to check the rhythm pattern. The pattern will be played
with the new chord setting applied. To stop play, press the
P
] key.
STOP [
5.
To change the chord type, press the cursor
down key once to bring up the indication
“CHORD” on the first line of the display.
You can now input the chord type.
1- 1- 0
CHORD
A --
6.
Turn the dial to select the chord type from
the following options.
Display Description Display Description
No change
7.
Move to the location where you want to
input the next chord information, and input
chord information in the same way as
described in steps 3 – 6.
You can move the input location during rhythm song step
input in the following ways.
• Moving in steps of a measure
Use the cursor left/right keys to move to the beginning of
the preceding or following measure.
• Moving in steps of a beat
Use the REW [T]/FF [Y] keys to move to the beginning
of the preceding or following beat.
• Moving in steps of a sixteenth note
Repeatedly press the cursor up key to bring up the
indication “EV→” on the display, and turn the dial to
move forward or backward in 12-tick (16th note) units.
If necessary, you can also input chord information at a
point within a measure, as shown below (smallest unit:
sixteenth note). To do this, bring up the indication
“EV→” on the first line of the display, turn the dial to
move current point, and then bring up the chord
]
information input screen again.
B7
Am
2
PATTERN A
Em
3
PATTERN B
12 3 4 1 2 3 4
Em
1
Measure
Beat
12 3 4 1 2 3 4
HINT
At a point where no chord information is input, “←” is shown
to the left of the “ROOT” or “CHORD” indication. This means
that the immediately preceding information continues to be
valid.
8.
Input the remaining chord information in
the same way.
If you have made a mistake or want to make a change,
proceed as follows.
•To change chord information
Move to the location at which the chord information is
input, use the cursor up/down keys to switch the display
to “ROOT” or “CHORD”, and turn the dial to change the
chord information.
•To delete chord information
Move to the location at which the chord information is
input, and use the cursor up/down keys to show the chord
information to delete. Press the [FUNCTION] key twice.
(The indication “EV ERASE SURE?” appears.) When
you press the [ENTER] key, the chord information will be
deleted, and the display changes to “← ROOT” or “
CHORD”.
9.
When you have finished, press the STOP
[P] key.
The unit returns to the rhythm song selection screen. By
pressing the PLAY [R] key in this condition, you can
check the rhythm song with the new chord information.
To return to the main screen, press the [EXIT] key.
Am
4
←
82
ZOOM MRS-8
Page 83

Entering other information
A rhythm song contains information about rhythm
patterns, chord, tempo, time signature etc. in a matrix
configuration, as shown at the bottom of this page. This is
called event information. When the rhythm song is in the
step input condition, you can move the current position
with the cursor left/right keys etc. and use the cursor up/
down keys to call up and enter or edit event information.
1.
Bring up the rhythm song selection screen
and turn the dial to select the rhythm song
for which to enter chord information.
2.
Press the REC [O] key.
The key lights up and rhythm song step input becomes
possible.
3.
Use the cursor up key to bring up the
indication “EV→” on the first line of the
display.
This screen lets you check which event information is
entered at the current point. The symbol after “EV→”
(such as “Pt” or “TS”) denotes the type of event.
EVEVå
1- 1- 0
Entered event type
Available events and their symbols are listed in the table
below.
Reference [Rhythm]
Event type Symbol Description Setting range
PTN
TimSig
ROOT
CHORD
TEMPO
DrVOL
BsVOL
DrKIT
BsPRG
Rhythm pattern
number
Time signature
(beat)
Chord root
Chord type
Tempo
Drum sequence
volume
Bass sequence
volume
Drum kit
Bass program
000 – 510
1 – 8(1/4 – 8/4)
C – B
--, Maj, m, 7, m7,
M7, aug, dim,
7sus4, sus4, m7b5,
m6, 6, m9, M9,
mM7
40.0 – 250.0
0 – 15
0 – 15
See appendix
See appendix
HINT
• Time signature information can be entered only at the
beginning of a measure.
• If no tempo information is input for the rhythm song, the
tempo currently set for the rhythm section will be used. To
ensure that a rhythm song will always play with the same
tempo, be sure to enter tempo information at the beginning of
the song.
4.
Move to the location where you want to
input a new event.
For details on how to move the current location, refer to
page 82.
5.
Use the cursor up/down keys to select the
type of event to input.
If the event you select here has been input at the current
location, its value will be displayed.
ZOOM MRS-8
Measure
Pattern
Time signature
Root/chord
Tempo
Drum track volume
Bass track volume
Drum kit number
Bass program number
13245
PATTERN 001 PATTERN 020
4/4
D maj G min A7
BPM-135
10
10
0
0
83
Page 84

Reference [Rhythm]
DrLevel
15
å
Tempo
SongNo0
SONG000
DrLevel
15
If there is no corresponding event, the display will
indicate “←xxx” (where xxx is the event name). This
indicates that the previously input event information still
applies.
Tempo
å
Playing a rhythm song
This section explains how to select and play one of the 10
rhythm songs that were created by inputting rhythm
pattern and chord information.
1.
From the main screen, press the [SONG/
PATTERN] key repeatedly, until the key is lit.
The rhythm song selection screen appears.
6.
Turn the dial to input the event value.
HINT
During rhythm song step input, you can press the PLAY [R
key to check the rhythm pattern. The pattern will be played
with the current setting applied. To stop play, press the STOP
P
] key.
[
7.
Input the remaining events in the same way.
To input more information for the same type of event, you
can move the current position in measures or beats while
the event input screen is displayed.
If you make a mistake or want to change the information,
the events can be edited in the following ways.
•To change an event setting
Display the event to change, and turn the dial to alter the
setting.
•To delete event information
Display the event to delete, and press the [FUNCTION]
key twice. (The indication “EV ERASE SURE?”
appears.) Then press the [ENTER] key.
8.
When you have finished, press the STOP
[P] key.
The REC [O] key goes out, and the rhythm song
selection screen appears again. To return to the main
screen, press the [EXIT] key repeatedly.
SongNo0
SONG000
2.
Turn the dial to select the rhythm song, and
]
then press the PLAY [R] key.
The selected rhythm song will begin playing. If
something has been recorded on the audio tracks, those
tracks will play back simultaneously.
HINT
It is also possible to play a drum kit or bass program
manually during rhythm song playback by hitting the pads.
NOTE
If you select an empty rhythm song for which an “E” is shown
to the right of the song number, nothing will be played back.
3.
To stop the rhythm song, press the STOP
[P] key.
4.
To return to the main screen, press the
[EXIT] key.
84
ZOOM MRS-8
Page 85

Editing a rhythm song
COPY
START
COPY
END
COPY
TO
This section explains how to edit a rhythm song that you
have created.
Reference [Rhythm]
5.
Turn the dial to select the measure to use
as copy source start point, and press the
[ENTER] key.
The display changes as follows. This screen lets you
specify the measure to be used as copy source end point.
Copying a specified range of
measures
Part of a rhythm song can be copied in measures and
inserted into another location. This is convenient to repeat
a portion of a rhythm song.
Copy
1234 6 7 85
PATTERN A PATTERN B
PATTERN A PATTERN A
1234 6 7 89105
PATTERN A PATTERN B PATTERN B
1234
PATTERN A PATTERN B
1234 6 7 8
PATTERN A PATTERN B PATTERN A PATTERN B
1.
From the main screen, press the [SONG/
PATTERN] key repeatedly, until the key is lit.
The rhythm song selection screen appears.
2.
Turn the dial to select the rhythm song to
edit.
3.
Press the REC [O] key.
The key lights up and rhythm song step input is possible.
4.
Repeatedly press the [FUNCTION] key to
bring up the indication “COPY START” on
the display.
This screen lets you specify the measure to be used as
copy source start point.
PATTERN A PATTERN A
Copy
5
COPY
START
1- 1- 0
Copy source start point
COPY
END
1- 1- 0
Copy source end point
6.
Turn the dial to select the measure to use
as copy source end point, and press the
[ENTER] key.
The copy range is specified, and the screen for selecting
the copy destination appears.
COPY
TO
1- 1- 0
Copy destination start point
7.
Turn the dial to select the measure to use
as copy destination start point.
8.
To carry out the copy process, press the
[ENTER] key.
The “EOS” marker is shifted back by the number of
copied measures.
By pressing the [EXIT] key instead of the [ENTER] key,
you can cancel the operation and back up one step at a
time.
9.
Press the STOP [P] key.
The unit returns to the rhythm song selection screen. To
return to the main screen, press the [EXIT] key.
Transposing the entire rhythm
song
You can transpose the bass sequence of the rhythm song
up or down in semitone units.
1.
From the main screen, press the [SONG/
PATTERN] key repeatedly, until the key is lit.
The rhythm song selection screen appears.
ZOOM MRS-8
85
Page 86

Reference [Rhythm]
SongEdit
TRANSPOS
TRANSPOS
0
COPY
0
1E
2.
Turn the dial to select the rhythm song to
transpose.
3.
Press the [EDIT] key.
The rhythm song edit menu appears.
SongEdit
TRANSPOS
4.
Verify that the indication “TRANSPOS” is on
the display, and press the [ENTER] key.
The display changes as follows.
TRANSPOS
0
Transpose value
5.
Turn the dial to select the transpose setting
(-6 – 0 +6), and press the [ENTER] key.
The default setting is 0 (no transposing). When you select
a setting such as +5, the bass sequence will be transposed
five semitones (a perfect fourth) up. (Depending on the
range, the result may be one octave higher or lower.)
When you press the [ENTER] key to confirm the
transpose setting, the indication “TRANSPOS SURE?”
appears on the display.
6.
To carry out the transpose operation, press
the [ENTER] key once more.
The transpose operation is carried out, and the rhythm
song edit menu appears again.
By pressing the [EXIT] key instead of the [ENTER] key,
you can cancel the operation and back up one step at a
time.
NOTE
When you carry out the transpose operation, the root of the
chord information for the rhythm song is rewritten. To return
to the original condition, perform transpose once more in the
opposite direction.
7.
To return to the main screen, press the
[EXIT] key repeatedly.
Copying a rhythm song
You can copy the contents of any rhythm song in a project
to any other rhythm song number. This is useful to create
variations of a song.
NOTE
When you execute the copy, the contents of the destination
rhythm song will be erased. Use this function with care.
1.
From the main screen, press the [SONG/
PATTERN] key repeatedly, until the key is lit.
The rhythm song selection screen appears.
2.
Turn the dial to select the rhythm song to
copy.
This song will be used as copy source.
3.
Press the [FUNCTION] key twice.
The display changes as follows.
COPY
0
å 1E
Copy destination rhythm song
Copy source rhythm song
4.
Turn the dial to select the number of the
copy destination rhythm song, and press
the [ENTER] key.
When you select an empty rhythm song number, the
indication “E” is shown to the right of the number.
When you press the [ENTER] key, the indication “COPY
SURE?” appears on the display.
5.
To carry out the copy operation, press the
[ENTER] key once more.
When the copy operation is completed, the unit returns to
the rhythm song selection screen with the destination
rhythm song being loaded.
By pressing the [EXIT] key instead of the [ENTER] key,
you can cancel the operation and back up one step at a
time.
6.
To return to the main screen, press the
[EXIT] key repeatedly.
86
ZOOM MRS-8
Page 87

Reference [Rhythm]
DELETE
SURE?
SongEdit
TRANSPOS
SongName
SONG000
Erasing the rhythm song
This section explains how to erase the entire rhythm song,
resetting it to a blank state.
NOTE
Once you erase the rhythm song, it cannot be recovered.
Use this function with care.
1.
From the main screen, press the [SONG/
PATTERN] key repeatedly, until the key is lit.
The rhythm song selection screen appears.
2.
Turn the dial to select the rhythm song to
erase.
3.
Press the [FUNCTION] key.
The display changes as follows.
DELETE
SURE?
4.
To carry out the erase operation, press the
[ENTER] key.
When the erase operation is completed, the unit returns to
the rhythm song selection screen.
By pressing the [EXIT] key instead of the [ENTER] key,
you can cancel the operation and back up one step at a
time.
5.
To return to the main screen, press the
[EXIT] key repeatedly.
Assigning a name to a rhythm
song
When a rhythm song is created, the song name “Songxxx”
(where xxx is the song number) is automatically assigned.
You can edit this name as necessary.
1.
From the main screen, press the [SONG/
PATTERN] key repeatedly, until the key is lit.
The rhythm song selection screen appears.
Turn the dial to select the rhythm song
2.
whose name you want to edit.
3.
Press the [EDIT] key.
The rhythm song edit menu appears.
SongEdit
TRANSPOS
4.
Use the cursor left/right keys to bring up
the indication “SongEdit NAME” on the
display, and press the [ENTER] key.
The display changes as follows.
SongName
SONG000
5.
Use the cursor left/right keys to move the
flashing position to the character to
change, and turn the dial or use the rhythm
section pads and keys to select a
character.
For information on how to input characters, refer to page
33.
6.
When the name has been input, press the
[EXIT] key.
The rhythm song name is changed, and the display
returns to the rhythm song edit menu.
7.
To return to the main screen, press the
[EXIT] key repeatedly.
ZOOM MRS-8
87
Page 88

Reference [Rhythm]
UTILITY
DRUM KIT
IMPORT
ALL
IMPORT
BontLkBl
r
Importing rhythm patterns
and rhythm songs from
another project
This section explains how to import all rhythm pattern
and rhythm song data or only a specific rhythm pattern
from another project that was saved on the SD card.
NOTE
The import process will overwrite existing rhythm patterns/
rhythm songs in the currently selected project. Take care not
to accidentally overwrite rhythm pattern or rhythm song data
that you want to keep.
1.
From the main screen, press the [SONG/
PATTERN] key to bring up the rhythm
pattern or rhythm song selection screen.
Importing of rhythm patterns or rhythm songs is possible
both in rhythm pattern mode and rhythm song mode.
2.
Press the [SYSTEM/UTILITY] key.
The rhythm utility menu for making various rhythm
section settings appears.
UTILITY
DRUM KIT
3.
Use the cursor left/right keys to bring up
the indication “UTILITY IMPORT” on the
display, and press the [ENTER] key.
The display changes as follows.
IMPORT
BontLkBl
Project name Project numbe
Turn the dial to select the source project,
5.
and press the [ENTER] key.
The subsequent steps differ, depending on which
selection was made in step 4.
• When ALL was selected
Verify that the indication “IMPORT SURE?” is shown on
the display. Then proceed to step 6.
• When PATTERN was selected
The source rhythm pattern is shown on the display. Turn
the dial to select the desired rhythm pattern, and press the
[ENTER] key. The import destination pattern then is
displayed. Use the dial again to select the destination
pattern, and press the [ENTER] key. The indication
“IMPORT SURE?” appears on the display.
6.
To carry out the import process, press the
[ENTER] key.
When all patterns/songs were selected, the rhythm
pattern or rhythm song selection screen appears again.
When a specific rhythm pattern was selected, the unit
returns to the condition of step 5. To return to the main
screen, press the [EXIT] key repeatedly.
By pressing the [EXIT] key instead of the [ENTER] key,
you can cancel the operation and back up one step at a
time.
0
4.
In this condition, you can select the source project from
which to import.
88
IMPORT
ALL
Use the cursor left/right keys to select ALL
(import all rhythm patterns and rhythm
songs) or PATTERN (import specific rhythm
pattern), and press the [ENTER] key.
ZOOM MRS-8
Page 89

Editing various settings of
UTILITY
DRUM KIT
COUNT
the rhythm section
This section explains how to edit various settings that
affect the entire rhythm section, such as adjusting the pad
sensitivity or adjusting the volume of the metronome.
Basic procedure
The basic procedure for editing the rhythm section
settings is the same for most items, as described below.
HINT
This procedure can be carried out either in rhythm pattern
mode or rhythm song mode.
1.
From the main screen, press the [SONG/
PATTERN] key to bring up the rhythm
pattern or rhythm song selection screen.
2.
Press the [SYSTEM/UTILITY] key.
The rhythm utility menu for making various rhythm
section settings appears.
UTILITY
DRUM KIT
Reference [Rhythm]
•PAD SENS
Change the pad sensitivity which determines the volume
level in relation to the force with which the pad is struck.
• MIDI
Make MIDI-related settings (→ p. 108).
• IMPORT
Import rhythm patterns and rhythm songs from another
project saved on the SD card (→ p. 88).
• MEMORY
Check the remaining amount of rhythm pattern and
rhythm song memory.
• POSITION
Select whether the drum track panning operates as seen
from the drummer or from the listener (audience).
4.
Turn the dial to edit the setting.
The screen display and operation will be different for
each item. For details on most items, refer to the sections
that follow. For information on rhythm pattern/rhythm
song import and MIDI settings, refer to the respective
sections in this manual.
5.
When you have finished making settings,
press the [EXIT] key repeatedly to return to
the main screen.
3.
• DRUM KIT
Select the drum kit to use for rhythm pattern/rhythm song
play (→ p. 64).
• BASS PRG
Select the bass program to use for rhythm pattern/rhythm
song play (→ p. 64).
• COUNT
Change the length of the pre-count that is heard during
real-time input of a rhythm pattern.
• ClickVol
Change the volume level of the metronome click that is
heard during real-time input of a rhythm pattern.
ZOOM MRS-8
Use the cursor left/right keys to select one
of the following items to edit, and press the
[ENTER] key.
Changing the length of the
pre-count
You can change the length of the pre-count that is heard
when you record a rhythm pattern in real time. Perform
steps 1 – 3 of “Basic procedure” to bring up the indication
“UTILITY COUNT”, and press the [ENTER] key. Then
turn the dial to choose one of these settings.
COUNT
4
• OFF
The pre-count is turned off.
•1 – 8
A pre-count of 1 – 8 beats is heard (default: 4).
89
Page 90

Reference [Rhythm]
ClickVol
15
PAD SENS
NORMAL
MEMORY
32%
• SPECIAL
A special pre-count as shown below is heard.
Changing the metronome
volume
You can change the volume of the metronome that is
heard when you record a rhythm pattern in real time.
Perform steps 1 – 3 of “Basic procedure” to bring up the
indication “UTILITY ClickVol”, and press the [ENTER]
key. Then turn the dial to set the volume (0 – 15).
ClickVol
15
HINT
A setting of zero means that the metronome click is off.
Adjusting the sensitivity of
the pads
You can specify the volume that is produced according to
the force with which you hit the pads (pad sensitivity).
Perform steps 1 – 3 of “Basic procedure” to bring up the
indication “UTILITY PAD SENS”, and press the
[ENTER] key. Then turn the dial to choose one of these
settings.
PAD SENS
NORMAL
• SOFT
The volume will be soft, regardless of how strongly you
tap the pad.
• MEDIUM
The volume will be medium, regardless of how strongly
you tap the pad.
• LOUD
The volume will be loud, regardless of how strongly you
tap the pad.
• LITE
Maximum sensitivity. Even light taps will produce a loud
volume.
• NORMAL
Normal sensitivity (default setting).
• HARD
Low sensitivity. Strong tapping is needed to produce a
loud volume.
• EX HARD
Lowest sensitivity. Very strong tapping is needed to
produce a loud volume.
Checking the remaining
amount of memory
To check the remaining amount of recording memory for
rhythm patterns and rhythm songs, perform steps 1 – 3 of
“Basic procedure” to bring up the indication “UTILITY
MEMORY”, and press the [ENTER] key.
This screen is for display only. There is no setting that can
be edited.
MEMORY
32%
Swapping the left/right pan
position
The pan setting for the drum sound can be set to apply as
seen from the drummer or from the listener.
Perform steps 1 – 3 of “Basic procedure” to bring up the
indication “UTILITY POSITION”, and press the
[ENTER] key. Then select one of the following settings.
• PLAYER
Left/right pan setting applies as seen from the player
(drummer).
• LISTENER
Left/right pan setting applies as seen from the listener
(audience).
90
ZOOM MRS-8
Page 91

Reference [Effects]
This section explains the functions and operation of the effect section built into the MRS-8.
result will be recorded when you carry out recording.
About the effects
The MRS-8 has two types of effects, an “insert effect”
that is inserted at a specific position, and a “send/return
effect” that is used via the built-in mixer. The two effect
types can be used simultaneously. The characteristics of
these effects are described below.
■
Insert effect
The insert effect is placed into the signal path at a specific
point. You can select one of the following positions at
which to apply the effect.
(1) Immediately after the input jack
(2) In the output of any audio track or drum
track/bass track
(3) Immediately before the [MASTER] fader
When the position immediately after the input jack is
selected, the effect processes the input signal, and the
When the insert effect is applied to one of the audio tracks
(tracks 1 – 8) or the drum track/bass track (drum kit/bass
program output signal), the effect processes only a
specific track. This can be used to modify the sound of a
recorded track.
By selecting the position immediately before the
[MASTER] fader, you can process the final stereo mix,
for example to adjust the tonal quality or sonic intensity
during mixdown or bounce recording.
■
Send/return effect
The send/return effect is internally connected to the send/
return loop of the mixer section. This applies to all tracks
and can be used to add effects such as reverb or chorus
during mixdown or bounce recording.
The signal level of each track going to the send/return
effect (send level) can be adjusted individually. The
output of the send/return effect is returned to the internal
mixer and added to the stereo mix.
Input
ZOOM MRS-8
Recorder
(1)
Rhythm section
Track 1
Track 2
Track 3
Track 4
Track 5/6
Track 7/8
Drum
Bass
Insert effect
(2)
BASSDRUM
Internal mixer
MASTER OUTPUT
7/85/64321
MASTER
(3)
91
Page 92

Reference [Effects]
Send
Send/return effect
Return
Using the insert effect
This section explains how to select the position for the
insert effect, how to select a patch, and how to edit
patches.
About insert effect patches
The insert effect section contains a number of single
effects such as compressor, distortion, and delay. Each of
these separate effects is called an “effect module”.
In the insert effect, the effect modules are connected in
series. A combination of effect modules that can be used
simultaneously is called an “algorithm”.
The MRS-8 allows the following algorithms.
• CLEAN
• DIST
• ACO/BASS SIM (Display: Ac/BsSIM)
• BASS
An algorithm suitable for recording guitar/bass.
Send level adjustment
SEND LEVEL
BASSDRUM
7/821
MASTER
• MIC
An algorithm suitable for microphone recording of vocals
and acoustic instruments.
• LINE
An algorithm suitable for recording line-level output
instruments such as a synthesizer.
• DUAL MIC
An algorithm with two entirely separate channels for
mono input x 2 and mono output x 2.
• MASTERING (Display: MASTRING)
An algorithm suitable for processing the final stereo mix
signal.
Depending on the selected algorithm, the input/output
configuration of the effect will differ. The arrangement of
effect modules for each algorithm and the input/output
signal flow are shown in the diagram below.
HINT
For some insert position settings, a stereo signal may be
mixed to mono before effect input (
p. 94).
→
Algorithm
CLEAN
DIST
ACO/BASS SIM
BASS
MIC
LINE
DUAL MIC
MASTERING
92
COMP
COMP/LIM
COMP/LIM
COMP/LIM
COMP/LIM
3BAND COMP
LO-FI
Effect module arrangement
PRE AMP/DRIVE MODULATION/DELAYZNR EQ
MIC PRE+DE-ESSER MODULATION/DELAYZNR EQ
ISOLATOR MODULATIONZNR EQ
MIC PRE DOUBLINGZNR EQ
MIC PRE DOUBLINGZNR EQ
NORMALIZE
ZNR EQ
DIMENSION
RESONANCE
Input/output type
Mono → Stereo
Stereo → Stereo
Mono x 2 → Mono x 2
Stereo → Stereo
ZOOM MRS-8
Page 93

Reference [Effects]
IN SRC
IN
Each effect module in an algorithm comprises two
aspects, namely the effect type and the effect parameters.
Even within the same algorithm, changing the effect type
and/or the effect parameters can produce a variety of
different sounds.
Patch
COMP
EQ
The edited effect type and parameter settings are stored as
a so-called “patch”. The insert effect allows 20 – 50
patches per algorithm. The numbers are listed in the table
below.
Algorithm
CLEAN
DIST
ACO/BASS SIM
BASS
MIC
LINE
DUAL MIC
MASTERING
To use a patch, first select the algorithm and then select
one of the patches in the algorithm. When you select a
patch, it becomes effective immediately.
PRE AMP/
DRIVE
MODULATION/
DELAY
Number of patches
(preprogrammed patches)
30 (22)
50 (42)
20 (10)
20 (10)
50 (31)
50 (30)
50 (30)
30 (21)
ZNR
PAT LVL
Changing the insert location
of the insert effect
In the default condition of a project, the insert effect is
applied immediately after the input. To change the insert
location, proceed as follows.
1.
From the main screen, press the [INPUT
SRC] key in the effect section.
The current insert position is shown on the display.
IN SRC
IN
Insert position
The display meaning is as follows.
• IN
Immediately after input (default)
• DRUM
Drum track
• BASS
Bass track
• TR 1 – 4
Tracks 1 – 4
• TR 1/2, TR 3/4, TR 5/6, TR 7/8
Mono tracks x 2 (tracks 1/2, 3/4) or stereo tracks (tracks
5/6, 7/8)
• MASTER
Immediately before [MASTER] fader
2.
Turn the dial to select the insert position.
HINT
While the screen of step 1 is shown, the status keys and
INPUT [ON/OFF] keys 1/2 can also be used to select the
insert position. To select the track pairs 1/2 and 3/4, press
both status keys together. To select the drum/bass track
using the status key method, press the [RHYTHM] status key
repeatedly until the desired insert position (“DRUM” or
“BASS”) is shown.
3.
When the desired insert position has been
selected, press the [EXIT] key to return to
the main screen.
Selecting the patch for the
insert effect
This section explains how to select the patch for the insert
effect.
1.
From the main screen, press the [INSERT
EFFECT] key in the effect section
repeatedly, until the key is lit.
The following display is shown. In this condition, you
can select the algorithm and patch for the insert effect.
ZOOM MRS-8
93
Page 94

Reference [Effects]
CLEAN
Standard
A
lgorithm name
CLEAN
Standard
2.
Use the cursor up/down keys to select the
0
Patch number Patch name
algorithm to use.
When you select the algorithm, the patch currently
selected for that algorithm becomes active.
Turn the dial to select the patch to use.
3.
The new patch is called up immediately.
HINT
•You can also use the cursor left/right keys to adjust the patch
level (the final volume of the patch).
• If the indication “EMPTY” is shown in the patch name field,
selecting the patch will have no effect.
4.
To temporarily turn off the insert effect,
press the [INSERT EFFECT] key so that the
key goes out.
The insert effect is switched to the bypass (off) condition.
The indications “BYPASS” and “TUNER→ENTER” are
shown alternately on the display.
To turn the insert effect on again, press the [INSERT
EFFECT] key once more.
HINT
Pressing the [ENTER] key in the bypass condition activates
the tuner function (
5.
Press the [EXIT] key to return to the main
screen.
The flow of the signal before and after the insert effect
will change, depending on the insert position and the
number of input/output channels (mono/stereo).
The illustration at right shows how the signal changes
before and after the insert effect, depending on the insert
effect position. (In the effect indication, “M→S” stands
for mono input/stereo output, “S→S” stands for stereo
input and output, and “Dual” stands for mono input x 2
and mono output x 2.)
p.114).
→
• Insert position immediately after input
Recording on a mono track
Input 1
Input 1
Input 1
Input 2
Input 1
Input 1
Input 2
Input 1
Input 2
EFFECT
EFFECT
EFFECT
EFFECT
EFFECT
EFFECT
(M→S)
(DUAL)
(S→S)
(S→S)
(M→S)
(DUAL)
L
Track
R
L
Track
R
L
Track
R
L
Track
R
L
Track
R
L
Track
R
Recording on a stereo track
Input 1
Input 1
Input 1
Input 2
Input 1
Input 1
Input 2
Input 1
Input 2
EFFECT
(M→S)
EFFECT
(DUAL)
EFFECT
(S→S)
EFFECT
(S→S)
EFFECT
(M→S)
EFFECT
(DUAL)
Odd-
L
numbered track
Evennumbered track
R
Odd-
L
numbered track
Evennumbered track
R
Odd-
L
numbered track
Evennumbered track
R
Odd-
L
numbered track
Evennumbered track
R
Odd-
L
numbered track
Evennumbered track
R
Odd-
L
numbered track
Evennumbered track
R
94
ZOOM MRS-8
Page 95

Reference [Effects]
• Insert position at output of audio track or
drum kit/bass program
Insert target is mono track (1 - 4) or
bass track
Recorder
Track Fader
Track
Track
EFFECT
(M→S)
EFFECT
(S→S)
EFFECT
(DUAL)
L
R
L
R
L
Internal mixer
Fader
Fader
• Insert position immediately before [MASTER]
fader
L
R
L
R
R
Insert target is stereo track (5/6, 7/8),
mono track pair (1/2, 3/4) or drum track
Recorder
Oddnumbered track
Evennumbered track
Oddnumbered track
Evennumbered track
EFFECT
(M→S)
EFFECT
(S→S)
Internal mixer
L
R
L
R
Fader
Fader
Fader
Fader
L
R
Editing an insert effect patch
The effect modules of an algorithm have various effect
parameters that can be adjusted to make detailed changes
Oddnumbered track
Evennumbered track
EFFECT
(DUAL)
L
Fader
Fader
R
to the character of the effect. By editing the effect
parameters, you can obtain the desired sonic result.
For some effect modules, you can also change the effect
type. For example, the MODULATION/DELAY effect
module of the MIC algorithm provides 19 effect types
such as chorus, flanger, phaser, etc. (When you change
the effect type, the effect parameter arrangement also
changes.)
EFFECT
(M→S)
EFFECT
(S→S)
EFFECT
(DUAL)
MASTER fader
MASTER
MASTER fader
MASTER
MASTER fader
MASTER
MASTER
OUTPUT
MASTER
OUTPUT
MASTER
OUTPUT
L
R
L
R
L
R
ZOOM MRS-8
Effect
MODULATION/
module
parameters
Effect
type
Effect
DELAY
CHORUS
DEPTH
RATE
MIX
FLANGER
DEPTH
RATE
FB
PHASER
RATE
COLOR
This section explains how to edit the effect type and effect
parameters for the currently selected patch.
95
Page 96

Reference [Effects]
COMPRES S
COMP/LI M
COMP L
COMP/LI M
CMP/LoF i
PRE/DRV
MIC PRE
MicPre L
ISOLATO R
NORMLZR
3BandEQ
3BandEQ
MOD/DLY
MOD/DLY
MOD/DLY
DIM/RESO
DOUBLE L
TOTAL
TOTAL
EQ L
TOTAL
3BandEQ
TOTAL
3BandEQ
TOTAL
CLEAN
Standard
COMPRESS
SENS
MOD/DLY
CHORUS
NOTE
The algorithm itself (type and arrangement of effect modules)
cannot be edited.
1.
From the main screen, press the [INSERT
EFFECT] key in the effect section
repeatedly, until the key is lit.
The insert effect patch selection screen is shown.
CLEAN
Standard
2.
Use the cursor up/down keys to select the
algorithm which has the patch you want to
edit. Turn the dial to select the patch.
HINT
If the indication “EMPTY” is shown in the patch name field,
all of the modules are set to off. By editing such a patch, you
can create it from scratch.
3.
Press the [EDIT] key.
The indication “EDIT” appears on the display. This
means that the patch can now be edited.
The first line of the display shows the effect module
currently selected for editing.
0
Effect module
COMPRESS
SENS
Use the cursor left/right keys to select the
4.
effect module to edit.
4
MOD/DLY
CHORUS
Depending on the selected effect module, the indication
on the first line of the display changes as shown in the
table below.
This table shows the display that is shown when the effect
module is on. If the effect module is off, the first line of
the display shows the module name or the effect type, and
the second line shows “-OFF-”.
HINT
In the DUAL MIC algorithm, the modules assigned to the L
and R channels can be edited separately. The indication “L”
on the display means that the module for the left channel is
selected. The indication “R” means that the module for the
right channel is selected.
5.
To change the effect type of the currently
selected effect module, turn the dial.
96
Algorithm Module/display indication
CLEAN
DIST
ACO/BASS SIM
BASS
MIC
LINE
DUAL MIC
MASTERING
COMPRESS
COMP PRE AMP/DRIVE EQ
COMP/LIM
COMP/LIM
COMP/LIM
COMP/LIM
COMP L
COMP/LIM
CMP/LoFi
3BAND COMP/
Lo-Fi
PRE/DRV
MIC PRE
MICPRE+DE-ESSER
ISOLATOR
ISOLATOR
MicPre L
MICPRE DOUBLING
NORMLZR
NORMALIZER
3BandEQ
3BandEQ
EQ
3BandEQ
EQ
EQ L
EQ
3BandEQ
EQ
MOD/DLY
MODULATION/DELAY
MOD/DLY
MODULATION/DELAY
MOD/DLY
MODULATION/DELAY
DOUBLE L
DIM/RESO
DIMENSION/
RESONANCE
TOTAL
ZNR, PAT LVL
TOTAL
ZNR, PAT LVL
TOTAL
ZNR, PAT LVL
TOTAL
ZNR, PAT LVL
TOTAL
ZNR, PAT LVL
ZOOM MRS-8
Page 97

Reference [Effects]
MOD/DLY
FLANGER
FLANGER
DEPTH
FLANGER
-OFF-
COMPARE
Standard
TOTAL
PAT LVL
For effect modules which comprise multiple effect types,
the name of the currently selected effect type is shown on
the second line of the display. When you turn the dial in
this condition, the effect type changes.
MOD/DLY
FLANGER
Effect type name
HINT
• If the contents of a patch have been changed, the “EDIT”
indicator in the upper part of the display will change to
“EDITED”. When the setting is returned to the original
condition, the indicator reverts to “EDIT”.
•To edit the ZNR module, bring up the indication “TOTAL” on
the first line of the display, and then press the cursor down key
to call up the parameter.
6.
Use the cursor up/down keys to select the
effect parameter to edit.
The displayed parameter will be different, depending on
the effect module and effect type.
The following illustration shows what appears on the
display when you have selected the DEPTH parameter of
the “FLANGER” effect.
FLANGER
DEPTH
Effect parameter Setting value
HINT
When the first line of the display shows “TOTAL”, the cursor
up/down keys can be used to select the ZNR module and the
patch level.
7.
Turn the dial to change the setting value.
For details on the effect types that can be selected for each
effect module and on the effect parameters of each type,
refer to the information in the appendix of this manual.
8.
To toggle the effect module on or off, bring
up an effect type or parameter for the
module, and then press the [ENTER] key.
The effect module is turned off. The module name or the
effect type is shown on the first line and the indication
“-OFF-” on the second line of the display. Pressing the
[ENTER] key once more in this condition turns the
2
module on again.
FLANGER
-OFF-
NOTE
The modules included in TOTAL cannot be turned off.
9.
To compare the sound of the currently
edited patch before and after editing, press
the [INSERT EFFECT] key.
Pressing the [INSERT EFFECT] key during editing
activates the compare function. While the compare
function is active, the display changes as follows and the
patch reverts to the last stored condition.
COMPARE
Standard
To return to the edited patch, press the [INSERT
EFFECT] key once more, or press the [EXIT] key.
10.
Repeat steps 4 – 8 as necessary to edit
other modules.
11.
To adjust the patch level (the final volume of
the patch), use the cursor left/right keys to
bring up the indication “TOTAL PAT LVL” on
the display, and turn the dial.
The patch level can be adjusted in the range from 1 to 30.
TOTAL
PAT LVL
12.
When you have finished editing, press the
[EXIT] key repeatedly to return to the main
screen.
NOTE
Keep in mind that if you select another patch without first
storing the edited patch, the changes will be lost. For
information on how to store a patch, refer to the next section.
0
23
ZOOM MRS-8
97
Page 98

Reference [Effects]
STORE TO
Standard
CLEAN
Standard
TOTAL
PAT LVL
PAT NAME
tandard
Storing or swapping insert
effect patches
An insert effect patch that you have edited can be stored
in any location of the same algorithm. By storing an
existing patch in another location, you can create a copy
of that patch. Interchanging the position of patches
(swapping) is also possible.
1.
From the insert effect patch selection
screen or the edit screen, press the
[FUNCTION] key.
The currently selected patch goes into store standby
mode. In this condition, you can select whether to
perform store or swap.
STORE TO
Standard
2.
Use the cursor left/right keys to bring up
the indication “STORE TO” or “SWAP TO”.
3.
Turn the dial to select the number of the
patch to store/swap.
When carrying out store, the current patch settings will be
stored under this number.
When carrying out swap, the currently selected patch and
the patch settings selected here will be interchanged.
4.
To carry out the store/swap operation,
press the [FUNCTION] key.
When the store/swap operation is completed, the insert
effect patch selection screen appears again.
By pressing the [EXIT] key instead of the [FUNCTION]
key, you can cancel the operation and back up one step at
a time.
HINT
• Patches are saved as part of a project.
• Patches from another project can be imported to the current
project (
p. 102).
→
0
Patch number
Assigning a name to an insert
effect patch
This section explains how to assign a name to the
currently selected insert effect patch.
1.
From the insert effect patch selection
screen, select the patch whose name you
want to change.
CLEAN
Standard
2.
Press the [EDIT] key.
The selected patch can now be edited.
3.
Use the cursor left/right keys to bring up
the indication “TOTAL PAT LVL” on the
display.
TOTAL
PAT LVL
4.
Repeatedly press the cursor down key to
bring up the indication “PAT NAME” on the
display.
The name of the selected patch can now be edited. The
cursor indicates the character that can be changed.
0
25
PAT NAME
±tandard
Cursor
5.
Use the cursor left/right keys to move the
cursor to the character you want to change,
and turn the dial or use the rhythm section
pads and keys to select a character.
For information on how to input characters, refer to page
33.
6.
To confirm the new name, press the
[FUNCTION] key in the control section
twice.
The patch is stored, overwriting the old information.
When storing is complete, the insert effect patch selection
screen appears again.
98
ZOOM MRS-8
Page 99

Reference [Effects]
SYSTEM
PROJECT
REC SRC
WET
NOTE
Keep in mind that the name will revert to the previous name
if you switch to another patch without storing the edited
patch.
Applying the insert effect only
to the monitor signal
Normally, when the insert effect is applied immediately
after the input, the signal processed by the effect will be
recorded (effect recording). If necessary, however, you
can apply the insert effect only to the monitor signal, and
record the unprocessed input signal on the track.
For example when recording the unprocessed sound of a
vocal performance, the vocalist may be more comfortable
singing if an effect is applied to the monitor signal only.
1.
Set the insert effect position to immediately
after the input.
2.
From the main screen, press the [SYSTEM/
UTILITY] key in the display section.
The indication “SYSTEM PROJECT” appears on the
display.
SYSTEM
PROJECT
3.
Use the cursor left/right keys to bring up
the indication “SYSTEM REC SRC” on the
display, and press the [ENTER] key.
The display changes as follows.
REC SRC
WET
Fader 1
1
Insert
effect
•DRY
Only the unprocessed input signal will be recorded on the
track. If the insert effect is applied to the input, the signal
appearing at the MASTER OUTPUT jacks will be
processed by the effect.
4.
Turn the dial to change the setting to
“DRY”.
5.
When you have finished making settings,
press the [EXIT] key repeatedly to return to
the main screen.
Track 1
Insert
effect
Track 1
[MASTER] fader
Fader 1
1
[MASTER] fader
MASTER
MASTER
MASTER
OUTPUT
jacks
MASTER
OUTPUT
jacks
NOTE
This setting is stored for each project. If required, change the
setting back to “WET” before you begin recording other
parts.
You can now select one of the following two signal types
to be recorded on the track.
• WET
The input signal that has passed through the insert effect
will be recorded on the track (default setting).
ZOOM MRS-8
99
Page 100

Reference [Effects]
SEND
VoChorus
SEND
VoChorus
TYPE
HALL
Using the send/return
effect
This section explains how to select and edit patches for
the send/return effect.
About the send/return effect
patches
3.
To temporarily turn off the send/return
effect, press the [SEND/RETURN] key so
that the key goes out.
The send/return effect is switched to the bypass (off)
condition. The indication “SEND -MUTE-” is shown on
the display. To turn the send/return effect on again, press
the [SEND/RETURN] key once more.
4.
Press the [EXIT] key to return to the main
screen.
The send/return effect of the MRS-8 is a single effect
module for which one effect type (reverb, chorus, delay,
etc.) can be selected.
Each effect type has various effect parameters which can
be adjusted to control the sound produced by the effect.
Such settings can be assigned a name and stored as a
patch. In the default condition, a project has 60 send/
return effect patches (40 of which are preprogrammed).
By selecting one of these, the send/return effect can be
instantly switched.
Selecting a send/return effect
patch
This section explains how to select a send/return effect
patch.
1.
From the main screen, press the [SEND/
RETURN] key in the effect section
repeatedly, until the key is lit.
The send/return effect patch selection screen appears.
SEND
VoChorus
Patch name Patch number
2.
Turn the dial to select the patch.
As you turn the dial, new patches will be recalled
immediately. If the send/return effect send level for each
track has been raised, you can press the PLAY [R] key to
play back the song and check out the result of the newly
selected patch.
HINT
•You can also use the cursor left/right keys to adjust the EFX
LVL parameter (the mix amount of the effect sound).
• For information on how to adjust the send level, see page 59.
0
Editing a send/return effect
patch
This section explains how to edit a send/return effect
patch.
1.
From the main screen, press the [SEND/
RETURN] key in the effect section
repeatedly, until the key is lit.
The send/return effect patch selection screen appears.
SEND
VoChorus
2.
Turn the dial to select the patch to edit.
HINT
If the indication “EMPTY” is shown in the patch name field,
all of the modules are set to off. By editing such a patch, you
can create it from scratch.
3.
Press the [EDIT] key.
The currently selected effect type appears on the second
line of the display.
0
TYPE
HALL
Effect type
The indication “EDIT” is shown on the display during
patch editing.
100
ZOOM MRS-8
 Loading...