


AUDIO INTERFACE MANUAL
© ZOOM Corporation
Reproduction of this manual, in whole or in part, by any means, is prohibited.

manual interface Audio
Contents
Contents |
1 |
Audio interface and control surface |
3 |
Cubase LE 5 Installation overview |
5 |
Audio interface |
5 |
Control surface |
5 |
R24 Audio Interface system requirements |
6 |
Cubase LE 5 Startup Guide |
6 |
Connecting and disconnecting in audio interface mode |
7 |
Connecting the R24 to a computer for the first time |
7 |
R24 setup and connection |
7 |
Disconnecting |
8 |
Using control surface functions |
9 |
About the control surface |
9 |
Control surface setup |
9 |
Transport section |
10 |
Fader section operation |
11 |
About banks |
11 |
Operating the fader section |
11 |
R24 level meters (Audio interface use) |
12 |
Setting the function keys |
13 |
Function key setup |
13 |
Control surface functions quick reference guide |
14 |
Recording with Cubase LE 5 |
15 |
Create a new project |
15 |
Create a new audio track |
16 |
Connect an instrument . . . . . . . . . . . . . . . . . . . . . . . . . . . . . . . . . . . .17
Adjust the recording level |
18 |
Recording |
19 |
Check the recording (playback) |
19 |
Importing audio data into Cubase LE 5 |
21 |
Importing by drag & drop |
21 |
Using the “Import” command |
23 |
1

The mixer in audio interface mode |
25 |
Volume, reverb send, pan |
25 |
Stereo link |
25 |
Balance |
25 |
Tuner |
26 |
Chromatic tuner |
26 |
Effects in audio interface mode |
27 |
INSERT effect |
27 |
SEND return effect |
27 |
Working with patches |
28 |
Patch operations . . . . . . . . . . . . . . . . . . . . . . . . . . . . . . . . . . . . . . |
.28 |
Patch initialization (factory reset) |
28 |
Control surface setup for other DAWs |
29 |
Logic |
29 |
SONAR |
30 |
Live |
31 |
Digital Performer |
32 |
manual interface Audio
2
manual interface Audio
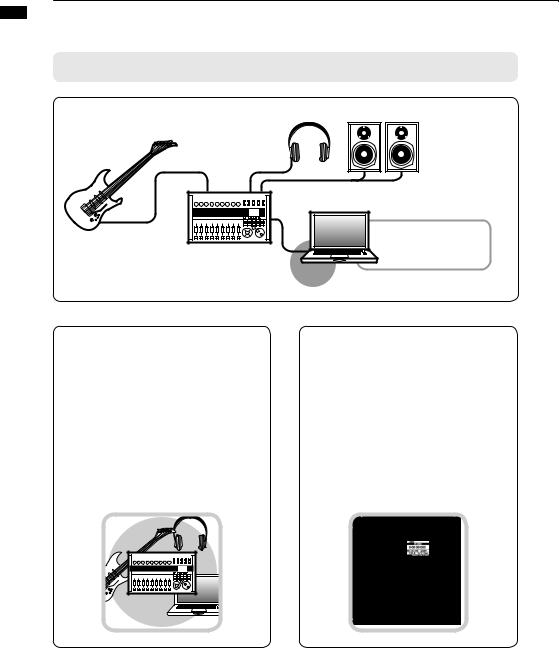
Audio interface and control surface
This section explains how to connect the unit with a computer and how to set up and use the audio interface and control surface functions of the R24 with a DAW and other software.
Functions of the audio interface and control surface
[INPUT 1-8] jacks |
[PHONES] jack |
[OUTPUT] jacks |
Guitars and other |
Playback device like |
Stereo system, |
musical instruments, |
headphones or an |
speakers with built-in |
built-in stereo mic |
audio system |
amplifiers, etc. |
R24 |
USB Cable
Windows/Mac
DAW software
Cubase LE 5, etc.
Audio driver
 Audio interface
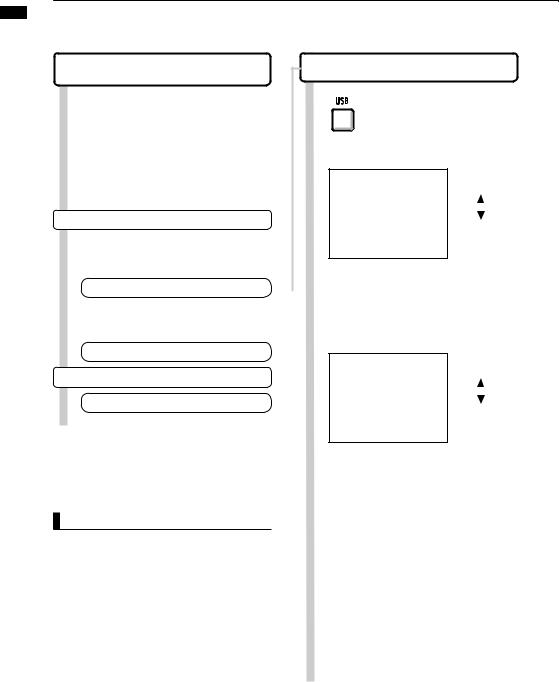
The R24 has numerous inputs and outputs and it can be used as a Hi-Speed USB (USB 2.0) audio interface with 8 inputs and 2 outputs at quality up to 24-bit/96 kHz. Effects can be used when the sampling rate is 44.1 kHz, and the unit can be powered by a computer’s USB bus.
 Control surface functions
On-board control surface functions can be used to control DAW software on a computer via USB. Transport operations, including playback, recording and stopping, and physical control of the DAW faders are possible. Furthermore, various other DAW software functions can be mapped to the F1~F5 keys (assignable functions depend on the DAW used).
3
 Supports input from a variety of sources, including guitars, mics and
line level instruments
The 8 onboard jacks accept XLR and standard phone plugs and include one high-impedance input and two inputs with phantom power (24V or 48V).
Many sources are supported from highimpedance guitars and basses to dynamic and condenser microphones and linelevel devices like synthesizers. In addition, built-in highperformance condenser microphones are convenient for recording acoustic guitars and vocals.
 Versatile effect functions
Built-in insert effects can be applied to specific channel paths, and two-types of send/return effects work via the mixer send/return. These effects can be applied when recording, of course, but they can also be applied to only the monitor output. For example, when recording vocals, you can apply reverb only to the monitor signal to make singing easier.
 Comprehensive built-in mixer
Using the R24’s mixer, you can make a mix for monitoring. When simultaneously recording guitar and vocals, for example, you can adjust volume balance, panning and reverb levels.
Moreover, you can also adjust the balance between the built-in mixer and the sound sent from a computer.
 Multifunction tuner
In addition to standard chromatic tuning, the on-board multifunction tuner also supports 7-string guitar, 5-string bass and various drop tunings.
manual interface Audio
4
manual interface Audio
Cubase LE 5 installation overview
To use the R24 with DAW software, after installing that software, a driver must be installed and set to recognize it. We explain how to do this with Cubase LE 5.
Audio interface |
Control surface |
By using the R24 between a computer and |
Using the faders and keys on the R24, you can |
external audio devices and instruments, their |
control transport operation and mixing in digi- |
signals can be recorded using a DAW or other |
tal audio workstation (DAW) software on your |
software. Instruments and mics that require |
computer. |
Hi-Z or phantom power can also be connected. |
|
|
|
|
Install DAW software |
Reference: "Cubase LE 5 Startup Guide" |
|
Cubase LE 5 |
|
|
Install driver |
Reference: "Cubase LE 5 Startup Guide" |
|
ZOOM R16/R24 audio driver |
|
|
Connect R24 to computer |
P.7 |
|
Audio interface setup
DAW software setup
Device setup |
Reference: "Cubase LE 5 Startup Guide" |
ZOOM R16/R24 audio driver
Control surface setup |
P.9, 29~ |
Mackie Control
Recording P.15
5
R24 Audio Interface system requirements
R24 Audio Interface system requirements
Windows
Windows® XP SP2 or later (32-bit) Windows® Vista SP1 or later (32-bit, 64-bit) Windows® 7 (32-bit, 64-bit)
32-bit: Intel® Pentium® 4 1.8 GHz or faster
64-bit: Intel® Pentium® Dual Core 2.7 GHz or faster 32-bit: RAM 1 GB or faster
64-bit: RAM 2 GB or faster
Intel Mac
OS X 10.4.11 or later/10.5 or later/10.6
Intel® Core Duo 1.83 GHz or faster
RAM 1 GB or faster
Both
USB 2.0 compatible port
•USB hubs are not supported.
•Intel® chipsets recommended.
Cubase LE 5 installation guide
Please refer to the Cubase LE 5 Startup Guide for detailed instructions for installing the R16/ R24 audio driver and Cubase LE 5.
Note about descriptions and images
This manual was prepared based on use with Windows systems. Special functions related to Mac OS X are indicated separately.
The screen images are of the Windows version.
About trademarks
• The SD symbol 
 and
and 
 SDHC symbol are trademarks.
• Windows®,Windows® XP, Windows Vista® and Windows 7® are registered trademarks of Microsoft® in the USA.
• Macintosh® and Mac OS® are trademarks of Apple Inc.
• Steinberg and Cubase are registered trademarks of Steinberg Media Technologies GmbH Inc.
• Intel® and Pentium® are trademarks of Intel Corporation.
• MACKIE Control is a registered trademark of LOUD Technologies.
• Logic is a trademark of Apple Inc.
• SONAR is a trademark of Cakewalk, Inc.
• Ableton Live is a trademark of Ableton AG.
• Digital Performer is a registered trademark of Mark of the Unicorn.
• All other product names, registered trademarks, and company names mentioned in this documentation are the property of their respective owners.
In order to improve the product, specifications might be changed without advance notice.
manual interface Audio
6
manual interface Audio
Connecting and disconnecting in audio interface mode
This is an overview of connecting and disconnecting the R24 to a computer with a USB cable. For details, see the included Cubase LE 5 Startup Guide guide.
Connecting the R24 to a computer for the first time
1 Install the Cubase LE 5 DAW software on the computer.
2 Install the audio driver on the computer from the included CD-ROM.
Installation and setup details
Reference: "CubaseLE5StartupGuide"
4 Connect the R24 to a computer.
R24 setup and connection
5 Setup the DAW software. Device setup
Reference: "Cubase LE 5 Startup Guide"
Control surface setup |
P.9 |
Mackie Control
R24 setup and connection
Follow these procedures when connecting again.
1 |
Press USB. |
|
|
|
|
2 Select AUDIO I/F. |
Change |
|
|
|
menu |
 Press ENTER.
3 Select EXECUTE.
Change
menu
 Press ENTER.
NOTE
•The ZOOM R16/R24 audio driver is essential for using the R24 as an audio interface with DAW software such as Cubase LE 5.
When downloading it, follow the included installation guide to install it correctly.
•Download the latest R24 audio driver from the Zoom Corporation website. http://www.zoom.co.jp/
7
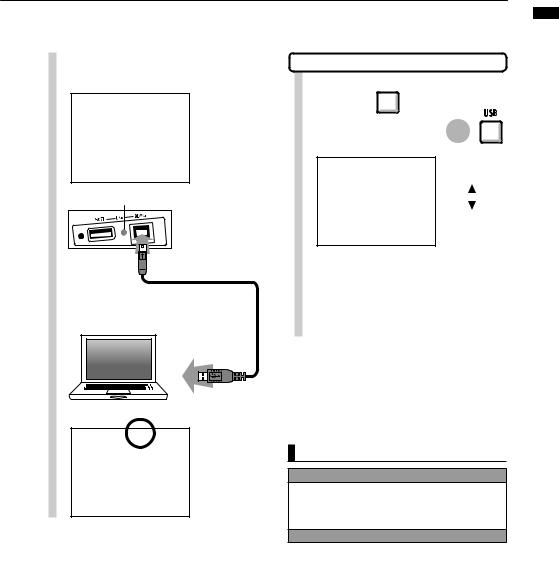
4 Connect the USB cable to the R24.
USB DEVICE indicator lights
5 Connect the USB cable to the computer.
Disconnecting
2 Select YES. |
or |
. |
Change |
|
|
|
menu |
|
 Press ENTER.
3 Disconnect the USB cable
USB icon appears when connection completes.
NOTE
Select CONTINUE to use the same settings as last time.
• INSERT EFFECT settings
• SEND RETURN EFFECT settings
• Mixer settings
• TUNER settings
Select RESET to restore default settings for each item.
• The audio interface and control surface functions of the R24 can be used by drawing power through a USB cable from the USB bus.
• We recommend always using the latest R24 system software.
• When using phantom power, we recommend using batteries or an AC adapter even when the unit is used as an audio interface.
manual interface Audio
8

manual interface Audio
Using control surface functions
When using the R24 connected by USB as an audio interface, the R24 keys and faders and mixer.
About the control surface
In control surface mode the keys and knobs on the R24 can be assigned to particular Cubase LE 5 functions.
Transport section |
P.10 |
About banks |
P.11 |
Fader section |
P.11 |
HINT
Assigning keys
For a list of functions that can be assigned to the knobs and keys of the R24, as well as other transport/function keys that are supported by Cubase LE 5, please consult the “Control surface functions quick reference guide” in this manual.
Reference: Control surface functions quick |
|
reference guide |
P.14 |
See R24 setup and connection steps 1–5 on P7~8
6
7 From the Cubase LE 5 “Devices” menu, select “Device setup…”
Open the “Device Setup…” window.
8 At the top left of the Device setup window [+], [−] and [|<] buttons appear. Click the [+] and select “Mackie Control”
9 Set the MIDI input and output
MIDI input: |
ZOOM R16_R24 |
MIDI output: |
ZOOM R16_R24 |
9
Transport section
By setting up the control surface, the R24’s transport section keys can be assigned to individual functions in Cubase LE 5.
F1 key F2 key F3 key F4 key F5 key
REW key FF key STOP key PLAY key REC key
manual interface Audio
10
 Loading...