


|
FCC INFORMATION (U.S.A.) |
IMPORTANT NOTICE: |
DO NOT MODIFY THIS UNIT! |
This product, when installed as indicated in the instructions contained in this manual, meets FCC requirements. Modifications not expressly approved by Yamaha may void your authority, granted by the FCC, to use the product.
IMPORTANT:
When connecting this product to accessories and/or another product use only high quality shielded cables. Cable/s supplied with this product MUST be used. Follow all installation instructions. Failure to follow instructions could void your FCC authorization to use this product in the USA.
NOTE:
This product has been tested and found to comply with the requirements listed in FCC Regulations, Part 15 for Class “B” digital devices. Compliance with these requirements provides a reason-
able level of assurance that your use of this product in a residential environment will not result in harmful interference with other electronic devices. This equipment generates/uses radio frequencies
and, if not installed and used according to the instructions found in the user’s manual, may cause interference harmful to the operation of other electronic devices. Compliance with FCC regulations
does not guarantee that interference will not occur in all installations. If this product is found to be the source of interference, which can be determined by turning the unit “OFF” and “ON”, please try
to eliminate the problem by using one of the following measures:
• Relocate either this product or the device that is being affected by the interference.
•Utilize power outlets that are on different branch (circuit breaker or fuse) circuits or install AC line filter/s.
•In the case of radio or TV interference, relocate/reorient the antenna. If the antenna lead-in is
300 ohm ribbon lead, change the lead-in to co-axial type cable.
If these corrective measures do not produce satisfactory results, please contact the local retailer authorized to distribute this type of product. If you can not locate the appropriate, please contact
Yamaha Corporation of America, Electronic Service Division, 6600 Orangethorpe Ave, Buena Park CA, 90620
• This applies only to products distributed by Yamaha Corporation of America.
CANADA
THIS DIGITAL APPARATUS DOES NOT EXCEED THE “CLASS B” LIMITS FOR RADIO NOISE
EMISSIONS FROM DIGITAL APPARATUS SET OUT IN THE RADIO INTERFERENCE REGULATION
OF THE CANADIAN DEPARTMENT OF COMMUNICATIONS.
LE PRESENT APPAREIL NUMERIQUE N’EMET PAS DE BRUITS RADIOELECTRIQUES DEPASSANT
LES LIMITES APPLICABLES AUX APPAREILS NUMERIQUES DE LA “CLASSE B” PRESCRITES
DANS LE REGLEMENT SUR LE BROUILLAGE RADIOELECTRIQUE EDICTE PAR LE MINISTERE
DES COMMUNICATIONS DU CANADA.
*This applies only to products distributed by Yamaha Canada Music LTD.
*Ceci ne s’applique qu’aux produits distribués par Yamaha Canada Music LTD.
Dit produkt is gefabriceerd in overeenstemming met |
Diese Geräte entsprechen der EG-Richtlinie 82/499/ |
de radiostoringsvoorschriften van de Richtlijn van de |
EWG und/oder 87/308/EWG. |
Raad (82/499/EEG). |
This product complies with the radio frequency |
|
|
ΑΥΤΗ Η ΣΥΣΚΕΥΗ ΑΝΤΑΠΟΚΡΙΝΕΤΑΙ ΣΤΙΣ |
interference requirements of the Council Directive 82/ |
ΑΠΑΙΤΗΣΕΙΣ ΤΩΝ Ο∆ΗΓΙΩΝ ΤΗΣ ΕΥΡΩΠΑΙΚΗΣ |
499/EEC and/or 87/308/EEC. |
ΟΙΚΟΝΟΜΙΚΗΣ ΚΟΙΝΟΤΗΤΑΣ 82/499/Ε.Ο.Κ. |
Questo apparecchio è conforme al D.M.13 aprile 1989 |
|
|
Este produto está de acordo com o radio de |
(Direttiva CEE/87/308) sulla soppressione dei |
interferencia frequente requiridos do Conselho |
radiodisturbi. |
Diretivo 82/499/EEC. |
Este producto está de acuerdo con los requisitos sobre |
|
|
Dette apparat overholder det gaeldende EF-direktiv |
interferencias de radio frequencia fijados por el |
verdrørende radiostøj. |
Consejo Directivo 87/308/CEE. |
Cet appareil est conforme aux prescriptions de la |
|
directive communautaire 87/308/CEE. |
|
|
|
YAMAHA CORPORATION
SPECIAL MESSAGE SECTION (U.S.A.)
This product utilizes batteries or an external power supply (adapter). DO NOT connect this product to any power supply or adapter other than one described in the manual, on the name plate, or specifically recommended by Yamaha.
This product should be used only with the components supplied or; a cart, rack, or stand that is recommended by Yamaha. If a cart, etc., is used, please observe all safety markings and instructions that accompany the accessory product.
SPECIFICATIONS SUBJECT TO CHANGE:
The information contained in this manual is believed to be correct at the time of printing. However, Yamaha reserves the right to change or
modify any of the specifications without notice or obligation to update existing units.
This product, either alone or in combination with an amplifier and headphones or speaker/s, may be capable of producing sound levels that could cause permanent hearing loss. DO NOT operate
for long periods of time at a high volume level or
at a level that is uncomfortable. If you experience any hearing loss or ringing in the ears, you should consult an audiologist. IMPORTANT: The louder
the sound, the shorter the time period before damage occurs.
NOTICE:
Service charges incurred due to lack of knowledge relating to how a function or effect works (when the unit is operating as designed) are not covered
by the manufacturer’s warranty, and are therefore the owners responsibility. Please study this manual carefully and consult your dealer before requesting service.
ENVIRONMENTAL ISSUES:
Yamaha strives to produce products that are both user safe and environmentally friendly. We sincerely believe that our products and the production methods used to produce them, meet these goals. In keeping with both the letter and the spirit of the law, we want you to be aware of the following:
Battery Notice:
This product MAY contain a small non-recharge- able battery which (if applicable) is soldered in
place. The average life span of this type of battery is approximately five years. When replacement becomes necessary, contact a qualified service representative to perform the replacement.
This product may also use “household” type batteries. Some of these may be rechargeable. Make
sure that the battery being charged is a rechargeable type and that the charger is intended for the battery being charged.
When installing batteries, do not mix old batteries with new, or with batteries of a different type. Batteries MUST be installed correctly. Mismatches or incorrect installation may result in overheating and battery case rupture.
Warning:
Do not attempt to disassemble, or incinerate any battery. Keep all batteries away from children. Dispose of used batteries promptly and as regulated by the laws in your area. Note: Check with any retailer of household type batteries in your area for battery disposal information.
Disposal Notice:
Should this product become damaged beyond
repair, or for some reason its useful life is considered to be at an end, please observe all local, state, and federal regulations that relate to the disposal of products that contain lead, batteries,
plastics, etc. If your dealer is unable to assist you, please contact Yamaha directly.
NAME PLATE LOCATION:
The name plate is located on the bottom of the product. The model number, serial number, power requirements, etc., are located on this plate. You should record the model number, serial number,
and the date of purchase in the spaces provided below and retain this manual as a permanent record of your purchase.
Model |
|
|
|
CBX-K1 |
Serial No. |
|
|
|
|
|
|
|
||
Purchase |
Date |
|
||
|
||||
PLEASE KEEP THIS MANUAL
92-BP
Welcome to the CBX-K1
Congratulations and thank you for purchasing the Yamaha CBX-K1 MIDI Keyboard!
The CBX-K1 is a sophisticated, yet compact MIDI keyboard controller, for use with computers and MIDI music systems. It allows you to play connected tone generators and rhythm machines, and enter performance data to sequencers and computers. It features a sophisticated touch-sensitive keyboard that can be adjusted to cover the full 128-note MIDI range. It also provides a wealth of MIDI controls that allow you to send virtually any MIDI message directly from the keyboard. Moreover, the CBX-K1 has a versatile ASSIGNABLE Wheel that lets you control a wide variety of parameters on your connected tone generator or sequencer in real time. Because of its exceptionally portable size, convenient battery/AC adaptor power supply, compatibility with General MIDI (GM) and XG, and extraordinarily powerful and comprehensive MIDI control functions, the CBX-K1 is an invaluable tool — a MIDI Swiss army knife, of sorts
— for all MIDI musicians and performers.
IMPORTANT ■ The CBX-K1 does not contain an internal tone generator. In order to play sounds from the CBX-K1, you need an external tone generator, such as the Yamaha MU series or TG series tone generators.
NOTE ■ The many MIDI functions and features of the CBX-K1 may not be supported by your particular MIDI device. Be sure to refer to the owner’s manual of your particular MIDI device when using it with the CBX-K1.
Table of Contents
The CBX-K1 — What It Is and What It Can Do . . . . . . 1 Precautions . . . . . . . . . . . . . . . . . . . . . . . . . . . . . . 2 How to Use This Manual . . . . . . . . . . . . . . . . . . . . . 3 Specifications . . . . . . . . . . . . . . . . . . . . . . . . . . . . 3 Panel Controls and Terminals . . . . . . . . . . . . . . . . . 4
■ Front Panel . . . . . . . . . . . . . . . . . . . . . . . . . . . . . . 4 ● Note Range of the CBX-K1 . . . . . . . . . . . . . 5 ■ Rear Panel . . . . . . . . . . . . . . . . . . . . . . . . . . . . . . 6 ● Default Settings of the CBX-K1 . . . . . . . . . . 6
Power Supply . . . . . . . . . . . . . . . . . . . . . . . . . . . . . 7
■ Using a Power Adaptor . . . . . . . . . . . . . . . . . . . . 7 ■ Using Batteries . . . . . . . . . . . . . . . . . . . . . . . . . . . 7 ■ When to Replace the Batteries . . . . . . . . . . . . . . . 7
Guided Tour |
|
Setting Up Your CBX-K1 . . . . . . . . . . . . . . . . . . . . . |
8 |
What You’ll Need . . . . . . . . . . . . . . . . . . . . . . . . . . . 8
Setup Examples . . . . . . . . . . . . . . . . . . . . . . . . . . . . 8
Making the Connections . . . . . . . . . . . . . . . . . . . . . . 9
Using the CBX-K1 — Basic Operations . . . . . . . . . . 10
Playing the Keyboard and Other Operations . . . . . 10
Using the SHIFT-Related Functions . . . . . . . . . . . . 12
● Basic Operations . . . . . . . . . . . . . . . . . . . . 13
Setting the Functions . . . . . . . . . . . . . . . . . . . . . . . 14
● Group A Operations . . . . . . . . . . . . . . . . . . 14
● Group B Operations . . . . . . . . . . . . . . . . . . 16
Reference
Group A Functions . . . . . . . . . . . . . . . . . . . . . . . . 18
Group B Functions . . . . . . . . . . . . . . . . . . . . . . . . 20
ASSIGNABLE Wheel — Controller Number List . . . . 22
Troubleshooting . . . . . . . . . . . . . . . . . . . . . . . . . . 23
MIDI Data Format . . . . . . . . . . . . . . . . . . . . . . . . . 24
MIDI Implementation Chart . . . . . . . . . . . . . . . . . . 26

The CBX-K1 — What It Is and What It Can Do
What It Is
The CBX-K1 is a compact, highly portable 37-key MIDI keyboard, designed especially for use with computers and MIDI music systems. The CBX-K1 does not generate any sound itself, but can be used as a keyboard controller for playing sounds on a connected tone generator or rhythm machine. It’s also ideal for recording to sequencers and computers. The keyboard is touch-sensitive and its octave range can be changed to cover the full 128-note MIDI range.
The true power and flexibility of the CBX-K1 is in its comprehensive MIDI controls. The CBX-K1 allows you to send virtually any type of MIDI message to connected MIDI devices. Pre-programmed commands provide easy control of basic sequencer/rhythm machine functions such as Start, Stop, Tempo and Song Select, while comprehensive program change commands let you easily select program banks and voices.
Most importantly, though, the CBX-K1 has an ASSIGNABLE Wheel that can be set for control of any controller number. This means that you can use the ASSIGNABLE Wheel to control a wide variety of parameters on your connected tone generator — such as Volume, Pan, Brightness, and the Depth of various effects — in real time. This gives you expressive control over different aspects of the sound in live performance.
The CBX-K1 is also the latest instrument in the Yamaha line to support the XG format, a new addition to the General MIDI standard. In short, XG provides for more instrument sounds and variations, and greater expressive control over voices and effects. With the use of the ASSIGNABLE Wheel on the CBX-K1, you have direct real-time control over many of these newly supported functions and parameters.
What It Can Do
Here are a few application ideas on how you can use the CBX-K1. The list below is not comprehensive, but is meant to be a general guide to the possibilities and provide a starting point or springboard for your own creative ideas and explorations.
● Using With a MIDI Tone Generator
In one of the most basic setups, you can play a connected tone generator from the CBX-K1. Because it’s so compact and portable, you can even use it as a hand-held keyboard for live performance.
● Using as a Second Keyboard or Dedicated
MIDI Controller
The CBX-K1 is small enough to fit on top of nearly any keyboard, making it perfect as a second keyboard. Since the CBX-K1 has a MIDI IN terminal, you can connect it between your main keyboard and your tone generator, and use the extensive MIDI capabilities of the CBX-K1 for greater expressive control during your performance.
● Using in a MIDI Music System
Combined with a laptop computer and a compact tone generator (like the General MIDI/XG-compatible Yamaha MU80), the CBX-K1 gives you comprehensive music making power — for recording, composing, arranging, practicing, and editing — in a portable system that’s ready to go wherever you go. The CBX-K1 is an ideal addition to larger MIDI studios as well, since it provides far greater MIDI control and flexibility than nearly any other keyboard controller. Use it along side your main MIDI keyboard as a kind of MIDI Swiss army knife — sending necessary MIDI messages, working the real-time controllers, or editing already recorded sequencer tracks.
● Multimedia
Since it’s portable and compatible with the General MIDI and XG formats, the CBX-K1 is a natural for multimedia applications. Because of its ease of use and comprehensive functions, it’s the only keyboard you’ll ever need for recording and editing MIDI data on your multimedia creations.
1

Precautions
Your CBX-K1 will give you years of reliable service if you follow the simple precautions below:
● LOCATION
Keep the instrument away from locations where it is likely to be exposed to high temperatures (such as direct sunlight) or humidity. Also avoid locations which are subject to excessive dust accumulation or vibration which could damage the instrument.
● USE THE CORRECT POWER ADAPTOR
Use only the recommended PA-1B or PA-3 Power Adaptor for supplying power. Use of another adaptor may cause serious damage to the instrument or the adaptor itself. Also avoid using a multiple-plug adaptor; plug the adaptor directly into a wall outlet.
● MAKE SURE POWER IS OFF WHEN MAKING
OR REMOVING CONNECTIONS
To prevent damage to the instrument and other connected equipment, always turn off the power prior to connecting or disconnecting cables. Also, turn the power off when the instrument is not in use, and disconnect the power adaptor during electric storms.
● NO MEMORY BACKUP
The CBX-K1 has no internal memory backup. As a result, all settings are returned to the factory default when turning the power off.
● HANDLE THE INSTRUMENT WITH CARE
Although the instrument has been constructed to withstand the rigors of normal use for optimum sturdiness and reliability, avoid subjecting it to strong physical shocks (such as dropping or hitting it). Since the CBX-K1 is a precision-made electronic device, also avoid applying excessive force to the various controls. When moving the instrument, first unplug the power adaptor and all other cables to prevent damage to cords and jacks. Always unplug cables by gripping the plug firmly, not by pulling on the cable.
● CLEAN WITH A SOFT, DRY CLOTH
Never use solvents such as benzine or thinner to clean the instrument, since these will damage the cabinet finish or dull the keys. Wipe clean with a soft, dry cloth. If necessary, use a soft, clean, slightly moistened cloth — making sure to wipe the instrument off again with a dry cloth. Do not leave vinyl on the panel as this may stick to and discolor the surface.
● ELECTROMAGNETIC INTERFERENCE
Avoid using the unit near televisions, radios or other equipment generating electromagnetic fields. Proximity to such equipment may cause the unit to malfunction, and may generate interference noise in the other appliance as well.
● DO NOT OPEN THE CASE OR TRY REPAIRING
THE INSTRUMENT YOURSELF
The instrument contains no user-serviceable parts. Never open the case or tamper with the internal circuitry in any way, since doing so may result in damage to the instrument. Refer all servicing to qualified Yamaha service personnel.
● MIDI CABLES
When connecting the instrument to other MIDI equipment, be sure to use only high-quality cables made especially for MIDI data transmission. Also, avoid using cables longer than 15 meters, since long cables can result in data errors.
Yamaha is not responsible for damage caused by improper handling or operation.
2

How to Use This Manual
By and large, the CBX-K1 is very easy to use and this manual is self-explanatory. However, we strongly recommend that you take time to read the manual — especially before trying some of the more sophisticated MIDI functions. Read through all of the initial sections first, then go on to the “Guided Tour” to set up your CBX-K1, learn how to use its various functions, and try out some of the practical application examples to help you become more familiar with its operations. For those who need to delve deeper, the “Reference” section provides at-a-glance information and important details on all functions.
The following conventions are used throughout this manual:
*Panel buttons and controls are indicated as they appear on the actual instrument. (For example, Cand
M.
*The functions and features assigned to the keyboard are shown like this: Tand {.
*Unless indicated otherwise, Lrefers to either of the ENTER keys, Jor K. However, when you wish to enter a decimal value, make sure to press K. Likewise, when entering a hexadecimal number, make sure to press J.
*Actual MIDI data messages (in hexadecimal) are indicated as follows: <<FE>> and <<En 00 40>>, etc.
*Operation steps are indicated as follows:
Example |
|
Actual Operation |
|
|
|
C+ E |
|
While holding down the Cbutton, press E(D2). |
|
|
|
C+ U→ |
L |
While holding down the Cbutton, first press U(Fm2), then press |
|
|
L (either Jor K). |
|
|
|
Specifications
● Keyboard
37 mini key keyboard (C2-C5), velocity responsive
● Functions
Basic: Octave Shift (+/- 4 octaves), Pitch Bend, Assignable control, MIDI Merge (MIDI IN)
MIDI Data: Sequencer control, MIDI clock, Bank Select,
Program Change, GM System On, XG System On,
GM-B Reset, Control Change, All Sound Off, Reset All Controllers, and others
Assignable Parameters: Transpose (+/- 12 semitones), MIDI
Transmit Channel, Fixed Velocity, Touch Sensitivity, Device Number, Merge On/Off (each channel)
● Panel Controls and Indicators
SHIFT button, OCTAVE SHIFT Q/W buttons and lamps, PITCH Wheel, ASSIGNABLE Wheel, POWER ON/OFF switch
●Input/Output Terminals
MIDI IN, MIDI OUT, DC IN
●Power Supply
Yamaha PA-3 or PA-1B AC Power Adaptor (sold separately), or six “AA” size, SUM-3, R-6 or equivalent batteries (sold separately).
● Power Consumption
Approximately 35 mA (with battery use); approximately 2 W
(with AC adaptor use).
● Dimensions (W x D x H)
509 x 155 x 55 mm (20-1/16” x 6-1/8” x 2-3/16”)
● Weight (without batteries)
1.3 kg (2 lbs., 14 oz.)
3

Panel Controls and Terminals
■ Front Panel
|
w |
|
|
e |
|
|
|
|
|
|
|
|
|
|
|
|
|
|
|
|
|
u |
|
|
|
|
|
|
|
|
|
|
|
|
|
|
|
|
|
|
|
|
|
|
|
|
|
|
|
|
|
|
|
|
|
|
|
|
|
|
|
|
|||||
|
|
|
|
|
|
|
|
|
|
|
|
|
|
|
|
|
|
|
|
|
|
|
|
|
|
|
|
|
|
|
|
|
|
|
|
|
|
|
|
IN |
|
MIDI |
|
OUT |
|
|
|
|
|
DC |
IN |
|
POWER ON |
OFF |
|
|
|
|
|
|
|
|
|
|
|
|
|
|
|
|
|
|
|
|
|
|
|
|
|
|
|
|
|
|
|
|
|
|
|
|
|
|
|
|
|
|
|
|
|
|
|
|
|
|
|
|
|
|
|
|
|
|
|
|
|
|
|
|
|
|
|
|
|
|
|
|
|
|
|
|
|
|
|
||
|
|
|
|
|
|
|
|
|
CONTROLLER NUMBER |
LIST |
|
|
|
|
|
|
|
|
|
|
|
|
|
|
|
|
|
|
|
|
|
|
|
|
|
|
|
|
|
|
|
|
|
|
|
|
|
|
|
|
|
|
|
|
|
|
|
|
|
|
|||||||
|
|
|
|
|
|
|
|
|
|
CONTROL |
CHANGE |
11 |
EXPRESSION |
73 |
ATTACK TIME |
|
|
|
|
(RPN) |
|
|
126 |
FILTER CUTOFF FREQUENCY |
|
|
|
134 |
DRUM EG DECAY RATE |
|
|
|
|
OTHERS |
|
|
|
|
|
|
|
|
|
|
|||||||||||||||||||||||
|
|
|
|
|
|
|
|
1 |
MODULATION |
DEPTH |
|
|
|
|
|
|
|
|
|
|
|
142 |
CHANNEL PRESSURE |
|
|
|
|
|
|
|
|
|
|
||||||||||||||||||||||||||||||||||
|
|
|
|
|
|
|
|
2 |
BREATH CONTROL |
64 |
HOLD1(DAMPER) |
74 |
BRIGHTNESS |
120 |
PITCH BEND SENSITIVITY |
|
|
127 |
FILTER RESONANCE |
|
|
|
135 |
DRUM PITCH COARSE |
|
|
143 |
POLYPHONIC KEY PRESSURE |
|
|
|
|
|
|
|
|
|
|
|||||||||||||||||||||||||||||
|
|
|
|
|
|
|
|
4 |
FOOT CONTROL |
65 |
PORTAMENTO |
84 |
PORTAMENTO CONTROL |
121 |
FINE TUNING |
|
|
128 |
EG ATTACK TIME |
|
|
|
136 |
DRUM PITCH FINE |
|
|
144 |
MASTER VOLUME |
|
|
|
|
|
|
|
|
|
|
|||||||||||||||||||||||||||||
|
|
|
|
|
|
|
|
5 |
PORTAMENTO TIME |
66 |
SOSTENUTO(CHORD HOLD) |
91 |
REVERB DEPTH |
122 |
COARSE TUNING |
|
129 |
EG DECAY TIME |
|
|
|
137 |
DRUM LEVEL |
|
|
145 |
MASTER BALANCE |
|
|
|
|
|
|
|
|
|
|
||||||||||||||||||||||||||||||
|
|
|
|
|
|
|
|
6 |
DATA ENTRY |
|
67 |
SOFT PEDAL |
92 |
TREMOLO DEPTH |
|
|
|
|
(NRPN) |
|
|
130 |
EG RELEASE TIME |
|
|
|
138 |
DRUM PAN |
|
|
146 |
MASTER TUNING |
|
|
|
|
|
|
|
|
|
|
|||||||||||||||||||||||||
|
|
|
|
|
|
|
|
7 |
MAIN VOLUME |
69 |
HOLD2 (FREEZE) |
93 |
CHORUS DEPTH |
123 |
VIBRATO RATE |
|
|
131 |
DRUM FILTER CUTOFF FREQUENCY |
|
139 |
DRUM REVERB DEPTH |
|
|
147 |
VELOCITY |
|
|
|
|
|
|
|
|
|
|
|||||||||||||||||||||||||||||||
|
PITCH |
ASSIGNABLE |
8 |
BALANCE CONTROL |
71 |
HARMONIC CONTENT |
94 |
VARIATION DEPTH |
124 |
VIBRATO DEPTH |
|
|
132 |
DRUM FILTER RESONANCE |
|
|
|
140 |
DRUM CHORUS DEPTH |
|
|
148 |
TEMPO |
|
|
|
|
MIDI KEYBOARD CBX-K1 |
|
|
|||||||||||||||||||||||||||||||||||||
|
|
|
|
|
|
|
|
10 |
PANPOT |
|
72 |
RELEASE TIME |
95 |
PHASER DEPTH |
125 |
VIBRATO DELAY |
|
|
133 |
DRUM EG ATTACK RATE |
|
|
|
141 |
DRUM VARIATION DEPTH |
|
|
|
|
|
|
|
|
|
|
|
|
|
|
|
|
||||||||||||||||||||||||||
r y t
SEQUENCER |
PROGRAM |
RESET |
SYSTEM |
WHEEL ASSIGN |
TRANSPOSE |
ENTER |
SHIFT |
|
|
|
|
BANK |
|
PROGRAM |
|
GM |
|
SOUND |
|
XG |
|
MERGE |
|
MIDI |
|
FIXED |
|
|
|
DRUM |
|
|
|
|
|
|
|
|
|
|
|
|
|
|
|
|
|
HEXA |
|
STOP |
CONTINUE |
START |
TEMPO |
SELECT |
|
CHANGE |
|
ON |
|
OFF |
|
ON |
|
ON/OFF |
|
CH |
|
VELOCITY |
RPN |
CONTROLLER |
NRPN |
NUMBER |
|
1 |
2 |
3 |
4 |
5 |
6 |
7 |
8 |
9 |
A |
B |
C |
D |
E |
F |
0 |
DECIMAL |
DECIMAL |
|
OCTAVE |
|
|
|
|
|
|
|
|
|
|
|
|
|
|
|
|
|
|
|
|
|
|
|
|
|
|
|
|
|
|
|
|
|
|
|
|
|
|
|
|
|
|
OCTAVE SHIFT |
|
|
|
|
|
|
|
|
|
|
|
|
|
|
|
|
|
|
|
|
|
|
|
|
|
|
|
|
|
|
|
|
|
|
|
|
|
|
|
|
|
|
OCTAVE |
|
RESET |
|
q
q Keyboard
The CBX-K1 has a 37-key, 3-octave keyboard (C2 to C5), featuring initial touch (velocity) control. All note on, note off and velocity data is transmitted via the MIDI OUT terminal. When used with the Cbutton, the keys are used for changing various settings and sending special MIDI messages. (See page 12.)
About the Functions of the CBX-K1: The functions are divided into two groups: Group A and Group B. The Group A functions are shown on the panel, above the left section of the keyboard. The Group B functions are “hidden” and are listed on pages 12 and 20. Several functions can be used by pressing only the relevant key; in other words, pressing Lis not necessary. These functions, such as Sequencer Stop and Start, are shown on the panel without underline. The right section of the keyboard serves as value entry and is used for those functions whose names are underlined on the panel and require value entry, such as Program Change and Tempo. Functions whose names appear with a dashed underline on the panel (for example, GM ON and XG ON) require pressing L. Value entry on the CBXK1 can be done in two number systems: Decimal and Hexadecimal. The keys labeled A through F are for Hexadecimal entry.
NOTE ■ The normal (default) velocity range of the CBX-K1 is from 16 to 127. The range differs according to the Touch Sensitivity setting (see page 20).
w PITCH Wheel (Pitch Bend)
This spring-loaded Wheel controls Pitch Bend. The Wheel’s operation can be reversed. (See page 20.)
e ASSIGNABLE Wheel
When the CBX-K1 is turned on, this Wheel (with center detent) is set to control Modulation Depth on the connected MIDI device. It can be set to control other functions; see pages 18 and 22 for details. The Wheel’s operation can be reversed. (See page 20.)
r CButton
This button is used to access the “hidden” functions of the CBX-K1. Used with the N/ Mbuttons, it allows you to step up or down through program numbers. (See page 10.) Used with the keys of the keyboard, it allows you to access the sophisticated MIDI control functions. (See page 12.)
t N/ MButtons
These buttons are used to change the octave range of the keyboard, allowing you to play across the entire range of MIDI notes (C-2 to G8). (See page 5.) Press both of these buttons together to restore the normal octave setting (C2 to C5). With the Cbutton, these buttons can also be used to step up or down through program numbers on the connected MIDI device. (See page 10.)
4

Panel Controls and Terminals
y V/ BLamps |
u CONTROLLER NUMBER LIST |
These lamps provide several indications: |
This shows the controller numbers that can be used with the |
* During normal playing conditions, these indicate the |
ASSIGNABLE Wheel. (See page 22.) |
octave setting of the keyboard, up (B) or down |
|
(V). Both light together for the normal octave |
|
setting. When changing the octave setting, these flash |
|
to indicate the number of octaves, up or down. (See |
|
page 11.) |
|
*When using some of the “hidden” functions, these flash when a MIDI message is transmitted or when a function is executed.
*The left lamp flashes slowly when the battery power is too low for proper operation.
*The right lamp flashes quickly when there is some kind of MIDI receive error. The lamp flashes until you turn the power off and on again, or until you set MIDI Merge to ON. (See page 24.)
● Note Range of the CBX-K1 (with Octave Shift )
Middle C
(C3 or MIDI note number 60)
|
|
|
|
|
|
|
|
|
|
|
|
|
|
|
|
|
|
|
|
|
|
|
|
|
|
|
|
|
|
|
|
|
|
|
|
|
|
|
|
|
|
|
|
|
|
|
|
|
|
|
|
|
|
|
|
|
|
|
|
|
|
|
|
|
|
|
|
|
|
|
|
|
|
|
|
|
|
|
|
|
|
|
|
|
|
|
|
|
|
|
|
|
|
|
|
|
|
|
|
|
|
|
|
|
|
|
|
|
|
|
|
|
|
|
|
|
|
|
|
|
|
|
|
|
|
|
|
|
|
|
|
|
|
|
|
|
|
|
|
|
|
|
|
|
|
|
|
|
|
|
|
|
|
|
|
|
|
|
|
|
|
|
|
|
|
|
|
|
|
|
|
|
|
|
|
|
|
|
|
|
|
|
|
|
|
|
|
|
|
|
|
|
|
|
|
|
|
|
|
|
|
|
|
|
|
|
|
|
|
|
|
|
|
|
|
|
|
|
|
|
|
|
|
|
|
|
|
|
|
|
C-2 |
|
|
|
|
C-1 |
|
|
|
|
C0 |
|
|
|
|
C1 |
|
|
|
|
C2 |
|
|
|
|
C3 |
|
|
|
|
C4 |
|
|
C5 |
|
|
|
|
C6 |
|
|
|
|
C7 |
|
|
|
|
C8 |
|
G8 |
|
|||||||||||||||||||||||||
(0) |
|
(12) |
|
(24) |
|
(36) |
|
(48) |
|
(60) |
|
(72) |
|
|
|
(84) |
|
(96) |
|
(108) |
|
(120) |
|
(127) |
|
|
||||||||||||||||||||||||||||||||||||||||||||||||||
|
|
|
|
|
|
|
|
|
|
|
|
|
|
|
|
|
|
|
|
|
|
|
|
|
|
|
|
|
|
|
|
|
|
|
|
|
|
|
|
|
|
|
|
|
|
|
|
|
|
|
|
|
|
|
|
|
|
|
|
|
|
|
|
|
|
|
|
|
||||||||
|
|
|
|
|
|
|
|
|
|
|
|
|
|
|
|
|
|
|
|
|
|
|
|
|
|
|
|
|
|
|
|
|
|
|
|
|
|
|
|
|
|
|
|
|
|
|
|
|
|
|
|
|
|
|
4 octaves up |
|
|
|
|
|
||||||||||||||||
|
|
|
|
|
|
|
|
|
|
|
|
|
|
|
|
|
|
|
|
|
|
|
|
|
|
|
|
|
1 octave down |
|
|
|
|
|
|
|
|
|
|
|
|
|
|
|
|
|
|
|
|
|
|
|
|
|
|
|
|
|
|
|||||||||||||||||
|
|
|
|
|
|
|
|
|
|
|
|
|
|
|
|
|
|
|
|
|
|
|
|
|
|
|
|
|
|
|
|
|
|
|
|
|
|
|
|
|
|
|
|
|
|
|
|
|
|
|
|
|
|
|
|
|
|
|
||||||||||||||||||
|
|
|
|
|
|
|
|
|
|
|
|
|
|
|
|
|
|
|
|
|
|
|
|
|
|
|
|
|
|
|
|
|
|
|
|
|
|
|
|
|
|
|
|
|
|
|
|
|
|
|
|
|
|
|
|
|
|
|
|
|||||||||||||||||
|
|
|
|
|
|
|
|
|
|
|
|
|
|
|
|
|
|
|
|
|
|
|
|
|
|
|
|
|
|
|
|
|
|
|
|
|
|
|
|
|
|
|
|
|
|
|
|
3 octaves up |
|
|
|
|
|
|
|
|
|
|
|
|||||||||||||||||
|
|
|
|
|
|
|
|
|
|
|
|
|
|
|
|
|
|
|
|
|
2 octaves down |
|
|
|
|
|
|
|
|
|
|
|
|
|
|
|
|
|
|
|
|
|
|
|
|
|
|
|
|
|
|
|
|
|
|
|
|
|
||||||||||||||||||
|
|
|
|
|
|
|
|
|
|
|
|
|
|
|
|
|
|
|
|
|
|
|
|
|
|
|
|
|
|
|
|
|
|
|
|
|
|
|
|
|
|
|
|
|
|
|
|
|
|
|
|
|
|
|
|
|
|
|||||||||||||||||||
|
|
|
|
|
|
|
|
|
|
|
|
|
|
|
|
|
|
|
|
|
|
|
|
|
|
|
|
|
|
|
|
|
|
|
|
|
|
|
|
|
|
|
|
|
|
|
|
|
|
|
|
|
|
|
|
|
|
|
||||||||||||||||||
|
|
|
|
|
|
|
|
|
|
|
|
|
|
|
|
|
|
|
|
|
|
|
|
|
|
|
|
|
|
|
|
|
|
|
|
|
|
|
|
|
|
2 octaves up |
|
|
|
|
|
|
|
|
|
|
|
|
|
|
|
|
|
|
||||||||||||||||
|
|
|
|
|
|
|
|
|
|
|
|
|
|
3 octaves down |
|
|
|
|
|
|
|
|
|
|
|
|
|
|
|
|
|
|
|
|
|
|
|
|
|
|
|
|
|
|
|
|
|
|
|
|
|
|
|
|
|
|
|
|
|
|||||||||||||||||
|
|
|
|
|
|
|
|
|
|
|
|
|
|
|
|
|
|
|
|
|
|
|
|
|
|
|
|
|
|
|
|
|
|
|
|
|
|
|
|
|
|
|
|
|
|
|
|
|
|
|
|
|
|
|
|
|
|
|
||||||||||||||||||
|
|
|
|
|
|
|
|
|
|
|
|
|
|
|
|
|
|
|
|
|
|
|
|
|
|
|
|
|
|
|
|
|
|
|
|
|
|
|
|
|
|
|
|
|
|
|
|
|
|
|
|
|
|
|
|
|
|
|
|
|||||||||||||||||
|
|
|
|
|
|
|
|
|
|
|
|
|
|
|
|
|
|
|
|
|
|
|
|
|
|
|
|
|
|
|
|
|
|
|
1 octave up |
|
|
|
|
|
|
|
|
|
|
|
|
|
|
|
|
|
|
|
|
|
|
|
|
|
||||||||||||||||
|
|
|
|
|
|
|
4 octaves down |
|
|
|
|
|
|
|
|
|
|
|
|
|
|
|
|
|
|
|
|
|
|
|
|
|
|
|
|
|
|
|
|
|
|
|
|
This section is outside the |
||||||||||||||||||||||||||||||||
|
|
|
|
|
|
|
|
|
|
|
|
|
|
|
|
|
|
|
|
|
|
|
|
|
|
|
|
|
|
|
|
|
|
|
|
|
|
|
|
|
|
|
||||||||||||||||||||||||||||||||||
|
|
|
|
|
|
|
|
|
|
|
|
|
|
|
|
|
|
|
|
|
|
|
|
|
|
|
|
|
|
|
|
|
|
|
|
|
|
|
|
|
|
|
|
|
|
|
|
|
|
|
|
|
|
|
|
|
|
|
|
|
||||||||||||||||
|
|
|
|
|
|
|
|
|
|
|
|
|
|
|
|
|
|
|
|
|
|
|
|
|
|
|
|
|
|
|
|
|
|
|
|
|
|
|
|
|
|
|
|
|
|
|
|
|
|
|
|
|
|
|
|
|
|
|
|
|
||||||||||||||||
|
|
|
|
|
|
|
|
|
|
|
|
|
|
|
|
|
|
|
|
|
|
|
|
|
|
|
|
|
|
|
|
|
|
Normal octave range |
|
|
|
|
|
|
|
|
|
|
|
|
|
|
||||||||||||||||||||||||||||
|
|
|
|
|
|
|
|
|
|
|
|
|
|
|
|
|
|
|
|
|
|
|
|
|
|
|
|
|
|
|
|
|
|
|
|
|
|
|
|
|
|
|
|
|
|
|
|
“legal” MIDI range and plays |
||||||||||||||||||||||||||||
|
|
|
|
|
|
|
|
|
|
|
|
|
|
|
|
|
|
|
|
|
|
|
|
|
|
|
|
|
|
|
|
(default: when power is turned on) |
|
|
|
|
|
|
|
|
|
|
|
|
|
|
||||||||||||||||||||||||||||||
|
|
|
|
|
|
|
|
|
|
|
|
|
|
|
|
|
|
|
|
|
|
|
|
|
|
|
|
|
|
|
|
|
|
|
|
|
|
|
|
|
|
|
|
|
|
notes G m4 (80) through C5 |
||||||||||||||||||||||||||||||
|
|
|
|
|
|
|
|
|
|
|
|
|
|
|
|
|
|
|
|
|
|
|
|
|
|
|
|
|
|
|
|
|
|
|
|
|
|
|
|
|
|
|
|
|
|
|
|
|
|
|
|
|
|
|
|
|
|
|
|
|
||||||||||||||||
|
|
|
|
|
|
|
|
|
|
|
|
|
|
|
|
|
|
|
|
|
|
|
|
|
|
|
|
|
|
|
|
|
|
|
|
|
|
|
|
|
|
|
|
|
|
|
|
|
|
|
|
|
|
|
|
|
|
|
|
|
||||||||||||||||
|
|
|
|
|
|
|
|
|
|
|
|
|
|
|
|
|
|
|
|
|
|
|
|
|
|
|
|
|
|
|
|
|
|
|
|
|
|
|
|
|
|
|
|
|
|
|
|
|
|
|
|
|
|
|
|
|
|
|
(84). |
|
|
|
|
|
|
|
|
|
|
|
|
|
||||
5
Panel Controls and Terminals
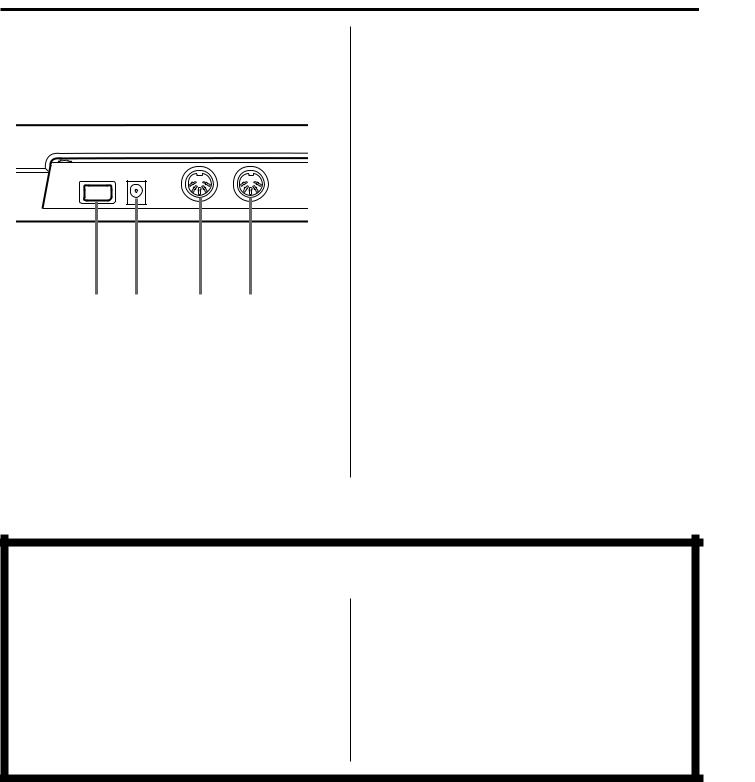
■ Rear Panel
POWER ON |
> OFF |
? |
DC IN |
OUT |
MIDI |
IN |
i o !0 !1
i POWER Switch
Push this switch in to turn on the power. Each time the power is turned on, the CBX-K1 returns to the default condition. (See boxed section below.)
o DC IN Terminal
This is for connection to an optional PA-1B or PA-3 AC power adaptor.
!0MIDI OUT Terminal
This is for connection to the MIDI IN terminal of another MIDI device (such as a MIDI tone generator, sequencer or computer that has a MIDI interface), for sending MIDI messages to that device. By using the MIDI Merge function, data received at MIDI IN can be combined with the data generated by the CBX-K1 and transmitted via this terminal.
!1MIDI IN Terminal
This is for connection to the MIDI OUT terminal of another MIDI device (such as a MIDI keyboard, sequencer or computer that has a MIDI interface), for input of that device’s data. By using the MIDI Merge function, that data can be combined with the data generated by the CBX-K1 and transmitted via the MIDI OUT terminal.
■ Default Settings of the CBX-K1
The CBX-K1 has no internal memory backup. As a result, all settings are returned to the factory default when turning the power off. The basic factory default settings are listed below.
*MIDI transmit channel: 1
*Octave range: C2-C5
*Transpose: normal (no transposition)
*Fixed velocity: Off (keyboard is velocity sensitive)
*ASSIGNABLE Wheel: Modulation
● User-configurable Defaults:
You can change certain power-on default settings of the CBX-K1. These include:
*Reversing the PITCH Wheel and ASSIGNABLE Wheel operation. Hold down Nand turn the power on. (See page 20.)
*Reversing the MSB, LSB order. Hold down Mand turn the power on. (See page 20.)
6
 Loading...