


AC Submersible Pump Motors
Installation & Operating Manual
4/09 MN414

Any trademarks used in this manual are the property of their respective owners.

Table of Contents
Section 1
General Information 1−1. . . . . . . . . . . . . . . . . . . . . . . . . . . . . . . . . . . . . . . . . . . . . . . . . . . . . . . . . . . . . . . . . . . . . . . . . . . . . . .
Overview 1−1. . . . . . . . . . . . . . . . . . . . . . . . . . . . . . . . . . . . . . . . . . . . . . . . . . . . . . . . . . . . . . . . . . . . . . . . . . . . . . . . . . . . .
Limited Warranty 1−1. . . . . . . . . . . . . . . . . . . . . . . . . . . . . . . . . . . . . . . . . . . . . . . . . . . . . . . . . . . . . . . . . . . . . . . . . . . . . . .
Safety Notice 1−1. . . . . . . . . . . . . . . . . . . . . . . . . . . . . . . . . . . . . . . . . . . . . . . . . . . . . . . . . . . . . . . . . . . . . . . . . . . . . . . . . .
Receiving 1−2. . . . . . . . . . . . . . . . . . . . . . . . . . . . . . . . . . . . . . . . . . . . . . . . . . . . . . . . . . . . . . . . . . . . . . . . . . . . . . . . . . . . .
Handling 1−2. . . . . . . . . . . . . . . . . . . . . . . . . . . . . . . . . . . . . . . . . . . . . . . . . . . . . . . . . . . . . . . . . . . . . . . . . . . . . . . . . . . . . .
Section 2
Installation & Operation 2−1. . . . . . . . . . . . . . . . . . . . . . . . . . . . . . . . . . . . . . . . . . . . . . . . . . . . . . . . . . . . . . . . . . . . . . . . . . .
Overview 2−1. . . . . . . . . . . . . . . . . . . . . . . . . . . . . . . . . . . . . . . . . . . . . . . . . . . . . . . . . . . . . . . . . . . . . . . . . . . . . . . . . . . . .
Installation 2−2. . . . . . . . . . . . . . . . . . . . . . . . . . . . . . . . . . . . . . . . . . . . . . . . . . . . . . . . . . . . . . . . . . . . . . . . . . . . . . . . . . . .
Grounding 2−3. . . . . . . . . . . . . . . . . . . . . . . . . . . . . . . . . . . . . . . . . . . . . . . . . . . . . . . . . . . . . . . . . . . . . . . . . . . . . . . . . . . .
Operation 2−6. . . . . . . . . . . . . . . . . . . . . . . . . . . . . . . . . . . . . . . . . . . . . . . . . . . . . . . . . . . . . . . . . . . . . . . . . . . . . . . . . . . . .
Table of Contents iMN414

Section 1
General Information
ii Table of Contents MN414

Section 1
General Information
Overview This manual contains general procedures that apply to Baldor Reliance Motor products. Be sure to read
and understand the Safety Notice statements in this manual. For your protection, do not install, operate
or attempt to perform maintenance procedures until you understand the Warning and Caution
statements.
A Warning statement indicates a possible unsafe condition that can cause harm to personnel.
A Caution statement indicates a condition that can cause damage to equipment.
Important: This instruction manual is not intended to include a comprehensive listing of all details for all
procedures required for installation, operation and maintenance. This manual describes general
guidelines that apply to most of the motor products. If you have a question about a procedure or
are uncertain about any detail, Do Not Proceed. Please contact your Baldor District Office for
more information or clarification.
Before you install, operate or perform maintenance, become familiar with the following:
NEMA Publication MG-2, Safety Standard for Construction and guide
for Selection, Installation and Use of Electric Motors and Generators.
The National Electrical Code
Local codes and Practices
Limited Warranty
www.baldor.com/support/warranty_standard.asp
Safety Notice: This equipment contains high voltage! Electrical shock can cause serious or fatal injury. Only qualified
personnel should attempt installation, operation and maintenance of electrical equipment.
Be sure that you are completely familiar with NEMA publication MG-2, safety standards for construction and
guide for selection, installation and use of electric motors and generators, the National Electrical Code and
local codes and practices. Unsafe installation or use can cause conditions that lead to serious or fatal injury.
Only qualified personnel should attempt the installation, operation and maintenance of this equipment.
WARNING: The Adjustable Speed Controller may apply hazardous voltages to the motor leads after power to
the controller has been turned off. Verify that the controller is incapable of delivering hazardous
voltages and that the voltage at the motor leads is zero before proceeding. Failure to observe this
precaution may result in severe bodily injury or death.
WARNING: Do not touch electrical connections before you first ensure that power has been disconnected.
Electrical shock can cause serious or fatal injury. Only qualified personnel should attempt the
installation, operation and maintenance of this equipment.
WARNING: Be sure the system is properly grounded before applying power. Do not apply AC power before
you ensure that all grounding instructions have been followed. Electrical shock can cause
serious or fatal injury. National Electrical Code and Local codes must be carefully followed.
WARNING: Avoid extended exposure to machinery with high noise levels. Be sure to wear ear protective
devices to reduce harmful effects to your hearing.
WARNING: Surface temperatures of motor enclosures may reach temperatures which can cause discomfort
or injury to personnel accidentally coming into contact with hot surfaces. Protection should be
provided by the user to protect against accidental contact with hot surfaces. Failure to observe
this precaution could result in bodily injury.
WARNING: This equipment may be connected to other machinery that has rotating parts or parts that are
driven by this equipment. Improper use can cause serious or fatal injury. Only qualified
personnel should attempt to install operate or maintain this equipment.
WARNING: Do not by-pass or disable protective devices or safety guards. Safety features are designed to
prevent damage to personnel or equipment. These devices can only provide protection if they
remain operative.
WARNING: Avoid the use of automatic reset devices if the automatic restarting of equipment can be
hazardous to personnel or equipment.
WARNING: Be sure the load is properly coupled to the motor shaft before applying power. The shaft key
must be fully captive by the load device. Improper coupling can cause harm to personnel or
equipment if the load decouples from the shaft during operation.
WARNING: Use proper care and procedures that are safe during handling, lifting, installing, operating and
maintaining operations. Improper methods may cause muscle strain or other harm.
General Information 1−1MN414

Section 1
General Information
Safety Notice Continued
WARNING: Pacemaker danger − Magnetic and electromagnetic fields in the vicinity of current carrying
carrying conductors and permanent magnet motors can result result in a serious health hazard to
persons with cardiac pacemakers, metal implants, and hearing aids. To avoid risk, stay way from
the area surrounding a permanent magnet motor.
WARNING: Incorrect motor rotation direction can cause serious or fatal injury or equipment damage. Be sure
to verify motor rotation direction before coupling the load to the motor shaft.
WARNING: Do not use non UL/CSA listed explosion proof motors in the presence of flammable or
combustible vapors or dust. These motors are not designed for atmospheric conditions that
require explosion proof operation.
WARNING: Motors that are to be used in flammable and/or explosive atmospheres must display the UL label
on the nameplate along with CSA listed logo. Specific service conditions for these motors are
defined in NFPA 70 (NEC) Article 500.
WARNING: UL Listed motors must only be serviced by UL Approved Authorized Baldor Service Centers if
these motors are to be returned to a hazardous and/or explosive atmosphere.
WARNING: Thermostat contacts automatically reset when the motor has slightly cooled down. To prevent
injury or damage, the control circuit should be designed so that automatic starting of the motor is
not possible when the thermostat resets.
Caution: To prevent equipment damage, be sure that the electrical service is not capable of delivering more
than the maximum motor rated amps listed on the rating plate.
Caution: If a HI POT test (High Potential Insulation test) must be performed, follow the precautions and
procedure in NEMA MG1 and MG2 standards to avoid equipment damage.
Caution: Never raise or lower the motor/pump by the power cords. Use lifting eyes provided in the motor
casting (opposite drive end) and attache a cord/cable to lift the weight of the motor and pump.
Failure to lift this motor properly may seriously damage the lead connections and water seals and
seriously damage the motor.
If you have any questions or are uncertain about any statement or procedure, or if you require additional
information please contact your Baldor District Office or an Authorized Baldor Service Center.
Receiving
Handling
Caution: Never raise or lower the motor/pump by the power cords. Use lifting eyes provided in the motor
Each BaldorSReliance Motor is thoroughly tested at the factory and carefully packaged for shipment.
When you receive your motor, there are several things you should do immediately.
1. Observe the condition of the shipping container and report any damage immediately to the
commercial carrier that delivered your motor.
2. Verify that the part number of the motor you received is the same as the part number listed on your
purchase order.
The motor must be stored shaft down in its’ original packaging until it is to be into service. The motor
should only be lifted using the lifting eyes provided, see Figure 2-1.
casting (opposite drive end) and attach a cord/cable to lift the weight of the motor and pump.
Failure to lift this motor properly may seriously damage the lead connections and water seals and
seriously damage the motor.
1. Only use the lifting eyes provided to lift the motor. Never attempt to lift the motor by the power cords.
2. Be sure the motor is stored shaft down until ready to install.
1−2 General Information MN414

Section 2
Installation & Operation
Overview
Installation should conform to the National Electrical Code as well as local codes and practices.
All Baldor
Reliance Submersible Pump Motors Include thermal devices as standard.
Normally, there are four conditions during which a submersible sewage pump may be operated in gases
or vapors.
1. When the wet well is being dewatered.
2. When the pump motor assembly is being lowered down the guide rails.
The flow from the pump is needed during the installation process to ensure that solids are cleared
from the discharge flange area to ensure proper seating.
3. When low−level cutoff controls fail.
4. When low−level sensors are positioned at the bottom of the pump assembly.
Continuous Operation Gasses Or Vapors
Be sure you have selected the correct motor for your application. The horsepower rating of the motor is
determined by the pump design, impeller size & head and flow conditions.
Operating time is a function of pit size, pump capacity, and flow conditions. Only the pump manufacturer
can ensure that the pump motor is properly applied for continuous in−gas or vapor operation. As with any
motor product, it is essential that proper consideration be given to the load characteristics to ensure the
motor will not be overloaded. Should such an overload occur, thermostats embedded in the windings will
provide a signal to deenergize the motor. However, proper consideration of the application will prevent
such an overload.
Caution: Lift using Lift Eyes only. Lifting by power cords will cause motor damage. Use spreader bar to
evenly distribute lift force. Angle of lift rope (no spreader bar) should not exceed 45
from vertical,
excessive lift angle can damage motor.
Figure 2-1
Alternate Method if Water Jacket equipped
Do not lift submersible motor by the water
jacket.
Use lifting straps at front and back end
brackets as shown.
Water Jacket
Level 2
Level 1
Below Level 1
45°
Maximum
Lift Methods
Preferred Lift
Method
Spreader
Bar
Lift Eye
Pump
Motor
The following load conditions should be noted, refer to Figure 2-1:
1. Below Level 1 (below the pump) fluid is not pumped and no load is reflected to the motor.
2. One pump should always be sized sufficiently large to draw the well down (even under maximum flow
conditions). The maximum amount of time the motor will operate fully loaded and uncovered is the
amount of time required to draw the well down from Level 2 (top of the motor) to the bottom of the
pump.
3. Time described in 2 should not be greater than 15 minutes.
4. These notes do not make allowance for the following:
a. The heat exchanger effect of the attached pump. It is pumping a relatively cool fluid and will
remove some heat.
b. The motor does not operate fully loaded completely in gas. It is fully loaded as the motor is being
uncovered.
c. !f the well is being drawn down from the top of the motor and the maximum flow conditions exist,
the influent flow will usually provide excellent cooling of the pump motor.
Installation & Operation 2−1MN414

WARNING: Do not touch electrical connections before you first ensure that power has been disconnected.
Electrical shock can cause serious or fatal injury. Only qualified personnel should attempt the
installation, operation and maintenance of this equipment.
WARNING: The Adjustable Speed Controller may apply hazardous voltages to the motor leads after power to
the controller has been turned off. Verify that the controller is incapable of delivering hazardous
voltages and that the voltage at the motor leads is zero before proceeding. Failure to observe this
precaution may result in severe bodily injury or death.
Installation
When the submersible pump motor leaves the factory it is ready for installation. No adjustment, venting or
oil filling is required.
Considerations
1. The user must select a motor starter and over−current protection suitable for this motor and Its
application. Consult motor starter application data as well as the National Electric Code and/or other
local codes.
2. Maximum submergence of motor is not to exceed 160 ft (49m) in depth and or 100 PSI (690 kpas) at
the external motor seal for Tandem Seal designs. For slurry seal designs the maximum external motor
seal pressure is 15 PSI (103 kpas).
3. Thermal Protectors must be connected. Leads marked P1 and P2 (See Figure 2-2).
4. Moisture Sensing Probes must be connected. Leads marked W1 and W2. (See Figure 2-3).
5. Check your power supply against final nameplate connection voltage.
6. Motor will operate properly with frequency not more than ±5% and voltage not more than ±10% above
or below nameplate rating.
7. Performance within this range will not necessarily be the same as the established performance at
exact rated voltage and frequency.
8. For three phase motors only: To reverse direction of a three phase motor, interchange any two motor
lead connections at the starter.
Installation Procedure
To prevent damage to the motor, do not use force to drive pump on (drive impeller onto motor shaft) or to
remove pump from motor shaft.
1. Turn off and lockout all power and verify the voltage at the motor starter connectors are zero.
2. Connect the motor power leads to the connectors in the motor starter. (See “Grounding”).
Note: The motor lead cable assembly for all Submersible Pump Motors has 3 marked power leads plus
two ground leads, two thermal leads and two moisture sensing probe leads.
3. Three Phase Motors ONLY.
a. Turn off and lockout all power and verify the voltage at the motor starter connectors are zero.
b. Be sure the motor shaft is disconnected from the load and will not cause mechanical rotation of
the motor shaft.
c. Remove all unused shaft keys and loose rotating parts to prevent them from flying off.
d. Momentarily apply power and check the direction of rotation of the motor shaft.
Motors are designed for bi−directional shaft rotation. When voltages in an A−B−C phase
sequence are applied to leads U/T1, V/T2, W/T3 clockwise shaft rotation facing the opposite drive
end will result. If shaft rotation is incorrect, change the direction of rotation as follows:
i. Turn off and lockout all power and verify that the voltage at the motor leads is zero.
ii. Reverse any two of three motor power leads at the motor starter.
iii. Restore power and verify correct rotation.
iv. Turn off and lockout all power and verify that the voltage at the motor leads is zero.
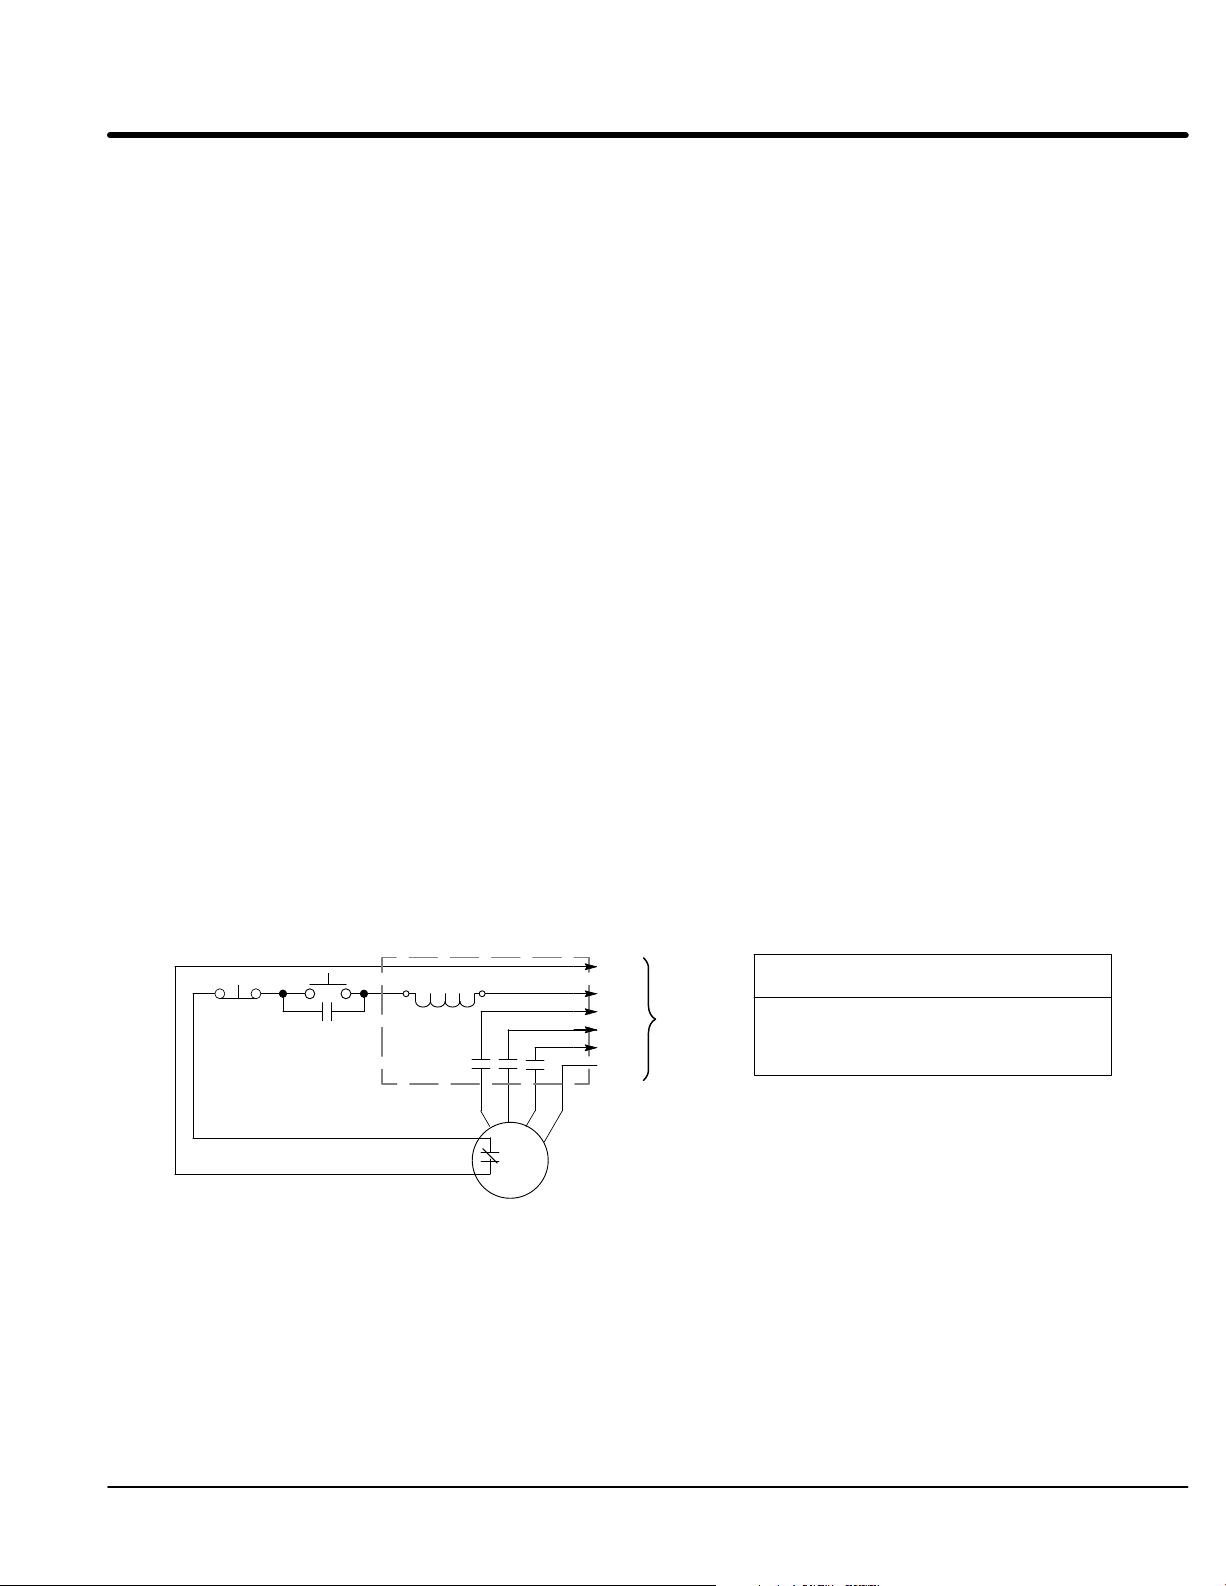
4. Connect the two Thermal Protectors at the motor starter as shown in Figure 2-2.
5. Connect the two Moisture Sensing Probes at the motor starter as shown in Figure 2-3.
6. Follow pump manufacturer’s instructions and mount the pump on the motor shaft.
7. Secure the pump case to the motor flange.
8. Attach drain piping to pump.
9. Use spreader bar and lifting eyes (see Figure 2-1) to lower the motor/pump assembly to the proper
depth. Be sure that motor wires are not damaged (contact with metal objects etc.)
10. Set control parameter values (if applicable) according to motor nameplate values.
2−2 Installation & Operation MN414
Grounding In the USA consult the National Electrical Code, Article 430 for information on grounding of motors and
generators, and Article 250 for general information on grounding. In making the ground connection, the
installer should make certain that there is a solid and permanent metallic connection between the ground
point, the motor or generator terminal housing, and the motor or generator frame. In non−USA locations
consult the appropriate national or local code applicable.
Motors with resilient cushion rings usually must be provided with a bonding conductor across the resilient
member. Some motors are supplied with the bonding conductor on the concealed side of the cushion ring
to protect the bond from damage. Motors with bonded cushion rings should usually be grounded at the
time of installation in accordance with the above recommendations for making ground connections. When
motors with bonded cushion rings are used in multimotor installations employing group fusing or group
protection, the bonding of the cushion ring should be checked to determine that it is adequate for the
rating of the branch circuit over current protective device being used.
There are applications where grounding the exterior parts of a motor or generator may result in greater
hazard by increasing the possibility of a person in the area simultaneously contacting ground and some
other nearby live electrical parts of other ungrounded electrical equipment. In portable equipment it is
difficult to be sure that a positive ground connection is maintained as the equipment is moved, and
providing a grounding conductor may lead to a false sense of security.
Select a motor starter and over current protection suitable for this motor and its application. Consult motor
starter application data as well as the National Electric Code and/or other applicable local codes.
Adjustable Frequency Power Inverters used to supply adjustable frequency power to induction motors
produce wave forms with lower order harmonics with voltage spikes superimposed. Turn−to−turn,
phase−to−phase, and ground insulation of stator windings are subject to the resulting dielectric stresses.
Suitable precautions should be taken in the design of these drive systems to minimize the magnitude of
these voltage spikes. Consult the drive instructions for maximum acceptable motor lead lengths, and
proper grounding.
Thermal Protection
Thermostat leads marked P1 & P2 must be connected in series with the stop button of the 3−wire pilot
circuit of the magnetic motor controller, so that the thermostat will open the circuit before dangerous
temperatures are reached. Thermostats are automatic reset for use in a normally closed circuit where the
thermostat is connected In series with the holding coil of the magnetic starter. Thermostats provide “Over
Temperature” Protection in accordance with NEMA MG 1−12.53. Thermostats do not provide winding
over temperature protection (locked rotor). It is suggested that over current protection be used in the
motor starter to ensure locked rotor protection.
Stop
Start
Starter
Figure 2-2 Thermal Protection Circuit
T1 T2 T3 GND
P2
P1
Motor
L1
L2
L3
GND
AC Line
P1 & P2 N.C. Thermostat Leads (N.O. Contacts unacceptable to UL)
Starter Holding Coil
Holding Coil Contacts (N.O.)
Polyphase
Single Phase
Volts
AC
110-120
220-240
440-480
550-600
Motor Power Cable Lead Color
Black White Red Orange Green
T1 T2 T3 - Ground
T1 T4 TA - Ground
Continuous
Amps
3.0
1.5
0.75
0.6
Inrush
Amps
30
15
7.5
6.0
Installation & Operation 2−3MN414

Moisture Protection
The submersible moisture protection system consists of the non−wicking cable cap assembly and the
dual moisture sensing probes. The cable cap assembly prevents moisture from wicking through the cable
assembly even when the cable jacket has been punctured.
Dual moisture sensing probes (Warrick type) extend into the oil chamber located between the tandem
mechanical seals. Should the outer seal fail, water will enter the oil chamber through the labyrinth slinger
paths and create a water/oil emulsion in the oil chamber. The moisture detector control applies 500 volts
to the moisture probes.
The presence of water in the oil chamber increases the conductivity sufficiently to increase current flow
through the probe circuit which illuminates a warning light and activates a relay to de−energize the motor.
The leakage detector control must be purchased separately from
Charles F. Warrick Co. Normandy Ct. Royal Oak, MI 48073 (810) 549−4900.
The leakage detector control system must be connected for the warranty and the U/L listing to be valid.
For information on the relay, see www.gemssensors.com (look for Model 2800/2810 relay).
It’s circuit diagram is shown in Figure 2-3.
Figure 2-3 Moisture Sensing Circuit
leakage detector control
not provided
AC Line
12
IMPORTANT:
Failure to properly connect and use this leakage
detector system voids motor warranty.
Model 2800/2810
Charles F. Warrick Co.
(810) 549-4900
ORDER BY COMPONENT NUMBER −−−−− *−280O−XXX
AC SUPPLY LINE
VOLTAGE & FREQUENCY
1
115V 50/60 Hz
2 230V 50/60Hz
4
480V 50/60Hz
Line voltage are nominal values
and may range from nominal
minus 15% to nominal plus 10%.
500V
Sec.
Test Lamp
Test Resistor
34
RE
78
910
Test
Switch
W1 W2
330k
Motor
CONTACT CONFIGURATION
TERMINAL PAIR
3-4 5-6 7 8
A N.O.
S
B N.C.
S S
C N.O. N.O.
D N.C. N.O.
E N.C. N.C.
F N.O. N.O. N.O.
G N.C. NO. N.O.
H
N.C. N.C. N.O.
J
N.C. N.C. N.C.
N.O.
NORMALLY OPEN
N.C.
NORMALLY CLOSED
S
NONE PROVIDED
65
To
Alarm
Control Cable Lead Color
Black White Red Orange Green
P1 P2 W1 W2 Ground
Moisture Sensors
S S S
NEMA TYPE ENCLOSURE
1 1
4 2, 4, 6
S
S
S
S
2−4 Installation & Operation MN414

Installation (for reference only)
Note: Since changes occur, always refer to installation and connection documentation from the
manufacturer and follow their procedures.
All type 2800−XXX controls are identified by a specific component number which follows the format
2800−XXX where the X’s are replaced by numbers and letters indicative of the A−C supply line voltage
and frequency, contact configuration and enclosure. Each control has a data label on the right hand side
of the terminal block. In addition, each enclosed control has another data label on the outside of the
enclosure cover.
Mount the control on a vertical surface with the transformer on the left hand side and accomplish all
indicated wiring. Terminals on the control are numbered and are in the same relative position as the
terminals shown on the wiring diagram.
Terminal pair 1 −2 must be continuously energized from an A−C supply line of electrical characteristics
shown on the data label. Contacts must be wired into the electrical load circuit(s) of the warning devices
as required. Each contact used for load duty must be wired in series with the load and that series branch
circuit connected across a power source compatible with the load.
Wiring must be provided from the moisture detector sensor probe leads W1 and W2 to terminals 9 and 10
of the 2800−XXX control. Control leads should not be installed in the same conduit as power leads.
Induced voltage can cause false moisture signals.
Contact Operation
Normally open load contacts close and normally closed load contacts open when the sensor probes
detect the influx of moisture within the motor.
Test Procedure
A normally closed pushbutton and neon indicating lamp are provided as means of checking the moisture
sensing components. When the pushbutton is depressed, the indicating lamp will be illuminated to
indicate (A) power is supplied to the control, (B) the control is operative, and (C) wiring to the moisture
sensing probes in the motor is intact. This procedure should be performed periodically to confirm integrity
of circuit. Signal devices The signal device may be audible (bell, buzzer, horn or siren) or visible
(incandescent or neon lamp) or both − a signal device of your choice may be obtained from your local
electrical supply house.
Signal Devices
The signal device may be audible (bell, buzzer, horn or siren) or visible (incandescent or neon lamp) or
both − a signal device of your choice may be obtained from your local electrical supply house.
System Operation
It is recommended that upon indication (by warning light, etc.,) of outer seal failure that the motor be
removed from the installation and the oil and outer seal be replaced as soon as possible. If reconditioning
is not performed within a 30 day period it is recommended that the inner seal be thoroughly inspected and
replaced if required.
Installation & Operation 2−5MN414

Section 1
General Information
WARNING: Surface temperatures of motor enclosures may reach temperatures which can cause discomfort
or injury to personnel accidentally coming into contact with hot surfaces. Protection should be
provided by the user to protect against accidental contact with hot surfaces. Failure to observe
this precaution could result in bodily injury.
WARNING: Do not touch electrical connections before you first ensure that power has been disconnected.
Electrical shock can cause serious or fatal injury. Only qualified personnel should attempt the
installation, operation and maintenance of this equipment.
WARNING: Disconnect all electrical power from the motor windings and accessory devices before
disassembly of the motor. Electrical shock can cause serious or fatal injury.
WARNING: Be sure the system is properly grounded before applying power. Do not apply AC power before
you ensure that all grounding instructions have been followed. Electrical shock can cause
serious or fatal injury. National Electrical Code and Local codes must be carefully followed.
Operation During operation, observe the motors performance. It should run smoothly with little noise.
Motor operation may stop for one of the following trip conditions:
1. If moisture infiltrates the motor, the moisture detector circuit will activate.
2. If the motor overheats, the Thermal Protection circuit will activate.
3. Other condition detected by motor starter (over current, overvoltage, etc. if equipped)
Unbalanced voltage or single−phase operation of poly phase motor may cause excessive heating and
ultimate failure. Only a slight unbalance of voltage applied to a poly phase motor will cause large
unbalanced currents and resultant overheating. Periodic checks of phase voltage, frequency and power
consumption of a motor (measured at the motor starter) while in operation are recommended; such
checks assure the correctness of frequency and voltage applied to the motor and yield an indication of the
load offered by the apparatus which the motor drives.
Comparisons of this data with previous no load and full−load power demands will give an indication of the
performance of the complete machine. Any serious deviations should be investigated and corrected.
If a problem with the motor occurs, contact your Baldor District Office for repair.
Should the lead connector assembly be damaged or the integrity of the encapsulation be in question, it is
required that a replacement lead connector assembly be ordered from Baldor, contact your Baldor District
Office. Renewal instructions will be provided with the replacement parts.
2−6 Installation & Operation MN414


Baldor District Offices

BALDOR ELECTRIC COMPANY
World Headquarters
P.O. Box 2400 Fort Smith, AR 72901−2400
(479) 646−4711 Fax (479) 648−5792
www.baldor.com
© 2009 Baldor Electric Company
MN414
All rights reserved. Printed in USA
4/09
 Loading...