


WDAB600XWX
Whirlpool WDAB600XWX, WHKMB10P, WDAB803XWX, WHKMD25, WDAB805XWX Use & Care Manual
...
WATER COOLER
Use & Care Guide
For questions about features, operation/performance
parts, accessories or service, call: 1-866-363-9472.
or visit our website at...
www.whirlpool.com
ENFRIADOR DE AGUA
Manual de uso y cuidado
Para consultas respecto a características, operación/desempeño,
partes, accesorios o servicio técnico, llame al: 1-866-363-9472.
o visite nuestra página de internet
www.whirlpool.com
DISTRIBUTEUR D’EAU
Guide d’utilisation
et d’entretien
Pour des questions à propos des caractéristiques, du
fonctionnement/de la performance, des pièces, accessoires ou du
service, composez le 1-866-363-9472
ou visitez notre site web à
www.whirlpool.com
W10193251A
Table of Contents/Índice/Table des matières..... 2
Models/
modelos/
modèles/
B10P
D25
D45
Submodels
submodelos
sous-modèles
WDAB600XWX, WHKMB10P
WDAB803XWX, WHKMD25
WDAB805XWX, WHKMD45
TABLE OF CONTENTS
WATER COOLER SAFETY ............................................................2
PARTS AND FEATURES................................................................3
INSTALLATION INSTRUCTIONS..................................................4
Tools and Parts ............................................................................4
Unpack the Water Cooler ............................................................4
Location Requirements................................................................4
Electrical Requirements ...............................................................4
WATER COOLER USE ...................................................................5
Water Cooler Preparation ............................................................5
Operating the Water Cooler.........................................................5
ÍNDICE
SEGURIDAD DEL ENFRIADOR DE AGUA.................................12
PIEZAS Y CARACTERÍSTICAS ...................................................13
INSTRUCCIONES DE INSTALACIÓN.........................................14
Piezas y herramientas................................................................14
Desempaque el enfriador de agua.............................................14
Requisitos de ubicación.............................................................14
Requisitos eléctricos..................................................................14
USO DEL ENFRIADOR DE AGUA...............................................15
Preparación del enfriador de agua ............................................15
Funcionamiento del enfriador de agua......................................15
Water Dispensers.........................................................................7
Changing a Water Bottle..............................................................8
WATER COOLER CARE.................................................................8
Cleaning........................................................................................8
Sanitizing ......................................................................................9
Storing the Water Cooler..............................................................9
TROUBLESHOOTING ..................................................................10
ASSISTANCE OR SERVICE.........................................................11
WARRANTY ..................................................................................11
Despachadores de agua............................................................17
Cómo cambiar una botella de agua...........................................18
CUIDADO DEL ENFRIADOR DE AGUA......................................18
Limpieza .....................................................................................18
Desinfección...............................................................................20
Almacenamiento del enfriador de agua.....................................20
SOLUCIÓN DE PROBLEMAS......................................................20
AYUDA O SERVICIO TÉCNICO...................................................21
GARANTÍA.....................................................................................22
TABLE DES MATIÈRES
SÉCURITÉ DU DISTRIBUTEUR D’EAU......................................23
PIÈCES ET CARACTÉRISTIQUES..............................................24
INSTRUCTIONS D'INSTALLATION ............................................24
Outillage et pièces......................................................................24
Déballage du distributeur d’eau.................................................24
Exigences d'emplacement.........................................................25
Spécifications électriques..........................................................25
UTILISATION DU DISTRIBUTEUR D'EAU .................................25
Préparation du distributeur d’eau..............................................25
Fonctionnement du distributeur d'eau ......................................26
Utilisation des distributeurs d'eau..............................................28
Changement de la bouteille d'eau .............................................28
ENTRETIEN DU DISTRIBUTEUR D'EAU....................................29
Nettoyage ...................................................................................29
Assainissement ..........................................................................30
Remisage....................................................................................30
DÉPANNAGE.................................................................................30
ASSISTANCE OU SERVICE.........................................................31
GARANTIE.....................................................................................32
WATER COOLER SAFETY
Your safety and the safety of others are very important.
We have provided many important safety messages in this manual and on your appliance. Always read and obey all safety
messages.
This is the safety alert symbol.
This symbol alerts you to potential hazards that can kill or hurt you and others.
All safety messages will follow the safety alert symbol and either the word “DANGER” or “WARNING.”
These words mean:
You can be killed or seriously injured if you don't immediately
DANGER
follow instructions.
WARNING
All safety messages will tell you what the potential hazard is, tell you how to reduce the chance of injury, and tell you what can
happen if the instructions are not followed.
2
can be killed or seriously injured if you don't
You
instructions.
follow
IMPORTANT SAFETY INSTRUCTIONS
WARNING:
■
Plug into a grounded 3 prong outlet.
■
Do not remove ground prong.
■
Do not use an adapter.
■
Do not use an extension cord.
To reduce the risk of fire, electric shock, or injury when using your water cooler, follow these basic precautions:
■
Disconnect power before servicing.
■
Replace all parts and panels before operating.
■
Use two or more people to move and install water cooler
and bottles.
SAVE THESE INSTRUCTIONS
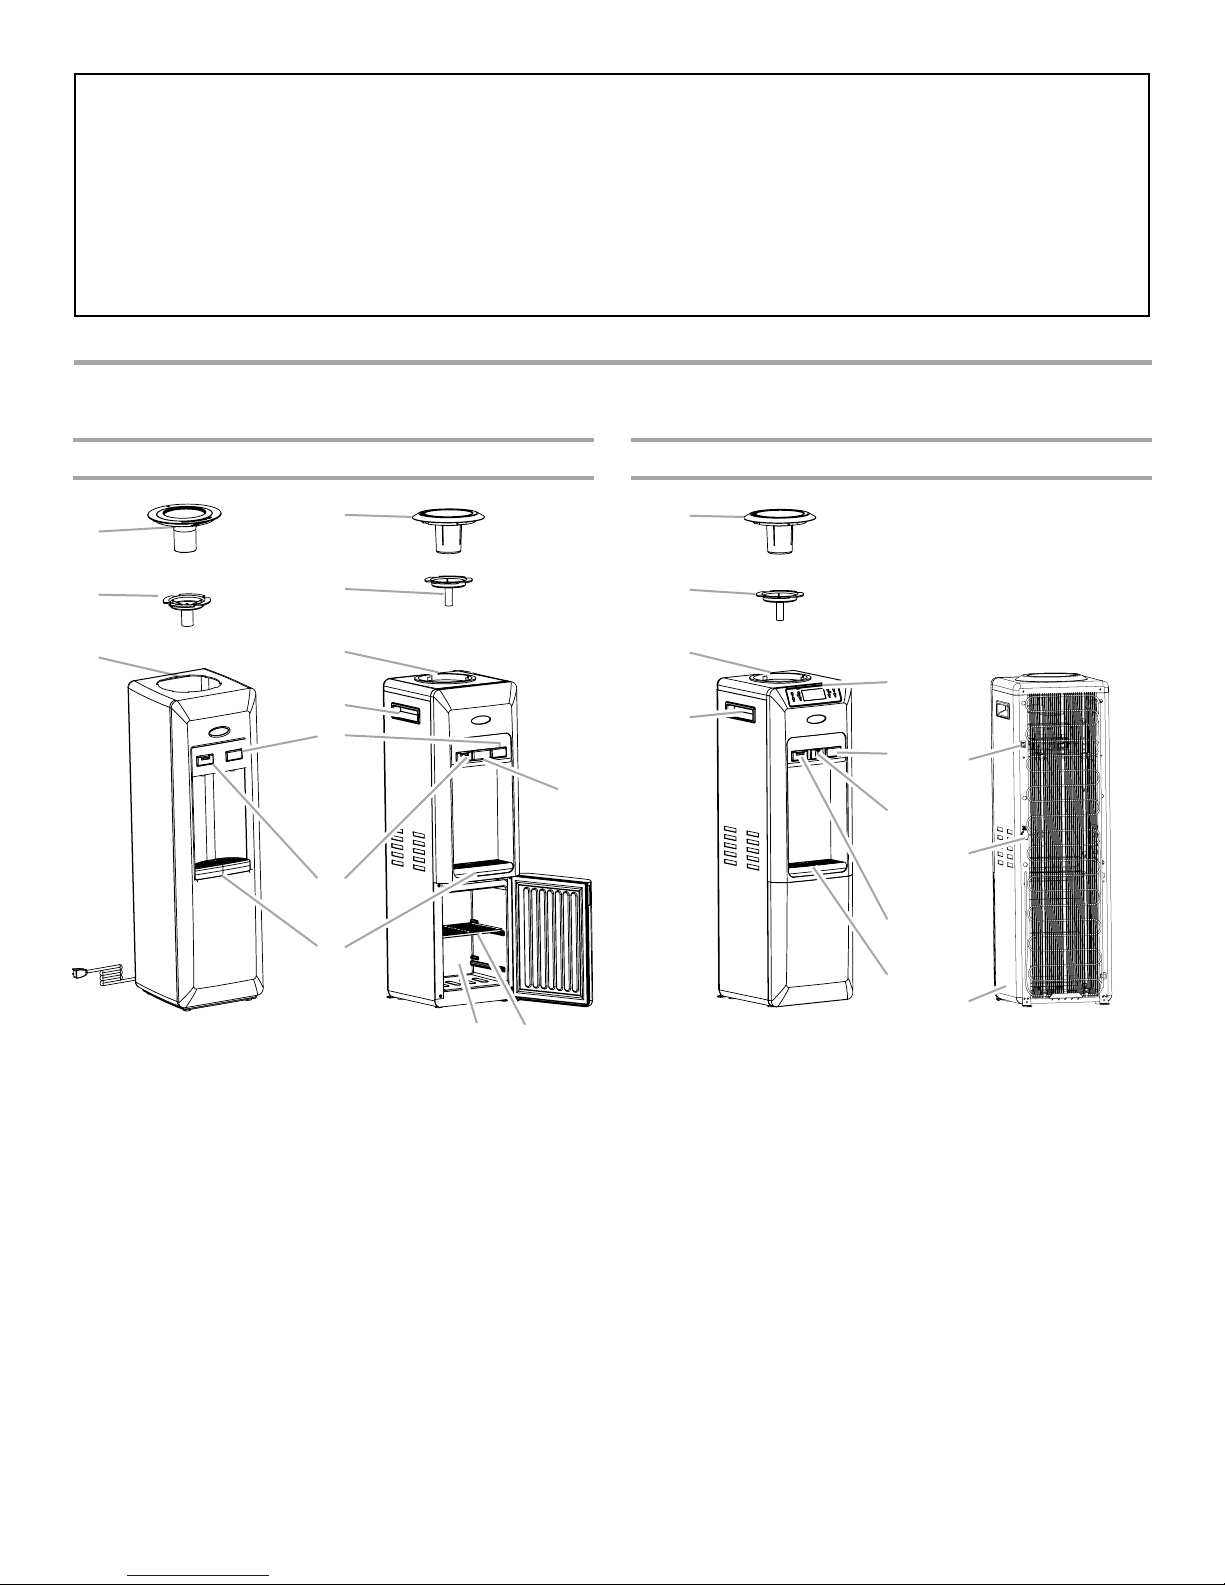
PARTS AND FEATURES
Model B10P Model D25 Model D45 Models B10P, D25, D45
D
C
B
A. Handle
B. Water reservoir
C. Baffle
D. Bottle supply collar
E. Cold water button
D
C
B
A
E
J
F
G
HI
F. Dual action hot water button
G. Drip tray
H. Storage compartment (model D25)
I. Shelf
J. LED display
D
C
B
A
A. Handle
B. Water reservoir
C.Baffle
D. Bottle supply collar
E. Control panel/display
F. Cold water button
E
F
L
G
K
H
I
J
G. Adjustable temperature control
H. Dual action hot water button
I. Drip tray
J. Serial number
K. Drain plug
L. Hot water tank switch (models
B10P and D25)
3
INSTALLATION INSTRUCTIONS
Tools and Parts
Gather the required tools and parts before starting installation.
Too l n ee de d
Flat-blade screwdriver or 7 mm hex nut driver
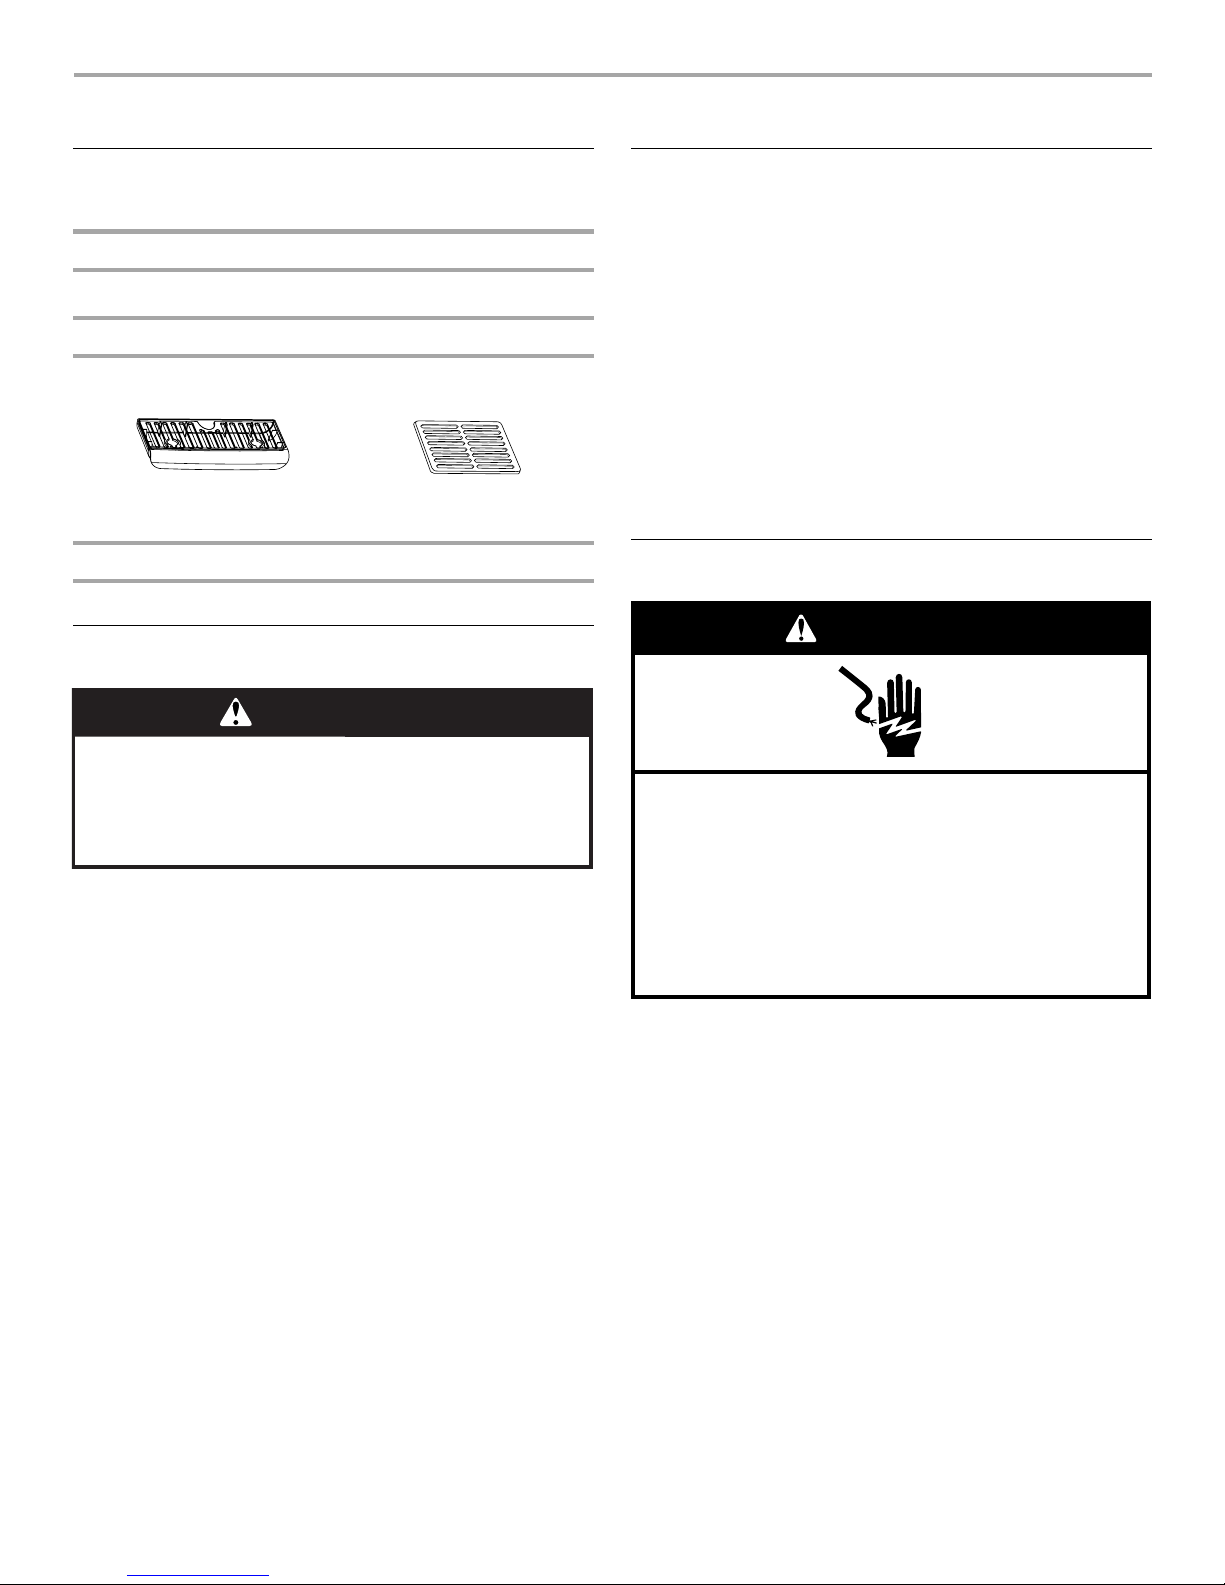
Parts Supplied
Check that all parts are included.
Drip tray Shelf (model D25)
Part Needed
3 or 5 gal. (11.4 or 18.9 L) water bottle ready to use
Unpack the Water Cooler
WARNING
Excessive Weight Hazard
Use two or more people to move and install
water cooler and bottles.
Failure to do so can result in back or other injury.
IMPORTANT:
■ Allow the water cooler to stand upright for a minimum of
1 hour after unpacking it and before plugging it into an
electrical outlet. This allows the refrigerant to settle properly
and avoids damage to the cooling system.
■ Remove the plastic bag and discard.
■ Remove tape from drip tray and discard.
■ Dispose of/or recycle all packaging materials.
Location Requirements
NOTE: This water cooler is recommended for indoor use only.
Check location where water cooler will be installed. The location
must provide:
■ A 2" (5 cm) clearance between the water cooler and the wall.
IMPORTANT: For best performance, do not place the water
cooler near an open flame, radiator or other heat source.
■ Grounded 3 prong outlet.
■ Install where water cooler is sheltered from the elements.
Protect against freezing to avoid possible rupture of drain
line. Such ruptures are not covered by the warranty. See
“Storing the Water Cooler” for winter storage information.
If the water cooler will be left unused for a period of time or in a
location where it may be subject to freezing, follow the
instructions in “Storing the Water Cooler.”
Electrical Requirements
WARNING
Electrical Shock Hazard
Plug into a grounded 3 prong outlet.
Do not remove ground prong.
Do not use an adapter.
Do not use an extension cord.
Failure to follow these instructions can result in death,
fire, or electrical shock.
A 120 volt, 60 Hz, AC only, 15- or 20-amp fused, grounded
electrical supply is required.
4
WATER COOLER USE
A
NOTE: Clean baffle and reservoir thoroughly before first using your water cooler and during normal maintenance operations. See
“Water Cooler Care.”
Water Cooler Preparation
WARNING
Excessive Weight Hazard
Use two or more people to move and install bottles.
Failure to do so can result in back or other injury.
IMPORTANT: Allow water to fill the tank before connecting the
water cooler to power to avoid a hot tank dry run.
1. Set the water cooler on flat, level floor.
2. Insert the water bottle into the top of the water cooler.
Reposition the water bottle until it is firmly seated in the water
cooler.
3. Wait 5 minutes for water to fill the tank. Make sure water
flows easily from both taps.
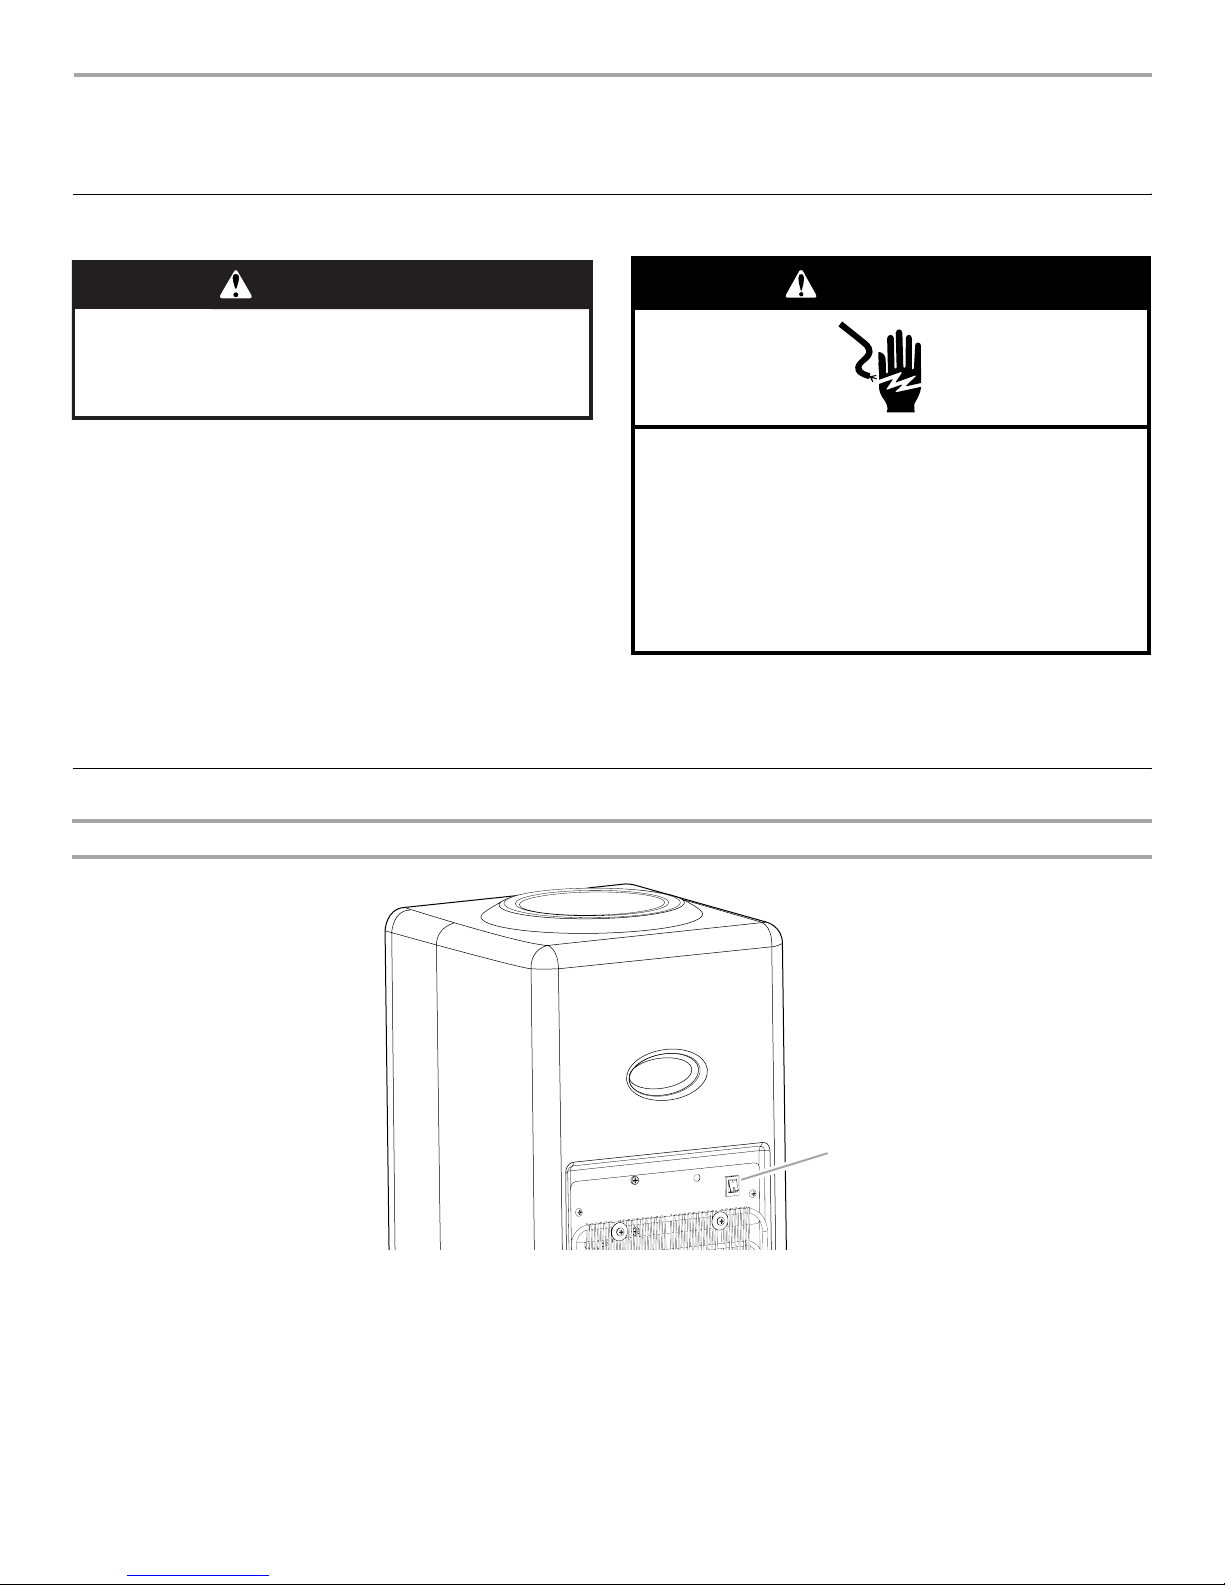
Operating the Water Cooler
Model B10P
WARNING
Electrical Shock Hazard
Plug into a grounded 3 prong outlet.
Do not remove ground prong.
Do not use an adapter.
Do not use an extension cord.
Failure to follow these instructions can result in death,
fire, or electrical shock.
4. Plug into a grounded 3 prong outlet.
5. Turn the power on. See “Operating the Water Cooler.”
NOTE: The thermostat is set at the factory. Allow 1 hour for
the water to reach optimal temperature.
1. Press the switch, located on the back of the water cooler, to
either the “0” or “1” position.
A. Hot water tank switch
“0” Position - Turns off the hot water tank.
“1” Position - Turns on the hot water tank.
NOTE: Allow 20 minutes for the water to heat.
5
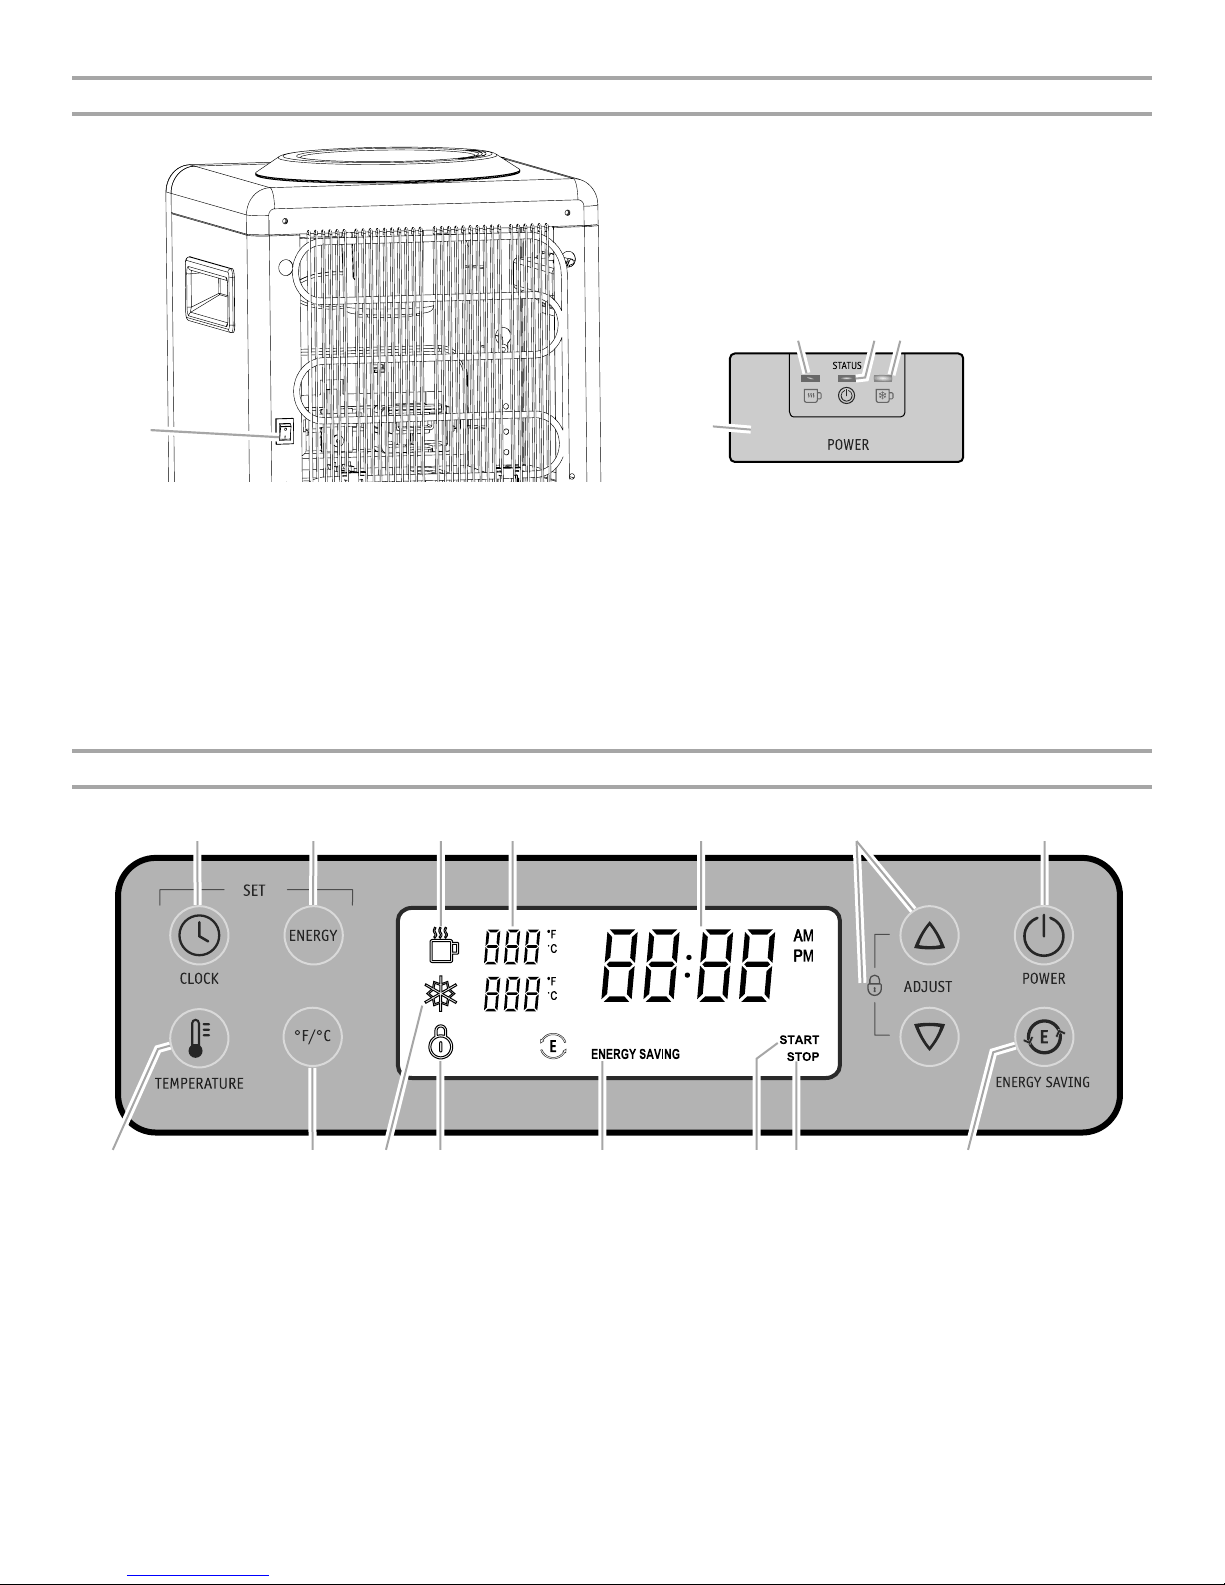
Model D25
C D E
A
A. Hot water tank switch B. Front Control panel
B
C. Hot water tank on
D. Power on
E. Cold water tank on
1. The STATUS LED will light up to indicate power is on. 2. Press the switch, located on the back of the water cooler, to
either the “0” or “1” position.
“0” Position - Turns off the hot water tank.
“1” Position - Turns on the hot water tank.
NOTE: Allow 20 minutes for the water to heat.
Model D45
A B C D E F G
H OJI K L NM
A. CLOCK button
B. ENERGY button
C. Hot water operation icon
D. Temperature display
E. Clock display
Press the power button to turn power on to the water cooler. When power is first supplied to the water cooler, the cold (snowflake) and
hot (teacup) operation icons will flash and the clock will be set to 12:00 AM.
Set the Clock
1. Press the CLOCK button. The minutes will begin to flash.
2. Press the ADJUST up arrow and down arrow buttons to set
the minutes.
6
F. Adjustment and Control Lock buttons
G. Power ON/OFF button
H. TEMPERATURE button
I. Fahrenheit/Celsius
J. Cold water operation icon
3. Press CLOCK again so the hour display begins to flash.
4. Press the ADJUST up arrow and down arrow buttons to set
the hour.
5. Press CLOCK again to exit.
K. Control panel lock icon
L. Energy Saver icon
M. Energy saving START icon
N. Energy saving STOP icon
O. Energy saving ON/OFF button
Energy Saving Option
Energy saving option is designed to save energy by automatically
turning the hot water tank on and off at preset times so that hot
water is available only when desired.
Set the Energy Saving START time:
The time you want the hot water tank to turn OFF.
1. Press the ENERGY button. The energy saving icon and the
START icon will light up, and the minute display will begin to
flash.
2. Press the ADJUST up arrow and down arrow buttons, to set
the minutes when you want the hot water tank to turn on
(usually set for sometime in the early morning).
3. Press ENERGY again so that the hour display begins to flash.
4. Press the ADJUST up arrow and down arrow buttons, to set
the hour.
Set the Energy Saving STOP time:
The time you want the hot water tank to turn ON.
1. Press the ENERGY button again. The energy saving icon and
STOP icon light up and the minute display begins to flash.
2. Press the ADJUST up arrow and down arrow buttons, to set
the minutes.
3. Press ENERGY again so the hour display begins to flash.
4. Press the ADJUST up arrow and down arrow buttons, to set
the hour.
5. Press ENERGY again to exit.
Turn on energy saving mode:
Press the ENERGY SAVING button to turn on the energy saving
option. The “E” icon will light up to indicate energy saving is on.
Press the ENERGY SAVING button again to turn off the energy
saving option.
Night Light (Model D45 only)
The night light automatically lights up when the water cooler is
plugged in.
Control Panel Lock
The control panel can be locked for easy cleaning or to avoid
unintentional adjustments to the settings.
To lock the control panel, press ADJUST up arrow and down
arrow buttons, simultaneously. The control panel lock icon will
remain lit when the control panel is locked.
To unlock the control panel, press ADJUST up arrow and down
arrow buttons, simultaneously. The control panel lock icon will no
longer be visible.
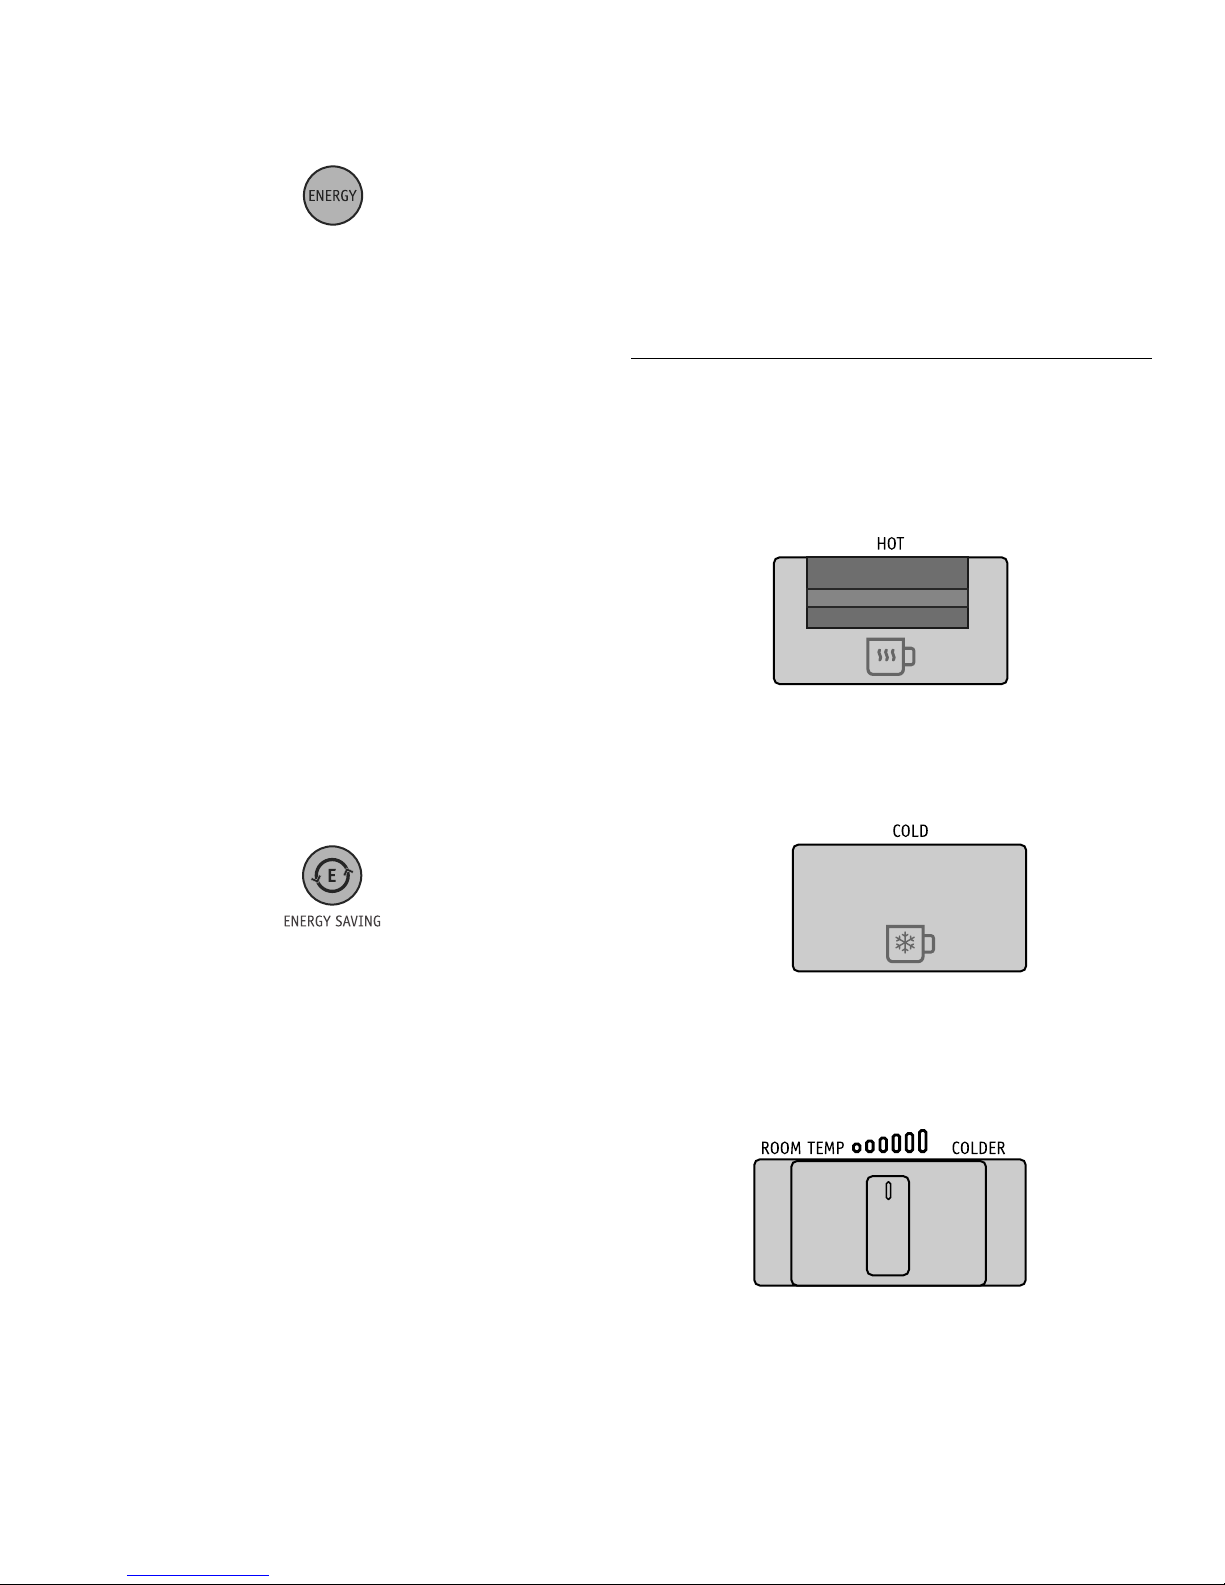
Water Dispensers
Your water cooler features 2 easy-to-use water dispensers.
Hot Water Dispenser
The HOT button dispenses hot water ranging from 140ºF to
195.8°F (60°C to 91°C)*. To activate, press the hot water button.
Cold Water Dispenser
The COLD button dispenses water ranging from cold (anywhere
from 41°F to 50°F [5°C to 10°C]*) to room temperature water. To
activate, press the cold water button.
Set the Temperature Display
The temperature of the hot and cold water can be set either in
degrees Fahrenheit or degrees Celsius.
1. Press °F/°C button. The “ºF” icon will flash.
2. Press the ADJUST up arrow and down arrow buttons, to set
the temperature to “ºF” for Fahrenheit or “ºC” for Celsius.
3. Press °F/°C button again to exit.
Set the Water Temperature
1. Press the TEMPERATURE button. The hot water icon and
temperature setting on the screen will flash.
2. Press the ADJUST up arrow and down arrow buttons, to set
the hot water temperature. The hot water temperature is
adjustable from 140°F to 195.8°F (60°C to 91°C).
3. Press the TEMP button again. The cold water icon and
temperature setting will flash.
4. Press the ADJUST up arrow and down arrow buttons, to set
the cold water temperature. The cold water temperature is
adjustable from 41°F to 50°F (5°C to 10°C).
5. Press the TEMPERATURE button again to exit.
NOTE: During normal operation of the water cooler, the cold
water icon and/or the hot water icon will flash when the unit is
cooling or heating the water.
Adjustable Temperature Control (Model D45 only)
The adjustable temperature control mixes room temperature
water and cold water. Slide the control to the left for room
temperature water and to the right for water from the coldest
setting on your control panel.
*Tested in environmental chambers at 77°F (25°C).
7
Changing a Water Bottle
WARNING
Excessive Weight Hazard
Use two or more people to move and install bottles.
Failure to do so can result in back or other injury.
1. Unplug water cooler or disconnect power.
2. Remove the empty water bottle from the water cooler.
3. Turn the new water bottle over and insert directly into the top
of the water cooler.
4. Reposition the water bottle until it is firmly seated in the water
cooler.
5. Wait 5 minutes and then check to see that water flows easily
from all taps.
WARNING
Electrical Shock Hazard
Plug into a grounded 3 prong outlet.
Do not remove ground prong.
Do not use an adapter.
Do not use an extension cord.
Failure to follow these instructions can result in death,
fire, or electrical shock.
WATER COOLER CARE
Cleaning
WARNING
Excessive Weight Hazard
Use two or more people to move and install bottles.
Failure to do so can result in back or other injury.
Cleaning the Exterior
In most cases, regular use of a soft, damp cloth or sponge and a
mild detergent, or any nonabrasive household cleaner, is all that
is necessary to keep the outside of your water cooler looking nice
and clean.
Cleaning the Interior
Follow these steps when first using your water cooler and during
regular cleaning operations. It is recommended that you clean
and sanitize the interior every 2 months. You may need to clean
the reservoir more frequently if the water cooler is located in a
high traffic office or factory area.
Wash
1. Unplug the water cooler to disconnect power.
2. Remove the bottle.
3. Using containers large enough to collect all of the water in the
reservoir, empty the reservoir through the water spouts.
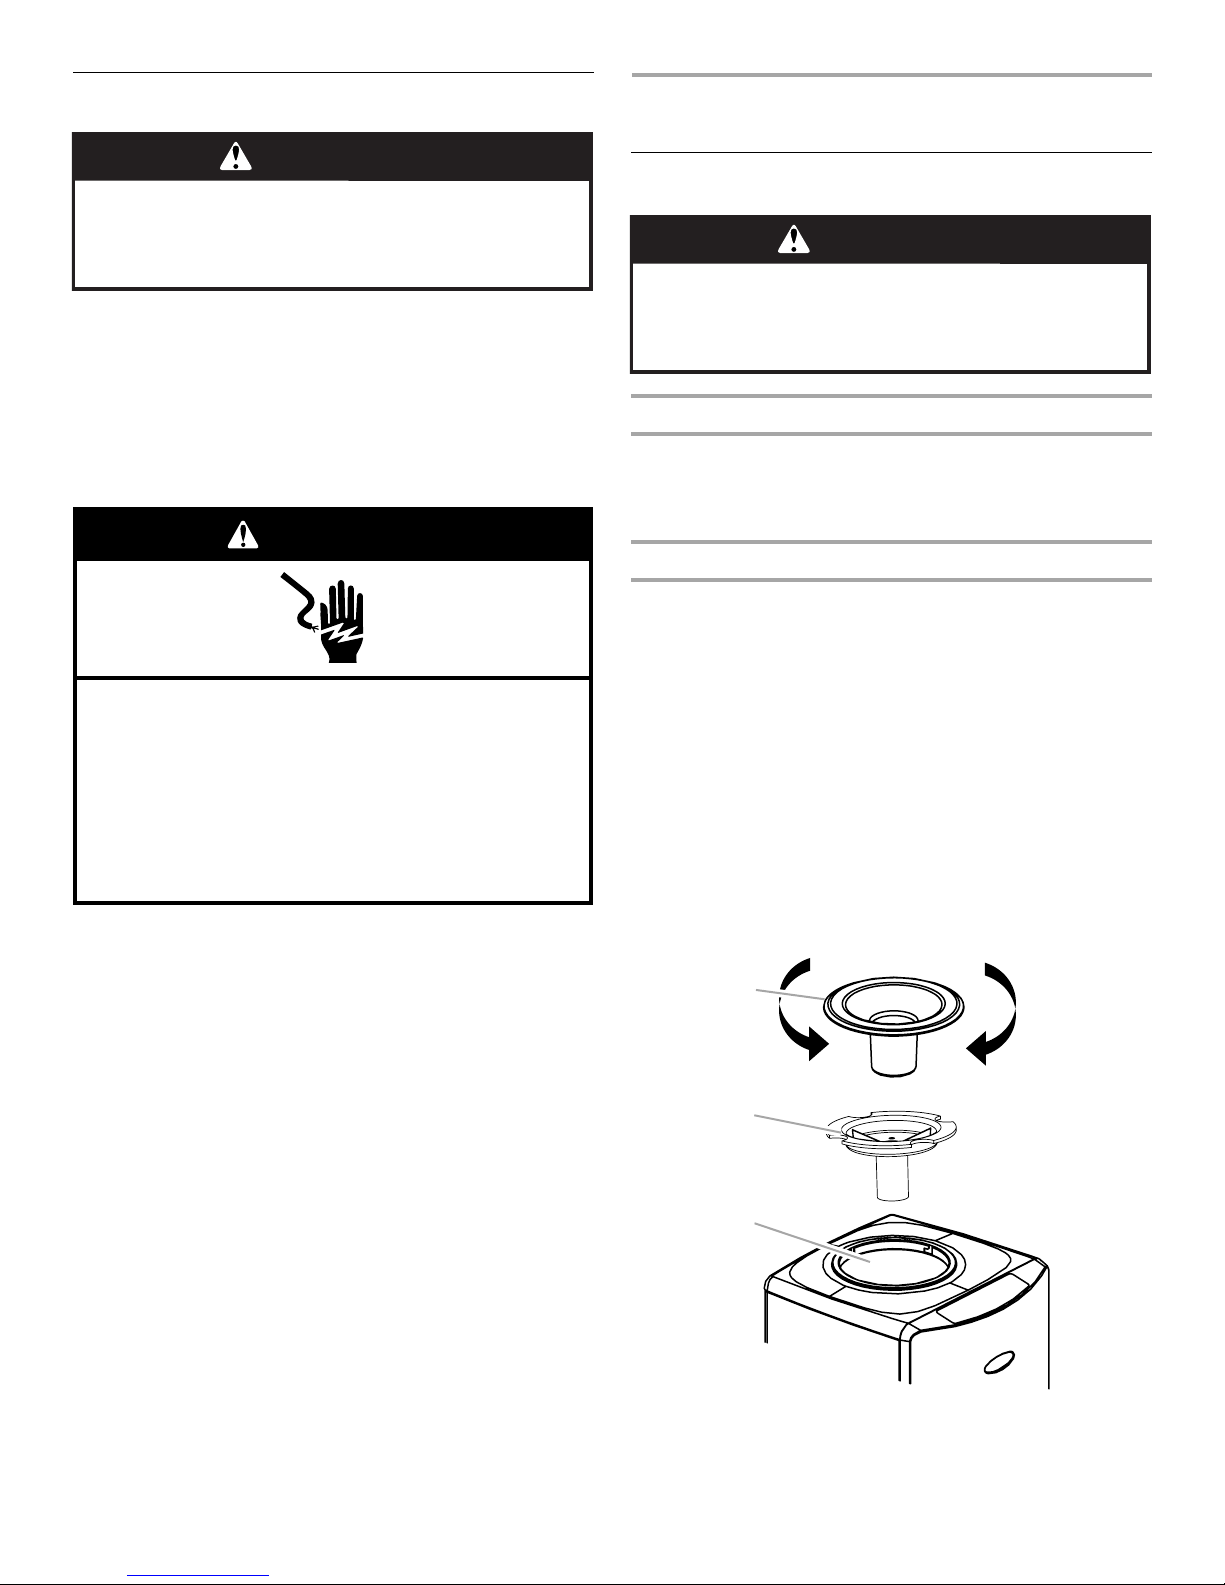
4. Remove the baffle from the water cooler.
A. Turn bottle supply collar clockwise and lift to remove.
B. Turn baffle counterclockwise and lift to remove.
6. Plug into a grounded 3 prong outlet.
7. Press the power button located on the front of the water
cooler (model D45).
A
B
C
A. Bottle supply collar
B. Baffle
C. Water reservoir
8
5. Prepare a cleaning solution of 1 tsp (5 mL) of a mild dish soap
to 0.5 gal. (2 L) of clean, room temperature water.
6. Wash the baffle and water spouts completely using a soft
cloth and the cleaning solution.
7. Rinse immediately with clean, running water.
8. Prepare a new cleaning solution of 1 tsp (5 mL) of a mild dish
soap to 0.5 gal. (2 L) of clean, room temperature water.
9. Fill the reservoir with the prepared cleaning solution.
10. Use a soft cloth to clean the inside of the reservoir with the
cleaning solution.
11. Using containers large enough to collect cleaning solution,
drain all of the cleaning solution from the cooler through both
water spouts equally and discard.
Rinse
IMPORTANT: After rinsing, continue on to sanitizing section.
1. To thoroughly rinse, fill the reservoir with clean water and
drain water through both water spouts equally. Repeat at
least 3 times. If an odor is present, continue to rinse until it is
gone.
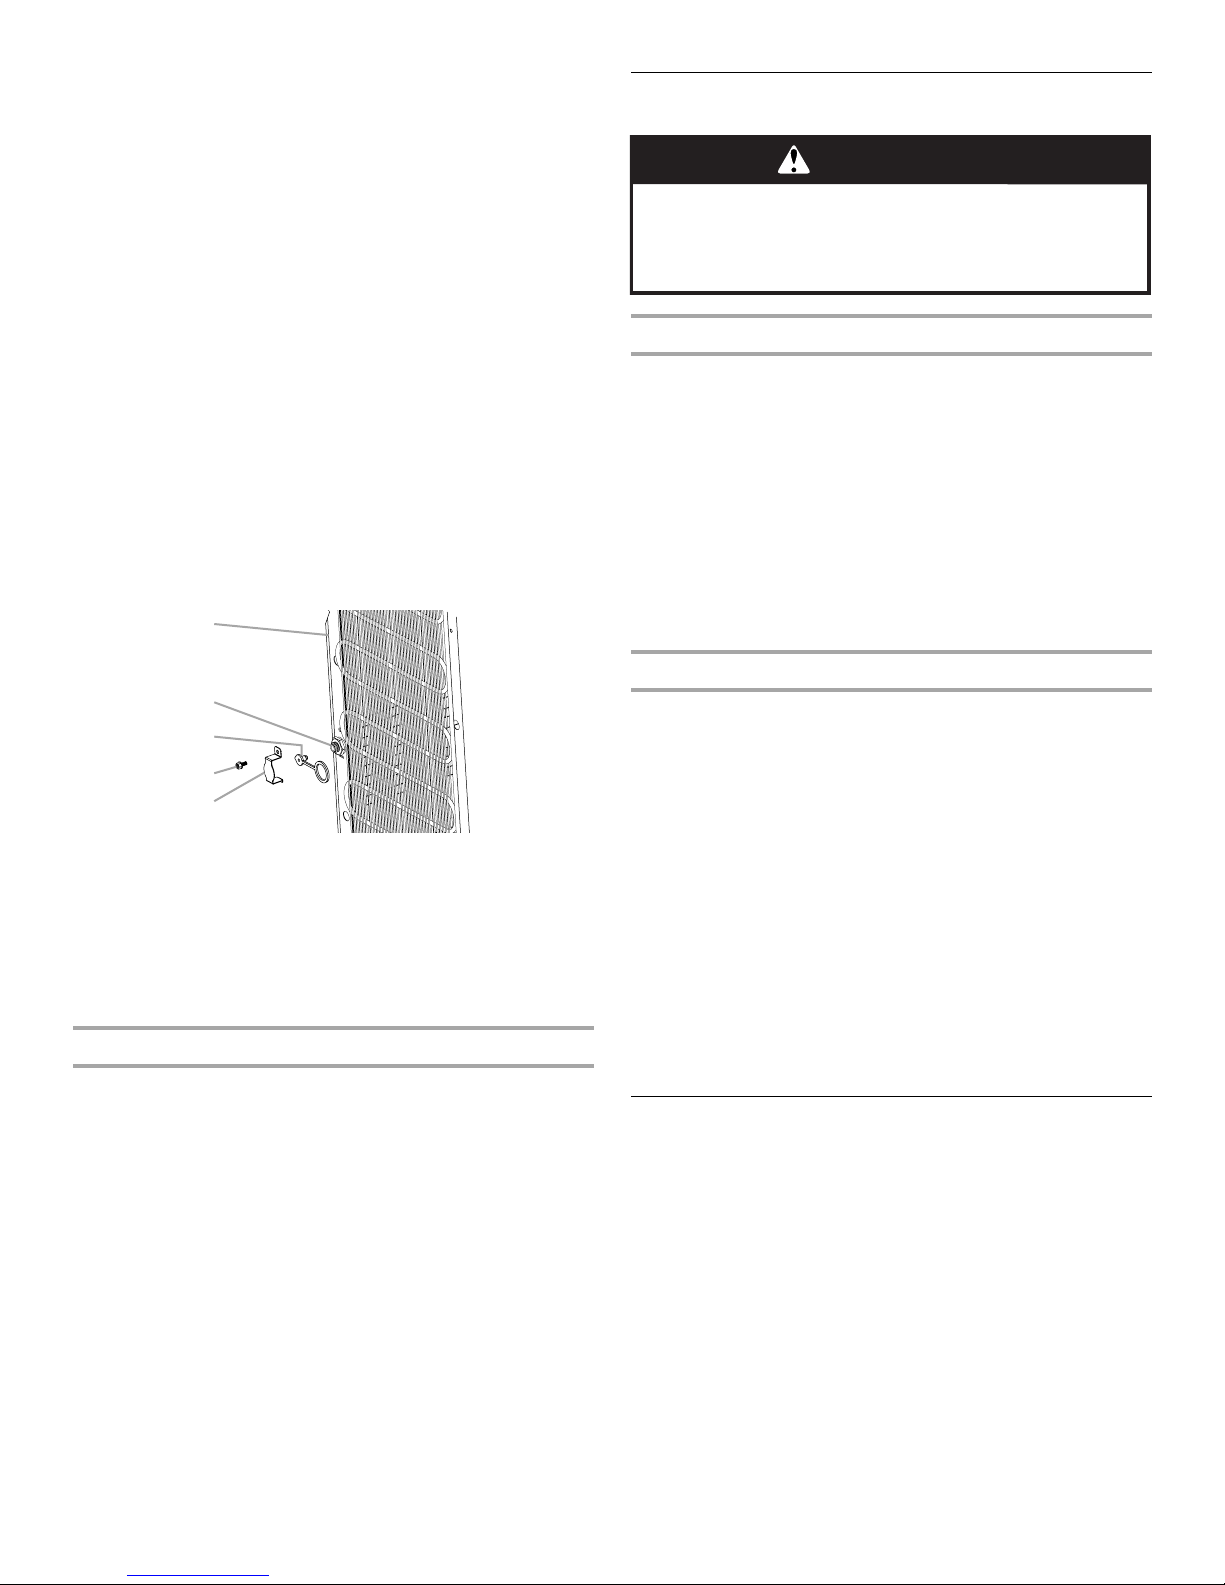
2. Place container under drain plug on the back of the unit.
3. Remove drain plug cover with flathead screwdriver or 7 mm
hex nut driver. Pull out the drain plug to remove.
A
Sanitizing
WARNING
Excessive Weight Hazard
Use two or more people to move and install bottles.
Failure to do so can result in back or other injury.
Sanitize
1. Prepare two sanitizing solutions each of 2 tsp (10 mL) of
common household bleach (5.25% sodium hypochlorite) to
1 gal. (4 L) of room temperature water.
2. Remove the baffle from water cooler.
3. Fill a clean container with one of the sanitizing solutions and
place baffle into the solution for 5 minutes.
4. Rinse baffle with running water.
5. Fill the reservoir with the prepared sanitizing solution and let
stand for 5 minutes.
6. Using containers large enough to collect all sanitizing
solution, drain all sanitizing solution from the water cooler
reservoir through both water spouts equally and discard.
B
C
D
E
A. Back of water cooler
B. Screw pipe
C. Drain plug
D. Drain plug cover screw
E. Drain plug cover
4. Drain all rinse water from the drain and discard.
5. Replace the drain plug and reattach the drain plug cover.
Cleaning the Storage Compartment (model D25 only)
1. Hand wash, rinse and dry the removable shelf.
2. Hand wash, rinse and dry the interior walls of the storage
compartment. Use a clean sponge or soft cloth and a mild
detergent in warm water.
■ Do not use abrasive or harsh cleaners such as window
sprays, scouring cleansers, flammable fluids, cleaning
waxes, concentrated detergents, bleaches or cleansers
containing petroleum products on plastic parts, interior
and door liners or gaskets. Do not use paper towels,
scouring pads, or other harsh cleaning tools.
■ To help remove odors, wash the interior walls with a
solution of baking soda and warm water (2 tbs to 1 qt
[26 g to 0.95 L]).
3. Replace the shelf.
Rinse
1. To thoroughly rinse, fill the reservoir with clean water and
drain water through both water spouts equally. Repeat at
least 3 times. If an odor of bleach is present, continue to rinse
until it is gone.
2. Then remove drain plug from the back of the unit to drain
remaining water. If an odor of bleach is present, continue to
rinse until it is gone. Reinstall drain plug. See “Cleaning the
Interior” in the “Cleaning” section.
3. Insert the baffle and turn counterclockwise to position.
4. Insert the bottle supply collar and turn clockwise to position.
5. Install a clean water bottle. See “Changing a Water Bottle.”
6. Clean water spouts and the water cooler exterior with a damp
cloth.
7. Check that water flows freely from water spouts.
8. Plug in the power cord to turn on the water cooler. Press the
power ON/OFF button on the control panel (model D45) so
the green power light display remains lit.
Storing the Water Cooler
If you will be away from your water cooler for an extended period
of time, unplug the power cord, remove the water bottle, empty
the reservoir, and completely drain the water line. See “Cleaning”
for drain plug removal.
9
TROUBLESHOOTING
First try the solutions suggested here and possibly avoid the cost of a service call...
Cooler does not heat or chill water
WARNING
Electrical Shock Hazard
Plug into a grounded 3 prong outlet.
Do not remove ground prong.
Do not use an adapter.
Do not use an extension cord.
Failure to follow these instructions can result in death,
fire, or electrical shock.
■ Is the power supply cord unplugged?
Plug into a grounded 3 prong outlet.
■ Has a household fuse blown, or has a circuit breaker
tripped?
Replace the fuse or reset the circuit breaker.
■ Is the Power button selected?
Check to see if the green light is on.
■ Is the Hot water button selected (on models B10P
and D25)?
Check to see if the switch on the back of the water cooler is
in the “1” position.
Water cooler leaks
Water is not cold enough
■ Is the cold temperature set at the correct temperature?
The cold water temperature select is located on the front of
the water cooler. Water should be 41°F to 50°F (5°C to 10°C)*.
Lower the water temperature (on model D45) by sliding the
adjustable temperature control to the right. See “Adjustable
Temperature Control” in the “Water Dispensers” section.
No water comes out of cooler
■ The reservoir may be empty.
■ Ice may have built up inside the reservoir.
Ice can build up when the temperature of the air surrounding
the water cooler is cold. Raise the water temperature (on
model D45) by sliding the control to the left. See “Adjustable
Temperature Control” in the “Water Dispensers” section.
Water cooler is noisy
The water cooler is equipped with a refrigeration system. It is,
therefore, normal to hear a refrigerator-like vibrating sound as
part of the operating cycle. For hot water models, it is also
normal to hear boiling sounds at regular intervals.
Water is not hot enough
The hot water temperature is adjustable from 140°F to
195.8°F (60°C to 91°C). Water takes several minutes to heat;
if the water is still not hot after several minutes, call customer
service. See “Assistance or Service.”
No water flows from the hot water tap
■ Are air bubbles keeping the water heater from filling up?
WARNING
WARNING
Excessive Weight Hazard
Use two or more people to move and install bottles.
Failure to do so can result in back or other injury.
■ Is the water bottle cracked?
A crack in the water bottle may be invisible to the naked eye.
Replace bottle.
■ Is the drain plug installed and tightened?
Check drain plug and tighten. See “Cleaning.”
10
Excessive Weight Hazard
Use two or more people to move and install bottles.
Failure to do so can result in back or other injury.
Remove the water bottle and check the reservoir water level.
There should be 1" (2.5 cm) of water above the baffle. If this is
not the case, insert a full bottle onto the cooler and check
again. If the water level is adequate, reinstall the bottle.
Place a container under the hot water tap and turn on the tap
to let trapped air out. This process may take up to 1 minute.
*Tested in environmental chambers at 77°F (25°C).
 Loading...