


User Guide
Dishwasher
LEARN MORE
In an effort to conserve natural resources, this dishwasher includes a condensed User Guide. A complete User Instructions manual can be downloaded at www.whirlpool.com/manuals.
For future reference, please make a note of your product model and serial numbers. You can find them on the label located near the door on the right-hand or left-hand side of the dishwasher interior.
Model Number________________________________ Serial Number______________________________________
Register your dishwasher at www.whirlpool.com. In Canada, register your dishwasher at www.whirlpool.ca. Para una version de estas instrucciones en español, visite www.whirlpool.com.
Your safety and the safety of others are very important.
We have provided many important safety messages in this manual and on your appliance. Always read and obey all safety messages. This is the safety alert symbol.
This symbol alerts you to potential hazards that can kill or hurt you and others.
All safety messages will follow the safety alert symbol and either the word “DANGER” or “WARNING.” These words mean:
 DANGER
You can be killed or seriously injured if you don’t immediately follow instructions.
 WARNING
You can be killed or seriously injured if you don’t follow instructions.
All safety messages will tell you what the potential hazard is, tell you how to reduce the chance of injury, and tell you what can happen if the instructions are not followed.
IMPORTANT SAFETY INSTRUCTIONS
WARNING: When using the dishwasher, follow basic precautions, including the following:
■Read all instructions before using the dishwasher.
■Use the dishwasher only for its intended function.
■Use only detergents or rinse agents recommended for use in a dishwasher, and keep them out of the reach of children.
■When loading items to be washed:
1)Locate sharp items so that they are not likely to damage the door seal; and
2)Load sharp knives with the handles up to reduce the risk of cut-type injuries.
■Do not wash plastic items unless they are marked “dishwasher safe” or the equivalent. For plastic items not so marked, check the manufacturer's recommendations.
■Do not touch the heating element during or immediately after use.
■Do not operate the dishwasher unless all enclosure panels are properly in place.
■Do not tamper with controls.
■Do not abuse, sit on, or stand on the door, lid, or dish racks of the dishwasher.
■To reduce the risk of injury, do not allow children to play in or on the dishwasher.
■Under certain conditions, hydrogen gas may be produced in a hot water system that has not been used for two weeks or more. HYDROGEN GAS IS EXPLOSIVE. If the hot water system has not been used for such a period, before using the dishwasher turn on all hot water faucets and let the water flow from each for several minutes. This will release any accumulated hydrogen gas. As the gas is flammable, do not smoke or use an open flame during this time.
■Remove the door or lid to the washing compartment when removing an old dishwasher from service or discarding it.
SAVE THESE INSTRUCTIONS
State of California Proposition 65 Warnings:
WARNING: This product contains one or more chemicals known to the State of California to cause cancer.
WARNING: This product contains one or more chemicals known to the State of California to cause birth defects or other reproductive harm.
1 |
W11172771A |
|

 WARNING
Tip Over Hazard
Do not use dishwasher until completely installed.
Do not push down on open door.
Doing so can result in serious injury or cuts.
GROUNDING INSTRUCTIONS
■ For a grounded, cord-connected dishwasher: |
Check with a qualified electrician or service representative if |
|
The dishwasher must be grounded. In the event of a |
you are in doubt whether the dishwasher is properly |
|
grounded. Do not modify the plug provided with the |
||
malfunction or breakdown, grounding will reduce the risk of |
||
dishwasher; if it will not fit the outlet, have a proper outlet |
||
electric shock by providing a path of least resistance for |
||
installed by a qualified electrician. |
||
electric current. The dishwasher is equipped with a cord |
||
■ For a permanently connected dishwasher: |
||
having an equipment-grounding conductor and a grounding |
||
plug. The plug must be plugged into an appropriate outlet |
The dishwasher must be connected to a grounded metal, |
|
that is installed and grounded in accordance with all local |
||
permanent wiring system, or an equipment-grounding |
||
codes and ordinances. |
||
conductor must be run with the circuit conductors and |
||
|
||
WARNING: Improper connection of the equipment- |
connected to the equipment-grounding terminal or lead on |
|
grounding conductor can result in a risk of electric shock. |
the dishwasher. |
|
|
SAVE THESE INSTRUCTIONS
KEY USAGE TIPS
Filtration System and Maintenance
Your dishwasher has a filtration system that efficiently removes food particles from the wash water.
The filter system consists of three parts: a fine filter plate, a coarse filter, and a lower filter.
IMPORTANT: To avoid damage to dishwasher, do not operate your dishwasher without filters properly installed. Be sure lower filter is securely
in place and upper filter assembly is locked into place. If the coarse filter turns freely,
it is not locked into place.
The filters may need to be cleaned when:
Coarse filter
Fine filter 


Lower filter
■■ Visible objects or soils are on fine filter plate. ■■ Dishes feel gritty to the touch.
See the “Filtration System” section in the full User Instructions for complete removal and maintenance schedule.
IMPORTANT: Do not use a wire brush or a scouring pad, etc., as they may damage the filters.
Rinse filter under running water until soils are removed. If you have hard-to-remove soils or calcium deposits because of hard water, a soft brush may be required.
Drying – Rinse aid is essential
You must use a drying agent such as a rinse aid for good drying performance. Rinse aid along with the Heated Dry option will provide improved drying and avoid excessive moisture on the dishwasher interior.
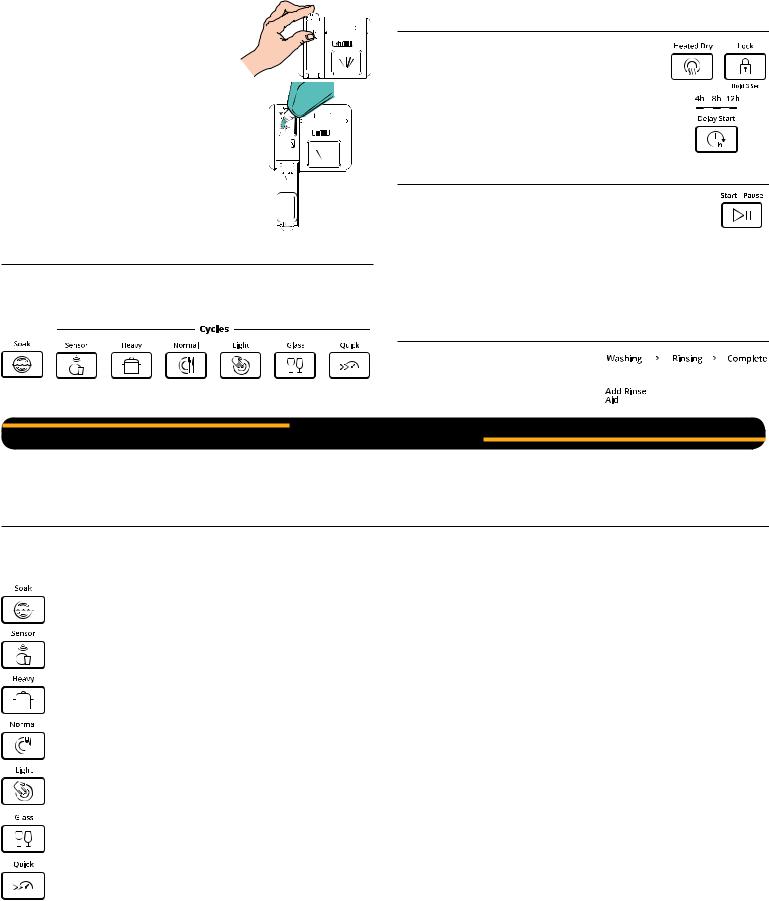
Touch START/Pause every time you add a dish
If anyone opens the door after the dishwasher has started (such as for adding a dish, even during the delay time), the Start/Pause button must be touched again to resume the cycle.
Push door firmly closed and touch START/Pause.
Adjust Upper Rack
You can raise or lower the upper rack to fit all items in either the upper or lower rack.
To raise or lower the rack:
Empty the rack. Pull the rack out halfway and take notice of the position of the carriage wheel assembly and side rail on each side of the rack. Lift up on the front of the rack while pulling the rack out all the way. The rack will then be completely free of the side rails. Reverse this action to re-engage the rack's carriage wheels onto the rails in the higher or lower position desired.
NOTE: The upper rack must be level.
2

OPERATING YOUR DISHWASHER
1. Prepare and load the dishwasher |
|
2. Check that all arms spin freely |
|
|
|
|
|
|
|
|
|
|
|
|
|
|
|
|
|
|
|
|
|
|
|
|
|
|
|
|
|
|
|
|
|
|
|
|
|
|
|
|
|
|
|
|
|
|
|
|
|
|
10-place load – upper rack |
10-place load – lower rack |
||||||||
IMPORTANT: Remove leftover food, bones, toothpicks, and other hard items from dishes. Remove labels from containers before washing.
■■ Make sure when dishwasher door is closed, no items are blocking detergent dispenser.
■■ Items should be loaded with soiled surfaces facing down and inward to the spray as shown in the graphics above. This will improve cleaning and drying results. Angle dirtiest dish surface downward, allowing space for water to flow up through rack and between dishes.
■■ Avoid overlapping items, like bowls or plates, that may trap food. ■■ Place plastics, small plates, and glasses in upper rack.
■■ Wash only items marked “dishwasher safe.”
■■ To avoid thumping/clattering noises during operation, load dishes so they do not touch one another. Make sure lightweight load items are secured in racks.
■■ Use slots in the covers and suggested loading patterns to keep your silverware separated for optimum wash.
1. |
Spoons |
|
|
|
|
|
|
|
|
|
|
|
|
|
|
2. |
Knives |
|
|
|
|
|
|
|
|
|
|
|
|
|
|
3. |
Salad forks |
|
|
|
|
|
|
|
|
|
|
|
|
|
|
4. |
Forks |
|
|
|
|
|
|
|
|
|
|
|
|
|
|
5. |
Large spoons |
|
|
|
|
|
|
|
|
|
|
|
|
|
|
6. |
Large forks |
|
|
|
|
|
|
1 |
2 |
3 |
|
4 |
5 |
6 |
|
|
6 |
4 |
4 |
2 |
|
|
2 |
|
2 |
2 |
1 |
3 |
3 |
|
|
|
|
|
|
|
|
|
|
||||||||
|
5 |
4 |
4 |
|
1 |
1 |
1 |
1 |
1 |
1 |
1 |
3 |
3 |
|
|
|
|
|
|
|
|
||||||||||
|
5 |
4 |
4 |
|
1 |
1 |
1 |
1 |
1 |
1 |
1 |
3 |
3 |
|
|
|
|
|
|
|
|
|
|
|
|
|
|
|
|
||
|
|
4 |
4 |
2 |
|
|
2 |
|
2 |
2 |
1 |
3 |
3 |
|
|
|
|
|
|
|
|
|
|
|
|
|
|||||
■■ If your silverware does not fit into the designated slots, lift and slide covers off to remove them and mix silverware types to keep them separated.
■■ When loading silverware, always place sharp items pointing down and avoid ‟nestingˮ as shown.
Items in the rack can block the spray arms.
3. Add detergent
Premeasured Detergents
High-quality premeasured tablets
and packs are recommended for improved performance.
Quality tablets and packs have been proven better than powder, liquid, or gel detergents at reducing filming on dishes. Using tablets and packs over time will
start to reduce or eliminate white film.
They are suitable for all water hardness and soil levels. Also, by using a rinse aid, you can minimize repeat buildup of white
film (not all packs and tablets contain rinse aid). Always place premeasured detergents in main compartment and close lid.
NOTE: Follow instructions on the package when using other dishwasher detergent types. See the complete User Instructions for more details about powders, liquids, and gels.
■■ Use automatic dishwasher detergent only. Add detergent just before starting a cycle.
■■ Fresh automatic dishwasher detergent results in better cleaning. Store tightly closed detergent container in a cool, dry place.
|
|
|
|
|
|
|
A. Release |
|
|
|
|
|
|
|
|
|
|
|
|
|
|
|
B. Cover |
|
|
|
|
|
|
|
|
|
|
|
|
|
|
|
C. Detergent |
|
|
|
|
|
|
|
|
|
|
|
|
|
|
|
compartment |
|
|
|
|
|
|
|
|
Close the detergent dispenser |
Open the detergent dispenser |
||||||
by sliding cover (B) over |
by sliding release (A) to the left |
||||||
detergent compartment (C). |
and the cover (B) will automatically |
||||||
|
|
|
|
|
slide open. |
||
4. Add rinse aid
■■ Your dishwasher is designed to use rinse aid for good drying performance. Without rinse aid, your dishes and dishwasher interior will have excessive moisture. The heating and drying options will not perform as well without rinse aid.
■■ Rinse aid keeps water from forming droplets that can dry as spots or streaks. It also improves drying by allowing water to drain off of dishes after final rinse. Rinse aid does not adhere to dishware, and when used, it is dispensed during each cycle.
3
■■ To add rinse aid, open the dispenser lid by gently pushing in the center of the lid with your thumb while lifting up on the edge.
■■ Pour rinse aid into the opening until the indicator level shows that it is full. Do not fill the reservoir above the full level indicator. Excess rinse aid can cause suds and water to overflow during the wash cycle.
■■ Close dispenser by pushing down gently on the lid until it clicks into place.
5. Select a cycle
NOTE: Heavier cycles and options lengthen cycle times. Choose a cycle appropriate for the food soils and dishes that you load. See the cycle descriptions in the Cycle Guide section.
6. Select options
You can customize your cycles by selecting the options desired (see the Cycle Guide). If you change your mind, touch the option again to turn off the option. If an invalid option is selected for a given cycle, the lights will flash. Adding options may increase the cycle time.
7. Start or resume a cycle
NOTE: If needed, run hot water at the sink nearest your dishwasher until the water is hot. Turn off water. With door
firmly closed touch the START/Pause button.
IMPORTANT: If the door is opened for any reason after the cycle is started (even during the delay time), the Start/Pause button must be touched again after the door is closed. If Start/Pause button is not touched, the cycle will not resume.
8. Follow the progress of your dishwasher
When the cycle is complete, the Complete light will remain on until the door is opened and closed or the Start/Pause button is touched.
CYCLE GUIDE
IMPORTANT: The sensor in your dishwasher monitors the soil level. Cycle time and/or water usage can vary as the sensor adjusts the cycle for the best wash performance. If the incoming water is less than the recommended temperature or food soils are heavy, the cycle will automatically compensate by adding time, heat, and water as needed.
The dishwasher remembers the cycle and options selections from the most recently completed cycle. To run the same cycle and options as the last time, touch the START/Pause button twice—once to wake up the controls, and again to start the dishwasher.
|
|
CYCLES |
ESTIMATED |
WATER USAGE |
|
|
|
WASH TIME |
GALLONS |
|
|
|
W/O OPTIONS |
(LITERS) |
|
|
|
HH:MM |
|
|
|
Use for rinsing dishes, glasses, and silverware that will not be washed right away. |
0:10 |
2.1 G |
|
|
Do not use detergent. |
|
(8.0 L) |
|
|
|
|
|
|
|
This cycle senses the soil amount, to adjust amount of water and time needed. |
1:45 - 3:18 |
2.9 - 5.8 G |
|
|
|
|
(11.1 - 21.8 L) |
|
|
|
|
|
|
|
Use for hard-to-clean, heavily soiled pots, pans, casseroles, and regular tableware. |
2:30 - 2:50 |
5.8 G |
|
|
Includes Heated Dry option. |
|
(22.1 L) |
|
|
|
|
|
|
|
This cycle is recommended for daily, regular, or typical use to completely wash and dry a full |
1:30 - 2:10 |
2.9 - 5.6 G |
|
|
|||
|
|
|||
|
|
load of normally soiled dishes. This dishwasher’s government energy certifications were based |
|
(11.1 -21.2 L) |
|
|
on the Normal cycle with only the Heated Dry option selected.* |
|
|
|
|
|
|
|
|
|
|
|
|
|
|
For lightly soiled loads. Includes Heated Dry option. |
1:45 |
5.0 G |
|
|
|
|
(19.0 L) |
|
|
|
|
|
|
|
For lightly soiled glassware. Includes Heated Dry option. |
1:45 |
4.9 G |
|
|
|||
|
|
|||
|
|
|
|
(18.4 L) |
|
|
|
|
|
|
|
For fast results, the Quick cycle will clean lightly soiled loads that do not need drying. |
0:55 |
4.0 G |
Includes Heated Dry option. |
(15.0 L) |
|
NOTE: Some detergents are not recommended for short wash cycles; please refer to your |
||
|
||
detergent packaging for more information. |
|
|
|
|
*No other washing and drying temperature options were selected, and the diswasher was not subjected to truncated testing. Rinse aid was not used, and there was no detergent used in the prewash.
4

|
OPTIONS |
CAN BE |
WHAT IT DOES |
ADDED TIME |
ADDED WATER |
|
|
SELECTED |
|
TO CYCLE |
GALLONS |
|
|
WITH |
|
|
(LITERS) |
|
Dries dishes with heat. This option, with the use of |
Available |
Uses a heating element |
0 - 0:05 |
NA |
|
rinse aid, will provide the best drying results. Plastic |
with any |
to speed drying times. |
|
|
|
items are less likely to deform when loaded in the |
cycle |
Heated Dry option |
|
|
|
upper rack. Use Heated Dry for optimum drying |
|
defaults to On when |
|
|
|
performance. For air dry, turn off Heated Dry. |
|
any cycle is selected, |
|
|
|
|
|
except for Rinse. |
|
|
|
To lock the controls, touch and hold Lock for |
Available |
When the Lock indicator |
NA |
NA |
|
3 seconds. The Lock light will turn on indicating |
with any |
is lit, all buttons are |
|
|
|
that it is activated. When the Lock indicator is lit, all |
cycle |
disabled. Eliminates |
|
|
|
buttons are diabled. If you touch any button while |
|
unintended use of |
|
|
|
|
|
|
||
|
|
|
|
||
|
your dishwasher is locked, the light flashes once. |
|
dishwasher between |
|
|
|
The dishwasher door can still be opened and closed |
|
cycles, or cycle and |
|
|
|
while the controls are locked. To turn off Lock, touch |
|
option changes during |
|
|
|
and hold the Lock button for 3 seconds. The Lock |
|
a cycle. |
|
|
|
indicator light will turn off. |
|
|
|
|
To delay the start:
1.Select a wash cycle and options.
2.Touch DELAY START for each hour of delay time.
3.Touch START/Pause to begin the delay countdown.
NOTE: If the door is opened, such as to add a dish, the Start/Pause button must be touched to resume the delay countdown.
Available |
Delays start of a cycle |
4:00 - 12:00 |
NA |
with any |
up to 24 hours. |
|
|
cycle |
|
|
|
Control |
Purpose |
Comments |
|
|
|
|
|
|
|
Touch to turn the |
Touch and hold for 1 second to turn the dishwasher on before making any selections. To turn |
|
|
dishwasher on or off. |
the dishwasher off, touch and hold for 2 seconds. This will stop the operation of the dishwasher |
|
|
|
and deactivate any cycles and options selected. The dishwasher will start a 60-second drain. Let |
|
|
|
dishwasher drain completely. |
|
|
Touch to cancel wash cycle. |
With the door closed and the cycle or delay running, touch the Cancel button. The dishwasher |
|
|
||
|
|
||
|
|
|
starts a 60-second drain. Let dishwasher drain completely. |
|
|
|
|
|
|
Touch to start or resume |
If the door is opened during a cycle or the power is interrupted, the cycle will not resume until the |
|
|
a wash cycle. |
Start/Pause button is touched again. |
|
|
Touch once to temporarily |
With a cycle running, touch START/Pause button once. This will interrupt the cycle without canceling. |
|
|
interrupt the cycle without |
Opening the door will also interrupt the cycle in the same way. Close the door and touch START/Pause |
|
|
canceling. |
again to resume the cycle. |
5
 Loading...