


Owner's Manual
Guide d’utilisation
Bracket Stack Kit
Ensemble de brides de superposition
Kit Number W11404611
Numéro de l’ensemble W11404611
For use only with 24" (610 mm) front-load washers and dryers Pour utilisation exclusive avec les laveuses et les sécheuses à chargement frontal de 24 po (610 mm)
If you have any problems or questions, visit us at www.whirlpool.com
Pour tout problème ou question, visiter le www.whirlpool.com
W11422895A

Table of Contents
STACK KIT SAFETY............................ |
2 |
INSTALLATION REQUIREMENTS..... |
2 |
Tools and Parts.............................. |
2 |
Location Requirements................. |
3 |
Uninstall Washer and Dryer........... |
3 |
If Your Washer or Dryer |
|
is Still in Its Packaging................... |
3 |
INSTALLATION INSTRUCTIONS....... |
4 |
Table des matières
SÉCURITÉ DE L’ENSEMBLE |
|
DE SUPERPOSITION........................... |
6 |
EXIGENCES D’INSTALLATION........... |
6 |
Outils et pièces.............................. |
6 |
Exigences d’emplacement............ |
7 |
Désinstallation – |
|
laveuse et sécheuse...................... |
7 |
Si la laveuse ou sécheuse est |
|
encore dans son emballage.......... |
7 |
INSTRUCTIONS D’INSTALLATION..... |
8 |
STACK KIT SAFETY
INSTALLATION REQUIREMENTS
TOOLS AND PARTS
Gather the required tools and parts before starting installation.
Tools needed:
Phillips screwdriver
Level |
|
|
|
|
|
|
|
|
|
|
|
|
|
|
|
|
|
|
|
|
|
|
|
|
|
|
|
|
|
|
|
|
|
Adjustable wrench that |
|
Pliers or slip-joint pliers |
TORX® T20®† security |
|||||||
opens to 1" (25 mm) |
|
(for drain and inlet hoses) |
screwdriver |
|||||||
|
|
|
|
|
|
|
|
|
|
|
|
|
|
|
|
|
|
|
|
|
|
|
|
|
|
|
|
|
|
|
|
|
Bucket |
Tape measure |
†TORX and T20 are registered trademarks of Acument Intellectual Properties, LLC.
2
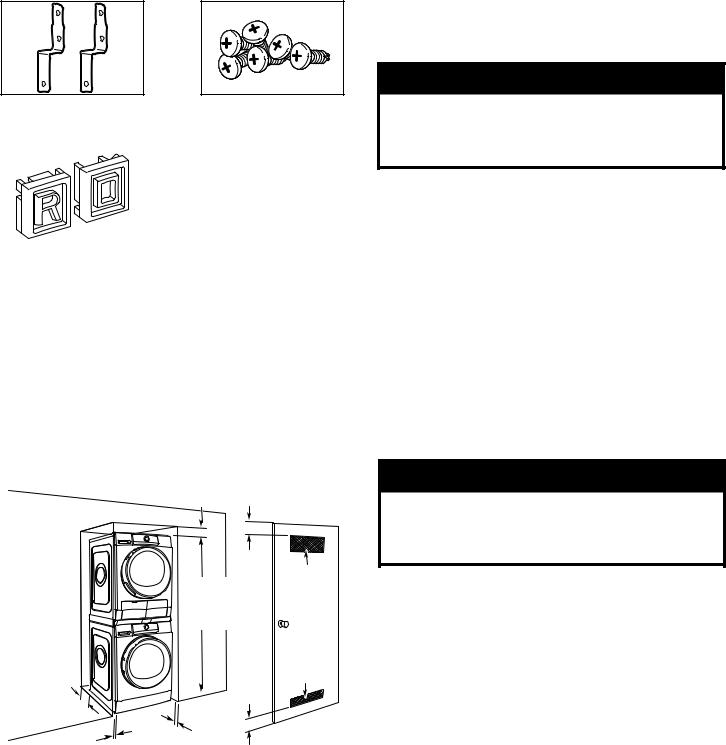
Parts supplied:
Brackets (2) |
Pan-head screws (6) |
|||
|
|
|
|
|
|
|
|
|
|
|
|
|
|
|
|
|
|
|
|
|
|
|
|
|
|
|
|
|
|
|
|
|
|
|
Rubber Pads (2)
LOCATION REQUIREMENTS
Recessed Area and Closet Installation Instructions
IMPORTANT: The stacked washer/dryer can be installed in an enclosure. Check the locations of the water supply faucets and grounded electrical outlets. Depending on your application,
washer fill hoses longer than those supplied with the washer/dryer may be needed.
|
0"/1" |
|
|
|
(0 mm/25 mm) |
|
|
|
|
3" |
|
|
|
(76 mm) |
48 in.2 |
|
683⁄4" Min. |
||
|
(310 cm2) |
||
|
(17463 mm) |
|
|
|
65 |
/4" |
|
|
(167069 ⁄2" mm)Max. |
|
|
|
(1765 mm) |
|
|
0"/1" |
|
|
24 in.2 |
|
|
(155 cm2) |
|
(0 mm/25 mm) |
|
3" |
|
|
|
||
|
|
|
|
|
|
(76 mm) |
|
|
0"/1" |
|
|
0"/1" |
(0 mm/25 mm) |
|
|
|
|
|
|
(0 mm/25 mm) |
|
|
|
If the water supply faucets, electrical outlets, or power cord need modification, have a qualified plumber or electrician make the changes.
UNINSTALL WASHER AND DRYER
IMPORTANT: If your washer and dryer are already installed, they must be uninstalled.
If you need to uninstall your washer or dryer, see the Installation Instructions that came with your model for tools required.
 WARNING
Excessive Weight Hazard
Use two or more people to move washer or dryer. Failure to do so can result in back or other injury.
Uninstalling Your Washer
1.Turn off the water faucet(s).
2.Unplug the power supply cord.
3.Slowly loosen the fill hose(s) at the faucet(s) to relieve the water pressure. Use a sponge or towel to absorb the released water.
4.Remove the fill hose(s) from the back of the washer. Drain water in the hose(s) into a bucket.
5.Remove the drain hose from the wall/floor drain pipe or utility sink and drain any water in the hose into a bucket.
Uninstalling Your Dryer
1.Disconnect the power supply.
2.Remove the drain hose from the floor drain pipe or utility sink and drain any water in the hose into a bucket.
IF YOUR WASHER OR DRYER IS STILL
IN ITS PACKAGING
 WARNING
Excessive Weight Hazard
Use two or more people to move washer or dryer. Failure to do so can result in back or other injury.
Position the packaged washer or dryer close to its final position. Cut the packaging as follows:
νWasher: Cut plastic film along dotted cut line around the base. Remove the packaging. Do not remove the shipping bolts.
νDryer: Cut around top and down corners along dotted cut lines. Discard carton top, corner posts and sides. Leave carton bottom underneath dryer.
3

INSTALLATION INSTRUCTIONS
 WARNING
Excessive Weight Hazard
Use two or more people to move washer or dryer. Failure to do so can result in back or other injury.
1. Move washer
48" |
(1.2 m) |
Move washer to within 48" (1.2 m) of its final location. It must be in a fully upright position.
IMPORTANT: Keep the feet on the washer even in a stacked installation. Remove all shipping materials, including the shipping bolts, for proper operation and to avoid excessive noise and vibration from the washer.
2. Ensure washer is level in its final location
Place level here. |
Place a level on the top edges of the
washer, checking each side and front. If it is not level, tip the washer and adjust the feet up or down as shown in the Installation Instructions, repeating as necessary.
|
|
|
|
|
|
|
|
|
|
|
|
|
|
|
|
|
|
|
|
|
|
|
|
|
|
|
|
|
|
|
|
|
|
|
|
|
|
|
|
|
|
|
|
|
|
|
|
|
|
|
|
Not Level |
|
|
|
LEVEL |
|
|
|
Not Level |
|
||||||
3. On covering, lay dryer on side or back
Place a covering, such as cardboard or a blanket, on the floor to avoid damage. Gently lay the dryer down with its side or back on covering.
4. Install pads
Using a wrench or slip-joint pliers, make sure all feet of the dryer are screwed in fully.
Install the rubber pads on front corners matching rib geometry of base.
4
 Loading...