


WCG97US6HS

THANK YOU for purchasing this high-quality product. Register your cooktop at www.whirlpool.com. In Canada, register your
cooktop at www.whirlpool.ca.
For future reference, please make a note of your product model and serial numbers. These can be found on the label located on the
bottom of the cooktop.
Model Number___________________________________________ Serial Number___________________________________________
Table of Contents
KEY USAGE TIPS ...........................................................................3
Propane Gas Conversion .............................................................3
Placements of Burner Heads and Caps ......................................3
Lightning the Burners ...................................................................3
Cleaning the Burner: Tips ............................................................3
ASSEMBLING YOUR COOKTOPS ...............................................4
Assembling the Burners ...............................................................4
Grate Placement ..........................................................................4
COOKTOP FEATURES ...................................................................5
CARE AND CLEANING ..................................................................6
ACCESSORIES ...............................................................................6
COOKING WITH YOUR COOKTOP ..............................................7
TROUBLESHOOTING ....................................................................8
WARRANTY ..................................................................................10
W11120470A
GAS COOKTOP
USER INSTRUCTIONS
2
You can be killed or seriously injured if you don't immediately
You
can be killed or seriously injured if you don't
follow
All safety messages will tell you what the potential hazard is, tell you how to reduce the chance of injury, and tell you what can
happen if the instructions are not followed.
Your safety and the safety of others are very important.
We have provided many important safety messages in this manual and on your appliance. Always read and obey all safety
messages.
This is the safety alert symbol.
This symbol alerts you to potential hazards that can kill or hurt you and others.
All safety messages will follow the safety alert symbol and either the word “DANGER” or “WARNING.”
These words mean:
follow instructions.
instructions.
DANGER
WARNING
WARNING: If the information in these instructions is not followed exactly, a fire or
explosion may result causing property damage, personal injury or death.
– Do not store or use gasoline or other flammable vapors and liquids in the vicinity of this
or any other appliance.
– WHAT TO DO IF YOU SMELL GAS:
•
Do not try to light any appliance.
•
Do not touch any electrical switch.
•
Do not use any phone in your building.
•
Immediately call your gas supplier from a neighbor's phone. Follow the gas supplier's
instructions.
•
If you cannot reach your gas supplier, call the fire department.
–
Installation and service must be performed by a qualified installer, service agency or
the gas supplier.
WARNING: Gas leaks cannot always be detected by smell.
Gas suppliers recommend that you use a gas detector approved by UL or CSA.
For more information, contact your gas supplier.
If a gas leak is detected, follow the “What to do if you smell gas” instructions.
State of California Proposition 65 Warnings:
WARNING: This product contains one or more chemicals known to the State of California to cause cancer.
WARNING: This product contains one or more chemicals known to the State of California to cause birth defects or other
reproductive harm.

3
State of California Proposition 65 Warnings:
WARNING: This product contains one or more chemicals known to the State of California to cause cancer.
WARNING: This product contains one or more chemicals known to the State of California to cause birth defects or other reproductive harm.
SAVE THESE INSTRUCTIONS
IMPORTANT SAFETY INSTRUCTIONS
WARNING:
To reduce the risk of fire, electrical shock, injury to
persons, or damage when using the cooktop, follow basic
precautions, including the following:
WARNING:
NEVER use this appliance as a space heater to
heat or warm the room. Doing so may result in carbon monoxide
poisoning and overheating of the cooktop.
CAUTION:
Do not store items of interest to children in
cabinets above the cooktop – children climbing on the cooktop
to reach items could be seriously injured.
Proper Installation – The cooktop, when installed, must be
electrically grounded in accordance with local codes or, in the
absence of local codes, with the
National Electrical Code,
ANSI/NFPA70 or the Canadian Electrical Code, Part 1
. Be sure
the cooktop is properly installed and grounded by a qualified
technician.
This cooktop is equipped with a three-prong grounding plug for
your protection against shock hazard and should be plugged
directly into a properly grounded receptacle. Do not cut or
remove the grounding prong from this plug.
Disconnect the electrical supply before servicing the cooktop.
Injuries may result from the misuse of the cooktop such as
stepping, leaning, or sitting on the top surface.
Maintenance – Keep cooktop area clear and free from
combustible materials, gasoline, and other flammable vapors
and liquids.
Storage on the cooktop – Flammable materials should not be
stored on or near surface units.
Top burner flame size should be adjusted so it does not extend
beyond the edge of the cooking utensil.
KEY USAGE TIPS
Propane Gas Conversion
IMPORTANT: This cooktop is factory set for use with Natural gas.
If you wish to use Liquid Propane, call a licensed professional to
install the Propane gas conversion kit (included).
Placement of Burner Heads and Caps
All burner caps and burner bases should be properly installed
BEFORE operating the cooktop. Check that each burner has the
right size head and cap.
Refer to the “Assembling Your Cooktop” section for proper burner
head placement details.
Lighting the Burners
IMPORTANT: All burners will click/spark when a knob is pushed
in. A burner will light only if the knob is pushed in then turned
counterclockwise to IGNITE.
To light the burners:
1. Push in the knob.
2. Turn the knob counterclockwise to IGNITE. Wait until you see
a flame.
3. Turn the knob anywhere between Hi and Lo to the desired
setting.
Power failure: In case of a power failure, burners can be lit
manually. Hold a lit match near the burner and turn the knob
counterclockwise to IGNITE.
Cleaning the Burner: Tips
The burners should be kept clean. Spillovers should be cleaned
immediately since they can clog the openings in the burners.
IMPORTANT: Before cleaning, make sure all controls are off and
the cooktop is cool. For more information, see the “Care and
Cleaning” section.
■ Remove the burner cap from the base. Clean the burner cap
with hot soapy water and then rinse it.
■ Remove the burner base and clean the gas tube opening
under the base.
■ Clean clogged burner ports with a straight pin, needle or
small-gauge wire as shown. Do not use a wooden toothpick or
clean in the dishwasher.
■ Gently clean the igniter with a damp cloth.
4
ASSEMBLING YOUR COOKTOP
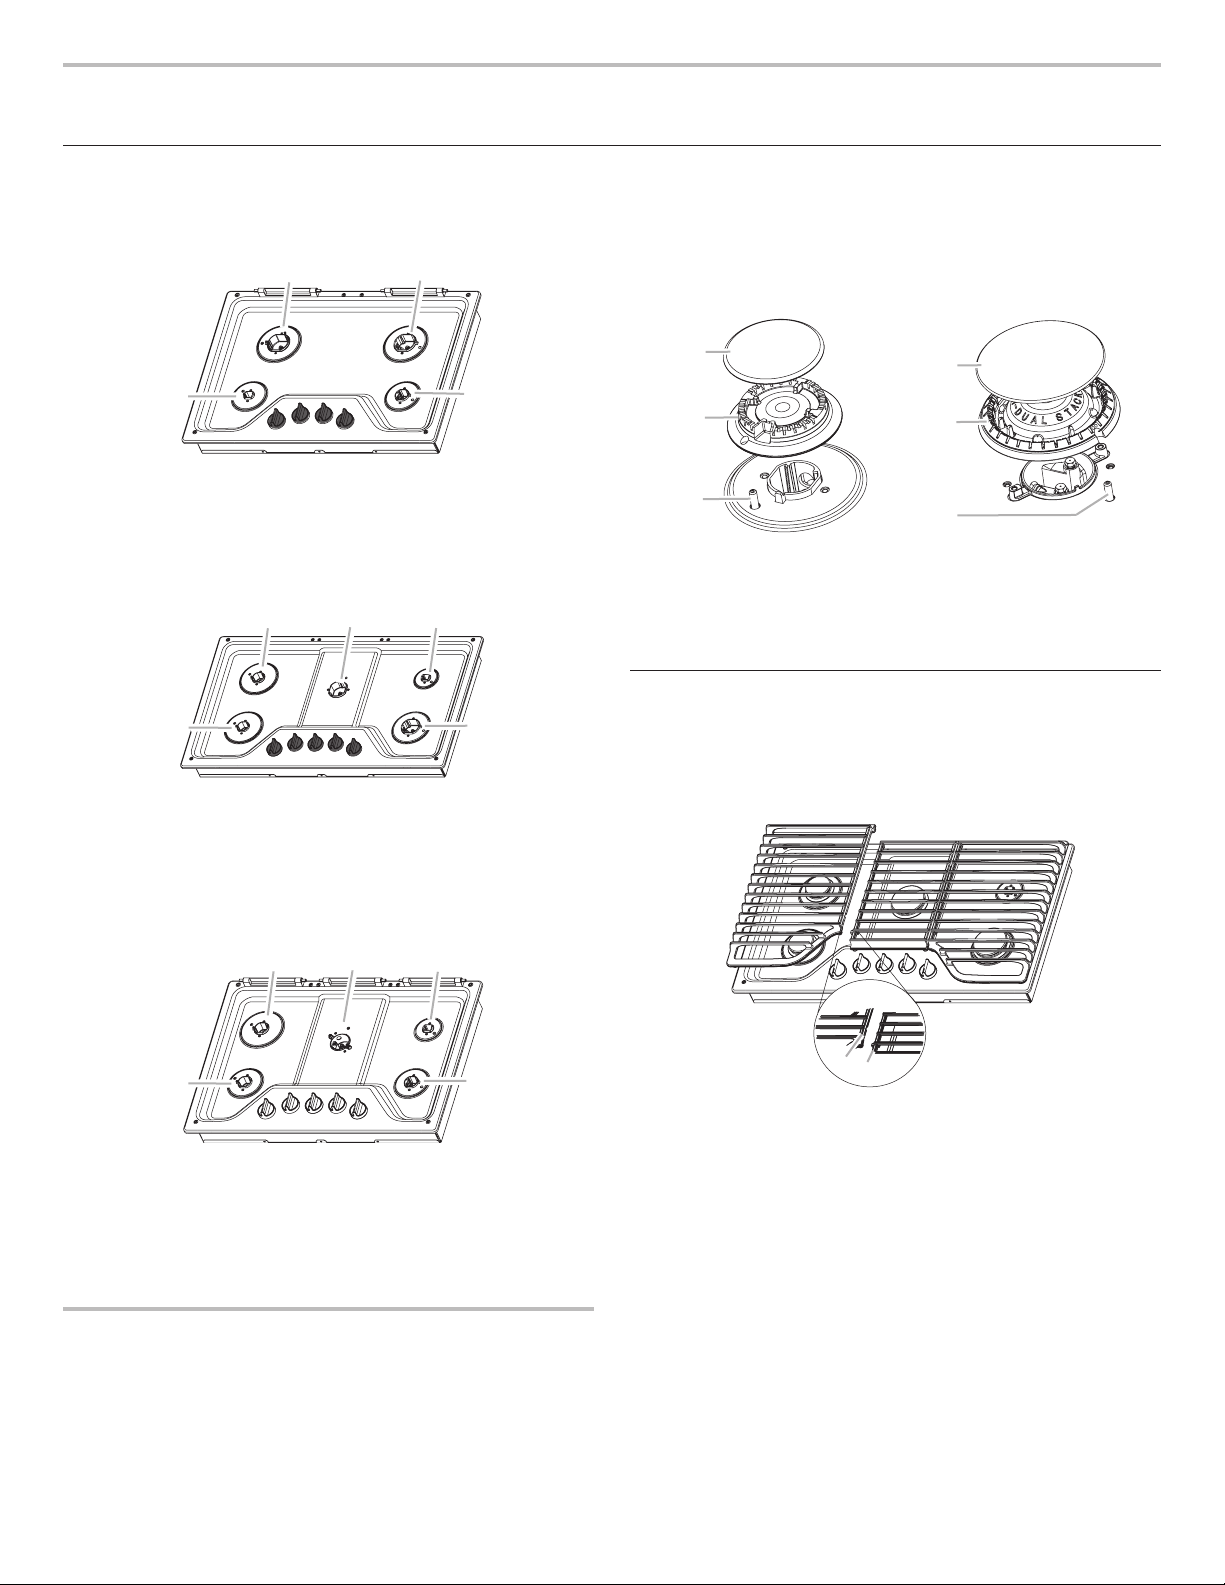
Assembling the Burners
Check your model number. Then refer to the following for
information specific to your burners.
B
C
D
A
WCG51US0D and WCG75US0D
A. SpeedHeat™ burner
B. Standard burner
C. Standard burner
D. Accusimmer
®
burner
B
C
D
E
A
WCG51US6D
A. Standard burner
B. SpeedHeat™ burner
C. Accusimmer
®
burner
D. Standard burner
E. Standard burner
WCG9
A. Standard burner
B. FlexHeat™ burner
C. Accusimmer
®
Plus burner
D. Standard burner
E. Standard burner
B
C
D
E
A
Burner Head Placement
■ Burner caps and heads are included with your cooktop.
■ Always match the burner head size to the cap size.
■ Always line up the hole in the burner head to the electrode.
■ The cooktop comes with an extra Melt cap on WCG9 series
models. This is a large cap with “MELT” and “FOR SMALLEST
BURNER” printed on it. Use this cap over the smallest burner
only.
■ Standard, SpeedHeat™ and FlexHeat™ burners are similar
in assembly. Note that there is no hole in the FlexHeat™ dual
flame burner head to insert the electrode. The FlexHeat™
burner electrode (C) aligns with the semicircle notch in the
head (B).
A
B
C
A
B
C
Standard and
SpeedHeat™ Burners
A.Cap
B. Head
C. Electrode
FlexHeat™ Burner
A. Cap
B. Head
C. Electrode
Grate Placement
To install the grates, align the feet on the center grate with the
indents on the cooktop. Then install the 2 outer grates by aligning
the tabs on the center grate with the slots in the outer grates. Be
sure to line up the slots and tabs for proper grate alignment.
A
B
A.Outer grate slot
B. Center grate tab

5
COOKTOP FEATURES
FlexHeat™ Burner
This burner has the flexibility of two burners in one, providing heat
ranges from fast boiling to precise simmering.
■ Power: Select Hi for preparing large quantities of food or to
boil liquids quickly. For best results, rotate the knob to Hi in the
Power range.
■ Simmer: Use Simmer to slowly cook foods or to hold a
simmer. For best results, rotate the knob to the end of the
Simmer range. Only the small flame will light, making this the
best burner for simmering or slow cooking.
A
B
Dual Flame Burner
A. Simmer range
B. Power range
Accusimmer
®
and Accusimmer
®
Plus Burners
The Even-Heat™ Simmer burner is for simmering sauces. Position
the knob closer to Melt for a more delicate simmer level.
Accusimmer
®
Plus
NOTE: The melt cap is available on WCG9 series models only.
Melt: For melting chocolate or butter or an even more delicate
simmer, the melt cap can be used in place of the standard burner
cap on the smallest burner. Set the knob to the “Melt” position.
Remove the small burner cap and replace it with the larger Melt
cap for delicate simmering. For less delicate simmering, use the
small cap.
EZ-2-Lift™ Hinged Cast Iron Grates
Your cooktop comes with hinged grates for easier cleaning. The
grates pivot upward and toward the back of the cooktop for easy
access under the grates.
The grates will stop once they are moved to their vertical (fully
open) position. A 20” (50.8 cm) minimum clearance from the
countertop to the bottom of the upper cabinets/appliances is
needed to fully open the grates.
Be sure to return the grates to their normal (down) position once
cleaning is complete.
The grates are removable for cleaning.
To attach the grates to their hinges, insert the grate slot over the
hinge pin on the back of the cooktop. Be sure to keep the grate
angled above the cooktop to avoid scratching the cooktop until
the grate is seated on the hinge pin. Then position the grate down
onto the cooktop.
A
B
A. Grate slot
B. Hinge pin
SpeedHeat™ Burner
Use the SpeedHeat™ burner for rapid boiling, searing and frying.
The SpeedHeat™ burner is the left rear burner on 30” (76.2 cm)
models and the center burner on 36” (91.4 cm) models.
6
Surface Type Cleaning Recommendation
Control Knobs
(Plastic)
The knobs should be cleaned with soap and water or in the dishwasher.
To remove the knobs, be sure the knobs are in the OFF position.
Do not remove the seals under the knobs.
Burner Grates Soap and Water: Use a nonabrasive plastic scrubbing pad and mildly abrasive cleanser, soap and water.
Dishwasher: The grates may be cleaned in the dishwasher. Remove any burnt on food prior to placing the grates
in the lowest rack in the dishwasher.
To avoid chipping, do not bang grates against each other or hard surfaces, such as cast iron cookware. Although
the grates are durable, they will gradually lose their shine due to exposure to high temperatures.
Burner Caps Use a nonabrasive plastic scrubbing pad and mildly abrasive cleanser, soap and water.
Do not place caps in the dishwasher or reassemble caps on burners when wet.
Burner Base The holes in the burner bases must be kept clean for proper ignition and a complete, even flame.
Refer to “Cleaning the Burners: Tips” in the “Key Usage” section.
Porcelain Enamel
Cooktop Surface
Use a nonabrasive scrubbing pad and glass cleanser or a mild liquid cleaner, such as affresh
®
Kitchen and
Appliance Cleaner, Part Number W10355010.
Stainless Steel
Cooktop Surface
For best results, use a soft cloth or non-scratch sponge.
Rub in direction of the grain to avoid damaging the surface.
Use all-purpose cleaner, such as affresh
®
Kitchen and Appliance Cleaner, Part Number W10355010.
For stainless steel finishes, order affresh
®
Stainless Steel Cleaner, Part Number W10355016.
Do not use scouring pads, abrasive cleaners, cooktop cleaner, steel wool pads, gritty washcloths or abrasive paper
towels.
To order affresh
®
cleaners, call the Whirlpool Customer eXperience center at 1-800-442-9991 or visit
www.whirlpool.com and click on “Service and Support” and then “Replacement Parts.”
In Canada, call 1-800-807-6777 or visit www.whirlpool.ca.
CARE AND CLEANING
IMPORTANT: Before cleaning, make sure all controls are off and the cooktop is cool. Soap, water and a soft cloth or sponge are
suggested first unless otherwise noted. Food spills containing acids, such as vinegar and tomato, should be cleaned as soon the cooktop
is cool. These spills may affect the finish.
ACCESSORIES
Enhance your new cooktop with the following genuine Whirlpool accessories. For more information on options and ordering, call
1-800-442-9991, or visit us at: www.whirlpool.com/accessories. In Canada, call 1-800-807-6777 or visit us at www.whirlpoolparts.ca.
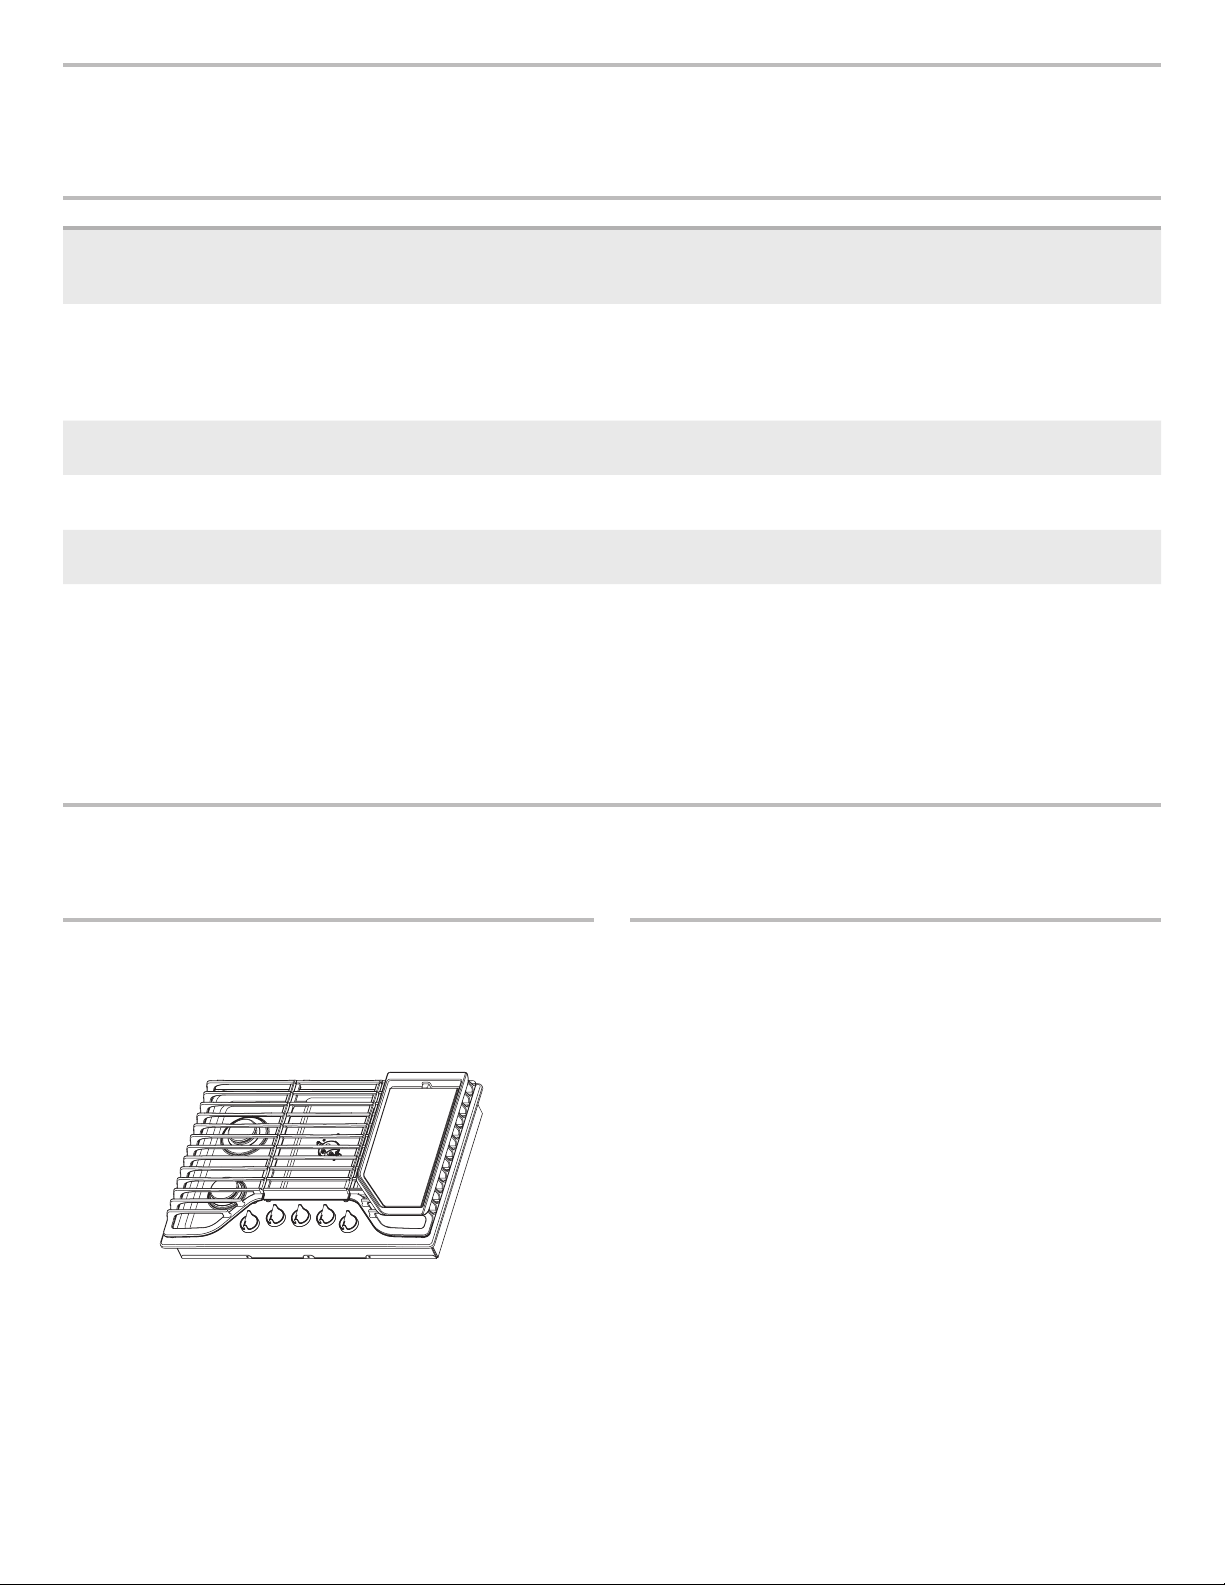
Gourmet Griddle (optional accessory)
A griddle accessory is available for these cooktops. The
griddle provides a large surface for cooking meats, pancakes,
sandwiches, etc. It is designed to match the right grate of your
cooktop without interfering with the controls. Order Part Number
W10685483.
White Ice and Black Ice Collection
To complete the look of your White Ice or Black Ice Whirlpool
kitchen appliances, coordinating knobs can be ordered. Gray
grates are also
Stainless steel color knobs: order Part Number W10698166.
Gray grates: order Part Number W10594440 for model number
WCG51US0DW or Part Number W10594443 for model number
WCG51US6DW.
7
COOKING WITH YOUR COOKTOP
WARNING
Fire Hazard
Do not let the burner flame extend beyond the edge of
the pan.
Turn off all controls when not cooking.
Failure to follow these instructions can result in death
or fire.
Selecting the proper flame size
The flame size should match the cookware you are using. When
you adjust the heat, watch the flame, not the knob. A flame larger
than the bottom of the cookware wastes energy and will heat the
handle.
■ High flame - Start food cooking, bring water to a boil, or pan
broiling.
■ Medium flame - Maintain a slow boil, fry or sauté, thicken
sauces, steam, or stew.
■ Low flame - Keep food cooking, simmer, or keep food warm.
Cookware
Ideal cookware should have a flat bottom, straight sides and a
well-fitting lid. The material should be medium to heavy thickness.
Rough finishes may scratch the cooktop. Aluminum and copper
cookware may be used but may leave permanent marks on the
grates or cooktop. Use the chart below as a guide for cookware
material.
IMPORTANT: Do not leave empty cookware on a hot surface
cooking area or burner.
Canning
When canning for long periods, alternate the use of burners
between batches to allow time for the most recently used area to
cool.
■ Center the canner on the gate.
■ Do not place the canner on 2 burners at the same time.
For more information, contact your local agricultural department or
a company that manufactures home canning products.
REMEMBER: When cooktop is in use, the entire cooktop
area may become hot.
Cookware Characteristics
Aluminum Heats quickly and evenly.
Medium or heavy thickness is best for most cooking tasks.
Cast iron Heats slowly and evenly.
Good for browning and frying.
Maintains heat for slow cooking.
Ceramic or
ceramic glass
Follow manufacturer’s instructions.
Heats slowly and evenly.
Ideal results on low to medium heat.
Copper Heats very quickly and evenly.
Earthenware Follow manufacturer’s instructions.
Use on low heat.
Porcelain
enamel-on-steel
or cast iron
Refer to stainless steel or cast iron.
Stainless steel Heats quickly but unevenly.
A core or base of aluminum or copper on stainless provides even heating.
 Loading...