


FRAMTID  DÅTID
DÅTID 
HGA5K
FI 
 SE
SE 
 NO
NO 
 DK
DK

FI ENGLISH
SE SUOMISVENSKA
NO NORSK
DK DANSK
 Language, Kieli, Språk Språk, Sprog

 Country, valtio, Land, Land, Land
4
18
33
47
61

ENGLISH |
4 |
Table of contents
Safety information |
4 |
Injector table |
10 |
Product description |
6 |
Technical Data |
11 |
Daily use |
7 |
Installation |
11 |
Helpful hints and tips |
7 |
Environmental concerns |
15 |
Maintenance and cleaning |
8 |
IKEA GUARANTEE |
16 |
What to do if ... |
9 |
|
|
Safety Information
Your safety and the safety of others are very important.
This manual and the appliance itself provide important safety messages, to be read and observed at all times.
This is the safety alert symbol, pertaining to safety, which alerts users
to potential hazards to themselves and others.
All safety messages will follow the safety alert symbol and either the terms:
DANGER Indicates a hazardous situation which, if not avoided, will
cause serious injury.
WARNING Indicates a hazardous situation which, if not avoided, could
cause serious injury.
All Safety messages will tell you what the potential hazard is, tell you how to reduce the chance of injury, and tell you what can happen if the instructions are not followed. The appliance must be disconnected from the power supply before carrying out any installation work.
Installation and maintenance must be carried out by a qualified technician, in
compliance with the manufacturer’s instructions and local safety regulations to the relevant gas standard. Only use original spare parts. Do not repair or replace any part of the appliance unless specifically stated in the user manual.
WARNING If the information in this manual is not followed exactly, a fire or
explosion may result causing property damage or injury.
-- Do not store or use gasoline or other flammable vapors and liquids in the vicinity of this appliance.
What to do if you smell gas:
-- Do not try to light any appliance. -- Do not touch any electrical switch.
-- Do not use any phone in your building. -- Immediately call your gas supplier from a neighbor’s phone. Follow the gas
supplier’s instructions.
-- If you cannot reach your gas supplier, call the fire department.
-- Installation and service must be performed by a qualified installer, service agency or the gas supplier.
-- Use appliance in well ventilated rooms only.
-- The electrical and gas connections must comply with local regulations.
-- When the hob is installed, provide a multi-pole circuit breaker with a contact separation of at least 3 mm, that provides full disconnection.
-- Regulations require that the appliance is grounded.
-- The power cable must be long enough for connecting the appliance, once fitted in its housing, to the power supply
-- Use only flexible or rigid metal hose for gas connection.
-- If necessary, the electrical power cable must be replaced exclusively with a power cable having identical characteristics to the original supplied
by manufacturer (type H05V2V2-F 90°C or H05RR-F). This operation must be
ENGLISH |
5 |
performed by a qualified electrician.
-- The manufacturer cannot be held responsible for any injury to persons or animals or damage to property
arising from failure to comply with these requirements.
-- Do not use multiple plug adapters or extension cords.
-- Do not pull the power supply cord in order to unplug the appliance.
-- The electrical components must not be accessible to the user after installation.
-- Do not touch the appliance with any wet part of the body and do not operate it when barefoot.
-- This hob (class 3) is designed solely for private household use for cooking food. Do not use this appliance as a
space heater to heat or warm the room. Doing so may result in carbon monoxide poisoning and overheating of the hob.
-- The Manufacturer declines all responsibility for inappropriate use or incorrect setting of the controls.
-- The appliance is not intended for use by persons (including children) with reduced physical, sensory or mental capabilities, or with lack of experience
and knowledge of the appliance, unless supervised or previously instructed in its use by those responsible for their safety.
-- Young children should be kept away from the appliance and supervised to ensure that they do not play with it.
-- The use of a gas appliance produces heat and humidity in the room. Make sure the room is well-ventilated, or install an extractor hood with exhaust duct.
-- In case of prolonged use, additional ventilation may be necessary (by opening a window or increasing the hood extraction speed).
-- After use, make sure the knobs are in off position and close the main gas supply cock or the gas cylinder valve.
-- Overheated oils and fats catch fire easily. Always remain vigilant when cooking foods rich in fat, oil or alcohol (e.g. rum, cognac, wine).
-- Keep the packaging materials out of the reach of children.
-- Before cleaning or maintenance wait for hob to cool down.
Save these instructions

ENGLISH
Product description
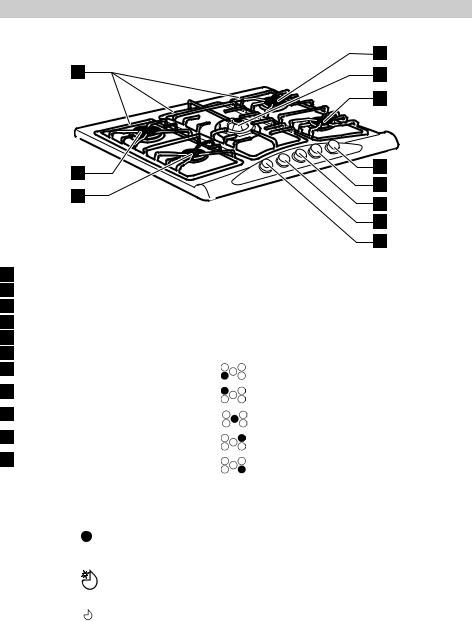
1
3
4
1Removable panstand grids
2Semirapid burner
3Rapid burner
4Auxiliary burner
5Semirapid burner
6Triple crown burner
7Auxiliary burner control knob
8Rapid burner control knob
9Triple crown control knob
10Semirapid burner control knob
11Semirapid burner control knob
Symbols |
|
|
|
Solid disc |
Tap closed |
Large flame |
Maximum |
and star |
opening/delivery |
and electric |
|
|
ignition |
Small flame |
Minimum opening |
or reduced |
|
|
delivery |
6
2
6
5
11
10
9
8
7

ENGLISH
Daily use
Do not let the burner flame extend beyond the edge of the pan.
Important: when the hob is in use, the entire hob area may become hot.
-- To ignite one of the burners, turn the relative knob anti-clockwise to the maximum flame setting.
-- Press the knob against the control panel to ignite the burner.
-- After the burner has ignited, keep the knob pressed for about 5-10 seconds to allow proper device operation.
This burner safety device shuts off the gas supply to the burner if the flame goes out accidentally (because of sudden draught, an interruption in the gas delivery, boiling over of liquids, etc.).
7
-- The knob must not be pressed for more than 15 sec. If, after that time has elapsed, the burner does not remain lit,
wait at least one minute before trying to light it again.
NOTE: should particular local conditions of the delivered gas make the ignition of burner difficult, it is advisable to repeat the operation with the knob turned to small flame setting.
The burner might go out when the knob is released. This means that the safety device has not warmed up enough. In this case, repeat the operations described above.
Helpful hints and tips
This hob has burners of different diameters. For better burner performance, please stick to the following rules:
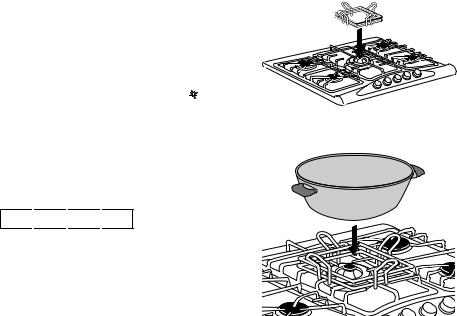
-- Use pots and pans with bottoms the same width as that of the burners or slightly larger (see table on the right).
-- Only use flat-bottomed pots and pans.
-- Use the correct amount of water for cooking foods and keep the pot covered.
-- Make sure pots on the grates do not protrude beyond the edge of the hob.
IMPORTANT: improper use of the grids can result in damage to the hob: do not position the grids upside down or slide them across the hob. Do not use:
-- Cast iron griddles, ollar stones, terracotta pots and pans.
-- Heat diffusers such as metal mesh, or any other types.
-- Two burners simultaneously for one receptacle (e.g. fish kettle).
Burner |
Pot Ø |
|
|
Triple crown |
from 24 to 26 cm |
|
|
Rapid |
from 24 to 26 cm |
|
|
Semi-rapid |
from 16 to 24 cm |
|
|
Auxiliary |
from 8 to 14 cm |
|
|

ENGLISH
Maintenance and cleaning
 Disconnect power before servicing. -- All the enamelled and glass parts
should be cleaned with warm water and neutral solution.
-- Stainless steel surfaces may be stained by calcareous water or aggressive detergents if left in contact for too long. Any food spills (water, sauce, coffee, etc.) should be wiped away before they dry.
-- Clean with warm water and neutral detergent, and then dry with a soft cloth or chamois. Remove baked-on dirt with specific cleaners for stainless steel surfaces.
NOTE: clean stainless steel only with soft cloth or sponge.
-- Do not use abrasive or corrosive products, chlorine-based cleaners or pan scourers.
-- Do not use steam cleaning appliances. -- Do not use flammable products.
-- Do not leave acid or alkaline substances, such as vinegar, mustard, salt, sugar or lemon juice on the hob.
CLEANING THE HOB PARTS
-- Grids, burner caps and burners can be removed to be cleaned.
-- Clean them by hand with warm water and non-abrasive detergent, removing any food residues and checking that none of the burner openings is clogged.
8
-- Rinse and dry
-- Refit burners and burner caps correctly in the respective housings.
-- When replacing the grids, make sure that the panstand area is aligned with the burner.
-- Models equipped with electrical ignition plugs and safety device require thorough cleaning of the plug end in order to ensure correct operation. Check these items frequently, and if necessary, clean them with a damp cloth. Any baked-on food should be removed with a toothpick or needle.
NOTE: to avoid damaging the electric ignition device, do not use it when the burners are not in their housing.
ENGLISH |
9 |
What to do if ...
Problem |
Possible cause |
Solution |
The electric ignition does not |
There is no electrical |
Check the unit is plugged in |
work |
supply |
and the electrical supply is |
|
|
switched on. |
The burner fails to ignite |
The gas tap could be |
Check that the gas tap is |
|
closed |
open |
The gas ring burns unevenly |
Burner crown may |
Clean the burner crown |
|
be occluded by food |
according to cleaning |
|
residues |
instructions to make sure that |
|
|
the burner crown is clear of |
|
|
food residues. |
Before calling the After-Sales Service:
1.Check “Troubleshooting guide” to see if you can eliminate the problem yourself
2.Turn the hob on again to check if correct operation has been restored.
3.If the problem persists, contact the After-
sales Service.
Give the following information:
•type of fault;
•hob model;
•service number (i.e. the number after the word SERVICE on the dataplate under the hob and on the warranty certificate);
•your full address;
•your telephone number.
If any repairs are required, contact an authorised service centre, indicated in the warranty.
In the unlikely event that an operation or repair is carried out by an unauthorised technician, always request certification
of the work carried out and insist on the use of original spare parts.
Failure to comply with these instructions may compromise the safety and quality of the product.

ENGLISH |
10 |
Injector table
Category II2H3B/P
Type of gas used |
Type of |
Injector |
Rated |
Rated |
Reduced |
|
Gas pressure |
|
|||||||
|
burner |
marking |
thermal |
consumption |
heat |
|
(mbar) |
|
|||||||
|
|
|
|
|
flow rate |
|
|
|
capacity |
|
|
|
|
|
|
|
|
|
|
|
|
|
|
|
min. |
|
rat. |
max. |
|||
|
|
|
|
|
kW |
|
|
|
kW |
|
|
||||
|
|
|
|
|
|
|
|
|
|
|
|
|
|
|
|
NATURAL GAS |
triple crown |
|
132 |
3.30 |
|
314 l/h |
2.20 |
|
|
|
|
|
|
||
rapid |
|
Y115 |
3.00 |
|
286 l/h |
0.60 |
|
|
|
|
|
|
|||
(Methane) |
|
|
|
17 |
|
20 |
|
25 |
|||||||
semi-rapid |
|
Z 95 |
1.65 |
|
157 l/h |
0.35 |
|
|
|
||||||
G20 |
|
|
|
|
|
|
|
|
|||||||
auxiliary |
|
X 72 |
1.00 |
|
95 l/h |
0.30 |
|
|
|
|
|
|
|||
|
|
|
|
|
|
|
|
|
|||||||
|
|
|
|
|
|
|
|
|
|
|
|
|
|
|
|
LIQUEFIED |
triple crown |
|
92 |
|
3.30 |
|
240 g/h |
1.90 |
|
|
|
|
|
|
|
PETROLEUM |
|
|
|
|
|
|
|
|
|
||||||
rapid |
|
85 |
|
3.00 |
|
218 g/h |
0.60 |
|
|
|
|
|
|
||
GAS |
|
|
|
|
25 |
|
30 |
|
35 |
||||||
semi-rapid |
|
63 |
|
1.65 |
|
120 g/h |
0.35 |
|
|
|
|||||
(Butane) G30 |
|
|
|
|
|
|
|
|
|
||||||
auxiliary |
|
50 |
|
1.00 |
|
73 g/h |
0.30 |
|
|
|
|
|
|
||
(Propane) G31 |
|
|
|
|
|
|
|
|
|
||||||
|
|
|
|
|
|
|
|
|
|
|
|
|
|
|
|
|
|
|
|
|
|
|
|
||||||||
Type of gas |
Model |
|
|
Rated thermal |
|
Total rated |
Air required (m3) |
||||||||
used |
configuration |
|
flowrate (kW) |
|
consumption |
for burning1m3 |
|||||||||
|
5 BURNERS |
|
|
|
|
|
|
|
of gas |
|
|||||
G20 20 mbar |
3 C - 1 R |
|
|
10.60 |
|
|
1009 l/h |
|
|
9.52 |
|
|
|||
2 SR - 1 AUX |
|
|
|
|
|
|
|
||||||||
|
|
|
|
|
|
|
|
|
|
|
|
|
|||
|
|
|
|
|
|
|
|
|
|
|
|
|
|
|
|
G30/G31 |
3 C - 1 R |
|
|
10.60 |
|
|
771 g/h |
|
|
30.94 |
|
|
|||
30 mbar |
2 SR - 1 AUX |
|
|
|
|
|
|
|
|||||||
|
|
|
|
|
|
|
|
|
|
|
|
||||
|
|
|
|
|
|
|
|
|
|
|
|
|
|
|
|
Electric Power: 230 V ~ 50 Hz
ENGLISH |
11 |
Technical data
Dimensions |
|
Width (mm) |
680 |
Height (mm) |
40 |
Length (mm) |
500 |
Voltage (V) |
230 |
The technical information are situated in the rating plate on the bottom side of the appliance.
Installation
After unpacking the hob, make sure that it has not been damaged during transport. In the event of problems, contact the dealer or your nearest After-sales Service.
Technical information for the installer
-- This product can be embedded in a worktop 20 to 50 mm thick.
-- If there is no oven beneath the hob, insert a separator panel that has a surface at least equal to the opening in the work surface. This panel must be positioned in no case less than 20 mm from the bottom of the hob.
-- Before installation, make sure that:
-- the local gas delivery conditions (nature and pressure) are compatible with the settings of the hob (see the rating plate and injector table);
-- the outer surfaces of the furniture or appliances adjacent to the hob are heat resistant according to local regulations;
-- This appliance is not connected to a
fume exhaust device. It shall be installed in accordance with current installation regulations. Particular attention shall be given to the relevant requirement regarding ventilation.
-- Combustion products are discharged outdoors through specific hoods or wall and/or window mounted electrical fans.
Gas connection
This operation must be performed by a qualified technician.
The gas supply system must comply with local regulations to the relavant gas standard.
-- You can find specific local regulations for some countries in the paragraph
-- “Reference to Local Regulations”. If no information concerning your Country is given, please ask details to a qualified technician.
-- The connection of the hob to the gas pipe network or gas cylinder must be

ENGLISH |
12 |
made by means of a rigid copper or steel pipe with fittings complying with local regulations, or by means of a continuous-surface stainless steel hose complying with local regulations. The maximum length of the hose is 2 linear metres.
A  B
B
 C
C  C
C
-- Connect elbow (A) or (B) supplied with to the hob inlet main pipe and interpose the washer (C) supplied, in compliance with EN 549.
-- Use elbow (A) for France and elbow (B) for all other destinations.
-- IMPORTANT: if a stainless steel hose is used, it must be installed so as not to touch any mobile part of the furniture. It must pass through an area where
there are no obstructions and where it is possible to inspect it on all its length.
-- After connection to the gas supply, check for leaks with soapy water. Light up the burners and turn the knobs from max
position  to minimum position
  to check flame stability
Electrical connection
 WARNING
-- This operation must be performed by a qualified technician.
-- The electrical connections must comply with local regulations.
-- The earthing of this appliance is compulsory by law.
L
Earth
 (yellow/green)
N
-- Do not use an extension cord.
-- IMPORTANT: the data relevant to the voltage and power absorption are indicated on the rating plate.
Assembly
After having cleaned the perimeter surface, apply the supplied gasket to the hob. Position the hob in the worktop opening made respecting the dimensions indicated in the Instruction.
NOTE: the power supply cable must be long enough to permit its upward extraction.
To secure the hob, use the brackets provided with it. Fit the brackets into the relevant bores shown by the arrow and fasten them by means of their screws in accordance with the thickness of the worktop.

ENGLISH |
13 |
Make sure that the outlet is near the product to install. So, if the cable that came with the product is not long enough, you will need to replace it with another one having the same features but with the right length.
Adjustment to different type of gas
 WARNING
-- This operation must be performed by a qualified technician.
If the appliance is intended to operate with a different gas from the gas type stated on the rating plate and information label on the top of the hob, change the injectors. Remove the information label and keep it with the instructions booklet.
Use pressure regulators suitable for the gas pressure indicated in the Instruction.
-- The gas nozzles must be changed by After Sales Service or a qualified technician.
-- Nozzles not supplied with the appliance must be ordered from After Sales Service.
-- Adjust the minimum setting of the taps. NOTE: when liquid petroleum gas is used (G30/G31), the minimum gas setting screw must be tightened as far as it will go. IMPORTANT: should you experience difficulty in turning the burners knobs, please contact the After Sales Service for the replacement of the burner tap if found to be faulty.
Replacing the injectors (see paragraph “injector table”)
-- Remove grids (A). -- Extract burners (B).
-- Using a socket spanner of the appropriate size unscrew the injector (C), unscrew the injector to be replaced.
-- Replace it with the injector suitable for the new type of gas.
-- Re-assemble the injector in (D).
Before installing the hob, remember to affix the gas calibration plate supplied with
the injectors in such a way that it covers the existing information relating to gas calibration.
D 
C
A
B
Adjusting minimum gas setting of taps

 E
E
To ensure that the minimum setting is correctly adjusted, remove the knob (E) and proceed as follows:
-- tighten screw to reduce the flame height
(-);
ENGLISH |
14 |
-- loosen screw to increase the flame height WOK ADAPTER
(+).
The adjustment must be performed with the
tap in minimum gas setting position (small flame ) .
-- The primary air of the burners does not need to be adjusted. -- At this stage, light up the burners and
turn the knobs from max position 
to minimum position  to check flame stability.
Upon completion of adjustment, reseal the work surface using sealing wax or an equivalent material.
SE 
 NO
NO 
 DK
DK 
 FI REFERENCE TO LOCAL REGULATIONS
Ensure that the installation and gas connections are performed by a qualified technician, following the manufacturer’s instructions and in compliance with current local safety regulations.

ENGLISH
Environmental concerns
Packing
-- The packing materials are 100% recyclable and marked with the recycling symbol ( ).
).
Products
This appliance is marked in compliance with European Directive 2002/96/EC on Waste Electrical and Electronic Equipment (WEEE). By ensuring that this appliance is correctly scrapped, the user can help prevent potentially harmful consequences for the environment and the health of people.
The symbol  on the product or accompanying documentation indicates that this product should not be treated as domestic waste but must be taken to a suitable centre for collection and recycling of electrical and electronic equipment. Disposal must be carried out in compliance with local regulations on waste disposal. For further information on the treatment, recovery and recycling of this product, contact your competent local office, the household waste collection service or the shop where you purchased the appliance.
15
Declaration of Conformity 

-- This cooking hob has been designed, constructed and put on the market in conformity with:
-- safety requirements of “Gas” Directive 2009/142/EEC;
-- safety objectives of “Low Voltage” Directive 2006/95/EC (which replaces 73/23/EEC as amended).
-- protection requirements of “EMC” Directive 2004/108/EEC;
-- This hob is suitable for contact with foodstuffs and complies with (EC) Regulation no. 1935/2004.
-- This cooking hob (Class 3) has been designed only for cooking food. Any other use (such as heating a room) is improper and dangerous.

ENGLISH
IKEA GUARANTEE
HowlongistheIKEAguaranteevalid?
This guarantee is valid for five (5) years from the original date of purchase of your appliance at IKEA, unless the appliance is named LAGAN in which case two (2) years of guarantee apply. The original sales receipt, is required
as proof of purchase. If service work is carried out under guarantee, this will not extend the guarantee period for the appliance.
Which appliances are not covered by the
IKEAfive(5)yearsguarantee?
The range of appliances named LAGAN and all appliances purchased in IKEA before 1st of August 2007.
Whowillexecutetheservice?
IKEA service provider will provide the service through its own service operations or authorized service partner network.
Whatdoesthisguaranteecover?
The guarantee covers faults of the appliance, which have been caused by faulty construction or material faults from the date of purchase from IKEA. This guarantee applies to domestic use only. The exceptions are specified under the headline “What is not covered under this guarantee?” Within the guarantee period, the costs to remedy the fault e.g. repairs, parts, labour and travel will be covered, provided that the appliance is accessible for repair without special expenditure. On these conditions the EU guidelines (Nr. 99/44/
EG) and the respective local regulations are applicable. Replaced parts become the property of IKEA.
WhatwillIKEAdotocorrecttheproblem?
IKEA appointed Service Provider will examine the product and decide, at its sole discretion, if it is covered under this guarantee. If considered covered, IKEA Service Provider or its authorized service partner through its own service operations, will then, at its sole discretion, either repair the defective product
16
or replace it with the same or a comparable product.
Whatisnotcoveredunderthisguarantee?
•Normal wear and tear.
•Deliberate or negligent damage, damage caused by failure to observe operating instructions, incorrect installation or by connection to the wrong voltage, damage caused by chemical or electrochemical reaction, rust, corrosion or water damage including but not limited to damage caused by excessive lime in the water supply, damage caused by abnormal environmental conditions.
•Consumable parts including batteries and lamps.
•Non-functional and decorative parts which do not affect normal use of the appliance, including any scratches and possible color differences.
•Accidental damage caused by foreign objects or substances and cleaning or unblocking of filters, drainage systems or soap drawers.
•Damage to the following parts: ceramic glass, accessories, crockery and cutlery baskets, feed and drainage pipes, seals, lamps and lamp covers, screens, knobs, casings and parts of casings. Unless such damages can be proved to have been caused by production faults.
•Cases where no fault could be found during a technician’s visit.
•Repairs not carried out by our appointed service providers and/or an authorized service contractual partner or where nonoriginal parts have been used.
•Repairs caused by installation which is faulty or not according to specification.
•The use of the appliance in a non-domestic environment i.e. professional use.
•Transportation damages. If a customer transports the product to his home or

ENGLISH |
17 |
another address, IKEA is not liable for any damage that may occur during transport. However, if IKEA delivers the product
to the customer’s delivery address, then damage to the product that occurs during this delivery will be covered by IKEA.
•Cost for carrying out the initial installation of the IKEA appliance.
However, if an IKEA appointed Service Provider or its authorized service partner repairs or replaces the appliance under the terms of this guarantee, the appointed Service Provider or its authorized
service partner will reinstall the repaired appliance or install the replacement, if necessary.
These restrictions do not apply to fault-free work carried out by a qualified specialist using our original parts in order to adapt the appliance to the technical safety specifications of another EU country.
Howcountrylawapplies
The IKEA guarantee gives you specific legal rights, which cover or exceed all the local legal demands. However these conditions do not limit in any way consumer rights described in the local legislation.
Area of validity
For appliances which are purchased in one EU country and taken to another EU country, the services will be provided in the framework of the guarantee conditions normal in the new country.
An obligation to carry out services in the framework of the guarantee exists only if the appliance complies and is installed in accordance with:
-the technical specifications of the country in which the guarantee claim is made;
-the Assembly Instructions and User Manual Safety Information.
The dedicated AFTER SALES for IKEA appliances
Please don’t hesitate to contact IKEA
appointed After Sales Service Provider to:
•make a service request under this guarantee;
•ask for clarifications on installation of the
IKEA appliance in the dedicated IKEA kitchen furniture;
•ask for clarification on functions of IKEA appliances.
To ensure that we provide you with the best assistance, please read carefully the Assembly Instructions and/or the User Manual before contacting us.
Howtoreachusifyouneedourservice
Please refer to the last page of this manual for the full list of IKEA appointed After Sales Service Provider and relative national phone numbers.
In order to provide you a quicker service,werecommendtousethe specificphonenumberslistedonthis manual.Alwaysrefertothenumbers listedinthebookletofthespecific appliance you need an assistance for.
PleasealsoalwaysrefertotheIKEA article number (8 digit code) and 12 digit service number placed on the rating plate of your appliance.
SAVE THE SALES RECEIPT!
It is your proof of purchase and required for the guarantee to apply. The sales receipt also reports the IKEA name and article number (8 digit code) for each of the appliances you have purchased.
Doyouneedextrahelp?
For any additional questions not related to After Sales of your appliances please contact your nearest IKEA store call centre. We recommend you read the appliance
documentation carefully before contacting us.

SUOMI |
18 |
Sisällysluettelo
Turvallisuusohjeet |
18 |
Suutintaulukko |
24 |
Tuotteen kuvaus |
20 |
Tekniset tiedot |
25 |
Päivittäinen käyttö |
21 |
Asennus |
25 |
Hyödyllisiä ohjeita ja vinkkejä |
21 |
Ympäristönsuojelu |
29 |
Huolto ja puhdistus |
22 |
IKEA-TAKUU |
30 |
Vianmääritys |
23 |
|
|
Turvallisuusohjeet
Huolehdi omasta ja muiden henkilöiden turvallisuudesta.
Tässä käyttöohjeessa ja itse laitteessa on tärkeitä turvallisuusohjeita. Lue ohjeet ja noudata niitä aina.
Tämä varoitusmerkki ilmoittaa käyttäjälle tai muille henkilöille
aiheutuvasta mahdollisesta vaarasta. Kaikkia turvallisuusohjeita edeltää varoitusmerkki ja toinen seuraavista sanoista:
VAARA: vaaratilanne, joka aiheuttaa vakavia vammoja, ellei sitä vältetä. VAROITUS: vaaratilanne, joka voi aiheuttaa vakavia vammoja, ellei sitä
vältetä.
Kaikissa turvallisuusohjeissa kuvataan mahdollinen vaara, miten tapaturma voidaan välttää ja mitä voi tapahtua, jos ohjeita ei noudateta.
Laite tulee kytkeä irti sähköverkosta ennen minkään asennustoimenpiteen aloittamista.
Asennuksen tai huollon saa suorittaa vain ammattitaitoinen asentaja
valmistajan ohjeiden ja asiaankuuluvaa kaasustandardia koskevien paikallisten turvallisuusmääräysten mukaisesti. Käytä ainoastaan alkuperäisiä varaosia. Älä korjaa tai vaihda mitään laitteen osaa, ellei käyttöohjeessa nimenomaan neuvota tekemään niin.
VAROITUS Jos käyttöohjetta ei noudateta huolellisesti, vaarana on
tulipalo tai räjähdys, joka voi aiheuttaa omaisuustai henkilövahinkoja.
-- Älä säilytä tai käytä bensiiniä tai muita tulenarkoja kaasuja tai nesteitä tämän laitteen läheisyydessä.
Jos tunnet kaasun hajua:
-- Älä yritä sytyttää mitään laitetta.
-- Älä koske mihinkään sähkökytkimeen. -- Älä käytä rakennuksessa olevia
puhelimia.
-- Soita heti kaasulaitokselle naapurin puhelimesta. Noudata kaasulaitoksen ohjeita.
-- Ellet saa yhteyttä kaasulaitokseen, soita palokunnalle.
-- Asennuksen ja huollon saa tehdä vain ammattitaitoinen asentaja, huoltoliike tai kaasun toimittaja.
-- Käytä laitetta vain hyvin ilmastoidussa tilassa.
-- Sähköja kaasuliitännät on tehtävä paikallisten määräysten mukaisesti.
-- Keittotason sähköliitäntään on asennettava vähintään 3 mm:n kosketinvälin suojakytkin, joka irrottaa laitteen kokonaan verkkovirrasta.
-- Laitteen maadoitus on lakisääteinen. -- Virtajohdon on oltava riittävän pitkä,
jotta kalusteeseen asennetun laitteen voi kytkeä pistorasiaan.
-- Käytä kaasuliitännässä ainoastaan metalliletkua tai metalliputkea.
-- Jos virtajohto täytyy vaihtaa, uuden johdon on vastattava valmistajan toimittaman alkuperäisen johdon ominaisuuksia (tyyppi H05V2V2-F 90 °C tai H05RR-F). Virtajohdon saa vaihtaa vain ammattitaitoinen sähköasentaja.
SUOMI |
19 |
-- Valmistaja ei vastaa mistään ihmisille, |
-- Lapset on pidettävä turvallisen |
eläimille tai omaisuudelle aiheutuneista |
välimatkan päässä ja lapsia on |
vahingoista, jos vahinko on syntynyt |
valvottava, jotta he eivät käytä laitetta |
näiden määräysten noudattamisen |
leikeissään. |
laiminlyönnin vuoksi. |
-- Kaasulaitteen käyttö tuottaa huoneeseen |
-- Älä käytä jakopistorasioita tai |
lämpöä ja kosteutta. Varmista, että |
jatkojohtoja. |
tila on hyvin tuuletettu tai asenna |
-- Älä irrota laitteen pistoketta pistorasiasta |
poistohormillinen liesituuletin. |
virtajohdosta vetämällä. |
-- Pitkään kestävä käyttö saattaa vaatia |
-- Kun asennus on tehty, sähköosat eivät |
lisätuuletusta (avaa ikkuna tai lisää |
saa olla käyttäjän ulottuvilla. |
liesituulettimen poistotehoa). |
-- Älä koske keittotasoa märin käsin äläkä |
-- Varmista käytön jälkeen, että säätimet |
käytä sitä paljain jaloin. |
ovat poiskytketyssä asennossa ja sulje |
-- Tämä keittotaso (luokka 3) on tarkoitettu |
kaasuverkon tai kaasupullon hana. |
ainoastaan ruoanvalmistukseen |
-- Ylikuumentunut rasva tai öljy syttyy |
kotitalouksissa. Älä käytä laitetta |
helposti palamaan. Valvo jatkuvasti |
lämmityslaitteena huoneen |
ruoanvalmistusta, jos käytät |
lämmittämiseen. Seurauksena voi |
valmistuksessa runsaasti rasvaa, öljyä tai |
olla häkämyrkytys ja keittotason |
alkoholia (esimerkiksi rommia, konjakkia, |
ylikuumeneminen. |
viiniä). |
-- Valmistaja ei vastaa väärästä |
-- Pidä pakkausmateriaalit poissa lasten |
tai ohjeiden vastaisesta käytöstä |
ulottuvilta. |
aiheutuneista vahingoista. |
-- Anna lieden jäähtyä ennen minkään |
-- Tätä laitetta ei ole tarkoitettu fyysisesti, |
puhdistustai huoltotoimenpiteen |
aisteiltaan tai henkisesti rajoitteisten |
aloittamista. |
tai kokemattomien tai taitamattomien |
Säilytä tämä käyttöohje |
henkilöiden (eikä myöskään lasten) |
|
käyttöön, ellei heidän turvallisuudestaan |
|
vastaava henkilö ole opastanut tai valvo |
|
heitä laitteen käytössä. |
|
SUOMI
Tuotteen kuvaus
1
3
4
1Irrotettavat kattilanalusritilät
2Keskikokoinen poltin
3Iso poltin
4Pieni poltin
5Keskikokoinen poltin
6Kolmoiskruunupoltin
7 Pienen polttimen säätönuppi
8 Ison polttimen säätönuppi
9 Kolmoiskruunun säätönuppi
10 Keskikokoisen polttimen säätönuppi
11 Keskikokoisen polttimen säätönuppi
Symbolit |
|
|
|
Tumma piste |
Hana kiinni |
Suuri liekki |
Suurin avaus/syöttö ja |
|
|
ja tähti |
sähköinen sytytys |
|
|
Pieni liekki |
Pienin avaus tai pienempi |
syöttö |
20
2
6
5
11
10
9
8
7
SUOMI
Päivittäinen käyttö
Älä anna polttimen liekin ulottua keittoastian pohjan yli.
Tärkeää: keittotason koko alue voi kuumentua hyvin kuumaksi keittotason käytön aikana.
-- Poltin sytytetään kääntämällä sen säädin vastapäivään maksimiliekin kohdalle
-- ja painamalla säädintä käyttöpaneelia kohti.
-- Kun poltin on syttynyt, säädintä pitää painaa vielä noin 5–10 sekuntia.
Polttimen turvalaite katkaisee kaasunsyötön polttimeen, jos liekki sammuu vahingossa (vedon, kaasunsyötön keskeytymisen, nesteen ylikiehumisen tms. vuoksi).
Hyödyllisiä ohjeita ja vinkkejä
Keittotasossa on erikokoisia polttimia. Jotta polttimet toimivat kunnolla, noudata seuraavia ohjeita:
-- Käytä kattiloita ja pannuja, joiden pohjan läpimitta on sama tai hieman suurempi kuin polttimen läpimitta (katso oikealla oleva taulukko).
-- Käytä vain tasapohjaisia kattiloita ja pannuja.
-- Käytä oikea määrä vettä ruokien keittämisessä ja peitä kattila kannella.
21
-- Säädintä ei saa painaa pitempään kuin 15 sekuntia. Ellei polttimen liekki jää palamaan tämän ajan jälkeen, odota vähintään minuutti ennen kuin yrität sytyttää liekin uudelleen.
HUOM. Jos polttimen sytyttäminen on hankalaa paikallisen kaasuverkon
olosuhteiden vuoksi, yritä sytyttää poltin säätimen ollessa käännetty pienen liekin asentoon.
Poltin saattaa sammua, kun vapautat säätimen. Tämä tarkoittaa, että turvalaite ei ole lämmennyt tarpeeksi. Tee tässä tapauksessa edellä kuvatut toimenpiteet uudelleen.
-- Tarkista, että ritilöillä olevat keittoastiat eivät ulotu keittotason reunan yli.
TÄRKEÄÄ: Ritilöiden epäasianmukainen käyttö voi vahingoittaa keittotasoa. Älä laita ritilöitä ylösalaisin äläkä vedä niitä keittotason päällä. Älä käytä:
-- Valurautaritilöitä, paistokiviä tai poltettuja saviastioita.
-- Liekinjakajia, kuten metalliverkkoja tms. -- Kahta poltinta samanaikaisesti yhdelle keittoastialle (esimerkiksi kalakattilalle).
Poltin |
Kattila Ø |
|
|
Kolmoiskruunu |
24 - 26 cm |
|
|
Iso |
24–26 cm |
|
|
Keskikoko |
16 - 24 cm |
|
|
Pieni |
8 - 14 cm |
|
|

SUOMI
Huolto ja puhdistus
 Kytke laite irti sähköverkosta ennen huoltotöiden aloittamista.
-- Kaikki emalija lasiosat puhdistetaan lämpimällä vedellä ja miedolla puhdistusaineella.
-- Kalkkipitoinen vesi tai voimakkaat puhdistusaineet voivat jättää läiskiä ruostumattomiin teräspintoihin pitkäaikaisessa kosketuksessa. Poista keittotasolle roiskunut ruoka (vesi, kastike, kahvi tms.) ennen kuin se ehtii kuivua.
-- Puhdista lämpimällä vedellä ja neutraalilla puhdistusaineella ja kuivaa pehmeällä liinalla tai säämiskällä. Poista kiinnipalanut lika ruostumattomille teräspinnoille tarkoitetulla erikoispuhdistusaineella.
HUOM. Käytä ruostumattomien teräspintojen puhdistuksessa vain pehmeää liinaa tai sientä.
-- Älä käytä hankaavia tai syövyttäviä aineita, klooripitoisia valkaisuaineita tai hankaussieniä.
-- Älä käytä höyrypuhdistuslaitteita. -- Älä käytä tulenarkoja aineita.
-- Älä jätä keittotason päälle happamia tai emäksisiä aineita, kuten
etikkaa, sinappia, suolaa, sokeria, sitruunamehua tms.
KEITTOTASON OSIEN PUHDISTAMINEN
-- Ritilät, polttimien hatut ja polttimet voidaan irrottaa puhdistusta varten.
-- Puhdista ne haalealla vedellä ja hankaamattomalla puhdistusaineella. Poista varovasti kaikki ruoanjäänteet ja tarkista, että polttimen aukot eivät ole tukossa.
22
-- Huuhtele ja kuivaa huolellisesti.
-- Aseta polttimet ja polttimien hatut oikein paikoilleen.
-- Kun laitat ritilät takaisin paikalleen, tarkista, että kattilan alustan alue on polttimen kohdalla.
-- Jos keittotasossa on elektroninen sytytin ja turvalaite, sytyttimen pää on puhdistettava huolellisesti, jotta se toimii kunnolla.
Tarkista nämä osat säännöllisesti ja puhdista tarvittaessa kostealla liinalla. Irrota kiinnipalanut ruoka hammastikulla tai neulalla.
HUOM. Elektronista sytytintä ei saa käyttää, kun polttimet eivät ole paikoillaan, jotta se ei vaurioidu.

SUOMI |
23 |
Vianmääritys
Ongelma |
Mahdollinen syy |
Ratkaisu |
Elektroninen sytytys ei toimi. |
Laitteeseen ei tule |
Tarkista, että laite on kytketty |
|
sähkövirtaa. |
verkkovirtaan ja virta on |
|
|
kytketty laitteeseen. |
Poltin ei syty. |
Kaasuhana saattaa olla |
Tarkista, onko kaasuhana |
|
kiinni. |
auki. |
Kaasuliekki palaa |
Polttimen kruunu |
Puhdista polttimen kruunu |
epätasaisesti. |
voi olla tukkeutunut |
puhdistusohjeita noudattaen |
|
ruoanjäänteistä. |
ja tarkista, että kruunussa ei |
|
|
ole ruoanjäänteitä. |
Ennen kuin otat yhteyttä huoltoon:
1.Lue kohta Vianmääritys ja tarkista, voitko poistaa ongelman omatoimisesti
2.Kytke keittotaso uudelleen toimintaan ja tarkista, toimiiko se oikein.
3.Jos ongelma ei poistu, ota yhteys
valtuutettuun huoltoliikkeeseen. Ilmoita seuraavat tiedot:
•toimintahäiriön laatu
•keittotason malli
•huoltokoodi (numero, joka on merkitty sanan SERVICE perään keittotason alla olevaan arvokilpeen sekä takuukorttiin)
•täydellinen osoitteesi
•puhelinnumerosi.
Jos korjausta tarvitaan, ota yhteys takuutiedoissa mainittuun valtuutettuun huoltoliikkeeseen.
Jos huoltotai korjaustyön jostakin syystä tekee joku muu kuin valtuutettu huoltoliike, pyydä aina vahvistus tehdystä työstä ja vaadi alkuperäisten varaosien käyttöä. Näiden ohjeiden noudattamisen laiminlyönti voi heikentää tuotteen turvallisuusja laatuominaisuuksia.
 Loading...