


How to use LP389 IP Phone HTTP provision feature
The Purpose of this document is to describe procedures to create an auto provision based on HTTP
platform for IP Phone LP389 and LP600N.
1. IP Phone MAC.cfg file Generation...........................................................................................1
Step 1. Build MAC address list for mass configuration file generation................................1
Step 2. Create a template configuration file ............................................................................1
Step 3. Make the change of “wtegencfg.ini” as follows if it is necessary...............................1
Step 4. Generate the individual configuration file. .................................................................2
Additional Notes to above steps................................................................................................2
2. HFS HTTP Server Setup...........................................................................................................4
Step 1. Setup HTTP server network.........................................................................................4
Step 2. Execute HFS Server.......................................................................................................4
Step 3. Setting Server User name and Password.....................................................................5
Step 4. Add configuration file or firmware..............................................................................6
3. LP389 Provision Setting and Server Message.........................................................................9
Step 1. LP389 Web for provision function ...............................................................................9
Step 2. MAC Address.cfg Messages........................................................................................10
Step 3. Firmware Upgrade Message.......................................................................................10
Note............................................................................................................................................11
4. Provisioning Debug..................................................................................................................12
Mode 1: Telnet..........................................................................................................................12
Mode 2: SYSLOG....................................................................................................................14
1. IP Phone MAC.cfg file Generation
Go to Welltech technical support webpage to download auto provision information of LP389 and
LP600N and start the following steps.
Step 1. Build MAC address list for mass configuration file generation
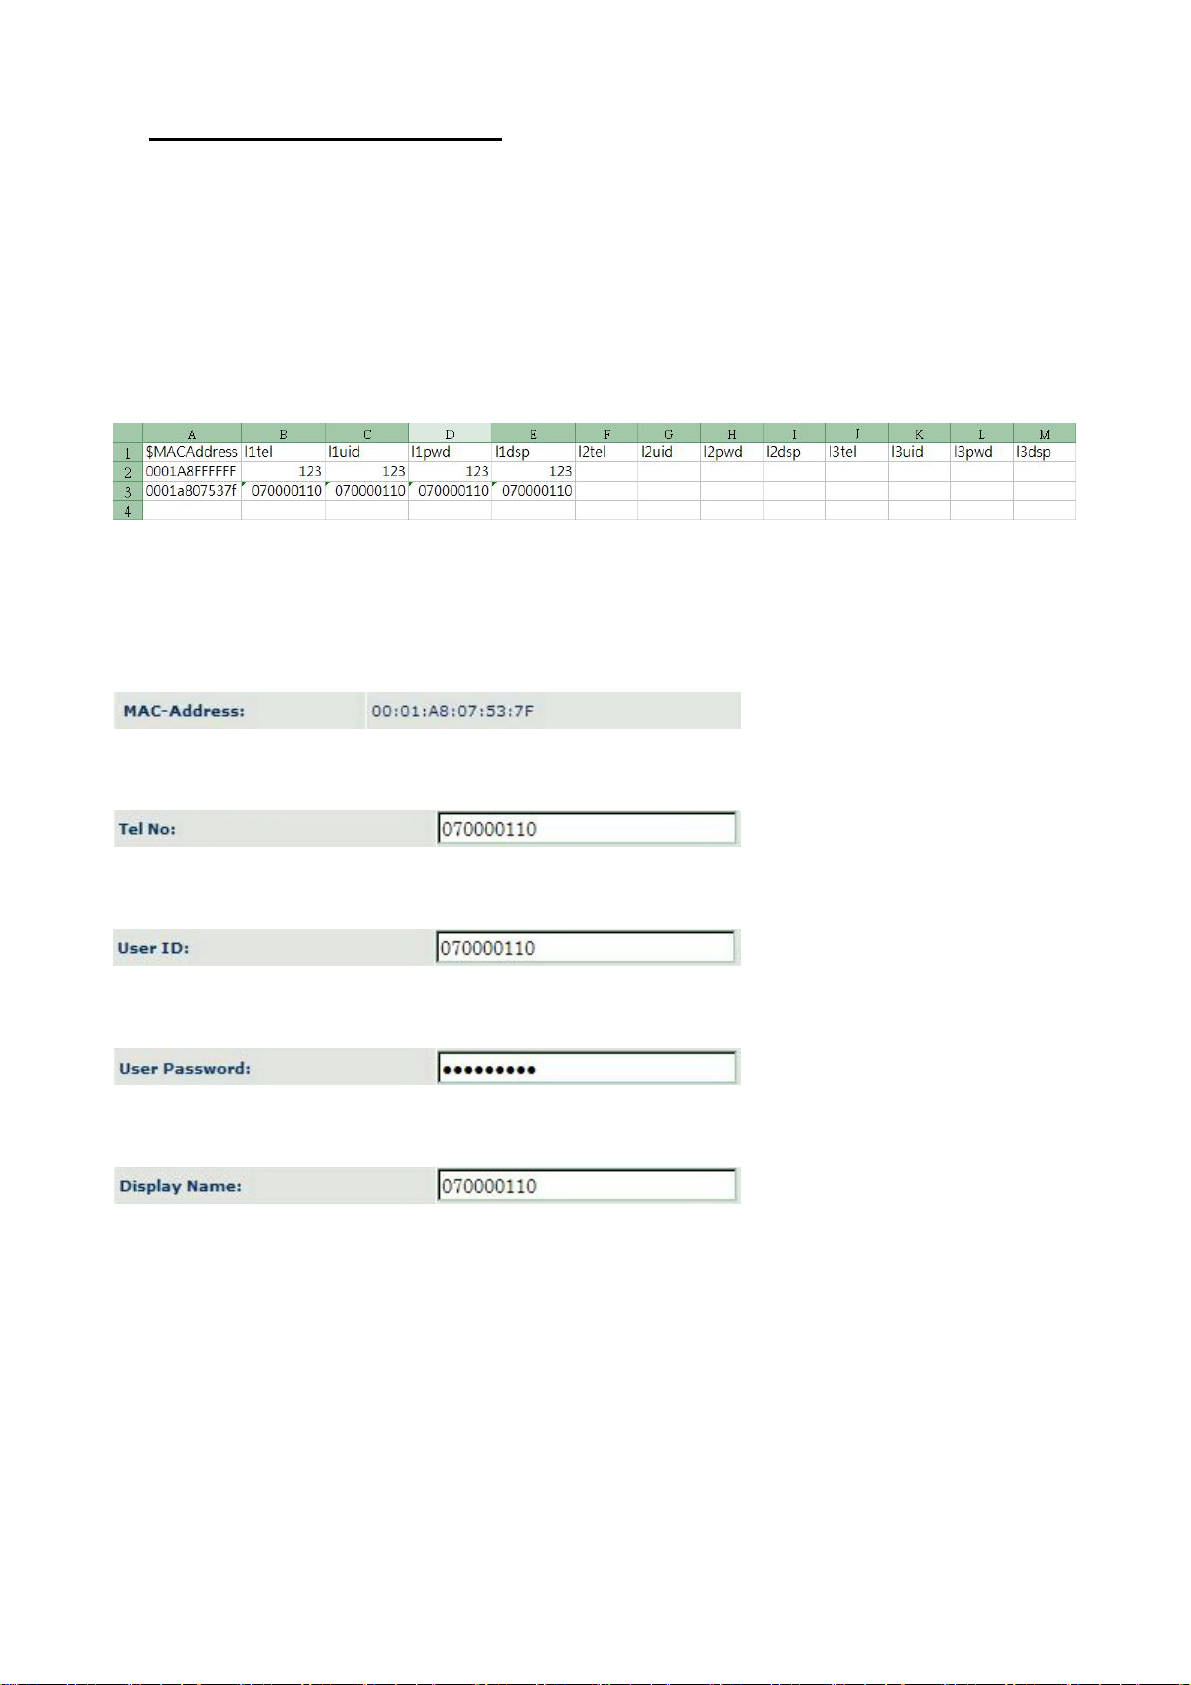
Open the “ LP389 MAC.csv” file by using Microsoft Excel program. Refer to the picture below.
You should ask for Welltech to provide you MAC address list by Excel file when you place an order.
Or, you can build an Excel file with MAC address by yourself. This file is used to generate auto
provision MAC address profile for each device.
The “MAC.csv” file contains most frequent configurable parameters at each column of Excel file as
follows.
Column A : MAC Address
Enter MAC address of this device which you are going to edit. The MAC address can be found
from device webpage or sticker at bottom of enclosure.
Column B, F, J : l1tel to l3tel
Telephone number ( Tel No ) of Line1, Line2 and Line3 are filled in these columns.
Column C, G, K : l1uid~l3uid
User ID of Line1, Line2 and Line3 are filled in these columns.
Column D, H, L : l1pwd~l3pwd
User Password of Line1, Line2 and Line3 are filled in these columns.
Column E, I, M : l1dsp~l3dsp
Display Name of Line1, Line2 and Line3 are filled in these columns.
Step 2. Create a template configuration file
Open the “LP389 Parameter.txt” file and make the required changes. Make the changes for those
necessary provision and SIP proxy setting. For details, please refer to file of “ LP389
Parameter.txt ”.
Step 3. Make the change of “wtegencfg.ini” as follows if it is necessary.
# T emp late File
BaseFile = .\LP389 Parameter.txt
# MAC list file
Released Version 1.0
1
ListFile = .\LP389 MAC.csv
# 0 : Off , 1: On
Encrypt = 0
Step 4. Generate the individual configuration file.
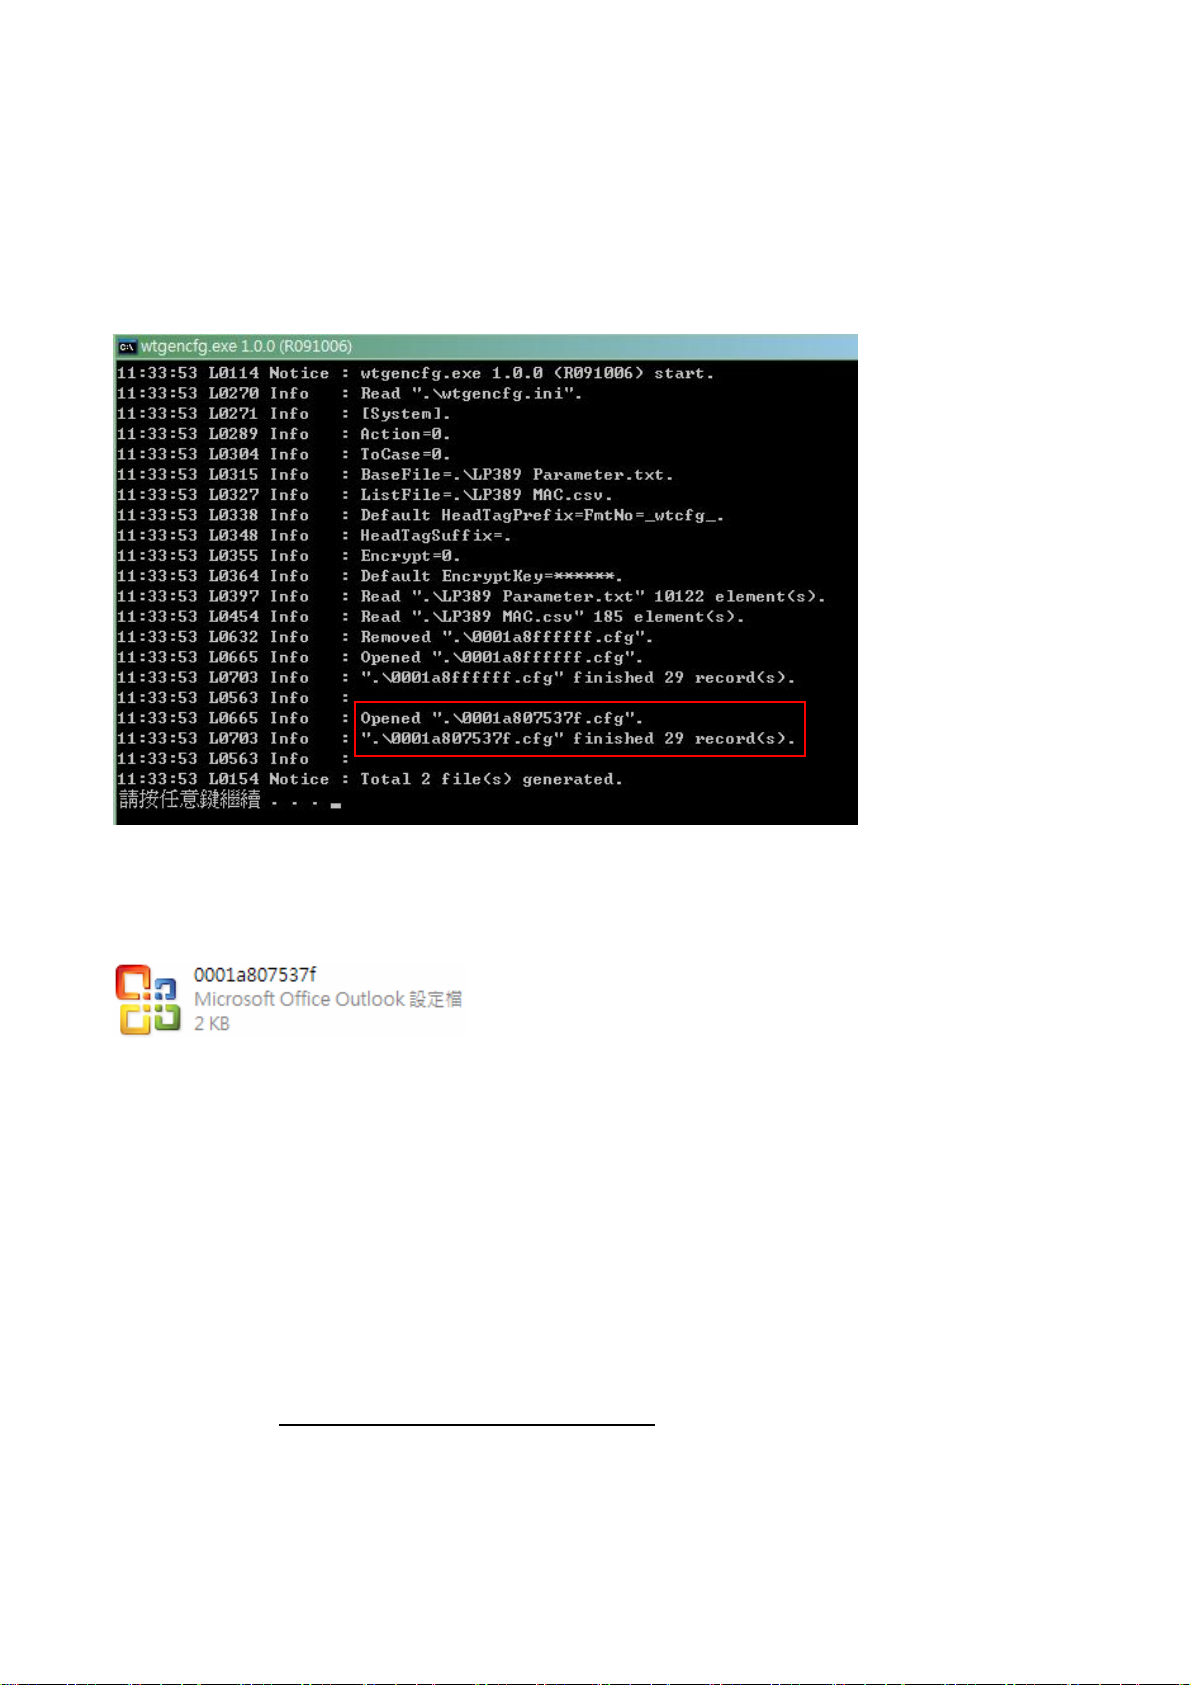
Double click the “wtgencfg.exe” file, it will generate the configuration file for each MAC address
list in “MAC address.cfg” format as the following pictures.
This program ( wtgencfg.exe ) generates an cfg file by using MAC Address as its name as shown
below. Please note this file is .cfg format and Windows recognize it as Office Outlook set up file
with the following display.
Additional Notes to above steps.
1. The “LP389 Parameter.txt” contains classification and detailed description of each parameter.
2. To configure common parameters to each phone set such as SIP Server IP address, SIP port
number or voice codec priority, please modify “LP389 Parameter.txt” file.
3. To configure unique parameters to each phone set such as Account number, registration password,
you need to modify “LP389 MAC.csv” file.
Please take caution to both files Parameter.txt and MAC.csv before you start to create your
desire features.
4. If you want to upgrade firmware via auto provision, you have to open “LP389 Parameter.txt ”
file and modify the parameter “frmurl”. There are two formats that can be used.
(1) /firmware name.bin
(2) http:// User name:Password@provision server address:port number/firmware name.bin
Released Version 1.0
2
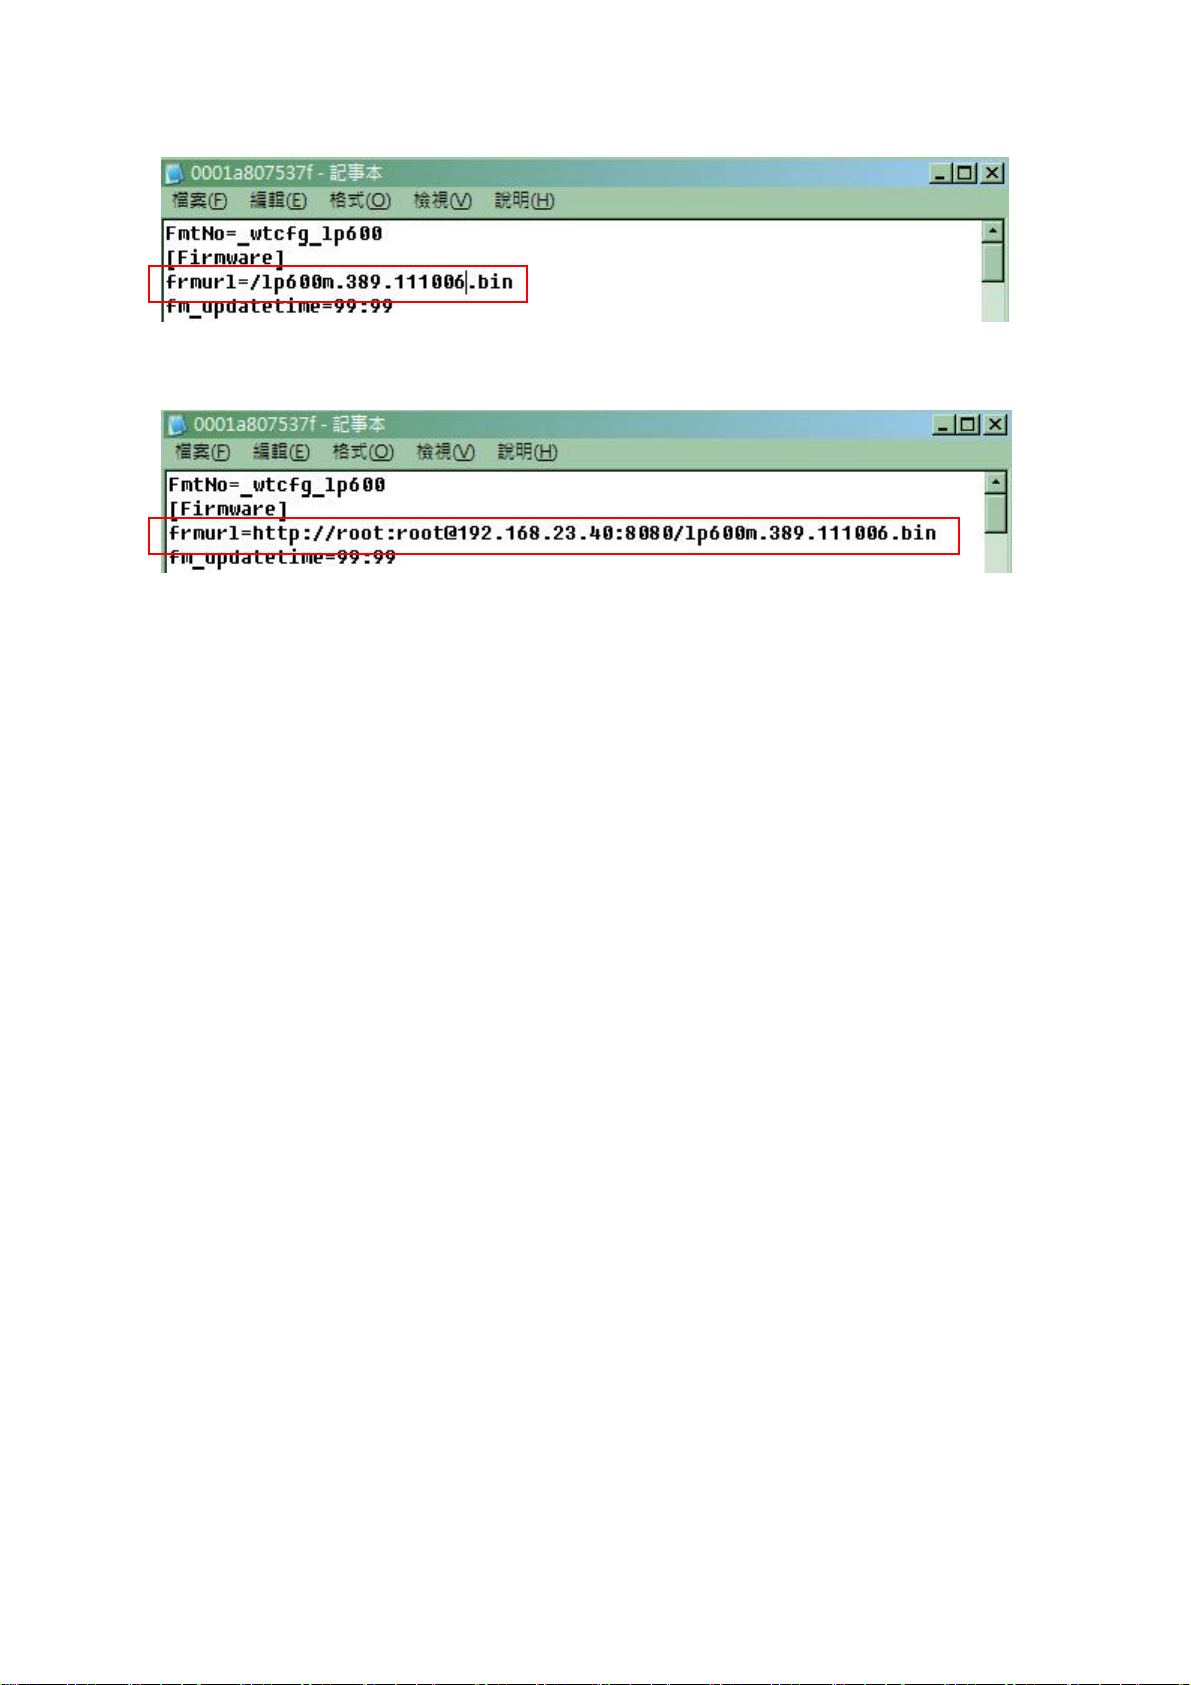
Example (1)
Example (2) :
Released Version 1.0
3
2. HFS HTTP Server Setup
You can use HFS as your HTTP server and refer to the following steps to create your HTTP server.
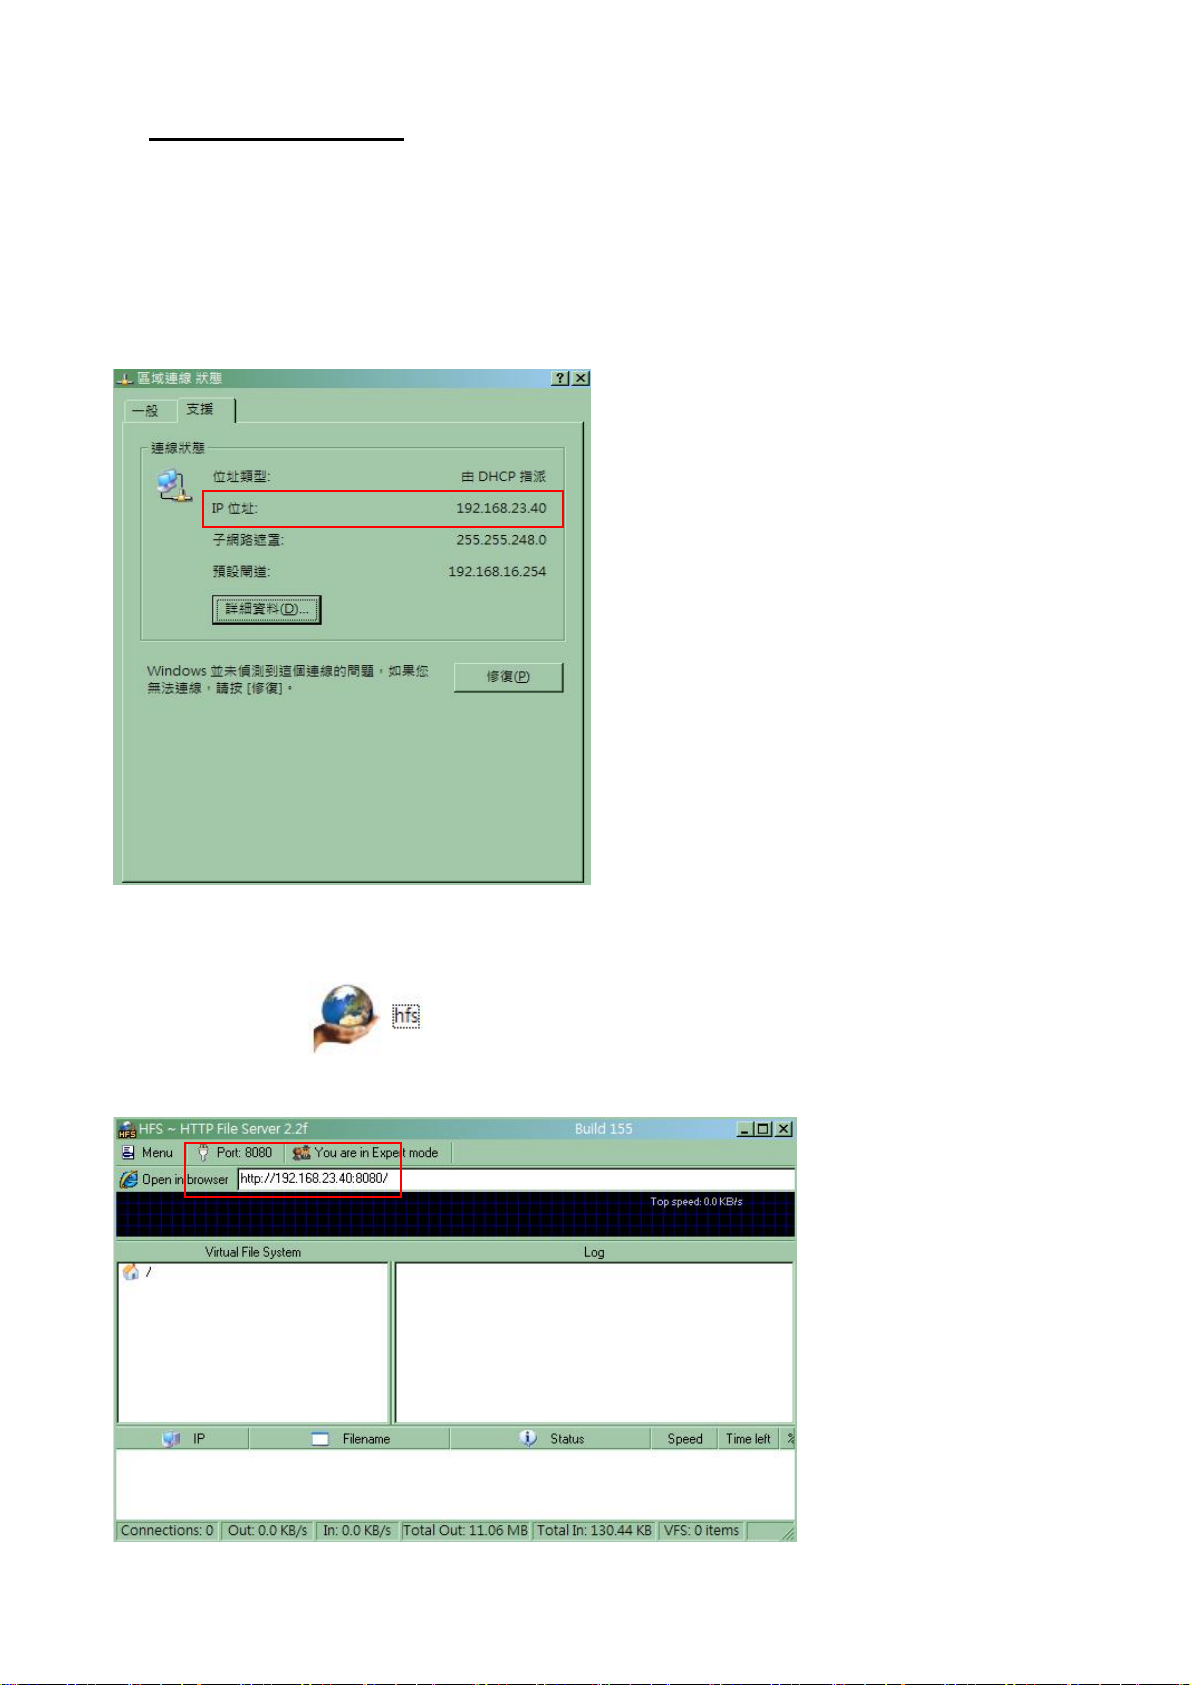
Step 1. Setup HTTP server network
Confirm the network settings on the computer in which you want it to work as HFS HTTP server.
For example: IP address 192.168.23.40
Step 2. Execute HFS Server
(1) Press “HFS.exe”
(2) Open HTTP software.
Released Version 1.0
4
You can see your server IP “http://192.168.23.40”and this example port is 8080. The server Port can
be changed.
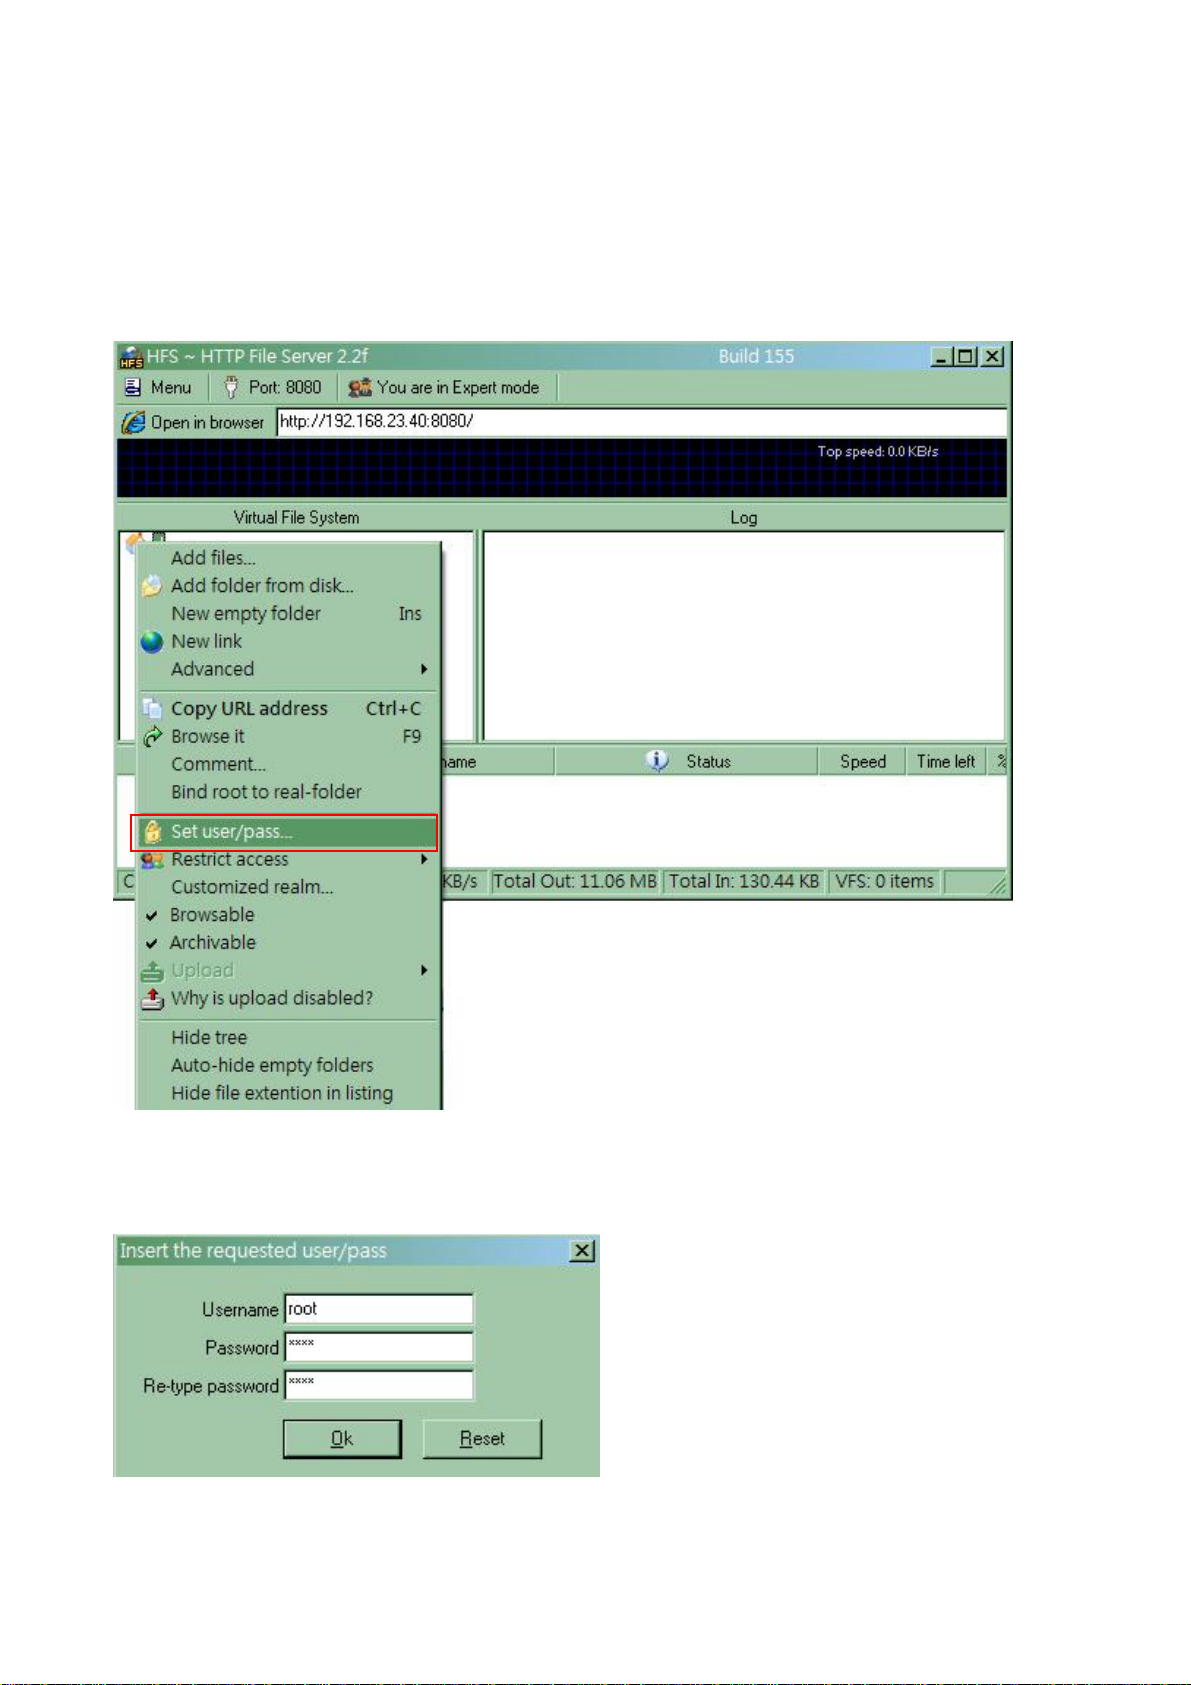
Step 3. Setting Server User name and Password
If you don’t need set “User / Password”, you can skip this step.
(1) Select the house Icon in Virtual File System. Right-click and select “Set user/pass..”.
(2) Enter HTTP server User name and Password, Re-type password. For this example, User name is
root, Password is root.
Released Version 1.0
5

(3) User name and Password Setting are completed.
Step 4. Add configuration file or firmware
(1) Select the house icon in Virtual File System. Right-click and select “Add files”.
Released Version 1.0
6

(2) Select IP Phone “ MAC.cfg” file or firmware and import to this window.
For example:
MAC.cfg file is 0001a807537f.cfg
Firmware file is lp600m.389.111006.bin
(3)
Press “Open in browser” button to activate the Internet Explorer browser.
Released Version 1.0
7

Enter your setting of HFS HTTP server User Name and Password. If you don’t set, you can skip.
See the following screen setup successfully.
Released Version 1.0
8

3. LP389 Provision Setting and Server Message
Step 1. LP389 Web for provision function
Enter LP389 web browser HTTP URL address. Select the left function “Device Setting” at
“Provisioning” to configure.
(1) Provisioning Type : Please select HTTP type.
(2) HTTP Config URL : Enter your HTTP server IP and Port number.
(3) Refresh Interval (minute) : The interval time is for LP389 IP Phone to access HTTP server to
check .cfg file if there are any new firmware to update.
(4) User ID : HTTP server User ID.
(5) Password : HTTP server Password.
Released Version 1.0
9

Step 2. MAC Address.cfg Messages
HTTP server will show .cfg file to check its messages. Confirm if message is consistent, then start
to download configuration.
Step 3. Firmware Upgrade Message
Provision function will check IP Phone firmware automatically. If existing firmware of IP Phone is
different with the firmware version on the “LP389 MAC.cfg” file, IP Phone will start to upgrade
new firmware from cfg file.
(1) Confirm if message is consistent, then start to download firmware.
Released Version 1.0
10

(2) Firmware upgraded is completed. Log message on Window show the messages.
Note.
1 – If the firmware upgrade process is starting, please don’t remove power on both IP Phone and
HTTP Server.
2 – During firmware update, it takes lots of CPU resources and loading, cause Computer
performance deterioration.
3 – After the upgrade messages, please wait for 1 or 2 minutes. LP389 LCD will display
“Upgrade…” message. Then LP389 reboot itself after upgraded procedures are completed.
Released Version 1.0
11

4. Provisioning Debug
If the provisioning has any problem, you can use the debug function from LP389 webpage. There
are two ways you can use. Please refer to the following steps to open the debug function. Enter your
LP389 web browser. Select the left function “Device Setting” at “Debug” to set. Then select
“emsclt” Debug Level : Debug.
Press button to complete setting.
Mode 1: Telnet
Step 1. Check your IP Phone network address
Step 2. Set up IP address of your computer which you are going to monitor debug messages. Both
the computer network address and IP Phone address should stay at the same subnet.
Step 3. Use Windows DOS command to login the LP389 IP Phone.
Released Version 1.0
12
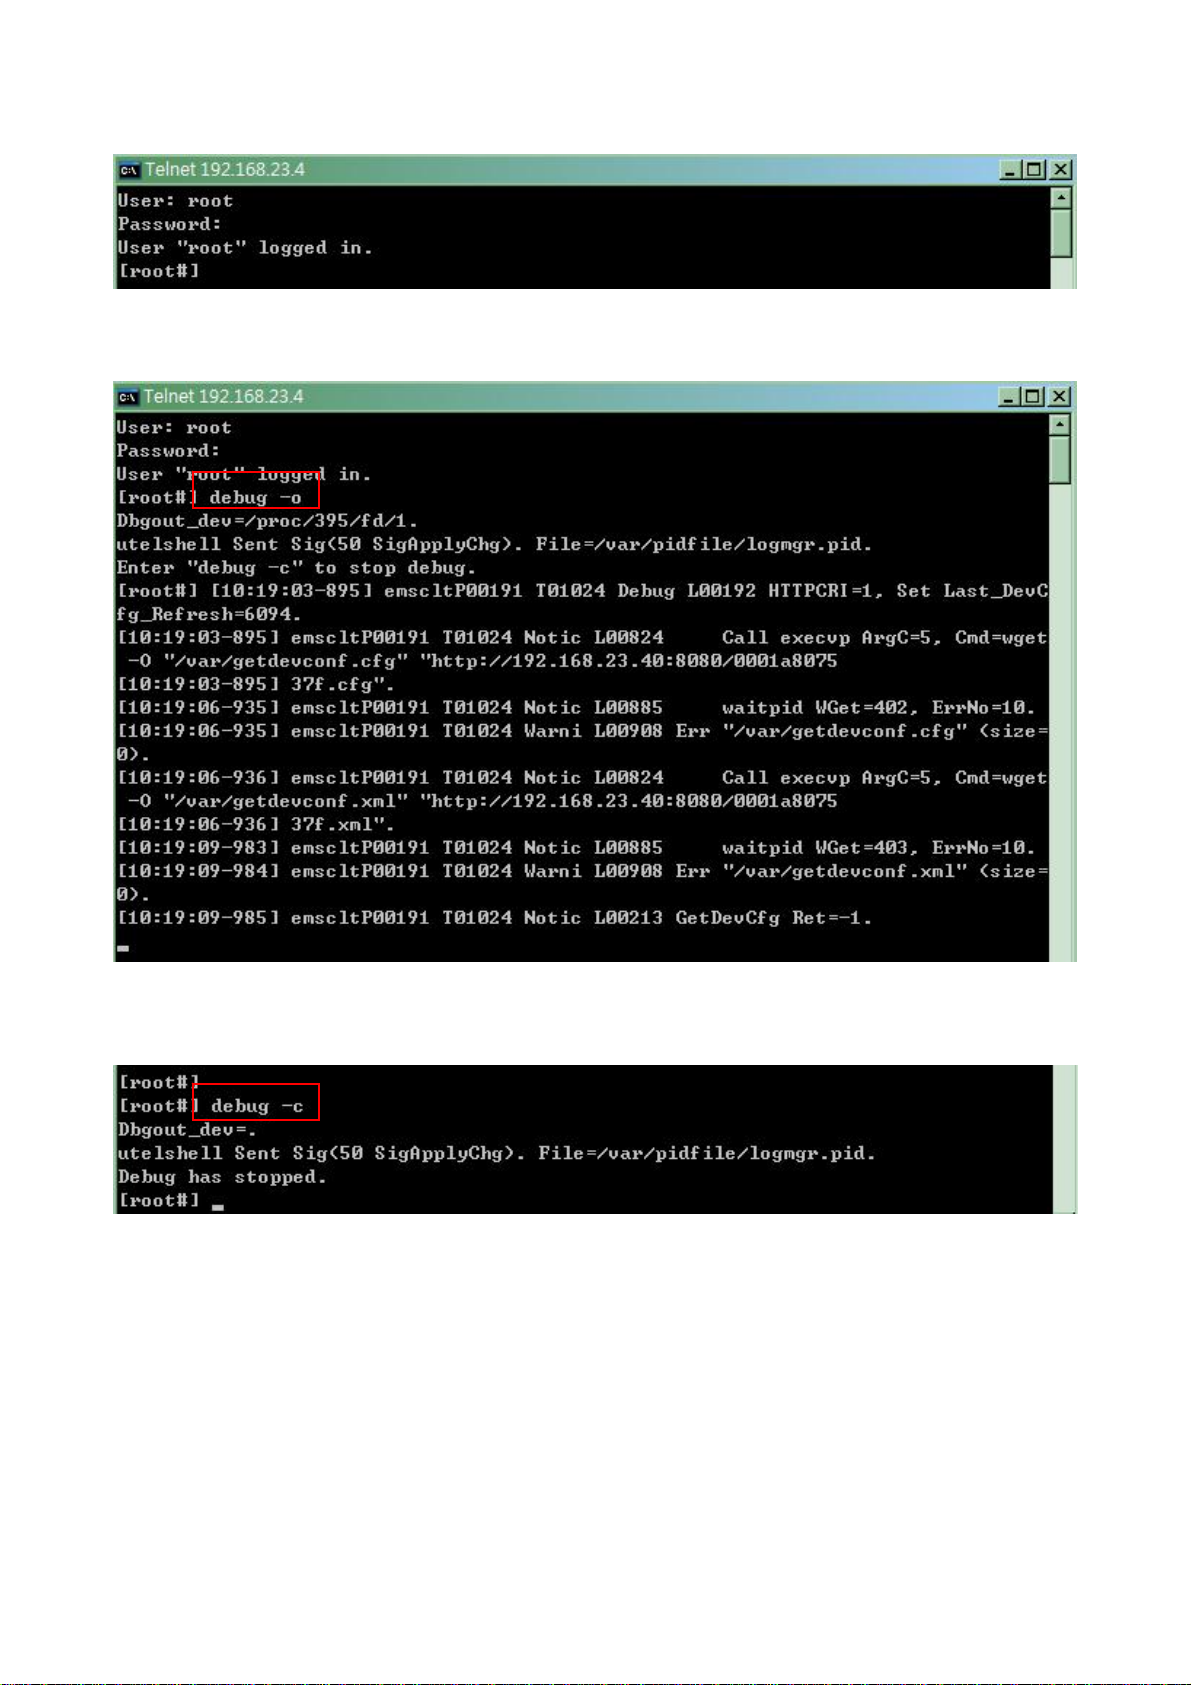
Step 4. Enter User Name : root, and Password : root (default)
Step 5. Enter “debug –o” to open the debug message.
To close the debug mode, please enter command “debug –c”.
Released Version 1.0
13

Mode 2: SYSLOG
You can use TFTP as your SYSLOG server and refer to the following steps to create your SYSLOG
server.
Step 1. Check your IP Phone network address.
Step 2. Set up IP address of your computer which you are going to monitor debug messages. Both
the computer network address and IP Phone address should stay at the same subnet.
Step 3. Press “TFTP.exe”
Step 4. Press the setting button.
The IP address in Server interfaces field is your computer network address and syslog server
address.
Released Version 1.0
14

Step 5. Please follow your demand to configure related settings.
(A) Base Directory : Choose the path to store syslog.txt.
(B) Global Settings : Select “Syslog Server” to establish your syslog server.
(C) Syslog server : Select the “Save syslog messages” and modify the log file name.
A
B C
Press ” OK “ button to complete setting.
Released Version 1.0
15

Step 6. Setting your LP389 SYSLOG configuration.
Enter your LP389 web browser. Select the left function “Device Setting” at “Debug” to set.
(1) SYSLOG : Select the “Enable” button to open the SYSLOG function.
(2) Check for start from Any Time : When You choose this function, the syslog message will be sent
out to pre-configured address immediately. If you want to receive Syslog messages at a certain
period of time, simply disable this selection.
(3) Syslog Start (YYYY/MM/DD HH:MM) : Syslog message start to send out date and time.
(4) Syslog Stop (YYYY/MM/DD HH:MM) : Syslog message stop to send out date and time.
(5) Syslog Server : Enter your TFTP server address.
(6) Syslog Port : Syslog default port is 514.
Press to complete syslog setting.
Released Version 1.0
16

Step 7. Syslog message will be output to your server.
(1) In Tftp32 Syslog server windows, It can monitor the syslog message.
(2) If you save the syslog message file, you can find syslog file under the path.
Released Version 1.0
17
 Loading...