


Welltech LP-803 User Manual

LAN Phone 803
User Manual
LP803 Series
IP Phone
User Manual
Version: V1.0
Welltech Technology Co., Ltd.
1 / 90 2014/07/22

Version directions:
Version
1.0 2014/07/22 First release of New v3.7 web page user operation.
date Modify content
LAN Phone 803
User Manual
Welltech Technology Co., Ltd.
2 / 90 2014/07/22

LAN Phone 803
User Manual
Directory
1. Brief Introduction .................................................................................. 5
1.1. Product Introduction ............................................................................................ 5
1.2. Hardware Function Introduction ...................................................................... 5
1.3. Software Function Introduction ....................................................................... 5
1.4. Rear Interface Description ................................................................................. 6
1.5. Hardware Installation .......................................................................................... 6
1.5.1. Network Environment Setting .................................................................. 7
1.5.2. Connection ....................................................................................................... 7
1.6. Basic Operations .................................................................................................... 7
1.6.1. Phone function ................................................................................................ 7
1.6.2. Dial function Introduction ........................................................................ 14
2. Web Page............................................................................................. 15
2.1. Web Login Level Table ....................................................................................... 15
2.2. Login LP803 Web Page ...................................................................................... 16
2.2.1. Functions ........................................................................................................ 16
2.2.2. Instruction ...................................................................................................... 17
2.3. VoIP Setup Manu ................................................................................................. 17
2.3.1. Functions ........................................................................................................ 17
2.3.2. Instruction ...................................................................................................... 17
2.4. Status (System Information) .......................................................................... 18
2.4.1. Functions ........................................................................................................ 18
2.4.2. Instruction ...................................................................................................... 18
2.5. Phone (Telephony environment) ................................................................... 23
2.5.1. Phone Book ....................................................................................................... 23
2.5.2. Speed Dial ......................................................................................................... 26
2.5.3. Dial Plan - Basic .............................................................................................. 28
2.5.4.Dial Plan – Advanced ..................................................................................... 31
2.5.5. Call Service (Phone Feature) ..................................................................... 33
2.5.6. General (Normal Setting) ........................................................................... 36
2.5.7. Volume ............................................................................................................... 36
2.6. Network ................................................................................................................... 38
2.6.1 WAN .................................................................................................................. 38
2.6.2. DDNS (Dynamic DNS Settings) ................................................................ 40
2.6.3. VLAN (VLAN Environment Settings) ....................................................... 41
2.6.4. VPN (PPTP/L2TP Link Type)........................................................................ 42
2.6.5. NTP (Time Environment) ............................................................................. 44
2.7. NAT (NAT Environment) .................................................................................... 48
2.7.1. LAN (LAN Network Setting) ....................................................................... 48
2.7.2. DMZ & MAC Clone (DMZ & MAC Setting) ............................................. 49
2.7.3. Virtual Server .................................................................................................. 50
2.8. SIP Setting (Register Environment) ............................................................. 52
2.8.1. Service (SIP Register Setting) ............................................................... 52
2.8.2. Codec (Voice Format) ................................................................................ 54
2.8.3. Advanced (Other Setting) ........................................................................ 56
2.8.4. STUN (STUN & Force Setting) ................................................................ 62
Welltech Technology Co., Ltd.
3 / 90 2014/07/22

LAN Phone 803
User Manual
2.9. Management (Advanced Settings) ............................................................... 64
2.9.1. Status Log (System Status) .................................................................... 64
2.9.2. Auto Provision (Configuration Automatically) .................................. 66
2.9.3. Auto Update (Firmware Auto Upgrade) .............................................. 73
2.9.4. Firmware (Firmware Upgrade) ............................................................... 77
2.9.5. Advanced (Advanced Settings) .............................................................. 78
2.9.6. Password (Change Login Account) ....................................................... 82
2.9.7. Tones (Audio Frequency Set up) ........................................................... 84
2.9.8. Default (Reset to Default) ........................................................................ 88
2.9.9. Language ........................................................................................................ 89
2.10. Save & Reboot ...................................................................................................... 90
2.10.1. Functions ........................................................................................................ 90
2.10.2. Instruction ...................................................................................................... 90
2.11. Logout (Logout System) ................................................................................... 90
2.11.1. Functions ........................................................................................................ 90
2.11.2. Instruction ...................................................................................................... 90
Welltech Technology Co., Ltd.
4 / 90 2014/07/22

LAN Phone 803
User Manual
1. Brief Introduction
1.1. Product Introduction
This user manual is applicable for LP803 series VoIP phone device. The chapter will be
targeted device detailed function and web page configuration introduction.
1.2. Hardware Function Introduction
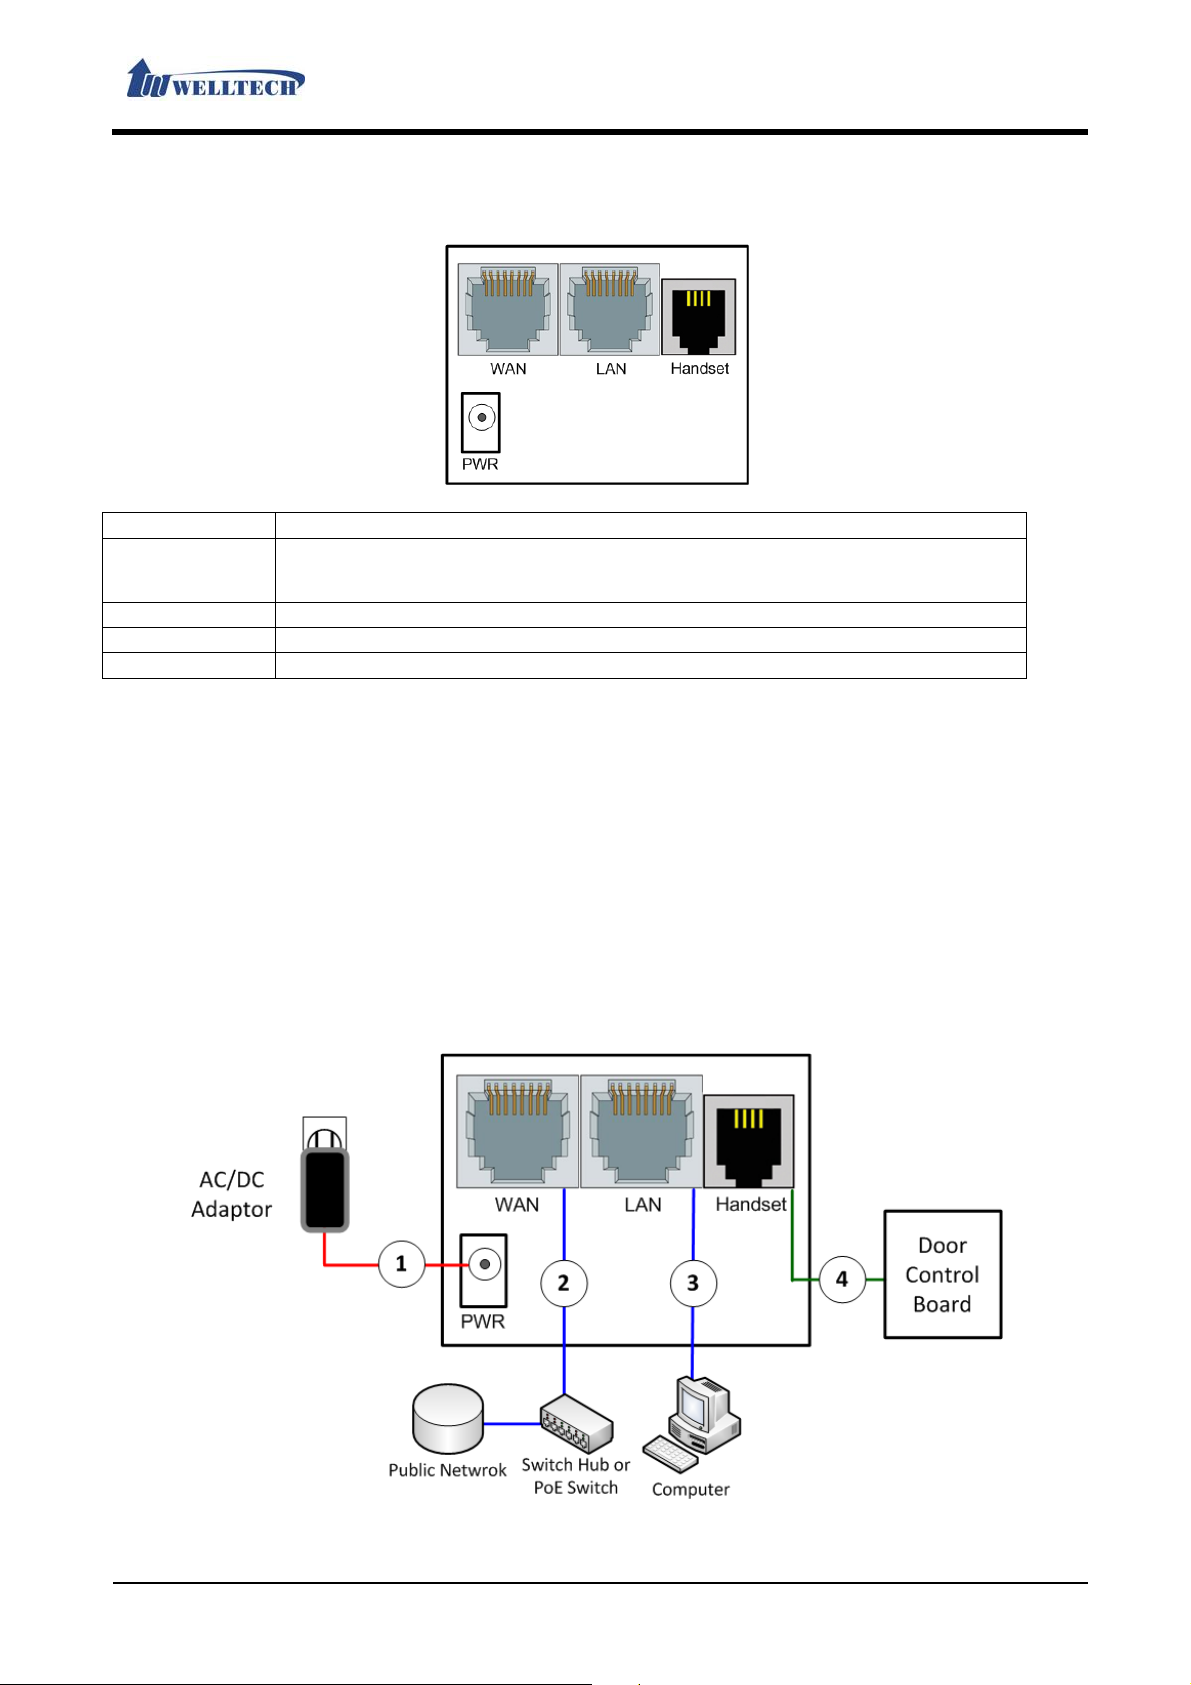
LP803 provided interface: RJ-45 Ethernet port, RJ-9 port for R elay control, LCD indication and
AC/DC power adaptor connecting seat.
Provided two RJ-45 Ethernet interface, they support 10/100MB Ethernet speed. Y o u can use
WAN port to connect ADSL or router; LAN port connects your computer.
1.3. Software Function Introduction
Network Protocol Tone
SIP v1 (RFC2543), v2(RFC3261)
IP/TCP/UDP/RTP/RTCP
IP/ICMP/ARP/RARP/SNTP
TFTP Client/DHCP Client/ PPPoE Client
Telnet/HTTP Server
DNS Client
IPv4
Codec Voice Quality
G.711: 64k bit/s (PCM)
iLBC,GSM
G.723
G.726: 16k / 24k / 32k / 40k bit/s
(ADPCM)
G.729A: 8k bit/s (CS-ACELP)
G.729B: adds VAD & CNG to G.729
Call Phone Function
Call Hold
Call Waiting
Call Forward
Caller ID
DTMF Function Secondsurity
In-Band DTMF
RFC2833
SIP Info
SIP Server
Registrar Server (three SIP account)
IP Assignment Firmware Upgrade
Static IP
DHCP
PPPoE
QoS
ToS field
VLAN
VPN
PPTP
L2TP
Ring Tone
Ring Back Tone
Dial Tone
Busy Tone
User Programming Tone
VAD: Voice activity detection
CNG: Comfortable noise generator
LEC: Line echo canceller
Packet Loss Compensation
Adaptive Jitter Buffer
Volume Adjustment
Speed dial, Phone book
Flash
Full-Duplex Speaker Phone
HTTP 1.1 basic/digest authentication for
Web Setup
MD5 for SIP authentication (RFC2069/
RFC 2617)
Configuration
Web Browser
Console/Telnet
Keypad
TFTP
Console
HTTP
FTP
NAT Traversal
STUN
Welltech Technology Co., Ltd.
5 / 90 2014/07/22
LAN Phone 803
User Manual
1.4. Rear Interface Description
Interface Explanation
PWR
(Internal-Positive;
External-Negative)
LAN Connect personal computer.
WAN Connect ADSL or Cable Modem device.
Handset Relay feature. (Not use for normal handset)
Connect AC/DC power DC 5V/1A adaptor.
1.5. Hardware Installation
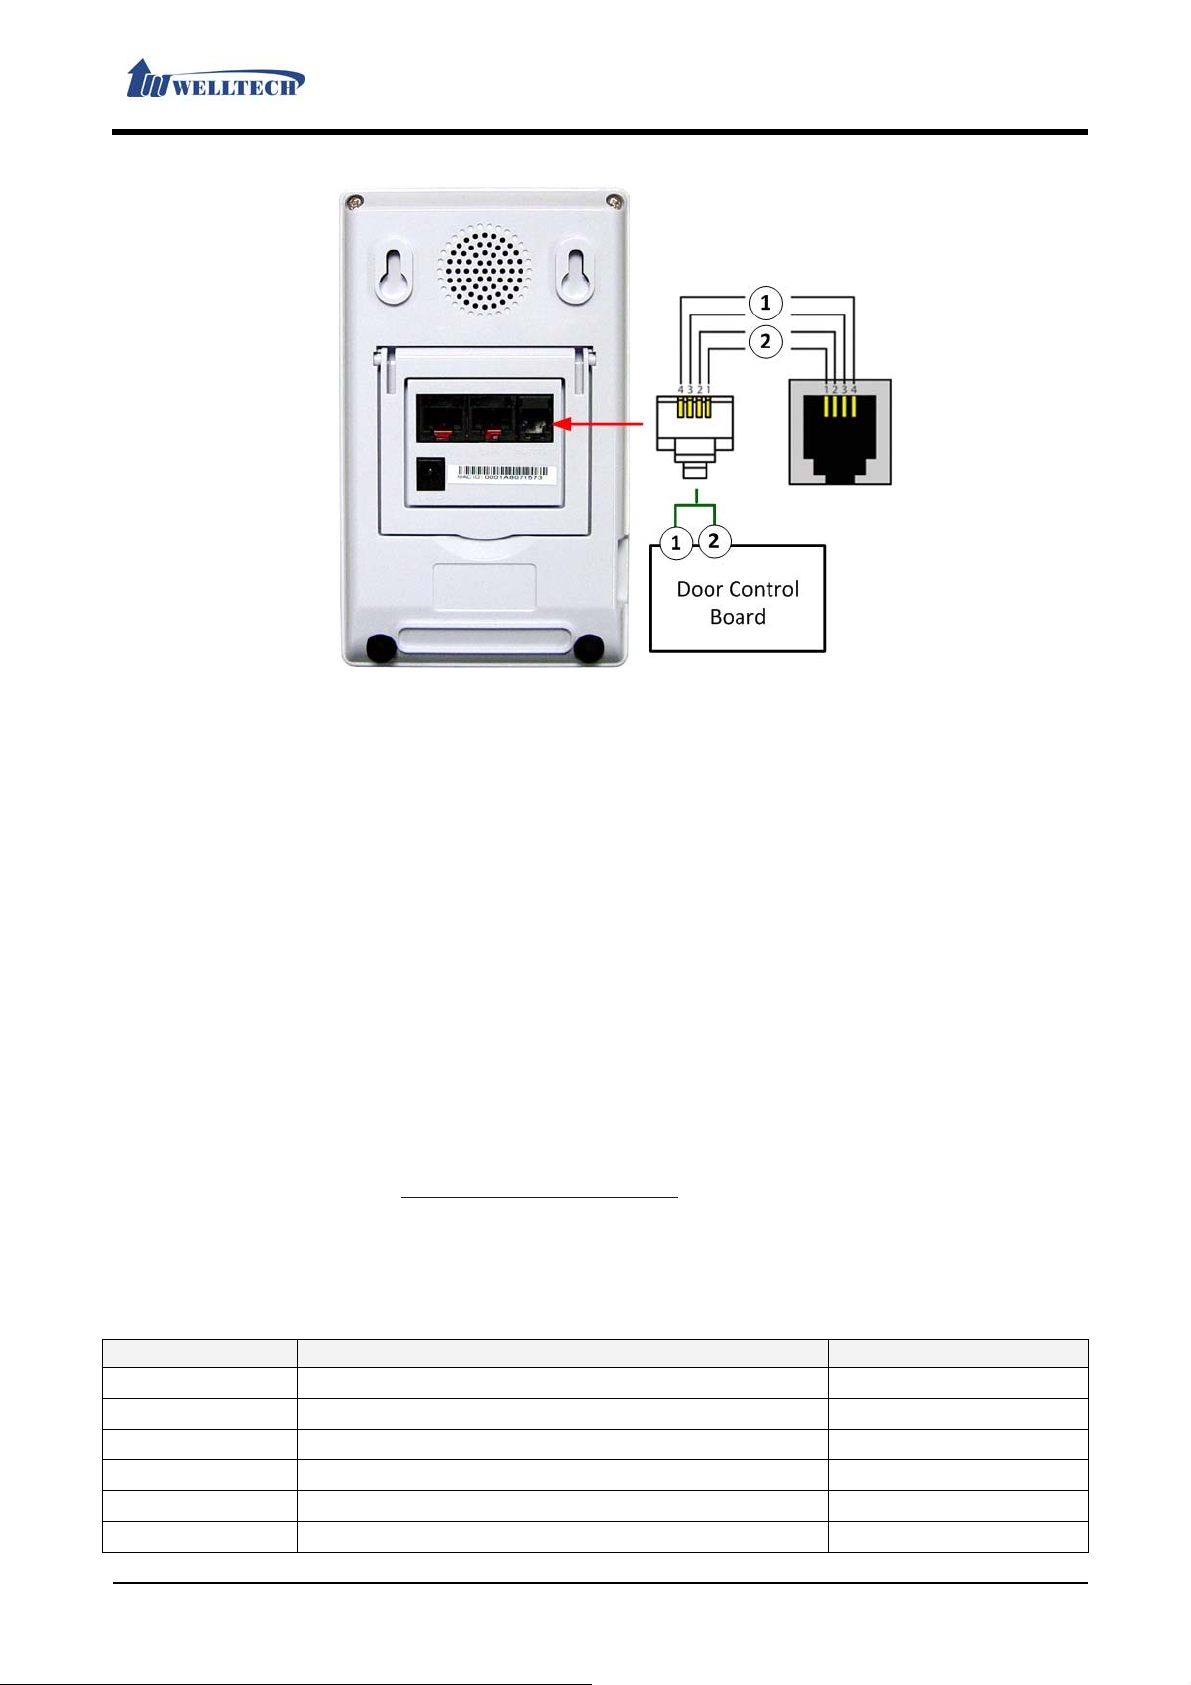
After set up the LP803 device, please follow these steps to connect LP803 accordingly.
1. One of the power cord connected to the LP803 AC/DC power adaptor connecting seat, the AC
outlet connected to the wall electric outlet.
2. Use LAN port through RJ-45 Ethernet line to connect personal computer.
3. Use RJ-45 Ethernet line to connect LP803 WAN port and ADSL/Cable modem、Ro uter or other
switch.
4. The RJ-9 handset port is two relay control switch for 1,2 and 3,4 pin. The port support door
control function. Remember the port can’t use for phone’s normal handset.
5. Once the phone power on, the LCD monitor will show the booting word. Wait a few minutes,
the LP803 boot completely then you can use L CD or web page to co nfigure your account and
phone number.
Welltech Technology Co., Ltd.
6 / 90 2014/07/22
LAN Phone 803
User Manual
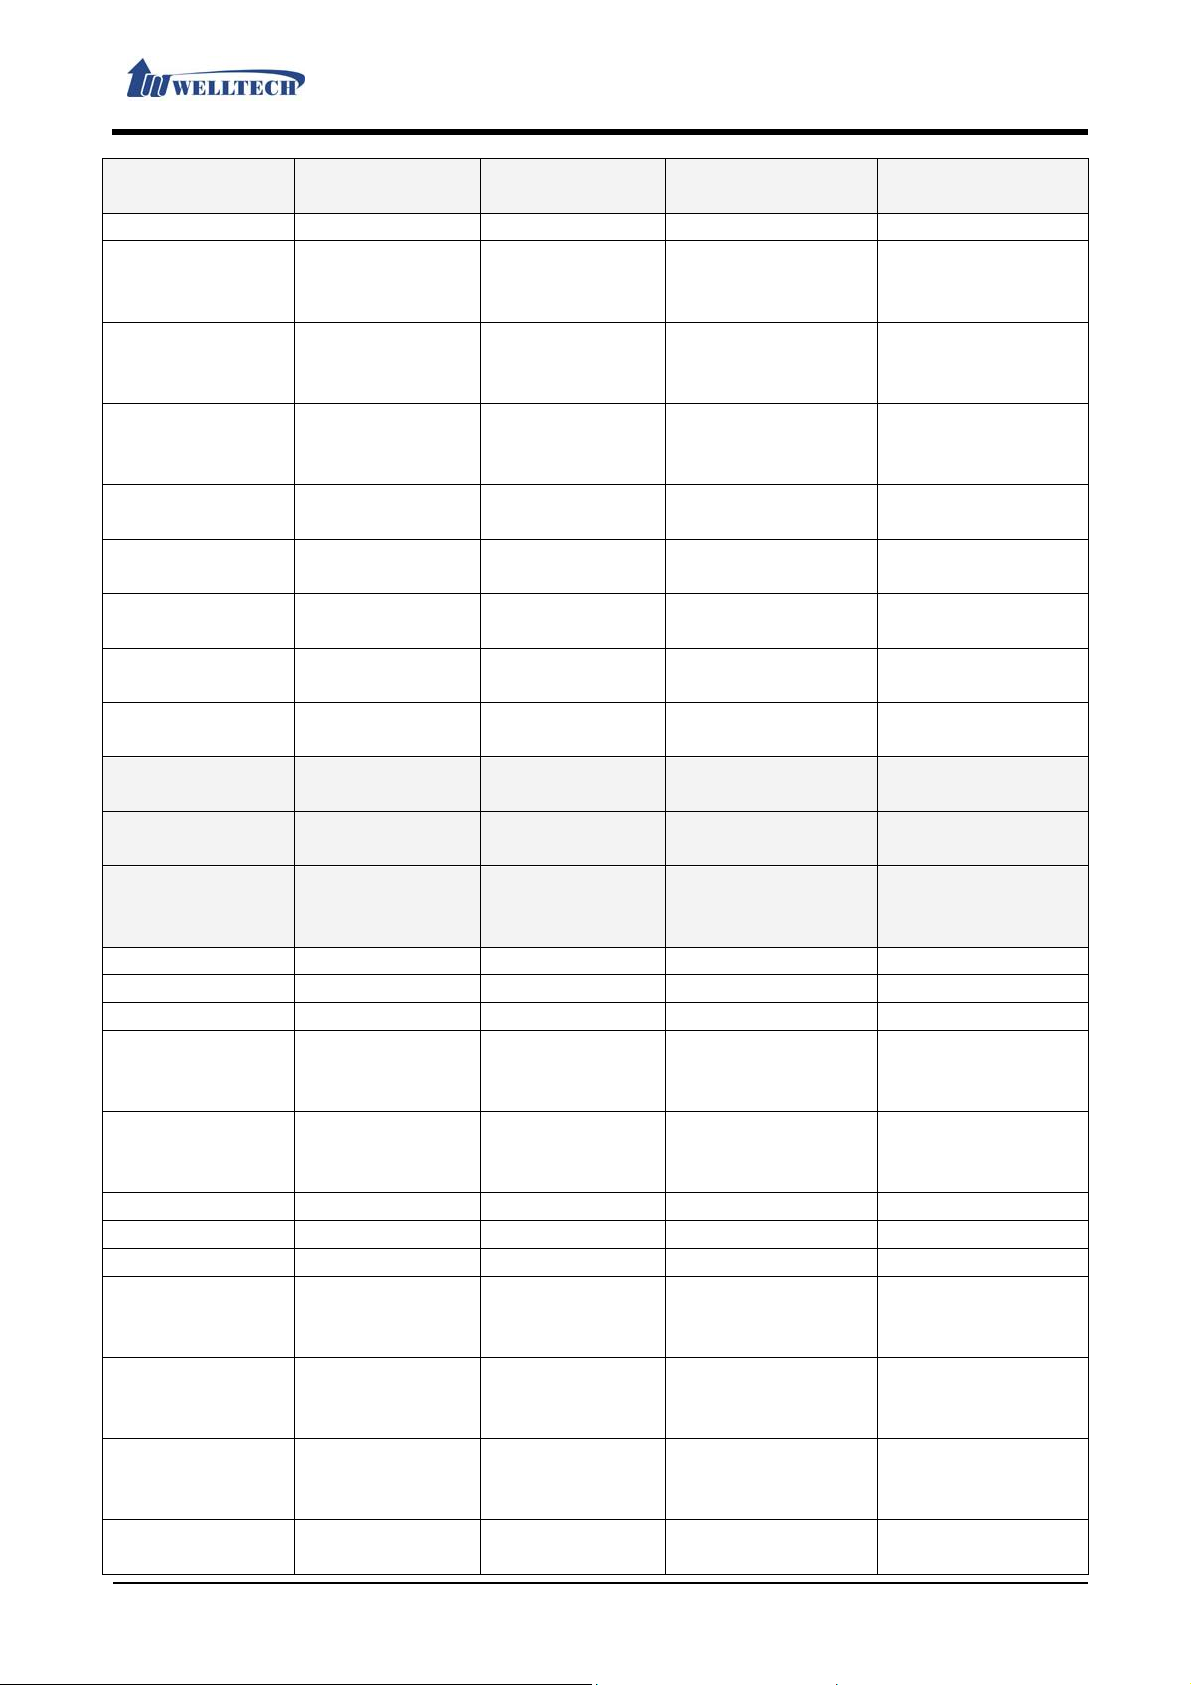
*Special Applications: Door control board connection.
1. This feature requires to produce a different phone line cable.
2. Line 1、Line 2 are relay’s second set of contacts (Connected to relay the same pin), Line 3、
Line 4 are relay’s first set of contacts (Connected to relay the same pin). In use time, these
contacts will reference web page setting, They have Normal Open(Always open) or Normal
Close(Always short) status.
3. Please use the two contacts to connect door control board PCBA. Than user can use this
LP803 to control door access devices.
Note. Reference Page 85, Managem ent > Advanced table item 『Relay Control』 and 『Relay
Mode』Explanation.
1.5.1. Network Environment Setting
Netwrok Mode: Default NAT Mode
WAN Port: DHCP Cli e nt Mode
LAN Port: DHCP Server Enable, IP Address: 192.168.123.1, Mask: 255.255.255.0
1.5.2. Connection
Please connect the personal computer to LP803 LAN port, then set up computer Ethernet to
configure DHCP mode. The computer will get DHCP IP address. (ex. 192.168.123.150). Use W eb
browser at your computer at http://192.168.123.1:9999
to enter webpage setup mode of LP803.
1.6. Basic Operations
1.6.1. Phone function
1.6.1.1. Key function
Key Explanation Remark
1
2
3
4
5
6
“1”,“-“,“٫”,“!”,“?”,“"”,“@”
“2”,“a”,“b”,“c”,“A”,“B”,“C”
“3”,“d”,“e”,”f”,“D”,“E”,“F”
“4”,“g”,“h”,“I”,“G”,“H”,“I”
“5”,“j”,“k”,“l”,“J”,“K”,“L”
“6”,“m”,“n”,“o”,“M”,“N”,“O”
Welltech Technology Co., Ltd.
7 / 90 2014/07/22

Key Explanation Remark
7
8
9
0
*
# Start the dialing process.
“7”,“p”,“q”,“r”,“s”,“P”,“Q”,“R”,‘S”
“8”,“t”,“u”,“v”,“T”,“U”,“V”
“9”,“w”,“x”,“y”,“z”,“W”,“X”,“Y”,“Z”
“0”,“space”
“*”,“•”,“:”,“+”
Trans a. In a talking line, press “Trans” key and
dial the transferee number to transfer
this call.
b. If the transferee number does not
answer this call, user can press “Trans”
key again to retrieve this call.
Hold In the talk time, press this key to make the
call on hold. Then press this key again will
unhold or press L1~L3 key unhold this call.
Redial a. Press this key to dial the last dialed
number automatically.
b. In LCD screen, User can use navigation
keys to choose a phone number in the
dialed list and press “Redial” key to dial
out automatically.
Talk Press this key can enable “Handfree”
function (In the “Headset” mode can use
this key to “Handfree” mode).
a. According to LCD screen’s state, use
,,
,,
,
“up、down、left、right” navigation key to
move.
b. Press “OK” key to select menu and save
Setting.
c. Press “C” key to give up this options
and don’t saving. Or return to upper
layer of the option.
d. Use “up、down” to setup speaker or
headset valume in idle or talking time.
Menu Press “MENU” key to enter Menu mode of
LCD control display. If you back to
previous LCD menu page, Please press
“MENU” key again.
Mute Pess this key at talk time, Phone’s MIC will
disabeled.
Phone Book This is the “Phone Book” function.
Call in Show all incoming call’s nember list.
LAN Phone 803
User Manual
A/a/1 change English
Letter upper/lower
Case and number.
Transfer
Retention
Redial the last dial
phone number
Handfree
Navigation
keys(the arrow
keys)
Mute(Close the
Microphone during
the phone call.)
Welltech Technology Co., Ltd.
8 / 90 2014/07/22

LAN Phone 803
User Manual
1.6.1.2. LP803 LCD Menu Item
First Layer Secondsond
Third Layer Fourth Layer Explanation
Layer
1. Phone Book 1. Search Search phone
book list
2. Add entry Add new phone
number
3. Speed Dial Add new speed
dial data
4. Erase all Delete all phone
book data
2. Call history 1. Incoming
Calls
2. Dialed
numbers
3. Erase
record
Show all missed
call
Show all dialed
call number
1. All Delete all call
records
2. Incoming Delete all
incoming call
records
3. Dialed Delete all dialed
call number
3. Phone
Setting
1.Call forward All forward Activation
(Enable/Disable)
Start/Stop
unconditional
forward feature
Number Set up forward
number
Busy forward Activation
(Enable/Disable)
Start/Stop busy
forward feature
Number Set up forward
number
No answer fwd Activation
(Enable/Disable)
Start/Stop no
answer feature
Number Set up forward
number
Ring Timeout Set up no answer
timeout
2.Do not
Disturb
1.Always 1.Enable
2.Disable
Start/Stop DND
incoming call
feature
2.By Period 1.Enable
2.Disable
Start/Stop at the
time enable DND
feature
3.Period Time Set up DND
enable time
3.Alarm
Setting
1.Activation 1. Enable
2. Disable
Start/Stop alarm
feature
2.Alarm time Set up alarm
time
4.Date/Time
Setting
1.Date & Time Set up device
time manually
2.SNTP 1.SNTP Start/Stop
Welltech Technology Co., Ltd.
9 / 90 2014/07/22

First Layer Secondsond
Third Layer Fourth Layer Explanation
LAN Phone 803
User Manual
Layer
Setting device regulate
time automatic
2.Primary SNTP Set up first time
server location
3.Secondsondary
SNTP
Set up
secondsond time
server location
4.Time zone Set up time zone
5.Adjustment
Time
5.Volume &
Gain,
2.Speaker
1.Handset
volume
Set up Handset
Set up Speaker
volume
3.Handset
Set up Handset
gain
4.Speaker
Set up speaker
gain
Set up how often
to check time
receiving volume
volume
microphone gain
Phone mode
microphone gain
6.Ringer 1. Ringer
Volume
Set up “Ring
Tone” volume
2. Ring Type Set up “Ring
Tone” type
7.Auto dial Set up auto dial
time
4. Network 1.WAN set up 1.IP Type 1.Fixed IP client Set up fixed IP
address
manually
2.DHCP client Set up IP
address
automatically
3.PPPoE client Use PPPoE
feature
2.Fixed IP
Setting
1.IP Address Set up IP
address
2.Subnet mask Set up network
mask
3.Default
Gateway
3.PPPoE
1.User name Set up PPPoE
Setting
Set up network
gateway
user name
2.Password Set up PPPoE
password
2.LAN set up 1.Bridge Set up bridge
mode
2.Router Set up NAT mode
3.DNS 1.Primary DNS Set up the first
DNS server
location
2.Secondary Set up secondary
Welltech Technology Co., Ltd.
10 / 90 2014/07/22

First Layer Secondsond
Third Layer Fourth Layer Explanation
LAN Phone 803
User Manual
Layer
DNS DNS server
location
4.VLAN 1.Activation 1. Enable
2. Disable
Start/Stop VLAN
feature
2. VID Setup VLAN ID
5.Status Show network
state
6.NETWORK
Speed
1.Auto
Set up network
speed
automatically
2.100M Full Set up network
speed 100M
Full-duplex
automatically
3.100M Half, Set up network
speed 100M
Half-duplex
automatically
4.10M Full Set up network
speed 10M
Full-duplex
automatically
5.10M Half Set up network
speed 10M
Half-duplex
automatically
5. SIP Setting
*Admin Use
1.Service
domain
1.First realm Activation
(Enable/Disable)
First SIP account
activation
Display name Set up account
display name
Phone number Set up SIP
account phone
number
Auth. ID Set up SIP
account register
name
Auth. password Set up SIP
account register
password
Domain server Set up Proxy
server address
Proxy server Set up Domain
server address
2.Second
realm
Activation
(Enable/Disable)
Second SIP
account
activation
Display name Set up account
display name
Phone number Set up SIP
account phone
Welltech Technology Co., Ltd.
11 / 90 2014/07/22

First Layer Secondsond
Third Layer Fourth Layer Explanation
LAN Phone 803
User Manual
Layer
number
Auth. ID Set up SIP
account register
name
Auth. password Set up SIP
account register
password
Domain server Set up Proxy
server address
Proxy server Set up Domain
server address
3.Third realm Activation
(Enable/Disable)
Third SIP
account
activation
Display name Set up account
display name
Phone number Set up SIP
account phone
number
Auth. ID Set up SIP
account register
name
Auth. password Set up SIP
account register
password
Domain server Set up Proxy
server address
Proxy server Set up Domain
server address
4.Fourth realm Activation
(Enable/Disable)
Fourth SIP
account
activation
Display name Set up account
display name
Phone number Set up SIP
account phone
number
Auth. ID Set up SIP
account register
name
Auth. password Set up SIP
account register
password
Domain server Set up Proxy
server address
Proxy server Set up Domain
server address
5.Fifth realm Activation
(Enable/Disable)
Fifth SIP account
activation
Display name Set up account
Welltech Technology Co., Ltd.
12 / 90 2014/07/22
First Layer Secondsond
Third Layer Fourth Layer Explanation
LAN Phone 803
User Manual
Layer
display name
Phone number Set up SIP
account phone
number
Auth. ID Set up SIP
account register
name
Auth. password Set up SIP
account register
password
Domain server Set up Proxy
server address
Proxy server Set up Domain
server address
2.Status
First realm First register
account state
Second realm Second register
account state
Third realm Third register
account state
Fourth realm Fourth register
account state
Fifth realm Fifth register
account state
6.
Administrator
1.Auto config
*Admin Use
1.Disable Disable provisi on
update
automatically
2.TFTP Use TFTP mode
3.FTP Use FTP mode
4.HTTP Use HTTP mode
2.Upgrade
system
1.Upgrade
Now
1. Yes
2. No
Execute/Cancel
upgrade
automatic
2.Upgrade via
*Admin Use
1.Disable Stop upgrade
automatically
feature
2.TFTP Use TFTP mode
3.FTP Use FTP mode
4.HTTP Use HTTP mode
3.Status No new s/w
Next=xx-xx
xx:xx
4.Reset Time 1. Yes
2. No
Show state and
next upgrade
time
Reset/Stop
upgrade time
automatically
3.Default
Setting
1.Load default Start reset to
default
configuration
2.Abort Stop reset to
default
Welltech Technology Co., Ltd.
13 / 90 2014/07/22

First Layer Secondsond
Third Layer Fourth Layer Explanation
LAN Phone 803
User Manual
Layer
configuration
4.System
Authent
Set up system
permissions
5.Version Device version
information
6.LCD
Language
1.English LCD English
interface
2.Portugal LCD Portugal
interface
7.Restart Restart device
8.Auto Reboot 1. Enable Enable auto
reboot feature
2. Disable Disable auto
reboot feature
*Admin Use: Enter LCD menu 6.Administrator > 4.System Authent, Then use the LP803
administrator’s password to login. After login, You can enter this option and modify
settings.
1.6.2. Dial function Introduction
1.6.2.1. LP803 Dial Feature
That is on ways to dial number:
1. Press “Talk” key, After dial number direct, press “#” key to dial out immediately.
2. Press “Talk” key. Enter phone number and wait for 3 seconds to dial out automatically.
(Default)
3. In ON-Hook state, Dial number and use C key to modify wrong number. After checking
correct number, press # key to dial out.
Example:
Dial other extension number at the same proxy server, for instance, 1008. Just pick up the
phone and dial number 1008, than press “#” key or wait 3 seconds to dial out.
Dial a PSTN number, ex. 0800024365, maybe need to add prefix code before the phone
number.
Remark:
In the LP803 web management system “Phone” -> “Dial Plan - Basic” web page, check
[Dial Plan - Basic] page parameter [Key As Send #], the Settings is Enable or not.
1.6.2.2. Point-to-Point(P2P) Dial Feature
Two LP803 IP-Phone devices can call directly without SIP proxy server registration mode.
Environmental requirements:
Both LP803 IP-Phone device need to use physical static network IP address ; or at the same
private LAN network environment, or in a same VPN network.
Example:
If the called LP803 IP address is 192.168.0.160, dial number as follows:
Pick up the phone, dial “192*168*0*160”, then press “#” or wait 3 seconds to finish the
P2P call.
If the called LP803 IP address is 192.168.1.20 and port is 5062, dial number as follows:
Pick up the phone, dial “192*168*1*20**5062” , then press “#” or wait 3 seconds to finish
the P2P call.
Welltech Technology Co., Ltd.
14 / 90 2014/07/22

LAN Phone 803
User Manual
1.6.2.3. Hold Call
In the talking state, press [Hold] key, the phone call will retain immediately. Then, user can
select other line to make a new call.
1.6.2.4. Call Waiting
In the talking state, If user hear a call waiting tones and LP803 LCD show a new incoming call
number at the same time. User can press [Hold] key to retain original call and answer waiting
call. During the talking state, User can press [Hold] key again, the original call will be connected.
1.6.2.5. Blind Transfer
If user 『A』 and 『B』 are in a phone call, 『A』 will transfer this phone to user 『C』:
1. 『A』 press [Trans] on LP803 device, then 『A』 can hear dial tone.
2. 『A』 enter user 『C』 phone number and press “#” Key (Or wait for 3 seconds).
3. 『A』 can hand up the phone.
1.6.2.6. Attendant Transfer (Answer then Transfer)
If user 『A』 and 『B』 are in a phone call, 『A』 will transfer this phone call and talk to user 『C』:
1. 『A』 press [Hold] key, then hear dial tone.
2. 『A』 dial 『C』 phone number and press “#” key (Or wait for 3 seconds).
3. The user 『C』 answer the call and after talk was finished. Then 『A』 press [Trans] key to
complete the transfer feature.
4. If the user 『C』 doesn’t answer, 『A』 can press [Hold] key to return the phone call, then talk
『B』.
2. Web Page
2.1. Web Login Level Table
Web Page Menu Administrator
Status Yes Yes Yes
Welltech Technology Co., Ltd.
15 / 90 2014/07/22
System Normal

Phone
Phone Book Yes Yes Ye s
Speed Dial Yes Yes Ye s
Dial Plan – Basic Yes Yes No
Dial Plan – Advanced Yes Yes Ye s
Call Service (Phone Feature) Yes Yes Yes
General (Normal Setting) Yes Yes Ye s
Volume (Volume Setting) Yes Yes Ye s
Network
WAN (Public Ethernet) Yes Yes Yes
DDNS (Dynamic DNS) Yes Yes Yes
VLAN (VLAN Environment) Yes Yes No
VPN (PPTP/L2TP Link) Ye s Yes No
NTP (Time Environment) Yes Yes No
NAT
LAN (LAN Network) Yes Yes Yes
DMZ & Mac Clone (DMZ and MAC
Setting)
Virtual Server (Virtual Proxy Server) Yes Yes Yes
SIP
Service (SIP Register) Yes Yes No
Codec (Voice Format) Yes Yes No
Advanced (Other Setting) Yes No No
STUN (STUN & Fource Setting) Yes Yes No
Management
Status Log (System State) Yes Yes Ye s
Auto Provisio n (Auto Config Setting) Yes Yes No
Auto Update (Auto Upgrade Firm ware)
Firmware (Firmware Upgrade) Yes Yes No
Advanced (Advance Setting) Yes No No
Password (Login User/Password) Yes Yes No
Tones (Frequency Setting) Yes No No
Default (Reset To Default) Yes Yes No
Language (Language Setting) Yes Yes Yes
Save & Reboot Yes Yes Ye s
Logout Yes Yes Yes
Engineer (Web page level) Yes No No
Update (Web page level) Yes No No
Yes Yes Yes
Yes Yes No
LAN Phone 803
User Manual
2.2. Login LP803 Web Page
LP803 Web Login IP address from LAN port default value is, http://192.168.123.1:9999
Login Accout:
Administrator account: root, password: test
System account: system, password: test
Normal account: user, password: test
2.2.1. Functions
Provide login LP803 system management page.
Welltech Technology Co., Ltd.
16 / 90 2014/07/22

LAN Phone 803
User Manual
2.2.2. Instruction
User Name Enter user name, can be numeral or letters.
Password Enter password, can be numeral or letters.
Login [Button] Login LP803 system web page.
Clear [Button] Clear all information.
2.3. VoIP Setup Manu
2.3.1. Functions
Provide functions menu [Status (System information), Phone (Telephony environment),
Network (Network environment), NAT (Network Address Translation), SIP (Register
environment), Management (Advance Setting), Save & Reboot (Configuration save and reboot
device), Logout (Logout web page)].
2.3.2. Instruction
Item Explanation
Phone Shows device type.
Status Provide status of the System.
Phone Phone (Telephony environment) Provide function menu[Phone Book,
Speed Dial, Dial Plan – Basic, Dial Plan – Advanc ed, Call Service (Phone
Welltech Technology Co., Ltd.
17 / 90 2014/07/22

Item Explanation
function), General (Normal Setting), Volume (Volume Setting)].
Network Provide [WAN, DDNS, VLAN, VPN(PPTP/L2TP), SNTP] functions.
NAT Provide [LAN, DMZ & Mac Clone, Virtual Server] functions.
SIP Provide [Service, Code, Advanced, STUN (STUN & Force Setting)]
functions.
Management Provide [Status Log, Auto Config, Auto Update, New Firmware ,
Advanced, Password, Tones, Default, Language] functions.
Save & Reboot Provide [Save, Reboot] functions.
Logout Logout the system.
LAN Phone 803
User Manual
2.4. Status (System Information)
2.4.1. Functions
Show status of Network, Firmware Version and SIP registration.
2.4.2. Instruction
Figure 1: LAN Port Device Active: Bridge
(Figure 1)
Item Explanation
WAN Information Shows the status of WAN Port.
Link Status Shows the network connected Speed.
Active Shows the network connected type.
IP Address Shows IP address of the device.
Subnet Mask Shows the subnet mask.
Default Gateway Shows the default gateway.
Primary DNS Shows the primary DNS server.
Secondsond DNS Shows the secondsondary DNS server.
MAC Address Shows the MAC ID.
System
Information
Model Name Show LP803 model name.
Version Show LP803 firmware version.
Firmware Version Shows the firmware version for software control.
DSP Version Shows the DSP version.
Shows the status of System.
AC: AC97
WM: Winbound
LE: Legeeity
NV:Nuvoton
Welltech Technology Co., Ltd.
18 / 90 2014/07/22

Item Explanation
Current Time Shows the current time.
Update Date Shows the date of updating system.
System U p Time Shows the system running time.
Netwrk Link Up
Shows the network running time.
Time
Register
Shows the status of SIP register.
Information
Realm 1 Status Shows the line 1 register state.
Display Name Shows the line 1 register number.
Realm 2 Status Shows the line 2 register state.
Display Name Shows the line 2 register number.
Realm 3 Status Shows the line 3 register state.
Display Name Shows the line 3 register number.
Figure 2: LAN Port Device Active: Bridge + VPN
LAN Phone 803
User Manual
(Figure 2)
Item Explanation
WAN Information Shows the statuses of WAN Port.
Link Status Shows the network connected Speed.
Active Shows the network connected type.
IP Address Shows IP address of the device.
Subnet Mask Shows the subnet mask.
Default Gateway Shows the default gateway.
Primary DNS Shows the primary DNS server.
Secondsond DNS Shows the secondsondary DNS server.
MAC Address Shows the MAC ID.
VPN Information Shows the status of VPN (PPTP/L2TP)
Active Shows the VPN connected type.
IP Address Shows the VPN IP address.
System
Shows the status of System.
Information
Model Name Show LP803 model name.
Version Show LP803 firmware version.
Firmware Version Shows the firmware version for software control.
DSP Version Shows the DSP version.
Welltech Technology Co., Ltd.
19 / 90 2014/07/22

AC: AC97
WM: Winbound
LE: Legeeity
NV:Nuvoton
Current Time Shows the current time.
Update Date Shows the date of updating system.
System U p Time Shows the system running time.
Network Link Up
Shows the network running time.
Time
Register
Shows the status of SIP register.
Information
Realm 1 Status Shows the line 1 register state.
Number Shows the line 1 register number.
Realm 2 Status Shows the line 2 register state.
Number Shows the line 2 register number.
Realm 3 Status Shows the line 3 register state.
Number Shows the line 3 register number.
Figure 3: LAN Port Device Active: Router
LAN Phone 803
User Manual
(Figure 3)
Item Explanation
WAN Information Shows the statuses of WAN Port.
Link Status Shows the network connected Speed.
Active Shows the network connected type.
IP Address Shows IP address of the device.
Subnet Mask Shows the subnet mask.
Default Gateway Shows the default gateway.
Primary DNS Shows the primary DNS server.
Secondsond DNS Shows the secondsondary DNS server.
MAC Address Shows the MAC ID.
LAN Information Shows the status of LAN Port.
IP Address Shows the LAN IP address.
MAC Address Shows the LAN MAC ID.
Welltech Technology Co., Ltd.
20 / 90 2014/07/22

Item Explanation
System
Shows the status of System.
Information
Model Name Show LP803 model name.
Version Show LP803 firmware version.
Firmware Version Shows the firmware version for software control.
DSP Version Shows the DSPversion.
AC: AC97
WM: Winbound
LE: Legeeity
NV:Nuvoton
Current Time Shows the current time.
Update Date Shows the date of updating system.
System U p Time Shows the system running time.
Netwrk Link Up
Shows the network running time.
Time
Register
Shows the statuses of SIP register.
Information
Realm 1 Status Shows the line 1 register state.
Number Shows the line 1 register number.
Realm 2 Status Shows the line 2 register state.
Number Shows the line 2 register number.
Realm 3 Status Shows the line 3 register state.
Number Shows the line 3 register number.
Figure 4: LAN Port Device Active: Router + VPN
LAN Phone 803
User Manual
(Figure 4)
Item Explanation
WAN Information Shows the statuses of WAN Port.
Link Status Shows the network connected Speed.
Active Shows the network connected type.
IP Address Shows IP address of the device.
Subnet Mask Shows the subnet mask.
Default Gateway Shows the default gateway.
Primary DNS Shows the primary DNS server.
Secondsond DNS Shows the secondsondary DNS server.
Welltech Technology Co., Ltd.
21 / 90 2014/07/22

Item Explanation
MAC Address Shows the MAC ID.
LAN Information Shows the statuses of LAN Port.
IP Address Shows the LAN IP address.
MAC Address Shows the LAN MAC ID.
VPN Information Shows the stat uses of VPN (PPTP/L2TP)
Active Shows the VPN connected type.
IP Address Shows the VPN IP address.
System
Information
Model Name Show LP803 model name.
Version Show LP803 firmware version.
Firmware Version Shows the firmware version for software control.
DSP Version Shows the DSP version.
Current Time Shows the current time.
Update Date Shows the date of updating system.
System U p Time Shows the system running time.
Netwrk Link Up
Time
Register
Information
Realm 1 Status Shows the line 1 register state.
Number Shows the line 1 register number.
Realm 2 Status Shows the line 2 register state.
Number Shows the line 2 register number.
Realm 3 Status Shows the line 3 register state.
Number Shows the line 3 register number.
Shows the statuses of System.
AC: AC97
WM: Winbound
LE: Legeeity
NV:Nuvoton
Shows the network running time.
Shows the statuses of SIP register.
LAN Phone 803
User Manual
Welltech Technology Co., Ltd.
22 / 90 2014/07/22

LAN Phone 803
User Manual
2.5. Phone (Telephony environment)
Provide functions of [Phone Book, Speed Dial, Dial Plan – Basic, Dial Plan – Advanced, Call
Service, Genereal, Volume].
2.5.1. Phone Book
2.5.1.1. Functions
Phone Book can provide 140 entries; Export/Import feature, the file format is csv.
When user A dials a [Name], Phone Book will check it on Phone Book. If system finds
it, it will dial the [Number] of [Name]. If the [Name] is not on Phone Book, system will
dial the number you have dialed.
2.5.1.2. Instruction
Item Explanation
Page Default: Page 1. Select the page, from Page1~Page7.
Index Shows the serial number. 140 entries in total, from Phone 0~139. One
page has 20 entries.
Name Set up the user’s name. These columns provide the function of speed
dial by only enter numbers; maximum length is 31 bytes.
Number/URL Set up the user’s number. These columns can enter numbers and
strings; maximum length is 63 bytes. Ex: 0212345678, 0800024365,
www.dyndns.info
Action Provide [Delete] button to erase the datas.
Submit [Button] Save the Settings.
Delete All Reset all data.
Acess Phone Book Enter “Remote Phone Book Setting” web page.
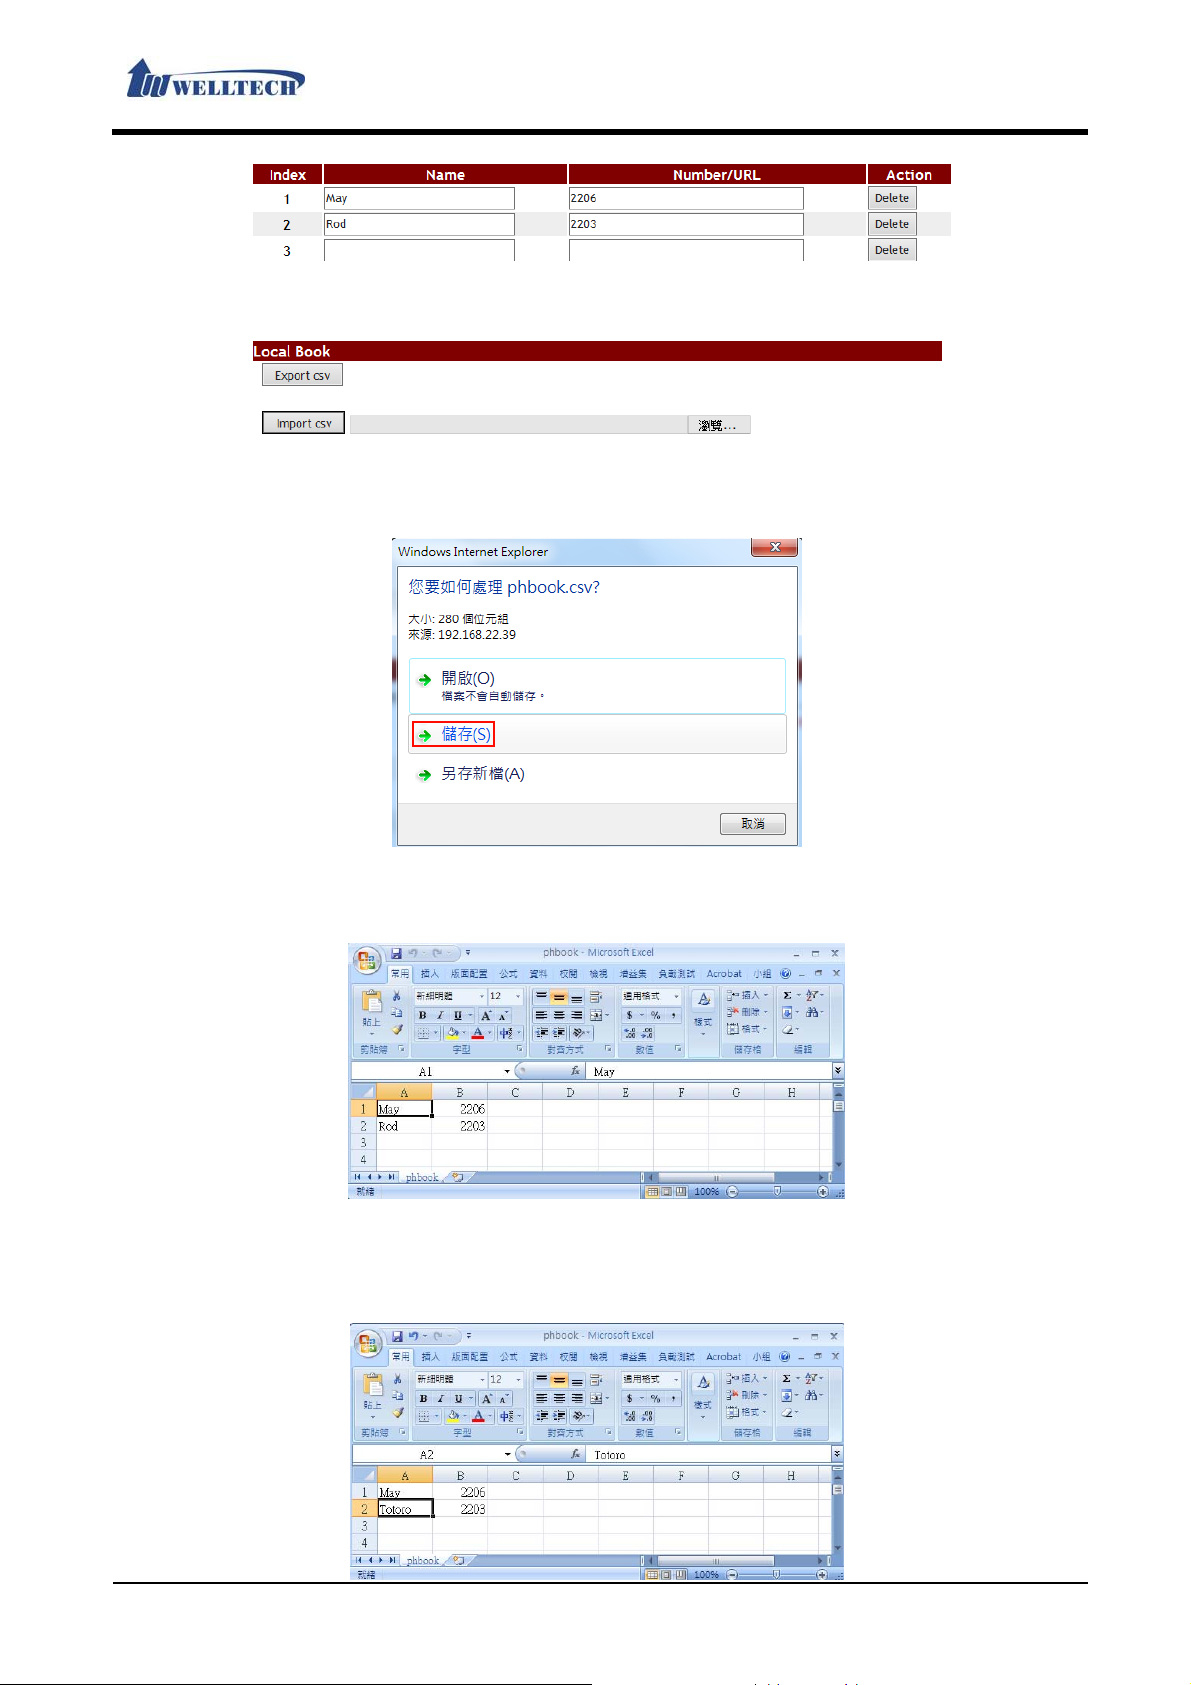
Export csv [Button] Export [Phone Book] data, the file format is 『.csv』.
Import csv
[Button]
Import [Phone Book] data, the file format is 『.csv』.
Welltech Technology Co., Ltd.
23 / 90 2014/07/22

LAN Phone 803
Item Explanation
Export csv [Button] Export [Phone Book] data, the file format is 『.csv』.
Import csv
[Button]
HTTP or TFTP
Server Address
Synchronlzation
period
Submit [Button] Save the Settings.
Import [Phone Book] data, the file format is 『.csv』.
Use HTTP or TFTP server to upgrade LP803’s phone book data.
The LP803 will reference this time to upgrade phone book data at HTTP
or TFTP server by itself.
2.5.1.3. Operate Instruction
Example 1: Setup [Phone Book] data
Step 1: On the [Phone Book Setting] page, Setup [Index: 1, Name: 301, Number:
301@192.168.1.2
Number: 8123478944566] (See Figure 1).
; Index: 2, Name: 206, Number: 1747643364; Index: 3, Name: test,
User Manual
(Figure 1)
Instruction 1: Dial [301], system find the [301] on Index 1, then system dial Name’s
Number of Index 1. System will dial [192.168.1.2]
Instruction 2: Dial [206], system find the [206] on Index 2, then system dial Name’s
Number of Index 2. System will dial [17476433364].
Instruction 3: Because Index 3’s Name is a string, so the speed dial function can not
be used, you can just check the Index 3’ Name and Number.
Example 2: Export / Import [Phone Book] data
Export Feature
Step 1: In [Phone Book Setting] web page, the page have two numbers data. (See Figure 2).
Welltech Technology Co., Ltd.
24 / 90 2014/07/22
LAN Phone 803
User Manual
(Figure 2)
Step 2: To perform the export function, please press [Export csv] button (See Figure 3).
(Figure 3)
Step 3: Monitor show [File Download] page, default file name is phbook.csv, select [Save] button,
LP803 parameter will save to 『.csv』file format (See Figure 4).
(Figure 4)
Step 4: Open the file, then check [Phone Book] number data (See Figure 5).
(Figure 5)
Import Featuer
Step 1: Set up 『.csv』 format for [Phone Book] data (See Figure 6).
Welltech Technology Co., Ltd.
25 / 90 2014/07/22

(Figure 6)
Step 2: In [Phone Book Setting] web page, choose the phone book file data to load [example:
F:\Test\phbook.csv], press [Import csv)] button (See Figure 7).
(Figure 7)
Step 3: Load data finish, [Index: 1 and 2] will show phone book data (See Figure 8).
(Figure 8)
LAN Phone 803
User Manual
Example 3: LP803 LCD Monitor Function
Step 1: In [Phone Book Setting] web page, Setup [Index: 1, Name: Cat 1, Number/URL: 102,
Index: 2, Name: Me To, Number/URL: 103] (See Figure 9).
(Figure 9)
Step 2: In [Service Domain Setting] web page, Setup [Realm Active: Enable, Displa y Name: 102,
Phoner Number: 102, Authentication ID: 102, Authentication Password: test, Domain
Server: 192.168.68.150, Proxy Server: 192.168.68.150] (See Figure 10)。
Note : Both registered account [Display Name] and [Authentication ID] must be the same
(See Figure 10) to take effect.
(Figure 10)
Step 3: When LP803 receives 102 incoming call, LCD can show [Me To, 102] incoming call
message automatically.
2.5.2. Speed Dial
2.5.2.1. Functions
Provide to Set [Pick-up] and [Voice Mail] key code. If there is no function ke y corresponding,
The service can’t take effect.
Welltech Technology Co., Ltd.
26 / 90 2014/07/22

2.5.2.2. Instruction
LAN Phone 803
User Manual
Item Explanation
Index This Index number is the one on LCD icon number.
Name Set up extension account data. These columns can enter numbers and
strings; maximum length is 31 bytes.
Number/URL Set up the user’s number. These columns can enter numbers and
strings; maximum length is 63 bytes.
Action Provide [Delete] button to clear Setting data.
Pick Up Setup [Pick Up] feature code. This code must be compatible with
IP-PBX server Pick-Up code. These columns can enter numbers and
strings (*#), maximum length is 15 bytes.
Voice Mail Set up [Voice Mail] feature code. This code must be compatible with
IP-PBX server [Voice Mail] service code. These columns can enter
numbers and strings (*#), maximum length is 15 bytes.
Submit [Button] Save the Settings.
Delete All [Button] Reset all data.
2.5.2.3. Operate Instruction
Example 1: [Pick Up & Voice mail] Button
Step 1: In [Speed Dial Setting] web page, Setup [Pick up: *98, Voice Mail: *97] (See Figure 1).
(Figure 1)
Description 1: Need to pick up nearby ring phone call, please press LP803 [Pick] key, LP803 will
pick up nearby ringing phone (This phone must stay at the same pick up group).
Description 2: Execution and listen voice mail messages, press [VMS] key to enter voice mail
process.
Welltech Technology Co., Ltd.
27 / 90 2014/07/22
 Loading...