


LP389 IP Phone
Administrator
Guide

Contents
LOGIN LP389 .................................................................................... 3
QUICK SETUP ............................................................................ 3
CONFIGURATION REFERENCE.............................................................. 7
Device Settings .......................................................................... 7
VOIP Parameters Setting ........................................................... 12
SIP Line Settings ...................................................................... 15
Phone Feature Settings ............................................................. 21
Dialing Plan ......................................................錯誤! 尚未定義書籤。
Call History.............................................................................. 26
Device Status .......................................................................... 27
Device Maintenance .................................................................. 29
2

LOGIN LP389
QUICK SETUP
Login to LP389:
Setp1:
connect the Ethernet cable into WAN port. Start IE6.0 (or later version) to
navigate LP389 web management system by typing the default URL is
http://192.168.123.1/home.asp the screen will display User Name and
Password (the default user id is root and user password is root). (Fig.1)
If you using the IPV6 only mode, you need to use LCD manual to check the
auto configured IPV6 address and use it to connect to LP389. The URL will be
like the following: http://[xxxx:xxxx:xxxx:xxxx]. It is recommend to use
IPV4 to configuration.
Setup the administrative PC’s IP address to be same as LP389 and
Fig.1
Step 2: The screen shows the Home page of LP389. (Fig.2)
3
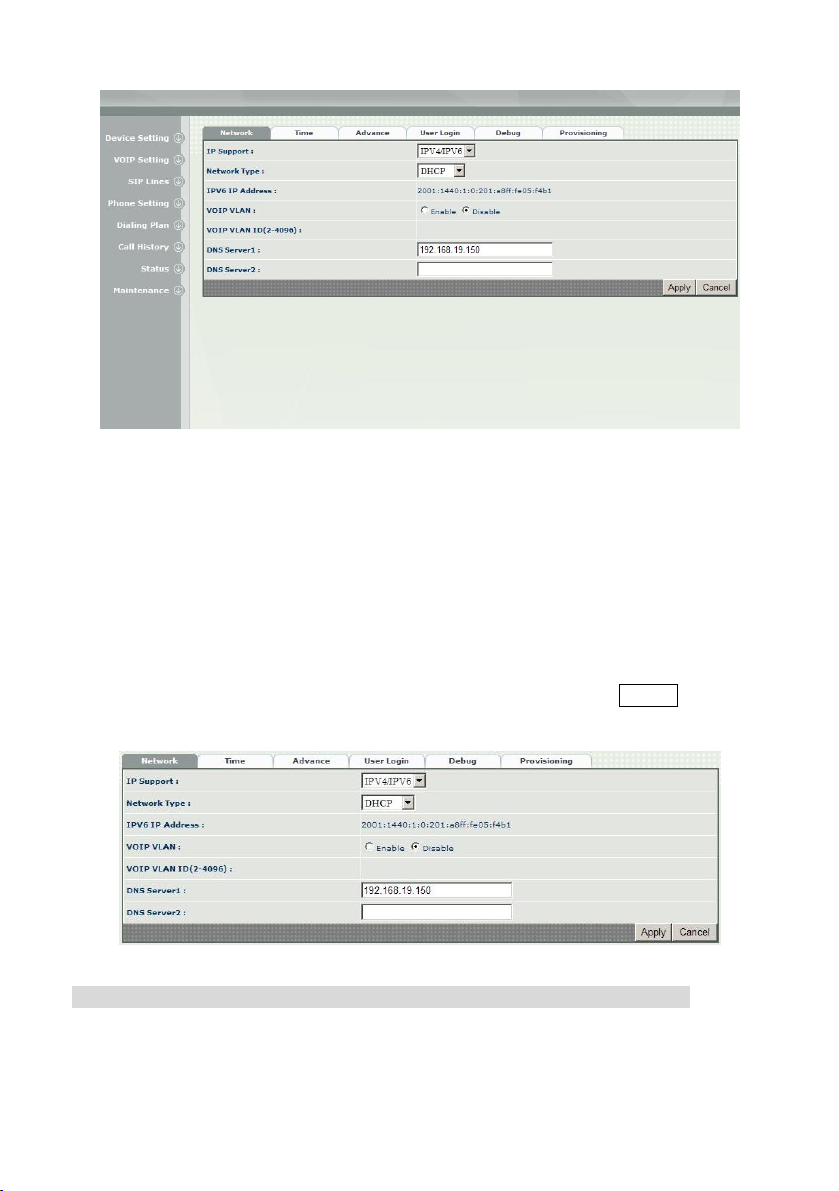
Fig.2
Change Default IP Network:
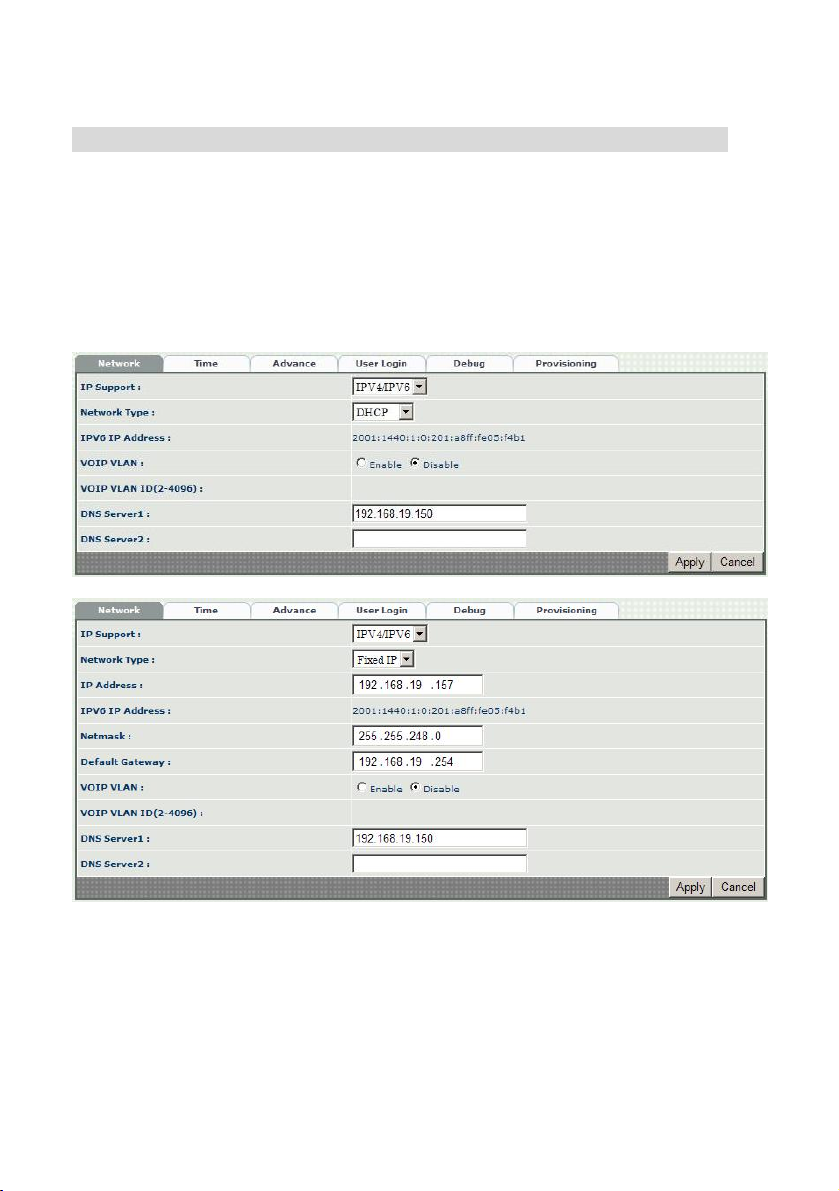
Step 3: After successfully logon to the system, we need to change the
network configuration. Click Device Setting > Network to setup the
Interface parameters. First, you need to select the IP supported mode which
could be IPV4/IPV6 dual stack, IPV4 only or IPV6 only. Since IPV6 address is
getting from router advertisement plus the MAC address and cannot be
changed, there is no need to set it up. You can tell the IPV6 address by the web
page. For IPv4, please enter the deserved IP address, netmask and default
gateway or selected to “DHCP”. Apply the change by clicking Apply button as
fig (Fig.3)
(Fig.3)
P.S. If DHCP is used, you can use LCD to know the IP address used.
Change Default Time setting:
Step 4: When re-logon to the new IP address, the next is to setup the system
time zone. Click Device Setting > Time to setup the system. Enter the
4
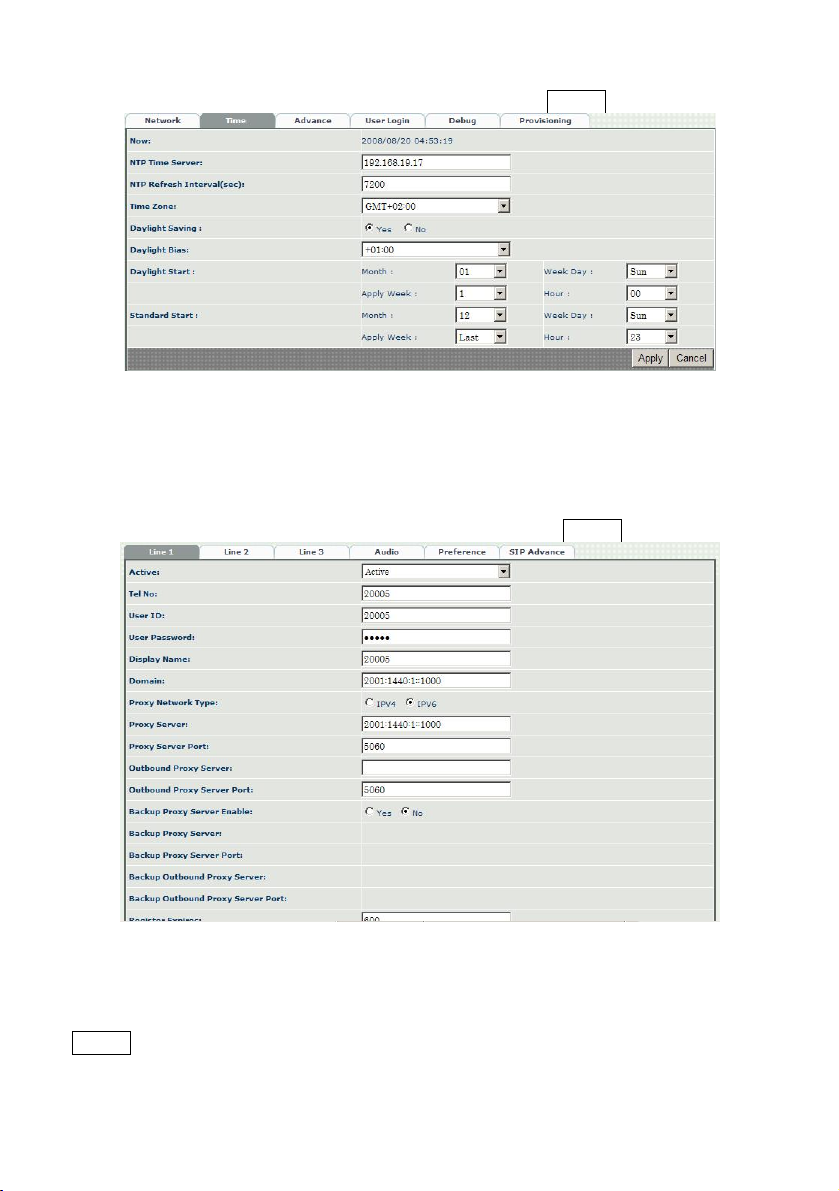
current date and time. Apply the change by clicking Apply button. (Fig.4)
(Fig.4)
Modify SIP Account Parameter:
Step 5: The next step is to setup the SIP account parameters. Click SIP Lines
> Line 1-3 to modify the parameter. Enter the effective user id, password and
proxy server or IPV6/IPV4…etc. You can have up-to 3 separate accounts to
register or making calls. Apply the change by clicking Apply button. (Fig.5)
(Fig.5)
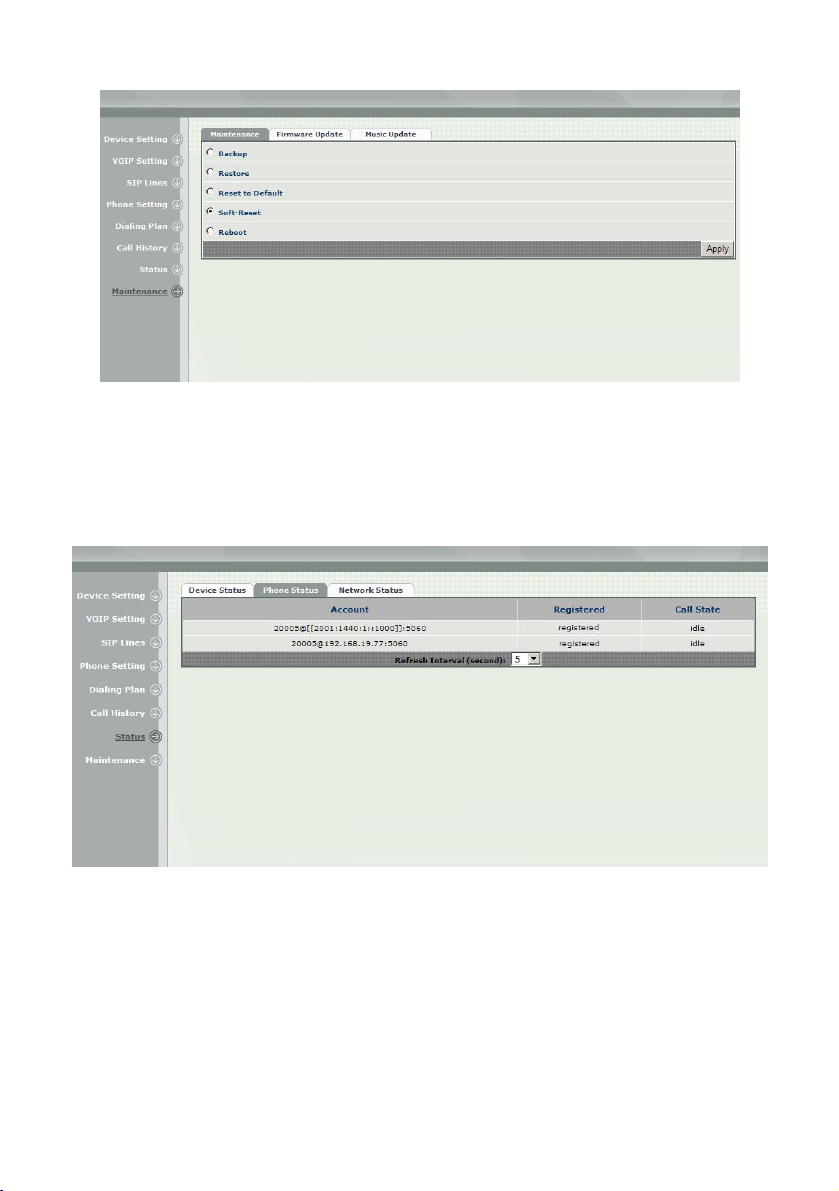
Soft Reset LP389:
Step 6: After modify basic setting. Need to reset LP389. Click Maintenance
> Maintenance > Soft-Reset to take effect. Apply the change by clicking
Apply button. (Fig.6)
5
(Fig.6)
Check LP389 Registered Status:
Step 7: After soft-reset. Click Status > Phone Status to check whether each
line is registered or not. (Fig.7)
(Fig.7)
6
CONFIGURATION REFERENCE
Device Settings
Network Configuration
Device Setting > Network
Network: DHCP
Network: Fixed IP
Parameter Description:
z IP Support: IP stack to be supported (IPV6 and IPV4 or IPV6 or IPV4
only)
z DHCP: Use IPv4 DHCP or not (available only when IPV4 is engaged)
z IPV6 Address: the auto configured IPv6 address (display only)
z IP Addess: IPV4 address
z Netmask: IPV4 network mask
7
z Default Gateway: IPV4 Default gateway
z VOIP VLAN: Enable VOIP VLAN or not
z VOIP VLAN ID(2-4096): VLAN ID to be used
z DNS Server1: Primary DNS Server IP network
z DNS Server2: Secondary DNS Server IP network
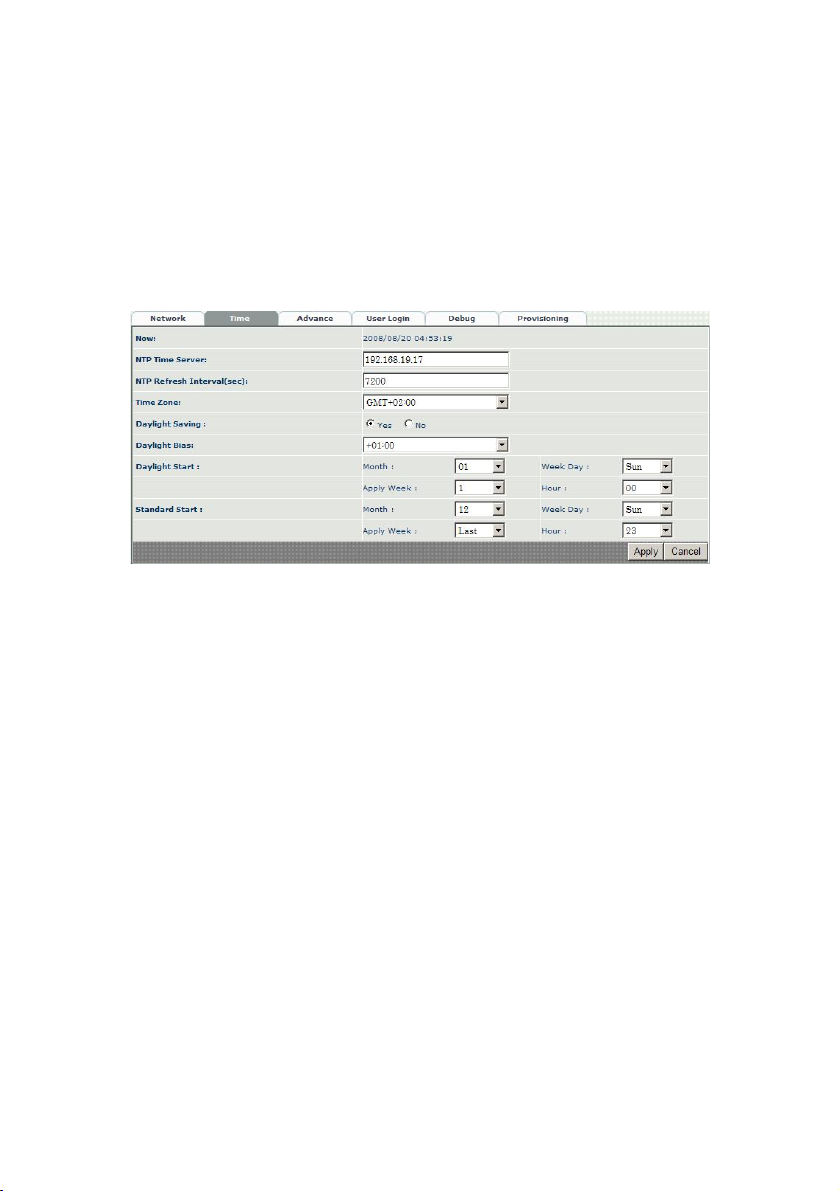
Device Time Setting:
LP389 support SNTP with time zone and daylight saving.
Device Setting > Time
Parameter Description:
z Now: Current Time (display only)
z
NTP Time Server: SNTP time server
z
NTP Refresh Interval(sec): The frequency to sync NTP server in seconds
z
Time Zone: The time-zone LP389 is located.
- Standard: Use a predefined standard time zone
- Customize: Use a user defined time zone
z Daylight Saving: Auto adjust daylight saving timer or not
z Daylight Bias: The offset added to the Bias when the time zone is in
daylight saving time
z Daylight Start: The date that a time zone enters daylight time
- Month: 01 to 12
- Week Day: Sunday to Saturday
- Apply Week (Day:01 to 05, Specifies the occurrence of day in the
month; 01 = First occurrence of day, 02 = Second occurrence of
day, ...and 05 = Last occurrence of day)
- Hour: 00 to 23
z Standard Start: The date that a time zone enters daylight time
- Month: 01 to 12
- Week Day: Sunday to Saturday
- Apply Week (Day:01 to 05, Specifies the occurrence of day in the
month; 01 = First occurrence of day, 02 = Second occurrence of
day, ...and 05 = Last occurrence of day)
8
- Hour: 00 to 23
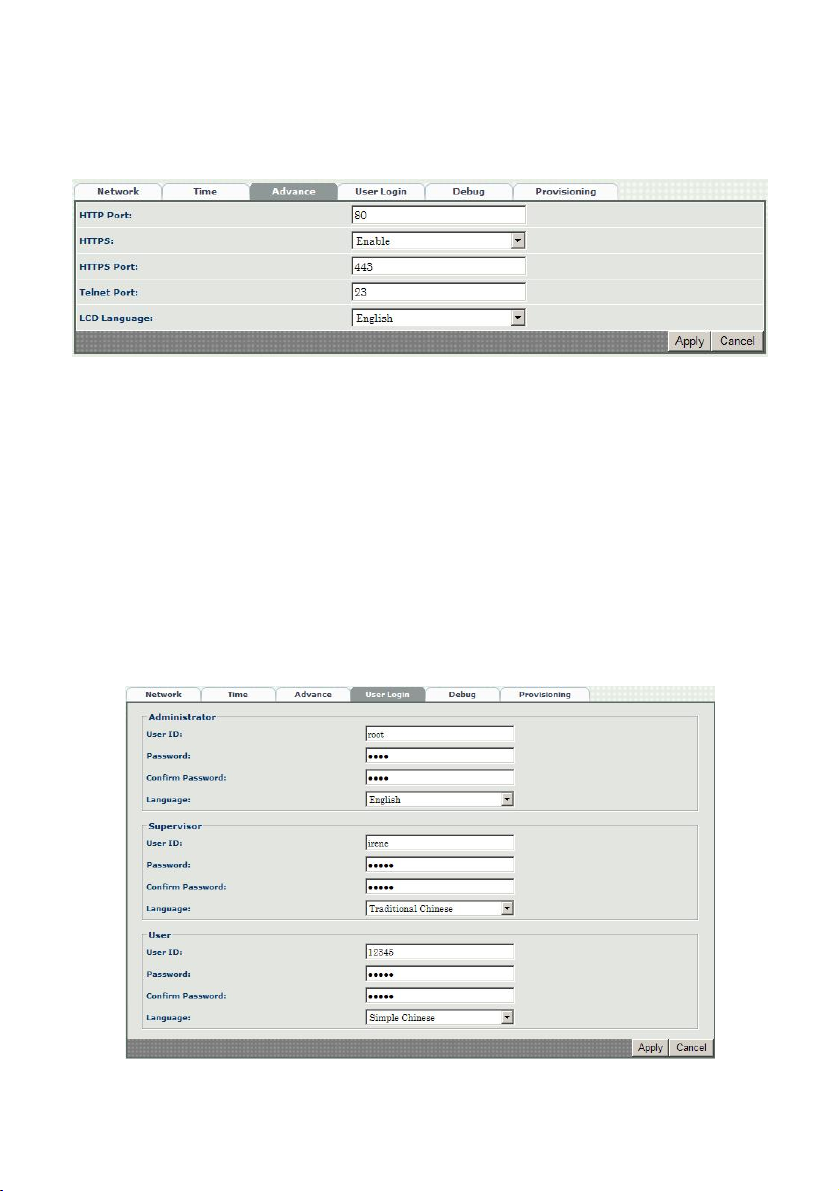
Device Advance Setting:
Device Setting > Advance
Parameter Description:
z HTTP Port: The Administrator Web service port (the default is 80)
z HTTPS: enable HTTPS web service or not
z HTTPS Port: The HTTPS Web service port (the default is 443)
z Telnet Port: The telnet service port (the default is 23)
z LCD Language: LCD menu language setting. Currently, it only can
support English or French.
User Login Setting:
Three level of users can be used, administrator, supervisor, user. Each level of
users will have different predefined access level.
Device Setting > User Login
9
Parameter Description:
z Administrator: The administrator level user which has full access of
LP389.
z Supervisor: The supervisor level user which has limited administrative
access right.
z User: The user access right which only allows to setting some user
related features.
z User ID: Login User ID
z Password: Login Password
z Confirm Password: Confirm new password again
z Language: The web page language used when the account login. To add
a customized local language, please contact Welltech.
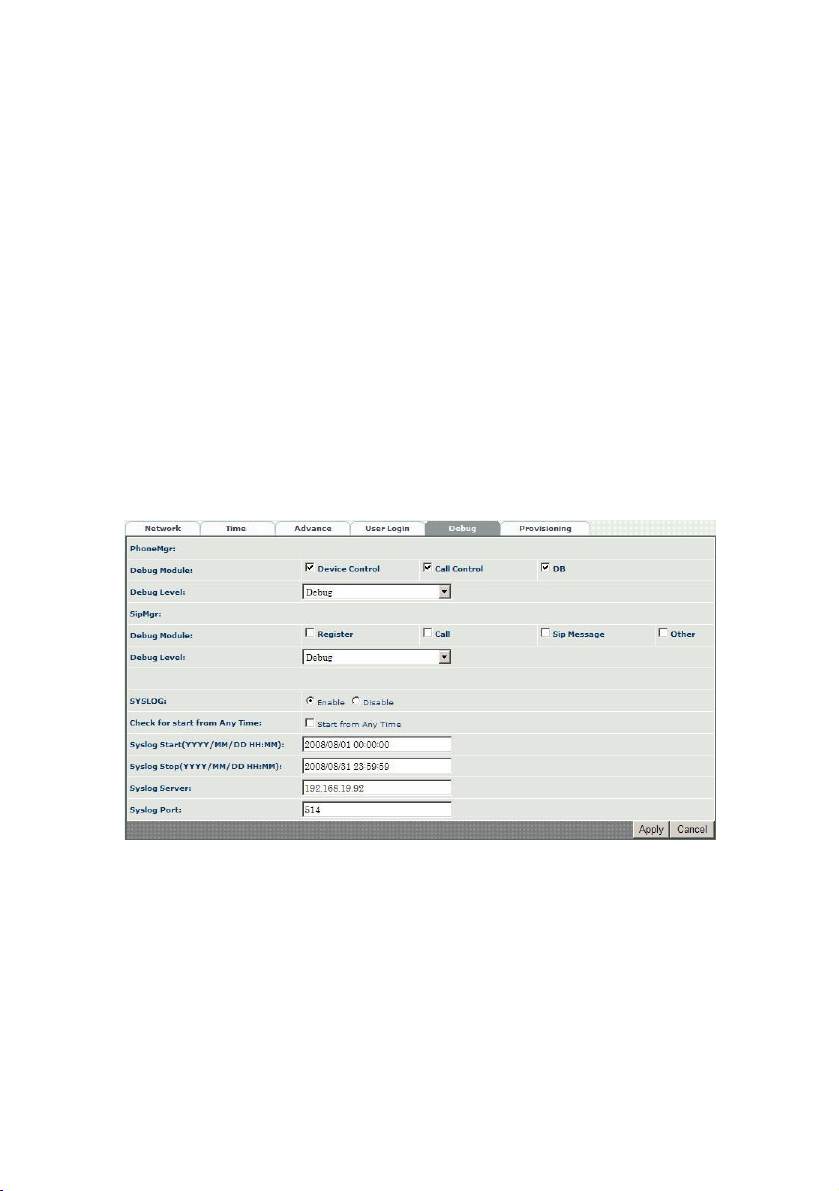
Debug Settings:
LP389 provides the real time debug to syslog or telnet interface. It generates the debug
information based on debug level and modules. Since the generating debug will
consume system resource, it is recommended to turn on only for necessary and under
Welltech FAE’s instruction.
Device Setting > Debug
Parameter Description:
z SYSLOG: Enable or disable to send system information to SYSLOGD
server or not
z Check for start from Any Time: Always Send: Always send syslog or only
during a specified time range.
z Syslog Start(YYYY/MM/DD HH:MM): Always Send: Always send syslog
or only during a specified time range.
z Syslog Stop(YYYY/MM/DD HH:MM): The syslog stop sending time.
z SyslogD Server: SyslogD server IP address
10

z Syslog Port: syslog server service port (default is 514)
Auto Provisioning:
The LP389 can be provisioned by WellEMS 9510 for large deployment.
Device Setting > Provisioning
Parameter Description:
z Provisioning Service: Enable auto provisioning service by WellEMS 9510
or not.
- Enable: Enable the service and use manual configured EMS server
parameters.
- Disable: Disable the auto provisioning service.
- Discovery: To automatically discover the EMS server or not. By using
this mode, WellEMS 9510 need to be the same IP network in order to
make the IP broadcasting work.
z EMS Discovery Port: WellEMS 9510 service auto discovery broadcasting
port (default is 61005).
z EMS summary refresh interval: How long the LP389 will report its
summary status to WellEMS 9510 in seconds.
z EMS IP address: The WellEMS 9510 server IP address
z EMS Server Port: The WellEMS 9510 Server port
z Data Encrypt: WellEMS 9510 encryption data for security
- Enable provisioning data encryption or not
11

VOIP Parameters Setting
SIP Parameters:
VOIP Setting > SIP
Parameter Description:
z Session Timer: Enable session timer or not (RFC 4028)
z Session Expires (sec): This is the setting of initial session timer expires
time according to rfc4028 - Session Timers in the Session Initiation
Protocol.
z Session Refresher: Who will send dialog keep alive message (re-invite or
update).
- UAC: Caller will do the refresh
- UAS: Called will do refresh
• Min SE: The minimum session timer allowed when receiving a call with
session timer value according to RFC 4028.
z Session Timer Refresh Method: The session timer refresh method
z PRACK: Enable provisioning ACK or not (RFC 3262)
- None: Disable PARCK
- Supported: When select this mode, 100rel will be added to the
support list. It indicates LP389 can support the PRACK but not
mandatory.
- Require: PRACK is mandatory required.
z SIP Local Port: The SIP local service port (default is 8080)
z SIP Qos Type: Quality of Service Type for SIP signaling
- None: Not using QOS Tag not enable QOS.
- DiffServ: Differentiated Services Value
- TOS: Type of Service
z DSCP Value: Differentiated Service Value
12

SIP Timer Settings: (for advance user only)
VOIP Setting > SIP Time
Parameter Description:
z SIP T1(msec): T1 determines several timers as defined in RFC3261. For
example, when an unreliable transport protocol is used, a Client Invite
transaction retransmits requests at an interval that start at T1 seconds
and doubles after every retransmission. A Client General transaction
retransmits requests at an interval that starts at T1 and doubles until it
reaches T2. (Default Value: 500ms) **
z SIP T2(msec): Determines the maximum retransmission interval as
defined in RFC3261. For example, when an unreliable transport protocol
is used, general requests are retransmitted at an interval which starts at
T1 and doubles until reaches T2. If a provisional response is received,
retransmission continue but at an interval of T2. (Default Value: 4000ms)
**
z SIP T4(msec): T4 represents the amount of time the network takes to
clear message between client and server transactions as defined in
RFC3261. For example, when working with an unreliable transport
protocol, T4 determines the time that UAS waits after receiving an ACK
message and before terminating the transaction. (Default Value: 5000)
**
z Invite Linger Timer: After sending an ACK for an INVITE final response,
a client cannot be sure that the server has received the ACK message.
The client should be able to
z retransmit the ACK upon receiving retransmissions of the final response
for this timer. This timer is also used when a 2xx response is sent for an
incoming Invite. In this case, the ACK is not part of the Invite
transaction.
z General Linger Timer: After a UAS sends a final response, the UAS
cannot be sure that the client has received the response message. The
UAS should be able to retransmit the
13
z response upon receiving retransmissions of the request based on this
timer.
z Cancel General No Response Time(msec): When sending a CANCEL
request on a General transaction, the User Agent waits cancel General
No Response Timer milliseconds before timeout termination if there is no
response for the cancelled transaction(Default Value: 10000ms).**
z General Request Timeout Timer(msec): After sending a General request,
the User Agent waits for a final response general Request Timeout Timer
milliseconds before timeout termination (in this time the User Agent
retransmits the request every T1, 2*T1,…T2,…milliseconds)**
z Cancel Invite No Response Timer(msec): When sending a CANCEL
request on an Invite request, the User Agent waits this timer before
timeout termination if there
z is no response for the cancelled transaction.
z Provisional Timer(msec): The provisionalTimer is set when receiving a
provisional response on an INVITE transaction. The transaction will stop
retransmissions of the INVITE request and will wait for a final response
until the provisionTimer expires. If you set the provisionTimer to 0, no
timer is set. The INVITE transaction will wait indefinitely for the final
response.
z First Response Timer(msec): When sending a request out, the User
Agent waits this timer for any response received from UAS. If timer is
expired and no any SIP message is received, the User Agent will think
the request is failed. The default is 5000 ms (5 seconds).
z MWI Subscript Expires(sec): The message waiting indication subscript
expires time (default is 3600).
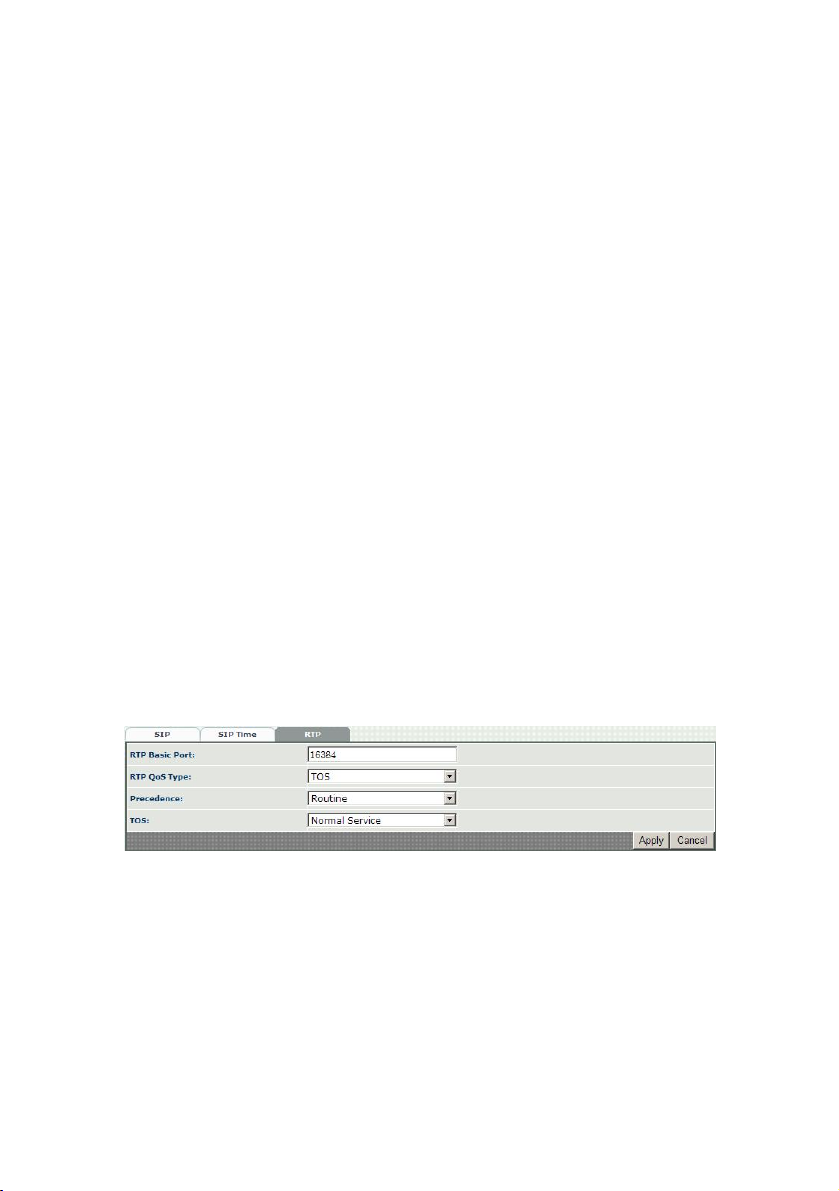
RTP Parameters:
VOIP Setting > RTP
Parameter Description:
z RTP Basic Port: The RTP starting port. Each channel will be add
additional 10. For example, the RTP basic port is 16384, thus call 1 will
use 16384 while call 2 will use 16394 etc.
z RTP Qos Type: IP QoS tag for RTP stream
- DiffServ: The differentiated service QoS tag is used.
- TOS: The Type of Service QoS tag is used.
z Precedence: IP Precedence for TOS tag
z TOS: Type of Service
z DSCP value: DSCP to be used.
14

SIP Line Settings
SIP Line Account:
SIP Lines > Line 1 to Line 3
Parameter Description:
z Line 1~Line3: Up-to 3 separate SIP line can be used. When auto
priority mode is selected in SIP advance, the line 1 will be have the
highest priority and then Line 2, Line 3. When Line 1 is failed to reach
the destination, LP389 will try to use the Line 2 and then line 3 when
the failure reason doesn’t meet the stop hunting reason (SIP response
code).
z Active: SIP registrar active or not
z Tel No: SIP registrar TEL NO
z User ID: SIP registrar user ID
z User Password: SIP registrar password
z Display Name: Display Name used for SIP call
z Domain: SIP registrar domain
z Proxy Network Type: The line should be used for IPv4 or IPv6.
z Proxy Server: SIP registrar IP address
z Proxy Server Port: SIP registrar UDP port number
z Outbound Proxy Server: SIP outbound proxy server IP
15

z Outbound Proxy Server Port: SIP outbound proxy server UDP Port
z Backup Proxy Server: Backup SIP registrar IP address
z Backup Proxy Server Port: Backup SIP registrar UDP port number
z Backup Outbound Proxy Server: Backup SIP outbound proxy server IP
z Backup Outbound Proxy Server Port: Backup SIP outbound proxy
server UDP Port
z Register Expires: The registration maximum time to live setting when
registered to the SIP registrar
z Un-Register All: When enable this feature, LP389 will try to unregister
all when system is started.
z Voice Mail Subscription: Enable to subscribe message waiting
indication subscription or not.
z Voice Mail Access Code: The dialed code when pressed VMS button.
z Server Conference Prefix: Server Conference prefix setup by SIPPBX
6200 for more than 3 parties. LP389 will automatically used the server
conference when the conference is more than 3 parties.
z Caller ID Mode:
- Transparent: Pass through the caller ID
- Inhibit: Hide the called party number
z Auto Answer: Auto answer the call or not.
- Notify: The call will be auto answered when receive a NOTIFY with
talk event.
- Yes: Auto answer is enabled.
- No: Disable the auto answer feature.
z Auto Answer Timer: After the auto answer timer, the call will be
answered.
z Busy Forward Tel: Forwarded telephone number when phone is busy.
z No Answer Forward Tel: Forward telephone number when the call does
not answered after no answer timeout.
z Unconditional Forward Tel: When an incoming is received, the call will
be forwarded to the specified number immediately.
Reject Anonymous Call: Reject the anonymous incoming call or not
SIP Line Audio:
SIP Lines > Audio
16

Parameter Description:
z Codec 1~5: The preferred codec priority
z Codec Priority: Selection order to match the remote SDP for codec
selection.
- Local SDP Order: Use local SDP order to match codec
- Remote SDP Order: Use Remote SDP order to match codec
z G.711u Payload Size: G.711 u-Law payload size
z GSM Payload Size: GSM payload size
z G.711a Payload Size: G.711 A-law payload size
z G.729 Payload Size: G.729A payload size
z Ring Tone: Ring Tone for incoming call
- ANS T1-401-1993 Audible Ringing
- Regular Audible Ringing
- Music: Ring 1 will be used
z Ring Tone for Headset: Ring Tone or music for incoming call when using
headset
z Busy Tone: Busy Tone played when remote party is busy for outgoing
call.
- ANS T1-401-1993 Line Busy Tone
- ANS T1-401-1993 Fast Busy Tone
- Regular Busy Tone
z Dial Tone: The Dial Tone played when pickup handset or press headset.
- ANS T1-401-1993 Dial Tone
- ITU-T Q.35 Dial Tone
- Regular Dial Tone
z Bit Rate: G.723.1 bit rate used
- 5.3K
- 6.3K
17

SIP Line Call Preference:
SIP Lines > Preference
Parameter Description:
z Record Missed Call: Record missed call or not. When enabled, the
missed call can be queried by LCD or web.
z Record Received Call: Record received call or not. When enabled, any
received calls can be queried by LCD or web.
z Recor d Dial ed Cal l: Re cord d ialed call o r not. Wh en e na bled, any di al ed
calls can be queried by LCD or web.
z No Answer Timeout: The no answer timeout will be used for forward
z
z Call Waiting: When disable call waiting features, the second incoming
call will be rejected.
z STUN: Enable STUN service or not. Please note that the STUN can be
used only for NAT type 1 and type 2, not type 3. When it worked with
type 3 NAT, the call might have only 1 way voice or the incoming call
might had problems.
z STUN Server: the STUN server address.
z Accept Proxy Only: Only accept the call coming from the SIP proxy. Not
accept peer to peer call.
SIP Line Advance:
18

SIP Lines > SIP Advance
Parameter Description:
z SIP Hold Type: SIP on hold message sending method.
- Send Only: Set the SDP media to sendonly when send a on-hold SIP
message.
- 0.0.0.0: Set the SDP connection to 0.0.0.0 when send a on-hold SIP
message.
- Inactive: Set the SDP media to inactive when send a on-hold SIP
message.
z SIP Compact Form: Enable SIP compact form or not. When enable this
feature, the connected SIP proxy is required to support compact form.
z DTMF Relay: DTMF relay type
- inband DTMF
: use inband DTMF instead of out of band.
- RFC 2833/Fall Back to SIPINFO: RFC 2833/Fall Back to SIPINFO
- RFC 2833/Fall Back to Inband: RFC 2833/Fall Back to inband
- SIP INFO: Use SIP INFO for DTMF transmission
z RFC 2833 Payload Type: 96 or 101. It is recommended to use 101.
z Barge-In: Allow to enable the barge-in feature or not. When barge-in is
enabled, it allow the user from Barge-in List to interrupt the on-going
call and talk to the called user.
z Barge-In List: The user allow to barge-in.
z Broadcasting: Allow accepting broadcasting call or not. The
broadcasting SIP call need contains the call-info with “answer after”
header. The broadcasting service will be derived to speaker.
z P2P TEL No: The user ID should be used for Peer to Peer calls.
z SIP Call Mode:
* Auto Priority: When this mode is selected, the line button will not
able to be selected. Instead of selecting the separate line, LP389
will always try to use line 1 first. If line 1 is failed to reach the
destination and the SIP failure reason code doesn’t in the list of
19

“Stop Hunting Reason”, LP389 will try to use line 2 and then line 3
subsequently.
* Per Line: When this mode is selected, you can use each line button
to select the different SIP line for making call. This is a typical
usage.
z Stop Hunting Reason: The SIP failure reason to be matched for
stopping the hunting when Auto Priority mode is selected.
z Display Text when Idle: The Display Text when LP389 is in idle state. If
you keep this field in blank, the line1’s user ID will be used.
20

Phone Feature Settings
Global Phone Voice Settings:
Phone Setting > Voice
Parameter Description:
z Silence Suppression:
Enable silence suppression.
z Min Jitter Buffer(ms): The minimum delay time of Jitter buffer.
z Max Jitter Buffer(ms): The maximum delay time of jitter buffer.
z Jitter Opt. Factor: Jitter buffer optimization factor from 0 to 12. The
default value is 7. Set to 0 will have lowest voice delay but have bad
voice quality. Set to 12 will have long voice delay but with better voice
quality
z AEC Mode: Acoustic Echo Cancellation mode. The default value is "Full
Duplex" mode.
- Disable: Disable AEC (not recommended)
- Full Duplex: Enable AEC in full duplex mode
- Half Duplex: Enable AEC in helf duplex mode
z AEC Target: Target to be enabled for AEC. The default value is speaker.
z AEC Tail Length(ms): The maximum of AEC tail length is 128ms.
z AGC: Enable automatically gain control or not
Phone Volume Settings:
Phone Setting > Volume
21

Parameter Description:
z Headset Mic Volume: Headset microphone volume
z Headset Volume: Headset output volume
z Speaker Mic Volume: Speaker microphone volume
z Speaker Volume: speaker output volume
z Handset Mic Volume: handset microphone volume
z Handset Volume: handset output volume
z Ring Volume: speaker/handset ring Tone volume
z Headset Ring Volume: headset ring tone volume
Feature Key Definition:
Phone Setting > Feature Key
Parameter Description:
z Pickup Access Code: Use the pickup a call either within the group or
globally.
z Call Pickup Access Code: It is used for specified extension call pickup
used by extension keypad.
z Park Code: To park a call from extension board’s access code
Feature Key Mask:
This is an option for administrator to lock the unnecessary feature button.
It is useful for hotel or when LP600 is locating in an public location.
Phone Setting > Feature Key Mask
Parameter Description:
z Active All: Active all feature button.
z Inactive All: Disable all feature button.
Dialing Plan
Dialing plan is used to configure the dialing parameters for user.
22

Dialing Plan > General
Parameter Description:
z Inter Digit Time Out: If you are not using or match the dialed plan
setting, the inter-digit time out can be used as the completion of
dialing.
z End of Digit: The assigned key will be tread as end of dial.
Dialing Digit Plan:
The dialing plan is used to speed up the dialing procedure. LP600 will use the
following rules to decide when will make the call out:
1. Dialed digits prefix is matched the Dialing Rule’s “dialed prefix” and the
input dialed length is matched the “max digits”.
2. End of Digit is pressed
3. Inter Digit Time Out is occurred.
Dialing Plan > Dialing Rule
Dialing rule is used to speed up the dialing procedure. Some user don’t like to
use the end of dialing digit such as “#”, the administrator can use dialing rule
instead.
Parameter Description:
z Dial Prefix: Dialing prefix. The longest prefix will be matched first. For
example, you have 0 (length 10) and 00 (length 16) prefix, when you
dial 09xxxx, LP600 will collect 10 digits as the called number. Instead,
if the user dials 002xxxxx, LP600 will try to collect 16 digits before
sending it out.
z Max Digits: maximum digits to be collected.
Digit Manipulation:
Digit Manipulation is used to modify the called number after user
finished the dialing procedure and speed dialing replacement.
Dialing Plan > Digit Manipulation
23

Parameter Description:
z Matched Prefix: Called number party matched
z Start Pos: Start position to be replaced
z Stop Pos: Stop position to be replaced
z Replace Value: Replaced value
Speed Dial:
When the user’s dialed number matched the speed dialed key, it will be
replaced by the defined dialed number. It works as a short key.
Dialing Plan > Speed Dial
Parameter Description:
z Speed Dial Key: Speed Dial Key
z Dialed Number: Actual sending called number
Phone Book:
The system provides the feature to dialing a user by name or by viewing the
phone book to dial out. To use the feature of naming guess dialing, each time
you press a digit, LP600 will try to show all possible name in the screen to
minimize the phone book entry. To dialing a name, you can use the following
examples:
1. Hank: dial 5368
2. Tony: dial 5646
Dialing Plan > Phone Book
24

Parameter Description:
z Name: User name for the phone entry. This name will be used for name
dialing features which support English only.
z Tel No: Telephone number to be dialed. The following formats were
supported.
- tel no: the telephone number will be dialed by using SIP line 1
or first defined line. An example is “12345”
- tel_no@@siplineid: You can specified an dedicate SIP line for
dialing. An example is “12345@@2”. LP389 will use sip line 2
for dialing out.
- tel_no@IP: You can defined to call a pure IP to IP calling. An
example is “
12345@192.168.23.1:5060”. The call will be send
to IP 192.168.23.1 and port 5060.
z Ring Tone: The specified ring tone will be used when the incoming
caller ID is matched the phone book.
Dialing Plan > ANI Black List
It is a black list for incoming caller. If the incoming caller ID is in the list, the call will be
reject automatically.
Parameter Description:
z Tel No: Caller ID to be rejected.
Dialing Plan > Hot Line
The hot line feature can be used when you want to call to a specified number after user
pickup the phone automatically.
25

Parameter Description:
z Hot Line Function: Enable to disable hot line feature
z Hot Line Number: The number to be dialed automatically after the user
pickup the phone.
z Hot Line Delay (sec): If it is not set to immediately hot line, LP389 will
wait the delay time to see whether user is trying to dial another
number or not. Once a key is dialed within the delay time, the hot line
will be turn off and the user can be processed as a regular dialing.
Imm ed iat ely : No wa it t o us er dia lin g and start the hot line immediately
when user pickup the phone.
Call History
Missed Call History:
Call History > Miss Call
Column Description:
z Tel no: Calling telephone number
z User Name: User name if found in the phone book
z Time: The calling time
Dialed Call History:
Call History > Dialing
26

Column Description:
z Tel no: calling telephone number
z User Name: Caller’s user name if found in the phone book
z Time: Calling time
Received Call History:
Call History > Received
Column Description:
z Tel no: Calling telephone number
z User Name: calling user name
z Time: calling time
Device Status
Device Status:
This page provides the device status.
Status > Device Status
27

Parameter Description:
z Model: Model number
z MAC-Address: Mac address
z DHCP: DHCP is used or not
z IP-Address: Current IPV4 address
z IPV6 IP-Address: Current IPV6 address
z Firmware: Firmware name
z Hardware: Hardware version (reference only)
Phone Status:
This page provides each SIP Line1~ Line3 register and call status
Status > Phone Status
Parameter Description:
z Account: SIP register account
z Registered: Register or not
z Call State: Call Status
Phone Status:
This page provides the network status.
Status > Network Status
28

Parameter Description:
z LAN Speed: LAN connected speed and status
z PC Speed: PC connected speed and status
z VLAN: Virtual LAN status
Device Maintenance
Maintenance:
It provides the device reset and configuration management features.
Maintenance > Maintenance
Parameter Description:
z Backup: Backup the working configuration
z Restore: Restore the working configuration
z Reset to Default: Restore to default factory settings
z Soft-Reset: Soft reset instead reboot the LP389
z Reboot: restart LP389
Firmware Upgrade:
It provides the firmware upgrade features.
Maintenance > Firmware Update
Parameter Description:
z Firmware Update: Upload the Firmware name
Music Update:
29

Here provides a way to upload the customized ring tone and hold ton.
Maintenance > Music Update
For Ring Music, you can have Ring Tone Music 1 to Ring Tone Music 5. You can have
different caller to play different music ring tone. When worked with SIPPBX 6200, you
can also define different ring tone for extension calling or external calling. Hold tone
will be used when LP389 is received hold.
Parameter Description:
z Music1~5.g726:
- file type: G.726, 32K, raw file
- Attribute: Mono
- Sample Rate: 8000
Please make sure the file name is music1.g726, music2.g726, music3.g726,
music4.g726 or music5.g726. The other name is invalid.
You can active Ring Music in the following web page and phone book.
SIP Lines > Audio
30

31
 Loading...